Beginning HTML5 Media. Make the most of the new video and audio standards for the Web (2015)
CHAPTER 3
![]()
The JavaScript API
With the rise of HTML5 there has been a corresponding rise in the use of JavaScript to extend the functionality of the various elements on a web page. In fact, it is becoming increasingly rare to see an HTML5 page that doesn’t include a link to a JavaScript document or library in the header or elsewhere in the document. It is no different when it comes to working with HTML5 video or audio.
JavaScript is the scripting language used in web browsers for client-side programming tasks. JavaScript as used in web browsers is a dialect of the standardized ECMAScript (www.ecma-international.org/publications/standards/Ecma-262.htm) programming language. JavaScript programs can execute all kinds of tasks ranging from the simple to the complex for web pages, ranging from the manipulation of a simple user interface feature to the execution of a complex image analysis program. JavaScript overcomes the limitations of HTML and CSS by providing full flexibility to programmatically change anything in the Document Object Model (DOM).
Since JavaScript support can be turned off in a web browser, it was important to explain what HTML and CSS provide without further scripting. Adding JavaScript to the mix, however, turns these web technologies into a powerful platform for the development of applications and we will see what the media elements can contribute.
In the years before the development of HTML5 and CSS3, JavaScript was used to bring many new features to the Web. Where many people shared common requirements, JavaScript libraries and frameworks such as jQuery, YUI, Dojo, or MooTools were created. These frameworks were used by many web developers to simplify the development of web content. The experience with these libraries, in turn, motivated the introduction of several of the new features of HTML5. As a consequence, we now see many of the functionalities of those early frameworks available natively in HTML5 and new frameworks evolving that make it easier to develop HTML5 web applications.
Since JavaScript executes in the web browser, it uses only the resources of the user’s machine rather than having to interact with the web server to make changes to the web page. This is particularly useful for dealing with any kind of user input and makes web pages much more responsive to users since no exchanges over a network will slow down the web page’s response. The use of JavaScript is therefore most appropriate where user information is not required to be saved on the server. For example, a game can be written in such a way that the game’s logic executes in JavaScript in the web browser and only the achieved high score of the user requires an interaction with the web server. This of course assumes that all the required assets for the game—images, audio, etc.—have been retrieved.
JavaScript interfaces with HTML through the DOM. The DOM is a hierarchical object structure that contains all the elements of a web page as objects with their attribute values and access functions. It represents the hierarchical structure of the HTML document and allows JavaScript to gain access to the HTML objects. WebIDL, the Web interface definition language (www.w3.org/TR/WebIDL/), has been created to allow for the specification of the interfaces that the objects expose to JavaScript and that web browsers implement.
The reason for this is pretty simple. HTML is merely a markup language to put objects on a page. These objects and their attributes are held by the browser and exposed through a programming interface. IDL is really a language to describe these data structures that the browser holds and make them available to JavaScript for manipulation.
WebIDL is particularly purpose-built to
· provide convenience structures that are used often in HTML, such as collections of DOM nodes, token lists, or lists of name-value pairs.
· expose the content attributes of the HTML element and enable the getting and setting of their values.
· explain what JavaScript types HTML element attributes map to and how.
· explain the transformations that have to be made to attribute values upon reading them and before handing them to JavaScript (e.g., the resolution of a uniform resource locator from a relative to an absolute URL).
· list the states that an element may go through and the events that may be executed on them.
· relate to the browsing context of the HTML document.
It is important to understand the difference between the attributes of the HTML5 elements introduced in Chapter 2 and attributes that are exposed for an element in the DOM. The former are called content attributes, while the latter are called IDL attributes. The easiest way to understand the difference between the two is that the attributes used in the HTML markup are content attributes with their values being merely strings. Their same-named brothers available in JavaScript objects are IDL attributes and contain values that are of specific JavaScript types. For example, a content attribute with a string value of “1.0” gets exposed to JavaScript as an IDL attribute with a floating point value of 1.0.
To simplify explanation of the JavaScript API of the media elements, we will look at the IDL attributes that were created from content attributes and IDL-only attributes separately. This will provide a better understanding of which attributes come through to JavaScript from HTML and which are created to allow script control and manipulation.
For the purposes of this chapter, we assume that you have a basic understanding of JavaScript and can follow the WebIDL specifications. Reading WebIDL is rather simple and compares to reading the class definitions in many object-oriented programming languages. We will explain the newly introduced interfaces that the HTML5 media elements provide to JavaScript in WebIDL and provide some examples regarding what can be achieved with JavaScript by using these interfaces. We start with content attributes.
Reflected Content Attributes
We have already become acquainted with the content attributes of the HTML5 media elements in Chapter 2. All of them map straight into the IDL interface of the media elements. The HTML specification calls this mapping a “reflection” of the content attributes in IDL attributes. You can see the reflection of the content attributes from Chapter 2 in the media element JavaScript objects.
interface HTMLMediaElement : HTMLElement {
attribute DOMString src;
attribute DOMString crossOrigin;
attribute DOMString preload;
attribute boolean autoplay;
attribute boolean loop;
attribute boolean controls;
attribute boolean defaultMuted;
};
interface HTMLAudioElement : HTMLMediaElement {};
interface HTMLVideoElement : HTMLMediaElement {
attribute unsigned long width;
attribute unsigned long height;
attribute DOMString poster;
};
interface HTMLSourceElement : HTMLElement {
attribute DOMString src;
attribute DOMString type;
attribute DOMString media;
};
If you work your way through the list, every element and attribute presented in Chapter 2 makes an appearance. All these attributes can be read (also called “get”) and set in JavaScript. You can see the JavaScript types that the content attributes’ values get converted into in the aforementioned code block.
So how does this work on an HTML5 document? The code examples are made available to follow up with at http://html5videoguide.net/. The following code in Listing 3-1 shows an example of how you can set and get some of the content attribute properties through the IDL attributes:
Listing 3-1. Getting a Feeling for the Content Attributes on Media Elements
<video controls autoplay>
<source src="video/HK_Traffic.mp4" type="video/mp4">
<source src="video/HK_Traffic.webm" type= "video/webm">
</video>
<script type="text/javascript">
videos = document.getElementsByTagName("video");
video = videos[0];
video.controls = false;
video.width = ’400’;
alert(video.autoplay);
</script>
We start by adding a video element and then toss in both the controls and autoplay parameters. From there we simply add the source attributes pointing to the videos and we are, for all intents and purposes, good to go. How certain video properties “work,” though, is now shifted out of the hands of the HTML and handed over to the JavaScript between the <script></script> tags at the bottom of the code block.
Note how we display the value of the autoplay content attribute through a “getter” API (application programming interface) function and change the values of the width and controls attributes through a “setter,” which make the video shrink to 400 pixels wide and the controls disappear.
When you open the page in the browser you can see that “getter” in action. The alert you see (Figure 3-1) shows you the autoplay value—true. Click the OK button and the video shrinks from its width of 1,066 pixels to the 400-pixel width set in the script.
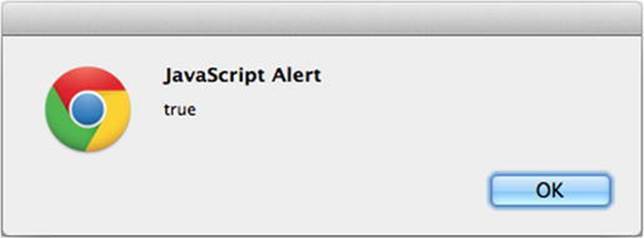
Figure 3-1. The JavaScript alert telling you that autoplay is true
Attributes that do not have a value in the HTML source code will be treated as though they have an empty string as their value. This is of particular interest for the src attribute, since it is associated with the video element. However, the media’s source URL may actually be specified in a<source> element, as in the previous example. In this case, getting the value of the video’s src content attribute will return an empty string. This is where the additional IDL attributes become important.
Further IDL Attributes
IDL attributes—also called DOM attributes—reflect the current state of a media element. We will look at these state-related additional IDL attributes that go beyond the reflected content attributes in this section. They are mostly read-only attributes. Only a few can be set which allow changing the playback of the media element. These are of particular importance to a web developer. Note that there are events being raised as part of changing these state-related IDL attributes. We will describe events as they become relevant and list them comprehensively in the section ”States of the Media Element” in this chapter.
The following code block shows a list of these state-related IDL attributes for audio and video elements (the <source> element has no additional IDL attributes to the reflected content attributes—its functionality is contributed to the HTMLMediaElement). The state constants have been omitted from this list and will be described as we go through the IDL attributes. There are quite a few IDL attributes to go through, so we will look at them in subsections of three groups: those conveying general state, those conveying playback-related state, and those conveying error states. Following is the code:
interface HTMLMediaElement : HTMLElement {
// error state
readonly attribute MediaError error;
// network state
readonly attribute DOMString currentSrc;
readonly attribute unsigned short networkState;
readonly attribute TimeRanges buffered;
// ready state
readonly attribute unsigned short readyState;
readonly attribute boolean seeking;
// playback state
attribute double currentTime;
readonly attribute double duration;
readonly attribute boolean paused;
attribute double defaultPlaybackRate;
attribute double playbackRate;
readonly attribute TimeRanges played;
readonly attribute TimeRanges seekable;
readonly attribute boolean ended;
// controls
attribute double volume;
attribute boolean defaultMuted;
};
interface HTMLAudioElement : HTMLMediaElement {};
interface HTMLVideoElement : HTMLMediaElement {
readonly attribute unsigned long videoWidth;
readonly attribute unsigned long videoHeight;
};
![]() Note There used to be IDL attributes called startTime, initialTime, and startOffsetTime, all of which were meant to help indicate that a file didn’t start at time 0, but at a non-zero time. This functionality has now been moved to a control method called getStartDate(), which we will describe in the section “Control Methods in the API,” when we discuss control methods on media elements. If a browser doesn’t yet implement the getStartDate() method, you can also get startTime from the first range stored in the @seekable time ranges.
Note There used to be IDL attributes called startTime, initialTime, and startOffsetTime, all of which were meant to help indicate that a file didn’t start at time 0, but at a non-zero time. This functionality has now been moved to a control method called getStartDate(), which we will describe in the section “Control Methods in the API,” when we discuss control methods on media elements. If a browser doesn’t yet implement the getStartDate() method, you can also get startTime from the first range stored in the @seekable time ranges.
General Features of Media Resources
The following IDL attributes represent general features of a media resource:
· currentSrc
· duration
· volume
· defaultMuted
· videoWidth
· videoHeight
@currentSrc
The resource location of the media element can be specified through @src content attributes either directly on the <audio> or <video> element, or on the selected <source> element. These are part of the HTML markup to give the browser a choice of the best possible resource for its particular situation. The location of the resource that the browser actually selected for use is stored in the @currentSrc IDL attribute and can be read by JavaScript. To dynamically change the resource location of the media element, you can always set the @src content attribute of the media element using JavaScript and call the load() method to reload a new media resource URL. This tells the browser to definitely attempt to load that particular resource.
The process of how a media resource is selected is somewhat complicated. It involves queuing tasks, firing events, setting network states, ready states, and, potentially, error states. This resource selection algorithm is invoked as the media element is loaded and asynchronously executes thereafter. It will also initiate the resource fetch algorithm, which actually downloads the media data and decodes it.
We will look at the different aspects of the resource selection algorithm through the different IDL attributes as we discuss them. Here, we focus on how the media resource location is identified and @currentSrc is set.
@currentSrc is initially an empty string which you can see in Figure 3-2. You cannot rely on it being available to JavaScript before the resource selection algorithm has finished and the browser has started fetching media data. Media fetching is signified by the browser through firing of a progress event. This, however, will not work with an already buffered video resource since, in this case, no progress event is fired. Thus, the event that will indicate that a media resource is now usable is the loadedmetadata event, which works for both newly fetched resources and already buffered resources. In summary, you need to listen for the loadedmetadata event being fired before accessing @currentSrc.
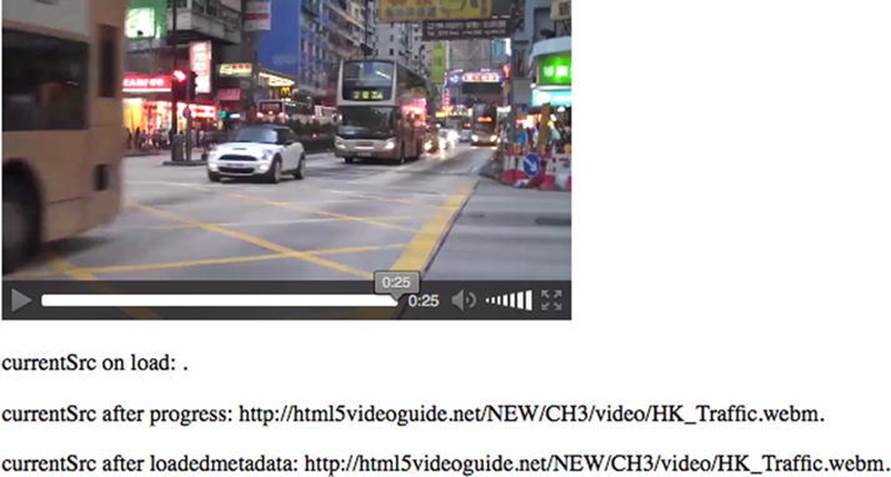
Figure 3-2. Retrieving the @currentSrc value
In JavaScript, there are three means for setting up an event listener. The first two follow the traditional model (www.quirksmode.org/js/events_tradmod.html), the third is the W3C’s modern and recommended model (www.quirksmode.org/js/events_advanced.html).
The first event listener method uses an event attribute that is created by adding the prefix “on” to the event name. For example,
function execute() {
// do something
}
<video onprogress="execute()" src="video.mp4"></video>
The second is to use the event IDL attribute in JavaScript. For example,
video.onprogress = execute;
The third method follows the W3C’s DOM events model (www.w3.org/TR/2000/REC-DOM-Level-2-Events-20001113/events.html) for registering events by explicitly attaching an EventListener to the video.
video.addEventListener("progress", execute, false);
We’ll be using the third method throughout this book.
The following code, seen in Listing 3-2, shows an example of how to retrieve the @currentSrc attribute during page load time, after a progress event and after a loadedmetadata event.
Listing 3-2. Tracking @currentSrc
<video controls autoplay width="400">
<source src="video/HK_Traffic.mp4" type= "video/mp4" >
<source src="video/HK_Traffic.webm" type="video/webm">
</video>
<p>CurrentSrc on start: <span id="first"></span>.</p>
<p>CurrentSrc after progress: <span id="progress"></span>.</p>
<p>CurrentSrc after loadedmetadata: <span id="loadedmetadata"></span>.</p>
<script type="text/javascript">
var video = document.getElementsByTagName("video")[0];
var span1 = document.getElementById("first");
var span2 = document.getElementById("progress");
var span3 = document.getElementById("loadedmetadata");
span1.innerHTML = video.currentSrc;
function span2Update(evt) {
span2.innerHTML = video.currentSrc;
}
function span3Update(evt) {
span3.innerHTML = video.currentSrc;
}
video.addEventListener("progress", span2Update, false);
video.addEventListener("loadedmetadata", span3Update, false);
</script>
Essentially, JavaScript is identifying the elements in the HTML and, as shown in Figure 3-2, is printing the state of the @currentSrc attribute to the <span> elements during document load, after a progress event and after a loadedmetadata event.
There are a couple of differences in how the browsers handle this IDL. Internet Explorer (IE) will display a loaded resource on start, while the others don’t. This is because IE has already parsed the DOM by the time it executes that line of JavaScript, while the others haven’t. This merely shows that you cannot rely on reading the @currentSrc attribute before the loadedmetadata event has fired.
@duration
When a media resource’s metadata is loaded and before any media data is played back, you can get the duration of the audio or video file. The read-only @duration IDL attribute returns the time of the end of the media resource in seconds. During loading time, @duration will return theNaN value (Not-a-Number). If it is a live or an unbound stream, the duration is infinity, unless the stream ends, at which time the duration changes to the duration given through the last samples in the stream.
Every update of the @duration of the media resource causes a durationchange event to be fired, so you can always retrieve the exact @duration value that the browser is working with. A durationchange event is also fired when a different resource is loaded by changing@src.
Listing 3-3 shows an example of how to retrieve the @duration attribute during page load time, after a loadedmetadata event, a durationchange event, and an ended event.
Listing 3-3. Getting the Resource Duration at Different Stages of the Resource Loading Process
<video controls autoplay width="400">
<source src="video/HK_Traffic.mp4" type= "video/mp4" >
<source src="vidoe/HK_Traffic.webm" type="video/webm">
</video>
<p>duration on start: <span id="duration_first"></span>.</p>
<p>duration after loadedmetadata: <span id="duration_loadedmetadata"></span>.</p>
<p>duration after durationchange: <span id="duration_durationchange"></span>.</p>
<p>duration after ended: <span id="duration_ended"></span>.</p>
<script type="text/javascript">
var video = document.getElementsByTagName("video")[0];
var span1 = document.getElementById("duration_first");
var span2 = document.getElementById("duration_loadedmetadata");
var span3 = document.getElementById("duration_durationchange");
var span4 = document.getElementById("duration_ended");
span1.innerHTML = video.duration;
function span2Update(evt) { span2.innerHTML = video.duration; }
function span3Update(evt) { span3.innerHTML = video.duration; }
function span4Update(evt) { span4.innerHTML = video.duration; }
video.addEventListener("loadedmetadata", span2Update, false);
video.addEventListener("durationchange", span3Update, false);
video.addEventListener("ended", span4Update, false);
</script>
The browsers such as Chrome (Figure 3-3) will show rather long numbers. Safari, for example will display a value of 25.343979 while Firefox and Opera return 25.357.

Figure 3-3. Getting the duration value for a media element
![]() Note Transcoded versions can be slightly different in duration (e.g., because some codecs can only encode audio samples in chunks of a fixed size). In this case, our input QuickTime file was 25.291933s long, the transcoded MP4 file is 25.343978s long, and the transcoded WebM file is 25.357000s (using ffprobe). It seems likely that Safari, Chrome, and ffprobe all use slightly different approaches and resolutions to calculate the duration of the MP4 file—possibly because of a difference in counting leading silence as part of the duration. The lesson to be learned here is that time is a matter of uncertain accuracy in video. If you have to check on playback positions or duration, treat them as inaccurate floating point numbers and check for ranges rather than equality.
Note Transcoded versions can be slightly different in duration (e.g., because some codecs can only encode audio samples in chunks of a fixed size). In this case, our input QuickTime file was 25.291933s long, the transcoded MP4 file is 25.343978s long, and the transcoded WebM file is 25.357000s (using ffprobe). It seems likely that Safari, Chrome, and ffprobe all use slightly different approaches and resolutions to calculate the duration of the MP4 file—possibly because of a difference in counting leading silence as part of the duration. The lesson to be learned here is that time is a matter of uncertain accuracy in video. If you have to check on playback positions or duration, treat them as inaccurate floating point numbers and check for ranges rather than equality.
@volume
When reading the @volume IDL attribute of a media resource, the playback volume of the audio track is returned in the range 0.0 (silent) to 1.0 (loudest). On initial load of the media resource, its @volume is set to the loudest setting 1.0. After use of the media resource and change of its volume setting—through either user or script interaction—the @volume value may have changed. The web browser may remember this setting for a later reload of the resource to allow a user to return to the volume adjustments made earlier.
The @volume IDL attribute can be set through JavaScript to change the volume of the media resource. A value between 0.0 and 1.0 inclusive is allowed—anything else will raise an IndexSizeError exception. The playback volume will be adjusted correspondingly as soon as possible after setting the attribute. Note that the range may not be linear but is determined by the web browser. Further, the loudest setting may be lower than the system’s loudest possible setting, since the user’s computer’s volume setting will control all audio playback on his or her system.
Whenever the volume of the media resource is changed—either through user interaction in the video or audio controls or through JavaScript—a volumechanged event is fired.
The code shown in Listing 3-4 is an example of how to get and set the @volume attribute using an audio element when the timeupdate event is fired.
Listing 3-4. Reading and Changing the Volume of an Audio File During Playback
<audio controls autoplay>
<source src="audio/Shivervein.mp3" type="audio/mp4">
<source src="audio/Shivervein.ogg" type="audio/ogg">
</audio>
<p>volume on start: <span id="volume_first"></span>.</p>
<p>volume after volumechange: <span id="volumechange"></span>.</p>
<p>volume after timeupdate: <span id="timeupdate"></span>.</p>
<script type="text/javascript">
var audio = document.getElementsByTagName("audio")[0];
var span1 = document.getElementById("volume_first");
var span2 = document.getElementById("volumechange");
var span3 = document.getElementById("timeupdate");
span1.innerHTML = audio.volume;
function span2Update(evt) { span2.innerHTML = audio.volume; }
function span3Update(evt) {
if (audio.volume > 0.1) {
audio.volume = audio.volume - 0.05;
} else {
audio.volume = 1.0;
}
span3.innerHTML = audio.volume;
}
audio.addEventListener("volumechange", span2Update, false);
audio.addEventListener("timeupdate", span3Update, false);
</script>
We reduce the volume by 0.05—audio.volume = audio.volume - 0.05;—until we reach a volume of less than 0.1. Then we reset the value to 1.0—audio.volume = 1.0;—and start pulling it down again, resulting in a sawtooth of volume state over the duration of the resource. The result is a volume level (see Figure 3-4), which constantly changes as the file plays. This example is a bit disorienting if you try it, but it is a great example of using the @volume IDL attribute.
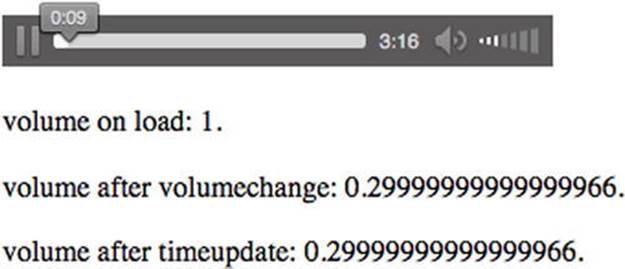
Figure 3-4. Retrieving and setting the volume value
![]() Note The frequency at which timeupdate is being called is different between the browsers and as such they all arrive at different volumes at the end of playback.
Note The frequency at which timeupdate is being called is different between the browsers and as such they all arrive at different volumes at the end of playback.
@defaultMuted
While the @muted IDL attribute allows JavaScript to mute and unmute a media resource, the @defaultMuted attribute reports to JavaScript about the presence of an @muted content attribute in the original HTML markup. Thus, it will report “true” if an @muted attribute was used and “false” otherwise. This allows the JavaScript developer to return @muted to its original state after some muting and unmuting action of the user and of JavaScript.
The code example, Listing 3-5, shows how to get the @defaultMuted attribute and how changing the @muted attribute doesn’t change the @defaultMuted attribute. In this example we have a video and an audio element. For the first 5 seconds, the video element is muted and the audio element is playing, then we change the muted state of both.
Listing 3-5. Reading defaultMuted and muted Attributes
<video controls autoplay muted width="400">
<source src="video/HK_Traffic.mp4" type="video/mp4"/>
<source src="video/HK_Traffic.webm" type="video/webm"/>
</video>
<audio controls autoplay>
<source src="audio/Shivervein.mp3" type="audio/mp4"/>
<source src="audio/Shivervein.ogg" type="audio/ogg"/>
</audio>
<p>defaultMuted/muted for video: <span id="muted_v_first"></span>.</p>
<p>defaultMuted/muted for audio: <span id="muted_a_first"></span>.</p>
<script type="text/javascript">
var video = document.getElementsByTagName("video")[0];
var audio = document.getElementsByTagName("audio")[0];
var span1 = document.getElementById("muted_v_first");
var span2 = document.getElementById("muted_a_first");
function spanUpdate(evt) {
span1.innerHTML = video.defaultMuted + "/" + video.muted;
span2.innerHTML = audio.defaultMuted + "/" + audio.muted;
}
function mutedChange(evt) {
if (video.currentTime > 5) {
video.muted = !video.muted;
audio.muted = !audio.muted;
audio.removeEventListener("timeupdate", mutedChange, false);
}
}
audio.addEventListener("timeupdate", mutedChange, false);
audio.addEventListener("loadedmetadata", spanUpdate, false);
audio.addEventListener("volumechange", spanUpdate, false);
</script>
Figure 3-5 shows the key to this code. The screenshot has been taken at 6 seconds in and shows how, even after changing the muted state of the video and the audio element, JavaScript still reports the video element as being @defaultMuted="true" and the audio element@defaultMuted="false"
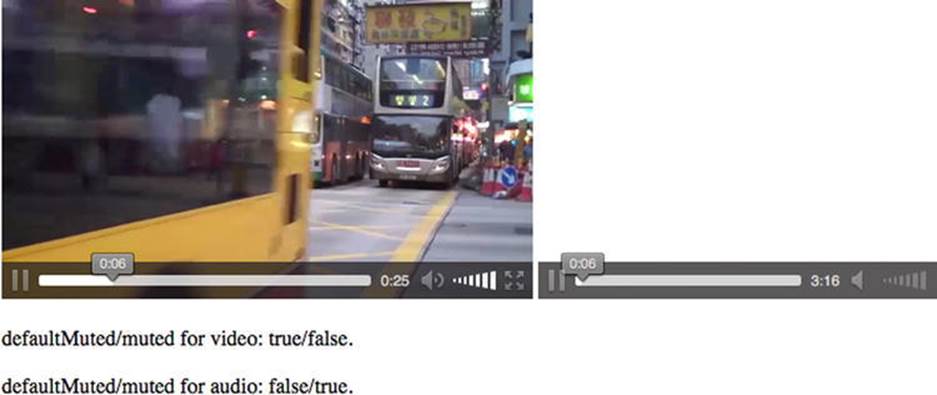
Figure 3-5. Retrieving the defaultMuted value and setting the muted value
.
@videoWidth, @videoHeight
For video resources, there are the read-only IDL attributes, @videoWidth and @videoHeight, which return the actual width and height of the video, or zero if the dimensions are not known as is the case during video load time. The dimensions are calculated in CSS pixels including information about the resource’s dimensions, aspect ratio, resolution, etc., as defined by the resource’s file format.
It is very important that you understand the difference between the @width and @height content attributes and these IDL attributes. They do not mean the same thing.
With the @width and @height content attributes, you change the width and height of the video in CSS pixels or in percentages. In contrast, the read-only @videoWidth and @videoHeight IDL attributes refer to the width and height of the video itself as it comes from the decoding pipeline. They represent nothing more than the original dimensions of the video. Changing the @width and @height content attribute values has no effect on the value of the @videoWidth and @videoHeight attributes. Specifying the @width and @height attributes will therefore have the effect of scaling the video from its original @videoWidth and @videoHeight to fit inside the specified dimensions while also maintaining aspect ratio of the original dimensions.
Listing 3-6 shows an example of how to get the @videoWidth and @videoHeight attributes and how their values compare to the @width and @height values.
Listing 3-6. Obtaining videoWidth and videoHeight in Contrast to Width and Height Attributes
<video controls width= "400">
<source src="video/HK_Traffic.mp4" type="video/mp4"/>
<source src="video/HK_Traffic.webm" type="video/webm"/>
</video>
<p>Dimensions on start: <span id="dimensions_first"></span>.</p>
<p>Dimensions after loadedmetadata: <span id="dimensions_loadedmetadata"></span>.</p>
<script type="text/javascript">
var video = document.getElementsByTagName("video")[0];
var span1 = document.getElementById("dimensions_first");
var span2 = document.getElementById("dimensions_loadedmetadata");
span1.innerHTML = video.videoWidth + "x" + video.videoHeight + " / "
+ video.width + "x" + video.height;
function span2Update(evt) {
span2.innerHTML = video.videoWidth + "x" + video.videoHeight + " / "
+ video.width + "x" + video.height;
}
video.addEventListener("loadedmetadata", span2Update, false);
</script>
When you run the code you will see the result shown in Figure 3-6. The important things to note are the dimensions shown. The start dimension is 0 simply because the video is loading. At that time, the content attribute values are already known and therefore @width is “400” and@height is 0, since height hasn’t been set on the <video> element. The last line shows the original dimensions of the video, which are now available after having loaded the video’s metadata. Incidentally, to get to the actually displayed width and height, you have to usevideo.clientWidth and video.clientHeight—these are the width and height values of the CSS box model after layout.
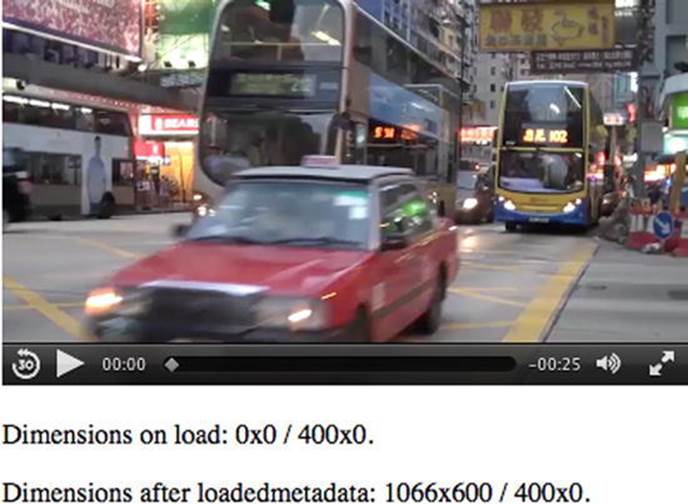
Figure 3-6. Retrieving the videoWidth and videoHeight/width and height
Playback-Related Attributes of Media Resources
To this point in the chapter we have concentrated on understanding the generic IDL attributes of the media elements: currentSrc, duration, volume, muted state, original width and height. In this section we will be concentrating on the IDL attributes commonly used to control the playback of a media resource.
The following IDL attributes all relate to playback position and control.
· currentTime
· seeking
· paused
· ended
· defaultPlaybackRate
· playbackRate
@currentTime
This IDL attribute is the basis for any seeking you may do within a video or audio file.
The @currentTime IDL attribute returns the current playback position of the media resource in seconds. Under normal circumstances, the media resource starts at 0, in which case the @currentTime during uninterrupted playback will contain the time passed since starting playback of the media resource.
It is possible to seek to a time offset during video load by setting @currentTime and then @currentTime will immediately start at that offset. It is also possible to use media fragment URIs (uniform resource identifier) (see Chapter 4) for loading media elements and then@currentTime will start at that offset. For example, @src="video.webm#t=10,15" will load the video.webm file and directly seek to 10 seconds time offset, so @currentTime=10 for this video.
The @currentTime can also be set by JavaScript, which will initiate a seek by the web browser to a new playback position. Depending on whether the resource is seekable and the position is both available and reachable, either the @currentTime is successfully changed or an exception is raised.
![]() Tip Seeking should only be undertaken when the media element’s metadata has been loaded. It is best to wait until a loadedmetadata event before trying to change the @currentTime value, since some browsers will otherwise ignore your seek.
Tip Seeking should only be undertaken when the media element’s metadata has been loaded. It is best to wait until a loadedmetadata event before trying to change the @currentTime value, since some browsers will otherwise ignore your seek.
A timeupdate event will be fired upon a successful seek. You have most likely experienced this when you drag a video’s seek bar deeper into the video and had to wait for the video to display the video from that point.
A web browser will interrupt any current seeking activities if you start a new seeking action. If you seek to a time where the data is not available yet, current playback (if any) will be stopped and you will have to wait until that data is available. A waiting event will be fired.
If you seek past the end of the media resource, you will be taken to the end. If you seek to a time before the @startTime of the media resource, you will be taken to the @startTime. If you seek to a time that is not seekable (i.e., it is not inside one of the time ranges in the@seekable attribute), the web browser will position the seek to the nearest seekable position. If your seek position is exactly between two seekable positions, you will be positioned at the nearest seekable position that’s closest to the current playback position. Unless the media resource is a live streaming resource, all positions in your media resource are typically seekable.
@currentTime provides a means to seek to a precise position. Some browsers are sample accurate in their seeking down to the individual audio sample!
It is important to understand that such precise seeking can be resource intensive. If the seek position falls between two encoded keyframes, the decoder needs to go back to the previous keyframe, which can be a few seconds back. Then it has to decode all the frames from that position to the seek position before being able to display the accurate video frame and audio sample. The WHATWG HTML specification has therefore added a fastSeek() method which takes a seek time as input, but will only seek to the closest keyframe. Thus, the seek position provided tofastSeek() is merely an approximate position, which is often sufficient.
In Listing 3-7, we demonstrate how to get and set the @currentTime attribute. After having played one-third of the resource, we jump forward by a third, and then the next timeupdate event shows the point in the video to where we jumped.
Listing 3-7. Retrieving and Setting the currentTime
<video controls width= "400">
<source src="video/Waterfall.mp4" type="video/mp4"/>
<source src="video/Waterfal.webm" type="video/webm"/>
</video>
<p>CurrentTime on start: <span id="currentTime_first"></span>.</p>
<p>CurrentTime after timeupdate: <span id="currentTime_timeupdate"></span>.</p>
<p>CurrentTime after ended: <span id="currentTime_ended"></span>.</p>
<script type="text/javascript">
var video = document.getElementsByTagName("video")[0];
var span1 = document.getElementById("currentTime_first");
var span2 = document.getElementById("currentTime_timeupdate");
var span3 = document.getElementById("currentTime_ended");
span1.innerHTML = video.currentTime;
function span2Update(evt) {
span2.innerHTML = video.currentTime;
video.removeEventListener("timeupdate", span2Update, false);
}
function span3Update(evt) { span3.innerHTML = video.currentTime; }
function timeupdatecallback(evt) {
if (video.currentTime > video.duration/3) {
video.currentTime = 2*video.duration/3;
video.removeEventListener("timeupdate", timeupdatecallback, false);
video.addEventListener("timeupdate", span2Update, false);
}
}
video.addEventListener("timeupdate", timeupdatecallback, false);
video.addEventListener("ended", span3Update, false);
</script>
The timeupdatecallback() function is the key here. The video is roughly 21 seconds in length so the first line of the function determines if the currenttime is greater than 7 seconds (a third of the duration). If it is, the playhead is scooted to the 14-second mark (the two-thirds mark)—video.currentTime = 2*video.duration/3;—and that value is then shown (see Figure 3-7) in the currentTime after timeupdate field. Finally, we also show the currentTime after the ended event is fired.
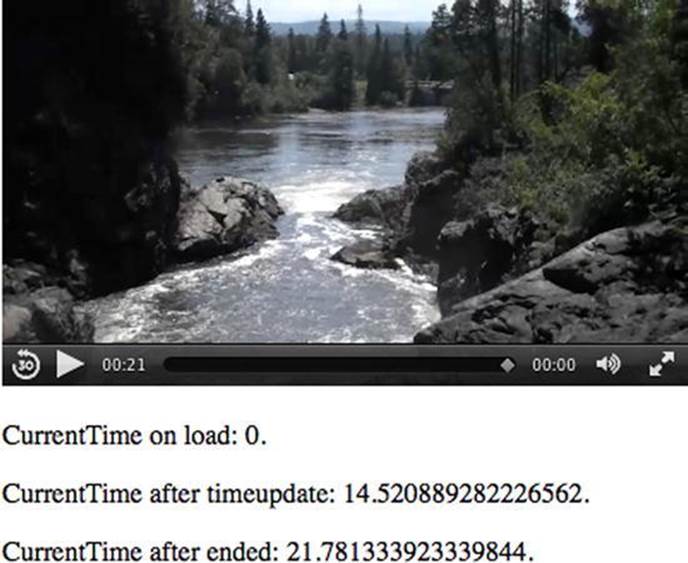
Figure 3-7. Retrieving and setting the currentTime value in Safari
Listen to the seeked event to determine when the browser has finished seeking. When you set @currentTime to a specific value, don’t expect that value to also be the one that @currentTime is set to after the seek—as mentioned before, everything to do with time is best handled as time ranges.
![]() Note When you compress a video you may have noticed that you can set the distance between keyframes or leave that choice to the software. The frames between the keyframes are called difference or delta frames and contain only the information that has changed for that frame since the keyframe. These frames have a major impact on any seeking you may do because the browser can’t display a delta frame and thus has to decode all the frames from the last keyframe. If you know that there will be lots of exact seeking necessary on your media file, you may want to decrease the distance between keyframes when encoding your media resource, even if this means increasing file size.
Note When you compress a video you may have noticed that you can set the distance between keyframes or leave that choice to the software. The frames between the keyframes are called difference or delta frames and contain only the information that has changed for that frame since the keyframe. These frames have a major impact on any seeking you may do because the browser can’t display a delta frame and thus has to decode all the frames from the last keyframe. If you know that there will be lots of exact seeking necessary on your media file, you may want to decrease the distance between keyframes when encoding your media resource, even if this means increasing file size.
@seeking
The read-only @seeking IDL attribute is set by the web browser to “true” during times of seeking and is “false” at all other times.
Listing 3-8 shows how to get the value of the @seeking attribute. Since seeking times are typically short, we have to catch the @seeking attribute value as soon after starting to seek as possible. Thus, we print it straight after changing @currentTime. Figure 3-8 shows the results in Safari.
Listing 3-8. Tracking the Value of the @seeking Attribute
<video controls autoplay width="400">
<source src="video/Waterfall.mp4" type="video/mp4"/>
<source src="video/Waterfall.webm" type="video/webm"/>
</video>
<p>seeking on start: <span id="seeking_first"></span>.</p>
<p>seeking after timeupdate: <span id="seeking_timeupdate"></span>.</p>
<p>seeking after ended: <span id="seeking_ended"></span>.</p>
<script type="text/javascript">
var video = document.getElementsByTagName("video")[0];
var span1 = document.getElementById("seeking_first");
var span2 = document.getElementById("seeking_timeupdate");
var span3 = document.getElementById("seeking_ended");
span1.innerHTML = video.seeking;
function span2Update(evt) {
if (video.currentTime > video.duration/3) {
video.currentTime = 2*video.duration/3;
video.removeEventListener("timeupdate", span2Update, false);
span2.innerHTML = video.seeking;
}
}
function span3Update(evt) {
span3.innerHTML = video.seeking;
}
video.addEventListener("timeupdate", span2Update, false);
video.addEventListener("ended", span3Update, false);
</script>
You can see in Figure 3-8 that @seeking is “true” just after seeking. All browsers exhibit the same behavior for this example.
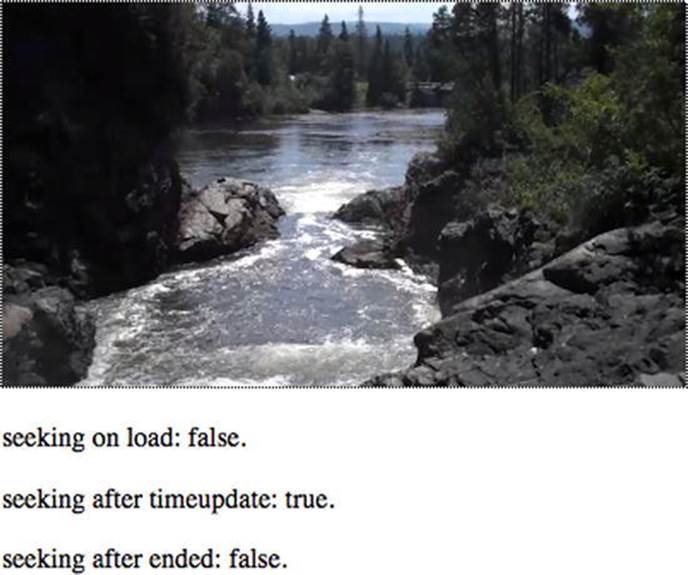
Figure 3-8. Retrieving the seeking attribute value Firefox
This IDL attribute doesn’t really have a lot of real-world use. It’s basically true while the video is moving the playback head to a new location and then while it is trying to get the media data buffered for continuing playback. You’ve seen this situation in YouTube: it’s when the spinner is sitting there and buffering data after you’ve jumped to a new location. Thus this IDL attribute is mostly useful only to JavaScript developers who need fine-grained control over every state of the video player: e.g. “I’m waiting for the seeked event to be raised, but it’s not coming” or “Is the video still seeking or has a network error occurred?” Normally, you would just wait for the seeked event.
@paused
The read-only @paused IDL attribute is set by the web browser to “true” if the media playback is paused. Pausing can happen either through user interaction on the interface or through JavaScript. Initially, @paused is “true” and is only set to “false” when the media resource is supposed to start playing. Sort of …
You cannot assume that the video is playing when @paused is “false.” Even when @paused is “false,” it is possible the media resource is currently in a state of buffering, is in an error state, or has reached the end and is waiting for more media data to be appended. Since there is no explicit @playing IDL attribute, you need to use the @paused value and other hints to determine if the web browser really is currently playing back a media resource. The combined hints are
· @paused is “false,”
· @ended is “false,”
· the readyState is HAVE_FUTURE_DATA or HAVE_ENOUGH_DATA, and
· @error is null.
There are also events that can help you track that playback continues working—the playing event is fired when playback starts—and as long as no waiting or ended or error event is fired and @paused is “false,” you can safely assume that you are still playing.
When the @paused IDL attribute changes value, a timeupdate event is fired.
The code block in Listing 3-9 is an example of how to get the value of the @paused attribute and to deduce an assumption for a playing status. Halfway through the media resource, we briefly paused the video to catch the states and then start playback again. Figure 3-9 shows the results in Chrome.
Listing 3-9. Obtaining an @paused Attribute Value
<video controls autoplay width= "400">
<source src="video/Waterfall.mp4" type="video/mp4"/>
<source src="video/Waterfall.webm" type="video/webm"/>
</video>
<p>Paused on start: <span id="paused_first"></span>.</p>
<p>Paused after pause(): <span id="paused_timeupdate"></span>.</p>
<p>Paused after play(): <span id="paused_playing"></span>.</p>
<p>Paused after ended: <span id="paused_ended"></span>.</p>
<script type="text/javascript">
var video = document.getElementsByTagName("video")[0];
var span1 = document.getElementById("paused_first");
var span2 = document.getElementById("paused_timeupdate");
var span3 = document.getElementById("paused_playing");
var span4 = document.getElementById("paused_ended");
function playing() {
return (!video.paused && !video.ended && video.error==null
&& (video.readyState==video.HAVE_FUTURE_DATA ||
video.readyState==video.HAVE_ENOUGH_DATA));
}
span1.innerHTML = video.paused + " (playing: " + playing() + ")";
function span2Update(evt) {
if (video.currentTime > video.duration/2) {
video.pause();
video.removeEventListener("timeupdate", span2Update, false);
span2.innerHTML = video.paused + " (playing: " + playing() + ")";
video.play();
span3.innerHTML = video.paused + " (playing: " + playing() + ")";
}
}
function span4Update(evt) {
span4.innerHTML = video.paused + " (playing: " + playing() + ")";
}
video.addEventListener("timeupdate", span2Update, false);
video.addEventListener("ended", span4Update, false);
</script>
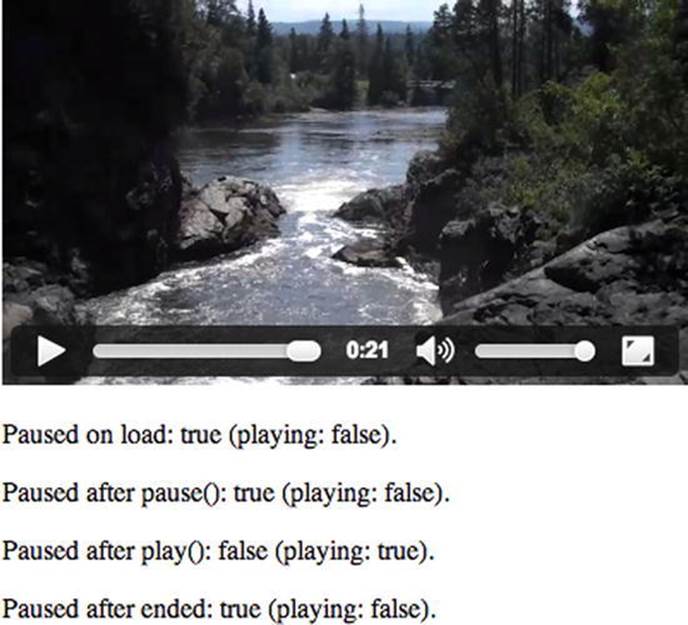
Figure 3-9. Retrieving the paused attribute value and also a playing status in Chrome
We start by displaying the paused state at the beginning while the video element is still being prepared: the video is paused and not playing because it doesn’t yet have enough data to play.
Next, the span2Update() function is called until video’s currentTime is beyond the halfway mark. At that point, we pause the video and check the playing state again (it is of course not playing when it’s paused). Then we start playing once which means we are no longer paused and are indeed playing with sufficiently buffered data. Once we arrive at the end, the video is paused again and thus not playing.
All browsers (Figure 3-9) behave the same with the state of @paused; IE9 additionally rewinds to the beginning of the resource and pauses the video there.
@ended
It is always nice to be able to know when a video has ended if you want to have an event occur at that point, such as a rewind to the start. The read-only @ended IDL attribute is set by the web browser to “true” if the media playback has ended and the direction of playback is forward (see@playbackRate), otherwise @ended is “false.”
![]() Note Be aware that “true” doesn’t always mean “true.” For example, when the @loop content attribute is set to “true” and the current playback position reaches the end of the media resource and the playback direction is forward, then @ended will not be set to “true.” Instead the web browser will seek to the beginning of the media resource and continue playback. The browser will not even raise an ended event in this case.
Note Be aware that “true” doesn’t always mean “true.” For example, when the @loop content attribute is set to “true” and the current playback position reaches the end of the media resource and the playback direction is forward, then @ended will not be set to “true.” Instead the web browser will seek to the beginning of the media resource and continue playback. The browser will not even raise an ended event in this case.
When @ended is set to “true,” the web browser will fire both a timeupdate event and an ended event.
Interestingly, when the playback direction is backward and the playback position reaches the beginning of the media resource, the value of the @loop content attribute is irrelevant and playback will stop. Only a timeupdate event will be fired. Since Safari is the only browser that implements a backward play direction, this is a rather academic situation.
Listing 3-10 shows how to get the @ended attribute.
Listing 3-10. Values of the ended IDL attribute at Media Start and End
<video controls width= "400" autoplay>
<source src="video/Waterfall.mp4" type="video/mp4"/>
<source src="video/Waterfall.webm" type="video/webm"/>
</video>
<p>Ended on start: <span id="ended_first"></span>.</p>
<p>Ended after ended: <span id="ended_ended"></span>.</p>
<script type="text/javascript">
var video = document.getElementsByTagName("video")[0];
var span1 = document.getElementById("ended_first");
var span2 = document.getElementById("ended_ended");
span1.innerHTML = video.ended;
function span2Update(evt) { span2.innerHTML = video.ended; }
video.addEventListener("ended", span2Update, false);
</script>
The magic happens in the last two lines of the script and the results are shown in Figure 3-10.
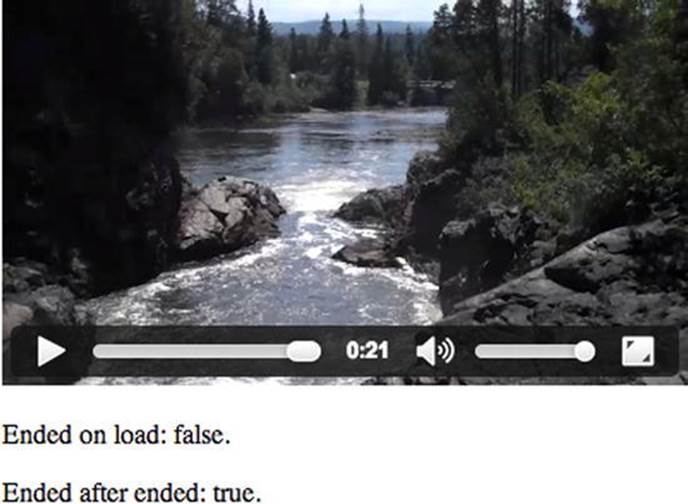
Figure 3-10. Retrieving the ended attribute value in Opera
@defaultPlaybackRate, @playbackRate
The @playbackRate IDL attribute returns the speed at which the media resource is playing. It can be set to change the playback speed. The value for normal speed is 1.0. Anything larger than 1.0 is faster than normal. Anything smaller is slow motion. Zero pauses the video. Negative values reverse the playback direction. Similar to fast playback, values smaller than -1.0 are fast backward playback and values between -1.0 and 0 are slow backward motion.
All browsers implement @playbackRate, but only Safari implements backward or reverse playback.
The @defaultPlaybackRate IDL attribute sets the default playback speed for the media engine. It is initially 1.0, but can be changed by script to a different default playback speed. You have to call the load() function again after you change the @defaultPlaybackRate for it to have effect. During loading, @playbackRate is set to the value of the @defaultPlaybackRate. Changing the @defaultPlaybackRate without reloading the resource has no effect.
When a user clicks the “play” button in the web browser controls the @playbackRate IDL attribute’s value is reset to the value of the @defaultPlaybackRate before starting playback.
You will likely use @playbackRate if you want faster/slower playback, but the @defaultPlaybackRate is not as useful. One use case is to enable blind users to set a higher default playback speed than 1.0, since they are highly trained to consume audio at high playback speeds. Note, however, that Safari does not support @defaultPlaybackRate and that the audio isn’t really decoded properly during fast forward/backward playback. Typically, browsers skip packets between the different playback positions, so the audio will have artifacts. Until this is fixed, the use of @defaultPlaybackRate is of limited value.
When the @defaultPlaybackRate or the @playbackRate attribute values are changed, a rateChange event is fired.
![]() Note If you are playing back at a high @playbackRate, the download and decoding of the media resource may not be able to keep up and you may get stalled as buffering takes place.
Note If you are playing back at a high @playbackRate, the download and decoding of the media resource may not be able to keep up and you may get stalled as buffering takes place.
In the code example in Listing 3-11, we show how to make use of both the @defaultPlaybackRate and @playbackRate attributes.
Listing 3-11. Playback Rate Changes
<video controls autoplay width= "400">
<source src="video/Waterfall.mp4" type="video/mp4"/>
<source src="video/Waterfall.webm" type="video/webm"/>
</video>
<p>Default/PlaybackRate on start:<span id="defaultPlaybackRate_first"></span>.</p>
<p>Default/PlaybackRate as set: <span id="defaultPlaybackRate_set"></span>.</p>
<p>Default/PlaybackRate after timeupdate:<span id="defaultPlaybackRate_timeupdate"></span>.</p>
<script type="text/javascript">
var video = document.getElementsByTagName("video")[0];
var span1 = document.getElementById("defaultPlaybackRate_first");
var span2 = document.getElementById("defaultPlaybackRate_set");
var span3 = document.getElementById("defaultPlaybackRate_timeupdate");
video.defaultPlaybackRate = 0.5;
video.load();
span1.innerHTML = video.defaultPlaybackRate + ", " + video.playbackRate;
function span2Update(evt) {
span2.innerHTML = video.defaultPlaybackRate + ", " + video.playbackRate;
}
function span3Update(evt) {
if (video.currentTime > video.duration/4) {
video.playbackRate = 2;
video.playbackRate = -2;
span3.innerHTML = video.defaultPlaybackRate + ", " + video.playbackRate;
video.removeEventListener("timeupdate", span2Update, false);
}
}
video.addEventListener("loadedmetadata", span2Update, false);
video.addEventListener("timeupdate", span3Update, false);
</script>
First we set the default to 0.5, and then we reload the resource to make it play in slow motion. When a quarter of the video is played back, we change the playback rate to 2, and then to -2 as shown in Figure 3-11. This makes those browsers that don’t’ support a backward playing direction at least play back at twice the speed, since they will igore the negative value.
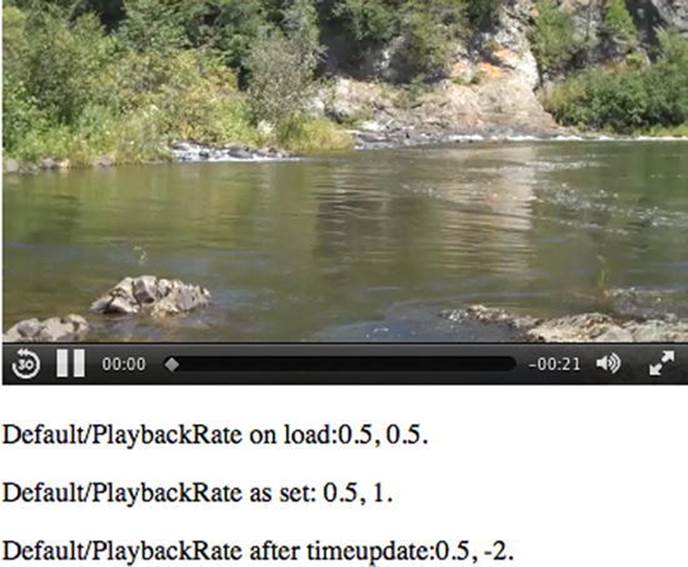
Figure 3-11. Retrieving the playback attribute values in Safari
Note that Safari does set the @playbackRate from the @defaultPlaybackRate, but once loadedmetadata is reached, it is reset to 1, thus not effectively used. You really want to see this example at work in Safari—it is very impressive to see reverse playback at work!
The fact that only Safari implemented support for this attribute may be related to the codec and media frameworks in use—possibly the media frameworks in use in Chrome, Opera, IE, and Firefox require new functionality to play the codecs backward. Since the feature is a bit of a gimmick, it’s unlikely that this feature will become widely available.
States of the Media Element
We have all experienced this: a video that takes forever to start playing because it is buffering. Wouldn’t it be neat if you could inform your users of the issue and, for example, when the buffering is finished, you could indicate the media can now be played? This is where the media element states can play a large role in your work.
The IDL attributes, which represent web browser managed states of a media element, explained in this section, are
· networkState
· readyState
· error
· buffered TimeRanges
· played TimeRanges
· seekable TimeRanges
@networkState
The @networkState IDL attribute represents the current state of network activity of the media element. The available states are
· NETWORK_EMPTY (0):
No @currentSrc has been identified—this may be because the element has not yet been initialized, or because the resource selection hasn’t found an @src attribute or <source> elements and is waiting for a load() function call to set it.
· NETWORK_IDLE (1):
A @currentSrc has been identified and resource fetching is possible, but the web browser has currently suspended network activity while waiting for user activity. This typically happens after the web browser has downloaded the media element metadata on a resource that is not set to @autoplay. It also happens when the media resource has been partially downloaded and network buffering is suspended for some reason such as a connection interruption, media resource file corruption, a user abort, or for the simple fact that the browser has pre-buffered more than enough media data ahead of the playback position so is waiting for the playback to catch up. Finally it also occurs when a resource is completely downloaded. A suspend event is fired as the web browser enters the NETWORK_IDLEstate.
· NETWORK_LOADING (2):
The web browser is trying to download media resource data. The first time this happens on a media resource, as part of the resource selection, the loadstart event is fired. If the @networkState changes at a later stage back to NETWORK_LOADING and the web browser is fetching media data, a progress event is fired periodically. If media data is unexpectedly not arriving from the network while trying to load, a stalled event is fired.
· NETWORK_NO_SOURCE (3):
The resource selection has identified a @currentSrc, but the resource has failed to load or the URL couldn’t be resolved or there is no resource provided (i.e., no @src or valid <source> children).
The code in Listing 3-12 provides an example of how the different @networkState values are reached. The states are displayed before load, after loading the resource metadata, after a progress event, and after changing the video’s @src half way through the video to a nonexistent resource.
Listing 3-12. Tracking networkState Through the Playback of a Resource
<video controls autoplay width= "400">
<source src="video/Waterfall.mp4" type="video/mp4"/>
<source src="video/Waterfall.webm" type="video/webm"/>
</video>
<p>NetworkState on start: <span id="networkState_first"></span>.</p>
<p>NetworkState after loadedmetadata: <span id="networkState_loadedmetadata"></span>.</p>
<p>NetworkState after progress: <span id="networkState_progress"></span>.</p>
<p>NetworkState after timeupdate: <span id="networkState_timeupdate"></span>.</p>
<script type="text/javascript">
var video = document.getElementsByTagName("video")[0];
var span1 = document.getElementById("networkState_first");
var span2 = document.getElementById("networkState_loadedmetadata");
var span3 = document.getElementById("networkState_progress");
var span4 = document.getElementById("networkState_timeupdate");
span1.innerHTML = video.networkState;
function span2Update(evt) {
span2.innerHTML = video.networkState;
}
function span3Update(evt) {
span3.innerHTML = video.networkState;
}
function span4Update(evt) {
if (video.currentTime > video.duration/2) {
video.src = "notavail.mp4";
video.load();
span4.innerHTML = video.networkState;
}
}
video.addEventListener("loadedmetadata", span2Update, false);
video.addEventListener("progress", span3Update, false);
video.addEventListener("timeupdate", span4Update, false);
</script>
Though the code works, the web browsers slightly differ in their implementations of the code, though consistency has improved a lot in recent browser versions. At the start (see Figure 3-12), we can find the browsers all in the @networkState NETWORK_NO_SOURCE (3) state.
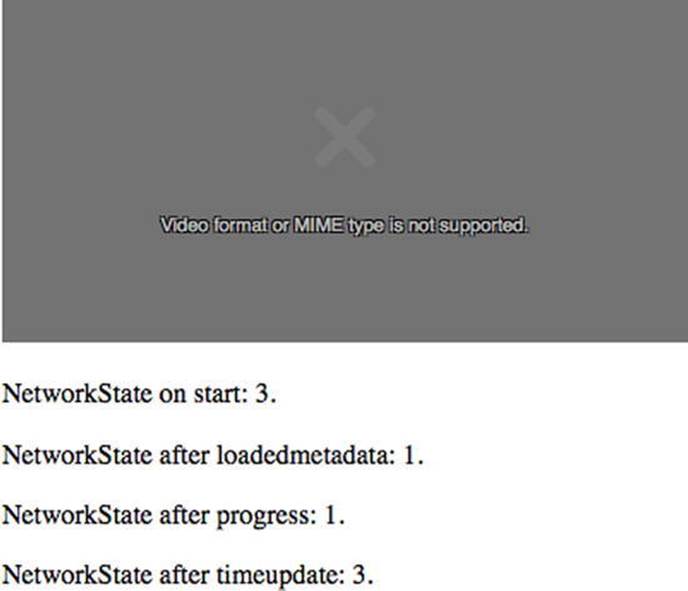
Figure 3-12. Retrieving the networkState attribute values in Firefox
After the metadata is loaded, @networkState first goes to NETWORK_LOADING (2) and then transitions to NETWORK_IDLE (1) once enough data is buffered.
After a progress event, browsers can be found in the NETWORK_LOADING (2) and then transition to the NETWORK_IDLE (1) state again.
After trying to load a nonexistent media resource, all browsers, with the exception of Firefox, report to be in NETWORK_LOADING (2) state. Firefox correctly reports a NETWORK_NO_SOURCE (3) state.
![]() Note Clearly, tracking of states is not a good idea, since often you’re just watching a process in transition. We therefore recommend watching events and making use of callbacks instead.
Note Clearly, tracking of states is not a good idea, since often you’re just watching a process in transition. We therefore recommend watching events and making use of callbacks instead.
@readyState
The @readyState IDL attribute represents the current state of the media element in relation to its playback position. The available states are the following:
· HAVE_NOTHING (0):
No information regarding the video resource is available, including its playback position. This is typically the case before a media resource starts downloading. Media elements whose @networkState attribute is set to NETWORK_EMPTY are always in theHAVE_NOTHING @readyState.
· HAVE_METADATA (1):
The setup information of the media resource has been received, such that the decoding pipeline is set up, the width and height of a video resource are known, and the duration of the resource(if it can be determined) is available. Seeking and decoding are now possible, even though no actual media data is available yet for the current playback position. As the HAVE_METADATA state is reached, a loadedmetadata event is fired.
· HAVE_CURRENT_DATA (2):
Decoded media data for the current playback position is available, but either there is not enough date to start playing back continuously or the end of the playback direction has been reached. If this state is reached for the first time, a loadeddata event is fired. Note that this state may not be taken, but rather a HAVE_FUTURE_DATA or HAVE_ENOUGH_DATA state may be directly achieved after HAVE_METADATA, in which case the loadeddata event is fired upon reaching them for the first time. This state will also be reached when waiting for enough data to download for playback (e.g. after a seek or after the buffered data ran out); in this case, a waiting and a timeupdate event are fired.
· HAVE_FUTURE_DATA (3):
Decoded media data for the current playback position and the next position is available (e.g., the current video frame and the one following it). If this state is reached for the first time, a canplay event is fired. If the element is not paused and not seeking andHAVE_FUTURE_DATA is reached, a playing event is fired. If the browser actually starts playback at this stage, it may still need to stop soon afterward to buffer more data.
· HAVE_ENOUGH_DATA (4):
Enough decoded media data is available for the current and next playback positions and the network download rate is fast enough that the web browser estimates that data will be fetched and decoded at the @defaultPlaybackRate sufficiently to allow continuous playback to the end of the media resource without having to stop for further buffering. If this state is reached without going through HAVE_FUTURE_DATA, a canplay event is fired. If the element is not paused and not seeking and this state is reached without going through HAVE_FUTURE_DATA, a playing event is fired. If the HAVE_ENOUGH_DATA state is reached for the first time, a canplaythrough event is fired.
Listing 3-13 shows how the different @readyState values can be reached. We check the state at specific events: after starting to load the video, after the metadata is loaded, after a timeupdate event, and after a progress event.
Listing 3-13. Getting the readyState Values for a Media Rlement
<video controls width= "400">
<source src="video/Waterfall.mp4" type="video/mp4"/>
<source src="video/Waterfall.webm" type="video/webm"/>
</video>
<p>ReadyState on load: <span id="readyState_first"></span>.</p>
<p>ReadyState after loadedmetadata: <span id="readyState_loadedmetadata"></span>.</p>
<p>ReadyState after progress: <span id="readyState_progress"></span>.</p>
<p>ReadyState after timeupdate: <span id="readyState_timeupdate"></span>.</p>
<script type="text/javascript">
var video = document.getElementsByTagName("video")[0];
var span1 = document.getElementById("readyState_first");
var span2 = document.getElementById("readyState_loadedmetadata");
var span3 = document.getElementById("readyState_progress");
var span4 = document.getElementById("readyState_timeupdate");
span1.innerHTML = video.readyState;
function span2Update(evt) {
span2.innerHTML = video.readyState;
}
function span3Update(evt) {
span3.innerHTML = video.readyState;
}
span4 = document.getElementById("readyState_timeupdate");
function span4Update(evt) {
span4.innerHTML = video.readyState;
}
video.addEventListener("loadedmetadata", span2Update, false);
video.addEventListener("progress", span3Update, false);
video.addEventListener("timeupdate", span4Update, false);
</script>
Figure 3-13 shows the results in Chrome and Firefox.
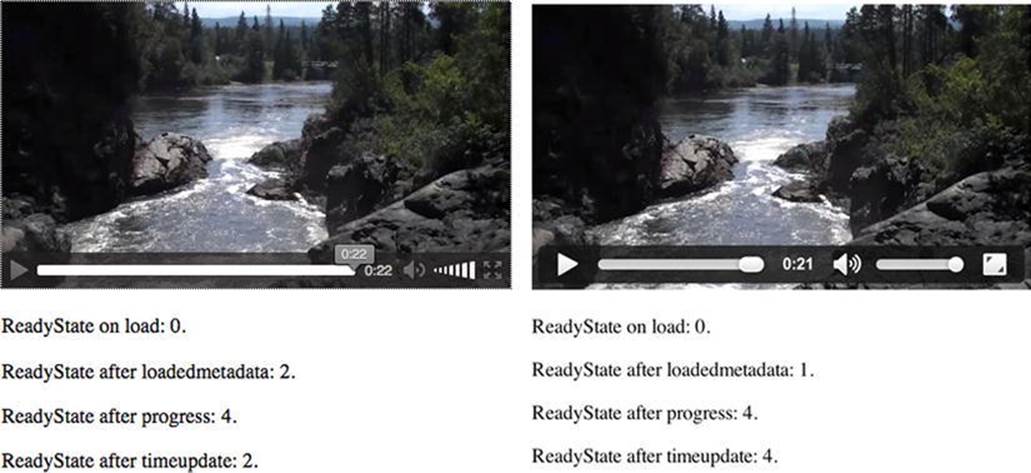
Figure 3-13. Retrieving the readyState attribute values in Firefox (L) and Chrome (R)
At the start, all browsers are in a HAVE_NOTHING (0) state. After the video element has been initialized, Opera, Chrome, and Safari go into the HAVE_METADATA (1) state (Chrome is shown, representing this group), while Firefox and IE9 show HAVE_CURRENT_DATA (2)(Firefox is shown, representing this group). Thus, you can rely on metadata being available with a @readyState being at minimum 1.
As we press the play button and the video starts playing, the timeupdate event provides us with HAVE_ENOUGH_DATA (4) ready state on all browsers except for IE9, which shows HAVE_CURRENT_DATA (2).
As we reach a progress event, all browsers except for IE9 shows HAVE_ENOUGH_DATA(4) and IE9 sticks with HAVE_CURRENT_DATA (2). Thus, you can rely on being able to play with a @readyState being at minimum 2.
@error
The @error IDL attribute represents the latest error state of the media element as a MediaError object.
The MediaError object has the following structure:
interface MediaError {
const unsigned short MEDIA_ERR_ABORTED = 1;
const unsigned short MEDIA_ERR_NETWORK = 2;
const unsigned short MEDIA_ERR_DECODE = 3;
const unsigned short MEDIA_ERR_SRC_NOT_SUPPORTED = 4;
readonly attribute unsigned short code;
};
If there is no error, @error will be null, otherwise @error.code will have the error state. The available errors are as follows:
· MEDIA_ERR_ABORTED (1):
This error is raised when the fetching process for the media resource is aborted by the user (e.g., when browsing to another web page). The @networkState will be either NETWORK_EMPTY or NETWORK_IDLE, depending on when the download was aborted. An abortevent is fired.
· MEDIA_ERR_NETWORK (2):
This error is raised when any kind of network error caused the web browser to stop fetching the media resource after the resource was established to be usable (e.g., when the network connection is interrupted). The @networkState will be either NETWORK_EMPTY orNETWORK_IDLE, depending on when the download was aborted. An error event is fired.
· MEDIA_ERR_DECODE (3):
This error is raised when decoding of a retrieved media resource failed and video playback had to be aborted (e.g., because the media data was corrupted or the media resource used a feature that the browser does not support). The @networkState will be eitherNETWORK_EMPTY or NETWORK_IDLE, depending on when the download was aborted. An error event is fired.
· MEDIA_ERR_SRC_NOT_SUPPORTED (4):
This error is raised when the media resource in the @src attribute failed to load or the URL could not be resolved. The media resource may not load if the server or the network failed or because the format is not supported. The @networkState will be eitherNETWORK_EMPTY or NETWORK_IDLE, depending on when the download was aborted. An error event is fired.
The code in Listing 3-14 shows an example of how to catch an @error value. The error is triggered at the quarter duration mark of the video by trying to load a nonexistent media resource.
Listing 3-14. Getting Error States for a Media Element
<video controls autolpay width="400">
<source src="video/Waterfall.mp4" type="video/mp4"/>
<source src="video/Waterfall.webm" type="video/webm"/>
</video>
<p>Error on start: <span id="error_first"></span>.</p>
<p>Error after timeupdate: <span id="error_timeupdate"></span>.</p>
<p>Error after error: <span id="error_error"></span>.</p>
<script type="text/javascript">
var video = document.getElementsByTagName("video")[0];
var span1 = document.getElementById("error_first");
var span2 = document.getElementById("error_timeupdate");
var span3 = document.getElementById("error_error");
span1.innerHTML = (video.error ? video.error.code : "none");
function span2Update(evt) {
if (video.currentTime > video.duration/4) {
video.src = "notavail.mp4";
video.load();
span2.innerHTML = (video.error ? video.error.code : "none");
}
}
function span3Update(evt) {
span3.innerHTML = (video.error ? video.error.code : "none");
}
video.addEventListener("timeupdate", span2Update, false);
video.addEventListener("error", span3Update, false);
</script>
We are forcing the browser to try to load a nonexistent media file, which leads to the browsers throwing an error and @error.code resulting in MEDIA_ERR_SRC_NOT_SUPPORTED. Figure 3-14 shows the error screen on Chrome. Compare this to the more informative error screen of Firefox in Figure 3-12 for the same error.
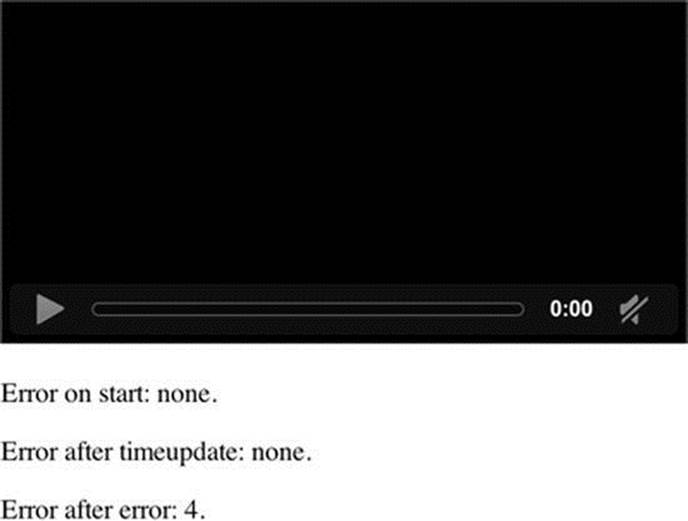
Figure 3-14. Retrieving the error attribute values in Chrome
@buffered
The @buffered IDL attribute retains the ranges of the media resource that the web browser has buffered. The value is stored in a normalized TimeRanges object, which represents a list of ranges (intervals or periods) of time.
The TimeRanges object syntax would be as follows:
interface TimeRanges {
readonly attribute unsigned long length;
float start(unsigned long index);
float end(unsigned long index);
};
The IDL attributes of the TimeRanges object have the following meaning:
· @length: contains the number of ranges in the object, counting from 0 to @length - 1.
· start(i): returns the start time for range number i in seconds from the start of the timeline,
· end(i): returns the end time for range number i in seconds from the start of the timeline.
![]() Note start(i) and end(i) raise INDEX_SIZE_ERR exceptions if called with an index greater than or equal to @length.
Note start(i) and end(i) raise INDEX_SIZE_ERR exceptions if called with an index greater than or equal to @length.
A normalized TimeRanges object is one that consists only of ranges that
· aren’t empty: start(i) < end(i) for all i
· are ordered, don’t overlap, and don’t touch: start(i) > end(j) for all j<i
· If adjacent ranges would need to be created, they are instead folded into one bigger range.
The timeline of the @buffered IDL attribute is the timeline of the media resource.
For a media resource that plays from start to end, the @buffered IDL attribute contains a single time range which begins at the @startTime of the media resource and grows as more media data is downloaded until all of the media data has been received. For a large resource where seeking is undertaken to later points in the resource, the web browser will instead store multiple byte ranges of the areas that were seeked to, thus creating multiple time ranges.
![]() Note Web browsers are free to discard previously buffered data; thus time ranges that may be available earlier are not guaranteed to be still available at a later time.
Note Web browsers are free to discard previously buffered data; thus time ranges that may be available earlier are not guaranteed to be still available at a later time.
In the code example in Listing 3-15, the browser retrieves the @buffered value at different playback states and displays the ranges. Since we autoplay, browsers will first need to buffer the beginning. Then we seek to the halfway mark and continue updating the buffered ranges.
Listing 3-15. Check the Buffered Ranges of a Long File After Seeking
<video controls autoplay width= "400">
<source src="video/ElephantDreams.mp4" type="video/mp4"/>
<source src="video/ElephantDreams.webm" type="video/webm"/>
</video>
<p>Buffered ranges on load: <span id="buffered_first"></span></p>
<p>Buffered ranges after loadedmetadata: <span id="buffered_loadedmetadata"></span></p>
<p>Buffered ranges after seeking: <span id="buffered_seeking"></span></p>
<p>Buffered ranges after timeupdate: <span id="buffered_timeupdate"></span></p>
<script type="text/javascript">
function printTimeRanges(tr) {
if (tr.length == 0) return "none";
s = tr.length + ": ";
for (i=0; i<tr.length; i++) {
s += tr.start(i) + " - " + tr.end(i) + "; ";
}
return s;
}
var video = document.getElementsByTagName("video")[0];
var span1 = document.getElementById("buffered_first");
var span2 = document.getElementById("buffered_loadedmetadata");
var span3 = document.getElementById("buffered_seeking");
var span4 = document.getElementById("buffered_timeupdate");
span1.innerHTML = printTimeRanges(video.buffered);
function span2Update(evt) {
span2.innerHTML = printTimeRanges(video.buffered);
video.currentTime = video.duration/2;
video.play();
span3.innerHTML = printTimeRanges(video.buffered);
}
function span4Update(evt) {
span4.innerHTML = printTimeRanges(video.buffered);
}
video.addEventListener("loadedmetadata", span2Update, false);
video.addEventListener("timeupdate", span4Update, false);
</script>
In this test we need a rather long video file so the browser won’t buffer it all. We are therefore making use of the Creative Commons Attribution Licensed “Elephants Dream” short film from the Blender Foundation. We thank the Blender Foundation for making this short film available under such a free license.
If you test this in a browser (see Figure 3-15), you will discover that the browsers all provide the attribute and update its content.
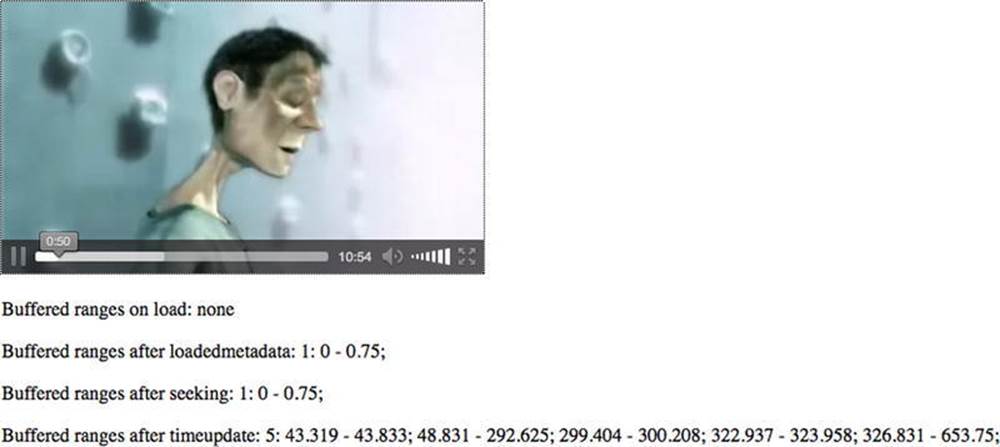
Figure 3-15. Retrieving the buffering attribute values in Firefox
The attribute also exposes some of the buffering strategy—Firefox first buffers the beginning of the video, then the end (probably when we’re using video.duration, and it checks on the data being accurate), and then starts buffering from the halfway mark, which is from about 326 seconds onward. Some of the other browsers don’t actually buffer the beginning because they immediately get to the seek point. None of the other browsers buffer a range at the end.
@played
The @played IDL attribute retains the ranges of the media resource that the web browser has played. The value is stored in a normalized TimeRanges object (see @buffered attribute). The timeline of the @played IDL attribute is the timeline of the media resource.
Typically, the @played IDL attribute contains a single time range, which starts at 0 and grows as more media data is downloaded and played until all the media data has been received. However, for a large resource where seeking is undertaken to diverse points in the resource, the web browser may store multiple time ranges.
The code example in Listing 3-16 retrieves the @played value at different playback states and displays the ranges in basically the same way as the previous @buffered example.
Listing 3-16. Check the Played Ranges of a Long File After Seeking
<video controls autoplay width="400">
<source src="video/Waterfall.mp4" type="video/mp4"/>
<source src="video/Waterfall.webm" type="video/webm"/>
</video>
<p>Played ranges on load: <span id="played_first"></span>.</p>
<p>Played ranges after loadedmetadata:<span id="played_loadedmetadata"></span></p>
<p>Played ranges after seeking: <span id="played_seeking"></span></p>
<p>Played ranges after timeupdate: <span id="played_timeupdate"></span></p>
<script type="text/javascript">
function printTimeRanges(tr) {
if (tr.length == 0) return "none";
s = tr.length + ": ";
for (i=0; i<tr.length; i++) {
s += tr.start(i) + " - " + tr.end(i) + "; ";
}
return s;
}
var video = document.getElementsByTagName("video")[0];
var span1 = document.getElementById("played_first");
var span2 = document.getElementById("played_loadedmetadata");
var span3 = document.getElementById("played_seeking");
var span4 = document.getElementById("played_timeupdate");
span1.innerHTML = printTimeRanges(video.played);
function span2Update(evt) {
span2.innerHTML = printTimeRanges(video.played);
video.currentTime = video.duration/2;
video.play();
span3.innerHTML = printTimeRanges(video.played);
}
function span4Update(evt) {
span4.innerHTML = printTimeRanges(video.played);
}
video.addEventListener("loadedmetadata", span2Update, false);
video.addEventListener("timeupdate", span4Update, false);
</script>
Note that if the user seeks to different time ranges and plays them back, several time ranges (see Figure 3-16) will be reported in the @played attribute. We’ll leave this as an exercise to the user.
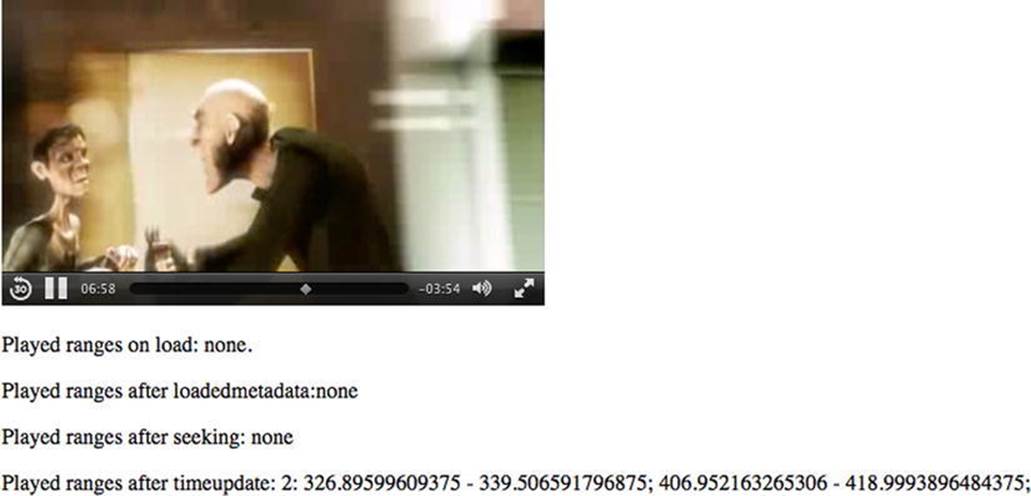
Figure 3-16. Retrieving the played attribute values in Safari
@seekable
The @seekable IDL attribute retains the ranges of the media resource to which the web browser can seek. The value is stored in a normalized TimeRanges object (see @buffered attribute). The timeline of the @seekable IDL attribute is the timeline of the media resource.
Typically, the @seekable IDL attribute contains a single time range which starts at 0 and ends at the media resource @duration. If the duration is not available from the start, such as an infinite stream, the time range may continuously change and just keep a certain window available.
The code in Listing 3-17 retrieves the @seekable value during load and after metadata load. It then displays the ranges in much the same way as the earlier @buffered example.
Listing 3-17. Getting the Seekable Ranges for a Media Element
<video controls autoplay width="400">
<source src="video/ElephantDreams.mp4" type="video/mp4"/>
<source src="video/ElephantDreams.webm" type="video/webm"/>
</video>
<p>Seekable on start: <span id="seekable_first"></span></p>
<p>Seekable after loadedmetadata:<span id="seekable_loadedmetadata"></span></p>
<script type="text/javascript">
function printTimeRanges(tr) {
if (tr.length == 0) return "none";
s = tr.length + ": ";
for (i=0; i<tr.length; i++) {
s += tr.start(i) + " - " + tr.end(i) + "; ";
}
return s;
}
var video = document.getElementsByTagName("video")[0];
var span1 = document.getElementById("seekable_first");
var span2 = document.getElementById("seekable_loadedmetadata");
span1.innerHTML = printTimeRanges(video.seekable);
function span2Update(evt) {
span2.innerHTML = printTimeRanges(video.seekable);
}
video.addEventListener("loadedmetadata", span2Update, false);
</script>
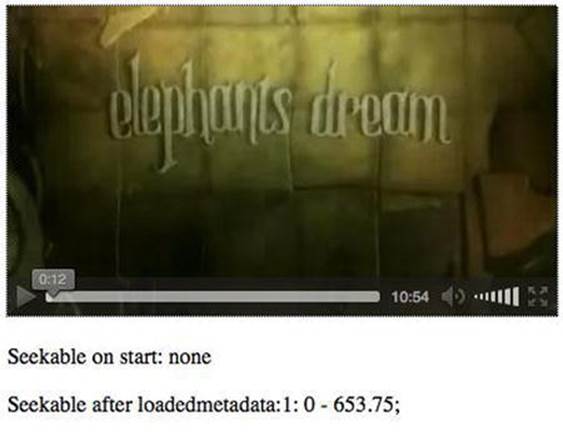
Figure 3-17. Retrieving the seekable attribute values in Firefox
The browsers have all implemented support for the @seekable IDL attribute. The major difference is the number of decimal places they provide, which is the same problem for @duration.
Control Methods in the API
Methods are the verbs of an object—the things an object can do. They are easily spotted because they usually end in parenthesis ( ), which is the punctuation that actually runs the method in question. In the case of video and audio, methods are how you control the media element. This section explains the following JavaScript control methods defined on media elements:
· load()
· play()
· pause()
· canPlayType()
· getStartDate()
load( )
The load() control method, when exectued on a media element, causes all activity on a media resource to be suspended (including resource selection and loading, seeking, and playback), all network activity to be seized, the element to be reset (including removal of pending callbacks and events), and the resource selection and loading process to be restarted. If the browser was in the middle of fetching a media resource, an abort event is fired.
In a typical scenario for a successful load(), the following sequence of steps will roughly occur:
· Initialization:
· @networkState is set to NETWORK_EMPTY
· an emptied event is fired
· @readyState is set to HAVE_NOTHING
· @paused is set to “true”
· @seeking is set to “false”
· @ended is set to “false”
· @currentTime is set to 0 and a timeupdate event is fired
· @duration is set to NaN
· @error is set to null
· @buffered, @played, and @seekable are set to empty
· @playbackRate is set to the value of @defaultPlaybackRate
· @autoplaying is set to “true”
· Resource selection:
· @networkState is set to NETWORK_NO_SOURCE
· @currentSrc is set from the given @src value or the <source> elements
· @networkState is set to NETWORK_LOADING
· the loadstart event is fired
· Resource fetching:
· begin downloading the media resource identified in the @currentSrc attribute
· progress event is fired roughly every 350 ms or for every byte received (whichever is less frequent)
· @preload and @autoplay values help determine how much to download
· if/when the browser suspends download, a suspend event is fired
· when the resource’s metadata has been downloaded:
· @audioTracks and @videoTracks are filled
· @duration is determined
· the durationchange event is fired
· @videoWidth and @videoHeight are determined (if video element) and a resize event is fired
· @seekable is determined
· @readyState is set to HAVE_METADATA
· the loadedmetadata event is fired
· seek to the appropriate start time given in the media resource or the @currentSrc URI
· @currentTime is set to this start time
· the timeupdate event is fired
· potentially more media data is downloaded (and decoded):
· @readyState changes to HAVE_CURRENT_DATA or higher
· the loadeddata event is fired
· the canplay event is fired for any @readyState higher than HAVE_FUTURE_DATA
· @buffered is updated
· @networkState is set to NETWORK_IDLE and buffering stops
· Playback start, if @autoplay is “true”:
· download more data until @readyState is HAVE_FUTURE_DATA or higher (preferably HAVE_ENOUGH_DATA so playback doesn’t get stalled)
· the canplaythrough event is fired
· @paused is set to “false”
· the play event is fired
· the playing event is fired
· playback is started
Note that many error situations and network state situations are also dealt with through the loading process. For example, if the network download stalls and the web browser hasn’t received data for more than about 3 seconds, a stalled event will be fired.
Several previous examples in this chapter have made use of the load() control method; thus, we will not include another example here.
play( )
The play( ) control method executed on a media element sets the @paused IDL attribute to “false” and starts playback of the media resource, downloading and buffering media data as required.
In a typical scenario for a successful play(), the following typical sequence of steps will occur:
· if @networkState is NETWORK_EMPTY—that is, no @currentSrc has been determined yet (e.g., because the @src of the element was empty as the element was set up, but now the attribute was set through JavaScript and the resource can be fetched)—“resource selection” and “resource fetching,” as described for load(), are executed
· if @ended is “true” and the playback direction is forward, the web browser seeks to the beginning
· @currentTime is set to 0
· timeupdate event is fired
· “start playback” as described for load()is executed
We’ll look at the use of play() together with pause() in the next example.
pause( )
The pause() control method executed on a media element sets the @paused IDL attribute to “true” and stops playback of the media resource.
In a typical scenario for a successful pause(), the following sequence of steps will happen to pause a media resource:
· if @networkState is NETWORK_EMPTY (i.e., no @currentSrc has been determined yet), “resource selection” and “resource fetching” as described for load(), are executed. @currentSrc may not have been determined yet because the @src of the element was empty as the element was set up, but now the attribute was set through JavaScript and the resource can be fetched
· pause playback
· @paused is set to “true”
· timeupdate event is fired
· pause event is fired
· downloading of more media data is potentially suspended and a suspend event is fired if the browser is far ahead of the current playback position
The code example in Listing 3-18 makes use of both play() and pause(). At first, no media resource is specified for a video element—then we set the @src attribute depending on what format a browser supports and call play(). Later we call pause() halfway through playing. Figure 4-17 shows the results in the browsers.
Listing 3-18. Using the play() and pause() Control Methods for a Media Element
<video controls width="400">
</video>
<p>CurrentSrc on start: <span id="currentSrc_first"></span>.</p>
<p>CurrentSrc after loadedmetadata: <span id="currentSrc_loadedmetadata"></span>.</p>
<p>CurrentTime on pause: <span id="currentTime_pause"></span>.</p>
<script type="text/javascript">
var video = document.getElementsByTagName("video")[0];
var source = document.getElementsByTagName("source");
var span1 = document.getElementById("currentSrc_first");
var span2 = document.getElementById("currentSrc_loadedmetadata");
var span3 = document.getElementById("currentTime_pause");
span1.innerHTML = video.currentSrc;
if (video.canPlayType("video/webm") != "") {
video.src = "video/HK_Traffic.webm";
} else if (video.canPlayType("video/mp4") != "") {
video.src = "video/HK_Traffic.mp4";
}
video.play();
function span2Update(evt) { span2.innerHTML = video.currentSrc; }
function callpause(evt) {
if (video.currentTime > video.duration/2) {
video.pause();
}
}
function span3Update(evt) { span3.innerHTML = video.currentTime; }
video.addEventListener("loadedmetadata", span2Update, false);
video.addEventListener("timeupdate", callpause, false);
video.addEventListener("pause", span3Update, false);
</script>
When running this code (see Figure 3-18), you will see that at first, no video URL is available, but it is then set and loaded and playback starts. Removing the video.play() command, you would need to start playback by clicking the play button in the video controls—it has the same effect. Pausing happens at the halfway point, see the callpause() function.
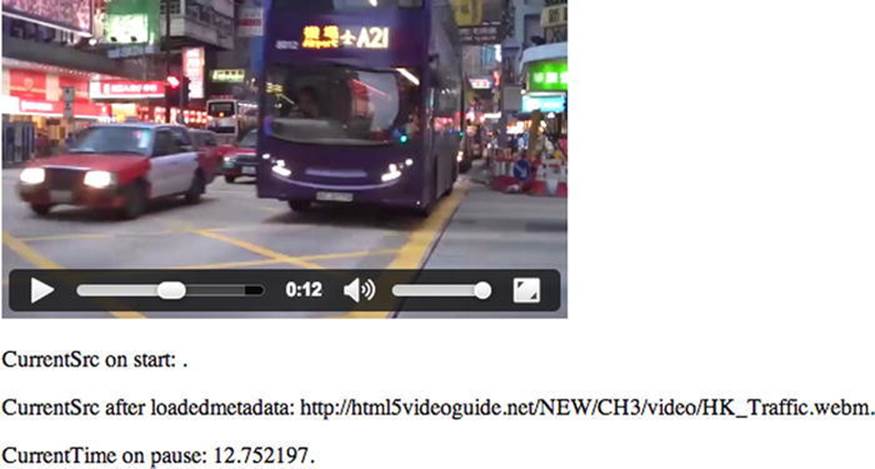
Figure 3-18. Using the play( ) and pause( ) control methods in Chrome
canPlayType( )
This method is particularly useful in situations where you wonder if the browser can actually play the media file. The canPlayType (in DOMString type) control method for a media element takes a string as a parameter which is a MIME type and returns whether the web browser is confident that it can play back that media type.
Possible return values are:
· the empty string “ ”: The web browser is confident it cannot decode and render this type of media resource in a media element
· "maybe": The web browser is not sure if it can or cannot render this type of media resource in a media element
· "probably": the web browser is confident that it can decode and render this type of media resource in a media element; since this implies knowledge about whether the codecs in a container format are supported by the web browser, they are encouraged to only return “probably” for a MIME type that includes the codecs parameter
The previous code block made use of the canPlayType() control method.
if (video.canPlayType("video/webm") != "") {
video.src = "video/HK_Traffic.webm";
} else if (video.canPlayType("video/mp4") != "") {
video.src = "video/HK_Traffic.mp4";
}
As you can see, it simply checks to see if the browser is able to play the various formats for the HK_Traffic video.
getStartDate()
Some media resources are associated with a real-world clock-time and date. Think, for example, of live streaming video. For such resources, the playback time of 0 is associated with a JavaScript Date object, which stores a date and a time—the so-called timeline offset. This date establishes a media timeline that begins at this start date as the earliest defined position and ends at the latest defined position.
For example, in a live stream, the start date could be the time at which the user connects to the stream and the end of the timeline would be the ever-changing current playback time.
Another example is the recording of a live stream, which has a timeline defined by its start date and end date.
In the end, the start date is nothing more than a label attached to the 0 time of the video controls, which can be exposed to the user for informative purposes.
Most browsers haven’t actually implemented this method, so don’t rely on it being available.
There is also a new method available in some browsers: fastSeek(double time). This method allows seeking to keyframes in a video rather than to exact time offsets. We mentioned this method in the context of @currentTime as a replacement for seeking by @currentTime. We are aware that at least Firefox supports this method.
Events
The browser raises media events during handling of a media resource whenever its state changes. It allows a web developer to react to this state change. We have already used some of these events extensively in this chapter. For example, you will use the loadedmetadata event whenever you want to read properties of the media resource (such as its duration or width and height) because you have to wait until these properties are available.
Rather than demonstrating the use of each possible event, we summarize them in the following table. As you go through, you may recognize some of them from earlier code samples in this chapter. This is just an overview table to find everything in one place.
Table 3-1. Overview of the Media Element related Events
|
Event |
Is dispatched when… |
Preconditions |
|
loadstart |
The web browser begins looking for media data, as part of the resource selection upon media element load, or load(), play(), or pause(). |
@networkState is NETWORK_LOADING for the first time. |
|
progress |
The web browser is fetching media data. |
@networkState is NETWORK_LOADING. |
|
suspend |
The web browser has paused fetching media data but does not have the entire media resource downloaded yet. |
@networkState is NETWORK_IDLE. |
|
abort |
The web browser was stopped from fetching the media data before it is completely downloaded, but not due to an error—rather, due to a user action, such as browsing away. |
@error is MEDIA_ERR_ABORTED. @networkState is either NETWORK_EMPTY or NETWORK_IDLE, depending on when the download was aborted. |
|
error |
An error occurred while fetching the media data. |
@error is MEDIA_ERR_NETWORK or higher. @networkState is either NETWORK_EMPTY or NETWORK_IDLE, depending on when the download was aborted. |
|
emptied |
A media element has just lost the network connection to a media resource, either because of a fatal error during load that’s about to be reported or because the load() method was invoked while the resource selection algorithm was already running. |
@networkState is NETWORK_EMPTY for the first time and all the IDL attributes are in their initial states. |
|
stalled |
The web browser tries to fetch media data, but data has not arrived for more than 3 seconds. |
@networkState is NETWORK_LOADING. |
|
loadedmetadata |
The web browser has just set up the decoding pipeline for the media resource and determined the @duration and dimensions. |
@readyState is HAVE_CURRENT_DATA or greater for the first time. |
|
loadeddata |
The web browser can render the media data at the current playback position for the first time. |
@readyState is HAVE_CURRENT_DATA or greater for the first time. |
|
canplay |
The web browser can start or resume playback of the media resource, but without being certain of being able to play through at the given playback rate without a need for further buffering. |
@readyState newly increased to HAVE_FUTURE_DATA or greater. |
|
canplaythrough |
The web browser is now certain that with the given media data, the rate at which the network delivers further media data, and the given playback rate, the media resource can play through without further buffering. |
@readyState is newly equal to HAVE_ENOUGH_DATA. |
|
playing |
Playback has started. |
@readyState is newly equal to or greater than HAVE_FUTURE_DATA, @paused is “false,” @seeking is “false,” or the current playback position is contained in one of the ranges in @buffered. |
|
waiting |
Playback has stopped because the next media data is not available from the network yet, but the web browser expects that frame to become available in due course (i.e., less than 3 seconds). This can be after a seek, or when the network is unexpectedly slow. |
@readyState is newly equal to or less than HAVE_CURRENT_DATA, and @paused is “false.” Either @seeking is “true” or the current playback position is not contained in any of the ranges in @buffered. |
|
seeking |
The web browser is seeking and the seek operation is taking long enough that the web browser has time to fire the event. |
@seeking is “true” and @readyState is less than HAVE_FUTURE_DATA. |
|
seeked |
The web browser is finished seeking. |
@seeking has changed to “false.” |
|
ended |
Playback has stopped because the end of the media resource was reached. |
@ended is newly “true” and @currentTime is equal to @startTime plus @duration. |
|
durationchange |
The duration has just been changed upon media element load, or after an explicit change of @src and media resource fetching, or when the web browser has a better estimate (e.g., during streaming). |
@readyState is HAVE_METADATA or greater for the first time. |
|
timeupdate |
The current playback position changed as part of normal playback every 15 to 250 ms. It is also fired when seeking, or when fetching a new media resource. It is also fired when playback has ended, when it is paused, when it is stopped due to an error, orbecause the media resource needs to buffer from the network. Basically, timeupdate is raised whenever something happens where you would want to update your own buffered or played video controls user interface. |
@seeking is newly “true” OR @startTime is newly set OR @ended is newly “true” OR @paused is newly “true” OR @readyState newly changed to a value lower than HAVE_FUTURE_DATA without@ended is “true” OR @error is newly non-null with @readyState being HAVE_METADATA or more OR @seeking is “false,” @paused is “false,” @ended is “false,” @readyState is at leastHAVE_FUTURE_DATA and the last timeupdate was fired more than 15–250 ms ago. |
|
play |
Playback has begun upon media element load with an @autoplay attribute, through user interaction, or after the play() method has returned. |
@paused is newly “false.” |
|
pause |
Playback has been paused either through user interaction, or after the pause() method has returned. |
@paused is newly “true.” |
|
ratechange |
Either the default playback rate or the playback rate has just been updated. |
@defaultPlaybackRate or @playbackRate is newly changed. |
|
resize |
Either @videoWidth or @videoHeight or both have been changed. |
Only works on video elements and when @readyState is not HAVE_NOTHING. |
|
volumechange |
Either the volume or the muted state of the media element changed. |
@volume or @muted changed. |
Third-Party Players
Now that you have had the opportunity to walk through the various bits and pieces of the JavaScript API as it relates to media, let’s turn our attention to media players that use the API.
Throughout this book you may have noticed the various browsers use different controller designs to play the video. This is fine for general playback but there will be times where consistency of look across all browsers is important. You have two choices when confronting this requirement: Use a third-party player or “roll your own” custom video player.
There are a number of third-party players out there and choosing which one to use is up to you. There is a comparison chart at http://praegnanz.de/html5video/, which is a fairly comprehensive overview of the major players and their strengths and weaknesses. In this section we will be focusing on two players that made the “Sucks Less Than Others” hit parade: JW Player and Video.js. Both are open source and supported by a commercial entity that can provide hosting and other services to you. We start with the JW Player.
![]() Note If neither of these appeal to you, take a look at another very popular player, Sublime, which is at www.sublimevideo.net/, or at mediaelement.js at http://mediaelementjs.com/. Sublime is likely the prettiest player out there, but it’s not open source. Mediaelement.js is open source and provided by a community developer.
Note If neither of these appeal to you, take a look at another very popular player, Sublime, which is at www.sublimevideo.net/, or at mediaelement.js at http://mediaelementjs.com/. Sublime is likely the prettiest player out there, but it’s not open source. Mediaelement.js is open source and provided by a community developer.
The big advantage with using a third-party media player is not just the consistent controls but that the authors have taken care to make these players work in all environments—including pre-HTML5 browsers and mobile—and for all users—including captions and keyboard control. They thus resolve some of the biggest headaches associated with media controls.
Using the JW Player
JW Player is a veteran in the space of video players. It was already dominant during the time that Flash was the main means of publishing video online and has managed to transition this into the HTML5 space. The basic player is available for free and open source athttps://github.com/jwplayer and the JWPlayer company is offering hosted video services with an extensive toolset. You can dig into the player API at http://support.jwplayer.com/customer/portal/articles/1413074-javascript-api-quick-start.
You will need to sign up for a free account before being able to follow the next steps. Then you follow a three-step process: you simply tell the player where the video is located and what skin to use, and then you copy and paste the scripts into your HTML5 page. Here’s how this currently works—the UI may have changed in the meantime.
1. The first step in the process is to click the Publish A Video Now button to open the Publish Wizard.
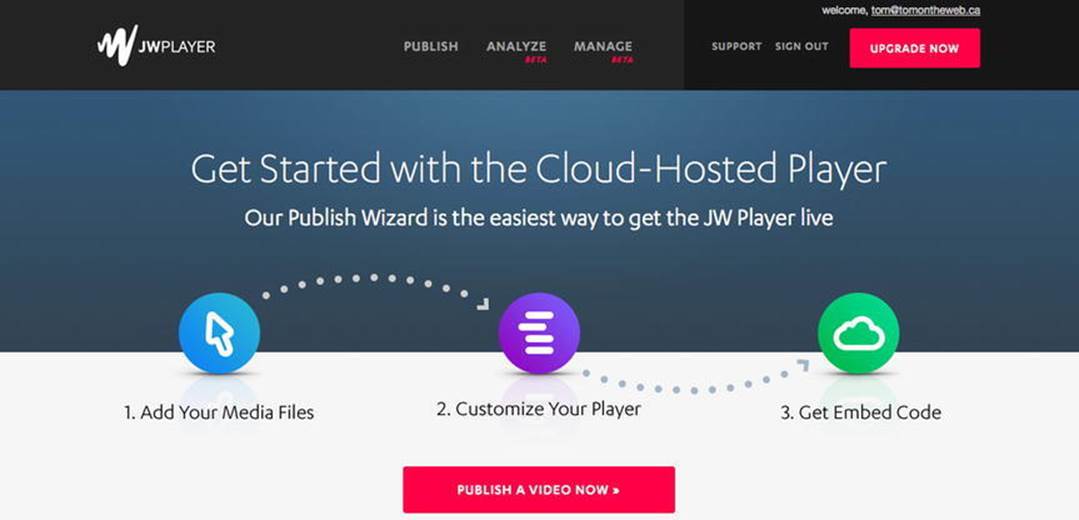
Figure 3-19. Getting ready to publish a video
The Publish Wizard offers three choices as to how you want to handle the video to be used.
· Use content from your web site.
· Use content that is currently sitting on your computer.
· Use a YouTube video.
The choice is yours to make, but our video and poster frame are already sitting on a web server so we are going to choose the web site option.
2. Click the Your Website button and enter the following:
· Media File: http://html5videoguide.net/BeginningHTML5Video/CH3/video/Vultures.mp4
· Poster Image: http://html5videoguide.net/BeginningHTML5Video/CH3/img/BabyVulture.jpg
· Media Title: Baby Turkey Vultures
When entering the links (see Figure 3-20), be sure to enter the full path to the content. If everything is correct click the Publish Video button to be taken to the Player Configuration page.
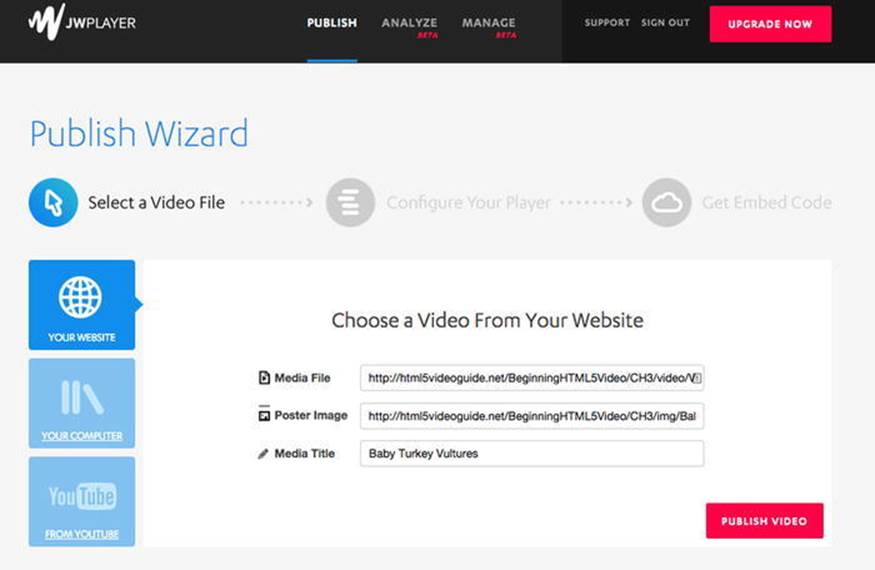
Figure 3-20. Pointing the JW Player to the content
When you arrive at the Configuration page the first thing you should notice is that the poster image is in place along with the title from the previous screen. In fact, this is the player the user sees and, if you click the button in the screen, the video will play. The watermark you see in the upper right corner is a feature of the free player and can’t be removed by purchasing a license.
The choices available are more common sense than confusing. You get to choose whether this project will be Responsive or a Fixed Width and Height. If you choose Responsive, the pop-down list lets you choose a target screen and aspect ratio. Select Fixed Dimensions and you can enter the values into the dialog box.
The Skin area only presents you with a single choice because this is a free account. If you switch over to a paid account you naturally receive a ton of extras including more skins.
The Playback options are self-explanatory.
1. Select Responsive and 16:9- Wide screen TV to maintain the video’s aspect ratio.
2. In the Playback options (see Figure 3-21), select HTML5 and Show Controller. Click the Get Embed Code button to open the Embed Code area.
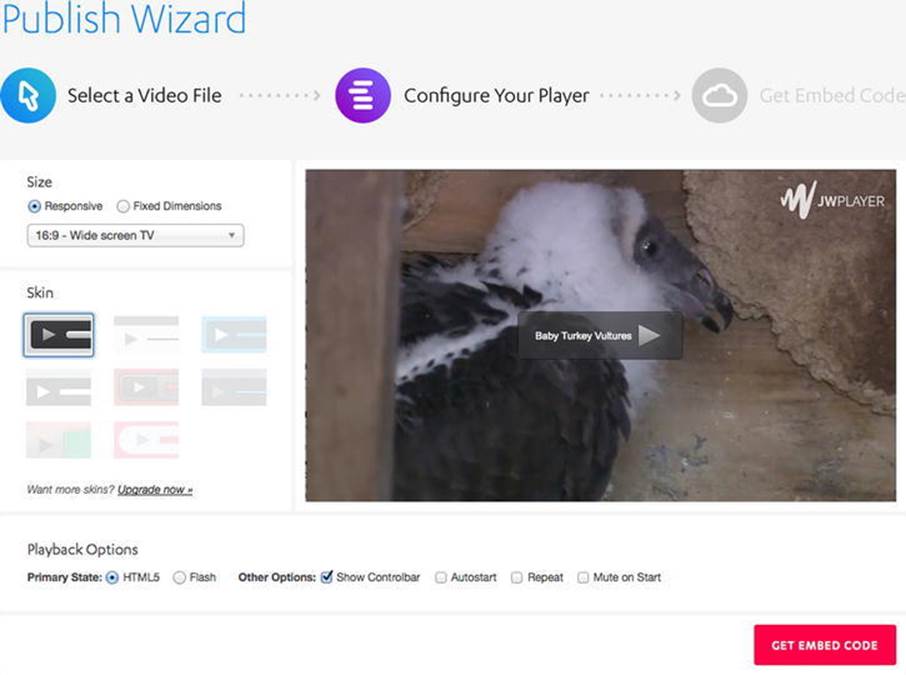
Figure 3-21. The JW Player is configured
Figure 3-22 presents two code snippets, and both get copied and pasted into your HTML document. The first snippet gets pasted into the <head></head> element of the HTML page. This little bit of code points to the JW Player’s .js library containing the code that creates and controls the Player.
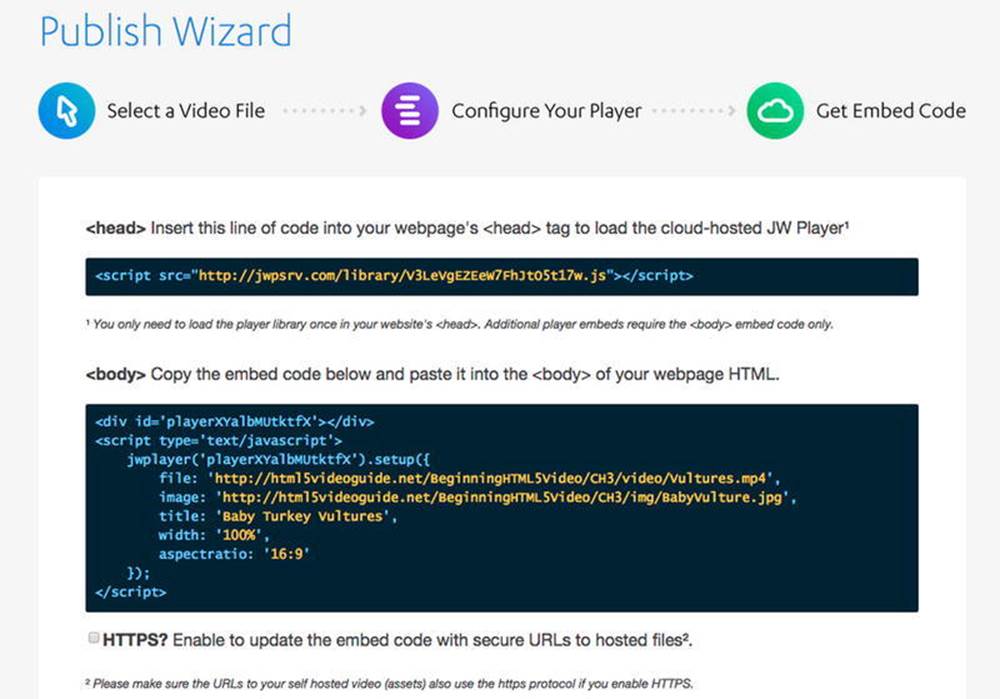
Figure 3-22. The JW Player embed code
The second snippet gets pasted into the body of the HTML document. The first line creates the div that will hold the player and the <script> element sets out the parameters for the content entered in the previous two screens.
In our page the final destination for the first snippet was as shown in Listing 3-19a.
Listing 3-19a. Using the JWPlayer
<!DOCTYPE html>
<html>
<head>
<meta charset="UTF-8">
<title>JW Player</title>
<script src="http://jwpsrv.com/library/V3LeVgEZEeW7FhJtO5t17w.js"></script>
</head>
You may have noticed, when you pointed the player to the video, it only points to the .mp4 version of the file. Obviously, there is a problem. If you want the video to play in Opera you will have to provide a .webm version of the file. Once you have pasted the code into the body here’s how you fix that.
1. In the code. Copy this line: file: ’http://html5videoguide.net/BeginningHTML5Video/CH3/video/Vultures.mp4’ to your clipboard.
2. Paste the contents of the clipboard into the Player code after the .mp4 line and change the file extension to .webm as shown in Listing 3-19b.
Listing 3-19b. Using the JWPlayer
<div id=’ playerXYalbMUtktfx ’></div>
<script type=’text/javascript’>
jwplayer(playerXYalbMUtktfx).setup({
file: ’video/Vultures.mp4’,
file: ’video/Vultures.webm’,
image: ’img/BabyVulture.jpg’,
title: ’JW Player Exercise’,
width: ’100%’,
aspectratio: ’16:9’
});
</script>
When we browser tested in Opera, the result is what you see in Figure 3-23.
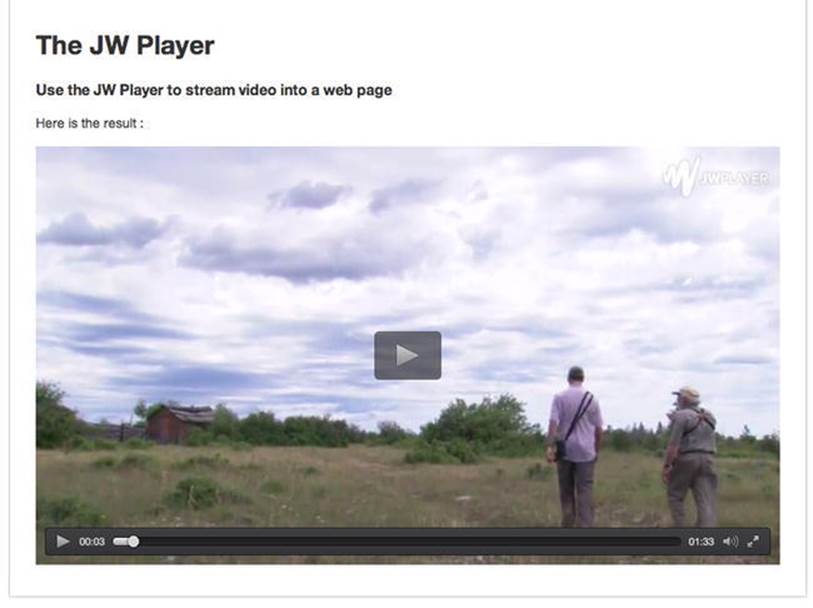
Figure 3-23. The .webm version plays in Opera
Using Video.JS
If an open source, easy-to-use and fully customizable player is what you are looking for, then you might want to try out Video JS. This player is made by the folks over at Zencoder and is designed to appeal to all web skill levels from beginner to code warrior.
Though there is a lot under the hood with this player, we will only be showing a very simple example of using this player. Due to its open source nature, Video.JS can be easily customized by either downloading the source files at www.videojs.com and adding them to your web directory or creating your own skin by modifying the LESS or CSS files at http://designer.videojs.com. If you really want to dig into the Video.JS API, you can find the documentation athttps://github.com/videojs/video.js/blob/stable/docs/api/vjs.Player.md.
Here’s how to play a video using Video JS:
1. Open a browser and navigate to www.videojs.com. The home page, shown in Figure 3-24, is where the “magic” happens.
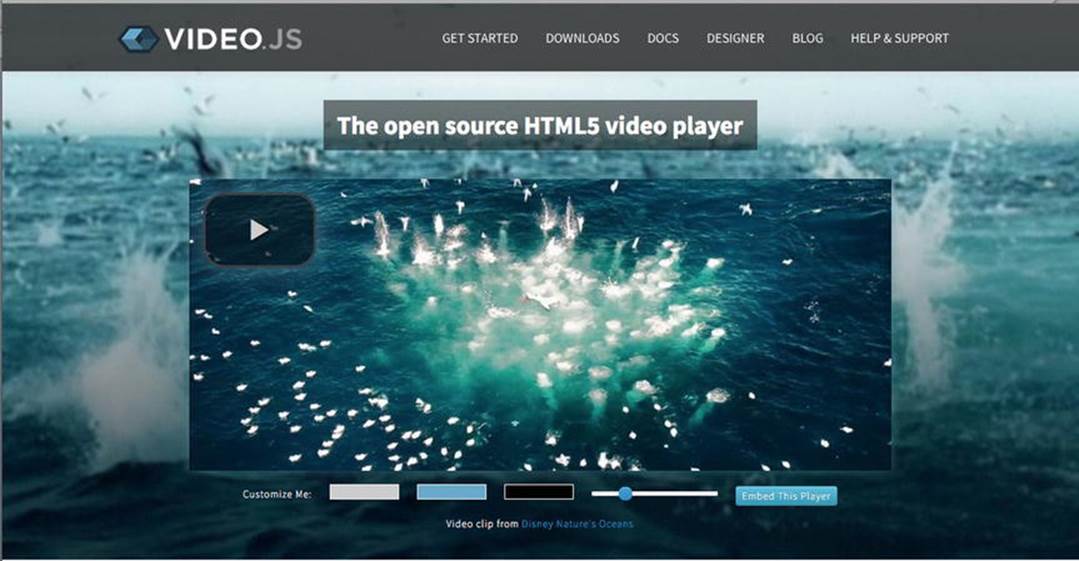
Figure 3-24. The Video.JS homepage is your only stop
The player you will be creating is in the middle of the page. The play button, located in the upper left corner, is there for a reason: to keep it out of the way. The slider beside the Embed This Player button lets you control the size of this button and the video controls.
The three colored chips at the bottom allow you to customize the colors of the video controls. From left to right, the following is what these colors affect:
· Gray Chip: changes the color of the icons used in the controls, including the big overlay button.
· Blue Chip: changes the background color for progress and volume bars.
· Black Chip: changes the background color of the player controls.
Be careful here because the colors are contained in a color picker, which is accessed by clicking on a color chip. There is no way, here, to actually enter a hexadecimal or RGBA color value.
![]() Note If you make bad color choices, you can always reset to the default colors by clicking the Reload button in your browser.
Note If you make bad color choices, you can always reset to the default colors by clicking the Reload button in your browser.
2. Click the Embed This Player button to open a window (see Figure 3-25) that presents you with a template for the embed code.
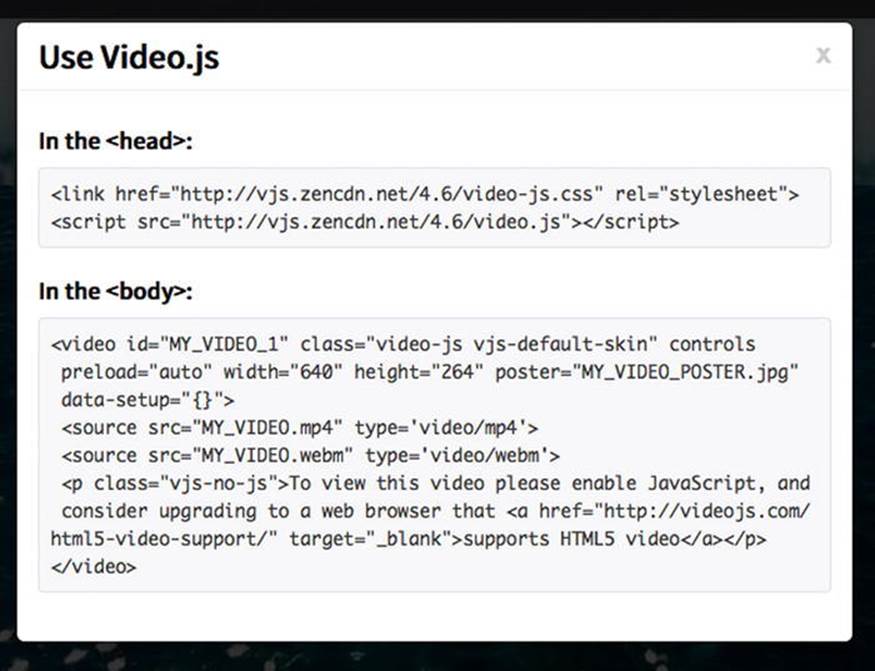
Figure 3-25. The Video.js embed code
3. Copy the code in the <head> area and paste it into your HTML page’s head. Notice that any changes to the player design resulted in extra CSS to be added to the <head> element.
4. Return to the browser and select the code found in the <body> area. Paste it into the div on the HTML page where the video is to be located.
With the code in place you are going to have to make a few changes to the contents of the <video> element. In our case we:
· Changed the width and height property values to those of the videos.
· Changed the poster value to link to the location of the poster image.
· Changed the source element to link to the .mp4 and .webm versions of the video.
The resulting code is shown in Listing 3-20.
Listing 3-20. Embedding a video.js Player
<head>
<link href="http://vjs.zencdn.net/4.6/video-js.css" rel="stylesheet">
<script src="http://vjs.zencdn.net/4.6/video.js"></script>
</head>
<body>
<video id="MY_VIDEO_1" class="video-js vjs-default-skin" controls
preload="auto" width="683" height="432" poster="img/BabyVulture.jpg"
data-setup="{}">
<source src="video/Vultures.mp4" type=’video/mp4’/>
<source src="video/Vultures.webm" type=’video/webm’/>
<p class="vjs-no-js">
To view this video please enable JavaScript, and consider upgrading to a web browser that
<a href="http://videojs.com/html5-video-support/" target="_blank">supports HTML5 video</a>
</p>
</video>
</body>
5. Save the HTML file and open it in a browser. The poster frame appears and, when you click the Play button, the video (see Figure 3-26) starts playing.
Figure 3-26. The video playing in the Video JS player
![]() Tip If you want to move the Play button to the middle of the video add the following class—vjs-big-play-centered—to the video element.
Tip If you want to move the Play button to the middle of the video add the following class—vjs-big-play-centered—to the video element.
You may have noticed a curious difference between the JWPlayer and Video.js: Video.js is using a native HTML5 <video> element to embed all the control functionality, including Flash fallback, while JWPlayer is using a <div> element. The <video> element approach makes it easier for developers to directly manipulate a video element in JavaScript using the API that we already covered in this book. However, that approach has a downfall in that it avoids the video.js adaptation layer for older browsers that don’t support the <video> element. Thus any control calls may not have an effect on the Flash fallback player. JWPlayer avoids this by not even exposing the HTML5 API in the first place. If you don’t care about old browsers, the direct use of the browser JavaScript API as in video.js is tempting.
A Custom Player
There will be times when the players used by the various browsers or third-party players just don’t fit the design objectives of the project. This could be due to branding, feature set, or even just personal preference. In this case building a custom video player is the only logical choice.
This is where the use of the JavaScript API really shines. Its foremost use case is to “roll your own” controls with a style that looks identical across all browsers. Since this is such a common use case, we provide you with an example on how to do so. It includes a skeleton of the HTML code, some CSS, and the required JavaScript calls to control it.
Our plan is to build the player displayed in Figure 3-27. You might find the controls that we’ve chosen and their layout a bit unusual. That’s because we decided to build a player that targets blind or vision-impaired users with the main buttons they might need. The buttons are deliberately kept large, color-coded, and off the video to be better usable. You can easily tab onto them and activate them using the space bar.
Figure 3-27. A custom accessible video player using the JavaScript API
Note that in Safari, by default, “tab” is disabled as a navigation means across elements on the page and you have to use option-tab to navigate. To turn on “tab” navigation, open your Preferences and check “Preferences ![]() Advanced
Advanced ![]() Press tab to highlight each item on a page.”
Press tab to highlight each item on a page.”
The player consists of several interface elements. It has a progress display (the bar underneath the video), behind which it shows the seconds played and the video duration. Below that is a collection of buttons. The buttons allow the video to start playing (a play/pause toggle), rewind by 5 seconds, stop playback (and reset to file start), increase volume by 10 percentage points, reduce volume by 10 percentage points, and a mute/unmute toggle. To the right of the video is the volume display—it is grayed out when muted and the volume level is shown as a percentage in the bar’s height.
![]() Note If you do decide to construct your own video player, do your research and investigate sites that have done just that. Pay particular attention to the control elements used, their placement in the interface, and their sizes. If you have a User Experience specialist on your team, his or her input will be invaluable when it comes to the design and placement of the various control elements in the Player.
Note If you do decide to construct your own video player, do your research and investigate sites that have done just that. Pay particular attention to the control elements used, their placement in the interface, and their sizes. If you have a User Experience specialist on your team, his or her input will be invaluable when it comes to the design and placement of the various control elements in the Player.
We start implementing this player by providing a skeleton of the HTML code, shown in Listing 3-21a, that creates this player.
Listing 3-21a. HTML Code for the Custom Player
<div id="player">
<div id="video">
<video width="400" height="225" poster="img/BabyVulture.jpg">
<source src="video/Vultures.mp4" type="video/mp4"/>
<source src="video/Vultures.webm" type="video/webm"/>
</video>
<div id="positionview">
<div id="transportbar"><div id="position"></div></div>
<div id="time">
<span id="curTime">00:00</span>/<span id="duration">00:00</span>
</div>
</div>
</div>
<div id="volumecontrol">
<div id="volumebar"><div id="volume"></div></div>
<div id="vol"></div>
</div>
<div style="clear: both;"></div>
<div id="controls">
<div><input id="play" type="image" src="img/0.gif" alt="Play"></div>
<div><input id="repeat" type="image" src="img/0.gif" alt="Repeat"></div>
<div><input id="stop" type="image" src="img/0.gif" alt="Stop"></div>
<div><input id="louder" type="image" src="img/0.gif" alt="Louder"></div>
<div><input id="quieter" type="image" src="img/0.gif" alt="Quieter"></div>
<div><input id="mute" type="image" src="img/0.gif" alt="Mute"></div>
</div>
</div>
A <div> with the id of player encapsulates the code in order that we can later give it a style to show it as an entity. Inside the #player div are three main divs: #video, #volumecontrol, and #controls. The #video part contains the video element as well as the transport bar and time displays. The #volumecontrol contains the volume bar and volume number display. The #controls contains all the buttons.
Note that the video element does not have an @controls attribute for the obvious reason that we have our own controls. Also, notice how the <input> elements, representing the buttons, have been made accessible by making them of type “image” and giving them an @alt attribute value. It is a best practice to provide alternative text for image input elements so they are accessible to vision-impaired users. Since we are going to provide the actual buttons in CSS, we have to put a 1 x 1 px gif placeholder into the @src attribute of the <input> elements to ensure they do not appear as broken images.
Next up is styling. In Listing 3-21b we’re showing an extract of the CSS.
Listing 3-21b. CSS Styling for the Custom Player
<style type="text/css">
#player {
padding: 10px;
border: 5px solid black;
border-radius: 15px;
box-shadow: 10px 10px 5px gray;
box-sizing: content-box;
max-width: 455px;
}
#positionview {
width: 400px; height: 40px;
}
#transportbar {
height: 20px;
width: 300px;
position: relative;
float: left;
border: 2px solid black;
}
#position {
background: #D7BC28;
height: 20px;
width: 0px;
}
#time {
position: relative;
float: right;
}
#video {
position: relative;
float: left;
padding: 0;
margin: 0;
}
/* include your own CSS for the volume control here and
style every button with an offset on buttons.png (we only show one) */
#controls div input {
background:url(’img/buttons.png’) no-repeat top left;
border:none;
height: 30px;
width: 30px;
padding: 5px;
display: inline-block;
}
#controls div #repeat {
background-position:0 -901px;
}
</style>
The player div gets a nice border, rounded corners and a shadow to make it stand out. This is a classic example of the maxim “Let the software do the work.” Were this to be added as a .jpg or .png image, it would require extra resources to be downloaded, which typically reduces the speed of the web page. Also, CSS design is adaptive (i.e., it adapts to different layout sizes without losing quality). That would not be the case when using images, which need to be scaled to different layout sizes.
For the position display we have an outer <div> and an inner <div>, where the outer one provides the box for the duration of the video and the inner one displays the current playback position.
The buttons all use the same .png which includes all the buttons in use (that’s called an “image sprite”). To display a particular button, you use an offset and a 30 x 30 px cropping area in CSS. Using image sprites reduces the number of resources that have to be downloaded and thus speeds up web page display again.
Finally we add the JavaScript, as in Listing 3-21c, that adds the functionality. We start by creating the variable names for the elements in the player.
Listing 3-21c. JavaScript Setup of DOM Element Variables
<script type="text/javascript">
var video = document.getElementsByTagName("video")[0];
var position = document.getElementById("position");
var curTime = document.getElementById("curTime");
var duration = document.getElementById("duration");
var volume = document.getElementById("volume");
var vol = document.getElementById("vol");
var play = document.getElementById("play");
var repeat = document.getElementById("repeat");
var stop = document.getElementById("stop");
var louder = document.getElementById("louder");
var quieter = document.getElementById("quieter");
var mute = document.getElementById("mute");
With that out of the way, we start using the IDL attribute values (see Listing 3-21d) to provide information for the duration and volume value displays:
Listing 3-21d. Loadedmetadata, timeupdate, and volumechange Event Callbacks to Update Duration and Volume Display
video.addEventListener("loadedmetadata", init, false);
function init(evt) {
duration.innerHTML = video.duration.toFixed(2);
vol.innerHTML = video.volume.toFixed(2);
}
video.addEventListener("timeupdate", curTimeUpdate, false);
function curTimeUpdate(evt) {
curTime.innerHTML = video.currentTime.toFixed(2);
position.style.width = 300*video.currentTime/video.duration + "px";
}
video.addEventListener("volumechange", dispVol, false);
function dispVol(evt) {
vol.innerHTML = video.volume.toFixed(2);
}
Finally, we’re ready to actually make the various buttons work using the methods, events, and IDL attributes (see Listing 3-21e) available in the JavaScript API. Note how every button has an onclick event handler that is hooked up to changing video states.
Listing 3-21e. Loadedmetadata, timeupdate, and volumechange Event Callbacks to Update Duration and Volume Display
play.addEventListener("click", togglePlay, false);
function togglePlay(evt) {
if (video.paused == false) {
video.pause();
play.style.backgroundPosition = "0 0";
} else {
video.play();
play.style.backgroundPosition = "0 -151px";
}
}
repeat.addEventListener("click", rewind, false);
function rewind(evt) {
video.currentTime = video.currentTime - 2.0;
}
stop.addEventListener("click", restart, false);
function restart(evt) {
video.pause();
play.style.backgroundPosition = "0 0";
video.currentTime = 0;
}
louder.addEventListener("click", volInc, false);
function volInc(evt) {
changeVolume(video.volume + 0.1);
}
quieter.addEventListener("click", volDec, false);
function volDec(evt) {
changeVolume(video.volume - 0.1);
}
mute.addEventListener("click", toggleMute, false);
function toggleMute(evt) {
video.muted = !video.muted;
if (video.muted) {
volume.className = ’disabled’;
} else {
volume.className = ’’;
}
}
function changeVolume(changeTo) {
if (video.muted){
toggleMute();
}
if (changeTo > 1.0) {
changeTo = 1.0;
} else if (changeTo < 0.0) {
changeTo = 0.0;
}
volume.style.height = 225*changeTo +’px’;
volume.style.marginTop = 225-(225*changeTo) + ’px’;
video.volume = changeTo;
}
</script>
Take a minute to go through the code. You will notice many familiar IDL attributes—video.duration, video.volume, video.currentTime, video.paused, and video.muted are all used here to provide the functions behind the buttons. Finally you will also notice theplay() and pause() control methods.
What you have just gone through is the JavaScript that makes this player fully functional. The purpose of the CSS is to manage the presentation. Put those two together and you have a powerful set of tools for creating practically anything.
Summary
This has been a rather longer yet very important chapter. It is critical that you both understand where JavaScript fits into the process and that its purpose is to provide functionality.
In this chapter we covered the following:
· JavaScript API of the <video> and <audio> elements. We have approached this in a structured way, starting with the IDL attributes that represent the content attributes from the HTML markup such as @src, @width, and @height. Then we discussed the IDL attributes that represent resource features such as @currentSrc, @duration, and @volume. Then we looked at the playback-related IDL attributes such as @currentTime, @paused, and @ended.
· The states of a media resource, including the networkState, the readyState, and played, buffered, or seekable time ranges.
· The control methods load(), play(), pause(), and canPlayType().
· A listing of the events the media elements fire. There are a fair number, including loadedmetadata, canplay, playing, pause, seeking, volumechange, durationchange, and ended.
· Third-party solutions for custom players, which all make extensive use of the JavaScript API.
· A practical use case of the JavaScript API: running your own custom controls.
We now have all the tools at hand to successfully use <audio> and <video> in HTML5 applications. We’ve already started looking at some accessibility issues through the player controls interface at the end of this chapter. The next chapter will dig more into this topic of accessibility, as well as look at internationalization and usability issues. We’ll see you there.
All materials on the site are licensed Creative Commons Attribution-Sharealike 3.0 Unported CC BY-SA 3.0 & GNU Free Documentation License (GFDL)
If you are the copyright holder of any material contained on our site and intend to remove it, please contact our site administrator for approval.
© 2016-2026 All site design rights belong to S.Y.A.