HTML5: The Missing Manual Matthew MacDonald (2013)
Part 1. Modern Markup
Chapter 3. Writing More Meaningful Markup
In the previous chapter, you met HTML5’s semantic elements. With their help, you can give your pages a clean, logical structure and prepare for a future of super-smart browsers, search engines, and assistive devices.
But you haven’t reached the end of the semantic story yet. Semantics are all about adding meaning to your markup, and there are several types of information you can inject. In Chapter 2, semantics were all about page structure—you used them to explain the purpose of large blocks of content and entire sections of your layout. But semantics can also include text-level information, which you add to explain much smaller pieces of content. You can use text-level semantics to point out important types of information that would otherwise be lost in a sea of web page content, like names, addresses, event listings, products, recipes, restaurant reviews, and so on. Then this content can be extracted and used by a host of different services—everything from nifty browser plug-ins to specialized search engines.
In this chapter, you’ll start by returning to the small set of semantic elements that are built into the HTML5 language. You’ll learn about a few text-level semantic elements that you can use today, effortlessly. Next, you’ll look at the companion standards that tackle text-level semantics head-on. That means digging into microdata, which began its life as part of the original HTML5 specification but now lives on as a separate, still-evolving standard managed by the W3C. Using microdata, you’ll learn how to enrich your pages and juice up your web search listings.
The Semantic Elements Revisited
There’s a reason you began your exploration into semantics with the page structure elements (see Table 3-1 for a recap). Quite simply, page structure is an easy challenge. That’s because the vast majority of websites use a small set of common design elements (headers, footers, sidebars, and menus) to create layouts that are—for all their cosmetic differences—very similar.
Table 3-1. Semantic elements for page structure
|
ELEMENT |
DESCRIPTION |
|
<article> |
Represents whatever you think of as an article—a section of self-contained content like a newspaper article, a forum post, or a blog entry (not including frills like comments or the author bio). |
|
<aside> |
Represents a complete chunk of content that’s separate from the main page content. For example, it makes sense to use <aside> to create a sidebar with related content or links next to a main article. |
|
<figure> and <figcaption> |
Represents a figure. The <figcaption> element wraps the caption text, and the <figure> element wraps the <figcaption> and the <img> element for the picture itself. The goal is to indicate the association between an image and its caption. |
|
<footer> |
Represents the footer at the bottom of the page. This is a tiny chunk of content that may include small print, a copyright notice, and a brief set of links (for example, “About Us” or “Get Support”). |
|
<header> |
Represents an enhanced heading that includes a standard HTML heading and extra content. The extra content might include a logo, a byline, or a set of navigation links for the content that follows. |
|
<nav> |
Represents a significant collection of links on a page. These links may point to topics on the current page or to other pages on the website. In fact, it’s not unusual to have a page with multiple <nav> sections. |
|
<section> |
Represents a section of a document or a group of documents. The <section> is an all-purpose container with a single rule: The content it holds should begin with a heading. Use <section> only if the other semantic elements (for example, <article> and <aside>) don’t apply. |
|
<main> |
Represents the main content of the page—all of it. For example, <main> might wrap an <article> element but leave out site-wide headers, footers, and sidebars. The <main> element is a new addition to the HTML 5.1 revision of HTML5 (page xv). |
Text-level semantics are a tougher nut to crack. That’s because people use a huge number of different types of content. If HTML5 set out to create an element for every sort of information you might add to a page, the language would be swimming in a mess of elements. Complicating the problem is the fact that structured information is also made of smaller pieces that can be assembled in different ways. For example, even an ordinary postal address would require a handful of elements (like <address>, <name>, <street>, <postalcode>, <country>, and so on) before anyone could use it in a page.
HTML5 takes a two-pronged approach. First, it adds a very small number of text-level semantic elements. But second, and more importantly, HTML5 supports a separate microdata standard, which gives people an extensible way to define any sort of information they want and then flag it in their pages. You’ll cover both of these topics in this chapter. First up are three new text-level semantic elements: <time>, <output>, and <mark>.
Dates and Times with <time>
Date and time information appears frequently in web pages. For example, it turns up at the end of most blog postings. Unfortunately, there’s no standardized way to tag dates, so there’s no easy way for other programs (like search engines) to extract them without guessing. The <time>element solves this problem. It allows you to mark up a date, time, or combined date and time. Here’s an example:
The party starts <time>2014-03-21</time>.
NOTE
It may seem a little counterintuitive to have a <time> element wrapping a date (with no time), but that’s just one of the quirks of HTML5. A more sensible element name would be <datetime>, but that isn’t what they chose.
The <time> element performs two roles. First, it indicates where a date or time value is in your markup. Second, it provides that date or time value in a form that any software program can understand. The previous example meets the second requirement using the universal date format, which includes a four-digit year, a two-digit month, and a two-digit day, in that order, with each piece separated by a dash. In other words, the format follows this pattern:
YYYY-MM-DD
However, it’s perfectly acceptable to present the date in a different way to the person reading your web page. In fact, you can use whatever text you want, as long as you supply the computer-readable universal date with the datetime attribute, like this:
The party starts <time datetime="2014-03-21">March 21<sup>st
</sup></time>.
Which looks like this in the browser:
The party starts March 21st.
The <time> element has similar rules about times, which you supply in this format:
HH:MM
That’s a two-digit hour (using a 24-hour clock), followed by a two-digit number of minutes, like this:
Parties start every night at <time datetime="16:30">4:30 p.m.</tim
e>.
Finally, you can specify a time on a specific date by combining these two standards. Just put the date first, followed by a space, and then the time information.
The party starts <time datetime="2014-03-21 16:30">March 21<sup>
st</sup>
at 4:30 p.m.</time>.
NOTE
Originally, the <time> element required a slightly different format to combine date and time information. Instead of separating the two components with a space, you had to separate them with an uppercase T (for time), as in 2014-03-21T16:30. This format is still acceptable, so you may encounter it while perusing other people’s web pages.
When combining dates and times, you may choose to tack a time zone offset on the end. For example, New York is in the Eastern time zone, which is known as UTC-5:00. (You can figure out your time zone at http://en.wikipedia.org/wiki/Time_zone.) To indicate 4:30 p.m. in New York, you’d use this markup:
The party starts <time datetime="2014-03-21 16:30-05:00">March 21
<sup>st</sup>
at 4:30 p.m.</time>.
This way, the people reading your page get the time in the format they expect, while search bots and other bits of software get an unambiguous datetime value that they can process.
The <time> element also supports a pubdate attribute. You should use this if your date corresponds to the publication date of the current content (for example, the <article> in which the <time> is placed). Here’s an example:
Published on <time datetime="2014-03-21" pubdate>March 31, 2014</ti
me>.
NOTE
Because the <time> element is purely informational and doesn’t have any associated formatting, you can use it with any browser. There are no compatibility issues to worry about. But if you want to style the <time> element, you need the Internet Explorer workaround described on Browser Compatibility for the Semantic Elements.
JavaScript Calculations with <output>
HTML5 includes one semantic element that’s designed to make certain types of JavaScript-powered pages a bit clearer—the <output> element. It’s nothing more than a placeholder that your code can use to show a piece of calculated information.
For example, imagine you create a page like the one shown in Figure 3-1. This figure lets the user enter some information. A script then takes this information, performs a calculation, and displays the result just underneath.
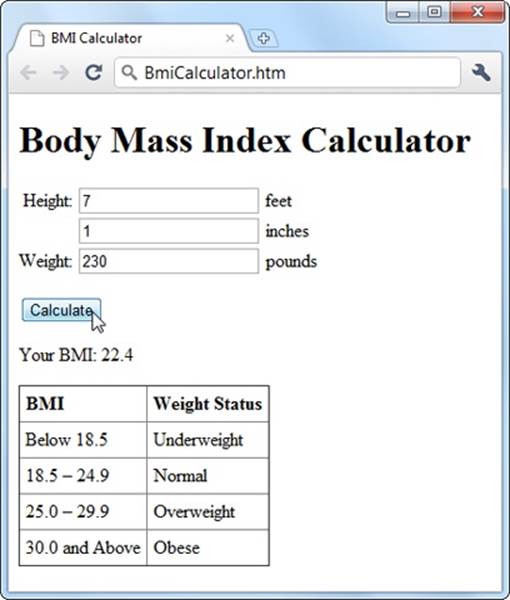
Figure 3-1. It’s a time-honored web design pattern. Type some numbers, click a button, and let the page give you the answer.
The usual way of dealing with this is to assign a unique ID to the placeholder, so the JavaScript code can find it when it performs the calculation. Typically, web developers use the <span> element, which works perfectly but doesn’t provide any specific meaning:
<p>Your BMI: <span id="result"></span></p>
Here’s the more meaningful version you’d use in HTML5:
<p>Your BMI: <output id="result"></output></p>
The actual JavaScript code doesn’t need any changes, because it looks up the element by name and doesn’t care about the element type:
var resultElement = document.getElementById("result");
NOTE
Before you use <output>, make sure you’ve included the Internet Explorer workaround described on Browser Compatibility for the Semantic Elements. Otherwise, the element won’t be accessible in JavaScript on old versions of Internet Explorer (IE 8 and earlier).
Often, this sort of page has its controls inside a <form> element. In this example, that’s the three text boxes where people can type in information:
<form action="#" id="bmiCalculator">
<label for="feet inches">Height:</label>
<input name="feet"> feet<br>
<input name="inches"> inches<br>
<label for="pounds">Weight:</label>
<input name="pounds"> pounds<br><br>
...
</form>
If you want to make your <output> element look even smarter, you can add the form attribute (which indicates the ID of the form that has the related controls) and the for attribute (which lists the IDs of the related controls, separated by spaces). Here’s an example:
<p>Your BMI: <output id="result" form="bmiCalculator"for="feet
inches pounds">
</output></p>
These attributes don’t actually do anything, other than convey information about where your <output> element gets its goods. But they will earn you some serious semantic brownie points. And if other people need to edit your page, these attributes could help them sort out how it works.
TIP
If you’re a bit hazy about forms, you’ll learn more in Chapter 4. If you know more about Esperanto than JavaScript, you can brush up on the programming language in Appendix B. And if you want to try this page out for yourself, you can find the complete example at http://prosetech.com/html5.
Highlighted Text with <mark>
The <mark> element represents a section of text that’s highlighted for reference. It’s particularly appropriate when you’re quoting someone else’s text and you want to bring attention to something:
<p>In 2009, Facebook made a bold grab to own everyone's content,
<em>forever</em>. This is the text they put in their terms of service:</p>
<blockquote>You hereby grant Facebook an <mark>irrevocable, perp
etual,
non-exclusive, transferable, fully paid, worldwide license</mark> (wit
h the
right to sublicense) to <mark>use, copy, publish
</mark>, stream, store,
retain, publicly perform or display, transmit, scan, reformat, modify, edit,
frame, translate, excerpt, adapt, create derivative works and distribute
(through multiple tiers), <mark>any user content you post
</mark>
...
</blockquote>
The text in a <mark> element gets the yellow background shown in Figure 3-2.
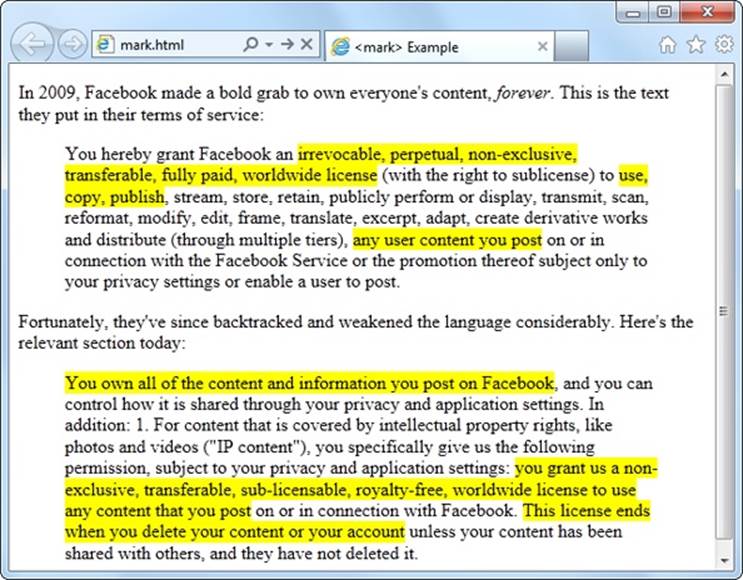
Figure 3-2. Here, the <mark> element highlights important details in a block of quoted text.
You can also use <mark> to flag important content or keywords, as search engines do when showing matching text in your search results, or to mark up document changes, in combination with <del> (for deleted text) and <ins> (for inserted text).
Truthfully, the <mark> element is a bit of a misfit. The HTML5 specification considers it to be a semantic element, but it plays a presentational role that’s arguably more important. By default, marked-up text is highlighted with a bright yellow background (Figure 3-2), although you can apply your own style sheet rules to use a different formatting effect.
TIP
The <mark> element isn’t really about formatting. After all, there are lots of ways to make text stand out in a web page. Instead, you should use <mark> (coupled with any CSS formatting you like) when it’s semantically appropriate. A good rule of thumb is to use <mark> to draw attention to ordinary text that has become important, either because of the discussion that frames it, or because of the task the user is performing.
Even if you stick with the default yellow-background formatting, you should add a style sheet fallback for browsers that don’t support HTML5. Here’s the sort of style rule you need:
mark {
background-color: yellow;
color: black;
}
You’ll also need the Internet Explorer workaround described on Browser Compatibility for the Semantic Elements to make the <mark> element style-able in old versions of IE.
Other Standards That Boost Semantics
At this point, it’s probably occurring to you that there are a lot of potential semantic elements that HTML doesn’t have. Sure, you can flag dates and highlighted text, but what about other common bits of information, like names, addresses, business listings, product descriptions, personal profiles, and so on? HTML5 deliberately doesn’t wade into this arena, because its creators didn’t want to bog the language down with dozens of specialized elements that would suit some people but leave others bored and unimpressed. To really get to the next level with semantics, you need to broaden your search beyond the core HTML5 language, and consider a few standards that can work with your web pages.
Semantically smart markup isn’t a new idea. In fact, way back when HTML5 was still just a fantasy in WHATWG editor Ian Hickson’s head, there were plenty of web developers clamoring for ways to make their markup more meaningful. Their goals weren’t always the same—some wanted to boost accessibility, some were planning to do data mining, and others just wanted to dial up the cool factor on their resumés. But none of them could find what they wanted in the standard HTML language which is why several new specifications sprung up to fill the gap.
In the following sections, you’ll learn about no fewer than four of these standards. First, you’ll get the scoop on ARIA, a standard that’s all about improving accessibility for screen readers. Then, you’ll take a peek at three competing approaches for describing different types of content, whether it’s contact details, addresses, business listings, or just about anything else you can fit between the tags of an HTML page.
ARIA (Accessible Rich Internet Applications)
ARIA is a developing standard that lets you supply extra information for screen readers through attributes on any HTML element. For example, ARIA introduces the role attribute, which indicates the purpose of a given element. For example, if you have a <div> that represents a header:
<div class="header">
You can announce that fact to screen readers by setting the ARIA role attribute to banner:
<div class="header" role="banner">
Of course, you learned last chapter that HTML5 also gives you a more meaningful way to mark up headers. So what you really should use is something like this:
<header role="banner">
This example demonstrates two important facts. First, ARIA requires you to use one of a short list of recommended role names. (For the full list, refer to the appropriate section of the specification at http://tinyurl.com/roles-aria.) Second, parts of ARIA overlap the new HTML5 semantic elements—which makes sense, because ARIA predates HTML5. But the overlap isn’t complete. For example, some role names duplicate HTML5 (like banner and article), while others go further (like toolbar and search).
ARIA also adds two attributes that work with HTML forms. The aria-required attribute in a text box indicates that the user needs to enter a value. The aria-invalid attribute in a text box indicates that the current value isn’t right. These attributes are helpful, because screen readers are likely to miss the visual cues that sighted users rely on, like an asterisk next to a missing field, or a flashing red error icon.
In order to apply ARIA properly, you need to learn the standard and spend some time reviewing your markup. Web developers are divided over whether it’s a worthwhile investment, given that the standard is still developing and that HTML5 provides some of the same benefits with less trouble. However, if you want to create a truly accessible website today, you need to use both, because newer screen readers support ARIA but not yet HTML5.
NOTE
For more information about ARIA (fully known as WAI-ARIA, because it was developed by the Web Accessibility Initiative group), you can read the specification at www.w3.org/TR/wai-aria.
RDFa (Resource Description Framework)
RDFa is a standard for embedding detailed metadata into your web documents using attributes. RDFa has a significant advantage: Unlike the other approaches discussed in this chapter, it’s a stable, settled standard. RDFa also has two significant drawbacks. First, RDFa was originally designed for XHTML, not HTML5. It’s a matter of debate how well the stricter, more elaborate RDFa syntax meshes with the more freewheeling philosophy of HTML5. Second, RDFa is complicated. Markup that’s augmented with RDFa metadata is significantly longer and more cumbersome than ordinary HTML. And because of its complexity, RDFa is also more likely to contain errors—three times more likely, according to a recent Google web page survey.
RDFa isn’t discussed in this chapter, although you will dig into its close HTML5 relative, microdata, on Microdata. But if you prefer to learn more about RDFa, you can get a solid introduction on Wikipedia at http://en.wikipedia.org/wiki/RDFa, or you can visit the Google Rich Snippets page described later (Google Rich Snippets), which has RDFa versions of all its examples.
Microformats
Microformats are a simple, streamlined approach to putting metadata in your pages. Microformats don’t attempt to be any sort of official standard. Instead, they’re a loose collection of agreed-upon conventions that let pages share structured information without requiring the complexities of something like RDFa. This approach has given microformats tremendous success, and a recent web survey found that when a page has some sort of rich metadata, it’s microformats 70 percent of the time.
Microformats work in an interesting way—they piggyback on the class attribute that’s usually used for styling. You mark up your data using certain standardized style names, depending on the type of data. Then, another program can read your markup, extract the data, and check the attributes to figure out what everything means.
For example, you can use the hCard microformat to represent the contact details for a person, company, organization, or place. The first step is to add a root element that has the right class name. For hCard, the class name is vcard. (Usually, the class name matches the name of the microformat. The name vcard was chosen for historical reasons, because hCards are based on a much older format called Versitcard.)
Here’s an example of a <div> that’s ready to hold contact details using the hCard microformat:
<div class="vcard">
</div>
Inside this root element, you supply the contact information. Each detail must be wrapped in a separate element and marked up with the correct class name, as defined by the microformat you’re using. For example, in an hCard you can use the fn class to flag a person’s full name and the urlclass for that person’s home page:
<div class="vcard">
<h3 class="fn">Mike Rowe</h3>
You can see Mike Rowe's website at
<a class="url" href="http://www.magicsemantics.com">www.magicsemanti
cs.com
</a>
</div>
When you use class names for a microformat, you don’t need to create matching styles in your style sheet. In the example above, that means that you don’t need to write style rules for the vcard, fn, or url classes. Instead, the class names are put to a different use—advertising your data as a nicely structured, meaningful chunk of content.
NOTE
Before you can mark up any data, you need to choose the microformat you want to use. There are only a few dozen microformats in widespread use, and most are still being tweaked and revised. You can see what’s available and read detailed usage information about each microformat at http://microformats.org/wiki. To learn more about hCard, surf straight tohttp://microformats.org/wiki/hCard.
Once you’ve worked your way around hCard, you’ll have no trouble understanding hCalendar, the world’s second-most-popular microformat. Using hCalendar, you can mark up appointments, meetings, holidays, product releases, store openings, and so on. Just wrap the event listing in an element with the class name vevent. Inside, you need at least two pieces of information: the start date (marked up with the dt-start class) and a description (marked up with the summary class). You can also choose from a variety of optional attributes described athttp://microformats.org/wiki/hCalendar, including an ending date or duration, a location, and a URL with more details. Here’s an example:
<div class="vevent">
<h2 class="summary">Web Developer Clam Bake</h2>
<p>I'm hosting a party!</p>
<p>It's
<span class="dtstart" title="2014-10-25 13:30">Tuesday, October 25,
1:30PM</span>
at the <span class="location">Deep Sea Hotel, San Francisco, CA
</span></p>
</div>
Based on the popularity of microformats, you might assume that the battle for the Semantic Web is settled. But not so fast—there are several caveats. First, the vast majority of pages have no rich semantic data at all. Second, most of the pages that have adopted microformats use them for just two purposes: contact information and event listings. So although microformats aren’t going anywhere soon, there’s still plenty of space for the competition. Third, the climate is beginning to shift to the more flexible but still lesser-known microdata specification. It seems increasingly likely that microformats were an interim stopping point on the way to the more sophisticated microdata standard, which is described in the next section.
Microdata
Microdata is a third take at solving the challenge of semantic markup. It began life as part of the HTML5 specification and later split into its own developing standard at http://dev.w3.org/html5/md. Microdata uses an approach that’s similar to RDFa’s, but simpler. Unlike microformats, microdata uses its own attributes and doesn’t risk colliding with style sheet rules (or confusing the heck out of other web developers). This design means microdata is more logical, as well as easier to adapt for your own custom languages. But it also comes at the cost of brevity—microdata-enriched markup can bloat up a bit more than microformat-enriched markup.
Recently, microdata received a big boost when Microsoft, Google, Yahoo, and Yandex (Russia’s largest search engine) teamed up to create a microdata-cataloguing site called http://schema.org. Here you’ll find examples of all sorts of different microdata formats, including Person and Event (which echo the popular hCard and hEvent microformats) and more specialized types for marking up businesses, restaurants, reviews, products, books, movies, recipes, TV shows, bus stops, tourist attractions, medical conditions, medications, and more. Right now, only search engines pay any attention to this information, but their traffic-driving, web-shaping clout is undeniable. (You’ll see how search engines use this sort of information starting on Google Rich Snippets.)
NOTE
It now seems possible that microdata just might catch on as the Goldilocks standard for metadata—a specification that’s more flexible than microformats but not quite as complex as RDFa.
To begin a microdata section, you add the itemscope and itemtype attributes to any element (although a <div> makes a logical container, if you don’t have one already). The itemscope attribute indicates that you’re starting a new chunk of semantic content. The itemtype attribute indicates the specific type of data you’re encoding:
<div itemscope itemtype="http://schema.org/Person">
</div>
To identify the data type, you use a predetermined, unique piece of text called an XML namespace. In this example, the XML namespace is http://schema.org/Person, which is a standardized microdata format for encoding contact details, as discussed in the box below.
UP TO SPEED: UNDERSTANDING MICRODATA NAMESPACES
Every microdata format needs a namespace. Technically, the namespace identifies the vocabulary your microdata uses. For example, the namespace http://schema.org/Person indicates that this section of markup uses the Person vocabulary. You can go cross-eyed exploring dozens of microdata vocabularies at http://schema.org (see Figure 3-3).
XML namespaces are often URLs. Sometimes, you can even find a description of the corresponding data type by typing the URL into your web browser (as you can with the http://schema.org/Person data format). However, XML namespaces don’t need to correlate to real web locations, and they don’t need to be URLs at all. It just depends on what the developer chose when creating the format. The advantage of a URL is that it can incorporate a domain name belonging to a person or organization. This way, the namespace is more likely to be unique—no one else will create a different data format that shares the same namespace name and confuses everyone.
If a namespace begins with http://schema.org, it’s an official vocabulary endorsed by the search engine dream team of Microsoft, Google, Yahoo, and Yandex. So if you use that vocabulary, you can be confident that the search engines of the world will understand what you’re doing. If a namespace begins with http://data-vocabulary.org, it’s using a slightly older set of microdata vocabularies. Most search engines will still understand your markup, but it’s better to stick with the times and find an equivalent vocabulary at http://schema.org.
Once you have the container element, you’re ready to move on to the next step. Inside your container element, you use the itemprop attribute to capture the important bits of information. The basic approach is the same as it was for microformats—you use a recognized itemprop name, and other pieces of software can grab the information from the associated elements.
Here’s a microdata-fied version of the hCard microformat you saw earlier:
<div itemscope itemtype="http://schema.org/Person">
<h3 itemprop="name">Mike Rowe</h3>
You can see Mike Rowe's website at
<a itemprop="url" href="http://www.magicsemantics.com">www.magicsema
ntics.
com</a>
</div>
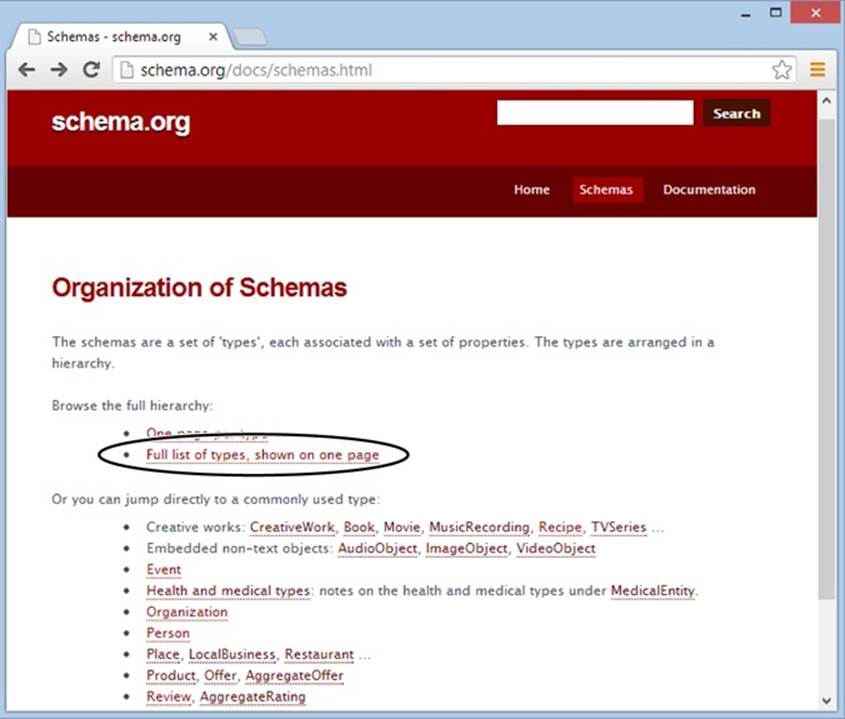
Figure 3-3. To find a microdata vocabulary that suits your information, there are few better starting points than the http://schema.org/docs/schemas.html page. Click a link to jump straight to the definition of a common vocabulary, like Person, Organization, or Event. Or, browse through the sprawling catalog by clicking the “Full list of types” link.
The most significant difference between microdata and microformats is that microdata uses the itemprop attribute to mark up elements instead of the class attribute.
NOTE
Since microdata uses its own itemscope, itemtype, and itemprop attributes, rather than the class attribute, there’s no chance you’ll confuse your semantic markup with your style sheet formatting.
There are plenty of additional details you can mark up using the Person vocabulary. Common choices include postal and email address, telephone number, birth date, photo, job title, organization name, gender, nationality, and so on. For the full list of possible properties, refer tohttp://schema.org/Person.
NOTE
The three standards for rich semantic data—RDFa, microdata, and microformats—all share broad similarities. They aren’t quite compatible, but the markup is similar enough that the skills you pick up learning one system are mostly applicable to the others.
A Practical Example: Retrofitting an “About Me” Page
So far, you’ve learned about the basic structure of two semantic staples: microformats and microdata. Armed with this knowledge, you could look up a new microformat (from http://microformats.org) or microdata vocabulary (from http://schema.org) and start writing semantically rich markup.
However, life doesn’t usually unfold this way—at least not for most web developers. Instead, you’ll often need to take a web page that already has all the data it needs and retrofit the page with semantic data. This task is fairly easy if you keep a few points in mind:
§ Often, you’ll have important data mixed in with content that you want to ignore. In this case, you can add new elements around each piece of information you want to capture. Use a <div> if you want a block-level element or a <span> if you want to get a piece of inline content.
§ Don’t worry about the order of your information. As long as you use the right class names (for a microformat) or property names (for microdata), you can arrange your markup however you wish.
§ If you’re supplying a picture, you can use the <img> element. If you’re supplying a link, you can use the <a> element. The rest of the time, you’ll usually be marking up ordinary text.
Here’s a typical example. Imagine you start with an “About Me” page (Figure 3-4) that has content like this:
<h1>About Me</h1>
<img src="face.jpg" alt="Mike's Face">
<p>This website is the work of <b>Mike Rowe Formatte</b>.
His friends know him as <b>The Big M</b>.</p>
<p>You can contact him where he works, at
The Magic Semantic Company (phone
641-545-0234 and ask for Mike) or email mike-f@magicsemantics.com.</p>
<p>Or, visit Mike on the job at:<br>
42 Jordan Gordon Street, 6th Floor<br>
San Francisco, CA 94105<br>
USA<br>
<a href="http://www.magicsemantics.com">www.magicsemantics.com</a>
</p>
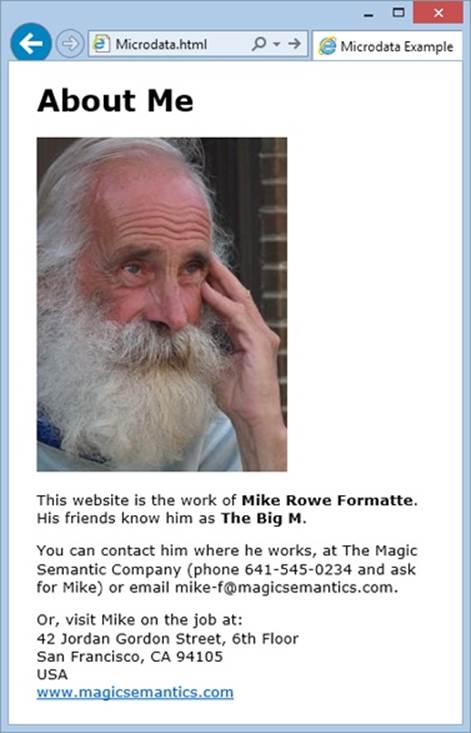
Figure 3-4. This “About Me” page includes the website author’s contact details, before adding any microdata.
Clearly, this is a good fit for the familiar Person vocabulary (detailed at http://schema.org/Person). Here’s a first attempt at weaving microdata around the key details in the “About Me” page. The newly inserted bits of microdata are emphasized with bold lettering:
<h1>About Me</h1>
<div itemscope itemtype="http://schema.org/Person">
<img itemprop="image" src="face.jpg" alt="Mike's Face">
<p>This website is the work of
<span itemprop="jobTitle" style="display:none">Web Developer
</span>
<b itemprop="name">Mike Rowe Formatte</b>.
His friends know him as <b itemprop="additionalname">The Big M
</b>.</p>
<p>You can contact him where he works, at
The Magic Semantic Company</span> (phone
<span itemprop="telephone">641-545-0234</span> and ask for Mik
e)
or email <span itemprop="email">mike-f@magicsemantics.com
</span>.</p>
<p>Or, visit Mike on the job at:<br>
42 Jordan Gordon Street, 6th Floor<br>
San Francisco, CA 94105<br>
USA<br>
<a itemprop="url" href="http://www.magicsemantics.com">www.magicsema
ntics.
com</a>
</p>
</div>
This example uses a few handy techniques:
§ It adds new <span> elements to wrap the bits of content you need for the microdata.
§ It adds the itemprop attribute to existing elements, where doing so makes sense. For example, the <b> element wraps the name information, so there’s no need to add an additional <span>. (Of course, you could do so. For example, you might prefer to write something like <b><span itemprop=“name”>Mike Rowe Formatte</span></b>.
§ It uses a hidden <span> to indicate the person’s job title. (The text is hidden with an inline style rule that sets the display property to none, as you can see in the markup above.) This technique lets you hide redundant information, while still preserving it for search engines and other tools. That said, the content-hiding technique is a bit controversial, because some tools (like Google) ignore information that isn’t made visible to the web page viewer.
It’s common for microdata to have a nested structure that puts one microdata vocabulary inside another. For example, in the Person vocabulary you might have a set of address information nestled inside the personal details. Technically, the address information all belongs to a separate vocabulary, called PostalAddress.
To mark up the address information, you need to add a new <div> or <span> element that uses an itemprop, itemscope, or itemtype attribute. The itemprop attribute has the property name, the itemscope attribute indicates that you’re starting a new vocabulary to supply the property data, and the itemtype property identifies the vocabulary by its XML namespace (in this case that’s http://schema.org/PostalAddress). Here’s how it all comes together:
<div itemscope itemtype="http://schema.org/Person">
<img itemprop="image" src="face.jpg" alt="Mike's Face">
<p>This website is the work of
...
<p>Or, visit Mike on the job at:<br>
<span itemprop="address" itemscope
itemtype="http://schema.org/PostalAddress">
...
</span>
</div>
You can then fill in the address details inside the new section:
<div itemscope itemtype="http://schema.org/Person">
<img itemprop="image" src="face.jpg" alt="Mike's Face">
<p>This website is the work of
...
<p>Or, visit Mike on the job at:<br>
<span itemprop="address" itemscope
itemtype="http://schema.org/PostalAddress">
<span itemprop="streetAddress">42 Jordan Gordon Street,
6th Floor</span><br>
<span itemprop="addressLocality">San Francisco</span>,
<span itemprop="addressRegion">CA</span>
<span itemprop="postalCode">94105</span><br>
<span itemprop="addressCountry">USA</span><br>
</span>
...
</div>
This all makes perfect sense, but you might be wondering how you know when to define a new microdata section inside your first microdata section. Fortunately, the reference page on http://schema.org makes it clear (Figure 3-5).
A similar microdata-within-microdata trick takes place when you mark up the company name. Here, you need to set the person’s affiliation property using the Organization vocabulary:
<p>You can contact him where he works, at
<span itemprop="affiliation" itemscope
itemtype="http://schema.org/Organization">
<span itemprop="name">The Magic Semantic Company</span>
</span>
TIP
If you don’t fancy filling in all the itemtypes and itemprops yourself, there are online tools that you can use to generate properly formatted microdata-enriched markup. Two examples are http://schema-creator.org and www.microdatagenerator.com. With both sites, the idea is the same—you pick your vocabulary, type your data into the supplied text boxes, and then copy the finished markup.
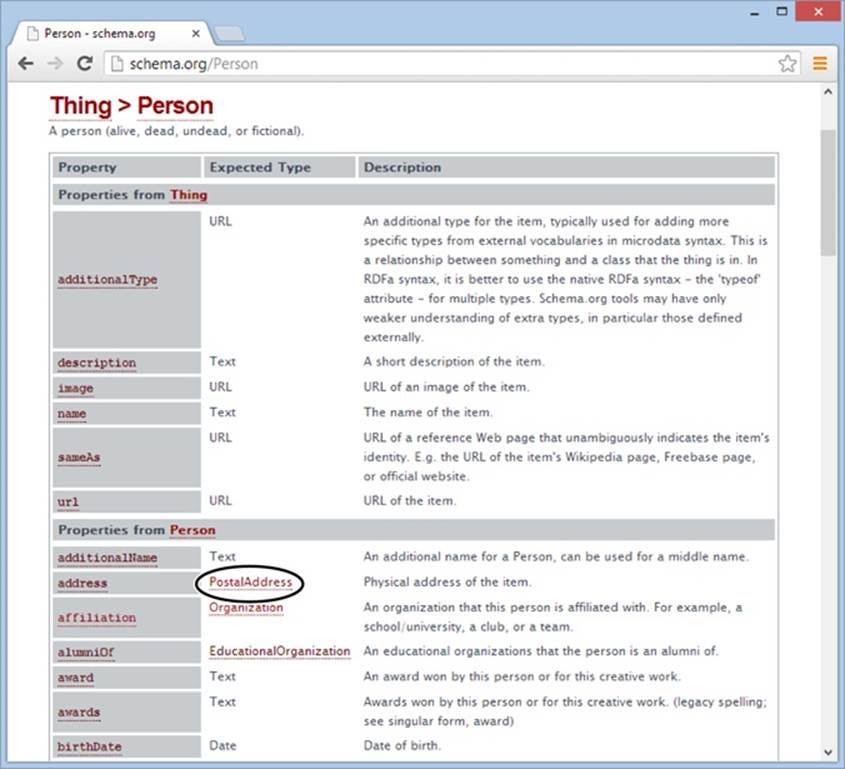
Figure 3-5. The Person vocabulary accepts a long list of properties (only some of which are shown here). Most properties take ordinary text, numbers, or date values. But some (like the address property, shown here) use their own vocabularies (like PostalAddress). To learn more about one of these subsections, just click the link.
Extracting Semantic Data in Your Browser
Now that you’ve gone to all this trouble, it’s time to see what sort of benefits you can reap. Although no browser recognizes microformats on its own (at least at the time of this writing), there are a variety of plug-ins and scripts that can give browsers these capabilities. And it’s not difficult to imagine useful scenarios. For example, a browser could detect the contact information on a page, list it in a side panel, and give you commands that would let you add a person to your address book as quickly as you bookmark a page. A similar trick could detect event information and let you add it to your calendar in a single click, or find locations and automatically plot them on a map.
Right now, no plug-in goes that far. However, some hardcore web developers have created a variety of JavaScript routines that can search for microformats or metadata, display it in pop-up boxes, or use it in another task. (One example is the JavaScript-powered Microdata Tool athttp://krofdrakula.github.io/microdata-tool.) And some browsers have plug-ins that can spot different types of metadata on a web page (Figure 3-6).
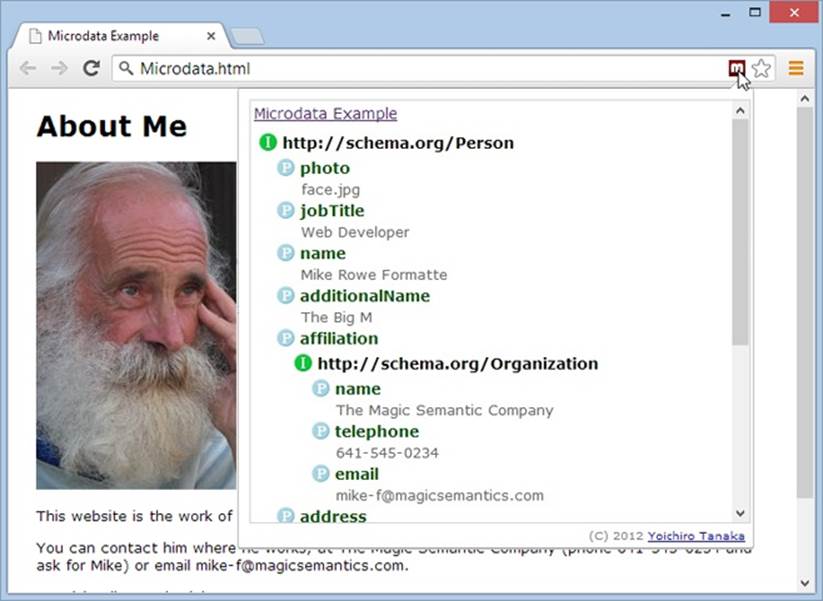
Figure 3-6. The Semantic Inspector is a Chrome extension that extracts all the microdata on the current page. Click its toolbar button, and you’ll get the semantic skinny. Here, the Semantic Inspector examines the “About Me” page.
The best bet for a microdata future may be for mainstream browsers to incorporate direct support, just like Internet Explorer and Firefox do for feeds. A feed is a special sort of markup document that provides up-to-date content, like a list of recently published news articles. For example, if you visit a blog with Firefox, it automatically detects the blog’s RSS feed and lets you create a “live” bookmark that fetches new content automatically. This is exactly the sort of value-added feature that could make microformats really useful.
How Search Engines Use Metadata
Stuffing your page with semantic details is a great way to win yourself some serious web-nerd cred. But even hardcore web developers need some sort of payoff to make the extra work (and the messier markup) worthwhile. It’s nice to think about a world of super-smart, semantically aware browsers, but right now the cold, hard reality is that web surfers have little more than a few experimental and little-known browser plug-ins.
Fortunately, there is another reason to embrace rich semantics: search engine optimization (SEO). SEO is the art of making your website more visible in a search engine—in other words, making it turn up more often in a results page, helping it get a better ranking for certain keywords, and making it more likely to entice a visitor to click through to your site. Good metadata can help with the last part of this equation. All you do is put the right semantic data on your page, and a search engine like Google will use it to present a fancier search listing, which can help your website stand out from the crowd.
Google Rich Snippets
Nowadays, most search engines can understand the metadata in the pages they catalog. In the rest of this chapter, you’ll focus on what Google does with the metadata it finds. There are two reasons to go Google-centric. First, Google is the Earth’s most popular search engine, with a commanding two-thirds share of worldwide web searches. Second, Google has been using and promoting metadata for years. The way it uses metadata today is the way other search engines will do so tomorrow.
Google uses the term rich snippets to lump together RDFa, microformats, and microdata. As you’ve already learned, these approaches share significant similarities and address the same problem. Google understands them all and attempts to treat them all equally, so it doesn’t matter which approach you favor. (The following examples use microdata, with the aim of helping you get onboard with HTML5’s newest semantic standard.)
To learn more about the metadata that Google supports, you can view Google’s documentation at http://tinyurl.com/GoogleRichSnippets. Not only does it include a decent overview of RDFa, microformats, and microdata, it also shows many different snippet examples (like contactinformation, events, products, reviews, recipes, and so on). Best of all, Google includes an RDFa, microformat, and microdata version of each example, which can help you translate your semantic skills from one standard to another, if the need arises.
Enhanced Search Results
To see how Google’s rich snippets feature works, you can use Google’s Structured Data Testing Tool. This tool checks a page you supply, shows you the semantic data that Google can extract from the page, and then shows you how Google might use that information to customize the way it presents that page in someone’s search results.
NOTE
The Structured Data Testing Tool is useful for two reasons. First, it helps validate your semantic markup. If Google isn’t able to extract all the information you put in the page, or if some of it is assigned to the wrong property, then you know you’ve done something wrong. Second, it shows you how the semantic data can change your page’s appearance in Google’s search results.
To use the Structured Data Testing Tool, follow these simple steps:
1. Go to www.google.com/webmasters/tools/richsnippets.
This simple page includes a single text box (see Figure 3-7).
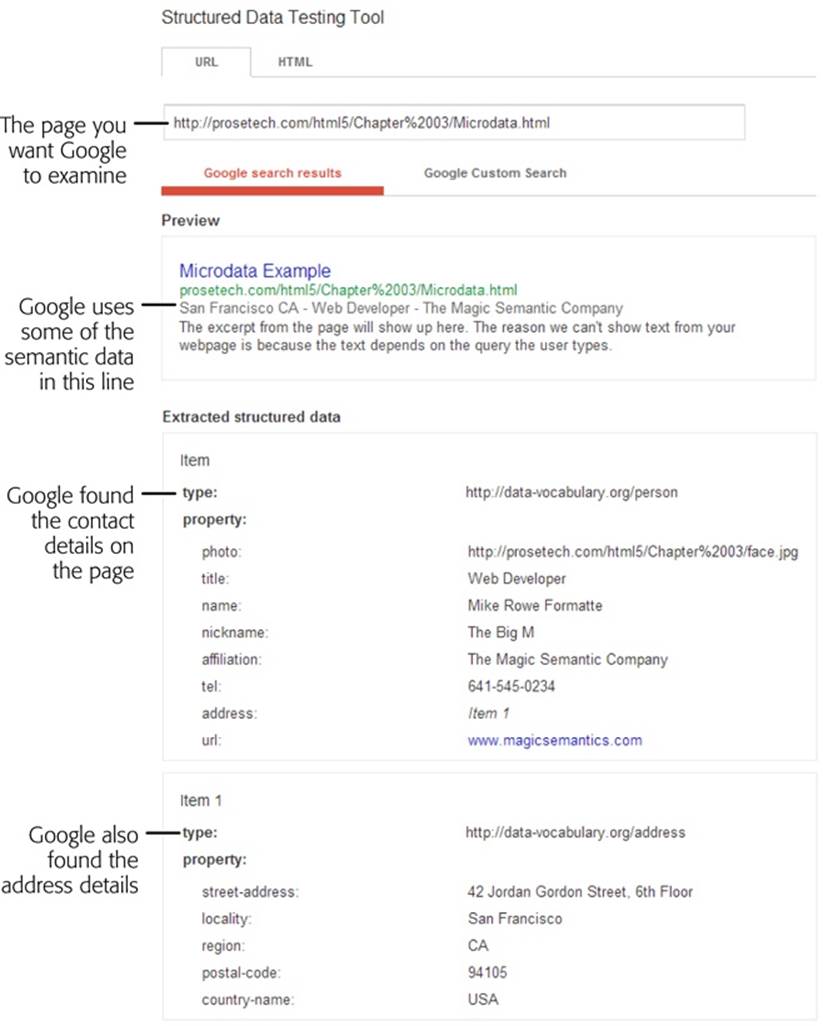
Figure 3-7. Here, Google found the person contact details and address information (from the microdata example shown on page 89). It used this information to add a gray byline under the page title with some of the personal details.
2. If you want to paste in your markup, click the HTML tab.
There are two ways to use the Structured Data Testing Tool, represented by the two tabs on the page.
o The URL tab asks Google to analyze a page that’s already online. You simply put in its full web address.
o The HTML tab lets you paste in the chunk of markup you want to analyze (the complete page isn’t necessary) into a large text box. If you haven’t yet uploaded your work, this is the most convenient approach.
3. Type in your URL or paste in your markup. Then click Preview.
You can now review the results (see Figure 3-7). There are two important sections to review. The “Google search preview” section shows how the page may appear in a search result. The “Extracted rich snippet data from the page” shows all the raw semantic data that Google was able to pull out of your markup.
TIP
If you see the dreaded “Insufficient data to generate the preview” error message, there are three possible causes. First, your markup may be faulty. Review the raw data that Google extracted, and make sure it found everything you put there. If you don’t find a problem here, it’s possible that you’re trying to use a data type that Google doesn’t yet support or you haven’t included the bare minimum set of properties that Google needs. To figure out what the problem is, compare your markup with one of Google’s examples at http://tinyurl.com/GoogleRichSnippets.
The method Google uses to emphasize contact details (Figure 3-7) is fairly restrained. However, contact details are only one of the rich data types that Google recognizes. Earlier in this chapter (Microdata), you saw how to define events using microformats. Add a list of events to your page, and Google just might include them at the bottom of your search result, as shown in Figure 3-8.
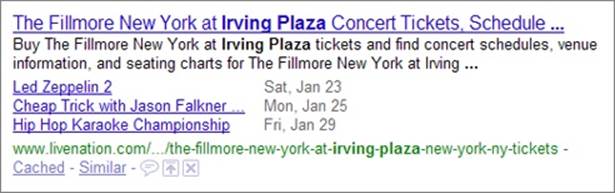
Figure 3-8. This example page has three events. If you supply a URL with your event listing (as done here), Google turns each event listing into a clickable link.
Google is also interested in business listings (which are treated in much the same way as personal contact details), recipes (which you’ll take a peek at in the next section), and reviews (which you’ll consider next).
The following example shows the markup you need to turn some review text into recognizable review microdata. The data standard is defined at http://schema.org/Review. Key properties include itemReviewed (in this case, a restaurant), author (the person making the review) andreviewBody (the full account of the review). You can also supply a one-sentence overview (description), the date when the review was made (datePublished, which supports HTML5’s <time> element), and a score that’s typically made on a scale from 0 to 5 (reviewRating).
Here’s an example, with all the microdata details highlighted:
<div itemscope itemtype="http://schema.org/Review">
<p itemprop="description">Pretty bad, and then the Health Departmen
t showed
up.
</p>
<div itemprop="itemReviewed" itemscope itemtype="http://schema.org/Thing">
<span itemprop="name">Jan's Pizza House</span>
</div>
<div>
<span itemprop="author" itemscope itemtype="http://schema.org/Person">
Reviewed by: <span itemprop="name">Jared Elberadi</span>
</span>
on <time itemprop="datePublished" datetime="2014-06-26">January 26</time>
</div>
<div itemprop="reviewBody">I had an urge to mack on some pizza, an
d this
place was the only joint around. It looked like a bit of a dive, but I went
in hoping to find an undiscovered gem. Instead, I watched a Health
Department inspector closing the place down. Verdict? I didn't get to
finish my pizza, and the inspector recommends a Hep-C shot.</div>
<div itemprop="reviewRating" itemscope itemtype="http://schema.org/
Rating">
Rating:<span itemprop="ratingValue">1.5</span></div>
</div>
If you put this microdata-formatted review in a web page, Google gives it truly special treatment (Figure 3-9).
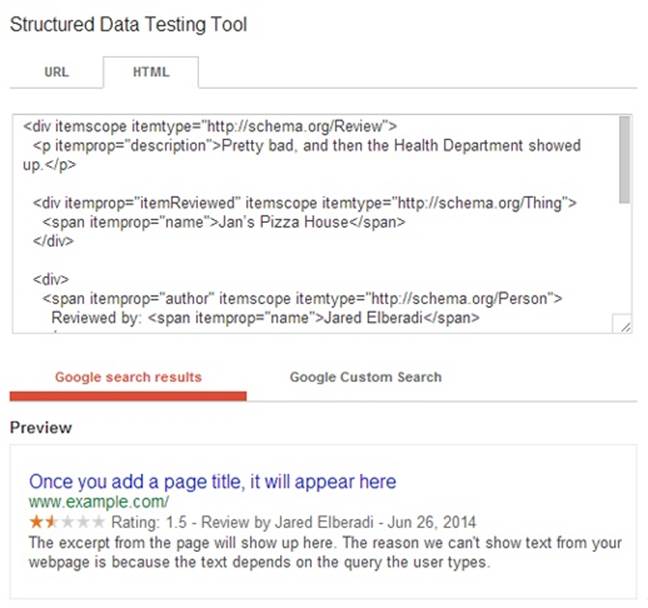
Figure 3-9. Reviews really stand out in search results. The ranking stars are eye-catching and attract immediate interest.
Keen eyes will notice that there are actually four microdata formats at work in this single review. There’s one format for the review itself (http://schema.org/Review), one for the thing you’re reviewing (http://schema.org/Thing), one for the person doing the reviewing (http://schema.org/Person), and one for the rating system (http://schema.org/Rating). You can use these standards to supply even more details with your review. For example, you can add the menu of the restaurant, the email address of the reviewer, or the minimum and maximum values of a custom rating system.
The http://schema.org/Thing data format, which is used by the itemReviewed property, is a bit different from the others. At first glance, a vocabulary for “things” sounds rather vague. This design is intentional—it gives you the flexibility to write a review about virtually anything, because Thing is a basic vocabulary upon which many more specialized categories are based. These include products, places, events, books, music recordings, and much more (see http://schema.org/docs/full.html for the full list of types). In this example, you could easily switch out the Thing vocabulary for the more specialized Restaurant vocabulary (defined at http://schema.org/Restaurant). However, as this page doesn’t include any extra information about the restaurant, there’s no need to take this step.
NOTE
You can take a similar look at how Bing (Microsoft’s search engine) deals with metadata using the Bing Markup Validator at www.bing.com/toolbox/markup-validator. And if you speak fluent Russian, why not take a look at Yandex’s microformat validator? It’s available at http://webmaster.yandex.ru/microtest.xml.
The Recipe Search Engine
Enhanced search listings are a neat trick, and they can drive new traffic into your website. But still, it’s hard not to want something even more impressive to justify your newfound semantic skills. Happily, the geniuses at Google are busy dreaming up the future of search, and it has semantics all over it.
One brilliant idea is to use the semantic information not to tweak how an item is presented in a search, but to allow smarter search filtering. For example, if people marked up their résumés using RDFa, microformats, or microdata, Google could provide a specialized résumé searching feature that looks at this data, considering résumés from every popular career website and ignoring every other type of web content. This résumé search engine could also provide enhanced filtering options—for example, allowing companies to find candidates who have specific accreditations or have worked for specific companies.
TROUBLESHOOTING MOMENT: WHAT TO DO WHEN GOOGLE IGNORES YOUR SEMANTIC DATA
Just because Google can show a semantically enriched page in a certain special way doesn’t mean it will. Google uses its own set of semi-secret rules to determine whether the semantic information is valuable to the searcher. But here are some surefire ways to make sure Google ignores your data:
§ The semantic data doesn’t represent the main content. In other words, if you slap your contact details on a page about fly-fishing, Google isn’t likely to use your contact information. (After all, the odds are that when web searchers find this page, they’re searching for something to do with fishing, and it doesn’t make any sense to see a byline with your address and business underneath.) On the other hand, if you put your contact details on your résumé page, they’re more likely to be used.
§ The semantic data is hidden. Google won’t use any content that’s hidden via CSS.
§ Your website uses just a little semantic data. If your site has relatively few pages that use semantic data, Google might inadvertently overlook the ones that do.
Avoid these mistakes and you stand a good chance of getting an enhanced listing.
Right now, Google doesn’t have a resumé search engine. However, Google has experimented with job search technology for veterans (http://tinyurl.com/vetjobsearch) and product searches (www.google.ca/merchants). But one of its more mature metadata-powered search services is a tool called Recipe View that can hunt through millions of recipes.
By now, you can probably guess what recipe data looks like when it’s marked up with microdata or a microformat. The entire recipe sits inside a container that uses the Recipe data format (that’s http://data-vocabulary.org/Recipe). There are separate properties for the recipe name, the author, and a photo. You can also add a one-sentence summary and a ranking from user reviews.
Here’s a portion of recipe markup:
<div itemscope itemtype="http://data-vocabulary.org/Recipe">
<h1 itemprop="name">Elegant Tomato Soup</h1>
<img itemprop="photo" src="soup.jpg" alt="A bowl of tomato soup">
<p>By <span itemprop="author">Michael Chiarello</span>
</p>
<p itemprop="summary">Roasted tomatoes are the key to developing th
e rich
flavor of this tomato soup.</p>
...
After this, you can include key details about the recipe, including its prep time, cook time, and yield. You can also add a nested section for nutritional information (with details about serving size, calories, fat, and so on):
...
<p>Prep time: <time itemprop="prepTime" datetime="PT30M">30 mi
n</time></p>
<p>Cook time: <time itemprop="cookTime" datetime="PT1H">40 mi
n</time></p>
<p>Yield: <span itemprop="yield">4 servings</span>
</p>
<div itemprop="nutrition" itemscope
itemtype="http://data-vocabulary.org/Nutrition">
Serving size: <span itemprop="servingSize">1 large bowl
</span>
Calories per serving: <span itemprop="calories">250</span>
Fat per serving: <span itemprop="fat">3g</span>
</div>
...
NOTE
The prepTime and cookTime properties are meant to represent a duration of time, not a single instant in time, and so they can’t use the same format as the HTML5 <time> element. Instead, they use an ISO format that’s detailed at http://tinyurl.com/ISOdurations.
After this is the recipe’s ingredient list. Each ingredient is a separate nested section, which typically includes information like the ingredient name and quantity:
...
<ul>
<li itemprop="ingredient" itemscope
itemtype="http://data-vocabulary.org/RecipeIngredient">
<span itemprop="amount">1</span>
<span itemprop="name">yellow onion</span> (diced)
</li>
<li itemprop="ingredient" itemscope
itemtype="http://data-vocabulary.org/RecipeIngredient">
<span itemprop="amount">14-ounce can</span>
<span itemprop="name">diced tomatoes</span>
</li>
...
</ul>
...
Writing this part of the markup is tedious. But don’t stop yet—the payoff is just ahead.
Finally, the directions are a series of paragraphs or a list of steps. They’re wrapped up in a single property, like this:
...
<div itemprop="instructions">
<ol>
<li>Preheat oven to 450 degrees F.</li>
<li>Strain the chopped canned tomatoes, reserving the juices.</li>
...
</div>
...
</div>
For a full recipe example, see http://tinyurl.com/RichSnippetsRecipe.
NOTE
Recipes tend to be long and fairly detailed, so marking them up is a long and involved project. This is a clear case where a good authoring tool could make a dramatic difference. Ideally, this tool would let web authors enter the recipe details in the text boxes of a nicely arranged window. It would then generate semantically correct markup that you could place in your web page.
Once Google indexes your marked-up recipe page, it will make that recipe available through the Recipe View search feature. Here’s how to try out Recipe View:
1. Surf to www.google.com/landing/recipes.
You arrive at the Recipe View feature homepage. It includes plenty of information about how Recipe View works, including a video that shows a recipe search in action.
2. Click the “Try Google with Recipe View” button.
This button takes you to the familiar Google search page. However, there’s something subtly different. Under the search box, the Recipes tab is highlighted in red, which indicates that you’re performing a recipe search.
3. Type a recipe name in the search box and click the search button.
Google starts you out with a search for chicken pasta, but you can do better.
4. Click the “Search tools” button (which appears under the right side of the search box).
Because Google can understand the structure of every recipe, it can include smarter filtering options. When you click “Search tools,” Google calls up three recipe-specific filtering features, which appear in drop-down lists, just above the search results (see Figure 3-10).
o Ingredients lets you choose to see only the recipes that include or omit certain ingredients. You choose by clicking a tiny Yes or No checkbox next to the corresponding ingredient. (To create the ingredient list, Google grabs the most commonly used ingredients from the search results for your search.)
o Any cook time lets you pinpoint fast recipes—for example, ones that take less than an hour or less than 10 minutes (raw chicken alert).
o Any calories lets you filter out recipes that come in under a specific calorie-per-portion threshold, which is handy for dieters.
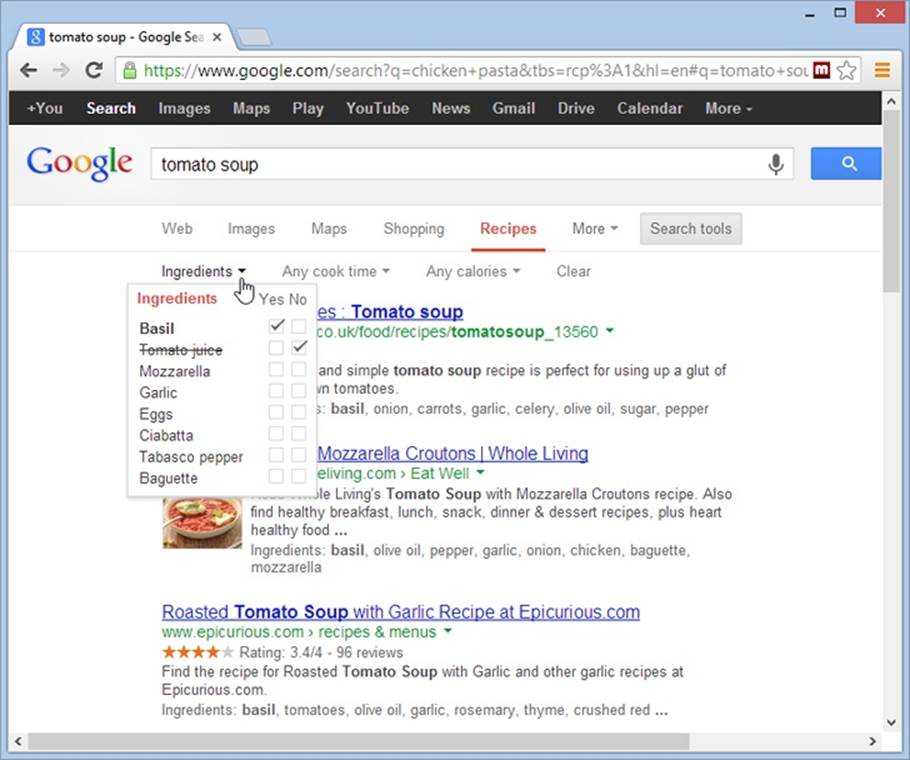
Figure 3-10. After you perform a recipe search, Google lets you filter the results based on some of the metadata that it found in the matching recipes. Here, a search hunts for a tomato soup recipe that’s heavy on the basil but avoids tomato juice.
The semantic data you’ve learned about in this chapter gives web surfers a powerful information-hunting tool—and a more effective way to find your web pages.
All materials on the site are licensed Creative Commons Attribution-Sharealike 3.0 Unported CC BY-SA 3.0 & GNU Free Documentation License (GFDL)
If you are the copyright holder of any material contained on our site and intend to remove it, please contact our site administrator for approval.
© 2016-2026 All site design rights belong to S.Y.A.