HTML5: The Missing Manual Matthew MacDonald (2013)
Part 2. Video, Graphics, and Glitz
Chapter 5, Audio and Video
Chapter 6, Fancy Fonts and Effects with CSS3
Chapter 7, Responsive Web Design with CSS3
Chapter 8, Basic Drawing with the Canvas
Chapter 9, Advanced Canvas: Interactivity and Animation
Chapter 5. Audio and Video
There was a time when the Internet was primarily a way to share academic research. Then things changed and the Web grew into a news and commerce powerhouse. Today the Internet’s state-of-the-art networking technology is used less for physics calculations and more for spreading viral videos of piano-playing kittens across the planet. And network colossus Cisco reports that the trend isn’t slowing down, estimating that a staggering 80 percent of all Internet traffic will be video by 2017.
Amazingly, this monumental change happened despite the fact that—up until now—the HTML language had no built-in support for video or audio. Instead, Web surfers of the recent past relied on the Flash plug-in, which worked for most people, most of the time. But Flash has a few key gaps, including the fact that Apple devices (like iPhones and iPads) refuse to support it.
HTML5 solves these problems by adding the <audio> and <video> elements that HTML has been missing all these years. However, the transition to HTML5 audio and video has been far from seamless. Browser makers spent a few years locked in a heated name-calling, finger-pointing format war. The good news today is that much of the dust has settled, and HTML5 audio and video have become good choices for even the most cautious web developer.
The Evolution of Web Video
Without HTML5, you have a couple of ways to add video to a web page. One old-fashioned approach is to shoehorn it into a page with the <embed> element. The browser then creates a video window that uses Windows Media Player, Apple QuickTime, or some other video player, and places it on the page.
The key problem with this technique is that it puts you in a desolate no-man’s-land of browser support. You have no way to control playback, you may not be able to buffer the video to prevent long playback delays, and you have no way of knowing whether your video file will be playable at all on different browsers or operating systems.
The second approach is to use a browser plug-in—like Microsoft’s relative newcomer, Silverlight, or the overwhelming favorite, Adobe Flash. Up until recently, Flash had the problem of browser support solved cold. After all, Flash video works everywhere the Flash plug-in is installed, and currently that’s on more than 99 percent of Internet-connected computers. Flash also gives you nearly unlimited control over the way playback works. For example, you can use someone else’s prebuilt Flash video player for convenience, or you can design your own and customize every last glowy button.
But the Flash approach isn’t perfect. To get Flash video into a web page, you need to throw down some seriously ugly markup that uses the <object> and <embed> elements. You need to encode your video files appropriately, and you may also need to buy the high-priced Flash developer software and learn to use it, and the learning curve can be steep. But the worst problem is Apple’s mobile devices—the iPhone and iPad. They refuse to tolerate Flash at all, slapping blank boxes over the web page regions that use it.
NOTE
Plug-ins also have a reputation for occasional unreliability. That’s because of the way they work. For example, when you visit a page that uses Flash, the browser lets the Flash plug-in take control of a rectangular box somewhere on the web page. Most of the time, this hands-off approach works well, but minor bugs or unusual system configurations can lead to unexpected interactions and glitches, like suddenly garbled video or pages that suck up huge amounts of computer memory and slow your web surfing down to a crawl.
Still, if you watch video on the Web today, and you aren’t using an iPhone or iPad, odds are that it’s wrapped in a Flash mini-application. If you’re not sure, try right-clicking the video player. If the menu that pops up includes a command like “About Flash Player 11,” then you know you’re dealing with the ubiquitous Flash plug-in. And even when you move to HTML5, you’ll probably still need a Flash-powered fallback for browsers that aren’t quite there yet, like Internet Explorer 8.
NOTE
YouTube provides a trial HTML5 video player at www.youtube.com/html5. Everywhere else, YouTube sticks exclusively with Flash. The exception is if you visit YouTube using an iPhone or iPad, in which case YouTube is smart enough to switch to properly supported HTML5 video automatically.
Introducing HTML5 Audio and Video
A simple idea underpins HTML5’s audio and video support. Just as you can add images to a web page with the <img> element, you should be able to insert sound with an <audio> element and video with a <video> element. Logically enough, HTML5 adds both.
UP TO SPEED: TURN BACK NOW IF…
Unfortunately, some things are beyond HTML5’s new audio and video capabilities. If you want to perform any of these tricks, you’ll need to scramble back to Flash (at least for now):
§ Licensed content. HTML5 video files don’t use any sort of copy protection system. In fact, folks can download HTML5 videos as easily as downloading pictures—with a simple right-click of the mouse. That said, digital rights management features are currently under development and slated for inclusion in HTML 5.1.
§ Video or audio recording. HTML5 has no way to stream audio or video from your computer to another computer. So if you want to build a web chat program that uses the microphones and webcams of your visitors, stick with Flash. The creators of HTML5 are experimenting with a <device> element that might serve the same purpose, but for now there’s no HTML-only solution, in any browser.
§ Adaptive video streaming. Advanced, video-heavy websites like YouTube need fine-grained control over video streaming and buffering. They need to provide videos in different resolutions, stream live events, and adjust the video quality to fit the bandwidth of the visitor’s Internet connection. Until HTML5 can provide these features, video-sharing sites may add HTML5 support, but they won’t completely switch from Flash.
§ Low-latency, high-performance audio. Some applications need audio to start with no delay or they need to play multiple audio clips in perfect unison. Examples include a virtual synthesizer, music visualizer, or a real-time game with plenty of overlapping sound effects. And while browser makers are hard at work improving HTML5’s audio performance, it still can’t live up to these demands.
§ Dynamically created or edited audio. What if you could not just play recorded audio, but also analyze audio information, modify it, or generate it in real time? New specifications, like the experimental Web Audio API (http://tinyurl.com/web-audio-API), are competing to add on these sorts of features to HTML5 audio, but they aren’t here yet.
Making Some Noise with <audio>
Here’s an example of the <audio> element at its absolute simplest:
<p>Hear us rock out with our new song,
<cite>Death to Rubber Duckies</cite>:</p>
<audio src="rubberduckies.mp3" controls></audio>
The src attribute provides the file name of the audio file you want to play. The controls attribute tells the browser to include a basic set of playback controls. Each browser has a slightly different version of these controls, but they always serve the same purpose—to let the user start and stop playback, jump to a new position, and change the volume (Figure 5-1).
NOTE
The <audio> and <video> elements must have both a start and an end tag. You can’t use empty element syntax, like <audio />.
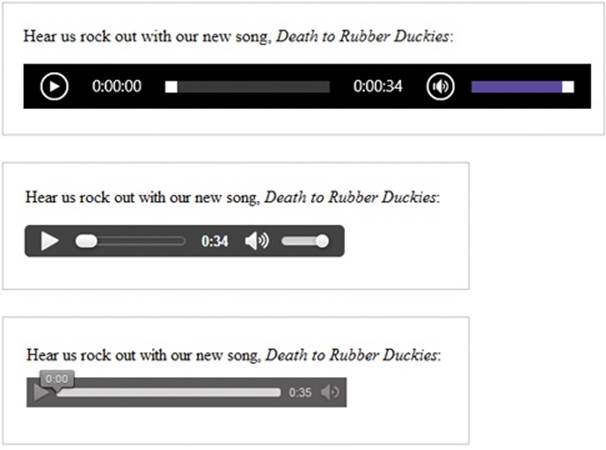
Figure 5-1. Here’s what playback controls look like on three browsers: Internet Explorer (top), Google Chrome (middle), and Firefox (bottom).
Along with the basic src and controls attributes, the <audio> element supports several other attributes, which are detailed in the following sections.
Preloading Media Files
One useful attribute is preload, which tells the browser how it should download a media file. Set preload to auto to tell the browser to start downloading the whole file, so it’s available when the user clicks the play button. Of course, this download process unfolds in the background, so your web page visitor can scroll around and read the page without waiting for the download to finish.
The preload attribute also supports two other values. You can use metadata to tell the browser to grab the first small chunk of data from the file, which is enough to determine some basic details (like the total length of the audio). Or, you can use none, which tells the browser to hold off completely. You might use one of these options to save bandwidth, for example, if you have a page stuffed full of <audio> elements and you don’t expect the visitor to play more than a few of them.
<audio src="rubberduckies.mp3" controls preload="metadata"></audio>
When you use the none or metadata values, the browser downloads the audio file as soon as someone clicks the play button. Happily, browsers can play one chunk of audio while downloading the next without a hiccup unless you’re working over a slow network connection.
If you don’t set the preload attribute, browsers can do what they want, and different browsers make different assumptions. Most browsers assume auto as the default value, but Firefox uses metadata. Furthermore, it’s important to note that the preload attribute isn’t a rigid rule, but a recommendation you’re giving to the browser—one that may be ignored depending on other factors. (And some slightly older browser builds don’t pay attention to the preload attribute at all.)
NOTE
If you have a page stuffed with <audio> elements, the browser creates a separate strip of playback controls for each one. The web page visitor can listen to one audio file at a time or start them all playing at once.
Automatic Playback
Next up is the autoplay attribute, which tells the browser to start playback immediately once the page has finished loading. It looks like this:
<audio src="rubberduckies.mp3" controls autoplay></audio>
Without autoplay, it’s up to the person viewing the page to click the play button.
You can use the <audio> element to play background music unobtrusively, or even to provide the sound effects for a browser-based game. To get background music, remove the controls attribute and add the autoplay attribute (or use JavaScript-powered playback, as described onControlling Your Player with JavaScript). But use this approach with caution, and remember that your page still needs some sort of audio shutoff switch.
NOTE
No one wants to face a page that blares music or sound effects but lacks a way to shut the sound off. If you decide to use the <audio> element without the controls attribute, you must, at a bare minimum, add a mute button that uses JavaScript to silence the audio.
Looping Playback
Finally, the loop attribute tells the browser to start over at the beginning when playback ends:
<audio src="rubberduckies.mp3" controls loop></audio>
In most browsers, playback is fluid enough that you can use this technique to create a seamless, looping soundtrack. The trick is to choose a loopable piece of audio that ends where it begins. You can find hundreds of free examples at www.flashkit.com/loops. (These loops were originally designed for Flash but can also be downloaded in MP3 and WAV versions.)
Getting the Big Picture with <video>
The <video> element pairs nicely with the <audio> element. Here’s a straightforward example that puts it to use:
<p>A butterfly from my vacation in Switzerland!</p>
<video src="butterfly.mp4" controls></video>
Once again, the controls attribute gets the browser to generate a set of handy playback controls (Figure 5-2). In most browsers, these controls disappear when you click somewhere else on the page and return when you hover over the movie.
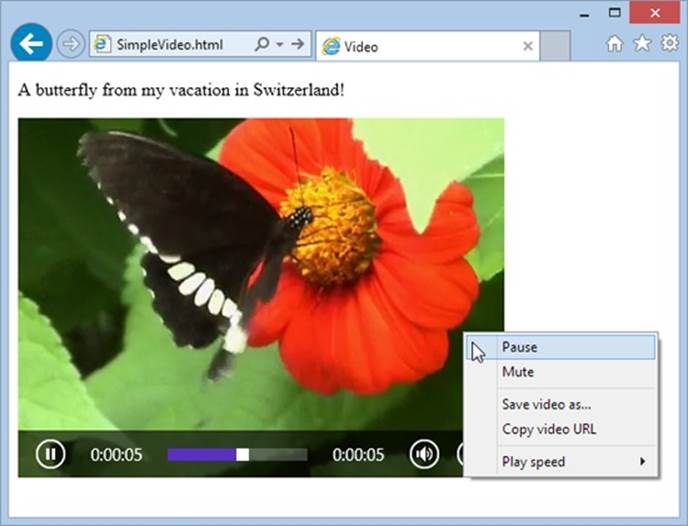
Figure 5-2. The <video> element could easily be mistaken for a Flash video window. But if you right-click the <video> element, you’ll get a simpler menu that includes the option to save the video file to your computer. Depending on the browser, it may also include commands for changing the playback speed, looping the video, taking it full screen, and muting the sound.
The <video> element has the same src, controls, preload, autoplay, and loop attributes as the <audio> element. However, if you choose to enable automatic playback, you can make it less obnoxious by throwing in the muted attribute, which shuts off the sound on most browsers. The viewer can switch the audio back on by clicking the speaker icon, as usual.
The <video> element also adds three more attributes: height, width, and poster.
The height and width attributes set the size of the video window (in pixels). Here’s an example that creates a video box that measures 400 x 300 pixels:
<video src="butterfly.mp4" controls width="400" height="300">
</video>
This should match the natural size of the video itself, but you might choose to indicate these details explicitly so your layout doesn’t get messed up before the video loads (or if the video fails to load altogether).
NOTE
No matter which dimensions you use to size the video box, the video frame always keeps its proper proportions. For example, if you take a 400 x 300 pixel video and put it in a 800 x 450 pixel video box, you’ll get the biggest video frame that fits in the box without stretching, which is 600 x 450 pixels. This leaves 100 pixels on each side of the video frame, which appear as blank space.
Finally, the poster attribute lets you supply an image that should be used in place of the video. Browsers use this picture in three situations: if the first frame of the video hasn’t been downloaded yet, if you’ve set the preload attribute to none, or if the selected video file wasn’t found.
<video src="butterfly.mp4" controls poster="swiss_alps.jpg">
</video>
Although you’ve now learned everything there is to know about audio and video markup, there’s a lot more you can do with some well-placed JavaScript. But before you can get any fancier with the <audio> and <video> elements, you need to face the headaches of audio and video codec support.
GEM IN THE ROUGH: MEDIA GROUPS
The HTML5 standard specifies an unusual attribute named mediagroup that applies to both the <audio> element and the <video> element. You can use the mediagroup attribute to link multiple media files together, so their playback is synchronized. All you need to do is assign the same mediagroup name (which can be whatever you want) to each <audio> or <video> element:
<video src="shot12_cam1.mp4" controls
mediagroup="shot12"></video>
<video src="shot12_cam2.mp4" controls
mediagroup="shot12"></video>
Now if the viewer presses play in the first video window (for shot12_cam1.mp4), playback begins in both windows at once.
The mediagroup attribute might be a useful tool if you need to synchronize concurrent video files—for example, recordings of a sporting event taken from different angles. You can also use it to synchronize audio and video, which is useful if you need to choose different audio tracks based on the visitor’s language or accessibility needs. For example, an audio track for visually impaired users might add a voiceover that describes the action that’s taking place. To accomplish this wizardry, you’d create a page with several hidden <audio> elements, give each one a different mediagroup name, and then add a bit of simple JavaScript that sets the mediagroup of your <video> element to match the mediagroup of the right <audio> element, based on the visitor’s requirements.
Unfortunately, mediagroup isn’t much use right now, because its browser support is still limited. Chrome and Opera understand it, but the latest versions of Internet Explorer and Firefox ignore it completely.
Understanding the HTML5 Media Formats
If the <video> and <audio> elements seem too good to be true, well, sometimes they are. The problem is that a media file format that works flawlessly in one browser can flummox another.
The examples you’ve just considered use two popular standards: MP3 audio and H.264 video. They’re enough to keep most browsers happy. But use them on the Opera browser, and they won’t work (Figure 5-3).
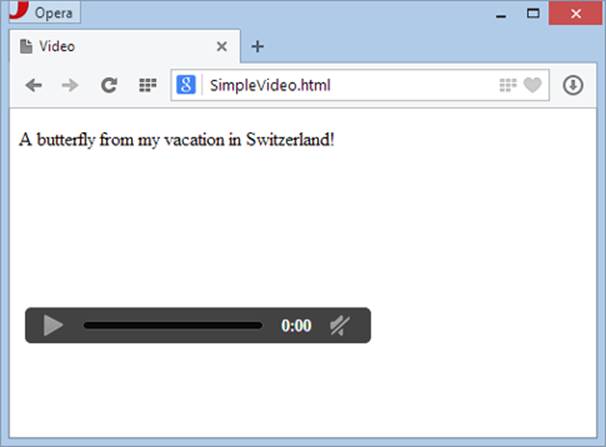
Figure 5-3. If you load a page that uses an H.264 video in Opera, the playback controls are disabled, and a blank space appears where the video should be.
Fortunately, you can solve this problem with a format fallback, as you’ll see on Supporting Multiple Formats. But before you learn how to do that, you need to take a closer look at the range of audio and video formats on the Web today, and the current state of browser support.
Meet the Media Formats
The official HTML5 standard doesn’t require support for any specific video or audio format. (Early versions did, but the recommendation was dropped after intense lobbying.) As a result, browser makers are free to choose the formats they want to support, despite the fact that they’re congenitally unable to agree with one another.
Table 5-1 shows the standards that they’re using right now.
Table 5-1. Some of the audio and video standards that HTML5 browsers may support
|
FORMAT |
DESCRIPTION |
COMMON FILE EXTENSION |
MIME TYPE |
|
MP3 |
The world’s most popular audio format. |
.mp3 |
audio/mp3 |
|
Ogg Vorbis |
A free, open standard that offers high-quality, compressed audio comparable to MP3. |
.ogg |
audio/ogg |
|
WAV |
The original format for raw digital audio. Doesn’t use compression, so files are staggeringly big and unsuitable for most web uses. |
.wav |
audio/wav |
|
H.264 |
The industry standard for video encoding, particularly when dealing with high-definition video. Used by consumer devices (like Blu-ray players and camcorders), web sharing websites (like YouTube and Vimeo), and web plug-ins (like Flash and Silverlight). |
.mp4 |
video/mp4 |
|
Ogg Theora |
A free, open standard for video by the creators of the Vorbis audio standard. Byte for byte, the quality and performance doesn’t match H.264, although it’s still good enough to satisfy most people. |
.ogv |
video/ogg |
|
WebM |
The newest video format, created when Google purchased VP8 and transformed it into a free standard. Critics argue that the quality isn’t up to the level of H.264 video—yet—and that it may have unexpected links to other people’s patents, which could lead to a storm of lawsuits in the future. |
.webm |
video/webm |
Table 5-1 also lists the recommended file extensions your media files should use. To realize why this is important, you need to understand that there are actually three standards at play in a video file. First, and most obviously, is the video codec, which compresses the video into a stream of data (examples include H.264, Theora, and WebM). Second is the audio codec, which compresses one or more tracks of audio using a related standard. (For example, H.264 generally uses MP3, while Theora uses Vorbis.) Third is the container format, which packages everything together with some descriptive information and, optionally, other frills like still images and subtitles. Often, the file extension refers to the container format, so .mp4 signifies an MPEG-4 container, .ogv signifies an Ogg container, and so on.
Here’s the tricky part: Most container formats support a range of different video and audio standards. For example, the popular Matroska container (.mkv) can hold video that’s encoded with H.264 or Theora. To keep your head from exploding, Table 5-1 puts each video format with the container format that’s most common and has the most reliable web support.
Table 5-1 also indicates the proper MIME type, which must be configured on your web server. If you use the wrong MIME type, browsers may stubbornly refuse to play a perfectly good media file. (If you’re a little fuzzy on exactly what MIME types do and how to configure them, see the box on MIME Types and Why to Use Them.)
UP TO SPEED: MIME TYPES AND WHY TO USE THEM
A MIME type (sometimes called a content type) is a piece of information that identifies the type of content in a web resource. For example, the MIME type of a web page is text/html.
Before a web server sends a resource to a browser, it sends the MIME type. For example, if a browser asks for the page SuperVideoPlayerPage.html, the web server sends the text/html MIME type, a few other pieces of information, and the actual file content. When the browser receives the MIME type, it knows what to do with the content that comes next. It doesn’t need to try to make a guess based on a file name extension or some other sort of hackery.
For common file types—for example, HTML pages and images—you don’t need to worry about MIME types, because every web server already handles them properly. But some web servers might not be configured with the MIME types for audio and video. That’s a problem, because browsers will be thrown off course if the web server sends a media file with the wrong MIME type. Usually, they won’t play the file at all.
To avoid this problem, make sure your web server is set up with the MIME types listed in Table 5-1, and use the corresponding file extensions for your audio and video files. (It’s no use configuring the MIME type and then using the wrong file extension, because the web server needs to be able to pair the two together. For example, if you configure .mp4 files to use the MIME typevideo/mp4, but then you give your video file the extension .mpFour, the web server won’t have a clue what you’re trying to do.)
Configuring MIME types is an easy job, but the exact steps depend on your web hosting company (or your web server software, if you’re hosting your site yourself). If your web hosting company uses the popular cPanel interface, then look for an icon named MIME Types and click it. You’ll then see a page like the one shown in Figure 5-4. And if you’re in any doubt, contact your web hosting company for help.
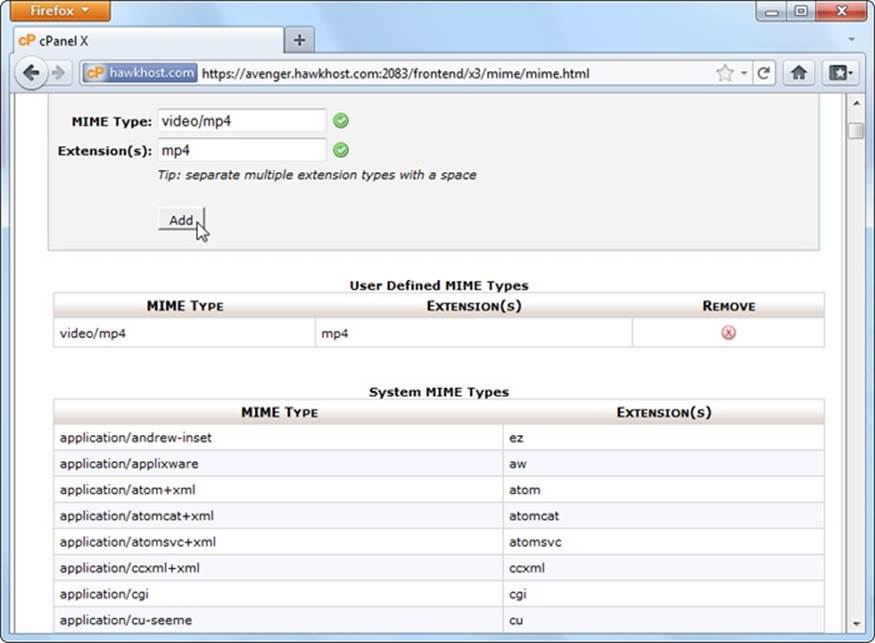
Figure 5-4. Here a new MIME type is being added to support H.264 video files. In many cases, you won’t need to take this step, because your website will already be configured correctly.
Browser Support for Media Formats
The format headaches in HTML5 have a long history. The conflict is fueled by the different needs of browser makers. Small companies, like Mozilla (the creators of Firefox) and Opera (the creators of the Opera browser) don’t want to pay stiff licensing costs for popular standards like MP3audio and H.264 video. And it’s hard to blame them—after all, they are giving away their work for free.
But bigger companies, like Microsoft and Apple, have their own reasonable-sounding excuses for shunning unlicensed standards. They complain that these standards won’t perform as well (they currently lack hardware acceleration) and aren’t as widespread (unlike H.264, which is used in camcorders, Blu-ray players, and a host of other devices). But the biggest problem is that these unlicensed standards may have obscure ties to someone else’s intellectual property. If they do, and if big companies like Microsoft and Apple start using them, they open themselves up to pricey patent lawsuits that could drag on for years.
Fortunately, the situation is improving. In 2013, Firefox gave in and agreed to support MP3 and H.264. Google, despite threatening to remove support for H.264 in Chrome, has never taken that step and now seems unlikely to do so. Opera remains the last holdout on the desktop—for now. For the full details of browser media support, see Table 5-2 (for audio formats) and Table 5-3 (for video formats).
Table 5-2. Browser support for HTML5 audio formats
|
IE |
FIREFOX |
CHROME |
SAFARI |
OPERA |
SAFARI IOS |
ANDROID |
|
|
MP3 |
9 |
21 |
5 |
3.1 |
- |
3 |
2.3 |
|
Ogg Vorbis |
- |
3.6 |
5 |
- |
10.5 |
- |
- |
|
WAV |
- |
3.6 |
8 |
3.1 |
10.5 |
- |
- |
Table 5-3. Browser support for HTML5 video formats
|
IE |
FIREFOX |
CHROME |
SAFARI |
OPERA |
SAFARI IOS |
ANDROID |
|
|
H.264 Video |
9 |
21 |
5 |
3.1 |
- |
4[a] |
2.3 |
|
Ogg Theora |
- |
3.5 |
5 |
- |
10.5 |
- |
- |
|
WebM |
- |
4 |
6 |
- |
10.6 |
- |
2.3 |
|
[a] iOS 3.x supports video, but there are subtle video bugs hiding in older versions of the Safari browser. For example, if you set the poster attribute (Understanding the HTML5 Media Formats), you may find that the video becomes unplayable. |
|||||||
Mobile browsers have their own quirks. Some don’t support features like autoplay and looping, because these features can drain batteries and use up valuable bandwidth. But even if you don’t plan to use these features, mobile devices need special consideration to ensure good video playback performance and to minimize data usage. To make mobile-friendly videos, you should encode them with lower quality settings and, possibly, with a lower resolution.
TIP
As a general rule of thumb, if you want a video to be playable on a mobile device, you should encode it using the H.264 Baseline Profile (rather than High Profile). For iPhone and Android phones, use a size of 640 x 480 or smaller (and stick to 480 x 360 if you want to play it on a BlackBerry). Many encoding programs (see the box on Encoding Your Media) have presets that let you prepare mobile-optimized video.
FREQUENTLY ASKED QUESTION: H.264 LICENSING
I’m using H.264 for my videos. Do I have to pay licensing costs?
If you’re using an H.264 decoder in your product (for example, you’re creating a browser that can play H.264-encoded video), you definitely need to pay. But if you’re a video provider, it’s less clear cut.
First, the good news. If you’re using H.264 to make free videos, you won’t be asked to pay anything, ever. If you’re creating videos that have a commercial purpose but aren’t actually being sold (say, you’re shooting a commercial or promoting yourself in an interview), you’re also in the clear.
If you’re selling H.264-encoded video content on your website, you may be on the hook to pay license fees to MPEG-LA, either now or in the future. Right now, the key detail is the number of subscribers. If you have fewer than 100,000, there’s no licensing cost, but if you have 100,000 to 250,000, you’re expected to cough up $25,000 a year. This probably won’t seem like much bank for a video- selling company of that size, and it may pale in comparison to other considerations, like the cost of professional encoding tools. However, these numbers could change when the licensing terms are revised in 2016. Big companies looking to make lots of money in web video might prefer to use an open, unlicensed video standard like Theora or WebM.
For the full licensing legalese on H.264, visit http://tinyurl.com/h264-lic.
Fallbacks: How to Please Every Browser
At this writing, an H.264 video file presented by the HTML5 <video> element works for over 80 percent of the people surfing the Web. This percentage is impressive, but it isn’t good enough on its own. To create a video that everyone can see, you need the help of a fallback.
There are two types of fallbacks that web developers use with HTML5 video. The first is a format fallback. This mechanism, which is built into HTML5, lets you swap out one type of media file—say, an MP3 file—and replace it with a file in another format (for example, Ogg Vorbis). This type of fallback solves the Opera problem shown on Meet the Media Formats. However, it won’t help when your page meets an old browser that doesn’t support HTML5’s media features, like Internet Explorer 8.
The second type of fallback is a technology fallback. If the browser that’s processing your page doesn’t support the <video> and <audio> element, your page can substitute a time-tested Flash player that does the job.
Conscientious web developers use both types of fallback. More time-constrained (or lazier) web developers sometimes omit the format fallback, in order to eliminate the work of re-encoding their video files. After all, the Opera browser (the lone desktop browser that doesn’t support H.264) accounts for a mere 1 percent of worldwide browser use, and developers speculate that Opera may eventually be forced to add H.264 support. On the other hand, the Flash fallback is easier to implement, because it uses the same media file, and it fills in the support gap for a larger portion of browsers, like that dinosaur IE 8. So ignore the Flash fallback at your own peril.
The following sections explain both types of fallbacks.
Supporting Multiple Formats
The <audio> and <video> elements have a built-in format fallback system. To use it, you must remove the src attribute from the <video> or <audio> element, and replace it with a list of nested <source> elements inside. Here’s an example with the <audio> element:
<audio controls>
<source src="rubberduckies.mp3" type="audio/mp3">
<source src="rubberduckies.ogg" type="audio/ogg">
</audio>
Here, the same <audio> element holds two <source> elements, each of which points to a separate audio file. The browser then chooses the first file it finds that has a format it supports. Firefox and Opera will grab rubberduckies.ogg. Internet Explorer, Safari, and Chrome will stick withrubberduckies.mp3. Unfortunately, it’s up to you to encode your content in every alternate format you want to support—a process that wastes time, CPU power, and disk space.
In theory, a browser can determine whether or not it supports a file by downloading a chunk of it. But a better approach is to use the type attribute to supply the correct MIME type (see Meet the Media Formats). That way, the browser will attempt to download only a file it believes it can play. (To figure out the correct MIME type, consult Table 5-1.)
The same technique works for the <video> element. Here’s an example that supplies the same video file twice, once encoded with H.264 and once with WebM, guaranteeing support for all HTML5-aware browsers:
<video controls width="700" height="400">
<source src="beach.mp4" type="video/mp4">
<source src="beach.webm" type="video/webm">
</video>
In this example, there’s one new detail to note. When using multiple video formats, the H.264-encoded file should always come first. Otherwise, it won’t work for old iPads running iOS 3.x. (The problem has since been fixed in iOS 4, but there’s no disadvantage to keeping H.264 in the top spot.)
NOTE
Just because a browser believes it supports a specific type of audio or video doesn’t necessarily mean it can play it. For example, you may have used an insanely high bitrate, or a strange codec in a recognized container format. You can deal with issues like these by supplying type and codec information through the type attribute, but it’ll make a mess of your markup. The HTML5 spec has all the gruesome details at http://tinyurl.com/media-types.
If you’re really ambitious, you may opt to create a single video page that’s meant for both desktop browsers and mobile devices. In this case, you not only need to worry about the H.264 and WebM video formats, but you also need to think about creating low-bandwidth versions of your video files that are suitable for devices that have less hardware power and use slower Internet connections. To make sure mobile devices get the lighter-weight video files while desktop browsers get the higher-quality ones, you need to write some crafty JavaScript or use media queries, as explained on Adapting Your Layout with Media Queries.
UP TO SPEED: ENCODING YOUR MEDIA
Now you know what combination of formats to use, but you don’t necessarily know how to transform your media files into those formats. Don’t despair, as there are plenty of tools. Some work on entire batches of files at once, some have a reputation for professional-grade quality (and a price tag to match), and some do their work on powerful web servers so you don’t have to wait. The trick is picking through all the choices to get the encoder that works for you.
Here are some of your options:
§ Audio editors. If you’re looking to edit WAV files and save them in the MP3 or Vorbis formats, a basic audio editor can help out. Audacity (http://audacity.sourceforge.net) is a free editor for Mac and Windows that fits the bill, although you’ll need to install the LAME MP3 encoder to get MP3 support (http://lame1.buanzo.com.ar). Goldwave (www.goldwave.com) is a similarly capable audio editor that’s free to try, but sold for a nominal fee.
§ Miro Video Converter. This free, open-source program runs on Windows and Mac OS X. It can take virtually any video file and convert it to WebM, Theora, or H.264. It also has presets that match the screen sizes and supported formats for mobile devices, like iPads, iPhones, or Android phones. The only downside is that you can’t tweak more advanced options to control how the encoding is done. To try it out, go to www.mirovideoconverter.com.
§ Firefogg. This Firefox plug-in (available at http://firefogg.org) can create Theora or WebM video files, while giving you a few more options than Miro. It also runs right inside your web browser (although it does all its work locally, without involving a web server).
§ HandBrake. This open-source, multi-platform program (available at http://handbrake.fr) converts a wide range of video formats into H.264 (and a couple of other modern formats).
§ Zencoder. Here’s an example of a professional media encoding service that you can integrate with your website. Zencoder (http://zencoder.com) pulls video files off your web server, encodes them in all the formats and bitrates you need, gives them the names you want, and places them in the spot they belong. A big player (say, a video sharing site) would pay Zencoder a sizable monthly fee.
Adding a Flash Fallback
The format fallback system has a key limitation: It works only on browsers that understand the <audio> and <video> elements (which is almost every browser in circulation today, except IE 8). To get your pages to work on non-HTML5 browsers, you need to add a Flash fallback.
To understand how the Flash fallback works, you first need to know that every web browser since the dawn of time deals with the tags it doesn’t recognize in the same way—it ignores them. For example, if Internet Explorer 8 comes across the opening tag for the <video> element, it barrels merrily on, without bothering to check the src attribute. However, browsers don’t ignore the content inside an unrecognized element, which is a crucial difference. It means if you have markup like this:
<video controls width="400" height="300">
<source src="discoParty.mp4" type="video/mp4">
<source src="discoParty.webm" type="video/webm">
<p>We like disco dancing.</p>
</video>
Browsers that don’t understand HTML5 will act as though they saw this:
<p>We like disco dancing.</p>
This fallback content provides a seamless way to deal with older browsers.
NOTE
Browsers that support HTML5 audio ignore the fallback section, even if they can’t play the media file. For example, consider what happens if Opera finds a <video> element that uses an H.264 video file but doesn’t support Theora. In this situation, the video player won’t show anything at all.
So now that you know how to add fallback content, you need to decide what your fallback content should include. One example of bad fallback content is a text message (as in, “Your browser does not support HTML5 video, so please upgrade.”). Website visitors consider this sort of comment tremendously impolite, and they’re likely never to return when they see it.
The proper thing to include for fallback content is another working video window—in other words, whatever you’d use in an ordinary, non-HTML5 page. One possibility is a YouTube video window. If you use this approach, you need to meet YouTube’s rules (make sure your video is less than 15 minutes and doesn’t contain offensive or copyrighted content). You can then upload your video to YouTube in the best format you have on hand, and YouTube will re-encode the video into the formats it supports. To get started, head to www.youtube.com/my_videos_upload.
Another possibility is to use a Flash video player. (Or, if you’re playing audio, a Flash audio player.) Happily, the world has plenty of Flash players. Many of them are free, at least for noncommercial uses. And best of all, most support H.264, a format you’re probably already using for HTML5 video.
Here’s an example that inserts the popular Flowplayer Flash (http://flash.flowplayer.org) into an HTML5 <video> element:
<video controls width="700" height="400">
<source src="beach.mp4" type="video/mp4">
<source src="beach.webm" type="video/webm">
<object id="flowplayer" width="700" height="400"
data="flowplayer-3.2.16.swf"
type="application/x-shockwave-flash">
<param name="movie" value="flowplayer-3.2.16.swf">
<param name="flashvars" value='config={"clip":"beach.mp4"}'>
</object>
</video>
Here, the bold part is a parameter that the browser passes to the Flowplayer Flash, with the file name of the video file. As you can see, even though this example has three possible outcomes (HTML5 video with H.264, HTML5 video with WebM, or Flash video with H.264), it needs only twovideo files, which saves on the encoding work. Figure 5-5 shows the result in action.
Of course, some people won’t have Flash or a browser that supports HTML5. You can offer them another fallback, such as a link to download the video file and open it in an external program. You place that fallback after the Flash content, but still inside the <object> element, like this:
<video controls width="700" height="400">
<source src="beach.mp4" type="video/mp4">
<source src="beach.webm" type="video/webm">
<object id="flowplayer" width="700" height="400"
data="http://releases.flowplayer.org/swf/flowplayer-3.2.16.swf"
type="application/x-shockwave-flash">
<param name="movie" value="beach.mp4">
<img src="beach_thumbnail.jpg" alt="A lazy day at the beach">
<p>Your browser does not support HTML5 video or Flash.</p>
<p>You can download the video in <a href="beach.mp4">MP4
H.264</a>
or <a href="beach.webm">WebM</a> format.</p>
</object>
</video>
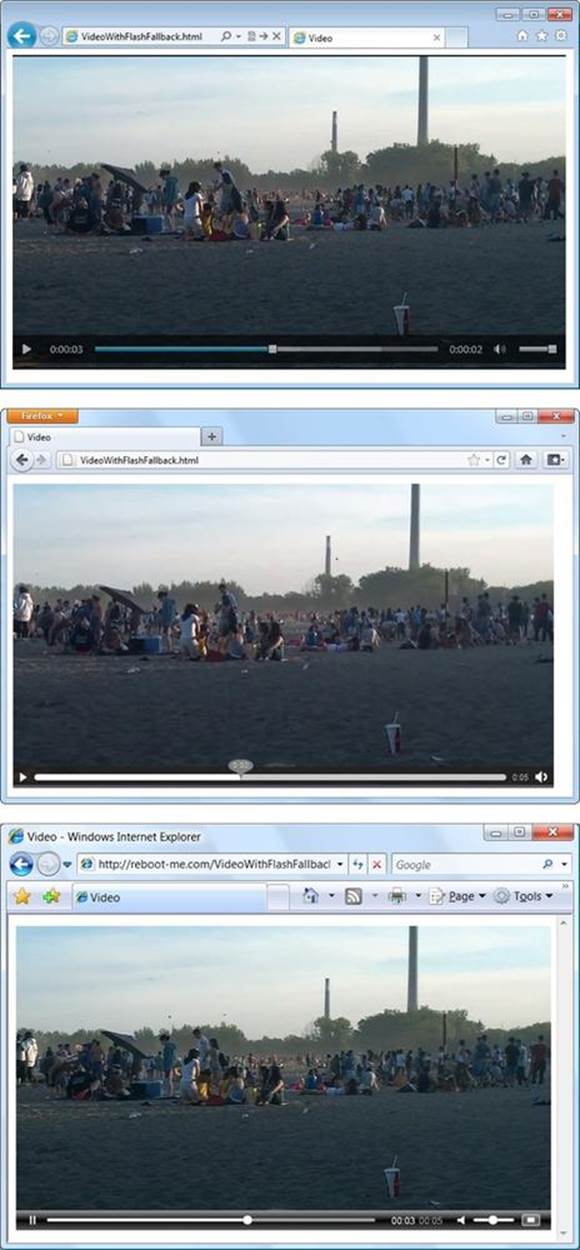
Figure 5-5. One video, served three ways: in IE 9 (top), in Firefox (middle), and in IE 7, with Flash (bottom).
Interestingly, there’s another way to implement a Flash fallback. The examples you’ve seen so far use HTML5 with a Flash fallback, which gives everybody HTML5 video (or audio) except for people with older browsers, who get Flash. However, you can invert this approach and use Flash first, with an HTML5 fallback. This gives everybody Flash, except for those who don’t have it installed. This strategy makes sense if you’re already showing video content on your website with a mature Flash video player, but you want to reach out to iPad and iPhone users. You might also choose this approach if your media requirements go beyond what HTML5 currently supports (as detailed in the box on Turn Back Now If…).
If you want a Flash player with an HTML fallback, you simply need to invert the previous example. Start with the <object> element, and nestle the <video> element inside, just before the closing </object> tag. Place the fallback content just after the last <source> element, like this:
<object id="flowplayer" width="700" height="400"
data="http://releases.flowplayer.org/swf/flowplayer-3.2.16.swf"
type="application/x-shockwave-flash">
<param name="movie" value="butterfly.mp4">
<video controls width="700" height="400">
<source src="beach.mp4" type="video/mp4">
<source src="beach.webm" type="video/webm">
<img src="beach_thumbnail.jpg" alt="A lazy day at the beach">
<p>Your browser does not support HTML5 video or Flash.</p>
<p>You can download the video in <a href="beach.mp4">MP4 H.264</a>
or <a href="beach.webm">WebM</a> format.</p>
</video>
</object>
Incidentally, there are a number of JavaScript players that support HTML5 directly and have a built-in Flash fallback. For example, Flowplayer provides another version called Flowplayer HTML5 (get it at http://flowplayer.org), which uses the HTML5 <video> element if the browser supports it and performs a Flash fallback automatically if needed. The advantage is that this approach simplifies your markup, because one ingredient (the JavaScript-powered media player) handles everything. The disadvantage is that it takes you further away from a pure HTML5 solution, which is what you’ll want to use one day soon when HTML5-loving browsers are ubiquitous.
Controlling Your Player with JavaScript
So far, you’ve covered some heavy ground. You’ve learned how to take the new <audio> and <video> elements and turn them into a reasonably supported solution that works on more web pages than today’s Flash-based players. Not bad for a bleeding-edge technology.
That’s about the most you can do with the <audio> and <video> elements if you stick to markup only. But both elements have an extensive JavaScript object model, which lets you control playback with code. In fact, you can even adjust some details—like playback speed—that aren’t available in the browser’s standard audio and video players.
In the following sections, you’ll explore the JavaScript support by considering two practical examples. First, you’ll add sound effects to a game. Next, you’ll create a custom video player. And finally, you’ll consider the solutions that other people have developed using this potent mix of HTML5 and JavaScript, including supercharged, skinnable players and accessible captioning.
Adding Sound Effects
The <audio> element doesn’t just let web visitors play songs and voice recordings. It’s also a useful tool for playing sound effects, whenever you need them. This makes it particularly useful if you need to add music and sound effects to a game.
Figure 5-6 shows a very simple example, with an interactive ball-dropping animation. You’ll see the code that makes this example work when you consider the <canvas> element in Chapter 8. But for now, the only important detail is how you can add a suitable sonic backdrop.
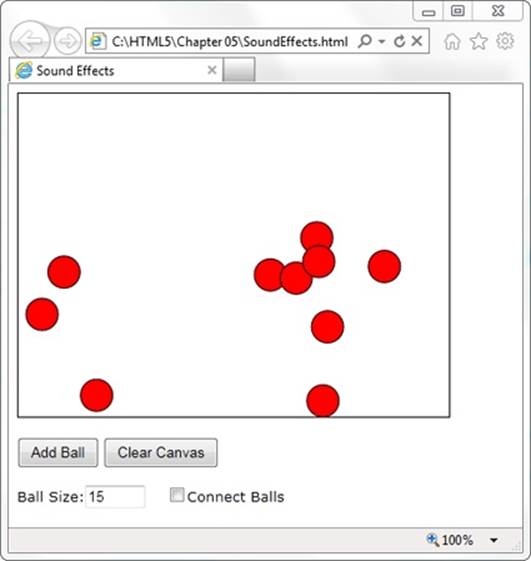
Figure 5-6. This web page runs a simple animation on a canvas. The visitor can click a button to add a new ball (which then falls down and bounces around the drawing surface). Or, the visitor can click a ball to send it bouncing in a new direction.
This example combines a background music track with sound effects. The background music track is the easiest part. To create it, you start by adding an invisible <audio> element to your page, like this:
<audio id="backgroundMusic" loop>
<source src="TheOwlNamedOrion.mp3" type="audio/mp3">
<source src="TheOwlNamedOrion.ogg" type="audio/ogg">
</audio>
This audio player doesn’t include the autoplay or controls attributes, so initially it’s silent and invisible. It does use the loop attribute, so once it starts playing it will repeat the music track endlessly. To control playback, you need to use two methods of the audio (or video) object:play() and pause(). Confusingly, there’s no stop method—for that, you need to pause the video and then reset the currentTime property to 0, which represents the beginning of the file.
With this in mind, it’s quite easy to start playback on the background audio when the first ball is created:
var audioElement = document.getElementById("backgroundMusic");
audioElement.play();
And just as easy to stop playback when the canvas is cleared:
var audioElement = document.getElementById("backgroundMusic");
audioElement.pause();
audioElement.currentTime = 0;
As you learned earlier, there’s no limit on the amount of audio you can play at once. So while the background audio is playing its tune, you can concentrate on the more interesting challenge of adding sound effects.
In this example, a “boing” sound effect is played every time a ball ricochets against the ground or a wall. To keep things interesting, several slightly different boing sounds are used. This is a stand-in for a more realistic game, which would probably incorporate a dozen or more sounds.
There are several ways to implement this design, but not all of them are practical. The first option is to add a single new <audio> element to play sound effects. Then, every time a collision happens, you can load a different audio file into that element (by setting the src property) and play it. This approach hits two obstacles. First, a single <audio> element can play only a single sound at once, so if more than one ball hits the ground in quick succession, you need to either ignore the second, overlapping sound, or interrupt the first sound to start the second one. The other problem is that setting the src property forces the browser to request the audio file. And while some browsers will do this quickly (if the audio file is already in the cache), Internet Explorer doesn’t. The result is laggy audio—in other words, a boing that happens half a second after the actual collision.
A better approach is to use a group of <audio> elements, one for each sound. Here’s an example:
<audio id="audio1">
<source src="boing1.mp3" type="audio/mp3">
<source src="boing1.wav" type="audio/wav">
</audio>
<audio id="audio2">
<source src="boing2.mp3" type="audio/mp3">
<source src="boing2.wav" type="audio/wav">
</audio>
<audio id="audio3">
<source src="boing3.mp3" type="audio/mp3">
<source src="boing3.wav" type="audio/wav">
</audio>
NOTE
Even though these three <audio> elements use different audio files, that isn’t a requirement. For example, if you wanted to have the same boing sound effect but allow overlapping audio, you’d still use three audio players.
Whenever a collision happens, the JavaScript code calls a custom function named boing(). That method grabs the next <audio> element in the sequence and plays it.
Here’s the code that makes it happen:
// Keep track of the number of <audio> elements.
var audioElementCount = 3;
// Keep track of the <audio> element that's next in line for playback.
var audioElementIndex = 1;
function boing() {
// Get the <audio> element that's next in the rotation.
var audioElementName = "audio" + audioElementIndex;
var audio = document.getElementById(audioElementName);
// Play the sound effect.
audio.currentTime = 0;
audio.play();
// Move the counter to the next <audio> element.
if (audioElementIndex == audioElementCount) {
audioElementIndex = 1;
}
else {
audioElementIndex += 1;
}
}
TIP
To get an idea of the noise this page causes with its background music and sound effects, visit the try-out site at http://prosetech.com/html5.
This example works well, but what if you want to have a much larger range of audio effects? The easiest choice is to create a hidden <audio> element for each one. If that’s impractical, you can dynamically set the src property of an existing <audio> element. Or, you can create a new<audio> element on the fly, like this:
var audio = document.createElement("audio");
audio.src = "newsound.mp3";
Or use this shortcut:
var audio = new Audio("newsound.mp3");
However, there are two potential problems with both approaches. First, you need to set the source well before you play the audio. Otherwise, playback will be noticeably delayed, particularly on Internet Explorer. Second, you need to know what the supported audio formats are, so you can set the right file type. This requires using the clunky canPlayType() method. You pass in an audio or video MIME type, and canPlayType() tells you if the browser can play that format—sort of. It actually returns a blank string if it can’t, the word “probably” if it thinks it can, and the word “maybe” if it hopes it might but just can’t make any promises. This rather embarrassing situation exists because supported container formats can use unsupported codecs, and supported codecs can still use unsupported encoding settings.
Most developers settle on code like this, which attempts playback if canPlayType() gives any answer other than a blank string:
if (audio.canPlayType("audio/ogg")) {
audio.src = "newsound.ogg";
}
else if (audio.canPlayType("audio/mp3")) {
audio.src = "newsound.mp3";
}
Creating a Custom Video Player
One of the most common reasons to delve into JavaScript programming with the <audio> and <video> elements is to build your own player. The basic idea is pure simplicity—remove the controls attribute, so that all you have is a video window, and add your own widgets underneath. Finally, add the JavaScript code that makes these new controls work. Figure 5-7 shows an example.
Every video player needs a basic complement of playback buttons. Figure 5-7 uses plain-Jane buttons:
<button onclick="play()">Play</button>
<button onclick="pause()">Pause</button>
<button onclick="stop()">Stop</button>
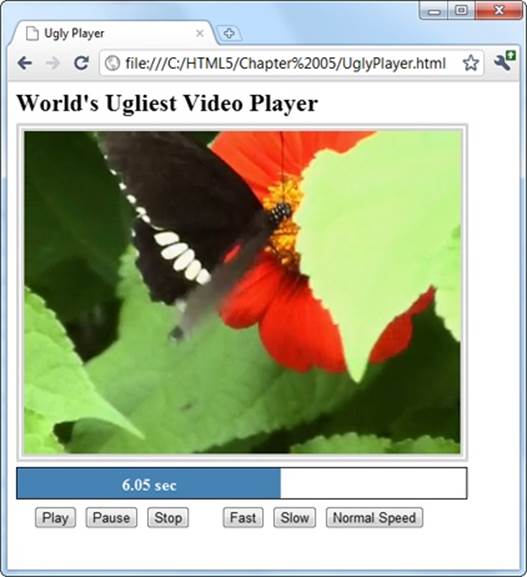
Figure 5-7. Making a custom HTML5 video player is easy (making it pretty is not). This example includes the standard playback buttons, a playback progress bar, and a few extra buttons that show off what JavaScript can do with the <video> element.
These buttons trigger the following super-simple functions:
function play() {
video.play();
}
function pause() {
video.pause();
}
function stop() {
video.pause();
video.currentTime = 0;
}
The other three playback buttons are more exotic. They adjust the playbackRate property to change the speed. For example, a playbackRate of 2 plays video at twice the normal speed, but with pitch correction so the audio sounds normal, just accelerated. This is a great feature for getting through a slow training video in a hurry. Similarly, a playbackRate of 0.5 plays video at half normal speed, and a playbackRate of -1 should play video at normal speed, backward, but browsers have trouble smoothly implementing this behavior.
function speedUp() {
video.play();
video.playbackRate = 2;
}
function slowDown() {
video.play();
video.playbackRate = 0.5;
}
function normalSpeed() {
video.play();
video.playbackRate = 1;
}
Creating the playback progress bar is a bit more interesting. From a markup point of view, it’s built out of two <div> elements, one inside the other:
<div id="durationBar">
<div id="positionBar"><span id="displayStatus">Idle.</span></div>
</div>
TIP
The playback progress bar is an example where the <progress> element (Progress Bars and Meters) would make perfect sense. However, the <progress> element still has limited support—far less than the HTML5 video feature—so this example builds something that looks similar using two <div> elements.
The outer <div> element (named durationBar) draws the solid black border, which stretches over the entire bar and represents the full duration of the video. The inner <div> element (named positionBar) indicates the current playback position, by filling in a portion of the black bar in blue. Finally, a <span> element inside the inner <div> holds the status text, which shows the current position (in seconds) during playback.
Here are the style sheet rules that size and paint the two bars:
#durationBar {
border: solid 1px black;
width: 100%;
margin-bottom: 5px;
}
#positionBar {
height: 30px;
color: white;
font-weight: bold;
background: steelblue;
text-align: center;
}
When video playback is under way, the <video> element triggers the onTimeUpdate event continuously. You can react to this event to update the playback bar:
<video id="videoPlayer" ontimeupdate="progressUpdate()">
<source src="butterfly.mp4" type="video/mp4">
<source src="butterfly.webm" type="video/webm">
</video>
Here, the code gets the current positioning in the video (from the currentTime property), divides that into the total time (from the duration property), and turns that into a percentage that sizes the <div> element named positionBar:
function progressUpdate() {
// Resizing the blue positionBar, from 0 to 100%.
var positionBar = document.getElementById("positionBar");
positionBar.style.width = (video.currentTime / video.duration * 100) + "%";
// Display the number of seconds, using two decimal places.
displayStatus.innerHTML = (Math.round(video.currentTime*100)/100) + " sec";
}
TIP
To get fancier, you could superimpose a download progress bar that shows how much current content has been downloaded and buffered so far. Browsers already add this feature to their built-in players. To add it to your own player, you need to handle the onProgress event and work with the seekable property. For more information about the many properties, methods, and events provided by the <video> element, check out Microsoft’s reference at http://tinyurl.com/video-obj-js.
JavaScript Media Players
If you’re truly independent-minded, you can create your own audio or video player from scratch. But it’s not a small project, especially if you want nifty features, like an interactive playlist. And if you don’t have a small art department to back you up, there’s a distinct possibility that your final product will look just a little bit ugly.
Happily, there’s a better option for web authors in search of the perfect HTML5 player. Instead of building one yourself, you can pick up a free, JavaScript-customized media player from the Web. Two solid choices are VideoJS (http://videojs.com) and, for jQuery fans, jPlayer (www.jplayer.org). Both of these players are lightweight, easy to use, and skinnable, which means you can change the look of the playback controls by plugging in a different style sheet.
Most JavaScript media players (including VideoJS and jPlayer) have built-in Flash fallbacks, which saves you from needing to find a separate Flash player. And jPlayer includes its own handy playlist feature, which lets you queue up a whole list of audio and video files (Figure 5-8).
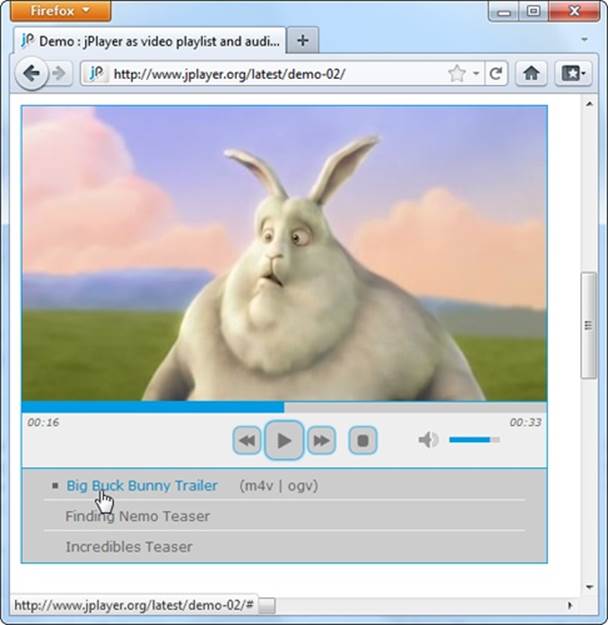
Figure 5-8. Using jPlayer’s playlist feature, you can offer a series of audio or video files. The user can then play them all in sequence or click to play a specific one. The example playlist here has three videos.
To use VideoJS, you start by downloading the JavaScript files from the VideoJS website. Then you add the JavaScript reference and style sheet reference shown here:
<!DOCTYPE html>
<html>
<head>
<meta charset="utf-8">
<title>...</title>
<script src="video.js"></script>
<link rel="stylesheet" href="video-js.css">
</head>
...
Then you use the exact same <video> element you’d normally use, with the multiple source elements and Flash fallback. (The VideoJS player sample code has the Flowplayer already slotted in for the Flash fallback, but you can remove it and use a different Flash player instead.) In fact, the only difference between a normal HTML5 video page and one that uses VideoJS is the fact that you must use a special <div> element to wrap the video player, as shown here:
<div class="video-js-box">
<video class="video-js" width="640" height="264" controls ...>
...
</video>
</div>
It’s nice to see that even when extending HTML5, life can stay pretty simple.
Video Captions
As you’ve seen in previous chapters, the creators of HTML5 were often thinking about web accessibility—in other words, how people with disabilities can use rich web pages easily and efficiently.
Adding accessibility information to images is easy enough. You simply need to bolt on some suitably descriptive text with the alt attribute. But what’s the equivalent to alt text for a video stream? The consensus is to use subtitles, text captions that pop up at the right point during playback. Subtitles can be similar to television closed-captioning, by simply transcribing dialogue, or they can add descriptive and supplementary information of their own. The point is that they give people an avenue to follow the video even if they have hearing difficulties (or if they just don’t want to switch on their computer speakers to play the Iron Man 4 movie trailer for the entire office).
Figure 5-9 shows an example of a captioned video.
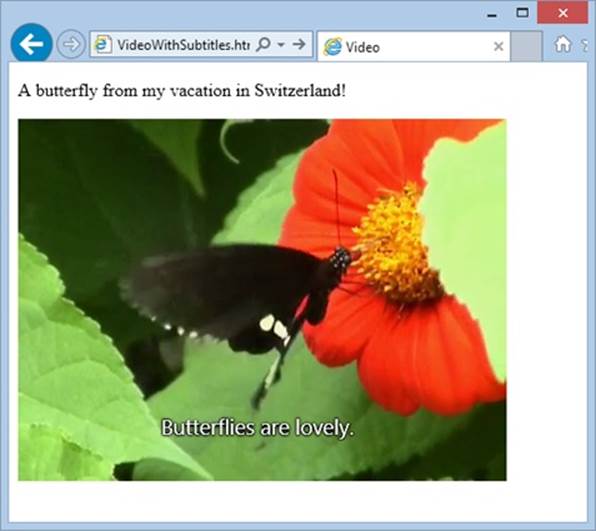
Figure 5-9. The subtitles in this video appear in their usual place: centered, and near the bottom of the video window.
Timed Text Tracks and WebVTT
In technical video speak, a subtitle is a caption that appears superimposed on a video, and a sequence of subtitles is a timed text track. There are a number of different formats for timed text tracks, but they all have fundamental similarities. All of them are recorded as ordinary text with time markings and are placed in chronological order in an ordinary text file. Here’s an example of a timed tracks file written in WebVTT (Web Video Text Tracks Format), which is the format favored by HTML5. It holds four captions:
WEBVTT
00:00:05.000 --> 00:00:10.000
This caption appears 5 seconds in and lingers until the 10 second mark.
00:01:00.000 --> 00:01:10.000
Now 1 minute has passed. Think about that for 10 seconds.
00:01:10.000 --> 00:01:15.000
This caption appears immediately after the second caption disappears.
00:01:30.000 --> 00:01:35.000
Captions can use <i>line breaks</i> and <b>simple</b> HTML markup.
As you can see, every entry in a WebVTT file specifies three details: the time the caption should appear (in hour:minute:seconds format), the time it should disappear, and the associated text. Save this content in a text file with the extension .vtt (as in subtitles.vtt), and you have a ready-to-go timed track file.
Although captioning seems simple, there are a number of fiddly details. For example, you may want to control line breaks, format your text, move the text captions to another position in the video window, or show karaoke-style captions that fill in one word at a time. That’s why there are close to 50 different timed track formats. In fact, the struggle between timed text standards has been as ugly as the format war over audio and video codecs.
Currently, the official HTML5 specification doesn’t specify what timed text format you should use. However, browser makers have united around WebVTT, a still-evolving specification inspired by the simple SRT format used for subtitles in desktop media players. Browser makers have chosen to ignore the more mature TTML (Timed Text Markup Language) standard, which the W3C has honed over a decade, because it’s too complex. (Currently, IE 10 [and later] are the only browsers that give TTML any measure of support.)
TIP
You can learn more about the WebVTT standard—including the techniques you need to format and style captions—from the specification at http://dev.w3.org/html5/webvtt. If you’d like some help writing your captions, you can try out Microsoft’s nifty Caption Maker page (Figure 5-10), which you can find at http://tinyurl.com/capmaker.
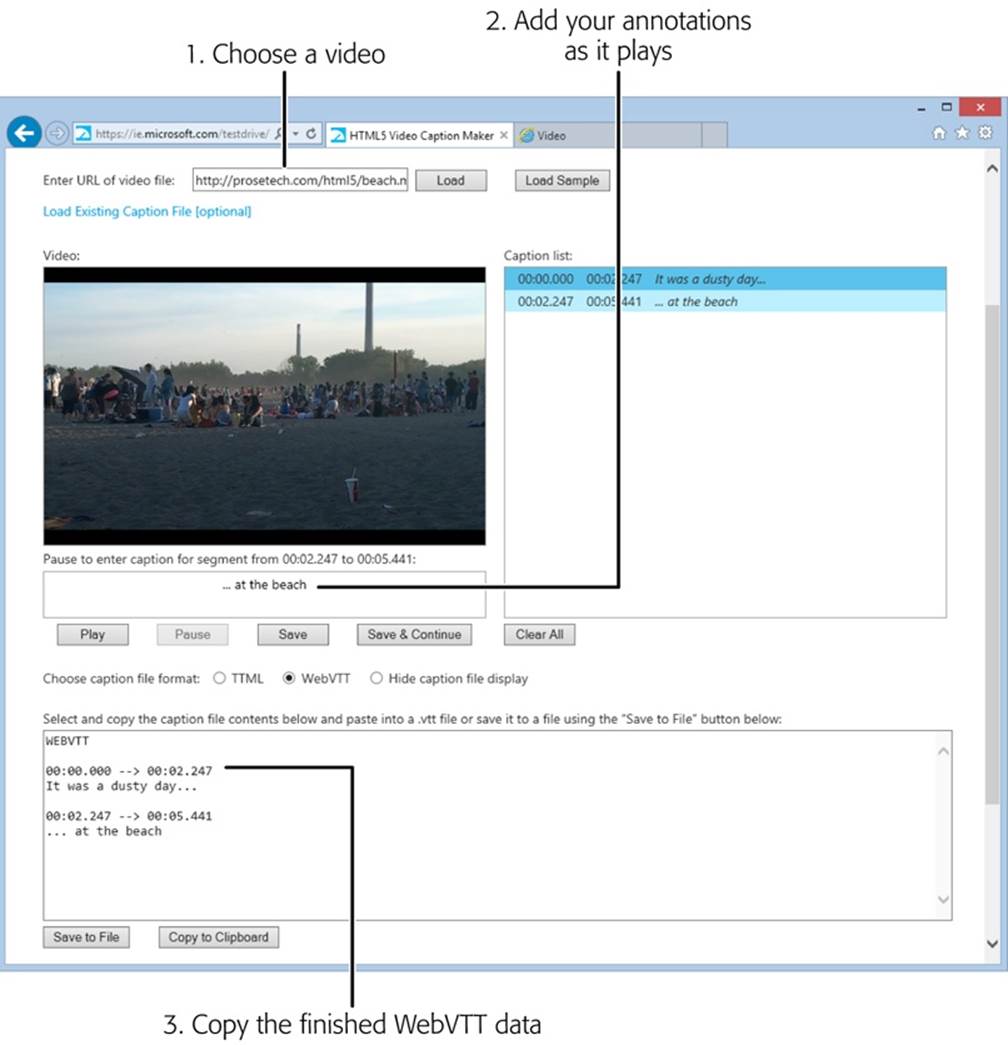
Figure 5-10. To use the Caption Maker, you must first point it to a video file that’s already on the Web (type in the URL and click Load). While you’re playing the video, it’s easy to make a quick caption (type it in the box under the video window and then click Save). Then, when you’re all done, you can copy the complete WebVTT listing from the text box below.
Adding Captions with <track>
Once you have a WebVTT file that contains your captions, you need a way to pair them up with your video file. The element that works this magic is named <track>. You add it inside your <video> element, after any <source> elements:
<video controls width="700" height="400">
<source src="butterfly.mp4" type="video/mp4">
<source src="butterfly.webm" type="video/webm">
<track src="butterfly.vtt" srclang="en" kind="subtitles" label="English"
default>
</video>
The <track> element takes several attributes. First is the src attribute, which identifies the timed track file. The srclang attribute identifies the language code of your subtitle file, for accessibility tools. Use en for English (or get the code for a more exotic language at http://tinyurl.com/l-codes).
The kind attribute describes the type of content in your captions. The HTML5 specification gives you five choices, but only two result in the pop-up captions you expect. Specify subtitles if your text consists of transcriptions or translations of dialogue), or captions if your text includes dialogue and descriptions for sound effects and musical cues.
TIP
Subtitles make sense when you can hear the audio but not understand it—for example, when watching a movie in another language. Captions make sense when no audio is available at all—for example, you’ve muted your player so you won’t wake up your officemate in the cubicle beside you.
More specialized values for the kind attribute are descriptions (text that can replace the video when it’s not available and may be spoken by speech synthesis), chapters (chapter titles, which viewers can use as a navigation aid), and metadata (bits of information that you can retrieve in your JavaScript code). If you choose one of these values, the video player won’t show the text. It’s up to another tool—or your JavaScript code—to retrieve this information and act on it.
The label attribute sets the text that’s shown in the video player’s Caption menu, which you can call up by clicking a small button under the video window. The label text is particularly important if you want to let viewers choose from multiple tracks. For example, here’s a video that has two tracks:
<video controls width="700" height="400">
<source src="butterfly.mp4" type="video/mp4">
<source src="butterfly.webm" type="video/webm">
<track src="butterfly.vtt" srclang="en" kind="subtitles" label="English"
default>
<track src="butterfly_fr.vtt" srclang="fr" kind="subtitles"
label="French">
</video>
The first track has the default attribute, so it’s the one that’s initially picked. But the viewer can click the caption button and pick the other track (Figure 5-11).
Even if your video has just a single track, the caption list still includes two choices: your track and an Off option that turns off the captions. If you want to give viewers the option of captions, but you want your captions to be off initially, just make sure none of your tracks have the defaultattribute. That way, the video player starts with the Off option.
NOTE
Track files aren’t just for accessibility and soundless playback. Search engines can also mine the information in a track file and use it to improve search results. If fact, a super-smart search engine of the future might use WebVTT information to lead a searcher directly to a specific playback location within a video file, by matching the search text with a timed caption.
Browser Support for Video Captions
Browsers have been slow to support the <track> element. At this writing, Firefox doesn’t support it at all, but the developers at Mozilla plan to include it in the future. Table 5-4 details the current state of affairs.
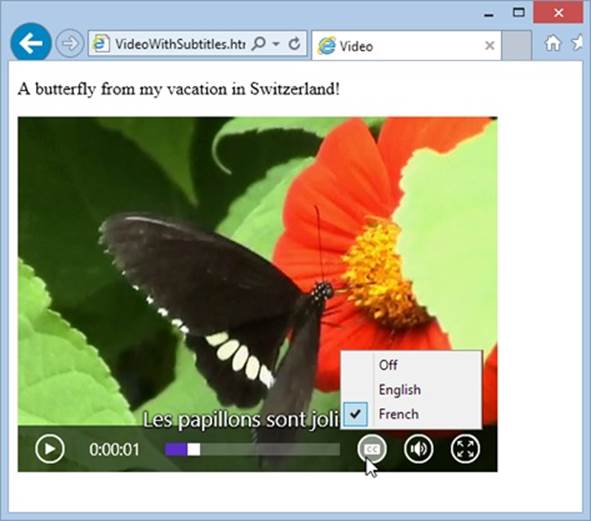
Figure 5-11. Browsers that support the <track> element add a caption-picking button like this one. Using it, the viewer can switch tracks or turn captions off altogether.
Table 5-4. Browser support for the <track> element
|
IE |
FIREFOX |
CHROME |
SAFARI |
OPERA |
SAFARI IOS |
ANDROID |
|
|
Minimum Version |
10 |
- |
26 |
6[a] |
15 |
- |
2 |
|
[a] Safari doesn’t provide a caption button for switching tracks or turning captions on and off. |
|||||||
NOTE
If you’re testing videos that use captions in Chrome, you’ll need to upload your files first. If you simply launch the file from your computer, Chrome can play the video file, but it can’t fetch the matching WebVTT file.
Fortunately, you can use the <track> element without worry. Browsers that don’t support it simply ignore it, without a hiccup.
If you need a way to provide captions that work on every HTML5 browser, there’s an easy workaround. You can use the <track> element as you would normally, in conjunction with a JavaScript polyfill, such as Captionator.js (http://captionatorjs.com). Captionator works by placing a floating element over the video window. Then, when playback reaches the appropriate points, Captionator.js retrieves the caption text from the WebVTT file and inserts it into the floating element.
All materials on the site are licensed Creative Commons Attribution-Sharealike 3.0 Unported CC BY-SA 3.0 & GNU Free Documentation License (GFDL)
If you are the copyright holder of any material contained on our site and intend to remove it, please contact our site administrator for approval.
© 2016-2026 All site design rights belong to S.Y.A.