HTML5: The Missing Manual Matthew MacDonald (2013)
Part 2. Video, Graphics, and Glitz
Chapter 6. Fancy Fonts and Effects with CSS3
It would be ludicrous to build a modern website without CSS. The standard is fused into the fabric of the Web almost as tightly as HTML. Whether you’re laying out pages, building interactive buttons and menus, or just making things look pretty, CSS is a fundamental tool. In fact, as HTML has increasingly shifted its focus to content and semantics (Introducing the Semantic Elements), CSS has become the heart and soul of web design.
Along the way, CSS has become far more detailed and far more complex. When CSS evolved from its first version to CSS 2.1, it quintupled in size, reaching the size of a modest novel. Fortunately, the creators of the CSS standard had a better plan for future features. They carved the next generation of enhancements into a set of separate standards, called modules. That way, browser makers were free to implement the most exciting and popular parts of the standard first—which is what they were already doing, modules or not. Together, the new CSS modules fall under the catchall name CSS3 (note the curious lack of a space, as with HTML5).
CSS3 has roughly 50 modules in various stages of maturity. They range from features that provide fancy eye candy (like rich fonts and animation) to ones that serve a more specialized, practical purpose (for example, speaking text aloud or varying styles based on the capabilities of the computer or mobile device). They include features that are reliably supported in the most recent versions of all modern browsers and features so experimental that no browser yet supports them.
In this chapter, you’ll tour some of the most important (and best supported) parts of CSS3. First, you’ll see how to use shadows, rounded corners, and other refinements to make your boxes look better. Next, you’ll learn how you can use transitions to create subtle effects when the visitor hovers over an element, clicks on it, or tabs over to a control. (And you’ll make these effects even better with two more CSS3 features: transforms and transparency.) Finally, you’ll learn how to jazz up ordinary text with a rich variety of web fonts.
But first, before you get to any of these hot new features, it’s time to consider how you can plug in the latest and most stylin’ features without leaving a big chunk of your audience behind.
Using CSS3 Today
CSS3 is the unchallenged future of web styling, and it’s not finished yet. Many modules are still being refined and revised, and no browser supports them all. You can see the current state of this giant family of specifications at http://tinyurl.com/CSS3-stages.
Because CSS3 is still being fine-tuned, it has the same complications as HTML5. Website authors like yourself need to decide what to use, what to ignore, and how to bridge the support gaps.
There are essentially three strategies you can use when you start incorporating CSS3 into a website. The following sections describe them.
NOTE
CSS3 is not part of HTML5. The standards were developed separately, by different people working at different times in different buildings. However, even the W3C encourages web developers to lump HTML5 and CSS3 together as part of the same new wave of modern web development. For example, if you check out the W3C’s HTML5 logo-building page atwww.w3.org/html/logo, you’ll see that it encourages you to advertise CSS3 in its HTML5 logo strips. Furthermore, many hallmarks of modern web design with HTML5—such as the mobile-friendly layout techniques you’ll learn about in the next chapter—require CSS3.
Strategy 1: Use What You Can
It makes sense to use features that already have solid browser support across all browser brands. One example is the web font feature (Web Fonts). With the right font formats, you can get it working with browsers all the way back to IE 6. Unfortunately, very few CSS3 features fall into this category. The word-wrap property works virtually everywhere, and older browsers can do transparency with a bit of fiddling, but just about every other feature leaves the still-popular IE 8 browser in the dust.
NOTE
Unless otherwise noted, the features in this chapter work on the latest version of every modern browser, including Internet Explorer, provided you use IE 9 or later. However, they don’t work on older versions of IE.
Strategy 2: Treat CSS3 Features as Enhancements
CSS3 fans have a rallying cry: “Websites don’t need to look exactly the same on every browser.” Which is certainly true. (They have a one-page website, too—see http://DoWebsitesNeedToBeExperiencedExactlyTheSameInEveryBrowser.com, which picks up a few frills on modern browsers but remains functional on laggards like IE 7.)
The idea behind this strategy is to use CSS3 to add fine touches that won’t be missed by people using less-capable browsers. One example is the border-radius property that you can use to gently round the corners of a floating box. Here’s an example:
header {
background-color: #7695FE;
border: thin #336699 solid;
padding: 10px;
margin: 10px;
text-align: center;
border-radius: 25px;
}
Browsers that recognize the border-radius property will know what to do. Older browsers will just ignore it, keeping the plain square corners (Figure 6-1).
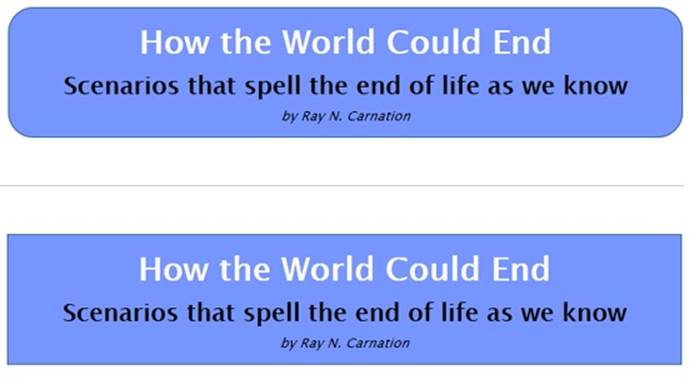
Figure 6-1. On Internet Explorer 9, this header box has rounded corners (top). IE 8 ignores the border-radius property but applies the rest of the style sheet properties (bottom).
This backward compatibility allows web designers to play with the latest frills in the newest version of CSS without breaking their sites on older browsers. However, there’s a definite downside if you go too far. No matter how good a website looks in the latest version of your favorite browser, it can be deeply deflating if you fire up an older browser that’s used by a significant slice of your clientele and find that it looks distinctly less awesome. After all, you want your website to impress everyone, not just web nerds with the best browsers.
For this reason, you may want to approach some CSS3 enhancements with caution. Limit yourself to features that are already in most browsers, even if they require the latest browser versions. And don’t use CSS3 features in ways that change the experience of your website so dramatically that some people will get second-rate status.
TIP
When it comes to CSS3, Internet Explorer is the straggler. There’s a militant minority of web designers who believe that web designers should ignore backward browsers like IE 8 and start using CSS3 features as soon as other browsers support them. Otherwise, who will keep pressure on Microsoft and encourage the Web to get better? That philosophy makes sense, if the primary purpose of your website is the political one of promoting advanced web standards. But otherwise, keep in mind that dismissing a large segment of the web world will reflect poorly on you—because no matter how much you dislike someone’s browser, that person is still using it to look at your work.
Strategy 3: Add Fallbacks with Modernizr
Using a partially supported CSS3 feature is a great idea if the website still looks great without it. But sometimes, a vital part of your website design can go missing, or the downgraded version of your website just looks ugly. For example, consider what happens if you use the Firefox-only multicolored border settings, as shown in Figure 6-2.
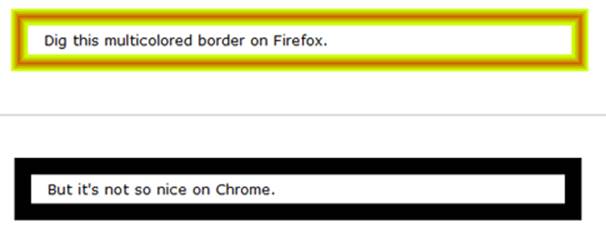
Figure 6-2. This multicolored border looks snazzy in Firefox (top). But try the same thing out in Chrome, and you’ll get a thick, plain black border (bottom)—and that never looks good.
Sometimes, you can solve the problem by stacking properties in the right order. The basic technique is to start with more general properties, followed by new properties that override these settings. When this works, it satisfies every browser—the old browsers get the standard settings, while the new browsers override these settings with newer ones. For example, you can use this technique to replace an ordinary background fill with a gradient:
.stylishBox {
...
background: yellow;
background: radial-gradient(ellipse, red, yellow);
}
Figure 6-3 shows the result.
In some cases, overriding style properties doesn’t work, because you need to set properties in combination. The multicolored border in Figure 6-2 is an example. The multicolored effect is set with the border-colors property, but it appears only if the border is made thick with the border-thickness property. On browsers that don’t support multicolored borders, the thick border is an eyesore, no matter what single color you use.
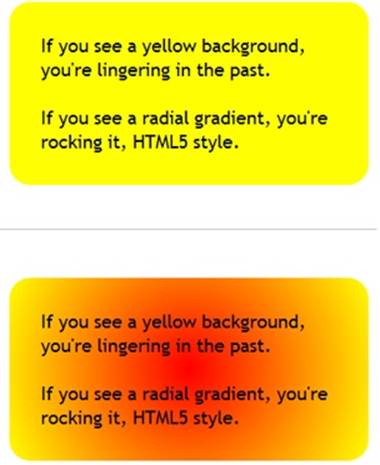
Figure 6-3. Top: In browsers that don’t understand CSS3, the stylishBox rule paints a yellow background. Bottom: In browsers that do understand CSS3, the yellow background is replaced with a radial gradient that blends from a red center point to yellow at the edges.
One way to address problems like these is with Modernizr, the JavaScript library that tests HTML5 feature support (Feature Detection with Modernizr). It lets you define alternate style settings for browsers that don’t support the style properties you really want. For example, imagine you want to create two versions of the header box shown in Figure 6-1. You want to use rounded corners if they’re supported, but substitute a double-line border if they aren’t. If you’ve added the Modernizr script reference to your page, then you can use a combination of style rules, like this:
/* Settings for all headers, no matter what level of CSS3 support. */
header {
background-color: #7695FE;
padding: 10px;
margin: 10px;
text-align: center;
}
/* Settings for browsers that support border-radius. */
.borderradius header {
border: thin #336699 solid;
border-radius: 25px;
}
/* Settings for browsers that don't support border-radius. */
.no-borderradius header {
border: 5px #336699 double;
}
So how does this nifty trick work? When you use Modernizr in a page, you begin by adding the class=“no-js” attribute to the root <html> element:
<html class="no-js">
When you load Modernizr on a page, it quickly checks if a range of HTML5, Java-Script, and CSS3 features are supported. It then applies a pile of classes to the root <html> element, separated by spaces, changing it into something like this:
<html class="js flexbox canvas canvastext webgl no-touch geolocation
postmessage no-websqldatabase indexeddb hashchange history draganddrop
no-websockets rgba hsla multiplebgs backgroundsize borderimage borderradius
boxshadow textshadow opacity no-cssanimations csscolumns cssgradients
no-cssreflections csstransforms no-csstransforms3d csstransitions fontface
generatedcontent video audio localstorage sessionstorage webworkers
applicationcache svg inlinesvg smil svgclippaths">
If a feature appears in the class list, that feature is supported. If a feature name is prefixed with the text “no-” then that feature is not supported. Thus, in the example shown here, JavaScript is supported (js) but web sockets are not (no-websockets). On the CSS3 side of things, the border-radius property works (borderradius) but CSS3 reflections do not (no-cssreflections).
You can incorporate these classes into your selectors to filter out style settings based on support. For example, a selector like .borderradius header gets all the <header> elements inside the root <html> element—if the browser supports the border-radius property. Otherwise, there will be no .borderradius class, the selector won’t match anything, and the rule won’t be applied.
The catch is that Modernizr provides classes for only a subset of CSS3 features. This subset includes some of CSS3’s most popular and mature features, but the border-color feature in Figure 6-2 doesn’t qualify because it’s still Firefox-only. For that reason, it’s a good idea to hold off on using multicolored borders in your pages, at least for now.
NOTE
You can also use Modernizr to create JavaScript fallbacks. In this case, you simply need to check the appropriate property of the Modernizr object, as you do when checking for HTML5 support. You can use this technique to compensate if you’re missing more advanced CSS3 features, like transitions or animations. However, there’s so much work involved and the models are so different that it’s usually best to stick with a JavaScript-only solution for essential website features.
Browser-Specific Styles with Vendor Prefixes
When the creators of CSS develop new features, they often run into a chicken-and-egg dilemma. In order to perfect the feature, they need feedback from browser makers and web designers. But in order to get this feedback, browser makers and web designers need to implement these new-and-imperfect features. The result is a cycle of trial and feedback that takes many revisions to settle down. As this process unfolds, the syntax and implementation of features change. This raises a very real danger—unknowing web developers might learn about a dazzling new feature and implement it in their real-life websites, not realizing that future versions of the standard could change the rules and break the websites.
To avoid this threat, browser makers use a system of vendor prefixes to change CSS property and function names while they’re still under development. For example, consider the radial-gradient() function described on Radial Gradients. In older versions of Firefox, the radial-gradient() function wasn’t available. However, you could use an “in progress” version of this function called -moz-radial-gradient:
.stylishBox {
background: yellow;
background: -moz-radial-gradient(ellipse, red, yellow);
}
Firefox uses the vendor prefix -moz- (which is short for Mozilla, the organization that’s behind the Firefox project). Every browser engine has its own vendor prefix (Table 6-1), which complicates life horrendously, but for a good reason. Different browser makers add support at different times, often using different draft versions of the same specification. Although all browsers will support the same syntax for final specification, the syntax of the vendor-specific properties and functions often varies.
Table 6-1. Vendor prefixes
|
PREFIX |
FOR BROWSERS |
|
-moz- |
Firefox |
|
-webkit- |
Chrome, Safari, and the latest versions of Opera (the same rendering engine powers all three browsers) |
|
-ms- |
Internet Explorer |
|
-o- |
Old versions of Opera (before version 15) |
Here’s an example that applies a radial gradient using all four of the browser-specific prefixes:
.stylishBox {
background: yellow;
background-image: -moz-radial-gradient(circle, green, yellow);
background-image: -webkit-radial-gradient(circle, green, yellow);
background-image: -o-radial-gradient(circle, green, yellow);
background-image: -ms-radial-gradient(circle, green, yellow);
}
Clearly, when dealing with the less mature parts of CSS3, you need some bloated style sheet rules.
The obvious question for every web designer is “When do I need to use vendor prefixes, and when is it safe to use the ordinary, unprefixed property or function name?” You might think you could just fire up your browser for a quick test, but you won’t have a conclusive answer unless you run your page through every browser out there. For example, the borderadius property works on all browsers, with no vendor prefixes required. But the radial-gradient() function is a bit trickier: At this writing, it works on most browsers but still requires the -webkit- prefix on some mobile browsers. And the transform property that you’ll consider later in this chapter works with no prefix on IE and Firefox, but still requires the -webkit- prefix in Chrome, Safari, and Opera.
Further complicating life, the syntax you use to specify a property value or function argument can change. For example, IE 10 introduced a prefixed version of the radial-gradient() function during testing. The final, released version of IE 10 lets developers use either the most recent syntax with the unprefixed radial-gradient() function or the slightly older form with the prefixed -ms-radial-gradient() function. This setup is good for endless hours of debugging fun.
NOTE
In this chapter, you’ll learn about the current state of support for all CSS3 parts covered here, including which ones need vendor prefixes. If a style sheet example in this chapter doesn’t use vendor prefixes, you can assume that it’s safe to omit them when you use the feature in your own pages.
If your head is starting to spin, don’t worry—help is at hand. To get the latest information about which CSS3 features require vendor prefixes, you can turn to the virtually indispensable site http://caniuse.com (which you first saw on How to Find the Browser Requirements for Any HTML5 Feature). When you look up a CSS3 feature, the “Can I use…” site clearly spells out which browser versions require a vendor prefix (Figure 6-4).
NOTE
Using vendor prefixes is a messy business. Web developers are split on whether they’re a necessary evil of getting the latest and greatest frills, or a big fat warning sign that should scare clear-thinking designers away. But one thing is certain: If you don’t use the vendor prefixes, significant parts of CSS3 will be off limits for now.
Building Better Boxes
From the earliest days of CSS, web designers were using it to format boxes of content. As CSS became more powerful, the boxes became more impressive, creating everything from nicely shaded headers to floating, captioned figures. And when CSS cracked the hovering problem, floating boxes were even turned into rich, glowy buttons, taking over from the awkward JavaScript-based approaches of yore. With this in mind, it’s no surprise that some of the most popular and best-supported CSS3 features can make your boxes look even prettier, no matter what they hold.

Figure 6-4. If you need to use a prefix, the “Can I use…” website lets you know in a tiny yellow text bubble. For example, the CSS3 transforms feature doesn’t need a vendor prefix in the latest versions of Firefox or IE, but it does in all other browsers.
GEM IN THE ROUGH: ADDING VENDOR PREFIXES AUTOMAGICALLY
If you make heavy use of the parts of CSS3 that still require vendor prefixes, you can quickly get worn down updating massive style sheets and adding multiple versions of the same style sheet property over and over again. Before you lose your sanity, consider a miraculously clever JavaScript tool called -prefix-free.
To use -prefix-free, you create an ordinary style sheet, using CSS3 properties as you need them, without worrying about vendor prefixes. Then, in your web pages, you add a reference to the -prefix-free script.
When someone views one of your pages, the -prefix-free script springs into action. It examines the current browser and automatically tweaks your style sheet to suit by adding all the vendor prefixes that that browser needs. (Yes, this automatic tweaking takes a bit of extra time, but you’ll probably find it’s so fast as to be undetectable.) Of course, -prefix-free can’t make a browser support a feature that it otherwise wouldn’t, but it can transform ordinary, sensibly named properties into the messy, vendor-specific names that some browsers need to support new and evolving features. For many developers, adding an extra JavaScript file is a small price to pay for managing the chaos of CSS3 prefixes.
To download the -prefix-free library, or play with an interactive page that lets you type some CSS and test the script’s prefix-adding ability, visit http://leaverou.github.io/prefixfree.
Transparency
The ability to make partially transparent pictures and colors is one of the most basic building blocks in CSS3. There are two ways to do it.
Your first option is to use the rgba() color function, which accepts four numbers. The first three values are the red, green, and blue components of the color, from 0 to 255. The final value is the alpha, a fractional value number from 0 (fully transparent) to 1 (fully opaque).
Here’s an example that creates a 50 percent transparent lime green color:
.semitransparentBox {
background: rgba(170,240,0,0.5);
}
Browsers that don’t support rgba() will just ignore this rule, and the element will keep its default, completely transparent background. So the second, and better, approach is to start by declaring a solid fallback color, and then replace that color with a semitransparent one:
.semitransparentBox {
background: rgb(170,240,0);
background: rgba(170,240,0,0.5);
}
This way, browsers that don’t support the rgba() function will still color the element’s background, just without the transparency.
TIP
To make this fallback better, strive to use a color that more accurately reflects the semitransparent effect. For example, if you’re putting a semitransparent lime green color over a mostly white background, the color will look lighter because the white shows through. Your fallback color should reflect this fact, if possible.
CSS3 also adds a style property named opacity, which works just like the alpha value. You can set opacity to a value from 0 to 1 to make any element partially transparent:
.semitransparentBox {
background: rgb(170,240,0);
opacity: 0.5;
}
Figure 6-5 shows two examples of semitransparency, one that uses the rgba() function and one that uses the opacity property.
The opacity property is a better tool than the rgba() function if you want to do any of the following:
§ Make more than one color semitransparent. With opacity, the background color, text color, and border color of an element can become transparent.
§ Make something semitransparent, even if you don’t know its color (for example, because it might be set by another style sheet or in JavaScript code).
§ Make an image semitransparent.
§ Use a transition, an animated effect that can make an element fade away or reappear (Triggering Transitions with JavaScript).
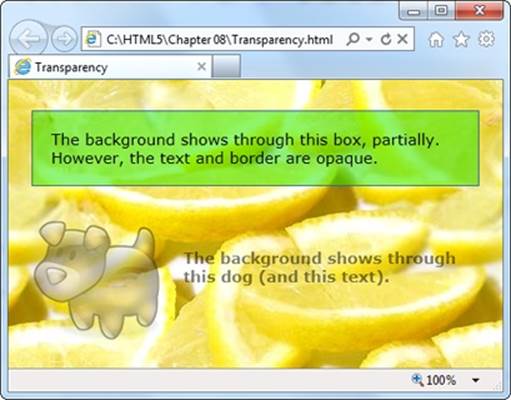
Figure 6-5. This page serves up semitransparency two different ways: to fade out a picture (using the opacity property) and to let the background show through a box (using a background color created with the rgba() function).
Rounded Corners
You’ve already learned about the border-radius property, which lets you shave the hard corners off boxes. But what you haven’t yet seen is how you can tweak this setting to get the curve you want.
First, you can choose a different, single value for the border-radius property, since the property specifies the radius of the circle that’s used to draw the rounded edge. (You don’t see the entire circle—just enough to connect the vertical and horizontal sides of the box.) Set a biggerborder-radius value, and you’ll get a bigger curve and a more gently rounded corner. As with most measurements in CSS, you can use a variety of units, including pixels and percentages. You can also adjust each corner separately by supplying four values:
.roundedBox {
background: yellow;
border-radius: 25px 50px 25px 85px;
}
But that’s not all—you can also stretch the circle into an ellipse, creating a curve that stretches longer in one direction. To do this, you need to target each corner separately (using properties like border-top-left-radius) and then supply two numbers: one for the horizontal radius and one for the vertical radius:
.roundedBox {
background: yellow;
border-top-left-radius: 150px 30px;
border-top-right-radius: 150px 30px;
}
Figure 6-6 shows some examples.
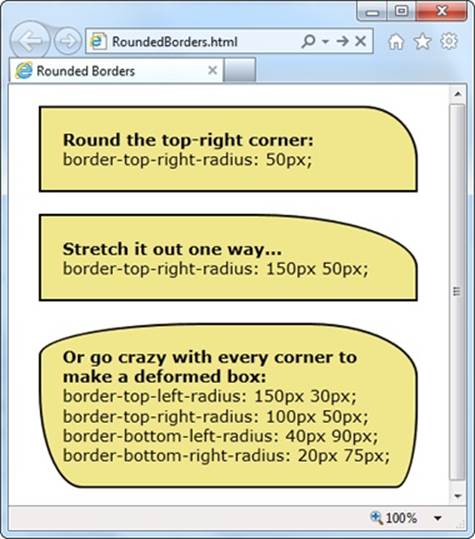
Figure 6-6. A clever application of border-radius can create virtually any sort of curve.
Backgrounds
One shortcut to attractive backgrounds and borders is to use images. CSS3 introduces two new features to help out here. First is multiple background support, which lets you combine two or more images in a single element’s background. Here’s an example that uses two backgrounds to embellish the top-left and bottom-right corner of a box:
.decoratedBox {
margin: 50px;
padding: 20px;
background-image: url('top-left.png'), url('bottom-right.png');
background-position: left top, right bottom;
background-repeat: no-repeat, no-repeat;
}
This first step is to supply a list with any number of images, which you use to set the background-image property. You can then position each image and control whether it repeats, using the background-position and background-repeat properties. The trick is to make sure that the order matches, so the first image is positioned with the first background-position value, the second image with the second background-position value, and so on. Figure 6-7 shows the result.
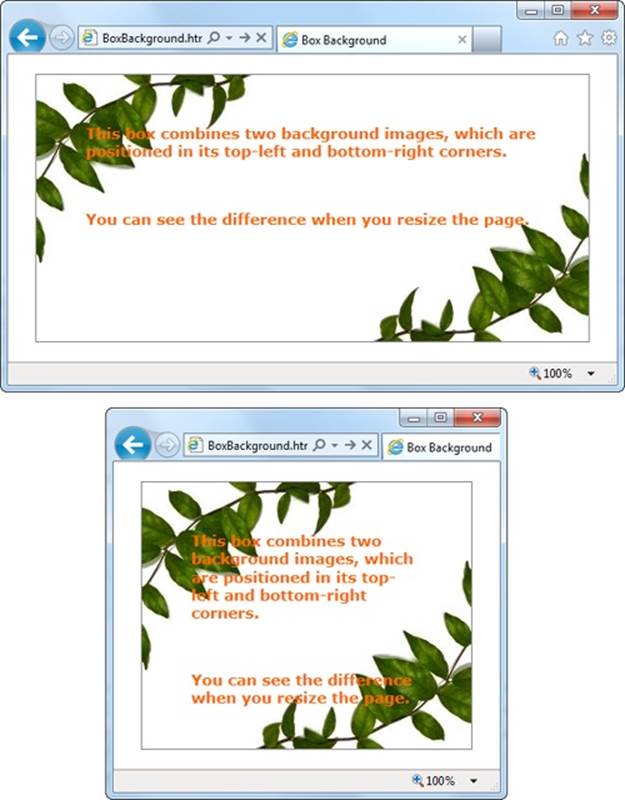
Figure 6-7. It doesn’t matter how big this box grows—the two background images stay fixed at either corner.
NOTE
If browsers don’t support multiple backgrounds, they’ll completely ignore your attempt to set the background. To avoid this problem, start by setting the background or background-image property with a fallback color or picture. Then, attempt to set multiple backgrounds by setting background-image with a list of pictures.
And here’s a revised example that uses the sliding doors technique—a time-honored web design pattern that creates a resizable graphic out of three pieces: an image for the left, an image for the right, and an extremely thin sliver that’s tiled through the middle:
.decoratedBox {
margin: 50px;
padding: 20px;
background-image: url('left.png'), url('middle.png'), url('right.png');
background-position: left top, left top, right bottom;
background-repeat: no-repeat, repeat-x, no-repeat;
}
You could use markup like this to draw a background for a button. Of course, with all of CSS3’s fancy new features, you’ll probably prefer to create those using shadows, gradients, and other image-free effects.
Shadows
CSS3 introduces two types of shadows: box shadows and text shadows. Of the two, box shadows are generally more useful. You can use a box shadow to throw a rectangular shadow behind any <div> (but don’t forget your border, so it still looks like a box). Shadows even follow the contours of boxes with rounded corners (see Figure 6-8).

Figure 6-8. Shadows can make text float (top), boxes pop out (middle), or buttons look glowy (bottom).
The two properties that make shadows work are box-shadow and text-shadow. Here’s a basic box shadow example:
.shadowedBox {
border: thin #336699 solid;
border-radius: 25px;
box-shadow: 5px 5px 10px gray;
}
The first two values set the horizontal and vertical offset of the shadow. Using positive values (like 5 pixels for both, in the above example) displaces the shadow down and to the right. The next value sets the blur distance—in this example, 10 pixels—which increases the fuzziness of the shadow. At the end is the shadow color. If there’s any content underneath the box, consider using the rgba() function (Transparency) to supply a semitransparent shadow.
If you want to tweak your shadow, you can tack on two details. You can add another number between the blur and the color to set the shadow spread, which expands the shadow by thickening the solid part before the blurred edge starts:
box-shadow: 5px 5px 10px 5px gray;
And you can add the word inset on the end to create a shadow that reflects inside an element, instead of outside. This works best if you use a shadow that’s directly on top of the element, with no horizontal or vertical offset:
box-shadow: 0px 0px 20px lime inset;
This creates the bottom example in Figure 6-8. You can use inset shadows to add hover effects to a button (A Basic Color Transition).
NOTE
You can even supply multiple shadows by separating each one with a comma. But getting shadow-crazy is usually a waste of effort and computing power.
The text-shadow property requires a similar set of values, but in a different order. The color comes first, followed by the horizontal and vertical offsets, followed by the blur:
.textShadow {
font-size: 30px;
font-weight: bold;
text-shadow: gray 10px 10px 7px;
}
Box shadows and text shadows don’t show up in old versions of Internet Explorer. Box shadows require IE 9 or later, while text shadows require IE 10 or later.
Gradients
Gradients are blends of color that can create a range of effects, from the subtle shading behind a menu bar to a psychedelic button that’s colored like a 1960s revival party. Figure 6-9 shows some examples.
NOTE
Many web gradients are faked with background images. But CSS3 lets you define the gradient you want and gets the browser to do the work. The advantage is fewer image files to schlep around and the ability to create gradients that seamlessly resize themselves to fill any amount of space.
CSS supports two types of gradients: linear gradients that blend from one band of color to another, and radial gradients that blend from a central point to the outer edges of your region.
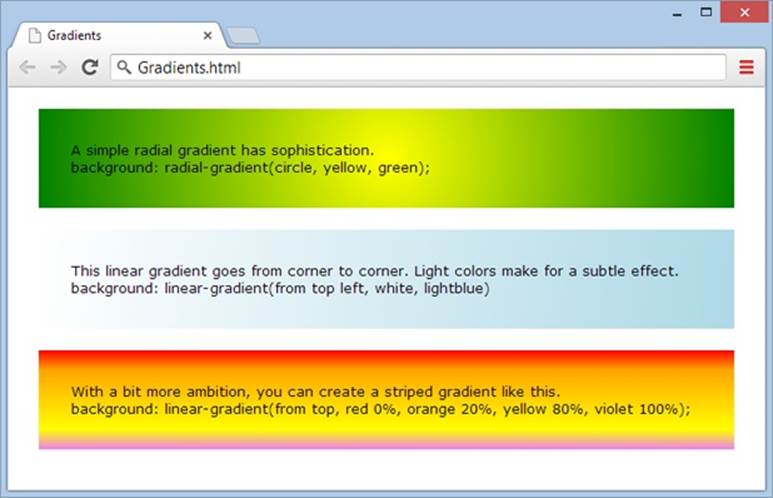
Figure 6-9. At the heart of it, gradients are nothing more than blends of two or more colors. But that simple recipe cooks up into plenty of different dishes.
There are no special CSS properties for creating gradients. Instead, you can use a gradient function to set the background property. Just remember to set the property to a solid color first to create a fallback for browsers that don’t support gradients (like versions of Internet Explorer before IE 10).
Linear Gradients
There are four gradient functions. The first function is linear-gradient(). Here it is in one of its simpler forms, shading a region from white at the top to blue at the bottom:
.colorBlendBox {
background: linear-gradient(from top, white, blue);
}
The word from indicates that the top is the starting point for the first color (white). You can replace this with to, which reverses the gradient so it blends from blue at the bottom to white at the top:
background: linear-gradient(to top, white, blue);
Similarly, you can replace top with left to go from one side to another. Or use both to blend diagonally from the top-left corner:
background: linear-gradient(from top left, white, lightblue)
If you want multiple-color bands, you simply supply a list of colors. Here’s how you create a series of three horizontal color stripes, starting with red at the top:
background: linear-gradient(from top, red, orange, yellow);
Finally, you can control where each color starts (bumping some together or off to one side), using gradient stops. Each gradient stop is a percentage, with 0 percent being at the very start of the gradient and 100 percent being at the very end. Here’s an example that extends the orangey-yellow section in the middle:
background: linear-gradient(from top, red 0%, orange 20%, yellow 80%,
violet 100%);
The syntax of the linear-gradient() function is easy to follow. But here’s the bad news: To guarantee support on Android browsers and slightly older versions of Safari (before Safari 7), you need to also add the -webkit- vendor prefix. And what’s worse, the -webkit-linear-gradient() function is subtly different from the true linear-gradient() function. Unlike linear-gradient(), -webkit-linear-gradient() doesn’t use the to or from values to specify direction. Instead, from is assumed automatically.
Here’s a fully outfitted style sheet rule that satisfies slightly older browsers by adding a vendor-prefixed gradient:
.colorBlendBox {
background: lightblue;
background: -webkit-linear-gradient(top left, white, lightblue);
background: linear-gradient(from top left, white, lightblue);
}
Fortunately, there’s no need to add other vendor prefixes (like -moz- and -o-), unless you want to support much older versions of Firefox and Opera.
TIP
In all these examples, gradients were used with the background property. However, you can also use gradient functions to set the background-image property in exactly the same way. The advantage here is that background-image lets you use an image fallback. First, set background-image to a suitable fallback image for less-equipped browsers, and then set it again using a gradient function. Most browsers are smart enough that they won’t download the gradient image unless they need it, which saves bandwidth.
Radial Gradients
To set a radial gradient, you use the radial-gradient() function. You need to supply a color for the center of the circle and a color for the outer edge of the circle, where it meets the boundaries of the element. Here’s a radial gradient that places a white point in the center and fades out to blue on the edges:
background: radial-gradient(circle, white, lightblue);
Once again, you need to add a -webkit- version of the function to be safe:
background: -webkit-radial-gradient(circle, yellow, green);
Replace the word circle with ellipse if you want to stretch your gradient out into an oblong shape to better fit its container.
As with a linear gradient, you can supply a whole list of colors. Optionally, you can add percentages to tweak how quickly the gradient blends from one color to the next. Here’s an example that starts yellow, blends slowly into green, and then quickly blends through blue, white, and black near the outside edge of the element:
background: radial-gradient(circle, yellow 10%, green 70%, blue, white,
black);
You can also place the center of your gradient using percentages. For example, if you want the center point of your circle to be near the top-right corner of your element, you might use this sort of radial gradient:
background: radial-gradient(circle at 90% 5%, white, lightblue);
These percentages tell the browser to start the gradient 90% from the left edge (which is almost all the way to the right side) and 5% from the top edge.
NOTE
The syntax of the radial-gradient() function has changed since it was first created. The at keyword, which positions the gradient’s center point, is a relatively new detail. Although it’s safe to use at with the radial-gradient() function, don’t attempt to use it with the vendor-specific -webkit-radial-gradient() function.
Repeating Gradients
CSS3 also includes two functions that let you create more dizzying gradients: repeating-linear-gradient() and repeating-radial-gradient(). Whereas linear-gradient() and radial-gradient() blend through your list of colors once, the repeating-linear-gradient() and repeating-radial-gradient() functions cycle through the same set of colors endlessly, until they fill up all the available space in your element with blended stripes of color. The result is a psychedelic tie-dye effect that just might fool you into thinking you’ve stepped back in time to the ’70s.
The syntax of repeating-linear-gradient() and repeating-radial-gradient() is essentially the same as the syntax of linear-gradient() and radial-gradient(). The only difference is that you need to make sure you limit the size of your gradient so it can repeat.
For example, this repeating gradient won’t look any different from a normal gradient, because its size isn’t limited. Instead, it starts with yellow in the center and blends to green at the outer edge:
background: repeating-radial-gradient(circle, yellow, green);
The following gradient is different. It keeps the yellow in the center, but sets the green to kick in at the 10% mark. After that, the gradient repeats, starting with the yellow color again. The result is a striped effect of blurry yellow and green lines.
background: repeating-radial-gradient(circle, yellow, green 10%);
You can have as many colors as you like in a repeating gradient. The key detail is to make sure that the final color includes a percentage or pixel value, which sets that color’s position. That way, the color won’t be placed at the edge of your element.
Instead of using a percentage value, you can use a pixel width, like this:
background: repeating-linear-gradient(to top, red, orange, white, yellow,
red 30px);
This gradient creates a slightly different effect. Now each stripe always has the same thickness (30 pixels), and the number of stripes depends on the available space. By comparison, the previous example always had the 10 proportionately sized stripes, each one filling 10% of the available space.
TIP
Repeating gradients come with two caveats. First, you may include only the to keyword but never from, because a repeating gradient can be filled in only one direction. Second, if you want your gradient to blend seamlessly without a sharp break between colors each time the gradient repeats itself, make sure the final color in your list is the same as the first color in your list.
GEM IN THE ROUGH: FANCY GRADIENTS WITH LESS FUSS
Creating complex gradients is a fiddly business. To speed up the process, you may want to try an online gradient-generating tool. The idea is simple: You play with the controls in your browser until the gradient looks fabulous, and the tool spits out the markup you need (complete with different vendor-prefixed versions, just in case you need them). Two good gradient-generating tools are the Ultimate CSS Gradient Generator (www.colorzilla.com/gradient-editor) and Microsoft’s CSS Gradient Background Maker (http://tinyurl.com/ms-gradient).
Creating Effects with Transitions
Back in the day when CSS 2.1 was hot stuff, web developers were excited about a new feature called pseudo-classes (Pseudo-Class Selectors). Suddenly, with the help of :hover and :focus, developers could create interactive effects without writing any JavaScript code. For example, to create a hover button, you simply supply a set of new style properties for the :hover pseudo-class. These styles kick in automatically when the visitor moves the mouse pointer over your button.
TIP
If you’re the last web developer on earth who hasn’t rolled your own hover button, you can find a detailed tutorial in Creating a Website: The Missing Manual, or in an online article at www.elated.com/articles/css-rollover-buttons.
Great as they are, pseudo-classes aren’t cutting edge any longer. The problem is their all-or-nothing nature. For example, if you use the :hover pseudo-class, then your style settings spring into action immediately when someone hovers over an element. But in Flash applications or in desktop programs, the effect is usually more refined. The hovered-over button may shift its color, move, or begin to glow using a subtle animation that takes a fraction of a second to complete.
Some web developers have begun to add effects like these to their pages, but it usually requires the help of someone else’s JavaScript animation framework. But CSS3 has a simpler solution—a transitions feature that lets you smoothly switch from one group of settings to another.
A Basic Color Transition
To understand how transitions work, you need to see a real example. Figure 6-10 shows a color-changing button that’s bolstered with some CSS3 transition magic.
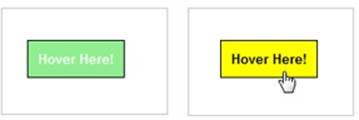
Figure 6-10. If this were an ordinary rollover button, its background would jump from green to yellow in one step. But with transitions, the green blends into yellow, taking half a second to make the change. Move the mouse off, and the same transition plays out in reverse, returning the button to its normal state. The result is a button that just feels more polished. (To try if for yourself, head to the try-out page at http://prosetech.com/html5.)
First, consider how you’d style this button the ordinary way, without using transitions. This task is basic CSS, requiring one style rule to set the button’s initial appearance and a second style rule to change it when it’s hovered on:
.slickButton {
color: white;
font-weight: bold;
padding: 10px;
border: solid 1px black;
background: lightgreen;
cursor: pointer;
}
.slickButton:hover {
color: black;
background: yellow;
}
Here’s a button that uses these style rules:
<button class="slickButton">Hover Here!</a>
This approach is all well and good, but it lacks a certain finesse. To smooth out the green-to-yellow color change, you can create a CSS3 transition using the transition property. You do this in the normal slickButton style (not the :hover pseudo-class).
At a minimum, every transition needs two pieces of information: the CSS property that you want to animate and the time the browser should take to make the change. In this example, the transition acts on the background property, and the duration is 0.5 seconds:
.slickButton {
color: white;
font-weight: bold;
padding: 10px;
border: solid 1px black;
background: lightgreen;
cursor: pointer;
-webkit-transition: background 0.5s;
transition: background 0.5s;
}
.slickButton:hover {
color: black;
background: yellow;
}
As you’ll no doubt notice, this example adds two transition properties instead of the promised one. That’s because the CSS3 transitions standard is not quite final and some browsers still require the -webkit- vendor prefix.
There’s one quirk in this example. The hovered-over button changes two details: its background color and its text color. But the transition applies to the background color only. As a result, the text blinks from white to black in an instant, while the new background color fades in slowly.
There are two ways to patch this up. Your first option is to set the transition property with a comma-separated list of transitions, like this:
.slickButton {
...
-webkit-transition: background 0.5s, color 0.5s;
transition: background 0.5s, color 0.5s;
...
}
But there’s a shortcut if you want to set transitions for all the properties that change and you want to use the same duration for each one. In this case, you can simply add a single transition and use all for the property name:
-webkit-transition: all 0.5s;
transition: all 0.5s;
Right now, transitions work in the latest version of every browser. Old versions of Internet Explorer (IE 9 and before) don’t have any transition support, and vendor prefixes won’t help. However, this lack of support isn’t the problem it seems. Even if a browser ignores the transition property, it still applies the effect. It just makes the change immediately, rather than smoothly fading it in. That’s good news—it means a website can use transitions and keep the essentials of its visual style intact on old browsers.
More Transition Ideas
It’s gratifying to see that CSS transitions can make a simple color change look good. But if you’re planning to build a slick rollover effect for your buttons or menus, there are plenty of other properties you can use with a transition. Here are some first-rate ideas:
§ Transparency. By modifying the opacity property, you can make an image fade away into the background. Just remember not to make the picture completely transparent, or the visitor won’t know where to hover.
§ Shadow. Earlier, you learned how the box-shadow property can add a shadow behind any box (Shadows). But the right shadow can also make a good hover effect. In particular, consider shadows with no offset and lots of blur, which create more of a traditional glow effect. You can also use an inset shadow to put the effect inside the box.
§ Gradients. Change up a linear gradient or add a radial one—either way, it’s hard not to notice this effect.
§ Transforms. As you’ll learn on Transforms, transforms can move, resize, and warp any element. That makes them a perfect tool for transitions.
On the flip side, it’s usually not a good idea to use transitions with padding, margins, and font size. These operations take more processing power (because the browser needs to recalculate layout or text hinting), which can make them slow and jerky. If you’re trying to make something move, grow, or shrink, you’re better off using a transform (Transforms).
Triggering Transitions with JavaScript
As you’ve seen, transitions kick in when an element switches from one style to another. If you want a nice, code-free way to make this happen, you can use pseudo-classes like :hover and :focus. But this approach has obvious limits. For example, it won’t work if you want your transition to take place at another time or in response to a different event. It also won’t work if you want your transition to be triggered by one element but then affect a different element. In situations like these, you need to chip in with a bit of JavaScript code.
Fortunately, it’s easy to create a JavaScript-powered transition. As with an ordinary transition, you begin by creating two style rules, one for your element’s initial state, and one for its transitioned state. Then you add the JavaScript code that finds your element and changes its style when the time is right.
WORD TO THE WISE: DON’T LEAVE OLD BROWSERS BEHIND
As you know, browsers that don’t support transitions switch between states immediately, which is usually a good thing. However, if you use CSS3 glitter to make your states look different (for example, you’re adding a shadow or a gradient to a hovered-over button), old browsers ignore that, too. That’s not so good. It means that visitors with less capable browsers get no hover effect at all.
To solve this problem, use a fallback that older browsers understand. For example, you might create a hover state that sets a different background color and then sets a gradient. This way, older browsers will see the background change to a new solid color when the button is hovered over. More capable browsers will see the background change to a gradient fill. For even more customizing power, you can use Modernizr, which lets you define completely different styles for older browsers (Feature Detection with Modernizr).
Figure 6-11 shows an example that uses a code-powered transition. In this page, two images are layered over each other—an image of a city skyline in the day and an image of the same skyline at night. The buttons use a few simple lines of JavaScript to trigger a transition that hides or shows the night-time image.
The first step to creating this example is adding an image-formatting style sheet rule. It does two things: switches the images to absolute positioning (so they can be placed on top of one another in their containing <div>), and defines the type of transition you plan to carry out. In this case, it’s a 10-second transition that alters the opacity of the nighttime image.
img {
position: absolute;
-webkit-transition: opacity 10s;
transition: opacity 10s;
}
You also need two style rules to represent the different possible states for the nighttime image, which begins fully transparent but can become solid at the click of a button:
.solid {
opacity: 1;
}
.transparent {
opacity: 0;
}
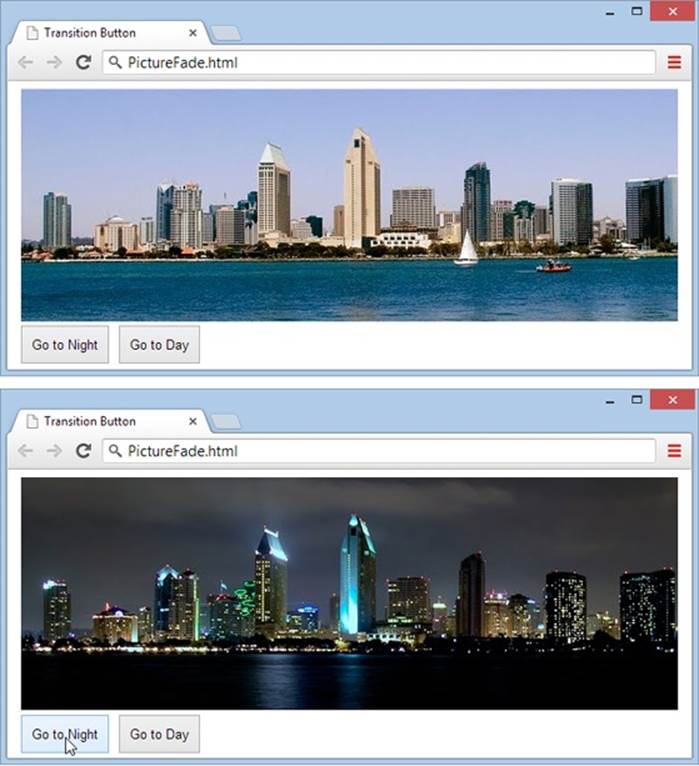
Figure 6-11. Initially, the image with the night skyline is completely transparent (top). But click the To Night button and the night image fades in, gradually blotting out the day skyline (bottom).
The page markup places both images into a <div>, taking care to apply the transparent class to the second image, and defines two buttons that are hard-wired into the JavaScript functions you need.
<div>
<img src="day.png" alt="Daytime view">
<img id="nightImage" src="night.png" alt="Night-time view"
class="transparent">
</div>
<button onclick="toNight()">Go to Night</button>
<button onclick="toDay()">Go to Day</button>
The final step is to add the code that reacts to the button clicks, finds the nighttime image, and switches its style:
function toNight() {
var nightImage = document.getElementById("nightImage");
nightImage.className = "solid";
}
function toDay() {
var nightImage = document.getElementById("nightImage");
nightImage.className = "transparent";
}
Although this seems like a single abrupt act, the change will phase in steadily over 10 seconds, thanks to the transition that’s defined for all <img> elements.
Remember, transitions take place only if your visitor has a modern browser. If someone visits your site with IE 9 and clicks the To Night or To Day button, the page will shift abruptly from one style to the other, with no 10-second blending effect. Unfortunately, there’s no easy polyfill to patch this gap, and it’s all too easy to ignore what your pages will look like on less capable browsers when you start weaving transitions into your code
NOTE
If animated effects are an essential part of your pages, you’re probably not quite ready to embrace CSS3. Instead, the most practical solution for transitions today is a JavaScript library like jQuery UI or MooTools. But CSS3 is the clear future of web effects, once the standards settle down and modern browsers have colonized the computers of the world.
Transforms
A transform is a powerful tool that lets you move, scale, skew, or rotate an element, warping its appearance. With CSS3 transforms, you use them to change the appearance of an element. Like transitions, transforms are a new and experimental feature. To use them, you need to use thetransform property. Here’s an example that rotates an element and all its contents:
.rotatedElement {
transform: rotate(45deg);
}
To get your transforms to work on Chrome, Safari, and Opera, you need to add the -webkit- vendor prefix. On Internet Explorer 9, you need the -ms- prefix (although IE 10 and later don’t need any prefix). Firefox doesn’t need a prefix. So unless you’re using the -prefix-free tool (Transparency), the proper way to use a transform looks like this:
.rotatedElement {
-ms-transform: rotate(45deg);
-webkit-transform: rotate(45deg);
transform: rotate(45deg);
}
POWER USERS’ CLINIC: MAKING MORE NATURAL TRANSITIONS
The transition property is an all-in-one property that combines several details. So far, you’ve seen how to give a transition a duration and specify the property it acts on. However, there are two more details you can use to fine-tune your transition.
First, you can choose a timing function that controls how the transition effect flows—for example, whether it starts slow and then speeds up or starts fast and then decelerates. In a short transition, the timing function you choose doesn’t make much of a difference. But in a longer, more complex animation, it can change the overall feel of the effect. Here’s an example that uses the ease-in-out timing function so that a transition starts slow, then accelerates, and then slows back down at the end:
transition: opacity 10s ease-in-out;
Other timing functions include linear (the transition has a constant rate from start to finish), ease-in (the transition starts slow and then goes at a constant rate), ease-out (the transition starts at a constant rate but slows at the end), and cubic-bezier (the transition goes according to a Bézier curve that you define, you math lover, you).
No matter what timing function you choose, the whole transition takes the same amount of time—the duration you’ve specified. The difference is in how the transition speeds up or slows down as it takes place. To review the different timing functions and get a feel for how each one alters the pace of a transition, you can see them in action with a helpful series of rolling square animations athttp://css3.bradshawenterprises.com/transitions/.
The other transition detail that you can add is an optional delay that holds off the start of the transition for some period of time. Here’s an example that waits 0.1 seconds:
transition: opacity 10s ease-in-out 0.1s;
In this example, the rotate() function does the work, twisting an element 45 degrees around its center. However, there are many more transform functions that you can use, separately or at the same time. For example, the following style chains three transforms together. It enlarges an element by half (using the scale transform), moves it 10 pixels to the left (using the scaleX transform), and skews it for effect (using the skew transform):
.rotatedElement {
-ms-transform: scale(1.5) scaleX(10px) skew(10deg);
-webkit-transform: scale(1.5) scaleX(10px) skew(10deg);
transform: scale(1.5) scaleX(10px) skew(10deg);
}
A skew twists an element out of shape. For example, imagine pushing the top edge of a box out to the side, while the bottom edge stays fixed (so it looks like a parallelogram).
Table 6-2 lists all the two-dimensional transform functions you can use. To remove all your transforms, set the transform property to none.
NOTE
Transforms don’t affect other elements or the layout of your web page. For example, if you enlarge an element with a transform, it simply overlaps the adjacent content.
Table 6-2. Transform functions
|
FUNCTION |
DESCRIPTION |
|
translateX(x) |
Moves an element horizontally. Use a positive value to shift it to the right, and a negative value to shift it to the left. |
|
translateY(y) |
Moves an element vertically. Use a positive value to shift it down, and a negative value to shift it up. |
|
translate(x, y) |
Moves an element vertically and horizontally. |
|
scaleX(x) |
Scales an element horizontally. Use a value greater than 1.0 to enlarge it (2.0 is twice as big) and a value between 0 and 1.0 to shrink it (0.5 is half as big). Use a negative value to flip the element around the y-axis, creating a right-to-left mirror image. |
|
scaleY(y) |
Scales an element vertically. Use a value greater than 1.0 to enlarge it and a value between 0 and 1.0 to shrink it. Use a negative value to flip the element around the x-axis, creating a bottom-to-top mirror image. |
|
scale(x, y) |
Scales an element horizontally and vertically. |
|
rotate(angle) |
Rotates an element clockwise around its center. Use a negative value to rotate the element counter-clockwise. If you want to rotate an element around another point, use the CSS transform-origin property. |
|
skewX(angle) |
Tilts an element horizontally. The top and bottom edges remain level, but the sides are pulled out of alignment. |
|
skewY(angle) |
Tilts an element vertically. The left and right edges remain in place, but the top and bottom are slanted. |
|
skew(x-angle, y-angle) |
Tilts an element horizontally and vertically. |
|
matrix(n1, n2, n3, n4, n5, n6) |
Uses matrix multiplication to move each of the corners of the element. The matrix, which is represented by six numbers, can duplicate any other transform (or any combination of transforms). However, you’re unlikely to build the matrix you need yourself, even if you’re a math nerd. Instead, you’ll probably use a tool that provides you with the ready-made matrix you want. |
NOTE
When you get tired of moving an element around in two dimensions, you can use 3-D transforms to move, rotate, and warp it in three-dimensional space. You’ll find several good, interactive examples of 3-D transforms at http://tinyurl.com/3d-transitions.
POWER USERS’ CLINIC: HOW TO SHIFT THE STARTING POINT
Ordinarily, transforms are made using the center point of your element as a reference point. You can shift this reference point by using the transform-origin property before you apply your transform. For example, here’s how you can rotate a shape around its top-left corner:
.rotatedElement {
-ms-transform-origin: 0% 0%;
-webkit-transform-origin: 0% 0%;
transform-origin: 0% 0%;
-ms-transform: rotate(45deg);
-webkit-transform: rotate(45deg);
transform: rotate(45deg);
}
To rotate around the top-right corner, you’d use a value of 100% 0%. You can even specify a far-off origin that doesn’t appear in your element (like 50% 200%, which puts the reference point halfway across the element, and a distance down that’s equal to twice the element’s height).
By default, the transform-origin property is set to 50% 50%, which puts the center point exactly in the middle of your element.
Transitions That Use Transforms
Transforms and transitions make a natural pair. For example, imagine you want to create an image gallery, like the one shown in Figure 6-12.
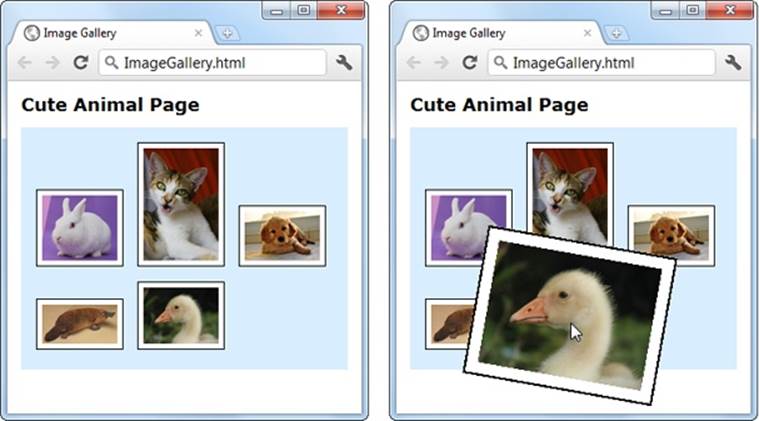
Figure 6-12. Here, a transform makes the hovered-over image stand out.
This example starts out simple enough, with a bunch of images wrapped in a <div> container:
<div class="gallery">
<img src="bunny.jpg">
<img src="cat.jpg">
<img src="dog.jpg">
<img src="platypus.jpg">
<img src="goose.jpg">
</div>
Here’s the style for the <div> that holds all the images:
.gallery {
margin: 0px 30px 0px 30px;
background: #D8EEFE;
padding: 10px;
}
And here’s how each <img> element starts off:
.gallery img {
margin: 5px;
padding: 5px;
width: 75px;
border: solid 1px black;
background: white;
}
Notice that all the images are given explicit sizes with the width property. That’s because this example uses slightly bigger pictures that are downsized when they’re shown on the page. This technique is deliberate: It makes sure the browser has all the picture data it needs to enlarge the image with a transform. If you didn’t take this step, and used thumbnail-sized picture files, the enlarged versions would be blurry.
Now for the hover effect. When the user moves the mouse over an image, the page uses a transform to rotate and expand the image slightly:
.gallery img:hover {
-ms-transform: scale(2.2) rotate(10deg);
-webkit-transform: scale(2.2) rotate(10deg);
transform: scale(2.2) rotate(10deg);
}
Right now, this transform snaps the picture to its new size and position in one step. But to make this effect look more fluid and natural, you can define an all-encompassing transition in the normal state:
.gallery img {
margin: 5px;
padding: 5px;
width: 75px;
border: solid 1px black;
-ms-transition: all 1s;
-webkit-transition: all 1s;
transition: all 1s;
background: white;
}
Now the picture rotates and grows over a time span of 1 second. Move the mouse away, and it takes another second to shrink back to its original position.
Web Fonts
With all its pizzazzy new features, it’s hard to pick the best of CSS3. But if you had to single out just one feature that opens an avalanche of new possibilities and is ready to use right now, that feature may just be web fonts.
In the past, web designers had to work with a limited set of web-safe fonts. These are the few fonts that are known to work on different browsers and operating systems. But as every decent designer knows, type plays a huge role in setting the overall atmosphere of a document. With the right font, the same content can switch from coolly professional to whimsical, or from old-fashioned to futuristic.
NOTE
There were good reasons why web browsers didn’t rush to implement custom web fonts. First, there are optimization issues, because computer screens offer far less resolution than printed documents. If a web font isn’t properly tweaked for onscreen viewing, it’ll look like a blurry mess at small sizes. Second, most fonts aren’t free. Big companies like Microsoft were understandably reluctant to add a feature that could encourage web developers to take the fonts installed on their computers and upload them to a website without proper permission. As you’ll see in the next section, font companies now have good solutions for both problems.
CSS3 adds support for fancy fonts with the @font-face feature. Here’s how it works:
1. You upload the font to your website (or, more likely, multiple versions of that font to support different browsers).
2. You register each font-face you want to use in your style sheet, using the @font-face command.
3. You use the registered font in your styles, by name, just as you use the web-safe fonts.
4. When a browser encounters a style sheet that uses a web font, it downloads the font to its temporary cache of pages and pictures. It then uses that font for just your page or website (Figure 6-13). If other web pages want to use the same font, they’ll need to register it themselves and provide their own font files.
NOTE
Technically, @font-face isn’t new. It was a part of CSS 2, but dropped in CSS 2.1 when browser makers couldn’t cooperate. Now, in CSS3, there’s a new drive to make @font-face a universal standard.
The following sections walk you through these essential steps.
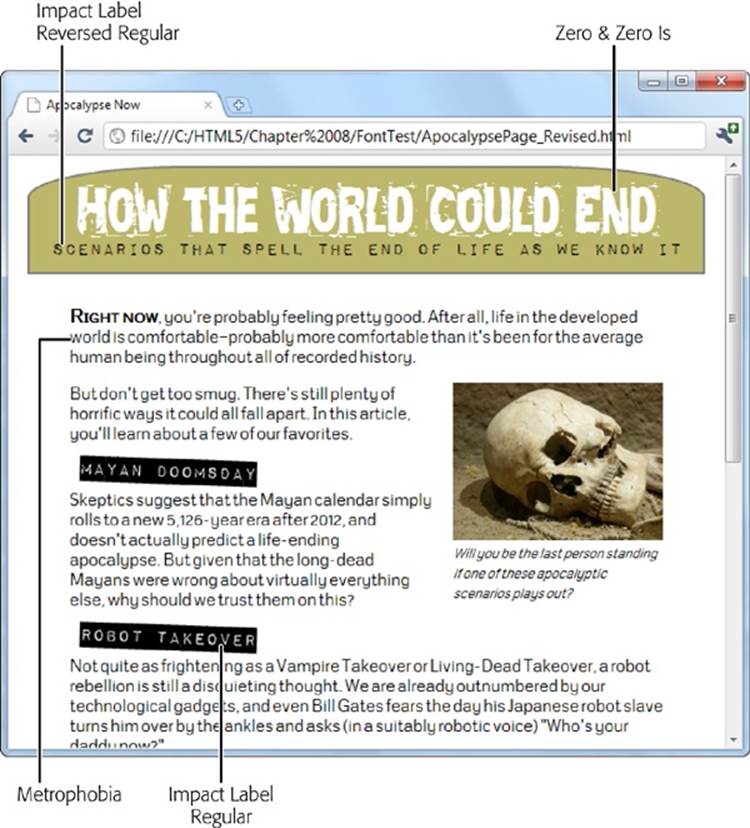
Figure 6-13. This revised version of the apocalyptic page combines a hodgepodge of four fonts. All of these fonts are free, and you’ll learn how to get them for yourself from Font Squirrel on page 209.
Web Font Formats
Although all current browsers support @font-face, they don’t all support the same types of font files. Internet Explorer, which has supported @font-face for years, supports only EOT (Embedded OpenType) font files. This format has a number of advantages—for example, it uses compression to reduce the size of the font file, and it allows strict website licensing so a font can’t be stolen from one website and used on another. However, the EOT format never caught on, and no other browser uses it. Instead, other browsers have (until recently) stuck with the more familiar font standards used in desktop computer applications—that’s TTF (TrueType) and OTF (OpenType PostScript). But the story’s still not complete without two more acronyms—SVG and WOFF. Table 6-3 puts all the font formats in perspective.
Table 6-3. Embedded font formats
|
FORMAT |
DESCRIPTION |
USE WITH |
|
WOFF (Web Open Font Format) |
The single font format of the future. Newer browsers support it. |
Any browser that supports it, starting with Internet Explorer 9, Firefox 3.6, and Chrome 6. |
|
EOT (Embedded Open Type) |
A Microsoft-specific format that never caught on with browsers except Internet Explorer. |
Internet Explorer (before IE 9) |
|
TTF (TrueType) OTF (OpenType PostScript) |
Your font will probably begin in one of these common desktop formats. |
Mobile devices using the Android operating system and (optionally) non-IE browsers, such as Firefox, Chrome, Safari, and Opera |
|
SVG (Scalable Vector Graphics) |
An all-purpose graphics format you can use for fonts, with good but not great results (it’s slower to display and produces lower-quality text). |
Old mobile versions of Safari (before iOS 4.2), and (optionally) mobile devices using the Android operating system. |
Bottom line: If you want to use the @font-face feature and support a wide range of browsers, you need to distribute your font in several different formats. The best practice is to include a WOFF file (for optimum performance on modern browsers), an EOT file (to fill in the gaps on old versions of IE), and a TTF or OTF file (to fill in support for Android and older non-IE browsers). It’s also a good idea to supply a lower-quality SVG file to satisfy old iPads and iPhones.
If you think that’s too many font files to manage, you can strip this down to an absolute minimum and cover most browsers with just two files: a font in the TTF or OTF format (either one is fine), and a font in the EOT format. This won’t satisfy everyone, but it will give fancy fonts to the vast majority of people who visit your site.
NOTE
Fortunately, font vendors and online font services will usually supply you with all four font formats you need, so you can guarantee the best possible level of browser support.
Finding a Font for Your Website
Now that you know where you can get the font files you need for your website, in which formats, you need to get your hands on them. You have two possibilities:
§ Download a free web font. This way, you don’t need to worry about licensing details. You can keep your wallet closed.
§ Convert a desktop font you already have into a web font. This approach lets you use a font that you’ve already fallen in love with. It’s also great for consistency—for example, if you work in a company that already has a standard set of fonts that it uses in logos, memos, and publications, it makes sense to stick with the same typefaces online. However, you’ll need to do a bit of research to figure out the licensing situation, and you may need to cough up some more cash.
In the following sections, you’ll try both approaches.
TROUBLESHOOTING MOMENT: IRONING OUT THE QUIRKS
Even if you follow the rules and supply all the required font formats, expect a few quirks. Here are some problems that occasionally crop up with web fonts:
§ Many fonts look bad on the ancient but still-popular Windows XP operating system, because Windows XP computers often have the anti-aliasing display setting turned off. (And fonts without anti-aliasing look as attractive as mascara on a mule.)
§ Some people have reported that some browsers (or some operating systems) have trouble printing certain embedded fonts.
§ Some browsers suffer from a problem known as FOUT (which stands for Flash of Unstyled Text). This phenomenon occurs when an embedded font takes a few seconds to download, and the page is rendered first using a fallback font, and then re-rendered using the embedded font. This problem is most noticeable on old builds of Firefox. If it really bothers you, Google provides aJavaScript library that lets you define fallback styles that kick in for unloaded fonts, giving you complete control over the rendering of your text at all times (see http://tinyurl.com/font-loader).
Although these quirks are occasionally annoying, most are being steadily ironed out in new browser builds. For example, Firefox now minimizes FOUT by waiting for up to 3 seconds to download an embedded font before using the fallback font.
Getting a Free Font from Font Squirrel
One of the best places to find free web fonts is the Font Squirrel website at www.fontsquirrel.com. It provides a catalog of roughly 1,000 free-to-use fonts (see Figure 6-14).
When you find a font you like in Font Squirrel’s list, start by checking the tiny icons underneath (Figure 6-15). These icons indicate how the font is licensed. Solid icons indicate that the font can be used in a particular context; white outlines indicate that it cannot.
If a font’s licensing details check out (and on Font Squirrel, they almost always do), the next step is to take a closer look at your font. Click on the font text to switch to a font preview page, which shows every letter of the font and lets you test drive it on some text you type in.
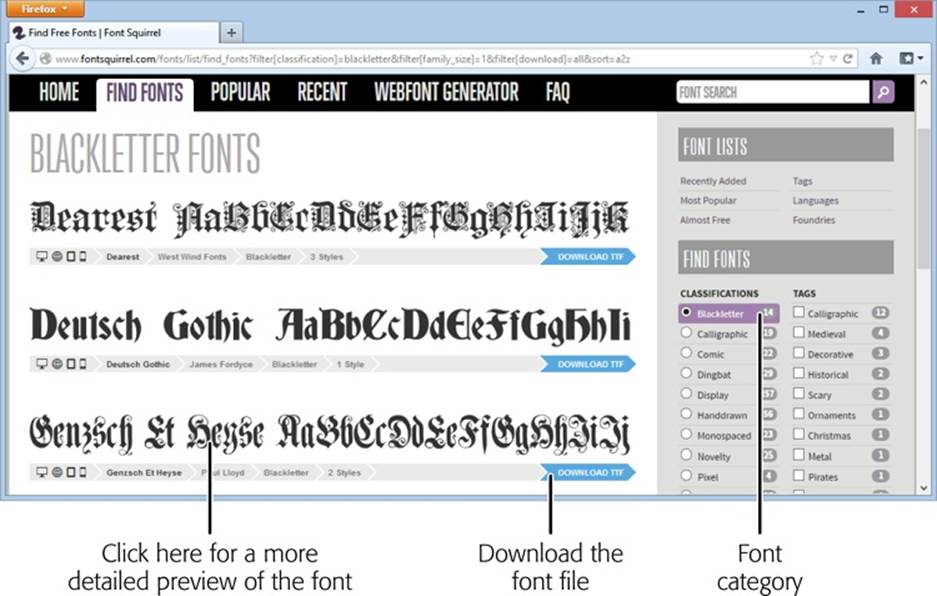
Figure 6-14. Font Squirrel gives you several options for font hunting, but the most effective way to find what you want is to browse by type (“Calligraphic,” “Novelty,” and “Retro,” for example). Best of all, most fonts are free to use wherever you want—on your personal computer to create documents, or on the Web to build web pages.
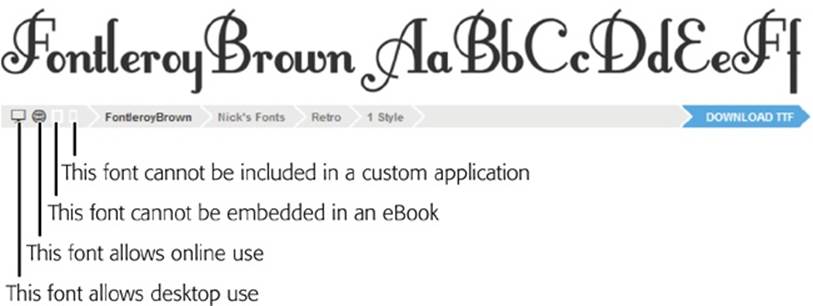
Figure 6-15. The first two icons are the most important—they indicate that the font is allowed both on the desktop and on the Web. Virtually all Font Squirrel fonts include these two icons. The next two icons indicate whether you can use the font in ebooks and custom-built applications. (If you’re not sure what an icon means, just click it to find out.)
If you like what you see, the final step is to download the font. Depending on the font, you may be able to download a complete web-ready font kit, or—more likely—you’ll need to download just the TTF or OTF file and then create your own kit. This quirk is largely due to the messy world of font licensing. Many fonts use the SIL Open Font License, which makes the font free for everyone to use but doesn’t allow a service like Font Squirrel to repackage it. Fortunately, creating your own kit is easy—and perfectly legit. You’ll learn how to do that in the next section.
FREQUENTLY ASKED QUESTION: USING A FONT ON YOUR COMPUTER
Can I use the same font for web work and printed documents?
If you find a hot new font to use in your website, you can probably put it to good use on your computer, too. For example, you might want to use it in an illustration program to create a logo. Or, your business might want to use it for other print work, like ads, fliers, product manuals, and financial reports.
Modern Windows and Mac computers support TrueType (.ttf) and OpenType (.otf) fonts. Every font package includes a font in one of these formats—usually TrueType. To install it in Windows, make sure you’ve pulled it out of the ZIP download file. Right-click the font file and then choose Install. (You can do this with multiple font files at once.) On a Mac, double-click the font file to open the Font Book utility. Then, click the Install Font button.
Preparing a Font for the Web
Using Font Squirrel, you can convert a standard desktop TTF or OTF format font file into a web-ready font that you can use in any web page. You can do this with any of the free fonts you download from Font Squirrel. You may also be able to do this with the fonts on your own computer, but it’s important to understand the licensing issues that you’ll face first (see the box below). Using an ordinary desktop font in an online website without permission is likely to be a breach of copyright—and, if the font maker has asked Font Squirrel to blacklist the font, you won’t be allowed to perform the desktop-to-web conversion anyway.
UP TO SPEED: UNDERSTANDING THE RULES OF FONT LICENSING
Ordinary fonts used in desktop software aren’t free. It’s not kosher to take a font you have on your computer and use it on your website, unless you have explicit permission from the font’s creator.
For example, Microsoft and Apple pay to include certain fonts with their operating systems and applications so you can use them to, say, create a newsletter in a word processor. However, this license doesn’t give you permission to put these fonts on a web server and use them in your pages.
If you have a favorite font, the only way to know whether you need to pay for it is to contact the company or individual that made it. Some font makers charge licensing fees based on the amount of traffic your website receives. Other font creators may let you use their fonts for a nominal amount or for free, provided you meet certain criteria (for example, you include some small-print note about the font you’re using, or you have a noncommercial website that isn’t out to make boatloads of money). There’s also a side benefit to reaching out: Skilled font makers often provide versions of their creations that are optimized for web viewing.
Once you know that you’re allowed to use a specific font, you can convert it using Font Squirrel’s handy web font generator. To get there, click on the Webfont Generator tab near the top of the Font Squirrel site, or just surf directly to www.fontsquirrel.com/fontface/generator. Figure 6-16shows you the three-step process you need to follow.
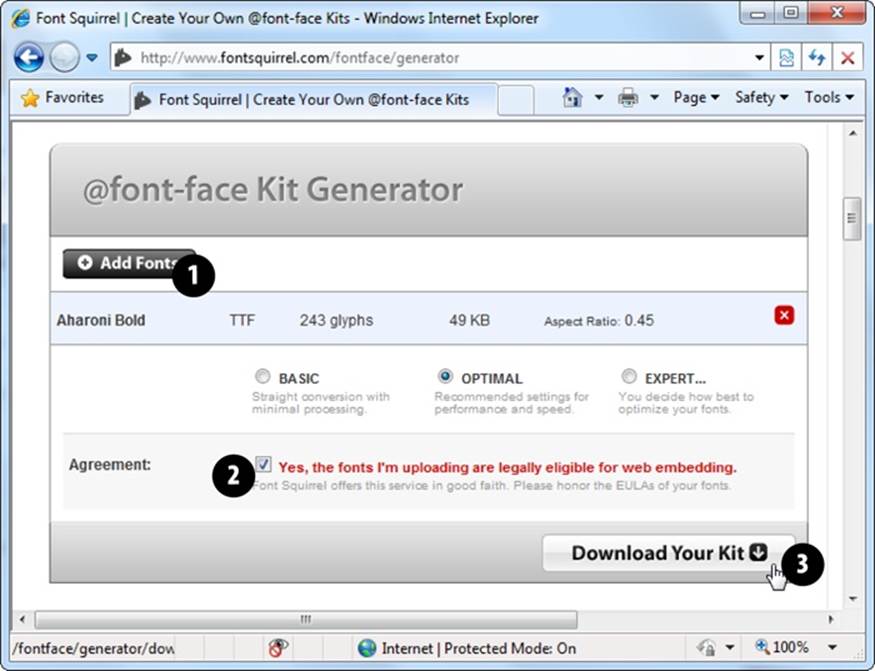
Figure 6-16. First, click Add Fonts to upload a font file from your computer (#1). Then, add a checkmark to the setting “Yes, the fonts I’m uploading are legally eligible for web embedding,” assuming you’ve reviewed their license requirements, as described on page 211 (#2). Finally, click Download Your Kit (#3).
When you download a font kit, you get a compressed Zip file that contains a number of files. For example, if you download the Chantelli Antiqua font, then you get these files:
Bernd Montag License.txt
Chantelli_Antiqua-webfont.eot
Chantelli_Antiqua-webfont.svg
Chantelli_Antiqua-webfont.ttf
Chantelli_Antiqua-webfont.woff
demo.html
stylesheet.css
The text file (Bernd Montag License.txt) provides licensing information that basically says you can use the font freely but never sell it. The Chantelli_Antiqua-webfont files provide the font in four different file formats. (Depending on the font you pick, you may get additional files for different variations of that font—for example, in bold, italic, and extra-dark styles.) Finally, the stylesheet.css file contains the style sheet rule you need to apply the font to your web page, and demo.html displays the font in a sample web page.
To use the Chantelli Antiqua font, you need to copy all the Chantelli_Antiqua-webfont files to the same folder as your web page. Then you need to register the font so that it’s available for use in your style sheet. To do that, you use a complex @font-face rule at the beginning of your style sheet, which looks like this (with the lines numbered for easy reference):
1 @font-face {
2 font-family: 'ChantelliAntiquaRegular';
3 src: url('Chantelli_Antiqua-webfont.eot');
4 src: local('Chantelli Antiqua'),
5 url('Chantelli_Antiqua-webfont.woff') format('woff'),
6 url('Chantelli_Antiqua-webfont.ttf') format('truetype'),
7 url('Chantelli_Antiqua-webfont.svg') format('svg');
8 }
To understand what’s going on in this rule, it helps to break it down line by line:
§ Line 1. @font-face is the tool you use to officially register a font so you can use it elsewhere in your style sheet.
§ Line 2. You can give the font any name you want. You’ll use this name later, when you apply the font.
§ Line 3. The first format you specify must be the file name of the EOT file. That’s because Internet Explorer gets confused by the rest of the rule and ignores the other formats. The url() function is a style sheet technique that tells a browser to download another file at the location you specify. If you put the font in the same folder as your web page, then you can simply provide the file name here.
§ Line 4. The next step is running the local() function. This function tells the browser the font name, and if that font just happens to be installed on the visitor’s computer, the browser uses it. However, in rare cases this can cause a problem (for example, it could cause Mac OS X to show a security dialog box, depending on where your visitor has installed the font, or it could load a different font that has the same name). For these reasons, web designers sometimes use an obviously fake name to ensure that the browser finds no local font. One common choice is to use a meaningless symbol like local(‘![]() ’).
’).
§ Lines 5 to 7. The final step is to tell the browser about the other font files it can use. If you have a WOFF font file, suggest that first, as it offers the best quality. Next, tell the browser about the TTF or OTF file, and finally about the SVG file.
TIP
Of course, you don’t need to type the @font-face rule by hand (and you definitely don’t need to understand all the technical underpinnings described above). You can simply copy the rule from the stylesheet.css file that’s included in the web font kit.
Once you register an embedded font using the @font-face feature, you can use it in any style sheet. Simply use the familiar font-family property, and refer to the font family name you specified with @font-face (in line 2). Here’s an example that leaves out the full @font-facedetails:
@font-face {
font-family: 'ChantelliAntiquaRegular';
...
}
body {
font-family: 'ChantelliAntiquaRegular';
}
This rule applies the font to the entire web page, although you could certainly restrict it to certain elements or use classes. However, you must register the font with @font-face before you use it in a style rule. Reverse the order of these two steps, and the font won’t work properly.
Even Easier Web Fonts with Google
If you want a simpler way to use a fancy font on your website, Google has got you covered. It provides a service called Google Fonts (formerly Google Web Fonts), which hosts free fonts that anyone can use. The beauty of Google Fonts is that you don’t need to worry about font formats, because Google detects the user’s browser and automatically sends the right font file. All you need to do is add a link to a Google-generated style sheet.
To use a Google font in your pages, follow these steps:
1. Go to www.google.com/fonts.
Google shows you a long list of available fonts (Figure 6-17).
2. At the top of the page, click a tab title (Word, Sentence, or Paragraph) to choose how you preview fonts.
For example, if you’re hunting for a font to use in a heading, you’ll probably choose Word or Sentence to take a close look at a single word or line of text. But if you’re looking for a font to use in your body text, you’ll probably choose Paragraph to study a whole paragraph of text at once. No matter what option you choose, you can type in your own preview text and set an exact font size for your previews.
3. Set your search options.
If you have a specific font in mind, type it into the search box. Otherwise, you’ll need to scroll down, and that could take ages. To help you get what you want more quickly, start by setting a sort order and some filtering options, if they apply (for example, you might want to find the most popular bold sans-serif fonts). Figure 6-17 shows you where to find these options.

Figure 6-17. Google has a relentlessly expanding selection of fonts. When you’re looking for a font, you’ll probably want to tweak the font list’s sorting and filtering options (circled). For example, you can sort alphabetically or put the most popular fonts first, and you can filter out just serif, sans-serif, or handwritten (cursive) fonts.
4. When you see a font that’s a candidate for your site, click the “Pop out” button.
Google pops open an informative window that describes the font and shows each of its characters.
5. If you like the font, click the “Quick-use” button to get the information you need to use it.
Google shows you the code you need to use this font. It consists of a style sheet link (which you must add to your web page) and an example of a style sheet rule that uses the font.
6. Add a style sheet link to your web page.
For example, if you picked the Metrophobic font, Google wants you to place the following link in the <head> section of your page:
<link href="http://fonts.googleapis.com/css?family=Metrophobic"
rel="stylesheet">
This style sheet registers the font, using @font-face, so you don’t have to. Best of all, Google provides the font files, so you don’t need to upload anything extra to your website.
NOTE
Remember to put the link for the Google font style sheet before your other style sheet links. That way, your other style sheets can use the Google font.
7. Use the font, by name, wherever you want.
For example, here’s how you could use the newly registered Metrophobic font in a heading, with fallbacks in case the browser fails to download the font file:
h1 {
font-family: 'Metrophobic', arial, serif;
}
POWER USERS’ CLINIC: CREATING A FONT COLLECTION
These steps show the fastest way to get the markup you need for a font. However, you can get more options by creating a font collection.
A font collection is a way to package up multiple fonts. To start creating one, you simply click the “Add to Collection” button next to a font you like. As you add fonts to your collection, each one appears in the fat blue footer at the bottom of the page.
When you’re finished picking the fonts you want, click the Use button in the footer. Google then shows a page that’s similar to the “Quick-use” page, except that it allows you to create a single style sheet reference that supports all the fonts from your custom-picked collection.
When you create a font collection, you can also use two buttons that appear at the top right of the page. Click the Bookmark button (which looks like a link in a chain) to create a browser bookmark that lets you load up the same collection at some point in the future, so you can tweak it. Click the Download button (which looks like a down-pointing arrow) to download copies of the fonts to your computer, so you can install the fonts and use them for print work.
TIP
Still looking for the perfect font? Popular font subscription sites like http://fonts.com and http://typekit.com give you access to thousands of ultra-high-quality typefaces from legendary font foundries like Linotype and Monotype. Font-addicted web developers will need to pay from $10 to $100 a year, with more money needed to outfit super-popular sites that get avalanches of web traffic.
Putting Text in Multiple Columns
Fancy fonts aren’t the only innovation CSS3 has for displaying text. It also adds a module for multicolumn text, which gives you a flexible, readable way to deal with lengthy content.
Using multiple columns is almost effortless, and you have two ways to create them. Your first option is to set the number of columns you want using the column-count property, like this:
.Content {
text-align: justify;
column-count: 3;
}
As of this writing, the column-count property works only in Internet Explorer 10 and 11. Although multiple columns are supported by Chrome, Firefox, Safari, and Opera, you need to use the vendor-prefixed versions of the column-count property, like this:
.Content {
text-align: justify;
-moz-column-count: 3;
-webkit-column-count: 3;
column-count: 3;
}
This approach—creating a set number of columns—works well for fixed-size layouts. But if you have a space that grows and shrinks with the browser window, your columns may grow too wide and become unreadable. In this situation, it’s better not to set the exact number of columns. Instead, tell the browser how big each column should be using the column-width property:
.Content {
text-align: justify;
-moz-column-width: 10em;
-webkit-column-width: 10em;
column-width: 10em;
}
The browser can then create as many columns as it needs to fill up the available space (see Figure 6-18).
NOTE
You can use pixel units to size a column, but em units make more sense. That’s because em units adapt to the current font size. So if a web page visitor ratchets up the text size settings in her browser, the column width grows proportionately to match. To get a sense of size, 1 em is equal to two times the current font size. So if you have a 12 pixel font, 1 em works out to 24 pixels.

Figure 6-18. In a narrow window (top), Firefox can accommodate just one column. But widen the window, and you’ll get as many more as can fit (bottom).
CSS3 provides a few more properties for tailoring the look of your columns. You can adjust the size of the spacing between columns with column-gap. You can also add a vertical line to separate them with column-rule, which accepts a thickness, border style, and color (just like theborder property). Here’s an example that makes a red, 1-pixel-wide column rule:
-webkit-column-rule: 1px solid red;
-moz-column-rule: 1px solid red;
column-rule: 1px solid red;
You can also use the column-span property to let figures and other elements span columns. The default value of column-span is 1, which means the element is locked in the single column where it appears. The only other acceptable value is all, which lets an element stretch across the entire width of all the columns. There’s currently no way to let an element span some but not all columns.
Here’s an example (shown in Figure 6-19) that uses column spanning with a figure:
.SpanFigure {
-moz-column-span: all;
-webkit-column-span: all;
column-span: all;
}
This technique doesn’t work for figures that set the float property to something other than none. That’s because floating figures already have the ability to float free of your layout and any columns it contains.
NOTE
Columns work well if you need to break up text to make it more readable on wide layouts. However, columns aren’t the best choice for truly large amounts of content, since there’s currently no way to tie the height of a column to the height of the browser window. So if you split a lengthy essay into three columns, the reader will need to scroll from top to bottom to read the first column, then back to the top, then down to the bottom to read the second column, and again for the third. If the content is more than a screenful or two, all this scrolling gets old fast.
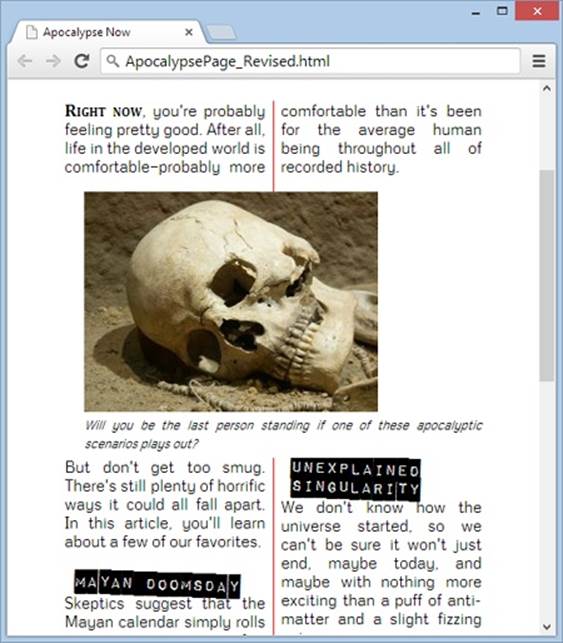
Figure 6-19. This tweaked-up multicolumn page adds a rule between columns and lets figures span multiple columns.
All materials on the site are licensed Creative Commons Attribution-Sharealike 3.0 Unported CC BY-SA 3.0 & GNU Free Documentation License (GFDL)
If you are the copyright holder of any material contained on our site and intend to remove it, please contact our site administrator for approval.
© 2016-2026 All site design rights belong to S.Y.A.