Mobile HTML5 (2013)
Chapter 5. SVG, Canvas, Audio, and Video
We’ve covered most of the new elements of HTML5, with the exception of elements uniquely associated with web APIs currently under development and the well-supported media-related elements of SVG, Canvas, Audio, and Video. The former are subject to change, so aren’t covered in this book. The latter are covered here.
We’ve covered the main features you’re likely to use in your day-to-day work as a frontend web developer, enabling you to use modern features when developing for mobile browsers. All modern mobile browsers (with the exception of Opera Mini) support <canvas>, <video>, and<audio>, as well as web APIs like geolocation, localStorage, offline web applications, etc.
A book could be written about each of the individual topics covered in this chapter, and, for the most part, already have been written. We’ll provide you with enough information, hopefully, to decide, “Hey, I do need to read the book on that” or to decide, “Hmmm, not interested quite yet.” While we won’t deep dive into any of these topics, you’ll have enough knowledge to get started. And, more importantly, you’ll understand the benefits and drawbacks of these technologies in the mobile arena.
HTML5 Media APIs
The original HTML specification was purely for textual content and did not even include the <img> element. We’ve come a long way since then. HTML5 provides for creating scalable, vector-based graphics with SVG and blank drawing space with <canvas>. In addition to supporting graphics, HTML5 supports <video> and <audio> inclusion without third-party plug-ins.
SVG
With SVG, you can create complex scalable vector graphics. Introduced in 2001, SVG is an open standard for defining two-dimensional vector graphics. The “scalable” aspect of SVG means the same graphic can look equally sharp on a large monitor as it does on a small mobile screen, without any modifications.
The SVG spec defines an XML grammar for shapes, lines, curves, images, and text, including features such as transparency, arbitrary geometry, filter effects (shadows, lighting effects, etc.), scripting, and animation.
Because it is a text-based image format, the file size can be very small. Because it has an object model, it can be changed with scripting. Because it is vector based, it can scale without pixelated or jagged edges. Because it is declarative, it is easy to understand. Because SVG supports animation, it can be animated.
There are various forms of SVG, with various levels of browser support. Basic support of standalone .svg files exists in all mobile devices and modern browsers, with support in Android beginning with Android 3. SVG as a source for the <img> element has been supported since iOS 3.2, Android 3.0, and mobile IE8.
The SVG file format as a value for the CSS background-image property has been supported since Android 3 and iOS 3.2, and it has been long supported in Opera Mobile. We’ve even been able to use the <svg> element in HTML5 pages since iOS 5, Android 3, and IE9 (along with all other modern browsers). Android 2.3.3 and below, Amazon Silk, and HP’s now defunct WebOS are the only mobile browsers lacking full SVG support. Static SVG is even supported in Opera Mini (as is <canvas>, which is supported in all mobile browsers), but can’t be animated, as Opera Mini’s JavaScript support does not allow for that.
As it’s an XML-based language, SVG’s root element is not <html>. Rather, it’s <svg>. Like all XML documents, SVG begins with an XML prologue and an SVG DTD. The <svg> root element contains all of the document’s content. SVG does not have a <head> and <body>. Rather, all of the content, including nested <svg> elements, are contained in the root <svg>.
A good starter SVG is the Japanese flag, which is simply a white rectangular flag with a red sun or disc in the center, as shown in Figure 5-1.

Figure 5-1. The Japanese flag made with SVG
1 <!DOCTYPE svg PUBLIC "-//W3C//DTD SVG 1.0//EN"
2 "http://www.w3.org/TR/2001/REC-SVG-20010904/DTD/svg10.dtd">
3 <svg xmlns="http://www.w3.org/2000/svg" height="220" width="320" version="1.0">
4 <title>Japanese Flag</title>
5 <desc>Red circle on white flag</desc>
6 <rect x="10" y="10" width="300" height="200"
7 style="fill: #ffffff; stroke: #e7e7e7;"/>
8 <circle cx="160px" cy="107px" r="60px" fill="#d60818"/>
9 </svg>
So what does that all mean? Lines 1–3 are the SVG DTD and then the root <svg> element, respectively. Something to note about the root element is that the size of the vector graphic is declared. To be able to use the CSS background-position when the background image is of type SVG, the size of the SVG must be declared. This is important if you are creating an SVG sprite file.
You can use <title>, line 4, if the SVG file is used independently of other resources. The <desc> in line 5 is where you can put a text-only description that will not be natively displayed when the SVG is rendered. Including good content in your <desc> or <title> provides for accessibility. As not all screen readers support SVG, adding the aria-label attribute can improve accessibility.
The <rect> in line 6 provides for a rectangle. Available shapes and lines include <path>, <rect>, <circle>, <ellipse>, <line>, <polyline>, and <polygon>. We provided four attribute values, x, y, width, and height, for the x-offset, y-offset (both for positioning), width, and height, respectively. We have also included a style attribute.
Like a regular HTML document, you can use CSS to provide style to elements in your SVG document. You can declare your styles inline using the style attribute, as I did in the previous example, or you can include an embedded or external stylesheet, targeting elements with selectors, just as you would in an HTML file.
The property names are slightly different than the CSS you may be used to, but they are human readable. The fill property is similar to the background property. In this case, we provided a background color. The stroke property is similar to the CSS border property. We could have provided a gradient or pattern.
While you can use most CSS properties and values in your SVG files, for content security reasons, some browser manufacturers[36] prevent SVG file types from importing raster images or scripts when included as a foreground image with <img>.
The <circle> in line 8 provides for a disc with a solid red background. Instead of a height and width, the <circle> has the r attribute, for radius. Instead of being positioned based on a top-left corner, like the <rect>, the <circle> is positioned based on the center of the circle, the cx is the x-axis coordinate of the center of the circle, and the cy is the y-axis coordinate of the center of the circle.
If you look at the circle attributes, you’ll note that we used fill as CSS property on the <rect>, and as an attribute on the <circle>.
Including SVG in Your Documents
You can include SVG directly in your document with the <img>, <object>, and <embed> tags:
<img src="flag.svg" alt="Japanese Flag"/>
or:
<embed type="image/svg+xml" src="flag.svg" width="320" height="220"/>
or:
<object data="flag.svg" type="image/svg+xml" width="320" height="220"></object>
Note that although the <embed> and <object> don’t have the alt attribute, SVG can be made accessible. You can improve accessibility by describing the illustration with <desc> or <title>, and adding an aria-label attribute with a value that matches the SVG title. By including the height and width in the <svg>, you shouldn’t need to include them on the <img>, <embed>, or <object> elements, but do include them in your CSS.
Clown Car Technique: SVG for Responsive Foreground Images
SVG can be used to create and serve responsive images. We can leverage browser support for SVG and SVG support for both media queries and raster images to create responsive images, using media queries within SVG to serve up the right image.
We know from CSS background images it is indeed possible to only download needed images. Similarly, to prevent the SVG from downloading all the included images, we use CSS background images instead of foreground images in our SVG file. In our responsive SVG, we include all the images that we may need to serve and show only the appropriate image based on media queries (media queries are discussed in more depth in Chapter 7):
<svg xmlns="http://www.w3.org/2000/svg"
viewBox="0 0 300 329" preserveAspectRatio="xMidYMid meet">
<title>Put the alt attribute here</title>
<style>
svg {
background-size: 100% 100%;
background-repeat: no-repeat;
}
@media screen and (max-width: 400px) {
svg {
background-image: url(images/small.png");
}
}
@media screen and (min-width: 401px) and (max-width: 700px) {
svg {
background-image: url(images/medium.png);
}
}
@media screen and (min-width: 701px) and (max-width: 1000px) {
svg {
background-image: url(images/big.png);
}
}
@media screen and (min-width: 1001px) {
svg {
background-image: url(images/huge.png);
}
}
</style>
</svg>
To preserve the aspect ratio of the containing element and ensure that it scales uniformly, we include the viewbox and preserveAspectRatio attributes. The value of the viewbox attribute is a list of four space- or comma-separated numbers: min-x, min-y, width, and height. By defining the width and the height of our viewbox, we define the aspect ratio of the SVG image.
Because of the security issues with <img> and SVG importing raster images, we use the <object> to include the responsive image in our site. The <object> element allows an external resource to be treated as an image:
<object data="awesomefile.svg" type="image/svg+xml"></object>
By default, the <object> will be as wide as the parent element. However, just as with images, we can declare a width or height with the width and height attributes or with the CSS width and height properties. Because of the viewbox and preserveAspectRatio declarations in our SVG file, the <object> will by default maintain the declared aspect ratio if only one dimension (height or width) is declared.
Because this technique uses <object> instead of <img>, we have no alt attribute. To make this technique accessible when and if screen readers support SVG,[37] ensure the contents of the SVG <title> contain what you would have included as the alt attribute.
The <object> embeds the SVG. The SVG pulls in the background image that matches the @media query based on the size of the <object>, not the viewport. With the preceding code, two HTTP requests are made: one for the SVG and one for the appropriate image. To reduce it to a single HTTP request, include an escaped data URI[38] for the <object>’s data attribute.
I call this the Clown Car Technique since we are including many large images (clowns) into a tiny single SVG image file (car).
Learning SVG
We’ve just touched the surface of SVG. SVG can be made accessible, scales to any screen resolution, and supports animation via the SVG syntax or via JavaScript, with full control over each element using the SVG DOM API. There is so much more that can be done with SVG, which is beyond the scope of this book. The W3C spec provides more information about all the elements, attributes, and animation API.
The Japanese flag is a very simple SVG. SVG can get very complicated very fast. If you are familiar with Adobe Illustrator, you may have noticed that you can export your illustrations as SVG. While this is a good way to create exacting SVG files, it creates a lot of code and the program is expensive.
Amaya is free software that supports a subset of SVG, including basic shapes, text, images, foreignObject, alpha transparency, transformations, and animations. You can download Amaya directly from the W3C. Amaya is helpful in learning SVG, as the source can be inspected and edited. You may also want to check out Inkscape, which is an open source vector graphics editor, with capabilities similar to Illustrator, CorelDraw, or Xara, using the W3C standard SVG file format.
CubeeDoo SVG
In CubeeDoo, we employ SVG twice. We have an SVG sprite for the background image of our game’s “shapes” theme, and as an SVG data URI for the mute icon.
We offer the user a few themes. We have numbers, colors, and shapes, among others. We are able to produce our shapes with a simple SVG sprite. The code we used to create the SVG sprite, as seen in Figure 5-2 for the face side of one of our decks of cards, is as follows:
1 <!DOCTYPE svg PUBLIC "-//W3C//DTD SVG 1.0//EN"
2 "http://www.w3.org/TR/2001/REC-SVG-20010904/DTD/svg10.dtd">
3 <svg xmlns="http://www.w3.org/2000/svg" height="400" width="400" version="1.0">
4 <desc>Squares, circles, diamonds and triangles sprite</desc>
5
6 <!-- Color squares -->
7 <rect x="10" y="10" width="80" height="80" style="fill: #d60818;"/>
8 <rect x="10" y="110" width="80" height="80" style="fill: #ffff33;"/>
9 <rect x="10" y="210" width="80" height="80" style="fill: #00FF00;"/>
10 <rect x="10" y="310" width="80" height="80" style="fill: #0000FF;"/>
11
12 <!-- Color Circles -->
13 <circle cx="150" cy="50" r="40" style="fill: #d60818;"/>
14 <circle cx="150" cy="150" r="40" style="fill: #ffff33;"/>
15 <circle cx="150" cy="250" r="40" style="fill: #00FF00;"/>
16 <circle cx="150" cy="350" r="40" style="fill: #0000FF;"/>
17
18 <!-- diamonds -->
19 <polygon points="250,10 210,50 250,90 290,50" style="fill: #d60818;"/>
20 <polygon points="250,110 210,150 250,190 290,150" style="fill: #FFFF33;"/>
21 <polygon points="250,210 210,250 250,290 290,250" style="fill: #00FF00;"/>
22 <polygon points="250,310 210,350 250,390 290,350" style="fill: #0000FF;"/>
23
24 <!-- Triangles -->
25 <polygon points="310,10 350,90 390,10" style="fill: #d60818;"/>
26 <polygon points="310,110 350,190 390,110" style="fill: #FFFF33;"/>
27 <polygon points="310,210 350,290 390,210" style="fill: #00FF00;"/>
28 <polygon points="310,310 350,390 390,310" style="fill: #0000FF;"/>
29 </svg>
Line 1 is the DTD. In line 3, we declare the root element, and include the height and width of the SVG image. While not required by the specifications, you must include these attributes if you plan on using an SVG image as a background image. Line 4 provides a description, which helps both in accessibility and in search engine optimization.
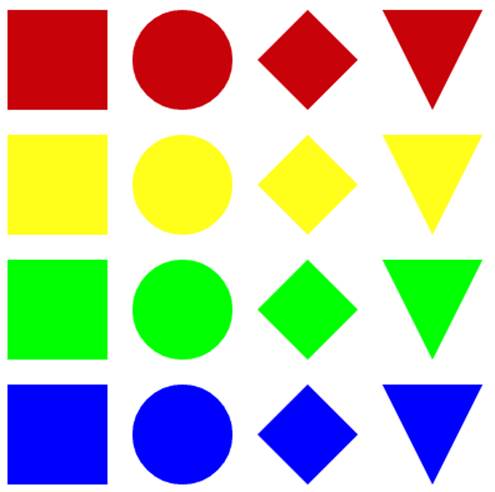
Figure 5-2. SVG sprite of shapes
Lines 7 through 10 provide the declarations for four squares. Line 9 reads: “Create a rectangle starting 10 px from the left, 210 px from the top. Make the rectangle 80 px wide and 80 px tall. Fill this shape in with #00FF00.”
<rect x="10" y="210" width="80" height="80" style="fill: #00FF00;"/>
Lines 13 through 16 define four circles or discs. Line 16 reads: “Find the point 150 px from the left and 350 px from the top, and make that the center of our 40 px radiused circle that has a background color of #0000FF.”
<circle cx="150" cy="350" r="40" style="fill: #0000FF;"/>
Lines 18 to 28 declare eight polygons: four diamond shaped and three triangles. Polygons are declared by defining the corners. Line 19 reads: “This shape has four corners, with the top point at 250 px from the left and 10 px from the top. The second point is at 210 px from the left and 50 px from the top. The bottom point is 90 px from the top, and the right-most point is 290 px from the left and 50 px from the top. The area within those four points should be filled in with #d60818, which is a shade of red.”
<polygon points="250,10 210,50 250,90 290,50" style="fill: #d60818;"/>
We chose to make squares, circles, diamonds, and upside-down triangles.
We could also have included these small images as data URIs directly in our CSS file, or as foreground images. For example, you can include encoded SVG as data URIs:
background-image: url(data:image/svg+xml,%3Csvg%20xmlns%3D%22http%3A%2F%2F
www.w3.org%2F2000%2Fsvg%22%20version%3D%221.0%22%3E%3Crect%20x%3D%220%22%20y
%3D%220%22%20fill%3D%22%23abcdef%22%20width%3D%22100%25%22%20height
%3D%22100%25%22%20%2F%3E%3C%2Fsvg%3E);
In CubeeDoo, we also include a mute icon. The data URI for that icon is:
background-image:
background-image:
url("data:image/svg+xml;utf8,%3Csvg%20xmlns=
'http://www.w3.org/2000/svg'%20width='100'%20height='100'%3E
%3Cpolygon%20points='39,13%2022,28%206,28%206,47%2022,48%2039,63
%2039,14'%20style='stroke:#111111;stroke-width:5;stroke-linejoin:round;
fill:#111111;'%20/%3E%3Cpath%20d='M%2048,50%2069,26'%20%20style='fill:none;
stroke:#111111;stroke-width:5;stroke-linecap:round'%20/%3E%3Cpath%20
%20d='M%2069,50%2048,26'%20style='fill:none;stroke:#111111;stroke-width:5;
stroke-linecap:round'%20/%3E%3C/svg%3E");
The paths in this example are barely human readable. They were created using Amaya. However, the syntax should be familiar. We are using the CSS background-image property. Instead of using url(path/mute.jpg), or even url(path/mute.svg), we employurl("data:image/svg+xml;utf8,<svg... /></svg>");, putting the entire SVG file, escaped, within the quotes.
For versions of Internet Explorer that support SVG (currently IE9 and IE10), data URIs should be escaped, as per the specifications.
Canvas
The HTML5 Canvas specification is a JavaScript API for creating drawings. The canvas API allows the definition of a canvas context object as the <canvas> element on your HTML page, inside which we can draw. We can even include canvas drawings in your CSS as background images.
We can draw in both 2D and 3D (WebGL) context. 2D is available in all of the modern web browsers. WebGL is gaining ground in the mobile space, and should only be included when hardware is accelerated (if at all) for performance reasons.
2D context provides a simple yet powerful API for performing quick drawing operations on a 2D bitmap surface. There is no file format, and you can only draw using script. You do not have any DOM nodes for the shapes you draw—with <canvas> you’re drawing pixels, not vectors. The single node makes canvas appear mobile friendly, but the high CPU usages of JavaScript animation can quickly drain a mobile battery (though battery usage performance is improving with hardware acceleration).
Your first <canvas>
Being a very basic introduction to canvas, we are only going to cover basic shapes and lines. If you are unfamiliar with JavaScript, the syntax may at first seem a bit confusing. If you are familiar, it should make sense.
The first step is adding the <canvas> element to your document. In terms of HTML, the only step is adding the <canvas> element to your document:
<canvas id="flag" width="320" height="220">
You don't support Canvas. If you did, you would see a flag.
</canvas>
That is it for the HTML part of canvas. I could simply have written <canvas></canvas>. The id was included for ease of JavaScript targeting, though I could also target it via the DOM. I have also included alternative content for users that don’t support or otherwise can’t see the<canvas> content.
NOTE
Other than the aria-label attribute, <canvas>, as currently implemented, is a completely non-accessible API.
With that, we’ve created our blank drawing board, or canvas. Everything else takes place in our JavaScript. In this example, we are creating the Japanese flag again, as seen in Figure 5-3.
The next step is drawing to our canvas. From now on, everything is in JavaScript. We target the <canvas> node with basic JavaScript in one of three ways:
document.getElementById('flag')
document.getElementsByTagName('canvas')[0]
document.querySelector('#flag')
We then initialize a 2D context and start drawing using 2D context API commands. Again, we draw the Japanese flag:
1 <script>
2 var el= document.getElementById("flag");
3
4 if (el && el.getContext) {
5 var context = el.getContext('2d');
6 if (context) {
7 context.fillStyle = "#ffffff";
8 context.strokeStyle = "#cccccc";
9 context.lineWidth = 1;
10 context.shadowOffsetX = 5;
11 context.shadowOffsetY = 5;
12 context.shadowBlur = 4;
13 context.shadowColor = 'rgba(0, 0, 0, 0.4)';
14 context.strokeRect(10, 10, 300, 200);
15 context.fillRect(10, 10, 300, 200);
16 context.shadowColor='rgba(0,0,0,0)';
17 context.beginPath();
18 context.fillStyle = "#d60818";
19 context.arc(160, 107, 60, 0, Math.PI*2, false);
20 context.closePath();
21 context.fill();
22 }
23 }
24 </script>
Line 2 finds the <canvas> element by matching the element’s id attribute. Before creating the 2D context, we check to make sure that the canvas element has been found and that the browser supports canvas, checking for the existence of the getContext method in line 4.
NOTE
You can use feature-detection scripts like Modernizr to feature detect whether a browser supports canvas and other modern features. Modernizr provides for feature detecting all features, or single features that you are actually employing. We’re not using Modernizr here because we’re showing you how to feature detect directly. Other than minimizing external scripts and HTTP requests, there is actually no reason to not use Modernizr if it otherwise makes sense.
In line 5, we create a reference to a context using the getContext(contextId) method of the canvas element: 2d is the correct context for <canvas>. If context creation is successful, checked in line 6, we are finally free to draw in our canvas, which we do in the rest of the script.

Figure 5-3. Japanese flag created as a canvas
While still experimental, if we want to include the canvas drawing as a background in a WebKit browser via CSS,[39] instead of calling the canvas element within our DOM, we could include it as a background image:
background: -webkit-canvas(theCanvas);
in our CSS, and:
var context = document.getCSSCanvasContext("2d", "theCanvas", 320, 220);
in our JavaScript, where the 2nd parameter is the name of the canvas that we use, unquoted, in our CSS.
Through line 6, and even through line 13, we haven’t drawn anything yet. All we have done up through line 6 is to define a canvas context in which we can draw and redraw pixels.
Before drawing a shape, we must define the look and feel of the shape we want to draw by setting properties on the context object. We define the look of the border (stroke and linewidth) properties, the background color (fill) and the shadow (shadowOffsetX, shadowOffsetY,shadowBlur, and shadowColor) of our first rectangle, which we draw with the strokeRect() method in line 14. We pass the same parameters as our SVG example: (10, 10, 300, 200). The four values are the x-offset, the y-offset, width, and height, respectively.
Once the script executes a command, the script forgets about what it has done, and moves onto the next line of code. Unlike our SVG example in the preceding section, the rectangle we’ve drawn on our canvas is not part of the DOM. Being properties, the stroke, fill, linewidth, andborder properties are still remembered, but the browser and script are not aware of what has been drawn. If you do want to capture what is drawn on the canvas and where, use the getImageData()method on the context to capture the red, green, blue, and alpha transparency values of your pixels.
When we draw our second rectangle using the fillRect method in line 15, which paints rectangles using the previously set fillStyle property, we need to pass the coordinates again, as the DOM does not remember our first rectangle (though it can access pixel information).
Both rectangle method calls (lines 14 and 15) have the same parameters—10, 10, 300, 200—we’ve drawn our fill rectangle directly on top of our drop shadow rectangle. We could have created an object with those coordinates and passed it to both methods, but we can’t tell the canvas to access the first rectangle’s coordinates and copy to the second after the method call.
We first stroked the rectangle, then we filled it. Had the reverse order been the case, the shadow would have been on top of the background color. As the origin coordinates are the same, and the border width is only 1 pixel, the final border will only be 0.5 pixels wide, as the fill covers the inner half of the border stroke.
As mentioned earlier, as we start the process of drawing the disc or sun on our flag, once you paint onto the canvas, the DOM has no recollection of what you’ve painted. Yes, it’s true that the JavaScript remembers the values of the properties you’ve set, like our shadowColor. It also remembers the most recent drawing steps whether or not they have been drawn. However, the pixels that are places on the canvas are just pixels of color. As we don’t want a shadow on the red circle, we must set the shadowColor to transparent before drawing it, which we do in line 16.
We start our instructions for our circle with beginPath() (line 17) and end with closePath()(line 20). The script remembers the drawing steps whether or not they have been drawn. If we drew a circle, and then some lines without opening and closing the context, when we drew the lines, the steps to draw the circle would still be in memory, and your new line may cut through that circle, cutting it in half. We avoid this by opening and closing the drawing paths with beginPath() and closePath(), respectively.
We define our circle: context.arc(x-offset, y-offset, radius, startAngle, endAngle, anticlockwise) adds points to an arced path creating a virtual circumference of a circle described by the arguments context.arc(160, 107, 60, 0, Math.PI*2, false);. Starting at the given start angle, in our case 0, which is on the right horizon, and ending at the given end angle, going in the given direction, which in our case is clockwise. Had our end angle been less than 2Π, our circle would have been flattened: the start and end points connected by a straight line. Π would have created a half circle.
We also redefine the fill color, from white to red (line 18). We then paint the circle we created using the fill() method (line 21) that fills the described arc in the fillStyle color.
We haven’t even touched the surface of what <canvas> can do. http://ie.microsoft.com/testdrive/Graphics/CanvasPad/Default.html is a fun page where you can learn simple shapes, colors, shadows, text, images, transformation, animation, and mouse movement with <canvas>.
<canvas> code example
In our game example, to make higher levels a little more difficult, we can include a changing background for the game board. We can include shapes that are on the front side of the cards in our animation just to make the higher levels insanely difficult.
In the online chapter resources, I’ve included a few canvas code examples. Try drawing the Japanese flag. Then convert your flag into a static Pac-Man, making the red circle yellow, with a mouth, a black circle for an eye, and three little edible dots. The online chapter resource examples also include some text to provide you with code that is beyond the scope of this book, including a function to invert the colors of the Pac-Man so that you may learn how to access the pixels already drawn to your canvas and other methods of drawing to the page.
While we’ve included an example of <canvas> in CubeeDoo for this book, we currently would not include a dynamic canvas element for production for mobile web applications. The battery consumption of running canvas animation via JavaScript with the current state of implementation would make your users very, very sad, but support for hardware acceleration of <canvas> is improving.
Canvas Versus SVG
HTML5 Canvas and SVG have several similarities and are often compared and contrasted. They are both web technologies that allow you to create rich graphics inside the browser, but they are fundamentally different.
As we’ve seen, in SVG, you “draw” with XML. For canvas, you draw with JavaScript. Canvas is the painting of pixels onto a canvas: once painted, each pixel is forgotten. SVG, on the other hand, creates DOM nodes, accessible until deleted or until the user navigates away from the page. They both have their advantages and disadvantages.
SVG drawings are resolution independent, making SVG an excellent choice for user interfaces of all sizes, as it allows scaling for all screen resolutions. SVG is an XML file format enabling easy accessibility. SVG can be animated using a declarative syntax, or via JavaScript. Each element becomes part of and is accessible via the SVG DOM API in JavaScript. However, anything that accesses the DOM repeatedly slows the page down, which is especially important and noticeable in the mobile environment.
Canvas is all drawn in pixels. Zooming can lead to pixelation. Canvas is inherently not accessible: accessibility is limited mainly to including fallback content should canvas not render. Interactivity requires redrawing of each pixel. There are no DOM nodes for anything you draw. There’s no animation API. Instead, timers or requestAnimationFrame are generally used for updating the canvas at quick intervals. Canvas gives you a surface to draw onto with the API of the context you choose. Canvas, however, is very well suited for editing of images, generating raster graphics such as for games or fractals, and operations requiring pixel-level manipulation. Drawings created with the canvas API can also be exported as images.
The <canvas> 2D context is well supported in all browsers (since IE9). SVG is also well supported, but in varying formats (since IE9 and Android 3). While both SVG and Canvas are well supported, they both have their drawbacks.
SVG may not perform well. Mobile browsers have difficulty handling increased DOM elements. Each additional DOM node uses up memory, and needs to be recalculated when the page is reflowed. For these reasons, you should limit the number of DOM nodes added to your web applications when developing for mobile. SVG is made up of DOM nodes, and these increased number of DOM elements can harm performance and, in more extreme cases, can crash some mobile browsers. Canvas, on the other hand, when animating (versus drawing a single image), can drain your users’ battery. Canvas has been hardware-accelerated in all major browsers, making the draw time and update time much faster, as well as improving battery consumption.
Weigh the pros of cons of both before deciding to use either (or neither).
WebGL
3D, or WebGL, support is still nascent, with major performance issues, excessive battery consumption, and limited implementation on mobile devices. (Try the Blackberry 10 at the time of this writing for the best implementation. WebGL was also recently implemented in Firefox OS.) When available on older mobile devices, because CPU usage eats up battery life, and JavaScript makes for heavy CPU usage, you may want to think twice before including WebGL: you don’t want to drain your users’ batteries. Devices that support WebGL, like BlackBerry 10, put WebGL on the GPU, which performs better and consumes less power than if it were on the CPU, but I am still hesitant to recommend its use. If you do choose to implement WebGL, always be aware of performance, such as memory usage and battery consumption.
Audio/Video
Prior to HTML5, there was no standards-based way to embed video in a web page. Instead, web videos were displayed through third-party plug-ins like Flash or QuickTime. In addition, without an easy way of creating accessible media, when video files were included, they were often inaccessible to the visually and hearing impaired.
HTML5 defines a standard way to embed video and audio into web pages, using the <video> and <audio> elements. Both <audio> and <video> are supported in all mobile browsers (except Opera Mini), but not all browsers support the same video formats at this time. Before we discuss how to include video and audio into a document, we need to discuss media file codecs and browser support, since we’ll need to include different media types for different browsers, and fallbacks for browsers that don’t support your media type.
Media Types
With browser support of the HTML5 <video> and <audio> elements and standard media types, there will no longer be a requirement for third-party plug-ins for this type of media. At this time, however, different browsers support different video and audio codecs. As you likely know, the iPad and iPhone do not support Flash. They do support the <video> and <audio> elements, supporting the H.264 video and AAC audio formats (described in the next section). Modern browsers all support HTML5 video, but do so with different video formats. Firefox, Chrome, Android, and Opera support Ogg/Theora (.ogv). IE9, Safari, Chrome, Android, and iOS support MPEG4/h.264 (.mp4). Firefox 4+, Chrome, Opera, and Android (2.3+) support WebM/VP8 (.webm), as does IE9 if the required codecs are installed on the system. See Table 5-1.
Table 5-1. Browser video codec support (Ogg and WebM can be separately installed in IE9)
|
iPhone/iPad |
Android |
BlackBerry |
Opera Mobile |
Opera Mini |
Windows/IE |
Chrome Android |
Firefox Android |
|
|
<video> |
Yes |
Yes |
7 |
11 |
9 |
yes |
yes |
|
|
Ogg |
2. |
11 |
(9*) |
yes |
||||
|
H.264 |
Yes |
3.0[a] |
7 |
9 |
yes |
yes* |
||
|
WebM |
2.3 |
14 |
(9*) |
yes |
yes |
|||
|
[a] See http://www.broken-links.com/2010/07/08/making-html5-video-work-on-android-phones/. |
||||||||
There are several video codecs. The three most relevant codecs are Theora/Ogg, VP8, and H.264. Theora/Ogg (.ogv) is an open standard natively supported by Firefox 3.5, Chrome 4, and Opera 10.5+, and works in IE only after installing a plug-in. WebM, used with the VP8 video codec, is a newer format that is supported natively in the newest versions of Chrome, Mozilla Firefox, and Opera 10.6.
VP8 is currently royalty free. There is a patent, but Google, the owner, provides for royalty-free licensing. Unfortunately, while well supported in modern browsers, WebM/VP8 video codec faces patent issues with Nokia that may make it unlikely to be adopted as an Internet standard anytime soon.
H.264 provides for low, medium, and high bandwidth devices, is playable through Adobe Flash, and mobile devices including Android and iPhone, but is not an open standard. Licensing can be quite costly. Originally, Chrome stated that it would drop support for it, but hasn’t yet. Firefox added support in 2013 if it is installed in the operating system. Opera on mobile does the same.
At this time, there is no format that works in all browsers, as demonstrated in Table 5-1. To make your video work everywhere, you have to encode your video in more than one format.
For right now, for mobile phones in the United States, H.264 is the way to go. Just keep yourself updated for the possibility that support may change. If the “mobile” devices you support include GPS systems, video games, etc., remember that Opera is the most popular mobile browser around the world, and even in the United States for other-than-phone-and-PC devices.
Adding <video> to Your Website
While simply including H.264 for mobile may work if you are targeting the US smartphone market, for maximum device compatibility, two versions of the video need to be produced. Make a WebM version (VP8 video and Vorbis audio) and an MP4 version (H.264 video and AAC audio). Link to both video files using the HTML5 <video> element and the child <source> tags, and include a Flash-based video player as a default option.
Attributes of <video> and <audio>
There are several attributes for <video> and <audio> elements that control the appearance and behavior of the embedded media.
The <video> and <audio> elements support:
src
The src attribute, or “source attribute,” takes as its value the URL for the video or audio file. It can be replaced by multiple <source> child nodes.
autoplay
The Boolean autoplay attribute, if present, tells the browser to start playing the video automatically, not waiting for the user to press play. This should only be included on web pages where the primary content of the page is the video.
loop
If the Boolean loop attribute is present, the video or audio will loop, once started it will play continuously until paused or stopped. When the video or audio clip reaches its end, if the loop attribute is present, it will start from the beginning again.
controls
If the Boolean controls attribute is included, the browser should display the media controls (timing, play, pause, etc.).
preload
The preload attribute hints to the browser how much it should download before the video starts playing. If omitted or included and set to none, the media does not preload. If included or included and set to auto, the media will be downloaded. If set to metadata, the dimensions, length, and other metadata should be retrieved, but the whole media object need not be downloaded.
The following attributes apply to <video> only, not to <audio>:
poster
The poster attribute takes as its value the URL of an image to be used as a visual placeholder until the video starts playing. If not included, the video player will show the first from of the video, which generally appears as a black rectangle.
width
The width attribute takes as its value the width of the video container (in pixels).
height
The height attribute takes as its value the height of the video box (in pixels).
Here is a sample <video> declaration (a description of each component is given in Table 5-2):
<video autoplay controls loop poster="poster.jpg" preload="metadata"
src="video.mp4" height="360" width="480">Fallback Text</video>
Table 5-2. The components of a sample <video> declaration
|
Component |
Description |
|
<video> |
The video tag. |
|
autoplay |
If set, the video starts when page loads. |
|
controls |
If set, a control bar is shown. |
|
loop |
If set, the video continuously loops. |
|
poster="/img/poster.jpg" |
If set, a preview image is shown. |
|
preload="metadata" |
Can be none, metadata, and auto. |
|
src="/video/video.mp4" |
Link to the video file. |
|
height="360" |
Height of the video. |
|
width="480"> |
Width of the video |
|
Fallback Text |
Can be any valid HTML code. Linking to the video is standard practice. |
|
</video> |
The closing </video> tag is required |
HTML5 <audio> and <video> allow for associating captions with the embedded media. These elements are part of the HTML5 DOM that allows for CSS styling and provides for a powerful API giving developers control over movie playback through a whole slew of new JavaScript methods and properties, including play(), pause(), muted, and ended.
When HTML5 video is fully supported, with all browsers supporting the same codec, the code will be as simple as this:
<video src="myVideo.mp4" width="400" height="300"
controls poster="myImage.jpg">
You don't support HTML5, but you can still
<a href="myVideo.ogv"> download the video here</a>.
</video>
Unfortunately, that code won’t work cross-browser quite yet. As explained previously, not all browsers support the same codec: we have to provide different sources to different browsers.
To enable that, HTML5 provides us with the <source> element. The <source> element allows the specifying of more than one media resource. The <source> element has three attributes (other than the global attributes) including src, type, and media.
NOTE
To dynamically change the media being played, modify the src attribute of the <video> and <audio> tags. Modifying the src attribute of a <source> element will not work. Use the canPlayType() method to select a type that the browser supports.
The type attribute denotes the type of the media resource, so that the browser can determine if it understands the media type before downloading it. If specified, its value must be a valid MIME type.
Until all browsers support a single codec, the code is still not too complicated. In our game example, we could add an instructional video explaining how to play the game. We didn’t include this video, but we could have. Had we opted to include a video, supporting video for all browsers would currently look something like this:
<video width="400" height="300" preload="none" poster="posterImg.jpg"
controls>
<source src="myVideo.mp4" type="video/mp4; codecs=avc1.42E01E, mp4a.40.2"/>
<source src="myVideo.webm" type="video/webm; codecs=vp8, vorbis"/>
<source src="myVideo.ogg" type="video/ogg; codecs=dirac, speex"/>
<object width="400" height="324" type="application/x-shockwave-flash"
data="myVideo.swf"/>
<param name="movie" value="myVideo.swf"/>
<param name="flashvars"
value="image=posterImg.jpg&file=myVideo.mp4"/>
<!-- fallback -->
<a href="linktovideo">
<img src="posterImg" width="400" height="300"
alt="Awesome Video"/>
</a>
</object>
</video>
If your browser supports it, HTML5 video is used. If the browser does not support the first media type and the code if included, it will try the next. If HTML5 video is not supported, Adobe Flash is used. If neither Flash nor <video> are supported, the placeholder image will be displayed. You may also want to include video download links.
NOTE
The preceding Flash file source is declared to be 24 px taller than the other versions: this is because the Flash controls take up 24 px of height below the video instead of overlaying the video like HTML5 video formats.
If we were targeting just modern mobile devices, we could have omitted Flash and added tracks (described in the section The <track> element):
<video width="400" height="300" preload="none" poster=
"posterImg.jpg" controls>
<source src="myVideo.mp4" type="video/mp4;
codecs=avc1.42E01E, mp4a.40.2"/>
<source src="myVideo.webm" type="video/webm;
codecs=vp8, vorbis"/>
<source src="myVideo.ogg" type="video/ogg;
codecs=theora, vorbis"/>
<img src="posterImg" width="400" height="300"
alt="Title of Video" title="Your browser does
not support video"/>
<track kind="subtitles" label="English" src="en.vtt"
srclang="en" default></track>
<track kind="subtitles" label="Deutsche" src="de.vtt"
srclang="de"></track>
</video>
Video files usually contain both audio and video tracks. Audio tracks contain markers to synchronize the audio with the video. Individual tracks can have metadata, such as the aspect ratio of a video track, or the language of an audio track. Containers can also have metadata, such as the title of the video itself, cover art for the video, episode numbers (for television shows), and so on.
Similarly, you can add <audio> to your documents:
<audio id="sound">
<source src="music.mp3" type="audio/mp3"/>
<source src="music.ogg" type="audio/ogg"/>
<!-- flash version of the audio for non supporting browsers -->
</audio>
An article on Dev.Opera provides very detailed instructions on detecting support.
The <track> element
To make videos and audio files accessible to users with hearing impairments, or even accessible to nonnative speakers, you can add captions to your video with a <track> element linking to a subtitling file.
Included as the child of a <video> or <audio> element, <track>’s src attribute links to a timed track, or time-based data. The kind attribute sets what kind of data is included by the src attribute. Values of the kind attribute include subtitles, captions, descriptions, chapters, or metadata.
You can include multiple track elements as children of a media element, but they must be of unique kind and language combinations:
subtitles
The default value of the kind attribute, indicates a translation of the dialogue and is displayed over the video or audio by default. This is most useful when the conversations are inaudible or in a foreign language.
captions
Denotes a track file that provides a transcription or translation of the dialogue similar to subtitles, but includes sound effects, musical cues, and other audio information that could fully replace the soundtrack if the audio is unavailable. This is most useful when videos are muted or the user is hearing impaired.
descriptions
Tracks are descriptions of the video component of the media resource, intended for audio synthesis when the video is unavailable. This is helpful for the visually impaired and for those who otherwise can’t see the video or read track text.
chapters
Denotes a track defining chapter titles, intended to be used for navigating the media.
metadata
Denotes a track that is intended for use by scripts and is not displayed to the human user.
Include the source of the track file with the required src attribute. The srclang attribute gives the language of the text <track> data. The label attribute gives a user-readable title for the <track> used by the browser to list subtitle, caption, and audio description tracks in their user interface.
The default attribute, if specified, indicates that the <track> is to be enabled if the user’s preferences do not indicate that another <track> would be more appropriate. There can only be one default <track> element.
HTML5 <audio> and <video> allow for associating captions with the embedded media. These elements are part of the HTML5 DOM, which allows for CSS styling and provides for a powerful API giving developers control over movie playback through a whole slew of new JavaScript methods and properties, including play(), pause(), muted, and ended.
Video and Audio and JavaScript
If you’re going to use JavaScript to control the <audio> and <video> elements, you will need to use feature detection to ensure support and avoid throwing a JavaScript error:
if (createElement('audio').canPlayType) { /* audio is supported */}
You can include native controls, or create your own. <audio> and <video> support the play() and pause() methods. To create your own, you can add HTML for the controls and JavaScript to play and pause the audio, with code similar to this:
<div id="controls" style="display: none">
<button id="playButton">Play</button>
<button id="pauseButton">Pause</button>
</div>
<script>
if (document.createElement('audio').canPlayType) {
if (document.createElement('audio').canPlayType('audio/mp3') ||
(document.createElement('audio').canPlayType('audio/ogg')) {
// HTML5 <audio> and an included audio type is supported
document.getElementById('player').style.display = 'block';
} else {
... Include flash or other audio here ...
}
</script>
To create your own controls, you can include the following:
var videoClip = document.querySelector('#clip');
var playButton = document.querySelector('#playButton');
var pauseButton = document.querySelector('#pauseButton');
playButton.addEventListener('touchEnd', function() {
playVideo();
});
pauseButton.addEventListener('touchEnd', function() {
pauseVideo();
});
function playVideo() {
//play the video
videoClip.play();
// update the controls
playButton.disabled = true;
pauseButton.disabled = false;
}
function pauseVideo() {
//pause the video
videoClip.pause();
// update the controls
playButton.disabled = false;
pauseButton.disabled = true;
}
function MuteUnMute() {
//change the button value
document.getElementById('mute').value = videoClip.muted ? 'Mute' : 'Unmute';
//change the state of the video
videoClip.muted = videoClip.muted ? false : true;
}
CubeeDoo
In our game example, we have a few sounds. In addition to optional annoying background music, when someone gets to the next level, makes a match, fails to make a match, etc., the game makes a sound indicating if there was a success or failure.
A background sound, if included, would use the actual <audio> tag, since the background music is user controllable. The feedback sounds are based on user action and success, so I dynamically generated them with JavaScript.
Here are the two methods we can employ to include sound. We can include the audio directly in our HTML:
<audio id="nonmatchsound" preload src="notmatch.mp3"></audio>
<audio id="matchsound" preload src="match.mp3"></audio>
We’ve preloaded the audio, but do not autoplay or loop our audio files. Instead, we use JavaScript to initiate playing the matched or nonmatched sound:
playSound: function(matched) {
if (qbdoo.mute) {
return false;
}
if (matched) {
qbdoo.matchfound.play();
} else {
qbdoo.failedmatch.play();
}
},
Alternatively, we don’t have to put the audio in our HTML. Instead, we add the audio to the DOM with JavaScript, without appending the audio files to the page:
playSound: function(matched) {
//if sound is off for game, skip
if (qbdoo.mute) {
return false;
}
// if we haven't created the audio node, create it.
if (!qbdoo.audio) {
qbdoo.audio = document.createElement('audio')
}
if (matched) {
qbdoo.audio.src = qbdoo.matchedSound;
}
else {
qbdoo.audio.src = qbdoo.failedMatchSound;
}
qbdoo.audio.play();
},
We’ve only included audio to demonstrate the use of <audio>. Never autoplay music; it is bad user experience. You’ll note the game includes a mute button. If you do include sound and it is on by default, if the user selects to mute the sound, remember this selection in localStorage, which we cover in Chapter 6.
Styling Video
The <video> element is an HTML element. Like all elements, <video> is styleable. You can use CSS to define the width and height of the video. You can mask it, round the corners, and even reflect its contents. With canvas you can sample the pixels and invert them (which we may also be able to do with CSS Filters).
Responsive video sizing
More importantly, you may want to resize videos based on device size and aspect ratio. Thierry Koblentz proposed an effective method for allowing browsers to determine video dimensions based on the width of the containing block (or the width of the page) using intrinsic dimensions. A width change, such as an orientation change, triggers a new height calculation, allowing videos to resize and giving them the ability to scale the same way images do.
To create the resizable video, you create a resizable box with the proper ratio (4:3, 16:9, etc.), then make the video inside that box stretch to fit the dimensions of the box by using padding, percentages, and absolute positioning. The padding is generally set as a percentage of either 56.25% or 75% of the width, depending on the aspect ratio. Taking advantage of the box model, the <video> is absolutely positioned to take up the entire height and width of the padding area.
If you need to include a resizable video for your responsive website:
.wrapper {
position: relative;
height: 0;
width: 100%;
padding-bottom: 56.25%;
/ * or */
padding-bottom: 75%;
}
video {
position: absolute;
width: 100%;
height: 100%;
left: 0;
top: 0;
}
Things to know about <video> implementation
Unlike Flash, which is a plug-in controlled by one company, and therefore behaves similarly everywhere, different browsers and operating systems have slightly different quirks when it comes to <video>. On the iPhone, Android, and Windows Phone 8, videos are always fullscreen. On the iPad, the controls have a fullscreen button, and it even works with the pinch gesture. Video uses GPU on iOS and Windows, but Android played video off the CPU until Android 4:
§ Make sure that your server is supporting the video mime types or Firefox may fail. Add AddType video/ogg.ogv and the like to the .htaccess file if not already supported.
§ iPhone and iPad will not autoplay, even if the attribute is included.
§ The appearance of the controls are based on the native browser controls. As mentioned earlier, the look and feel can be overwritten with JavaScript. Check out http://videojs.com/ if you would like to skin your controls.
§ If you want to start including your own videos, there is an open source, GPL-licensed, multiplatform, multithreaded video transcoder, available for Mac OS X, Linux, and Windows called Handbrake.
Remember that video and sound uses a lot of battery power. While both are supported on all smartphones, with great power comes great responsibility: it is your job to ensure that your web applications don’t drain your users’ batteries. Use caution when including battery-draining features.
[36] Currently, WebKit and Mozilla prevent importing scripts and raster images in SVG via the <img> tag, even when the raster images are from the same origin.
[37] http://www.iheni.com/just-how-accessible-is-svg/.
[38] The data URI needs to be escaped for IE9 and later. This is just a brief overview of the Clown Car Technique. More details and examples, along with fallbacks for browsers that don’t support SVG, can be found at http://github.com/estelle/clowncar.
[39] Firefox 4+ supports canvas in CSS as well, dynamically creating a virtual canvas element with JavaScript and with -moz-element('#myCanvas') in the CSS.
All materials on the site are licensed Creative Commons Attribution-Sharealike 3.0 Unported CC BY-SA 3.0 & GNU Free Documentation License (GFDL)
If you are the copyright holder of any material contained on our site and intend to remove it, please contact our site administrator for approval.
© 2016-2026 All site design rights belong to S.Y.A.