Java EE and HTML5 Enterprise Application Developmentb (2014)
CHAPTER
4
WebSocket
HTTP was designed to share information over the Internet, and it has served very well in that respect. But it is inherently half-duplex; that is, the client (in most cases the browser) initiates a request to an HTTP server, and the server processes the request and responds to the client. Web applications that require the server to push information to the client have typically achieved that functionality by abusing the protocol, such as via polling and long polling.
In polling, a client requests a resource from a server using normal HTTP at regular intervals. A new connection to the server is opened at the specified interval, say after three seconds, and the server returns any new information in the response. The connection is closed after the client has received the information. It is likely that new information is not available for each request. This also requires tuning the interval at which the information is requested, and is generally application-specific. Therefore, this is not a very efficient way to push information from server to client.
In long polling, a client requests a resource from a server using normal HTTP. The server does not immediately respond with the requested information but rather waits and responds when new information is available. The client receives the new information, closes the connection, and immediately sends another request to the server. This type of polling keeps an open connection between the client and the server indefinitely, with possibly no data exchanged during the majority of the time. It also requires opening a new connection after a response is received. This is also not efficient utilization of resources.
The Server-Sent Events (SSE) specification included in HTML5 provides a similar mechanism to the long polling mechanism, except it does not send only one message per connection. The client sends a request and the server holds open a connection until a new message is ready. It sends a message back to the client when new information is available while still keeping the connection open. This allows the connection to be reused for subsequent messages, or events.
For a regular HTTP request and response, each HTTP request requires establishing a new TCP connection to the server, and that connection is terminated after the HTTP response has been received. Setting up a TCP connection is an expensive operation but is rather invisible if the number of HTTP requests is low. If the number of requests increases, then creation and termination of the TCP connection with each HTTP message exchange reduces the overall performance of the application.
HTTP also has a high overhead for a wire protocol. A minimum set of headers must be exchanged on-the-wire between the client and the server in order to fulfill the protocol requirements. There is a processing cost associated with parsing these headers that further reduces the performance of an application if the number of message exchanges increases.
In short, HTTP is a half-duplex and verbose protocol that is inefficient for full-duplex and bidirectional communication between client and server. This is exactly the need served by WebSocket.
What Is WebSocket?
WebSocket is a full-duplex, bidirectional protocol that uses a single TCP connection for exchanging messages in both directions.
WebSocket is defined by two different specifications:
![]() WebSocket Protocol, RFC 6455 http://tools.ietf.org/html/rfc6455
WebSocket Protocol, RFC 6455 http://tools.ietf.org/html/rfc6455
![]() W3C WebSocket API www.w3.org/TR/websockets/
W3C WebSocket API www.w3.org/TR/websockets/
RFC 6455 defines how a WebSocket connection can be established using a handshake. It also defines the wire protocol for WebSocket message exchange. The W3C WebSocket API is a JavaScript API that is implemented by different browsers. This API can then be used by web applications to make connections to WebSocket endpoints and exchange messages.
WebSocket Handshake
Section 14.42 of HTTP 1.1 (RFC 2616) defines an upgrade mechanism that allows a transition from the HTTP 1.1 protocol to a different protocol. In this case, to the WebSocket protocol. After an upgrade is negotiated between the client and the server, the subsequent requests use the newly chosen protocol for message exchanges.
RFC 6455 defines how a WebSocket client can make an HTTP upgrade request. This is called a WebSocket client handshake and is shown in Listing 4-1.
![]()
Listing 4-1 WebSocket Client Handshake
![]()
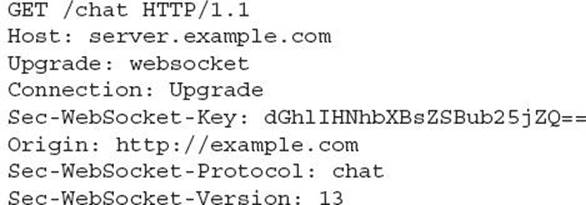
Listing 4-1 shows a typical client opening handshake request. The header fields in the handshake may be sent in any order. In this fragment, the first couple of lines are like a usual HTTP request, indicating that this is a GET request and identifying the host and URI to which the request is addressed. The key part to notice here is that the WebSocket protocol attempts to achieve bidirectional communication in the context of existing HTTP infrastructure. This allows the protocol to work over HTTP ports 80 and 443 and to support HTTP proxies and intermediaries.
The WebSocket-related header fields in Listing 4-1 are as follows:
![]() The Upgrade and Connection header fields mark this HTTP request as an upgrade request, specifically requesting an upgrade to WebSocket.
The Upgrade and Connection header fields mark this HTTP request as an upgrade request, specifically requesting an upgrade to WebSocket.
![]() Different subprotocols can be negotiated using the Sec-WebSocket-Protocol header field. If you choose to define a subprotocol, that same field must be included on both the server and client. It is also recommended that any subprotocol be registered with the Internet Assigned Numbers Authority (IANA) to help avoid naming conflicts.
Different subprotocols can be negotiated using the Sec-WebSocket-Protocol header field. If you choose to define a subprotocol, that same field must be included on both the server and client. It is also recommended that any subprotocol be registered with the Internet Assigned Numbers Authority (IANA) to help avoid naming conflicts.
![]() The Sec-WebSocket-Version header is returned by the server and must be set to a value of 13.
The Sec-WebSocket-Version header is returned by the server and must be set to a value of 13.
![]() The Origin header field is used to protect against unauthorized cross-origin use of the WebSocket server by scripts using the WebSocket API in a web browser.
The Origin header field is used to protect against unauthorized cross-origin use of the WebSocket server by scripts using the WebSocket API in a web browser.
![]() If the server is capable of handling this upgrade request, then it processes the received Sec-WebSocket-Key header field using a predefined algorithm and returns the generated value in the server handshake response.
If the server is capable of handling this upgrade request, then it processes the received Sec-WebSocket-Key header field using a predefined algorithm and returns the generated value in the server handshake response.
A typical server opening handshake response looks like this:
![]()

The first line is an HTTP status line and indicates that the handshake was successful. The Upgrade and Connection header fields complete the HTTP upgrade. The Sec-WebSocket-Accept header field must contain the value generated on the server using the predefined algorithm defined by RFC 6455. All these header fields must be present in order for the handshake to be complete.
Once a connection is established between the client and server, they are considered to be peers with equal capabilities. Each can send messages to the other without waiting for the other to respond.
Either peer can initiate the closing handshake by sending a Close control frame with data containing a specified control sequence. The receiving peer sends a Close control frame in response indicating that the connection is now closed.
A peer does not send any further data after sending a Close control frame. Similarly, a peer discards any further data received after receiving a Close control frame. The WebSocket closing handshake then initiates the TCP closing handshake as well.
WebSocket API
The WebSocket API (www.w3.org/TR/websockets/) enables web pages to use the WebSocket protocol for two-way communication with a remote host.
WebSocket can send and receive text and binary data. The API provides an overloaded send method that can send text or binary data by taking any of the following parameters:
![]() Text: String
Text: String
![]() Binary: Blob, ArrayBuffer, ArrayBufferView
Binary: Blob, ArrayBuffer, ArrayBufferView
The API provides event handlers that are invoked for different lifecycle events and when a message is received:
![]() Lifecycle events: onopen(), onerror(), onclose()
Lifecycle events: onopen(), onerror(), onclose()
![]() Message: onmessage()
Message: onmessage()
Java API for WebSocket
Java API for WebSocket defines a set of Java APIs for the development of WebSocket applications. The API enables you to define a server endpoint and a client endpoint. A server endpoint listens for requests from multiple clients. A client endpoint communicates with only one server.
You can define a server endpoint or a client endpoint by decorating a POJO with annotations from the Java API for WebSocket. Such an endpoint is called an annotated endpoint. Alternatively, you can extend some of the classes from the Java API for WebSocket to provide a more fine-grained control over the endpoint. This type of endpoint is called a programmatic endpoint.
In this chapter, we’ll build the legendary game of tic-tac-toe using WebSocket. In this game, two players, identified by X and O, take turns marking the squares in a nine-square grid composed of three columns and three rows. The player who succeeds in placing their respective mark (X or O) in three consecutive squares horizontally, vertically, or diagonally wins the game.
The annotated endpoint for the game is shown in Listing 4-2.
![]()
Listing 4-2 WebSocket Endpoint Annotations
![]()
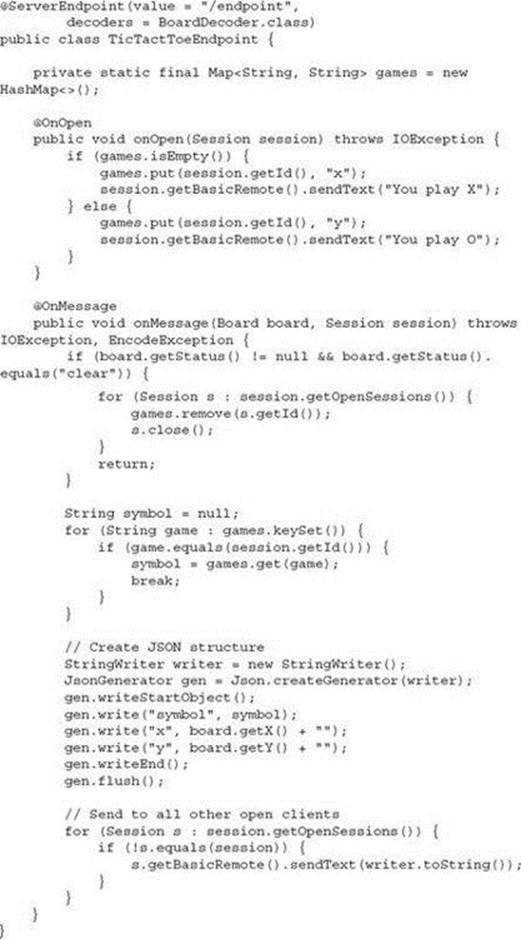
The following list explains the code shown in Listing 4-2:
![]() @ServerEndpoint is a class-level annotation that decorates a POJO to be a WebSocket endpoint. The annotation allows the developer to define the URL where this endpoint is published using the value attribute.
@ServerEndpoint is a class-level annotation that decorates a POJO to be a WebSocket endpoint. The annotation allows the developer to define the URL where this endpoint is published using the value attribute.
By default, a new instance of the endpoint is created per application per virtual machine (VM) to represent the logical endpoint per connected peer. Each instance of the endpoint in this typical case handles connections to the endpoint from one and only one peer.
![]() The configurator attribute can be used to specify a ServerEndpointConfig.Configurator class that can be used to provide a singleton instance of the endpoint for all the peers. Custom configuration algorithms, such as intercepting the opening handshake, can also be specified using this configurator. This attribute is not used in this example.
The configurator attribute can be used to specify a ServerEndpointConfig.Configurator class that can be used to provide a singleton instance of the endpoint for all the peers. Custom configuration algorithms, such as intercepting the opening handshake, can also be specified using this configurator. This attribute is not used in this example.
Additional configuration information can be specified using other attributes; for example, the decoders attribute defines an ordered array of decoder classes used by this endpoint. BoardDecoder.class converts WebSocket messages into an application-defined Board object. The implementation creates a new instance of the decoder per endpoint instance per connection.
![]() The annotated class must have a public no-args constructor.
The annotated class must have a public no-args constructor.
![]() games is a Map object that stores the unique identifier of the client with the corresponding symbol.
games is a Map object that stores the unique identifier of the client with the corresponding symbol.
![]() @OnOpen is a method-level annotation that decorates a Java method to be called when a new WebSocket connection is open. The method may take the following parameters:
@OnOpen is a method-level annotation that decorates a Java method to be called when a new WebSocket connection is open. The method may take the following parameters:
![]() An optional Session parameter that represents a conversation between two WebSocket endpoints
An optional Session parameter that represents a conversation between two WebSocket endpoints
![]() An optional EndpointConfig parameter that contains the information used during the handshake for this endpoint
An optional EndpointConfig parameter that contains the information used during the handshake for this endpoint
![]() Zero to n String parameters annotated with @PathParam annotation that maps the URI template specified in the path mapping of the endpoint
Zero to n String parameters annotated with @PathParam annotation that maps the URI template specified in the path mapping of the endpoint
This method defines the player’s symbol, puts it in the games Map object keyed by the client identifier, and also sends a message back to the player indicating the symbol.
![]() @OnMessage is a method-level annotation that decorates a Java method to be called when an incoming WebSocket message is received. Each WebSocket endpoint may have only one method for each of the native WebSocket message formats: text, binary, and pong. If the method is handling text messages, then the parameter may be one of the following:
@OnMessage is a method-level annotation that decorates a Java method to be called when an incoming WebSocket message is received. Each WebSocket endpoint may have only one method for each of the native WebSocket message formats: text, binary, and pong. If the method is handling text messages, then the parameter may be one of the following:
![]() String to receive the whole message
String to receive the whole message
![]() Java primitive or class equivalent to receive the whole message converted to that type
Java primitive or class equivalent to receive the whole message converted to that type
![]() String and boolean pair to receive the message in parts
String and boolean pair to receive the message in parts
![]() Reader to receive the whole message as a blocking stream
Reader to receive the whole message as a blocking stream
![]() Any object parameter for which the endpoint is a text decoder
Any object parameter for which the endpoint is a text decoder
If the method is handling binary messages, then the parameter may be one of the following:
![]() byte[] or ByteBuffer to receive the whole message
byte[] or ByteBuffer to receive the whole message
![]() byte[] and boolean pair, or ByteBuffer and boolean pair, to receive the message in parts
byte[] and boolean pair, or ByteBuffer and boolean pair, to receive the message in parts
![]() InputStream to receive the whole message as a blocking stream
InputStream to receive the whole message as a blocking stream
![]() Any object parameter for which the endpoint is a binary decoder
Any object parameter for which the endpoint is a binary decoder
If the method is handling pong messages, then the parameter should be PongMessage.
In this case, Board is decoded by BoardDecoder. An optional Session parameter is specified to represent the conversation between two endpoints.
If the received board status is set to "clear", then all games are removed from the games Map and the connection to the client peer is also closed. Otherwise, the symbol is retrieved from the games Map.
![]() Java API for JSON Processing provides a standard API to parse and generate JSON. It allows production/consumption of JSON text in a streaming fashion (similar to StAX API for XML), or allows the building of a Java object model (similar to DOM API for XML).
Java API for JSON Processing provides a standard API to parse and generate JSON. It allows production/consumption of JSON text in a streaming fashion (similar to StAX API for XML), or allows the building of a Java object model (similar to DOM API for XML).
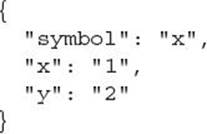
A streaming generator is created using the Json.createGenerator() method. A Writer or an OutputStream can be passed to this method. A Writer is used to write to a character stream, and an OutputStream is used to write to a byte stream. A JSON structure indicating the current symbol used in the game and the x and y coordinates in the grid are created. It looks like:
![]() The session.getOpenSessions() method provides a list of all the listening clients. This generated JSON text is sent to all the listening clients, which then update the state of the game board.
The session.getOpenSessions() method provides a list of all the listening clients. This generated JSON text is sent to all the listening clients, which then update the state of the game board.
BoardDecoder.class decodes the incoming text payload and converts it to the application-specific Board class. Listing 4-3 shows what it looks like.
![]()
Listing 4-3 BoardDecoder Class
![]()
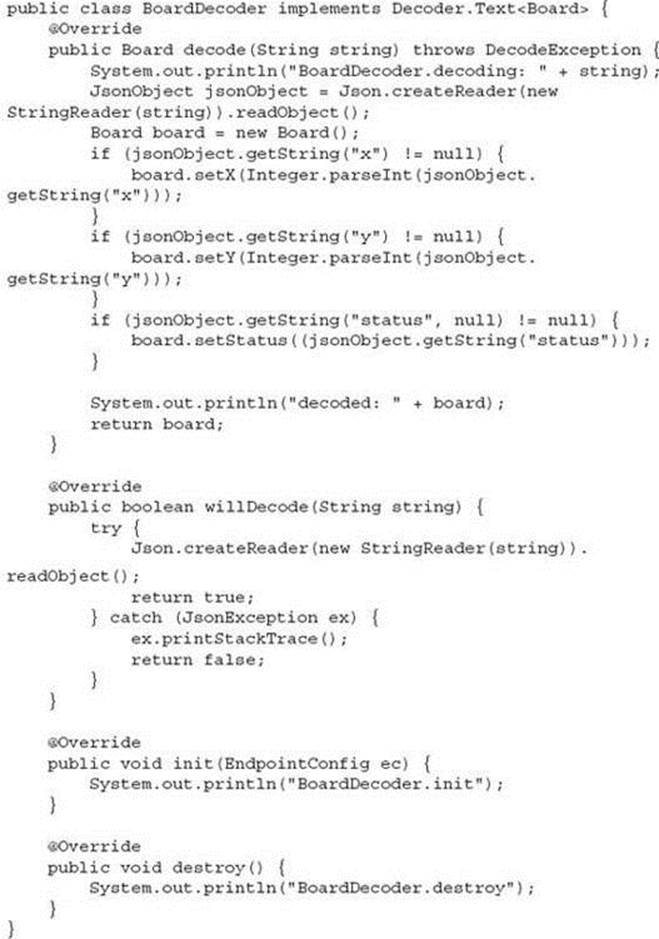
The following list describes the code shown in Listing 4-3:
![]() The text-based decoder typically implements the Decoder.Text<T> interface, and the binary-based decoder typically implements the Decoder.Binary<T> interface.
The text-based decoder typically implements the Decoder.Text<T> interface, and the binary-based decoder typically implements the Decoder.Binary<T> interface.
In addition, there are Decoder.TextStream and Decoder.BinaryStream interfaces that read the WebSocket message from a character or binary stream, respectively.
![]() The Decoder.Text<T> interface requires implementing the decode() method that decodes the given String into an object of type T. In our method implementation, the message payload is read using a Reader and then converted into a JsonObject. Different values read from the parsed object are used to populate the application-specific Board class. An overloaded version of the getString() method is used to define a default value of null.
The Decoder.Text<T> interface requires implementing the decode() method that decodes the given String into an object of type T. In our method implementation, the message payload is read using a Reader and then converted into a JsonObject. Different values read from the parsed object are used to populate the application-specific Board class. An overloaded version of the getString() method is used to define a default value of null.
![]() The interface also requires implementing the willDecode() method. This method returns true if the given String can be decoded to an object of type T. Our method implementation tries to parse the message payload as JsonObject. If the parsing is successful, then it returns true; it returnsfalse otherwise.
The interface also requires implementing the willDecode() method. This method returns true if the given String can be decoded to an object of type T. Our method implementation tries to parse the message payload as JsonObject. If the parsing is successful, then it returns true; it returnsfalse otherwise.
Other lifecycle methods like init() and destroy() need to be implemented. They are no-op in this case.
HTML5 Client Application for WebSocket
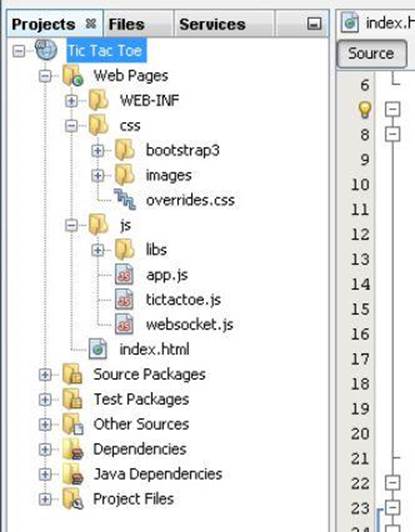
The client-side code for the tic-tac-toe application that you’ve been working on so far is all located in the Web Pages folder in the NetBeans IDE navigator window, as shown in Figure 4-1. Over the next sections of this chapter, you will build the client code that connects to the WebSocket service you created in previous sections.
![]()
![]()
FIGURE 4-1. Client code in IDE
HTML5 Application Setup
The client side of this tic-tac-toe application is created using a couple of different JavaScript frameworks. Twitter Bootstrap is used for the basic look and feel, as well as to enable the application to resize as the browser window changes size—called responsive design (covered in more detail in Chapter 5). The second framework is Knockout.js.
Listing 4-4 shows how the index.html file is set up to load all of the dependencies.
![]()
Listing 4-4 Loading Dependencies in index.html
![]()

Let’s take a look at how the application is configured in the <head> section of the index.html file. This application uses Knockout.js (http://knockoutjs.com/) to implement a Model-View-ViewModel (MVVM) architectural pattern. All of this will be explained in much more detail inChapter 5, but for now, you can see in this code that the Knockout JavaScript libraries are being added with a simple <script> reference. The other JavaScript libraries being used are jQuery and Bootstrap.
To get the proper layout and style for the game, Twitter Bootstrap CSS files and an override CSS file are referenced. CSS files are read in the order in which they are listed, so the override.css files must come last in the list of all CSS files.
The two JavaScript files that you will work with the most for connecting up the WebSocket interface and managing the game itself are found in websocket.js and tictactoe.js.
Listing 4-5 shows the main sections of the body of the index.html file and how the view layer of the application is set up.
![]()
Listing 4-5 Main Sections of index.html File
![]()

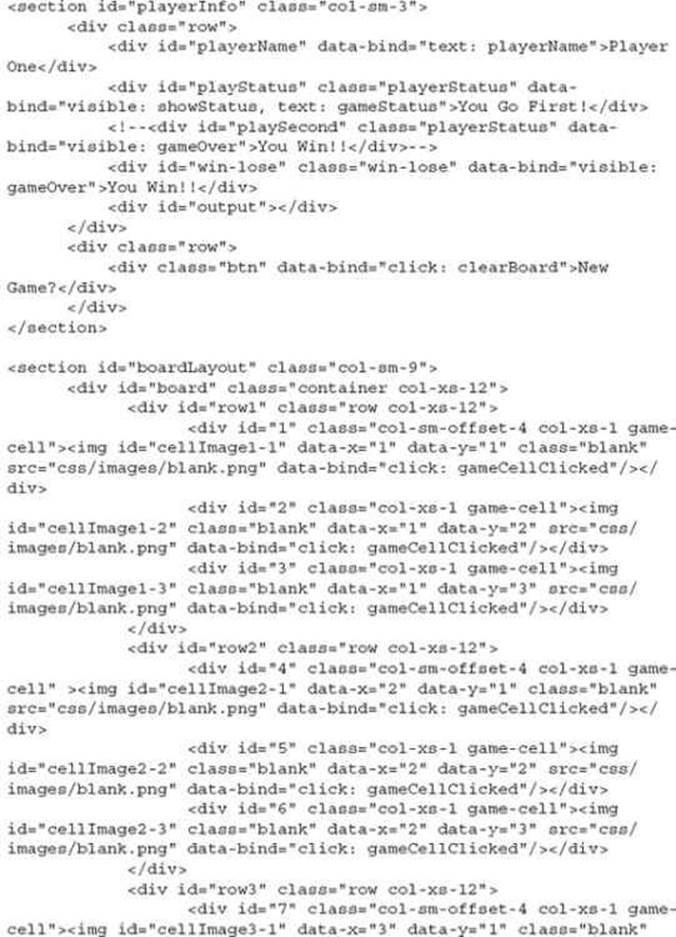
Let’s take a look at the different sections of the code:
![]() The first section of the code is the <header> element, which does exactly what its name suggests: it defines the header for the main game page.
The first section of the code is the <header> element, which does exactly what its name suggests: it defines the header for the main game page.
![]() The playing area is broken into two <section> elements. The first <section> element shows the current player information and any messages that may need to be displayed while the game is being played. The second <section> element is the game board itself. This is a nine-square grid (three columns by three rows) whose layout is managed by the CSS grid layout provided by Twitter Bootstrap. The key things to notice in the game board layout are that the x and y coordinates for each cell are being set as data attributes for the specific cell, and that a click binding has been set up for each cell using a Knockout data binding. Each cell also has a blank image set by default as a placeholder. The importance of the Knockout binding is that it allows us to do all of our WebSocket integration at the JavaScript layer and just assign the information that needs to be displayed in the game board, via Knockout’s two-way binding mechanism. We do not have to set up any kind of event listeners on HTML DOM elements ourselves. All of that is handled by Knockout for us.
The playing area is broken into two <section> elements. The first <section> element shows the current player information and any messages that may need to be displayed while the game is being played. The second <section> element is the game board itself. This is a nine-square grid (three columns by three rows) whose layout is managed by the CSS grid layout provided by Twitter Bootstrap. The key things to notice in the game board layout are that the x and y coordinates for each cell are being set as data attributes for the specific cell, and that a click binding has been set up for each cell using a Knockout data binding. Each cell also has a blank image set by default as a placeholder. The importance of the Knockout binding is that it allows us to do all of our WebSocket integration at the JavaScript layer and just assign the information that needs to be displayed in the game board, via Knockout’s two-way binding mechanism. We do not have to set up any kind of event listeners on HTML DOM elements ourselves. All of that is handled by Knockout for us.
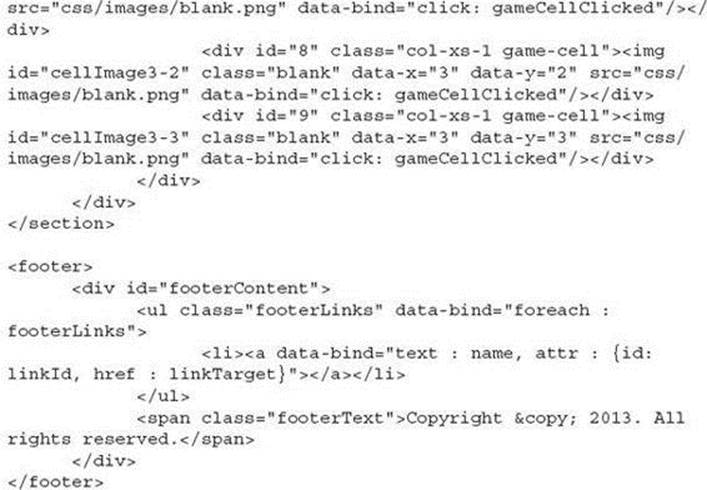
![]() The last section is the <footer> element. It contains a list of links for the footer of our page. Again, Knockout is being used to dynamically provide the links themselves.
The last section is the <footer> element. It contains a list of links for the footer of our page. Again, Knockout is being used to dynamically provide the links themselves.
When the index.html file is loaded in the browser, each dependency is loaded in the order in which it’s listed in the <head> section of the page. In the tictactoe.js file, there is a jQuery JavaScript call set up to bind the Knockout.js viewmodel to the view layer once the HTML page is fully loaded. Listing 4-6 shows this code.
![]()
Listing 4-6 Knockout.js Binding
![]()

When the Knockout binding is made, the viewmodel code is run. Not all browsers support the WebSocket protocol yet, so the first thing that you need to do in the viewmodel is make sure that your current browser does provide the proper support. For our example, this is achieved by using the code shown in Listing 4-7 from the tictactoe.js BoardViewModel() function.
![]()
Listing 4-7 Checking for WebSocket Support
![]()

If the browser doesn’t support the WebSocket protocol, this code will display an alert dialog that tells the player to use a more modern browser.
JavaScript API for WebSocket
You’ve learned about how to create and interact with the Java API for WebSocket on the server side, so now let’s take a look at how that same WebSocket service can be consumed and interacted with from the client side.
WebSocket Initialization
When the websocket.js file is loaded, the initialization of the WebSocket connection is attempted as shown in Listing 4-8.
![]()
Listing 4-8 WebSocket Endpoint Initialization
![]()

You’ll notice that the URL for the WebSocket endpoint is a reference to the endpoint that you set up during your work with the Java API for WebSocket.
While you can set the URL directly to the service in your final production code, it’s a good idea to set up the URL dynamically when you are in development. The reason for this is more about testing than about development. When you run the code from the IDE, it will usually load with localhost as the hostname from your local development machine. However, if you hard-code the endpoint URL to localhost, you will have trouble connecting to the web application from some other device for testing. By getting the current hostname from the browser’s window object, you can connect from any device on the same network for testing. As an example, if you run the tic-tac-toe game from your local machine, it will show up in the browser as http://localhost:8080/TicTacToe/. However, if you connected to the same web app from a tablet that is connected to the same wireless network, you would have to do something like http://<ip address of dev machine>:8080/TicTacToe.
Using the code shown in Listing 4-8 will connect using whichever hostname you join the game from.
WebSocket Control Methods
Just as when working with the Java API for WebSocket, you have five different methods available in the JavaScript API:
![]() onopen()
onopen()
![]() onmessage()
onmessage()
![]() onclose()
onclose()
![]() onerror()
onerror()
![]() send()
send()
As part of this sample application, an HTML element is set up to show the current state of the WebSocket connection. You can see this being defined as “output” in Listing 4-8. As you review the code for each of the JavaScript API methods shown in Listing 4-9, you will see that a function called writeToScreen(message) was defined as a simple means of setting the value for the output HTML element. The onmessage() method is not covered in Listing 4-9. It will be covered in a separate section after the other four methods.
![]()
Listing 4-9 JavaScript Methods for WebSocket
![]()
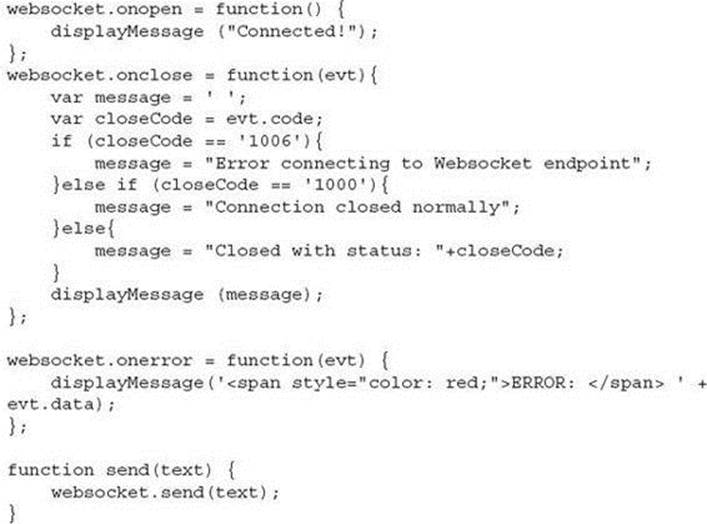
Let’s take a closer look at the methods shown in Listing 4-9. Remember that during the initialization, you defined the new WebSocket object as a variable named websocket.
![]() For websocket.onopen(evt) you are simply sending a message to the output variable saying that the connection was successful. This is the first event thrown by the WebSocket connection and is where you would do any additional setup code if you needed it.
For websocket.onopen(evt) you are simply sending a message to the output variable saying that the connection was successful. This is the first event thrown by the WebSocket connection and is where you would do any additional setup code if you needed it.
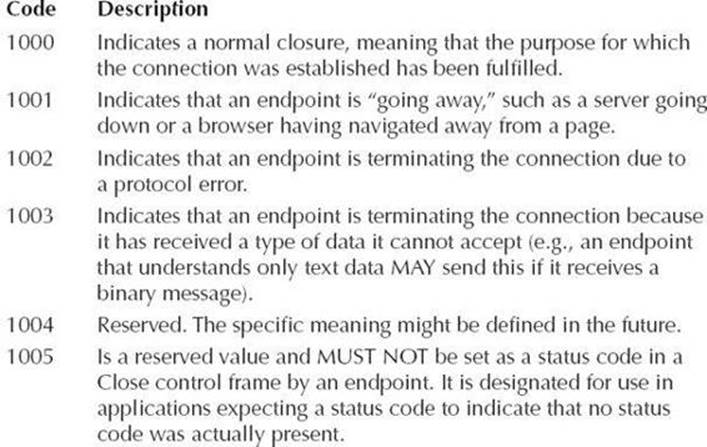
![]() For websocket.onclose(evt) you are going to check for the code given by the WebSocket protocol to help determine why the connection was closed. The tricky part with doing this is that the WebSocket specification (RFC 6455) says only that the endpoint “may” send a close code, not that it has to. If a code is sent, it should conform with one of the close codes defined in the IETF specification (http://tools.ietf.org/html/rfc6455#section-7.4). The recommended codes are listed and described (quoting RFC 6455) in Table 4-1. In the code for this game you are only going to check for a couple of specific codes, and just fall back to a generic message that shows the close code for anything else that may be sent by the endpoint. The check for close code 1006 is just in case the application tries to connect to the endpoint and it’s not there. You can’t use theonerror() event for this case because the WebSocket object is not completely created when this happens. It closes before it has been completely opened. The check for close code 1000 is to indicate that the New Game button was clicked and the websocket.close() method was called and processed successfully.
For websocket.onclose(evt) you are going to check for the code given by the WebSocket protocol to help determine why the connection was closed. The tricky part with doing this is that the WebSocket specification (RFC 6455) says only that the endpoint “may” send a close code, not that it has to. If a code is sent, it should conform with one of the close codes defined in the IETF specification (http://tools.ietf.org/html/rfc6455#section-7.4). The recommended codes are listed and described (quoting RFC 6455) in Table 4-1. In the code for this game you are only going to check for a couple of specific codes, and just fall back to a generic message that shows the close code for anything else that may be sent by the endpoint. The check for close code 1006 is just in case the application tries to connect to the endpoint and it’s not there. You can’t use theonerror() event for this case because the WebSocket object is not completely created when this happens. It closes before it has been completely opened. The check for close code 1000 is to indicate that the New Game button was clicked and the websocket.close() method was called and processed successfully.
![]()
![]()
TABLE 4-1. RFC 6455 Close Codes
![]() The websocket.onerror() method is pretty self-explanatory. If there is an error, the endpoint may trigger an error event. That error would be captured by this method and the message will be displayed on the game.
The websocket.onerror() method is pretty self-explanatory. If there is an error, the endpoint may trigger an error event. That error would be captured by this method and the message will be displayed on the game.
![]() The websocket.send() method is used to send a message to the server. For this game example, only text is being sent and received over the WebSocket connection. However, the WebSocket protocol can also send and receive binary data in the form of a Blob or an ArrayBuffer.
The websocket.send() method is used to send a message to the server. For this game example, only text is being sent and received over the WebSocket connection. However, the WebSocket protocol can also send and receive binary data in the form of a Blob or an ArrayBuffer.
WebSocket Data Management
The final method for the WebSocket API is websocket.onmessage(). This is where the heart of the communication between the client and server is performed. Listing 4-10 shows the code from the websocket.js file that handles the incoming text messages from the server endpoint.
![]()
Listing 4-10 websocket.onmessage() Method
![]()
Let’s walk through the code in Listing 4-10 to get a better idea of how the client interacts with the server for the game:
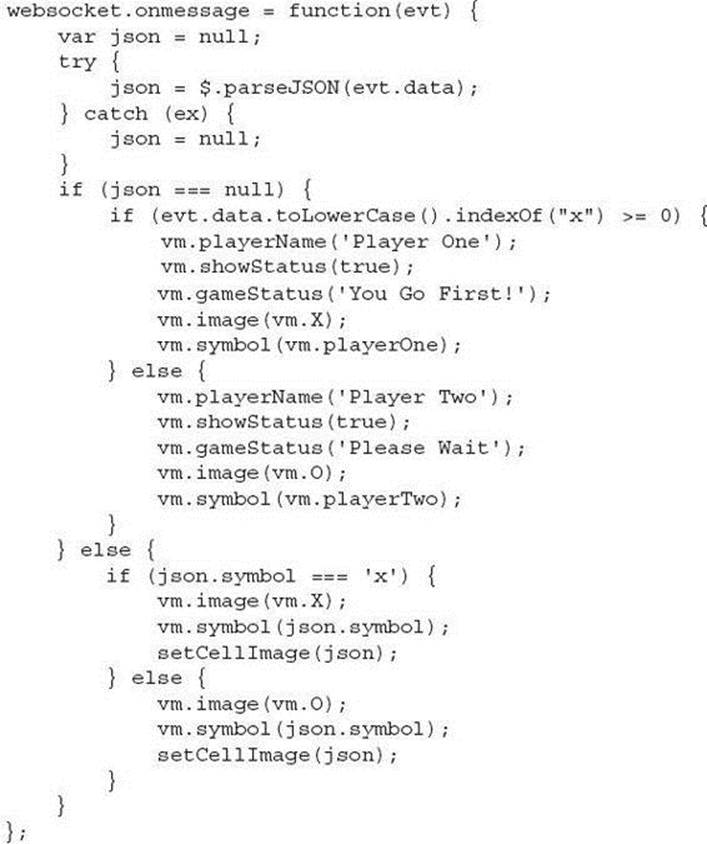
![]() The data that is being sent from the server is expected by the client to be in the form of a JSON object, except for the first time a browser connects. That first message is sent as plain text and indicates which player the game should be showing. Once the message is received, a try-catchblock tries to parse the data from the event and assign it to the json variable. If this fails, then you know that this is the first connection for this player, and the json variable is set to null. If it succeeds, then the data is assigned to the variable and the game that is in progress can continue.
The data that is being sent from the server is expected by the client to be in the form of a JSON object, except for the first time a browser connects. That first message is sent as plain text and indicates which player the game should be showing. Once the message is received, a try-catchblock tries to parse the data from the event and assign it to the json variable. If this fails, then you know that this is the first connection for this player, and the json variable is set to null. If it succeeds, then the data is assigned to the variable and the game that is in progress can continue.
![]() The first time the browser connects to the WebSocket endpoint, the server sends back a message saying which player that connection is assigned to. Player X always goes first in the game of tic-tac-toe, so the retuned string is parsed for the character “x” and, if found, the onmessage()method does all of the game setup for “Player One.” Any other connection string is assigned to “Player Two.”
The first time the browser connects to the WebSocket endpoint, the server sends back a message saying which player that connection is assigned to. Player X always goes first in the game of tic-tac-toe, so the retuned string is parsed for the character “x” and, if found, the onmessage()method does all of the game setup for “Player One.” Any other connection string is assigned to “Player Two.”
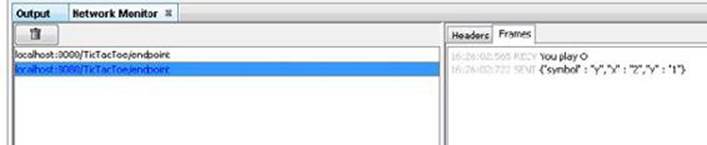
![]() If the onmessage data is a JSON object, the symbol member of the object is checked to see if this is data for player X or player Y, and the onmessage() method sets the appropriate image name for that player. It then passes the JSON object over to the setCellImage() method for further processing. Figure 4-2 shows the use of the NetBeans IDE Network Monitor feature to see the data being sent and received in the WebSocket frame.
If the onmessage data is a JSON object, the symbol member of the object is checked to see if this is data for player X or player Y, and the onmessage() method sets the appropriate image name for that player. It then passes the JSON object over to the setCellImage() method for further processing. Figure 4-2 shows the use of the NetBeans IDE Network Monitor feature to see the data being sent and received in the WebSocket frame.
![]()
![]()
FIGURE 4-2. NetBeans Network Monitor window
Managing the Game Logic
In the tictactoe.js file, the rest of the game logic is processed. Listing 4-11 shows the setCellImage() method.
![]()
Listing 4-11 setCellImage() Method
![]()
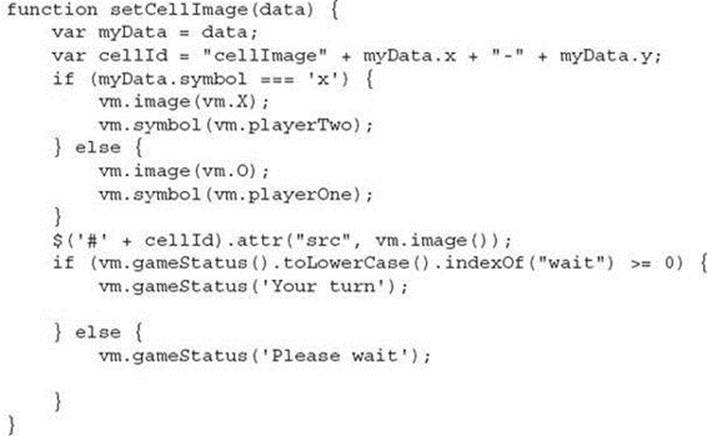
When setting the image for the specific game cell, as shown in Listing 4-11, the image can be set either from the client of the player actually clicking the game cell or from the server to show what the opponent just selected. This method has to handle both cases. Here is where your use of the Knockout viewmodel starts to come into play. If the symbol member of the data object is for player X, the viewmodel’s image attribute, or observable in Knockout terms, is set to be the image for X. You are then going to set the viewmodel’s symbol observable to be the opposite of who just played. This is because the existing player’s turn is done and you are beginning to set things up for the next player now. Next you set the src attribute of the specific cell to be that location of the X or Y image. Finally, the status needs to be updated to tell the players whose turn it is. If thegameStatus observable is currently set to “Please wait,” then you switch it to say “Your turn.” Otherwise, set it to “Please wait.”
So far you have followed the flow of how things work when data is received from the server with the websocket.onmessage() event. The flow for clicking a specific game cell and then sending that data to the server and then your opponent is very similar, but it starts with thegameCellClicked() method shown in Listing 4-12.
![]()
Listing 4-12 Capturing Game Cell Clicks and Sending Data
![]()
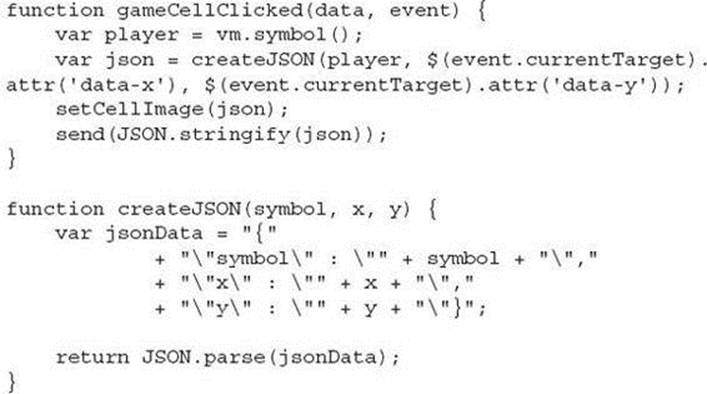
Let’s walk through the two functions shown in Listing 4-12:
![]() When a cell on the game board is clicked, it calls the gameCellClicked() method. The Knockout click binding that is being used for this automatically sends the data and the event objects as part of the method. The data object in this case contains the current boardViewModel() content. The event object is what you are really looking for though. You want to know which game cell was clicked so you can set the appropriate image, and then you want to create the JSON data for that cell so you can send it back to the server and have your opponent’s game board updated.
When a cell on the game board is clicked, it calls the gameCellClicked() method. The Knockout click binding that is being used for this automatically sends the data and the event objects as part of the method. The data object in this case contains the current boardViewModel() content. The event object is what you are really looking for though. You want to know which game cell was clicked so you can set the appropriate image, and then you want to create the JSON data for that cell so you can send it back to the server and have your opponent’s game board updated.
![]() In the gameCellClicked() method, the current player is set by getting the value of symbol from the viewmodel. Then the values of the data-x and data-y attributes of the specific cell that was clicked are gathered. All three of these values are sent to a function that will format the values into the JSON object that your WebSocket endpoint expects. This is done in the createJSON() method shown in Listing 4-12.
In the gameCellClicked() method, the current player is set by getting the value of symbol from the viewmodel. Then the values of the data-x and data-y attributes of the specific cell that was clicked are gathered. All three of these values are sent to a function that will format the values into the JSON object that your WebSocket endpoint expects. This is done in the createJSON() method shown in Listing 4-12.
|
|
NOTE It would be desirable to use the HTML5 dataset method to get the data-x and data-y values in this function. If you were to use dataset, the code would look like this:
The reason this is not done in this example is that the dataset HTML5 feature is not supported in all browsers at the time of writing. Internet Explorer specifically did not support this feature until IE 11 was released. Using a direct DOM call to get the attribute will work with all browsers. |
![]() The createJSON() function returns the formatted JSON as a JSON object so that it can be used in the setCellImage() function that you looked at earlier in Listing 4-11.
The createJSON() function returns the formatted JSON as a JSON object so that it can be used in the setCellImage() function that you looked at earlier in Listing 4-11.
![]() Once the image and game status have been set properly, the JSON object is converted back to a string so it can be sent to the WebSocket endpoint using the websocket.send() method. Remember that WebSocket data must be in either UTF-8 string format or a binary format of Blob orArrayBuffer. Sending the actual JSON object will result in a WebSocket protocol error.
Once the image and game status have been set properly, the JSON object is converted back to a string so it can be sent to the WebSocket endpoint using the websocket.send() method. Remember that WebSocket data must be in either UTF-8 string format or a binary format of Blob orArrayBuffer. Sending the actual JSON object will result in a WebSocket protocol error.
While the game code used for this chapter does not make use of the Blob or ArrayBuffer binary data types, you may want to know a little more about how they are used. Blob is the default binary data type, and there is nothing special that you have to do to send data in this format. Just pass in a Blob object as the argument to the send() method, just as you would with a text string. The server code will need to check for the type of the incoming message. Listing 4-13 shows a possible way of checking for the message type and processing it appropriately.
![]()
Listing 4-13 Example of Testing for Message Type
![]()

From the client side, you would need to provide some method for gathering the binary data and then passing that data to a function for processing and sending to the WebSocket connection. Listing 4-14 shows one possible solution: using an input type of file and allowing the end user to select a file and send it to the WebSocket stream.
![]()
Listing 4-14 Example of Client-Side Code for Sending Binary Data
![]()
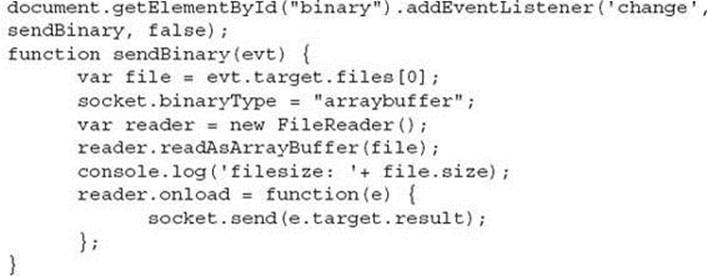
Let’s take a quick look at the code in Listing 4-14:
![]() The first line is adding an event listener to an input element of type file in the HTML markup. This input element has an id attribute set to the name “binary.”
The first line is adding an event listener to an input element of type file in the HTML markup. This input element has an id attribute set to the name “binary.”
![]() When the event listener detects that a change has happened to the input element, it will call the sendBinary() function. This function uses the event object that the listener sent by default to get the file that the end user selected.
When the event listener detects that a change has happened to the input element, it will call the sendBinary() function. This function uses the event object that the listener sent by default to get the file that the end user selected.
![]() The sendBinary() method then sets the binaryType property of the WebSocket connection to be a type of ArrayBuffer.
The sendBinary() method then sets the binaryType property of the WebSocket connection to be a type of ArrayBuffer.
![]() At this point a FileReader object is created and the contents of the file are read into it using the FileReader’s readAsArrayBuffer() method.
At this point a FileReader object is created and the contents of the file are read into it using the FileReader’s readAsArrayBuffer() method.
![]() Finally, once the FileReader has completed the loading of the data, the data is sent over the WebSocket connection.
Finally, once the FileReader has completed the loading of the data, the data is sent over the WebSocket connection.
|
|
NOTE It should be noted that the FileReader API is new to HTML5 and is not implemented by all browsers. Specifically, Internet Explorer 9 and any version of Safari older than 6.0 do not support it. |
Summary
In this chapter you have learned about what the WebSocket protocol is, and how the APIs for both Java and JavaScript are used to interact with the WebSocket protocol on the server and in a pure client-side HTML5 application. You have learned how to work with the Java API for JSON to read and generate JSON objects on the server.
On the client side, you learned how to work with String and JSON object data to manipulate the HTML DOM elements and interact with the game board using the Knockout.js MVVM architectural pattern.
One thing that you may have noticed while either playing the game or reading all of the Knockout observables in the boardViewModel() is that there is not a scoring system implemented in the game. This omission is intentional. It is now up to you to take what you have learned and add the client- and server-side code that can store and manage the game state. The Knockout observables of win, lose, and tie are already in place and ready for you to use with the gameStatus system that is in place.
In Chapter 5 you will learn more details about working with HTML5, JavaScript, and CSS. The Knockout.js library will also be given more attention.

All materials on the site are licensed Creative Commons Attribution-Sharealike 3.0 Unported CC BY-SA 3.0 & GNU Free Documentation License (GFDL)
If you are the copyright holder of any material contained on our site and intend to remove it, please contact our site administrator for approval.
© 2016-2026 All site design rights belong to S.Y.A.