Java EE and HTML5 Enterprise Application Developmentb (2014)
CHAPTER
5
HTML5, JavaScript, and CSS
The increase in development and availability of HTML5 applications for just about every type of device, from desktop computers to smartphones, and everything in between, has brought much-needed scrutiny to how HTML5 applications can best be used in the enterprise application space. In this chapter you will learn how to create a pure client-side HTML5 application that will consume and interact with the REST, Server-Sent Events (SSE), and WebSocket Java web services that you learned how to write in previous chapters. You will see how to implement the Model-View-ViewModel (MVVM) architecture pattern through the use of the JavaScript library Knockout.js. You will also be shown the basics of responsive design techniques using CSS3 media queries to dynamically change the UI layout when the application is displayed on devices of different sizes. Finally, you will be shown the basics of working with Syntactically Awesome StyleSheets (SASS) and the Sassy CSS (SCSS) syntax for managing more complex CSS file sets in an enterprise application.
HTML5 Project Setup
To get started, create a new HTML5 project using NetBeans IDE:
1. Choose File | New Project.
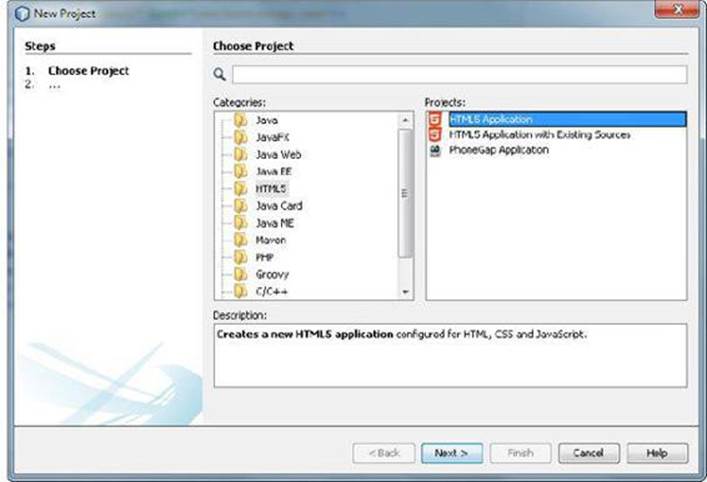
2. As shown next, select HTML5 in the Categories pane and then select HTML5 Application in the Projects pane. Click the Next button to enter details about your project.
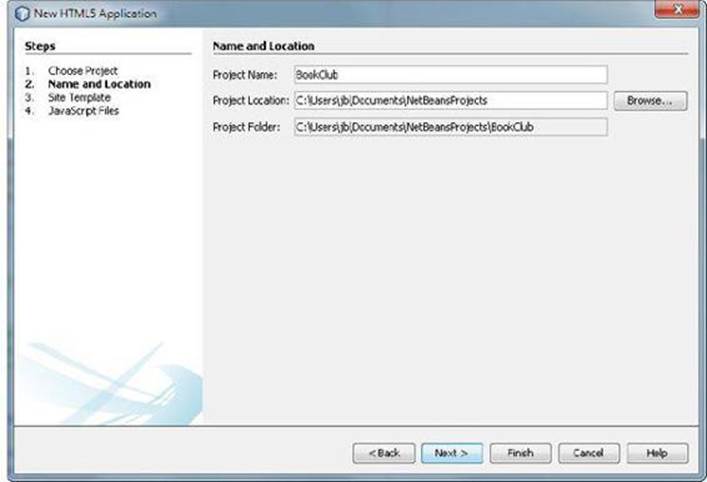
3. For the second step of the wizard, enter BookClub in the Project Name field and click Next again.
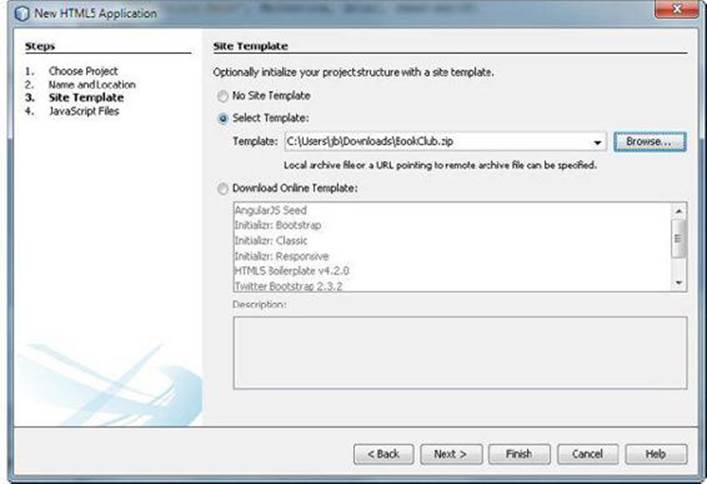
4. In the next step of the wizard, Site Template, you are given three options from which to choose how you want to configure your new project. For this example, you are going to base your new project on a template provided as part of this book. This template will provide the foundation for the information covered later in this chapter. So, as shown next, click the Select Template radio button, click the Browse button, and go to the location of the BookClub.zip file. Click the Next button after you have the BookClub.zip file selected in the Template field.
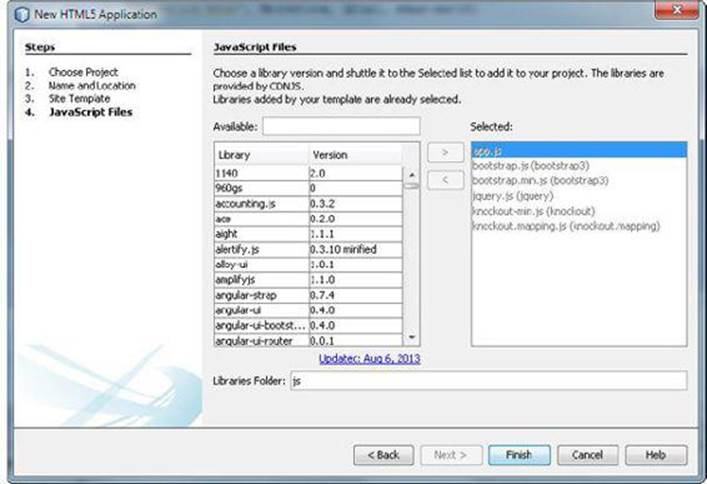
5. The last step in creating your new project is to add any other JavaScript libraries that you may need. The list of JavaScript libraries, shown partially in the following image, is pulled directly from the Content Delivery Network for JavaScript (CDNJS) repository and can be updated at any time by clicking the link under the library list. If you need to add more libraries at a later time, go to the Project Properties dialog in NetBeans IDE and select the JavaScript Library Manager option. For now, all of the JavaScript libraries that you will need for this project are included in the template. Click the Finish button to create the project.
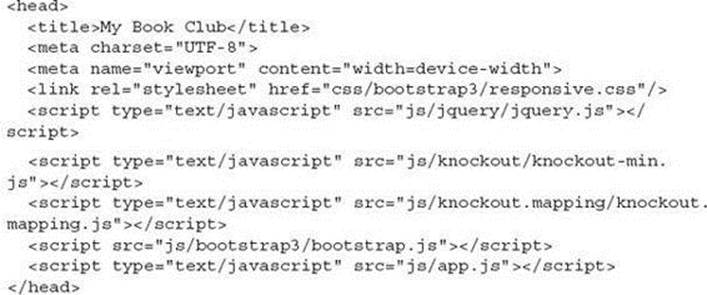
Listing 5-1 shows the index.html file that the wizard loaded from the template for your project. As you can see, the <title> element identifies the name of your project. Also note how the CSS and JavaScript libraries are referenced: The <link> and <script> tags in the <head> section tell the browser to load the designated files when the index.html document file is run.
![]()
Listing 5-1 Setting Up CSS and JavaScript References
![]()
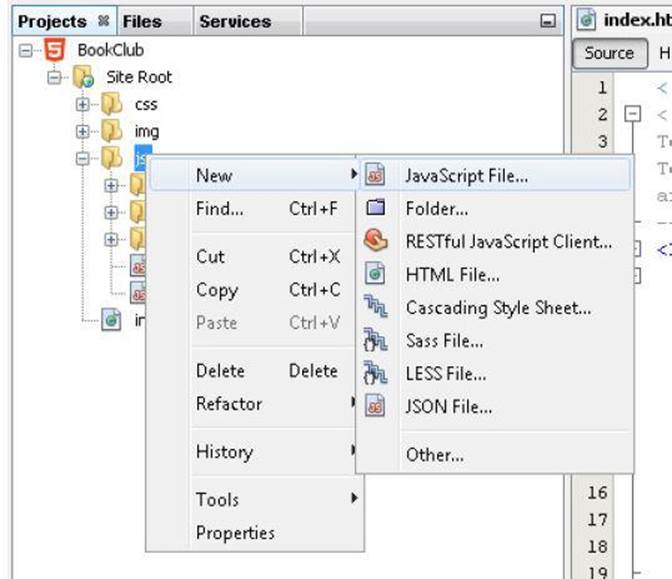
Notice that the last line of the <head> section includes an extra <script> element that references a JavaScript file called app.js. This file contains JavaScript code that is specific to this application. If you were starting this project from scratch and needed to add this file, you would right-click the js node in the project navigator, as shown here, and select New | JavaScript File.
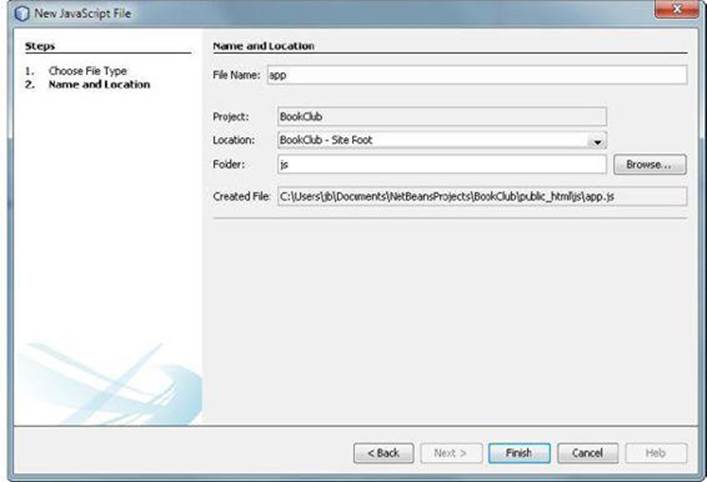
A dialog will be shown as in the following illustration. Set the file name to app and click Finish.
You can now run your project, and everything should load in the browser without errors.
REST
When working with a REST service, you first will want to identify the REST APIs that you have available to work with. This information is most often found in the developer documentation for the specific REST service. For this chapter, you are going to use the REST service and the persistence APIs that you created in Chapters 2 and 3 of this book. The code for those two chapters is available as part of the book for you to load and run from your installation of the NetBeans IDE. If you are running from a local machine, the URL will belocalhost:8080/sahara/webresources.
The APIs that you have available are shown in Listing 5-2.
![]()
Listing 5-2 Available REST APIs
![]()

The APIs shown in Listing 5-2 provide the following functionality:
![]() /books returns a list of all books in the database.
/books returns a list of all books in the database.
![]() /books/{id} returns the details for a specific book. The {id} of a book is its ISBN (International Standard Book Number).
/books/{id} returns the details for a specific book. The {id} of a book is its ISBN (International Standard Book Number).
![]() /books/{id}/authors returns all of the authors for a specific book.
/books/{id}/authors returns all of the authors for a specific book.
![]() /authors returns a list of all authors.
/authors returns a list of all authors.
![]() /authors/{id} returns the details for a specific author. Each author has a unique ID in the database.
/authors/{id} returns the details for a specific author. Each author has a unique ID in the database.
![]() /authors/{id}/books returns a list of all books that a specific author is associated with.
/authors/{id}/books returns a list of all books that a specific author is associated with.
The easiest way to learn how to use a particular REST service is to write a CRUD application that exercises the APIs required to create, read, update, and delete data. You will use the APIs in Listing 5-2 to do just that in this section. All of the code discussed in this REST section is found in the app.js file of your project.
Read, Using the GET Request (R of CRUD)
You’re going to start with the code shown in Listing 5-3 to perform a read of the available data.
![]()
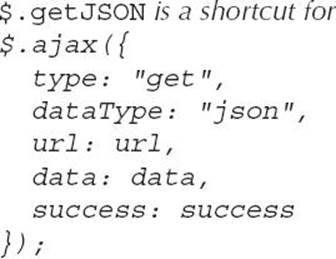
Listing 5-3 jQuery getJSON Method Call
![]()

This is a very simple call that uses the jQuery alias of $ and calls the .getJSON method. The call takes two arguments: the URL of the REST API, and a callback function to do something with the data that is returned. Listing 5-3 uses .getJSON() to make the call, so it requests the data to be returned as a JavaScript Object Notation (JSON) object. Because the JSON data format is syntactically identical to the code used to create JavaScript objects, it can be parsed directly from the JavaScript language without the need for any additional parsers or processors.
|
|
NOTE
|
You’ll notice that the callback function only works against a successful request. If you need to do error handling, you will want to use the full syntax similar to what is shown in Listing 5-7 later in the chapter.
You’ll also notice that the URL in this example is being set using a variable, self.serviceURL, instead of a string for the URL itself. This is because this line is actually part of a larger function called a ViewModel. This is part of the Knockout.js Model-View-ViewModel (MVVM) architectural pattern that you read about in Chapter 1. Listing 5-4 shows the full ViewModel code.
![]()
Listing 5-4 Example ViewModel
![]()
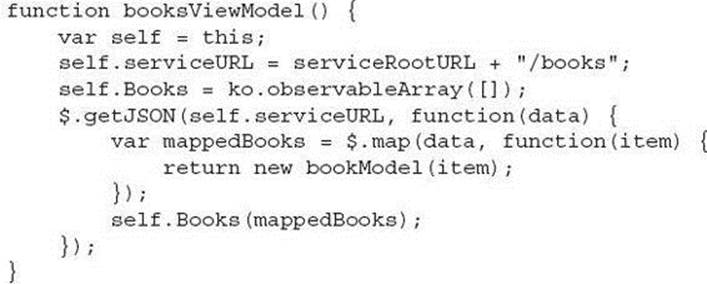
Let’s walk through what each line provides:
![]() function booksViewModel() { var self = this; The current object in JavaScript is often referenced by a pseudo variable called this. The major problem with always using this to reference variables in a function is that the scope of this can change depending on how the function is called. You want to bind a local variable to the current this object so that the same object can still be referenced no matter how the function is called later in your code.
function booksViewModel() { var self = this; The current object in JavaScript is often referenced by a pseudo variable called this. The major problem with always using this to reference variables in a function is that the scope of this can change depending on how the function is called. You want to bind a local variable to the current this object so that the same object can still be referenced no matter how the function is called later in your code.
![]() self.serviceURL = serviceRootURL + "/books"; This line sets up the URL that will be used to make the actual REST API call. Since all of the REST API calls have the same hostname and application path, a global variable has been set to contain the part of the URL that is always the same. One thing to keep in mind while working with REST service calls in development mode is that the hostname may vary as you test your code from different devices. For example, using “localhost” as the hostname will work fine for any browser that you would use to connect to the REST service that you have running on the same machine. However, if you were to try to test your code from, say, a tablet and connect to the IP address of your development machine, the JavaScript call to “localhost” would fail. For this reason, you will see at the top of the same application code that the serviceHostname variable is being set to serviceHostname = window.location.hostname; and the final serviceRootURL variable is created using this dynamic value.
self.serviceURL = serviceRootURL + "/books"; This line sets up the URL that will be used to make the actual REST API call. Since all of the REST API calls have the same hostname and application path, a global variable has been set to contain the part of the URL that is always the same. One thing to keep in mind while working with REST service calls in development mode is that the hostname may vary as you test your code from different devices. For example, using “localhost” as the hostname will work fine for any browser that you would use to connect to the REST service that you have running on the same machine. However, if you were to try to test your code from, say, a tablet and connect to the IP address of your development machine, the JavaScript call to “localhost” would fail. For this reason, you will see at the top of the same application code that the serviceHostname variable is being set to serviceHostname = window.location.hostname; and the final serviceRootURL variable is created using this dynamic value.

![]() self.Books = ko.observableArray([]); This shows your first use of a Knockout.js method. You are assigning the variable self.Books to a Knockout observableArray and initializing it with an empty array. The use of Knockout observables and observableArrays is the key to setting up two-way binding between the data at the Model layer of your MVVM architecture and the View layer. You’ll see a bit later in this chapter how this observableArray is used.
self.Books = ko.observableArray([]); This shows your first use of a Knockout.js method. You are assigning the variable self.Books to a Knockout observableArray and initializing it with an empty array. The use of Knockout observables and observableArrays is the key to setting up two-way binding between the data at the Model layer of your MVVM architecture and the View layer. You’ll see a bit later in this chapter how this observableArray is used.
![]() $.getJSON(self.serviceURL, function(data) { This line was already presented in Listing 5-3 and discussed thereafter, but the variables should make a little more sense at this point. The callback function is processed when a successful request is returned. The data object contains the data that is returned from the server as part of the response object. Because you are using $.getJSON(), the data returned is a JSON object.
$.getJSON(self.serviceURL, function(data) { This line was already presented in Listing 5-3 and discussed thereafter, but the variables should make a little more sense at this point. The callback function is processed when a successful request is returned. The data object contains the data that is returned from the server as part of the response object. Because you are using $.getJSON(), the data returned is a JSON object.
![]() var mappedBooks = $.map(data, function(item) { This line is using the jQuery .map() utility method to take each top-level element in the returned JSON object and add it to an array. Each item is created as a new bookModel object before it is returned from the .map() method.
var mappedBooks = $.map(data, function(item) { This line is using the jQuery .map() utility method to take each top-level element in the returned JSON object and add it to an array. Each item is created as a new bookModel object before it is returned from the .map() method.
![]() return new bookModel(item); In the end, you have an array that contains a collection of models. You’ll find out more about the Model object when Listing 5-5 is discussed a bit later.
return new bookModel(item); In the end, you have an array that contains a collection of models. You’ll find out more about the Model object when Listing 5-5 is discussed a bit later.
![]() self.Books(mappedBooks); This final line sets the value of the predefined observableArray self.Books to contain the collection of Model objects. You will see how this object is used when you bind the ViewModel to the View layer.
self.Books(mappedBooks); This final line sets the value of the predefined observableArray self.Books to contain the collection of Model objects. You will see how this object is used when you bind the ViewModel to the View layer.
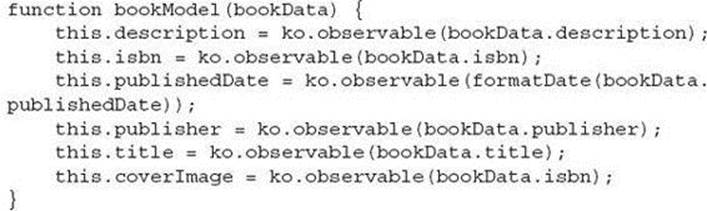
The Model represents one instance of your data. It’s easiest to think of this as a single record in your database, or a single row of a table. In Listing 5-5 you can see that each field in your Model is assigned to a Knockout observable variable. This lets you take advantage of the two-way binding that Knockout.js is known for. Two-way binding means that when the value of an observable or observableArray is changed, either programmatically or from end-user data entry, the Knockout libraries automatically update all of the elements that are bound to it. You do not have to worry about setting up listeners for every variable that is used in your View layer. (This will become clearer when you get to the discussion of the View layer a little later in the chapter.) In the last line of the Model, you will notice that you not only assign each field from the data set, but you can also define your own variables that will be used in your View layer. In the example application, the book cover photos are provided already and are named after the ISBN code for each book. In Listing 5-5, you can see that the variable this.coverImage is being assigned to the value ofbookData.isbn so that it can be used later to load that specific image in the HTML code.
![]()
Listing 5-5 Example Model
![]()
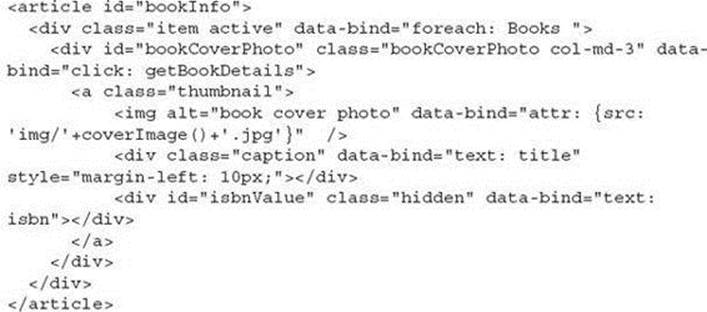
Now that you have your Model and ViewModel created, there is one last piece to the puzzle. Listing 5-6 shows the HTML code for the View layer. This is included in the main.html file of your project.
![]()
Listing 5-6 View Example
![]()
Let’s break down this code example:
![]() <article id="bookInfo"> This element represents a simple semantic element that helps define the structure of the larger page. However, the id attribute is important because it is what will be used by the Knockout.js applyBindings() method to bind this section of the HTML View to the ViewModel that you created previously.
<article id="bookInfo"> This element represents a simple semantic element that helps define the structure of the larger page. However, the id attribute is important because it is what will be used by the Knockout.js applyBindings() method to bind this section of the HTML View to the ViewModel that you created previously.
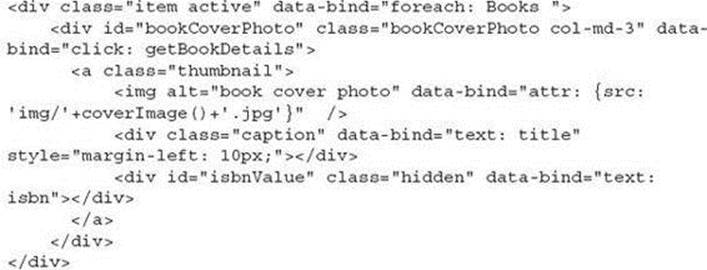
![]() <div class="item active" data-bind="foreach: Books "> This line is the beginning of the list of books that will be rendered. This <div> will contain the layout and styling for one Model. If this were a table, this would be the layout and styling for one row of data. The key attribute isdata-bind. This uses the Knockout foreach: binding to render everything contained inside this <div> for each item that is in the object “Books.” Recall from the discussion about Listing 5-4 that you set the value of Books to the array of Models returned from the REST call.
<div class="item active" data-bind="foreach: Books "> This line is the beginning of the list of books that will be rendered. This <div> will contain the layout and styling for one Model. If this were a table, this would be the layout and styling for one row of data. The key attribute isdata-bind. This uses the Knockout foreach: binding to render everything contained inside this <div> for each item that is in the object “Books.” Recall from the discussion about Listing 5-4 that you set the value of Books to the array of Models returned from the REST call.
![]() <div id="bookCoverPhoto" class="bookCoverPhoto col-md-3" data-bind="click: getBookDetails"> This <div> is the container for the book cover image and its caption. It has a Knockout click: binding bound to it so that you can drill down in your page to get more details about this specific book. You will see more about getting and displaying the book details a little later, as this details page will be used for the update and delete actions of your CRUD application.
<div id="bookCoverPhoto" class="bookCoverPhoto col-md-3" data-bind="click: getBookDetails"> This <div> is the container for the book cover image and its caption. It has a Knockout click: binding bound to it so that you can drill down in your page to get more details about this specific book. You will see more about getting and displaying the book details a little later, as this details page will be used for the update and delete actions of your CRUD application.
![]() The next three lines set up the contents that will be displayed for each book. The cover image, the caption, and the ISBN for each book are bound to their own HTML elements. There are two items of note in this code:
The next three lines set up the contents that will be displayed for each book. The cover image, the caption, and the ISBN for each book are bound to their own HTML elements. There are two items of note in this code:
![]() data-bind="attr: {src: 'img/'+coverImage()+'.jpg'}" In this data-bind attribute, the Knockout observable coverImage is being called as a method instead of just referencing the variable as you have seen done in all of the previous bindings so far. You do this when you want to get the actual value of the variable and not a reference to the function that Knockout uses for the two-way binding. This breaks the two-way binding for this reference, but in some cases, that is fine. In this case, you are just using the variable to dynamically get the name of the coverImagefile. You do not plan on changing this name in other parts of your code, so you don’t need to have it set up as a two-way binding. You will see a better example of why you would do this later in the chapter, when you get to the Update section of the code.
data-bind="attr: {src: 'img/'+coverImage()+'.jpg'}" In this data-bind attribute, the Knockout observable coverImage is being called as a method instead of just referencing the variable as you have seen done in all of the previous bindings so far. You do this when you want to get the actual value of the variable and not a reference to the function that Knockout uses for the two-way binding. This breaks the two-way binding for this reference, but in some cases, that is fine. In this case, you are just using the variable to dynamically get the name of the coverImagefile. You do not plan on changing this name in other parts of your code, so you don’t need to have it set up as a two-way binding. You will see a better example of why you would do this later in the chapter, when you get to the Update section of the code.
![]() class="hidden" data-bind="text: isbn"> In this code line, the value is being bound to the ISBN value for this particular book. You don’t actually need to use this value as part of the current View, but you do need this value when you get the details for this book. By setting the CSS style class to "hidden", the actual <div> is not rendered, but the ISBN value will be available as part of the data that Knockout passes to the function as part of the click: binding.
class="hidden" data-bind="text: isbn"> In this code line, the value is being bound to the ISBN value for this particular book. You don’t actually need to use this value as part of the current View, but you do need this value when you get the details for this book. By setting the CSS style class to "hidden", the actual <div> is not rendered, but the ISBN value will be available as part of the data that Knockout passes to the function as part of the click: binding.
The final result of putting all of the code from Listing 5-3 through Listing 5-6 together will look like Figure 5-1 when you run it in a browser.
![]()

![]()
FIGURE 5-1. List of all books
Create, Using the POST Request (C of CRUD)
Now that you know how to do the most common task, reading data, with a REST service, you will learn how to add a new record to your data service.
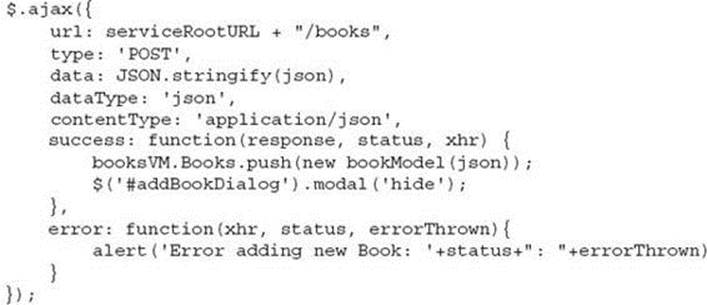
For this example, you will be adding a new book to the database. You will use the same REST API that you used for reading the list of books, /books; however, the request type that you use will be a POST request instead of the GET request that you used previously. Listing 5-7 shows the code for making this POST request.
![]()
Listing 5-7 Example of AJAX POST Call
![]()
Let’s walk through the code:
![]() $.ajax({, This is the jQuery method for implementing an asynchronous HTTP request (AJAX).
$.ajax({, This is the jQuery method for implementing an asynchronous HTTP request (AJAX).
![]() url: serviceRootURL + "/books", This line sets the URL that you will make the REST call to.
url: serviceRootURL + "/books", This line sets the URL that you will make the REST call to.
![]() type: 'POST', This line sets the request type to POST. This tells the REST service that you want to add this new data to the database.
type: 'POST', This line sets the request type to POST. This tells the REST service that you want to add this new data to the database.
![]() data: JSON.stringify(json), The data that you will pass into the request is going to come from a form, which you’ll learn how to create in a little while. Since the REST service is expecting to receive data as a JSON object, you will use the utility method .stringify()provided by the JSON object to convert the JavaScript object into a valid JSON object.
data: JSON.stringify(json), The data that you will pass into the request is going to come from a form, which you’ll learn how to create in a little while. Since the REST service is expecting to receive data as a JSON object, you will use the utility method .stringify()provided by the JSON object to convert the JavaScript object into a valid JSON object.
![]() dataType: 'json', This is the type of data that you are expecting back from the server in response to this request.
dataType: 'json', This is the type of data that you are expecting back from the server in response to this request.
![]() contentType: 'application/json', This tells the server what type of data you are sending to it in this request.
contentType: 'application/json', This tells the server what type of data you are sending to it in this request.
![]() success: This is the callback function that is used if the request is successful.
success: This is the callback function that is used if the request is successful.
![]() error: This the callback function that is used if the request fails.
error: This the callback function that is used if the request fails.
|
|
TIP To test your error callback function, try sending a request with the same value for a field that is required to be unique. In the case of the sample application, try adding two books with the same ISBN. |
The HTML code shown in Listing 5-8 includes a Knockout click: binding that displays the dialog in which to enter the information about the new book that you want to add to the database.
![]()
Listing 5-8 click: Binding to Show New Book Dialog
![]()

This code is straightforward. The Knockout click: binding is calling a function called showAddDialog. This function is using the modal dialog functionality provided by the Twitter Bootstrap framework (with which you initially created the project) to display a modal dialog. This dialog contains the form that gathers the details for new books being added to the database. Listing 5-9 shows the HTML for the dialog. The one line of code that displays the modal dialog is
![]()
![]()
![]()
Listing 5-9 New Book Modal Dialog with Form
![]()
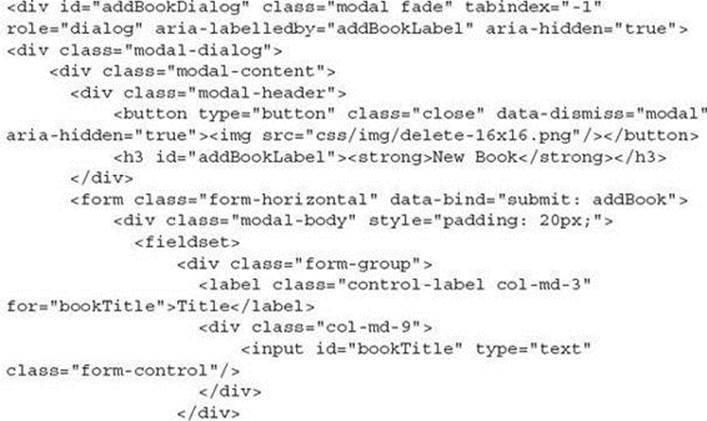
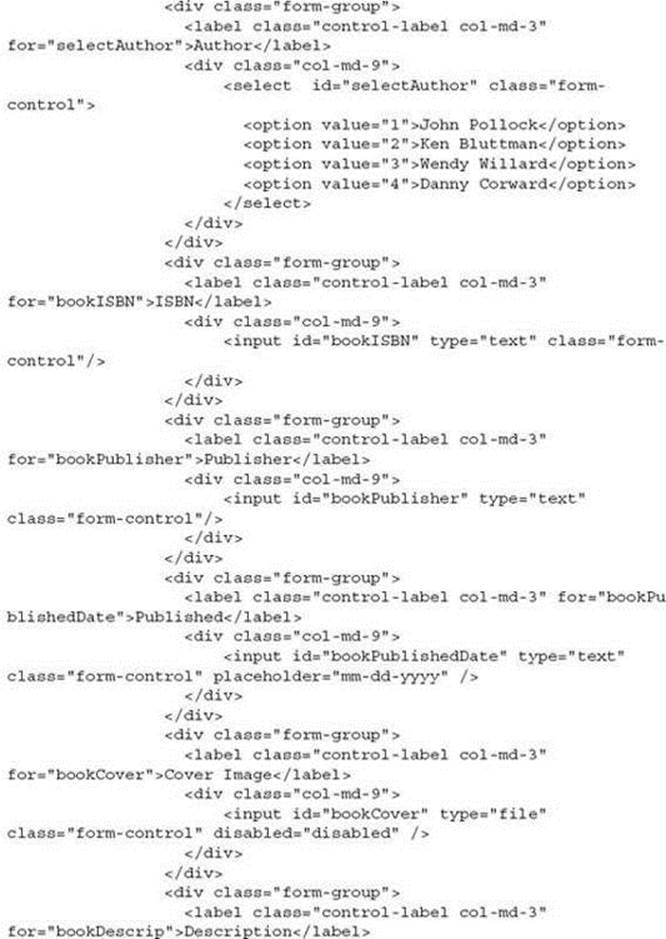
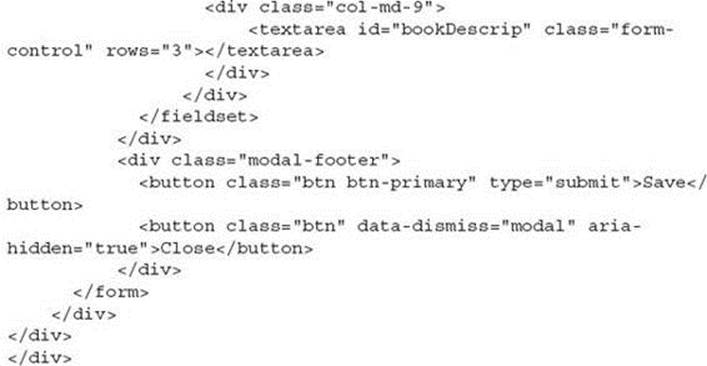
This is a really large piece of code, but almost all of it is just HTML layout and styling. Let’s discuss the lines that provide the functionality:
![]() <form class="form-horizontal" data-bind="submit: addBook"> This is the Knockout submit: binding that tells Knockout to pass all of the form elements to the addBook function when a submit is performed.
<form class="form-horizontal" data-bind="submit: addBook"> This is the Knockout submit: binding that tells Knockout to pass all of the form elements to the addBook function when a submit is performed.
![]() <button class="btn btn-primary" type="submit">Save< /button> By setting the type attribute of this button to "submit", it will fire the submit event when it’s clicked, causing the initial submit: binding to be invoked.
<button class="btn btn-primary" type="submit">Save< /button> By setting the type attribute of this button to "submit", it will fire the submit event when it’s clicked, causing the initial submit: binding to be invoked.
When the form is submitted, it will call back to the addBook function that contains the REST call that you reviewed previously. The only thing not shown in the previous example is how the data was formatted into the JSON object that was passed as part of the request. Listing 5-10 shows you how the JSON data is created using the form elements passed in by the Knockout submit: binding.
![]()
Listing 5-10 Example Parsing Form Data to JSON Object
![]()

The data passed into the addBook() function contains an array of the HTML elements, and you will assign the value, from those elements that you need, to the fields that are expected by the REST service. In this case, the array includes the five fields shown in Listing 5-10. When you are sending data to the REST service, you have to know in which format each field is expecting its value to be sent. For example, when the publishedDate field is being set, the REST service expects a Date to be sent for this field, so you will need to transform the data from the form into the appropriate format.
Data validation can be done in two ways at this point. You can use built-in validation functionality from the client-side frameworks, such as Twitter Bootstrap, to make sure that the data entered into the form is in the proper formats before the submit event is fired, and/or you can perform validation on the data as you are assigning it to the JSON object. The sample application provided doesn’t perform any client-side validation. It does, however, provide a hint on the Published Date form field to help the end user know which format is expected for this field:
![]()
![]()
Knowing which specific HTML element contains the data that you want to assign to a specific field in your JSON object may be tricky if you have also included elements in your form that you don’t want to use. NetBeans IDE provides a JavaScript debugger that is very useful for determining what is what in the data object returned to the function. Figure 5-2 shows an example of how the debugger can be used to determine which elements you need to use to achieve the code shown in Listing 5-10. Clicking in the left-hand gutter of your JavaScript file will place a breakpoint on that line, as shown for line 141 in Figure 5-2. When the form is submitted in the browser, the IDE will stop at this line. You can hover over the data variable to see the value of it in the tooltip. Expanding it will show each of the elements in the data object and their values. Of course, you can also see this debugger information in the Variables window at the bottom of the IDE if you don’t want to use the tooltip approach.
![]()

![]()
FIGURE 5-2. NetBeans JavaScript debugger example
Now that you have submitted the request to add the book to the REST service, you want to finish any changes to the View layer that may be affected by the result of the POST request. Taking another look at Listing 5-7, you will see the two callback functions for success and error. If there is an error, you should do something to inform the end user that the request didn’t work. In this example, an alert is called with the error status and any text that the REST service returned as a result of the error:
![]()

In the case where the request is successful, you will want to add the same JSON data that you sent to the server to the existing Knockout observableArray that your View is bound to. In Listing 5-7, the line of code booksVM.Books.push(new bookModel(json)); creates a new Model object out of the JSON data and then pushes it into the observableArray booksVM.Books(). Because Books is a Knockout observableArray, just adding the new Model object will cause an event to be fired, and the HTML that is bound to the foreach: binding will automatically update itself.
Update, Using the PUT Request (U of CRUD)
The process for updating a record is about the same as the process for creating a new entry, as covered in the previous section. First you will want to see the details for the book that you are going to edit. Listing 5-11 shows how the HTML is coded to list all of the books in your service.
![]()
Listing 5-11 Example of Knockout foreach: Binding
![]()
The Knockout binding of foreach: is used to display each item in Books with the same look and feel. Books is the Knockout observableArray from your ViewModel. The most important element in the HTML code is actually a hidden <div> that contains the ISBN for each book. The ISBN is a unique ID for each book, which will allow you to make another REST call to get the information about one specific book. Notice that each of the <div id="bookCoverPhoto"> elements for the book’s cover image, title, and ISBN has a click: binding to the function getBookDetails(). This function will load the page that shows all the details about a specific book. Listing 5-12 shows this function.
![]()
Listing 5-12 getBookDetails Function
![]()
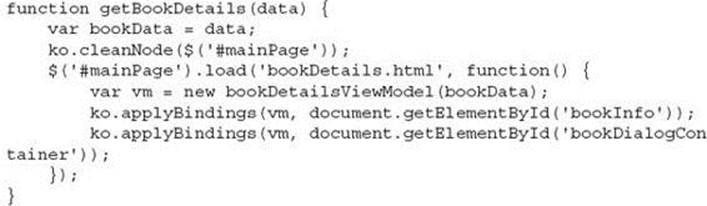
Let’s take a look at this code:
![]() The first line simply sets a local variable, bookData, to contain the data from the page that you just left.
The first line simply sets a local variable, bookData, to contain the data from the page that you just left.
![]() The entire sample application that you have been working with so far is designed as a single-page application. This means that the application doesn’t change URLs and load a new page when a request is made, but rather loads a new page fragment, or template, into a specific section of the larger page. In the case of this application, the index.html page has been designed to have the header and footer code and a single <div> in the body of the page to contain all the other page templates. This <div> has an ID of mainpage. Because Knockout allows you to have only one binding to a DOM element at one time, you need to clear out the existing binding and add the new bindings as you load the new page template.
The entire sample application that you have been working with so far is designed as a single-page application. This means that the application doesn’t change URLs and load a new page when a request is made, but rather loads a new page fragment, or template, into a specific section of the larger page. In the case of this application, the index.html page has been designed to have the header and footer code and a single <div> in the body of the page to contain all the other page templates. This <div> has an ID of mainpage. Because Knockout allows you to have only one binding to a DOM element at one time, you need to clear out the existing binding and add the new bindings as you load the new page template.
![]() After ko.cleanNode($('#mainPage')); clears out the mainpage DOM element, $('#mainPage').load ('bookDetails.html', function() { loads the new page template into that same DOM element.
After ko.cleanNode($('#mainPage')); clears out the mainpage DOM element, $('#mainPage').load ('bookDetails.html', function() { loads the new page template into that same DOM element.
![]() In the callback function for the .load method, you will set the new ViewModel and bind that ViewModel to two separate DOM elements. The first is the container for all of the individual book details, and the second is the container for the modal dialogs. The dialogs will be used for updating the details for this book and as a confirmation of whether to delete the book or not.
In the callback function for the .load method, you will set the new ViewModel and bind that ViewModel to two separate DOM elements. The first is the container for all of the individual book details, and the second is the container for the modal dialogs. The dialogs will be used for updating the details for this book and as a confirmation of whether to delete the book or not.
Once you call the Knockout applyBindings() call, the bookDetailsViewModel() ViewModel will be processed. Listing 5-13 shows this ViewModel code.
![]()
Listing 5-13 Example of bookDetailsViewModel Function
![]()
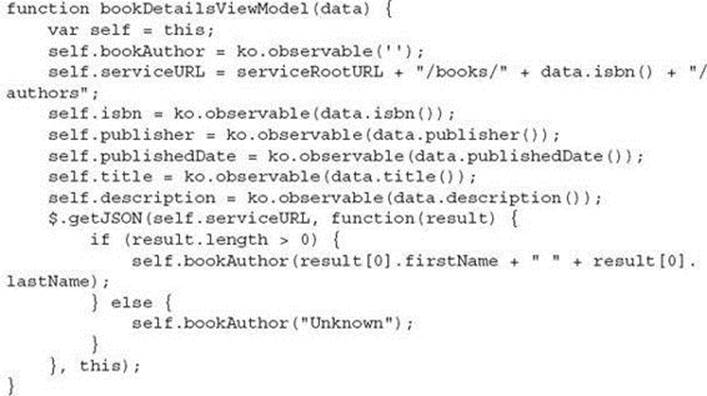
When you created the new instance of the bookDetailsViewModel() in the getBookDetails() function, you passed in the bookData variable. This means that you have all of the information that you need for that specific book and can assign those values to Knockout observables for use in your View. However, the Author information is not included in that book data. The Author details are kept in a separate table of your database. There is a REST API for getting the Author details for a specific book, though. In the fourth line of code in Listing 5-13, you can see that you are setting a variable called self.serviceURL to point to that REST API.
Further down in Listing 5-13 you make a getJSON() call to get the Author details:
![]()
![]()
In your database, Author is not a required field, so this API could return successfully and still not contain specific information. Because of this, the code is testing to see if the length of the returned data is larger than zero; if it is, the code sets the Knockout observable for the author’s name to be a concatenation of the first and last name returned. If the returned data doesn’t contain any information, the code sets the author to Unknown.
Now that you have loaded the new page template for book details and have pulled in the appropriate data to populate the page, you can take a look at how to allow your end user to edit the book data.
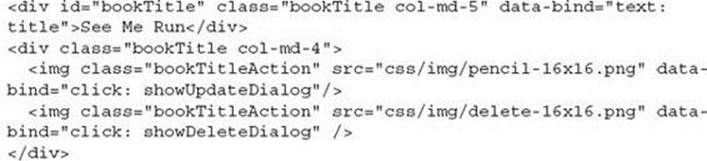
Listing 5-14 shows that at the top of the book details template HTML code there is a knockout click: binding added to an icon for Edit and another icon for Delete. Both of these functions do nothing more than load and display the dialogs for their specific purposes.
![]()
Listing 5-14 Example of Icons for Edit and Delete
![]()
Let’s look at Listing 5-15 to see how the updateBookDialog dialog is handled first.
![]()
Listing 5-15 Partial Edit Dialog
![]()
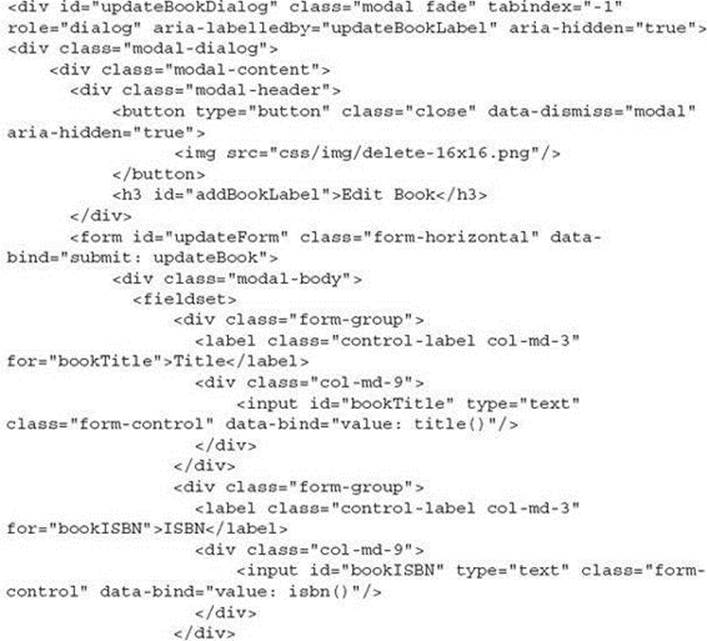
Like the addBookDialog dialog created in Listing 5-9, this is a Twitter Bootstrap modal dialog. There are two important things to note in Listing 5-15. First, you don’t need to pass in any information to this dialog directly. Each field is bound to the existing Knockout observable that was also used to display the book details in the main page.
|
|
NOTE Notice that all <input> elements use a value: binding while other DOM elements use a text: binding to get their content. When working with Knockout bindings, it’s important to bind the proper content attribute for each type of DOM element. For example, if you set the content of a DOM element by using the value attribute, then you would use the value Knockout binding. |
Second, notice that the Knockout observables are being called as a function in all of the form element bindings: data-bind="value: isbn()". This is very important. Because of Knockout’s two-way binding, if you were to attempt a binding to the observable directly, as soon as you changed it in the form field, it would update in the book details page. You don’t want this to happen immediately, just in case the end user clicks the Cancel button instead of submitting the changes. By calling the observable as a function, you get the actual value of the variable instead of the observable object.
Listing 5-16 shows how the form is processed and the actual update is performed in the REST API.
![]()
Listing 5-16 Submitting Update
![]()
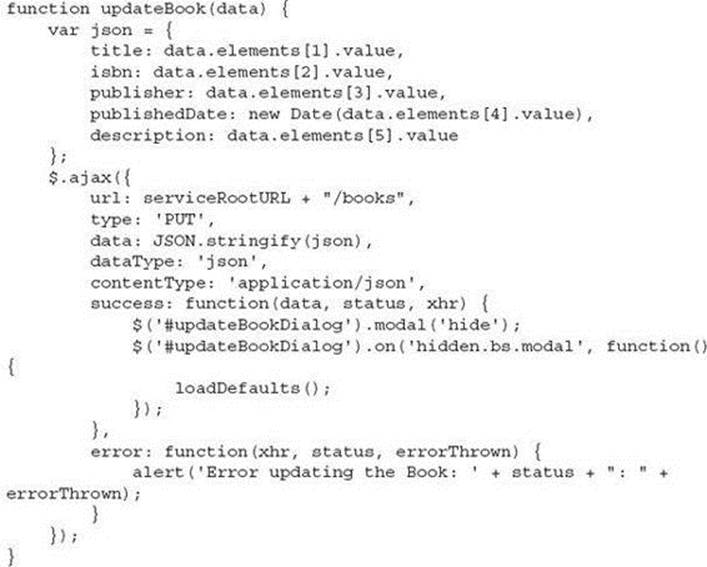
Let’s walk through this code to examine what is going on:
![]() The JSON object that will be passed into the REST API call is being created using the form data passed when the Knockout submit: binding is triggered.
The JSON object that will be passed into the REST API call is being created using the form data passed when the Knockout submit: binding is triggered.
![]() The same AJAX call that you used to add a new book is used again to update a book. However, the type attribute used is now PUT instead of POST as was used for the add method.
The same AJAX call that you used to add a new book is used again to update a book. However, the type attribute used is now PUT instead of POST as was used for the add method.
![]() You have the same success: and error: callback functions as well. The error: function is exactly the same as before.
You have the same success: and error: callback functions as well. The error: function is exactly the same as before.
![]() After the update has been completed, the application returns to the main page. The success: function closes the updateBookDialog dialog and then waits for that close to be completed. It then calls the loadDefaults() function, which resets the ViewModel and correct bindings back to the main page.
After the update has been completed, the application returns to the main page. The success: function closes the updateBookDialog dialog and then waits for that close to be completed. It then calls the loadDefaults() function, which resets the ViewModel and correct bindings back to the main page.
Delete, Using the DELETE Request (D of CRUD)
The setup for the update process was a little long, but that setup also enabled the delete functionality. The confirmDeleteDialog dialog is displayed in the same way that the updateBookDialog dialog was, with a call to a showDeleteDialog() function. Listing 5-17 shows the REST API call that is needed to perform a delete.
![]()
Listing 5-17 Example of DELETE REST API Call
![]()
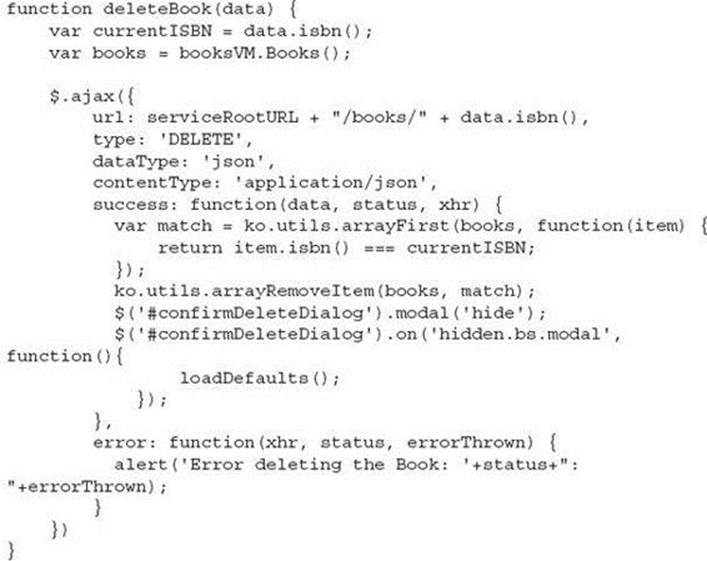
After the user clicks the Yes button in the confirmDeleteDialog confirmation dialog, the deleteBook(data) function is called and the current Books details are passed to the function. To delete a record using a REST API, you need to have a unique ID for the record you want to delete. In the example application’s case, this is the ISBN value.
Let’s take a look at the code in Listing 5-17:
![]() The JSON object that will be passed to the AJAX call needs to contain only the unique ID for the record you want to delete. Notice that, once again, you are setting the actual value of the observable, and not a reference to the observable object.
The JSON object that will be passed to the AJAX call needs to contain only the unique ID for the record you want to delete. Notice that, once again, you are setting the actual value of the observable, and not a reference to the observable object.
![]() A local variable is set to the current ISBN value so that the ISBN value can be used in a comparison function later.
A local variable is set to the current ISBN value so that the ISBN value can be used in a comparison function later.
![]() A local variable is set to the Books observableArray so that you can remove the Model entry if the REST API call is successful.
A local variable is set to the Books observableArray so that you can remove the Model entry if the REST API call is successful.
![]() The URL is set in the AJAX call to use the REST API that will get the exact book that you want to delete.
The URL is set in the AJAX call to use the REST API that will get the exact book that you want to delete.
![]() The type attribute is set to DELETE.
The type attribute is set to DELETE.
![]() The dataType and contentType are both set to JSON so that the service knows that is what you are sending and expecting back.
The dataType and contentType are both set to JSON so that the service knows that is what you are sending and expecting back.
![]() As with all the other calls, there are success: and error: callback functions. The error: function is exactly the same as before.
As with all the other calls, there are success: and error: callback functions. The error: function is exactly the same as before.
![]() The success: function uses the Knockout utility function of arrayFirst() to find the first match in the observableArray. Once that is found, it returns a reference to that Model so that it can be removed using another Knockout utility function called arrayRemoveItem().
The success: function uses the Knockout utility function of arrayFirst() to find the first match in the observableArray. Once that is found, it returns a reference to that Model so that it can be removed using another Knockout utility function called arrayRemoveItem().
![]() Just as you did with the updateBookDialog dialog, the confirmDeleteDialog dialog is closed, and then once the close is completed, the loadDefaults() function is called to reset the ViewModel and load the main page.
Just as you did with the updateBookDialog dialog, the confirmDeleteDialog dialog is closed, and then once the close is completed, the loadDefaults() function is called to reset the ViewModel and load the main page.
Server-Sent Events (SSE)
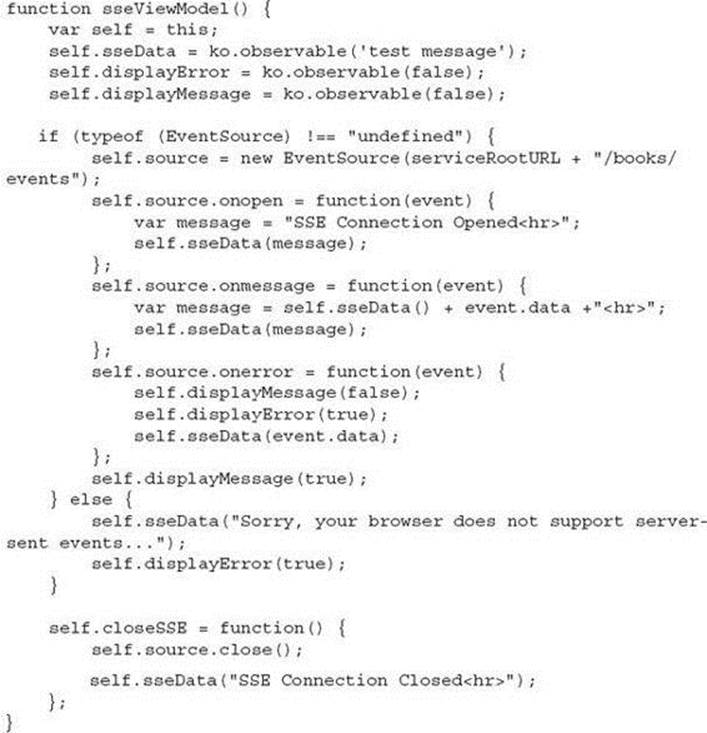
Server-Sent Events is sometimes referred to as push technology because the data flow is in one direction only. Everything comes from the server. The browser chooses to attach to the SSE stream to have information sent to it whenever new information becomes available. The example application has an Events section set up that will display data coming from an SSE stream. Knockout two-way binding is really helpful with the displaying of the data since you can set up the binding between the incoming data and a specific DOM element and just let Knockout update whenever the observable is changed by the new data coming in. Listing 5-18 shows how you connect to the SSE stream and which functions are used to work with the stream and its data.
![]()
Listing 5-18 Example of Server-Sent Events
![]()
Server-Sent Events is a new feature introduced in HTML5. Some browsers do not support this feature at the time of writing.
|
|
TIP Currently, no versions of Microsoft Internet Explorer support Server-Sent Events. |
Before continuing with the initialization code, it’s a good idea to perform the following check to make sure the browser provides SSE support:
![]()
![]()
If the browser doesn’t understand the type of EventSource, then it doesn’t support SSE, in which case you can display an error message.
Let’s walk through the code in Listing 5-18 to see what each section does:
![]() The first few lines set the defaults for your Knockout observables. These observables are bound to the SSE section of the HTML code.
The first few lines set the defaults for your Knockout observables. These observables are bound to the SSE section of the HTML code.
![]() Inside the if statement that is checking to make sure the browser supports Server-Sent Events, you create a new EventSource object and assign it to the self.source variable. The URL that is used to make the connection is for the SSE stream that you wrote in Chapter 3 of the book:
Inside the if statement that is checking to make sure the browser supports Server-Sent Events, you create a new EventSource object and assign it to the self.source variable. The URL that is used to make the connection is for the SSE stream that you wrote in Chapter 3 of the book: ![]()
![]() Once you have the EventSource object, there are three events you can listen for and then perform the appropriate actions:
Once you have the EventSource object, there are three events you can listen for and then perform the appropriate actions:
![]() onopen: This event is triggered on the initial opening of the connection.
onopen: This event is triggered on the initial opening of the connection.
![]() onmessage: This is triggered each time the server sends a message to the browser. This is the main event that you will want to work with.
onmessage: This is triggered each time the server sends a message to the browser. This is the main event that you will want to work with.
![]() onclose: This is triggered when the connection is closed for any reason.
onclose: This is triggered when the connection is closed for any reason.
![]() In Listing 5-18, you are setting the local variable message to a string stating that the connection was opened. You are then assigning that value to the Knockout observable sseData, which will be displayed inside the SSE HTML section that is bound to the same observable. Because you are including HTML markup in the message, the Knockout binding on the HTML page is actually the html: binding instead of the plain text: binding:
In Listing 5-18, you are setting the local variable message to a string stating that the connection was opened. You are then assigning that value to the Knockout observable sseData, which will be displayed inside the SSE HTML section that is bound to the same observable. Because you are including HTML markup in the message, the Knockout binding on the HTML page is actually the html: binding instead of the plain text: binding:
![]()
![]() In the onmessage function, you want to lay out the message that goes into this area by appending the most recent message from the server onto the end of the existing messages. You do this by setting the local variable message to the actual value of the observable and then appending the incoming event.data. After generating the new appended message, you set the self.sseData observable to the new value.
In the onmessage function, you want to lay out the message that goes into this area by appending the most recent message from the server onto the end of the existing messages. You do this by setting the local variable message to the actual value of the observable and then appending the incoming event.data. After generating the new appended message, you set the self.sseData observable to the new value.
![]() If the connection is closed for whatever reason, you set a message stating that the connection is closed and set the same self.sseData observable to show that message.
If the connection is closed for whatever reason, you set a message stating that the connection is closed and set the same self.sseData observable to show that message.
![]() When the original observables for self.displayMessage and self.displayError were initialized, they were set to false so they would not show these areas while the page is loading. Now that the connection has been established and a message has been set, you can set the observable to true, which will display the Message area while still leaving the Error section hidden.
When the original observables for self.displayMessage and self.displayError were initialized, they were set to false so they would not show these areas while the page is loading. Now that the connection has been established and a message has been set, you can set the observable to true, which will display the Message area while still leaving the Error section hidden.
![]() Finally, there is a small X icon in the View layer of the Event section that has been bound to the closeSSE() function. When the icon is clicked, the current SSE stream closes and an appropriate message is displayed.
Finally, there is a small X icon in the View layer of the Event section that has been bound to the closeSSE() function. When the icon is clicked, the current SSE stream closes and an appropriate message is displayed.
WebSocket
Using the WebSocket API in JavaScript and connecting the resulting data to an HTML view layer was covered in Chapter 4. If you haven’t read Chapter 4 yet, the basic approach to setting up the connection to the service is the same as what you just learned with Server-Sent Events. However, with the WebSocket API, you can also send data back to the server. One of the biggest advantages of using a WebSocket connection instead of REST or some other type of protocol is the significant reduction in the amount of traffic that you send over the wire when you use the WebSocket protocol. The connection between the client and server is set up once and then maintained until the connection is closed either via the API or via the client closing. With other protocols, you are required to go through the connection setup each time you want to send or receive data from the server.
To get a full description of the new WebSocket protocol, please read Chapter 4.
Responsive Design
The concept of responsive design addresses the need to design your web application such that it renders its layout appropriately in response to the screen size of the device on which it is being displayed. The application View layer needs to respond to this change in view size by changing the layout, or amount, of the content that is rendered.
The CSS2 specification provided the capability to use different CSS rules dynamically based on the media type. The most common of these types were (and continue to be in CSS3) screen and print. The CSS3 specification expands this capability with the introduction of media queries. A media query is made up of a media type and zero or more expressions. These expressions check for specific conditions of media features. A good example of this is an expression that checks for the current size of the display screen:
![]()
![]()
Through the use of media queries and a pattern of CSS classes defined as a grid layout, you can make your application respond to changes in the display screen.
The grid layout pattern is something that you can design yourself, but it’s much easier to use an existing grid framework. Thus far, you have been using the Twitter Bootstrap framework to show modal dialogs and to help with the display of buttons and general form layout. Twitter Bootstrap also comes with a grid layout as part of its CSS files. The most common grid style in use is a 12-column grid. You can define different sections of your layout into any number of columns that would add up to the largest width of 12. For example, you could have three sections that were each set to be four columns wide. In the sample application’s model dialog for adding a new book, for example, the dialog uses a nine-column width for all of the form elements, while the label elements use three columns. Listing 5-19 shows how this looks in part of that dialog HTML code.
![]()
Listing 5-19 Sample Grid Layout HTML
![]()
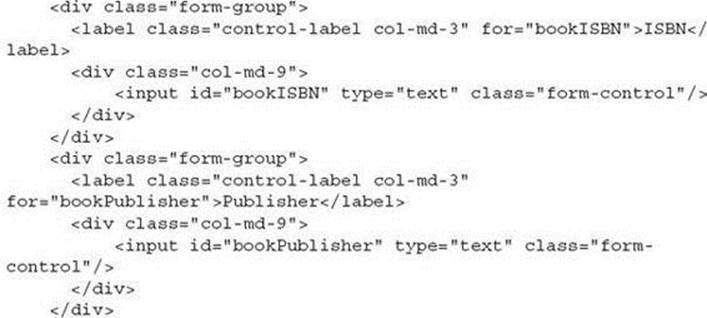
Notice the style class of class="col-md-9" in each of the input <div> elements and the class="col-md-3" style class for the labels. The combination of these style classes and media queries is what makes responsive design possible.
Let’s take a look at the CSS code in Listing 5-20.
![]()
Listing 5-20 CSS Example for Grid Layout
![]()
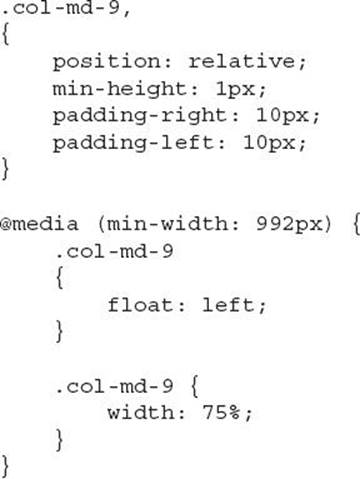
The two sections of Listing 5-20 follow the style class for .col-md-9 through to different media queries. The first section covers the situation in which the browser size doesn’t fall into any specific defined media query. The second section introduces the media query for the situation in which the browser size is set to min-width:992px. Any style rules that you place inside a specific media query will override any previous values for the same rule while the media query expression is true. If you don’t override a rule, the existing rule will continue to be used. In the code shown, you are not overriding an existing value, but rather setting new rules for width: and float:. Notice that the width is being set to a percentage instead of a specific numeric value. This will cause the nine-column grid to maintain its relative size as the browser is resized, but it still remains within the range that this media query has defined.
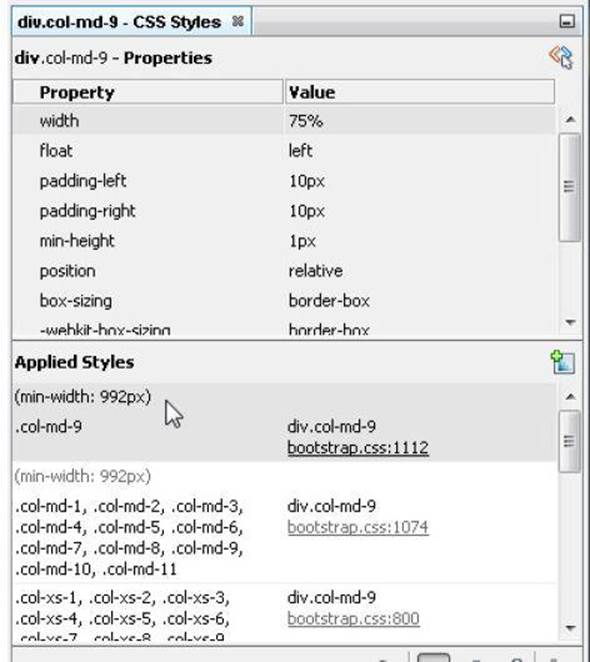
Figure 5-3 shows the CSS Styles property window in NetBeans IDE. Selecting an element in the DOM navigator will show that element’s current CSS styles and rules, including whether the browser is currently resized to fit within a specific media query.
![]()
![]()
FIGURE 5-3. NetBeans CSS Styles window
Syntactically Awesome Stylesheets (SASS)
For most HTML5 applications, you may be able to get away with using a single CSS file that is reasonably constructed and easy to maintain. However, as the applications grow and become more complex, the CSS becomes just as complex. Historically, maintaining very large CSS files has been extremely difficult. Even if you broke the files down into smaller files and referenced each file in your HTML, you had to remember to place the files in the proper order because CSS files are loaded by the browser with the order they are listed, but each file will overwrite any previously set style classes. A concept of last in wins. If you happened to have the same rule defined in multiple files, the file in which the rule would take effect depended on the order in which the files were listed in your HTML code. In 2007, SASS was introduced by a developer named Hampton Catlin. The development of SASS is continued today by Nathan Weizenbaum and Chris Eppstein.
The original dynamic stylesheet language was designed to be similar to the Haml (HTML abstraction markup language) programming language in its use of an indentation syntax style. Referred to as indented syntax, this style really doesn’t look or feel like CSS at all. This syntax is most often referenced with a file extension of .sass. A newer syntax has been created called Sassy CSS, or SCSS, which is designed to look and feel exactly like CSS itself—so much so that any valid CSS code is also a valid subset of SCSS. This syntax is most often referenced by a file extension of .scss.
SASS works as a preprocessor of the SASS or SCSS files and compiles these separate files into one or more CSS files that you can reference in your HTML code.
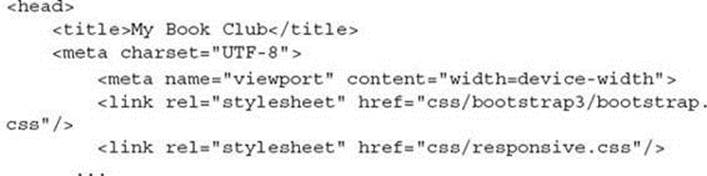
Listing 5-21 includes two link references to stylesheets. The first is for the Bootstrap framework that you used as the basis of the My Book Club sample application, and the second is the reference to the application’s specific styles. The latter file, named responsive.css, is a CSS file that was generated as a result of the SASS preprocessing of four separate SCSS files. These files are shown in Figure 5-4.
![]()
Listing 5-21 Referencing the CSS File
![]()
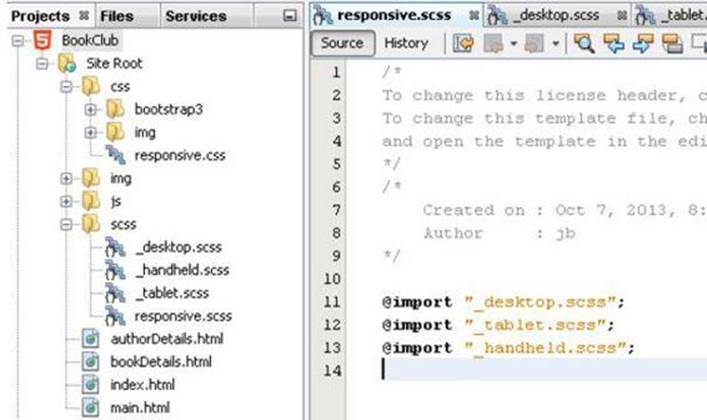
As you can see in Figure 5-4, the responsive.scss file contains only three lines of real code. It imports the other three SCSS files in the order in which you want them to be assembled. The other three files are broken out to contain the classes and rules specific to a certain media query type: in this case, Desktop, Tablet, and Handheld. This separation is just one example. Your individual projects will dictate how you determine what is the best way to break up your CSS into more manageable sections.
![]()
![]()
FIGURE 5-4. Listing of SCSS and generated CSS files
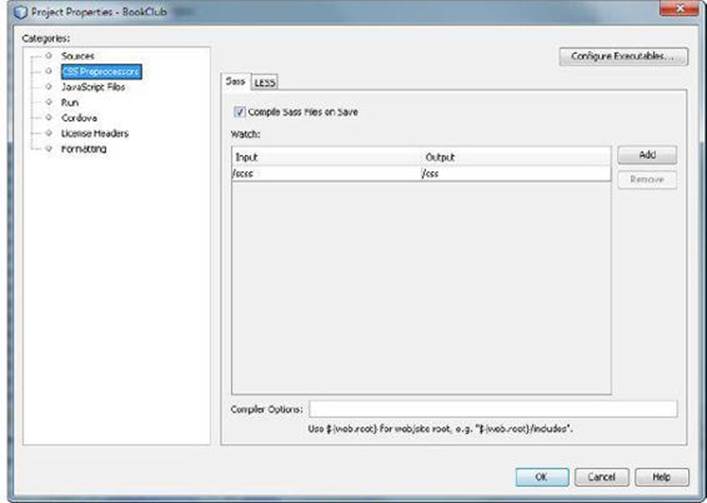
NetBeans IDE makes it very easy to work with SASS in your projects. Right-click your project name in the Navigator and select the Properties menu option. In the Project Properties dialog, select the CSS Preprocessors option, as shown in Figure 5-5. For this project, the IDE is being instructed to look for the SCSS files in a directory named /scss and to output the compiled files into the /css directory.
![]()
![]()
FIGURE 5-5. CSS preprocessor settings
|
|
TIP When working with SASS, if you start the name of an SCSS file with an underscore, that will instruct the compiler to not compile that specific file into its own CSS file. This is useful when you have multiple smaller files that are being imported into one larger file and you only want the larger file compiled to a final CSS file. |
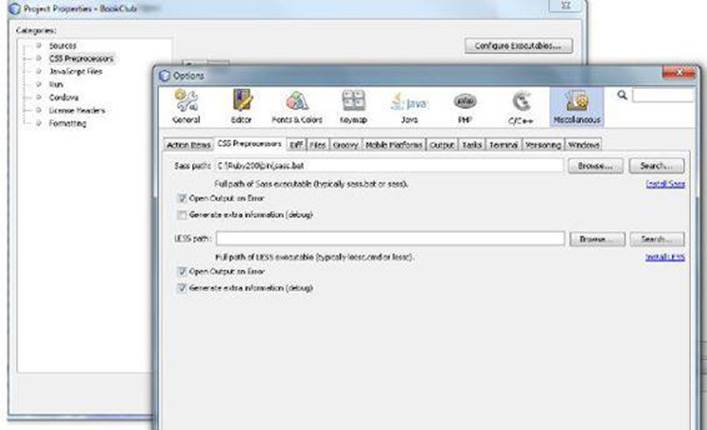
If you have not already done so, you can install and manage the executable for SASS by clicking the Configure Executables button at the top right of this dialog. The Global IDE options dialog for working with CSS preprocessor executables is shown in Figure 5-6. You’ll notice that if you don’t know where to download the executable from, there is a link provided that will take you to the proper location.
![]()
![]()
FIGURE 5-6. Global IDE properties for CSS preprocessors
You will also notice that NetBeans IDE supports another type of CSS preprocessing called LESS. This is a similar approach to SASS and was designed by Alexis Sellier in 2009. As with many open source projects, one project may influence another and vice versa. In this case, SASS was designed in 2007, which influenced the development of LESS in 2009. The introduction of LESS then influenced the new SCSS syntax used in SASS. Both stylesheet languages have their advantages and disadvantages. As far as NetBeans IDE is concerned, the setup and functionality are the same for either one.
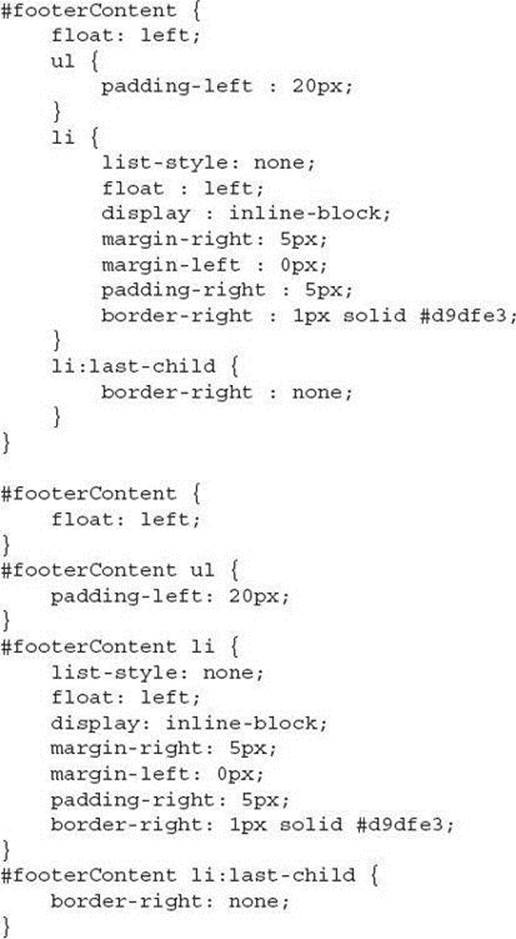
Now that you have seen how you can work with SCSS files using NetBeans IDE, you are ready to take a look at the code. Listing 5-22 presents a very simple example of nesting, and then displays the resulting CSS in the generated file. All of the related rules for the #footerContent class are nested inside the root style in the SCSS file. After the CSS is compiled, the generated CSS contains separated rules.
![]()
Listing 5-22 SCSS Nesting and the Resulting CSS Code
![]()
Summary
In this chapter you’ve learned how to work with an HTML5 project within NetBeans IDE and how to consume and interact with a REST web service to perform CRUD functions. You connected to a Server-Sent Events (SSE) stream using JavaScript, and then used the data from that stream to update an events window in the BookClub application. You were introduced to the Model-View-ViewModel (MVVM) architectural pattern through the use of the Knockout.js JavaScript library. You’ve also learned the basics of responsive design using a grid layout and media queries provided by the Twitter Bootstrap framework. Finally, you briefly looked at how you can use a CSS preprocessor to manage large and complex CSS implementations.
The BookClub application that was used throughout this chapter was intentionally left unfinished in the area of the Author details. This is so that you can use the tasks you learned while setting up the Book details to add the same type of functionality to the Author section of the application.

All materials on the site are licensed Creative Commons Attribution-Sharealike 3.0 Unported CC BY-SA 3.0 & GNU Free Documentation License (GFDL)
If you are the copyright holder of any material contained on our site and intend to remove it, please contact our site administrator for approval.
© 2016-2026 All site design rights belong to S.Y.A.