The Responsive Web (2015)
Part 1. The responsive way
Responsive web design dramatically changes what we build. It’s a fundamental redefinition of our online output, and it requires us to take into consideration every point in the web design and development workflow.
In the first chapter of this book you’ll learn to work responsively. Right off the bat, I’m going to give you all the basic information you need to get started with responsive web design. This will give you a sense of what responsive web design entails, and also how it’s different from traditional web design.
In chapter 2 we’ll talk about designing for mobile first. Here we’ll start to cover the challenges of designing a website, keeping its mobile version in mind first. This will round out your introduction to responsive web design and give you the background you need to start building responsive websites.
Chapter 1. Learning to work responsively
This chapter covers
· An overview of a responsive workflow
· Using a prototype to communicate responsive design
· Building a simple responsive website
As the web has evolved, we’ve learned new tactics. We’ve established new ways of working and added them to our older ways. Responsive web design has given us a whole new set of skills to add to our workflow. But before we can start discussing those skills, we need to answer a simple question. What exactly is “the responsive web”?
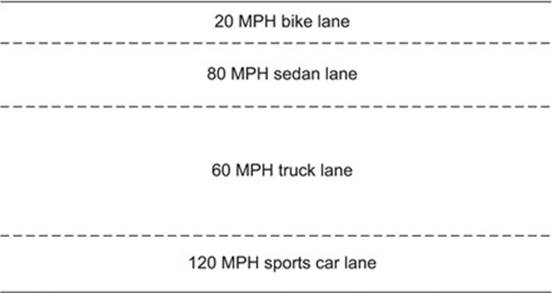
Remember when people called the internet the “information superhighway”? It sounds cheesy now, but imagine that “superhighway.” Right now it’s full of people in sports cars, 18-wheelers, bicycles, family sedans, racecars, and pickup trucks. Some travel at hundreds of miles an hour; others go at a snail’s pace. Some legs of the highway have bike lanes, sedan lanes, and fast lanes, as illustrated in figure 1.1. Every once in a while, a traveler gets confused, and a sports car ends up in the bike lane, and a bike ends up in the sedan lane.
Figure 1.1. A cluttered “information superhighway”
Just as the Department of Transportation created traffic standards, so the responsive web strives to standardize development patterns to accommodate users with screens of all sizes. For the last decade or so, web design and development has stayed in a fairly tight window. Websites have generally been accessed by desktop computers and laptops. Bandwidth and screen resolutions have stabilized, and most users have engaged websites with a traditional mouse and keyboard. These expectations gave us an anticipated standard, and we played within the confines of our sandbox.
With the rise of handheld and tablet devices, web design and development is undergoing a phase of rapid and painful growth. Mobile websites are nothing new—mobile-optimized websites have been around for over a decade. The problem lies in the architecture of these mobile sites.
Ethan Marcotte (coauthor of Handcrafted CSS and Designing with Web Standards, Third Edition)[1] wrote an article for the online magazine A List Apart called “Responsive Web Design” that proposed a new technique for designing web pages to accommodate the needs of users with screens of all sizes, from mobile to desktop (http://mng.bz/pOIb). Marcotte expanded the article into one of the most groundbreaking books in the history of web design, Responsive Web Design (A Book Apart, 2011). Marcotte’s book struck a resonating chord among designers and developers worldwide, and the principles he described sparked a revolution.
1 Dan Cederholm and Ethan Marcotte, Handcrafted CSS (New Riders, 2009); Jeffrey Zeldman and Ethan Marcotte, Designing with Web Standards, Third Edition (New Riders, 2009).
This book is written to transform your process, whether you’re a designer, developer, or both, or if you support or manage designers or developers. This book exists to give you the tools you need to understand this new way of creating according to the rules of the responsive web. With this book, you’ll learn how to work with the limited screen real estate of small-screen devices, such as smartphones. We’ll cover the concepts and technologies that are crucial to responsive web design and equip you with the knowledge you need to be a part of the responsive web.
This chapter serves as a quick introduction to the responsive web and its core concepts and gives you a base on which to get started. Once we get through the basic concepts, you’ll build your first responsive site!
Designer/developer insights
In this book, the lines between what’s considered “design” and what’s considered “development” are blurred. Occasionally, these roles are occupied by one person, and other times multiple people take on these responsibilities. Either way, the responsive web requires harmony between the two skillsets.
The goal of this book is to teach designers and developers not only the practices and executions that will produce successful responsive websites, but also how to communicate and collaborate more efficiently. Responsive design is truly successful when you focus on how you work as well as what you produce.
There are some sections in this book that dive deeply into teaching design principles, and other parts talk specifically about skillsets important to developers. Knowledge of both the design and development skills involved in responsive design is important to a balanced education on the topic. Be sure to look for sidebars like this one to draw out those connections and provide discipline-specific insights.
1.1. Meet the responsive web
I know you may be eager to start building your first responsive site, but before we do, I want to make sure you have the basics under your belt. In this section, I’ll let you in on what the responsive web really is and what its key features are. Once you’re through with this quick introduction, you’ll be ready to start building.
1.1.1. What is the responsive web?
In order to move forward, we need to set a few ground rules about what, exactly, we mean by the responsive web:
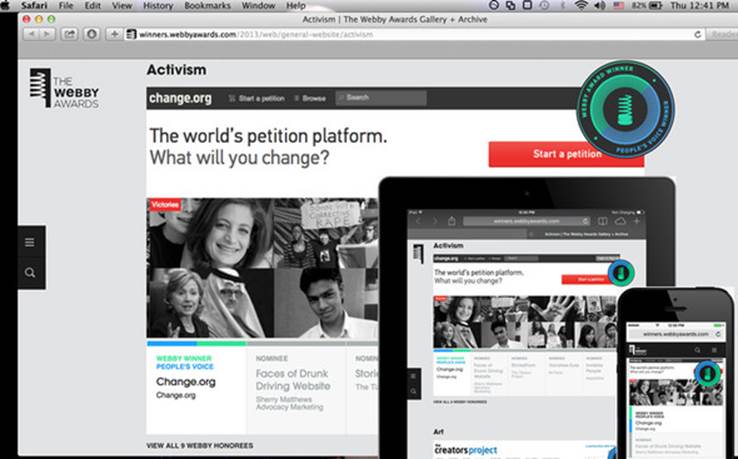
· A responsive site, like the one shown in figure 1.2, is one that uses a single URL for mobile, tablet, and desktop sites. With about 15%[2] of traffic (and more all the time) coming from mobile devices, and an increasing number of tablets and smartphones on the market, these devices are a crucial segment of all web traffic.
2 Mary Meeker and Liang Wu, “Internet Trends D11 Conference” (May 29, 2011), https://kpcb.com/file/kpcb-internet-trends-2013.
Figure 1.2. An example of how a responsive website behaves for a single URL (http://mng.bz/vTVT). The “Activism” section of the 2013 Webby Awards can be accessed by multiple devices with different hardware properties.
· Because responsive web design relies on media queries to adjust to page width, the responsive web requires CSS3 support and updating to HTML5.
· A responsive site strives for consistency across devices. By using a single URL, you ensure that all inbound links to your site serve consistent content.
· A responsive site delivers faster and heightens user experience. By developing mobile sites first, an emphasis is placed on efficiency.
· A responsive site is future-friendly. Every site will eventually need to be optimized for new technology, but by building responsively, you ensure that optimization won’t entail a full site redesign.
If you’ve been involved in designing or developing a website, you probably have a standard workflow. You have tools you use in certain ways to construct your work. In many cases, building a responsive site requires making adjustments to these tools and using entirely new tools.
Traditional web development takes a waterfall approach. The project follows a sequence, typically along the lines of figure 1.3.
Figure 1.3. Commonly called the “waterfall method,” each phase in this process involves creating and passing a deliverable to the next person in the workflow.
![]()
The waterfall approach becomes inefficient and costly if the team needs to consider variations on a project. Also, what if there are inconsistencies or performance issues when you get to development? Suddenly the entire project has to be changed, and even potentially rebuilt.
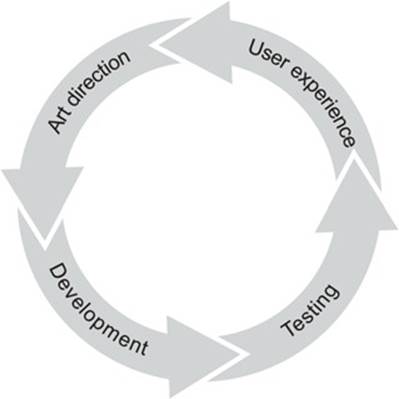
The responsive web is about adaptation. With responsive web design, teams work closely together to build a site. Instead of passing off deliverables along the “website assembly line,” teams iterate and improve upon each other’s work (figure 1.4).
Figure 1.4. In this new, more agile approach, user experience and development happen iteratively. Deliverables are passed along and reviewed in an iterative cycle.
In the traditional pixel-perfect web, the emphasis was on re-creating the layout work from the art/design department, but in this approach, the emphasis is on adapting. Using the standard pixel widths and font sizes won’t do anymore. We need something a little more fluid.
By focusing on adapting and giving the site a fluid layout, your site stands to gain several things:
· A layout that adapts to variations in screen-size technology— If a new web-enabled product hits the market with an uncommon screen, then you’re already prepared for it.
· A faster site— By optimizing for mobile first, you prioritize load times from the beginning of development. Faster sites are always better.
· Simpler browser-specific development— Cross-browser layout issues can actually be easier to resolve with fluid CSS.
1.1.2. Key features
The responsive web couldn’t exist as it is without two components: media queries and breakpoints. These features are what create cross-browser responsiveness and give websites the ability to adapt to the user’s screen.
Media queries
A media query is a type of CSS rule that limits a style’s scope based on factors defined by the query. Each media query specifies a media type and a set of expressions that are checked by the browser. Possible media types include screen for digital screens, print for printed pages, and allfor all media types. Expressions are more detailed and include instructions such as max-width or orientation.
Media queries come from a specification in the 2001 working draft of the W3C CSS3 proposal,[3] which presented a solution to the problem of offering various CSS rules depending on browser size and device screen size. Media queries are an ingenious solution, and they’re the life and spirit of the responsive web. They can be used to deliver CSS rules based on a number of factors, including screen resolution, orientation, and even color index. Without them, mobile web development would be in a really tight spot.
3 W3C, “Introduction to CSS3,” W3C Working Draft, 23 May 2001, www.w3.org/TR/2001/WD-css3-roadmap-20010523/.
The media query is simple and looks something like this:

This line in a stylesheet will tell the browser to give paragraph tags the font-family of sans-serif, but only on screens. It won’t give the style to printed pages or handhelds that recognize themselves with the media type handheld.
Now imagine something like this:
@media handheld{
p{ font-family: sans-serif; }
}
With that line, you’re now targeting any user on a device that identifies itself as handheld. In practice, when your site targets modern and popular devices, this particular media query is fairly useless, because most of the device manufacturers define their devices with the screen media type (iOS, Android, even the Kindle experimental browser).
A media query can also be used to serve a relevant CSS file based on the criteria laid out in the media query in a <link> tag. In this format, a media query is served within the head tag at the very top of a web page, and looks like this:
<link rel="stylesheet" type="text/css" media="handheld" href="sansserif.css">
This example allows you to load this stylesheet only for browsers that identify themselves as being handheld.
The biggest difference between these two methods is that serving a separate stylesheet for mobile requires additional HTTP requests for each stylesheet. The browser will only load the stylesheets that pass the media query, and this can be used strategically to limit the total amount of CSS on a page.
The key to using media queries in responsive design lies in their ability to serve CSS based on viewport width, which is the width of the browser window. These media queries are what are called expressions, and they’re the parameters that the browser checks.
Information a device relays to a server includes the browser agent, the resolution of the device being used, and the size of the window viewing the page. In the responsive web, it’s important to note these factors and to understand their differences. Using media queries, you can serve CSS based on either viewport width or device width.
To apply CSS based on a viewport with a width of 400 pixels or less, you’d use a media query like this:
@media (max-width: 400px) { ... }
Alternatively, if you needed to target only devices whose width is 400 pixels or less, you could change your expression to something like this:
@media (max-device-width: 400px) { ... }
It’s important to note the differences between the two, because in some cases you might wish to serve the smaller-size rules to a browser window that’s been slimmed down, to prevent the appearance of a horizontal scrollbar or create a better user experience. You might wish to target only small-screen devices if you’d prefer desktop users to be given the full-screen version of a site, regardless of window size.
Another helpful distinction that you’ll want to be aware of is the difference between a min-width and a max-width media query. @media (max-width :400px){...} targets a browser with a width of 400 pixels or less, whereas @media(min-width:400px){...} targets a browser with a width of 400 pixels or more. With max-width, the rules affect every viewport below the set width, but min-width affects everything over the viewport width specified.
So how does one decide when to use a media query? That brings us to our next topic...
Breakpoints
The goal of responsive design is to avoid what Ethan Marcotte refers to as the “zero sum game” of redesigning a website for every possible device and viewport.[4] To avoid this, you need to identify boundaries for where you’ll alter your layout to fit the needs of the changing context. As the site you’re working on goes from a mobile device width to a desktop width, at what point does it change or “break”?
4 Ethan Marcotte, Responsive Web Design (A Book Apart, 2011).
This is what’s called a breakpoint in responsive design. Breakpoints are the points at which new rules are served to the responsive site. In figure 1.5 you can see an example of three potential breakpoints in a page.
Figure 1.5. A visual representation of three breakpoints applied to a page. In this example, the first breakpoint might represent a large tablet, the second could be a small tablet, and the third a mobile device.

Suppose you have a 600-square-foot room that starts to shrink. At about 550 square feet, things start rubbing against each other and the room is cramped, so you resize the furniture and adjust the room’s layout. The room then continues to shrink, and when it hits 500 square feet, you again have to adapt the room’s layout. In this metaphor, your room’s breakpoints are at 600 square feet, 550 square feet, and 500 square feet, because these are the points at which your layout starts to break.
Some designers like using standardized breakpoints, built specifically for mobile, tablet, and desktop variations. I prefer starting with a mobile-first website and then growing the site from there. In my method, I expand the site gradually, and once the layout starts to look off or has excessive space at the sides, I insert a breakpoint and start to adjust as gradually as possible.
1.2. Building your first responsive site
Now that you have an understanding of what the responsive web is, it’s time to dive into building a responsive site. In the rest of this chapter, we’ll walk through the fundamentals of a responsive site build. For this chapter, it’s important that you have some basic understanding of HTML and CSS. If you’re an absolute beginner, pick up Rob Crowther’s Hello! HTML5 & CSS3 (Manning, 2012) or find another introductory resource to get started. I’ll try to break the concepts down a bit, but it might be helpful to do some research if you find yourself getting lost.
First we’ll create a prototype. When building a responsive site, I normally use rapid prototyping, because I can quickly view and arrange content in the browser. Rapid prototypes are written in HTML, so they render in mobile and tablet browsers as well as desktop browsers. This gives teams a distinct advantage once the actual design phase approaches.
Then we’ll discuss how to interpret a traditional layout, like one you might get from an art director in the form of a Photoshop, Fireworks, InDesign, or Illustrator file. We’ll discuss how to take the components of a full site design and interpret them to create the markup for a mobile site. After that, we’ll cover how to use percentages to build the site layout, and I’ll show you how to implement responsive images. Then we’ll get hands-on with our first breakpoint.
This is some exciting stuff, and this chapter will build some of the foundations that will carry you through the rest of the book. This is by no means all there is to the responsive web, but it’s at least the tip of the iceberg.
1.2.1. Creating prototypes
When I was a teenager, I loved to work with my hands. I’d build toolbox after toolbox in my high school shop class. I’d build one and think to myself, “This is good, but it’s not great,” and immediately want to do it again. Every night I’d snip, bend, and weld these little metal boxes, and each toolbox I made was better than the last, improving my technique and adding little tweaks here and there.
Creating prototype after prototype made it so that when I took my final exam, I knew exactly how the toolbox should be built. The same is true for responsive sites. By prototyping before you build, you make sure that you’re creating a site that communicates your vision clearly. For both the designer and developer, rapid prototyping is essential. Rapid prototyping is the process of building a site for exploratory purposes. There are a few different approaches to rapid prototyping, and we’ll use Foundation 3, by Zurb.
Foundation is a front-end framework for rapid site production. It offers a suite of tools for making front-end development simple, but like all frameworks it requires strict adherence to its own system. As a result, I use it only for quickly building prototypes. I still prefer starting from scratch when I produce a site, but getting ideas into a browser early on is fantastic.
Developer insight: Foundation versions
I wrote this chapter using Foundation 3, and the Foundation library has since been updated. At the time of this writing, Foundation 5 is the latest version.
The list of features available in Foundation is fairly exhaustive. Included in the basic framework are
· A responsive grid system
· Navigation elements, including sliders and tabs
· Buttons and forms
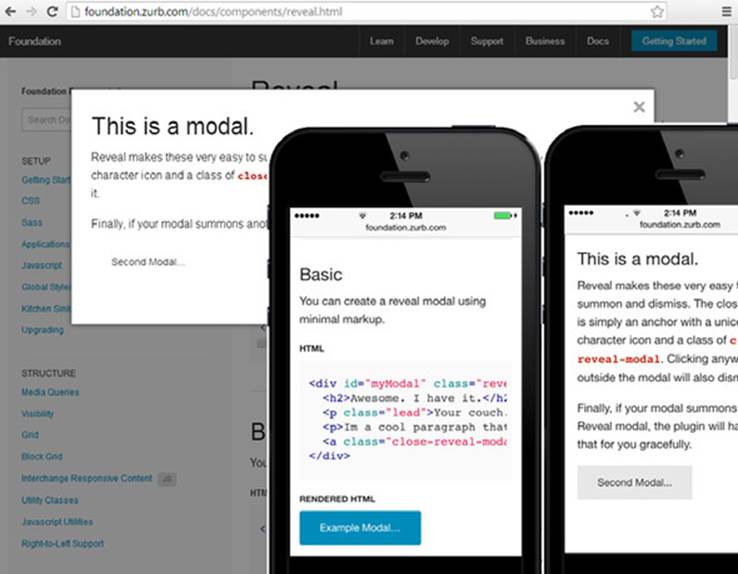
· jQuery plug-ins for modal pop-ups and tooltips, as seen in figure 1.6
Figure 1.6. An example of one of the Foundation Zurb components, the Reveal Modal
Most prototyping frameworks are relatively similar, and though I discourage using prototype markup in a production-ready site build, Foundation is relatively clean for production if necessary. Foundation is available as a free download from http://foundation.zurb.com.
Developer insight: rapid prototyping
Rapid prototyping is your first line of defense in the war against bad ideas. Because the responsive web is constantly in flux and every element on the page needs to be agile enough to refactor itself, getting in ahead of design and identifying modules and page templates is the best way to guide a conversation. When prototyping, it’s common to find out that there are easier ways for users to accomplish goals, or that an element is completely unnecessary.
The most important plus of rapid prototyping, though, is that it gives you an incomplete but usable piece of the site that you can discuss with your team and can interact with across devices. Remember, until something is actually created, it’s purely speculative. I’m regularly asked to attend meetings or review creative work from designers to try and find out whether or not ideas will work. I make my best guess, but I can never truly know unless I have time to build a prototype and experiment. In my experience, that’s where some of the most innovative work comes from—the sense of exploration that comes with building a prototype.
From sketch to prototype
We’ll prototype a redesign for a developer blog. We’ll use a blog as our example because it’s one of the few kinds of sites every developer has experience with. Everyone who builds websites starts with their own blog or portfolio site. Even if you’ve never built a website, you’ve probably considered what your site would need to have on it.
Because we want to keep the site extremely simple, we’ll work from a rough sketch. Generally sketches, like the one shown in figure 1.7, are transformed into wireframes, which serve as an early articulation of a website’s layout and functionality.
Figure 1.7. Rough sketches offer some direction for the prototype.
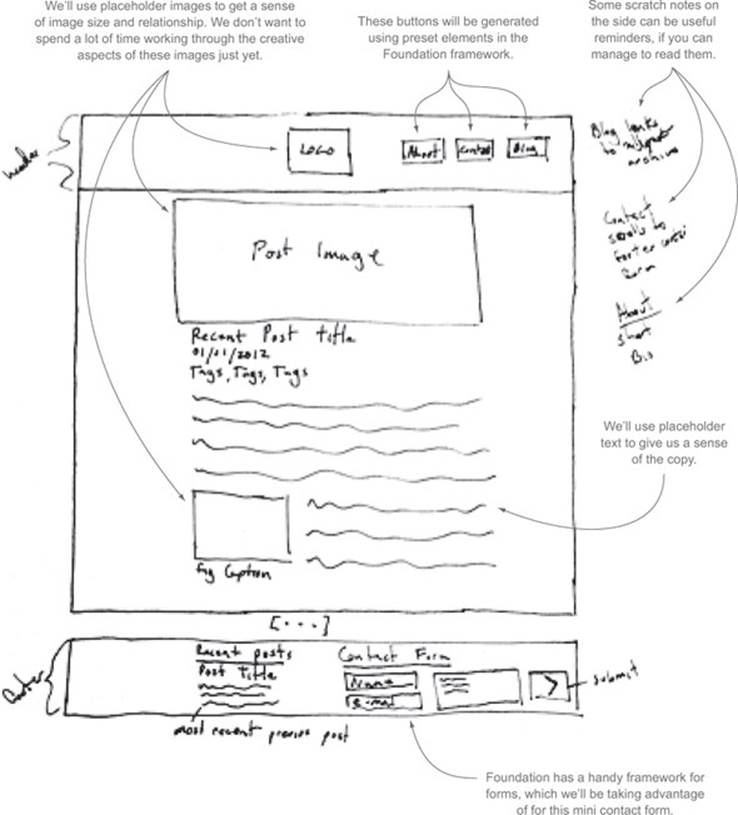
As you can see, this rough draft gives you a model for building your prototype. You can clearly tell what elements are on the page and get a general sense of their relationships. It’s just enough to get you started.
Using markup to create a prototype
Most of the CSS and JavaScript you’ll need to use in Foundation is already there for you. It’s just a matter of writing your markup to fit it, and luckily the markup is straightforward. For a full reference to the Foundation 3 source code, check out the book’s chapter 1 source code directory. The 1.1 folder contains a starter template for this Foundation prototype.
We’ll start by writing the HTML code for the header area. You need to set the header aside as the first row, and then work inside that row to separate areas based on Foundation’s built-in 12-column grid system. The source code for this is in the 1.2 folder:
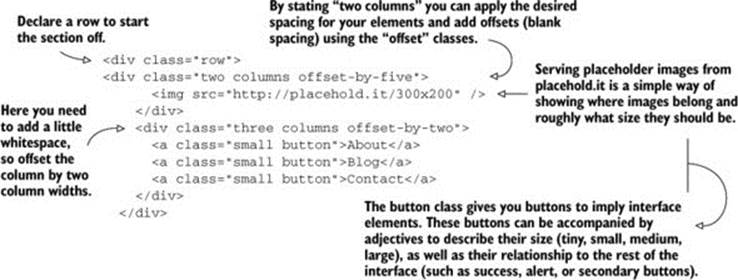
With this little snippet of code, you’ve produced a simple header for the prototype. Now that you have a header, you can add a footer before moving on to adding the content. The full source code is in the 1.2 folder:
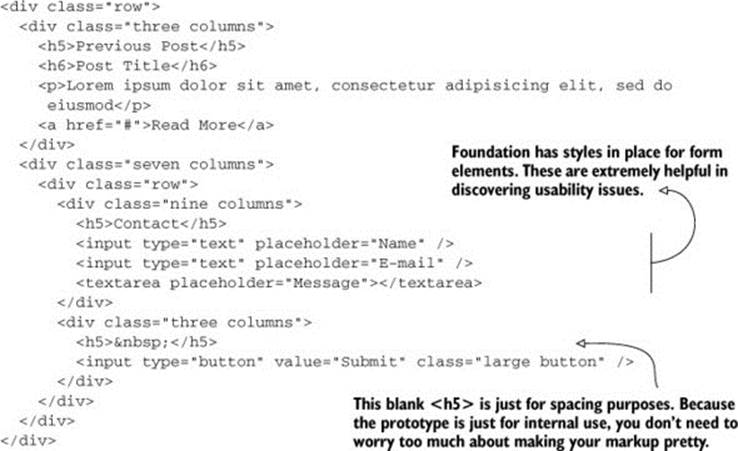
In just a few lines of code, you’ve been able to produce a browser-based prototype that can be hosted in a development environment and shared with the rest of the team. For designers, this can be a powerful tool in anticipating the layout of a site, and for developers, a model in the browser allows them to conceptualize the responsive elements of a site.
If you scale your browser window down, you’ll see how the site starts to break down in smaller screens. If you immediately jump into the mobile view, you’ll see that your header breaks down and gets a little clunky. Fortunately, the Foundation framework offers you control over what your prototype looks like as your viewport changes.
Using rapid prototypes to create content
One of the advantages of using a rapid prototype is the ability to quickly view and arrange content in the browser. For instance, if you’re doing a redesign of a blog site, you can post existing blog articles, images, and videos into the prototype and view how the content interacts. Through this sort of exploration, you can discover facets of the site that might remain undiscovered until later in the project.
Before you use a rapid prototype, you need to define what type of content you want to arrange. Defining content types is important in the responsive web for two reasons:
· Defining content early can identify why the user is visiting the site, and you can prioritize according to user needs.
· Once you identify the content types in a site, you can start building a content well. A content well is a collection of assets, such as images, articles, and copy for the site.
Looking at the sketch, you can see that there are two different content types, a large image and an article, with a headline, tags, and a date. We’re going to want to replicate these in the prototype. The full source code can be found in the 1.3 folder:
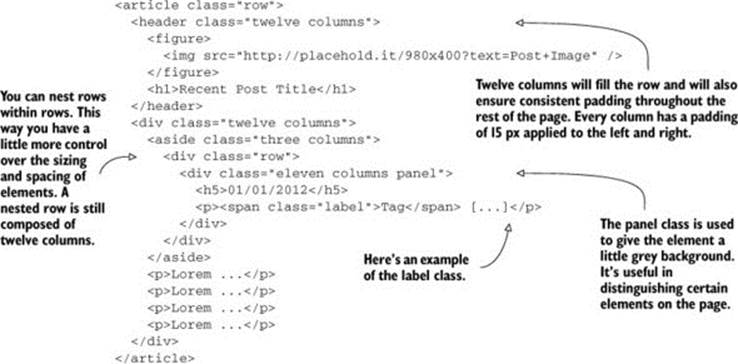
The preceding markup produces a rather respectable prototype (figure 1.8).
Figure 1.8. With just a little markup, you’re well on your way to a functional prototype.
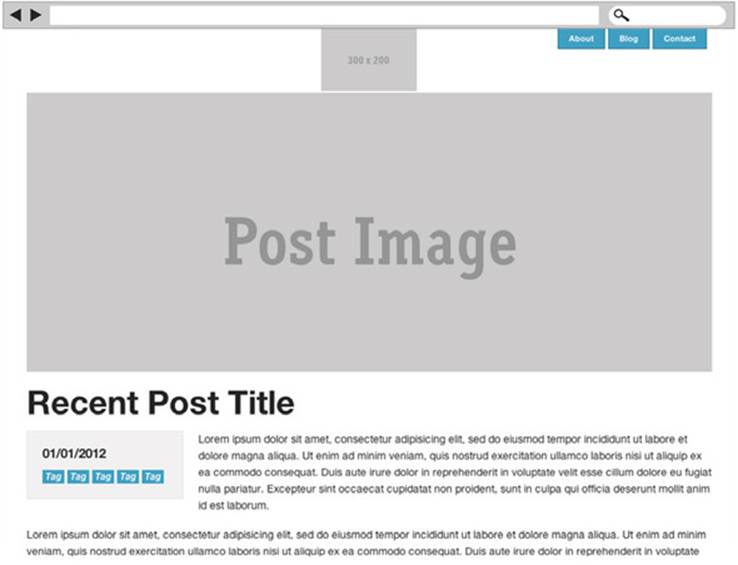
You’ll notice that this prototype deviates slightly from the sketch earlier in figure 1.7. Once I got the content into place, I noticed that the date and tags looked better floated to the left. I also made the content appear a little bulkier by expanding it from end to end on the page. This is an example of the kind of insight you can gain by building a prototype.
With a built prototype, you can assert some of the basic structure of your site. Although the prototype itself can be used as a fully formed responsive site, I recommend ditching it once you move on to building the actual site. Although a framework like Foundation is great for building quick prototypes, responsive websites should be built with custom CSS, so that each site is as efficient as possible.
With this in mind, we’ll move on to building a basic responsive layout. We’ll start from scratch to focus on the needs presented by a very simple design and demonstrate some basic CSS concepts used in responsive web design. We’ll return to the preceding prototype later in the book.
1.3. The basic responsive layout
In the responsive web, designers and developers strive to circumvent the need to design multiple layouts for various screen sizes. Comprehensive layouts (comps), which worked well for print publications and early websites, are too limiting for responsive design. This is where developers come in. Developers can translate the design into the language of the internet using HTML, CSS, and JavaScript for front-end development. Earlier we talked about using rapid prototypes to help bridge the gap between a responsive front end and the design, but for now let’s focus on how to take that full-screen layout and turn it into a responsive website.
Comprehensive layouts (comps)
In advertising, a comprehensive layout (or comp for short) is a static image used to represent the final composition of a site. It’s an element left over from the days of print advertising, and it served its purpose well back then. Comps were also handy in the early days of web design because of the lack of variation in screen sizes. Unfortunately, comps are too limiting for responsive design because they don’t speak to the scalability of a site.
You can look at a website’s composition and make some basic assumptions about what can stay, what can be refactored, and what needs to go to save space in a small-screen (mobile) environment. Let’s look at our example layout (figure 1.9) and make a few of these assumptions about how we can build this mobile-first.
Figure 1.9. Inspecting the design can reveal something about the site’s intent.
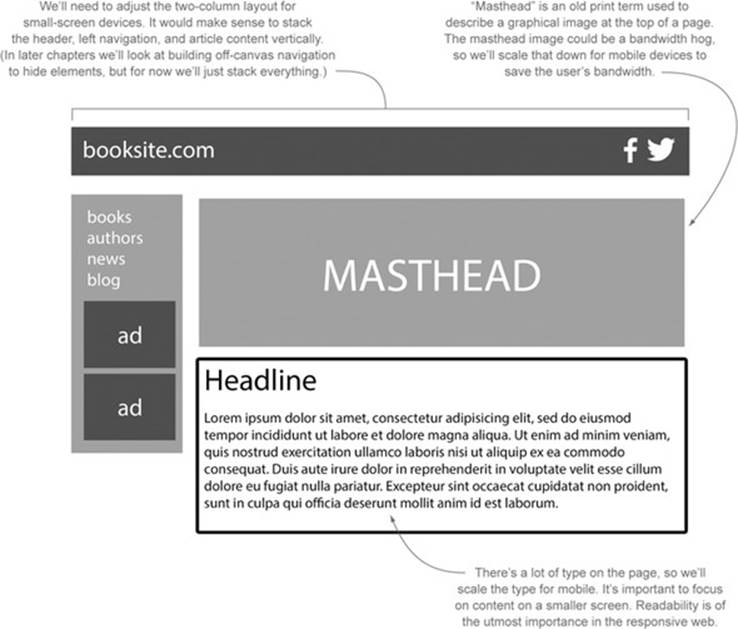
With a few assumptions in place, we now have a plan for converting this full-screen website design into a mobile-first site.
Developer insight: the CSS box model
I find it’s important to keep the basic CSS box model in mind when making layout assumptions. The page will flow, by default, from top to bottom, and then from left to right (or right to left, depending on your use of CSS floats). You can easily float objects left or right once you expand the layout, but with your markup, make sure to put the first (and most important) elements at the top of the document, and then work down the page.
1.3.1. Mobile-first markup
First we’ll address the markup of the page. This way we can focus on writing HTML in the most efficient manner possible. We’ll deal with the CSS a little later in the chapter, but because writing efficient code is so important to the responsive web, I want to spend a little time explaining practices that will make your markup as clean and semantically correct as possible. This will also be beneficial later, as you expand your site into tablet and desktop versions. You’ll need to go over the same code multiple times, so take your time and write good, clean code.
Our goal in writing the markup is simple: convert the content into HTML. We’ll use some basic placement elements, but ideally we want to keep things as lean as possible. This is good practice in general, but it’s especially important in responsive development. CSS and JavaScript are flexible, but your markup should stay consistent between viewports.
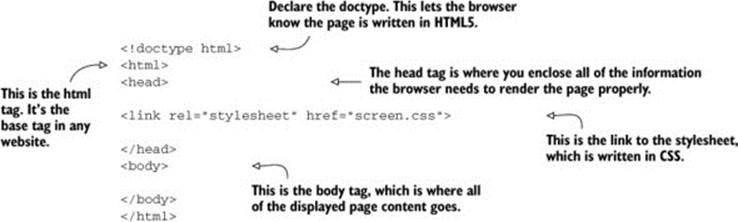
Let’s start with some standard stuff. Because we’ll go through basic site structure and CSS, I’ll throw in a doctype declaration and html, head, and body tags. This code can be found in the 1.4 folder in the sample code:
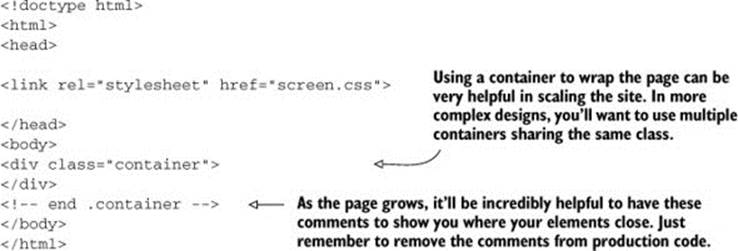
From here you can start interpreting the markup to create a responsive site. The first thing you want is a container div. This will prevent the site from being too fluid and becoming unstable between breakpoints.
Note that in the following code the closing tag is followed by a comment identifying the div’s selector. This will remind you what the closure applies to. Because responsive design is highly iterative, these comments can be life savers:
Next, we’ll start creating page elements. We’ll model the DOM on a left-to-right, top-to-bottom structure. This will provide a logical flow when we’re expanding into the wider view. This code can be found in the 1.5 directory in the sample code.
Let’s start with the main layout structure:
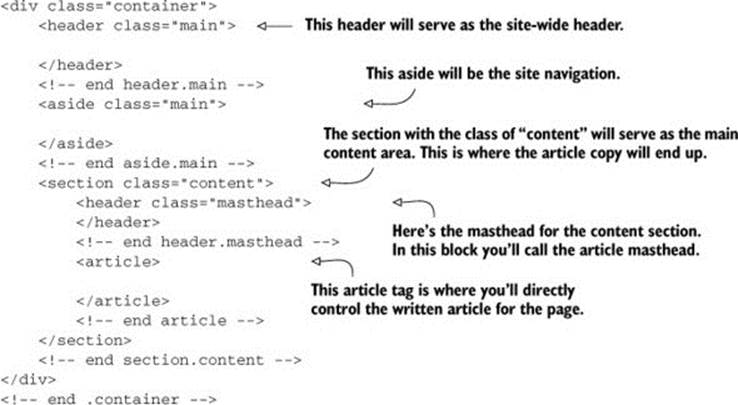
There are a few things to note in this example. First, I recommend using classes to define the areas you’re marking up. This will give you repeatable classes to use throughout the site and more streamlined CSS.
You’ve established the structure, so now you can start placing content into the page. In general, when writing your initial mockup, it helps to keep in mind that you should write as little as possible.
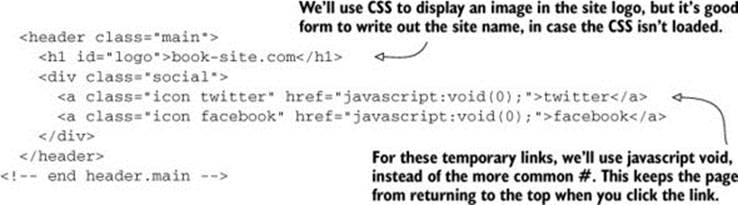
Let’s get into the details of the markup. We’ll start with <header class="main">:
Next, you can start marking up the aside block, which will contain secondary elements such as navigation and advertisements:
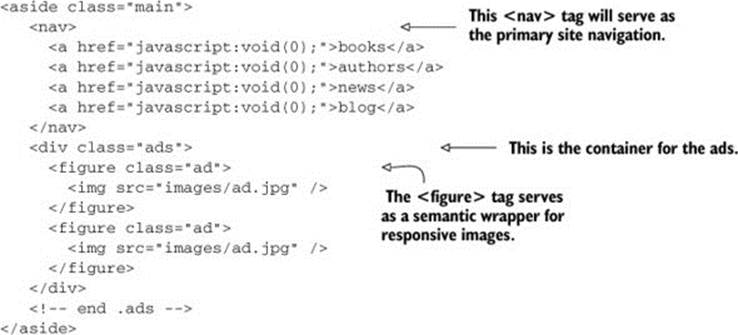
Notice that the <img> tag on the page is wrapped with a <figure> tag. The <figure> tag will be used as a responsive image wrapper to scale the image with CSS. It’s a handy little trick, and I like to use the wonderfully semantic <figure> tag, as opposed to using a <div> with animage-wrap class. We’ll cover responsive images in the next section, when we start talking about CSS.
With a little more HTML code, you’ll have all of the markup you need to start styling the page:
Now you should have something that looks like figure 1.10.
Figure 1.10. The page in raw, unstyled markup
This page will function as your raw material. By throwing all of your content out there, you have a base to start from and you can begin to style the page. It’s not uncommon to find that you need to add some helpers to the page, but because you’re taking a mobile-first approach here, it’s important to strive for as light a page as possible.
1.3.2. Using percentages in CSS
You can now start styling the page. This is where the rubber really meets the road in responsive design.
When you build anything physical in this world, you assign it some values. Say you’re building a birdhouse. You can make that birdhouse 6 inches long, 7 inches wide, and 5 inches tall. When you’re done, you’re done. It’s a 6 × 7 × 5 birdhouse, forever and always. That birdhouse can never adapt to fit bigger birds or shrink to fit in a smaller tree, but on a web page you can do exactly that.
If you could build a flexible birdhouse that’s 5% as tall as the tree it’s in and then the tree grows, the birdhouse would grow with it, and then bigger birds could live inside it. Percentages give you a fluid model to base your site’s structure on. With percentages, every element becomes relative to its parent element. We’ll dive into this subject more in chapter 5.
So how can you turn the previous very static web page blueprint into a magically expanding birdhouse?
Using containers
Let’s start by defining the context. Because we’re adopting a mobile-first approach, we’ll start by defining the container element with a little CSS. The CSS for the following examples can be found in the 1.7 source code folder:

With the container defined, you can start putting some other pieces in place. The container will be the expanding birdhouse; as the content needs to grow, this container will grow to accommodate it.
Now you need to start setting up the contents of this container. You need to ensure that the containers are fluid, so that they can grow and shrink to meet your needs.
Wholes, halves, and quarters
At its core, the mobile grid is broken into wholes, halves, and quarters. This is a very simple grid, and it works extremely well for small-screen devices (see figure 1.11). By using such a rudimentary grid, you’ll find it’s easier to understand content areas and how they interact.
Figure 1.11. A four-column grid for mobile websites

Important areas, or areas that serve as wrappers for quarantined content, get to be wholes, occupying 100% of their parent. Other areas can be halves or quarters, depending on their priority and how they interact with the rest of the page.
You know that the header, aside, and content sections will fill the entire width of the container by stacking vertically on top of each other, so they can take advantage of all the space allotted to them:

With the preceding code, all of the main blocks will fill out the width and stack nicely. Now let’s add a little styling and jump ahead a bit:
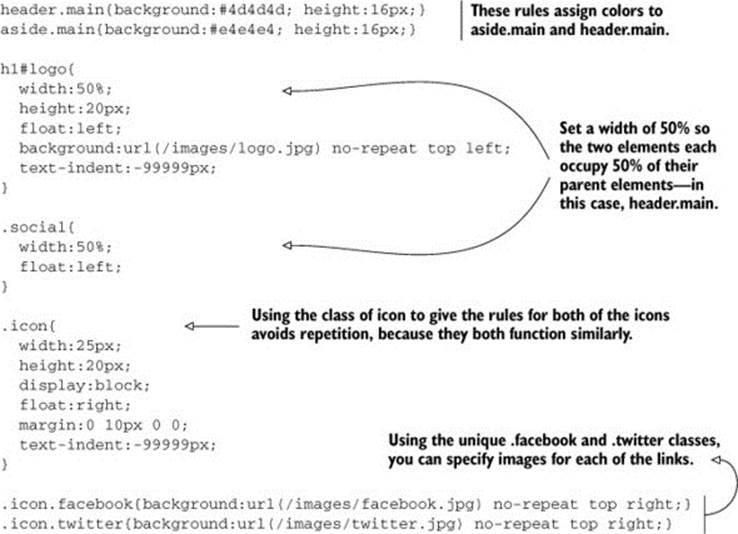
There’s a lot going on in this bit of CSS. First of all, you give two elements, #logo and .social, block percentage–based rules. This ensures they’ll always occupy 50% of their parent. If the parent (header.main) occupies 320 px, then div.social and h1#logo will each occupy 160 px. If the header scales up to 640 px, then div.social and h1#logo will each occupy 320 px.
When you know that you have even halves or quarters, percentages can be easy. It gets more complicated when you have to make a percentage-based layout based on fixed creative design. Later in the book, we’ll go into depth on how to do that.
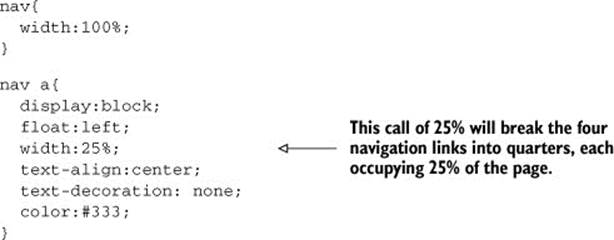
You’ve already set the <aside class="main"> to 100%. Now let’s add the following code to the stylesheet to break the links into quarters of the navigation area. This gives the links a good amount of interactive space:
Now we just need to apply some CSS to clean up the ads:
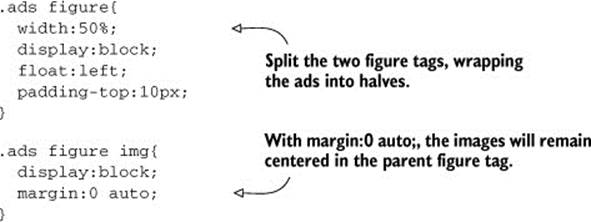
Using some simple, fluid CSS, you’ve managed to organize the site in an orderly manner and add some logical navigation.
1.3.3. Adding text and images
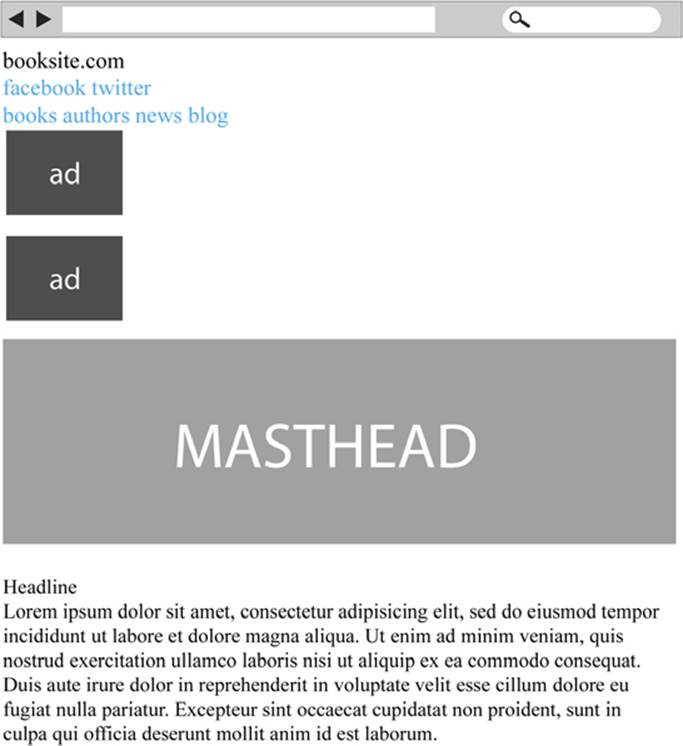
Now that the primary navigation and site header are in place, you can start dropping in content. Because this is a rudimentary mobile site, the content will follow below the navigation, preserving the hierarchy from the design. We’ll include a masthead, a headline, and a few paragraphs of placeholder text.
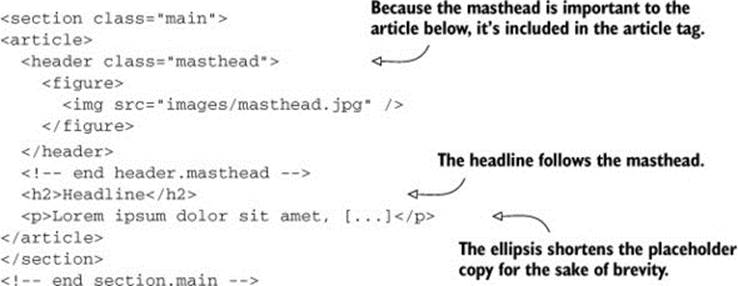
Earlier you wrote the markup for this; now you just need to add the content. To review, the markup looks like this:
<article>
<header class="masthead">
<figure>
<img src="images/masthead.jpg" />
</figure>
</header>
<!-- end header.masthead -->
<h2>Headline</h2>
<p>Lorem ipsum dolor sit amet, [...]</p>
</article>
</section>
<!-- end section.main -->
Content is king in the responsive web. Every site I’ve ever visited, I visited because the site contained some information that I wanted. Because of my profession, sometimes that information relates to design choices or code snippets, but in general, people browsing the web are looking for content. In later chapters, I’ll focus on this topic in depth.
For now, let’s just focus on two important factors:
· Display images fluidly, so they can be easily resized with the browser window.
· Apply scalable CSS to the text, so you can adjust font sizes for various devices.
Before you can do this, you have to set the context of the <article> tag. This tag will serve as the wrapper for the text, headline, and images it contains. You can apply some simple CSS to accomplish this wrapping:
article{
width:100%;
}
Scalable images
In the article’s masthead, there’s a large image that will need to be shrunk down. This is how you can scale images for responsive web development:
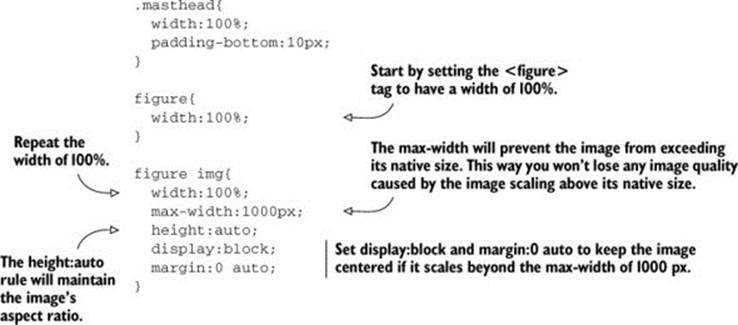
We’ll use the <figure> tag because it’s intended as a semantic wrapper for images. This makes more sense than using a div with an image-wrap class, because you should always strive to use semantic markup. Some sort of wrapper is necessary in order to properly scale the containing image. The <img> will occupy 100% of the <figure> wrapper.
Luckily, all browsers can scale images and preserve their aspect ratio—the image’s proportional relationship between width and height. An image that’s 1000 × 500 pixels can scale down to 100 × 50 pixels for a mobile device and still look great. In fact, for devices with higher pixel density, such as the Apple Retina display, this can create a desirable effect by doubling the image’s pixel density.
It should be noted that downloading a large 1000 × 500 pixel image on a small-screen device will require the user to download a lot of data they don’t need. There are a few ways of serving responsive images that have been in use for a while, but there still isn’t a satisfying solution in the HTML specifications.
By giving the image a max-width of 1000 px and centering it inside the figure tag, you ensure that the image doesn’t look broken if the figure tag extends beyond 1000 px. This is a safety measure to ensure that the site retains its wonderful layout in a wide-screen monitor.
1.3.4. The fickle and mighty em
Now that you have a fluid masthead image, it’s time to focus on the text. Adjustable text is another foundational element in the responsive web. People read copy differently depending on the device they’re using. For example, a desktop monitor might be further away from a user than a handheld device.
Personally, I like text on all of my devices to be large, because I don’t like having the device too close to my face. Because of this, my devices commonly have a higher default text size. This inevitably breaks layouts that aren’t designed with fluidity in mind. If a site is built with an ebb and flow for content using less-rigid CSS, my text-size preferences shouldn’t affect the layout.
How is this achieved? The answer is in em values. Em values are a little hard to understand, because they’re abstract and can change at the drop of a hat. Historically, front-end development has had an emphasis on pixel perfection, and developers have typically used pixel control. Pixels are literal, stiff, and consistent. Twelve-pixel type is exactly 12 pixels (except on a Retina display, which has quadruple the pixel density, so 1 pixel unit is actually 4 pixels). The em, in contrast, is a bit fickle, but once you master it, it’s highly rewarding.
The trick to using ems is that the em is a cascading size. Browsers have a default base font size, usually 16 px. This would make 1 em equal to 16 px by default.
Imagine you have an <h1> that has a font-size of 2 em: that <h1> would be 32 px. Now say you need a smaller block of text within that <h1>, so you write this:
<h1> Headline <small>Sub-Head</small></h1>
With CSS, you’d apply this rule:
h1{
font-size:2em;
}
h1 small{
font-size:0.75em;
}
The <h1> takes the default font size (16px) and multiplies it by its em size (2em) to get the applied font-size (which would appear as 32px). The font size would then cascade to the child tag, which in turn sets the font size to 0.75em, so the parent font-size (which appears as 32px) is multiplied by the child selector (0.75em) to get the new size (32 × 0.75 = 24px).
Designer insight: web typography
Mobile websites are great opportunities to focus on type. In small-screen layouts, there are a couple of important factors to consider. First, the screen is obviously going to be smaller, so there’s less room to spare. Type might also need to be scaled up in order to be readable.
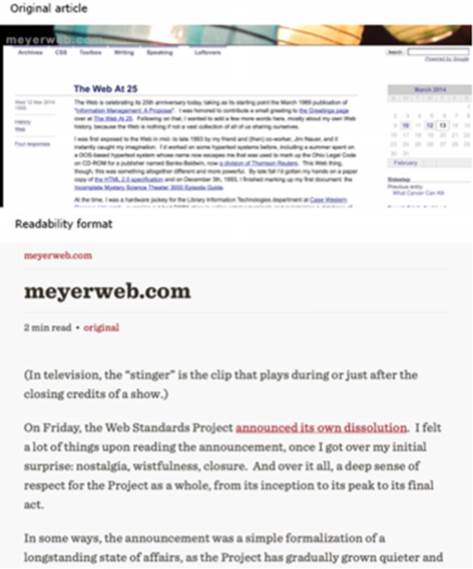
Second, it’s important that you allow your site’s written content to flow, and that you clear it of any distractions. Look at popular apps, such as Readability and Instapaper. These apps are popular because they satisfy the user’s desire to strip down distractions and get to the heart of the content. You can see this in action in figure 1.12.
Figure 1.12. Typography differences between the original “The Web At 25” article from Eric Meyer and a version formatted with the Readability app. Although the original version has useful links, the Readability version offers a better reading experience with nicer typography and fewer distractions.
Let’s apply this to the web page. First give the <h1> its sizing. (Resist the urge to reset the body type to 16 px, as most resets are prone to do, in order to respect the user’s browser settings.) Because it’s a header, let’s make it considerably bigger than the rest of the type:
article h1{
font-size: 1.5em;
}
If the user has their default type size set to 16 px, this header will appear to be 24 px.
Developer insight: CSS reset
A CSS reset stylesheet is a set of CSS rules that gives a consistent default style to all the HTML elements across different browsers.
Eric Meyer created the original “meyerweb reset,”[a] and most popular CSS frameworks use a variation of Meyer’s reset, sometimes with just an update of the supported HTML tags.
a Eric Meyer, “CSS Tools: Reset CSS,” http://meyerweb.com/eric/tools/css/reset/.
You can leave the paragraph text set to 1 em, because that’s a default setting for paragraphs, but let’s suppose that you know you’re going to be including some bold text inline that needs to be bigger. You could do this by adding a rule of font-size: 1.1em to the <strong> tag, written in CSS as follows:
p strong{font-size:1.1em;}
We’ll discuss the details of using ems in depth in chapter 6, where we’ll compare using pixels and ems in responsive design, and discuss how to manipulate cascading em sizes to your benefit. For now, just keep in mind that ems should only be applied directly to text elements such as<span>, <p>, <h1> through <h6>, <small>, and <big>.
Avoid setting ems directly on elements on the page—this can cause problems when the font sizes cascade. Suppose you need a particular size text, but only in a given element, in a scenario like this:
<div class="promotional-area">
<span>EXTRA BIG TEXT</span>
</div>
Instead of doing this,
span{font-size:5em; /* big text */}
try doing this:
.promotional-area span{font-size:5em; /* big text */}
Or use a helper class, like this:
<div class="promotional-area">
<span class="big-text">EXTRA BIG TEXT</span>
</div>
span.big-text{font-size:5em; /* big text */}
You should now have a rough little demo site, but if you expand your browser, you’ll see that you only have a mobile site. The entire point of the responsive web is to build sites that are fluid, so this simply won’t do. The responsive web is all about adjusting layouts for various devices. Now it’s time to apply the core concepts of the responsive web: media queries and breakpoints.
1.3.5. Your first breakpoint
As you gain experience building responsive sites, you’ll get a feel for where to set breakpoints, but for now we’ll set one at 600 px. In this instance, 600 px is kind of arbitrary; a good rule of thumb with responsive sites is that you should insert breakpoints whenever the site breaks. If the layout starts to fall apart, you add a breakpoint and fix it.
We’re trying to get this new mobile site to look like the desktop design when it’s expanded, so you need to incrementally adapt the site until it looks like the design in figure 1.11:

With this simple rule, the container div has taken a new shape.
Now you can begin the work of refactoring your layout to match the design. CSS rules within a media query have a higher specificity. The media query itself has a specificity value that’s added to the selector’s overall specificity.
Developer insight: CSS specificity
CSS rules are applied using selectors and can cascade over one another. Every element on a page has a number of ways of attaching rules, each one with its own value. The value applied to a selector is referred to as its specificity.
A class has a small value, an ID has a greater value, and !important declarations have a huge value. Media queries are involved in calculating these values.
If you have some JavaScript experience, you might recognize the media query as being similar to an if statement. Basically, @media is like saying “If you’re viewing this,” and then you state the conditions that validate the media query. In the preceding example, the conditions are only screen and (min-width: 600px).
The first condition is quite literal. The only screen condition means just that: only on a screen. The second condition, (min-width:600px), is slightly more complicated. This could be translated as “at a minimum width of 600 px.” If we put the entire query together, it could be read as “If you’re viewing this only on a screen at a minimum width of 600 px.”
Using the preceding media query, if the browser size meets or exceeds 600 px, the new rules take effect. There are some other subtleties involved in this and several reasons for doing it this way. You’re applying new rules only if the browser exceeds a size, as opposed to applying new rules if a browser is under a size as you might do with @media (max-width:600px);. This is beneficial, assuming that a smaller screen means a smaller device, which means limited capabilities.
There you have it, your first responsive website. Approaching site-building in this way, with a prototype, makes building the site easy. Now you can get into adding details and styles, but this will serve as your base.
1.4. Summary
In this chapter, we discussed what the responsive web is and its core concepts. You also learned how to build your own responsive site. This chapter has given you all the information you need to make a basic responsive site.
Collaboration is a huge part of your ability to succeed in responsive web design. This chapter’s example site is extremely pared down, but with a designer’s eye and a coder’s hands, you could make something magical. Prototyping gives designers and developers a shared starting point in the creation of a website. Every phase in a website’s life is a prototype for its next version, and every version includes a series of small improvements. By prototyping, you get to the first version quickly and can craft your end product from there, with designers and developers collaborating toward a shared goal.
Up next, we’ll create a responsive website mobile-first!
1.5. Discussion points
Because this book is all about collaboration, each chapter will end with some discussion points as opposed to simple exercises. These discussion points are meant to open up conversations between designers and developers and provide opportunities for teams to explore new ways of working together and collaborating. Although this book will strive to give you the information and tools to create better sites, a lot of the challenge in crafting incredible work comes in finding a balance between team members.
Here are a few discussion points arising from the topics covered in this chapter:
· How do you think responsive web design is challenging the web community?
· How do you see prototypes affecting your process? Do you think that simple prototypes can be used to inform design?
· What do you think the major challenges are in translating a web design from desktop to mobile or vice versa?
All materials on the site are licensed Creative Commons Attribution-Sharealike 3.0 Unported CC BY-SA 3.0 & GNU Free Documentation License (GFDL)
If you are the copyright holder of any material contained on our site and intend to remove it, please contact our site administrator for approval.
© 2016-2026 All site design rights belong to S.Y.A.