Custom SharePoint Solutions with HTML and JavaScript: For SharePoint 2013 and SharePoint Online (2015)
2. Introduction to SharePoint Front-End Solutions
Brandon Atkinson1
(1)
VA, US
SharePoint has come a very long way since it debuted, and the development story is no different. If you have to do any development on SharePoint 2007 or earlier, it’s fairly safe to say you hated the experience. SharePoint 2010 made things much easier and introduced some new components that allowed for front-end development, like the ECMAScript Object Model, later renamed the JavaScript Object Model. With the most recent versions of SharePoint, a real focus has been put on moving code off the SharePoint server and into the browser or other servers.
This focus came in part because Microsoft was seeing a lot of support issues arise from server code that was either written poorly or was just pushing a server to its limits. Combine that with the introduction of SharePoint Online, where end users have no access to the server itself, the need for a more robust front-end development solution was needed. What came from this was an expanded JavaScript Object Model, a new REST API, and Apps for SharePoint.
We’ll be digging into the JavaScript Object Model and the REST API in more detail throughout this book. We’ll also be looking at new front-end components, such as JSLink and display templates. This chapter will explore the differences between server-side and front-end development, as well as some of the capabilities of this style of development. We’ll also explore some of the limitations you may encounter along the way.
Note
Apps for SharePoint will not be covered in this book. While Apps can be considered front-end development in some cases, it’s a very large topic that involves development, networking, and domain management. Apps for SharePoint, in a lot of cases, runs server side, just not on the server running SharePoint. For more information on building Apps for SharePoint, please visit the following URL: http://msdn.microsoft.com/en-us/library/office/jj163230(v=office.15).aspx .
Server-Side Development vs. Front-End Development
SharePoint development and the building of custom solutions remained the realm of hardcore developers for a very long time. It took knowledge of a wide range of components, including Visual Studio, PowerShell, ASP.NET, Microsoft Server, and more. It was at times a daunting experience—even for those who had been doing .NET development but were new to SharePoint. Figure 2-1 shows a typical server-side development experience, which includes Visual Studio, deployment packages, and a PowerShell window to actually deploy the code to the server.
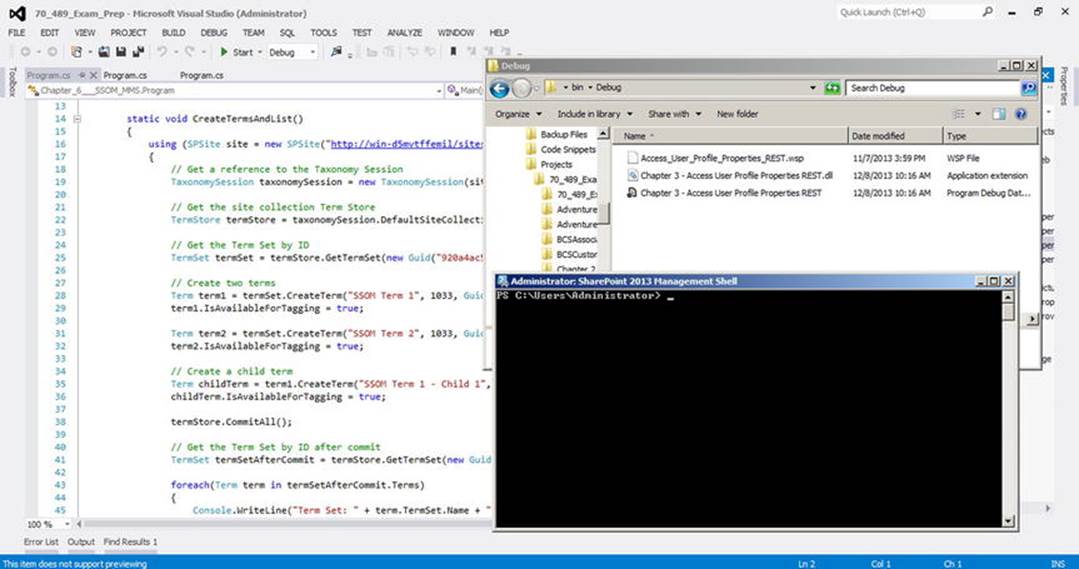
Figure 2-1.
A typical SharePoint server-side development experience
Server-side code is written specifically for running on the SharePoint server itself. Once the code is written and packaged for deployment, it is copied to the server and installed using either PowerShell or Central Administration. In most cases it involves developers, business users, and server administrators all working together. Since the code runs directly on the server, it has a tremendous amount of power and can adversely affect the SharePoint environment quite easily.
Even writing server-side code for SharePoint can be difficult, as it requires a powerful PC that has SharePoint installed on it. It used to be that most developers would build virtual machines on their PCs, where they could write code for SharePoint in an isolated environment. It was at times difficult to learn server-side development due to the new code frameworks you had to learn, the needs of having SharePoint installed on your PC, and coding best practices required to ensure you did not harm the server with poorly written code.
Once SharePoint Online and Office 365 came along, server-side development took a hit, because with these products you have no access to the server running SharePoint. This is good from the standpoint of all the other customers using the same server. If one customer were to install poorly written or malicious code, they could potentially take down the entire server for everyone. However, if you’re a customer who has the need for custom solutions, you no longer have the option for robust server-side code.
Note
Sandboxed solutions offered another way to write and deploy server-side code in SharePoint. These solutions did not require server access, as they could be installed using the browser by a site collection administrator. They were called “sandboxed” because they ran in isolation on the server and were monitored by SharePoint to ensure that they did not affect performance. With SharePoint 2013, sandboxed solutions could still be installed on-premises, but were deprecated in SharePoint Online, and could only include HTML and JavaScript. For more information on sandboxed solutions, please visit the following URL: http://technet.microsoft.com/en-us/library/ee721992(v=office.14).aspx .
At first glance it would seem that Microsoft gutted the ability to create custom SharePoint solutions for your business, especially if you’re using Office 365. Customers using SharePoint on-premises are also getting the same message from Microsoft, which has stop putting custom code on the server. Luckily, Microsoft did not leave anyone “high and dry” with this approach. The latest versions of SharePoint come with a wide range of front-end components to develop solutions.
Front-end development, or client-side code, is written specifically for running in a web browser. It uses HTML, JavaScript, and CSS, and runs in every browser. You will still add your code to SharePoint, but since it’s only HTML and JavaScript, you can utilize out-of-the-box components like document libraries to upload and store your solutions. In the next section, we’ll explore the various components of front-end development with SharePoint and look at what they offer you.
Components of Front-End Development in SharePoint
Now that we’ve looked at some differences between server-side and front-end development, let’s take a look at some of the components of front-end development that this book will cover. Throughout this book we’ll showcase several different ways to create custom solutions, and in this section we’ll introduce you to them. These will be fairly quick, high-level introductions, as we’ll dive much deeper into each of these in later chapters. We’ll explore
· JavaScript Object Model (JSOM)
· REST API
· JS Link
· Display templates
Each of these items operates in conjunction with other components to comprise a total front-end solution. You may even use several of them together if needed. For now, we’ll quickly look at each item and get you ready to start building some solutions in the next chapters.
JavaScript Object Model (JSOM)
The JavaScript Object Model, or JSOM for short, is part of the family of SharePoint client APIs. This is traditionally called client-side object model, or CSOM for short. All this is fairly confusing, as people will tend to use the term “client-side object model” for a wide range of discussions. CSOM encompasses everything from JSOM, to Silverlight libraries, down to a set of server-side libraries, and even the REST API. The point here is that if someone is talking about CSOM, you may need them to be a bit more specific about what they are doing.
The JavaScript Object Model is basically a collection of JavaScript files that come as part of SharePoint. Each file contains code that will allow you to do a wide range of tasks—from interacting with the term store, accessing user profile information, or just common core tasks like reading lists and sites. If you have access to a server, you can view all of these files at C:\Program Files\Common Files\Microsoft Shared\Web Server Extensions\15\TEMPLATE\LAYOUTS. Figure 2-2 shows this folder in Windows Explorer. If you are on SharePoint Online, never fear, all of these files are still available to you—you just can’t view them in Windows Explorer!
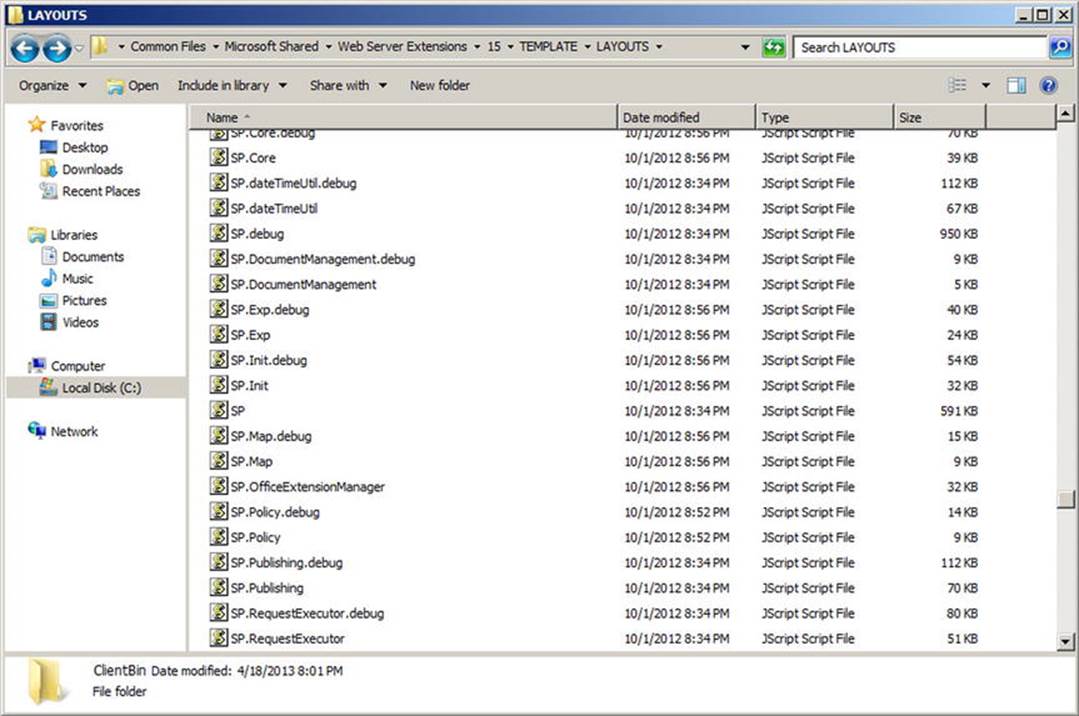
Figure 2-2.
Files that make up the JavaScript Object Model on the file system
All of the files are located in the Layouts folder in SharePoint. The Layouts folder is a workhorse folder in SharePoint and contains a lot of common files and code used throughout the environment. When deploying custom server-side code that uses custom pages, images, and so forth, it is all typically deployed to the Layouts folder. If you’re not familiar with it, no need to worry—you will be soon.
Figure 2-2 only shows a portion of the files available to you, but should help illustrate the power of JSOM for building custom solutions. Microsoft put a lot of time and effort into expanding the capabilities of JSOM. Since they were telling their customers to no longer use server-side code, and in many ways move to SharePoint Online, they made sure to provide a comprehensive set of tools to allow for a rich development experience.
Note
For more information on JSOM, please visit the JavaScript API reference for SharePoint at the following URL: http://msdn.microsoft.com/en-us/library/office/jj193034(v=office.15).aspx .
Using JSOM in your solutions is fairly straightforward, as they are all JavaScript. First, you need to place a reference to a particular file, like this:
<script type="text/javascript" src="/_layouts/15/sp.js"></script>
This is a standard SCRIPT tag in HTML, which tells the browser to load a particular file located at the location specified in the SRC attribute. In this case, the browser would load the sp.js filelocated in the Layouts folder. Once we have a reference to the SharePoint JSOM files that we need, we can write a script that looks something like this:
$(function () {
retrieveListItems();
});
function retrieveListItems() {
var clientContext = new SP.ClientContext();
var oList = clientContext.get_web().get_lists().getByTitle('Demo List');
var camlQuery = new SP.CamlQuery();
this.collListItem = oList.getItems(camlQuery);
clientContext.load(collListItem);
clientContext.executeQueryAsyn c(
Function.createDelegate(this, this.onQuerySucceeded),
Function.createDelegate(this, this.onQueryFailed)
);
}
If this is the first time you’re seeing JSOM code,, don’t be overwhelmed! It can look intimidating, but as you work through this book, it will become easier to read and write. Let’s break this example down and look at each part.
· $(function () {}); - This is the entry point of the code and it is all jQuery. This is called a document.ready function, and it is called that because it’s fired when the HTML page is completely loaded by the browser. You’ll see this a lot in jQuery development since it’s an easy and convenient way to fire code off when your pages load. In this example, all we’re doing is calling another function where the JSOM code resides.
· SP.ClientContext() - This line obtains a reference to the client context and is used in every JSOM call to the SharePoint server. The client context contains a lot of information about the current web application, site, site collection, and more.
· clientContext.get_web().get_lists().getByTitle('Demo List') - Using the client context, we can obtain references to just about anything in the site. In this line we reference the current site, requesting from all the lists a particular list with the title “Demo List”. The syntax of this line is very easy to read: Get Web, Get Lists, Get by Title. You’ll see a similar pattern when using the REST API.
· SP.CamlQuery() - This line allows you to specify which items to return by using a CAML query, which is a syntax for querying SharePoint . It has been around for a while and it is used a lot when working with lists and libraries. In this example, we simply pass an empty query that tells SharePoint that we want all items in the list. We do this by calling oList.getItems(camlQuery) passing in the query.
· clientContext.executeQueryAsync() - This line will actually initiate the query to the SharePoint server. You can then process the data that is returned and display it to your users.
That was about as high-level an explanation as possible with JSOM! The main objective was to show some JSOM and briefly explain the parts. There is a lot more to JSOM, but before we jump into any demos, you will at least have had some exposure to the code.
REST API
The REST API was introduced with SharePoint 2013 and SharePoint Online. It allows you to make RESTful calls to SharePoint via a specially crafted URL. Data can be returned as either XML or JSON, and can easily be consumed by JavaScript in the browser. RESTful data was available in previous versions of SharePoint, but was limited to mostly list interactions. The new REST API has been greatly expanded, like JSOM, to include a wide range of functions.
Note
For more information on the REST API, please visit the REST API reference and samples for SharePoint at the following URL: http://msdn.microsoft.com/en-us/library/office/jj860569(v=office.15).aspx .
A typical REST API call will look like the following URL:
http://SERVER/_api/web/lists/GetByTitle('Demo List')/items
Just like the JSOM example in the previous section, this URL will query the list titled Demo List and request all the items. The syntax should look familiar as well: Web, Lists, GetByTitle, Items. With both examples, the structure of the call is very easy to read and gives you all the context you need to know about what data to expect. Figure 2-3 shows the results of a REST call in the browser.
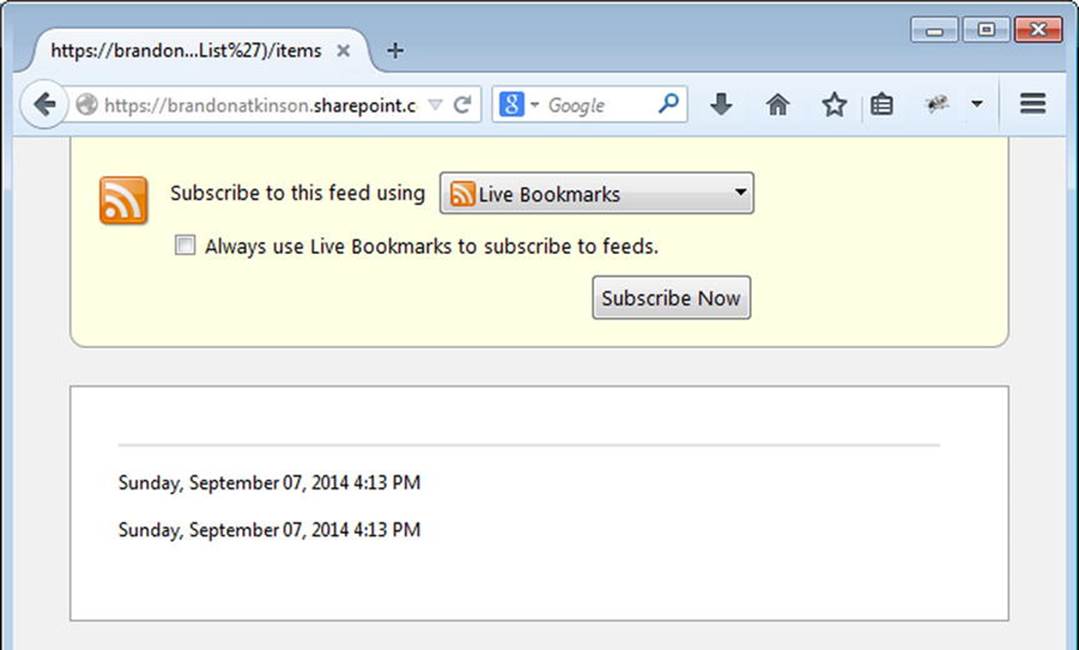
Figure 2-3.
REST API call in the browser returned as XML
In this example, the results are returned as XML, as that is what the browser requests by default. When calling via JavaScript, we can request either XML or JSON. We’ll look at that in more detail later on. Like JSOM, where we can supply a CAML query to limit the results, we can use query string operators to select, filter, and order the data we request from the API.
If we wanted to limit the data to a single row, the REST API call will look like the following URL:
http://SERVER/_api/web/lists/GetByTitle('Demo List')/items?$top=1
The query string operator top=1 tells the API to only return the first row of data. Figure 2-4 shows the results of this call in the browser.
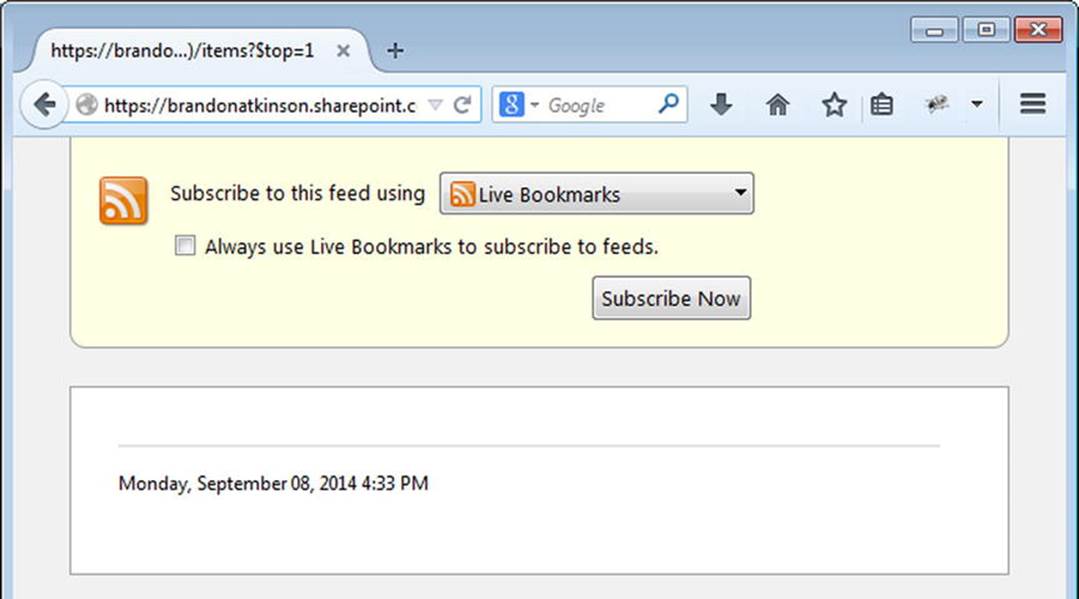
Figure 2-4.
REST API call with a query string operator limiting results
There are many operators that you can use to craft your REST API calls. We’ll be looking at more of these in later chapters, but rest assured that you’ll have all the tools you need to get proper results. This example should illustrate how easy it is to request data from SharePoint using the REST API.
JSLink
JSLink is new in SharePoint 2013 and offers a very powerful and easy way to style list view web parts. Prior to JSLink you had to use XSLT, or Extensible Stylesheet Language Transformations. XSLT was a way to style, or transform, HTML and give it some life. It did a good job of allowing developers to change the way web parts were rendered, but it was quite a pain to work with. Most developers cringed at the thought of having to use XSLT and generally stayed away from it.
Along came JSLink, which allows you to style parts using JavaScript and HTML. It provides a much easier and faster way to render the web parts to meet business needs, and provide increased functionality. Not only does JSLink provide an easy way to style web parts, because it is HTML and JavaScript you can also do a lot more with it. For now, let’s just take a look at how JSLink works. Figure 2-5 shows a standard SharePoint home page with a List Web Part inserted on it and showing the items from the Demo List.
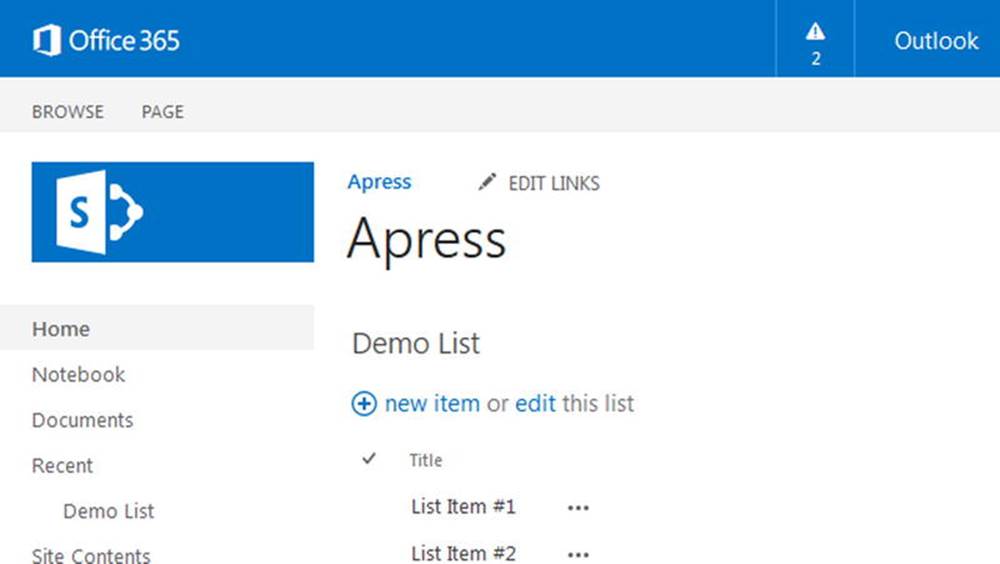
Figure 2-5.
SharePoint page with a List Web Part inserted, listing the items from the Demo List
This is the standard List Web Part that comes with SharePoint, but now it has a new property on it. If you place the web part into edit mode and expand the Miscellaneous panel in the web part tool pane, you will see a new property called “JS Link”. This is a textbox where you can place the path to a JavaScript file that will be used during rendering of the web part. Figure 2-6 shows this new property.
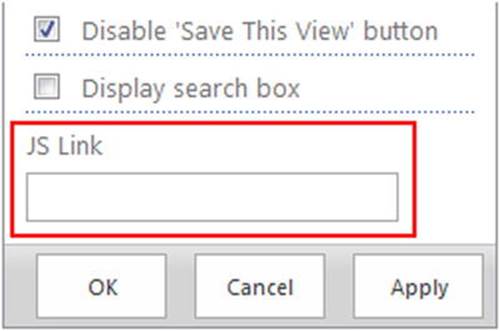
Figure 2-6.
JSLink property in the Web Part Properties pane
Now that you know how to apply a JavaScript file via the JSLink property, let’s see what the JavaScript actually looks like. The following code is a simple demonstration on how the JS Link code works.
(function () {
var overrideContext = {};
overrideContext.Templates = {};
overrideContext.Templates.Item = overrideTemplate;
SPClientTemplates.TemplateManager.RegisterTemplateOverrides(overrideContext);
})();
function overrideTemplate(ctx) {
return "<div style='font-size:32px;border:solid 1px Silver;'>" + ctx.CurrentItem.Title + "</div>";
}
Let’s break this example down and look at each part.
· overrideContext, overrideContext.Templates, and overrideContext.Templates.Item - As their names imply, these are objects that override the default rendering of the web part. The parent object, overrideContext, can be named anything you like. The first two lines simply create the object and a property called Templates. This is standard in all of your JSLink files, as it’s the basis for your code. The third line defines another JavaScript function, which will fire for each individual item in the web part; this is designated by the “Item” in its name. You can target items, or just specific properties in an item. For instance, if we only wanted to style the Title, we can reference that property only.
· SPClientTemplates.TemplateManager.R egisterTemplateOverrides(overrideContext) - Once you have your object built, you have to tell SharePoint that you want to use it. This line does just that by registering it with the TemplateManager object. Once this is done, the JavaScript function you referenced will be called when the web part is rendered.
· function overrideTemplate(ctx) - This is the actual code that will run when the web part is rendered. It is very simple: all it does is render an HTML DIV element with some styling and the current item’s title inside.
Once this code is placed into a file, we upload it to a library in SharePoint. Then we place the path to the file in the JSLink property of the web part. Figure 2-7 shows the output once the web part is rendered using the JSLink file.
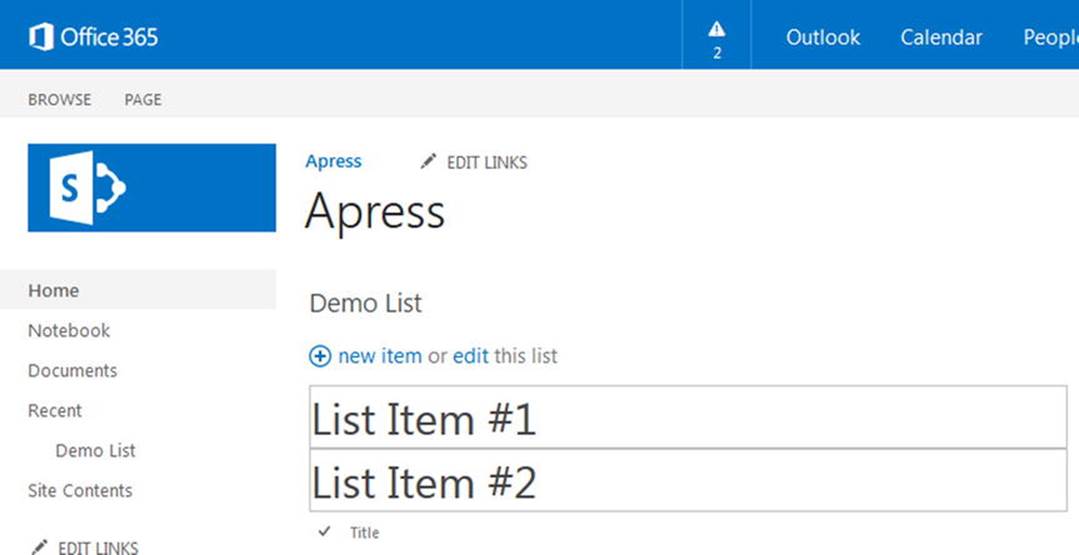
Figure 2-7.
List Web Part after applying JS Link code
We’ll get into more of the details on using JSLink in later chapters, and I’ll demonstrate more ways to style content and build custom solutions. When using list web parts on your page, you’ll find JSLink an extremely useful tool to achieve your business needs.
Display Templates
Like JSLink, display templates are new in SharePoint 2013 and SharePoint Online. They work in conjunction with Search Web Parts, such as the Content Search Web Part that comes with SharePoint. Display templates use HTML and JavaScript to render content and allow you to specify which properties to show, where to place them, and how to style them. By using these templates, you have an immense amount of control over search results and how they are displayed. Figure 2-8 shows a standard Content Search Web Part placed on a page.
Figure 2-8.
Out-of-the-box Content Search Web Part placed on a page
We can change the display template being used by placing the web part into edit mode and viewing the Properties panel in the web part tool pane. Directly under Search Criteria, you will find the Display Templates area. There are two drop-downs in this section that allow you to choose how the content should render: Control and Item. Figure 2-9 shows the Display Templates area and drop-downs.
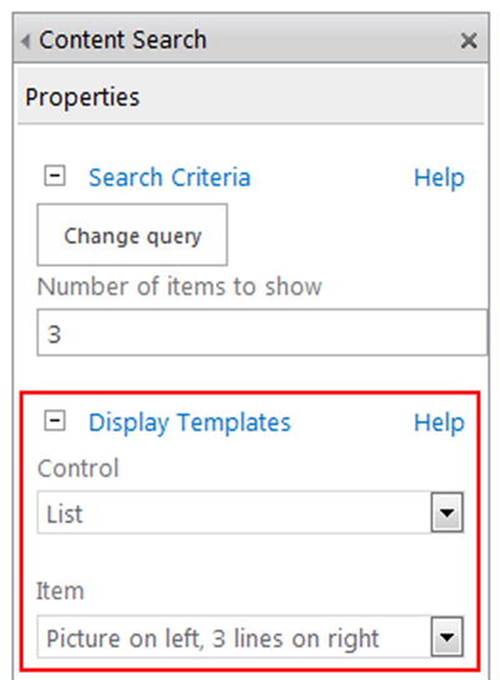
Figure 2-9.
Control and Item options in the Content Search Web Part tool pane
Each of these items is a template, and they work together to render content. The Control template provides an overall HTML layout for your content. You can think of it as a container to hold all the search result items. It’s also a good area to load any JavaScript or CSS that you would like to use in the search results. The Item template provides the individual HTML for each search result item. This template also makes use of Managed Properties on the search results, and allows you to control which properties are displayed. When used together, these templates provide a complete way to render your content.
You can view the out-of-the-box display templates by navigating to Site Settings, and then Master Pages under the Web Designer Galleries header. This will open the Master Page Gallery page, as shown in Figure 2-10.
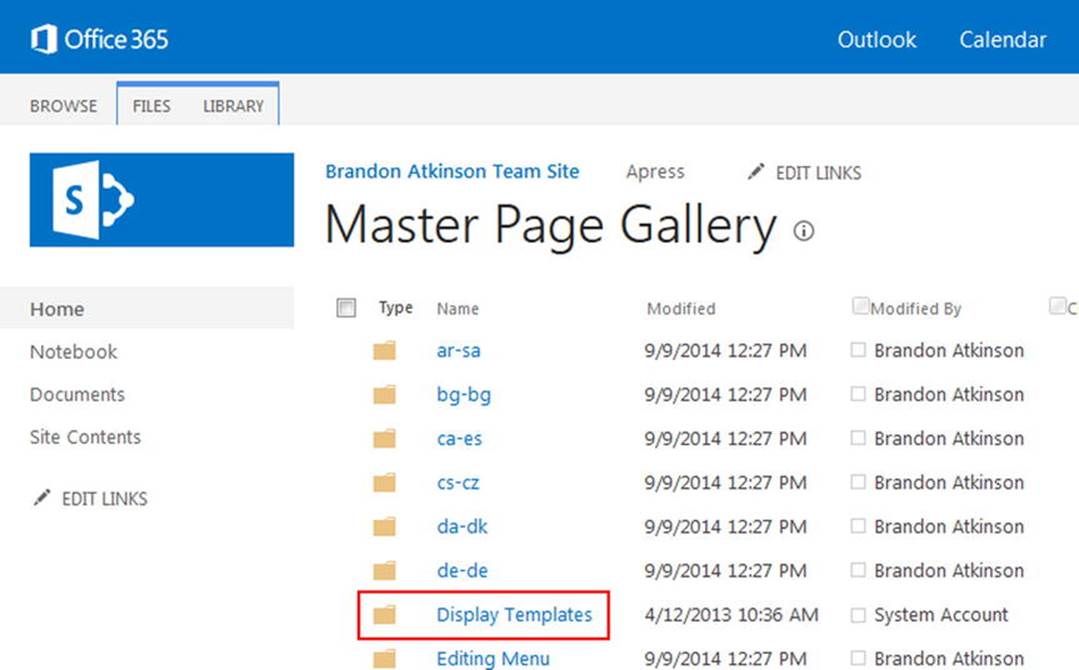
Figure 2-10.
Master Page Gallery where you can find the out-of-the-box display templates
Note
In order to use display templates and the Content Search Web Part, you will need to ensure that the SharePoint Server Publishing site feature is activated. If your site is using a Publishing template, this should already be activated. This web part is also only available in the Office 365 E3 and E4 plans, or the Enterprise version of SharePoint on-premises.
Clicking the Display Templates folder will display another page, with all the current display templates organized by folder. The Content Search Web Part display templates that are all located in the Content Web Parts folder, as shown in Figure 2-11.
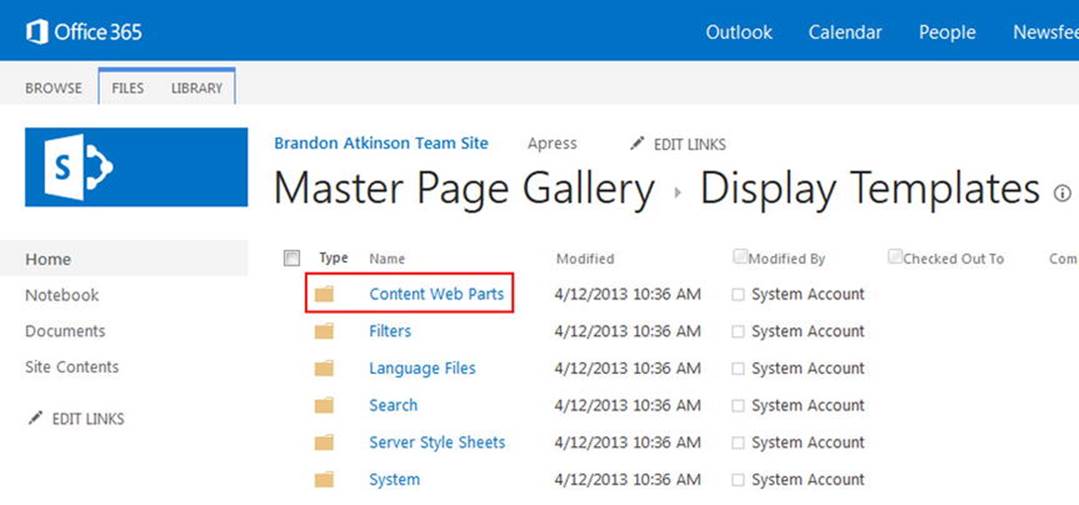
Figure 2-11.
Display Templates and the Content Web Parts folder
When opening the Content Web Parts folder, you will find a bunch of display templates. Each template has an HTML file and a corresponding JavaScript file, as shown in Figure 2-12.
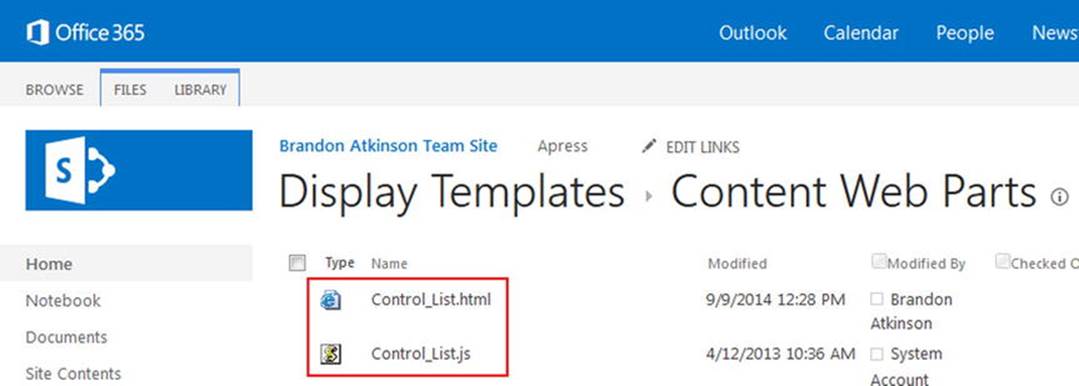
Figure 2-12.
Display template with an HTML file and corresponding JavaScript file
When you build a new display template, you will only work with HTML files. Once you upload the HTML file, SharePoint generates the JavaScript file for you, and this is what it uses when rendering content. With this model, you don’t need to worry about the scripting required; you only worry about the HTML—and SharePoint does the rest. Display templates use managed properties from the search results to render content. The template uses a token system to render the content, as you can see in the following code sample:
<a class="cbs-pictureImgLink" href="_#= linkURL =#_" title="_#= $htmlEncode(line1.defaultValueRenderer(line1)) =#_" id="_#= pictureLinkId =#_">
The token looks like _#= variabl eName =#_. You can create your own variables to store content to be used later in the template. We’ll look at these in much more detail in later chapters.
Summary
In this chapter, we looked at the differences between server-side development and front-end development and explored some of the components that you can use for your custom solutions. With the latest versions of SharePoint, Microsoft is really stressing the advantages of not using server-side code for your development efforts. When it comes to SharePoint Online, it’s not available to you at all! As you have read in this chapter, they have provided a lot of options to build custom solutions that do not rely on server-side code. All of these solutions utilize HTML and JavaScript, making these solutions easily accessible to anyone who is comfortable building web pages.
In the next chapter, we’ll continue expanding on what we’ve learned so far. We’ll look at the Content Editor Web Part and how you can place HTML content directly on a page. In addition, we’ll explore the new Script Editor Web Part, which can be used in conjunction with the Content Editor. We’ll use some of the code you saw in this chapter and actually see it in action.
© Brandon Atkinson 2015
Brandon AtkinsonCustom SharePoint Solutions with HTML and JavaScript10.1007/978-1-4842-0544-0_3
All materials on the site are licensed Creative Commons Attribution-Sharealike 3.0 Unported CC BY-SA 3.0 & GNU Free Documentation License (GFDL)
If you are the copyright holder of any material contained on our site and intend to remove it, please contact our site administrator for approval.
© 2016-2026 All site design rights belong to S.Y.A.