Custom SharePoint Solutions with HTML and JavaScript: For SharePoint 2013 and SharePoint Online (2015)
6. Content Search Web Part and Display Templates
Brandon Atkinson1
(1)
VA, US
Since SharePoint began, search has always played a major role in its usage. Whether it’s a site search, an Enterprise search, or a custom solution, one of the key benefits to SharePoint is being able to easily find things. One of the ways to facilitate search in SharePoint is by way of the Content Search Web Part. This can be easily placed on a page and configured to return specific results for your users. It’s a tried-and-true web part that has been around a long time. In the latest version of SharePoint, the Content Search Web Part utilizes new functionality in the form of result sourcesand display templates.
Result sources allow you to craft specific search criteria to quickly target the content that you are looking for. Display templates allow you to style and render those search results to your business needs. This new functionality offers developers another avenue for creating rich, custom solutions in SharePoint. In this chapter, we’ll look at these areas and create some custom search solutions.
Adding Documents
Before you can begin building solutions using search in SharePoint, you’ll need some documents to actually search for. If you’re using an existing SharePoint environment, you probably already have some documents to search for. If you’ve set up your environment for this book, you’ll need to upload some documents to perform some searches. In this example, you’ll have a variety of document types to search for, including Word, Excel, and PDF. Figure 6-1 shows some samples files in a document library.

Figure 6-1.
Excel, PDF, and Word documents in the Documents library
Note
The documents used in this example can be downloaded from Apress. Visit Apress ( www.apress.com ) and search for this book title to locate the documents and source code.
I’ve used the out-of-the-box “Documents” document library that was created when I created my team site called Apress. No matter where you store your documents, the main takeaway here is to just upload some files into SharePoint so that you can search for them. Now that some files are uploaded and will be eventually indexed, you can create a custom result source to facilitate searches.
Result Sources
In SharePoint 2010, you had the concept of custom search scopes. They allowed you to limit search results to specific content enabling more targeted searches for your end users without them having to know how to craft complex search queries. In SharePoint 2013, you can accomplish the exact same thing with custom result sources.
When a search is performed in SharePoint 2013, the system matches the query with a result source to provide results. A result source is a definition that specifies the following:
· Protocol - This can be the local search service index, a remote SharePoint installation, Exchange, or even another search engine that uses the OpenSearch protocol.
· Source URL - If you are using a protocol other than Local SharePoint, you will need to provide a URL for the service returning the search results.
· Type - When using Local or Remote SharePoint, you can specify either SharePoint Search or People Search.
· Query transform - Using a query transform, you can narrow results for the given search using KQL property restrictions.
· Credentials - You can specify credentials to use for the search.
SharePoint comes with many preconfigured result sources for you to use, including Conversations, Documents, and Pictures, to name a few. Custom result sources can also be created at various levels throughout SharePoint, and where you create the result source determines the level of permissions that you’ll need. The following lists the levels at which result sources may be created and the permissions required when creating them:
· Site Collection - You must be a site collection administrator, and the result source can be used by any site within the site collection.
· Site - You must be a member of the Owners group for the site, and the result source can only be used by that site.
You can also specify a result source at the Search Service Application level, or the SharePoint Admin Center for Office 365, and the result source is available to any site collection that consumes the Search Service Application. This level won’t be covered in this book, however, the steps to create the result source at this level is also exactly the same.
The first thing you need to decide when creating a custom result source is the level to create it at. This depends on how you intend to use the source; for instance, if it’s to highlight items in a specific site, then the Site level would make sense. But if you want a more encompassing result source, you may want to create it at the Site Collection level. The steps are exactly the same for both. If you plan to create a new result source at the Site Collection or Site level, you can simply navigate to the Site Settings page and choose Result Sources under the Search heading for Site level, or Search Result Sources under the Site Collection Administration heading for Site Collection level. Figure 6-2 shows the Site Settings page for the site collection.
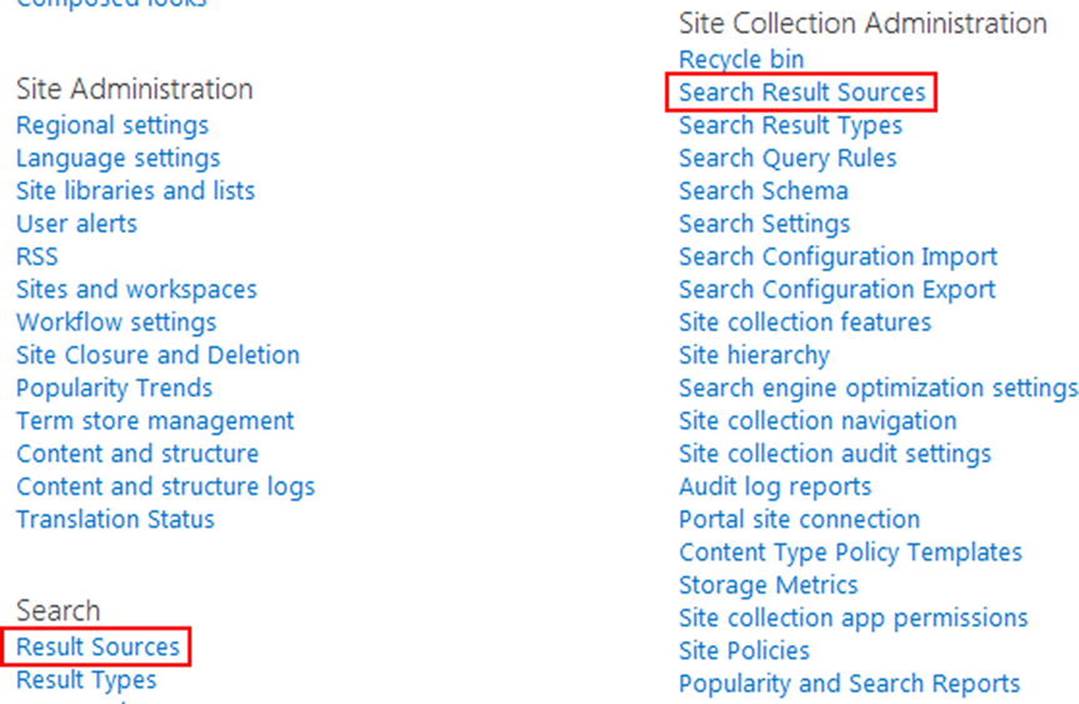
Figure 6-2.
Accessing Result Sources from the Site Collection site settings page
As you can see at the site collection level, you can create a result source for the entire site collection or just the site at the root level. For this example, we’ll navigate to the Apress subsite where our other code samples live, and create a new result source for only this site, as shown in Figure 6-3.
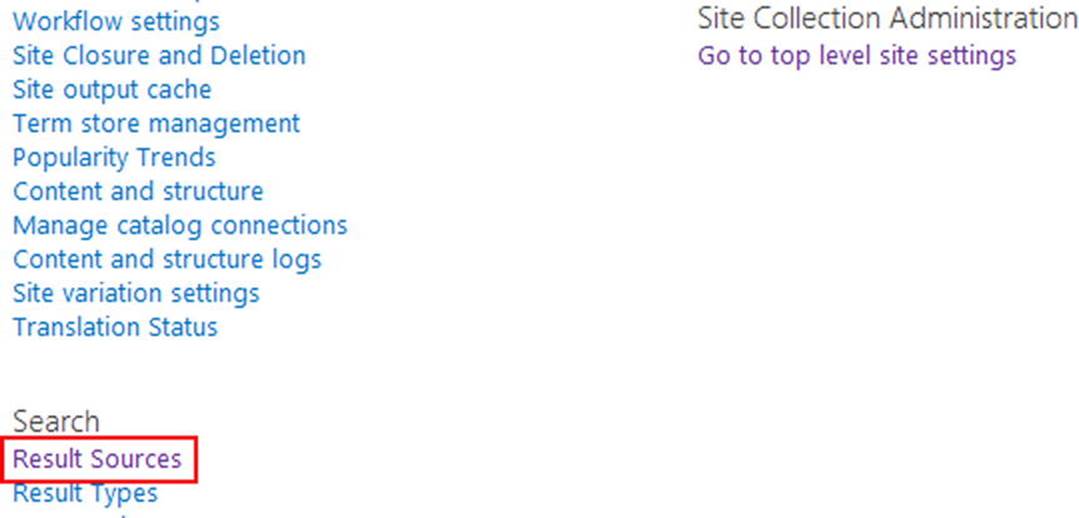
Figure 6-3.
Accessing Result Sources from the Site’s site settings page
Clicking the Result Sources link will bring you to the Manage Result Sources page. This page displays all the current result sources that are set up. It also includes all the out-of-the-box result sources that SharePoint comes with. You cannot change any of the out-of-the-box result sources; however, you can view their settings. To begin creating a custom result source, click the New Result Source link at the top of the page, as shown in Figure 6-4.
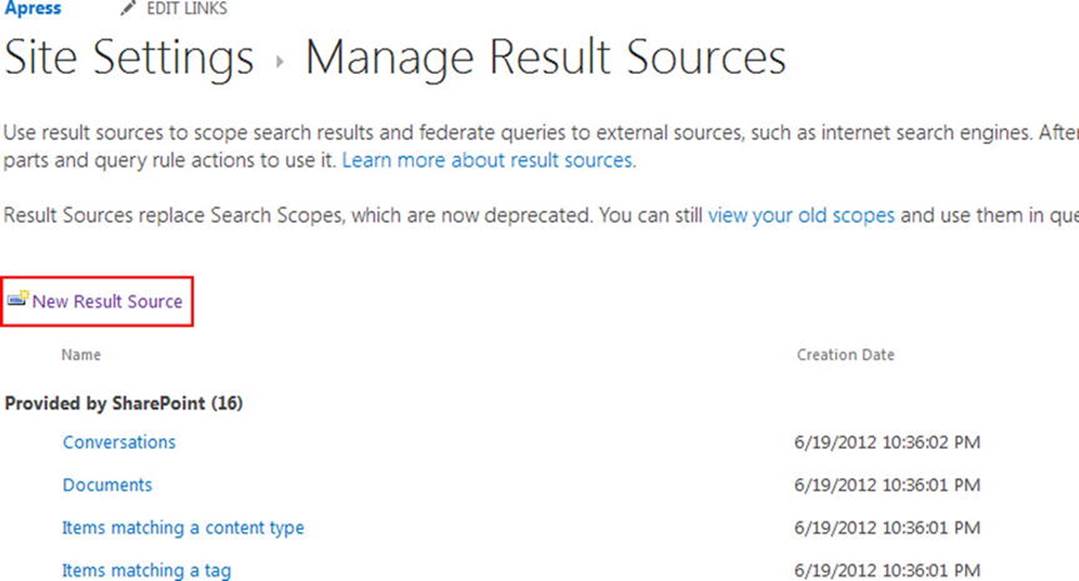
Figure 6-4.
Manage Result Sources page in site settings
Once you are on the Add Result Source page, the first thing you’ll need to supply is a name and description. The description is optional, but you should provide one for other users. Figure 6-5 shows the initial properties required for a new result source.
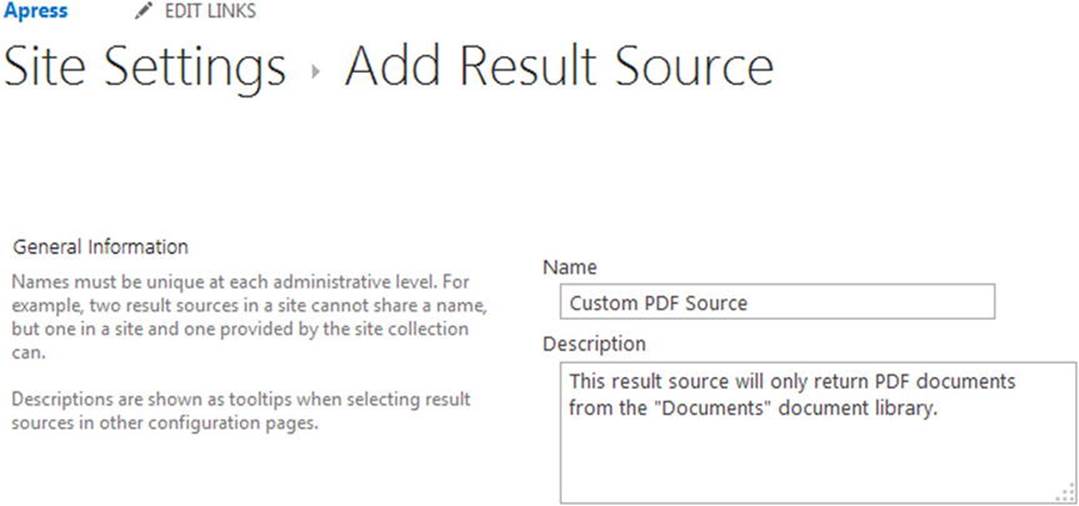
Figure 6-5.
Providing a name and description for the new result source
In this example, you’ll create a result source that will only return PDF documents from the Documents library in the site. To that end, we’ll provide the title Custom PDF Source and a proper description so that users know exactly what to expect when using this result source. Next, you need to supply a protocol and type; in this case, it the protocol will be Local SharePoint and the type will be SharePoint Search Results, as shown in Figure 6-6. Depending on your needs, you may need to select a different protocol and type and supply additional information. In this scenario, the page will update to show the additional fields required for the selected options.
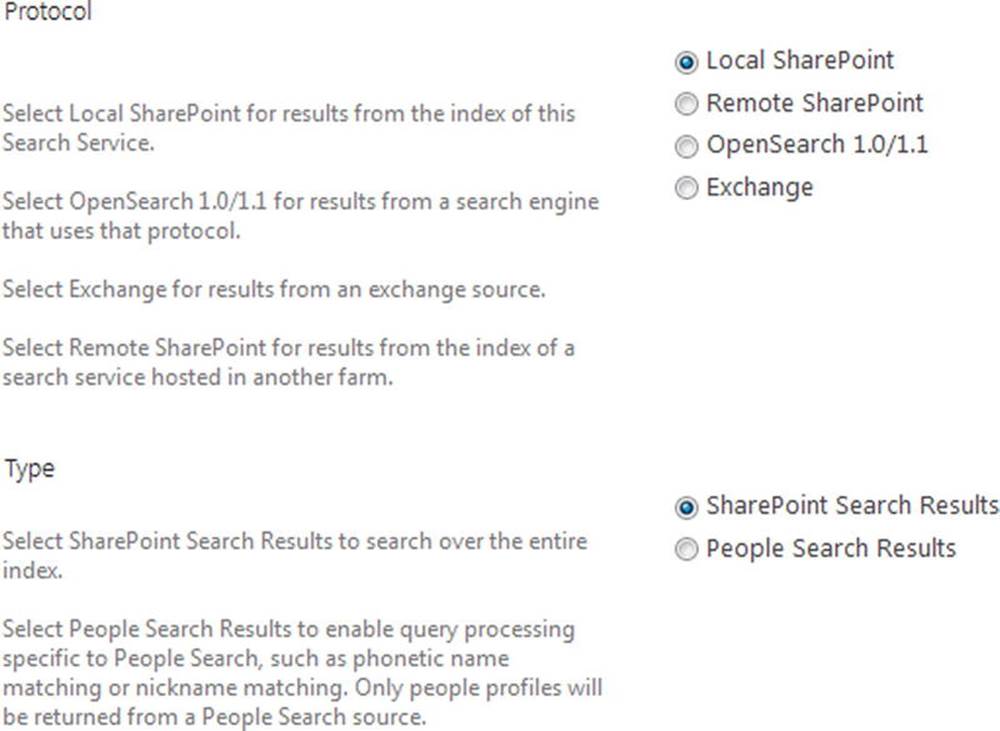
Figure 6-6.
Protocol and Type options for the new result source
Next, you’ll need to provide a query transform that will actually do the limiting of the search results. This is done using Keyword Query Language, which is a set of search options, property restrictions, and operators. The query transform will always start off with the token {searchTerms}; this will be replaced with whatever the user enters as their search term. After that, you can provide any valid property restrictions and/or operators. We’ll dig deeper into this in a moment. For now, you can see the {searchTerms} token in the textbox, as well as the Launch Query Builder button, as shown in Figure 6-7.

Figure 6-7.
Query Transform options and the Launch Query Builder option
Finally, you can specify credentials to be used with this result source. You can specify the Default Authentication to use the user’s authentication when performing a search. This is usually the desired result. The authentication types are shown in Figure 6-8.

Figure 6-8.
Credentials Information for the result source
Click Save to create the new result source. You will be taken back to the Manage Result Sources page where the custom result source will be listed, as shown in Figure 6-9. The new result source is listed under the heading “Defined for this site” at the top of the page.
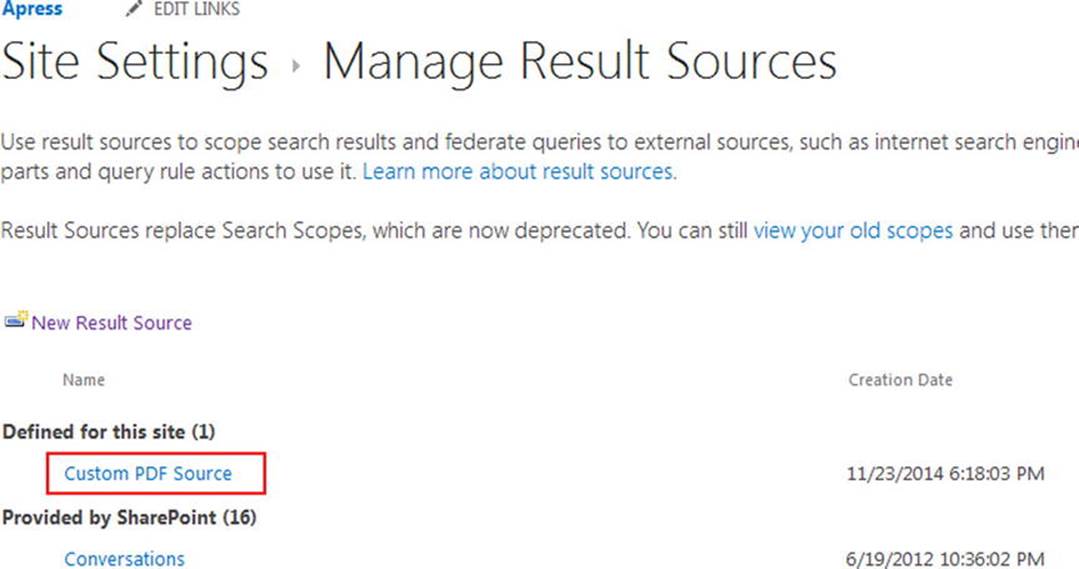
Figure 6-9.
The new result source in the Manage Result Sources page
Since we did not provide any details in the Query Transform section, this new result source will simply take the user’s input and perform a search. We definitely did not need to create a new result to achieve that result. Let’s update it so that it will only return PDFs from the Documents folder. Open the result source context menu and click Edit, as shown in Figure 6-10.
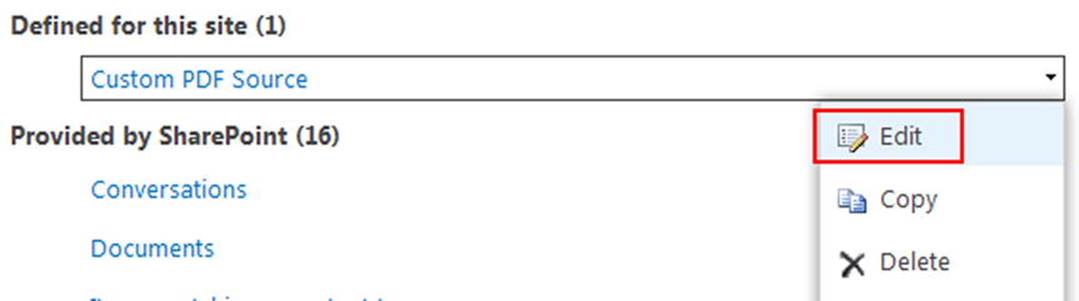
Figure 6-10.
Editing the result source we just created
Editing the result source takes you to the Edit Result Source page and you will see all the previous settings that you just entered. Scroll down to the Query Transform section and click the Launch Query Builder button, as shown in Figure 6-11.
Figure 6-11.
Query Transform section with the Launch Query Builder button
The Build Your Query modal window opens, which will help you build your query transform. There are many out-of-the-box filters that you can use in this window by accessing the drop-down lists that are provided. You can apply sorting and test your queries here as well. You can also opt to just type in your query, as shown in Figure 6-12.
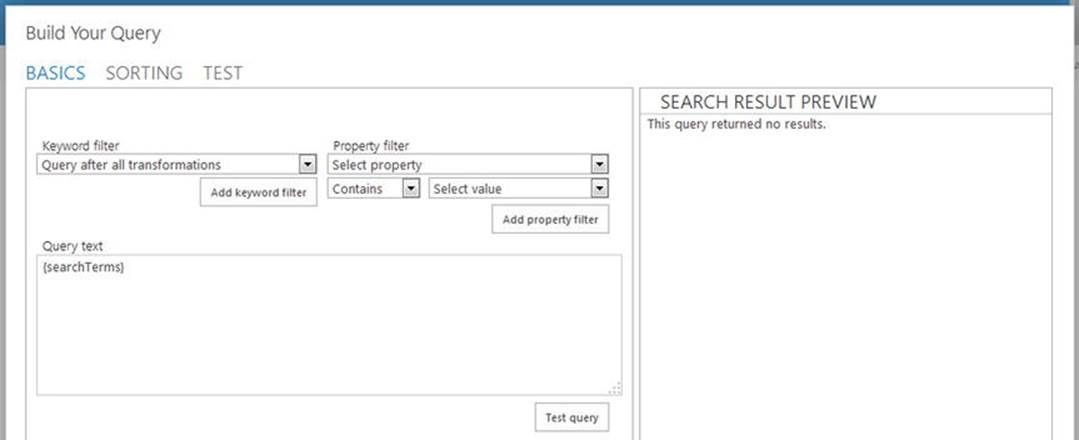
Figure 6-12.
The Build Your Query modal window
Queries are built in SharePoint using Keyword Query Language, or KQL for short. Using KQL you can specify the search terms or property restrictions that are passed to the SharePoint search service. A KQL query is not overly complicated and consists of one or more of the following elements:
· Free-text keywords - These can be words or phrases, such as whitepaper, event, Bob Smith, and so forth.
· Property restrictions - These can be the file type, author, file name, and so forth.
Property restrictions do pretty much what their name implies: they restrict the search results. For instance, you could add a FileType restrictor and only return a certain document type by using FileType:docx to only return Word files. There a lot of property restrictions available, making KQL very robust in your search needs.
Note
Keyword Query Language, while easy to implement, has a very rich and deep syntax. It is great for crafting queries that exactly meet your needs, but it is way too large a subject for this book. We’ll simply scratch the surface on what you can accomplish. For detailed information on KQL, property restrictions, and more, visit http://msdn.microsoft.com/en-us/library/office/ee558911(v=office.15).aspx .
The KQL query must contain one free-text keyword, or one property restriction, or a combination of the two to be valid. To begin, we’ll remove the {searchTerms} part of the query. We won’t use this since our Content Search Web Part will simply return results without any interaction from the user. Next, we’ll add a property restriction using the path property:
path:" https://brandonatkinson.sharepoint.com/apress/Shared Documents "
The path property instructs the query that we only want results from the specified path and anything below it, which includes folders, subsites, and so forth. The path must be a fully qualified URL, and if it includes any spaces, the URL must be wrapped in quotes. In my environment, I’m using the out-of-the-box Documents folder, which is actually the Shared Documents folder. You can always double-check the actual name of the folder by clicking it in the navigation panel and inspecting the URL in the address bar of the browser. Placing this property restriction in the Query Text textbox and clicking the Test Query button will produce the results shown in Figure 6-13.
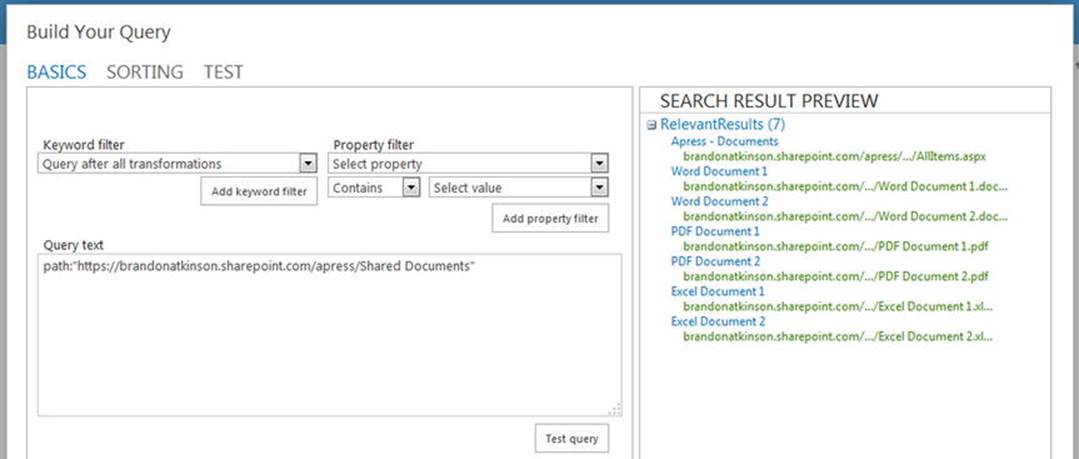
Figure 6-13.
Path property restriction returning only files from the specific document library
The property restriction is limiting the search results to the Documents library, and only seven documents are being returned. We can now limit it once again by using the FileType property:
FileType:pdf
This property instructs the query to only return files that have a .pdf extension. Adding this to the query and clicking the Test Query button will further limit the results, as shown in Figure 6-14.
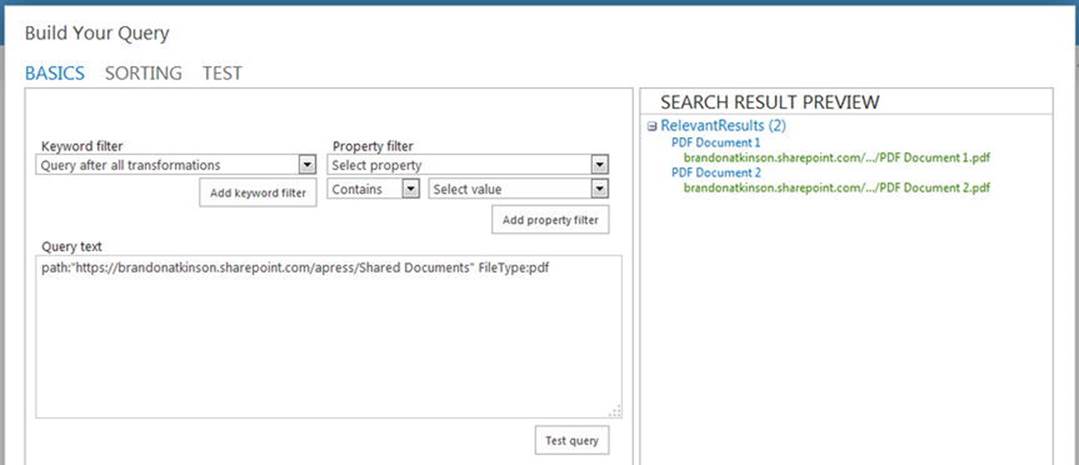
Figure 6-14.
FileType property restriction limiting results to only PDF files
Now only two files are being returned because we only have two PDF files in the Documents library. Although this is a very simple example, it should illustrate the power that KQL provides when constructing your queries. With only two property restrictions, we’ve been able to limit the search results quite a bit. You can imagine that if you had a requirement to display only Office files located in a particular site, no matter which folder they were in, your KQL query would look something like the following:
path:" http://SERVER/SITE " FileType:docx FileType:xlsx FileType:ppt
As you can see, you can combine the same type of property restrictors to craft exactly what you need. KQL is very flexible; you should have no problems finding the right combination of search terms and property restrictions to meet your needs.
Now that we the query set up the way we want it, click OK in the Build Your Query window. Then click Save on the Edit Result Source page. The custom result source is now set up and ready to use. Next, let’s place a Content Search Web Part on the page and consume the result source.
Content Search Web Part
The Content Search Web Part is another workhorse that is new to SharePoint 2013. When the Content Search Web Part is placed on a page, it automatically issues a search query when a user loads the page. Depending on how the web part is configured, the user will most likely not even know that a search is taking place. This makes the Content Search Web Part a powerful way to create custom solutions that are based on search. It’s an easy web part to use and configure, and as you saw in the previous section, it’s very easy to set up specific search queries for your needs.
Note
The Content Search Web Part is available as part of the Search Web Parts feature. This is available only to the SharePoint Online E3 and E4 plans, and on-premises for Enterprise licensing. If you do not have these, you will find that the Content Search Web Part is not available for adding a new web part to the page. You can find more information about the features available for SharePoint Online plans at http://technet.microsoft.com/en-us/library/sharepoint-online-service-description.aspx .
To begin, navigate to the page where the other web parts have been placed for this book, and then remove any existing web parts from previous chapters. With the page still in Edit mode, place a new Content Search Web Part by selecting the Insert tab from the Ribbon. Choose Content Rollup from the Categories section, and then choose Content Search, as shown in Figure 6-15.
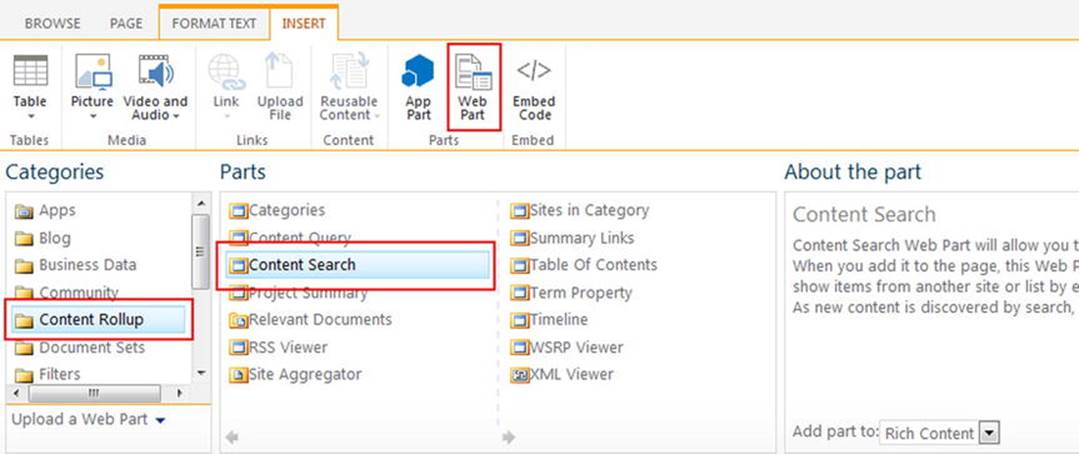
Figure 6-15.
Inserting the Content Search Web Part onto the page
Click Add to place the web part on the page. The web part will display search results immediately. The default search for the Content Search Web Part is called Recently Changed Items and it displays just that—a list of recently changed items. In this case, the list is comprised of the documents that were recently added to the Documents library, as shown in Figure 6-16.
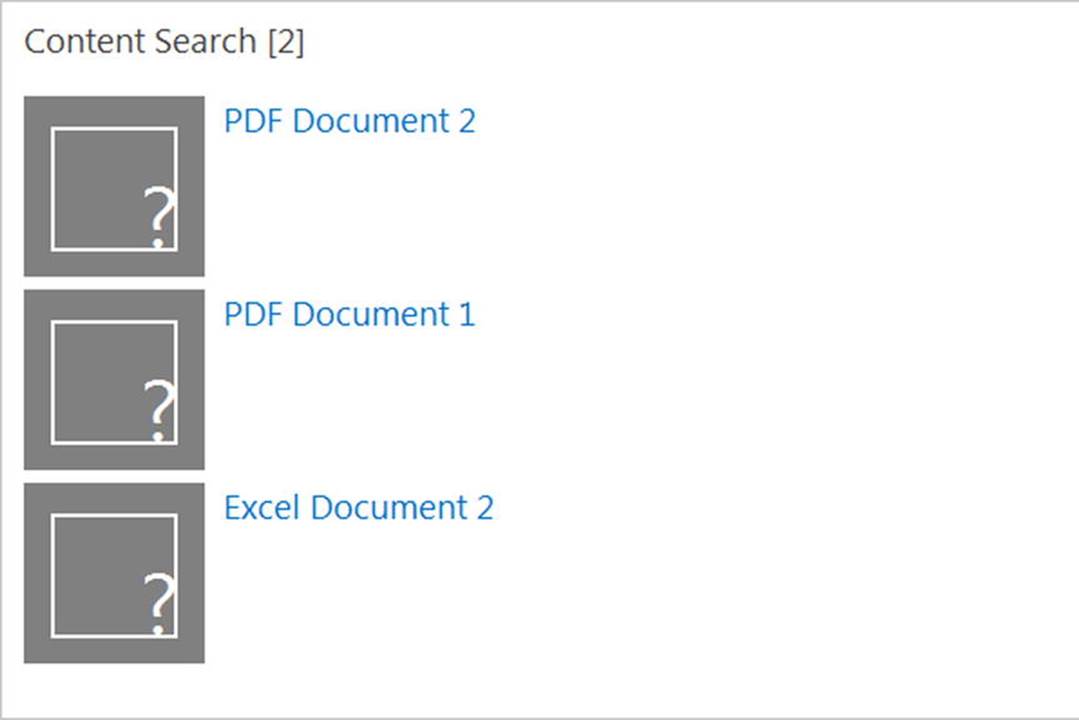
Figure 6-16.
The Content Search Web Part using the Recently Changed Items search
At first glance, this web part is doing almost what we wanted from the beginning, which is to show only PDF documents. The fact that the two PDF documents are shown in this web part is only by the luck of the draw. For instance, depending on the order in which you uploaded your documents, you may see two Word documents at the top. We’ll update the web part to use the custom result source that we created in the previous section to ensure that we only get PDF documents in the results. Place the Content Search Web Part into Edit mode, and in the Properties accordion pane, click the Change Query button, as shown in Figure 6-17.
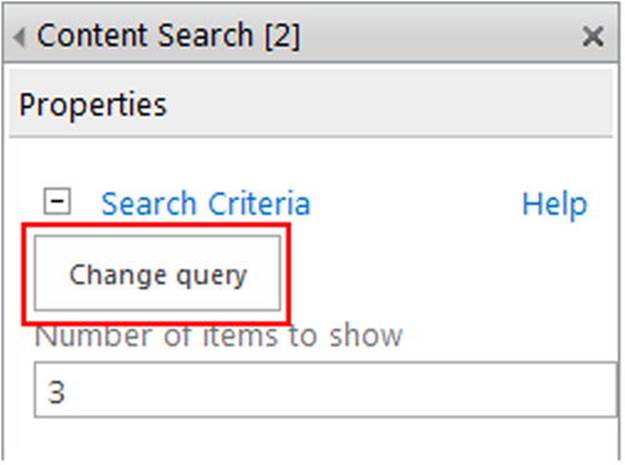
Figure 6-17.
Accessing the query settings of the Content Search Web Part
Clicking this button opens the Build Your Query modal window. Under the Basics tab, you’ll see the Select a Query header and the selected option, Recently changed items (System), as shown in Figure 6-18.
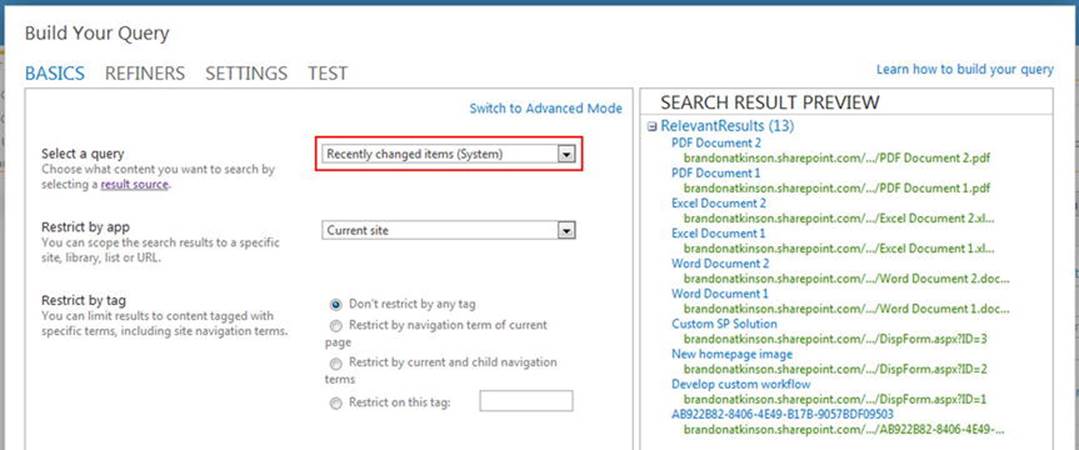
Figure 6-18.
The Build Your Query modal window with the “Recently changed items” result source selected
As you can see in this window, the Content Search Web Part has a lot of settings—and these only concern the search query! This web part can be configured to give you very exact results and it is able to meet a wide variety of business needs. For now, let’s change the result source to the custom PDF source. Click the link in the top-right corner of the window titled Switch to Advanced Mode, as shown in Figure 6-19.
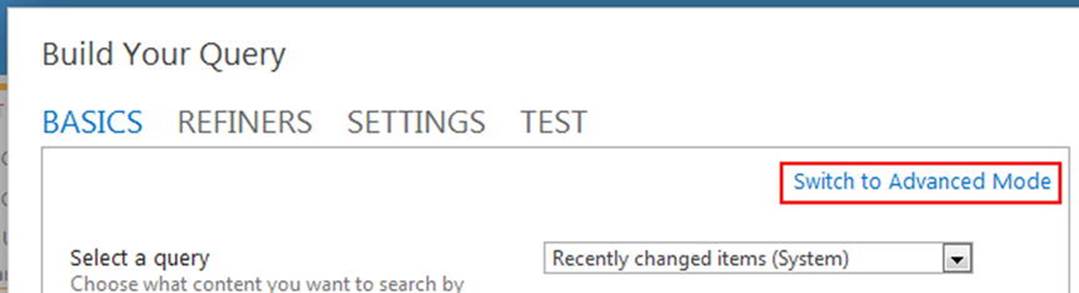
Figure 6-19.
Switch to Advanced Mode link in the Build Your Query modal window
Clicking this link brings up a window that looks a lot like the Build Your Query window that you saw when building a custom result source. You can type in a query, use keyword filters and property filters, and even see a preview of the search query in the right pane. All of these settings were available when we created the custom result source; however, a new drop-down is here, called Select a Query. Opening this will display a list of result sources that you can choose to use for the query. Open the drop-down list and choose Custom PDF Source, as shown in Figure 6-20.
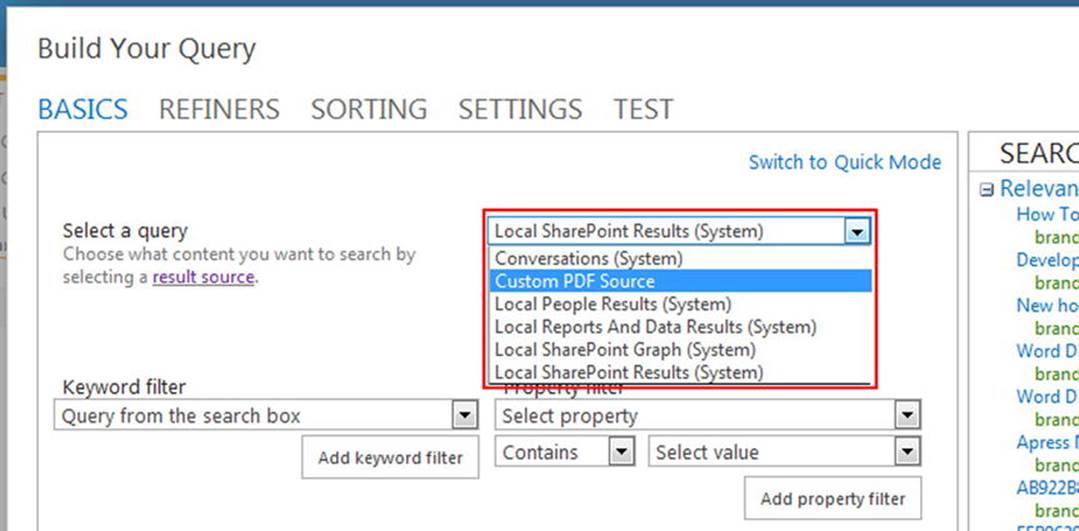
Figure 6-20.
Choosing the custom result source Custom PDF Source from the drop-down menu
Once you have chosen a result source from the drop-down, click the Test Query button at the bottom of the modal window to preview the custom result source query. As shown in Figure 6-21, it’s performing the proper search of only returning PDF documents from the Documents folder.
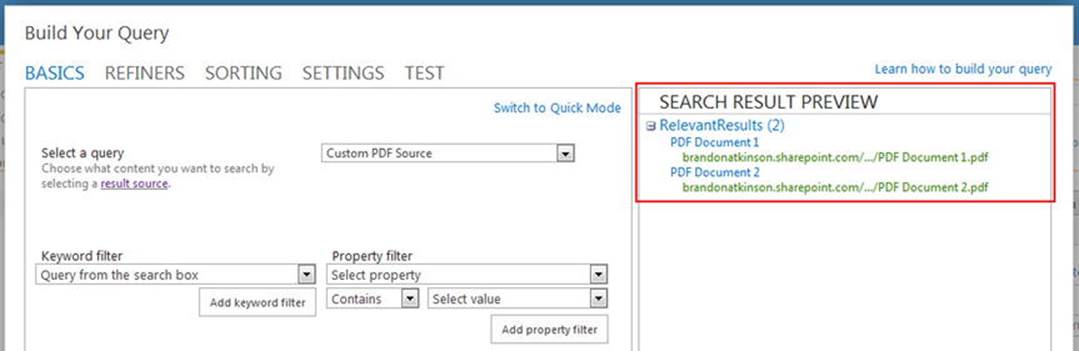
Figure 6-21.
The Custom PDF Source result source search shown in the preview window
Click OK in the Build Your Query modal window. Next, click OK in the Content Search Web Part tool pane to save the changes. Save the page. The custom result source will be active, showing only PDF documents, as shown in Figure 6-22.
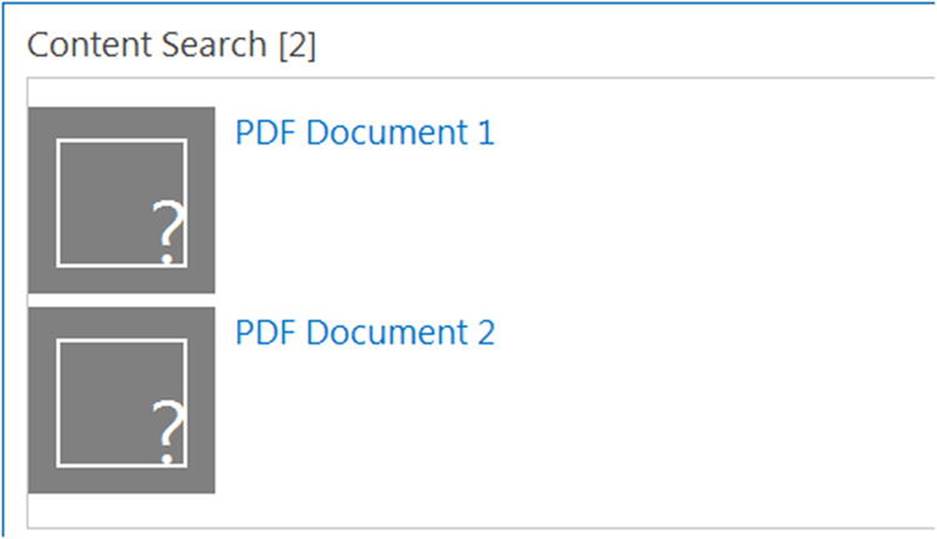
Figure 6-22.
Custom result source displaying only PDF documents
At this point, we’ve created a custom result source and applied it to a Content Search Web Part with success. Only the documents specified by the result source are returned and displayed to the user. However, the display is nothing to be desired. Whereas the content is correct, it does not look very nice. Next, let’s explore display templates and see how you can apply custom styling to match the custom results.
Note
The Content Search Web Part is quite complex. It has many settings that can be configured to help you achieve very precise results for your solutions. For more detailed information on these settings, please visit https://support.office.com/en-us/article/Configure-a-Content-Search-Web-Part-in-SharePoint-0dc16de1-dbe4-462b-babb-bf8338c36c9a .
Display Templates
SharePoint allows you full control over your search results, down to how they appear on the page. This is accomplished with display templates. You can use display templates to style your search results however you like using HTML. There are two types of display templates that you can create:
· Control - These templates handle the overall structure of how search results are displayed, and can include things like headers and footers. This template will only be rendered once per web part.
· Item - These templates handle how each individual search result item is displayed. This template will be rendered once for every search result that is returned.
You can see these display templates by placing the Content Search Web Part into Edit mode, and in the tool pane you will find the Display Templates header in the Properties accordion, as shown in Figure 6-23.
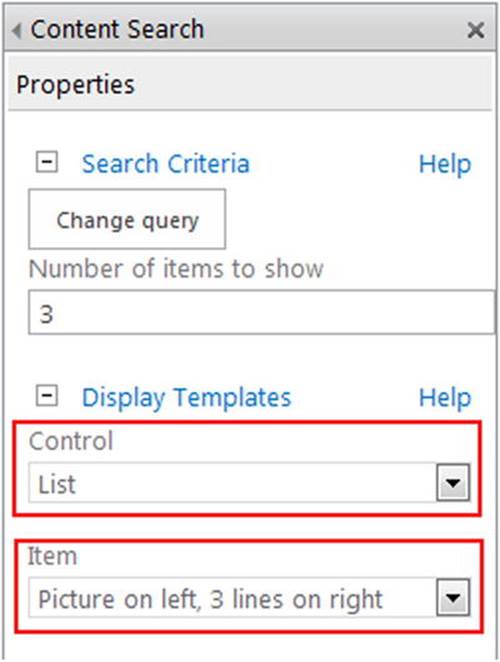
Figure 6-23.
Control and Item display templates in the Content Search Web Part tool pane
There are many out-of-the-box display templates available and you can view them by clicking the drop-down list for each type. For instance, the Control templates include List, List with Paging, and Slideshow. The Item templates have even more options to choose from. To begin creating a new display template, the easiest place to start is with an existing template. To view all the current search display templates, navigate to the Master Page Gallery, which is found under Site Settings and the Web Designer Galleries. Click the “Master pages and page layouts” link, as shown in Figure 6-24.
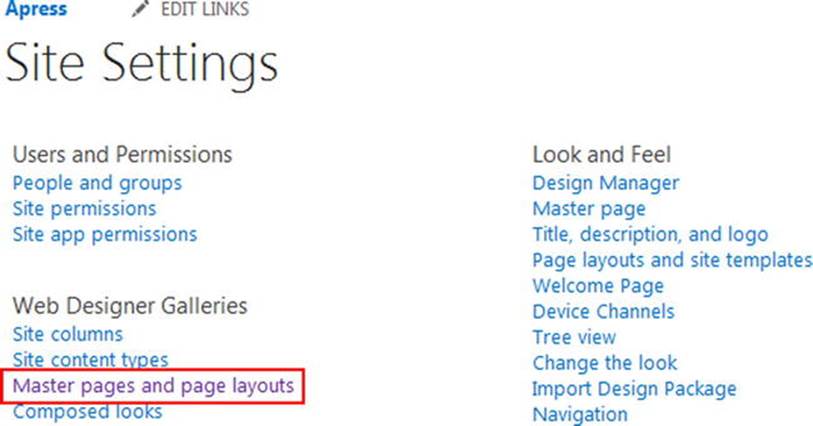
Figure 6-24.
The “Master pages and page layouts” link in Site Settings
Once you are in the Master Page Gallery, you’ll notice it has a lot more in it than previous versions of SharePoint. Near the top there is a folder called Display Templates. By opening this folder you’ll see several more folders that correspond to different areas in SharePoint; one of these is Content Web Parts, as shown in Figure 6-25.
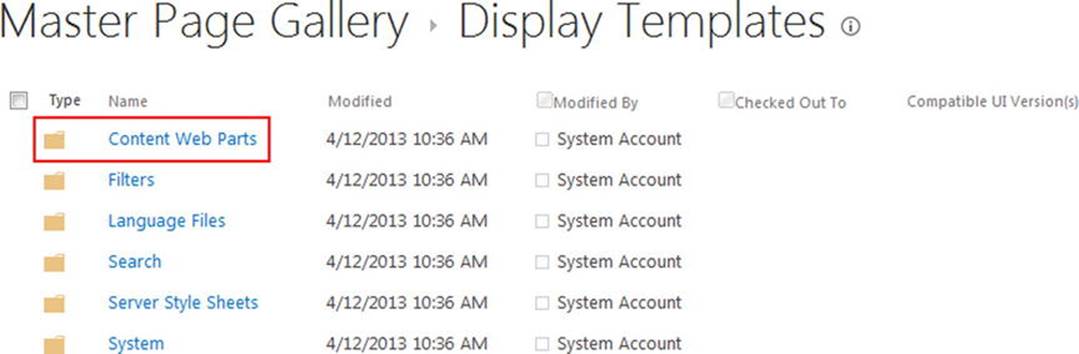
Figure 6-25.
Content Web Parts folder inside the Display Templates folder
Open the Content Web Parts folder to view all the available display templates that come out of the box with SharePoint. As you can see in Figure 6-26, there are quite a few in here. At the top of the page you can see the Control templates that you saw in the Content Search Web Part tool pane.
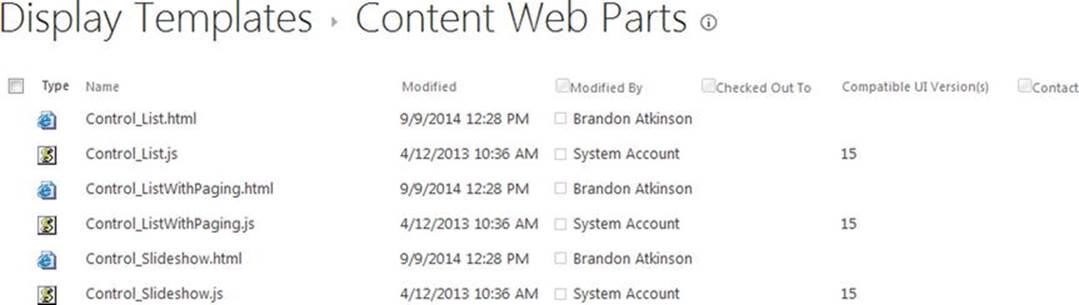
Figure 6-26.
Out-of-the-box display templates in the Content Web Parts folder
Each display template has a corresponding JavaScript file associated with it. Behind the scenes, SharePoint is using this JavaScript file to render the display templates. You do not need to create or modify this file; when you upload a new display template to this folder, a corresponding JavaScript file is created for you, which we’ll see later in this chapter.
Note
Display templates can be very simple or very complex. You have a good deal of control over what properties are available and how the content is laid out, and you can even add additional JavaScript to your templates. The overall topic of display templates is quite large and too complex to completely cover in this chapter. For more information, please visit http://msdn.microsoft.com/en-us/library/office/jj945138%28v=office.15%29.aspx .
To start building a new display template, we’ll download a copy of another template and use it as a base. Display templates can be quite complex, and building one from scratch can be a painstaking task. Using an existing template to start with will dramatically cut down on the time it takes to create a new template. For this example, we’ll focus on an item template and use the default “Picture on Left, 3 Lines on Right” template. In the Content Web Parts folder, this template is titled Item_Picture3Lines.html. Check this template in the folder, and from the Ribbon, click Download a Copy, as shown in Figure 6-27.
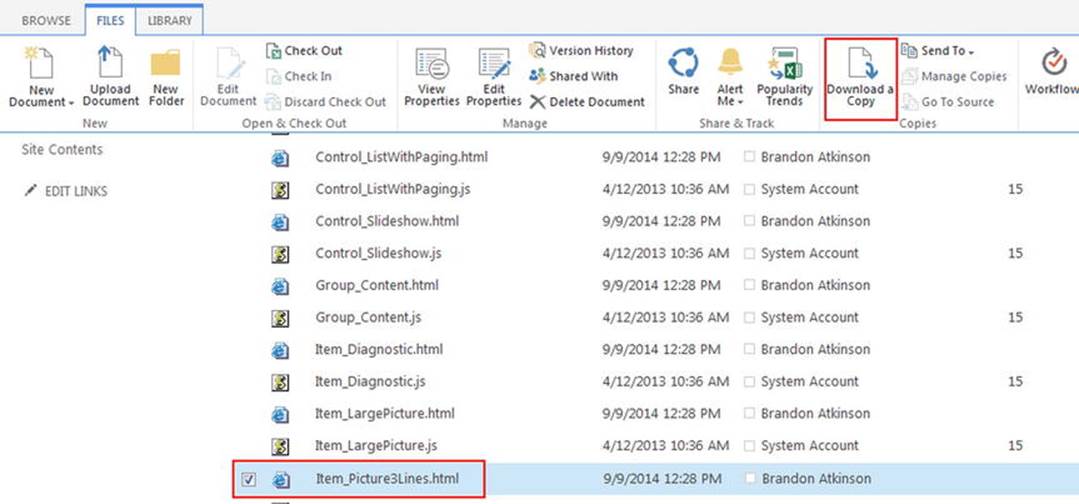
Figure 6-27.
Downloading a copy of an existing display template
Once you have downloaded a copy, you can open it in Visual Studio. Examine this document and you’ll see that it’s a little complicated. It has a HEAD section, a TITLE, and a BODY—just as you’d expect an HTML document to have—along with a lot of rendering code. The actual rendering takes place in the BODY. You’ll notice inside the BODY there are a couple of DIVs that contain all the logic. The file in Visual Studio is shown in Figure 6-28.
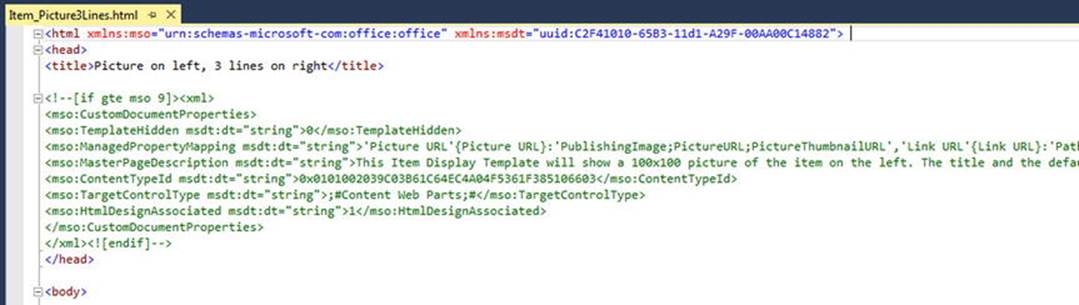
Figure 6-28.
Item_Picture3Lines.html file open in Visual Studio
Let’s break this file down by each section to get a grasp on what’s going on. First, go ahead and save the file and name it Item_CustomPdf.html. At the top of the file are standard HTML and HEAD tags; there is nothing special about these tags. The TITLE tag is important, as it will be display in the drop-down list when choosing an Item template in the Content Search Web Part. Change the title to Custom PDF Template.
<html xmlns:mso="urn:schemas-microsoft-com:office:office" xmlns:msdt="uuid:C2F41010-65B3-11d1-A29F-00AA00C14882">
<head>
<title>Custom PDF Template</title>
The next section is a collection of properties in a section titled CustomDocumentProperties. These properties provide additional information about the display template to SharePoint. Some of these are populated automatically for you, and others you will want to update. Here are some of the more important ones:
· ManagedPropertyMapping - This property takes the managed properties used by search and maps them to values that can be used by the display template.
· MasterPageDescription - This property provides a friendly description for the display template and is shown to users.
· TargetControlType - This property specifies the context in which the display template is used; for instance, Content Web Parts.
The ManagedPropertyMapping property allows you to use the managed properties in searching and to map them to values that can be used by the display template. It’s a comma-delimited list of values that uses the following format:
'property display name'{property name}:'managed property'
In the ManagedPropertyMapping in this display template, for example, you can find the following: 'Link URL'{Link URL}:'Path'. This takes the managed property Path and maps it to a variable called Link URL. The ManagedPropertyMapping has several managed properties mapped:
<mso:ManagedPropertyMapping msdt:dt="string">'Picture URL'{Picture URL}:'PublishingImage;PictureURL;PictureThumbnailURL','Link URL'{Link URL}:'Path','Line 1'{Line 1}:'Title','Line 2'{Line 2}:'Description','Line 3'{Line 3}:'','SecondaryFileExtension','ContentTypeId'</mso:ManagedPropertyMapping>
Once a property has been mapped you can obtain its value using the following JavaScript:
var linkURL = $getItemValue(ctx, "Link URL");
The getItemValue() function takes two parameters. The first is called ctx and represents the current context. You’ll notice that it’s not defined anywhere; it is just available to use. All you need to remember is that you must pass this in and it will always be there to use. The second parameter is a property display name in single quotes used in the ManagedPropertyMapping element. In this example, Link URL is the property name.
The only other property that we’ll update is the MasterPageDescription property, just to update the description so that it’s not confusing.
<mso:MasterPageDescription msdt:dt="string">This Item Display Template will display custom PDF results.</mso:MasterPageDescription>
Immediately after the <body> tag, you’ll find a <script> section:
<script>
$includeLanguageScript(this.url, "∼sitecollection/_catalogs/masterpage/Display Templates/Language Files/{Locale}/CustomStrings.js");
</script>
In this section, you can add your own scripts or CSS references. By default it includes a reference to a file called CustomStrings.js, which is in all the display templates. You can add additional references by using some of the following lines:
· Script located in the same site:
$includeScript(this.url, "∼site/Webparts/CustomScript.js");
· Script located on an external site:
$includeScript(this.url, " http://www.contoso.com/CustomScript.js ");
· CSS file located in the same site:
$includeCSS(this.url, "∼site/Webparts/CustomCSS.css");
Immediately after the <script> tag, you’ll find a <div> element that contains all the HTML and code that will be included in the display template. This DIV has an ID that must match the name of the display template file. For instance, the DIV in this example would look like the following:
<div id="Item_CustomPdf">
After the DIV element, you’ll see code inside comment blocks that begin with <!--#_ and end with _#-->. Inside this block you can use any JavaScript code that you would like and this is where you will also obtain all the values for any managed properties. We’ll keep this display template simple and only use two managed properties with the following code:
<!--#_
var linkURL = $getItemValue(ctx, "Link URL");
var line1 = $getItemValue(ctx, "Line 1");
_#-->
As you can see, we simply declare two variables to hold the values from the managed properties that are defined in the ManagedPropertyMapping. We’ll use these two variables in our HTML code. We’ll keep the HTML simple as well with the following code:
<div style="border:solid 1px Silver;padding:10px;margin-bottom:20px;">
<strong>_#= line1 =#_</strong>
<br />
<a href="_#= linkURL =#_">
_#= linkURL =#_
</a>
</div>
In this code, we simply have a DIV wrapping all the content. We’ve applied a simple border and padding via inline CSS. Next, we’ll display the line1 variable using the following syntax : _#= line1 =#_. You can use JavaScript variables in your display template by using this syntax. Next, we’ll show the link to the PDF file by using an <a> element. The complete file is shown in Figure 6-29.
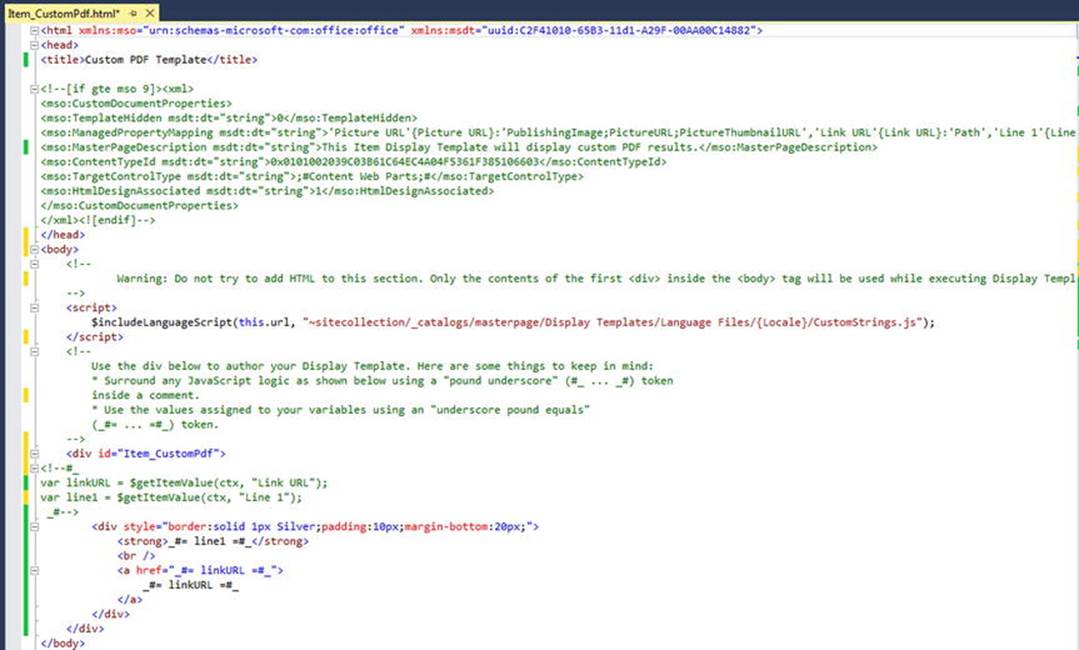
Figure 6-29.
Display template in Visual Studio
Navigate back to the Content Web Parts folder in the Master Page Gallery, and from the Ribbon upload the Item_CustomPdf.html file to the library. Once the file has been uploaded, you will be prompted with a modal window in which you can set properties for the file, as shown in Figure6-30.
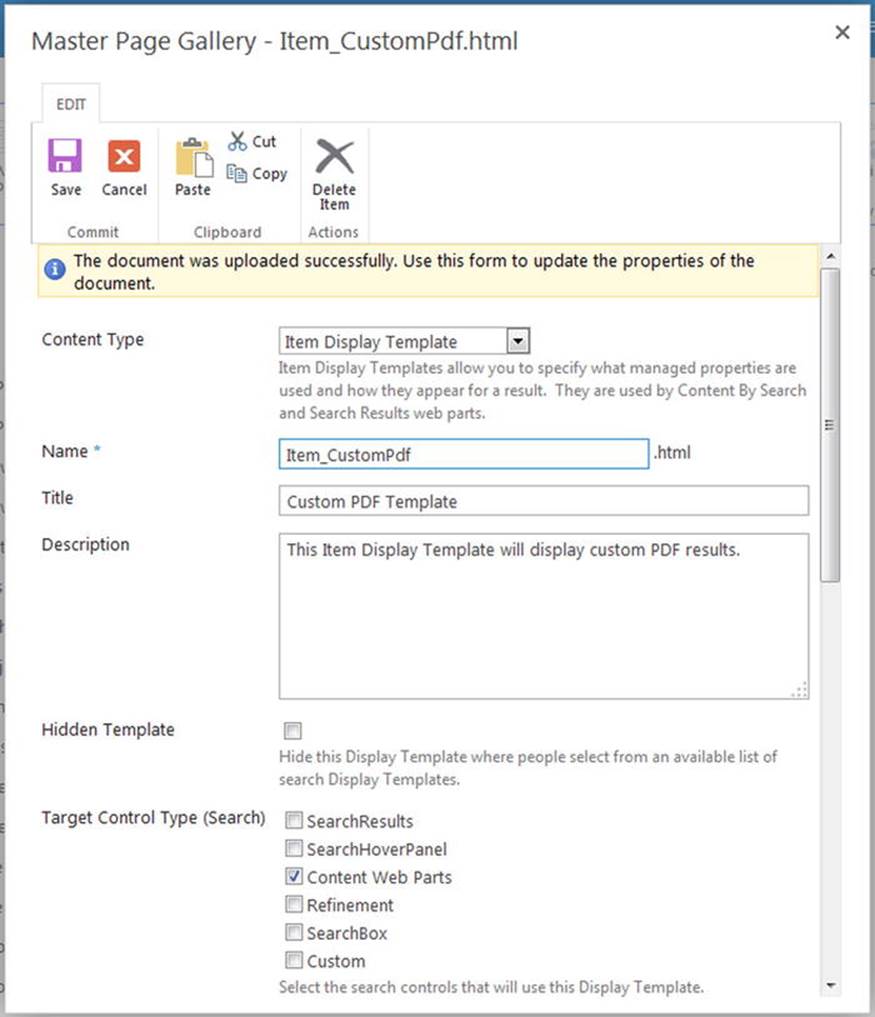
Figure 6-30.
Properties dialog for the display template
This dialog has many of the properties that you saw in the HTML file for the display template. All the properties that are in the file are pulled and populated in this window for you. As such, you can pretty much just leave all the properties as is and click Save. You’ll see that the display template has been uploaded to the library, as shown in Figure 6-31.
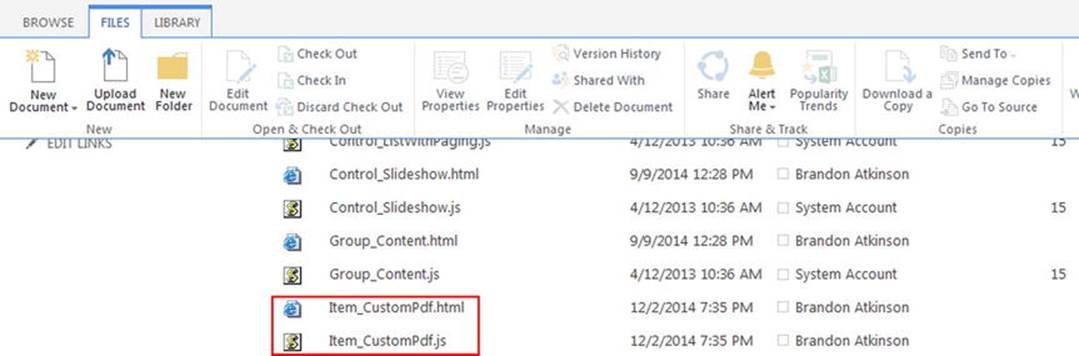
Figure 6-31.
The newly uploaded display template and generated JavaScript file
You will also see that a companion JavaScript file has been created with the same name. SharePoint generates this file based on the HTML file that you upload. This is what it uses when it renders the content. You don’t need to worry about this file and you should never try to modify it. If you need to make changes, simply change the HTML file and upload it again. A new JavaScript file is generated each time you upload a new copy of the HTML.
Navigate back to the page with the Content Search Web Part and place the web part into Edit mode. If you click the Item drop-down in the Display Templates section, you will now see the Custom PDF Template as an option, as shown in Figure 6-32. Choose this option, click OK, and then save the page.
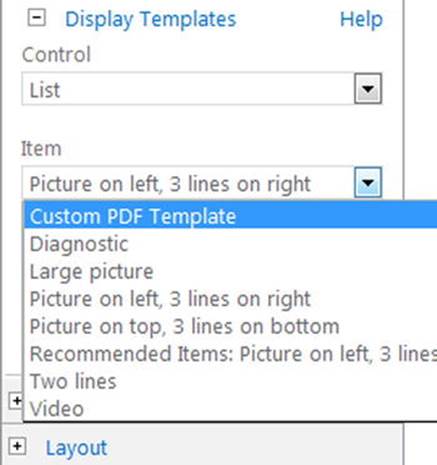
Figure 6-32.
The new display template is available for use
The page reloads and the new display template is rendered, as shown in Figure 6-33.
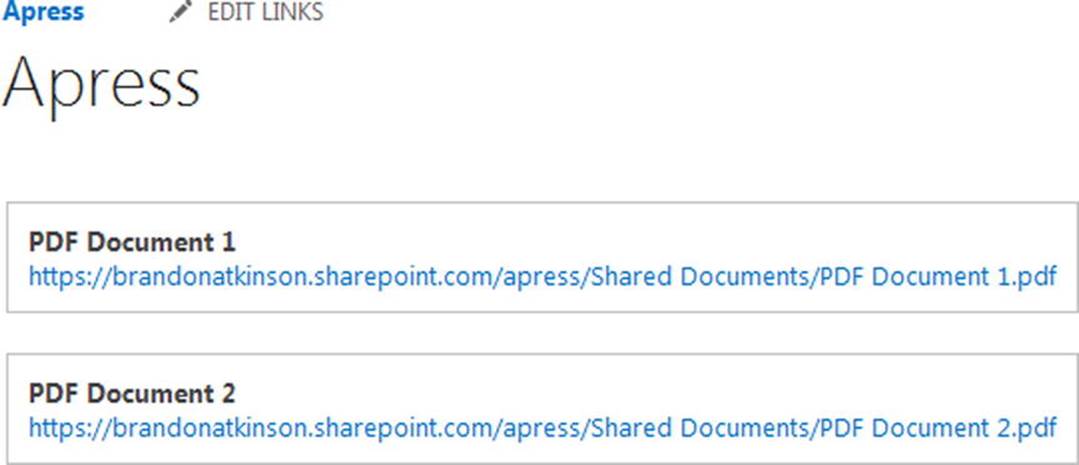
Figure 6-33.
The new display template being used to render the Content Search Web Part
This example is about as basic as you can get, but hopefully it demonstrates the ease and power of display templates and search web parts. Using these templates, you can build custom search solutions that utilize managed properties, JavaScript, and CSS. All the tools you need to create a rich experience are available.
Note
Spend some time downloading and exploring the out-of-the-box display templates that come with SharePoint. You can find a lot of useful information by simply browsing these files and seeing the code used in each one.
Summary
In this chapter, we explored how to build custom search solutions using the Content Search Web Part, custom result sources, and custom display templates. You learned about result sources and saw how to build a new source and use it with the Content Search Web Part. We quickly explored display templates and created a simple example of how to apply custom rendering. Search will always play a big role in SharePoint and now you have some tools to build custom search solutions for your business needs.
In the next chapter, we’ll continue to explore what SharePoint has to offer when crafting custom solutions. We’ll look at some of the built-in JavaScript functionality that is at your fingertips when writing your code. We’ve already seen some of this functionality, and we’ll dive much deeper into what’s possible.
© Brandon Atkinson 2015
Brandon AtkinsonCustom SharePoint Solutions with HTML and JavaScript10.1007/978-1-4842-0544-0_7
All materials on the site are licensed Creative Commons Attribution-Sharealike 3.0 Unported CC BY-SA 3.0 & GNU Free Documentation License (GFDL)
If you are the copyright holder of any material contained on our site and intend to remove it, please contact our site administrator for approval.
© 2016-2026 All site design rights belong to S.Y.A.