Custom SharePoint Solutions with HTML and JavaScript: For SharePoint 2013 and SharePoint Online (2015)
9. Working with the REST API
Brandon Atkinson1
(1)
VA, US
In the previous chapter, we saw how to perform a great range of tasks using the JavaScript Object Model (JSOM) and the Etherson method. In this chapter, we’ll look at the same tasks, except how to perform them using the REST API. To that end, a lot of the HTML from the previous chapter will be similar and the results will be the same. The JavaScript, however, will be completely different. If you skipped the JSOM chapter, don’t worry; all the explanations of the code are present, so you won’t be left in the dark on any example.
REST stands for Representational State Transfer, which is a fancy way of saying, “Web services that allow anything to connect to them via the Web.” REST services can be called from any device that is capable of making an HTTP request over the Internet. This type of service has gained a lot of traction lately, as it’s a simple means for making data accessible to any system. SharePoint 2013 introduced a new REST API for exposing data for apps. Luckily, the API can be easily consumed via HTML and JavaScript as well.
Note
Code that utilizes the REST API runs under the context of the user that is logged in. What this means is that the code only has the ability to perform actions that the user’s permission level allows. For instance, if you have code to create a new subsite in the site collection, but the user that is logged in does not have that permission, the code will run but will produce an error. Keep this in mind as you build your solutions, and ensure that you do not show users options that they cannot utilize.
Getting Set Up
The examples in this chapter continue to utilize the Etherson method introduced in Chapter 4. Navigate to the Webparts folder in your site and create a new folder named Chapter 9, as shown in Figure 9-1.
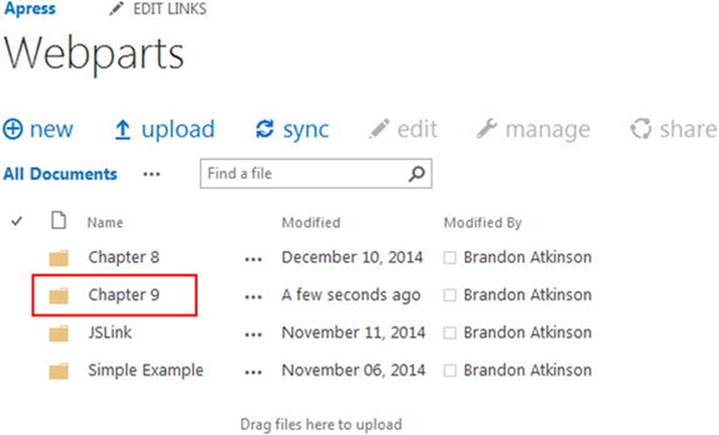
Figure 9-1.
Chapter 9 folder in the Webparts document library
Each example in this chapter will follow the same pattern. We’ll look at the HTML file rendered in the Content Editor Web Part, the JavaScript file used to retrieve and render data, and, finally, the results. We’ll dive into each file and along the way I’ll explain what is happening in each one.
Working with Lists
As stated in the previous chapter, lists are everywhere in SharePoint! You won’t go very far in your development efforts without working with a list. In this section, we’ll explore some of the ways you can use the REST API to interact with lists.
Get List Data
In this example, we’ll simply retrieve some list data to display to the user.
HTML
Create a new HTML file in Visual Studio and name it RESTGetListData.html. The HTML in this example is very simple. It only consists of the following lines:
<script type="text/javascript" src="/apress/webparts/chapter 9/RESTGetListData.js"></script>
<div id="divGetListData"></div>
If you worked through the JSOM examples, you’ll notice that this HTML is much more concise with fewer JavaScript references. The main reason for this is that when working with the REST API, you do not need to load any of the SharePoint JavaScript files, like JSOM. All the calls to the REST API are performed with JavaScript AJAX calls. We’ll be using jQuery’s AJAX methods in our examples.
Next, we load in our custom JavaScript file called RESTGetListData. This file contains all the code to load data into the DIV on the page, which has an ID of divGetListData. All in all, there is not much on this page.
JavaScript
Create a new JavaScript file in Visual Studio and name it RESTGetListData.js. The JavaScript file is more complex in comparison to the HTML. It consists of the following lines:
$(function () {
getListData();
});
function getListData() {
var siteUrl = _spPageContextInfo.webAbsoluteUrl;
var fullUrl = siteUrl + "/_api/web/lists";
$.ajax({
url: fullUrl,
type: "GET",
headers: {
"accept": "application/json;odata=verbose",
"content-type": "application/json;odata=verbose",
},
success: onQuerySucceeded,
error: onQueryFailed
});
}
function onQuerySucceeded(data) {
var listItemInfo = '';
$.each(data.d.results, function (key, value) {
listItemInfo += 'Title: ' + value.Title + ' - Created: ' +
value.Created + '<br />';
});
$("#divGetListData").html(listItemInfo);
}
function onQueryFailed() {
alert('Error!');
}
The first thing you’ll notice with this file is that there is very little SharePoint code here. The overwhelming majority of the code in this file is JavaScript and jQuery, with only the _spPageContextInfo.webAbsoluteUrl call referencing any SharePoint JavaScript. For those new to front-end development with SharePoint, but who have jQuery experience, this can seem the way to go! It certainly does provide a faster way to begin creating custom solutions if you are familiar with jQuery and making AJAX calls.
Most of the REST examples in this book follow the same pattern as this example. Let’s dive into each line in detail to fully understand what is going on. The script begins with a jQuery Document.ready method, which simply calls a custom function called getListData, where we first build the URL to the REST API:
var siteUrl = _spPageContextInfo.webAbsoluteUrl;
var fullUrl = siteUrl + "/_api/web/lists";
We use the _spPageContextInfo.webAbsoluteUrl method to obtain the full URL that the user is currently on. Next, we append the path to the REST API for the lists in this web by using /_api/web/lists. This produces a URL that looks similar to the following:
http://<DOMAIN>/<SITE>/_api/web/lists
This is the basic structure for all the REST URLs. The _api denotes that this is a call to the REST API. When SharePoint sees this as part of the URL in the AJAX call, it knows to route the request to the REST API for processing. For this particular example, we’re asking the list collection on the current web. If you compare this to the JSOM request, you can see some similarities:
var collList = clientContext.get_web().get_lists();
As you can see, the REST API follows a similar pattern of “Get the web, and then get the lists.” This pattern repeats itself throughout the chapter. Next, we make a standard jQuery AJAX call to get the lists in the web:
$.ajax({
url: fullUrl,
type: "GET",
headers: {
"accept": "application/json;odata=verbose",
"content-type": "application/json;odata=verbose",
},
success: onQuerySucceeded,
error: onQueryFailed
});
For this AJAX call, the first thing we pass in is the URL of the call. This is the fullUrl variable we created earlier that holds the full URL to the REST API. Next, we specify the “type” of call, in this case a GET. We have to supply some “headers” in the call so that SharePoint knows we are anticipating JSON back as the result. To do this we pass in application/json;odata=verbose for both the accept and content-type headers. These two headers will be present in just about all your REST calls. Finally, we specify the success and failure functions that should fire once the call is complete. The success function simply displays each list and its created timestamp:
function onQuerySucceeded(data) {
var listItemInfo = '';
$.each(data.d.results, function (key, value) {
listItemInfo += 'Title: ' + value.Title + ' - Created: ' +
value.Created + '<br />';
});
$("#divGetListData").html(listItemInfo);
}
The structure of the data coming back from a REST call can be confusing at first. If you were to open Firebug and look at the object, you would find that a huge amount of data is being returned. More than you would ever need to show a user. Furthermore, the data you would want to show a user is nested in a property called d. For instance, in this example the list collection is in a property called data.d.results. If you were to query for a single list, there would be no results property, and you could just access data directly off the d property, like data.d.Title. You’ll see many more instances of this throughout the chapter.
Results
Set the Content Link property of the Content Editor Web Part to the HTML file and save the page. The results will display all the lists in the current site, as shown in Figure 9-2.
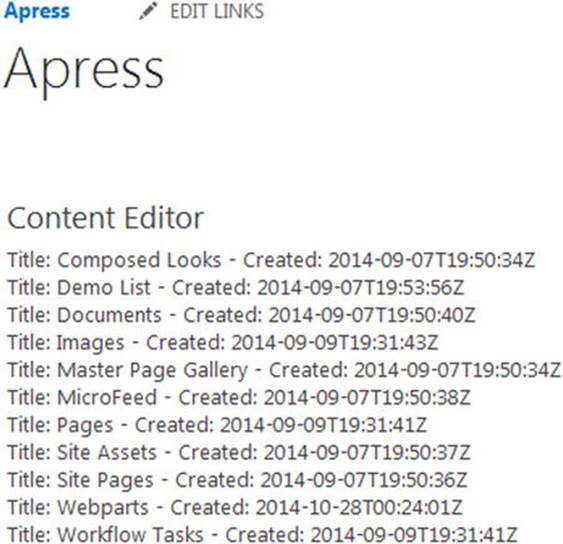
Figure 9-2.
Get List Data results in the Content Editor Web Part
Create a New List
We can easily create new lists using REST, as you’ll see in this example.
HTML
Create a new HTML file in Visual Studio and name it RESTCreateList.html. The HTML for this example is a little more complex than the previous example. It consists of the following lines:
<script type="text/javascript" src="/apress/webparts/chapter 9/RESTCreateList.js"></script>
<div>
<strong>Enter a name for the list:</strong>
<input type="text" id="txtListName" />
<input type="button" id="btnSubmitListName" value="Submit" />
</div>
<div id="divCreateListResults"></div>
The HTML is a little more complex, with several elements on the page. First, there is some simple text wrapped in a <strong> tag to make it bold on the page. Next, there is an INPUT of type Text that is just a simple textbox for the user to input the name of the list they wish to create. There is a button for the user to submit the new list request and, finally, a DIV where we can output the results of the list creation. Each element has an ID so that we can easily target it with jQuery.
Note
In order to create a new list via REST, the user executing the code must have at least Manage Lists permissions in SharePoint. The page will be rendered no matter the permission level; however, SharePoint will throw an error if the user does not have adequate permissions.
JavaScript
Create a new JavaScript file in Visual Studio and name it RESTCreateList.js. The JavaScript file is more complex in comparison. It consists of the following lines:
$(function () {
bindButtonClick();
});
function bindButtonClick() {
$("#btnSubmitListName").on("click", function () {
var listName = $("#txtListName").val();
createList(listName);
});
}
function createList(listName) {
var siteUrl = _spPageContextInfo.webAbsoluteUrl;
var fullUrl = siteUrl + "/_api/web/lists";
$.ajax({
url: fullUrl,
type: "POST",
data: JSON.stringify({
'__metadata': { 'type': 'SP.List' },
'BaseTemplate': 100,
'Title': listName
}),
headers: {
"accept": "application/json;odata=verbose",
"content-type": "application/json;odata=verbose",
"X-RequestDigest": $("#__REQUESTDIGEST").val()
},
success: onQuerySucceeded,
error: onQueryFailed
});
}
function onQuerySucceeded(data) {
$("#divCreateListResults").html(data.d.Title + " successfully created!");
}
function onQueryFailed() {
alert('Error!');
}
In this example, we don’t need to fire any actions on the page load; however, we do need to wire up a button click event when the page loads. In the Document.ready function, we fire the bindButtonClick function, which we use the jQuery on operator to wire a click event on thebtnSubmitListName button in the HTML. When the user clicks the button, we grab the text from the textbox on the page and pass it to the createList() function. This is accomplished using the following lines:
function bindButtonClick() {
$("#btnSubmitListName").on("click", function () {
var listName = $("#txtListName").val();
createList(listName);
});
}
The createList() function takes a variable called listName, which is the text the user inputs on the page. Next, we build the URL for the REST call using the following code:
var siteUrl = _spPageContextInfo.webAbsoluteUrl;
var fullUrl = siteUrl + "/_api/web/lists";
You’ll notice that this is the same URL as in the previous example, as we are targeting the list collection in the web. The AJAX, however, looks quite different:
$.ajax({
url: fullUrl,
type: "POST",
data: JSON.stringify({
'__metadata': { 'type': 'SP.List' },
'BaseTemplate': 100,
'Title': listName
}),
headers: {
"accept": "application/json;odata=verbose",
"content-type": "application/json;odata=verbose",
"X-RequestDigest": $("#__REQUESTDIGEST").val()
},
success: onQuerySucceeded,
error: onQueryFailed
});
Just as in the previous example, we pass the fullUrl variable in as the URL to call, and the type is now a POST. Since we are creating a new list in this example, we use the POST to indicate to SharePoint that this is a creation operation. Next, we pass in the data for the new list using the following lines:
data: JSON.stringify({
'__metadata': { 'type': 'SP.List' },
'BaseTemplate': 100,
'Title': listName
})
When we perform any type of operation using the REST API other than GET, we are passing data to SharePoint. This data is in the JSON format. The JSON.stringify method is a standard JavaScript method that converts JavaScript data structures into JSON text. This helps to ensure that the data we pass to SharePoint is in the proper format. The first thing we do is set the “type” as “SP.List” and set the “BaseTemplate” to “100”, which is a generic list. Finally, we pass in the listName variable for the Title. Next, we add the headers and include a new header called X-RequestDigest:
"X-RequestDigest": $("#__REQUESTDIGEST").val()
This header allows us to pass in the value for the FormDigest control on the page. This control is used as a security measure in SharePoint to ensure that a POST request is in fact coming from a valid SharePoint page. You don’t need to know all the details of this control, other than you can obtain its value using the jQuery line $("#__REQUESTDIGEST").val(). Once the headers are in place, we specify the success and failure functions. The success function simply displays the list name along with a success message:
function onQuerySucceeded(data) {
$("#divGetListData").html(data.d.Title + " successfully created!");
}
This function takes in a parameter called data. This variable will be populated with the data from the list that was just created. There is nothing special about the naming of this variable; we could call it “list”, or “myCoolData”. You could even not specify a parameter if you wish and just display a success message!
Results
Set the Content Link property of the Content Editor Web Part to the HTML file and save the page. The page will now show the textbox and button for the user to input a new list name. Type My Custom REST List and then click the Submit button. The results will display the success message, as shown in Figure 9-3.

Figure 9-3.
Create new list code after it has been run
Since this is all done using JavaScript and AJAX, the list will get created and the user will be notified as expected. However, the left navigation on the page will not be updated because the page has not been refreshed. You could absolutely change this code to refresh the page on success, but for this example, we’ll simply refresh the page in the browser. Figure 9-4 shows the page after a refresh, where the new list is displayed in the left navigation.
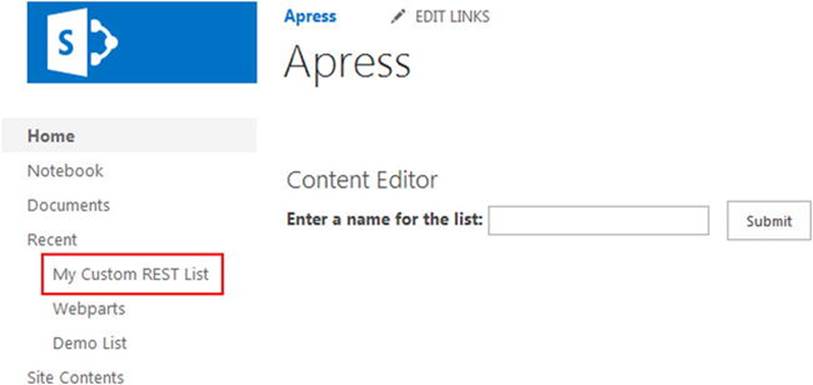
Figure 9-4.
The new list as displayed in the left navigation pane
Delete a List
In this example, we’ll simply delete the list we just created.
HTML
Create a new HTML file in Visual Studio and name it RESTDeleteList.html. The HTML for this example is almost identical to the previous example. It consists of the following lines:
<script type="text/javascript" src="/apress/webparts/chapter 9/RESTDeleteList.js"></script>
<div>
<strong>Enter the name of the list to delete:</strong>
<input type="text" id="txtListName" />
<input type="button" id="btnSubmitListName" value="Submit" />
</div>
<div id="divDeleteListResults"></div>
The only difference here is that we updated the text on the page to indicate that this web part will delete a list, and changed the ID of the results DIV to divDeleteListResults.
JavaScript
Create a new JavaScript file in Visual Studio and name it RESTDeleteList.js. The JavaScript file consists of the following lines:
$(function () {
bindButtonClick();
});
function bindButtonClick() {
$("#btnSubmitListName").on("click", function () {
var listName = $("#txtListName").val();
deleteList(listName);
});
}
function deleteList(listName) {
var siteUrl = _spPageContextInfo.webAbsoluteUrl;
var fullUrl = siteUrl + "/_api/web/lists/GetByTitle('" + listName + "')";
$.ajax({
url: fullUrl,
type: "POST",
headers: {
"accept": "application/json;odata=verbose",
"content-type": "application/json;odata=verbose",
"X-RequestDigest": $("#__REQUESTDIGEST").val(),
"X-HTTP-Method": "DELETE",
"IF-MATCH": "*"
},
success: onQuerySucceeded,
error: onQueryFailed
});
}
function onQuerySucceeded() {
$("#divDeleteListResults").html("List successfully deleted!");
}
function onQueryFailed(sender, args) {
alert('Error!');
}
The jQuery button wiring is the same as in the previous example. Next, we need to craft the URL for the REST call, this time requesting a specific list:
var siteUrl = _spPageContextInfo.webAbsoluteUrl;
var fullUrl = siteUrl + "/_api/web/lists/GetByTitle('" + listName + "')";
This URL adds the additional GetByTitle command, passing in the name of the list we are looking for. The final URL will look like the following:
http://<DOMAIN>/<SITE>/_api/web/lists/GetByTitle('<LISTNAME>')
Next, we need to add in a couple of additional headers:
"X-HTTP-Method": "DELETE",
"IF-MATCH": "*"
You’ll notice that the type of request is a POST, just like when we created a new list. However, here we want to initiate a “delete” request, so we need to include the X-HTTP-Method header to let SharePoint know that we want to delete the list, and not take some other action on it. Next, we include the IF-MATCH header. This header is required when making an update via REST and when deleting. This header helps prevent concurrent updates from happening. For instance, if you were trying to update a list item, you could pass in an etag property that would look like the following:
"If-Match": data.d.__metadata.etag
Passing the * in this header basically tells SharePoint not to worry about concurrency and to just perform the update. In this example, we’re deleting the list, so we don’t need to worry about this check. The success function simply notifies the user that the deletion was successful.
Results
Set the Content Link property of the Content Editor Web Part to the HTML file and save the page. The page will now show the textbox and button for the user to input a list name to delete. Type My Custom REST List and then click the Submit button. The results will display the success message, as shown in Figure 9-5.
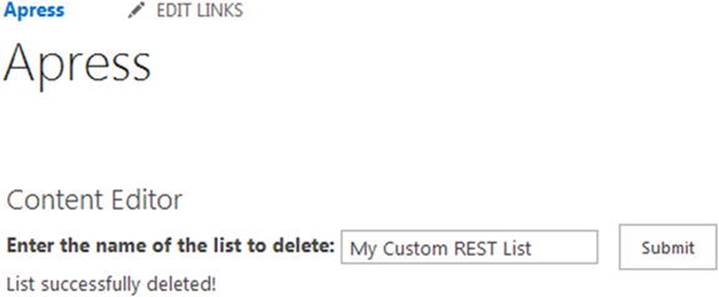
Figure 9-5.
Delete List code after it has successfully run
Since this is all done using JavaScript and AJAX, the list will be deleted and the user will be notified as expected. However, the left navigation on the page will not be updated because the page has not been refreshed. As before, you could update this code to refresh the page on success, but for this example, we’ll simply refresh the page in the browser. Figure 9-6 shows the page after a refresh where the list is no longer displayed in the left navigation.
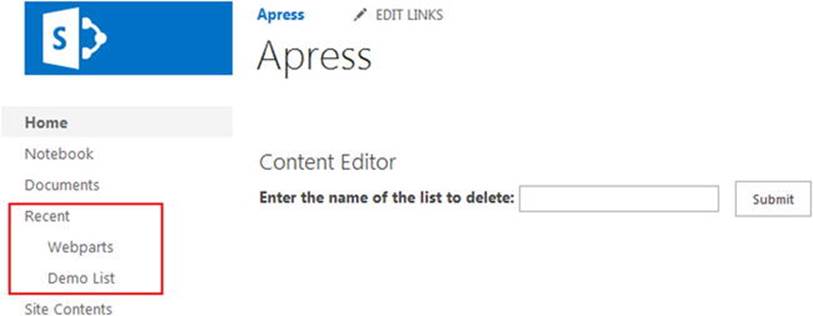
Figure 9-6.
Deleted list has been removed from the left navigation
Working with List Items
Since working with lists is a very common task in SharePoint development, working with list items is even more common. In this section we’ll explore some ways you can interact with list items using the REST API.
Get List Items
This example will show you how to retrieve list items using REST.
HTML
Create a new HTML file in Visual Studio and name it RESTGetListItems.html. The HTML for this example continues to follow the minimalist pattern of the previous examples. It consists of the following lines:
<script type="text/javascript" src="/apress/webparts/chapter 9/RESTGetListItems.js"></script>
<div id="divListItems"></div>
For this example, we’ll simply grab all the list items from the Demo List and display them in the divListItems DIV on the page.
JavaScript
Create a new JavaScript file in Visual Studio and name it RESTGetListItems.js. The script to retrieve list items should look very familiar to the other scripts that we’ve seen so far. It consists of the following lines:
$(function () {
retrieveListItems();
});
function retrieveListItems() {
var siteUrl = _spPageContextInfo.webAbsoluteUrl;
var fullUrl = siteUrl + "/_api/web/lists/GetByTitle('Demo List')/items";
$.ajax({
url: fullUrl,
type: "GET",
headers: {
"accept": "application/json;odata=verbose",
"content-type": "application/json;odata=verbose",
},
success: onQuerySucceeded,
error: onQueryFailed
});
}
function onQuerySucceeded(data) {
var listItemInfo = '';
$.each(data.d.results, function (key, value) {
listItemInfo += '<strong>ID: </strong> ' + value.Id +
' <strong>Title:</strong> ' + value.Title +
'<br />';
});
$("#divListItems").html(listItemInfo);
}
function onQueryFailed(sender, args) {
alert('Error!');
}
The URL for the REST call to get list items should look very familiar at this point:
var siteUrl = _spPageContextInfo.webAbsoluteUrl;
var fullUrl = siteUrl + "/_api/web/lists/GetByTitle('Demo List')/items";
As with the delete URL, we get a list’s title by using the GetByTitle command, and then add the items command, which tells SharePoint to return all the items in the list. The AJAX call is a simple GET with the familiar JSON headers included. The success function uses jQuery to loop through the results:
$.each(data.d.results, function (key, value) {
listItemInfo += '<strong>ID: </strong> ' + value.Id +
' <strong>Title:</strong> ' + value.Title +
'<br />';
});
Just like when we access the lists in the site, we use the data.d.results collection to access the query results. In the jQuery each loop, we pull out the ID and Title for each list item and display these results on the page.
Results
Set the Content Link property of the Content Editor Web Part to the HTML file and save the page. The page will now show all the items in the Demo List, as shown in Figure 9-7.
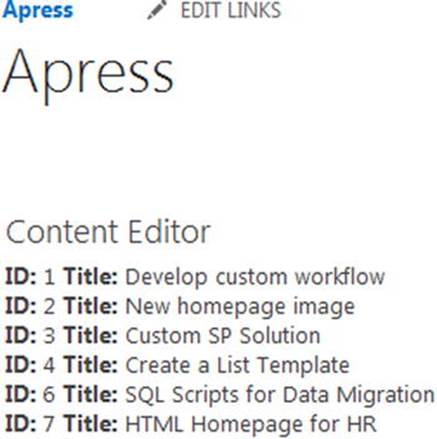
Figure 9-7.
List items from the Demo List displayed in the Content Editor Web Part
Limit Results with Query Operators
In the previous chapter, we discussed the fact that in most cases you should not be requesting all items from a list; whether using JSOM or REST, it’s not a good idea. We saw how you can limit results in JSOM using the CAML query. When using the REST API, you can use query operators to limit the results that are returned. Query operators are basically query string parameters that are added on to the end of the REST URL in your AJAX call.
JavaScript
Update the RESTGetListItems.js from the previous example and update the section where you declare the REST URL with the following lines:
var siteUrl = _spPageContextInfo.webAbsoluteUrl;
var fullUrl = siteUrl + "/_api/web/lists/GetByTitle('Demo List')/items?$filter=Id ge 4";
The only addition here is on the end of the URL, with the following query string: $filter=Id ge 4. We are using the filter operator, which filters the results. We specify that we want to filter on the ID that is greater than or equal to (ge) 4. This is very simple addition, but it is a good introduction to the query operators.
Note
Query operators are a large topic—way too big for this book. These operators allow you to select, filter, sort, order, and more. You can even tell SharePoint to only return specific data about items in SharePoint by using these operators. For more in-depth information on using query operators, please visit http://msdn.microsoft.com/en-us/library/office/fp142385%28v=office.15%29.aspx .
Results
Update the JavaScript file and upload it, overwriting the previous version. Refresh the page with the Content Editor Web Part and you will see that the results now only show items with an ID greater than or equal to 4, as shown in Figure 9-8.
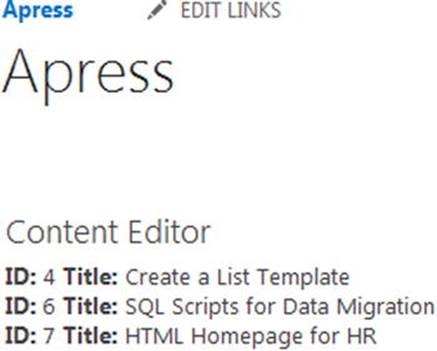
Figure 9-8.
The results of the Demo List query limited by a query operator
Add List Items
In this example, we’ll look at how you can add new list items to a list.
HTML
Create a new HTML file in Visual Studio and name it RESTAddListItems.html. The markup for this page will allow a user to add an item to the Demo List, providing a Title and a Description. It consists of the following lines:
<script type="text/javascript" src="/apress/Webparts/chapter 9/RESTAddListItems.js"></script>
<div id="AddListData">
<div>
Title:
<br />
<input type="text" id="txtTitle" />
</div>
<div>
Description:
<br />
<textarea cols="20" id="txtDesc"></textarea>
</div>
<br />
<div>
<input id="btnSubmit" type="button" value="Submit" />
</div>
</div>
<div id="divResult"></div>
We provide an INPUT of type TEXT for the list item Title and a TEXTAREA for the Description. Each element on the page has an ID, so we can easily target it with jQuery.
JavaScript
Create a new JavaScript file in Visual Studio and name it RESTADDListItems.js. The script to add list items will look similar to the script for creating a new list. It consists of the following lines:
$(function () {
bindButtonClick();
});
function bindButtonClick() {
$("#btnSubmit").on("click", function () {
addListItem();
});
}
function addListItem() {
var title = $("#txtTitle").val();
var desc = $("#txtDesc").val();
var siteUrl = _spPageContextInfo.webAbsoluteUrl;
var fullUrl = siteUrl + "/_api/web/lists/GetByTitle('Demo List')/items";
$.ajax({
url: fullUrl,
type: "POST",
data: JSON.stringify({
'__metadata': { 'type': 'SP.Data.Demo_x0020_ListListItem' },
'Title': title,
'Description': desc,
'Status':'On-time'
}),
headers: {
"accept": "application/json;odata=verbose",
"content-type": "application/json;odata=verbose",
"X-RequestDigest": $("#__REQUESTDIGEST").val()
},
success: onQuerySucceeded,
error: onQueryFailed
});
}
function onQuerySucceeded(sender, args) {
$("#divResult").html("Item successfully added!");
}
function onQueryFailed() {
alert('Error!');
}
After we attach a button click event with jQuery, the first thing we do on the click event is grab the values that the user is providing. This is accomplished with the following lines:
var title = $("#txtTitle").val();
var desc = $("#txtDesc").val();
Next, we craft the REST URL, targeting the Demo List and the list items in the list:
var siteUrl = _spPageContextInfo.webAbsoluteUrl;
var fullUrl = siteUrl + "/_api/web/lists/GetByTitle('Demo List')/items";
We then create a jQuery AJAX POST call, passing in the data for the new list item:
data: JSON.stringify({
'__metadata': { 'type': 'SP.Data.Demo_x0020_ListListItem' },
'Title': title,
'Description': desc,
'Status':'On-time'
})
This code looks very familiar to the Create List code seen earlier in the chapter. The first thing we do is specify the type of item being created; in this case, an SP.Data.Demo_x0020_ListListItem. The type of the item always includes the name of the list from which it is being created, and it follows this pattern:
SP.Data.<LISTNAME>ListItem
In this example, since our list is titled Demo List, we have to include the _x0020_, which SharePoint uses to represent a space. For the Title and Description, we simply pass in the values that we retrieved earlier. For the Status column, we simply hard-code a value of On-time. Since we are performing a POST, we include the X-RequestDigest header. The success function will simply display a message to the user that the item was added to the list.
Results
Set the Content Link property of the Content Editor Web Part to the HTML file and save the page. The page will show the textboxes for the user to input the details. It will display a success message when an item is added, as shown in Figure 9-9.
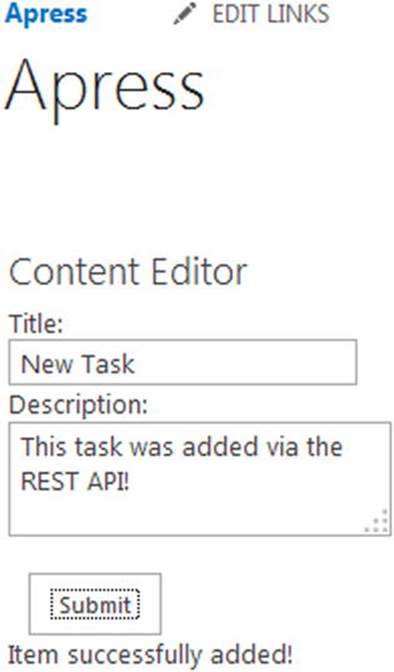
Figure 9-9.
Adding a new item to the Demo List
We can then navigate to the Demo List to confirm that a new item was added. Figure 9-10 shows the Demo List with a new list item added and with the values supplied by the HTML page.
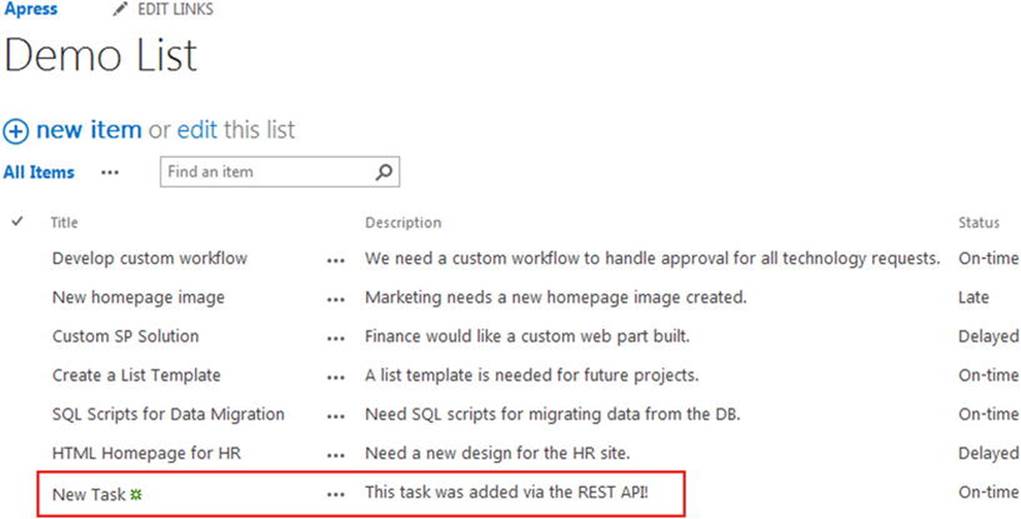
Figure 9-10.
A new list item added to the Demo List
Delete List Items
For this example we’ll simply delete the new list item we created in the previous section.
HTML
Create a new HTML file in Visual Studio and name it RESTDeleteListItems.html. The HTML for this file will be much smaller, as all we need to capture from the user is an ID corresponding to the list item that they wish to delete. This is accomplished with the following lines:
<script type="text/javascript" src="/apress/Webparts/chapter 9/RESTDeleteListItems.js"></script>
<div>
Enter ID to Delete: <input type="text" id="txtId" />
</div>
<div>
<input id="btnSubmit" type="button" value="Submit" />
</div>
<div id="divResult"></div>
This example is overly simplified, in that a user will most likely not know the ID of a certain list item to delete. A more real-world example would most likely show the user a list of items and allow them to click one to delete it. In such a scenario, you would have the list item IDs on the page and you could easily access it. We’ll keep a simple textbox to keep the example streamlined.
JavaScript
Create a new JavaScript file in Visual Studio and name it RESTDeleteListItems.js. Include the following code:
$(function () {
bindButtonClick();
});
function bindButtonClick() {
$("#btnSubmit").on("click", function () {
deleteListItem();
});
}
function deleteListItem() {
var id = $("#txtId").val();
var siteUrl = _spPageContextInfo.webAbsoluteUrl;
var fullUrl = siteUrl + "/_api/web/lists/GetByTitle('Demo List')/items(" + id + ")";
$.ajax({
url: fullUrl,
type: "POST",
headers: {
"accept": "application/json;odata=verbose",
"content-type": "application/json;odata=verbose",
"X-RequestDigest": $("#__REQUESTDIGEST").val(),
"X-HTTP-Method": "DELETE",
"IF-MATCH": "*"
},
success: onQuerySucceeded,
error: onQueryFailed
});
}
function onQuerySucceeded(sender, args) {
$("#divResult").html("Item successfully deleted!");
}
function onQueryFailed() {
alert('Error!');
}
The deleteListItem() function will be called on the button click event on the page. The first thing we do is grab the ID that the user entered on the page. This is accomplished using the following line:
var id = $("#txtId").val();
Next, we craft the REST URL targeting the specific list item by its ID:
var siteUrl = _spPageContextInfo.webAbsoluteUrl;
var fullUrl = siteUrl + "/_api/web/lists/GetByTitle('Demo List')/items(" + id + ")";
You can request or target a single list item by including its ID in parentheses at the end of the URL. The full URL would look like the following:
http://<DOMAIN>/<SITE>/_api/web/lists/GetByTitle('<LISTNAME>')/items(<ID>)
Just as before, when deleting a list, we include the "X-HTTP-Method": "DELETE" and "IF-MATCH": "*" headers when making the AJAX call. The success method will simply display a message to the user, informing them that the delete has been completed.
Results
Set the Content Link property of the Content Editor Web Part to the HTML file and save the page. The page will show the textbox for the user to input the ID and will then display a success message when an item is deleted, as shown in Figure 9-11.
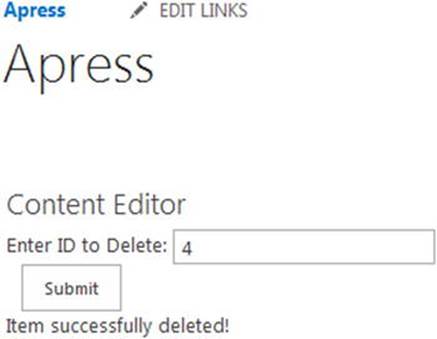
Figure 9-11.
Deleting a list item using REST
Working with Document Libraries
One of SharePoint’s main strengths lies in document management and it’s document libraries. You will certainly find requirements where you will need to work with libraries via code. In this section, we’ll look at some of the ways you can interact with document libraries using the REST API.
Create a New Folder
Folders are something SharePoint users love to create, and in this example we’ll see how to create one via code.
HTML
Create a new HTML file in Visual Studio and name it RESTCreateFolder.html. The markup for this page is quite simple, allowing the user to enter a name for the folder that they wish to create. It consists of the following lines:
<script type="text/javascript" src="/apress/Webparts/chapter 9/RESTCreateFolder.js"></script>
<div>
<strong>Enter a name for the folder:</strong>
<input type="text" id="txtFolderName" />
<input type="button" id="btnSubmit" value="Submit" />
</div>
<div id="divResults"></div>
JavaScript
Create a new JavaScript file in Visual Studio and name it RESTCreateFolder.js. Include the following code:
$(function () {
bindButtonClick();
});
function bindButtonClick() {
$("#btnSubmit").on("click", function () {
createFolder();
});
}
function createFolder() {
var folderName = $("#txtFolderName").val();
var siteUrl = _spPageContextInfo.webAbsoluteUrl;
var fullUrl = siteUrl + "/_api/web/folders";
$.ajax({
url: fullUrl,
type: "POST",
data: JSON.stringify({
'__metadata': { 'type': 'SP.Folder' },
'ServerRelativeUrl': 'Shared Documents/' + folderName
}),
headers: {
"accept": "application/json;odata=verbose",
"content-type": "application/json;odata=verbose",
"X-RequestDigest": $("#__REQUESTDIGEST").val()
},
success: onQuerySucceeded,
error: onQueryFailed
});
}
function onQuerySucceeded() {
$("#divResults").html("Folder successfully created!");
}
function onQueryFailed() {
alert('Error!');
}
After using jQuery to wire up the button click, the createFolder() function begins with grabbing the name of the folder that the user entered on the page:
var folderName = $("#txtFolderName").val();
Next, we create the REST URL, but this time we target the Folders collection for the site:
var siteUrl = _spPageContextInfo.webAbsoluteUrl;
var fullUrl = siteUrl + "/_api/web/folders";
This breaks from the familiar pattern that we’ve seen up to this point, in that we’re requesting a URL that is not specifically where we want to create the folder. We specify where the folder should reside in the data property:
data: JSON.stringify({
'__metadata': { 'type': 'SP.Folder' },
'ServerRelativeUrl': 'Shared Documents/' + folderName
})
The ServerRelativeUrl property is used to tell SharePoint where the folder should be created. In this example, we’ll create it in the Shared Documents folder and append the folder name that the user entered on the page. As with the previous examples, we specify a “type” for the item, which in this case is an SP.Folder. We include the familiar headers and notify the user of the folder creation in the success method.
Results
Set the Content Link property of the Content Editor Web Part to the HTML file and save the page. The page will show the textbox for the user to input the name of the folder to be created, and will then display a success message when completed, as shown in Figure 9-12.
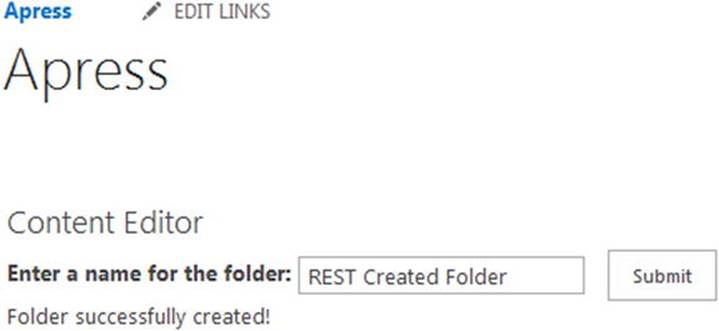
Figure 9-12.
Creating a new folder with REST
We can then navigate to the Documents library to visually verify that the new folder was created, as shown in Figure 9-13.
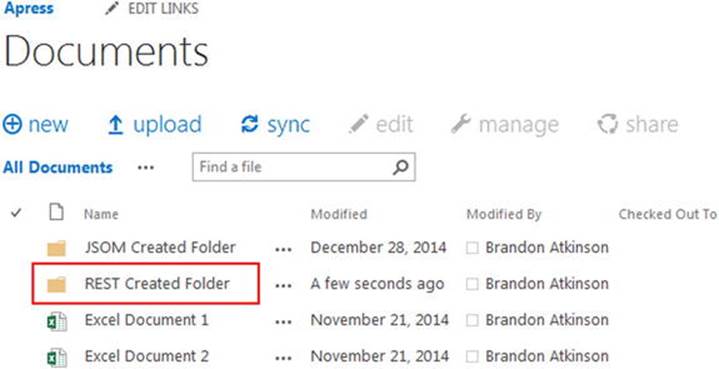
Figure 9-13.
New folder created via REST
Working with Files
There will be times you will need to work with files in your custom solutions. In this section, we’ll see how to create, read, and delete text files using REST.
Create a New File
In this example, we’ll see how you can create a new text file via code.
HTML
Create a new HTML file in Visual Studio and name it RESTCreateDocument.html. The markup for this page will allow the user to enter a name for a new text file, as well as the content for the file itself. It consists of the following lines:
<script type="text/javascript" src="/apress/Webparts/chapter 9/RESTCreateDocument.js"></script>
<div id="CreateFile">
<div>
<strong>Enter a title for the document:</strong>
<br />
<input type="text" id="txtDocumentTitle" />
</div>
<div>
<strong>Enter content for the document:</strong>
<br />
<textarea cols="20" id="txtDocumentContent"></textarea>
</div>
<br />
<input type="button" id="btnSubmit" value="Submit" />
</div>
<div id="divResults"></div>
JavaScript
Create a new JavaScript file in Visual Studio and name it RESTCreateDocument.js. Include the following code:
$(function () {
bindButtonClick();
});
function bindButtonClick() {
$("#btnSubmit").on("click", function () {
createDocument();
});
}
function createDocument() {
var docTitle = $("#txtDocumentTitle").val() + ".txt";
var docContent = $("#txtDocumentContent").val();
var siteUrl = _spPageContextInfo.webAbsoluteUrl;
var fullUrl = siteUrl + "/_api/web/GetFolderByServerRelativeUrl('Shared Documents')/Files/add(url='" + docTitle + "',overwrite=true)";
$.ajax({
url: fullUrl,
type: "POST",
data: docContent,
headers: {
"accept": "application/json;odata=verbose",
"content-type": "application/json;odata=verbose",
"X-RequestDigest": $("#__REQUESTDIGEST").val()
},
success: onQuerySucceeded,
error: onQueryFailed
});
}
function onQuerySucceeded() {
$("#divResults").html("Document successfully created!");
}
function onQueryFailed() {
alert('Error!');
}
The first thing that we need to do is grab the document title and the content that the user entered on the page. This is accomplished with the following lines:
var docTitle = $("#txtDocumentTitle").val() + ".txt";
var docContent = $("#txtDocumentContent").val();
Notice that we append .txt to the end of the document title. This will let SharePoint know that we intend to create a text file, as it will use the extension in the name to determine the file type. Next, we build the REST URL:
var siteUrl = _spPageContextInfo.webAbsoluteUrl;
var fullUrl = siteUrl + "/_api/web/GetFolderByServerRelativeUrl('Shared Documents')/Files/add(url='" + docTitle + "',overwrite=true)";
This is by far the most complex REST URL that we’ve crafted so far. In order to reference the folder where we want to create the file, we need to include the GetFolderByServerRelativeUrl command, passing in the folder name; in this case, Shared Documents. We then target the Files collection in the folder and use the add command to actually create the file. We can pass in properties for the file; in this case, the URL and the Overwrite flag. The content of the file is passed in via the data property in the AJAX call:
$.ajax({
url: fullUrl,
type: "POST",
data: docContent,
headers: {
"accept": "application/json;odata=verbose",
"content-type": "application/json;odata=verbose",
"X-RequestDigest": $("#__REQUESTDIGEST").val()
}
The success function displays a message to the user that the file has been created.
Note
In this example, we are creating a simple text file. In most real-world scenarios, a text file would not be the intended result, but perhaps a Word file or an Excel file instead. You could absolutely change this example to generate a Word document by simply changing the .txt to .docx. This simple change would in fact create a new Word document with the content in it. However, it could only be opened in Word on the client machine, not Office Web Apps. Luckily, there are Office JavaScript files available via Microsoft to allow you to create and manipulate Office files from the browser. You can find more information at http://msdn.microsoft.com/en-us/library/office/fp160953%28v=office.15%29.aspx .
Results
Set the Content Link property of the Content Editor Web Part to the HTML file and save the page. The page will show textboxes for the user to input the title of the document and the content, and will then display a success message when the new document has been created, as shown in Figure 9-14.
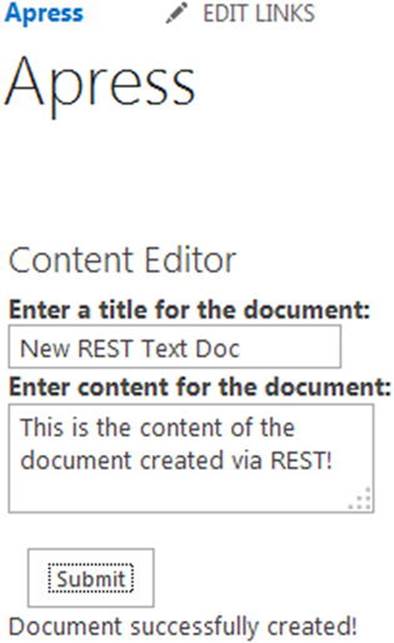
Figure 9-14.
Creating a new document from a Content Editor Web Part
We can navigate to the Documents folder and find that the new text document has been created, as shown in Figure 9-15. You can click the document and it will open in the browser and display the contents that the user entered from the page.
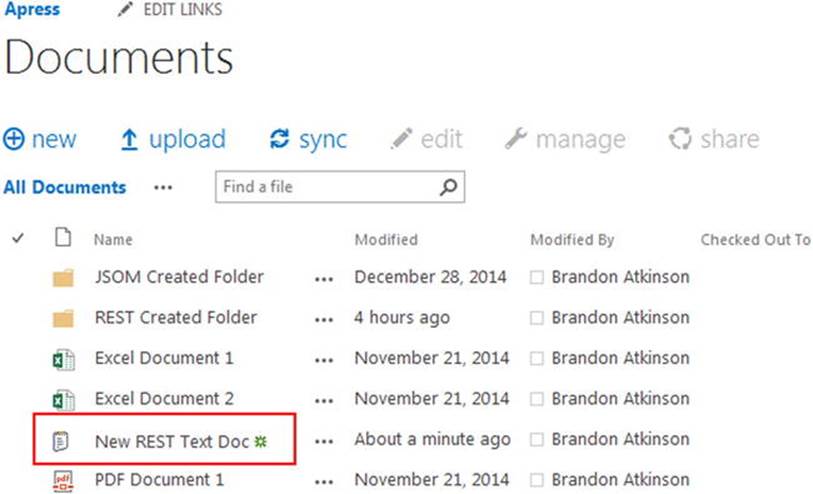
Figure 9-15.
New text document created in the Documents folder
Read a File
In this example, we’ll see how to read the text file we just created and display the contents to the user.
HTML
Create a new HTML file in Visual Studio and name it RESTReadDocument.html. It consists of the following lines:
<script type="text/javascript" src="/apress/Webparts/chapter 9/RESTReadDocument.js"></script>
<div id="divReadDocument" />
JavaScript
Create a new JavaScript file in Visual Studio and name it RESTReadDocument.js. Include the following code:
$(function () {
readDocument();
});
function readDocument() {
var siteUrl = _spPageContextInfo.webAbsoluteUrl;
var documentLibrary = "/Shared Documents/"
var fileUrl = "New Text Doc.txt";
var fullUrl = siteUrl + documentLibrary + fileUrl;
$.ajax({
url: fullUrl,
type: "GET"
})
.done(function (data) {
$("#divReadDocument").html(data);
})
.fail(function () {
alert("error");
});
}
This is the same code example from the previous chapter, as it does not require JSOM or REST! If you skipped the JSOM chapter, read on; otherwise, the only thing that has changed are the file references.
The beauty of reading a text file from SharePoint is all that you need is jQuery. There is a simple jQuery Document.ready function that will fire the code to read the file. We’ll intentionally keep this code simple and hard-code the file name for the document we just created:
var siteUrl = _spPageContextInfo.webAbsoluteUrl;
var documentLibrary = "/Shared Documents/"
var fileUrl = "New REST Text Doc.txt";
var fullUrl = siteUrl + documentLibrary + fileUrl;
The first thing we do is get the current web’s full URL using _spPageContextInfo.webAbsoluteUrl. Next, we hard-code the document library portion of the URL and the file name. Finally, we put them all together into a new variable called fullUrl. You could absolutely have done all of that in one line, but you’ll find it’s easier to debug your code later if you break it up into smaller lines. Once we have the URL for the file, we use a jQuery AJAX call to get the document:
$.ajax({
url: fullUrl,
type: "GET"
})
.done(function (data) {
$("#divReadDocument").html(data);
})
.fail(function () {
alert("error");
});
When retrieving a text file via AJAX in jQuery, the content will be returned as text and we can simply output that to the page without any modifications. We use the jQuery .done function, setting the content of the file to a new variable called data. Then, we set the data to the HTML of the results DIV on the page.
Note
As before, when creating a new file, we kept things simple by utilizing a text file. This is also true for this section and reading a file. You cannot read an Office file using the method described earlier. You will need to utilize the Office JavaScript files to properly read a Word file or an Excel file in the browser. You can find more information at http://msdn.microsoft.com/en-us/library/office/fp160953%28v=office.15%29.aspx .
Results
Set the Content Link property of the Content Editor Web Part to the HTML file and save the page. The page will display the contents of the text file, as shown in Figure 9-16.
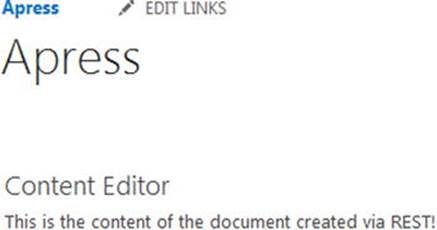
Figure 9-16.
Contents of the text file displayed on the page
Delete a File
In this example, we’ll simply delete the newly created text file.
HTML
Create a new HTML file in Visual Studio and name it RESTDeleteDocument.html. The markup for this page has a textbox for the user to enter the name of the file that they wish to delete. It consists of the following lines:
<script type="text/javascript" src="/apress/Webparts/chapter 9/RESTDeleteDocument.js"></script>
<div id="DeleteFile">
<div>
<strong>Enter the name of document to delete:</strong>
<br />
<input type="text" id="txtDocumentTitle" />
</div>
<br />
<input type="button" id="btnSubmit" value="Submit" />
</div>
<div id="divResults"></div>
JavaScript
Create a new JavaScript file in Visual Studio and name it RESTDeleteDocument.js. Include the following code:
$(function () {
bindButtonClick();
});
function bindButtonClick() {
$("#btnSubmit").on("click", function () {
deleteDocument();
});
}
function deleteDocument() {
var docTitle = $("#txtDocumentTitle").val() + ".txt";
var siteUrl = _spPageContextInfo.webAbsoluteUrl;
var webRelUrl = _spPageContextInfo.webServerRelativeUrl;
var fullUrl = siteUrl + "/_api/web/GetFileByServerRelativeUrl('" + webRelUrl + "/Shared Documents/" + docTitle + "')";
$.ajax({
url: fullUrl,
type: "POST",
headers: {
"accept": "application/json;odata=verbose",
"content-type": "application/json;odata=verbose",
"X-RequestDigest": $("#__REQUESTDIGEST").val(),
"X-HTTP-Method": "DELETE",
"IF-MATCH": "*"
},
success: onQuerySucceeded,
error: onQueryFailed
});
}
function onQuerySucceeded() {
$("#divResults").html("Document successfully deleted!");
}
function onQueryFailed(sender, args) {
alert('Error!');
}
After wiring up the button click event, the first that we do is grab the title of the document that the user wishes to delete:
var docTitle = $("#txtDocumentTitle").val() + ".txt";
We’ll keep this example simple and delete the text file that was created earlier, and thus hard-code the .txt extension into the code. Next, we build the REST URL as we’ve done in all the previous examples:
var siteUrl = _spPageContextInfo.webAbsoluteUrl;
var webRelUrl = _spPageContextInfo.webServerRelativeUrl;
var fullUrl = siteUrl + "/_api/web/GetFileByServerRelativeUrl('" + webRelUrl + "/Shared Documents/" + docTitle + "')";
For this example, in addition to getting the web’s absolute URL, webAbsoluteUrl, we also need to the get the server-relative URL, webServerRelativeUrl. Where the absolute URL looks like http://<DOMAIN>/<SITE>, the server-relative URL of the site looks like /<SITE>. We need this value to properly target the file in the REST URL. In order to delete the file, we need to utilize the GetFileByServerRelativeUrl command, passing in the relative URL to the file. In this case, we combine the server relative URL, /Shared Documents/ and the document title that the user passed in.
As with the other delete operations, we include the "X-HTTP-Method": "DELETE" and "IF-MATCH": "*" headers. The success function will simply notify the user that the delete took place.
Results
Set the Content Link property of the Content Editor Web Part to the HTML file and save the page. The page will display a textbox for the user to enter the document title and display a result message, as shown in Figure 9-17.
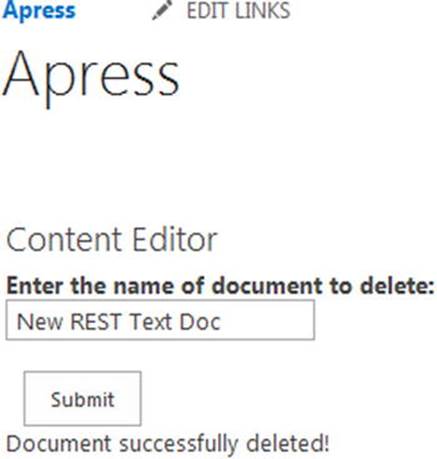
Figure 9-17.
Deleting a file via REST
Working with Sites
Creating new sites in SharePoint is a common task. In this section, we’ll see how to create and delete a site using the REST API. The previous examples definitely illustrated the power of the REST API, and this section should drive home just how much power it offers you in your development efforts.
Create a Site
In this example, we’ll create a new site and set several of it’s properties.
HTML
Create a new HTML file in Visual Studio and name it RESTCreateSite.html. The markup for this page has a textbox for the user to enter the name of the new site, as well as a textbox for a site description. It consists of the following lines:
<script type="text/javascript" src="/apress/Webparts/chapter 9/RESTCreateSite.js"></script>
<div id="DeleteFile">
<div>
<strong>Enter the name of the site:</strong>
<br />
<input type="text" id="txtSiteTitle" />
</div>
<br />
<div>
<strong>Enter site description:</strong>
<br />
<textarea cols="20" id="txtSiteDescription"></textarea>
</div>
<br />
<input type="button" id="btnSubmit" value="Submit" />
</div>
<div id="divResults"></div>
JavaScript
Create a new JavaScript file in Visual Studio and name it RESTCreateSite.js. Include the following code:
$(function () {
bindButtonClick();
});
function bindButtonClick() {
$("#btnSubmit").on("click", function () {
createSite();
});
}
function createSite() {
var newSiteTitle = $("#txtSiteTitle").val();
var newSiteDesc = $("#txtSiteDescription").val();
var newSiteUrl = newSiteTitle.replace(/\s/g, "");
var siteUrl = _spPageContextInfo.webAbsoluteUrl;
var fullUrl = siteUrl + "/_api/web/webinfos/add";
$.ajax({
url: fullUrl,
type: "POST",
data: JSON.stringify({
'parameters': {
'__metadata': {'type': 'SP.WebInfoCreationInformation' },
'Url': newSiteUrl,
'Title': newSiteTitle,
'Description': newSiteDesc,
'Language':1033,
'WebTemplate':'sts#0',
'UseUniquePermissions': false
}
}),
headers: {
"accept": "application/json;odata=verbose",
"content-type": "application/json;odata=verbose",
"X-RequestDigest": $("#__REQUESTDIGEST").val()
},
success: onQuerySucceeded,
error: onQueryFailed
});
}
function onQuerySucceeded() {
$("#divResults").html("Site successfully created!");
}
function onQueryFailed(sender, args) {
alert('Error!');
}
Creating a new site takes a bit more code, but it should all be very familiar by now. First, we grab the Title and Description that the user submitted. This is accomplished using the following lines:
var newSiteTitle = $("#txtSiteTitle").val();
var newSiteDesc = $("#txtSiteDescription").val();
var newSiteUrl = newSiteTitle.replace(/\s/g, "");
When you create a site, you must provide a URL for the site in addition to the Title. For this example, we’ll simply take the text the user entered for the Title and remove all the spaces to make the URL. This is done using the replace() method in JavaScript, with the first parameter being what we are searching for, and the second being what it should be replaced with. The /\s/g text denotes a space and must be used for this function to work properly.
Once we have the variables needed for site creation, we create the REST URL, but this time we target the Webinfos collection for the site:
var siteUrl = _spPageContextInfo.webAbsoluteUrl;
var fullUrl = siteUrl + "/_api/web/webinfos/add";
Similar to when we created a new folder, we’re targeting a location that is different from where the site will ultimately reside. We also include the add command in the URL; this is different from the other creation scripts so far. Next, we create the AJAX call in jQuery:
$.ajax({
url: fullUrl,
type: "POST",
data: JSON.stringify({
'parameters': {
'__metadata': {'type': 'SP.WebInfoCreationInformation' },
'Url': newSiteUrl,
'Title': newSiteTitle,
'Description': newSiteDesc,
'Language':1033,
'WebTemplate':'sts#0',
'UseUniquePermissions': false
}
})
This example differs from previous ones when passing in the data using the JSON.strigify() method. You’ll notice that we have to create a parameters object that then contains all the information for creating the new site. This was not required for the other examples. There is nothing of note about this object, as it simply serves as a wrapper for the data inside; however, SharePoint expects it and will not create a site without this structure in place.
First, we specify the “type” and in this case it’s an SP.WebInfoCreationInformation type. If you worked through the JSOM examples in the previous chapter, you’ll recognize this as the same object used to create sites using JSOM. The remainder of the properties are fairly straightforward: we pass in the site title, URL, and description variables that were created earlier. We also pass in a Language setting (1033 for English), as well as the WebTemplate (sts#0, which is a Team Site Template). The success function will display a success message once the site has been created.
Note
Again, the code in these examples run under the permission level of the current user. Since a lot of these examples perform higher-level functions like creating and deleting SharePoint objects, the user needs to have appropriate permissions to perform these functions. It’s worth pointing this out again, as site creation requires the user to have Full Control permissions for the site where the new web is being created.
Results
Set the Content Link property of the Content Editor Web Part to the HTML file and save the page. The page will display textboxes for the user to enter the new site title and description, and display a result message, as shown in Figure 9-18.
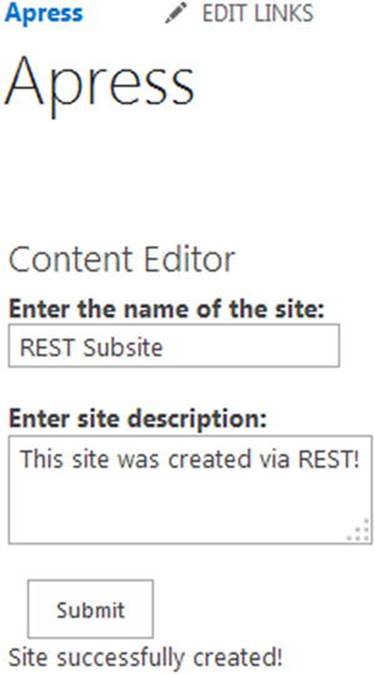
Figure 9-18.
Creating a new site via REST
We can then open the Site Contents page where the new site was created, and scroll to the bottom. In the Subsites section, we can see that the new site has been created, as shown in Figure 9-19.

Figure 9-19.
The newly created sub-site in the Site Contents page
Delete a Site
In this example, we’ll delete the site we created in the previous section.
HTML
Create a new HTML file in Visual Studio and name it RESTDeleteSite.html. The markup for this page has a textbox for the user to enter the name of the site that they would like to delete. It consists of the following lines:
<script type="text/javascript" src="/apress/Webparts/chapter 9/RESTDeleteSite.js"></script>
<div id="DeleteFile">
<div>
<strong>Enter the name of the site to delete:</strong>
<br />
<input type="text" id="txtSiteTitle" />
</div>
<br />
<input type="button" id="btnSubmit" value="Submit" />
</div>
<div id="divResults"></div>
JavaScript
Create a new JavaScript file in Visual Studio and name it RESTDeleteSite.js. Include the following code:
$(function () {
bindButtonClick();
});
function bindButtonClick() {
$("#btnSubmit").on("click", function () {
deleteSite();
});
}
function deleteSite() {
var siteTitle = $("#txtSiteTitle").val();
var siteTitleNoSpaces = siteTitle.replace(/\s/g, "");
var siteUrl = _spPageContextInfo.webAbsoluteUrl;
var fullUrl = siteUrl + "/" + siteTitleNoSpaces + "/_api/web";
$.ajax({
url: fullUrl,
type: "POST",
headers: {
"accept": "application/json;odata=verbose",
"content-type": "application/json;odata=verbose",
"X-RequestDigest": $("#__REQUESTDIGEST").val(),
"X-HTTP-Method": "DELETE",
"IF-MATCH": "*"
},
success: onQuerySucceeded,
error: onQueryFailed
});
}
function onQuerySucceeded() {
$("#divResults").html("Site successfully deleted!");
}
function onQueryFailed(sender, args) {
alert('Error!');
}
Just like in the previous example, we grab the title of the site that the user entered and then remove all the spaces:
var siteTitle = $("#txtSiteTitle").val();
var siteTitleNoSpaces = siteTitle.replace(/\s/g, "");
Once we have the title and have removed the spaces, we need to construct the REST URL to the site:
var siteUrl = _spPageContextInfo.webAbsoluteUrl;
var fullUrl = siteUrl + "/" + siteTitleNoSpaces + "/_api/web";
Deleting a site is no different from any of the other delete operations performed so far. All we need to do is include the "X-HTTP-Method": "DELETE" and "IF-MATCH": "*" headers. The success function will display a message to the user, informing them that the delete has taken place.
Results
Set the Content Link property of the Content Editor Web Part to the HTML file and save the page. The page will display a textbox for the user to enter the site title, and display a result message, as shown in Figure 9-20.
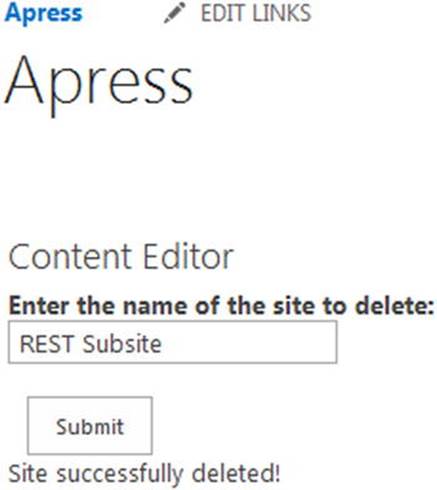
Figure 9-20.
Deleting a subsite via REST
In this example, we’ll delete the site that we just recently created. Navigating back to the Site Contents page will show that the subsite was successfully deleted, as shown in Figure 9-21.

Figure 9-21.
Site has been removed from the root site
Working with Social Data
Social data is a hot topic in SharePoint 2013 and something you should become familiar with as you begin creating custom solutions. In this section, we’ll see how to retrieve some social data and display this to the currently logged-in user.
HTML
Create a new HTML file in Visual Studio and name it RESTGetSocialData.html. The markup for this page will include a couple of DIVs and a SPAN to output data to. It consists of the following lines:
<script type="text/javascript" src="/apress/Webparts/chapter 9/RESTGetSocialData.js"></script>
<link rel="stylesheet" type="text/css" href="/apress/Webparts/chapter 9/RESTGetSocialData.css" />
<div id="WelcomeMessage">
Welcome back <span id="WelcomeMessageUserName"></span>
</div>
<div id="UserFollows" />
We’ll include a custom CSS file titled RESTGetSocialData.css. It will be used to style the output from the script. All of the other examples could have easily included CSS for styling. You’ll find in your custom development efforts that styling will play a big role in a lot of your web parts, so this example will show you how easy it is to include.
JavaScript
Create a new JavaScript file in Visual Studio and name it RESTGetSocialData.js. Include the following code:
$(function () {
getUserProfileInfo();
getUserFollows();
});
function getUserProfileInfo() {
var siteUrl = _spPageContextInfo.webAbsoluteUrl;
var fullUrl = siteUrl + "/_api/social.feed/my";
$.ajax({
url: fullUrl,
type: "GET",
headers: {
"accept": "application/json;odata=verbose",
"content-type": "application/json;odata=verbose",
},
success: onUserInfoQuerySucceeded,
error: onQueryFailed
});
}
function getUserFollows() {
var siteUrl = _spPageContextInfo.webAbsoluteUrl;
var fullUrl = siteUrl + "/_api/social.following/my/followed(types=15)";
$.ajax({
url: fullUrl,
type: "GET",
headers: {
"accept": "application/json;odata=verbose",
"content-type": "application/json;odata=verbose",
},
success: onFollowQuerySucceeded,
error: onQueryFailed
});
}
function onUserInfoQuerySucceeded(data) {
$("#WelcomeMessageUserName").text(data.d.Me.Name);
}
function onFollowQuerySucceeded(data) {
var following = data.d.Followed.results;
var followedItems = "Items you are following:<br />";
$.each(following, function (index, value) {
followedItems += "<a href='" + value.Uri + "'>" + value.Name + "</a><br />";
});
$("#UserFollows").append(followedItems);
}
function onQueryFailed(sender, args) {
alert("Error");
}
The first thing that should strike you about this example is the introduction of a second function to retrieve data. We have one function to retrieve the user profile information, and another to retrieve the “following” information. This is because the REST endpoints for this data are different, and thus two calls are required to retrieve everything that we wish to show on the page.
Note
In the previous chapter, we discussed how you could “batch” JSOM requests using batch processing. This allows you wrap all your different requests for data into a single call, which improves performance. SharePoint Online and Office 365 supports batch processing when using the REST API via the $batch query operator. Using this, you could optimize the performance of this example. However, batch processing using the REST API is an in-depth topic and outside the scope of this book. It’s more important that you know that it’s available. You can read more about it athttp://msdn.microsoft.com/EN-US/library/office/dn903506%28v=office.15%29.aspx .
The first function, getUserProfileInfo, is used to retrieve the display name for the user. To get this information, we’ll utilize the social feed REST API:
var siteUrl = _spPageContextInfo.webAbsoluteUrl;
var fullUrl = siteUrl + "/_api/social.feed/my";
This URL looks a bit different from all the other endpoints in the REST API in that is has a social.feed as part of the URL. The social feed has two components, Feed and Following, and this format is how we target each component. User information is found under the my endpoint and you can find additional information like News, Likes, and so forth, for each user.
Note
The social feed exposes a lot of data about users. In this example, all we’ll show is the display name for user, but you have access to much more. You can find more information about what is available at http://msdn.microsoft.com/EN-US/library/office/dn155789%28v=office.15%29.aspx .
The success function pulls the display name from the results:
$("#WelcomeMessageUserName").text(data.d.Me.Name);
The results from the social feed are also a little different than in previous examples. As you can see, we have the familiar data.d object, but the user data is further nested under an object named Me, from which we can get the Name property.
The second function, getUserFollows, is used to retrieve all the items that the user is following. To get this information, we’ll utilize the social.following feed:
var siteUrl = _spPageContextInfo.webAbsoluteUrl;
var fullUrl = siteUrl + "/_api/social.following/my/followed(types=15)";
We can then obtain all the actors that the user is following using the followed endpoint. An actor is really just anything the user follows, which can be users, documents, sites, or tags. When you call the followed endpoint, you need to pass in a number that corresponds to the actors that you want returned. In this example, we use 15, which indicates all actors.
You can see the full list of values at http://msdn.microsoft.com/en-us/library/microsoft.sharepoint.client.social.socialactortypes(v=office.15).aspx .
Note
The following feed also exposes a lot of data about users. You can find more information at http://msdn.microsoft.com/EN-US/library/office/dn194080%28v=office.15%29.aspx .
The success function contains a jQuery loop where we build the HTML to display all the items that the user is following:
var following = data.d.Followed.results;
var followedItems = "Items you are following:<br />";
$.each(following, function (index, value) {
followedItems += "<a href='" + value.Uri + "'>" + value.Name + "</a><br />";
});
$("#UserFollows").append(followedItems);
Much like the user info, the following data is nested inside the data.d object in an object called Followed. This contains the familiar results object, which holds all the items. We create a new variable to hold all the followed items. Next, we loop through each item using a jQuery each loop. For each item, we get the Uri, the URL to the item, and the Name, in order to construct a link so that the user can jump directly to the item from the page. Finally, we append all the HTML to the page with the following line:
$("#UserFollows").append(followedItems);
CSS
Create a new CSS file in Visual Studio and name it RESTGetSocialData.css. Include the following code:
#WelcomeMessage {
margin-bottom: 20px;
}
#WelcomeMessageUserName {
font-weight: bold;
}
#UserFollows {
border:dashed 1px #C0C0C0;
width:240px;
padding: 6px;
}
This CSS is very basic and it is only intended to provide a simple demonstration of styling. We’ll apply a bottom margin on the welcome message to the user, and put the user name in bold. The followed items will be wrapped in a dashed border for emphasis.
Results
Set the Content Link property of the Content Editor Web Part to the HTML file and save the page. The page will display a “Welcome back” message to the user, along with their name in bold. Directly underneath is a list of all the items that they are following, displayed as hyperlinks, as shown in Figure 9-22.

Figure 9-22.
Social data being retrieved via REST
Summary
In this chapter, we took a deep dive into the REST API and looked at how it can be used to create custom web parts using the Etherson method. We looked at wide variety of examples: querying for list data, creating new lists and sites, and querying for social data about users. Even though this was a long chapter in comparison to others in this book, it only scratched the surface on what is possible with REST in SharePoint. However, after working through all the examples presented here, you should have a very firm grasp on working with the REST API and on how HTML, JavaScript, and CSS all work together in a custom web part. You should now be comfortable enough to begin crafting your own custom solutions using REST.
All materials on the site are licensed Creative Commons Attribution-Sharealike 3.0 Unported CC BY-SA 3.0 & GNU Free Documentation License (GFDL)
If you are the copyright holder of any material contained on our site and intend to remove it, please contact our site administrator for approval.
© 2016-2026 All site design rights belong to S.Y.A.