Creating a Website: The Missing Manual (2015)
Part 2. From Web Page to Website
Chapter 9. Getting Your Site Online
By this point, you know how to build a complete, basic website. You’ve written HTML pages, formatted them with style sheets, incorporated some pictures, and linked everything together. But all this work is for naught if you don’t put your page online so your legions of fans (or your uncle Dan in Fresno) can visit it on the Web.
In this chapter, you’ll learn how web servers work and how to put them to work for you. Armed with these high-tech nerd credentials, you’ll be ready to search for your own web host, a company that lets you park your site on its web server. All you need to do is figure out your requirements, see which hosts offer what you need, and start comparison-shopping.
How Web Hosting Works
As you learned in Chapter 1, the Web isn’t stored on any single computer, and no company owns it. Instead, the individual pieces (websites) are scattered across millions of computers known as web servers. And while it may seem like all these sites are part of a single environment, in reality, the Internet is just a set of standards that let independent computers talk to one another.
Understanding Web Servers
Web servers are the computers that store HTML pages. When you type a web address into your browser, the browser sends your request to the web server that hosts the site. When the server receives the request, it carries out a simple and essential task—it serves the corresponding page to the person who wants it.
For a busy website, this basic task can add up to a lot of work. As a result, web servers tend to be industrial-strength computers. Even though the average Windows PC with the right setup can host a website, it’s rarely worth the effort (see the box on Uploading in Expression Web). Instead, most people get a commercial company, called a web host, to rent them a little space on one of their servers for a small monthly fee. In other words, to put your site online, you need to lease some space on the Web.
Sometimes, you can rent this space from the same company you use to get online in the first place, called an Internet service provider, or ISP; it may even include server space as part of your Internet connection package. But the most straightforward way to get your site online is to use a web hosting company. Either way, you’re going to copy your newly built website to some far-off computer that will make sure a worldwide audience can enjoy your talents.
Understanding URLs
Now that you know where you’re going to put your site (on a web server), it’s time to answer another question—how does a browser know which of the thousands of web servers to call when someone requests one of your pages? The process involves a bit of traffic direction, and it starts with the URL (Uniform Resource Locator), which is simply the website address a web surfer types into his browser.
A URL consists of several pieces. Some are optional, because a browser or web server can fill in those blanks automatically. Others are required. Figure 9-1 dissects the URL http://www.SellMyJunkForMillions.com/Buyers/listings.htm.
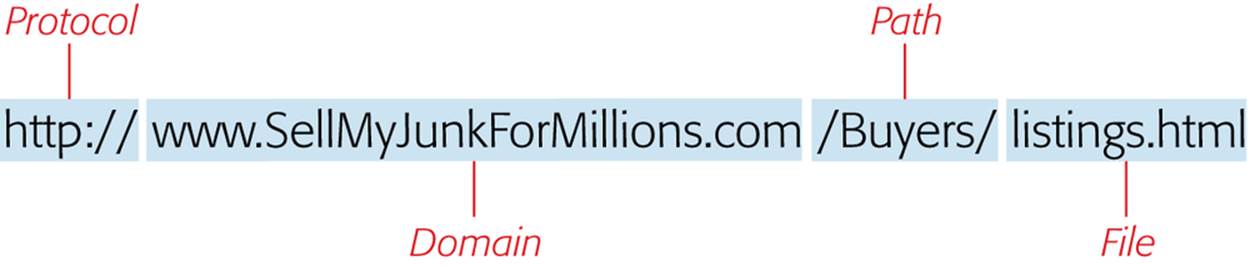
Figure 9-1. The average URL consists of four pieces of information. The first part (the protocol) identifies the web standards the page follows. The second part (the domain) identifies the web server you’re contacting. The third and fourth parts indicate the desired page’s path and filename on that server.
Web addresses pack a lot of detail into a single line of text:
§ The protocol reflects the standard your browser uses to communicate with web servers. Websites always use the HTTP (HyperText Transfer Protocol) standard, which means the protocol portion of a website URL is always http:// or https://. (The latter establishes a super-secure connection to the Web that encrypts sensitive information you submit, like credit card numbers or passwords.) In most browsers, you can get away without typing in this part of the URL. For example, when you type www.google.com, your browser automatically converts it to the full URL, http://www.google.com.
NOTE
Although http:// is the way to go when browsing the Web, depending on your browser, you may use other protocols for other tasks. Common examples include ftp:// (File Transfer Protocol) for uploading and downloading files and file:/// for retrieving a file directly from your own computer’s hard drive.
§ The domain name identifies the server that hosts the site you want to see. By convention, server names usually start with www to identify them as World Wide Web servers. In addition, as you’ll discover later in this chapter, friendly domain names like www.google.com orwww.microsoft.com are really just stand-ins for what your browser really needs in order to locate a server—namely, its numeric address (see How Browsers Analyze a URL).
§ The path identifies the folder where the server stores the web page you’re looking for. This part of the URL can have as many levels as needed. For example, the path /MyFiles/Sales/2011/ refers to a MyFiles folder that contains a Sales folder that, in turn, contains a folder named 2011. Windows fans, take note—the slashes in the path portion of a URL are ordinary forward slashes, not the backward slashes used in Windows file paths (like c:\MyFiles\Current). This convention matches the file paths Unix-based computers use, which were the first machines to host websites. It’s also the convention used in modern Macintosh operating systems.
NOTE
Many browsers are smart enough to correct the common mistake of typing in the wrong type of slash. However, you shouldn’t rely on this because similar laziness can break the web pages you create. For example, if you use the <img> element to link to an image and use the wrong type of slash, your picture won’t appear.
§ The filename is the last part of the path, and it identifies the specific web page you’re requesting. Often, you can recognize it by the file extension .htm or .html, both of which stand for HTML.
NOTE
While web pages often end with .htm or .html, they don’t need to. For example, if you look at a URL and see the strange extension .blackpudding, odds are you’re still looking at an HTML document. In most cases, browsers ignore an extension as long as the file contains information that a browser can interpret. However, just to keep yourself sane, this is one convention you shouldn’t break.
§ The fragment is an optional part of a URL that identifies a specific position within a web page. You can recognize a fragment because it always starts with the number-sign character (#) and appears after a filename. For example, the URL http://www.LousyDeals.com/index.html#Newincludes the fragment #New. When you click the URL, it takes you to the section of the index.html page where the webmaster placed the New bookmark. (You can learn about bookmarks on When Good Links Go Bad.)
§ The query string is an optional part of a URL that some websites use to send extra information from one web page to another. You can identify one because it starts with a question mark (?) and appears after a filename. To see a query string in action, go to Microsoft’s search enginewww.bing.com and search for “pet platypus.” When you click the Search button, Bing creates a URL like http://www.bing.com/search?q=pet+platypus&form=QBLH&filt=all&qs=n. This address is a little tricky to analyze, but if you hunt for the question mark and look to the left of it, you’ll discover that you’re on a page named “search.” The information to the right of the question mark indicates that you’re executing an English-language search for pages that match both the “pet” and “platypus” keywords. When you request this URL, a specialized Microsoft web program analyzes the query string to determine what to search for.
NOTE
You won’t use a query string for your own web pages, because it’s designed for heavy-duty web programs like the one that powers Bing (or Google). By understanding the query string, however, you gain a bit of insight into how other websites work.
How Browsers Analyze a URL
Clearly, URLs include a lot of detail. But how does a browser actually use one to fetch the web page you want? To understand that, take a peek behind the scenes (see Figure 9-2).
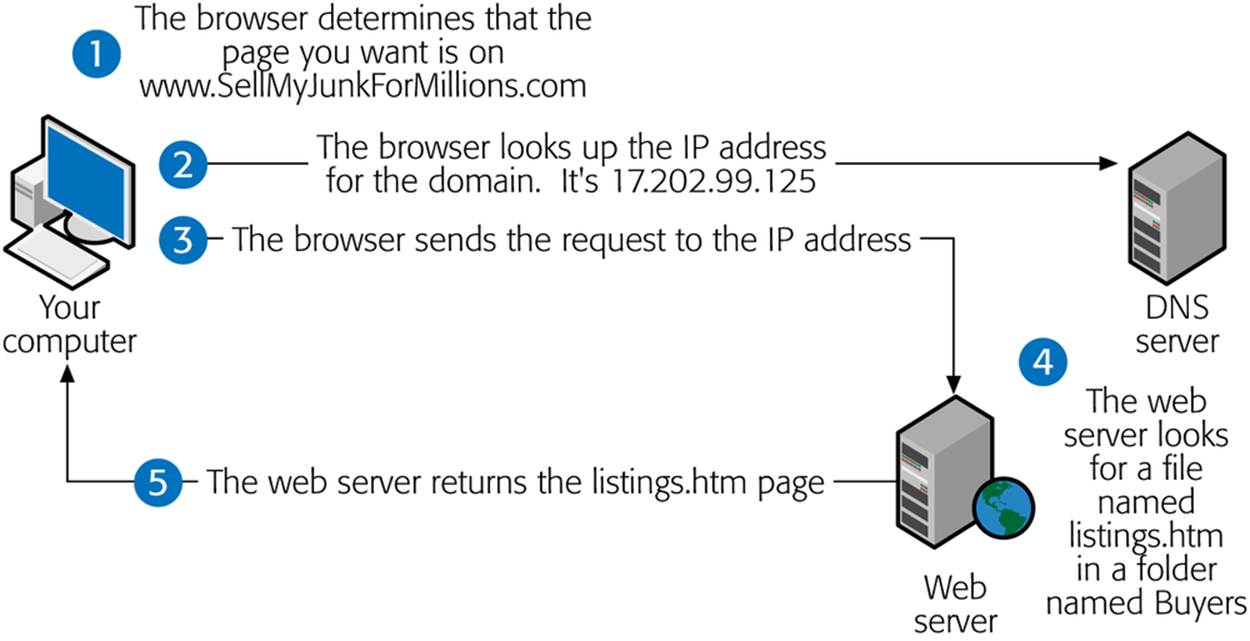
Figure 9-2. A simple web request usually involves a bevy of computers contacting one another in the order indicated earlier. The first computer (the DNS server, number 2) gives you the all-important IP address, letting you track down the second computer (the web server, number 4), which gets you the web page you want (number 5).
For example, after you type http://www.SellMyJunkForMillions.com/Buyers/listings.htm into a browser’s address bar and press Enter, here’s what happens:
1. The browser figures out what web server to contact by extracting the domain name from the URL.
In this example, the domain name is www.SellMyJunkForMillions.com.
2. To find the server that hosts www.SellMyJunkForMillions.com, the browser converts the domain name into a computer-friendly number called the IP address.
Every computer on the Web—from web servers to your own machine—has its own unique IP address. To find the IP address for a server, the browser looks up the server’s domain name in a giant online catalog called the DNS (Domain Name System). An IP address looks like a set of four numbers separated by periods (or, in techie speak, dots). For example, the www.SellMyJunkForMillions.com website may lead to a web server that has the IP address 17.202.99.125.
NOTE
The DNS catalog isn’t stored on your computer—your browser gets this information from the Internet. You can see the advantage of this approach. Under ordinary circumstances, the domain name for an online business never changes; it’s the public face customers use and remember. Behind the scenes, however, its IP address may change, because the business moved its website from one server to another. As long as the business updates the DNS, the move won’t cause any disruption. Fortunately, you won’t need to worry about managing the DNS yourself if your web host moves to a new server, because the host automatically handles the change for you.
3. The browser sends the page request to the web server’s now-retrieved IP address.
The actual route the message takes is difficult to predict. It may cross through a number of other servers on the way.
4. The server receives the request and looks at the path and filename in the URL.
In this case, the server sees that the request is for a file named listings.htm in a folder called Buyers. The server looks up that file and sends it back to the browser. If the file doesn’t exist, the server sends back an error message.
5. The browser receives the HTML page it’s been waiting for (listings.htm) and then displays it for your viewing pleasure.
The URL http://www.SellMyJunkForMillions.com/Buyers/listings.htm is a typical web address. In the wild, however, you’ll sometimes come across URLs that seem a lot simpler. For instance, consider http://www.amazon.com. It clearly specifies the domain name (www.amazon.com), but it doesn’t include any path or filename for a page. So what’s a web server to do? It sees that you aren’t requesting a specific file, so it sends you the site’s fallback page—its default page, in geekspeak, which is often named index.htm or index.html, and is what you know as the site’s home page. (However, a web administrator can configure any page as the default.)
POWER USERS’ CLINIC: INTERNET VS. INTRANET
As you already know, the Internet is a huge network of computers that spans the globe. An intranet is a lot smaller; it’s a network that exists within a specific company, organization, or home that joins together a much smaller number of computers. In fact, an intranet could have as few as two computers.
An intranet makes sense anytime you need a website available to only a small number of people in one location. For example, a company could use an intranet to share marketing information (or the latest office gossip). In your own home, you could let your housemates browse your web creations from their own computers. The only limitation is that a website on an intranet is accessible to the computers on that network only. Other web visitors won’t be able to see it.
Setting up a website for an intranet is easier than setting one up for the Internet because you don’t need to register a domain name. Instead, you can use the network computer’s name. For example, if your computer has the network name SuperServer, you could visit a web page with a URL like http://SuperServer/MySite/MyPage.htm. Of course, this works only if you’ve set up a home network (easy) and some web server software (a little more complicated). For example, on a Windows computer, you might use the IIS (Internet Information Services) server software, which most versions of Windows include, but you need to explicitly enable and configure the program. These tasks are outside the scope of this book. To learn more, consult a good networking resource.
Domain Names
Before you sign up for a web hosting plan, put some serious thought into the first part of your website address, the domain. It’s hard to find a domain name that’s both catchy and available. The solution is to brainstorm some ideas and find out what’s on the market before you sign up for a hosting plan. That way, you can buy the domain and sign up for a plan at the same time, from the same company. The following sections help you get started.
Choosing the Right Domain Name
Shakespeare may have famously written “What’s in a name? That which we call a rose/By any other name would smell as sweet.” But he may have seen things differently if he had to type www.thesweetsmellingredflowerwiththorns.biz into his browser instead of www.rose.com. Short, snappy domain names attract attention and are easy to remember.
Unfortunately, most short, clever word combinations have already been claimed as domain names. Even if they aren’t in use, domain squatters—people who buy and hold popular names in hopes of selling them to desperate high bidders later—have long since laid claim to common names. Give up on www.worldsbestchocolate.com—it’s gone. However, you may find success with names that are a little longer or more specific (www.worldsbestmilkchocolate.com), use locations or the names of people (www.bestvermontchocolate.com or www.anniesbestchocolate.com), or introduce made-up words (www.chocolatech.com). All these domain names were available at the time of this writing.
NOTE
Valid domain names can include only letters, numbers, and dashes.
Choosing a good domain name isn’t an exact science, but you can find plenty of anecdotal evidence on names that don’t work. Here are some mistakes to avoid:
§ Too-many-dashes. It may be tempting to get exactly the domain name you want by adding extra characters, like dashes, between words. For example, you have no chance of getting www.popularbusiness.com, but www.popular-business.com is still there for the taking. Think carefully. Dashes can confuse some people, and others may overlook them. Some webmasters believe that a domain name with a single dash is perfectly reasonable, but one with several dashes looks like a spam site and should be avoided.
§ Phrases that look confusing in lowercase. Domain names aren’t case-sensitive, and when you type a poly-case domain name into a browser, the browser converts everything to lowercase. The problem is that some phrases can blend together in lowercase, particularly if you have words that start with vowels. Take a look at what happens when the documentation company Prose Xact puts its business name into a lowercase domain name: www.prosexact.com. You get the picture. (Incidentally, this is one situation where you might want to resort to a dash.)
TIP
Even though domain names don’t distinguish case, that doesn’t stop businesses from using capital letters in business cards, promotions, and marketing material to make the domain name more readable. Whether customers type www.google.com or www.google.com into their browsers, they get to the same site.
§ Names that don’t match your business. It’s a classic business mistake. You set up a flower shop in New York called Roses are Red, only to find out that the domain www.rosesarered.com is already taken. So you go for the next-best choice, www.newyorkflorist.com. Huh? Now you’ve created two separate business names, and a somewhat schizophrenic identity for your company. If you’re starting a new business, try to choose your business name and your domain name at the same time so they match. If you already have a business name, settle on a URL that has an extra word or two, like www.rosesareredflorist.com. This name may not be as snappy as www.newyorkflorist.com, but it avoids the inevitable confusion caused by creating a whole new identity.
In the time since the first edition of this book was published, it’s become much, much harder to get a decent domain name. In the past, your only competition was other people planning to set up a website and unscrupulous domain name resellers looking to buy a hot name and flip it for a big profit. But now, nefarious people buy just about any domain name at the drop of a hat, build a fly-by-night web page filled with ads, and wait a few months to see how much unsuspecting web traffic stumbles their way. This practice, called domain tasting, is surprisingly profitable. The bottom line? It’s possible to cook up a decent domain name that’s still available, but you’ll need a dash of compromise and all the creativity you’ve got.
More Choices for Top-Level Domains
The top-level domain is the part of the domain name after the last period, like .com. While you can choose whatever you want for the first part of your domain name (so long as you stick to letters, numbers, and dashes), you’re restricted to a set of predefined choices for the top-level domain.
Everyone wants a .com address for their business, and as a result they’re the hardest top-level domain to get. But you might want to compromise by choosing a less popular top-level domain (like .net) to get what you want for the rest of the domain name (say, www.WhenPigsCanFly.net). Is the tradeoff worth it? It depends on the sort of site you’re building. The following sections lay out your options.
The Originals
There’s a small set of general-purpose domains that are nearly as old as the Internet itself. They include .com, .net, .org, and a few more that are limited to specific uses (such as .edu for educational institutions and .gov for government organizations). A few more that are nearly as old are .biz,.info, and .name.
You’ll find that it’s easier to get the domain name you want if you use one of the less popular top-level domains. The problem is, most web visitors expect a .com. If you have the domain name www.SuperShop.biz, odds are someone will type in www.SuperShop.com while trying to find your site. That mistake can easily lead your fans to a competitor (or to a vastly inferior website). You need to weigh whether this tradeoff is acceptable for your site. If you’re a local business and you think that a significant portion of your visitors will get to your site by typing the domain name straight into their browsers (rather than following a link), you might not want to risk confusion with a less common top-level domain.
One exception is the top-level domain .org, which was originally intended for nonprofit organizations. It’s now available for anyone to use and abuse. However, if you’re setting up a nonprofit of your own, the .org domain makes more sense than .com and is just as recognizable.
Country-Specific Domains
These are domains that are (or were) reserved for a specific country. Examples include .us (USA), .ca (Canada), and .co.uk (United Kingdom, which looks like two domains, but just go with it). You might use these because you live in that country, or—in some exceptional cases—because the domain name sounds cool and has been made available to everyone.
For example, if you offer piano lessons in England, www.pianolessons.co.uk isn’t a bad choice. If you plan to sell products to an international audience, however, www.HotRetroRecords.co.uk could frighten away otherwise interested buyers, who may assume dealing with a British seller is too much trouble.
Special rules apply regarding who can register country-specific names. For example, some are available only to people who live in the corresponding country or who have a registered business there. Due to these restrictions, some web hosting companies can’t sell certain country-specific domains. If you have trouble registering the country-specific name you want, you can use Google to find a registrar that supports your choice. For example, to find a registrar for Australian domains, search for “Australian domain names.”
Each country in the world has its own unique top-level domain, but some are now available for people to use in more creative ways. For example, the top-level domain .tv was created for the tiny country of Tuvalu, but it’s now available for anyone who wants to create a television-focused website (with the Tuvaluan government getting a small cut of the domain registrar’s profits). Similarly repurposed domains include .me, .cd, .tm, and .ws. You can find more information about these odder domain name choices on Wikipedia, at http://tinyurl.com/rnlmf.
The New Kids on the Block
Recently, longer and more exotic top-level domains have started to appear. Examples include .club, .church, .consulting, .directory, .fitness, .estate, .global, .guru, .services, and .training, to name just a few. At the time of this writing, there are nearly 100 top-level domains in existence. But you can’t find them all in one place, because different domain registrars have rights to different top-level domains.
Experts are divided about whether these domain names will help organize the Web or just encourage spammers to buy up more addresses. And because they’re so new and unfamiliar, these new options might trip up people trying to visit your site. Right now, most seasoned web experts would prefer the domain pacysgrillrestaurant.com to pacysgrill.restaurant, even though the latter is shorter and perfectly clear. The problem is that the .restaurant domain hasn’t caught on yet, and so the address doesn’t instantly look like a URL to the average web visitor.
There’s another risk with the new top-level domains. Certain browsers, operating systems, web servers, and programs don’t recognize them yet. That’s especially true for mobile devices, like phones and tablets that run the Android operating system or older versions of Apple’s iOS. Their browsers don’t recognize the new top-level domains. If you type one in, the browser performs a search for that text, rather than taking you to the corresponding site.
This situation will probably change in a couple of years. But if even a small fraction of your audience is locked out of your site because they’re using old devices, that’s a serious problem. So for now, your best bet is to avoid the new top-level domains and stick with the tried, true, and less glamorous domains described in the previous sections.
Searching for a Name
With a few domain name ideas in hand, you’re ready to start checking their availability. Every web hosting company has a domain searching tool, and you can use any one of them. (Google “domain names” to find hundreds.) It doesn’t matter where you go to perform your search, and you don’t need to be ready to commit to hosting with that particular company. For now, you’re just conducting some web domain research.
TIP
Domain name searches are an essential bit of prep work. Try to come up with as many variations and unusual name combinations as possible. Aim to find at least a dozen available names to give yourself lots of choice. Once you compile the list, why not make a few late-night phone calls to pester friends and relatives for their first reactions?
Just about every web hosting company provides its own version of a domain name search tool. Figure 9-3 shows one from www.instantdomainsearch.com. To get started, type in the domain you want most and then click Search. (In most cases, you don’t have to type the www at the start of the name or the .com at the end, because the search tool adds them behind the scenes.)
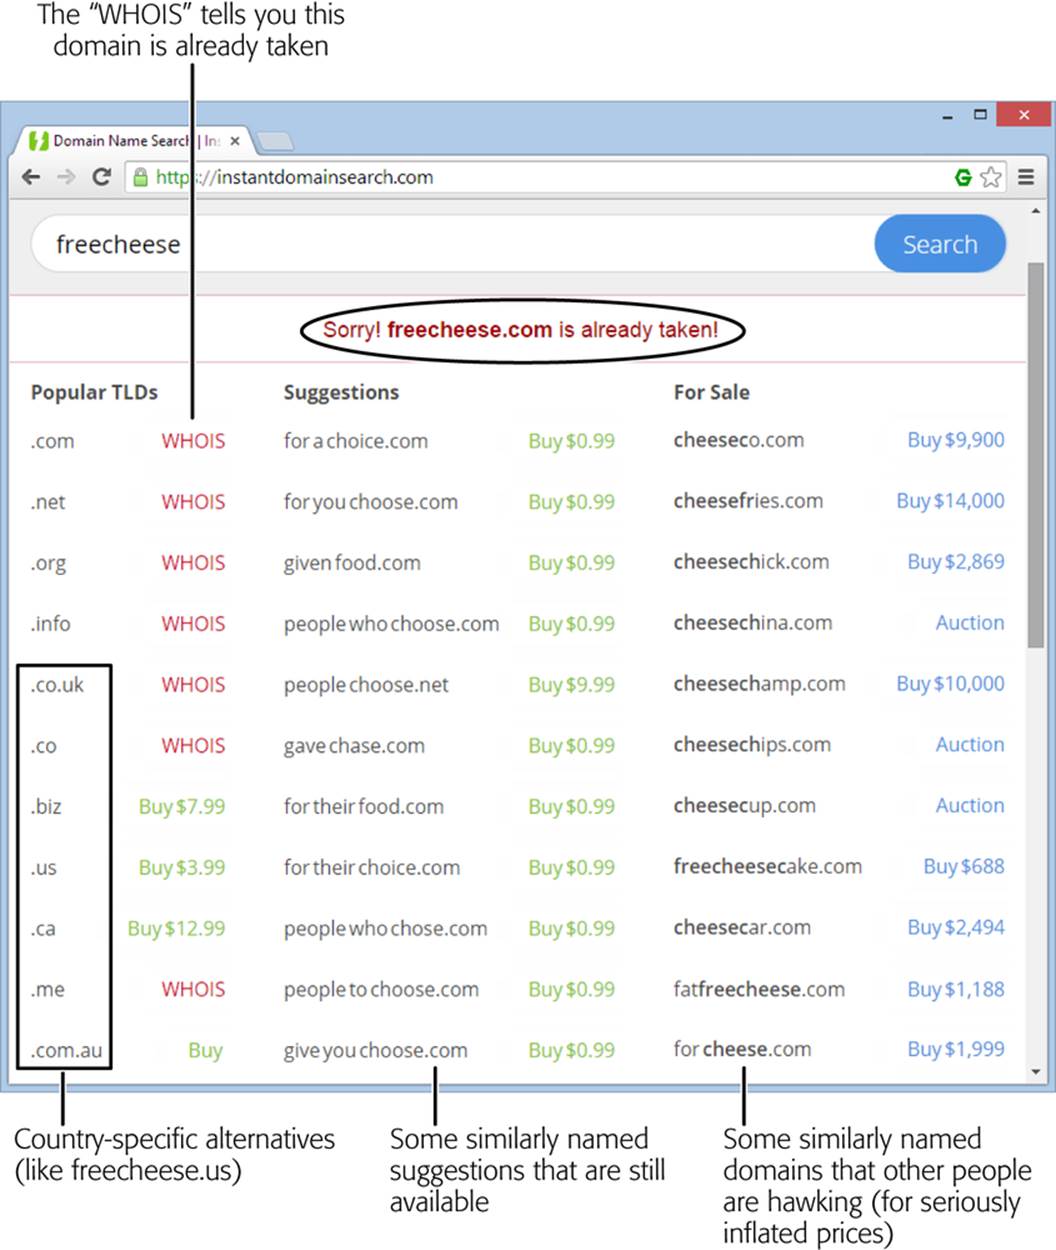
Figure 9-3. This search reveals that your first choice, www.freecheese.com, is gone. All that’s left are the less-catchy www.freecheese.biz and country-specific domains (left). Some domain registrars will suggest similar domain names that are still available (middle), or list already registered domains that you can buy from their owners (right). This is rarely worthwhile, however, because domain resellers usually expect you to shell out some serious bank (like $9,900 for cheeseco.com).
When you find an available domain name, the hosting company gives you the option to buy it. But don’t do anything yet, because you still need to do some comparison-shopping to find the best host.
NOTE
You may think you could see if a domain is free just by typing it into your web browser. But this method of checking takes more time, and it doesn’t give you a definitive result. Someone can buy a domain name without setting up a website, so even if your domain-fishing doesn’t hit on a live site, the domain may not be available.
Registering Your Name
After you find an available name, you probably want to wait to register it until you’re ready to sign up for a web hosting plan (which you’ll read about in the next section). Most web hosts offer free or discounted domain name registration when you rent space from them. In addition, doing both at once is the easiest way to set up your domain name, because the process automatically establishes a relationship between your domain name and your website.
In a few cases, however, you may want to register a domain name separately from your web hosting package. Here are some examples:
§ You don’t want to create a website right now, but you do want to register a name so no one else can grab it—a tactic known as domain parking (see the box on Buying a Domain for the Future). Sometime in the future, you may develop a website that uses that name.
§ You already have web space, possibly through your ISP (Internet service provider), and all you need to make your website seem more professional is a personalized domain name. It takes more work to set up this sort of arrangement, but you can learn how to get started in the box on A Host Here, a Domain There.
§ Your hosting company can’t register the type of domain you want. This can happen if you need a domain name with a country-specific top-level domain or one of the new top-level domains (More Choices for Top-Level Domains) and your web host isn’t authorized to register them.
If you decide to register a domain name separately, remember that you won’t be able to use it until you get a web hosting plan. Either way, the next section will help you get properly set up with the right web host.
NOTE
All web hosting companies let you register more than one domain for the same website. That means you can register both www.FancyPants.com and www.FancyPants.biz, and specify that both these addresses point to the same website. Of course, you’ll need to pay an extra domain name registration fee. (Really big web companies use this strategy to accommodate typos. For instance, see where http://amzn.com and http://googel.com take you.)
UP TO SPEED: BUYING A DOMAIN FOR THE FUTURE
Domain parking means you’ve registered a domain name but haven’t yet purchased any other services, like renting web space.
Most people use domain parking to put a domain name away on reserve. In the increasingly crowded world of the Web, many people use it to protect their own names (for example, www.samanthamalone.com). Domain parking is also useful if you want to secure several potential business names you may use in the future.
If you do reserve a domain name, do your research and pick a company that you’d also like to use to host your website. You can switch domain names from one web host to another, but it’s a bit of a pain. Contact the host you’re currently working with for specific instructions.
The real appeal of domain parking is that it’s cheap. You pay a nominal domain-name registration fee (as little as $5 a year), and get to keep the name for as long as you’re willing to pay for it.
Getting Web Space
All you need to achieve web superstardom is a domain name and a small amount of space on a web server. There’s no one-size-fits-all solution when it comes to finding a web host. Instead, you choose a hosting company based on your budget, what you want your website to do, and your own capricious whims (let’s face it—some hosting companies just have way cooler names than others).
What you don’t want is a web host that offers some sort of special software that promises to help you create a website in two or three easy steps. These tools range from mediocre to terrible. After all, if you were content to create the same cookie-cutter website as everyone else, you probably wouldn’t be interested in learning HTML, and you wouldn’t have picked up this book.
Instead, you want standard website hosting, where you’re given a slot of space on a server to manage as you see fit. You create your pages on your own computer and then copy those files to the web server so others can view them. This type of web hosting is all you need to use this book.
Web hosts usually charge a monthly fee. For basic hosting, it starts at the reasonable sum of $5 to $10 per month. Of course, that cost can escalate quickly, depending on the features you want your host to provide.
Assessing Your Needs
Before you decide on a host, ask yourself one important question—what features do you need? Web hosts are quick to swamp their ads and websites with techie jargon, which doesn’t tell you which services are truly useful. Here’s a quick overview that describes what hosts sell and what you need to know about each offering.
§ Web space is how much server space you rent to store your website. Although HTML pages are extremely small, you may need more space for images or files you want others to download, like a video of your wedding. A modest site can easily survive with a measly 100 MB (that’s megabytes, not gigabytes) of space, unless you’re stuffing it full of pictures or videos. Most web hosts throw in 10 or 100 times more server space, knowing you’ll probably never use it.
NOTE
For the numerically challenged, a gigabyte (GB) is the same as 1,024 megabytes (MB). To put that in perspective, today’s hard drives can have 500 GB of space or more, enough room for tens of thousands of websites.
§ Bandwidth (or web traffic, as it’s sometimes called) is the maximum amount of information you can deliver to visitors in a month. Usually, you can make do with the lowest bandwidth your hosting company offers. For more information, see the box on The Riddle of Bandwidth.
§ A domain name is a custom website address, as in www.HenryTheFriendly.com. If you decide to get a personalized domain name, you don’t necessarily need to get it from the same company that hosts your site. However, getting both from the same source makes life easier, and hosting companies often throw in one or more domain names at a discounted price when you sign up for a hosting plan.
§ Email addresses. Odds are, you already have some of these. But you may want an email address that matches your website address, especially if you’re paying for a customized domain name. For example, if you own www.HenryTheFriendly.com, you’d probably like to use an email address like Hank@HenryTheFriendly.com. Most hosting companies let you create dozens or hundreds of email addresses for your domain (which is good if you’re running a small company), and most also let you read your email in your browser or send it to a desktop program like Microsoft Outlook.
§ Upload-ability. The ease of transferring files to your server is another important detail. As you saw in the previous chapter, you can perfect your web pages on your own computer before you upload them. But once your website is ready for prime time, you need a convenient way to copy all the files to your server. The vast majority of commercial web hosts offer something called FTP (File Transfer Protocol), which lets you easily copy a number of files at once (for details, see Uploading with an FTP Program).
§ Programming support. Today, most web hosts support at least some of the dozens of server-side programming languages available. When shopping for a web host, you’ll come across their names—ASP, PHP, CGI, Perl, Python, Ruby, and so on. Although server programming is too complex for most ordinary people, this feature gives you some room to grow. To take advantage of a server-side programming technology, you could conceivably use someone else’s script in your web pages to carry out an advanced task, like collecting visitor information with a form.
NOTE
Although this book doesn’t cover server-side programs in depth, you’ll learn about client-side scripts in Chapter 14. Client-side scripts are based on JavaScript, and they run right inside visitors’ browsers. They’re more limited in ability than server-side programs, and you’ll commonly see them used for special effects like animated buttons. The nice thing about client-side scripts is that even programming novices can drop a simple script into a web page and enjoy the benefits. But you don’t need to worry about any of this right now, because unlike server-side programming, client-side scripts don’t require any special support from your web hosting company.
§ Tech support. The best companies provide 24-hour tech support, ideally through a toll-free number or a live chat feature that lets you ask questions using your browser.
§ Frills. In an effort to woo you to their side, web hosts often pack a slew of frills into their plans. For example, they’ll sometimes boast about their amazing, quick-and-easy website creation tools. Translation: They’ll let you use a clumsy piece of software on their website to build yours. You’ll end up with a cookie-cutter site and not much opportunity to express yourself. Steer clear of these pointless features. More usefully, a web hosting company can provide site statistics—detailed information about how many visitors flock to your site daily or monthly. (In Chapter 10, you’ll find out about a free visitor-tracking tool that runs circles around what most hosts provide.)
§ Private domain registration. Ordinarily, when you register a domain, your contact information—which includes your email address, full name, and mailing address—appears in the official domain records. These records are public, which means spammers may send you junk and mail you fake domain renewal letters. To avoid the hassle, you can ask your web host to hide your contact information for a small fee (usually about $10 per year). But if you’re setting up a site for a business, you’re probably already publishing your contact details publicly, so there’s no reason to hide anything.
Choosing Your Host
With your requirements in mind, you’re ready to shop for a web host. You’re looking for a plan that’s often called shared hosting, because your website shares a web server with hundreds of other websites.
If you have heftier hosting needs, you can opt for a dedicated hosting plan. This super-premium option gives you an entire web server to yourself. Big companies use this type of hosting to get rock-solid stability, but few people want to pay the extra cost, which can run well over $100 a month.
A similar but somewhat cheaper choice is a VPS, or virtual private server hosting. With VPS hosting, you don’t get the entire web server computer to yourself, but your website gets its own private “environment,” so there’s no chance that someone else’s malfunctioning website can trample on its toes. VPS hosting also gives advanced webmasters the ability to customize the software that runs on the web server. VPS hosting is cheaper than dedicated hosting but still significantly more expensive than shared hosting.
UP TO SPEED: THE RIDDLE OF BANDWIDTH
Most web hosting companies base their prices, at least in part, on how much web space and bandwidth you need. This can be a problem, because the average website creator has no idea how to calculate those numbers to come up with a realistic estimate.
Fortunately, you can save a lot of time and effort by taking advantage of a dirty little secret: For the average personal or small-business site, you don’t need much disk space or bandwidth. You can probably take the smallest amounts on offer from any web hosting company and live quite happily.
If you still insist on calculating bandwidth, here’s how it works. Suppose you create a relatively modest website of 50 pages, a pile of small web-optimized graphics, and a few downloadable documents (say, PDF files or Word documents). Altogether, this website occupies 10 MB of space.
Suppose your site is doing well, and receives about 30 visitors a day. If each guest visits every page (in other words, downloads your entire website), your daily bandwidth requirement is 300 MB (30 visitors x 10 MB), and your monthly bandwidth consumption weighs in at 9 GB (30 days x 300 MB). That’s far less than what the typical startup web hosting package offers, which often includes 100 GB or more per month.
As a result, most people can ignore the bandwidth limits offered by their web host. The only exceptions are if your website is absurdly popular; if you want to store extremely large files and let visitors download them; or if you’re showcasing a huge catalog of digital photos, music, or video, and you don’t want to use a third-party service like Flickr or YouTube. If you’re in the small minority of people who need huge amounts of bandwidth, look for a web host that promises unlimited bandwidth. That way, you don’t need to worry about exceeding your limit.
NOTE
The bottom line is this: If you don’t know what type of hosting plan you want, the best choice for you is shared hosting. Dedicated and VPS hosting plans are for sites with special requirements or huge amounts of traffic.
Every web host offers shared hosting, and there’s no shortage of choices. Table 9-1 lists just a few hosts (ordered alphabetically) so you can get started comparison-shopping.
Table 9-1. A few of the Internet’s many web hosting firms.
|
NAME |
URL |
|
DreamHost |
www.dreamhost.com |
|
Hawkhost |
www.hawkhost.com |
|
HostGo |
www.hostgo.com |
|
Insider Hosting |
www.insiderhosting.com |
|
MDDHosting |
www.mddhosting.com |
|
OCS Solutions |
www.ocssolutions.com |
|
Pair Networks |
www.pair.com |
|
SpeedySparrow |
http://speedysparrow.com |
|
StableHost |
www.stablehost.com |
It’s not easy finding honest web host reviews on the Web. Most websites that claim to review and rank hosts are simply advertising a few companies that pay for a recommendation. Popular tech sites haven’t reviewed web hosts in years, because a thorough analysis of even a fraction of them would require a massive amount of manpower. And old reviews aren’t much help either, because the quality of a hosting company can change quickly.
However, the Web isn’t completely useless in your hunt. You can get information about hosting companies from a web discussion board, where people like you chat with more experienced hosts and customers. One of the best is WebHostingTalk, which you’ll find at http://tinyurl.com/5zffwp. Its discussion board is particularly useful if you’ve narrowed your options to just a few companies, and you’d like to ask a question or hear about other people’s experiences.
As you consider different hosts, you’ll need to sort through a dizzying array of options. In the next two sections, you’ll practice digging through some marketing haze to find the important information in the offerings of two example hosting companies.
FREQUENTLY ASKED QUESTION: BECOMING A WEB HOST
Can I run a web server?
In theory, you definitely can. The Web was designed to be an open community, and no one is out to stop you. In practice, however, it’s not at all easy—no matter how many computer-savvy relatives you have.
Several monumental challenges prevent all but the most ambitious people from running their own servers. The first is that you need to have a reliable computer that runs 24 hours a day. That computer also needs to run special web-hosting software that can serve up web pages.
The next problem is that your computer requires a special type of connection to the Internet, called a fixed IP address. An IP address is a number that identifies your computer on the Web. (IP stands for Internet Protocol, which governs how different devices communicate on a network.)
Most ISPs (Internet service providers) randomly assign IP addresses to customers like you as needed, and change them on a whim. For your computer to run a website and make sure others can find it, you need to lock down your IP address so that it’s not constantly changing. That means that most people can’t use their computers to host a permanent website, at least not without special software. If you’re still interested, you can call your ISP and ask if it provides a fixed IP address service, and at what cost.
A Web Host Walkthrough
Figure 9-4 shows the home page for the popular web hosting company Aplus.net. The company offers dedicated servers, standard hosting, domain name registration, and web design services. All four options are designed to help you get online, but you’re really interested in the one for web hosting.
The top of the Aplus home page includes several tabbed buttons. The Domain Registration tab gives you the option to transfer an existing domain name or park a domain for future use. The Website Hosting tab lets you see Aplus’s hosting plans (see Figure 9-5), which is what you really want. The “Build a Website” tab is mainly of interest to HTML-phobes. It lets you pay a web design team to craft all the HTML pages and graphics for your website. But where’s the fun in that?
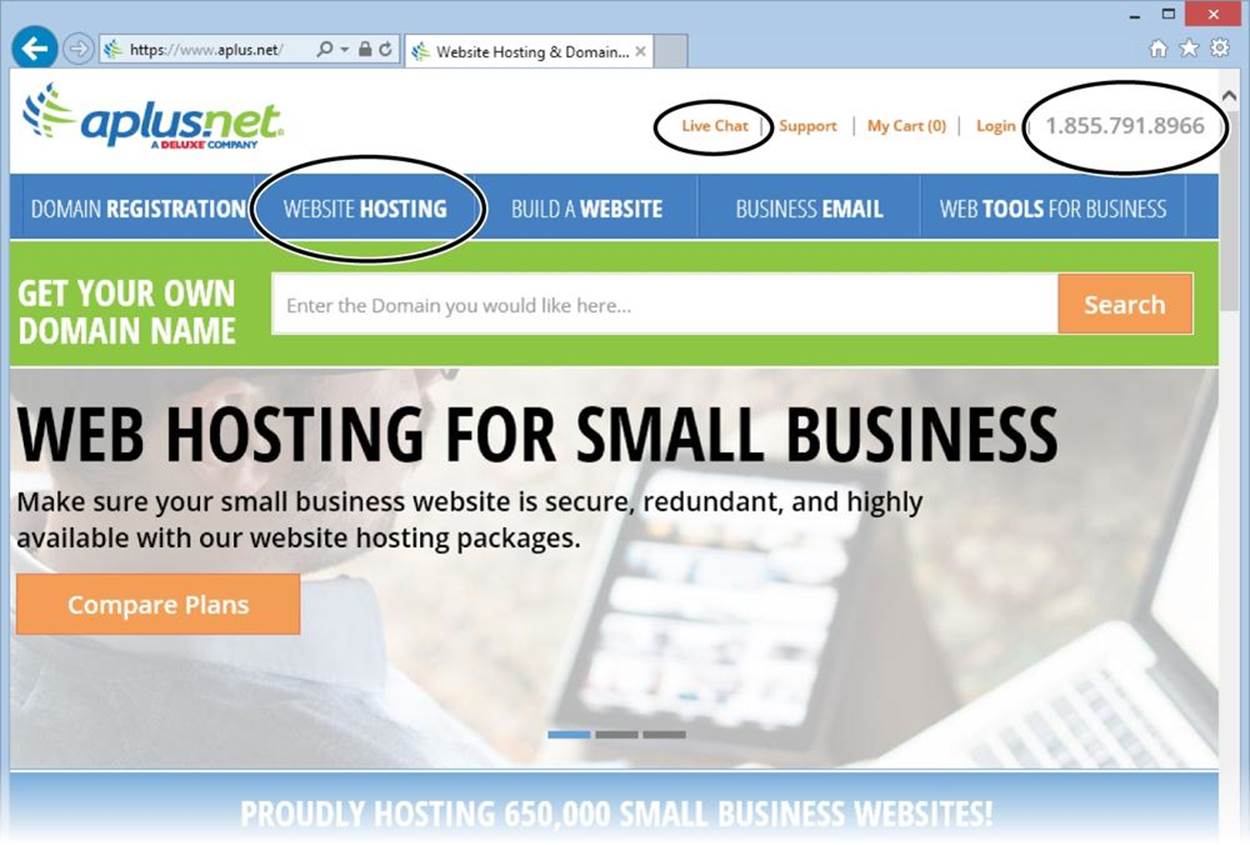
Figure 9-4. This page packs a lot of information. Click the Website Hosting tab to find out about Aplus’s hosting plans. At the top of the page, Aplus lists a toll-free number for sales or support. Click the Live Chat link and a chat window opens. Type your question there, and an Aplus technician gives you an immediate answer. If you’re serious about signing up with Aplus, give both these options a try so you can evaluate its technical support.
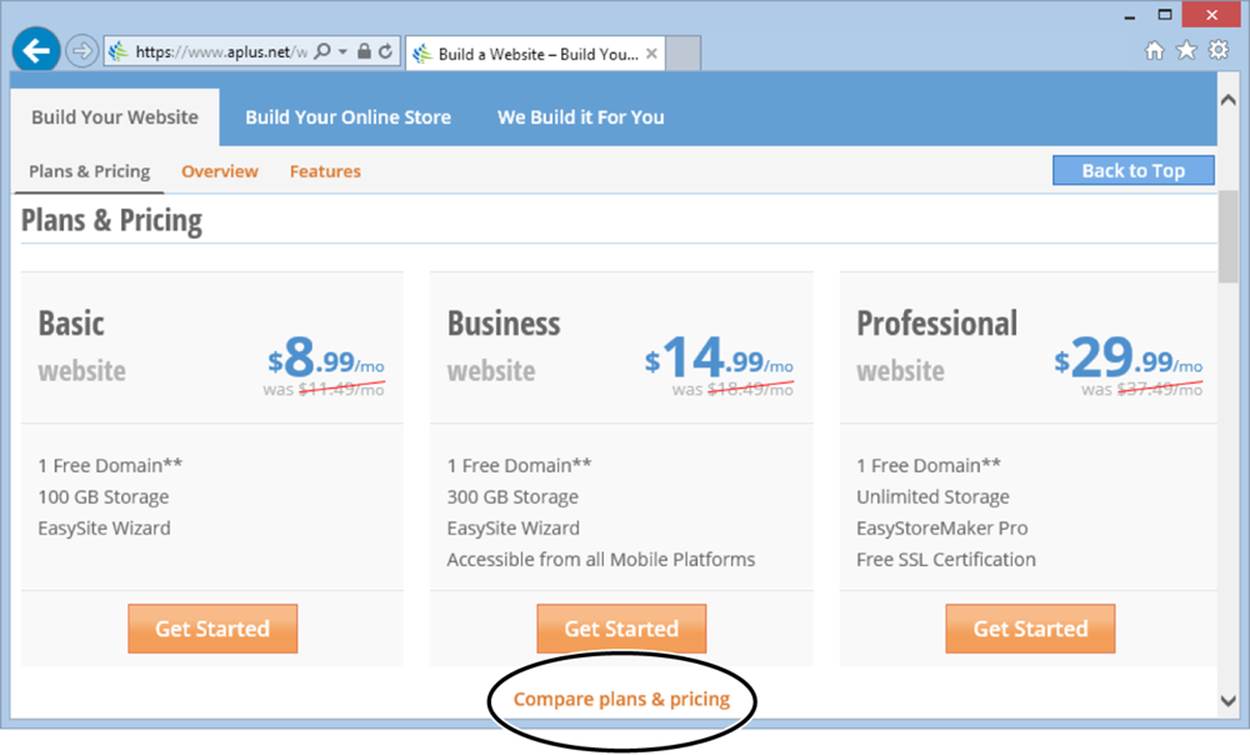
Figure 9-5. Aplus offers three web hosting packages. The Basic package has everything you need right now. Some of the features in the other packages are red herrings—for example, only novices would consider using the EasySite Wizard, and you don’t actually need a special plan to make your site “Accessible from All Mobile Platforms.” To get a deeper comparison of these plans, click the “Compare plans & pricing” link underneath (Figure 9-6).
To continue, click the Website Hosting tab. Aplus shows you its basic web hosting package. To compare that with its other offerings, click the See All button (Figure 9-5). And to get even more details about the plans, click the “Compare plans & pricing” link (Figure 9-6).
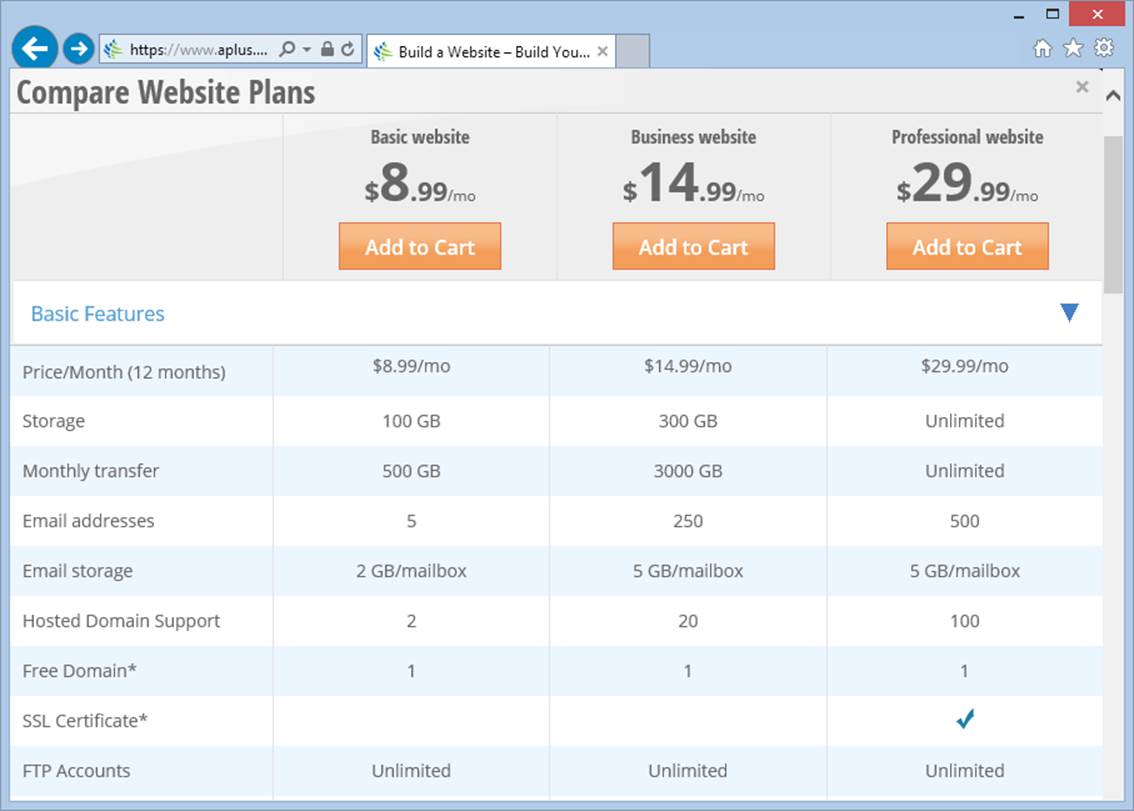
Figure 9-6. Here’s a breakdown that spells out the details of Aplus’s three hosting plans, including how much bandwidth you’ll get (described as “Monthly transfer”), how much space you’ll have for your email inboxes, and so on. Some of these details are immediately important (you want FTP support, as explained on page 289), while some are more advanced features for web programs that use server-side scripts (like databases).
At the end of your search, you’ll discover that the cheapest option is $9 per month for a free domain name and 100 GB of storage space for your website. Aplus throws in a free domain name and five email addresses for good measure, along with FTP support.
Overall, the Aplus.net search turned up a solid offer at a fair price. However, discerning web shoppers may hope to save a few dollars or get a little more space. Before you sign up, browse several other web hosts, and then research your first choice in greater detail at WebHostingTalk.
NOTE
If your web host is letting you down, don’t panic. It’s not too hard to upgrade your hosting plan or even switch hosts altogether. The key thing to remember is when you change hosts, you’re essentially abandoning one server and setting up shop on another. It’s up to you to copy your web pages to the new server—no one will do it for you. As long as you have a copy of your website on your personal computer (and you always should), this part is easy. If you’re still a little skeptical about what company to choose, look for a 30-day, money-back guarantee.
What to Expect after You Sign Up
Once you decide on a web host, you don’t need anything more than a credit card. Along the way, you’ll need to choose your domain name. Then sit back and wait—you’ll be online in only a few hours.
First, you’ll get an email or two from your web host (Figure 9-7). They include a receipt for your payment and the login information you need to get to your account page. Log in to open the page to manage your hosting plan, pay for renewal, buy additional domain names, and change your contact information.
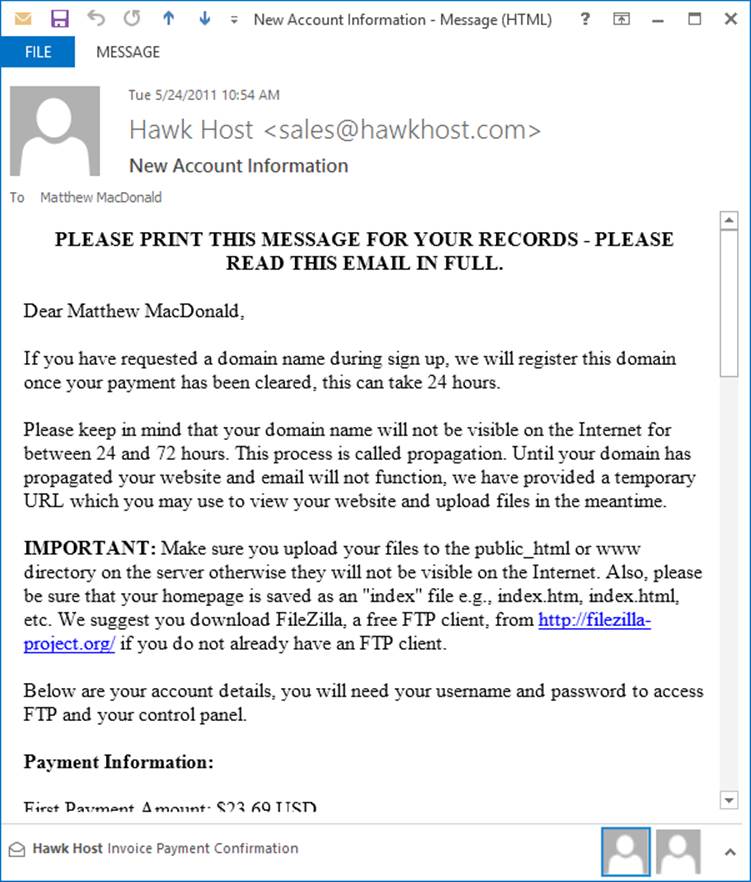
Figure 9-7. After signing up with a web host, you’ll receive an email like this one. Scroll down and you’ll see the payment details and the login information for your account. You’ll also find instructions about how to configure your FTP program (page 301) and set up an email account.
You’ll also get a web address that points to your site’s control panel, where you can tap a dizzying array of tools. Most handle features beyond the scope of this book (for example, you won’t start using databases or installing new software packages on your site in this book), but you’ll explore your site’s traffic statistics in Chapter 10.
Finally, you’ll get the address for your website. Usually, you’ll get two addresses: the real website domain that you picked (say, www.reboot-me.com), and a temporary numeric address (like http://174.37.162.41/~rebootme). Here’s an example of what this part of the message might look like:
Temporarily, you may use one of the addresses given below to manage your website:
Temporary FTP Hostname: 174.37.162.41
FTP Port: 21
Temporary Webpage URL: http://174.37.162.41/~rebootme/
Temporary Control Panel: http://174.37.162.41/cpanel
Once your domain has propagated:
FTP Hostname: www.reboot-me.com
FTP Port: 21
Webpage URL: http://www.reboot-me.com
Control Panel: http://www.reboot-me.com/cpanel
You can use the temporary address right now. Of course, you haven’t uploaded anything yet, so if you visit your site, you’ll just get an error message or an “Under Construction” page. However, you can start uploading files using your FTP program (Uploading with an FTP Program), and you can get to your website’s control panel through the temporary control panel URL. The real website address takes a bit longer to become active, because it has to spread to DNS servers across the Internet. That should take a day or two.
FREQUENTLY ASKED QUESTION: A HOST HERE, A DOMAIN THERE
Can I buy my domain name and web space from different companies and still make them work together?
The simplest approach is to get both from the same company, but that’s not always possible. Maybe you bought your domain name before you set up your site and you don’t want to pay to transfer the domain. Or maybe you have a country-specific domain name (like www.CunningPets.co.uk) that your web host can’t register. Or maybe you just want the flexibility to change hosts frequently, so you can get the best service or cheapest rates.
To make this multiple-company tango work, you need some technical support from your web hosting company. Contact its help desk and let the staff know what you plan to do. They can give you specific instructions, and they’ll set up their name servers (more on what those are in a moment) with the right information for your domain.
The next task is to change the registration information for your domain. Follow these steps:
1. Find out the name of the domain name servers (DNS servers) at your web hosting company. These are the computers that convert domain names into numeric IP addresses (How Browsers Analyze a URL). The technical support staff can give you this information.
2. Go to the company where you registered the domain name and update your domain registration settings. Change the name server setting to match the name servers you found out about in step 1 (as shown in Figure 9-8).
Due to the way DNS servers work, the change can take 24 hours or more to take effect.
When you make this change, you’re essentially saying that your web host is now responsible for giving out the IP address of your website. When someone types your domain name into a browser, the browser contacts the name server at your hosting company to get the IP address. From that point on, it’s smooth sailing.
Once you modify your domain name registration, you still have the same two bills to pay. You’ll pay your hosting fees to the web hosting company and the yearly domain name registration fee to the company where you registered your domain name.
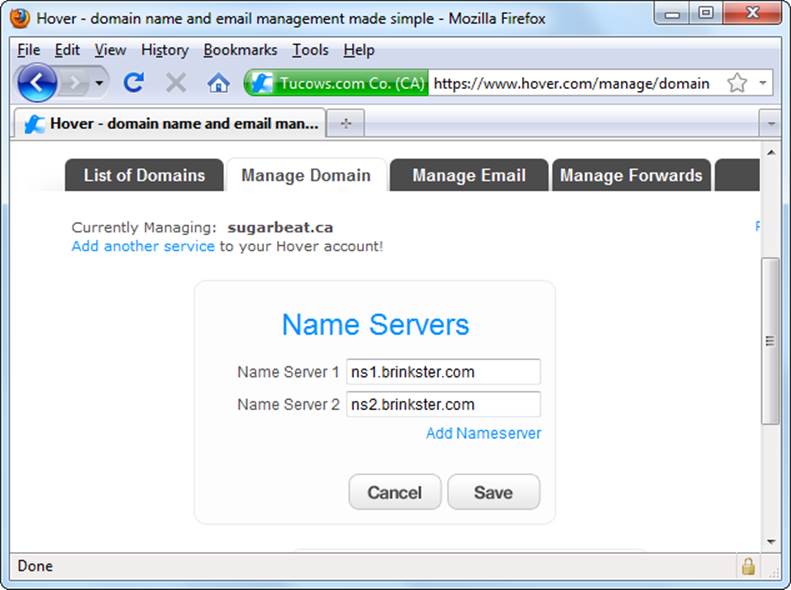
Figure 9-8. Here, the website owner has registered his domain (sugarbeat.ca) with www.hover.com, but hosts his content through www.brinkster.com. To make this work, he transfers control of his domain name to the name servers ns1.brinkster.com (http://ns1.brinkster.com) and ns2.brinkster.com (http://ns2.brinkster.com).
Free Web Hosts: Just Say No
As you no doubt know, the Web is a great place for frugal shoppers. Not only can you score a great deal on a sporty iPod and a used sofa bed, you can also pick up a bit of web space storage for the princely sum of zero dollars. Sound attractive? Think again.
Free hosts give you a small parcel of web space without charging you anything. Sometimes it’s because they hope to get you to upgrade to a cost-based service if you outgrow the strict limitations of the free package. Other times, free hosts force you to include an obnoxious ad banner at the top of your web pages.
Although free hosts don’t set out to scam people (at least most of them don’t), they aren’t worth the risk and aggravation. Here are some of the headaches you can face:
§ Ad banners. The worst free hosts force you to display their advertisements on your pages. If you’d like to crowd out your content with obnoxious credit card commercials, this is the way to go. Otherwise, move on to somewhere new. It’s finally possible to find free hosts that don’t impose the Curse of the Blinking Banner Ad, so don’t settle for one that does.
§ Unreliability. Free web hosts may experience more downtime, which means your website may periodically disappear from the Web. Or the web servers the host uses may be bogged down by poor maintenance or other people’s websites, causing your site to slow to a crawl.
§ Unpredictability. Free hosts aren’t the most stable companies. It’s not unheard of for a host to go out of business, taking your site with it and forcing you to look for a new web home in a hurry. Similarly, free hosts can change their requirements overnight, sometimes shifting from an ad-free web haven to a blinking-banner extravaganza without warning.
§ Usage limits. Some free hosts force you to agree to a policy that limits the type of content you can put on your site. For example, you may be forbidden from running a business, selling ad space, or uploading certain types of files (like music, movies, or large downloads).
§ Limited tech support. Many professional website operators say that what makes a good host isn’t a huge expanse of free space or a ginormous bandwidth limit—it’s the ability to get another human being on the phone at any hour to solve unexpected problems. Free web hosts can’t afford to hire a platoon of techies for customer service, so you’ll be forced to wait for help—if you get it at all.
§ Awkward uploads. Many free hosts lack support for easy FTP uploading (see the next section). Without this convenience, you’ll be forced to use a time-consuming upload page.
If you absolutely must try a free web host—perhaps you have the time to experiment, and your site doesn’t need rock-solid reliability—you can learn more at www.free-webhosts.com. The site provides a huge catalog of free hosts, which painstakingly details the space they give you and the conditions they impose. You’ll also find thousands of user reviews. However, keep in mind that unscrupulous web hosts may pad the rankings with their own reviews, and any free host can abruptly change its offerings.
Transferring Files to Your Site
Once you sign up with a web host, you’re ready to transfer files to your web space. As long as your host supports FTP (and all the good ones do), this task is almost as easy as copying files from one spot to another on your computer. You just need to pick your tool:
§ Windows Explorer. If you’re using a Windows computer, you can do the job using the same tool that you use to manage your computer’s files.
§ An FTP program. You can transfer files using one of the many free FTP programs you can find online.
§ A professional web editor. If you’re using a professional web editor like Dreamweaver or Expression Web, you get all the FTP smarts you need right in the program.
The following sections outline these approaches. But before you can upload files using FTP, you need to collect a few details. These include the address of the FTP server, as well as the user name and password you use to log onto that server. The FTP login information may match the login information you use for your web hosting account, or it may be different.
You also need to decide what you want to upload. To run a simple test, you can upload a standalone web page, like one of the resumé examples from Chapter 1. For a more ambitious test, you can upload an entire site—in other words, a collection of web pages and the resources they use, like style sheets and pictures. For example, you can transfer the trip website from the tutorial in Chapter 6 (Linking to Pages Within the Same Folder). In this case, you need to copy all the files in the website folder (in this example, that’s Tutorial-6-1\End), along with all its subfolders (if there are any).
After you upload a file, you can check your work. Type in your domain name followed by the web page name. For example, if you upload the resume4.htm example to your website www.supersavvyworker.com, try requesting www.supersavvyworker.com/resume4.htm. You don’t need to wait. Once you upload the file to your server, it’s available almost instantly to any browser that requests it.
Uploading with Windows Explorer
In these modern times, you don’t need a standalone FTP editor. Windows includes its own built-in FTP features that handle the task comfortably. Here’s how it works:
1. Open Windows Explorer.
One quick way to do this is by right-clicking the Start button and then choosing Explore (in older versions of Windows) or File Explorer (in Windows 8 and up).
2. Type the FTP address into the Windows Explorer address bar (Figure 9-9).
Make sure the URL starts with ftp://. In other words, if you want to visit http://ftp.myhost.com, enter the URL http://ftp://ftp.myhost.com, not http://ftp.myhost.com, which incorrectly sends your computer off looking for web pages.
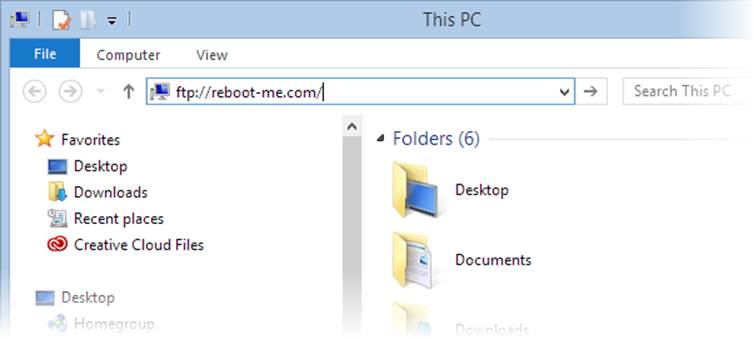
Figure 9-9. It’s a surprisingly small jump to move from the file system on your Windows computer to the file system on your website. It all starts when you click in the Windows Explorer address box and type in the URL for your FTP server.
3. Enter your login information (see Figure 9-10).
Once you log in, you’ll see your site’s folders and files on the web server; you can copy, delete, rename, and move them in much the same way you do local folders and files. Since you haven’t uploaded anything yet, the folder may be empty, or it may contain a generic index.htm file that displays an “Under Construction” message if someone happens to browse to the page.
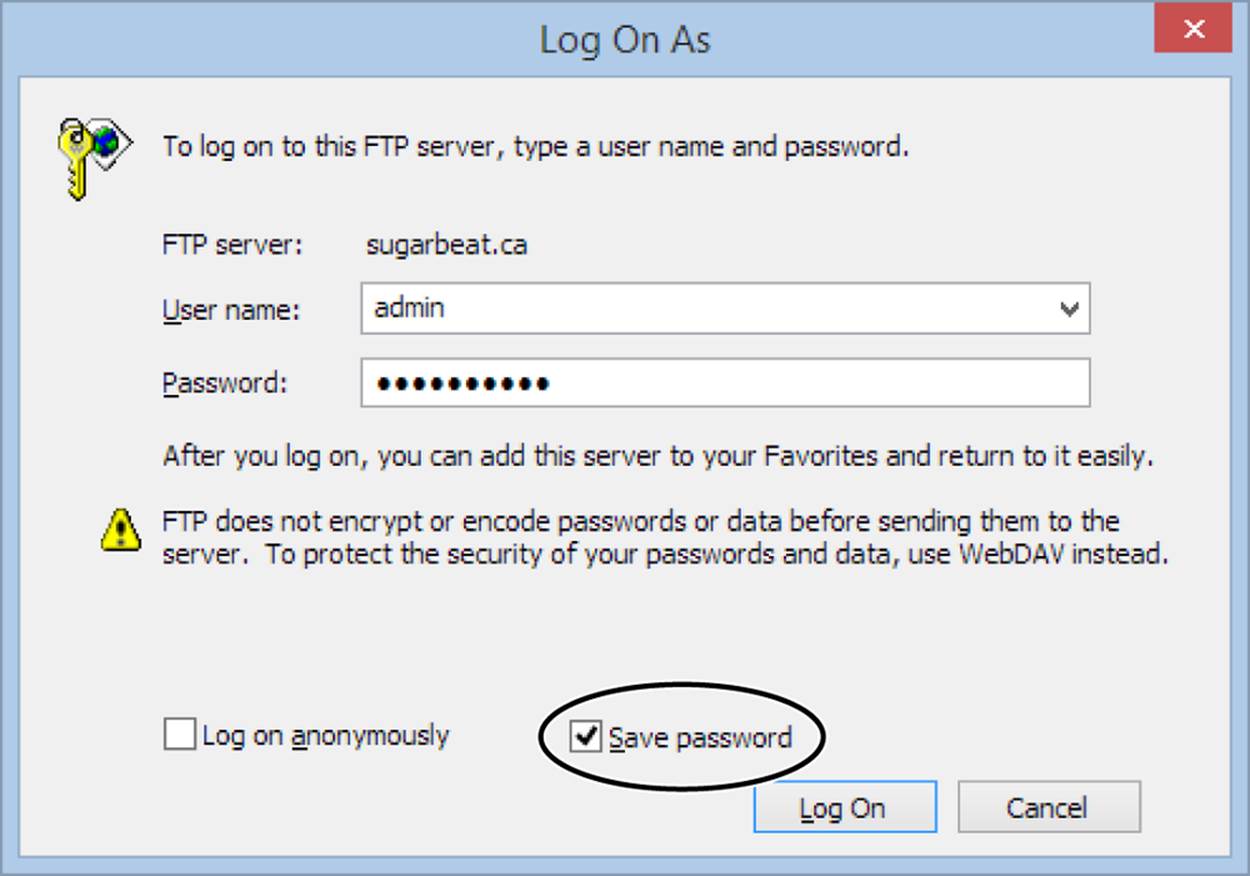
Figure 9-10. When you first type in an FTP address, Windows Explorer may try to log you in anonymously and fail. It may then prompt you for your user ID and password (as shown here), or it may display an error message. If you get an error message, click OK and then right-click the file display area (on the right), and choose Login As. If you turn on the “Save password” checkbox (circled), you don’t need to repeat this process on subsequent visits.
4. Browse to the folder that holds your website.
You need to copy your files to the right place—the root folder that holds the content of your website. Depending on your web host, you may start out in this folder, or you may need to browse to it.
Often this is a folder named public_html. However, it could be something else, like www or webroot. Your web host can give you the correct name—in fact, you’re likely to find the details in your welcome email (What to Expect after You Sign Up).
5. Copy your files to the server.
The easiest way to do this is to open a second Windows Explorer window. Then you can drag the files from that window and drop them in the FTP window.
Figure 9-11 shows the steps to upload the resumé example from Chapter 1. Make sure you upload both the resume4.htm file and the linked picture, leepark.jpg, to the same folder on your site. You can drag these files one at a time or as a group (hold down the Ctrl [⌘] key as you click each filename), and then pull them over en masse.
If you want to transfer an entire website, browse to the root website folder on your computer. Select everything, and then drag all the files and subfolders to your FTP folder. For example, to copy the trip files from the first tutorial in Chapter 6, browse to the Tutorial-6-1\End folder and select everything, including all the pages and the TripArctic and TripChina folders. You can then drag all the selected files in one step.
TIP
Drag-and-drop isn’t the only way to transfer files. You can use all the familiar Windows shortcuts, including the Cut, Copy, and Paste commands in the Edit menu, and the Ctrl+C (copy) and Ctrl+V (paste) keyboard shortcuts.
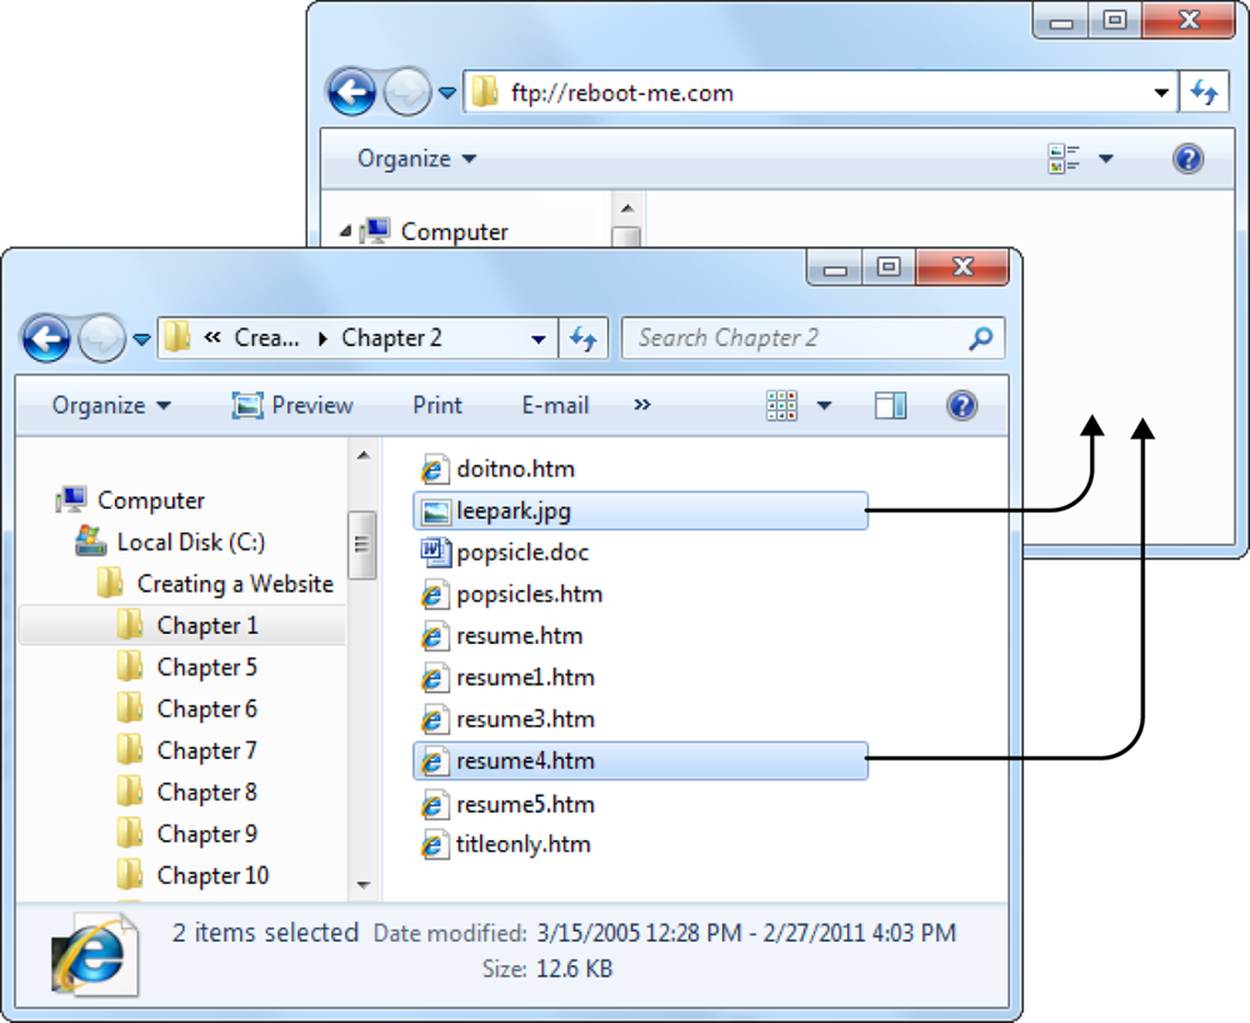
Figure 9-11. To get Lee Park onto the Web from a Windows computer, start by opening two instances of Windows Explorer. Use one for your local files and one for your FTP site. Then browse to the appropriate folder on your computer. When you find the resume4.htm and leepark.jpg files you downloaded earlier, select them, and then drag them onto the FTP window to start uploading files.
Uploading with an FTP Program
There are plenty of FTP programs that can help you transfer files from your computer to your website. Some come equipped with bells and whistles, like the ability to set up automated transfers that follow your preset rules. But if you don’t want any of these exotic features, you can get plenty of basic FTP programs for free, for any operating system.
Two good, popular, and free FTP programs are Cyberduck (http://cyberduck.io) and FileZilla (http://filezilla-project.org). Both offer Windows and Mac versions, and both work more or less the way you’d expect—like a glorified file browser that shows you the contents of your web server.
NOTE
The Mac operating system does include an FTP feature, but it’s read-only. That means you can use the built-in FTP feature to copy files from a web location to your computer, but you can’t use it to transfer your work to your web server, which makes this feature useless for website development.
To use Cyberduck, follow these steps:
1. Begin by visiting http://cyberduck.io to download Cyberduck and install it on your computer.
2. Once you install Cyberduck, fire it up.
The main window appears. Right now, it’s empty.
3. Click the plus (+) button in the bottom-left corner (Figure 9-12).
This brings up a window where you tell Cyberduck how to connect to your FTP server.
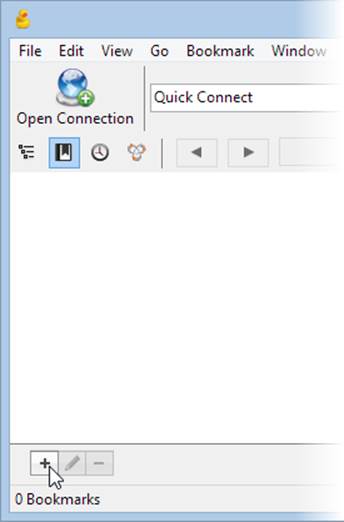
Figure 9-12. The easiest way to connect to an FTP server in Cyberduck is to create a bookmark for it. Start by clicking the plus (+) button shown here.
4. Fill in your account details (Figure 9-13).
You need to supply the standard information, including the FTP server address and your user name. You also need to pick a nickname, because you’re creating a link to the server and you need to label it. (Cyberduck calls these links “bookmarks.”)
5. When you finish, click the red X icon in the top-right corner of the box to close it.
Now you’ll see your bookmark in the main Cyberduck window.
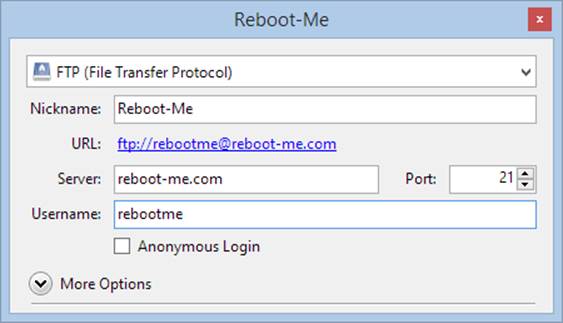
Figure 9-13. Cyberduck saves the connection information for your FTP site and calls it a bookmark. Cyberduck lists all the bookmarks you’ve created in the main window.
6. Double-click your new bookmark to connect to the FTP server.
7. Enter your password.
If you turned on the “Save password” checkbox, Cyberduck remembers the password for this site, so you won’t need to enter it the next time you connect.
Once Cyberduck connects, you’ll see a list of the folders and files on your web hosting account.
8. Browse to the root folder for your site.
Often, it’s named public_html, but not always. Check with your web host if you can’t find the right spot.
9. Start transferring your files.
To upload something to your website, simply drag your files and folders from Windows Explorer (on Windows) or Finder (on Mac) and drop them onto the Cyberduck window.
Uploading in Dreamweaver
If you’re fortunate enough to be working with Dreamweaver, you don’t need to fiddle around with Windows Explorer or another FTP program. Instead, you can do all your uploading from the comfort of the Dreamweaver window. Even better, Dreamweaver’s uploading feature is intelligent. For example, with a single click, it lets you copy just the files you changed since the last time you uploaded files to your site.
Adding Your FTP Information
Before you can use Dreamweaver’s FTP features, you need to “define” your website, a process first described on Defining a Dreamweaver Site. However, merely defining a site isn’t enough. You also need to make sure you’ve added the FTP connection information to your site. Here’s how:
1. Go to the Site Setup window.
If you’re creating a new site, start by choosing Site→New Site. Then fill in a descriptive name and pick the folder on your computer where you store your site’s files, as described on Setting Up Shop with Expression Web.
If you’ve already created a site, choose Site→Manage Site. Then, double-click the site you want to edit.
2. Now click Servers in the list on the left.
This takes you to the Servers section of the Site Setup window.
3. Click the tiny plus icon in the bottom-left corner of the empty server list (Figure 9-14).
Dreamweaver displays a dialog box where you fill in your connection information (see Figure 9-15).

Figure 9-14. Initially, Dreamweaver’s list of web servers is empty. You need to fill in the information for your web server.
NOTE
Don’t forget to fill in the Root Directory setting. This is the folder on your web hosting account that holds your site (usually it’s something like public_html). Dreamweaver is going to do the uploading for you, and if this detail isn’t in place, it won’t put your files in the correct location.
4. When you finish entering your server information, click Save.
Dreamweaver stores your connection information so you won’t need to enter it again and returns you to the Site Setup window.
5. Click Save again to close the Site Setup window.
You return to the Manage Sites dialog box.
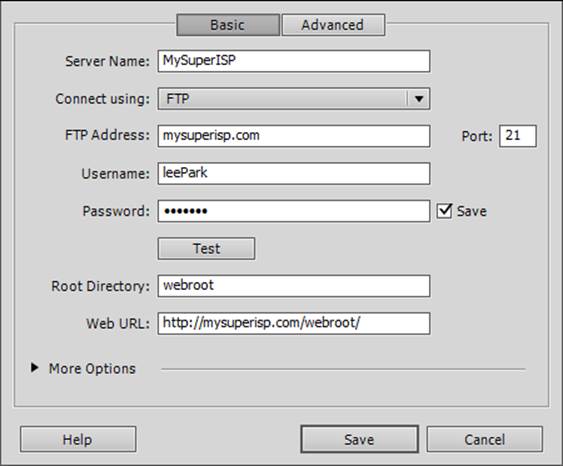
Figure 9-15. Your web host can supply all the connection information you need. Key details include the address of your FTP server, your user name and password, and the root directory (folder name) of your website on the server.
6. Click Done.
You return to Dreamweaver’s main window.
Once you finish adding the FTP information to your site, you’ll be able to take a peek at the contents of it using Dreamweaver’s Files panel (Figure 9-16). In the location drop-down list at the top right of the panel, choose “Remote server” to see what’s on the web server. Choose “Local view” to switch back to the folder on your computer.
The Files panel includes a strip of buttons that let you transfer files back and forth from your computer to the server. The following sections explain how to use them.
Copying Files to Your Website
To transfer files from your local computer to your server, you use an operation called a put in FTP jargon. It works like this:
1. In the Files panel, choose your website from the drop-down menu at the top left.
2. Choose “Local view” from the drop-down menu at the top right.
The Files panel lists the files on your computer (see Figure 9-16).
TIP
Initially, Dreamweaver crams the file view into a small corner of the Dreamweaver window. To expand it to fill the entire window and simultaneously display both the files on your local hard drive and those on the web server, click the Expand button shown in Figure 9-16. This gives you a view that’s similar to the Site View tab in Expression Web.
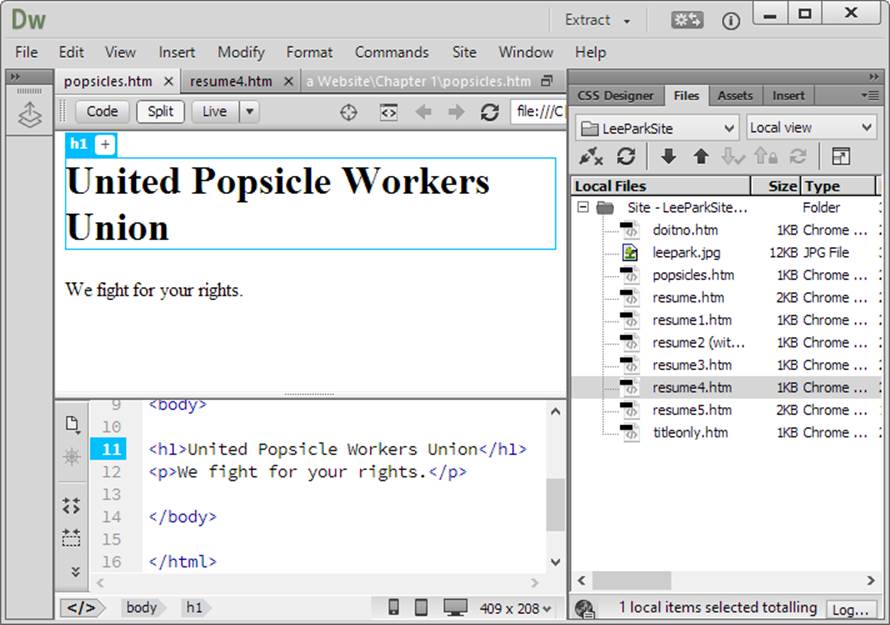
Figure 9-16. This is the local view of a website named LeeParkSite. It lists all the files in the site folder on your computer. Using the icons in this window, you can quickly transfer files to and from your server.
3. Select the files you want to transfer to the server.
You can select multiple files by holding down Ctrl (⌘) while you click each file’s icon.
4. Click the Put arrow (the one that points up), or right-click the selected files, and choose Put.
Dreamweaver asks if you want to copy dependent files.
5. Choose Yes to copy all the files that make up your site.
For example, if you upload a page that uses <img> elements to display graphics, click Yes to make sure Dreamweaver uploads the graphics files as well as the pages themselves. If you don’t have any dependent files, your choice has no effect.
Once you make your choice, Dreamweaver connects to your web server and transfers the files.
Copying Files to Your Computer
To do the reverse and transfer files from your server to your computer, you use a get operation. Follow these steps:
1. In the Files panel, choose your website from the drop-down menu at the top left.
2. Choose “Remote server” from the drop-down menu at the top right (see Figure 9-16).
Dreamweaver doesn’t automatically display the list of files on your server, because getting that list could take a little time. So you need to specifically ask Dreamweaver for an updated view of the files on the server, which you’ll do in the next step.
3. Click the Refresh button, which looks like a circular arrow icon.
Dreamweaver connects to the web server and displays the list of site files.
4. Select the files you want to transfer to your computer.
You can select multiple files by holding down Ctrl (⌘) while you click each file’s name.
5. Click the Get arrow (the down-pointing arrow icon), or right-click the selected files, and choose Get.
Dreamweaver asks if you want to copy dependent files.
6. Choose Yes if you want to copy linked files.
For example, if you download a page that uses <img> elements to display graphics, click Yes to make sure Dreamweaver downloads the graphics, too. If your page doesn’t have any dependent files, your choice has no effect.
Now Dreamweaver connects to your web server and copies the files to the site folder on your computer.
TIP
Once you’re comfortable transferring small batches of files, you can try out Dreamweaver’s Synchronize button. It works like the website publishing feature in Expression Web. When you click it, Dreamweaver examines the web page files on your computer, determines which ones you updated, and transfers just those to your server.
Uploading in Expression Web
Uploading a site in Expression Web is just as convenient as it is in Dreamweaver. Not only does it save you the effort of switching to a separate program, but it also keeps track of pages that have changed and lets you update just those files in a single, speedy operation.
Before you can take advantage of Expression Web’s FTP features, however, you need to define your local website by following the site definition process explained on Defining a Site in Expression Web. Make sure you choose to add the metadata folders, because Expression Web needs them to keep track of the files you change.
Once you define a site and switch on the metadata folders, you’re ready to press on. Here’s how to upload your site:
1. Choose Site→Publishing (or click Publishing at the bottom of the Site View tab).
You can’t publish your website until you fill in some basic information about your web hosting company.
2. Click the big “Add a publishing destination” link in the middle of the Site View tab.
Expression Web displays the Connection Settings window (see Figure 9-17).
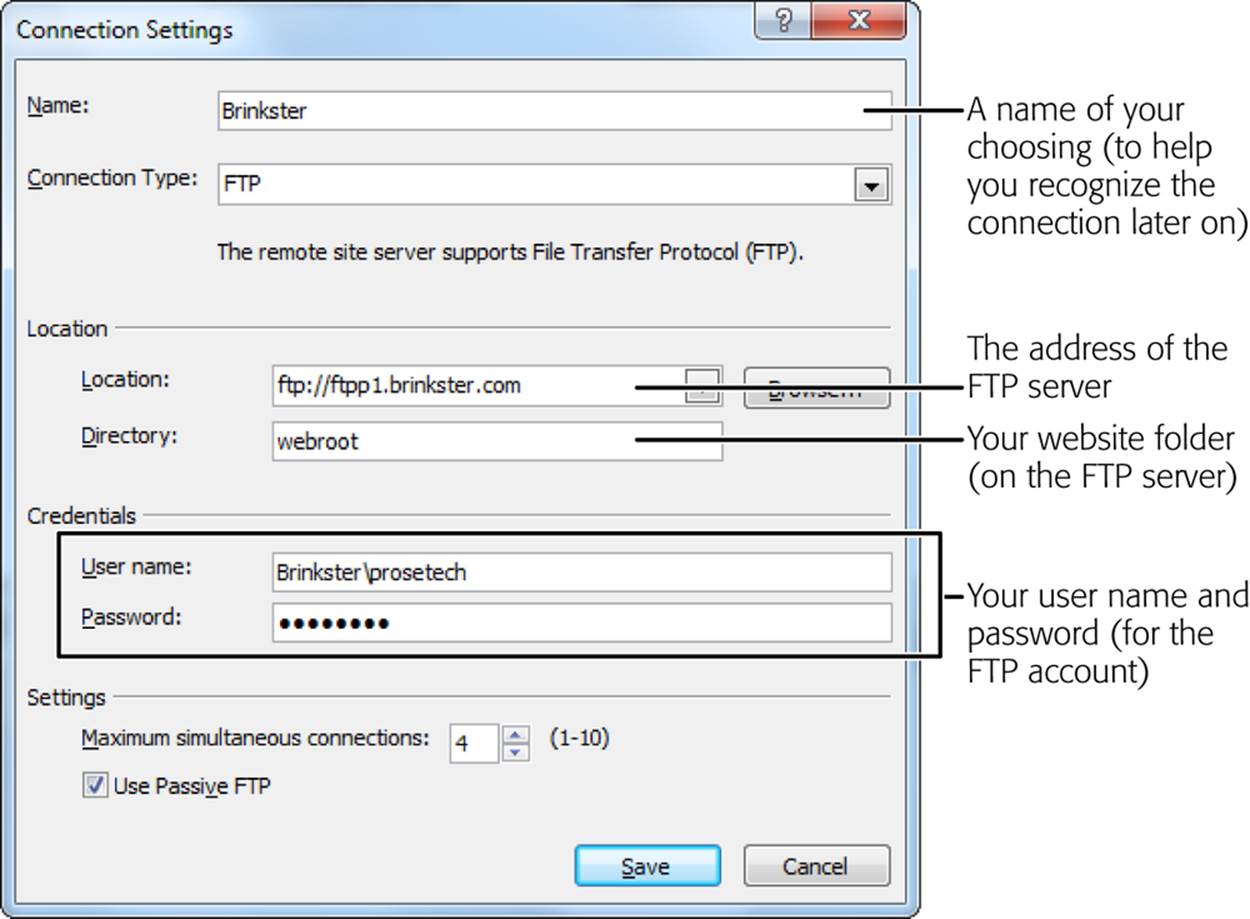
Figure 9-17. Your web hosting company should tell you the exact choices to make in the Connection Settings window. Typically, you need to supply the address of your host’s FTP server, the directory (folder name) of your website on the server, and your user name and password. You need to complete this form only once. If you’re successful, Expression Web uses this information the next time you publish your site (although you have to type in your password each time).
3. Fill in the information that tells Expression Web how to connect to your server, and then click Add.
Expression Web saves the info and connects to your web host. The next time you upload files, you’ll see a “Connect to publishing destination” link instead of the “Add a publishing destination” link. Just click once to connect, with no extra work.
Once you’re connected, Expression Web shows you a side-by-side file list that compares the contents of the website stored on your computer with that on the server, so you can tell at a glance which files have changed (Figure 9-18).
4. To bring your web server up to date, choose Site→Publish Changed Files.
This choice starts the publishing process (see Figure 9-19).
You can also transfer individual files using the arrows that appear between the two file lists. To transfer files from your computer to the server, select them on the left list and then click the right-facing arrow. To download a file from your server, select it from the right list and then click the left-facing arrow. The two-way arrow underneath (“Synchronize files”) is like both operations rolled into one; it examines each file you select and makes sure it updates any old versions on either your computer or web server.
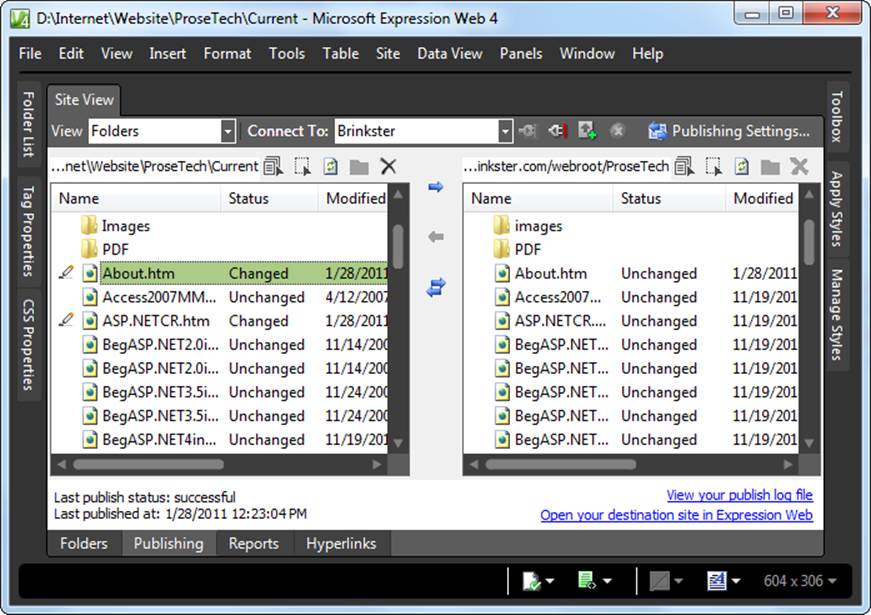
Figure 9-18. Here, Expression Web uses a pencil icon to highlight two files that you updated on your computer but not on the web server.
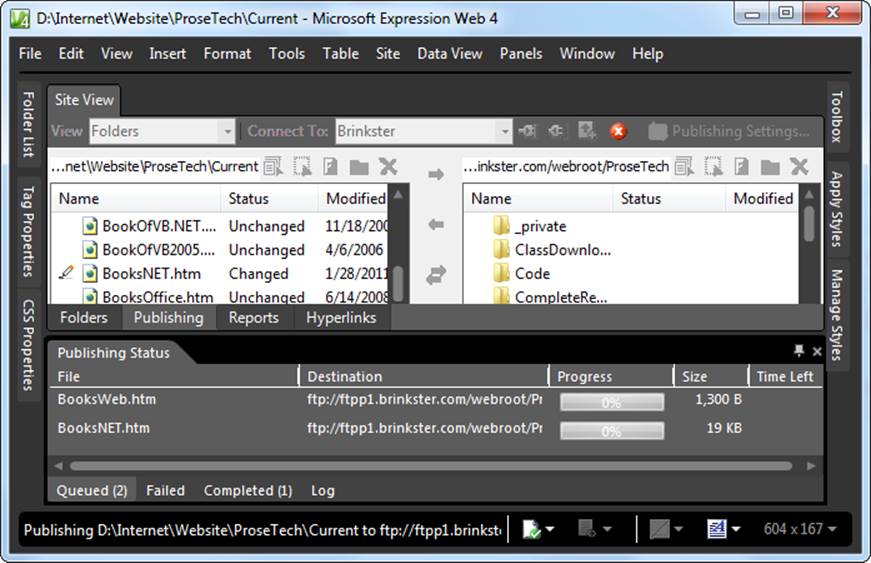
Figure 9-19. When you publish a website, Expression Web scans your files and copies only the ones you added or changed since the last time you published the site. A progress indicator identifies the file being copied and estimates how long the operation will take.