Learning JavaScript Data Structures and Algorithms (2014)
Chapter 4. Queues
We have already learned how stacks work. Queues are very similar, but instead of LIFO, they use a different principle that you will learn about in this chapter.
A queue is an ordered collection of items that follows the FIFO (which stands for First In First Out, also known as first-come first-served) principle. The addition of new elements in a queue is at the tail and the removal is from the front. The newest element added to the queue must wait at the end of the queue.
The most popular example of a queue in real life is the typical line that we form from time to time:
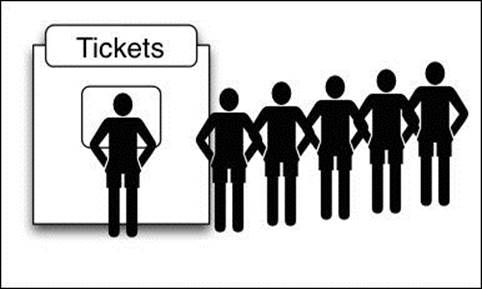
We have lines for movies, the cafeteria, and a checkout line at a grocery store, among other examples. The first person that is in the line is the first one that will be attended.
A very popular example in Computer Science is the printing line. Let's say we need to print five documents. We open each document and click on the print button. Each document will be sent to the print line. The first document that we asked to be printed is going to be printed first and so on, until all documents are printed.
Creating a queue
We are going to create our own class to represent a queue. Let's start from the basics and declare our class:
function Queue() {
//properties and methods go here
}
First, we need a data structure that will store the elements of the queue. We can use an array to do it, just like we used for the Stack class in the previous chapter (you will notice the Queue and Stack class are very similar, just the principles for adding and removing the elements are different):
var items = [];
Next, we need to declare the methods available for a queue:
· enqueue(element(s)): This adds a new item (or several items) at the back of the queue.
· dequeue(): This removes the first item from the queue (the item that is in the front of the queue). It also returns the removed element.
· front(): This returns the first element from the queue, the first one added, and the first one that will be removed from the queue. The queue is not modified (it does not remove the element; it only returns the element for information purposes—very similar to the peek method from theStack class).
· isEmpty(): This returns true if the queue does not contain any elements and false if the queue is bigger than 0.
· size(): This returns how many elements the queue contains. It is similar to the length property of the array.
The first method we will implement is the enqueue method. This method will be responsible for adding new elements to the queue with one very important detail; we can only add new items to the end of the queue:
this.enqueue = function(element){
items.push(element);
};
As we are using an array to store the elements for the stack, we can use the push method from the JavaScript array class that we covered in Chapter 2, Arrays, and also in Chapter 3, Stacks.
Next, we are going to implement the dequeue method. This method will be responsible for removing the items from the queue. As the queue uses the FIFO principle, the first item that we added is the one that is removed. For this reason, we can use the shift method from the JavaScript arrayclass that we also covered in Chapter 2, Arrays. If you do not remember, the shift method will remove the element that is stored at the index 0 (first position) of the array:
this.dequeue = function(){
return items.shift();
};
With the enqueue and dequeue methods being the only methods available for adding and removing items from the queue, we assured the FIFO principle for our own Queue class.
Now, let's implement some additional helper methods for our class. If we want to know what the front item of our queue is, we can use the front method. This method will return the item from the front of the queue (index 0 of the array):
this.front = function(){
return items[0];
};
The next method is the isEmpty method, which returns true if the queue is empty and false otherwise (note that this method is the same as the one in the Stack class):
this.isEmpty = function(){
return items.length == 0;
};
For the isEmpty method, we can simply verify that the length of the internal array is 0.
Like the length property of the array class, we can also implement the same for our Queue class. The size method is also the same for the Stack class:
this.size = function(){
return items.length;
};
And we are done! Our Queue class is implemented. Just like we did for the Stack class, we can also add the print method:
this.print = function(){
console.log(items.toString());
};
And now we are really done!
The complete Queue class
Let's take a look how our Queue class looks like after its full implementation:
function Queue() {
var items = [];
this.enqueue = function(element){
items.push(element);
};
this.dequeue = function(){
return items.shift();
};
this.front = function(){
return items[0];
};
this.isEmpty = function(){
return items.length == 0;
};
this.clear = function(){
items = [];
};
this.size = function(){
return items.length;
};
this.print = function(){
console.log(items.toString());
};
}
Note
The Queue and Stack class are very similar. The only difference is the dequeue and front methods because of the difference between the FIFO and LIFO principles.
Using the Queue class
The first thing we need to do is instantiate the Queue class we just created. Next, we can verify that it is empty (the output is true because we have not added any elements to our queue yet):
var queue = new Queue();
console.log(queue.isEmpty()); //outputs true
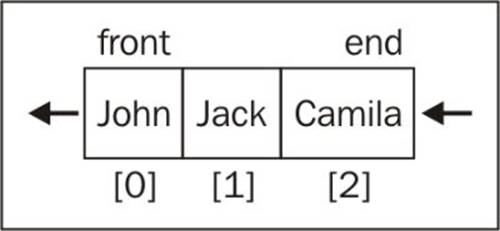
Next, let's add some elements to it (let's enqueue the elements "John" and "Jack"—you can add any element type to the queue):
queue.enqueue("John");
queue.enqueue("Jack");
Let's add another element:
queue.enqueue("Camila");
Let's also execute some other commands:
queue.print();
console.log(queue.size()); //outputs 3
console.log(queue.isEmpty()); //outputs false
queue.dequeue();
queue.dequeue();
queue.print();
If we ask to print the contents of the queue, we will get John, Jack, and Camila. The size of the queue will be 3 because we have three elements queued on it (and it is also not going to be empty).
The following diagram exemplifies all the enqueue operations we executed so far and the current status of our queue:
Next, we asked to dequeue two elements (the dequeue method is executed twice). The following diagram exemplifies the dequeue method execution:
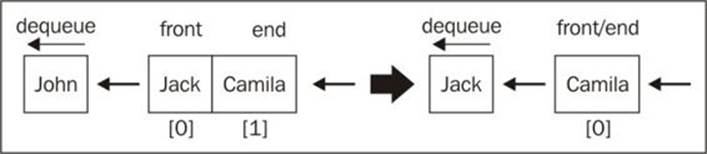
And when we finally ask to print the content of the queue again, we only have the element Camila. The first two elements queued, were dequeued; the final element queued to the data structure is the last one that will be dequeued from it. That being said, we are following the FIFO principle.
The priority queue
As queues are largely applied in Computer Science and also in our lives, there are some modified versions of the default queue we implemented in the previous topic.
One modified version is the priority queue. Elements are added and removed based on a priority. An example from real life is the boarding line at the airport. First class and business class passengers have priority over coach class passengers. In some countries, elderly people and pregnant women (or women with newborn children) also have priority for boarding over other passengers.
Another example from real life is the patient's waiting room from a hospital (emergency department). Patients that have a severe condition are seen by a doctor prior to patients with a less severe condition. Usually, a nurse will do the triage and assign a code to the patient depending on the condition severity.
There are two options when implementing a priority queue: you can set the priority and add the element at the correct position, or you can queue the elements as they are added to the queue and remove them according to the priority. For this example, we will add the elements at their correct position, so we can dequeue them by default:
function PriorityQueue() {
var items = [];
function QueueElement (element, priority){ // {1}
this.element = element;
this.priority = priority;
}
this.enqueue = function(element, priority){
var queueElement = new QueueElement(element, priority);
if (this.isEmpty()){
items.push(queueElement); // {2}
} else {
var added = false;
for (var i=0; i<items.length; i++){
if (queueElement.priority < items[i].priority){
items.splice(i,0,queueElement); // {3}
added = true;
break; // {4}
}
}
if (!added){ //{5}
items.push(queueElement);
}
}
};
//other methods - same as default Queue implementation
}
The difference between the implementation of the default Queue and PriorityQueue classes is that we need to create a special element (line {1}) to be added to PriorityQueue. This element contains the element we want to add to the queue (it can be any type) plus the priority on the queue.
If the queue is empty, we can simple enqueue the element (line {2}). If the queue is not empty, we need to compare its priority to the rest of the elements. When we find an item that has a higher priority than the element we are trying to add, then we insert the new element one position before (with this logic, we also respect the other elements with the same priority, but were added to the queue first). To do this, we can use the splice method from the JavaScript array class that you learned about in Chapter 2, Arrays. Once we find the element with bigger priority, we insert the new element (line {3}) and we stop looping the queue (line {4}). This way, our queue will also be sorted and organized by priority.
Also, if the priority we are adding is greater than any priority already added, we simply add to the end of the queue (line {5}):
var priorityQueue = new PriorityQueue();
priorityQueue.enqueue("John", 2);
priorityQueue.enqueue("Jack", 1);
priorityQueue.enqueue("Camila", 1);
priorityQueue.print();
In the previous code, we can see an example of how to use the PriorityQueue class. We can see each command result in the following diagram (a result of the previous code):
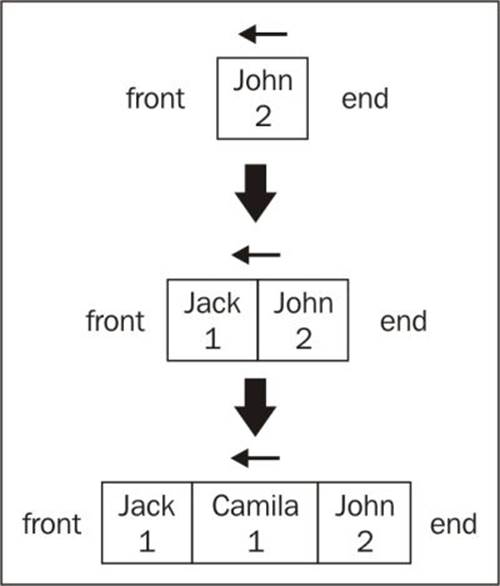
The first element that was added was John with priority 2. Because the queue was empty, this is the only element on it. Then, we added Jack with priority 1. As Jack has higher priority than John, it is the first element in the queue. Then, we added Camila also with priority 1. As Camila has the same priority as Jack, it will be inserted after Jack (as it was inserted first); and as Camila has a higher priority than John, it will be inserted before this element.
The priority queue we implemented is called a min priority queue, because we are adding the element with the lower value (1 has higher priority) to the front of the queue. There is also the max priority queue, which instead of adding the element with the lower value to front of the queue, it adds the element with greater value to the front of the queue.
The circular queue – Hot Potato
We also have another modified version of the queue implementation, which is the circular queue. An example of a circular queue is the Hot Potato game. In this game, children are organized in a circle, and they pass the hot potato to the neighbor as fast as they can. At a certain point of the game, the hot potato stops being passed around the circle of children and the child that has the hot potato is removed from the circle. This action is repeated until there is only one child left (the winner).
For this example, we will implement a simulation of the Hot Potato game:
function hotPotato (nameList, num){
var queue = new Queue(); // {1}
for (var i=0; i<nameList.length; i++){
queue.enqueue(nameList[i]); // {2}
}
var eliminated = '';
while (queue.size() > 1){
for (var i=0; i<num; i++){
queue.enqueue(queue.dequeue()); // {3}
}
eliminated = queue.dequeue();// {4}
console.log(eliminated + ' was eliminated from the Hot Potato game.');
}
return queue.dequeue();// {5}
}
var names = ['John','Jack','Camila','Ingrid','Carl'];
var winner = hotPotato(names, 7);
console.log('The winner is: ' + winner);
To implement a simulation of this game, we will use the Queue class we implemented at the beginning of this chapter (line {1}). We will get a list of names and queue all of them (line {2}). Given a number, we need to iterate the queue. We will remove an item from the beginning of the queue and add it to the end of it (line {3}) to simulate the hot potato (if you passed the hot potato to your neighbor, you are not threatened to be eliminated right away). Once we reach the number, the person that has the hot potato is eliminated (removed from the queue—line {4}). When there is only one person left, this person is declared the winner (line {5}).
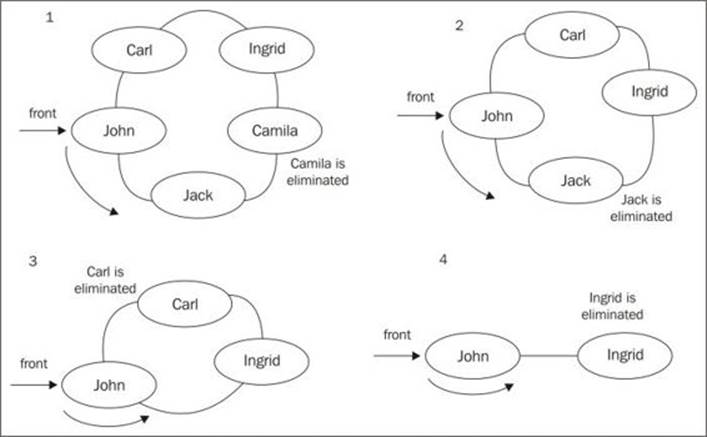
The output from the previous algorithm is:
Camila was eliminated from the Hot Potato game.
Jack was eliminated from the Hot Potato game.
Carl was eliminated from the Hot Potato game.
Ingrid was eliminated from the Hot Potato game.
The winner is: John
This output is simulated in the following diagram:
You can change the number passed to the hotPotato function to simulate different scenarios.
Summary
In this chapter, you learned about the queue data structure. We implemented our own algorithm that represents a queue; you learned how to add and remove elements from it using the enqueue and dequeue methods. We also covered two very famous special implementations of the queue: the priority queue and the circular queue (using the Hot Potato game implementation).
In the next chapter, you will learn about linked lists, a more complex data structure than the array.
All materials on the site are licensed Creative Commons Attribution-Sharealike 3.0 Unported CC BY-SA 3.0 & GNU Free Documentation License (GFDL)
If you are the copyright holder of any material contained on our site and intend to remove it, please contact our site administrator for approval.
© 2016-2026 All site design rights belong to S.Y.A.