Learning JavaScript Data Structures and Algorithms (2014)
Chapter 7. Dictionaries and Hashes
In the previous chapter, we learned about sets. In this chapter, we will continue our discussion about data structures that store unique values (non-repeated values) using dictionaries and hashes.
Sets, dictionaries, and hashes store unique values. In a set, we are interested in the value itself as the primary element. In a dictionary (or map), we store values as pairs as [key, value]. The same goes for hashes (they store values as pairs as [key, value]); however, the way that we implement these data structures is a little bit different, as we will see in this chapter.
Dictionaries
As you have learned, a set is a collection of distinct elements (non-repeated elements). A dictionary is used to store [key, value] pairs, where the key is used to find a particular element. The dictionary is very similar to a set; a set stores a [key, key] collection of elements, and a dictionary stores a [key, value] collection of elements. A dictionary is also known as a map.
In this chapter, we will cover some examples of the use of the dictionary data structure in the real world: a dictionary itself (the words and their definitions), and an address book.
Creating a dictionary
Similar to the Set class, ECMAScript 6 also contains an implementation of the Map class—also known as a dictionary.
Note
You can check out the details of the ECMAScript 6 Map class implementation at https://developer.mozilla.org/en-US/docs/Web/JavaScript/Reference/Global_Objects/Map (or http://goo.gl/dm8VP6).
The class we are going to implement in this chapter is based on the Map implementation of ECMAScript 6. You will notice that it is very similar to the Set class (but instead of storing [key, key] pair, we will store [key, value] pair).
This is the skeleton of our Dictionary class:
function Dictionary(){
var items = {};
}
Similar to the Set class, we will also store the elements in an Object instance instead of an array.
Next, we need to declare the methods available for a map/dictionary:
· set(key,value): This adds a new item to the dictionary.
· remove(key): This removes the value from the dictionary using the key.
· has(key): This returns true if the key exists in the dictionary and false otherwise.
· get(key): This returns a specific value searched by the key.
· clear(): This removes all the items from the dictionary.
· size(): This returns how many elements the dictionary contains. It is similar to the length property of the array.
· keys(): This returns an array of all the keys the dictionary contains.
· values(): This returns an array of all the values of the dictionary.
The has and set methods
The first method we will implement is the has(key) method. We will implement this method first because it will be used in other methods such as set and remove. We can see its implementation in the following code:
this.has = function(key){
return key in items;
};
The implementation is exactly the same as what we did for the Set class. We are using the JavaScript in operator to verify that the key is a property of the items object.
The next method is the set method:
this.set = function(key, value){
items[key] = value; //{1}
};
This receives a key and a value parameter. We simply set the value to the key property of the items object. This method can be used to add a new value or update an existing one.
The remove method
Next, we will implement the remove method. It is very similar to the remove method from the Set class; the only difference is that we first search for key (instead of value):
this.remove = function(key){
if (this.has(key)){
delete items[key];
return true;
}
return false;
};
Then we use the JavaScript remove operator to remove the key attribute from the items object.
The get and values methods
If we want to search for a particular item from the dictionary and retrieve its value, we can use the following method:
this.get = function(key) {
return this.has(key) ? items[key] : undefined;
};
The get method will first verify that the value that we would like to retrieve exists (by searching for key), and if the result is positive, its value is returned, if not, an undefined value is returned (remember that undefined is different from null—we covered this concept in Chapter 1, Javascript – A Quick Overview).
The next method is the values method. This method will be used to retrieve an array of all values instances present in the dictionary:
this.values = function(){
var values = [];
for (var k in items) { //{1}
if (this.has(k)) {
values.push(items[k]); //{2}
}
}
return values;
};
First, we will iterate through all attributes from the items object (line {1}). Just to make sure the value exists, we will use the has function to verify that key really exists, and then we add its value to the values array (line {2}). At the end, we simply return all the values found.
Note
We cannot simply use the for-in statement and iterate through the properties of the items object. We also need to use the has method (to verify if the items object has that property) because the object's prototype contains additional properties of the object as well (properties are inherited from the base JavaScript Object class, but it still has properties of the object—which we are not interested in for this data structure).
The clear, size, keys, and getItems methods
The clear, size, and keys methods are exactly the same from the Set class. For this reason, we will not go through them again in this chapter.
Finally, just so that we can verify the output of the items property, let's implement a method called getItems that will return the items variable:
this.getItems = function(){
return items;
}
Using the Dictionary class
First, we create an instance of the Dictionary class, and then we add three e-mails to it. We are going to use this dictionary instance to exemplify an e-mail address book.
Let's execute some code using the class we created:
var dictionary = new Dictionary();
dictionary.set('Gandalf', 'gandalf@email.com');
dictionary.set('John', 'johnsnow@email.com');
dictionary.set('Tyrion', 'tyrion@email.com');
If we execute the following code, we will get the output as true:
console.log(dictionary.has('Gandalf'));
The following code will output 3 because we added three elements to our dictionary instance:
console.log(dictionary.size());
Now, let's execute the following lines of code:
console.log(dictionary.keys());
console.log(dictionary.values());
console.log(dictionary.get('Tyrion'));
The output will be as follows, in the respective order:
["Gandalf", "John", "Tyrion"]
["gandalf@email.com", "johnsnow@email.com", "tyrion@email.com"]
tyrion@email.com
Finally, let's execute some more lines of code:
dictionary.remove('John');
Let's also execute the following ones:
console.log(dictionary.keys());
console.log(dictionary.values());
console.log(dictionary.getItems());
The output will be as follows:
["Gandalf", "Tyrion"]
["gandalf@email.com", "tyrion@email.com"]
Object {Gandalf: "gandalf@email.com", Tyrion: "tyrion@email.com"}
As we removed one element, the dictionary instance now contains only two elements. The highlighted line exemplifies how the items object is structured internally.
The hash table
In this section, you will learn about the HashTable class, also known as HashMap, a hash implementation of the Dictionary class.
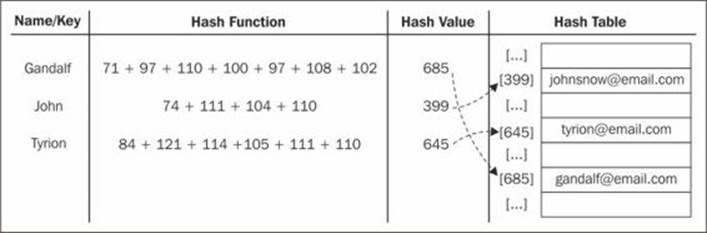
Hashing consists of finding a value in a data structure in the shortest time possible. You have learned from previous chapters that if we would like to get a value from it (using a get method), we need to iterate through the structure until we find it. When we use a hash function, we already know which position the value is in, so we can simply retrieve it. A hash function is a function that given a key, and will return an address in the table where the value is.
For example, let's continue using the e-mail address book we used in the previous section. The hash function we will use is the most common one, called a "lose lose" hash function, where we simply sum up the ASCII values of each character of the key length.
Creating a hash table
We will use an array to represent our data structure to have a data structure very similar to the one we used in the diagram in the previous topic.
As usual, let's start with the skeleton of our class:
function HashTable() {
var table = [];
}
Next, we need to add some methods to our class. We will implement three basic methods for every class:
· put(key,value): This adds a new item to the hash table (or it can also update it)
· remove(key): This removes the value from the hash table using the key
· get(key): This returns a specific value searched by the key
The first method that we will implement before we implement these three methods is the hash function. This is a private method of the HashTable class:
var loseloseHashCode = function (key) {
var hash = 0; //{1}
for (var i = 0; i < key.length; i++) { //{2}
hash += key.charCodeAt(i); //{3}
}
return hash % 37; //{4}
};
Given a key parameter, we will generate a number based on the sum of each char ASCII value that composes key. So, first we need a variable to store the sum (line {1}). Then, we will iterate through the key (line {2}) and add the ASCII value of the corresponding character value from the ASCII table to the hash variable (to do so, we can use the charCodeAt method from the JavaScript String class—line {3}). Finally, we return this hash value. To work with lower numbers, we will use the rest of the division (mod) of the hash number using an arbitrary number (line {4}).
Note
For more information about ASCII, please go to http://www.asciitable.com/.
Now that we have our hash function, we can implement the put method:
this.put = function (key, value) {
var position = loseloseHashCode(key); //{5}
console.log(position + ' - ' + key); //{6}
table[position] = value; //{7}
};
First, for the given key, we need to find a position in the table using the hash function we created (line {5}). For information purposes, we will log the position on the console (line {6}). We can remove this line from the code as it is not necessary. Then, all we have to do is add the valueparameter to position, which we found using the hash function (line {7}).
To retrieve a value from the HashTable instance is also simple. We will implement the get method for this purpose:
this.get = function (key) {
return table[loseloseHashCode(key)];
};
First, we will retrieve the position of the given key using the hash function we created. This function will return the position of the value and all we have to do is access this position from the table array and return this value.
The last method we will implement is the remove method:
this.remove = function(key){
table[loseloseHashCode (key)] = undefined;
};
To remove an element of the HashTable instance, we simply need to access the desired position (that we can get using the hash function) and assign the value undefined to it.
For the HashTable class, we do not need to remove the position from the table array as we did for the ArrayList class. As the elements will be distributed throughout the array, some positions will not be occupied by any value, having the undefined value by default. We also cannot remove the position itself from the array (this will shift the other elements), otherwise, next time we try to get or remove another existing element, the element will not be present in the position we get from the hash function.
Using the HashTable class
Let's test the HashTable class by executing some code:
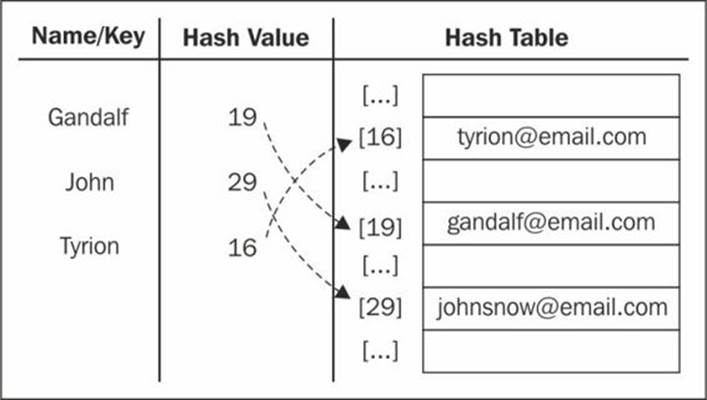
var hash = new HashTable();
hash.put('Gandalf', 'gandalf@email.com');
hash.put('John', 'johnsnow@email.com');
hash.put('Tyrion', 'tyrion@email.com');
When we execute the previous code, we will get the following output on the console:
19 - Gandalf
29 - John
16 - Tyrion
The following diagram represents the HashTable data structure with these three elements in it:
Now, let's test the get method:
console.log(hash.get('Gandalf'));
console.log(hash.get('Loiane'));
We will have the following output:
gandalf@email.com
undefined
As Gandalf is a key that exists in HashTable, the get method will return its value. As Loiane is not an existing key, when we try to access its position in the array (a position generated by the hash function) its value will be undefined (non-existent).
Next, let's try to remove Gandalf from HashTable:
hash.remove('Gandalf');
console.log(hash.get('Gandalf'));
The hash.get('Gandalf') method will give undefined as the output on the console, as Gandalf no longer exists in the table.
Hash table versus hash set
A hash table is the same thing as a hash map. We covered this data structure in this chapter.
In some programming languages, we also have the hash set implementation. The hash set data structure consists of a set, but to insert, remove, or get elements, we use a hash function. We can reuse all the code we implemented in this chapter for a hash set; the difference is that instead of adding a key-value pair, we will insert only the value, not the key. For example, we could use a hash set to store all the English words (without their definition). Similar to set, the hash set also stores only unique values, not repeated ones.
Handling collisions between hash tables
Sometimes, different keys can have the same hash value. We call it a collision, as we will try to set different values to the same position of the HashTable instance. For example, let's see what we get in the output with the following code:
var hash = new HashTable();
hash.put('Gandalf', 'gandalf@email.com');
hash.put('John', 'johnsnow@email.com');
hash.put('Tyrion', 'tyrion@email.com');
hash.put('Aaron', 'aaron@email.com');
hash.put('Donnie', 'donnie@email.com');
hash.put('Ana', 'ana@email.com');
hash.put('Jonathan', 'jonathan@email.com');
hash.put('Jamie', 'jamie@email.com');
hash.put('Sue', 'sue@email.com');
hash.put('Mindy', 'mindy@email.com');
hash.put('Paul', 'paul@email.com');
hash.put('Nathan', 'nathan@email.com');
The following will be the output:
19 - Gandalf
29 - John
16 - Tyrion
16 - Aaron
13 - Donnie
13 - Ana
5 - Jonathan
5 - Jamie
5 - Sue
32 - Mindy
32 - Paul
10 – Nathan
Note that Tyrion has the same hash value as Aaron (16). Donnie has the same hash value as Ana (13). Jonathan, Jamie, and Sue (5) have the same hash value as well and so do Mindy and Paul (32).
What will happen to the HashTable instance? Which values do we have inside it after executing the previous code?
To help us find out, let's implement a helper method called print, which will log on the console the values in the HashTable instance:
this.print = function () {
for (var i = 0; i < table.length; ++i) { //{1}
if (table[i] !== undefined) { //{2}
console.log(i + ": " + table[i]); //{3}
}
}
};
First, we iterate through all the elements of the array (line {1}). For the positions that have a value (line {2}), we will log the position and its value on the console (line {3}).
Now, let's use this method:
hash.print();
We will have the following output on the console:
5: sue@email.com
10: nathan@email.com
13: ana@email.com
16: aaron@email.com
19: gandalf@email.com
29: johnsnow@email.com
32: paul@email.com
Jonathan, Jamie, and Sue have the same hash value, that is, 5. As Sue was the last one to be added, Sue will be the one to occupy position 5 of HashTable. First, Jonathan will occupy it, then Jamie will overwrite it, and Sue will overwrite it again. The same will happen to the other elements that have a collision.
The idea of using a data structure to store all these values is obviously not to lose these values, it is to keep them all somehow. For this reason, we need to handle this situation when it happens. There are a few techniques to handle collisions: separate chaining, linear probing, and double hashing. We will cover the first two in this book.
Separate chaining
The separate chaining technique consists of creating a linked list for each position of the table and store the elements in it. It is the simplest technique to handle collisions; however, it requires additional memory outside the HashTable instance.
For example, if we use separate chaining in the code we used to do some testing in the previous topic, this would be the output:
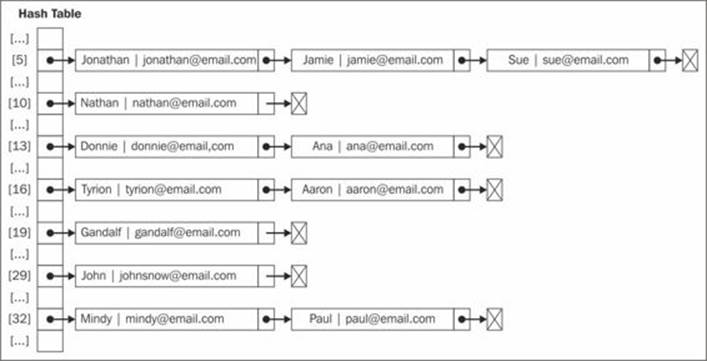
At position 5, we would have a LinkedList instance with three elements in it; at positions 13, 16, and 32, we would have LinkedList instances with two elements in it, and at positions 10, 19, and 29, we would have LinkedList instances with a single element in it.
For separate chaining and linear probing, we only need to override three methods: put, get, and remove. These three methods will be different in each different technique we decide to implement.
To help us implement a HashTable instance using the separate chaining technique, we will need a new helper class to represent the element we will add to the LinkedList instance. We will call it the ValuePair class (declared inside the HashTable class):
var ValuePair = function(key, value){
this.key = key;
this.value = value;
this.toString = function() {
return '[' + this.key + ' - ' + this.value + ']';
}
};
This class will simply store key and value in an Object instance. We will also override the toString method to help us later in outputting the results on the browser console.
The put method
Let's implement the first method, the put method, as follows:
this.put = function(key, value){
var position = loseloseHashCode(key);
if (table[position] == undefined) { //{1}
table[position] = new LinkedList();
}
table[position].append(new ValuePair(key, value)); //{2}
};
In this method, we will verify that the position we are trying to add the element to already has something in it (line {1}). If this is the first time we are adding an element in this position, we will initialize it with an instance of the LinkedList class (which you learned about in Chapter 5, Linked Lists). Then, we will add the ValuePair instance (key and value) to the LinkedList instance using the append method we implemented in Chapter 5 (line {2}).
The get method
Next, we will implement the get method to retrieve a specified value:
this.get = function(key) {
var position = loseloseHashCode(key);
if (table[position] !== undefined){ //{3}
//iterate linked list to find key/value
var current = table[position].getHead(); //{4}
while(current.next){ //{5}
if (current.element.key === key){ //{6}
return current.element.value; //{7}
}
current = current.next; //{8}
}
//check in case first or last element
if (current.element.key === key){ //{9}
return current.element.value;
}
}
return undefined; //{10}
};
The first verification we need to do is to see whether there is any element at the desired position (line {3}). If not, we return undefined to represent that the value was not found in the HashTable instance (line {10}). If there is a value in the position, we know that the instance is a LinkedListinstance. Now, all we have to do is search for the element we want to find by iterating through the list. To do so, we need to get the reference of the head of the list (line {4}) and then we can iterate through it until we find the end of the list (line {5}, current.next, will be null).
The Node list contains the next pointer and the element attribute. The element attribute is an instance of ValuePair, so it has the attributes value and key. To access the key attribute of the Node list, we can use current.element.key and compare it to see whether it is the key we are searching for (line {6}). (This is the reason we are using the helper class ValuePair to store the elements. We cannot simply store the value itself, as we would not know which value corresponds to a particular key.) If it is the same key attribute, we return the Node value (line {7}), and if not, we continue iterating through the list by going to the next element of the list (line {8}).
If the element we are looking for is the first or last element of the list, it will not go inside the while loop. For this reason, we also need to handle this special case in line {9}.
The remove method
Removing an element from the HashTable instance using the separate chaining technique is a little bit different from the remove method we implemented earlier in this chapter. Now that we are using LinkedList, we need to remove the element from LinkedList. Let's check the remove method implementation:
this.remove = function(key){
var position = loseloseHashCode(key);
if (table[position] !== undefined){
var current = table[position].getHead();
while(current.next){
if (current.element.key === key){ //{11}
table[position].remove(current.element); //{12}
if (table[position].isEmpty()){ //{13}
table[position] = undefined; //{14}
}
return true; //{15}
}
current = current.next;
}
//check in case first or last element
if (current.element.key === key){ //{16}
table[position].remove(current.element);
if (table[position].isEmpty()){
table[position] = undefined;
}
return true;
}
}
return false; //{17}
};
In the remove method, we will do the same thing we did in the get method to find the element we are looking for. When iterating through the LinkedList instance, if the current element in the list is the element we are looking for (line {11}), we will use the remove method to remove it fromLinkedList (line {12}). Then we will do an extra validation: if the list is empty (line {13}—there are no elements in it anymore), we will set the table position as undefined (line {14}), so we can skip this position whenever we look for an element or try to print its contents. At last, we returntrue to indicate that the element was removed (line {15}) or we return false at the end to indicate that the element was not present in HashTable (line {17}). Also, we need to handle the special case of first or last element (line {16}), as we did for the get method.
Overwriting these three methods, we have a HashMap instance with a separate chaining technique to handle collisions.
Linear probing
Another technique of collision resolution is linear probing. When we try to add a new element, if the position index is already occupied, then we try index +1. If index +1 is occupied, then we try index + 2, and so on.
The put method
Let's go ahead and implement the three methods we need to overwrite. The first one will be the put method:
this.put = function(key, value){
var position = loseloseHashCode(key); // {1}
if (table[position] == undefined) { // {2}
table[position] = new ValuePair(key, value); // {3}
} else {
var index = ++position; // {4}
while (table[index] != undefined){ // {5}
index++; // {6}
}
table[index] = new ValuePair(key, value); // {7}
}
};
As usual, we start by getting the position generated by the hash function (line {1}). Next, we verify that the position has an element in it (if it is already occupied, it will be line {2}). If not, we add the element to it (line {3}—an instance of the ValuePair class).
If the position is already occupied, we need to find the next position that is not (position is undefined), so we create an index variable and assign position + 1 to it (line {4}—the increment operator ++ before the variable will increment the variable first and then assign it to index). Then we verify that the position if occupied (line {5}), and if it is, we increment index (line {6}) until we find a position that is not occupied. Then, all we have to do is assign the value we want to that position (line {7}).
Note
In some languages, we need to define the size of the array. One of the concerns of using linear probing is when the array is out of available positions. We do not need to worry about this in JavaScript as we do not need to define a size for the array and it can grow as needed automatically—this is part of JavaScript's built-in functionality.
If we run the inserts from the Handling collisions section again, this will be the result for the hash table using linear probing:

Let's simulate the insertions in the hash table:
1. We will try to insert Gandalf. The hash value is 19 and as the hash table was just created, so position 19 is empty—we can insert the name here.
2. We will try to insert John at position 29. It is also empty, so we can insert the name.
3. We will try to insert Tyrion at position 16. It is empty, so we can insert the name.
4. We will try to insert Aaron, which also has a hash value of 16. Position 16 is already occupied by Tyrion, so we need to go to position + 1 (16 +1). Position 17 is free, so we can insert Aaron at 17.
5. Next, we will try to insert Donnie in position 13. It is empty, so we can insert it.
6. We will try to insert Ana also at position 13, but this position is occupied. So we try position 14, which is empty, so we can insert the name here.
7. Next, we will insert Jonathan at position 5, which is empty, so we can insert the name.
8. We will try to insert Jamie at position 5, but this position is occupied. So, we go to position 6, which is empty, so we can insert the name.
9. We will try to insert Sue at position 5 as well, but is occupied. So we go to position 6, which is also occupied. Then we go to position 7, which is empty, so we can insert the name.
And so on.
The get method
Now that we have added our elements, let's implement the get function so that we can retrieve their values:
this.get = function(key) {
var position = loseloseHashCode(key);
if (table[position] !== undefined){ //{8}
if (table[position].key === key) { //{9}
return table[position].value; //{10}
} else {
var index = ++position;
while (table[index] === undefined
|| table[index].key !== key){ //{11}
index++;
}
if (table[index].key === key) { //{12}
return table[index].value; //{13}
}
}
}
return undefined; //{14}
};
To retrieve a key's value, we first need to verify that the key exists (line {8}). If it does not exist, it means that the value is not in the hash table, so we can return undefined (line {14}). If it does exist, we need to check whether the value we are looking for is the one at the specified position (line {9}). If positive, we simply return its value (line {10}).
If not, we continue searching the following positions in the HashTable instance until we find a position that contains an element, and this element's key matches the key we are searching for (line {11}). Then, we verify that the item is the one we want (line {12}—just to make sure) and then we return its value (line {13}).
This is the reason we continue using the ValuePair class to represent the HashTable element—because we do not know at which position the element will actually be.
The remove method
The remove method will be exactly the same as the get method. The difference will be in lines {10} and {13}, which will be replaced with the following code:
table[index] = undefined;
To remove an element, we simply assign the value undefined to represent that the position is no longer occupied and it is free to receive a new element if needed.
Creating better hash functions
The "lose lose" hash function we implemented is not a good hash function as we can conclude (too many collisions). We would have multiple collisions if we use this function. A good hash function is composed by some factors: time to insert and retrieve an element (performance) and also a low probability of collisions. We can find several different implementations on the Internet or we can create our own.
Another simple hash function that we can implement and is better than the "lose lose" hash function is djb2:
var djb2HashCode = function (key) {
var hash = 5381; //{1}
for (var i = 0; i < key.length; i++) { //{2}
hash = hash * 33 + key.charCodeAt(i); //{3}
}
return hash % 1013; //{4}
};
This consists of initializing the hash variable with a prime number (line {1}—most implementations use 5381), then we iterate the key parameter (line {2}), multiply the hash value by 33 (used as a magical number), and sum it with the ASCII value of the character (line {3}).
Finally, we are going to use the rest of the division of the total by another random prime number (greater than the size we think the HashTable instance can have—in our case, let's consider 1000 as the size).
If we run the inserts from the Handling collisions section again, this will be the result we will get using djb2HashCode instead of loseloseHashCode:
798 - Gandalf
838 - John
624 - Tyrion
215 - Aaron
278 - Donnie
925 - Ana
288 - Jonathan
962 - Jamie
502 - Sue
804 - Mindy
54 - Paul
223 - Nathan
No collisions!
This is not the best hash function there is, but it is one of the most highly recommended hash functions by the community.
Tip
There are also a few techniques to create a hash function for numeric keys. You can find a list and implementations at http://goo.gl/VtdN2x.
Summary
In this chapter, you learned about dictionaries, and how to add, remove, and get elements among other methods. We also learned the difference between a dictionary and a set.
We also covered hashing, how to create a hash table (or hash map) data structure, how to add, remove, and get elements, and also how to create hash functions. We learned how to handle collision in a hash table using two different techniques.
In the next chapter, we will learn a new data structure called a tree.
All materials on the site are licensed Creative Commons Attribution-Sharealike 3.0 Unported CC BY-SA 3.0 & GNU Free Documentation License (GFDL)
If you are the copyright holder of any material contained on our site and intend to remove it, please contact our site administrator for approval.
© 2016-2026 All site design rights belong to S.Y.A.