Learning JavaScript Data Structures and Algorithms (2014)
Chapter 8. Trees
So far in this book, we have covered some sequential data structures. The first non sequential data structure we covered in this book was the Hash Table. In this chapter, we will learn another non sequential data structure called a tree, which is very useful for storing information that needs to be found easily.
A tree is an abstract model of a hierarchical structure. The most common example of a tree in real life would be a family tree, or a company organizational chart as we can see in the following figure:

Trees terminology
A tree consists of nodes with a parent-child relationship. Each node has a parent (except for the first node at the top) and zero or more children:
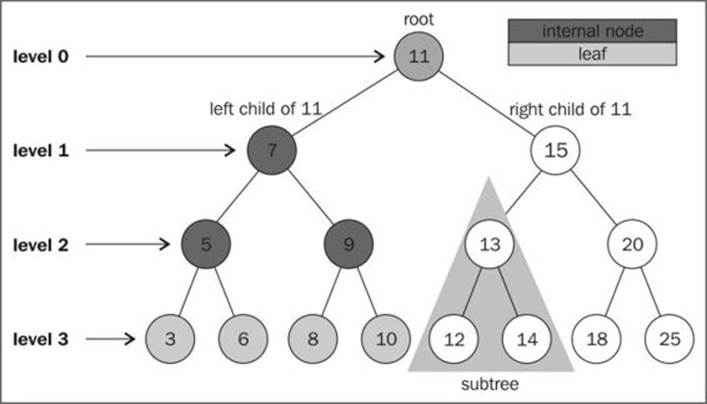
The top node of a tree is called the root (11). It is the node that does not have a parent. Each element of the tree is called node. There are internal nodes and external nodes. An internal node is a node with at least one child (7, 5, 9, 15, 13, and 20 are internal nodes). A node that does not have children is called an external node or leaf (3, 6, 8, 10, 12, 14, 18, and 25 are leaves).
A node can have ancestors and descendants. The ancestors of a node (except the root) are parent, grandparent, great-grandparent, and so on. The descendants of a node are child, grandchild, great-grandchild, and so on. For example, node 5 has 7 and 11 as its ancestors and 3 and 6 as its descendants.
Another terminology used with trees is the subtree. A subtree consists of a node and its descendants. For example, nodes 13, 12, and 14 consist a subtree of the tree from the preceding diagram.
The depth of a node consists of the number of ancestors. For example, node 3 has depth 3 because it has 3 ancestors (5, 7, and 11).
The height of a tree consists of the maximum depth of any node. A tree can also be broken down into levels. The root is on level 0, its children are on level 1, and so on. The tree from the preceding diagram has height 3 (maximum depth is 3 as shown in the preceding figure—level 3).
Now that we know the most important terms related to trees, we can start learning more about trees.
Binary tree and binary search tree
A node in a binary tree has at most two children: one left child and one right child. This definition allows us to write more efficient algorithms for inserting, searching, and deleting nodes to/from a tree. Binary trees are largely used in computer science.
A binary search tree is a binary tree, but it only allows you to store nodes with lesser values on the left side and nodes with greater values on the right side. The diagram in the previous topic exemplifies a binary search tree.
This will be the data structure we will be working on in this chapter.
Creating the BinarySearchTree class
Let's start by creating our BinarySearchTree class. First, let's declare its skeleton:
function BinarySearchTree() {
var Node = function(key){ //{1}
this.key = key;
this.left = null;
this.right = null;
};
var root = null; //{2}
}
The following diagram exemplifies how our Binary Search Tree (BST) will be organized in terms of data structure:
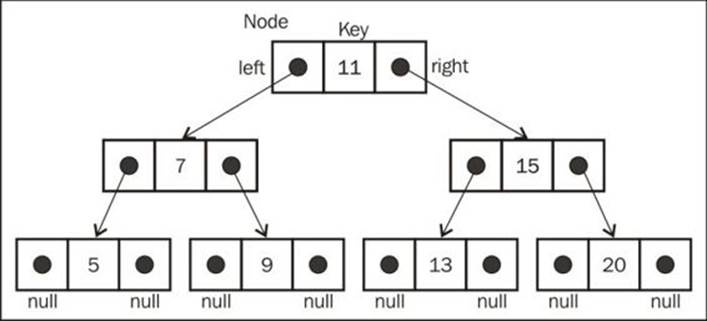
Just like in linked lists, we will work with pointers again to represent the connection between the nodes (called edges in tree terminology). When we worked with double linked lists, each node had two pointers: one to indicate the next node and another one to indicate the previous node. Working with trees, we will use the same approach (we will also work with two pointers). However, one pointer will point to the left child, and the other one will point to the right child. For this reason, we will declare a Node class that will represent each node of the tree ({1}). A small detail that is worth noticing is that instead of calling the node itself as a node or item as we did in the previous chapters, we will call it a key. A key is how a tree node is known in tree terminology.
We are going to follow the same pattern we used in the LinkedList class (from Chapter 5, Linked Lists). This means that we will also declare a variable so we can control the first node of the data structure. In the case of a tree, instead of the head, we have the root ({2}).
Next, we need to implement some methods. The following are the methods we will implement in our tree class:
· insert(key): This inserts a new key in the tree
· search(key): This searches for the key in the tree and returns true if it exists and returns false if the node does not exist
· inOrderTraverse: This visits all nodes of the tree using in-order traverse
· preOrderTraverse: This visits all nodes of the tree using pre-order traverse
· postOrderTraverse: This visits all nodes of the tree using post-order traverse
· min: This returns the minimum value/key in the tree
· max: This returns the maximum value/key in the tree
· remove(key): This removes the key from the tree
We will implement each of these methods in the subsequent sections.
Inserting a key in a tree
The methods we will be implementing in this chapter are a little bit more complex than the ones we implemented in previous chapters. We will use a lot of recursion in our methods. If you are not familiar with recursion, please refer to the Recursion section in Chapter 11, More about Algorithms.
The following code is the first piece of the algorithm used to insert a new key in a tree:
this.insert = function(key){
var newNode = new Node(key); //{1}
if (root === null){ //{2}
root = newNode;
} else {
insertNode(root,newNode); //{3}
}
};
To insert a new node (or item) in a tree, there are three steps we need to follow.
The first step is to create the instance of the Node class that will represent the new node ({1}). Because of its constructor properties, we only need to pass the value we want to add to the tree and its pointers left and right will have a null value automatically.
Second, we need to verify that the insertion is a special case. The special case is if the node we are trying to add is the first one in the tree ({2}). If it is, all we have to do is point the root to this new node.
The third step is to add a node to a different position than the root. In this case, we will need a helper ({3}) private function to help us to do this, which is declared as follows:
var insertNode = function(node, newNode){
if (newNode.key < node.key){ //{4}
if (node.left === null){ //{5}
node.left = newNode; //{6}
} else {
insertNode(node.left, newNode); //{7}
}
} else {
if (node.right === null){ //{8}
node.right = newNode; //{9}
} else {
insertNode(node.right, newNode); //{10}
}
}
};
The insertNode function will help us to find out where the correct place to insert a new node is. The following are the steps that describe what this function does:
· If the tree is not empty, we need to find a place to add a new node. For this reason, we will call the insertNode function passing the root and the node as parameters ({3}).
· If the node's key is less than the current node key (in this case, it is the root ({4})), then we need to check the left child of the node. If there is no left node ({5}), then we insert the new node there ({6}). If not, we need to descend a level in the tree by calling insertNode recursively ({7}). In this case, the node we will be comparing next time will be the left child of the current node.
· If the node's key is greater than the current node key and there is no right child ({8}), then we insert the new node there ({9}). If not, we will also need to call the insertNode function recursively, but the new node to be compared will be the right child ({10}).
Let's use an example so we can understand this process better.
Consider the following scenario: we have a new tree, and we are trying to insert its first key:
var tree = new BinarySearchTree();
tree.insert(11);
In this case, we will have a single node in our tree, and the root pointer will be pointing to it. The code that will be executed is in line {2} of our source code.
Now, let's consider we already have the following tree:
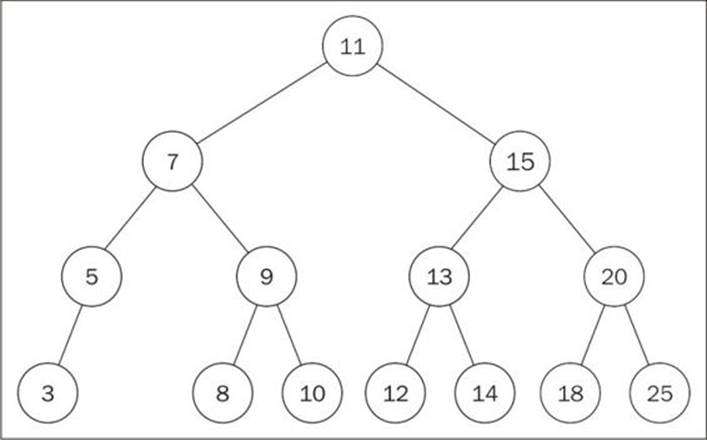
The code to create the tree seen in the preceding diagram is a continuation of the previous code (where we inserted key 11):
tree.insert(7);
tree.insert(15);
tree.insert(5);
tree.insert(3);
tree.insert(9);
tree.insert(8);
tree.insert(10);
tree.insert(13);
tree.insert(12);
tree.insert(14);
tree.insert(20);
tree.insert(18);
tree.insert(25);
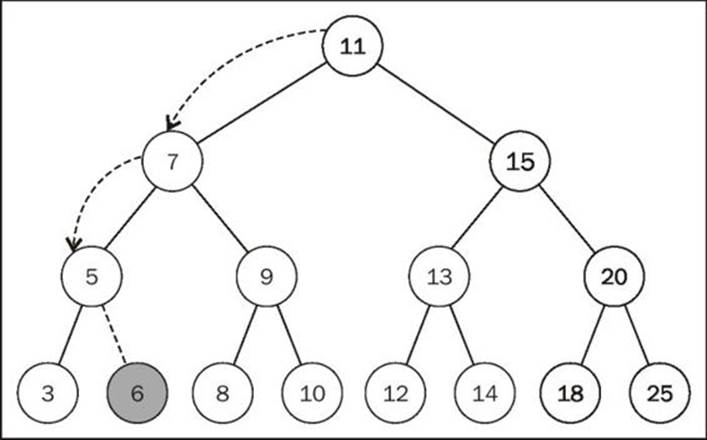
And we would like to insert a new key with value 6, so we will execute the following code:
tree.insert(6);
The following steps will be executed:
1. The tree is not empty, and then the code from line {3} will be executed. The code will call the insertNode method (root, key[6]).
2. The algorithm is going to check line {4} (key[6] < root[11] is true) and then will check line {5} (node.left[7] is not null) and then will go to line {7} calling insertNode (node.left[7], key[6]).
3. We will go inside the insertNode method again, but with different parameters. It will check line {4} again (key[6] < node[7] is true) and then will check line {5} (node.left[5] is not null), and then will go to line {7} calling insertNode (node.left[5], key[6]).
4. We will go once more inside the insertNode method. It will check line {4} again (key[6] < node[5] is false), and then it will go to line {8} (node.right is null—node 5 does not have any right child descendents) and will execute line {9}, inserting key 6 as the right child of node 5.
5. After that, the stack of method calls will pop up and the execution will end.
This will be the result after key 6 is inserted in the tree:
Tree traversal
Traversing (or walking) a tree is the process of visiting all nodes of a tree and performing an operation at each node. But how should we do that? Should we start from the top of the tree or from the bottom? From the left or the right side? There are three different approaches that can be used to visit all the nodes in a tree: in-order, pre-order, and post-order.
In the following sections, we will deep dive into the uses and implementations of these three types of tree traversals.
In-order traversal
An in-order traversal visits all the nodes of a BST in ascending order, meaning it visits the nodes from the smallest to largest. An application of in-order traversal would be to sort a tree. Let's check out its implementation:
this.inOrderTraverse = function(callback){
inOrderTraverseNode(root, callback); //{1}
};
The inOrderTraverse method receives a callback function as a parameter. This function can be used to perform the action we would like to execute when the node is visited (this is known as the visitor pattern; for more information on this, refer to http://en.wikipedia.org/wiki/Visitor_pattern). As most algorithms we are implementing for the BST are recursive, we will use a private helper function that will receive a node and the callback function to help us with it ({1}):
var inOrderTraverseNode = function (node, callback) {
if (node !== null) { //{2}
inOrderTraverseNode(node.left, callback); //{3}
callback(node.key); //{4}
inOrderTraverseNode(node.right, callback); //{5}
}
};
To traverse a tree using the in-order method, first we need to check whether the node that was passed as parameter is null (this is the point where the recursion stops being executed—line {2}—the base case of the recursion algorithm).
Next, we visit the left node ({3}) calling the same function recursively. Then we visit the node ({4}) by performing an action with it (callback), and then we visit the right node ({5}).
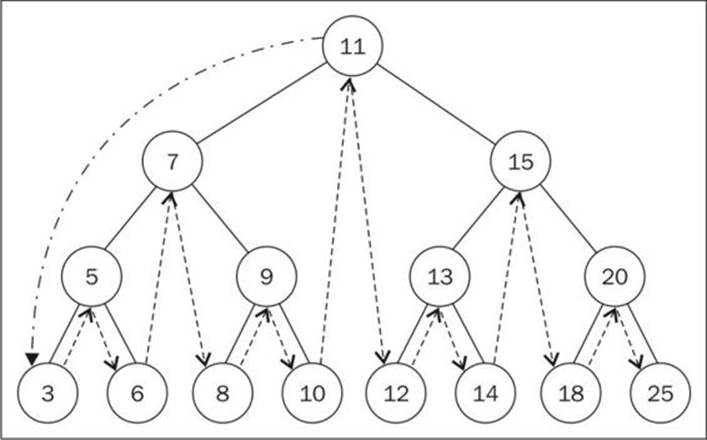
Let's try to execute this method using the tree from the previous topic as an example:
function printNode(value){ //{6}
console.log(value);
}
tree.inOrderTraverse(printNode); //{7}
But first, we need to create a callback function ({6}). All we are going to do is print the node's value on the browser's console. Then, we can call the inOrderTraverse method passing our callback function as a parameter ({7}). When we execute this code, the following will be the output in the console (each number will be outputted on a different line):
3 5 6 7 8 9 10 11 12 13 14 15 18 20 25
The following diagram illustrates the path the inOrderTraverse method followed:
Pre-order traversal
A pre-order traversal visits the node prior to its descendants. An application of pre-order traversal could be to print a structured document.
Let's see its implementation:
this.preOrderTraverse = function(callback){
preOrderTraverseNode(root, callback);
};
The preOrderTraverseNode method implementation is as follows:
var preOrderTraverseNode = function (node, callback) {
if (node !== null) {
callback(node.key); //{1}
preOrderTraverseNode(node.left, callback); //{2}
preOrderTraverseNode(node.right, callback); //{3}
}
};
The difference between the in-order and the pre-order is that the pre-order will visit the node first ({1}) and then will visit the left node ({2}) and then the right node ({3}), while the in-order executes the lines in the following order: {2}, {1}, and {3}.
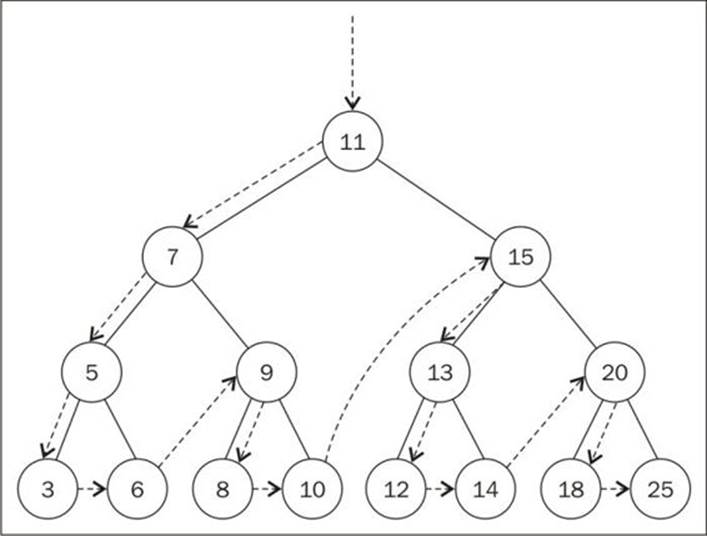
The following will be the output in the console (each number will be outputted on a different line):
11 7 5 3 6 9 8 10 15 13 12 14 20 18 25
The following diagram illustrates the path followed by the preOrderTraverse method:
Post-order traversal
A post-order traversal visits the node after it visits its descendants. An application of post-order could be computing the space used by a file in a directory and its subdirectories.
Let's see its implementation:
this.postOrderTraverse = function(callback){
postOrderTraverseNode(root, callback);
};
The postOrderTraverseNode implementation is as follows:
var postOrderTraverseNode = function (node, callback) {
if (node !== null) {
postOrderTraverseNode(node.left, callback); //{1}
postOrderTraverseNode(node.right, callback); //{2}
callback(node.key); //{3}
}
};
In this case, the post-order traverse will visit the left node ({1}), and then the right node ({2}), and at last, it will visit the node ({3}).
As you can see, the algorithms for the in-order, pre-order, and post-order approaches are very similar; the only thing that changes is the order that lines {1}, {2}, and {3} are executed in each method.
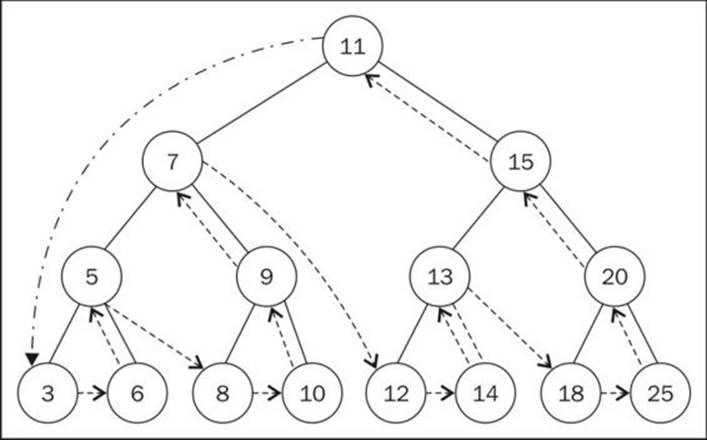
This will be the output in the console (each number will be outputted on a different line):
3 6 5 8 10 9 7 12 14 13 18 25 20 15 11
The following diagram illustrates the path the postOrderTraverse method followed:
Searching for values in a tree
There are three types of searches that are usually performed in trees:
· Minimum values
· Maximum values
· Searching for a specific value
Let's take a look at each one.
Searching for minimum and maximum values
Let's use the following tree for our examples:
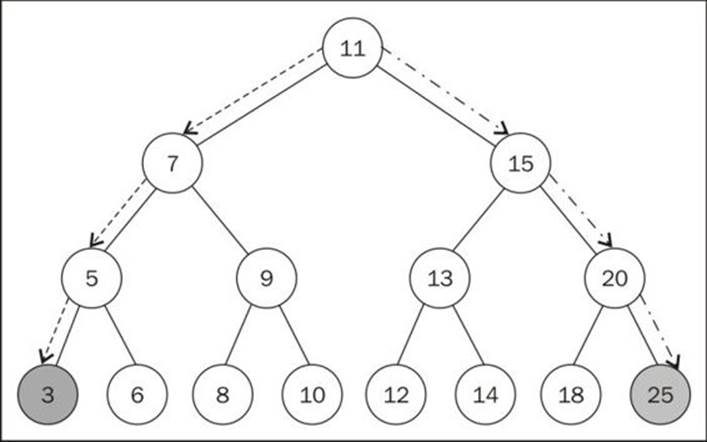
Just looking at the preceding figure, could you easily find the minimum and maximum values of the tree?
If you take a look at the left-most node in the last level of tree, you will find the value 3, which is the lowest key from this tree. And if you take a look at the node that is furthest to the right (also in the last level of the tree), you will find the key 25, which is the highest key in this tree. This information helps us a lot when implementing methods that will find the minimum and maximum nodes of the tree.
First, let's take a look at the method that will find the minimum key of the tree:
this.min = function() {
return minNode(root); //{1}
};
The min method will be the method exposed to the user. This method calls the minNode method ({1}):
var minNode = function (node) {
if (node){
while (node && node.left !== null) { //{2}
node = node.left; //{3}
}
return node.key;
}
return null; //{4}
};
The minNode method allows us to find the minimum key from any node of the tree. We can use it to find the minimum key from a subtree or from the tree itself. For this reason, we call the minNode method passing the tree root ({1})—because we want to find the minimum key of the whole tree.
Inside the minNode method, we will traverse the left edge of the tree ({2} and {3}) until we find the node at the highest level of the tree (left end).
In a similar way, we also have the max method:
this.max = function() {
return maxNode(root);
};
var maxNode = function (node) {
if (node){
while (node && node.right !== null) { //{5}
node = node.right;
}
return node.key;
}
return null;
};
To find the maximum key, we will traverse the right edge of the tree ({5}) until we find the last node at the right end of the tree.
So for the minimum value, we always go the left side of the tree, and for the maximum value, we will always navigate to the right side of the tree.
Searching for a specific value
In previous chapters, we also implemented the find, search, or get methods to find a specific value in the data structure (similar to the has method we implemented in previous chapters). We will also implement the search method for the BST as well. Let's see its implementation:
this.search = function(key){
return searchNode(root, key); //{1}
};
var searchNode = function(node, key){
if (node === null){ //{2}
return false;
}
if (key < node.key){ //{3}
return searchNode(node.left, key); //{4}
} else if (key > node.key){ //{5}
return searchNode(node.right, key); //{6}
} else {
return true; //{7}
}
};
The first thing we need to do is declare the search method. Following the pattern of other methods declared for our BST, we are going to use a helper function to help us ({1}).
The searchNode method can be used to find a specific key in the tree or any of its subtrees. This is the reason we call this method in {1}, passing the tree root as parameter.
Before we start the algorithm, we are going to validate that the node passed as parameter is valid (is not null). If it is, it means that the key was not found and we return false.
If the node is not null, we need to continue the verification. If the key we are looking for is lower than the current node ({3}), then we will continue the search using the left child subtree ({4}). If the value we are looking for is greater than the current node ({5}), then we continue the search from the right child of the current node ({6}). Otherwise, it means the key we are looking for is equal to the current node's key, and we return true to indicate we found the key ({7}).
We can test this method using the following code:
console.log(tree.search(1) ? 'Key 1 found.' : 'Key 1 not found.');
console.log(tree.search(8) ? 'Key 8 found.' : 'Key 8 not found.');
It will output the following:
Value 1 not found.
Value 8 found.
Let's go into more detail on how the method was executed to find the key 1:
1. We called the searchNode method, passing the root as parameter ({1}). (node[root[11]]) is not null ({2}), therefore we go to line {3}.
2. (key[1] < node[11]) is true ({3}), therefore we go to line {4} and call the searchNode method again, passing (node[7], key[1]) as parameters.
3. (node[7]) is not null ({2}), therefore we go to line {3}.
4. (key[1] < node[7]) is true ({3}), so we go to line {4} and call the searchNode method again, passing (node[5], key[1]) as parameters.
5. (node[5]) is not null ({2}), therefore we go to line {3}.
6. (key[1] < node[5]) is true ({3}), therefore we go to line {4} and call the searchNode method again, passing (node[3], key[1]) as parameters.
7. (node[3]) is not null ({2}), therefore we go to line {3}.
8. (key[1] < node[3]) is true ({3}), therefore we go to line {4} and call the searchNode method again, passing (null, key[1]) as parameters. null was passed as a parameter because node[3] is a leaf (it does not have children, so the left child will have the value null).
9. (null) is null (in line {2}, the node to search in this case is null), therefore we return false.
10.After that, the stack of method calls will pop up and the execution will end.
Let's do the same exercise to search value 8:
1. We called the searchNode method, passing root as parameter ({1}). (node[root[11]]) is not null ({2}), therefore we go to line {3}.
2. (key[8] < node[11]) is true ({3}), therefore we go to line {4} and call the searchNode method again, passing (node[7], key[8]) as parameters.
3. (node[7]) is not null ({2}), therefore we go to line {3}.
4. (key[8] < node[7]) is false ({3}), therefore we go to line {5}.
5. (key[8] > node[7]) is true ({5}), therefore we go to line {6} and call the searchNode method again, passing (node[9], key[8]) as parameters.
6. (node[9]) is not null ({2}), therefore we go to line {3}.
7. (key[8] < node[9]) is true ({3}), therefore we go to line {4} and call the searchNode method again, passing (node[8], key[8]) as a parameter.
8. (node[8]) is not null ({2}), therefore we go to line {3}.
9. (key[8] < node[8]) is false ({3}), therefore we go to line {5}.
10.(key[8] > node[8]) is false ({5}), therefore we go to line {7} and return true because node[8] is the key we were looking for.
11.After that, the stack of method calls will pop up and the execution will end.
Removing a node
The next and final method we will implement for our BST is the remove method. This is the most complex method we will implement in this book. Let's start with the method that will be available to be called from a tree instance:
this.remove = function(key){
root = removeNode(root, key); //{1}
};
This method receives the desired key to be removed and it also calls removeNode, passing root and key to be removed as parameters ({1}). One thing very important to note is that the root receives the return of the method removeNode. We will understand why in a second.
The complexity of the removeNode method is due to the different scenarios that we need to handle and also because it is recursive.
Let's take a look at the removeNode implementation:
var removeNode = function(node, key){
if (node === null){ //{2}
return null;
}
if (key < node.key){ //{3}
node.left = removeNode(node.left, key); //{4}
return node; //{5}
} else if (key > node.key){ //{6}
node.right = removeNode(node.right, key); //{7}
return node; //{8}
} else { // key is equal to node.key
//case 1 - a leaf node
if (node.left === null && node.right === null){ //{9}
node = null; //{10}
return node; //{11}
}
//case 2 - a node with only 1 child
if (node.left === null){ //{12}
node = node.right; //{13}
return node; //{14}
} else if (node.right === null){ //{15}
node = node.left; //{16}
return node; //{17}
}
//case 3 - a node with 2 children
var aux = findMinNode(node.right); //{18}
node.key = aux.key; //{19}
node.right = removeNode(node.right, aux.key); //{20}
return node; //{21}
}
};
As a stop point we have line {2}. If the node we are analyzing is null, it means the key does not exist in the tree, and for this reason, we return null.
Then, the first thing we need to do is to find the node in the tree. So if the key we are looking for has a lower value than the current node ({3}), then we go to the next node at the left edge of the tree ({4}). If the key is greater than the current node ({6}), then we will go the next node at the right edge of the tree ({7}).
If we find the key we are looking for (key is equal to node.key), then we have three different scenarios we have to handle.
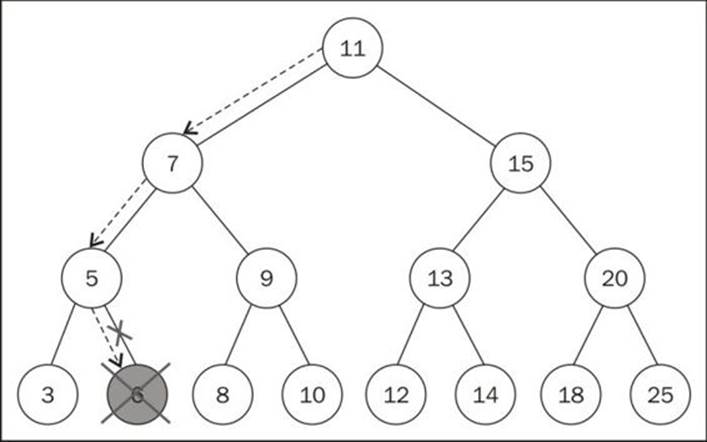
Removing a leaf node
The first scenario is a leaf node that does not have a left or right child—{9}. In this case, all we have to do is get rid of this node by assigning null to it ({9}). But as we learned during the implementation of linked lists, we know that assigning null to the node is not enough and we also need to take care of the pointers. In this case, the node does not have any children, but it has a parent node. We need to assign null to its parent node and this can be done by returning null ({11}).
As the node already has value null, the parent pointer to the node will receive this value as well. And this is the reason we are returning the node value as the function return. The parent node will always receive the value returned from the function. An alternative to this approach could be passing the parent and the node as parameters of the method.
If we take a look back at the first lines of the code of this method, we will notice that we are updating the pointer values of the left and right pointer of the nodes in {4} and {7} and we are also returning the updated node in {5} and {8}.
The following diagram exemplifies the removal of a leaf node:
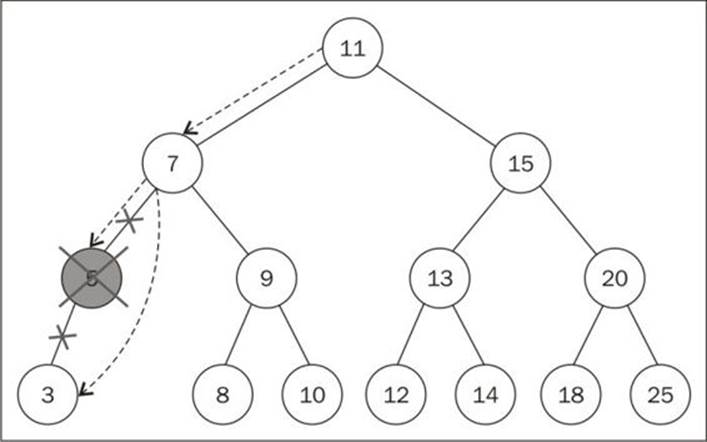
Removing a node with a left or right child
Now let's take a look at the second scenario, which is a node that has a left or right child. In this case, we need to skip this node and assign the parent pointer to the child node.
If the node does not have a left child ({12}), it means it has a right child. So, we change the reference of the node to its right child ({13}) and return the updated node ({14}). We will do the same if the node does not have the right child ({15})—we will update the node reference to its left child ({16}) and return the updated value ({17}).
The following diagram exemplifies the removal of a node with only a left child or a right child:
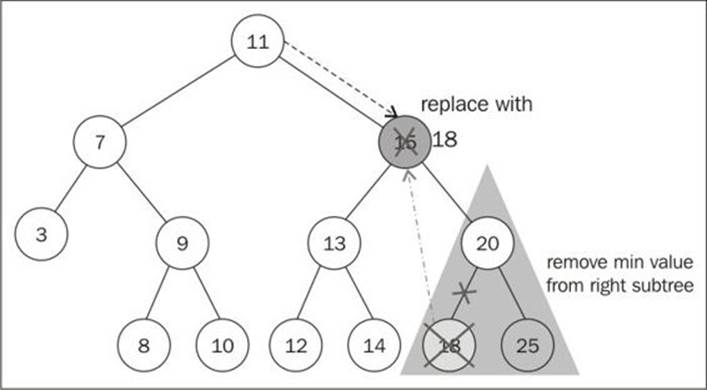
Removing a node with two children
Now comes the third scenario and the most complex one, which is the scenario where the node we are trying to remove has two children—the right and left one. To remove a node with children, there are four steps that need to be performed:
1. Once we find the node we want to remove, we need to find the minimum node from its right edge subtree (its successor—line {18}).
2. Then, we update the value of the node with the key of the minimum node from its right subtree ({19}). With this action, we are replacing the key of the node, which means it was removed.
3. However, now we have two nodes in the tree with the same key and this cannot happen. What we need to do now is remove the minimum node from the right subtree, since we moved it to the place of the removed node ({20}).
4. And finally, we return the updated node reference to its parent ({21}).
The implementation of the findMinNode method is exactly the same as the min method. The only difference is that in the min method, we return only the key and in the findMinNode method, we are returning the node.
The following diagram exemplifies the removal of a node with only a left child and right child:
More about binary trees
Now that you know how to work with BST, you can dive into the study of trees if you would like to.
BST has an problem: depending on how many nodes you add, one of the edges of tree can be very deep, meaning a branch of the tree can have a high level, and another branch can have a low level, as shown in the following diagram:
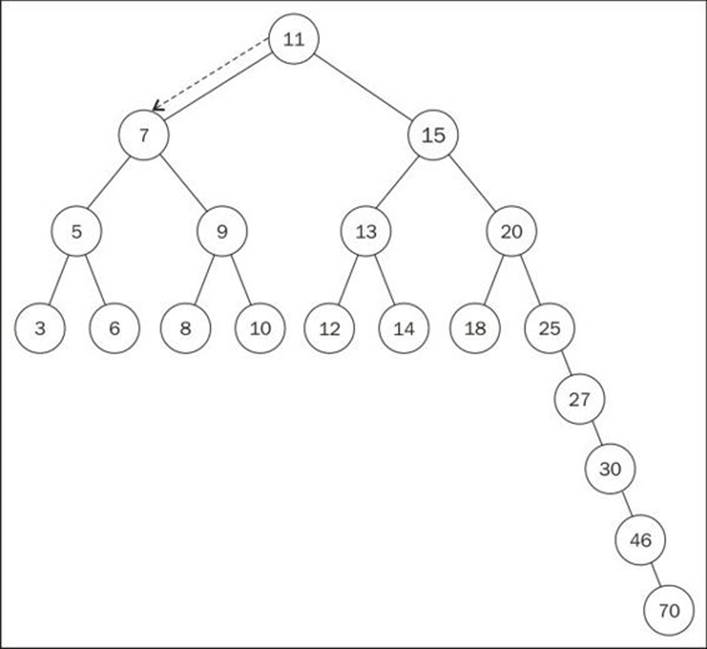
This can cause performance issues when adding, removing, and searching for a node on a particular edge of the tree. For this reason, there is a tree called Adelson-Velskii and Landis' tree (AVL tree). The AVL tree is a self-balancing BST tree, which means the height of both the left and right subtree of any node differs by 1 at most. This means the tree will try to become a complete tree whenever possible while adding or removing a node.
We will not cover AVL trees in this book, but you can find its source code inside the chapter08 folder of this book's source code and take a look at it there.
Note
Another tree that you should also learn about is the Red-Black tree, which is a special type of binary tree. This tree allows efficient in-order traversal of its nodes (http://goo.gl/OxED8K). You should also check out the Heap tree as well (http://goo.gl/SFlhW6).
Summary
In this chapter, we covered the algorithms to add, search, and remove items from a binary search tree, which is the basic tree data structure largely used in Computer Science. We also covered three traversal approaches to visit all the nodes of a tree.
In the next chapter, we will study the basic concepts of graphs, which is also a non linear data structure.
All materials on the site are licensed Creative Commons Attribution-Sharealike 3.0 Unported CC BY-SA 3.0 & GNU Free Documentation License (GFDL)
If you are the copyright holder of any material contained on our site and intend to remove it, please contact our site administrator for approval.
© 2016-2026 All site design rights belong to S.Y.A.