CORS in Action: Creating and consuming cross-origin APIs (2015)
Part 2. CORS on the server
Chapter 6. Best practices
This chapter covers
· Opening up your API to public CORS requests
· Limiting CORS requests to a whitelisted set of origins
· Ensuring your CORS responses are properly handled by proxy servers
· Protecting against cross-site request forgery (CSRF) vulnerabilities
· Configuring and minimizing preflight requests
The previous chapters showed how Access-Control prefixed HTTP headers can dictate the behavior of CORS requests. There are six CORS-specific response headers, each with its own set of valid values. This can lead to myriad ways in which the server response can be configured. While the previous chapters explained what these HTTP headers do, they didn’t offer a lot of guidance on how to best use these headers. How should you configure your server if you want to whitelist certain clients? How can your server accept cookies while still remaining secure?
This chapter will answer these questions and show you how to configure these headers in a way that makes sense for your server needs. If HTTP headers are the language of CORS, this chapter aims to improve your CORS grammar.
The chapter starts by refactoring the sample code from chapter 5 to be more configurable. It then takes a closer look at each of the CORS response headers and offers practical guidance on how to use them. By the end of this chapter, the sample code will become something you can incorporate into your own server to handle CORS requests.
6.1. Refactoring the sample code
The sample code from the previous three chapters did a good job of covering various CORS topics. But it falls far short of being a general-purpose CORS library. The code has hard-coded values geared toward explaining particular concepts, and isn’t flexible or configurable. Concepts like the Timezone-Offset and Sample-Source request headers were made up to demonstrate CORS. If you were to copy and paste the sample code into your own server, it wouldn’t match up with your own needs.
The goal of this chapter is to build a flexible CORS server that can be used with a variety of configurations. To do this, we’ll first refactor the sample code so that it can be configured in different ways. The configuration options will allow the code to be used in various circumstances. The following listing shows the result of this refactoring.
Listing 6.1. Modifying the handleCors method to accept configuration options
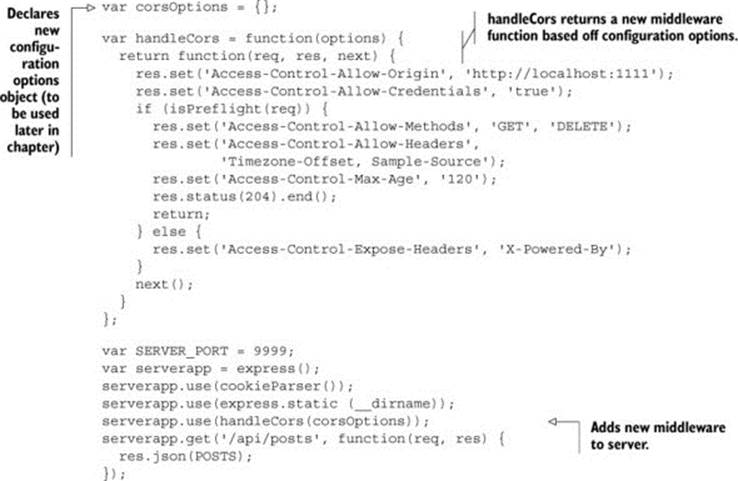
The listing starts by declaring the corsOptions variable which will store the configuration options we’ll add throughout this chapter. This variable will grow as you learn ways to configure CORS requests. The handleCorsmethod is updated to accept an options object, and returns a new middleware object. The corsOptions variable is passed to the handleCors method, and you receive a fully configured middleware.
Now that the sample code framework is in place, you can focus on tips for setting each individual header in the CORS pipeline. But before doing that, let’s take a few moments to think about your own server configuration.
6.2. Before you begin
Before writing a single line of code, take a step back and think about what you’re trying to achieve by adding CORS support to your server. Here are a few questions you should consider:
· Why are you adding support for cross-origin requests?
· Are you adding CORS support to a new service or an existing server?
· Which clients should have access to the site?
· What devices/browsers will they be accessing the site from?
· Which HTTP methods and headers will your server support?
· Should the API support user-specific data? If so, will cookies be used to authenticate the user?
The answers will guide you through the rest of this chapter. For example, an API that needs Internet Explorer 8 or Internet Explorer 9 support will need to be built differently from an API that only needs to be supported on mobile devices. An API that is open to the public will have different needs than an API built for internal use. Here are some common server configurations that may benefit from CORS support:
· Providing a public API that users can access from JavaScript. Most Google APIs support CORS, including the popular Drive API and YouTube API.
· Unifying various properties behind a single API. If you own a mobile, tablet, and website, and each is hosted under a different origin, they can all talk to the same underlying API using CORS.
By having an understanding of what you’re trying to achieve with CORS, you can make better choices on how to configure CORS for your server. Now that you have a sense of how your own CORS implementation should behave, let’s turn our attention to the most important CORS header: Access-Control-Allow-Origin.
6.3. Setting the Access-Control-Allow-Origin header
The Access-Control-Allow-Origin header indicates which origins can access a resource via a cross-origin request. This header can either use the * value to give access to everyone, or it can set a specific origin value to give access to a specific client. Table 6.1 gives an overview of the valid values for the Access-Control-Allow-Origin header. The rest of this chapter delves deeper into these values, and explores different use cases.
Table 6.1. Valid values for the Access-Control-Allow-Origin header
|
Access-Control-Allow-Origin value |
Effect on the response |
|
<no header> |
CORS isn’t supported for any origins |
|
* |
CORS is supported for all origins |
|
null |
CORS is supported for unknown origins (such as accessing from a file rather than a website) |
|
<origin value> |
CORS is supported on a specific origin |
6.3.1. Allowing cross-origin access for everyone
If you want to allow cross-origin requests to the widest audience, use the * value for the Access-Control-Allow-Origin header. The * value indicates that any client can make a cross-origin request to this resource.
An example of a site that sets the * value is the HTML5Rocks.com website. This website contains a wealth of articles and tutorials for using HTML5. HTML5Rocks.com sets the Access-Control-Allow-Origin: * header on every page. This allows other JavaScript developers to use CORS to consume and parse any page on the HTML5Rocks.com site.
The * value works best in the cases where
· The resource should be accessible to as wide a range of users as possible.
· You don’t know ahead of time which origins and clients will access the resource.
· No authentication or individualization is required.
Turning to the sample code, it’s easy to enable the * value on all pages, as shown in the following code:
var handleCors = function(options) {
return function(req, res, next) {
res.set('Access-Control-Allow-Origin', '*');
Note that just because the * value is enabled, it doesn’t mean that the request will be successful. The request may fail for other reasons, such as a 404 Not Found or a 500 Internal Server Error. The * value only indicates that a client can make cross-origin requests, and nothing more.
Be careful with content behind a firewall
Setting the * value comes with a caveat: you should be careful when setting it on content behind a firewall. A firewall is set up specifically to allow access to a certain set of users. For example, your company may maintain a firewall so that only employees can access certain pages on the intranet. The * value can be used to bypass these restrictions and broadcast the data to unintended users.
Figure 6.1 illustrates the dangers of allowing all origins over a VPN. Suppose there are some private internal documents on your company’s intranet, which happens to have the Access-Control-Allow-Origin: * header set. As an employee, because you’re able to connect to the firewall, you’re able to access these documents using CORS. Now suppose some malicious hacker would like to access this document as well. He knows the URL, but he can’t make a request to the document because he isn’t on the firewall.
Figure 6.1. An example of how a hacker could take advantage of an Access-Control-Allow-Origin: * response over a VPN
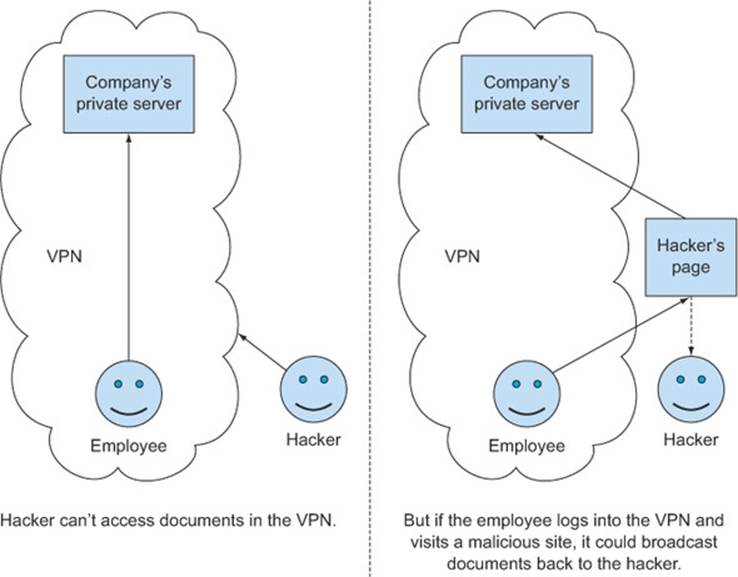
But he can create a special HTML file that makes a CORS request to grab the contents of the document, and then uploads the contents to the hacker’s own server. Even though he has this specially crafted HTML file, the hacker still can’t use it because he isn’t connected to the firewall. But if he can somehow trick an employee to visit the web page while the employee is connected to the intranet, the CORS request will succeed and the hacker will get the contents of the document.
This example contains a lot of steps, but a determined hacker will use any tools at his disposal to get at the information he wants. If a document or API needs to be accessible to a group of users, it’s best to limit the set of origins. The next section looks at how to do this.
6.3.2. Limiting CORS requests to a set of origins
Suppose you’re in the early days of building your blogging service. While you know you’d like the mobile, tablet, and web versions of the site to be driven by the same API, you aren’t yet comfortable exposing the API to external users. In this case, the * value for the Access-Control-Allow-Origin header isn’t quite right because this could open up your API to unexpected requests.
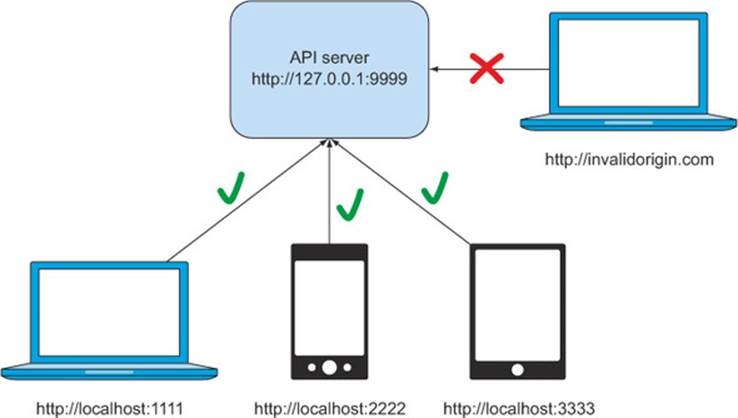
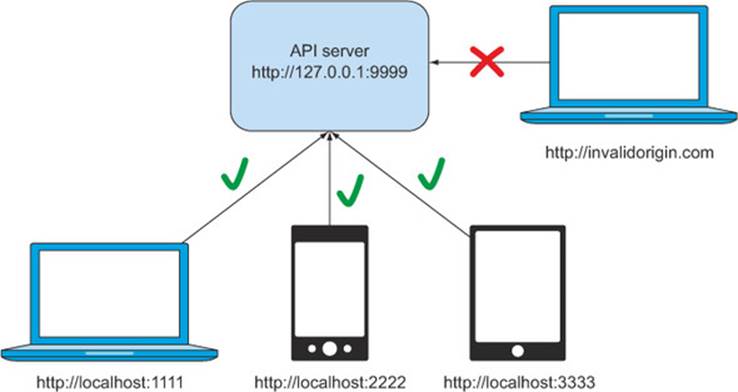
If you’d like to limit which clients can access your server, the Access-Control-Allow-Origin header also accepts a client origin value. Building off the preceding example, suppose your API is at http://127.0.0.1:9999, and you’d like to allow access to the API from your website at http://localhost:1111, your mobile site at http://localhost:2222, and your tablet site at http://localhost:3333, as shown in figure 6.2.
Figure 6.2. Accepting requests from specific origins
Chapter 3 showed you how to set the Access-Control-Allow-Origin header to a single origin value. For example, to allow access from a desktop client, the header would be set as
Access-Control-Allow-Origin: http://localhost:1111
This is fine if you only want to give access to a single origin. But what if instead of only http://localhost:1111, you’d like to give access to a range of origins? Suppose you have mobile, tablet, and web versions of the same website, and you’d like to give them all access to your API. In this case, using a single origin value isn’t enough, and the Access-Control-Allow-Origin header doesn’t support more than one value. You’ll need to write code to process the incoming origin value against a whitelist.
Using a whitelist to specify the origin
A whitelist is a list of origins that are allowed to make requests to the server. In the example from figure 6.2, the whitelist would include the origins http://localhost:1111, http://localhost:2222, and http://localhost:3333. If the origin of the incoming request matches one of these values, then the client is allowed access to the resource.
The code in the following listing creates a function to validate an origin value against a whitelist.
Listing 6.2. Creating a whiltelist validator function in app.js
var createWhitelistValidator = function(whitelist) {
return function(val) {
for (var i = 0; i < whitelist.length; i++) {
if (val === whitelist[i]) {
return true;
}
}
return false;
}
};
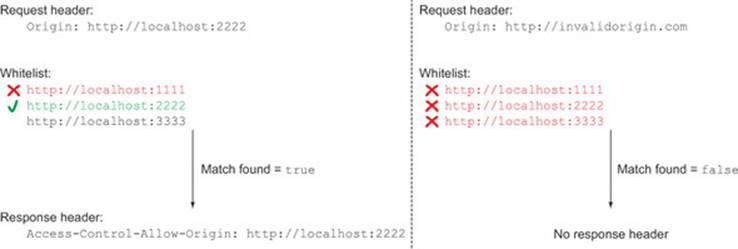
The createWhitelistValidator function returns a function that validates an origin value against a whitelist of acceptable origins. The createWhitelistValidator function doesn’t do the validation itself; it only creates a function that can be used to do the validation later on, when the client sends a request. The validation function loops through each value in the whitelist. If there is a match, the function returns true. If the function loops through all the whitelist values without finding a match, it returns false. Figure 6.3 provides a visualization of what the whitelist check looks like.
Figure 6.3. Example of using a whitelist to find a valid and an invalid Origin header
Armed with the createWhitelistValidator function, let’s validate the origin against the whitelist values. The following listing updates the sample code to validate origins against a whitelist.
Listing 6.3. Using the whitelist validator
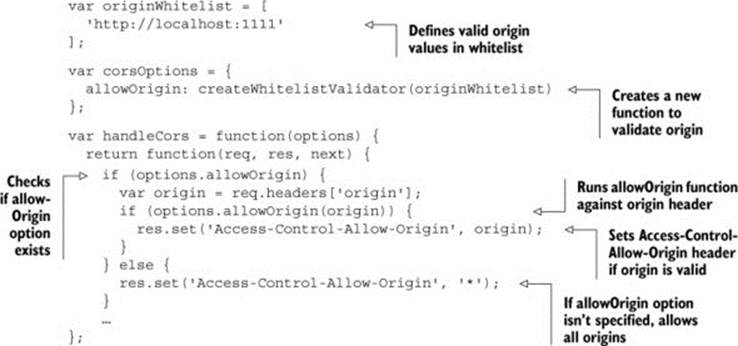
The code starts by creating an array of valid client origins. Because the sample code accepts cross-origin requests only from http://localhost:1111, this is the only value in the whitelist. The code then defines a new allowOriginoption which uses the create-WhitelistValidator function to create a function to validate the origin.
Now that you’ve created the allowOrigin option, you need to read that value from your middleware. The code starts by checking if the allowOrigin option exists. If it doesn’t, the code sets the Access-Control-Allow-Origin header to *, as it did originally. But if the allowOrigin does exist, the code runs the validator function against the value of the origin header. If there is a match, the origin is allowed to make cross-origin requests, and you can set the Access-Control-Allow-Origin header to the value of the Origin header. Otherwise, the client isn’t allowed to make cross-origin requests, and the Access-Control-Allow-Origin header is never set.
A whitelist is an easy way to manage cross-origin access to your server. You can easily add values to the originWhitelist array to give access to more servers. But it also requires constant management to make sure it’s up-to-date.
Other ways to validate the origin
A whitelist is not the only way you can validate client origin values. You can also modify listing 6.3 to use a regular expression or issue a database call to validate the origin. Suppose instead of just three clients you want to allow any client from http://localhost, regardless of port, to access your API. You could use a regular expression to validate this origin, as follows:
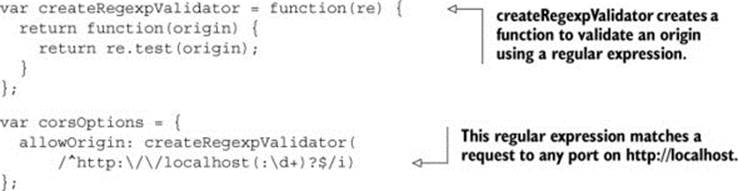
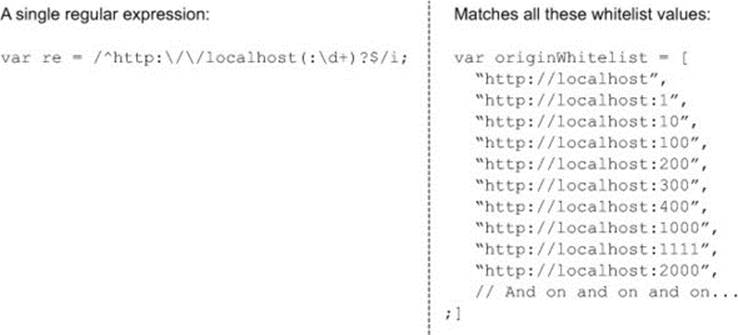
This code snippet introduces a new createRegexpValidator function. The create-RegexpValidator function works in the same way as the createWhitelistValidator function from listing 6.2, except instead of a whitelist check, this function runs a regular expression. Any client of the form http://localhost:PORT (where PORT is the port number) can access the API. If you had hundreds of clients, each living on a different port, you can see how a single regular expression would be easier to manage than a whitelist with hundreds of entries, as shown in figure 6.4.
Figure 6.4. Regular expression versus a whitelist
A regular expression is just one example of using a custom function to validate the origin. Table 6.2 shows more ways to validate the origin, along with the pros and cons of each.
Table 6.2. Pros and cons of validation techniques
|
Validation technique |
Description |
Pros |
Cons |
|
Whitelist |
Maintains a list of valid origins |
Clearly indicates which origins are allowed Works well for small lists of origins |
Difficult to maintain as the list grows larger |
|
Regular expression |
Writes a regular expression that matches all the valid origins |
Works well for a range of origins that follow a pattern |
Need to verify that the regular expression doesn’t accidentally match an invalid origin |
|
Database query |
Stores the list of valid origins in a database |
Provides a central location for storing origin information Works well for a large number of origins without any common pattern Good for maintaining a consistent CORS policy across different servers |
Database calls can be slow (may need a caching layer to speed up things) |
|
Blacklist |
The opposite of a whitelist: maintains a list of origins that aren’t valid |
Easier to maintain if you’d like to allow all but a few origins |
Easy for clients to bypass (just pick a new origin that isn’t in the blacklist) |
Regardless of which technique you choose to validate the origin, the steps of the validation are the same:
1. Grab the value from the Origin header.
2. Validate the origin value using your chosen technique.
3. If the origin is valid, set the Access-Control-Allow-Origin header.
6.3.3. CORS and proxy servers
One side effect of validating origins against a whitelist is that the value of the Access-Control-Allow-Origin header can vary between requests. For example, a request from the origin http://localhost:1111 will return the headerAccess-Control-Allow-Origin: http://localhost:1111, but a request from http://localhost:2222 to the same server will return the header Access-Control-Allow-Origin: http://localhost:2222. These different response headers from the same servers can sometimes cause caching issues. If your server can return different Access-Control-Allow-Origin headers to different clients, you should also set the Vary HTTP response header to Origin, like so:
Vary: Origin
Without the Vary header, proxy servers may cache responses for one client and send them as responses to a different client. This issue is notoriously difficult to debug, because it may not be reproducible from clients who aren’t behind the same proxy servers.
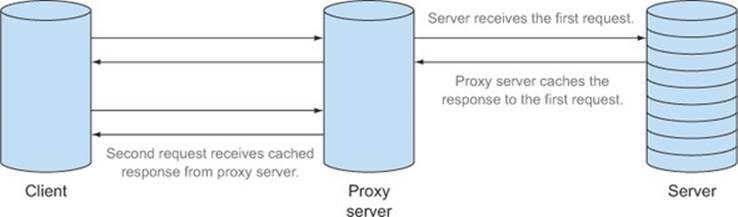
A proxy server is a server that sits between the client and the destination server. The proxy server forwards the request from the client to the server. Along the way, it may also provide additional functionality, such as caching data to speed up response time. Figure 6.5 shows two separate requests passing through a proxy server; the first request hits the destination server, while the second request is cached.
Figure 6.5. Example of a proxy server making two requests
It’s this caching functionality that is relevant to CORS. Proxy servers use some, but not all, of the HTTP request headers when deciding whether or not to cache a response. Because the Origin header is a fairly new HTTP header, not all proxy servers take the Origin header into account when deciding whether to cache a response.
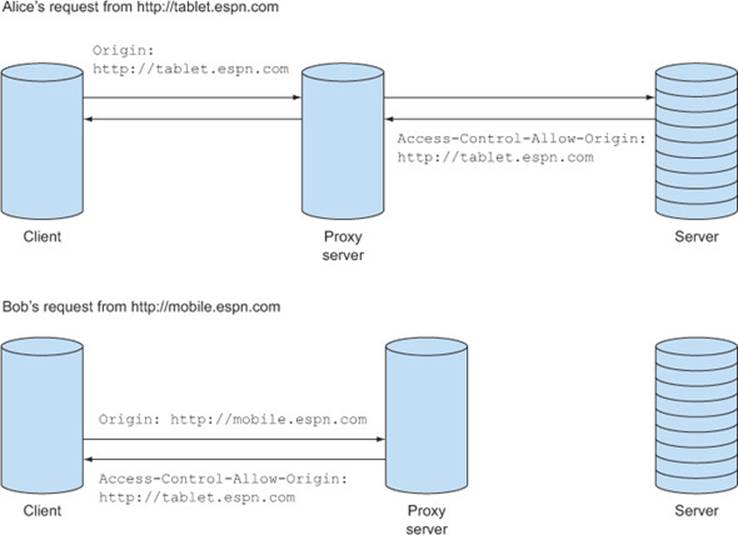
Suppose it’s Monday morning and coworkers Bob and Alice are at work catching up on the highlights from yesterday’s game. They both get the scores from ESPN, but Bob is using his iPhone and visits http://mobile.espn.com, while Alice is using her tablet and visits http://tablet.espn.com. Because both Alice and Bob are at work, their requests flow through the company’s proxy server.
When Alice makes the first request to http://tablet.espn.com, the tablet site makes a CORS request to load the scores from http://api.espn.com. The API responds with the header Access-Control-Allow-Origin: http://tablet.espn.com, and the proxy server caches the response.
Next, Bob makes his request to http://mobile.espn.com, and the mobile site grabs the scores from the same API. The proxy server notices that the request is to the same server that the tablet requested, and so it returns the cached response. Unfortunately, the cached response has the Access-Control-Allow-Origin: http://tablet.espn.com header set. This header causes a request from http://mobile.espn.com to fail, because the Origin header doesn’t match the Access-Control-Allow-Origin header (figure 6.6).
Figure 6.6. Example of how a proxy server could mix up Access-Control-Allow-Origin headers through caching
Luckily, there is a way to fix this. The Vary header tells the proxy server that the Origin header should be taken into account when deciding whether or not to send cached content. With the Vary: Origin header in place, the proxy server will treat a request with Origin: http://mobile.espn.com differently from a request with Origin: http://tablet.espn.com.
The following listing shows a simple one-line change for adding the Vary header to the sample.
Listing 6.4. Listing 6.4 Setting the Vary response header
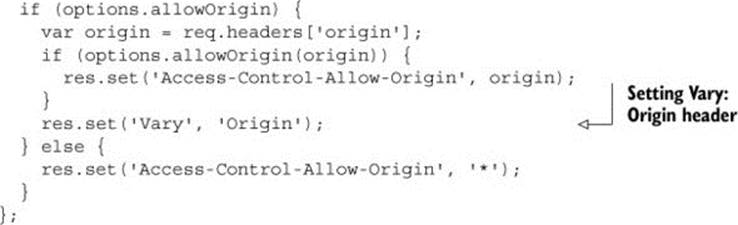
The Vary header is only necessary when the Origin header causes changes in the response. You don’t need it when you return Access-Control-Allow-Origin: *, because the * value is the same regardless of what the value of the Origin header is. The Vary header should also be present even if the Access-Control-Allow-Origin header isn’t in the response. If a request’s origin is http://example.com, the response will not have an Access-Control-Allow-Origin header, because http://example.com isn’t in the list of whitelisted headers. But the response should still contain a Vary header, because the response can change, based on the Origin header value.
6.3.4. Null origin
So far we’ve only discussed origins in terms of URLs with a scheme, host, and port. But when configuring the acceptable origin values, it’s important to keep in mind that null is also a valid origin value. A null origin value typically indicates that the request is coming from a file on a user’s computer, rather than from a website. It can also mean the request came from a redirect (which we’ll cover in more detail later).
Making requests from a file on your computer (which I’ll refer to as a local file) is useful if you want to test CORS requests without uploading files to a live server. It can be a lot easier to test locally than to upload new code every time you’d like to test a request. Testing code is an iterative process: the developer writes code, tests the results, and writes more code based on the results. When working with a local file, a developer can iterate very quickly: trying new code is as easy as saving a file and refreshing the web browser.
In contrast, if CORS requests required an actual origin for every request, the developer velocity would be much slower. Each change would need to be uploaded to a web server, which can be slow (at least when compared with saving a file locally). The developer would also need a separate test server to test changes on, because uploading to the live server could break other users. Even if you don’t anticipate using this technique to test your own API, opening up your API to null origins can make it easier for your users to test their code against your API.
The * value allows all origins to make cross-origin requests, including the null origin. If your server returns *, there is nothing more you need to do to support local files. If you’re using the whitelist method, be sure to add the nullvalue to your whitelist, as follows:

Adding null to the whitelist means that the server will return the following header in the response:
Access-Control-Allow-Origin: null
Along with the * and origin value, null is a valid value for the Access-Control-Allow-Origin response header.
6.3.5. Origin header on same-origin requests
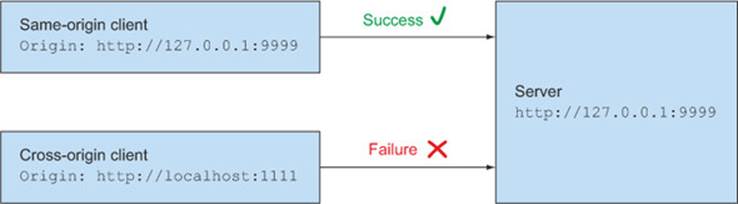
Up until this point we’ve only discussed the Origin header in the context of cross-origin requests. But it turns out that some browsers will include the Origin header on same-origin requests as well. Chrome and Safari include the Origin header on same-origin POST, PUT, and DELETE requests. Firefox, Internet Explorer, and Opera don’t include the Origin header on same-origin requests.
The good news is that although Chrome and Safari sometimes include the Origin header, they don’t require any CORS-specific headers on the response. Same-origin requests will always work (figure 6.7), regardless of whether or not they have an Access-Control-Allow-Origin header. You don’t need to explicitly whitelist your same-origin requests (although it won’t hurt to do so).
Figure 6.7. Response status when the server responds without an Access-Control-Allow-Origin header. The same-origin request succeeds, even though it has an Origin header. The cross-origin request fails.
You usually won’t need to worry about this distinction between same-origin and cross-origin requests. If you’re building an API for external users, you probably won’t expect same-origin requests. And even if your API accepts both same-origin and cross-origin requests, as long as your API behaves exactly the same for both request types, you won’t have to distinguish between the two.
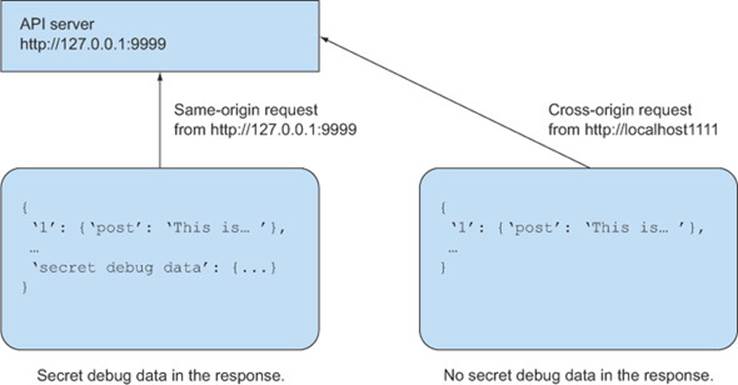
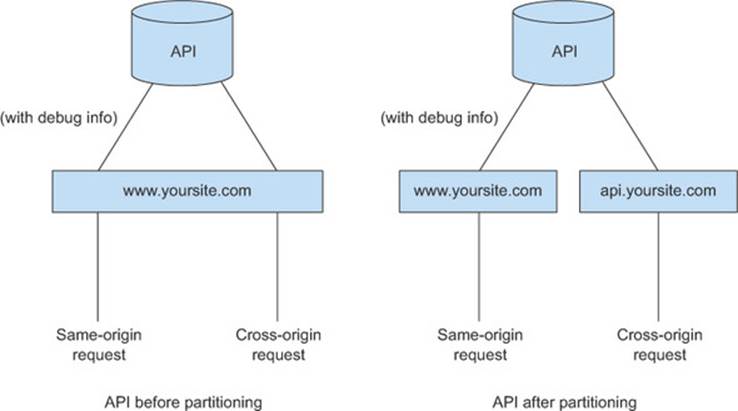
But if same-origin requests behave differently from cross-origin requests, the distinction between the two becomes relevant. Suppose you have an API that accepts requests from your own web page (a same-origin request) as well as requests from other clients (a cross-origin request). The request from your own web page receives additional debug information, which you don’t want to share with cross-origin clients, as shown in figure 6.8. In this case, you want to differentiate between same-origin and cross-origin requests; otherwise cross-origin requests could receive data they aren’t supposed to see.
Figure 6.8. Different data is sent to same-origin and cross-origin requests
In these cases, you can compare the Origin header against the Host header to see if they match. The Host header is an HTTP request header that contains the host and port of the server receiving the request. Because the Origin header contains the scheme, host, and port of the client sending the request, if the Origin and the Host headers match, the request is a same-origin request.
The following code snippet shows a function for detecting whether the request is a same-origin request. The isSameOrigin function returns true if the request is a same-origin request, and false otherwise.
var isSameOrigin = function(req) {
var host = req.protocol + '://' + req.headers['host'];
var origin = req.headers['origin'];
return host === origin || !origin;
};
The isSameOrigin function extracts the client origin from the Origin header and compares it to the server’s origin, which is derived from the Host header. Note that the Host header doesn’t include any scheme information, so it’s up to you to decide which scheme to use. The preceding code snippet uses the req.protocol property to figure out the scheme of the request. Calling req.protocol returns either http or https, and calculating the scheme is as easy as appending :// to the protocol (for example, if the URL’s protocol is “http”, the scheme is “http://”). This protocol property is only available in Express. If you use Node without Express, you may need to find some other way of getting the request’s scheme.
A better alternative to the Host header method is to separate same-origin traffic from cross-origin traffic (figure 6.9). If your same-origin and cross-origin traffic all funnels through www.yoursite.com, consider separating API requests into two different servers: www.yoursite.com for same-origin traffic, and http://api.yoursite.com for cross-origin traffic. You don’t have to implement two completely different APIs, you just need to channel the requests differently. It’s like having two doors to enter a bank: one door is for the public, and the second is for employees only.
Figure 6.9. Splitting an API into same-origin and cross-origin components
Hopefully this section has given you a more comprehensive understanding of how to use the Access-Control-Allow-Origin header to manage cross-origin requests to your API. Although the Access-Control-Allow-Origin header helps dictate who gets access to your server, it shouldn’t be the sole security mechanism for your API. The next section looks at the security issues related to CORS.
6.4. Security
The previous section presented strategies for accessing a server from different origins. At one end of the spectrum, any client can make cross-origin requests by setting the Access-Control-Allow-Origin: * header. At the other end of the spectrum, a server administrator can limit cross-origin requests to specific clients only. But regardless of which strategy you choose, there is one thing to always keep in mind: CORS isn’t security.
This is an important enough point to state again: CORS isn’t security. The Access-Control-Allow-Origin header only indicates which clients are allowed to make cross-origin requests. It shouldn’t also be used to protect a site’s content.
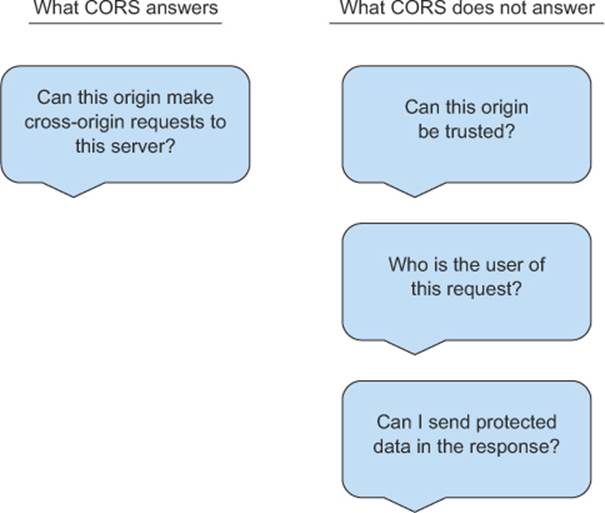
Figure 6.10 shows some questions that CORS does and doesn’t answer. Don’t be disheartened if you see a question that you’d like answered. Just because CORS doesn’t answer a particular question doesn’t mean it can’t be answered at all. There are other mechanisms to answer these questions, which this section will explore.
Figure 6.10. Questions CORS does and doesn’t answer
To demonstrate why CORS shouldn’t be used for security, consider that it’s possible to use tools to spoof the Origin header. The following curl command shows how to send a request to your API with the Origin header set tosomerandomorigin.com (if you don’t know what curl is, don’t worry; it will be covered in the next chapter).
curl -H "Origin: somerandomsite.com" http://127.0.0.1:9999/api/posts
This request is obviously not coming from somerandomsite.com, and your server shouldn’t trust only the Origin header. This is why the Access-Control-Allow-Origin header should only be used to specify the cross-origin policy.
Spoofing CORS requests
The preceding curl request may have set off a red flag: What is the point of CORS if an Origin header can be spoofed? To answer this, it’s important to keep in mind that users can use tools like curl to make an HTTP request to any server, regardless of whether or not the server has CORS enabled. CORS doesn’t introduce any new security holes; it only ensures that cross-origin requests from a browser are performed in a safe manner.
So if CORS shouldn’t be used for security, how can you protect the content on your site when enabling cross-origin requests? The rest of this section explores ways to keep your site secure while still using CORS.
6.4.1. Including cookies on requests
Cookies aren’t included on CORS requests by default, but they can be enabled by setting the Access-Control-Allow-Credentials header to true. If you’re thinking about enabling cookies on your API, you should really consider whether you need cookie support. Cookies make requests harder to debug, and expose a new attack vector. So if you don’t need cookies, don’t enable them.
Cookies work best in situations where
· You want to authorize users within your own ecosystem of clients and servers.
· You know exactly which clients will be accessing your server.
This means that you control both the clients and the servers, and you don’t accept CORS requests from external clients. The web/tablet/mobile scenario shown in figure 6.11 is a good example. In this scenario, CORS access is limited to a select few whitelisted origins. Because you’re in charge of both the server and the clients, you have control over where the requests are coming from.
Figure 6.11. Whitelisted requests from a desktop, mobile, and tablet client
The following listing shows how to configure the sample code to allow cookies.
Listing 6.5. Enabling cookies on requests
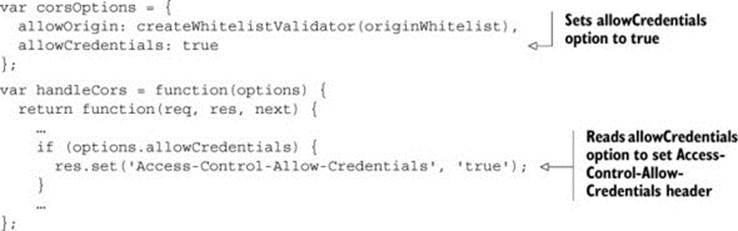
The code introduces a new allowCredentials option. Setting this value to true means that cookies are allowed on requests.
If you allow credentials on requests, the Access-Control-Allow-Origin header must be set to an actual origin value. The * value isn’t valid when using credentials, and the browser will reject any response that has Access-Control-Allow-Credentials set to true but Access-Control-Allow-Origin set to *.
Using similar code as the previous section, you could write code to always echo the Origin header value when allowCredentials is set to true. This would allow any client (internal or external) to include cookies on requests. But while this is technically possible, it’s not advisable. By enabling cookies to be always included on requests, you open your server up to a class of vulnerabilities called cross-site request forgery (CSRF). Appendix C goes into more details on CSRF. The rest of this section explores how to protect against CSRF vulnerabilities.
Validating the origin
The simplest way to protect against CSRF is to return an error if the origin is invalid. This ensures that only valid origins are allowed, and that the request stops processing if the origin is invalid. The previous section showed you how to use a whitelist to validate the origin, but it continued to process the request even when it encountered an invalid origin. The following listing repeats the origin validation code from the previous section.
Listing 6.6. Only whitelisted origins can make CORS requests
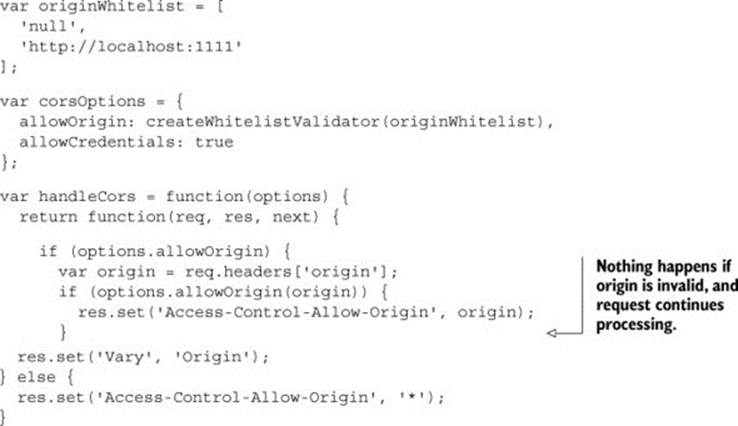
Even though the code in the listing checks if the origin is valid, there is no else block to define how the request behaves with an invalid origin. Without defining this behavior, the code continues processing the request, even if the request is from an unauthorized origin. This means that even if the origin is invalid, the request’s action, such as returning the user’s blog posts, will go through.
What you really want to do is short-circuit the request in the CORS handler and return an error to the user. By stopping the request at the CORS-level, you prevent any other request code from running. The following listing introduces a new option to short-circuit the request.
Listing 6.7. Short-circuiting the request on invalid origins.
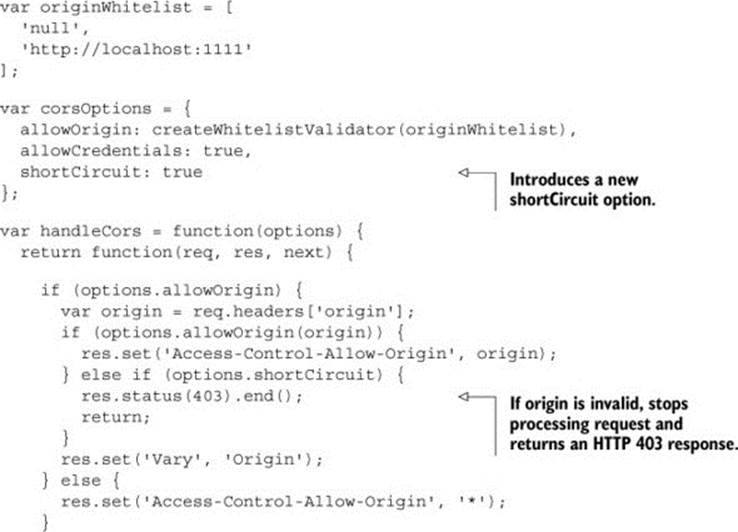
The code begins by introducing a new shortCircuit option that controls this new behavior. Next, the code returns an HTTP 403 status if the origin is invalid, and stops processing the request.
Additional CSRF protection
Validating the origin is a nice way to verify that the request meets your expectations and for most use cases, this should be a sufficient form of CSRF protection. However, it is not foolproof. As we saw earlier, tools like curl could be used to spoof the origin of a request. If you want stronger protection, you will need a CSRF token.
A simple definition is that a CSRF token is an unguessable secret shared between the client and the server. If a CSRF token is invalid, the request fails. Appendix C goes into more details about CSRF tokens and how they are used.
There are many packages available for adding CSRF token support to same-origin requests. Appendix C also includes an example that uses the CSURF middleware package to add CSRF token support to a sample server. This is easier to do on same-origin requests, where the client and server are the same machine, or share the same code.
Implementing CSRF token support is a bit trickier for cross-origin requests because in order for CSRF tokens to work, the server and client must agree upon a CSRF token format. A cross-origin request’s client and server may live on separate servers and have separate codebases, which makes it hard to sync secrets. Another issue is that the CSRF token usually has embedded user information, such as a user ID or session ID. On same-origin requests, the user info can be derived from the cookie. On cross-origin requests, the client doesn’t have access to the server’s cookies.
These issues make it difficult to add CSRF protection to CORS requests. One possible way to do this is to have the client embed an iframe from the server. The server can place the CSRF token in this iframe, and then give it to the client via postMessage.
Security is very difficult to get right. If you need CSRF protection on CORS requests, here are a few things to keep in mind:
· Consider whether you need CSRF protection. CSRF protection is only needed if you are requesting protected data that includes the cookie.
· Validate the Origin header. This is a good form of CSRF protection, and it may be sufficient for your needs. While tools such as curl can spoof the Origin header, spoofing along with the cookie is harder (curl wouldn’t have access to the cookie). Older browsers that allow the Origin header to be set don’t support CORS.
· Consider same-origin requests instead. If you have a particular feature that requires CSRF protection, such as posting a new weblog, consider making it a same-origin feature instead. Same origin requests have proven mechanisms for protecting against CSRF. Part of using CORS successfully is understanding its limits, and you may save yourself a headache or two by using same-origin requests in this particular case.
· Use something other than a cookie to validate the user. If you’re building a public API, or need to provide authorized access to all origins, an authorization mechanism like OAuth2 might be a better fit for your needs.
The next section explores the last bullet point in-depth by looking at what OAuth2 is and how it works.
6.4.2. Authorizing requests using OAuth2
Suppose you store all your calendar data in Google Calendar. One day you discover a cool new startup app that uses your calendar data to determine when is the best time to schedule a massage. This is a revolutionary idea! No longer do you need to worry about scheduling your own massages—this new app will do it for you.
There is only one problem. This hot new startup app needs your Google Calendar data in order to work. How can the startup get data from a different company such as Google? Well, you could give your Google password to this startup app, and the startup app could then log into your Google account and read your calendar data.
Of course sharing your password is a horrible, horrible idea. Your password is the key not only to your calendar data, but to any data you store in Google. By giving your password to a third-party startup, you trust that third party not to do anything bad with your data (like accidentally delete your calendar entries). And even if you do trust them, their systems could be hacked and your password could land in the hands of a hacker. Passwords are just too valuable to share.
So if you can’t share your password, how can the startup app gain access to your data? OAuth2 can save the day. OAuth2 is an open authorization standard. It’s a popular authorization mechanism for APIs. APIs from Dropbox, Facebook, GitHub, and Google (to name a few) all use OAuth2. The goal of OAuth2 is to allow a site to get user data from a different site without asking for the user’s password. This keeps the user’s password safe, and puts the user in control of when and how his or her data is used.
If the startup app implements OAuth2, instead of asking for your password, it will redirect you to a special page hosted on Google. Figure 6.12 shows an example of what this authorization page looks like.
Figure 6.12. Example of a Google authorization page asking for your permission to share your calendar data with a third-party app
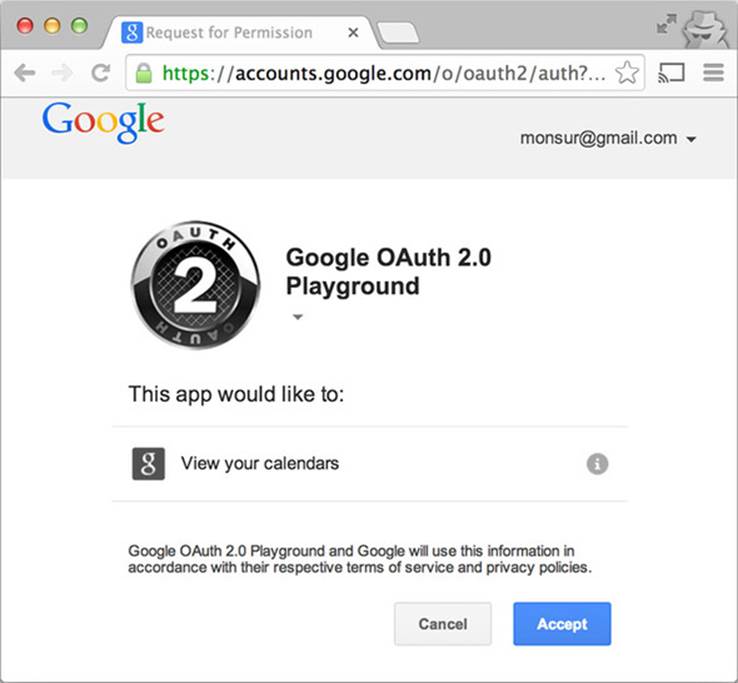
Google then asks you if it’s okay to share your data with this hot new startup. If you click Accept, Google gives a token to the hot new startup app. The startup app can then include this token in the request to load Google Calendar data. No passwords need to be shared to make this work.
This token method is a much better option than sharing your password. The token is “scoped,” meaning that it can only be used to load calendar data, and can’t change or delete calendar data. And if you, the user, decide you don’t want the startup app to access your data after all, you have the power to revoke the token. Revoking the token prevents the startup app from using the token to access your data.
Once the third-party app has a token, it can use the token to make requests to the Google Calendar API for a particular user’s data. When making a request for data, the token is included in the Authorization header of the request, as shown in figure 6.13. Because the Authorization header is added to the request by the client (rather than passively included on requests like cookies), a malicious user can’t trigger a cross-site request forgery attack.
Figure 6.13. Making an authorized request to the Google Calendar API
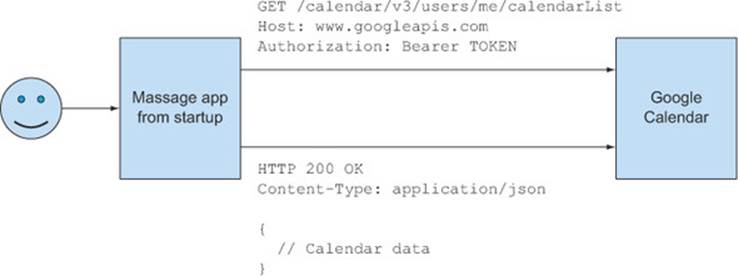
If you’re using OAuth2 with CORS, it’s important to remember to whitelist the Authorization header on preflight requests. Because the Authorization header isn’t a simple request header, it will always require a preflight request, even on GET and POST requests. Table 6.3 shows an example of making a request with an Authorization header. The Authorization header carries the token in the request. The request requires a preflight request because Authorization is a custom header.
Table 6.3. Making a CORS request with an OAuth2 token.
|
Preflight request |
Preflight response |
|
OPTIONS /api/posts HTTP/1.1 Host: 127.0.0.1:9999 Origin: http://localhost:1111 Access-Control-Request-Method: GET Access-Control-Request-Headers: Authorization |
HTTP/1.1 204 No Content Access-Control-Allow-Origin: http://localhost:1111 Access-Control-Allow-Methods: GET, POST, PUT, DELETE Access-Control-Allow-Headers: Authorization |
|
Actual request |
Actual response |
|
GET /api/posts HTTP/1.1 Host: 127.0.0.1:9999 Origin: http://localhost:1111 Authorization: Bearer <OAUTH2 TOKEN> |
HTTP/1.1 200 OK |
Adding support for OAuth2 is beyond the scope of this book. It can be a difficult technology to work with, but luckily there are libraries for most major server languages. The node-oauth project has a popular OAuth2 implementation; it can be found at https://github.com/ciaranj/node-oauth. The OAuth2 website at http://oauth.net/2/ has more information on how OAuth2 works, as well as pointers to various server implementations. Getting Started with OAuth2 by Ryan Boyd (O’Reilly Media, 2012) is also a great resource for learning how OAuth2 works.
This section introduced a lot of different security concepts. Here is a recap of each of these concepts, and how they’re used:
· Origin header— Identifies where the client’s request originates. Should only be used to verify that cross-origin requests from the origin are allowed.
· Authorization cookies— Can be used to identify the user making the request to the server. Cookies are always included on same-origin requests, and must be opted into by both the server and the client on cross-origin requests. But once opted in to, cookies can be vulnerable to CSRF attacks.
· CSRF token— Guards against CSRF attacks. Ensures that a request is coming from the user, not from a different page that is trying to trick the user into making a request.
· Authorization header— Used to add OAuth2 authorization information to the request. Authorizes a client to use a third-party API on behalf of a user, without the user giving their third-party username and password to the client.
Next, let’s turn our attention to best practices for handling preflight requests.
6.5. Handling preflight requests
In the beginning of the chapter we talked about simple CORS requests. But if your server handles anything beyond simple GETs or POSTs, you also need to respond to preflight requests. Chapter 4 introduced the basics of handling preflight requests. As covered in that chapter, preflight requests are a necessary part of the CORS flow, and help protect servers from unsupported requests. But a preflight request can be a performance hit, because it requires two HTTP requests. This can especially be an issue on resource-constrained systems, like mobile phones. This section investigates strategies for both handling and reducing preflight requests.
6.5.1. Whitelisting request methods and headers
The preflight request is issued to verify that the server allows certain HTTP methods and headers. In the blogging sample, a preflight request is issued before a post can be deleted to ensure that HTTP DELETE requests are allowed.
Earlier in this chapter we used a whitelist to validate the origin header. You can use a similar whitelist to specify valid HTTP methods and headers. The code in the following listing updates the blogging sample application in app.js with two new options for configuring preflight requests, called allowMethods and allowHeaders.
Listing 6.8. Allowing HTTP methods and headers
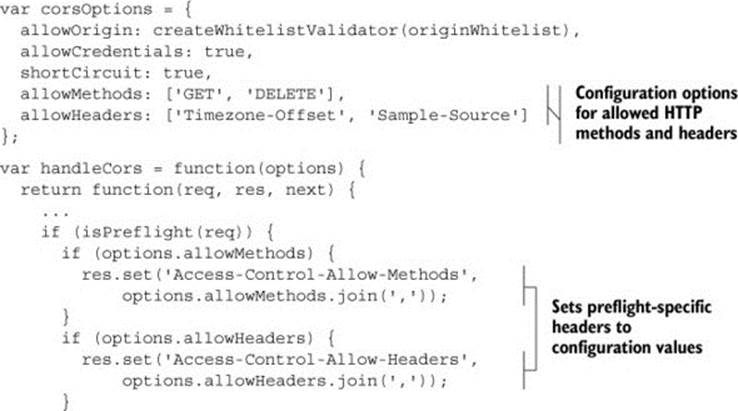
The allowMethods and allowHeaders options contain the whitelisted HTTP methods and headers that are allowed by the server. The server uses these values to set the corresponding preflight headers on the response. Now that the code is configured to set the preflight headers, the far more interesting question is: what values do you choose for the whitelist?
Allowing HTTP methods
When it comes to the HTTP method, there are only a handful of acceptable values, the most common of which are HEAD, OPTIONS, GET, POST, PUT, PATCH, and DELETE. If you’d like to allow all types of cross-origin requests, you can set the Access-Control-Allow-Methods header to all of these values, as follows:
var corsOptions = {
allowMethods: ['HEAD', 'OPTIONS', 'GET', 'POST',
'PUT', 'PATCH', 'DELETE']
};
A better approach is to consider which types of requests your server allows, and only accept those types of requests. If your server only allows GET and DELETE requests, you should only set those values on the preflight:
var corsOptions = {
allowMethods: [GET', DELETE']
};
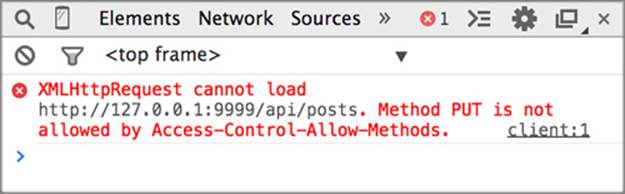
Accurate preflight headers protect your server from unexpected requests, and serve as useful documentation for your clients. If your server doesn’t allow PUT requests, there is no reason to accept them in the first place, only to have them fail on the actual request. From the client’s perspective, if they try to make a PUT request and it fails on the preflight, the developer can look at the error message and clearly understand why the request is failing, as shown infigure 6.14. If the PUT request is accepted by the preflight request but then fails on the actual request, the developer may be misled into thinking that the PUT request is failing for some other reason.
Figure 6.14. Example of a failing PUT request. The error message clearly indicates why the request is failing.
Unlike HTTP methods, which have a small set of acceptable values, clients can send any HTTP header. Let’s look at how to configure custom request headers.
Allowing HTTP headers
It can be a bit tougher to know which HTTP headers to allow on requests because there are so many different request headers. If you have control over both the server and the client, you can control exactly which headers are included on requests. Because you control the server code, it’s easy to add a new header to the allow-Headers whitelist.
If you’re building an API for external clients, it can be harder to know which headers to allow. JavaScript libraries and frameworks may add their own custom headers to requests. Table 6.4 lists a few common HTTP request headers.
Table 6.4. Common HTTP request headers
|
Request header |
Description |
|
Authorization |
The credentials for making an authenticated request. If the server uses OAuth2 to authorize users, the token would be set in this header. |
|
Content-Type |
The MIME type of the request body. The MIME type indicates the data type of the body. If the body were JSON, the MIME type would be application/json. |
|
If-Match |
The ETag value of the corresponding resource. Used during updates to ensure that the update doesn’t conflict with a different update. Also used for requests with the Range header to make sure the new part matched the previously downloaded parts. |
|
If-Modified-Since |
Similar to the If-None-Match header, but with a date instead of ETag. The server only returns a response body if the resource has been modified since the date in this header. Otherwise, the server returns an HTTP 304 Not Modified status. |
|
If-None-Match |
The ETag value of the corresponding resource. Used when retrieving a resource. If the resource’s ETag matches the request ETag, the resource hasn’t changed since the previous retrieval, and the server returns an HTTP 304 Not Modified status (without a response body). |
|
If-Unmodifed-Since |
Similar to If-Match. Used during updates to ensure that the update doesn’t conflict with a different update and to check if a Range request makes sense. Uses date instead of ETag. |
|
Range |
Specifies a range of bytes to download from the server (rather than the entire response). Used during resumable downloads to specify where to start the downloading. |
|
X-Requested-With |
Indicates where an AJAX request originates. Set by many JavaScript clients (although JQuery disables this header when making CORS requests). |
Some of these headers are tied to certain features. For example, the If-Match and If-None-Match headers are tied to ETag support, so those headers need only be allowed if your server supports ETags. Table 6.4 is a good place to start if you’re trying to decide which HTTP headers to support.
It’s not easy to configure HTTP headers because there can literally be an infinite number of custom response headers. As a server administrator, you don’t want to continually update your server configuration every time a client sends a new header. If you find yourself in this situation, the next section shares code to allow all request headers through.
Allowing all request headers
As a server administrator, it can be overwhelming to manage all the headers a client may send. You may not even care about which headers a client includes on the request. In these cases, it would be helpful if the Access-Control-Allow-Headers header supported a * value that let all request headers through. The CORS spec doesn’t define a * value for the Access-Control-Allow-Headers header, but you can mimic this behavior through the code in the following listing.
Listing 6.9. Adding all requested headers on preflight
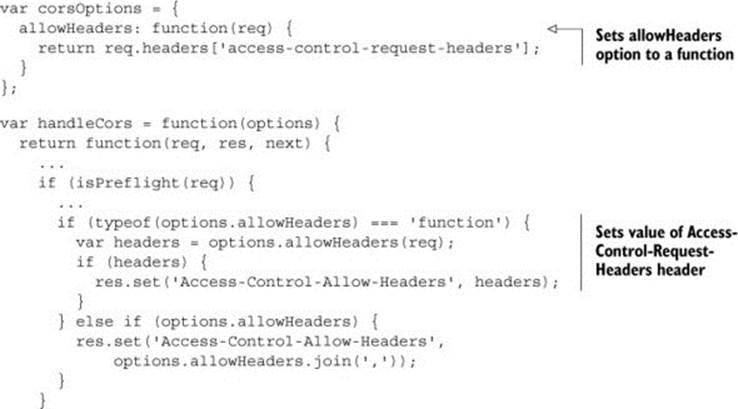
The previous listing introduces an option that lets users define a function for setting the Access-Control-Allow-Headers header. The header is set to whatever value is returned by the function. This allows the user to customize the Access-Control-Allow-Headers header in any way (if the allowHeaders option isn’t a function but an array, the code falls back on the original behavior of setting the header to the array).
In listing 6.9, the function in the allowHeaders option just returns the value of the Access-Control-Request-Headers header. This means that any header that is requested will be allowed. While the code itself is simple, the consequences are powerful. Any header the client sets on a request will be sent to your server. If you use this technique, you should be absolutely sure that your server is prepared to handle all incoming request headers.
Because the allowHeaders option can be a function, the developer isn’t limited to allowing all request headers, and can define any type of behavior. For example, the function in the following listing will allow only those header values prefixed with X-.
Listing 6.10. Only allowing request headers prefixed with X-
allowHeaders: function(req) {
var reqHeaders = req.headers['access-control-request-headers'];
if (!reqHeaders) {
return null;
}
reqHeaders = reqHeaders.split(',');
resHeaders = [];
for (var i = 0; i < reqHeaders.length; i++) {
var header = reqHeaders[i].trim();
if (header.toLowerCase().indexOf('x-') === 0) {
resHeaders.push(header);
}
}
return resHeaders.join(',');
}
This function is different from the one before because it actually parses and looks at the values in the Access-Control-Request-Headers header. It only returns those requested header values that start with an X-. For example, if the client sends the following request header:
Access-Control-Request-Headers: X-One, Two, Three, X-Four
the server will reply with the following response header:
Access-Control-Allow-Headers: X-One, X-Four
X-One and X-Four are allowed because they begin with X-, while header values Two and Three don’t. If a developer inspects the preflight request and response, he or she can easily see which header values were requested and which were allowed.
This is just one example of the nuanced ways you can control the Access-Control-Allow-Headers header. If your own server has different request header requirements, you can tailor it any way you see fit.
6.6. Reducing preflight requests
While preflight requests are an important form of server protection, the additional HTTP request can be a performance hit. This is especially true for resource-constrained environments where HTTP requests are expensive, such as mobile devices. Therefore, it’s useful to try to limit the number of preflight requests a client has to make. Now that your server is configured to respond to all types of preflight requests, let’s look at ways to reduce the number of preflight requests.
Note
Some of these suggestions are also useful for supporting CORS on Internet Explorer 8 and Internet Explorer 9. If you’ll recall from Chapter 2, Internet Explorer 8 and Internet Explorer 9 use a special XDomainRequest object to make limited CORS requests.
6.6.1. Maximizing the preflight cache
The simplest way to avoid preflight requests is to take advantage of the preflight result cache. The cache exists for the specific purpose of avoiding multiple preflight requests to the same URL. You can increase the cache time by using the Access-Control-Max-Age header, as shown in the following listing.
Listing 6.11. Configuring the Access-Control-Max-Age header
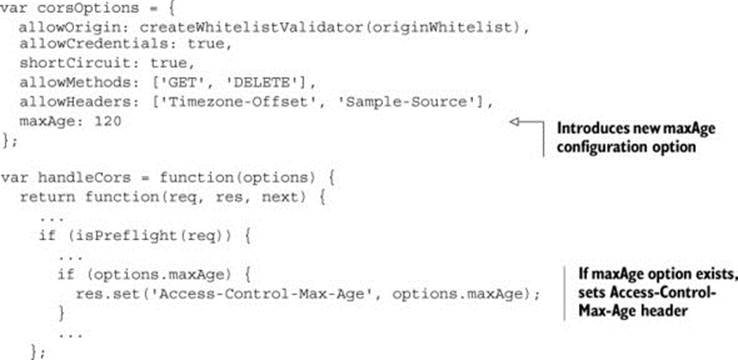
The Access-Control-Max-Age indicates the maximum number of seconds to cache a preflight request. For example, setting the header to a value of 120 will wait two minutes before issuing a new preflight request to the URL.
It’s tempting to set the Access-Control-Max-Age value to something really high, like 604800 (the number of seconds in a week). But the Access-Control-Max-Age value is more of a suggestion, because browsers have their own caps on how long a preflight request can be cached for. Chrome, Safari, and Opera cache preflight requests for up to five minutes, while Firefox caches preflight requests for up to 24 hours.
The client origin and the server URL are part of the unique cache key used to determine if a preflight request has been cached. Because the cache key takes both the URL and origin into account, the cache can’t be used to set blanket caching rules across sites. For example, because the cache applies to a specific URL, there is no way to specify a caching policy for an entire domain. Each URL under a domain has its own cache value. At the same time, there is no way to specify caching rules for a URL across all origins. If you make a request to a URL from origin http://foo.com, and then make a request to that same URL from http://bar.com, you’ll have to issue a new preflight. Table 6.5summarizes the cases where preflight requests are cached.
Table 6.5. Various requests and whether their preflight requests are cached
|
Request URL |
Request origin |
Is preflight cached? |
Why? |
|
/api/posts |
http://localhost:1111 |
No |
First request, there is nothing in the cache |
|
/api/posts |
http://localhost:1111 |
Yes |
Preflight request was cached from the previous request |
|
/api/posts/1 |
http://localhost:1111 |
No |
Request sent to a different URL |
|
/api/posts |
http://localhost:2222 |
No |
Request is from a different origin |
Because the criteria for caching a preflight request are so limited, the preflight result cache provides narrow value. The preflight result cache is only useful for multiple requests to the same URL from the same origin, within a five-minute span. Most requests to an API will probably fall outside of this window. Luckily, there are still changes you can make to your API to reduce preflight requests.
6.6.2. Changing your site to reduce preflight requests
The key to reducing preflight requests is to reduce the conditions that result in preflight requests. Recall from Chapter 4, a preflight is issued in cases where:
· The request method is something other than GET or POST.
· The request contains custom HTTP headers.
Eliminating these conditions will eliminate the need for a preflight. The following section looks at ways in which you can do this. Note that some of these suggestions fly in the face of what is considered good API design. You should weigh your need to eliminate preflight requests against the need to have a sane, structured RESTful API before implementing these suggestions.
Reducing custom headers
If your API includes custom headers on requests, eliminating or moving these headers can remove the need for a preflight. The Content-Type request header indicates what data type is in the body of a request. If you have a JSON API, it’s tempting to set the value of the Content-Type request header to application/json. In fact, there are some libraries that will automatically set this value for you. But setting the Content-Type to application/jsontriggers a preflight, because the only allowed values for Content-Type are application/x-www-form-urlencoded, multipart/form-data, or text/plain. By removing this header from the request, you avoid the need to issue a preflight.
If you need the information from a particular header, you could consider moving the value from a header to a query parameter. The sample code in Chapter 4 introduced the Timezone-Offset and Sample-Source custom headers to demonstrate how preflight requests work. Instead of custom headers, you could use query parameters to convey the same information. Table 6.6 shows two ways to convey the time zone and sample source data introduced in Chapter 4.
Table 6.6. Moving custom headers into the query parameter. Eliminating the custom headers eliminates the need for a preflight request.
|
Original request (requires a preflight request due to custom headers) |
New request (no custom headers, so no preflight request) |
|
GET /api/posts HTTP/1.1 Host: 127.0.0.1:9999 Origin: http://localhost:1111 Timezone-Offset: 300 Sample-Source: CORSInAction |
GET /api/posts? timezoneOffset=300& sampleSource=CORSInAction HTTP/1.1 Host: 127.0.0.1:9999 Origin: http://localhost:1111 |
The server-side code that reads these values would also have to change to read from the query parameter rather than the request headers.
Reducing HTTP methods
Another way to reduce preflight requests is to reduce the types of HTTP methods used. If your API supports PUT or DELETE requests, these requests must have a preflight request. There is no way to work around a preflight on PUTand DELETE requests.
But if the request were a POST instead of a PUT, it wouldn’t need a preflight request (so long as it didn’t also have custom headers). Certain protocols, such as JSON-RPC, are built entirely around GET and POST requests only. (JSON-RPC also gives excellent preflight caching because all requests are made to a single endpoint.) If avoiding preflight requests is important, you may want to investigate an alternative protocol.
This section covered strategies for handling preflight requests. It started by discussing common methods and headers that should be whitelisted. It then described a technique to give more fine-grained control over what types of request headers are allowed (a technique that can be expanded to allow any request header).
Next it discussed strategies for reducing preflight requests. Because preflight requests issue an additional HTTP request, reducing them can lead to performance gains, especially on resource-constrained devices such as mobile. A preflight request is issued whenever a request uses methods other than GET or POST, or when it uses custom headers. Reducing the need for either reduces the need for preflight requests.
This discussion of preflight requests rounds out the basic building blocks of a CORS server. But there are still a few more odds and ends to CORS requests. The next sections look into exposing headers to clients, and handling HTTP redirects.
6.7. Exposing response headers
The last remaining CORS feature is the ability to expose response headers to the client. Chapter 5 described how the Access-Control-Expose-Headers header could be used to indicate which, if any, response headers are visible to the client. It’s not a critical CORS header in that the request will still succeed if this header isn’t present, but it’s useful if clients need to read response headers. If the server wants to give the client the ability to read the X-Powered-By response header, it would set the following header on the response:
Access-Control-Expose-Headers: X-Powered-By
Using the technique similar to the Access-Control-Allow-Headers header, the sample code in the following listing adds an option to set the Access-Control-Expose-Headers header.
Listing 6.12. Exposing response headers to the client
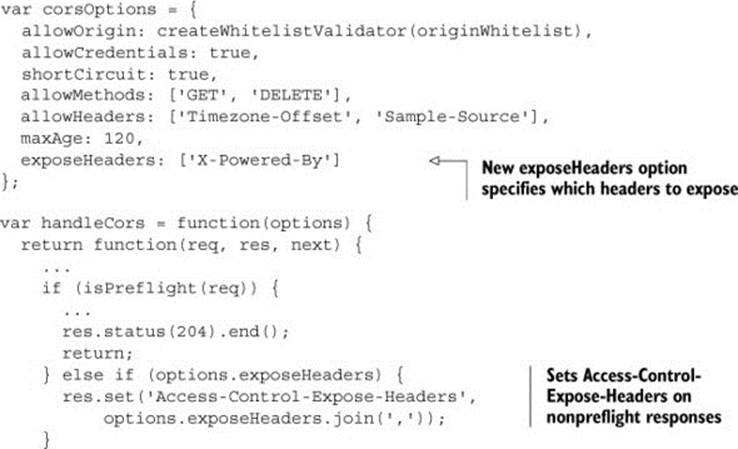
The exposeHeaders option specifies the response headers that should be exposed to the client. If the exposeHeaders property exists and the request isn’t a preflight request, the Access-Control-Expose-Headers header is set to the values in the expose-Headers array.
Table 6.7 summarizes common response headers that may be useful to clients. If your server sets one of the headers listed in the table, it may be useful to expose these to clients.
Table 6.7. Common response headers
|
Response header |
Description |
|
Content-Length |
The number of bytes in the response body. |
|
Date |
The date the server sent the response. |
|
ETag |
A unique identifier that identifies a particular version of a resource. Used in conjunction with the If-Match and If-None-Match request headers to determine whether a resource has changed. |
|
Expires |
The date after which the resource is considered stale. Can be used in conjunction with the ETag or Date header to retrieve fresh content from the server. |
|
Last-Modified |
The date the resource was last modified. |
It would be convenient to support a * value for the exposeHeaders option (similar to how you did for the allowHeaders option). A * value would mean that all response headers should be exposed to the client. To do this, the code needs to keep track of all the headers in the response. Unfortunately, NodeJS and Express don’t provide convenient mechanisms for reading the response headers before the response is sent to the client. Other platforms, such as Java servlets, provide a mechanism for doing this. If you’re using a language that supports this feature, you can use it to configure the Access-Control-Expose-Headers header.
6.8. CORS and redirects
When performing an HTTP redirect, both the server initiating the redirect and the server receiving the redirect must have the correct CORS headers. If either server doesn’t have the correct CORS configuration, or doesn’t support CORS at all, the request will fail.
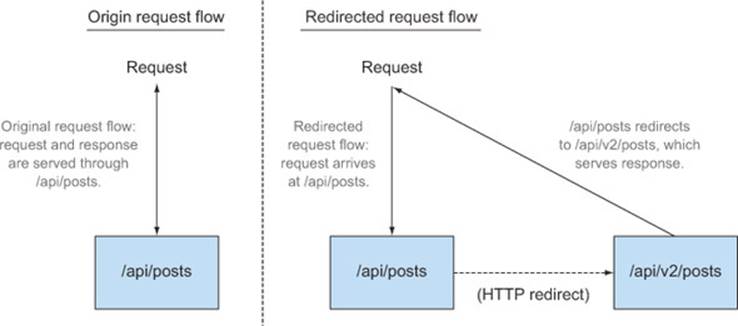
As an API evolves, it may have the need to use HTTP redirects. While we like to think that our API design is perfect from the beginning, the truth is that APIs change based on user’s needs and feedback, and it’s sometimes necessary to create a whole new URL endpoint. In these cases, HTTP redirects give the server a mechanism for connecting the old URL to the new URL. Visitors to the old URL are seamlessly redirected to the new one. This ensures that old URLs will continue to work even as an API evolves.
Suppose you want to introduce a new API version living at /api/v2/posts. After a lot of testing and bug fixes, you decide that the API is ready for everyone to use, including users of the previous version. So you set up an HTTP redirect from /api/posts (the old endpoint) to /api/v2/posts (the new endpoint). Figure 6.15 shows what your new API would look like.
Figure 6.15. Sample server before and after introducing a redirect
The following snippet shows the code that implements a redirect which consists of two parts: the HTTP status code and the Location header. The status code indicates that the response is a redirect. There are two valid status codes for redirects: 301, which indicates that a resource has permanently moved to a new URL, and 302, which indicates a temporary move. (An example of a temporary redirect is if a server is down and you want to redirect the visitor to a status page for the duration of the outage.) The Location header indicates where the new resource lives. The Location header can point to a resource on the same server, or on a completely different server.
serverapp.get('/api/posts', function(req, res) {
res.redirect(301, '/api/v2/posts');
});
serverapp.get('/api/v2/posts', function(req, res) {
res.json(POSTS);
});
This code sets the HTTP status to 301 (because you want to permanently redirect users), and sets the Location header to your new resource at /api/v2/posts. In addition to this code, any xhr.setRequestHeader code in client.html should be deleted. This prevents the client from initiating a preflight request (you’ll see why this is important in a moment).
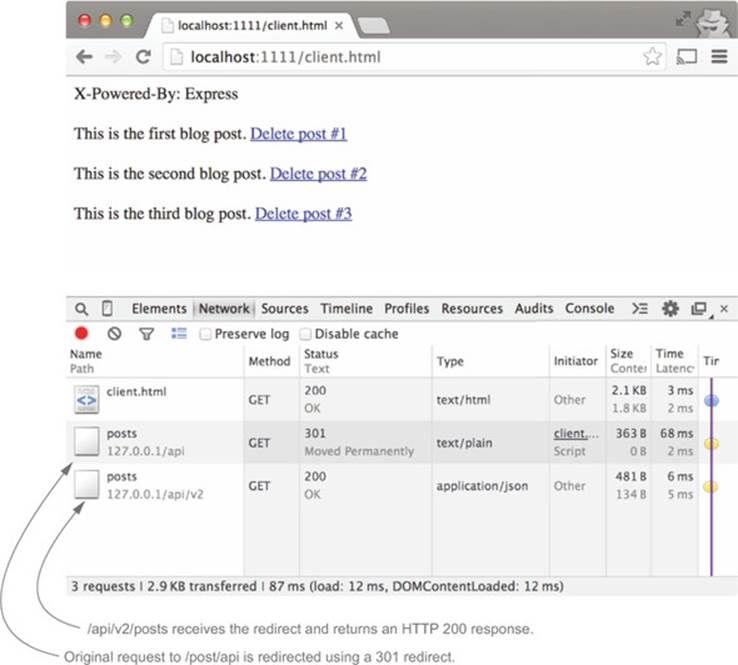
If you restart the server and visit client.html, you’ll see two HTTP requests in your Network tab, as shown in figure 6.16. The first request hits /api/posts. This first request is then redirected to /api/v2/posts.
Figure 6.16. Viewing the HTTP redirect in Chrome’s Network tab
There are a couple of other caveats when handling a redirect with CORS. First, if the client is redirected to a resource on a different server, the Origin header will be set to null. So far we’ve only encountered null Origin values when working with local files, but this is an example of a null origin in a different context. The next listing shows what would happen if instead of redirecting to your own server, you redirected requests from /api/posts towww.HTML5Rocks.com/en/.
Listing 6.13. Redirecting a CORS request to a server at a different origin.
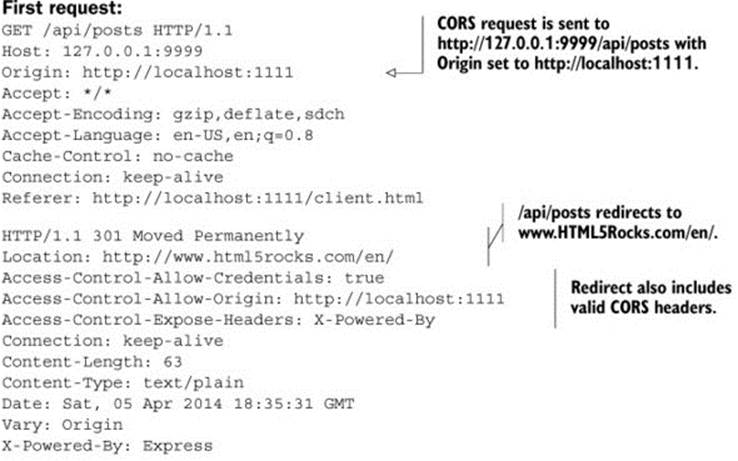
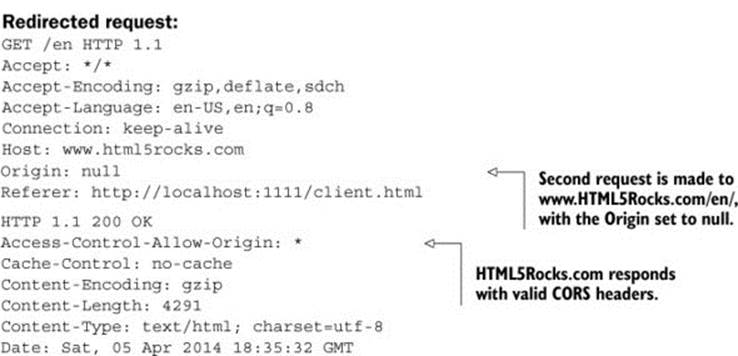
The Origin header is set to null because the browser doesn’t want to leak the origin value to the new server. Remember that redirects are followed automatically, so the client has no way to intervene before following the redirect. This could lead to a case where the client is redirected to a site that they didn’t expect or want. In this case, hiding the Origin header value by setting it to null is a safety precaution.
The other caveat is that CORS preflight requests will never follow redirects. If you’re making a CORS request that has a preflight, and the server tries to redirect you, the request will fail. Figure 6.17 shows the error message you’ll see in Chrome if you try to redirect a request that requires a preflight.
Figure 6.17. Error when redirecting a request with a preflight
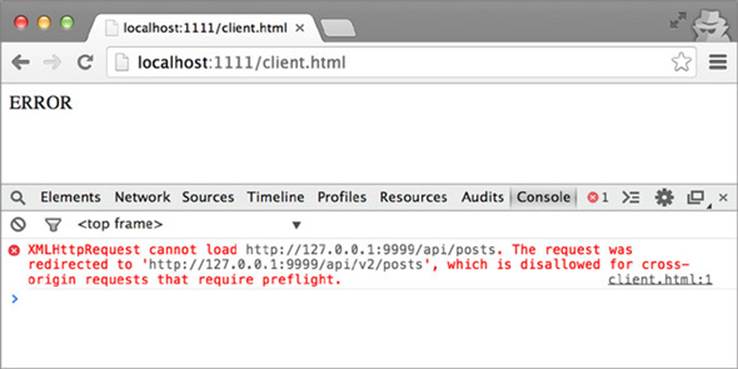
In this case, you’ll need to manually inspect the response’s Location header to figure out where the server is trying to redirect you, then send your request directly to that URL.
Here is a recap of how CORS works with redirects:
· Simple CORS requests will follow redirects.
· Preflight requests will not follow redirects.
· If the redirect is to the same server as the original request, the Origin header will stay the same. Otherwise, the Origin header will be set to null.
You probably won’t run into redirects often, but it’s still useful to understand how they work so you can build your API appropriately.
6.9. Summary
This chapter opened with questions you should ask yourself about your own CORS needs. After answering those questions, you should have a better idea of how you want to configure your server. The chapter then took a closer look at how to configure the various CORS-specific headers for your own needs. Here is a recap of each header:
· Access-Control-Allow-Origin:
o Use the * value to allow requests from all origins.
o Use a whitelist to allow only certain origins.
· Access-Control-Allow-Credentials:
o Setting the value to true allows cookies on requests.
o Enable cookies only if you’re sure you need them.
o If your server does support cookies, be sure to also validate the origin and implement CSRF protection.
· Access-Control-Allow-Methods:
o This header only needs to be present on preflight responses.
o It indicates which HTTP methods are allowed on a URL.
o Common values include HEAD, OPTIONS, GET, POST, PUT, PATCH, and DELETE.
· Access-Control-Allow-Headers:
o This header only needs to be present on preflight responses.
o It indicates which HTTP headers are allowed on a URL.
o Echo the Access-Control-Request-Headers value to get full header support.
· Access-Control-Max-Age:
o This header only needs to be present on preflight responses.
o It indicates how many seconds to cache preflight requests for.
o Browsers may have their own maxAge caps.
· Access-Control-Expose-Headers:
o This header indicates which response headers to expose to clients.
o It’s an optional header that isn’t required for a successful CORS request.
The chapter also took a look at the security of CORS. It’s important to remember that CORS in and of itself doesn’t also serve as a mechanism for securing a server. If you need to serve protected content, consider some other authorization mechanism, such as cookies or OAuth2. If your CORS implementation allows cookies, it’s also important to have CSRF protection in place.
Finally, this chapter examined how to minimize preflight requests by reducing the circumstances that lead to preflights. Reducing preflight requests is desirable because it eliminates an extra HTTP request, which can be expensive on resource-constrained devices such as mobile phones.