Building Web Apps with Ember.js (2014)
Chapter 10. Ember Testing
If you’ve kept up with the Ember testing over the last year, there has been quite a bit of debate within the Ember community about testing best practices. Well, what would you expect? That’s just how testing goes.
When putting together the testing strategy for this book, we wanted to base on it on our experience with real-world application development. In doing so, one of our guiding principles is to keep our strategy as simple as possible, without sacrificing test coverage.
We also wanted readable tests, because they act as the development team’s primary source of “enforced” and tested requirements. It is also important to us that our test runner be fast to ensure we are not impeding developer productivity, and we’d like the test runner to integrate with a CI server easily. Finally, it’s important to obtain test coverage over as much code that makes sense for our particular application.
We will explore a basic integration and unit-testing approach with a simple setup provided by Ember App Kit. This setup uses Qunit, Ember testing helpers, and the Testem test runner.
One thing that is certain is that there are as many testing strategies as there are development teams, so hopefully the following examples give you enough exposure to the basics for you to start formulating your own strategy to fit your application, team, and development timeline.
The Ember Guides provide a great reference for setting up a basic testing scenario, so we won’t be redundant in rehashing that documentaiton. We will assume you have read the Ember Guides page on Integration Testing to have full context of the following information.
Ember Testing with Ember App Kit, Qunit, and Testem
The source code for this initial example is included here: https://github.com/emberjsbook/rocknrollcall-eak.
rocknrollcall-eak uses QUnit, Ember Testing, and Testum Test Runner.
If you have been following along in this book, you will have seen that there is an Activity model that records data associated to the user’s searches. For our basic unit testing example, let’s use this model and the associated route and template.
To start, let’s set up our first test. Fortunately, Ember App Kit has handled our boilerplate within a couple of files starting with test_helper.js:
document.write('<div id="ember-testing-container"><div id="ember-testing">
</div></div>');
Ember.testing = true;
window.startApp = require('appkit/tests/helpers/start_app')['default'];
window.isolatedContainer = require('appkit/tests/helpers/isolated_container')['default'];
... // test-helpers
window.exists = exists;
window.equal = equal;
window.strictEqual = strictEqual;
First, the ember-testing-container and ember-testing divs are injected into our test runner HTML page. The,n Ember.testing is set to true, which turns off the run-loop’s autorun. Later you will see it is necessary to wrap any asynchrounous code within your tests with aEmber.run(), or you will receive the following message in your console:
You have turned on testing mode, which disabled the run-loop's autorun.
You will need to wrap any code with asynchronous side-effects in an Ember.run
Then, two additional boilerplate files are included and referenced globally through the window object.
As you might have noticed, the boilerplate has also included a number of test helpers that essentially just wrap QUnit assertions to use within your tests. Then, test_helper.js sets up global references to these helpers as well:
function exists(selector) {
return !!find(selector).length;
}
function getAssertionMessage(actual, expected, message) {
return message || QUnit.jsDump.parse(expected) + " expected but was "
+ QUnit.jsDump.parse(actual);
}
function equal(actual, expected, message) {
message = getAssertionMessage(actual, expected, message);
QUnit.equal.call(this, actual, expected, message);
}
function strictEqual(actual, expected, message) {
message = getAssertionMessage(actual, expected, message);
QUnit.strictEqual.call(this, actual, expected, message);
}
Then in start_app.js, EAK begins to initialize the application for the testing context. The startApp() method uses the imported app to create an instance of itself with configurable attributes, calls setupForTesting() (which defers the execution of application code), and injects the aforementioned test helpers:
import Application from 'appkit/app';
function startApp(attrs) {
var App;
var attributes = Ember.merge({
// useful Test defaults
rootElement: '#ember-testing',
LOG_ACTIVE_GENERATION:false,
LOG_VIEW_LOOKUPS: false
}, attrs); // but you can override;
Ember.run(function(){
App = Application.create(attributes);
App.setupForTesting();
App.injectTestHelpers();
});
return App;
}
export default startApp;
The last file that is included to finish off the boilerplate for testing is called isolatedContainer.js.
The purpose of this file is just what the name suggests, to provide an isolated copy of the Ember.Container for testing:
import Resolver from 'resolver';
function isolatedContainer(fullNames) {
var container = new Ember.Container();
container.optionsForType('component', { singleton: false });
container.optionsForType('view', { singleton: false });
container.optionsForType('template', { instantiate: false });
container.optionsForType('helper', { instantiate: false });
var resolver = Resolver['default'].create();
resolver.namespace = {
modulePrefix: 'appkit'
};
for (var i = fullNames.length; i > 0; i--) {
var fullName = fullNames[i - 1];
container.register(fullName, resolver.resolve(fullName));
}
return container;
}
export default isolatedContainer;
NOTE
In later versions of EAK, this functionality has been moved to the Ember-Qunit library. So if you are wondering where isolatedContainer.js is, you are probably running a later version of EAK. It will now be managed by bower and located in vendor/ember-qunit/lib/.
For more on Ember-Qunit, stay tuned—we will go into detail later in this chapter.
Testem and QUnit Test Runners
EAK (Ember App Kit) ships with the Testem test runner enabled by default. So for the beginning part of this chapter, we will be using this fantastic test runner.
Ember-testing uses QUnit, so one benefit to that is that we get the Qunit test runner that can run in the browser. When used with a test runner like Testem, we can also view our tests at the command line.
If we follow the standard red-green-refactor cycle of TDD (test-driven development), broken tests will display highlighted. It is your choice to monitor the tests at the command line or in the browser. Here is how your tests will look as you run them.
We can view our tests in a broken state first. Just open a terminal, navigate to the application directory, and run the test server:
$ cd rocknrollcall-eak
$ grunt test:server
You should then see the Testem test runner fire up and start executing our tests, as shown in Figure 10-1.
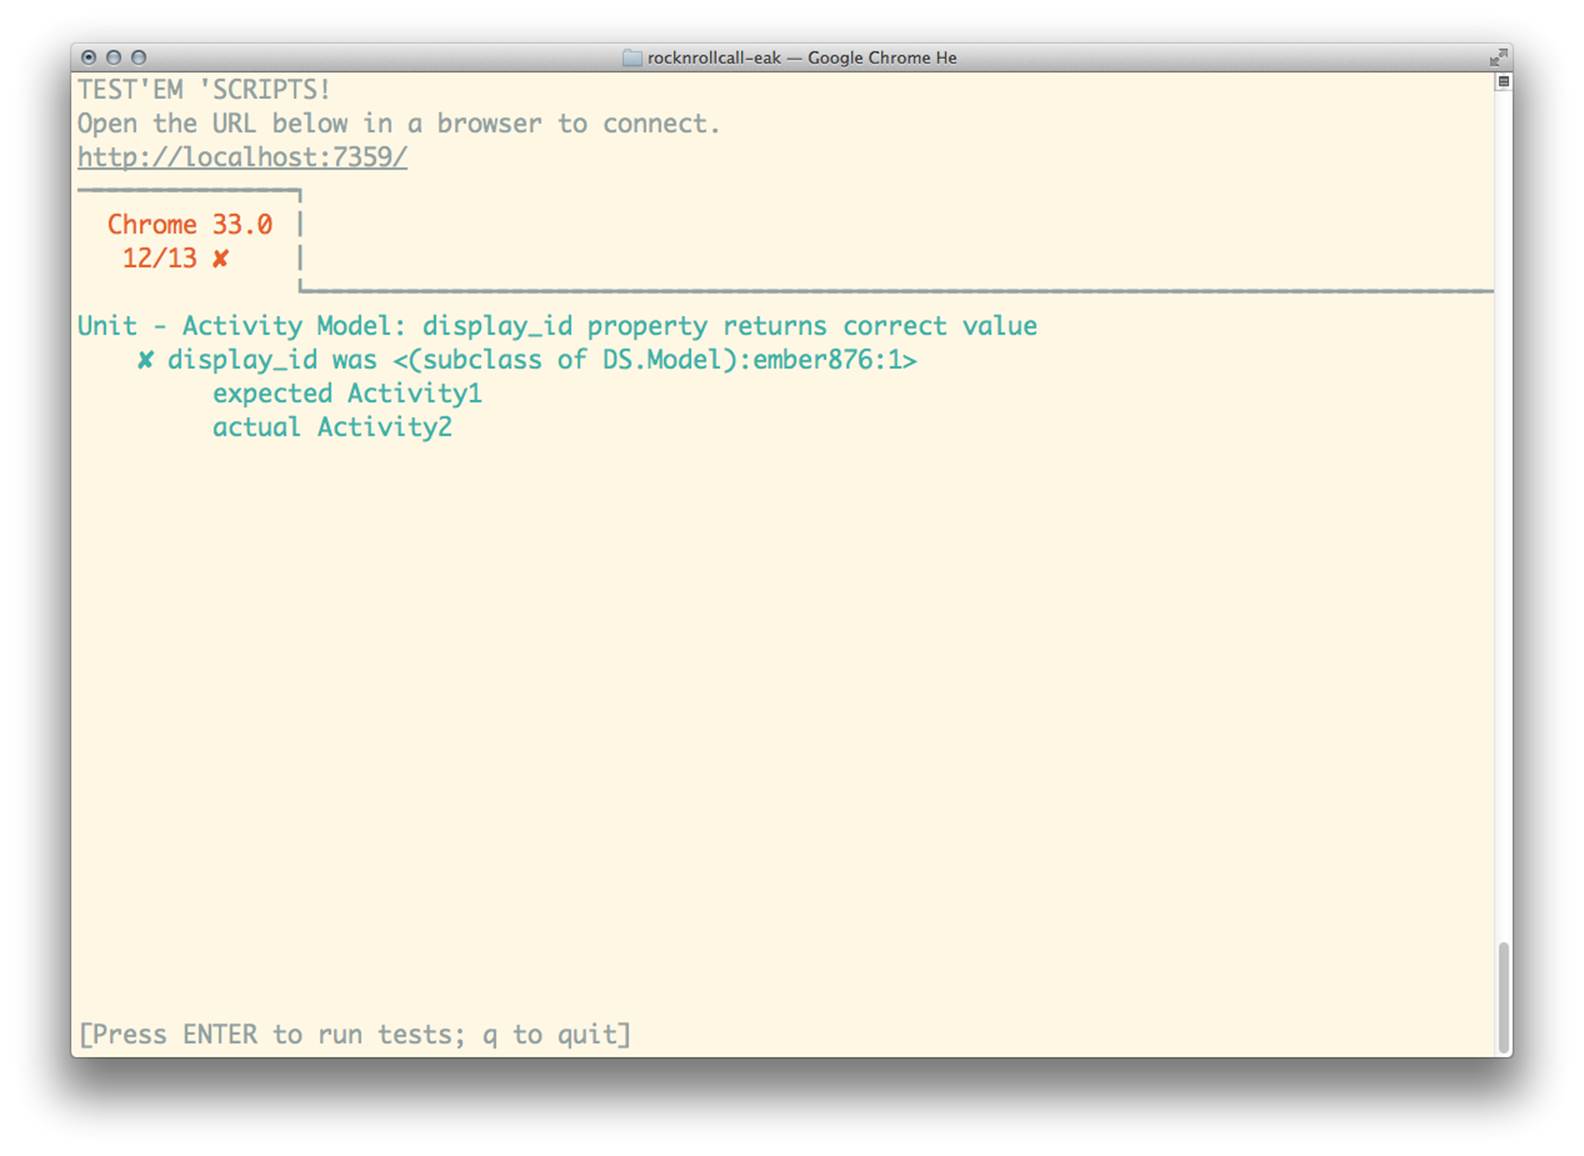
Figure 10-1. Testem test runner: one test failing
It is not the intention of this chapter to walk through the red-green-refactor cycle of each test, but by the end of this section, we should have a test suite of 13 passing unit and integration tests.
Again, open a terminal, navigate to the application directory, and run the test server, as shown in Figure 10-2:
$ cd rocknrollcall-eak
$ grunt test:server
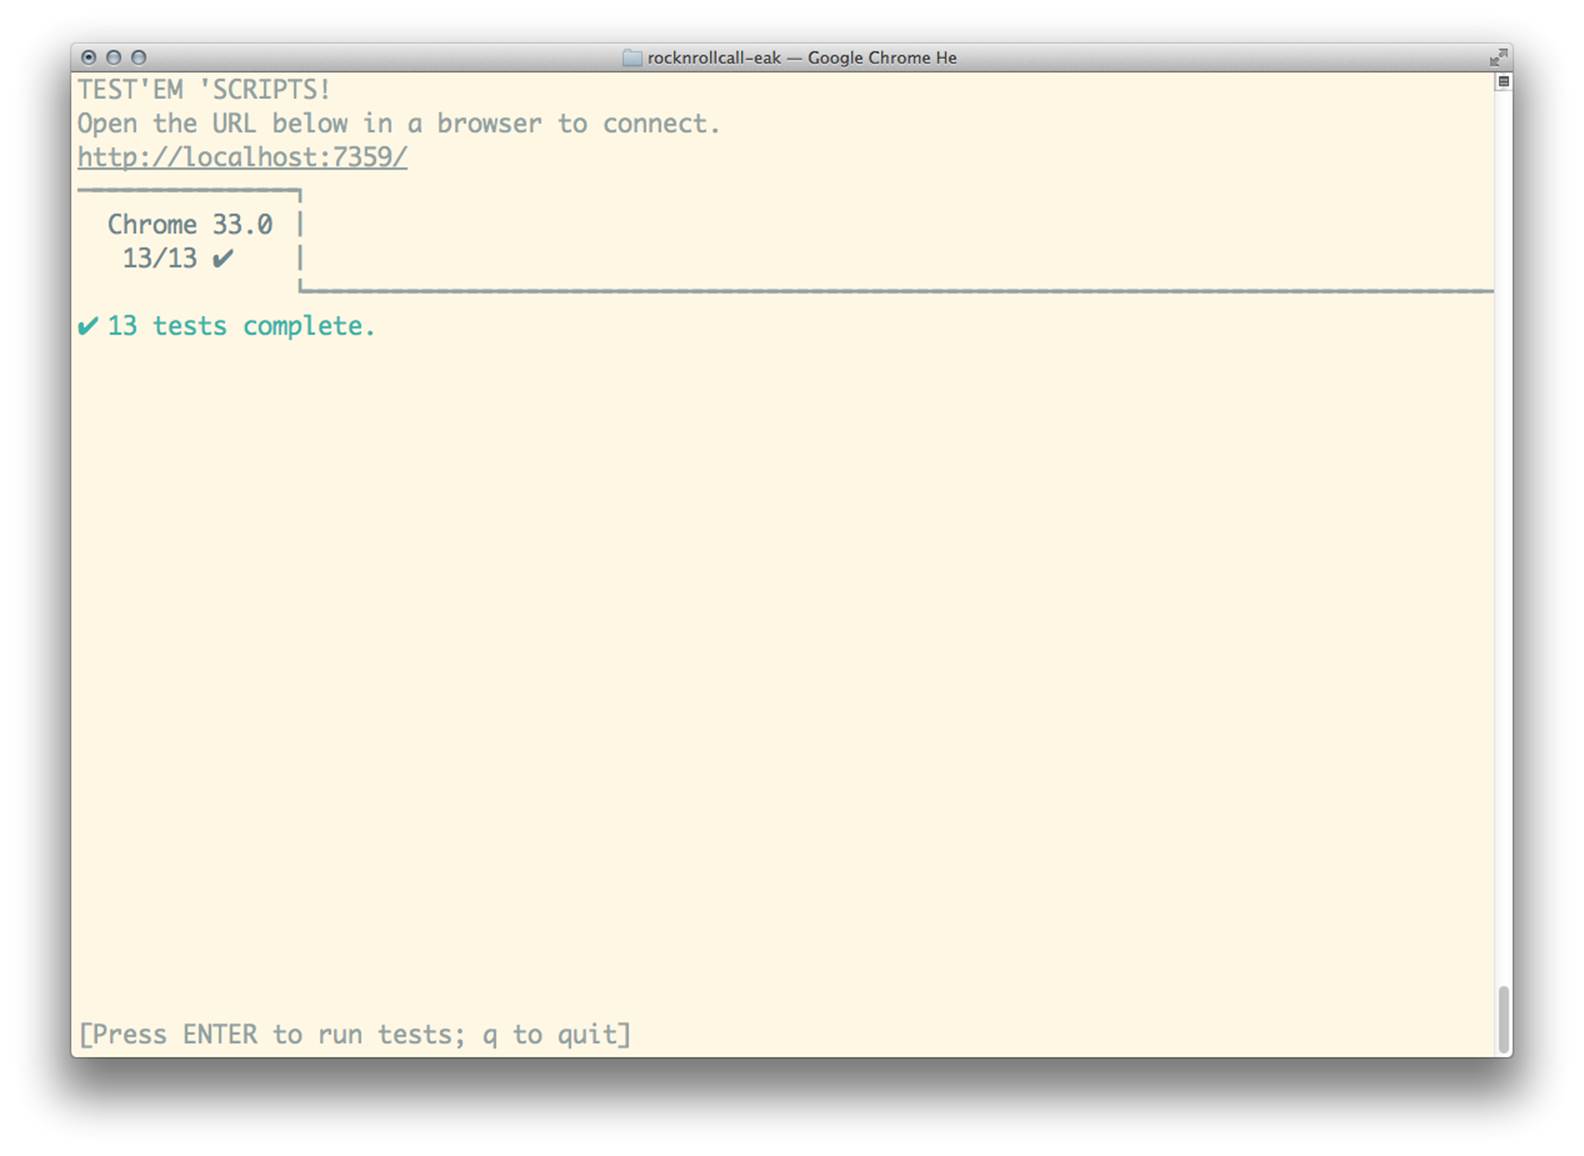
Figure 10-2. Testem test runner: all tests passing
As mentioned, if you are not comfortable with running tests in the Terminal, you can also open a browser window to view your tests in the Qunit test runner and enter http://localhost:7359/743/tmp/result/tests/index.html (see Figure 10-3).
Now that we understand the basic setup, the Testem command line test runner, and the Qunit browser-based alternative, let’s begin creating our first tests.
Ember Client-Side Integration Testing
Let’s begin with browser-only integration tests, perhaps one of the coolest aspects of the Ember framework. Here we can write and automate tests that exercise most of our application layers (router, models, controllers, and views) without the overhead of an application server, calls over the network, or even a database.
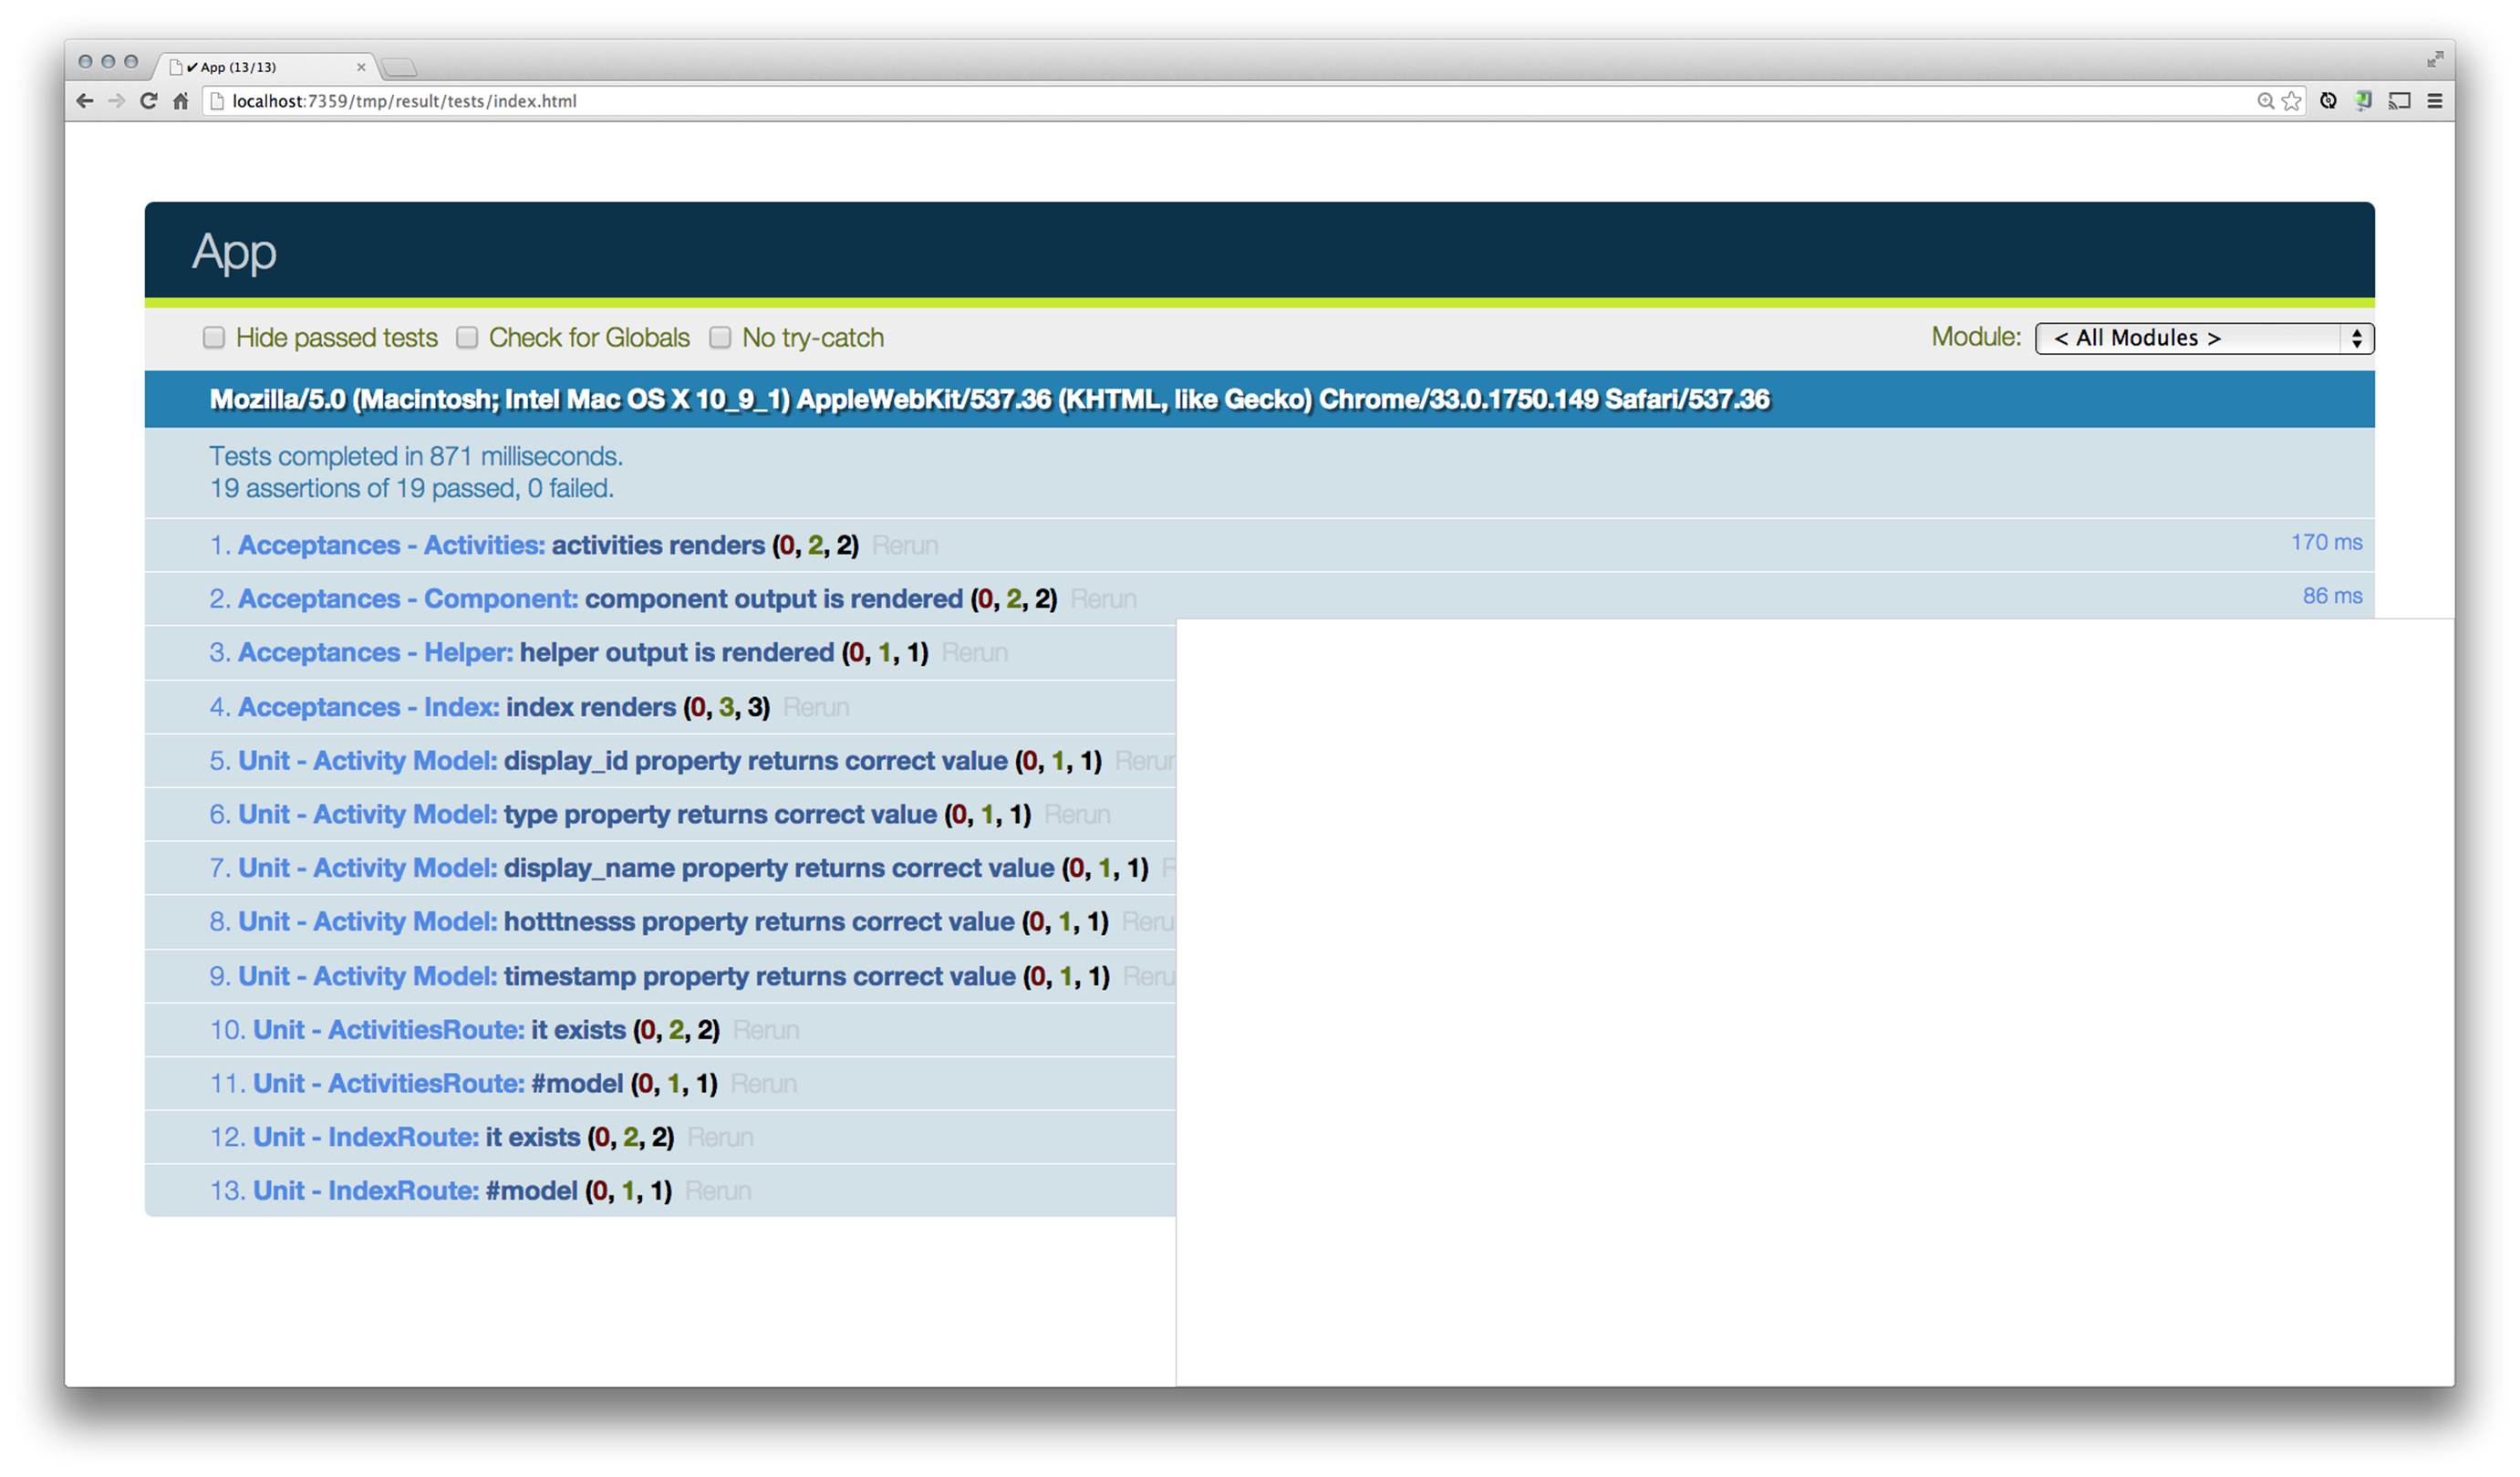
Figure 10-3. QUnit test runner as an alternative
Helpers
The Ember testing module provides six helpers that automate interactions with your Ember application. These helpers include: visit(), find(), fillIn(), click(), triggerEvent(), and keyEvent().
There are also three helpers that return helpful information about the state of the application: currentPath(), currentRouteName(), and currentURL().
For more information, see the Ember Integration Testing helpers section.
Testing the Index Page
As mentioned earlier in the chapter, our testing setup also includes helpers that wrap QUnit assertions. To begin, we will do some finds() and use the equal() assertion that was explained earlier.
In tests/acceptance, we are given an index-test.js for free, as an initial example. In this example, we will do a basic setup and teardown of the application, and then run one test:
var App;
module('Acceptances - Index', {
setup: function(){
App = startApp();
},
teardown: function() {
Ember.run(App, 'destroy');
}
});
test('index renders', function(){
expect(3);
visit('/').then(function(){
var title = find('h2#title');
var list = find('ul li');
equal(title.text(), 'Welcome to Ember.js');
equal(list.length, 3);
equal(list.text(), 'redyellowblue');
});
});
To break down this code further, notice that a QUnit test() accepts a description, index renders, and a callback function that contains the test. Within the test, we will first let Qunit know how many assertions to expect within this test. Keep in mind, if the number of assertions run doesn’t equal the number passed to expect(), the test will not pass.
Then, we can use the visit() helper to access the index page, and use then() to handle the promise that is returned. Then, we use find to query the page for a few elements and assign them to variables. We then pass those HTML elements stored in variables, title and list, as the first parameter in our equal() assertion helpers. The second parameter in the equal() assertion helper is the value that we expect.
Figure 10-4 shows the results of this test.
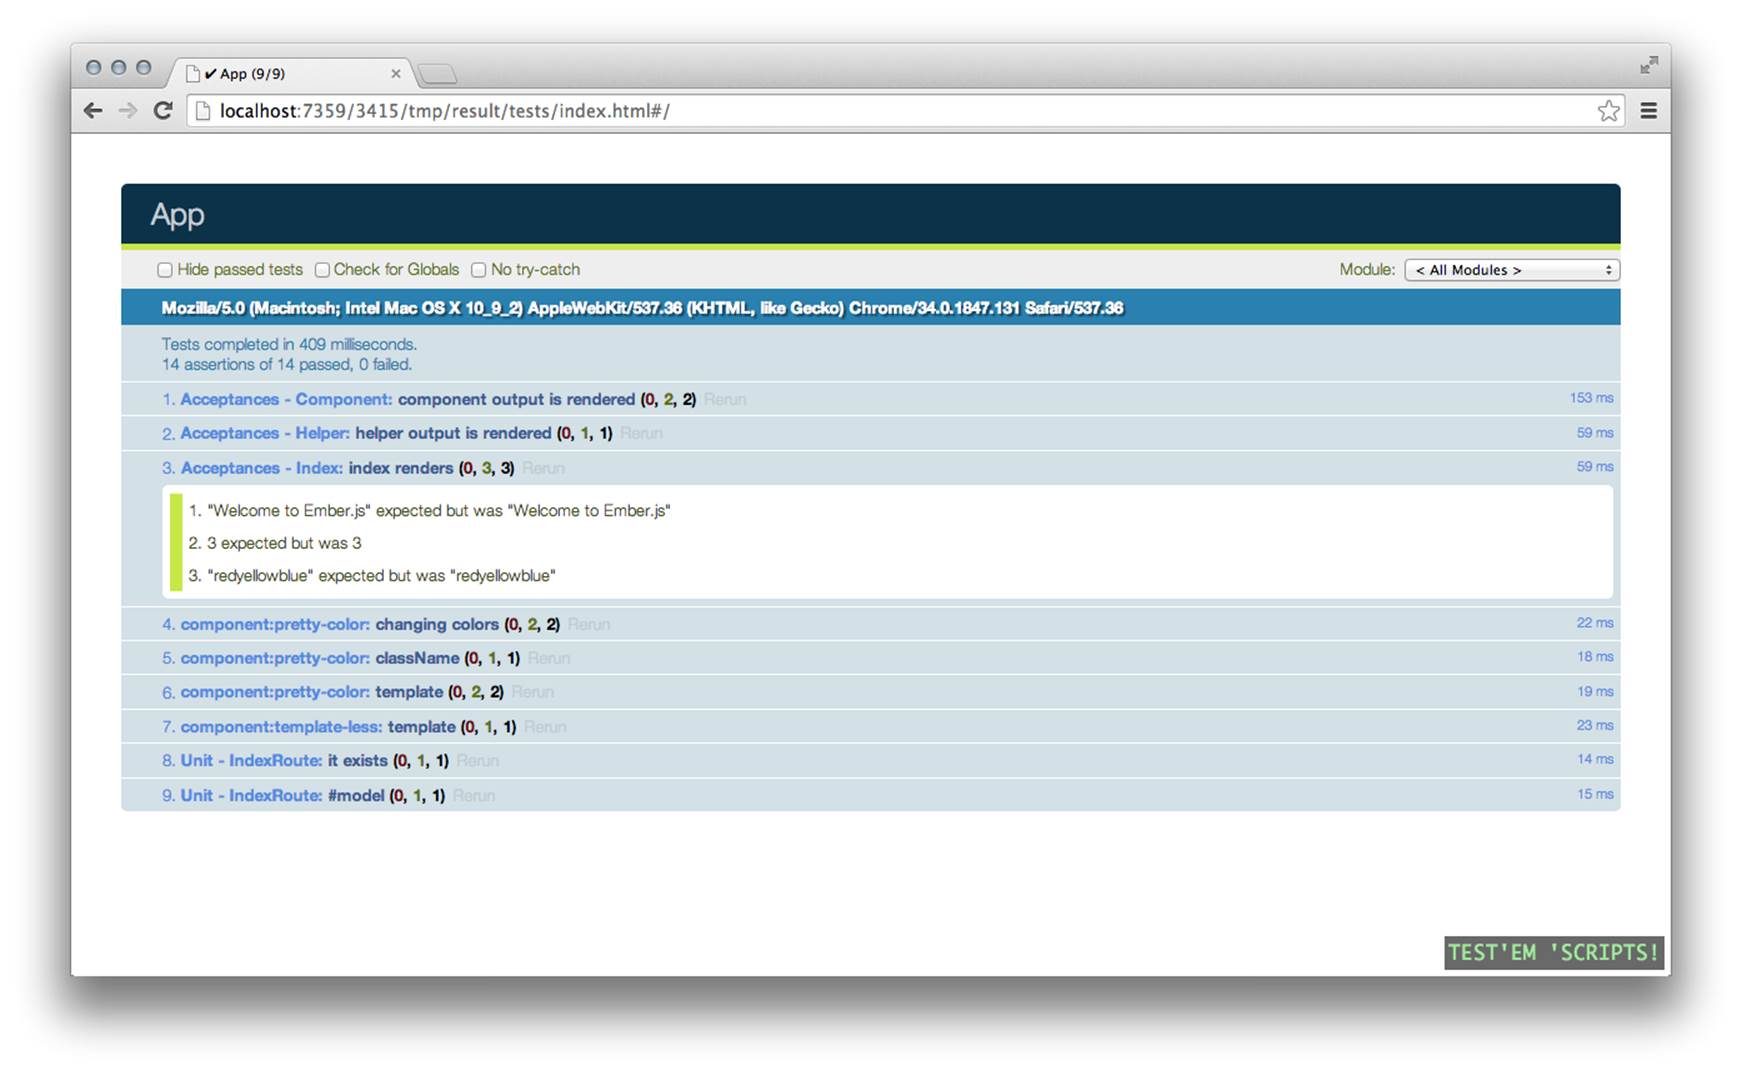
Figure 10-4. Acceptance test: rendering the index page
Testing the Activities Route
In our next test, we will visit the Activities route, access the data model through Ember Data, and test that the data was properly displayed within the activities template.
In tests/acceptance, create an activities-test.js file:
var App;
module('Acceptances - Activities', {
setup: function(){
App = startApp();
},
teardown: function() {
Ember.run(App, 'destroy');
}
});
test('activities renders', function(){
visit('/activities').then(function(){
var title = find('h4');
var list = find('ul li.activity');
equal(title.text(), 'Total Activity Records: 2');
equal(list.length, 2);
});
});
See the change in this commit.
Our tests fail, as shown in Figure 10-5, but why?
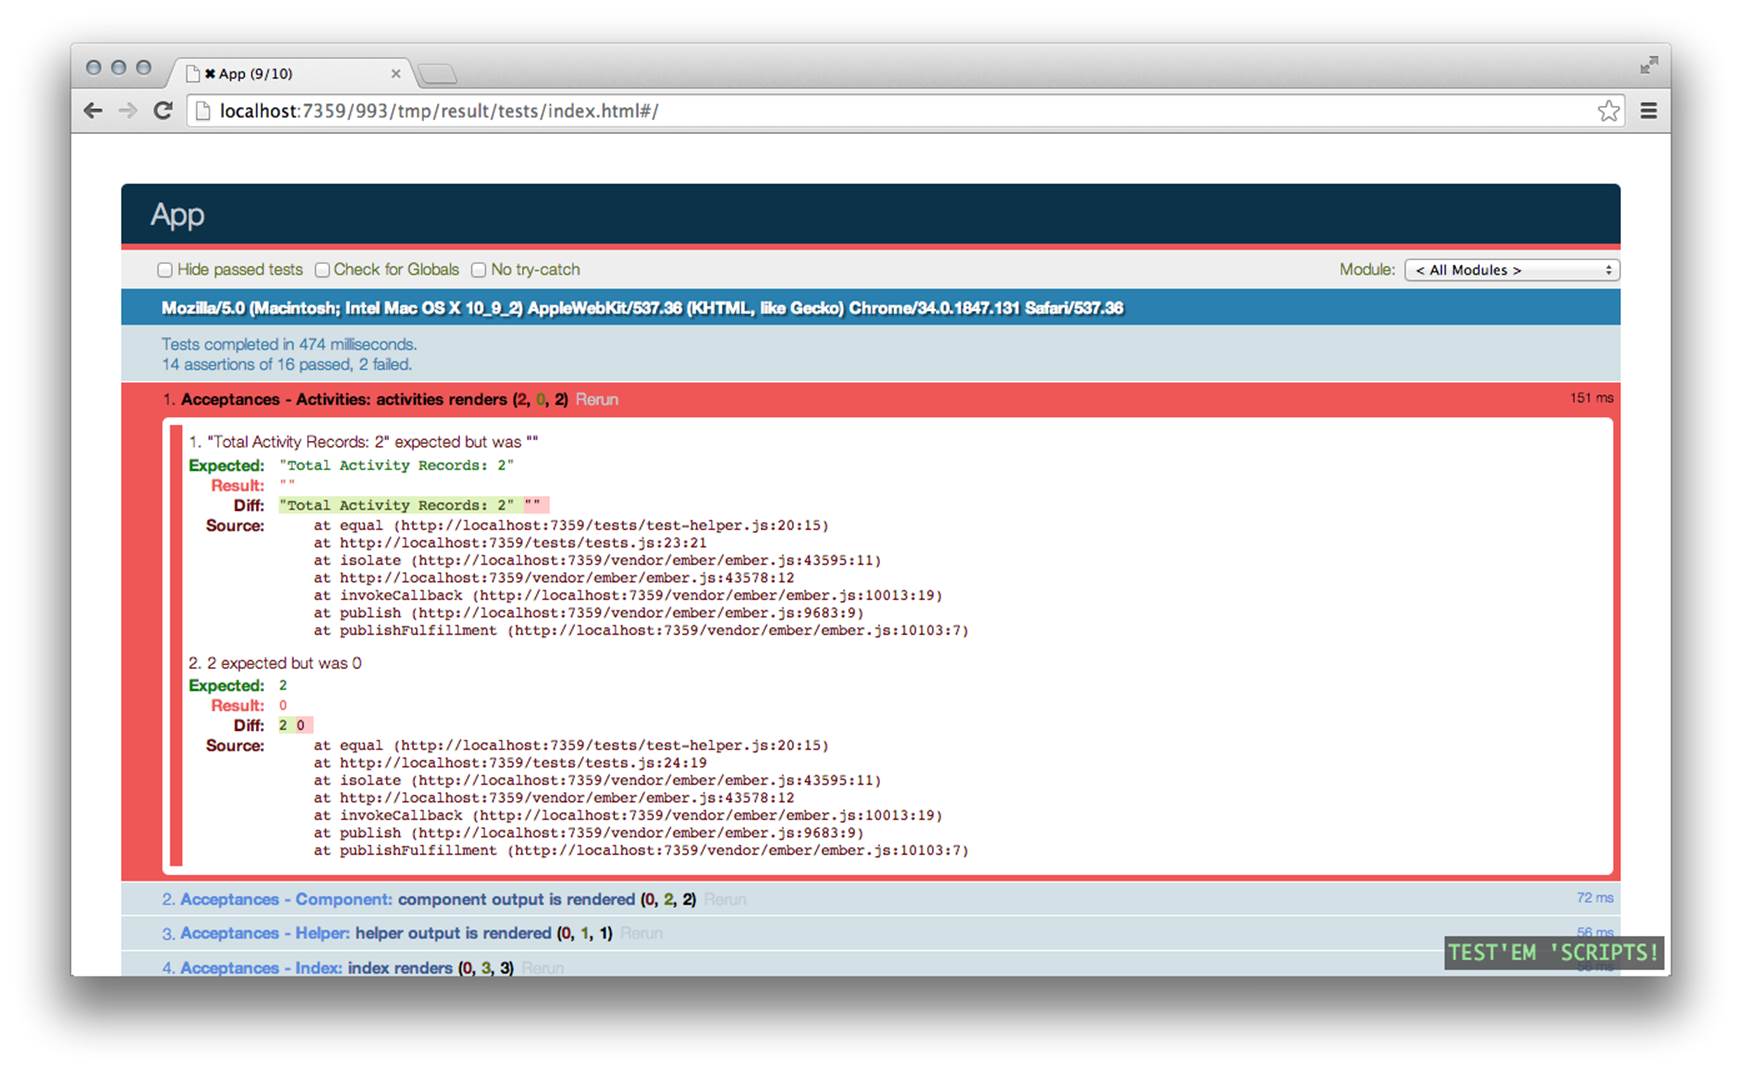
Figure 10-5. Acceptance activities fail: rendering the Activities page
The answer is in the JavaScript error message that is being displayed in the browser console:
Failed to load resource: the server responded with a status of 404 (Not Found)
http://localhost:7359/api/activities
The reason we get this error is that our Ember application, actually Ember Data, is making a request to /api/activities at the same domain as the Testem test environment, running on localhost, port 7359. The data is not available, because the Express app that serves the data is not running there.
To solve this issue, we need to make some minor configuration and code changes. This actually demonstrates more of Ember App Kit’s extensibility and flexibility, a testament to the amount of thought put into how it was built.
First, we can create a host property in our test environment’s config file:
window.ENV.host = 'http://localhost:8000'
And then use that property in app/adapters/application.js to tell Ember Data to point to the Express server running on the default port, which is different than our test environment:
export default DS.RESTAdapter.extend({
namespace: 'api',
host: window.ENV.host
});
This means we will need to run our Express.js app in a separate terminal:
$ grunt server
Running "expressServer:debug" (expressServer) task
Using API Stub
>> Started development server on port 8000.
and our test server in another:
$ grunt test:server
TEST'EM 'SCRIPTS!
Open the URL below in a browser to connect.
http://localhost:7359/
Almost there! Now, you should see an error in our browser’s JavaScript console:
XMLHttpRequest cannot load http://localhost:8000/api/activities.
No 'Access-Control-Allow-Origin' header is present on the requested
resource. Origin 'http://localhost:7359' is therefore not allowed access.
This is an issue caused by trying to make a XMLHttpRequest to another domain. Fortunately, we can use node’s cors module middleware to make this request return without error. The cors module utilizes the CORS specification to properly configure the Express server to handle cross-site XMLHttpRequests by adding a custom header to the response.
To enable CORS, we first add the new development dependency to our package.json:
"devDependencies": {
"express": "~3.4.8",
...
"cors": "2.2.0"
}
Then, add the require of the dependency in tasks/express-server.js:
var express = require('express'),
lockFile = require('lockfile'),
Helpers = require('./helpers'),
fs = require('fs'),
path = require('path'),
request = require('request'),
cors = require('cors');
And then add the middleware, just before the conditional logic that handles the proxyMethod:
app.use(cors());
if (proxyMethod === 'stub') {
grunt.log.writeln('Using API Stub');
...
And finally, we need to install the new dependency by running:
$ npm install
More on CORS
CORS stands for cross-origin resource sharing, which is a specification that allows applications to make requests to other domains from within the browser. With CORS, you have a secure and easy-to-implement approach for circumventing the browser’s same origin policy.
If you want another example using CORS, you can read about it in more detail in Jesse Cravens and Jeff Burtoft’s HTML5 Hacks (O’Reilly, 2012); in particular, see Hack #75: Configure Amazon S3 for Cross-Origin Resource Sharing to Host a Web Font.
And now, we should see that our test environment is able to access the data from the Express server and the test passes (Figure 10-6).
See these changes in this commit.
Ember Unit Testing
Our first unit tests will test the existence of the Activities route, and exercise its model method.
In unit testing a route, we immediately run into a few questions around how we should manage data in our unit tests. If you are following along, you know that we decided to make server-side fixtures on our Express server for our integration tests.
Figure 10-6. Acceptance activities pass: rendering the Activities page
EAK ships with a simple example of unit testing a route’s model hook, but you may notice that the data is hardcoded or “mocked” as a returned array of values:
export default Ember.Route.extend({
model: function() {
return ['red', 'yellow', 'blue'];
}
});
But what happens when our route actually calls the Ember Data store, such as our model hook in the Activities route:
export default Ember.Route.extend({
model: function() {
return this.get('store').find('activity');
}
});
A number of things are different when we return data from Ember Data. The model hook is no longer isolated to the return of an array of values; the code now “calls out” to Ember Data’s find(), and context travels through the implementation, resulting in a return of a promise. Because a promise is returned, the value from this hook needs to be resolved and handled differently than a simple return of an array of values. In other words, this model method invocation has now become an asynchronous operation.
This creates a number of questions about our testing strategy.
First, do we want to use the FixtureAdapter or the RESTAdapter to obtain the data? Or, do we want to isolate this functionality to a manually created mock object, therefore removing any interaction with Ember Data Adapters?
The answer lies in what we are intending to test, what we will be testing in our other tests such as our full-stack, integration tests, and possibly even our automated system tests. This is one area where the testing strategy debate can turn religious.
In general, our unit tests should maintain their own consistent test data to execute against. One reason this is important is so that the tests are portable and repeatable in different environments.
The other reason is so that the functionality we are testing is isolated to the unit we are testing and not impacted by another layer like the network or a database.
Where this is arguable, in an application of this kind, is at what level those fixtures are acceptable as isolated. If you are following along, you know we currently have fixture data hardcoded on the server in our Express app. You also know that, through the power of Ember Data, we have the ability to switch adapters and use the FixtureAdapter, essentially eliminating the network roundtrip.
For the sake of this tutorial, we will assume that our server-side fixtures are acceptable for our integration tests and for our unit tests, we will manage the data within client-side fixtures.
Using Ember-Qunit
One reason why Ember-Qunit is important is that it provides for some of the setup boilerplate that used to have to be done manually.
Ember-Qunit provides three helpers: moduleFor(), moduleForComponent(), and moduleForModel().
Perhaps the best way to understand the benfit of Ember-Qunit is by looking at the way we had to write our test setup module before we had moduleFor():
module('Unit - ActivitiesRoute', {
setup: function() {
var container = isolatedContainer([
'route:activities'
]);
route = container.lookup('route:activities');
}
});
In the past, you can see that we had to create a new isolatedContainer and then look up the route directly on the container. Now the functionality has been abstracted out to the moduleFor() wrapper. The same setup is now much less verbose:
moduleFor('route:activities', "Unit - ActivitiesRoute");
It still works in a similar way, but the lookup and management of the isolated container happens “behind the scenes.”
The creation of the object we are testing is now returned by the subject() method. So we can then get access to the ActivitiesRoute within our test like so:
import Activities from 'appkit/routes/activities';
test("it exists", function(){
ok(this.subject() instanceof Activities);
});
That’s the basic idea, and we will dig into Ember-Qunit’s other two helpers, moduleForComponent() and moduleForModel(), in the following sections.
Unit Testing Routes
So now that we understand that our setup has been simplified by Ember-Qunit, let’s dissect the rest of the code. In tests/unit/routes/activities-test.js, we need to import the test and moduleFor functions from the Ember-Qunit module and the ActivitiesRoute. Then, pass moduleFor()the object to lookup, in this case the activities:route, and then we can give our test a meaningful description like quot;Unit - ActivitiesRoutequot;:
import { test, moduleFor } from 'ember-qunit';
import Activities from 'appkit/routes/activities';
moduleFor('route:activities', "Unit - ActivitiesRoute");
Then, our first two tests will assert the existence of the route from within the container, and that it as an instance of the ActivitiesRoute:
test("it exists", function(){
ok(this.subject());
ok(this.subject() instanceof Activities);
});
See the change in this commit.
Looking good so far. Then, we will isolate the route’s model hook by creating a simple mock store and defining a find() method. Then we assign the store to the route’s store property. find() simply returns an array of one data object that we have manually copied from the Activitymodel’s FIXTURES:
test("#model", function(){
var store = {
find: function() {
return [{
id: 0,
display_id: 'Activity1',
type: 'song',
display_name: 'On The Road Again',
hotttnesss: 54,
timestamp: 'Fri Dec 06 2013 01:05:53 GMT-0600 (CST)'
}
];
}
};
var route = this.subject();
route.set('store', store);
deepEqual(route.model(), [{
id: 0,
display_id: 'Activity1',
type: 'song',
display_name: 'On The Road Again',
hotttnesss: 54,
timestamp: 'Fri Dec 06 2013 01:05:53 GMT-0600 (CST)'
}
]);
});
See the change in this commit.
Using Fixtures
This is one area where a testing debate can get started if we aren’t careful; but to finish these simple tests, we want to clean things up a bit. A unit test by definition should really keep our code as isolated as possible, so some developers may argue that the previous example ensures that isolation. Others may argue that they don’t want to manage the same data in two separate locations. But we know that the model fixtures are simple arrays maintained elsewhere in the app (in this case, we declare them in the Activity model appkit/models/activity.js) so it makes sense to import the fixture data and reuse it in our tests.
This is the example data from our fixtures:
var Activity = DS.Model.extend({
display_id: DS.attr('string'),
type: DS.attr('string'),
display_name: DS.attr('string'),
hotttnesss: DS.attr('number'),
timestamp: DS.attr()
});
Activity.FIXTURES = [
{
id: 0,
display_id: 'Activity1',
type: 'song',
display_name: 'On The Road Again',
hotttnesss: 54,
timestamp: 'Fri Dec 06 2013 01:05:53 GMT-0600 (CST)'
},
{
id: 1,
display_id: 'Activity2',
type: 'artist',
display_name: 'Willie Nelson',
hotttnesss: 99,
timestamp: 'Fri Dec 06 2013 01:05:53 GMT-0600 (CST)'
}
];
export default Activity;
See the change in this commit.
Now by importing this data we can begin to use the data. The FIXTURES object is nothing more than an array at this point, so it is safe to use within our route unit tests.
Also notice that we aren’t making use of the Activity model class, in order to not introduce another layer of functionality into our isolated ActivityRouter unit tests:
import { test, moduleFor } from 'ember-qunit';
import Activities from 'appkit/routes/activities';
import Activity from 'appkit/models/activity';
moduleFor('route:activities', "Unit - ActivitiesRoute");
test("it exists", function(){
ok(this.subject());
ok(this.subject() instanceof Activities);
});
test("#model", function(){
var store = {
find: function() {
return Activity.FIXTURES;
}
};
var route = this.subject();
route.set('store', store);
deepEqual(route.model(), Activity.FIXTURES);
});
See the change in this commit.
Unit Testing Models
Finally, it is time to set up and test our models. Start by creating a new directory for these tests called tests/unit/models/. Then, create activity-test.js and place it within this directory.
In our setup, we can make use of Ember-Qunit’s moduleForModel method:
import { test, moduleForModel } from 'ember-qunit';
import Activity from 'appkit/models/activity';
moduleForModel('Activity', "Unit - Activity");
First, we can check the existence of the model:
test("it exists", function(){
ok(this.subject() instanceof Activity);
});
Then we begin to check that the values of the Activity model properties are what we expect them to be. Notice that we continue to manage the data in one place within the model’s definition file:
test('#properties', function() {
var activity = this.subject(Activity.FIXTURES[0]);
equal(activity.get('display_id'), 'Activity1');
equal(activity.get('type'), 'song');
equal(activity.get('display_name'), 'On The Road Again');
equal(activity.get('hotttnesss'), 54);
equal(activity.get('timestamp'), 'Fri Dec 06 2013 01:05:53 GMT-0600 (CST)');
});
See the change in this commit.
Wrapping Things Up
In this chapter, we started out covering our goals to have a testing setup that was simple, fast, and that provided readable tests. Along the way, we set up a Testem test runner, used CORS to configure our app to be used in our integration tests, covered the basics of Ember-Qunit, isolated functionality in unit tests, and mocked out some data with client-side fixtures.
All materials on the site are licensed Creative Commons Attribution-Sharealike 3.0 Unported CC BY-SA 3.0 & GNU Free Documentation License (GFDL)
If you are the copyright holder of any material contained on our site and intend to remove it, please contact our site administrator for approval.
© 2016-2026 All site design rights belong to S.Y.A.