Head First JavaScript Programming (2014)
Chapter 6. Interacting with Your Web Page: Getting to know the DOM
You’ve come a long way with JavaScript. In fact you’ve evolved from a newbie to a scripter to, well, a programmer. But, there’s something missing. To really begin leveraging your JavaScript skills you need to know how to interact with the web page your code lives in. Only by doing that are you going to be able to write pages that are dynamic, pages that react, that respond, that update themselves after they’ve been loaded. So how do you interact with the page? By using the DOM, otherwise known as the document object model. In this chapter we’re going to break down the DOM and see just how we can use it, along with JavaScript, to teach your page a few new tricks.
In our last chapter, we left you with a little challenge. The “crack the code challenge.”

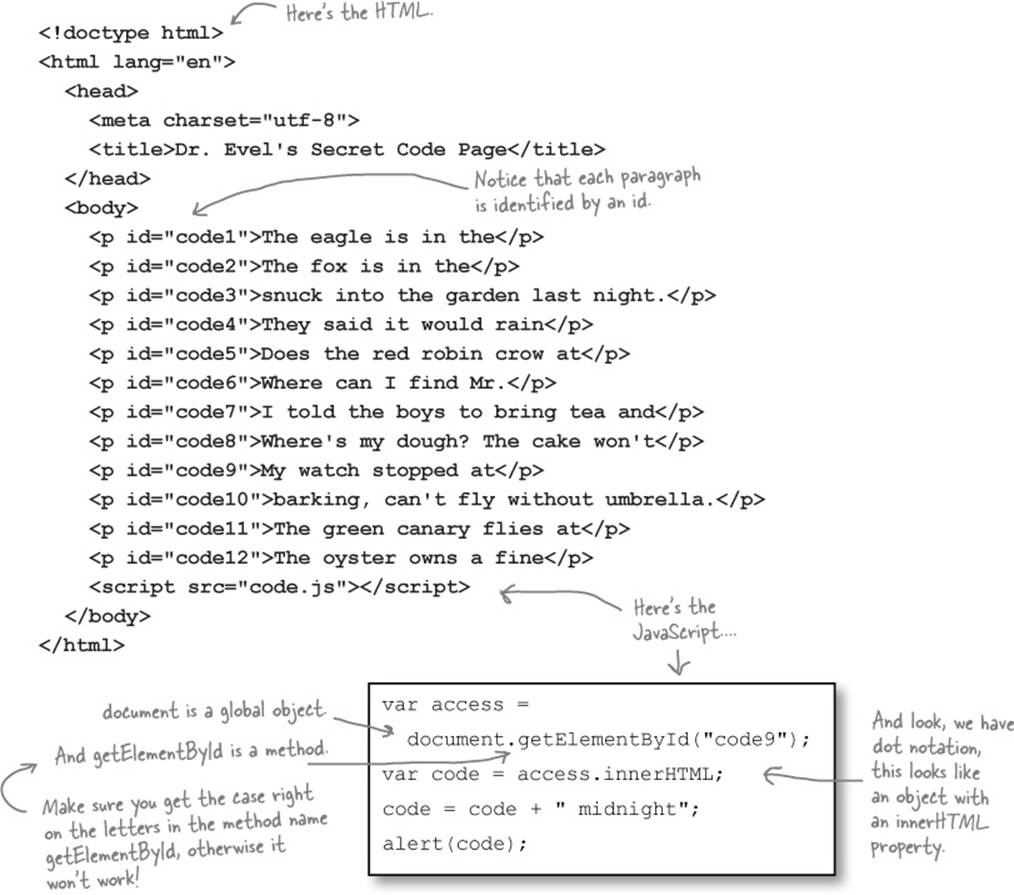
You were given some HTML with code in an external file, captured from Dr. Evel’s web site, that looked like this:
And you needed to figure out Dr. Evel’s passcode using your deductive powers on this code.
So what does the code do?
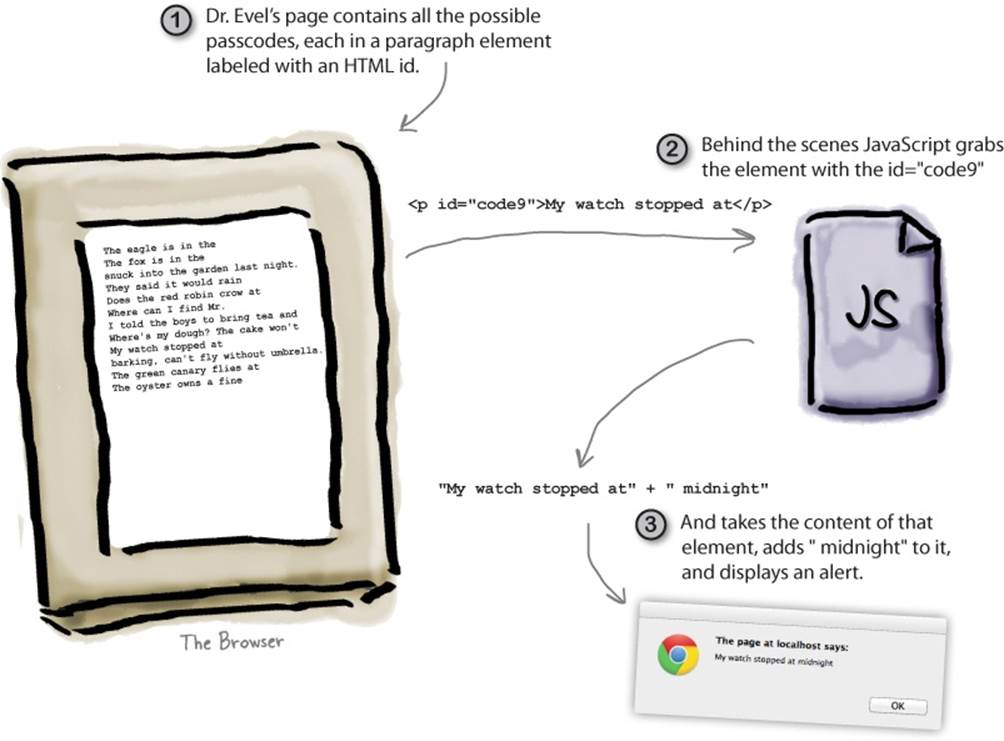
Let’s walk through this code to see how Dr Evel is generating his passcodes. After we break down each step you’ll start to see how this all works:
1. First, the code sets the variable access to the result of calling the document object’s getElementById method and passing it “code9”. What gets returned is an element object.
NOTE
We’ll learn all about document and element objects in this chapter.
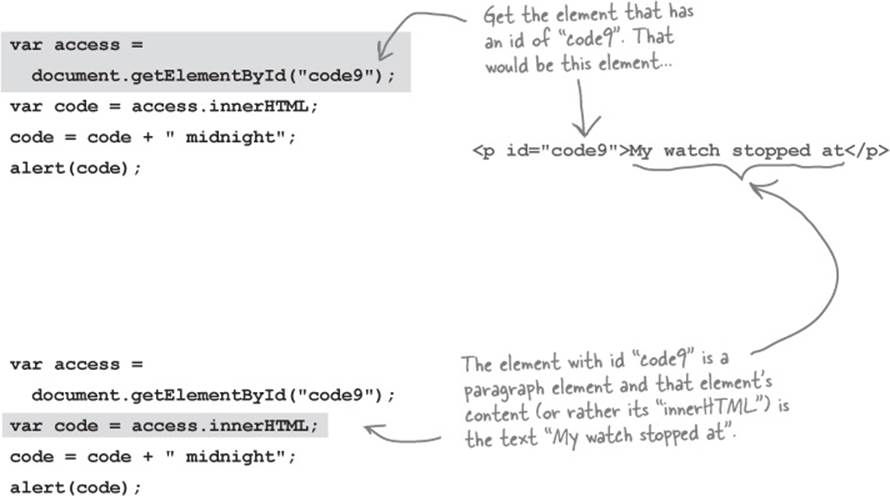
2. Next we take that element (that is, the element with the id “code9”) and we use its innerHTML property to get its content, which we assign to the variable code.
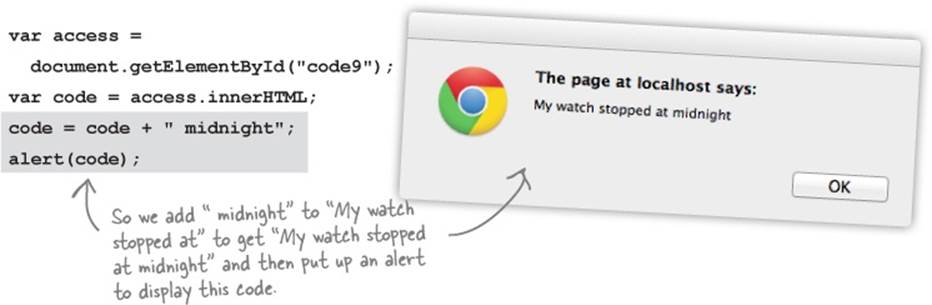
3. Dr. Evel’s code adds the string “midnight” to the end of string contained in code, which is “My watch stopped at”. Then, the page creates an alert with the passcode contained in the variable code.
A quick recap
So, what did we just do? Well, we had some JavaScript that reached into the page (otherwise known as the document), grabbed an element (the one with the id equal to "code9"), took that element’s content (which is "My watch stopped at"), slapped a " midnight" on the end, and then displayed the result as a passcode.
Now, more power to Dr. Evel and his JavaScript skills, and we wish him the best in his security schemes, but what is important here is to notice that the web page is a living, breathing data structure that your JavaScript can interact with—you can access and read the content of the elements in your page. You can also go the other way, and use JavaScript to change the content or structure of your page. To do all that, let’s step back for a moment and understand better how JavaScript and HTML work together.
How JavaScript really interacts with your page
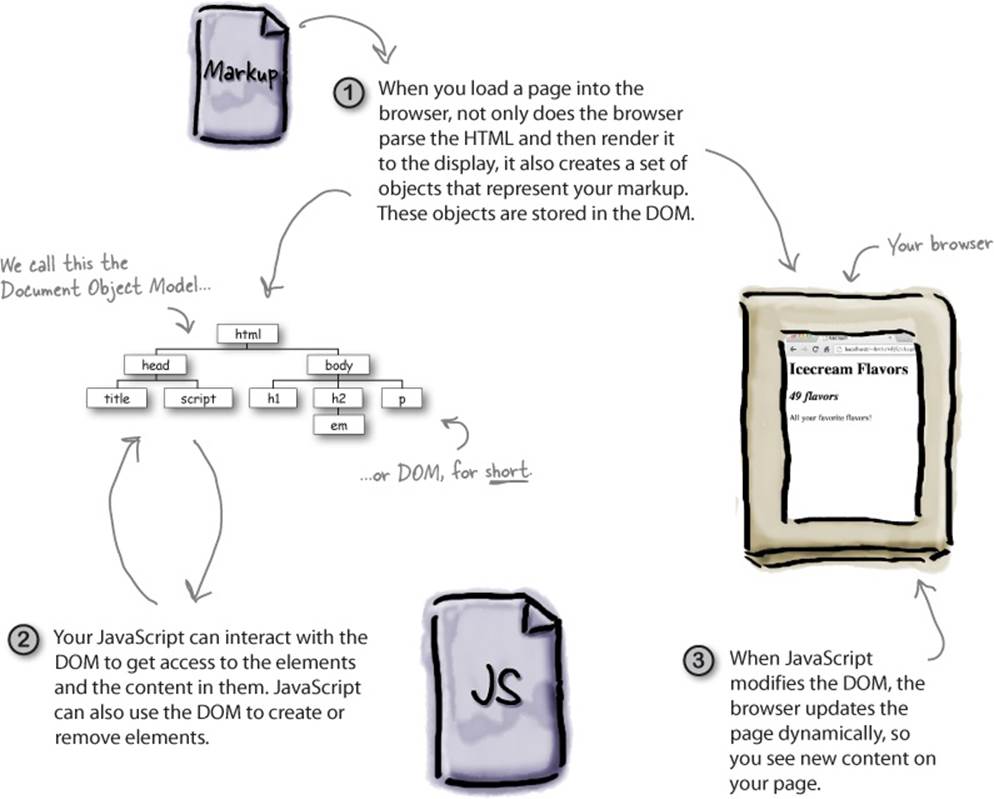
JavaScript and HTML are two different things. HTML is markup and JavaScript is code. So how do they interact? It all happens through a representation of your page, called the document object model, or the DOM for short. Where does the DOM come from? It’s created when the browser loads your page. Here’s how:
How to bake your very own DOM
Let’s take some markup and create a DOM for it. Here’s a simple recipe for doing that:

Instructions
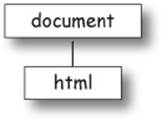
1. Start by creating a document node at the top.

2. Next, take the top level element of your HTML page, in our case the <html> element, call it the current element and add it as a child of the document.
3. For each element nested in the current element, add that element as a child of the current element in the DOM.
4. Return to (3) for each element you just added, and repeat until you are out of elements.

A first taste of the DOM
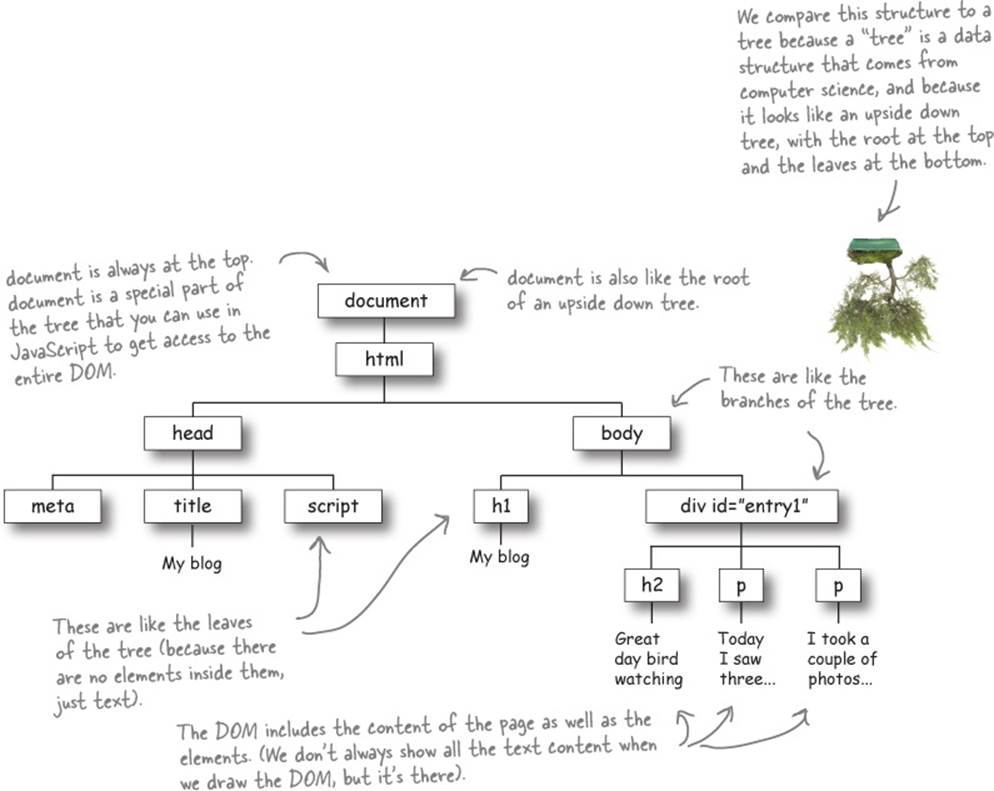
If you follow the recipe for creating a DOM you’ll end up with a structure like the one below. Every DOM has a document object at the top and then a tree complete with branches and leaf nodes for each element in the HTML markup. Let’s take a closer look.
BE THE BROWSER

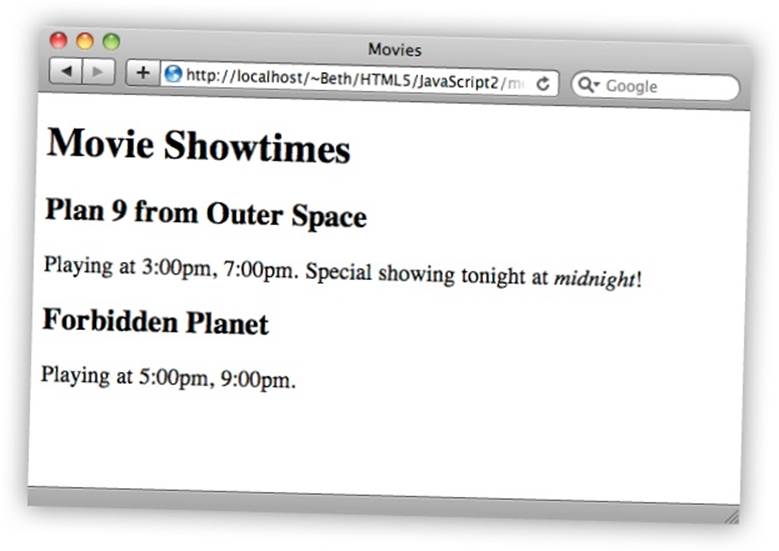
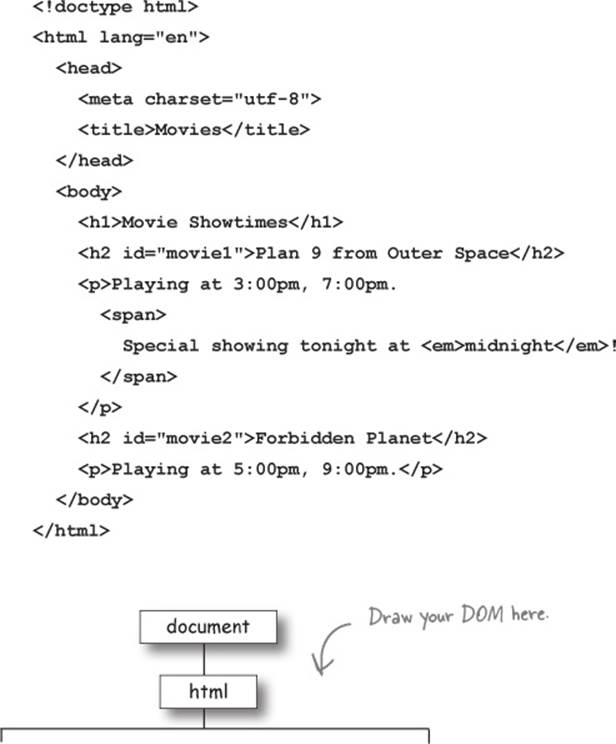
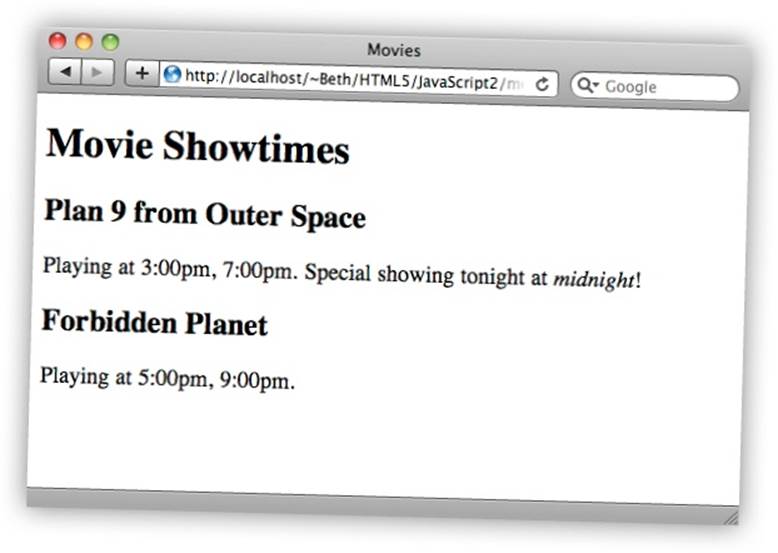
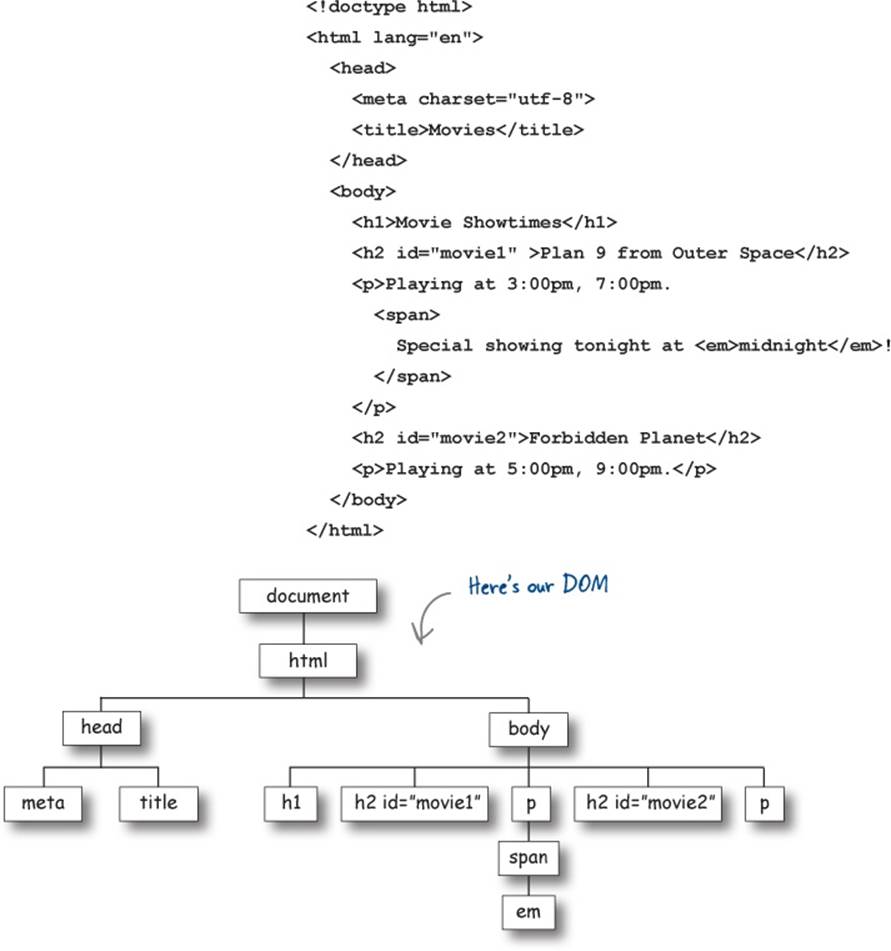
Your job is to act like you’re the browser. You need to parse the HTML and build your very own DOM from it. Go ahead and parse the HTML to the right, and draw your DOM below. We’ve already started it for you.
NOTE
Check your answer with our solution at the end of the chapter before you go on.
Or, how two totally different technologies hooked up.
HTML and JavaScript are from different planets for sure. The proof? HTML’s DNA is made of declarative markup that allows you to describe a set of nested elements that make up your pages. JavaScript, on the other hand, is made of pure algorithmic genetic material, meant for describing computations.
Are they so far apart they can’t even communicate? Of course not, because they have something in common: the DOM. Through the DOM, JavaScript can communicate with your page, and vice versa. There are a few ways to make this happen, but for now let’s concentrate on one—it’s a little wormhole of sorts that allows JavaScript to get access to any element in your page. That wormhole is getElementById.
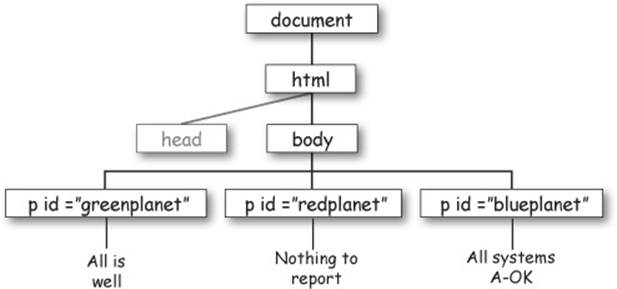
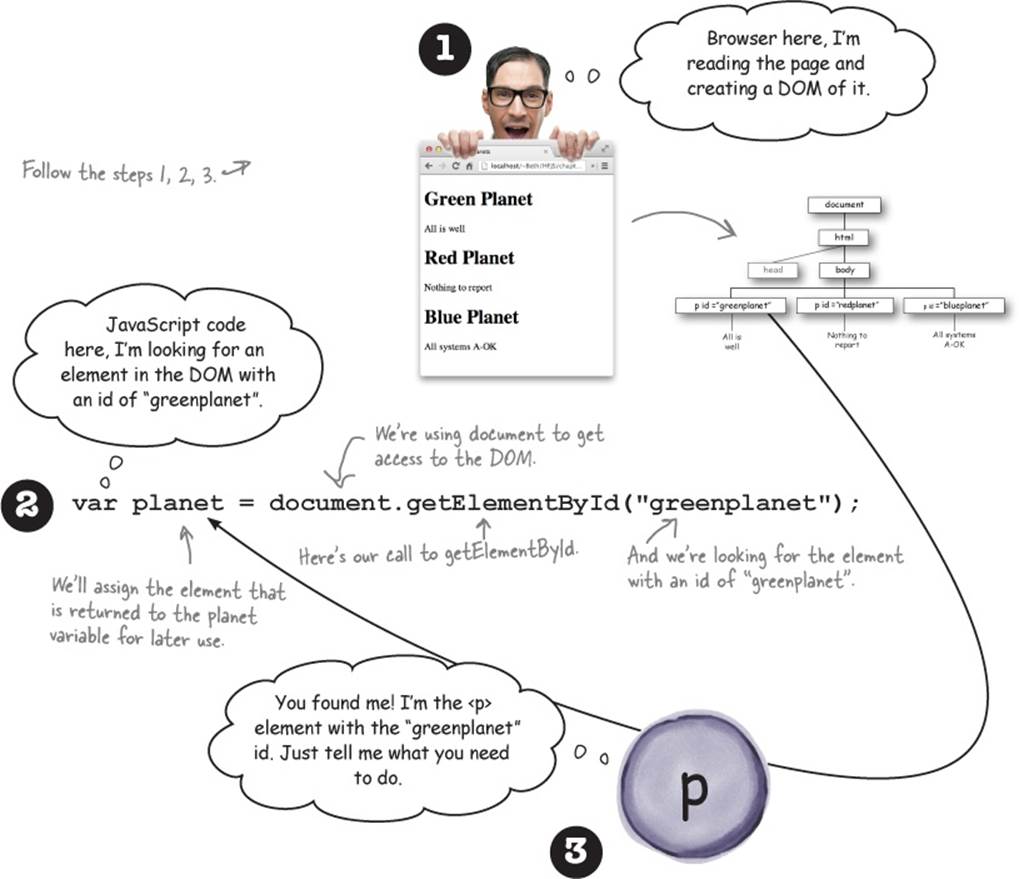
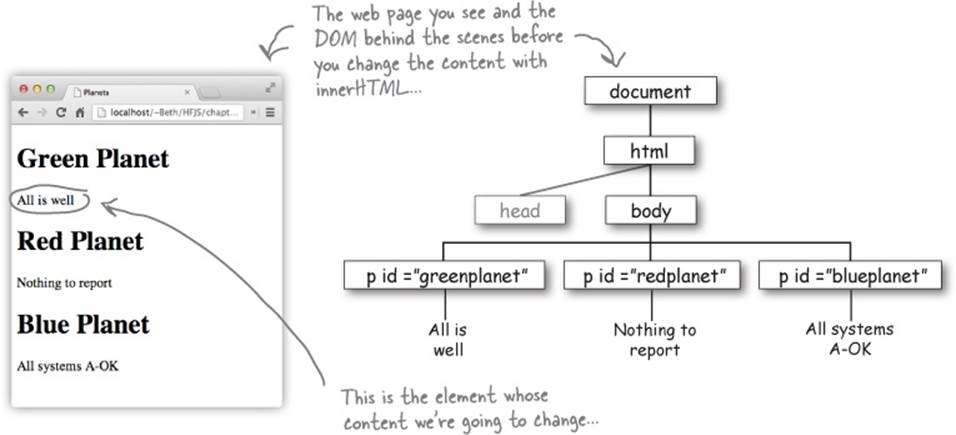
Let’s start with a DOM. Here’s a simple DOM; it’s got a few HTML paragraphs, each with an id identifying it as the green, red or blue planet. Each paragraph has some text as well. Of course there’s a <head> element too, but we’ve left the details out to keep things simpler.
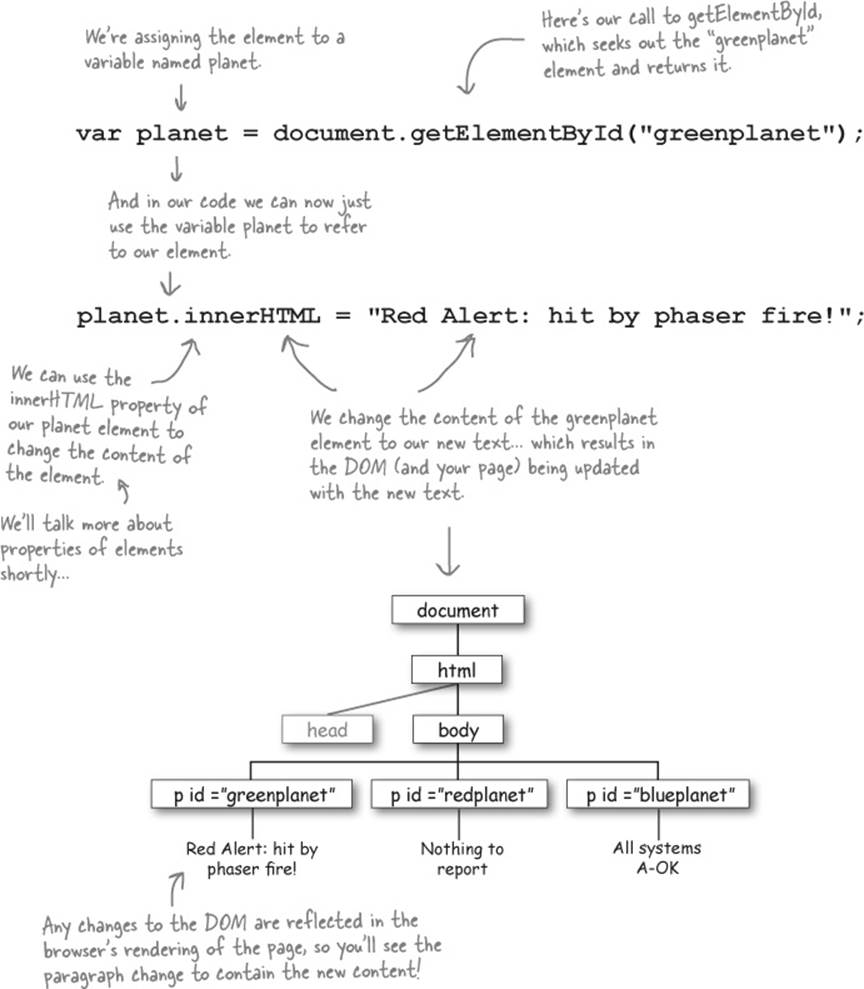
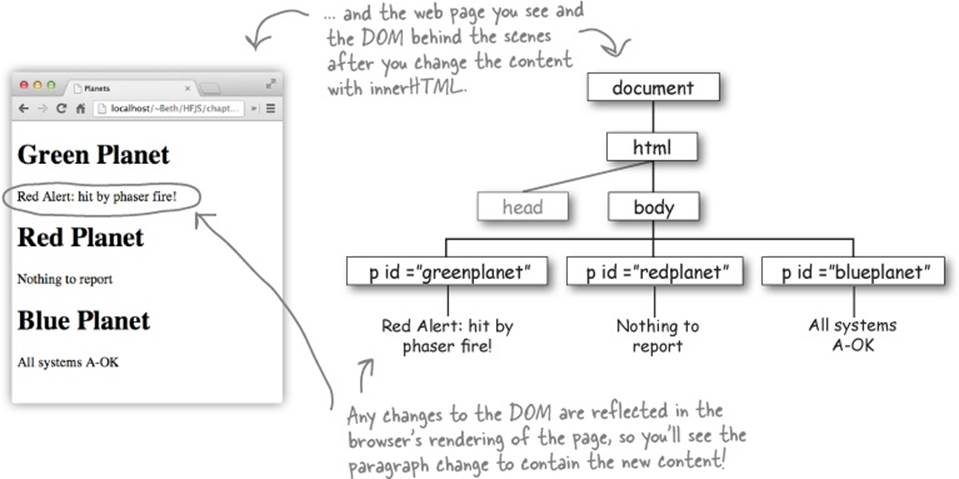
Now let’s use JavaScript to make things more interesting. Let’s say we want to change the greenplanet’s text from “All is well” to “Red Alert: hit by phaser fire!” Down the road you might want to do something like this based on a user’s actions, or even based on data from a web service. We’ll get to all that; for now let’s just get the greenplanet’s text updated. To do that we need the element with the id “greenplanet”. Here’s some code that does that:
Once getElementById gives you an element, you’re ready do something with it (like change its text to “Red Alert: hit by phaser fire!”). To do that, we typically assign the element to a variable so we can refer to the element thoughout our code. Let’s do that and then change the text:
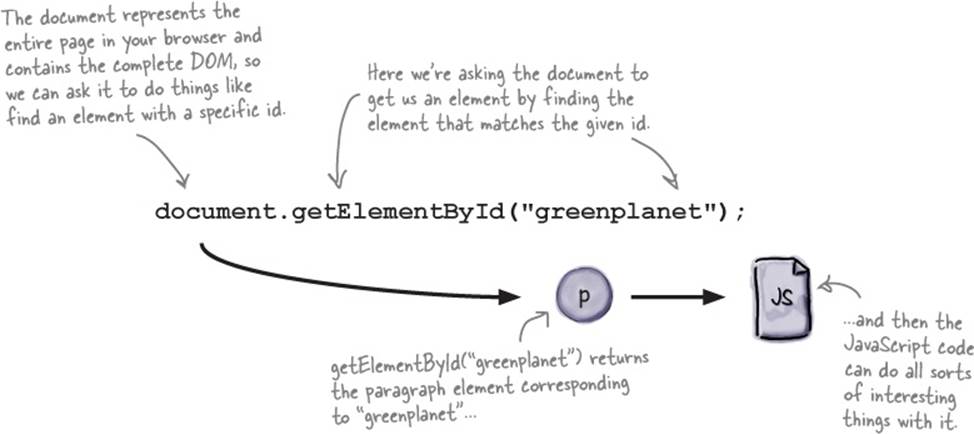
Getting an element with getElementById
So, what did we just do? Let’s step through it in a little more detail. We’re using the document object to get access to the DOM from our code. The document object is a built-in object that comes with a bunch of properties and methods, including getElementById, which we can use to grab an element from the DOM. The getElementById method takes an id and returns the element that has that id. Now in the past you’ve probably used ids to select and style elements with CSS. But here, what we’re doing is using an id to grab an element—the <p> element with the id “greenplanet”—from the DOM.
Once we have the right element, we can modify it. We’ll get to that in just a moment; for now, let’s focus on how getElementById works by tracing through these steps:
What, exactly, am I getting from the DOM?
When you grab an element from the DOM using getElementById, what you get is an element object, which you can use to read, change or replace the element’s content and attributes. And here’s the magic: when you change an element, you change what is displayed in your page as well.
But, first things first. Let’s take another look at the element object we just grabbed from the DOM. We know that this element object represents the <p> element in our page that has the id “greenplanet” and that the text content in the element is “All is well”. Just like other kinds of JavaScript objects, an element object has properties and methods. In the case of an element object, we can use these properties and methods to read and change the element. Here are a few things you can do with element objects:
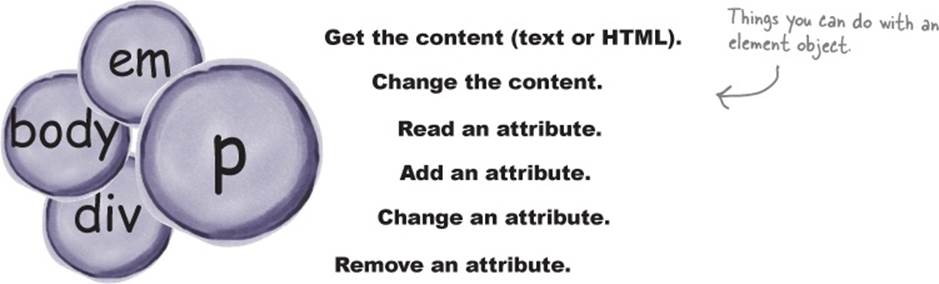
What we want to do with our <p> element—which, remember, is the <p> element with the id “greenplanet”—is change the content “All is well” to “Red Alert: hit by phaser fire!”. We’ve got the element object stashed in the planet variable in our code; let’s use that to modify one of its properties, innerHTML:

Finding your inner HTML
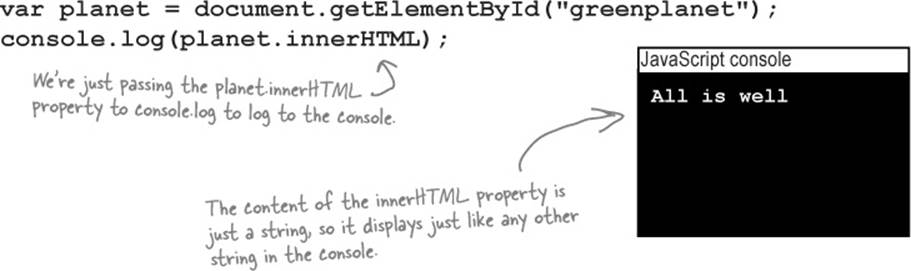
The innerHTML property is an important property that we can use to read or replace the content of an element. If you look at the value of innerHTML then you’ll see the content contained within the element, not including the HTML element tags. The “withIN” is why it’s called “inner” HTML. Let’s try a little experiment. We’ll try displaying the content of the planet element object in the console by logging the innerHTML property. Here’s what we get:
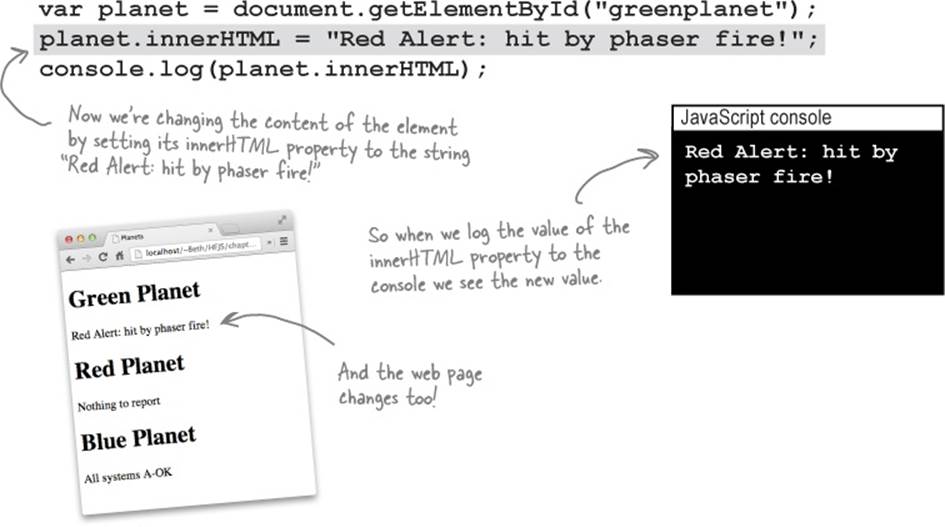
Now let’s try changing the value of the innerHTML property. When we do this, we’re changing the content of the “greenplanet” <p> element in the page, so you’ll see your page change too!
A QUICK REFRESHER

Hey, sit down; take a quick break. You might be saying to yourself, “Wait, I remember something about ids and classes but I don’t remember the specifics, and don’t they have something to do with CSS anyway?” No, problem, let’s just have a quick refresher, get some context, and we’ll have you back on your way in no time...
With HTML, ids give us a way to uniquely identify an element, and, once an element is unique, we can use that to select it with CSS for styling. And, as you’ve seen, we can get an element by its id in JavaScript as well.
Let’s look at an example:

And once we have that, we can select it with CSS to style it. Like this:

And we can access this element through its id in JavaScript too:
var myMenu = document.getElementById("menu");
Don’t forget, there’s another way to label your elements: with classes. Classes give us a way to label a set of elements, like this:

And we can select elements by classes too, both in CSS and JavaScript. We’ll see how to make use of classes with JavaScript in a bit. And, by the way, if this reminder isn’t quite enough, check out Chapter 7 of Head First HTML and CSS, or your favorite HTML & CSS reference guide.
What happens when you change the DOM
So, what exactly happens when you change the content of an element using innerHTML? What you’re doing is changing actual content of your web page, on the fly. And when you change the content in the DOM, you’ll see that change immediately in your web page, too.
Before...
... and after.
THERE ARE NO DUMB QUESTIONS
|
Q: |
Q: What happens if I use document. getElementById and pass in an id that doesn’t exist? |
|
A: |
A: If you try to get an element from the DOM by id, and that id doesn’t exist in an element, then the call to getElementById returns a null value. Testing for null is a good idea when you use getElementById to ensure that the element is there before you try to access its properties. We’ll talk more about null in the next chapter. |
|
Q: |
Q: Can we use document.getElementById to get elements by class as well—for instance, say I have a bunch of elements in the class “planets”? |
|
A: |
A: No, but you’re thinking along the right lines. You can only use getElementById with an id. But there is another DOM method named getElementsByClassName that you can use to get elements by class name. With this method, what you get back is a collection of elements that belong to the class (because multiple elements can be in the same class). Another method that returns a collection of elements is getElementsByTagName, which returns all elements that match the tag name you specify. We’ll see getElementsByTagName a little later in the book and see how to handle the collection of elements it returns. |
|
Q: |
Q: What exactly is an element object anyway? |
|
A: |
A: Great question. An element object is the browser’s internal representation of what you type into your HTML file, like <p>some text</p>. When the browser loads and parses your HTML file, it creates an element object for every element in your page, and adds all those element objects to the DOM. So the DOM is really just a big tree of element objects. And, keep in mind that, just like other objects, element objects can have properties, like innerHTML, and methods, too. We’ll explore a few more of the properties and methods of element objects later in the book. |
|
Q: |
Q: I would have expected a property named “content” or maybe “html” in the element object. Why is it called innerHTML instead? |
|
A: |
A: We agree, it’s kind of a weird name. The innerHTML property represents all the content contained in your element, including other nested elements (like a paragraph might include <em> and <img> elements in addition to the text in the paragraph). In other words, it’s the HTML that’s “INside” your element. Is there an outerHTML property? Yes! And that property gets you all the HTML inside the element, as well as the element itself. In practice you won’t see outerHTML used very often, but you will see innerHTML used frequently to update the content of elements. |
|
Q: |
Q: So by assigning something to innerHTML I can replace the content of any element with something else. What if I used innerHTML to change, say, the <body> element’s content? |
|
A: |
A: Right, innerHTML gives you a convenient way to replace the content of an element. And, yes, you could use it to replace the content of the <body> element, which would result in your entire page being replaced with something new. |
SHARPEN YOUR PENCIL
Here’s a DOM with a secret message hidden in it. Evaluate the code below to reveal the secret! The answer is upside down on this page.
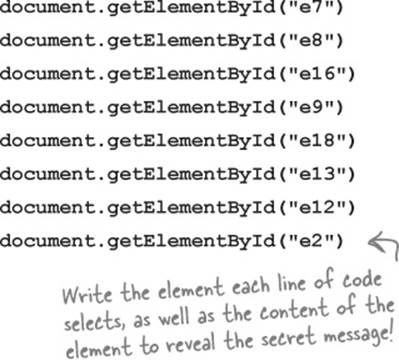
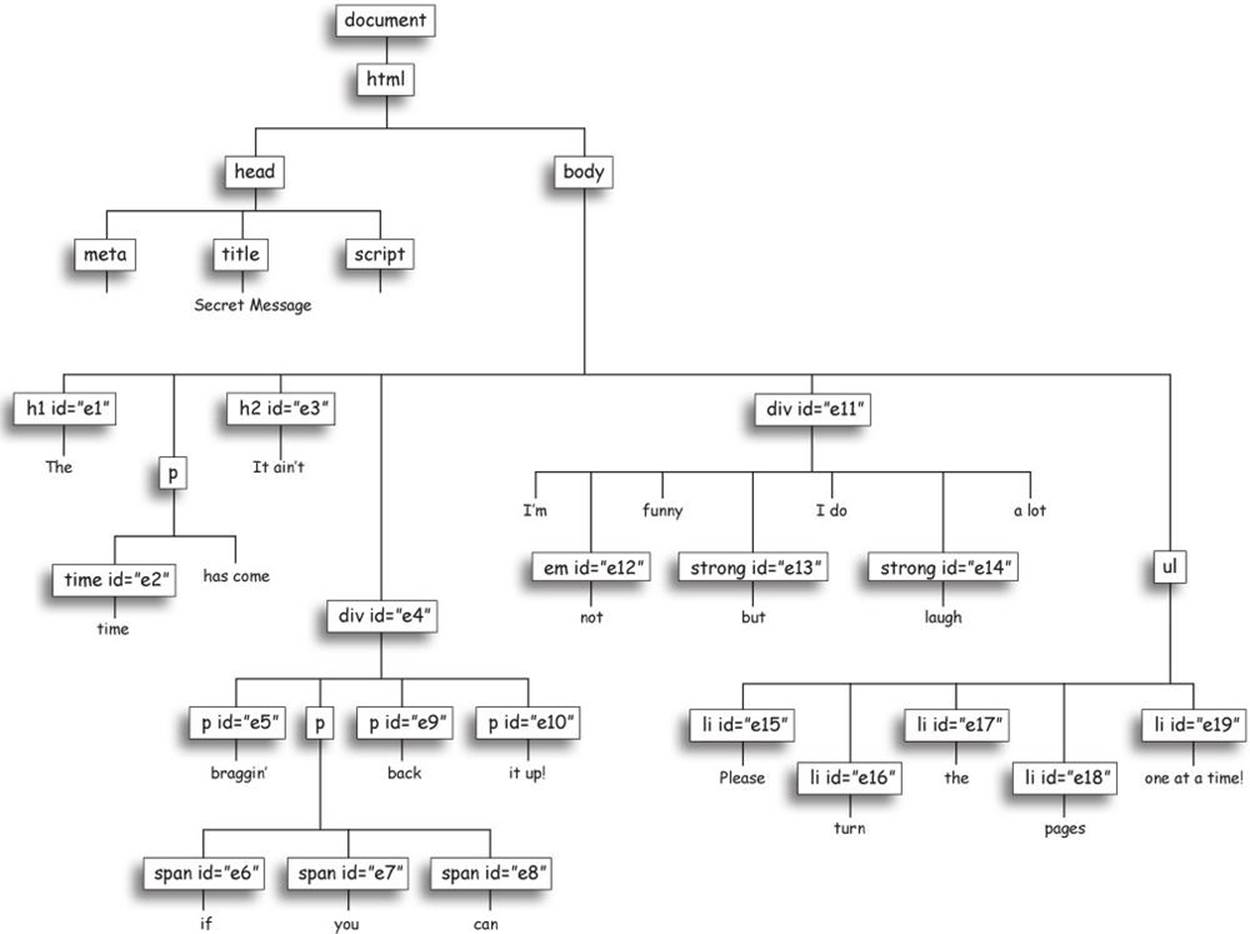
Answer: “you can turn back pages but not time”
A test drive around the planets ![]()

Okay, you know how to use document.getElementById to get access to an element, and how to use innerHTML to change the content of that element. Let’s do it for real, now.
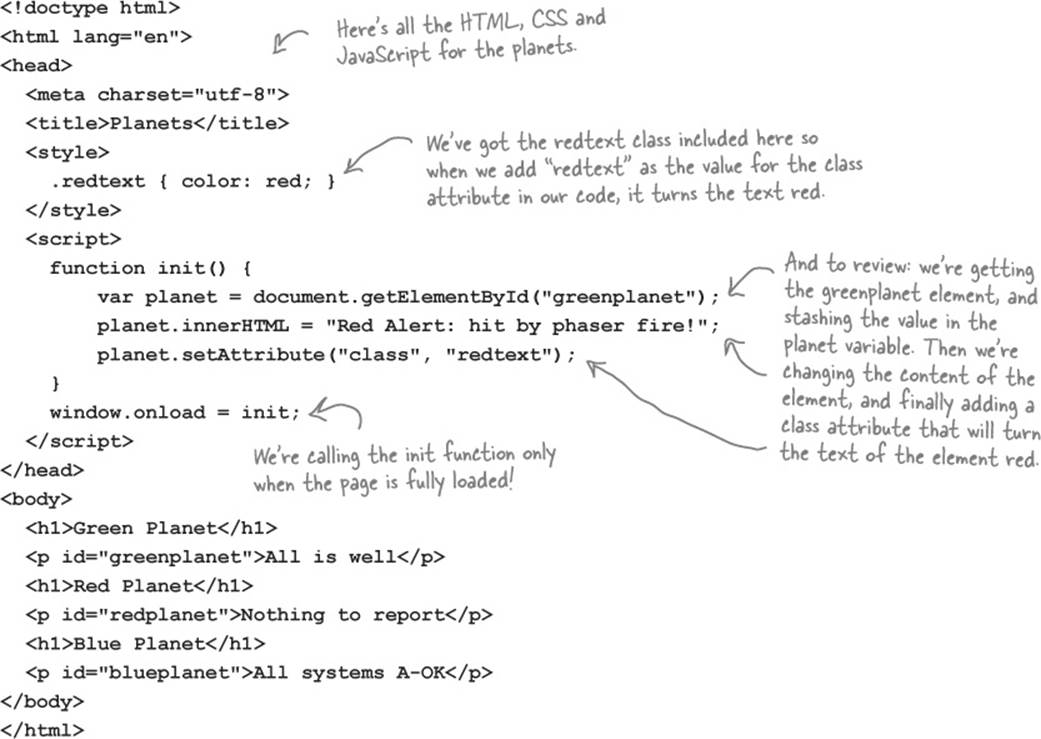
Here’s the HTML for the planets. We’ve got a <script> element in the <head> where we’ll put the code, and three paragraphs for the green, red, and blue planets. If you haven’t already, go ahead and type in the HTML and the JavaScript to update the DOM:
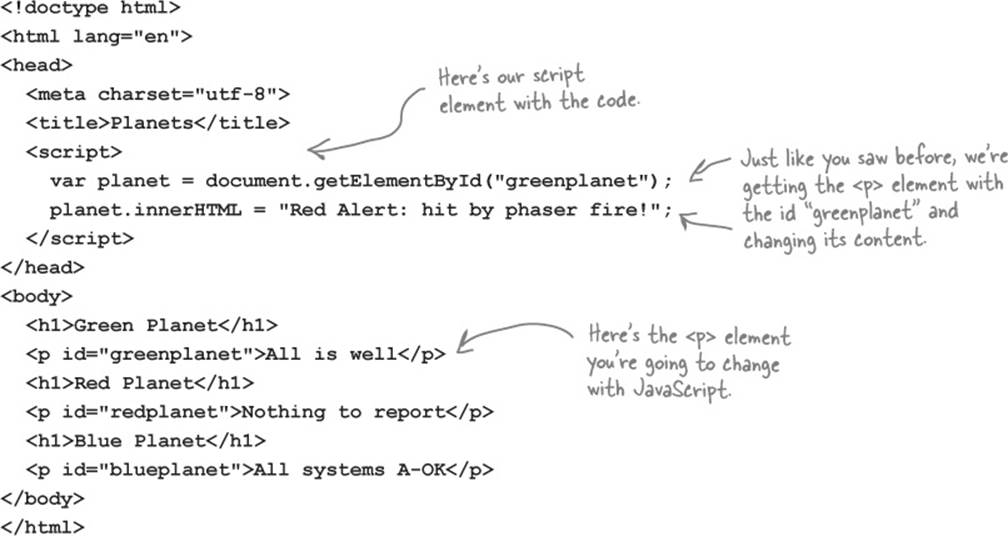
After you’ve got it typed in, go ahead and load the page into your browser and see the DOM magic happen on the green planet.
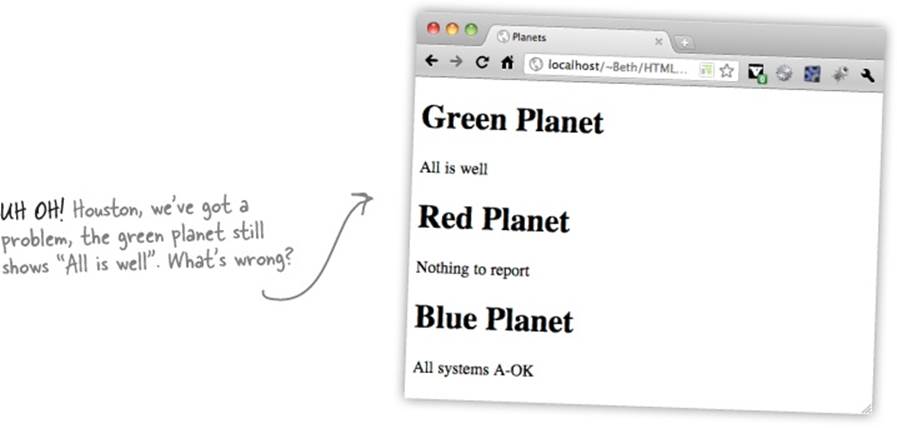
Oh yeah, we forgot to mention one thing. When you’re dealing with the DOM it’s important to execute your code only after the page is fully loaded. If you don’t, there’s a good chance the DOM won’t be created by the time your code executes.
Let’s think about what just happened: we put code in the <head> of the page, so it begins executing before the browser even sees the rest of the page. That’s a big problem because that paragraph element with an id of “greenplanet” doesn’t exist, yet.
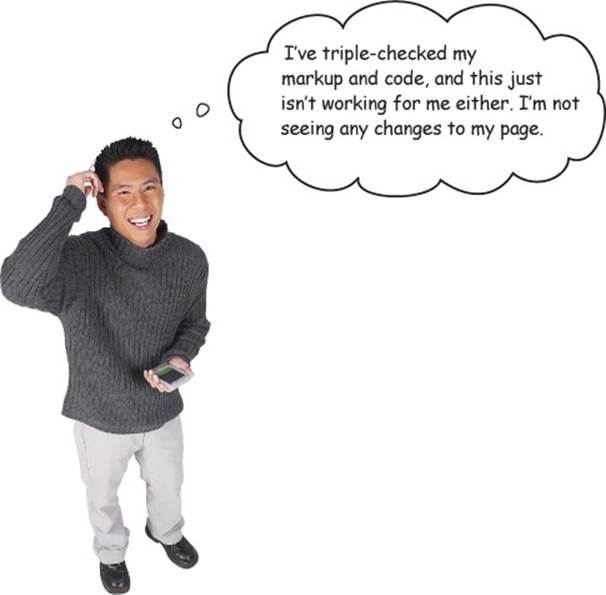
So what happens exactly? The call to getElementById returns null instead of the element we want, causing an error, and the browser, being the good sport that it is, just keeps moving and renders the page anyway, but without the change to the green planet’s content.
How do we fix this? Well, we could move the code to the bottom of the <body>, but there’s actually a more foolproof way to make sure this code runs at the right time; a way to tell the browser “run my code after you’ve fully loaded in the page and created the DOM.” Let’s see how to do that next.
Don’t even think about running my code until the page is fully loaded!
Ah, but how? Besides moving the code to the bottom of the body, there’s another—and, one might argue—cleaner way to do it: with code.
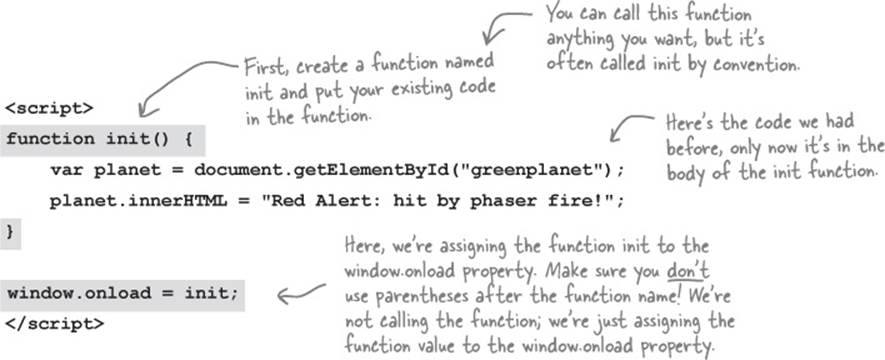
Here’s how it works: first create a function that has the code you’d like executed once the page is fully loaded. After you’ve done that, you take the window object, and assign the function to its onload property.
NOTE
The window object is built-in to JavaScript. It represents the browser window.
What does that do? The window object will call any function you’ve assigned to its onload property, but only after the page is fully loaded. So, thank the designers of the window object for giving you a way to supply the code that gets called after the page has loaded. Check this out:
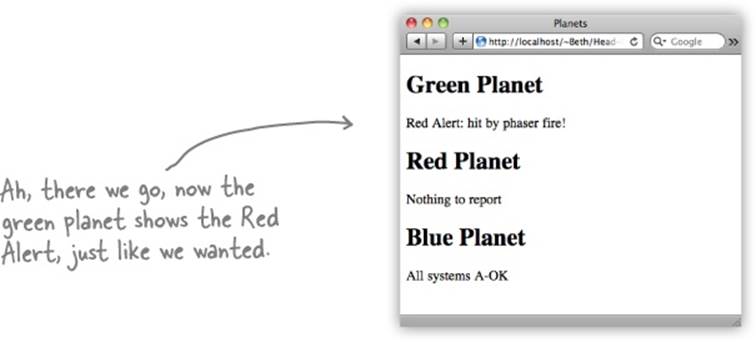
Let’s try that again... ![]()
Go ahead and reload the page with the new init function and the onload property. This time the browser will load the page completely, build the entire DOM and only then call your init function.
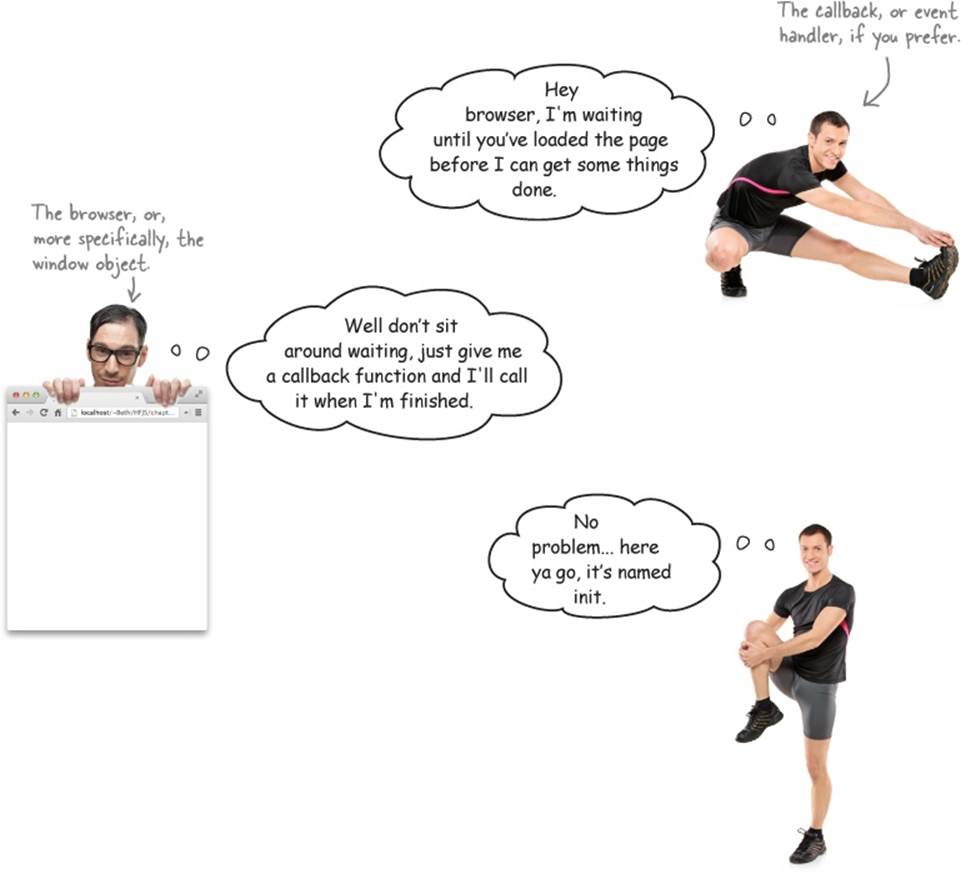
You say “event hander,” I say “callback”
Let’s think about how onload works just a bit more, because it uses a common coding pattern you’ll see over and over again in JavaScript.
Let’s say there’s a big important event that’s going to occur, and you definitely want to know about it. Say that event is the “page is loaded” event. Well, a common way to deal with that situation is through a callback, also known as an event handler.
A callback works like this: give a function to the object that knows about the event. When the event occurs, that object will call you back, or notify you, by calling that function. You’re going to see this pattern in JavaScript for a variety of events.

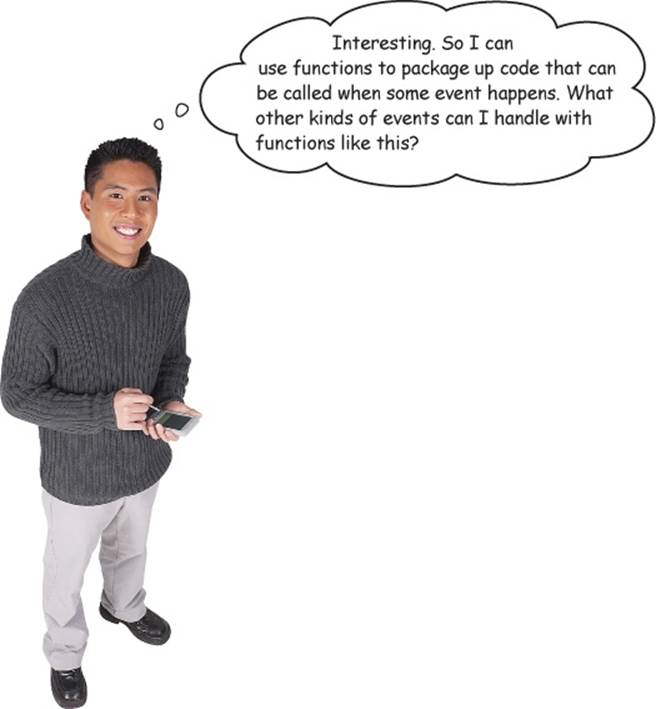
That’s right, and there are many kinds of events you can handle if you want to. Some events, like the load event, are generated by the browser, while others are generated by a user interacting with the page, or even by your own JavaScript code.
You’ve seen an example of “the page is loaded” event, which we handle by setting the onload property of the window object. You can also write event handlers that handle things like “call this function every five seconds,” or “some data arrived from a web service that we need to deal with,” or “the user clicked a button and we need to get some data from a form,” and there are many more. All these types of events are heavily used when you’re creating pages that act more like applications than static documents (and who doesn’t want that). Right now, we’ve had just a brief glimpse of event handlers, but we’ll be spending a lot more time on them a bit later given their important role in JavaScript programming.
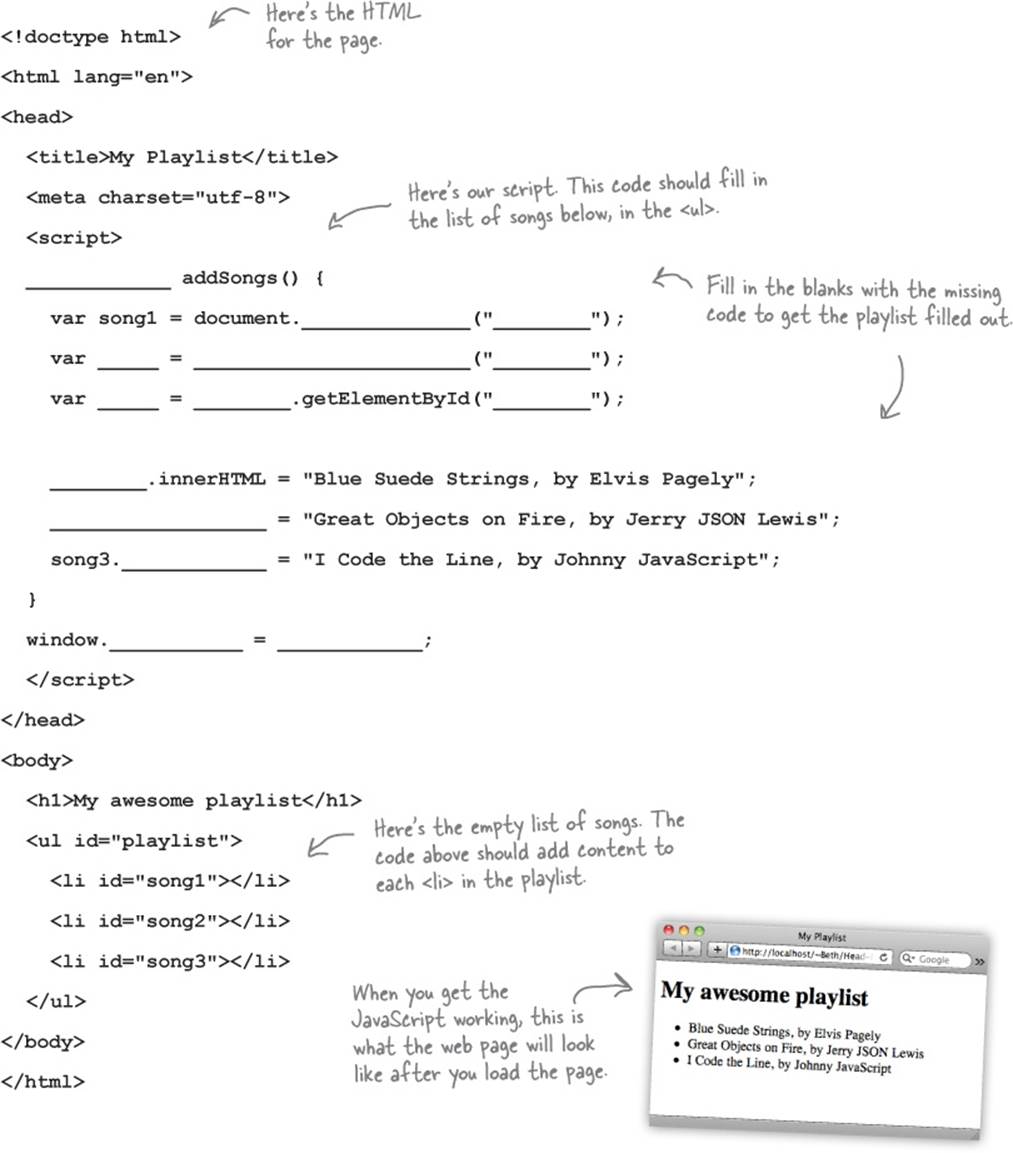
SHARPEN YOUR PENCIL
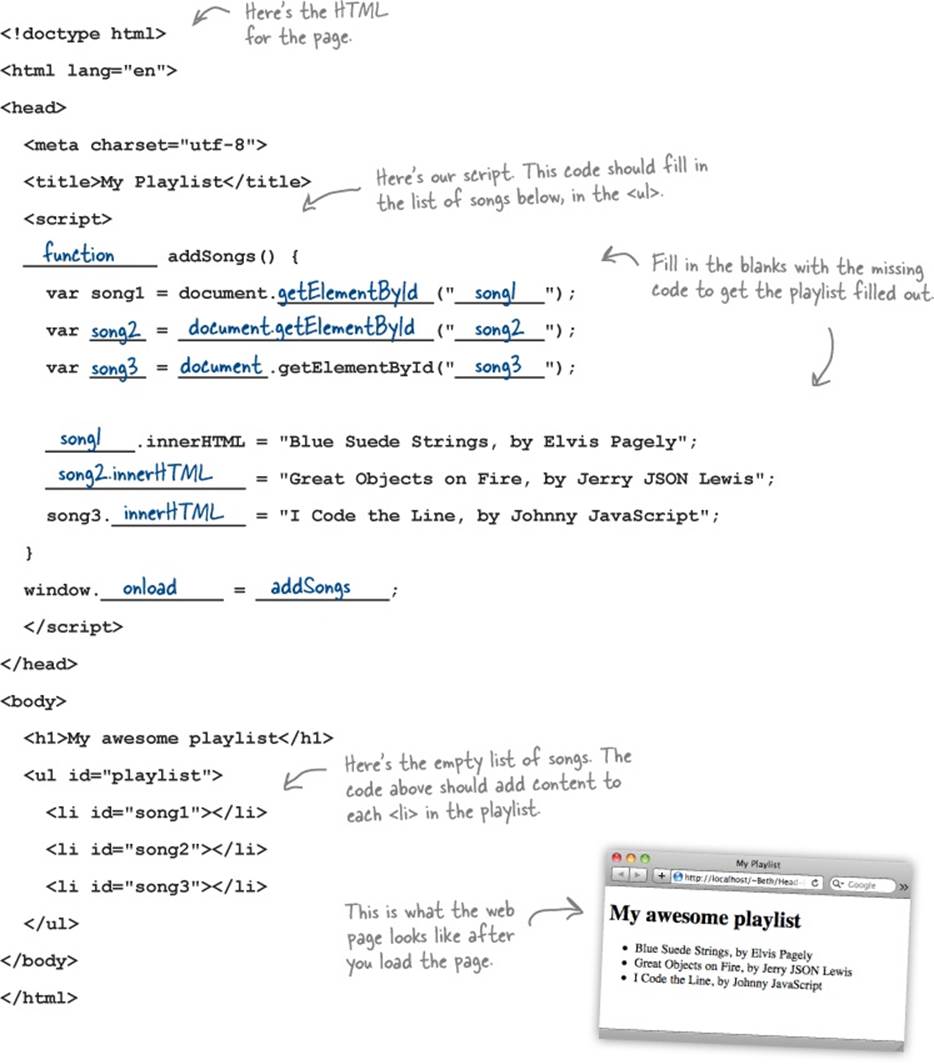
Here’s some HTML for a playlist of songs, except that the list is empty. It’s your job to complete the JavaScript below to add the songs to the list. Fill in the blank with the JavaScript that will do the job. Check your answer with our solution at the end of the chapter before you go on.
Why stop now? Let’s take it further
Let’s think for a second about what you just did: you took a static web page and you dynamically changed the content of one of its paragraphs using code. It seems like a simple step, but this is really the beginning of making a truly interactive page.
NOTE
And that’s our goal, which we’ll fully realize in Chapter 8.
Let’s take the second step: now that you know how to get your hands on an element in the DOM, let’s set an attribute of an element with code.
Why would that be interesting? Well, take our simple planets example. When we set the paragraph to read “Red Alert,” we could also set the paragraph’s color to red. That would certainly more clearly communicate our message.

Here’s how we’re going to do that:
1. We’ll define a CSS rule for the class “redtext” that specifies a red color for the text of the paragraph. That way any element we add to this class will have red text.
2. Next, we’ll add code to take the greenplanet paragraph element and add the class “redtext”.
That’s it. All we need now is to learn how to set an attribute of an element and then we can write the code.
SHARPEN YOUR PENCIL
How about getting another part of your brain working? We’re going to need the CSS style for the class “redtext” that sets the color to “red” for the text in the planet paragraph. If it’s been a while since you wrote CSS, don’t worry; give it a shot anyway. If you can do it in your sleep, awesome. Either way, you’ll find the answer at the end of this chapter.
How to set an attribute with setAttribute
Element objects have a method named setAttribute that you can call to set the value of an HTML element’s attribute. The setAttribute method looks like this:
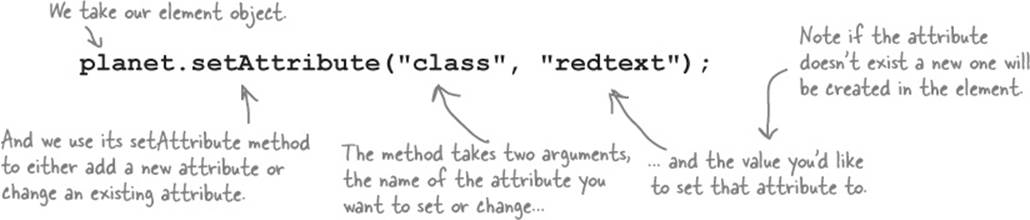
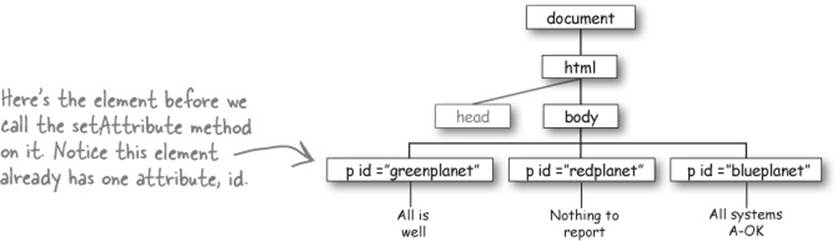
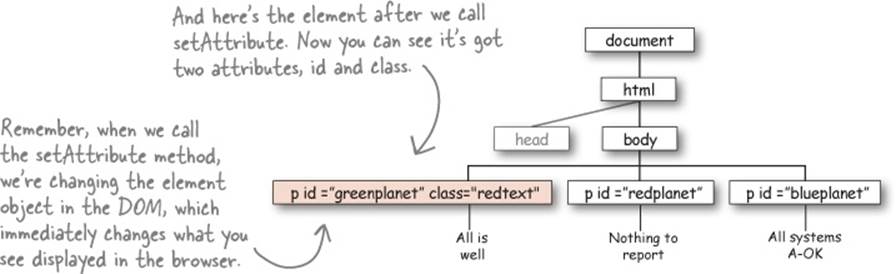
We can call setAttribute on any element to change the value of an existing attribute, or, if the attribute doesn’t already exist, to add a new attribute to the element. As an example, let’s check out how executing the code above affects our DOM.
Before...
And After
More fun with attributes! (you can GET attributes too)
Need to know the value of an attribute in an element? No problem, we have a getAttribute method that you can call to get the value of an HTML element’s attribute.
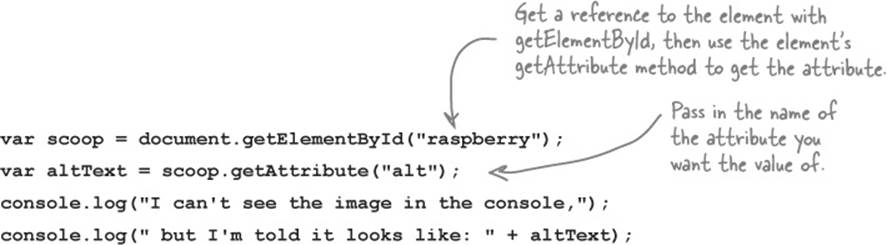
What happens if my attribute doesn’t exist in the element?
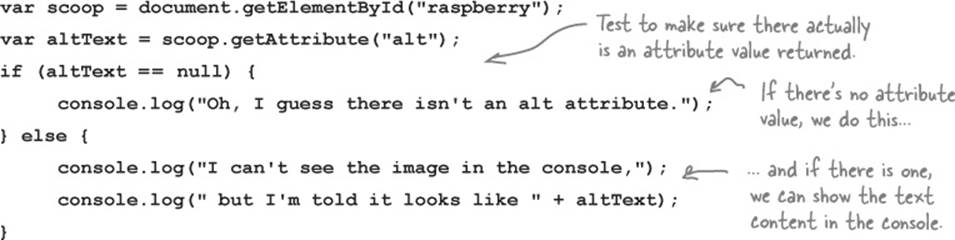
Remember what happens when you call getElementById and the id doesn’t exist in the DOM? You get null. Same thing with getAttribute. If the attribute doesn’t exist, you’ll get back null. Here’s how you test for that:
DON’T FORGET GETELEMENTBYID CAN RETURN NULL TOO!
Any time you ask for something, you need to make sure you got back what you expected...
The call to getElementById can return a null value if the element id does not exist in the DOM. So, to follow best practices, you’ll want to make sure you test for null after getting elements too. We could follow that rule ourselves, but then the book would end up being 1000 pages longer.
Meanwhile, back at the  solar system...
It’s time to put all the code for the planets together and do a final test drive.
Test driving the planets one last time... ![]()
Load this page up in your browser and you’ll see the green planet has been hit by phaser fire, and now we see the message in bright red, so we’ll be sure not to miss it!

So what else is a DOM good for anyway?
The DOM can do a fair bit more than we’ve seen so far and we’ll be seeing some of its other functionality as we move forward in the book, but for now let’s just take a quick look so you’ve got it in the back of your mind:
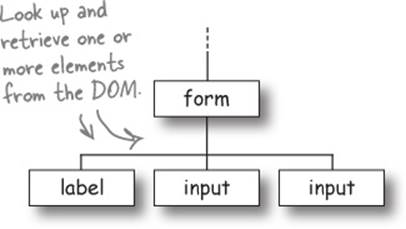
Get elements from the DOM.
Of course you already know this because we’ve been using document.getElementById, but there are other ways to get elements as well; in fact, you can use tag names, class names and attributes to retrieve not just one element, but a whole set of elements (say all elements in the class “on_sale”). And you can get form values the user has typed in, like the text of an input element.
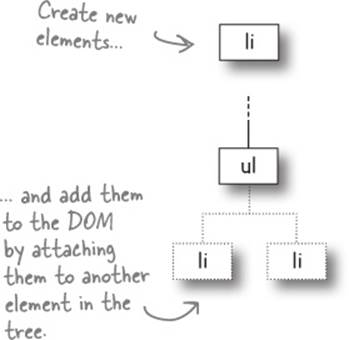
Create and add elements to the DOM.
You can create new elements and you can also add those elements to the DOM. Of course, any changes you make to the DOM will show up immediately as the DOM is rendered by the browser (which is a good thing!).
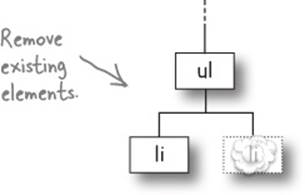
Remove elements from the DOM.
You can also remove elements from the DOM by taking a parent element and removing any of its children. Again, you’ll see the element removed in your browser window as soon as it is deleted from the DOM.
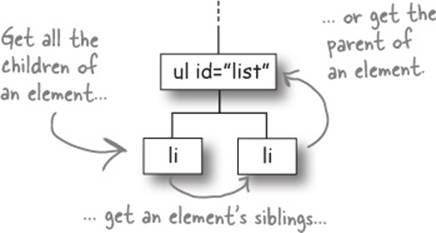
Traverse the elements in the DOM.
Once you have a handle to an element, you can find all its children, you can get its siblings (all the elements at the same level), and you can get its parent. The DOM is structured just like a family tree!
BULLET POINTS
§ The Document Object Model, or DOM, is the browser’s internal representation of your web page.
§ The browser creates the DOM for your page as it loads and parses the HTML.
§ You get access to the DOM in your JavaScript code with the document object.
§ The document object has properties and methods you can use to access and modify the DOM.
§ The document.getElementById method grabs an element from the DOM using its id.
§ The document.getElementById method returns an element object that represents an element in your page.
§ An element object has properties and methods you can use to read an element’s content, and change it.
§ The innerHTML property holds the text content, as well as all nested HTML content, of an element.
§ You can modify the content of an element by changing the value of its innerHTML property.
§ When you modify an element by changing its innerHTML property, you see the change in your web page immediately.
§ You can get the value of an element’s attributes using the getAttribute method.
§ You can set the value of an element’s attributes using the setAttribute method.
§ If you put your code in a <script> element in the <head> of your page, you need to make sure you don’t try to modify the DOM until the page is fully loaded.
§ You can use the window object’s onload property to set an event handler, or callback, function for the load event.
§ The event handler for the window’s onload property will be called as soon as the page is fully loaded.
§ There are many different kinds of events we can handle in JavaScript with event handler functions.
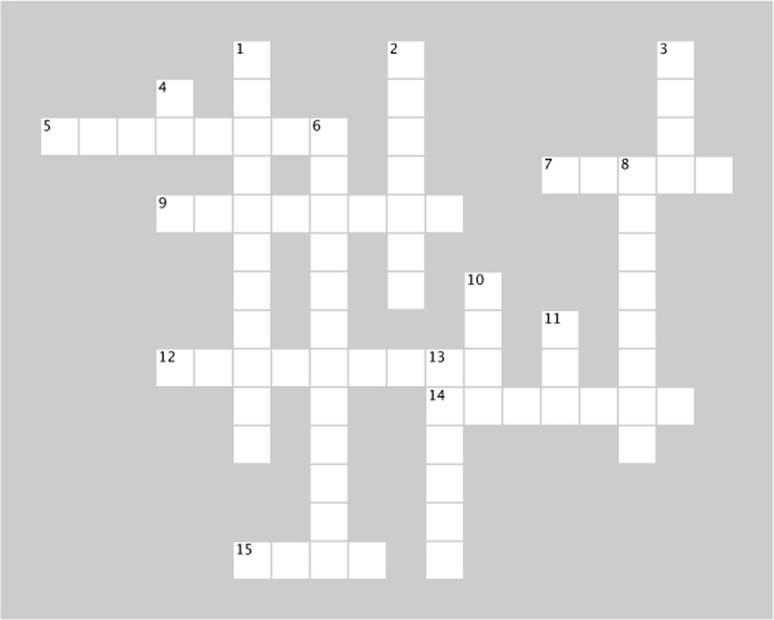
JAVASCRIPT CROSS
Load the DOM into your brain with this puzzle.
|
Across |
Down |
|
5. Functions that handle events are known as event ________. 7. Dr. Evel’s passcode clue was in the element with the id _____. 9. Assign a ________ to the window.onload property to handle the load event. 12. Use the element object’s property, ________, to change the HTML inside an element. 14. The setAttribute method is a method of an ________ object. 15. The DOM is shaped like a _____. |
1. Which planet gets hit by phaser fire? 2. Use the _______ to see if you have errors in your code. 3. It’s important to make sure the ____ is completely loaded before using code to get or change elements in the page. 4. The getElementById method gets an element by its ___. 6. Change the class of an element using the _________ method. 8. The ______ object is always at the top of the DOM tree. 10. It’s a good idea to check for ____ when using getElementById. 11. When you load a page into the browser, the browser creates a ____ representing all the elements and content in the page. 13. getElementById is a ________ of the document object. |
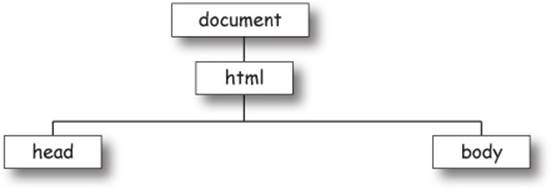
BE THE BROWSER SOLUTION
Your job is to act like you’re the browser. You need to parse the HTML and build your very own DOM from it. Go ahead and parse the HTML to the right, and draw your DOM below. We’ve already started it for you.
SHARPEN YOUR PENCIL SOLUTION
Here’s some HTML for a playlist of songs, except that the list is empty. It’s your job to complete the JavaScript below to add the songs to the list. Fill in the blank with the JavaScript that will do the job. Here’s our solution.
SHARPEN YOUR PENCIL SOLUTION
How about getting another part of your brain working? We’re going to need the CSS style for the class “redtext” that sets the color to “red” for the text in the planet paragraph. If it’s been a while since you wrote CSS, don’t worry; give it a shot anyway. If you can do it in your sleep, awesome. Here’s our solution.
.redtext { color: red; }
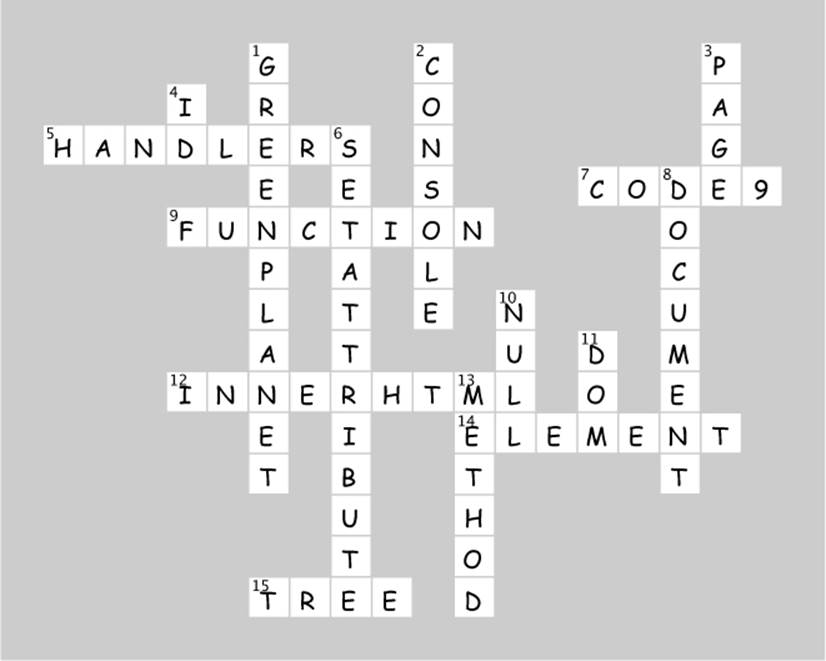
JAVASCRIPT CROSS SOLUTION
Load the DOM into your brain with this puzzle.
All materials on the site are licensed Creative Commons Attribution-Sharealike 3.0 Unported CC BY-SA 3.0 & GNU Free Documentation License (GFDL)
If you are the copyright holder of any material contained on our site and intend to remove it, please contact our site administrator for approval.
© 2016-2026 All site design rights belong to S.Y.A.