RESTful Java with JAX-RS 2.0 (2013)
Part II. JAX-RS Workbook
Chapter 18. Examples for Chapter 3
Chapter 3 walked you through a very basic example of creating a JAX-RS service and a JAX-RS client that invokes on it. This service was a simple in-memory customer database. It was modeled as a singleton JAX-RS resource class and exchanged simple XML documents.
This chapter takes the code from Chapter 3 and shows you how to run it using the downloadable workbook example code. I’ll walk you through how the code is structured on disk as well as how the examples use the Maven build system to compile, build, and run it.
Build and Run the Example Program
Perform the following steps:
1. Open a command prompt or shell terminal and change to the ex03_1 directory of the workbook example code.
2. Make sure your PATH is set up to include both the JDK and Maven, as described in Chapter 17.
3. Perform the build by typing maven install. Maven uses pom.xml to figure out how to compile, build, and run the example code.
Before we examine the build file for this example, you might want to take a quick look at the Maven utility at its Apache website.
Maven is a build-by-convention tool. It expects that your source code be laid out in a certain directory structure. From this standard directory structure, it knows how to automatically find, compile, and package your main class files. It also knows where your test code is and will compile and run it.
Every exercise in this book will follow the directory structure shown in Figure 18-1. Table 18-1 describes the purpose of the various directories.
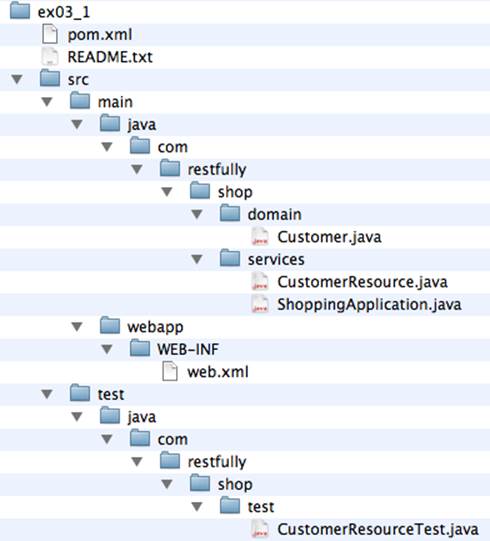
Figure 18-1. Example directory structure
Table 18-1. Directory structure description
|
Directory |
Description |
|
src |
Top-level directory that contains all source and configuration files. |
|
src/main |
Contains all Java source code and configuration files that are used to create your package. In this case, we’re creating a WAR file. |
|
src/main/java |
Contains server-side Java source code. |
|
src/main/webapp |
Contains servlet configuration files, specifically web.xml. |
|
src/test/java |
Contains Java source code that will be used to run tests on the packaged archive. This code will not be included within our WAR file. |
Deconstructing pom.xml
The pom.xml file provided for each workbook exercise gives the Maven utility information about how to compile and deploy your Java programs. In our case, Maven will use the information within the pom.xml file to compile the code within src/main/java, create a WAR file using theweb.xml file within src/main/webapp, deploy the WAR file automatically using the Jetty-embedded servlet container, and finally, run any test code that is within the src/test/java directory.
Here’s a breakdown of what is contained within pom.xml:
<projectxmlns="http://maven.apache.org/POM/4.0.0"
xmlns:xsi="http://www.w3.org/2001/XMLSchema-instance"
xsi:schemaLocation="http://maven.apache.org/
POM/4.0.0 http://maven.apache.org/maven-v4_0_0.xsd"> <parent>
<groupId>com.oreilly.rest.workbook</groupId>
<artifactId>jaxrs-2.0-workbook-pom</artifactId>
<version>1.0</version>
<relativePath>../pom.xml</relativePath>
</parent>
<modelVersion>4.0.0</modelVersion>
In this initial part of the pom.xml file, we’re inheriting from a parent Maven module. This parent module defines the default configuration for Maven plug-ins as well as the location of remote Maven repositories to use to download library dependencies.
<groupId>com.oreilly.rest.workbook</groupId>
<artifactId>jaxrs-2.0-workbook-ex03_1</artifactId>
artifactId is the name of the project. It is also used for the name of the WAR file that is created by the build unless you override it with the finalName element in the build section of the POM. This artifact belongs to a family of packages defined by the element groupId.
<version>2.0</version>
The version element identifies the version of the project we are creating. Generally, this version text is appended to the artifactId when Maven creates the WAR file, but you’ll see later that we have overridden this with the finalName element.
<packaging>war</packaging>
The packaging element tells Maven that this project is building a WAR file. Other values for packaging could be jar, if we were creating a JAR, or ear for a Java EE enterprise archive.
<dependencies>
<dependency>
<groupId>org.jboss.resteasy</groupId>
<artifactId>resteasy-jaxrs</artifactId>
<version>3.0.5.Final</version>
</dependency>
<dependency>
<groupId>org.jboss.resteasy</groupId>
<artifactId>resteasy-client</artifactId>
<version>3.0.5.Final</version>
</dependency>
<dependency>
<groupId>org.jboss.resteasy</groupId>
<artifactId>async-http-servlet-3.0</artifactId>
<version>3.0.5.Final</version>
</dependency>
<dependency>
<groupId>org.jboss.resteasy</groupId>
<artifactId>jaxrs-api</artifactId>
<version>3.0.5.Final</version>
</dependency>
<dependency>
<groupId>org.jboss.resteasy</groupId>
<artifactId>resteasy-servlet-initializer</artifactId>
<version>3.0.5.Final</version>
</dependency>
<dependency>
<groupId>junit</groupId>
<artifactId>junit</artifactId>
<version>4.1</version>
<scope>test</scope>
</dependency>
</dependencies>
The dependencies element lists all library dependencies our ex03_1 project needs to compile and run. We are dependent on the RESTEasy project, as this is the JAX-RS implementation we are using. We are also dependent on the JUnit library for running the test code in our project. Prior to building, Maven will search for these libraries within the remote repositories listed in the parent POM. It will then download these libraries to your machine along with each of the transitive dependencies that these libraries have. What do I mean by transitive dependencies? Well, for example, RESTEasy depends on a multitude of third-party libraries like the servlet and JAXB APIs. The repository in which RESTEasy resides contains metadata about RESTEasy’s dependencies. Maven will discover these extra dependencies when it tries to download the RESTEasy JAR.
Unless you define a scope element, each dependency and its transitive dependencies will be included in your WAR’s WEB-INF/lib directory when it is built. Take a look specifically at the junit dependency:
<dependency>
<groupId>junit</groupId>
<artifactId>junit</artifactId>
<version>4.1</version>
<scope>test</scope>
</dependency>
The junit dependency has a scope of test. This means that this library is only used to run the tests and therefore does not need to be included within the WAR. If you were building this WAR file to be deployed on the JBoss or Wildfly application servers, you would not want to include all of these RESTEasy dependencies within the WAR file. This is because these application servers already come with JAX-RS preinstalled. In this case, you would define a scope of provided for each of the other dependencies listed in this file. For example:
<dependency>
<groupId>org.jboss.resteasy</groupId>
<artifactId>resteasy-jaxrs</artifactId>
<version>3.0.5.Final</version>
<scope>provided</scope>
</dependency>
The provided scope tells Maven that this is a dependency that is needed to compile your code, but that the environment in which you will deploy this WAR already includes the dependency.
OK, now that we’ve got that covered. Let’s look at the rest of our pom.xml file:
<build>
<finalName>ex03_1</finalName>
The build element contains configuration information related to how Maven should build our project. The first item we have under this section is the finalName element. This element overrides the default file naming conventions of Maven. Here we’re stating that we want our WAR file to be named ex03_1.war.
Next we have the plugins element. This section defines the configuration for the Maven plug-ins that will be used to build the project:
<plugins>
<plugin>
<groupId>org.apache.maven.plugins</groupId>
<artifactId>maven-compiler-plugin</artifactId>
<configuration>
<source>1.6</source>
<target>1.6</target>
</configuration>
</plugin>
The first plugin listed is the compiler plug-in, which is used to configure the Java compiler. Here, the plug-in is configured to compile our source code into the Java 6 bytecode format:
<plugin>
<groupId>org.apache.maven.plugins</groupId>
<artifactId>maven-surefire-plugin</artifactId>
<configuration>
<skip>true</skip>
</configuration>
<executions>
<execution>
<id>surefire-it</id>
<phase>integration-test</phase>
<goals>
<goal>test</goal>
</goals>
<configuration>
<skip>false</skip>
</configuration>
</execution>
</executions>
</plugin>
The next plug-in we need to configure is surefire-it. This plug-in controls how our test execution works. By default, Maven will compile the source code under src/main/java and src/test/java and then try to run the tests under src/test/java. If the tests succeed, it packages the .class files into a WAR or JAR file. In our case, though, we want to create a WAR file and deploy it to the Jetty-embedded servlet container before we run our test code. The surefire-it configuration listed tells Maven not to run the test code until the WAR file has been built and deployed to Jetty:
<plugin>
<groupId>org.mortbay.jetty</groupId>
<artifactId>jetty-maven-plugin</artifactId>
<version>8.1.11.v20130520</version>
<configuration>
<webApp>
<contextPath>/</contextPath>
</webApp>
<scanIntervalSeconds>10</scanIntervalSeconds>
<stopKey>foo</stopKey>
<stopPort>9999</stopPort>
</configuration>
<executions>
<execution>
<id>start-jetty</id>
<phase>pre-integration-test</phase>
<goals>
<goal>run</goal>
</goals>
<configuration>
<scanIntervalSeconds>0</scanIntervalSeconds>
<daemon>true</daemon>
</configuration>
</execution>
<execution>
<id>stop-jetty</id>
<phase>post-integration-test</phase>
<goals>
<goal>stop</goal>
</goals>
</execution>
</executions>
</plugin>
The final plug-in is the Jetty plug-in, which is responsible for running the Jetty-embedded servlet container. After the WAR file is built, the Jetty container will boot up an HTTP server under port 8080. The WAR file is then deployed into Jetty.
I don’t really need to explain the specifics of the entire Jetty plug-in configuration. The interesting bits that you might want to tweak are the port (8080) and the stopPort (9999). You may have to change these if there is a service on your computer already using these network ports.
Running the Build
To run the build, simply type mvn install at the command prompt from the ex03_1 directory. The output will look something like this:
[INFO] Scanning for projects...
[INFO]
[INFO] ------------------------------------------------------------------------
[INFO] Building ex03_1 2.0
[INFO] ------------------------------------------------------------------------
[INFO]
Downloading: http://download.java.net/maven/1
/org.jboss.resteasy/poms/resteasy-jaxrs-3.0.5.Final.pom
...
You’ll see Maven downloading a bunch of files from the repositories. This may take a while the first time you run the build script, as Maven needs to pull down a huge number of dependencies:
[INFO] Compiling 3 source files to C:\resteasy\p1b-repo\master\jaxrs
\examples\oreilly-jaxrs-2.0-workbook
\ex03_1\target\classes
[INFO]
[INFO]
[INFO] Compiling 1 source file to C:\resteasy\p1b-repo\master\jaxrs
\examples\oreilly-jaxrs-2.0-workbook
\ex03_1\target\test-classes
Next, you’ll see Maven compiling your main and test source code:
[INFO] Tests are skipped.
[INFO]
[INFO] Packaging webapp
[INFO] Assembling webapp [jaxrs-2.0-workbook-ex03_1] in
[C:\resteasy\p1b-repo\master\jaxrs
\examples\oreilly-jaxrs-2.0-workbook
\ex03_1\target\ex03_1]
[INFO] Processing war project
[INFO] Copying webapp resources [C:\resteasy\p1b-repo
\master\jaxrs
\examples\oreilly-jaxrs-2.0-workbook
\ex03_1\src\main\webapp]
[INFO] Webapp assembled in [172 msecs]
[INFO] Building war: C:\resteasy\p1b-repo\master\jaxrs
\examples
\oreilly-jaxrs-2.0-workbook
\ex03_1\target\ex03_1.war
Then you’ll see that the WAR file is built:
[INFO] Started Jetty Server
[INFO]
[INFO] Surefire report directory: C:\resteasy\p1b-repo
\master\jaxrs\examples
\oreilly-jaxrs-2.0-workbook\
ex03_1\target\surefire-reports
[source,java]
-------------------------------------------------------
T E S T S
-------------------------------------------------------
Running com.restfully.shop.test.CustomerResourceTest
*** Create a new Customer ***
Created customer 1
Location: http://localhost:8080/services/customers/1
*** GET Created Customer **
<customer id="1">
<first-name>Bill</first-name>
<last-name>Burke</last-name>
<street>256 Clarendon Street</street>
<city>Boston</city>
<state>MA</state>
<zip>02115</zip>
<country>USA</country>
</customer>
**** After Update ***
<customer id="1">
<first-name>William</first-name>
<last-name>Burke</last-name>
<street>256 Clarendon Street</street>
<city>Boston</city>
<state>MA</state>
<zip>02115</zip>
<country>USA</country>
</customer>
Tests run: 1, Failures: 0, Errors: 0, Skipped: 0, Time elapsed: 0.487 sec
Results :
Tests run: 1, Failures: 0, Errors: 0, Skipped: 0
Finally, Maven will start Jetty, deploy the WAR file created, and run the test code under src/test/java:
[INFO]
[INFO]
[INFO] ------------------------------------------------------------------------
[INFO] BUILD SUCCESS
[INFO] ------------------------------------------------------------------------
[INFO] Total time: 4.462s
[INFO] Finished at: Mon Aug 26 12:44:11 EDT 2013
[INFO] Final Memory: 23M/618M
[INFO] ------------------------------------------------------------------------
The output of the build should end with BUILD SUCCESS.
Examining the Source Code
The server-side source code is exactly as posted in Chapter 3. The guts of the client code are the same as in Chapter 3, but the client code is structured as a JUnit class. JUnit is an open source Java library for defining unit tests. Maven automatically knows how to find JUnit-enabled test code and run it with the build. It scans the classes within the src/test/java directory, looking for classes that have methods annotated with @org.junit.Test. This example has only one: com.restfully.shop.test.CustomerResourceTest. Let’s go over the code for it that is different from the book:
src/test/java/com/restfully/shop/test/CustomerResourceTest.java
packagecom.restfully.shop.test;
importorg.junit.Test;
importjavax.ws.rs.client.Client;
importjavax.ws.rs.client.ClientBuilder;
importjavax.ws.rs.client.Entity;
importjavax.ws.rs.core.Response;
/** * @author <a href="mailto:bill@burkecentral.com">Bill Burke</a> * @version $Revision: 1 $ */publicclassCustomerResourceTest
{ @Test
publicvoidtestCustomerResource()throwsException{
Our test class has only one method: testCustomerResource(). It is annotated with @Test. This tells Maven that this method is a JUnit test. The code for this method is exactly the same as the client code in Chapter 3. When you run the build, Maven will execute the code within this method to run the example.
That’s it! The rest of the examples in this book have the same Maven structure as ex03_1 and are tested using JUnit.
All materials on the site are licensed Creative Commons Attribution-Sharealike 3.0 Unported CC BY-SA 3.0 & GNU Free Documentation License (GFDL)
If you are the copyright holder of any material contained on our site and intend to remove it, please contact our site administrator for approval.
© 2016-2026 All site design rights belong to S.Y.A.