Web Development with jQuery (2015)
Part II. jQuery UI
Chapter 16. Datepicker
jQuery UI offers a sophisticated and feature-rich UI component for inputting dates into a form field in its Datepicker plugin. The jQuery UI Datepicker plugin provides a graphical calendar that can be set to pop up anywhere you might need a date keyed into a form. The calendar can be customized in its look and feel. The date format it produces can be set to mirror local customs. The text it labels fields with can be swapped out with whatever text you like or translated into a foreign language, making the plugin fully capable of localization.
This chapter describes how to use and customize the Datepicker plugin.
Implementing a Datepicker
A barebones implementation of the Datepicker plugin doesn't look like much; it's not styled, but it works, more or less, from the standpoint of functionality.
The following document, which can be downloaded from www.wrox.com/go/webdevwithjquery as Example 16-1, demonstrates a basic implementation of the jQuery UI Datepicker plugin:
<!DOCTYPE HTML>
<html xmlns='http://www.w3.org/1999/xhtml'>
<head>
<meta http-equiv='content-type'
content='application/xhtml+xml; charset=utf-8' />
<meta http-equiv='content-language' content='en-us' />
<title>Datepicker Plugin</title>
<script src='../jQuery.js'></script>
<script src='../jQueryUI.js'></script>
<script src='Example 16-1.js'></script>
<link href='Example 16-1.css' rel='stylesheet' />
</head>
<body>
<form action='javascript:void(0);' method='post'>
<fieldset>
<legend>Appointment Form</legend>
<div class="exampleDate">
<label for="exampleDate">Date:</label>
<input type="text" name="exampleDate" id="exampleDate" />
<img src="images/Calendar.png" alt="Calendar Icon" />
</div>
</fieldset>
</form>
</body>
</html>
The following style sheet provides a little bit of styling for the preceding markup document:
body {
font: 12px 'Lucida Grande', Arial, sans-serif;
background: #fff;
color: rgb(50, 50, 50);
}
fieldset {
border: none;
}
input {
background: lightblue;
}
div.exampleDate img {
vertical-align: -5px;
}
In the following script, the datepicker() method is called on the <input> element in the markup document, which causes a calendar to dynamically pop up for date selection whenever the <input> element receives focus:
$(document).ready(
function()
{
$('input#exampleDate').datepicker();
}
);
As you can see in Figure 16.1, the Datepicker plugin provides an unstyled calendar provided each time the <input> field it is associated with is activated.
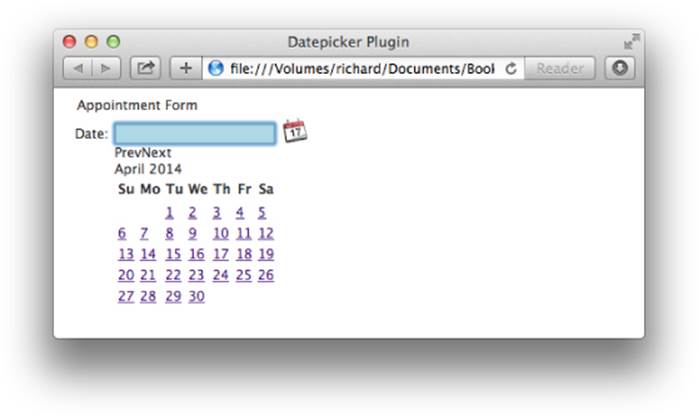
Figure 16.1
Custom Styling the Datepicker
By default, the Datepicker plugin doesn't provide styling. To style the Datepicker plugin, you can either use a jQuery UI theme or style it manually. This section presents how to style the Datepicker calendar manually. Before you can style the Datepicker widget, however, you need to understand how the widget is structured. A comprehensive list of customization options and a list of class names appear in Appendix O, “Datepicker.”
In the following example, you examine the markup structure of the Datepicker plugin and apply some CSS to it. This example is available in this book's source code download materials available at www.wrox.com in Example 16-2.html and Example 16-2.css. This example focuses only on the markup and CSS portions of the Datepicker plugin and does not include any JavaScript. This is an example of the markup the Datepicker plugin generates with default options selected. If you provide custom options to the Datepicker plugin, you need to use something such as WebKit Inspector or Firebug to examine the markup generated by the plugin for changes.
<!DOCTYPE HTML>
<html xmlns='http://www.w3.org/1999/xhtml'>
<head>
<meta http-equiv='content-type'
content='application/xhtml+xml; charset=utf-8' />
<meta http-equiv='content-language' content='en-us' />
<title>Datepicker Plugin</title>
<link href='Example 16-2.css' rel='stylesheet' />
</head>
<body>
<div id="ui-datepicker-div"
class="ui-datepicker
ui-widget
ui-widget-content
ui-helper-clearfix
ui-corner-all">
<div class="ui-datepicker-header
ui-widget-header
ui-helper-clearfix
ui-corner-all">
<a class="ui-datepicker-prev
ui-corner-all"
title="Prev">
<span class="ui-icon
ui-icon-circle-triangle-w">Prev</span>
</a>
<a class="ui-datepicker-next
ui-corner-all"
title="Next">
<span class="ui-icon
ui-icon-circle-triangle-e">Next</span>
</a>
<div class="ui-datepicker-title">
<select class="ui-datepicker-month">
<option value="0">Jan</option>
<option value="1">Feb</option>
<option value="2">Mar</option>
<option value="3" selected="selected">Apr</option>
<option value="4">May</option>
<option value="5">Jun</option>
<option value="6">Jul</option>
<option value="7">Aug</option>
<option value="8">Sep</option>
<option value="9">Oct</option>
<option value="10">Nov</option>
<option value="11">Dec</option>
</select>
<select class="ui-datepicker-year">
<option value="2004">2004</option>
<option value="2005">2005</option>
<option value="2006">2006</option>
<option value="2007">2007</option>
<option value="2008">2008</option>
<option value="2009">2009</option>
<option value="2010">2010</option>
<option value="2011">2011</option>
<option value="2012">2012</option>
<option value="2013">2013</option>
<option value="2014" selected="selected">2014</option>
<option value="2015">2015</option>
<option value="2016">2016</option>
<option value="2017">2017</option>
<option value="2018">2018</option>
<option value="2019">2019</option>
<option value="2020">2020</option>
<option value="2021">2021</option>
<option value="2022">2022</option>
<option value="2023">2023</option>
<option value="2024">2024</option>
</select>
</div>
</div>
<table class="ui-datepicker-calendar">
<thead>
<tr>
<th class="ui-datepicker-week-end">
<span title="Sunday">S</span>
</th>
<th>
<span title="Monday">M</span>
</th>
<th>
<span title="Tuesday">T</span>
</th>
<th>
<span title="Wednesday">W</span>
</th>
<th>
<span title="Thursday">T</span>
</th>
<th>
<span title="Friday">F</span>
</th>
<th class="ui-datepicker-week-end">
<span title="Saturday">S</span>
</th>
</tr>
</thead>
<tbody>
<tr>
<td class="ui-datepicker-week-end
ui-datepicker-other-month
ui-datepicker-unselectable
ui-state-disabled"> </td>
<td class="ui-datepicker-other-month
ui-datepicker-unselectable
ui-state-disabled"> </td>
<td>
<a class="ui-state-default" href="#">1</a>
</td>
<td>
<a class="ui-state-default" href="#">2</a>
</td>
<td>
<a class="ui-state-default" href="#">3</a>
</td>
<td>
<a class="ui-state-default" href="#">4</a>
</td>
<td class="ui-datepicker-week-end">
<a class="ui-state-default" href="#">5</a>
</td>
</tr>
<tr>
<td class="ui-datepicker-week-end">
<a class="ui-state-default" href="#">6</a>
</td>
<td class="ui-datepicker-days-cell-over
ui-datepicker-today">
<a class="ui-state-default
ui-state-highlight
ui-state-hover" href="#">7</a>
</td>
<td>
<a class="ui-state-default" href="#">8</a>
</td>
<td>
<a class="ui-state-default" href="#">9</a>
</td>
<td>
<a class="ui-state-default" href="#">10</a>
</td>
<td>
<a class="ui-state-default" href="#">11</a>
</td>
<td class="ui-datepicker-week-end">
<a class="ui-state-default" href="#">12</a>
</td>
</tr>
<tr>
<td class="ui-datepicker-week-end">
<a class="ui-state-default" href="#">13</a>
</td>
<td>
<a class="ui-state-default" href="#">14</a>
</td>
<td>
<a class="ui-state-default" href="#">15</a>
</td>
<td>
<a class="ui-state-default" href="#">16</a>
</td>
<td>
<a class="ui-state-default" href="#">17</a>
</td>
<td>
<a class="ui-state-default" href="#">18</a>
</td>
<td class="ui-datepicker-week-end">
<a class="ui-state-default" href="#">19</a>
</td>
</tr>
<tr>
<td class="ui-datepicker-week-end">
<a class="ui-state-default" href="#">20</a>
</td>
<td>
<a class="ui-state-default" href="#">21</a>
</td>
<td>
<a class="ui-state-default" href="#">22</a>
</td>
<td>
<a class="ui-state-default" href="#">23</a>
</td>
<td>
<a class="ui-state-default" href="#">24</a>
</td>
<td>
<a class="ui-state-default" href="#">25</a>
</td>
<td class="ui-datepicker-week-end">
<a class="ui-state-default" href="#">26</a>
</td>
</tr>
<tr>
<td class="ui-datepicker-week-end">
<a class="ui-state-default" href="#">27</a>
</td>
<td>
<a class="ui-state-default" href="#">28</a>
</td>
<td>
<a class="ui-state-default" href="#">29</a>
</td>
<td>
<a class="ui-state-default" href="#">30</a>
</td>
<td class="ui-datepicker-other-month
ui-datepicker-unselectable
ui-state-disabled"> </td>
<td class="ui-datepicker-other-month
ui-datepicker-unselectable
ui-state-disabled"> </td>
<td class="ui-datepicker-week-end
ui-datepicker-other-month
ui-datepicker-unselectable
ui-state-disabled"> </td>
</tr>
</tbody>
</table>
</div>
</body>
</html>
The preceding markup document is styled with the following CSS:
body {
font: 12px "Lucida Grande", Arial, sans-serif;
background: rgb(255, 255, 255);
color: rgb(50, 50, 50);
margin: 0;
padding: 0;
}
div#ui-datepicker-div {
border: 1px solid rgb(128, 128, 128);
background: rgb(255, 255, 255);
width: 180px;
margin: 30px;
position: relative;
}
div.ui-datepicker-control div a {
color: rgb(0, 0, 0);
}
div.ui-datepicker-links {
position: relative;
height: 16px;
padding: 0;
background: rgb(255, 255, 255);
text-align: center;
}
div.ui-datepicker-clear,
a.ui-datepicker-prev {
position: absolute;
top: 0;
left: 0;
}
div.ui-datepicker-close,
a.ui-datepicker-next {
position: absolute;
top: 0;
right: 0;
}
div.ui-datepicker-header {
padding-top: 16px;
}
a.ui-datepicker-next,
a.ui-datepicker-prev {
display: block;
text-indent: -10000px;
width: 58px;
height: 16px;
border-left: 1px solid rgb(186, 186, 186);
border-bottom: 1px solid rgb(186, 186, 186);
background: rgb(233, 233, 233);
}
a.ui-datepicker-next span,
a.ui-datepicker-prev span {
display: block;
width: 0;
height: 0;
border-top: 6px solid rgb(77, 77, 77);
border-left: 7px solid transparent;
border-right: 7px solid transparent;
position: relative;
top: 4px;
left: 23px;
}
a.ui-datepicker-next:active ,
a.ui-datepicker-prev:active {
background: rgb(200, 200, 200);
}
a.ui-datepicker-prev {
border-right: 1px solid rgb(186, 186, 186);
border-left: none;
}
a.ui-datepicker-prev span {
border-top: none;
border-bottom: 6px solid rgb(77, 77, 77);
}
a.ui-datepicker-next:active span,
a.ui-datepicker-prev:active span {
border-top-color: rgb(255, 255, 255);
}
a.ui-datepicker-prev:active span {
border-top-color: transparent;
border-bottom-color: rgb(255, 255, 255);
}
div.ui-datepicker-title {
margin-top: 5px;
text-align: center;
}
div.ui-datepicker-title select {
margin: 0 3px;
}
table.ui-datepicker-calendar {
width: 100%;
border-collapse: collapse;
margin: 10px 0 0 0;
}
table.ui-datepicker-calendar td {
padding: 3px;
text-align: center;
color: rgb(255, 255, 255);
background: rgb(158, 158, 158);
border-bottom: 1px solid rgb(255, 255, 255);
font-size: 11px;
}
table.ui-datepicker-calendar td a {
color: rgb(255, 255, 255);
text-decoration: none;
display: block;
}
table.ui-datepicker-calendar thead th {
text-align: center;
font-weight: bold;
font-size: 11px;
color: rgb(0, 0, 0);
}
table.ui-datepicker-calendar td.ui-datepicker-today {
background: rgb(230, 230, 230);
}
table.ui-datepicker-calendar td.ui-datepicker-today a {
color: rgb(0, 0, 0);
}
table.ui-datepicker-calendar td.ui-datepicker-current-day {
background: rgb(0, 0, 0);
}
table.ui-datepicker-calendar td.ui-datepicker-current-day a {
color: rgb(255, 255, 255);
}
table.ui-datepicker-calendar td.ui-datepicker-other-month {
background: rgb(230, 230, 230);
border-bottom: 1px solid rgb(255, 255, 255);
font-size: 11px;
}
When you load the document in a browser, the preceding example results in something similar to Figure 16.2.
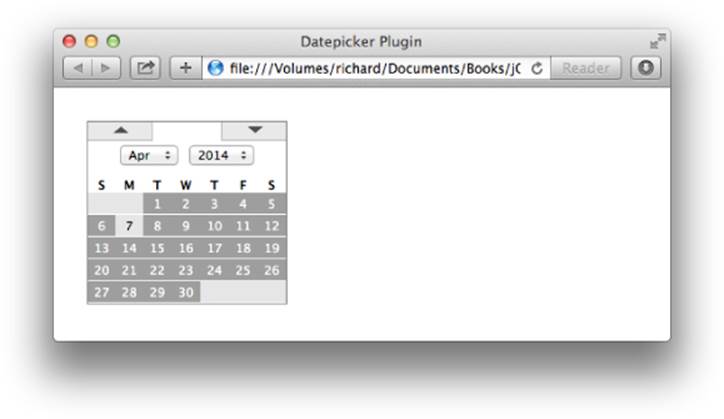
Figure 16.2
In the preceding example, you learned how to style the default Datepicker widget without using a premade jQuery UI theme, which would otherwise style the widget for you. Other aspects of the Datepicker concerning which dates you are allowed to pick from, how dates are formatted, and which controls are present in the widget may also be customized. You learn more about these things in the “Localizing the Datepicker” section later in this chapter.
To style the Datepicker, you can reference the markup provided, using the various id and class names to create styling for the pop-up calendar.
The styles provided are nothing extraordinary, just run-of-the-mill CSS. In the following sections, you take a look at how to further customize the Datepicker widget.
Setting the Range of Allowed Dates
By default, the jQuery UI Datepicker plugin allows you to select from a range of dates that goes 10 years into the future and 10 years into the past. You can customize the range of dates that are allowed by the widget, however, by specifying the range via options that you set upon calling the datepicker() method:
· minDate and maxDate set the minimum and maximum possible dates a user can enter into the date field. These options are set by providing a JavaScript Date object.
· changeMonth and changeYear are both boolean options that toggle regardless of whether the month and year are drop-down menus, which allow the user to jump to a particular date more quickly.
· yearRange sets the range of years made available in the year drop-down menu. This option is a string with the beginning and end year separated by a colon. For example, “1900:2000” would populate a drop-down menu with every year from 1900 to 2000.
The following example is a demonstration of the preceding options and is available in the source materials as Example 16-3.html, and it uses a style sheet based on the example provided in Example 16-2.css.
<!DOCTYPE HTML>
<html xmlns='http://www.w3.org/1999/xhtml'>
<head>
<meta http-equiv='content-type'
content='application/xhtml+xml; charset=utf-8' />
<meta http-equiv='content-language' content='en-us' />
<title>Datepicker Plugin</title>
<script src='../jQuery.js'></script>
<script src='../jQueryUI.js'></script>
<script src='Example 16-3.js'></script>
<link href='Example 16-3.css' rel='stylesheet' />
</head>
<body>
<form action='javascript:void(0);' method='post'>
<fieldset>
<legend>Appointment Form</legend>
<div class="exampleDate">
<label for="exampleDate">Date:</label>
<input type="text" name="exampleDate" id="exampleDate" />
<img src="images/Calendar.png" alt="Calendar Icon" />
</div>
</fieldset>
</form>
</body>
</html>
The date field in the preceding markup is made into a Datepicker with the following JavaScript:
$(document).ready(
function()
{
$('input#exampleDate').datepicker({
changeMonth : true,
changeYear : true,
minDate : new Date(1900, 1, 1),
maxDate : new Date(2020, 12, 31),
yearRange : "1900:2020"
});
$('div.exampleDate img').click(
function()
{
$(this)
.prev('input')
.focus();
}
);
}
);
The preceding results are shown in Figure 16.3.
The preceding script sets up five options for the Datepicker. The first two options, changeMonth and changeYear, toggle whether the month or year, respectively, are <select> inputs in the pop-up Datepicker. If these options are set to false, as in the following script, which is available in the source materials as Example 16-4, the month and year become static:
$('input#exampleDate').datepicker({
changeMonth : false,
changeYear : false,
minDate : new Date(1900, 1, 1),
maxDate : new Date(2020, 12, 31),
yearRange : "1900:2020"
});

Figure 16.3
Figure 16.4 shows the difference in providing changeMonth with the false versus the true value.
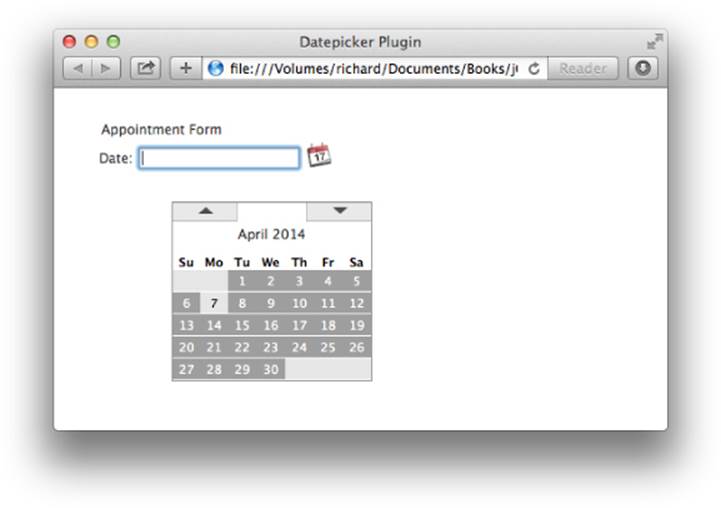
Figure 16.4
It is also possible to make only the month a <select> input or only the year. In the next section you learn how to localize the Datepicker.
Localizing the Datepicker
The Datepicker plugin has many localization options that allow you to completely change how the calendar looks, the text that it uses, the date format that it uses, and the weekday the calendar starts on. The following sections describe how to localize a Datepicker implementation.
Setting the Date Format
You can change the date format displayed as the value of the <input> element to whatever format you like. The following script, Example-16-5, demonstrates how to change the date format so that the day is placed before the month, as is done with dates in much of the world:
$(document).ready(
function()
{
$('input#exampleDate').datepicker({
changeMonth : true,
changeYear : true,
minDate : new Date(1900, 1, 1),
maxDate : new Date(2020, 12, 31),
yearRange : "1900:2020",
dateFormat : "dd/mm/yy"
});
$('div.exampleDate img').click(
function()
{
$(this)
.prev('input')
.focus();
}
);
}
);
In the preceding script, the date format is set using the dateFormat option; in this case, it specifies the day, month, and year—the day and month with leading zeroes and the year in four-digit format. A full list of options is available in Appendix O, in the “Format Options” section. Figure 16.5 shows that the day appears first, then the month, and then the year.
Localizing Datepicker Text
You can use the following options to localize, customize, or translate an implementation of Datepicker:
· appendText—The text to display after each date field.
· buttonText—The text to display on the button element that triggers the Datepicker.
· closeText—The text to display for the close link. The default is “Close”.
· currentText—The text to display for the current day link. The default is “Today”.
· dayNames—The list of long day names, starting from Sunday, for use as requested via the dateFormat setting. Day names also appear as pop-up hints when hovering over the corresponding column headings. The default is [“Sunday”, “Monday”, “Tuesday”, “Wednesday”, “Thursday”, “Friday”, “Saturday”].
· dayNamesMin—The list of minimized day names, starting from Sunday, for use as column headers within the Datepicker. The default is [“Su”, “Mo”, “Tu”, “We”, “Th”, “Fr”, “Sa”].
· dayNamesShort—The list of abbreviated day names, starting from Sunday, for use as requested via the dateFormat setting. The default is [“Sun”, “Mon”, “Tue”, “Wed”, “Thu”, “Fri”, “Sat”].
· monthNames—The list of full month names, as used in the month header on each Datepicker and as requested via the dateFormat setting. The default is [“January”, “February”, “March”, “April”, “May”, “June”, “July”, “August”, “September”, “October”, “November”, “December”].
· monthNamesShort—The list of abbreviated month names, for use as requested via the dateFormat setting. The default is [“Jan”, “Feb”, “Mar”, “Apr”, “May”, “Jun”, “Jul”, “Aug”, “Sep”, “Oct”, “Nov”, “Dec”].
· nextText—The text to display for the next month link. The default is “Next”.
· prevText—The text to display for the previous month link. The default is “Prev”.
· weekHeader—The column header for the week of the year (see showWeeks). The default is “wk”.
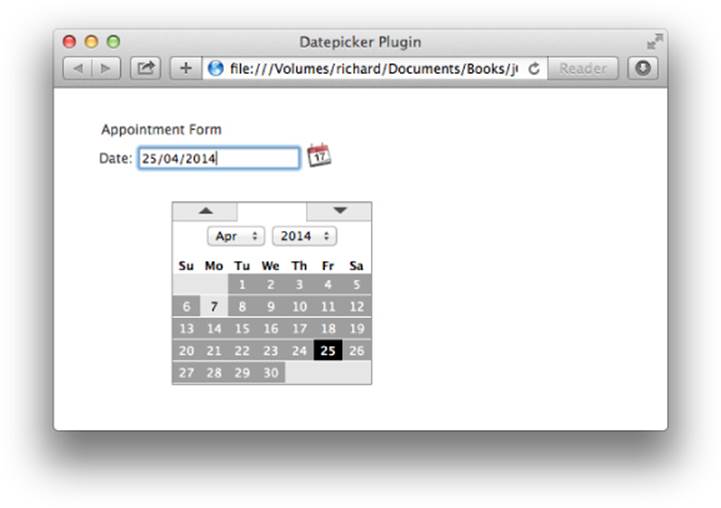
Figure 16.5
Changing the Starting Weekday
In some places in the world, the calendar begins with Monday and ends with Sunday. Whichever day you want to use as the starting weekday is also customizable via the firstDay option. The following script, Example 16-6, demonstrates how to change the starting weekday:
$(document).ready(
function()
{
$('input#exampleDate').datepicker({
changeMonth : true,
changeYear : true,
minDate : new Date(1900, 1, 1),
maxDate : new Date(2020, 12, 31),
yearRange : "1900:2020",
dateFormat : "dd/mm/yy",
firstDay : 1
});
$('div.exampleDate img').click(
function()
{
$(this)
.prev('input')
.focus();
}
);
}
);
In the preceding script, the firstDay option changes the starting calendar day from Sunday (which is number 0) to Monday (which is number 1). Figure 16.6 shows the result of the change.
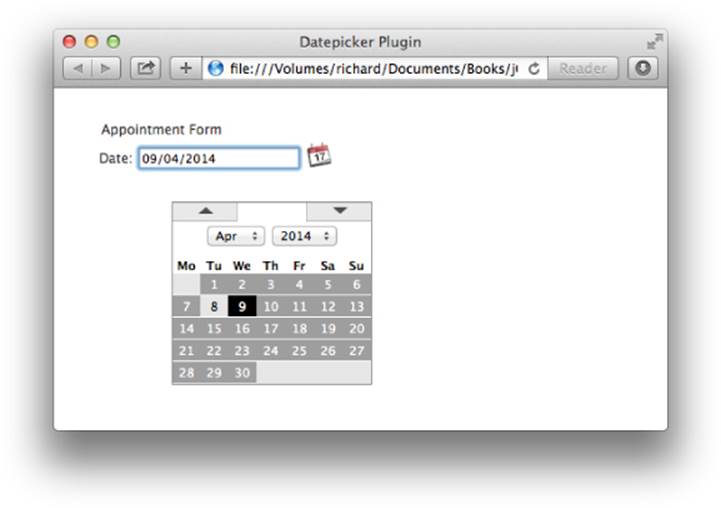
Figure 16.6
Summary
In this chapter, you learned a little about what the jQuery UI Datepicker plugin offers. This chapter covered only some of the options allowed because of constraints on resources; however, a comprehensive reference containing all the options that you can use with thedatepicker() method appears in Appendix O.
In this chapter, you learned that the Datepicker plugin does not come with much styling, and whatever styling you want must be implemented either manually or using one of the premade jQuery UI themes. You saw how the widget's markup is structured and a sample style sheet that could be applied to it.
You learned that the Datepicker can limit the range of selectable dates. To limit what dates the user can put in the date field, the minDate and maxDate options can be used. To set the range of years the Datepicker displays, the yearRange option can be used. To toggle whether the month and year options are drop-down menus, you use the changeMonth and changeYear options.
You learned a little about the options available to you for localizing the Datepicker. You can change the date format any of the text labels, and the starting weekday displayed in the calendar.
Exercises
1. Name the two options that you can potentially use to limit the dates the user can input into the Datepicker.
2. Which option sets the years populated in the year drop-down menu? What is an example value?
3. Which options provide the month and year options as drop-down menus?
4. Which option would you use to change the date format?
5. Does the Datepicker plugin give you the ability to translate its text into Spanish? How would you translate the weekday labels into Spanish?
6. Which option would you use to change the starting weekday?
All materials on the site are licensed Creative Commons Attribution-Sharealike 3.0 Unported CC BY-SA 3.0 & GNU Free Documentation License (GFDL)
If you are the copyright holder of any material contained on our site and intend to remove it, please contact our site administrator for approval.
© 2016-2026 All site design rights belong to S.Y.A.