JavaScript for Kids: A Playful Introduction to Programming (2015)
Part I. Fundamentals
Chapter 7. Creating a Hangman Game
In this chapter we’ll build a Hangman game! We’ll learn how to use dialogs to make the game interactive and take input from someone playing the game.
Hangman is a word-guessing game. One player picks a secret word, and the other player tries to guess it.
For example, if the word were TEACHER, the first player would write:
![]()
The guessing player tries to guess the letters in the word. Each time they guess a letter correctly, the first player fills in the blanks for each occurrence of that letter. For example, if the guessing player guessed the letter E, the first player would fill in the Es in the word TEACHER like so:
![]()
When the guessing player guesses a letter that isn’t in the word, they lose a point and the first player draws part of a stick-man for each wrong guess. If the first player completes the stickman before the guessing player guesses the word, the guessing player loses.
In our version of Hangman, the JavaScript program will choose the word and the human player will guess letters. We won’t be drawing the stickman, because we haven’t yet learned how to draw in JavaScript (we’ll learn how to do that in Chapter 13).

Interacting with a Player
To create this game, we have to have some way for the guessing player (human) to enter their choices. One way is to open a pop-up window (which JavaScript calls a prompt) that the player can type into.
Creating a Prompt
First, let’s create a new HTML document. Using File▸Save As, save your page.html file from Chapter 5 as prompt.html. To create a prompt, enter this code between the <script> tags of prompt.html and refresh the browser:
var name = prompt("What's your name?");
console.log("Hello " + name);
Here we create a new variable, called name, and assign to it the value returned from calling prompt("What's your name?"). When prompt is called, a small window (or dialog) is opened, which should look like Figure 7-1.
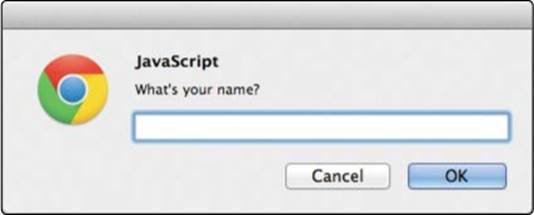
Figure 7-1. A prompt dialog
Calling prompt("What's your name?") pops up a window with the text “What’s your name?” along with a text box for input. At the bottom of the dialog are two buttons, Cancel and OK. In Chrome, the dialog has the heading JavaScript, to inform you that JavaScript opened the prompt.
When you enter text in the box and click OK, that text becomes the value that is returned by prompt. For example, if I were to enter my name into the text box and click OK, JavaScript would print this in the console:
Hello Nick
Because I entered Nick in the text box and clicked OK, the string "Nick" is saved in the variable name and console.log prints "Hello " + "Nick", which gives us "Hello Nick".
NOTE
The second time you open any kind of dialog in Chrome, it adds an extra line to the dialog with a checkbox saying, “Prevent this page from creating additional dialogs.” This is Chrome’s way of protecting users from web pages with lots of annoying pop-ups. Just leave the box unchecked for the exercises in this chapter.
WHAT HAPPENS IF YOU CLICK CANCEL?
If you click the Cancel button, prompt returns the value null. In Chapter 2, we learned that you can use null to indicate when something is intentionally empty.
Click Cancel at the dialog, and you should see this:
Hello null
Here, null is printed as a string by console.log. Normally, null isn’t a string, but since only strings can be printed to the console and you told JavaScript to print "Hello " + null, JavaScript turns the value null into the string "null" so it can be printed. When JavaScript converts a value into another type, it’s called coercion.
Coercion is an example of JavaScript trying to be clever. There isn’t any way to combine a string and null using the + operator, so JavaScript does its best with the situation. In this case, it knows it needs two strings. The string version of null is "null", which is why you see the string "Hello null" printed.
Using confirm to Ask a Yes or No Question
The confirm function is a way to take user input without a text box by asking for a yes or no (Boolean) answer. For example, here we use confirm to ask the user if they like cats (see Figure 7-2). If so, the variable likesCats is set to true, and we respond with “You’re a cool cat!” If they don’t like cats, likesCats is set to false, so we respond with “Yeah, that’s fine. You’re still cool!”
var likesCats = confirm("Do you like cats?");
if (likesCats) {
console.log("You're a cool cat!");
} else {
console.log("Yeah, that's fine. You're still cool!");
}
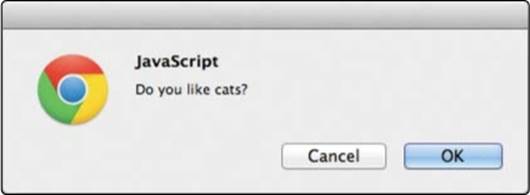
Figure 7-2. A confirm dialog
The answer to the confirm prompt is returned as a Boolean value. If the user clicks OK in the confirm dialog shown in Figure 7-2, true is returned. If they click Cancel, false is returned.
Using Alerts to Give a Player Information
If you want to just give the player some information, you can use an alert dialog to display a message with an OK button. For example, if you think that JavaScript is awesome, you might use this alert function:
alert("JavaScript is awesome!");
Figure 7-3 shows what this simple alert dialog would look like.
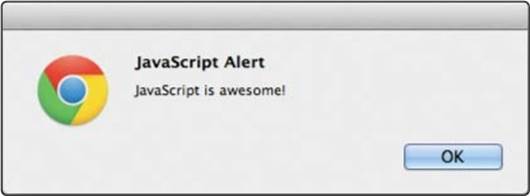
Figure 7-3. An alert dialog
Alert dialogs just display a message and wait until the user clicks OK.
Why Use alert Instead of console.log?
Why use an alert dialog in a game instead of using console.log? First, because if all you want to do is tell the player something, using alert means the player doesn’t have to interrupt game play to open the console to see a status message. Second, calling alert (as well as prompt andconfirm) pauses the JavaScript interpreter until the user clicks OK (or Cancel, in the case of prompt and confirm). That means the player has time to read the alert. On the other hand, when you use console.log, the text is displayed immediately and the interpreter moves on to the next line in your program.

Designing Your Game
Before we start writing the Hangman game, let’s think about its structure. There are a few things we need our program to do:
1. Pick a random word.
2. Take the player’s guess.
3. Quit the game if the player wants to.
4. Check that the player’s guess is a valid letter.
5. Keep track of letters the player has guessed.
6. Show the player their progress.
7. Finish when the player has guessed the word.
Apart from the first and last tasks (picking a word for the player to guess and finishing the game), these steps all need to happen multiple times, and we don’t know how many times (it depends on how well the player guesses). When you need to do the same thing multiple times, you know you’ll need a loop.
But this simple list of tasks doesn’t really give us any idea of what needs to happen when. To get a better idea of the structure of the code, we can use pseudocode.
Using Pseudocode to Design the Game
Pseudocode is a handy tool that programmers often use to design programs. It means “fake code,” and it’s a way of describing how a program will work that looks like a cross between written English and code. Pseudocode has loops and conditionals, but other than that, everything is just plain English. Let’s look at a pseudocode version of our game to get an idea:
Pick a random word
While the word has not been guessed {
Show the player their current progress
Get a guess from the player
If the player wants to quit the game {
Quit the game
}
Else If the guess is not a single letter {
Tell the player to pick a single letter
}
Else {
If the guess is in the word {
Update the player's progress with the guess
}
}
}
Congratulate the player on guessing the word
As you can see, none of this is real code, and no computer could understand it. But it gives us an idea of how our program will be structured, before we get to actually writing the code and having to deal with the messy details, like how we’re going to pick a random word.
Tracking the State of the Word
In the previous pseudocode, one of the first lines says, “Show the player their current progress.” For the Hangman game, this means filling in the letters that the player has guessed correctly and showing which letters in the secret word are still blank. How are we going to do this? We can actually keep track of the player’s progress in a similar way to how traditional Hangman works: by keeping a collection of blank spaces and filling them in as the player guesses correct letters.
In our game, we’ll do this using an array of blanks for each letter in the word. We’ll call this the answer array, and we’ll fill it with the player’s correct guesses as they’re made. We’ll represent each blank with the string "_".
The answer array will start out as a group of these empty entries equal in number to the letters in the secret word. For example, if the secret word is fish, the array would look like this:
["_", "_", "_", "_"]
If the player correctly guessed the letter i, we’d change the second blank to an i:
["_", "i", "_", "_"]
Once the player guesses all the correct letters, the completed array would look like this:
["f", "i", "s", "h"]

We’ll also use a variable to keep track of the number of remaining letters the player has to guess. For every occurrence of a correctly guessed letter, this variable will decrease by 1. Once it hits 0, we know the player has won.
Designing the Game Loop
The main game takes place inside a while loop (in our pseudocode, this loop begins with the line “While the word has not been guessed”). In this loop we display the current state of the word being guessed (beginning with all blanks); ask the player for a guess (and make sure it’s a valid, single-letter guess); and update the answer array with the chosen letter, if that letter appears in the word.
Almost all computer games are built around a loop of some kind, often with the same basic structure as the loop in our Hangman game. A game loop generally does the following:
1. Takes input from the player
2. Updates the game state
3. Displays the current state of the game to the player
Even games that are constantly changing follow this same kind of loop—they just do it really fast. In the case of our Hangman game, the program takes a guess from the player, updates the answer array if the guess is correct, and displays the new state of the answer array.
Once the player guesses all letters in the word, we show the completed word and a congratulatory message telling them that they won.
Coding the Game
Now that we know the general structure of our game, we can start to go over how the code will look. The following sections will walk you through all the code in the game. After that, you’ll see the whole game code in one listing so you can type it up and play it yourself.
Choosing a Random Word
The first thing we have to do is to choose a random word. Here’s how that will look:
➊ var words = [
"javascript",
"monkey",
"amazing",
"pancake"
];
➋ var word = words[Math.floor(Math.random() * words.length)];
We begin our game at ➊ by creating an array of words (javascript, monkey, amazing, and pancake) to be used as the source of our secret word, and we save the array in the words variable. The words should be all lowercase. At ➋ we use Math.random and Math.floor to pick a random word from the array, as we did with the random insult generator in Chapter 3.
Creating the Answer Array
Next we create an empty array called answerArray and fill it with underscores (_) to match the number of letters in the word.
var answerArray = [];
➊ for (var i = 0; i < word.length; i++) {
answerArray[i] = "_";
}
var remainingLetters = word.length;
The for loop at ➊ creates a looping variable i that starts at 0 and goes up to (but does not include) word.length. Each time around the loop, we add a new element to answerArray, at answerArray[i]. When the loop finishes, answerArray will be the same length as word. For example, if word is "monkey" (which has six letters), answerArray will be ["_", "_", "_", "_", "_", "_"] (six underscores).
Finally, we create the variable remainingLetters and set it to the length of the secret word. We’ll use this variable to keep track of how many letters are left to be guessed. Every time the player guesses a correct letter, this value will be decremented (reduced) by 1 for each instance of that letter in the word.
Coding the Game Loop
The skeleton of the game loop looks like this:
while (remainingLetters > 0) {
// Game code goes here
// Show the player their progress
// Take input from the player
// Update answerArray and remainingLetters for every correct guess
}
We use a while loop, which will keep looping as long as remainingLetters > 0 remains true. The body of the loop will have to update remainingLetters for every correct guess the player makes. Once the player has guessed all the letters, remainingLetters will be 0 and the loop will end.
The following sections explain the code that will make up the body of the game loop.
Showing the Player’s Progress
The first thing we need to do inside the game loop is to show the player their current progress:
alert(answerArray.join(" "));
We do that by joining the elements of answerArray into a string, using the space character as the separator, and then using alert to show that string to the player. For example, let’s say the word is monkey and the player has guessed m, o, and e so far. The answer array would look like this["m", "o", "_", "_", "e", "_"], and answerArray.join(" ") would be "m o _ _ e _". The alert dialog would then look like Figure 7-4.
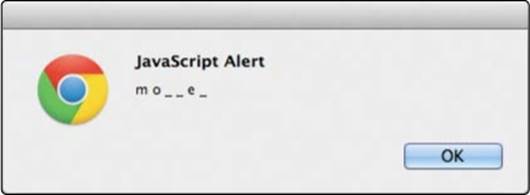
Figure 7-4. Showing the player’s progress using alert
Handling the Player’s Input
Now we have to get a guess from the player and ensure that it’s a single character.
➊ var guess = prompt("Guess a letter, or click Cancel to stop playing.");
➋ if (guess === null) {
break;
➌ } else if (guess.length !== 1) {
alert("Please enter a single letter.");
} else {
➍ // Update the game state with the guess
}
At ➊, prompt takes a guess from the player and saves it to the variable guess. One of four things will happen at this point.
First, if the player clicks the Cancel button, then guess will be null. We check for this condition at ➋ with if (guess === null). If this condition is true, we use break to exit the loop.
NOTE
You can use the break keyword in any loop to immediately stop looping, no matter where the program is in the loop or whether the while condition is currently true.
The second and third possibilities are that the player enters either nothing or too many letters. If they enter nothing but click OK, guess will be the empty string "". In this case, guess.length will be 0. If they enter anything more than one letter, guess.length will be greater than 1.
At ➌, we use else if (guess.length !== 1) to check for these conditions, ensuring that guess is exactly one letter. If it’s not, we display an alert saying, “Please enter a single letter.”
The fourth possibility is that the player enters a valid guess of one letter. Then we have to update the game state with their guess using the else statement at ➍, which we’ll do in the next section.
Updating the Game State
Once the player has entered a valid guess, we must update the game’s answerArray according to the guess. To do that, we add the following code to the else statement:
➊ for (var j = 0; j < word.length; j++) {
➋ if (word[j] === guess) {
answerArray[j] = guess;
➌ remainingLetters--;
}
}
At ➊, we create a for loop with a new looping variable called j, which runs from 0 up to word.length. (We’re using j as the variable in this loop because we already used i in the previous for loop.) We use this loop to step through each letter of word. For example, let’s say word ispancake. The first time around this loop, when j is 0, word[j] will be "p". The next time, word[j] will be "a", then "n", "c", "a", "k", and finally "e".
At ➋, we use if (word[j] === guess) to check whether the current letter we’re looking at matches the player’s guess. If it does, we use answerArray[j] = guess to update the answer array with the current guess. For each letter in the word that matches guess, we update the answer array at the corresponding point. This works because the looping variable j can be used as an index for answerArray just as it can be used as an index for word, as you can see in Figure 7-5.
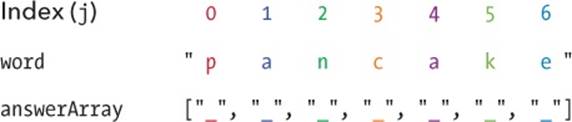
Figure 7-5. The same index can be used for both word and answerArray.
For example, imagine we’ve just started playing the game and we reach the for loop at ➊. Let’s say word is "pancake", guess is "a", and answerArray currently looks like this:
["_", "_", "_", "_", "_", "_", "_"]
The first time around the for loop at ➊, j is 0, so word[j] is "p". Our guess is "a", so we skip the if statement at ➋ (because "p" === "a" is false). The second time around, j is 1, so word[j] is "a". This is equal to guess, so we enter the if part of the statement. The lineanswerArray[j] = guess; sets the element at index 1 (the second element) of answerArray to guess, so answerArray now looks like this:
["_", "a", "_", "_", "_", "_", "_"]
The next two times around the loop, word[j] is "n" and then "c", which don’t match guess. However, when j reaches 4, word[j] is "a" again. We update answerArray again, this time setting the element at index 4 (the fifth element) to guess. Now answerArray looks like this:
["_", "a", "_", "_", "a", "_", "_"]
The remaining letters don’t match "a", so nothing happens the last two times around the loop. At the end of this loop, answerArray will be updated with all the occurrences of guess in word.
For every correct guess, in addition to updating answerArray, we also need to decrement remainingLetters by 1. We do this at ➌ using remainingLetters--;. Every time guess matches a letter in word, remainingLetters decreases by 1. Once the player has guessed all the letters correctly, remainingLetters will be 0.
Ending the Game
As we’ve already seen, the main game loop condition is remainingLetters > 0, so as long as there are still letters to guess, the loop will keep looping. Once remainingLetters reaches 0, we leave the loop. We end with the following code:
alert(answerArray.join(" "));
alert("Good job! The answer was " + word);
The first line uses alert to show the answer array one last time. The second line uses alert again to congratulate the winning player.
The Game Code
Now we’ve seen all the code for the game, and we just need to put it together. What follows is the full listing for our Hangman game. I’ve added comments throughout to make it easier for you to see what’s happening at each point. It’s quite a bit longer than any of the code we’ve written so far, but typing it out will help you to become more familiar with writing JavaScript. Create a new HTML file called hangman.html and type the following into it:

<!DOCTYPE html>
<html>
<head>
<title>Hangman!</title>
</head>
<body>
<h1>Hangman!</h1>
<script>
// Create an array of words
var words = [
"javascript",
"monkey",
"amazing",
"pancake"
];
// Pick a random word
var word = words[Math.floor(Math.random() * words.length)];
// Set up the answer array
var answerArray = [];
for (var i = 0; i < word.length; i++) {
answerArray[i] = "_";
}
var remainingLetters = word.length;
// The game loop
while (remainingLetters > 0) {
// Show the player their progress
alert(answerArray.join(" "));
// Get a guess from the player
var guess = prompt("Guess a letter, or click Cancel to stop
playing.");
if (guess === null) {
// Exit the game loop
break;
} else if (guess.length !== 1) {
alert("Please enter a single letter.");
} else {
// Update the game state with the guess
for (var j = 0; j < word.length; j++) {
if (word[j] === guess) {
answerArray[j] = guess;
remainingLetters--;
}
}
}
// The end of the game loop
}
// Show the answer and congratulate the player
alert(answerArray.join(" "));
alert("Good job! The answer was " + word);
</script>
</body>
</html>
If the game doesn’t run, make sure that you typed in everything correctly. If you make a mistake, the JavaScript console can help you find it. For example, if you misspell a variable name, you’ll see something like Figure 7-6 with a pointer to where you made your mistake.
![]()
Figure 7-6. A JavaScript error in the Chrome console
If you click hangman.html:30, you’ll see the exact line where the error is. In this case, it’s showing us that we misspelled remainingLetters as remainingLetter at the start of the while loop.
Try playing the game a few times. Does it work the way you expected it to work? Can you imagine the code you wrote running in the background as you play it?

What You Learned
In just a few pages, you’ve created your first JavaScript game! As you can see, loops and conditionals are essential for creating games or any other interactive computer program. Without these control structures, a program just begins and ends.
In Chapter 8, we’ll use functions to package up code so you can run it from different parts of your programs.
Programming Challenges
Here are some challenges to build on and improve the Hangman game you created in this chapter.
#1: MORE WORDS
Add your own words to the words array. Remember to enter words in all lowercase.
#2: CAPITAL LETTERS
If a player guesses a capital letter, it won’t match a lowercase letter in the secret word. To address this potential problem, convert the player’s guess to lowercase. (Hint: You can use the toLowerCase method to convert a string to lowercase.)
#3: LIMITING GUESSES
Our Hangman game gives a player unlimited guesses. Add a variable to track the number of guesses and end the game if the player runs out of guesses. (Hint: Check this variable in the same while loop that checks whether remainingLetters > 0. As we did in Chapter 2, you can use &&to check whether two Boolean conditions are true.)
#4: FIXING A BUG
There’s a bug in the game: if you keep guessing the same correct letter, remainingLetters will keep decrementing. Can you fix it? (Hint: You could add another condition to check whether a value in answerArray is still an underscore. If it’s not an underscore, then that letter must have been guessed already.)
All materials on the site are licensed Creative Commons Attribution-Sharealike 3.0 Unported CC BY-SA 3.0 & GNU Free Documentation License (GFDL)
If you are the copyright holder of any material contained on our site and intend to remove it, please contact our site administrator for approval.
© 2016-2026 All site design rights belong to S.Y.A.