Learning JavaScript (2016)
Chapter 18. JavaScript in the Browser
JavaScript began its life as a browser scripting language, and now holds a near-complete monopoly in that role. This chapter is for anyone who’s working with JavaScript in the browser. The language may be the same, but there are some special considerations and APIs for this scenario.
Fully covering browser-based JavaScript development is a whole book in itself. The goal of this chapter is to introduce you to the important core concepts in browser development, which will give you a solid foundation. At the end of this chapter, I will recommend some additional learning resources.
ES5 or ES6?
Hopefully by now you are convinced of the utility of the enhancements ES6 brings. Unfortunately, it will be a while before you can rely on strong and consistent ES6 support on the Web.
On the server side, you can know with certainty which ES6 features are supported (assuming you have control of the JavaScript engine). On the Web, you send your precious code out into the ether, over HTTP(S), where it’s executed by some JavaScript engine that you don’t control. Worse, you may not even have reliable information about what browser is being used.
So-called “evergreen” browsers are cutting into this problem; by automatically updating (without asking the user), they are allowing new web standards to be rolled out more quickly and consistently. However, this only reduces the problem instead of eliminating it.
Unless you can somehow control your user’s environment, you will have to ship ES5 for the foreseeable future. This isn’t the end of the world: transcompilation still provides a path for writing ES6 today. It can make deployment and debugging more painful, but such is the price of progress.
In this chapter, we will assume the use of a transcompiler, as covered in Chapter 2. The examples in this chapter all run correctly in the latest version of Firefox without transcompilation. If you are publishing your code for a wider audience, you will need to transcompile to ensure your code works reliably across many browsers.
The Document Object Model
The Document Object Model, or DOM, is a convention for describing the structure of an HTML document, and it’s at the heart of interacting with the browser.
Conceptually, the DOM is a tree. A tree consists of nodes: every node has a parent (except for the root node), and zero or more child nodes. The root node is the document, and it consists of a single child, which is the <html> element. The <html> element, in turn, has two children: the<head> element and the <body> element (Figure 18-1 is an example DOM).
Every node in the DOM tree (including the document itself) is an instance of the Node class (not to be confused with Node.js, the subject of the next chapter). Node objects have a parentNode and childNodes properties, as well as identifying properties such as nodeName and nodeType.
NOTE
The DOM consists entirely of nodes, only some of which are HTML elements. For example, a paragraph tag (<p>) is an HTML element, but the text it contains is a text node. Very often, the terms node and element are used interchangeably, which is rarely confusing, but not technically correct. In this chapter, we’ll mostly be dealing with nodes that are HTML elements, and when we say “element” we mean “element node.”
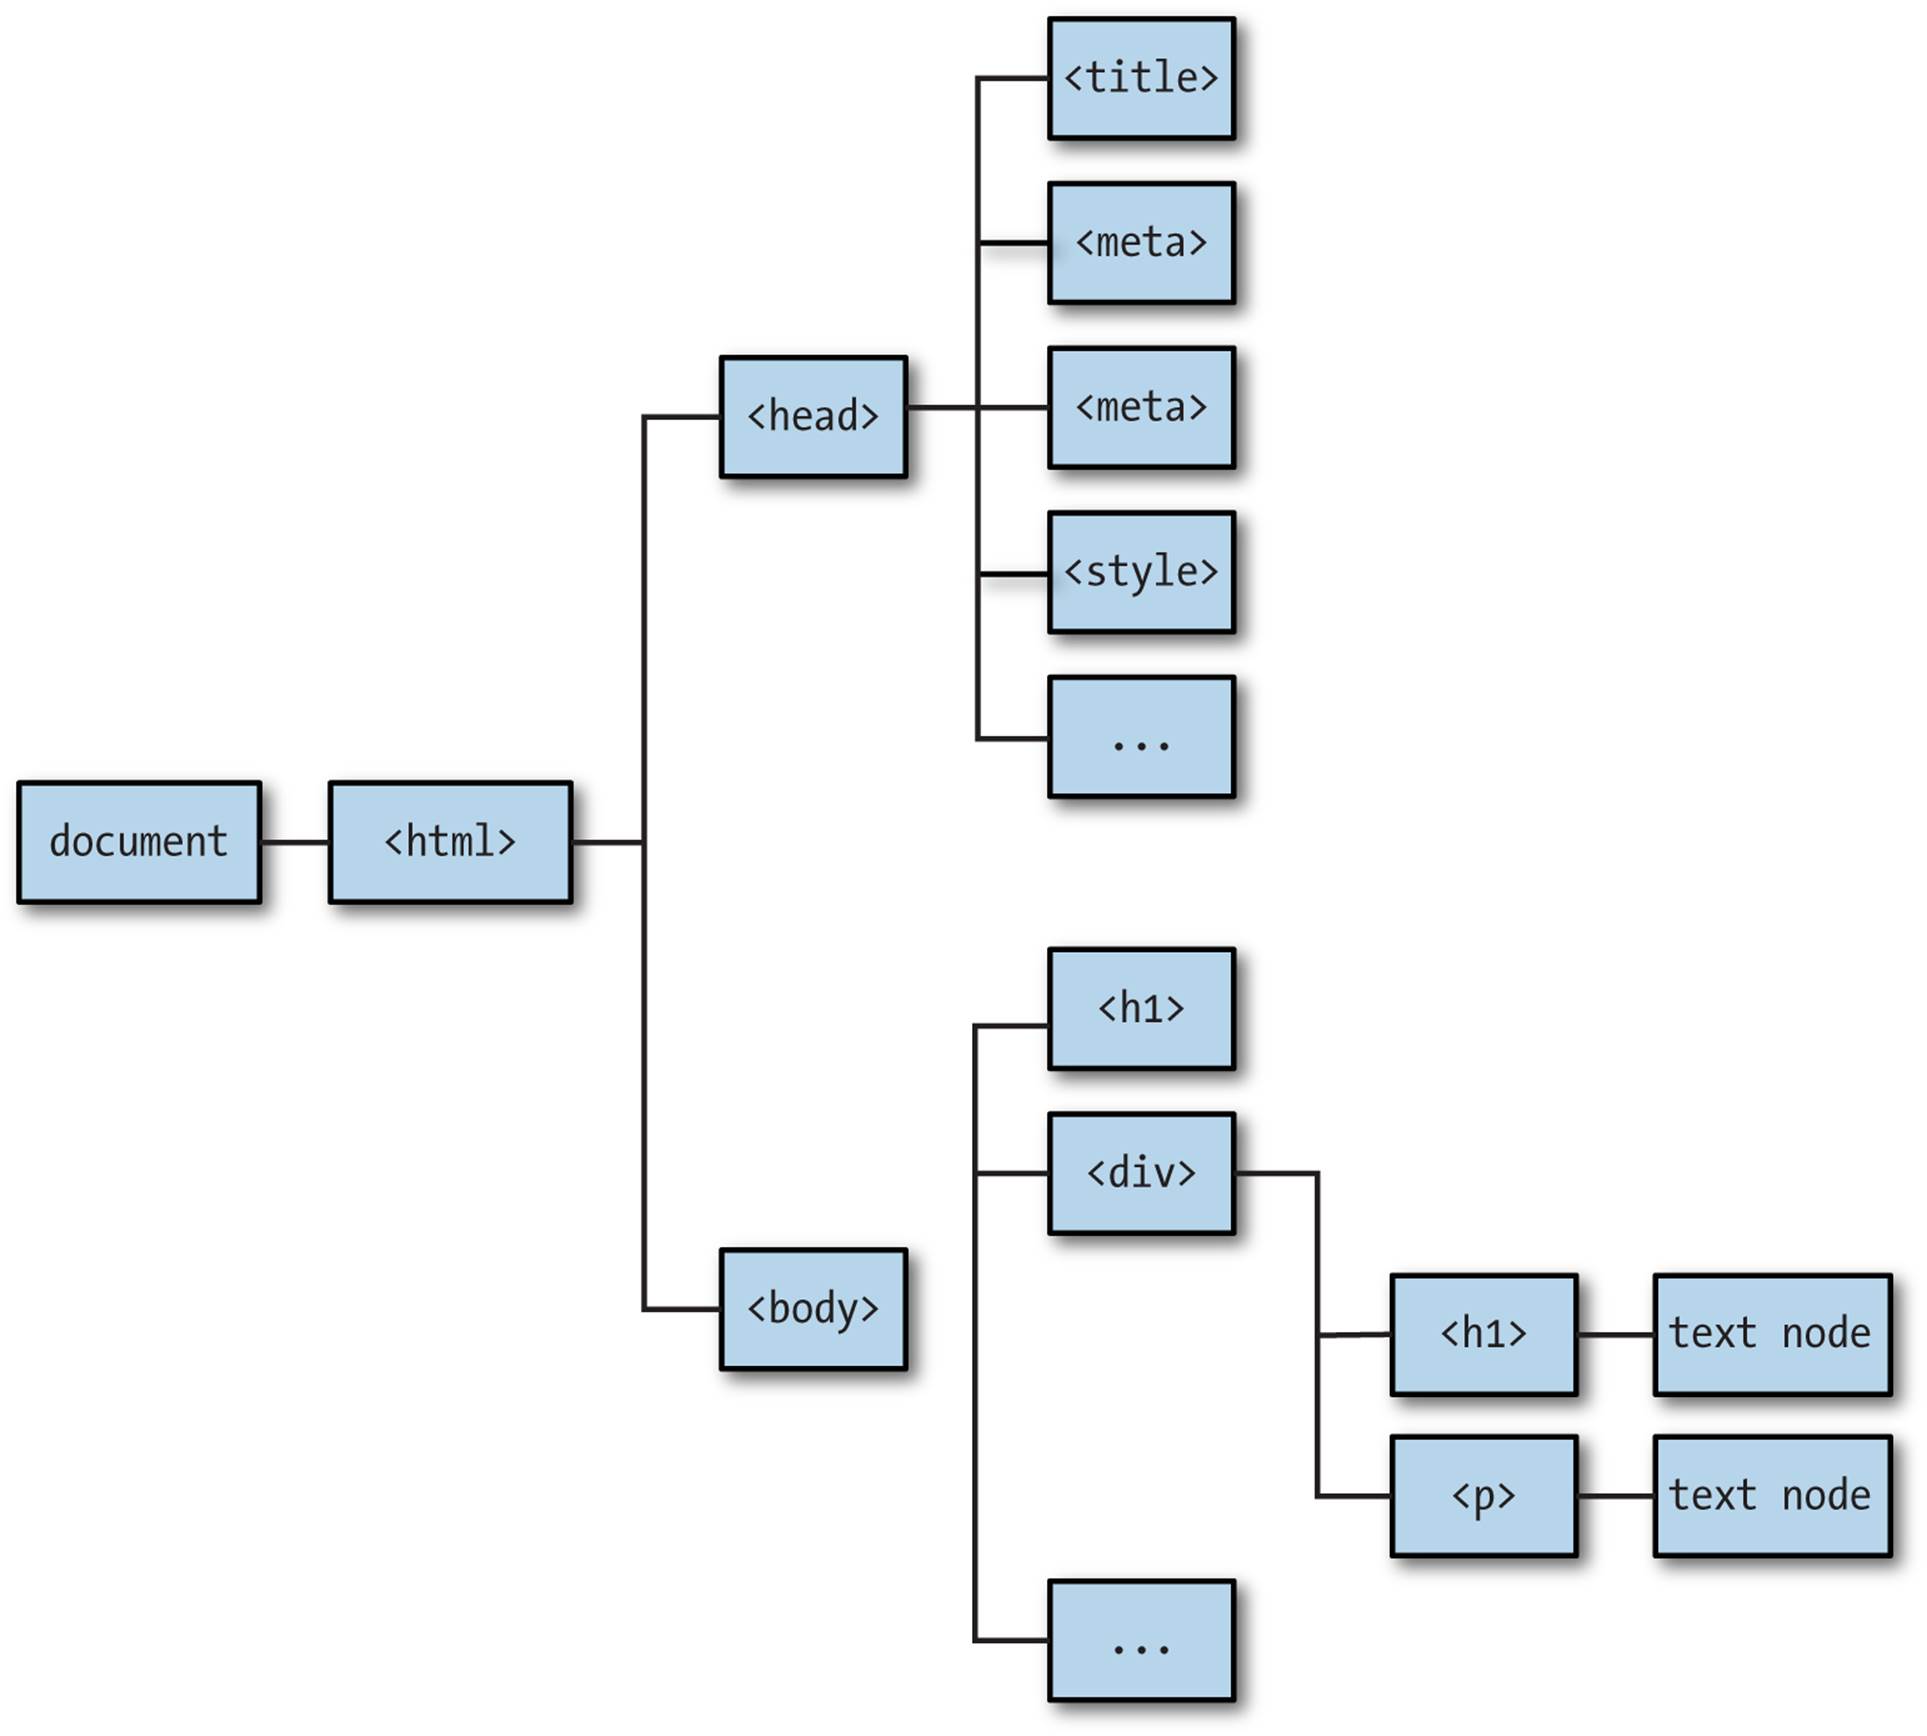
Figure 18-1. DOM tree
For the following examples, we’ll use a very simple HTML file to demonstrate these features. Create a file called simple.html:
<!doctype html>
<html>
<head>
<meta charset="utf-8">
<title>Simple HTML</title>
<style>
.callout {
border: solid 1px #ff0080;
margin: 2px 4px;
padding: 2px 6px;
}
.code {
background: #ccc;
margin: 1px 2px;
padding: 1px 4px;
font-family: monospace;
}
</style>
</head>
<body>
<header>
<h1>Simple HTML</h1>
</header>
<div id="content">
<p>This is a <i>simple</i> HTML file.</p>
<div class="callout">
<p>This is as fancy as we'll get!</p>
</div>
<p>IDs (such as <span class="code">#content</span>)
are unique (there can only be one per page).</p>
<p>Classes (such as <span class="code">.callout</span>)
can be used on many elements.</p>
<div id="callout2" class="callout fancy">
<p>A single HTML element can have multiple classes.</p>
</div>
</div>
</body>
</html>
Every node has the properties nodeType and nodeName (among others). nodeType is an integer identifying what type of node it is. The Node object contains constants that map to these numbers. The types of node we’ll be primarily dealing with in this chapter are Node.ELEMENT_NODE(HTML elements) and Node.TEXT_NODE (text contents, usually within HTML elements). For more information, see the MDN documentation for nodeType.
It’s an instructive exercise to write a function that traverses the entire DOM and prints it to the console, starting with document:
function printDOM(node, prefix) {
console.log(prefix + node.nodeName);
for(let i=0; i<node.childNodes.length; i++) {
printDOM(node.childNodes[i], prefix + '\t');
}
}
printDOM(document, '');
This recursive function does what’s known as a depth-first, pre-order traversal of a tree. That is, it follows branches all the way before moving on to the next branch. If you run it in a browser with a page loaded, you will see the entire structure of the page printed out to the console.
While this is an instructive exercise, it would be a tedious and inefficient way to manipulate HTML (having to traverse the entire DOM to find what you’re looking for). Fortunately, the DOM provides methods to locate HTML elements more directly.
TIP
While writing your own traversal function is a good exercise, the DOM API provides the TreeWalker object, which allows you to iterate through all of the elements in the DOM (optionally filtering by certain element types). For more information, see the MDN documentation for document.createTreeWalker.
Some Tree Terminology
The concept of a tree is straightforward and intuitive, and lends itself to similarly intuitive terminology. A node’s parent is its direct parent (that is, not a “grandparent”) and a child is a direct child (not a “grandchild”). The term descendant is used to refer to a child, or a child’s child, or so on. The term ancestor is used to refer to a parent, the parent’s parent, and so on.
DOM “Get” Methods
The DOM provides “get” methods that allow you to quickly locate specific HTML elements.
The first of these is document.getElementById. Every HTML element on a page may be assigned a unique ID, and document.getElementById can retrieve an element by its ID:
document.getElementById('content'); // <div id="content">...</div>
WARNING
Browsers don’t do anything to enforce the uniqueness of IDs (though an HTML validator will catch these issues), so it is incumbent on you to ensure that IDs are unique. As the construction of web pages gets more complicated (with components coming from multiple sources), it’s becoming increasingly difficult to avoid duplicate IDs. For this reason, I recommend using them carefully and sparingly.
document.getElementsByClassName returns a collection of elements that have the given class name:
const callouts = document.getElementsByClassName('callout');
And document.getElementsByTagName returns a collection of elements that have the given tag name:
const paragraphs = document.getElementsByTagName('p');
WARNING
All of the DOM methods that return a collection do not return a JavaScript array, but an instance of HTMLCollection, which is an “array-like” object. You can iterate over it with a for loop, but the Array.prototype methods (such as map, filter, and reduce) won’t be available. You can convert an HTMLCollection to an array by using the spread operator:[...document.getElementsByTagName(p)].
Querying DOM Elements
getElementById, getElementsByClassName, and getElementsByTagName are useful, but there’s a much more general (and powerful) method that can locate elements not just by a single condition (ID, class, or name), but also by the element’s relationship to other elements. Thedocument methods querySelector and querySelectorAll allow you to use CSS selectors.
CSS selectors allow you to identify elements by their name (<p>, <div>, etc.), their ID, their class (or combination of classes), or any combination thereof. To identify elements by name, simply use the name of the element (without angle brackets). So a will match all <a> tags in the DOM, and br will match all the <br> tags. To identify elements by their class, use a period before the class name: .callout will match all elements that have the class callout. To match multiple classes, just separate them with periods: .callout.fancy will match all elements that have the class callout and the class fancy. Lastly, they can be combined: for example, a#callout2.callout.fancy will match <a> elements with ID callout2, and classes callout and fancy (it’s very rare to see a selector that uses element name, ID, and class(es)…but it is possible).
The best way to get the hang of CSS selectors is to load the sample HTML provided in this chapter in a browser, open the browser’s console, and try them out with querySelectorAll. For example, in the console, type document.querySelectorAll('.callout'). All of the examples in this section will produce at least one result with querySelectorAll.
So far, we’ve been talking about identifying specific elements no matter where they appear in the DOM. CSS selectors also enable us to locate elements according to their position in the DOM.
If you separate multiple element selectors with a space, you can select nodes with a specific ancestry. For example, #content p will select <p> elements that are descendants of whatever element has the ID content. Likewise, #content div p will select <p> elements that are inside a<div> that are inside an element with the ID content.
If you separate multiple elements selectors with a greater-than sign (>), you can select nodes that are direct children. For example, #content > p will select <p> elements that are children of an element with ID content (contrast this with "#content p“).
Note that you can combine ancestry and direct child selectors. For example, body .content > p will select <p> tags that are direct children of elements with class content that are descendants of <body>.
There are more sophisticated selectors, but the ones covered here are the most common. To learn more about all the selectors available, see the MDN documentation on selectors.
Manipulating DOM Elements
Now that we know how to traverse, get, and query elements, what do we do with them? Let’s start with content modification. Each element has two properties, textContent and innerHTML, that allow you to access (and change) the element’s content. textContent strips out all HTML tags and provides text data only, whereas innerHTML allows you to create HTML (which results in new DOM nodes). Let’s see how we can access and modify the first paragraph in our example:
const para1 = document.getElementsByTagName('p')[0];
para1.textContent; // "This is a simple HTML file."
para1.innerHTML; // "This is a <i>simple</i> HTML file."
para1.textContent = "Modified HTML file"; // look for change in browser
para1.innerHTML = "<i>Modified</i> HTML file"; // look for change in browser
WARNING
Assigning to textContent and innerHTML is a destructive operation: it will replace whatever is in that element, no matter how big or complex. For example, you could replace the entire page contents by setting innerHTML on the <body> element!
Creating New DOM Elements
We’ve already seen how to implicitly create new DOM nodes by setting an element’s innerHTML property. We can also explicitly create new nodes with document.createElement. This function creates a new element, but it doesn’t add it to the DOM; you’ll have to do that in a separate step. Let’s create two new paragraph elements; one will become the first paragraph in <div id="content">, and the other will become the last:
const p1 = document.createElement('p');
const p2 = document.createElement('p');
p1.textContent = "I was created dynamically!";
p2.textContent = "I was also created dynamically!";
To add these newly created elements to the DOM, we’ll use the insertBefore and appendChild methods. We’ll need to get references to the parent DOM element (<div id="content">), and its first child:
const parent = document.getElementById('content');
const firstChild = parent.childNodes[0];
Now we can insert the newly created elements:
parent.insertBefore(p1, firstChild);
parent.appendChild(p2);
insertBefore takes the element to inset first, and then a “reference node,” which is the node to insert before. appendChild is very simple, appending the specified element as the last child.
Styling Elements
With the DOM API, you have complete and fine-grained control over element styling. However, it is generally considered good practice to use CSS classes instead of modifying the individual properties of an element. That is, if you want to change the style of an element, create a new CSS class, and then apply that class to the element(s) you wish to style. Using JavaScript, it is easy to apply an existing CSS class to an element. For example, if we wanted to highlight all paragraphs that contain the word unique, we would first create a new CSS class:
.highlight {
background: #ff0;
font-style: italic;
}
With that in place, we can find all <p> tags, and if they contain the word unique, add the highlight class. Every element has a property classList, which contains all of the classes (if any) the element has. classList has an add method that allows you to add further classes. We’ll be using this example later in this chapter, so we put it in a function called highlightParas:
function highlightParas(containing) {
if(typeof containing === 'string')
containing = new RegExp(`\\b${containing}\\b`, 'i');
const paras = document.getElementsByTagName('p');
console.log(paras);
for(let p of paras) {
if(!containing.test(p.textContent)) continue;
p.classList.add('highlight');
}
}
highlightParas('unique');
And then if we want to remove the highlights, we can use classList.remove:
function removeParaHighlights() {
const paras = document.querySelectorAll('p.highlight');
for(let p of paras) {
p.classList.remove('highlight');
}
}
NOTE
When removing the highlight class, we could have reused the same paras variable, and simply called remove('highlight') on every paragraph element; it will do nothing if the element doesn’t already have the class. However, it’s likely that the removal will come at some later point in time, and there may have been highlighted paragraphs added by other code: if our intention is to clear all highlighting, performing a query is the safer method.
Data Attributes
HTML5 introduced data attributes, which allow you to add arbitrary data to HTML elements; this data isn’t rendered by the browser, but it does allow you to add information to elements that can easily be read and modified by JavaScript. Let’s modify our HTML by adding a button that we will eventually hook up to our highlightParas function, and another one that we’ll hook up to removeParaHighlights:
<button data-action="highlight" data-containing="unique">
Highlight paragraphs containing "unique"
</button>
<button data-action="removeHighlights">
Remove highlights
</button>
We’ve called our data attributes action and contains (the names are up to us), and we can use document.querySelectorAll to find all elements that have "highlight" as their action:
const highlightActions = document.querySelectorAll('[data-action="highlight"]');
This introduces a new type of CSS selector. So far, we’ve seen selectors that can match specific tags, classes, and IDs. The square bracket syntax allows us to match elements by any attribute…in this case, a specific data attribute.
Because we only have one button, we could have used querySelector instead of querySelectorAll, but this allows us to have multiple elements that are designed to trigger the same action (which is quite common: think about actions that you can access through a menu, link, or toolbar, all on the same page). If we take a look at one of the elements in highlightActions, we note that it has a dataset property:
highlightActions[0].dataset;
// DOMStringMap { containing: "unique", action: "highlight" }
NOTE
The DOM API stores data attribute values as strings (as implied by the class DOMStringMap), meaning you cannot store object data. jQuery extends the functionality of data attributes by providing an interface that allows you to store objects as data attributes, which we will be learning about in Chapter 19.
We can also modify or add data attributes with JavaScript. For example, if we wanted to highlight paragraphs with the word giraffe and indicate that we want case-sensitive matches, we might do this:
highlightActions[0].dataset.containing = "giraffe";
highlightActions[0].dataset.caseSensitive = "true";
Events
The DOM API describes almost 200 events, and each browser further implements nonstandard events, so we certainly won’t discuss all events here, but we will cover what you need to know about them. Let’s start with a very easy-to-understand event: click. We’ll use the click event to hook up our “highlight” button to our highlightParas function:
const highlightActions = document.querySelectorAll('[data-action="highlight"]');
for(let a of highlightActions) {
a.addEventListener('click', evt => {
evt.preventDefault();
highlightParas(a.dataset.containing);
});
}
const removeHighlightActions =
document.querySelectorAll('[data-action="removeHighlights"]');
for(let a of removeHighlightActions) {
a.addEventListener('click', evt => {
evt.preventDefault();
removeParaHighlights();
});
}
Every element has a method named addEventListener that allows you to specify a function that will be called when that event occurs. That function takes a single argument, an object of type Event. The event object contains all the relevant information about the event, which will be specific to the type of event. For example, click events will have the properties clientX and clientY, which tell you the coordinates where the click occurred, as well as target, which is the element that raised the click event.
The event model is designed to allow multiple handlers to handle the same event. Many events have default handlers; for example, if the user clicks on an <a> link, the browser will handle the event by loading the requested page. If you want to prevent this behavior, call preventDefault()on the event object. Most of the event handlers you write will call preventDefault() (unless you explicitly want to do something in addition to the default handler).
To add our highlights, we call highlightParas, passing in the value of the button’s containing data element: this allows us to change the text we’re looking for simply by changing the HTML!
Event Capturing and Bubbling
Because HTML is hierarchical, events can be handled in multiple places. For example, if you click on a button, the button itself could handle the event, the button’s parent, parent’s parent, and so on. Because multiple elements have the opportunity to handle the event, the question becomes “in what order do elements get the opportunity to respond to the event?”
There are essentially two options. One is to start at the most distant ancestor. This is called capturing. In our example, our buttons are children of <div id="content"> which is, in turn, a child of <body>. Therefore, <body> has the opportunity to “capture” events destined for the buttons.
The other option is to start at the element where the event occurred, and then walk up the hierarchy so all ancestors have a chance to respond. This is called bubbling.
To support both options, HTML5 event propagation starts by allowing handlers to capture the event (starting at the most distant ancestor and working down to the target element) and then the event bubbles back up from the target element to the most distant ancestor.
Any handler can optionally do one of three things to affect how (and if) additional handlers will get called. The first and most common, which we’ve already seen, is preventDefault, which cancels the event. Canceled events continue propagating, but their defaultPrevented property is set to true. Event handlers built into the browser will respect the defaultPrevented property and take no action. Event handlers that you write can (and usually do) choose to ignore this property. The second approach is to call stopPropagation, which prevents further propagation past the current element (all handlers attached to the current element will be called, but no handlers attached to other elements). Finally—the big gun—stopImmediatePropagation will prevent any further handlers from getting called (even if they’re on the current element).
To see all of this in action, consider the following HTML:
<!doctype html>
<html>
<head>
<title>Event Propagation</title>
<meta charset="utf-8">
</head>
<body>
<div>
<button>Click Me!</button>
</div>
<script>
// this creates an event handler and returns it
function logEvent(handlerName, type, cancel,
stop, stopImmediate) {
// this is the actual event handler
return function(evt) {
if(cancel) evt.preventDefault();
if(stop) evt.stopPropagation();
if(stopImmediate) evt.stopImmediatePropagation();
console.log(`${type}: ${handlerName}` +
(evt.defaultPrevented ? ' (canceled)' : ''));
}
}
// this adds an event logger to an element
function addEventLogger(elt, type, action) {
const capture = type === 'capture';
elt.addEventListener('click',
logEvent(elt.tagName, type, action==='cancel',
action==='stop', action==='stop!'), capture);
}
const body = document.querySelector('body');
const div = document.querySelector('div');
const button = document.querySelector('button');
addEventLogger(body, 'capture');
addEventLogger(body, 'bubble');
addEventLogger(div, 'capture');
addEventLogger(div, 'bubble');
addEventLogger(button, 'capture');
addEventLogger(button, 'bubble');
</script>
</body>
</html>
If you click the button, this is what you will see on the console:
capture: BODY
capture: DIV
capture: BUTTON
bubble: BUTTON
bubble: DIV
bubble: BODY
Here we clearly see the capture propagation followed by the bubble propagation. Note that on the element on which the event was actually raised, handlers will be called in the order they were added, whether they were capture or propagation events (if we reversed the order in which we added the capture and bubble event handlers, we would see the bubble called before the capture).
Now let’s see what happens if we cancel propagation. Modify the example to cancel propagation on the <div> capture:
addEventLogger(body, 'capture');
addEventLogger(body, 'bubble');
addEventLogger(div, 'capture', 'cancel');
addEventLogger(div, 'bubble');
addEventLogger(button, 'capture');
addEventLogger(button, 'bubble');
We now see that the propagation continues, but the event is marked as canceled:
capture: BODY
capture: DIV (canceled)
capture: BUTTON (canceled)
bubble: BUTTON (canceled)
bubble: DIV (canceled)
bubble: BODY (canceled)
Now stop the propagation at the <button> capture:
addEventLogger(body, 'capture');
addEventLogger(body, 'bubble');
addEventLogger(div, 'capture', 'cancel');
addEventLogger(div, 'bubble');
addEventLogger(button, 'capture', 'stop');
addEventLogger(button, 'bubble');
We see that propagation stops after the <button> element. The <button> bubble event still fires, even though the capture fired first and stopped the propagation. The <div> and <body> elements do not receive their bubbled events, however:
capture: BODY
capture: DIV (canceled)
capture: BUTTON (canceled)
bubble: BUTTON (canceled)
Lastly, we stop immediately on the <button> capture:
addEventLogger(body, 'capture');
addEventLogger(body, 'bubble');
addEventLogger(div, 'capture', 'cancel');
addEventLogger(div, 'bubble');
addEventLogger(button, 'capture', 'stop!');
addEventLogger(button, 'bubble');
Now we see that propagation stops totally at the <button> capture, and no further propagation occurs:
capture: BODY
capture: DIV (canceled)
capture: BUTTON (canceled)
NOTE
addEventListener replaces a much older way to add events: using “on” properties. For example, a click handler would have been added on the element elt with elt.onclick = function(evt) { /* handler */ }. The primary disadvantage of this method is that only one handler could be registered at a time.
While it is unlikely that you will have to do advanced control of event propagation very often, it is a subject that causes much confusion among beginners. Having a firm grasp on the details of event propagation will set you apart from the crowd.
NOTE
With jQuery event listeners, explicitly returning false from the handler is equivalent to calling stopPropagation; this is a jQuery convention, and this shortcut does not work in the DOM API.
Event Categories
MDN has an excellent reference of all DOM events grouped into categories. Some commonly used event categories include:
Drag events
Allow the implementation of a drag-and-drop interface with events like dragstart, drag, dragend, drop, and others.
Focus events
Allow you to take action when a user interacts with editable elements (such as form fields). focus is raised when a user “enters” a field (by clicking, pressing Tab, or touching), and blur is raised when the user “leaves” a field (by clicking somewhere else, pressing Tab, or touching elsewhere). The change event is raised when a user makes a change to a field.
Form events
When a user submits a form (by pressing a Submit button, or pressing Enter in the right context), the submit event is raised on the form.
Input device events
We’ve already seen click, but there are additional mouse events (mousedown, move, mouseup, mouseenter, mouseleave, mouseover, mousewheel) and keyboard events (keydown, keypress, keyup). Note that “touch” events (for touch-enabled devices) take precedence over mouse events, but if touch events aren’t handled, they result in mouse events. For example, if a user touches a button, and touch events aren’t handled explicitly, a click event will be raised.
Media events
Allow you to track a user’s interaction with HTML5 video and audio players (pause, play, etc.).
Progress events
Inform you about the browser’s progress loading content. The most common is load, which fires once the browser has loaded the element and all its dependent resources. error is also useful, allowing you to take action when an element is unavailable (for example, a broken image link).
Touch events
Touch events provide sophisticated support for devices that allow touch. Multiple simultaneous touches are permitted (look for the touches property in the event), enabling sophisticated touch handling, such as support for gestures (pinch, swipe, etc.).
Ajax
Ajax (which was originally an acronym for “Asynchronous JavaScript and XML”) enables asynchronous communication with a server—allowing elements on your page to be refreshed with data from the server without reloading the entire page. This innovation was made possible with the introduction of the XMLHttpRequest object in the early 2000s, and ushered in what became known as “Web 2.0.”
The core concept of Ajax is simple: browser-side JavaScript makes HTTP requests programatically to a server, which returns data, usually in JSON format (which is much easier to work with in JavaScript than XML). That data is used to enable functionality on the browser. While Ajax is based on HTTP (just like non-Ajax web pages), the overhead of transferring and rendering a page is reduced, enabling web applications that perform much faster—or at least appear to from the user’s perspective.
To use Ajax, we need to have a server. We’ll write an extremely simple server in Node.js (this is a preview of Chapter 20) that exposes an Ajax endpoint (a specific service that is exposed for use in other services or applications). Create a file called ajaxServer.js:
const http = require('http');
const server = http.createServer(function(req, res) {
res.setHeader('Content-Type', 'application/json');
res.setHeader('Access-Control-Allow-Origin', '*');
res.end(JSON.stringify({
platform: process.platform,
nodeVersion: process.version,
uptime: Math.round(process.uptime()),
}));
});
const port = 7070;
server.listen(port, function() {
console.log(`Ajax server started on port ${port}`);
});
This creates a very simple server that reports the platform (“linux,” “darwin,” “win32,” etc.), the version of Node.js, and the server uptime.
NOTE
Ajax introduced the possibility of a security vulnerability called cross-origin resource sharing (CORS). In this example, we are adding a header of Access-Control-Allow-Origin with a value of *, which signals to the client (the browser) not to prevent the call for security reasons. On a production server, you would either want to use the same protocol, domain, and port (which will be allowed by default), or specify explicitly what protocol, domain, and port can access the endpoint. For demonstration purposes, though, it is safe to disable CORS checking like this.
To start this server, simply run:
$ babel-node ajaxServer.js
If you load http://localhost:7070 in a browser, you will see the output of the server. Now that we have a server, we can make an Ajax code from our sample HTML page (you can use the same one that we’ve been using through this chapter). We’ll start by adding a placeholder somewhere in the body that will receive the information:
<div class="serverInfo">
Server is running on <span data-replace="platform">???</span>
with Node <span data-replace="nodeVersion">???</span>. It has
been up for <span data-replace="uptime">???</span> seconds.
</div>
Now that we have a place to put the data that’s coming from the server, we can use XMLHttpRequest to perform an Ajax call. At the bottom of your HTML file (right before the closing </body> tag), add the following script:
<script type="application/javascript;version=1.8">
function refreshServerInfo() {
const req = new XMLHttpRequest();
req.addEventListener('load', function() {
// TODO: put these values into HTML
console.log(this.responseText);
});
req.open('GET', 'http://localhost:7070', true);
req.send();
}
refreshServerInfo();
</script>
This script executes a basic Ajax call. We first create a new XMLHttpRequest object, and then we add a listener that listens for the load event (which is what will get called if the Ajax call was successful). For now, we just print the server response (which is in this.responseText) to the console. Then we call open, which is what actually establishes the connection to the server. We specify that it’s an HTTP GET request, which is the same method used when you visit a web page with your browser (there are also POST and DELETE methods, among others), and we provide the URL to the server. Finally, we call send, which actually executes the request. In this example, we’re not explicitly sending any data to the server, but we could.
If you run this example, you’ll see the data that’s returned from the server show up on the console. Our next step is inserting this data into our HTML. We structured our HTML so that we could simply look for any element that has the data attribute replace, and replace that element’s contents with the data from the object that was returned. To accomplish this, we iterate over the properties that were returned from the server (using Object.keys), and if there are any elements with matching replace data attributes, we replace their contents:
req.addEventListener('load', function() {
// this.responseText is a string containing JSON; we use
// JSON.parse to convert it to an object
const data = JSON.parse(this.responseText);
// In this example, we only want to replace text within the <div>
// that has class "serverInfo"
const serverInfo = document.querySelector('.serverInfo');
// Iterate over the keys in the object returned from the server
// ("platform", "nodeVersion", and "uptime"):
Object.keys(data).forEach(p => {
// Find elements to replace for this property (if any)
const replacements =
serverInfo.querySelectorAll(`[data-replace="${p}"]`);
// replace all elements with the value returned from the server
for(let r of replacements) {
r.textContent = data[p];
}
});
});
Because refreshServerInfo is a function, we can call it at any time. In particular, we may wish to update the server info periodically (which is one reason we added the uptime field). For example, if we want to update the server five times a second (every 200 milliseconds), we can add the following code:
setInterval(refreshServerInfo, 200);
By doing this, we will see the server uptime increase live in the browser!
NOTE
In this example, when the page initially loads, <div class=".serverInfo"> contains placeholder text with question marks in it. On a slow Internet connection, the user may see those question marks for an instant before they’re replaced with the information from the server. This is a variation of the “flash of unstyled content” (FOUC) problem. One solution is to have the server render the initial page with the correct values. Another solution is to hide the entire element until its contents have been updated; it could still be a jarring effect, but might be more acceptable than meaningless question marks.
This covers only the basic concepts involved in making Ajax requests; to learn more, see the MDN article “Using XMLHttpRequest”.
Conclusion
As you can see from this chapter, web development introduces a lot of concepts and complexities in addition to the JavaScript language itself. We’ve only scratched the surface here, and if you are a web developer, I recommend Semmy Purewal’s Learning Web App Development. If you’d like to learn more about CSS, any of Eric A. Meyer’s books are excellent.
All materials on the site are licensed Creative Commons Attribution-Sharealike 3.0 Unported CC BY-SA 3.0 & GNU Free Documentation License (GFDL)
If you are the copyright holder of any material contained on our site and intend to remove it, please contact our site administrator for approval.
© 2016-2026 All site design rights belong to S.Y.A.