Microsoft Press Programming Windows Store Apps with HTML, CSS and JavaScript (2014)
Chapter 9 Commanding UI
For consumers coming anew to Windows 8, Windows 8.1, and Windows Store apps, one of their first reactions might be “Where are the menus? Where is the ribbon? How do I tell this app to do something with the items I selected from a list?” This will be a natural response until users become more accustomed to where commands live, giving another meaning, albeit a mundane one, to the dictum “Blessed are those who have not seen, and yet believe!”
With the design principle of “content before chrome,” UI elements that exist solely to invoke actions and don’t otherwise contain meaningful content fall into the category of “chrome.” As such, they are generally kept out of sight until needed, as are system-level commands like the Charms bar. The user indicates his or her desire for those commands through an appropriate gesture. A swipe on the top or bottom edge of the display, a right mouse button click, or the Win+Z key combination brings up app-specific commands at the top and bottom. A swipe on the left edge of the display, a mouse click on the upper left corner, or Win+Tab allows for switching between apps. And a swipe on the right edge of the display, a mouse click on the upper-right or lower-right corner, or Win+C reveals the Charms bar. (Win+Q, Win+H, and Win+i open the Search, Share, and Settings charms directly.) An app responds to the different charms through particular contracts, as we’ll see in a number of the chapters that follow.
App-specific commands, for their part, are provided through an app bar control: WinJS.UI.AppBar. In many ways, the app bar is the equivalent of a menu and ribbon for Windows Store apps, because you can create all sorts of UI within it and even show menu elements. Menus, supplied by the WinJS.UI.Menu control, can also pop up from specific points on the app’s main display, such as a menu attached to a header. There is also a special case app bar for navigation: WinJS.UI.NavBar.
The app/nav bar and menus are specific instances of the more generic WinJS.UI.Flyout control, which is used directly for messages or actions that the user can cancel or ignore; such flyouts are dismissed simply by clicking or tapping outside the flyout’s window. (This is like pressing a Cancel button.) For important messages that require action—that is, where the user must choose between a set of options—apps employ Windows.UI.Popups.MessageDialog. Dialog boxes are a familiar concept from the world of desktop applications and have long been used for collecting all kinds of information and adjusting app settings. In Windows Store app design, however, dialog boxes are used only to ask a question and get a simple answer, or just to inform the user of some condition that did not arise directly from user interaction. Settings are specifically handled through the Settings charm, as we’ll see in Chapter 10, “The Story of State, Part 1.”
An important point with all of these command controls is that they don’t participate in page layout: they instead “fly out” and remain on top of the current page. This means we thankfully don’t need to worry about their impact on layout…with one small exception that I’ll keep secret for now.
To begin with, though, let’s take a step back to think about an app’s commands as a whole and where those commands are ideally placed.
Where to Place Commands
The placement of commands is really quite central to app design. Unlike the guidelines—or lack thereof!—for desktop application commands, which has resulted in quite a jumble, the Windows Developer Center offers two rather extensive topics on this subject: Commanding design andLaying out your UI. These are must-reads for any designer working on an app, because they describe the different kinds of commanding UI and how to gain the best smiling accolades from Windows design pundits. These are also good topics for developers because they can give you some idea of what you might expect from your designers. Let’s review that guidance, then, as an introductory tour to the various options:
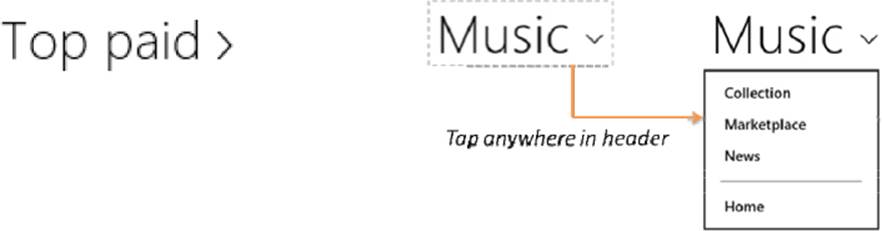
• The user should be able to complete their most important scenarios using just the app canvas, so commands that are essential to a workflow should appear directly on-screen. The overall purpose here is to minimize the distraction of unnecessary commands. Nonessential commands should be kept out of view, except for navigation options where a single navigation command uses a forward chevron (below left) and those with multiple options use a down chevron and a drop-down menu (below right):
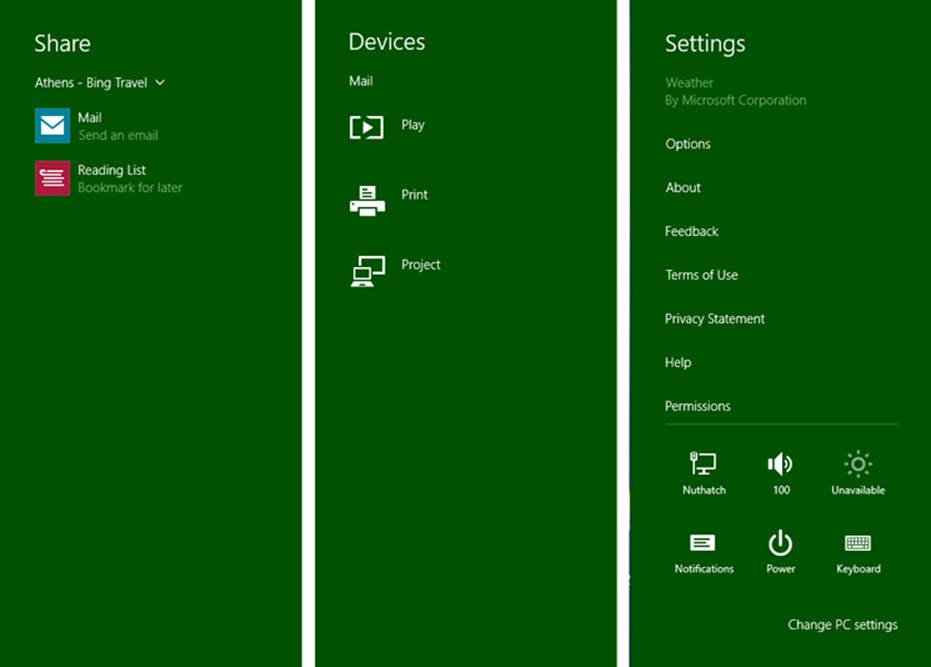
• Use Charms for common app commands where possible. That is, instead of supplying individual commands to share with specific targets such as email apps, your contacts, social network apps, and the like, use the Share charm. Instead of supplying your own Print commands, rely on the Device charm. And instead of creating pages within your navigation hierarchy for app settings, Help, About, permissions, license agreements, privacy statements, and login/account management, simplify your life and use the Settings charm! (Refer also to “Sidebar: Logins and License Agreements.”) Examples of the charms are shown in the image below, which also illustrates that many app commands can leverage the Charms bar, which means less clutter in the rest of your commanding UI. Again, we’ll cover how to respond to Charms events in later chapters.
An exception to this guidance for charms is Search, which typically is placed on the app canvas with the WinJS.UI.SearchBox control, but an app can also use the Search contract to work with the Search Charm. We’ll learn about search in Chapter 15, “Contracts.”
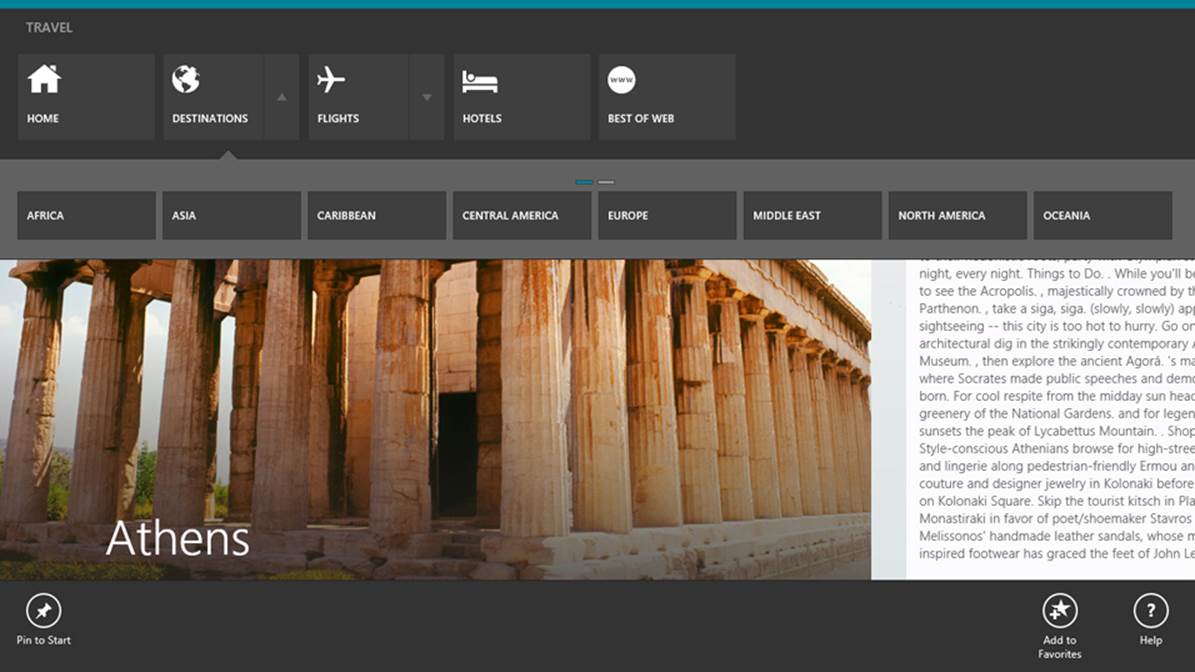
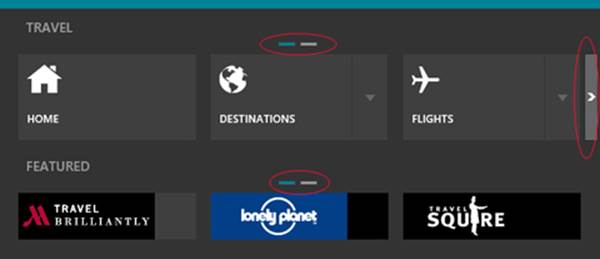
• Commands that can’t be placed in Charms and don’t need to be on the app canvas are then placed within the nav bar and app bar, as shown below in the Travel app. Both bars are invoked together by swiping in from either the top or bottom edges and are the closest analogies to traditional menus:
• The top bar should contain navigation commands.
• The bottom app bar contains all other commands that are sensitive to the context or selection, as well as global (nonselection) commands. Context and global commands are placed on different sides of the app bar.
• App bar and nav bar commands can display menus to group related commands to reduce clutter; below, the Destinations button in the nav bar opens up the secondary list.
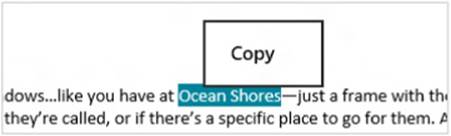
• Context menus can provide specific commands for particular content or a selection. For example, selected text typically provides a context menu for clipboard commands, as shown here in the Mail app.
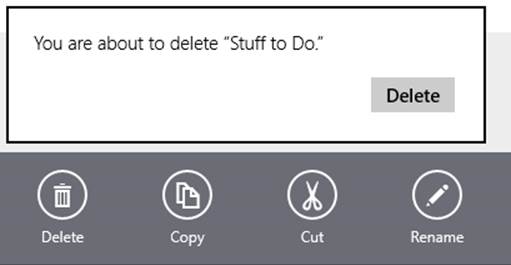
• Confirmations and other questions (including collecting information) that you need to display in response to a user action should use a flyout control; see Guidelines and checklist for Flyouts. Tapping or clicking outside the control (or pressing ESC) is the same as canceling. Here’s an example from the OneDrive app when using the Delete button:
• For blocking events that are not related to a user command but that affect the whole app, use a message dialog. A message dialog disables the rest of the app until you pay attention to it! A good example of this is a loss of network connectivity, where the user needs to be informed that some capabilities may not be available until connectivity is restored. User consent prompts for capabilities like geolocation, as shown below from the Maps app, is another place you see message dialogs. Note that a message dialog is used only when the app is in the foreground. Toast notifications, as we’ll see in Chapter 16, “Alive with Activity,” are how background apps and tasks get the user’s attention.

• Finally, other errors that don’t require user action can be displayed either inline (on the app canvas) or through flyouts. See Laying out your UI: errors for full details; we’ll see some examples later on as well.
Where the app bar (on the bottom) is concerned, it’s also important to organize your commands into sets, as this streamlines implementation as we’ll see in the next section. For full guidance I recommend Guidelines or app bars and Commanding Design in the documentation, which provide many specifics on placement, spacing, and grouping. That guidance can be summarized as follows:
• First, make two groups of commands: one with those commands that appear throughout the entire app, regardless of context, and another with those that show only on certain pages. The app bar control is fairly simple to reconfigure at run time for different groups.
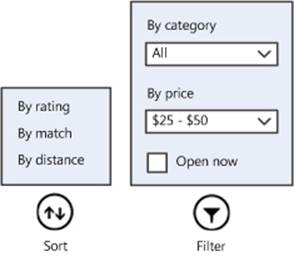
• Next, create command sets, such as those that are functionally related, those that toggle view types, and those that apply to selections. Remember that an app bar command can display a popup menu, as shown below, to provide a list of options and/or additional controls, including longer labels, drop-down lists, checkboxes, radiobuttons, and toggle switches. In this way you can combine closely related commands into a single one that gets more room to play than its little space on the app bar proper.
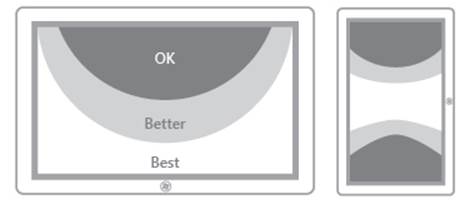
• For placement, put persistent commands on the right side of the app bar and the most common context-specific commands on the left. After that, populate additional commands toward the middle. This recommendation comes from the ergonomic realities of human hands: fingers and thumbs—even on the largest hands of basketball players!—grow only so long and can reach only so far on the screen without having to move one’s hand. The most commonly used commands are best placed nearest to where a person’s thumbs will be when holding a device, as indicated in the image below (from the Touch interaction design topic in the docs). Those spots are easier to reach (especially by those of us that can’t grip a large ball with one hand!) and thus make the whole user experience more comfortable.
• The nav bar and app bar are always available in all views, regardless of size; in narrower views you can limit app bar commands to around 10 so that they fit into one or two rows, and also omit labels and tighten up the hit targets. The WinJS app bar does this automatically.
• Know too that the app bar is not limited to circular command buttons: you can create whatever custom layout you like, which is how the nav bar is implemented. With any custom layout, make sure that your elements are appropriately sized for touch interaction. More on this—including a small graphic of the aforementioned finger of a basketball player—can again be found on Guidelines for app bars as well as Touch interaction design under “Touch targets.”
Sidebar: Logins and License Agreements
As noted above, Microsoft recommends that login/account management and license agreements/terms-of-use pages are accessed through the Settings charm, where an app adds relevant commands to the Settings pane that appears when the charm is invoked. These commands invoke subsidiary pages with the necessary controls for each functions. Of course, sometimes logins and license agreements need some special handling. For example, if your app requires a login or license agreement on startup, such controls can be shown on the app’s first page, through the Web Authentication Broker (see Chapter 4, “Web Content and Services”), or in enterprise scenarios through the Credential Picker UI (see Appendix C, “Additional Networking Topics”). If the user provides a login and/or agrees to the terms of service, the app can continue to run. Otherwise, the app should show a page that indicates that a login or agreement is necessary to do something more interesting than stare at error messages.
If a login is recommended but not required, perhaps to enable additional features, you can place those controls directly on the canvas. When the user logs in, you can replace those controls with bits of profile information (user name and picture, for example, as on the Windows Start screen). If, on the other hand, a login is entirely optional, keep it within Settings.
In all cases, commands to view the license agreement, manage one’s account or profile, and log in or out should still be available within Settings. Other app bar or on-canvas commands can invoke Settings programmatically, as we’ll see in Chapter 10.
The App Bar and Nav Bar
After placing essential commands on the app canvas, most of your app’s commands will be placed in the app bar and navigation-specific commands in the top nav bar. Again, both bars are automatically brought up in response to various user gestures, such as a top or bottom edge swipe, Win+Z, or a right mouse button click. Whenever you perform one of these gestures, Windows looks for suitable controls on the current page and invokes them—you don’t need to process any input events yourself. (Similarly, a click/tap outside the control or the ESC key dismisses them.)
Tip To prevent the app/nav bar from appearing, you can do one of two things. First, to prevent an app bar or nav bar from appearing at all (for any gesture), set the control’s disabledproperty to true. Second, if you want to prevent it for, say, a right-click on a particular element (such as a canvas), listen to the contextmenu (right click) event for that element and call eventArgs.preventDefault()within your handler.
For apps written in HTML and JavaScript, the app bar control is implemented as a WinJS control, WinJS.UI.AppBar, and the nav bar with WinJS.UI.NavBar. As with all other WinJS controls, you declare either or both controls in HTML and instantiate them with a call to WinJS.UI.processor WinJS.UI.processAll. For a first example, we don’t need to look any farther than some of the Visual Studio/Blend project templates like the Grid App project, where a placeholder app bar is included in default.html (initially commented out):
<div id="appbar" data-win-control="WinJS.UI.AppBar">
<button data-win-control="WinJS.UI.AppBarCommand"
data-win-options="{id:'cmd', label:'Command', icon:'placeholder'}"></button>
</div>
The super-exciting result of this markup, using the WinJS ui-dark.css stylesheet, is as follows:

Because the app bar is declared in default.html, which is the container for all other page controls, this same app bar will apply to all the pages in the app. With this approach you can declare all your commands within a single app bar and assign different classes to the commands that allow you to easily show and hide command sets as appropriate for each page. This also centralizes those commands that appear on multiple pages, and you can wire up event handlers for them in your app’s primary activation code (such as that in default.js).
Alternately, you can declare app/nav bars within the markup for individual page controls. Because the controls will be in the DOM, the Windows gestures will invoke it on each particular page. In the Grid App project, for example, you can move the markup above from default.html into groupedItems.html, groupDetail.html, and itemDetail.html with whatever modifications you like for each page. This might be especially useful if your app’s pages don’t share many commands in common.
In these cases, each page’s ready method should take care of wiring up the commands on its particular app/nav bars. Note also that you can add handlers within a page’s ready method even for central app/nav bars; it’s just a matter of calling addEventListener on the appropriate child element within those controls. If it’s in the DOM, you can add a listener!
Let’s look now at how all this works through the HTML AppBar control sample and the HTML NavBar control sample. We’ll look at app bars first, starting with the basics and the standard command-oriented configuration; then we’ll look at how to display menus for some of those commands and see how to create custom layouts as is used for a top navigation bar. The WinJS NavBar control, in fact, is a derivative of a custom layout app bar, so we’ll come to that at the end of this section.
Hint Technically speaking, you can declare as many app/nav bars as you want in whatever pages you want, and they’ll all be present in the DOM. However, the last one that gets processed in your markup will be the one that’s topmost in the z-index by default and therefore the one to receive events. Windows does not make any attempt to combine app/nav bars, so because page controls are inserted into the middle of a host page like default.html, an app bar in default.html that’s declared after the page control host element will appear on top. At the same time, if the page control’s nav bar is larger than that in default.html, a portion of it might be visible. The bottom line: declare app/nav bars either in the host page or in a page control, but not both.
App Bar Basics and Standard Commands
As I just mentioned, an app bar can be declared once for an app in a container page like default.html or can be declared separately for each individual page control. The HTML AppBar control sample does the latter, because it provides very distinct app bars for its various scenarios.
Scenario 1 of the sample (html/create-appbar.html) declares an app bar with four commands and a separator:
<div id="createAppBar" data-win-control="WinJS.UI.AppBar" data-win-options="">
<button data-win-control="WinJS.UI.AppBarCommand" data-win-options="{id:'cmdAdd',
label:'Add', icon:'add', section:'global', tooltip:'Add item'}"></button>
<button data-win-control="WinJS.UI.AppBarCommand" data-win-options="{id:'cmdRemove',
label:'Remove', icon:'remove', section:'global', tooltip:'Remove item'}"></button>
<hr data-win-control="WinJS.UI.AppBarCommand" data-win-options="{type:'separator',
section:'global'}"/>
<button data-win-control="WinJS.UI.AppBarCommand" data-win-options="{id:'cmdDelete',
label:'Delete', icon:'delete', section:'global', tooltip:'Delete item'}"></button>
<button data-win-control="WinJS.UI.AppBarCommand" data-win-options="{id:'cmdCamera',
label:'Camera', icon:'camera', section:'selection', tooltip:'Take a picture'}"></button>
</div>
This appears in the app as follows, using the WinJS ui-light.css stylesheet, in which we can also see a tooltip, a focus rectangle, and a hover effect on the Add command (I placed my mouse over the command to see all this):

In the markup, the app bar control is declared like any other WinJS control (this is becoming a habit!) using some containing element (a div) with data-win-control="WinJS.UI.AppBar". Each page in this sample is loaded with WinJS.UI.Pages.render that conveniently calls WinJS.UI.-processAll to instantiate the app bar. (It is also allowable, as with other controls, to create an app bar programmatically using the new operator.)
This example doesn’t provide any specific options for the app bar in its data-win-options, but there are a number of possibilities:
• disabled, if set to true, creates an initially disabled app bar; the default is false.
• layout (a string) can be commands (the default) or custom, as we’ll see in the “Custom App Bars” section later.
• placement (a string) can be either top or bottom (the default). The top option is the default for a nav bar.
• sticky changes the light-dismiss behavior of the app bar. With the default of false, the app bar will be dismissed when you click or tap outside of it. If this is set to true, the app bar will stay on the screen until either you change sticky to false and tap outside or you programmatically relieve the control from its duties with its hide method.
So, if you wanted a sticky nav bar with a custom layout to appear at the top of the screen, you’d use markup like this:
<div id="navBar" data-win-control="WinJS.UI.AppBar"
data-win-options="{layout:'custom', placement:'top', sticky: true}">
Note that having two app bars in a page with different placement values will not interfere with each other. (Again, the NavBar derives from the AppBar and uses a custom layout and top placement by default, so you don’t have use markup like the above.) Also, the sticky property for each placement operates independently. So if you want to implement an appwide top nav bar, you could declare that within default.html (or whatever your top-level page happens to be), and declare bottom app bars in each page control. Again, they’re all just elements in the DOM!
As you can see, an app bar control can contain any number of child elements for its commands, each of which must be a WinJS.UI.AppBarCommand control within a button or hr element or else the app bar won’t instantiate.
The properties and options of an app bar command are as follows:
• id The element identifier, which you can use with document.getElementById or the app bar’s getCommandById method to wire up click handlers.
• type (a string) One of button (the default), separator (which creates a vertical bar), flyout (which triggers a popup specified with the flyout property; see “Command Menus” later), toggle (which creates a button with on/off states), and content (which allows for arbitrary controls as commands; see “Custom App Bars” later on). With toggle, the selected property of a command can also be used to set the initial value and to retrieve the state at run time.
• label The text shown below for the command button. You always want to use this instead of providing text for the button element itself, because such text won’t be aligned properly in the control. (Try it and you’ll see!) The app bar will also automatically hide labels in narrow views. Also, note that this property, along with tooltip below, is often localized using data-win-res attributes. We’ll cover this in Chapter 19, “Apps for Everyone, Part 1,” but for the time being you can look at the html/localize-appbar.html file in the sample (scenario 8) to see how it works.
• tooltip The (typically localized) tooltip text for the command, using the value of labelas the default. Note that this is just text that gets passed to the element’stitleattribute, so using a full HTML-based WinJS.UI.Tooltipcontrol here is not supported.
• icon Specifies the glyph that’s shown in the command. Typically, this is one of the strings from theWinJS.UI.AppBarIcon enumeration, which contains 150 different options from the Segoe UI Symbol font. If you look in the ui.strings.js resource file of WinJS you can see how these are defined using codes like \uE109—the enumeration, in fact, simply provides friendly names for character codes \uE100 through \uE1E9. But you’re not limited by these. For one thing, you can use any other Unicode escape value '\uXXXX' from the Segoe UI Symbol font. (Note the single quotes.) You can also use a different font or use your own graphics as described in “Custom Icons” later.77
• section (a string) Controls the placement of the command. For left-to-right languages (such as English), the default value of selection places the command on the left side of the app bar and global places it on the right. For right-to-left languages (such as Hebrew and Arabic), the sides are swapped. These simple choices encourage consistent placement of these two categories of commands (and using any other random value here defaults to selection). This trains users’ eyes to look for the most constant commands on one side and selection-specific commands on the other. Note that the commands in each section are laid out left-to-right (or right-to-left) in the order they appear in your markup.
• firstElementFocus, lastElementFocus For commands of type content, gets or sets the element within that command’s DOM tree that should receive the focus with the Home and End keys, respectively, and the arrow keys.
• onclick Can be used to declaratively specify aclickhandler; remember that any function named here in markup must be marked safe for processing. (See Chapter 5, “Controls and Control Styling,” in the “Strict Processing and processAll Functions” section.)Clickhandlers can also be assigned programmatically with addEventListener, in which case the mark is not needed.
• disabled Sets the disabled state of a command if true; the default isfalse.
• extraClass Specifies one or more CSS classes that are attached to the command. These can be used to individually style command controls as well as to create sets that you can easily show and hide, as explained in the “Showing, Hiding, Enabling, and Updating Commands” section later.
If you want to generate commands at run time (not using the content type), you can do so by setting the app bar’s commands property with an array of JSON AppBarCommanddescriptors any time the app bar isn’t visible (that is, when its hidden property is true). An array of such descriptors for the scenario 1 app bar in the sample would be as follows (this is provided in the modified sample included with this chapter; see js/create_appbar.js):
//Set the app bar commands property to populate it
var commands = [
{ id: 'cmdAdd', label: 'Add', icon: 'add', section: 'global', tooltip: 'Add item' },
{ id: 'cmdRemove', label: 'Remove', icon: 'remove', section: 'global',
tooltip: 'Remove item' },
{ type: 'separator', section: 'global' },
{ id: 'cmdDelete', label: 'Delete', icon: 'delete', section: 'global',
tooltip: 'Delete item' },
{ id: 'cmdCamera', label: 'Camera', icon: 'camera', section: 'selection',
tooltip: 'Take a picture' }
];
appBar.commands = commands;
When the app bar is created, it will iterate through the commands array and create AppBarCommand controls for each item. If type isn’t specified or if it’s set to button, flyout, or toggle, then the command is a button element. A type of separator creates an hr element. The content type will create an empty div. Note that you should localize the label, tooltip, and possibly icon fields in each command declaration rather than using explicit text as shown here.
You can also use such an array directly within declarative markup, but this form cannot be localized and is thus discouraged (though I include comments that show how in the modified sample). At the same time, because the value of commands in markup is just a string, you can assign its value through data binding with an attribute like this in the app bar element:
data-win-bind="{ winControl.commands: Data.commands }"
where Data.commands can refer to a localized data source. In this case Data must be a global variable (like a namespace), and you must call WinJS.Binding.processAll on the app bar element (with no specific context) within a completed handler for WinJS.UI.processAll to make sure the app bar has been created first. Alternately, you can pass Data as the second argument to Binding.processAll and just use commands for the source in the data-win-bind string.
Note also that this approach does not work with the data-win-res attribute (as we’ll see in Chapter 19 and which is also shown in scenario 8 of the sample) because the resource string won’t be converted to JSON as part of the resource lookup. Attempting to play such a trick would be more trouble than it’s worth anyway, so it’s best to use either the HTML declarative form or a localized commands array at run time.
Also, be aware that commands is a rare example of a write-only property: you can set it, but you cannot retrieve the array from an app bar. The app bar uses this array only to configure itself and the array is discarded once all the elements are created in the DOM. At run time, however, you can use the app bar’s getCommandById method to retrieve a particular command element.
Command Events
Speaking of the command elements, an app bar’s AppBarCommand controls (other than separators) are all just button elements and thus respond to the usual events. Because each command element is assigned the id you specify, you can use getElementById as a prelude to addEventListener, but the more direct means is the app bar’s getCommandByIdmethod. In scenario 1 of the HTML App Bar control sample, for instance, this code appears in the page’s ready method (js/create-appbar.js):
var appBar = document.getElementById("createAppBar").winControl;
appBar.getCommandById("cmdAdd").addEventListener("click", doClickAdd, false);
appBar.getCommandById("cmdRemove").addEventListener("click", doClickRemove, false);
appBar.getCommandById("cmdDelete").addEventListener("click", doClickDelete, false);
appBar.getCommandById("cmdCamera").addEventListener("click", doClickCamera, false);
Of course, if you specify a handler for each command’s onclick property in your markup (with each one having its supportedForProcessing property true), you can avoid all of this entirely!
It should also be obvious that you can wire up events from anywhere in your app, and you can certainly listen to any other events you want to, especially when doing custom app bar layouts with other UI. Also, know that the click event conveniently handles touch, mouse, and keyboard input alike, so you don’t need to do any extra work there. In the case of the keyboard, by the way, the app bar lets you move between commands with the Tab key and the arrow keys; Enter or Spacebar will invoke the click handler.
App Bar Events and Methods
In addition to the app bar’s getCommandById method we just saw, the app bar has several other methods and a handful of events. First, the methods:
• show displays an app bar if its disabled property is false; otherwise the call is ignored.
• hidedismisses the app bar.
• showCommands, hideCommands, and showOnlyCommands are used to manage command sets as described in the next section, “Showing, Hiding, Enabling, and Updating Commands.”
As for events, there are a total of four that are common to the overlay-style UI controls in WinJS (that is, those that don’t participate in layout):
• beforeshow occurs before a flyout becomes visible. For an app bar, this is when you could set the commands property depending on the state of the app at the moment or enable/disable specific commands.
• aftershow occurs immediately after a flyout becomes visible. For an app bar, if its sticky property is true, you can use this event to adjust the app’s layout if you have a scrolling element that might be partially covered otherwise—see below.
• beforehide occurs before a flyout is hidden. For an app bar, you’d use this event to hide any supplemental UI created with the app bar and to readjust layout around a sticky app bar.
• afterhide occurs immediately after a flyout is hidden. For an app bar, this again could be a time to readjust the app’s layout.
You can find an example of using the show method along with the aftershow and beforehide events in scenario 5 of the HTML AppBar control sample.
The matter with app layout identified above (and what I kept secret in the introduction to this chapter) arises because an app bar overlays and obscures the bottom portion of the page. If that page contains a scrolling element, an app bar with sticky set to true will, for mouse users, partly cover a vertical scrollbar and will make a horizontal scrollbar wholly inaccessible. If you’re using a sticky app bar with such a page—and because Windows Store policy does not look kindly upon discrimination against mouse users!—you should use aftershow to reduce the scrolling element’s height by the offsetHeight or clientHeight of the app bar control, thereby keeping the scrollbars accessible. When the app bar is hidden and afterhide fires, you can then readjust the layout. Always use a runtime value like clientHeight in these calculations as well, because it accommodates different view sizes and because the height of an app bar can vary with the number of commands and with view size.
To show this, scenario 7 of the sample has a horizontally panning ListView control that normally occupies most of the page; a scrollbar will appear along the very bottom when the mouse is used. If you select an item, the app bar is made sticky and then shown (see the doSelectItemfunction in js/appbar-listview.js):
appBar.sticky = true;
appBar.show();
The show method triggers both beforeshow and aftershow events. To adjust the layout, the appropriate event to use is aftershow, which makes sure the height of the app bar is valid. The sample handles this event in function called doAppBarShow (also in js/appbar-listview.js):
function doAppBarShow() {
var listView = document.getElementById("scenarioListView");
var appBarHeight = appBar.offsetHeight;
// Move the scrollbar into view if appbar is sticky
if (appBar.sticky) {
var listViewTargetHeight = "calc(100% - " + appBarHeight + "px)";
var transition = {
property: 'height',
duration: 367,
timing: "cubic-bezier(0.1, 0.9, 0.2, 0.1)",
to: listViewTargetHeight
};
WinJS.UI.executeTransition(listView, transition);
}
}
Note The SDK sample uses beforeshowinstead of aftershow, with the result that sometimes the app bar still has a zero height and the layout is not adjusted properly. To guarantee that the app bar has its proper height for such calculations, use the aftershowevent as demonstrated in the modified sample included with this chapter’s companion content.
Here you can see that the appBar.offsetHeight value is simply subtracted from the ListView’s height with an animated transition. (See Chapter 14, “Purposeful Animations.”) The operation is reversed in doAppBarHide where the ListView height is simply reset to 100% with a similar animation. In this case, the event handler doesn’t depend on the app bar’s height at all, so it can use either beforehide or afterhide events. If, on the other hand, you need to know the size of the app bar for your own layout, use the beforehide event.
As an exercise, run scenario 8 of the SDK sample. Notice how the bottom part of the text region’s vertical scrollbar is obscured by the sticky app bar. Try taking the code from scenario 7 to handle aftershow and beforehide to adjust the text area’s height to accommodate the app bar and keep the scrollbar completely visible (they show and hide the app bar to see the scrollbar adjust). And no, I won’t be grading you on this quiz: the solution is provided in the modified sample with this chapter.
Showing, Hiding, Enabling, and Updating Commands
In the previous section I mentioned using the beforeshow event to configure an app bar’s commands property such that it contains those commands appropriate to the current page and the page state. This might include setting the disabled property for specific commands that are, for example, dependent on selection state. This can be done through the commands array, in markup, or again by using the app bar’s getCommandById method:
appBar.getCommandById("cmdAdd").disabled = true;
Let me reiterate that the commands that appear on an app bar are specific to each page; it’s not necessary to try to maintain a consistent app bar structure across pages. That is, if a command would always be disabled for a particular page, don’t bother showing it at all. What’s more important is that the app bar for a page is consistent, because it’s a really bad idea to have commands appear and disappear depending on the state of the page. That would leave users guessing at how to get the page in the right state for certain commands to appear!
Speaking of changes, it is entirely allowable to modify or update a command at run time, which can eliminate the need to create multiple commands that your alternately show or hide. Because each command on the app bar is just a DOM element, you can really make any changes you want at any time. An example of this is shown in scenario 3 of the sample where the app bar is initially created with a Play button (html/custom-icons.html):
<button data-win-control="WinJS.UI.AppBarCommand"
data-win-options="{id:'cmdPlay', label:'Play', icon:'play', tooltip:'Play this song'}">
</button>
This button’s click handler uses the doClickPlay function in js/custom-icons.js to toggle between states:
var isPaused = true;
function doClickPlay() {
var cmd = appBar.getCommandById('cmdPlay');
if (!isPaused) {
isPaused = true; // paused
cmd.icon = 'play';
cmd.label = 'Play';
cmd.tooltip = 'Play this song';
} else {
isPaused = false; // playing
cmd.icon = 'pause';
cmd.label = 'Pause';
cmd.tooltip = 'Pause this song';
}
}
You can use something similar with a command to pin and unpin a secondary tile, as we’ll see in Chapter 16. And again, the button is just an element in the DOM and updating any of its properties, including styles, will update the element on the screen once you yield control to the UI thread.
Now using beforeshow for the purpose of adjusting your commands is certainly effective, but you can accomplish the same goal in other ways. The strategy you use depends on the architecture of your app as well as personal preference. From the user’s point of view, so long as the appropriate commands are available at the right time, it doesn’t really matter how the app gets them there!
Thinking through your approach is especially important when dealing with narrow views, because the recommendation is that you limit your commands so that the app bar fits on one or two rows. This means that you will want to think through how to adjust the app bar for different view sizes, perhaps combining multiple commands into a popup menu on a single button.
One approach is to have each page in the app declare and handle its own app bar, which includes pages that create app bars on the fly within their ready methods. This makes the relationship between the page content and the app bar very clear and local to the page. The downside is that common commands—those that appear on more than one page—end up being declared multiple times, making them more difficult to maintain and certainly inviting small inconsistencies like ants to sugar. Nevertheless, if you have very distinct content in your various pages and few common commands, this approach might be the right choice. It is also necessary if your app uses multiple top-level pages rather than one page with page controls, as we discussed in Chapter 3, “App Anatomy and Performance Fundamentals,” because each top-level HTML page has to declare its own app bar anyway.
For apps using page controls, another approach is to declare a single app bar in the top-level page and set its commands property within each page control’s ready method. The drawback here is that because commands is a write-only property, you can’t declare your common commands in HTML and append your page-specific commands later on, unless you go through the trouble of creating each individual AppBarCommand child element within each ready method. This kind of code is both tedious to write and to maintain.
Fortunately, there is a third approach that allows you to define a single app bar in your top-level page that contains all of your commands, for all of your pages, and then selectively show certain sets of those commands within each page’s ready method. This is the purpose of the app bar’sshowCommands, hideCommands, and showOnlyCommands methods.
All three of these methods accept an array of commands, which can be either AppBarCommand objects or command id’s. showCommands makes those commands visible and can be called multiple times with different sets for a cumulative result. On the opposite side, hideCommands hides the specified commands in the app bar, again with cumulative effects. The basic usage of these methods is demonstrated in scenario 5 of the sample.
showOnlyCommands then combines the two, making specific commands visible while hiding all others. If you declare an app bar with all your commands, you can use showOnlyCommands within each page’s ready method to quickly and easily adjust what’s visible. The trick is obtaining the appropriate array to pass to the method. You can, of course, hard-code commands into specific arrays, as scenario 5 of the sample does for showCommands and hideCommands. However, if you’re thinking that this is A Classic Bad Idea, you’re thinking like I’m thinking! Such arrays mean that any changes you make to app bar must happen in both HTML and JavaScript file, meaning that anyone having to maintain your code in the future will surely curse your name!
A better path to happiness and long life is thus to programmatically obtain the necessary arrays from the DOM, using each command’s extraClass property to effectively define command sets. This enables you to call querySelectorAll to retrieve those commands that belong to a particular set.
Consider the following app bar definition, where for the sake of brevity I’ve omitted properties like label, icon, and section, as well as any other styling classes:
<div id="appbar" data-win-control="WinJS.UI.AppBar" data-win-options="{
commands:[
{id:'home', extraClass: 'menuView gameView scoreView'},
{id:'play', extraClass: 'menuView gameView scoreView'},
{id:'rules', extraClass: 'menuView gameView scoreView'},
{id:'scores', extraClass: 'menuView gameView scoreView'},
{id:'newgame', extraClass: 'gameView gameNarrowView'},
{id:'resetgame', extraClass: 'gameView gameNarrowView'},
{id:'loadgame', extraClass: 'gameView gameNarrowView'},
{id:'savegame', extraClass: 'gameView gameNarrowView'},
{id:'hint', extraClass: 'gameView gameNarrowView'},
{id:'timer', extraClass: 'gameView gameNarrowView'},
{id:'pause', extraClass: 'gameView gameNarrowView'},
{id:'replaygame', extraClass: 'scoreView'},
{id:'resetscores', extraClass: 'scoreView'}
]}">
</div>
In the extraClass properties we’ve defined four distinct sets: menuView, gameView, gameNarrow-View, and scoreView. With these in place, a simple call to querySelectorAll provides exactly the array we need for showOnlyCommands. A generic function like the following can then be used from within each page’s ready method (or elsewhere) to activate commands for a particular view:
function updateAppBar(view) {
var appbar = document.getElementById("appbar").winControl;
var commands = appbar.element.querySelectorAll("." + view);// The . is essential
appbar.showOnlyCommands(commands);
}
With this approach, credit for which belongs to my colleague Jesse McGatha, the app bar is wholly defined in a single location, making it very easy to manage and maintain.
App Bar Styling
The extraClass property for commands can, of course, be used for styling purposes as well as managing command sets. It’s very simple: whatever classes you specify in extraClass are added to the AppBarCommand controls created for the app bar.
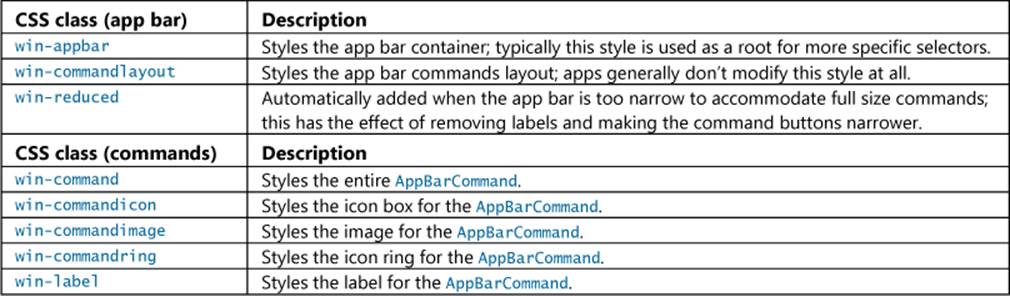
There are also seven WinJS style classes utilized by the app bar, as described in the following table, where the first two apply to the app bar as a whole and the other five to the individual commands:
Hint To get an app bar to show up in Blend for Visual Studio, right-click its element in the Live DOM and select the Activate AppBar menu, which will keep it up for as long as you need it. You can also invoke it within Interactive Mode and then switch back to Design Mode and it will remain. In Visual Studio’s DOM Explorer and debugger, on the other hand, an app bar will be dismissed when you click/tap outside of it. To be able to access it, make it sticky or add a call to show in your page’s ready method or your app’s activated event.
Generally speaking, you don’t need to override the win-appbar or win-commandlayout styles; instead, create selectors for a custom class related to these and then style the particular pieces you need. This can include pseudo-selectors like button:hover, button:active, and so forth.
Scenario 2 of the HTML Appbar Control sample shows many such selectors in action, in this case to set the background of the app bar and its commands to blue and the foreground color to green (a somewhat hideous combination, but demonstrative nonetheless).
As a basis, scenario 2 (html/custom-color.html) adds a CSS class customColor to the app bar:
<div id="customColorAppBar" data-win-control="WinJS.UI.AppBar" class="customColor" ...>
In css/custom-color.css it then styles selectors based on .win-appbar.customColor. The following rules, for instance, set the overall background color, the label text color, and the color of the circle around the commands for the :hover and :active states:
.win-appbar.customColor {
background-color: rgb(20,20,90);
}
.win-appbar.customColor.win-label {
color: rgb(90,200,90);
}
.win-appbar.customColorbutton:hover.win-commandring,
.win-appbar.customColorbutton:active.win-commandring {
background-color: rgba(90,200,90,0.13);
border-color: rgb(90,200,90);
}
To help accommodate narrow layouts, the app bar automatically checks whether the total width of all the commands together is greater than the width of the app bar control in whatever view it’s in. When this happens, it adds the win-reduced class to the app bar (and removes it when the app bar is again wider). In the WinJS stylesheets, win-reduced hides the labels, shrinks the margins, and otherwise tightens up the layout. For example, in the modified HTML AppBar control sample in the companion content, I’ve added a number of extra buttons to scenario 1 so that we can see the effect. With full size command buttons, the app bar appears like this:

And when win-reduced is in effect, they look like this (same scale):

To compare the two sizes, here’s a reduced app bar command (with a color outline) overlaid on the full size command:

Note For the automatic size reduction to work properly, avoid setting the margin, border, or padding styles of AppBarCommand elements.
All of this styling, by the way, applies only to the standard command-oriented layout; that is, the various style classes are those that the AppBar control adds only when using the command layout. If you’re using a custom layout, the app bar just contains whatever elements you want with whatever style classes you want, so you just handle styling as you would any other HTML.
Custom Icons
Earlier we saw that the icon property of an AppBarCommand typically comes from the Segoe UI Symbol font. Although this is suitable for most needs, you might want at times to use a character from a different font (some of us just can’t get away from Wingdings!) or to provide custom graphics. The app bar supports both.
To use a different font for the whole app bar, simply add a class to the app bar and create a rule based on win-appbar:
win-appbar.customFont {
font-family: "Wingdings";
}
To change the font of a specific command button, add a class to its extraClass property (such as customButtonFont) and create a rule with the following selector (as used in scenario 1 of the modified sample that will show if you add extraClass: 'otherFont' to a button):
button.otherFont.win-commandimage {
font-family: "Wingdings";
}
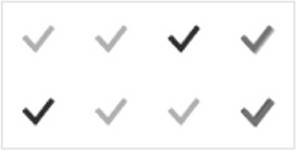
To provide graphics of your own, do the following for a 100% resolution scale:
• Create a 160x80 pixel PNG sprite image with a transparent background, saving the file with the .scale-100 suffix in the filename.
• This sprite is divided into two rows of four columns—that is, 40x40 pixel cells. The top row is for the light styling theme, and the bottom is for the dark theme.
• Each row has four icons for the following button states, in this order from left to right: default (rest), hover, pressed (active), and disabled.
• Each image is centered in its respective 40x40 cell, but remember that a ring will be drawn around the icon, so generally keep the image in the 20–30 pixel range vertically and horizontally. It can be wider or taller in the middle areas, of course, where the ring is widest.
For other resolution scales, multiple the sizes by 1.4 (140%) and 1.8 (180%) and use the .scale-140 and .scale-180 suffixes in the image filename.
To use the custom icon, point the command’s icon property to the base image URI (without the .scale-1x0 suffixes)—for instance, icon: 'url(images/icon.png)'.
Scenario 3 of the HTML Appbar Control sample uses custom icon graphics for an Accept button:
The icon comes from a file called accept.png, which appears something like this—I’ve adjusted the brightness and contrast and added a border so that you can see each cell clearly:
The declaration for the app bar button then appears as follows (some properties omitted for brevity):
<button data-win-control="WinJS.UI.AppBarCommand"
data-win-options="{id:'cmdAccept', label:'Accept', icon:'url(images/accept.png)' }">
Note that although the sample doesn’t have variations of the icon for resolution scales, it does provide variants for high contrast themes, an important accessibility consideration that we’ll come back to in Chapter 19. For this reason, the button element includes style="-ms-high-contrast-adjust:none" to override automatic adjustments for high contrast.
Command Menus
The next aspect of an app bar we need to explore in a little more depth are those commands whose type property is set to flyout. In this case the command’s flyout property must identify a WinJS.UI.Flyout object or a WinJS.UI.Menu control (which is a flyout). As noted before, flyout or popup menus like this are used when there are too many related commands cluttering up the basic app bar, or when you need other types of controls that aren’t quite appropriate on the app bar itself. It’s said, though, that if you’re tempted to use a button labeled “More”, “Advanced”, or “Other Stuff” because you can’t figure out how to organize the commands otherwise, it’s a good sign that the app itself is too complex! Seek ways to simplify the app’s purpose so that the app bar doesn’t just become a repository for randomness.
We’ll be covering flyouts more fully a little later in this chapter, but let’s see how to use one in an app bar, as demonstrated in scenario 6 of the HTML flyout control sample (not the app bar sample, mind you!):
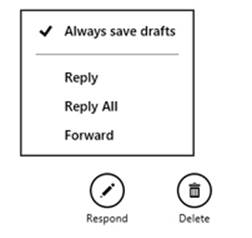
In html/appbar-flyout.html of this sample we see the app bar button declared as follows:
<button data-win-control="WinJS.UI.AppBarCommand"
data-win-options="{id:'respondButton', label:'Respond', icon:'edit', type:'flyout',
flyout:select('#respondFlyout') }">
The respondFlyout element identified here is defined earlier in html/appbar-flyout.html; note that such an element must be declared prior to the app bar to make sure it’s instantiated before the app bar is created:
<div id="respondFlyout" data-win-control="WinJS.UI.Menu">
<button data-win-control="WinJS.UI.MenuCommand"
data-win-options="{id:'alwaysSaveMenuItem',
label:'Always save drafts', type:'toggle', selected:'true'}"></button>
<hr data-win-control="WinJS.UI.MenuCommand"
data-win-options="{id:'separator', type:'separator'}"/>
<button data-win-control="WinJS.UI.MenuCommand"
data-win-options="{id:'replyMenuItem', label:'Reply'}"></button>
<button data-win-control="WinJS.UI.MenuCommand"
data-win-options="{id:'replyAllMenuItem', label:'Reply All'}"></button>
<button data-win-control="WinJS.UI.MenuCommand"
data-win-options="{id:'forwardMenuItem', label:'Forward'}"></button>
</div>
It should come as no surprise by now that the menu is just another WinJS control, WinJS.UI.Menu, where its child elements define the menu’s contents. As all these elements are, once again, just elements in the DOM; their click events are wired up in js/appbar-flyout.js with the ever-present addEventListener. (By the way, the sample uses document.getElementById to obtain the elements in order to call addEventListener; you can use the app bar’s getCommandById method instead.)
Each menu item, as you can see, is a MenuCommand object, and we’ll come back to the details later—for the time being, you can see that those items have an id, a label, and a type, very similar to AppBarCommand objects.
That’s pretty much all there is to it—the one added bit is that when a menu item is selected, you’ll want to dismiss the menu and perhaps also the app bar (if it’s not sticky). This is shown in the sample within js/appbar-flyout.js in a function called hideFlyoutAndAppBar:
function hideFlyoutAndAppBar() {
document.getElementById("respondFlyout").winControl.hide();
document.getElementById("appBar").winControl.hide();
}
Custom App Bars
All this time we’ve been looking at the standard commands layout of the app bar, which is of course the simplest way to use the control. There will be times, however, when the standard commands layout isn’t sufficient. Perhaps you want to place more interesting controls on the app bar, especially custom controls (like a color selector). For this you have two options.
The first is to place different controls alongside standard command buttons with the app bar’s layout property set to commands. Here you must still have AppBarCommand controls for each child of the app bar, but those with type:"content" can contain any elements you’d like, though the root element must be a div. This way they act like standard commands and participate in keyboard navigation but aren’t just circles and labels. Scenario 4 of the HTML AppBar control sample provides an example (html/custom-content.html):
<div id="customContentAppBar" data-win-control="WinJS.UI.AppBar">
<div data-win-control="WinJS.UI.AppBarCommand" data-win-options="{ id: 'list',
type: 'content', section: 'selection',
firstElementFocus: select('.dessertType'), lastElementFocus:select('.dessertType') }">
<select class="dessertType">
<option>Baked</option>
<option>Fried</option>
<option>Frozen</option>
<option>Chilled</option>
</select>
</div>
<div tabindex="-1" data-win-control="WinJS.UI.AppBarCommand"
data-win-options="{ id: 'banana', type: 'content', section: 'selection' }">
<img src="../images/40Banana.png"/>
</div>
<div data-win-control="WinJS.UI.AppBarCommand"
data-win-options="{ id: 'search', type: 'content', section: 'selection' }">
<input type="text" value="Search for desserts."/>
</div>
<button data-win-control="WinJS.UI.AppBarCommand" data-win-options="{ id: 'cmdAdd',
label: 'Add', icon: 'add', tooltip: 'Add a recipe' }"></button>
<button data-win-control="WinJS.UI.AppBarCommand" data-win-options="{ id: 'cmdFavorites',
label: 'Favorites', icon: 'favorite', tooltip:'Favorites' }"></button>
</div>
The result (combined with a slight bit in css/custom-content.css) is as follows:

The other option is to set the app bar’s layout to custom and place whatever HTML you want within the app bar control, styling it with CSS, and wiring up whatever events you need in JavaScript. As mentioned before, the WinJS NavBar control is just an app bar with a custom layout and top placement; if you implement a navigation bar of your own, you’d do the same.
Scenario 6 of the HTML AppBar control sample provides an example, though in this case the result is not something I’d recommend for your own app design: it creates a page header and a backbutton (html/custom-layout.html):
<div id="customLayoutAppBar" data-win-control="WinJS.UI.AppBar" aria-label="Navigation Bar"
data-win-options="{layout:'custom', placement:'top'}">
<header aria-label="Navigation bar" role="banner">
<button id="cmdBack" class="win-backbutton" aria-label="Back"></button>
<div class="titleArea">
<h1 class="win-type-xx-large" tabindex="0">
Page Title
</h1>
</div>
</header>
</div>
The result of this example is as follows (focus rectangles included!):
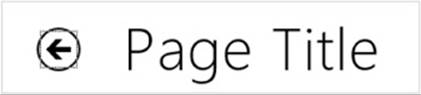
The point, though, is that a custom layout app bar is essentially nothing more than a container for whatever arbitrary content you want to place there, and that content is entirely under your control. The app bar in these cases is just taking care of showing and hiding that content at appropriate times and firing relevant events.
A custom layout app bar is typically what you’d use to implement a completely custom nav bar, using a placement of top. Before going down that road, however, let’s check out the WinJS NavBar control that provides a lot of functionality in this department already.
Nav Bar Features
Navigation with page controls, as we know from Chapter 3, is just a matter of calling WinJS.Naviga-tion.navigate at the appropriate times with the appropriate target page. Assuming there’s some piece of code like the PageControlNavigator to pick up the navigation events and take care of the page loading, an app can wire whatever controls it sees fit to navigate calls. This includes a top placement app bar that can have whatever design you would like to use, typically with a custom layout. With the flat navigation pattern, this app bar can contain just a horizontally-panning ListView (using ListLayout) with the relevant pages. With a hierarchical system, on the other hand, the implementation gets trickier as you want to have one list that opens up a secondary list and potentially has even a third level of options.
Fortunately, the WinJS NavBar control steps in to support this pattern, which you can see demonstrated in the inbox Travel app. Let’s see some of the variations to understand what the control provides for us. For starters, here’s the nav bar at full width:

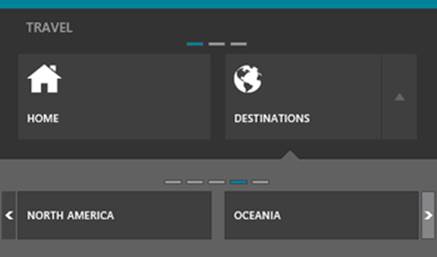
Tapping the down arrow next to Destinations or Flights opens up the second level in the navigation hierarchy, where again we see all the options when the screen is wide enough:

Notice how the down arrow by Destinations changed to an up arrow to indicate that this second level can be collapsed back to its previous state.
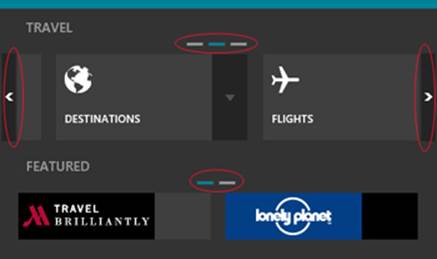
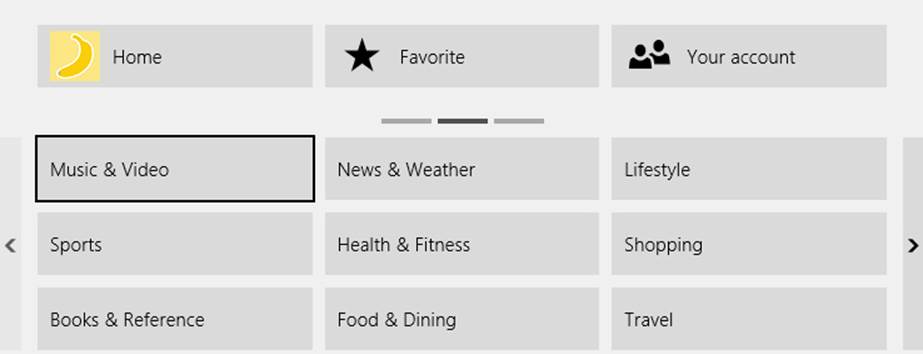
So far so good. Now if we resize the app to a narrower view, we’ll clearly need a way to pan the commands left and right. In this case the NavBar provides panning arrows a’la FlipView (circled on the right side), as well as page indicators to show where you are in the list (circled in the middle):
Narrowing the view still further (down to 500px), we see that more indicators appear and that the flipping arrows appear on both sides of the list:
And we get the same effect on the second level navigation commands when we tap the down arrow by Destinations:
The WinJS.UI.NavBar control makes it straightforward to implement these kinds of patterns, as well as vertical layout, by leveraging much of what we already know of the app bar. The NavBar, in fact, derives directly from the AppBar and thus shares many of the same properties, methods, and events, such as sticky, show/hide, showOnlyCommands, aftershow, etc. As noted before, the NavBar’s default placement is top, but it also supports bottom (check out Internet Explorer for a bottom navigation bar design). The layout property, however, is always custom (thus, thecommands property is ignored), and the NavBar adds one event, childrenprocessed, to inform you when the NavBar has constructed itself fully. This event exists because processing NavBar children is done at “idle” priority, as explained in Chapter 3: the NavBar isn’t typically visible when the page containing it first appears, so it’s appropriate to do that processing only after other UI work is complete. Of course, if you invoke the NavBar, it will reprioritize this processing so that it completes more quickly.
Because the NavBar is a custom layout AppBar, you can place any controls on it that you like. More often, however, you’ll want collection-like behavior for multiple navigation targets, perhaps with multiple levels. For this there’s a special control, the WinJS.UI.NavBarContainer, whose children are instances of the NavBarCommand class, the latter of which has properties like label and icon to control its display just like the AppBarCommand.
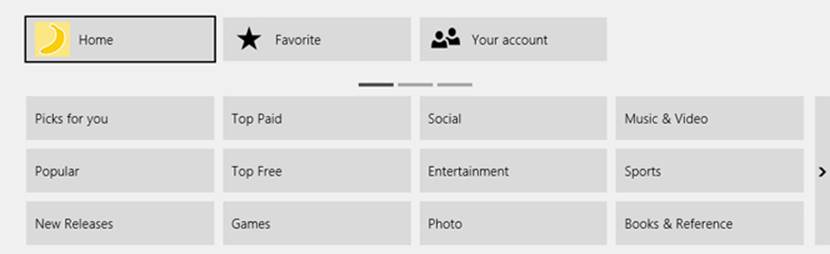
Let’s see two brief examples from the HTML NavBar control sample. First, here’s the simple markup from scenario 1 (html/1-CreateNavBar.html):
<div id="createNavBar" data-win-control="WinJS.UI.NavBar">
<div data-win-control="WinJS.UI.NavBarContainer">
<div data-win-control="WinJS.UI.NavBarCommand"
data-win-options="{ label: 'Home', icon: 'url(../images/homeIcon.png)' }"></div>
<div data-win-control="WinJS.UI.NavBarCommand"
data-win-options="{ label: 'Favorite', icon: 'favorite' }"></div>
<div data-win-control="WinJS.UI.NavBarCommand"
data-win-options="{ label: 'Your account', icon: 'people' }"></div>
<div data-win-control="WinJS.UI.NavBarCommand"
data-win-options="{ label: 'Music', icon: 'audio' }"></div>
<div data-win-control="WinJS.UI.NavBarCommand"
data-win-options="{ label: 'Video', icon: 'video' }"></div>
<div data-win-control="WinJS.UI.NavBarCommand"
data-win-options="{ label: 'Photos', icon: 'camera' }"></div>
<div data-win-control="WinJS.UI.NavBarCommand"
data-win-options="{ label: 'Settings', icon: 'settings' }"></div>
</div>
</div>
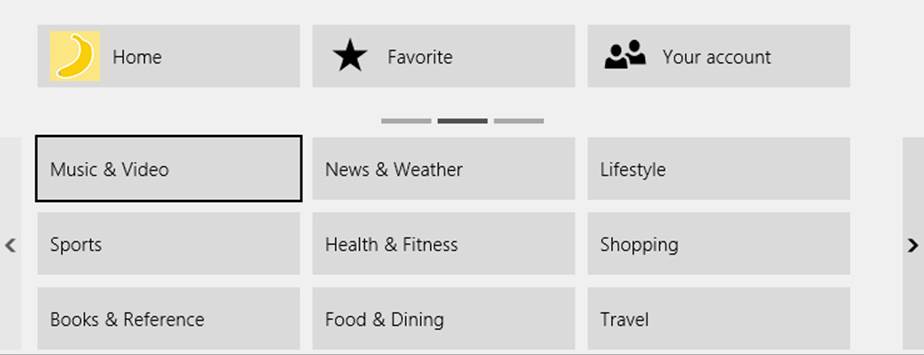
The result of this, in a view that’s narrow enough to see the page indicators, is as follows:

You can clearly see that the default shape of a NavBarCommand is a rectangle with the icon on the left and a label on the right (reversed for right-to-left languages, as is the paging direction). You can choose icons from the AppBarIcon enumeration or provide one of your own, and the labels act just like those on the AppBar where localization is concerned.
The second example is found in scenario 5, which uses the same markup as above plus a WinJS.UI.SearchBox outside the NavBarContainer (see html/5-UseSearchControl.html):
<div id="useSearch" data-win-control="WinJS.UI.NavBar">
<div class="globalNav" data-win-control="WinJS.UI.NavBarContainer">
<!-- ... -->
</div>
<div class="SearchBox" data-win-control="WinJS.UI.SearchBox"></div>
</div>
With this the SearchBox appears to the right of the command container, and the container has adjusted itself to a smaller width by making more pages of commands:

In most of the sample’s scenarios, note that the buttons don’t actually navigate because none of the commands have a location property—this is the URI string that you want the command to pass to WinJS.Navigation.navigate, such as:
<div data-win-control="WinJS.UI.NavBarCommand"
data-win-options="{ label: 'Home', icon: 'url(../images/homeIcon.png)',
location: '/pages/home/home.html' }">
</div>
Scenario 4 is the only part of the sample that actually navigates, and it does so between the different scenarios simply through the location property.
Besides label, icon, and location, the NavBarCommand has these additional properties:
• tooltip The typically localized tooltip text for the command, using the value of label as the default. As with the app bar, only text is supported here (not HTML or a Tooltip control) because it just passes on to the element’s title attribute.
• state An app-provided object that is passed with the location to Navigation.navigate (in the initialState argument). If you want to dynamically customize this state—such as storing selection information from the current page to pass to the target page—update the object within a handler for the either the WinJS.Navigation.onbeforenavigate event or the NavBarContainer.oninvoked event (see below).
• splitButton Iftrue, adds a down arrow or “split button” to the command.
• splitOpened Indicates (true or false) whether the split button is open on this command. By setting this flag you’ll trigger the container’ssplitToggle event.
We’ll come back to the split button operation in a bit, because it’s necessary to learn a little more about the NavBarContainer beforehand. This control is what we use to organize commands—NavBarCommand controls, that is—into meaningful groups, and it provides for page indicators, paging arrows, and opening another NavBarContainer for to a split button.
Tip There’s nothing in the NavBarContainer that says it has to exist inside a NavBar; you can use the control by itself wherever you like. Just be aware that it will still call WinJS.Navigation.navigate!
A NavBar can contain multiple NavBarContainer controls as its immediate children, in which case they are stacked vertically. In the earlier examples from the Travel app, the Travel group of commands is in one container and the Featured group is in another. This is why they have separate page indicators and page navigation arrows. Scenario 2 of the sample shows a similar result:
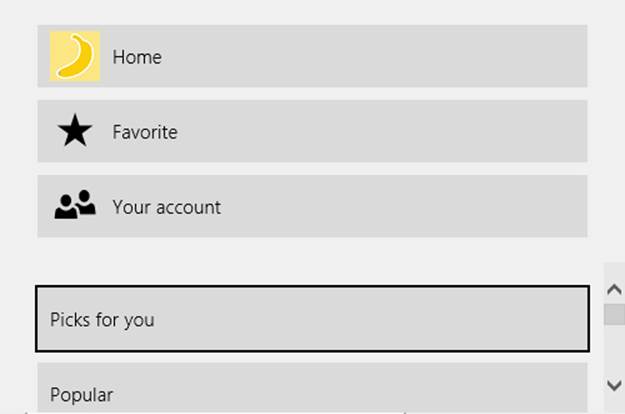
In this case, as with scenarios 1 and 5, the upper NavBarContainer is declared without any options and all its commands are declared inline. Of course, because the NavBarContainer is itself a kind of collection control, it would make perfect sense to hand it a WinJS.Binding.List to describe its contents, which would be especially useful if you have a dynamic navigation hierarchy or just a large list of commands, as in the lower container above. This is the purpose of the data property.
To use the data property, build a List of options objects for the NavBarCommand controls you want: each object in the List is just passed to the NavBarCommand constructor as the options argument. Then you can just declare the NavBar like so (html/2-UseData.html):
<div class="categoryNav" data-win-control="WinJS.UI.NavBarContainer"
data-win-options="{ data: Data.categoryList, maxRows: 3 }"></div>
where you also see the maxRows property that limits the vertical height of the container. Data.categoryList is defined in the page’s initmethod (see js/2-UseData.js):
WinJS.Namespace.define("Data");
var categoryNames = ["Picks for you", "Popular", "New Releases", "Top Paid", "Top Free",
"Games", "Social", "Entertainment", "Photo", "Music & Video",
"Sports", "Books & Reference", "News & Weather ", "Health & Fitness", "Food & Dining",
"Lifestyle", "Shopping", "Travel", "Finance", "Productivity",
"Tools", "Security", "Business", "Education", "Government"];
var categoryItems = [];
for (var i = 0; i < categoryNames.length; i++) {
categoryItems[i] = {
label: categoryNames[i]
};
}
Data.categoryList = new WinJS.Binding.List(categoryItems);
Tip When declaratively referring to a Binding.List that you generate within a page control, be sure to create that list within the page’s initmethod rather than ready. This is because init is called prior to WinJS.UI.processAll, which instantiates the NavBarContainer, whereas ready is called after. By creating the List within init, you make sure it exists before the container’s data-win-options is processed.
Take note that the NavBarContainer works directly with a Binding.List (not its dataSource) and is thus limited to in-memory collections.
The NavBarContainer also supports these additional members:
• template (Property) Gets or sets a WinJS.BindingTemplate or rendering function that creates the DOM for each item in the data collection. The template must render a single root element but can otherwise contain whatever controls you’d like.
• layout (Property) A value from the WinJS.UI.Orientation enumeration, either horizontal (the default) or vertical. The horizontal layout works with paging, as we’ve seen, with the maxRows property (default is 1) controlling the layout in each page. The vertical layout pans continuously without page indicators or arrows and ignores maxRows.
• currentIndex (Property) Gets or sets the index of the item with the keyboard focus.
• fixedSize (Property) When true, the width of each command in the container is determined by its styling, which means there could be gaps on the sides. When false (the default), the container will size the commands so that they fill the horizontal width of the container.
• forceLayout (Method) As with other collection controls, call this when making the control visible again after changing its display style to something other than none.
• invoked (Event) Fired when a command in the container has been invoked in response to a click, tap, or the Space or Enter keys being pressed. The eventArgs.detail object contains the index and navbarcommand object of the command that was invoked, along with the data item that was used to create the command. Note that navigation to the command’s location will have already started when this event is fired.
• splitToggle (Event) Fired when a command with splitButton: true changes its splitOpen state. The eventArgs.detail object contains the same properties as invoked above plus the new state in the opened property. You use this to show or hide a secondary NavBarContainer.
• The layout and fixedSize properties are demonstrated in scenario 3 of the HTML NavBar control sample. By default it uses dynamic width, so both containers fill the width:
Click the Switch To Fixed Width button, and you’ll see that at certain view widths you get a gap on the right side (or left in right-to-left languages):
If you size the view all the way down to 500px (and it must be 500px, because the manifest isn’t set for anything smaller!), the sample changes the layout to vertical with the following result:
As for implementing additional levels of navigation hierarchy, this is where we make use of the splitButton option for a command along with the splittoggle event on the container. As shown in scenario 6, a command with splitButton: true (html/6-UseSplitButton.html):
<div data-win-control="WinJS.UI.NavBarCommand" data-win-options="{ label: 'Favorite',
icon: 'favorite', splitButton: 'true' }"></div>
appears with a down arrow (if in the closed state, left) or an up arrow (if in the open state, right):

By itself, a split button just makes this one visual change when you invoke it, updates its splitOpen property, and—as a result—causes its container to fire a splitToggle event. This latter event is then where you then show or hide whatever additional controls you want to attach to it. Note that I didn’t specifically say a NavBarContainer—though you’ll probably want to use a NavBarContainer to implement the expected UI pattern, this is not required by any means.
The key here is to make those other controls appear as an overlay within the NavBar, which is exactly what the generic WinJS.UI.Flyout control is meant for (and which we’ll learn about right after we talk NavBar styling). Simply said, a flyout is a separate piece of transient UI that won’t appear until you call its show method. In scenario 6, the flyout for the Favorite button above is, in fact, declared separately from the NavBar itself (html/6-UseSplitButton.html):
<div id="useSplit" data-win-control="WinJS.UI.NavBar">
<div class="globalNav" data-win-control="WinJS.UI.NavBarContainer">
<div data-win-control="WinJS.UI.NavBarCommand" data-win-options="{ label: 'Home',
icon: 'url(../images/homeIcon.png)' }"></div>
<div data-win-control="WinJS.UI.NavBarCommand" data-win-options="{ label: 'Favorite',
icon: 'favorite', splitButton: 'true' }"></div>
<div data-win-control="WinJS.UI.NavBarCommand"
data-win-options="{ label: 'Your account', icon: 'people' }"></div>
</div>
</div>
<div id="contactFlyout" data-win-control="WinJS.UI.Flyout"
data-win-options="{ placement: 'bottom' }">
<div id="contactNavBarContainer" data-win-control="WinJS.UI.NavBarContainer" }">
<div data-win-control="WinJS.UI.NavBarCommand"
data-win-options="{ label: 'Family' }"></div>
<div data-win-control="WinJS.UI.NavBarCommand"
data-win-options="{ label: 'Work' }"></div>
<div data-win-control="WinJS.UI.NavBarCommand"
data-win-options="{ label: 'Friends' }"></div>
<div data-win-control="WinJS.UI.NavBarCommand"
data-win-options="{ label: 'Blocked' }"></div>
</div>
</div>
The sample then implements a handler for the container’s splitToggle event to show or hide this flyout as needed (js/6-UseSplitButton.js):
setupNavBarContainer: function () {
var navBarContainerEl = document.body.querySelector('#useSplit .globalNav');
navBarContainerEl.addEventListener("splittoggle", function (e) {
var flyout = document.getElementById("contactFlyout").winControl;
var navbarCommand = e.detail.navbarCommand;
if (e.detail.opened) {
flyout.show(navbarCommand.element);
var subNavBarContainer = flyout.element.querySelector('.win-navbarcontainer');
if (subNavBarContainer) {
// Switching the navbarcontainer from display none to display block requires
// forceLayout in case there was a pending measure.
subNavBarContainer.winControl.forceLayout();
// Reset back to the first item:
subNavBarContainer.currentIndex = 0;
}
flyout.addEventListener('beforehide', go);
} else {
flyout.removeEventListener('beforehide', go);
flyout.hide();
}
function go() {
flyout.removeEventListener('beforehide', go);
navbarCommand.splitOpened = false;
}
});
Notice the use of the flyouts beforehide event here to make sure the command’s splitOpened flag is set to false when the flyout is dismissed. This is necessary because the flyout can be dismissed independently of the split button.
Because showing and hiding the flyout is under your complete control, the splitToggle event is also where you can perform animations for your subsidiary navigation controls.
Nav Bar Styling
In the previous section, as we looked at NavBar examples from both the Travel app and the HTML NavBar control sample, you’ll have easily noticed some styling differences other than the basic light or dark theme (which you can switch in the sample, by the way). The Travel app, for example, definitely uses its own template for the top-level commands and adds some color theming along the top and in the page indicators:
These appearances are easy to control, as the NavBar, NavBarContainer, and NavBarCommand classes all provide the usual win-* style hooks for their different parts.
Hint As with the app bar, to keep it visible in Blend for Visual Studio, right-click its element and select Activate NavBar, or activate it in Interactive Mode and switch back to Design Mode. You can also make the nav bar sticky or add a call to show in an appropriate place, if you need to keep it visible within Visual Studio’s debugger and DOM Explorer.
The NavBar as a whole has just one relevant class, win-navbar, that’s added to the control’s root element. This is where you can add something like the Travel app’s top color border—try this in css/scenario1.cs:
#createNavBar.win-navbar {
border-top: 10pxsolid#008299;
}
Within the NavBar, any of your own child elements (like the travel and featured labels in the Travel app) have whatever classes you assign to them. If you have NavBarContainer elements, those are composed of a considerable hierarchy of parts:
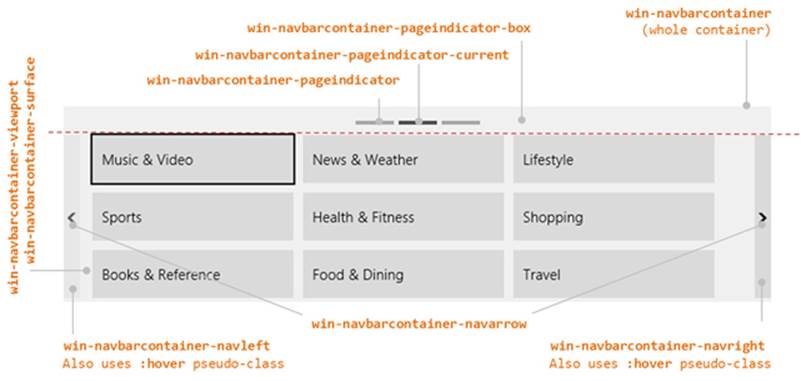
To color the page indicators like the Travel app, for example, uses these rules:
#createNavBar.win-navbarcontainer-pageindicator {
background-color: #636363;
}
#createNavBar.win-navbarcontainer-pageindicator-current {
background-color: #008299;
}
The viewport and pageindicator-box (if I may drop the win-navbarcontainer- prefix) are sibling elements, each of which has its own portion within the container where you can style background colors, margins/padding, etc.
Within the viewport we then have the pannable surface area alongside the left and right navigation arrows. The navarrow style specifically styles the arrow inside the buttons; the navleft and navright selectors (including pseudo-styles) affect the surrounding controls.
Within the win-navbarcontainer-surface element is where you’ll find the NavBarCommand elements, each of which has this hierarchy of elements and classes, through which you can specifically address whichever part you want:
<div class="win-navbarcommand">
<div class="win-navbarcommand-button">
<div class="win-navbarcommand-button-content">
<div class="win-navbarcommand-icon"></div>
<div class="win-navbarcommand-label"></div>
</div>
<div class="win-navbarcommand-splitbutton"></div>
</div>
</div>
Alternately, you might find it easier to provide a template for the command items so that you can control the elements that are built up for each one.
As for the little triangle that you see on the secondary flyout in the Travel app (to point up to the Destinations button), that’s just a little element in the Flyout that uses a background-image; it’s not part of the NavBarContainer with the list of items.
Flyouts and Menus
Going back to our earlier discussion about where to place commands, a flyout control—WinJS.UI.-Flyout—is used for confirmations, collecting information, and otherwise answering questions in response to a user action. The menu control—WinJS.UI.Menu—is then a particular kind of flyout that contains WinJS.UI.MenuCommand controls rather than arbitrary HTML. In fact, Menu is directly derived from Flyout using WinJS.Class.define, so they share much in common. As flyouts, they also share some feature in common with the app bar and nav bar, as all of them, in fact, derive from a common internal base class (WinJS.UI._Overlay).
Tip In addition to the Flyout control that you’ll employ in an app, there is also a system flyout that appears in response to some API calls, such as creating or removing a secondary tile (see Chapter 16—specifically Figure 16-3 and the “Secondary Tiles” section). Although visually the same, the system flyout will trigger a blur event to the app whereas the WinJS flyout, being part of the app, does not. As a result, a system flyout will cause a non-sticky app bar to be dismissed. To prevent this, it’s necessary to set the appbar’s sticky property to true before calling APIs with system flyouts. This is demonstrated in scenario 7 of the Secondary tiles sample.
Styling in Blend As with app bars and nav bars, you can right-click a flyout element in Blend’s Live DOM and select Activate Flyout to make it visible for styling, or you can activate it in Interactive Mode and switch back to Design Mode. To work with it in Visual Studio’s debugger or the DOM Explorer, you’ll need to make it sticky, otherwise switching to Visual Studio will dismiss it.
Before we look at the details, let’s see a number of visual examples from the HTML flyout control sample in which we already saw a popup menu on an app bar command. The Flyout controls used in scenarios 1–4 are shown in Figure 9-1. Notice the variance of content in the flyout itself and how the flyout is always positioned near the control that invoked it, such as the Buy, Login, and Format output text buttons and the Lorem ipsum hyperlink text. These examples illustrate that a flyout can contain a simple message with a button (scenario 1, for warnings and confirmations), can contain fields for entering information or changing settings (scenarios 2 and 3), and can have a title (scenario 4). Scenario 5, for its part, contains the example of a popup header menu with Menu that we’ll see a little later.
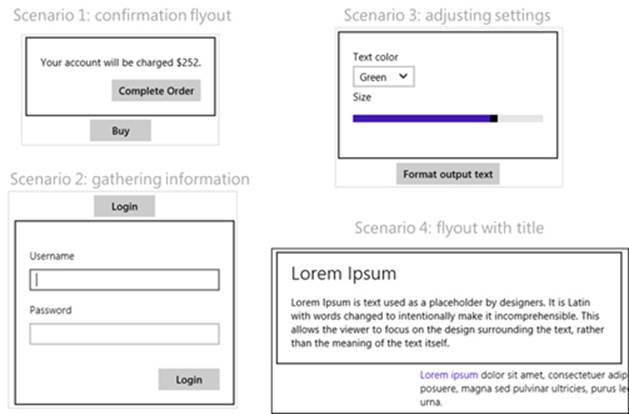
FIGURE 9-1 Examples of flyout controls from the HTML flyout control sample.
There are two key characteristics of flyout controls, including menus. One is that flyouts can be dismissed programmatically, like an app bar, when an appropriate control within the flyout is invoked. This is the case with the Complete Order button of scenario 1 and the Login button of scenario 2.
The second characteristic, also shared with the app bar, is the light dismiss 'color:black'> Figure 9-1 that there is no OK button or other control to confirm changes you might make in the flyout. With this particular design, changes are immediately applied such that dismissing the flyout does not reverse or cancel them. If you don’t want that kind of behavior, you can place something like an Apply button on the flyout and not make changes until that button is pressed. In this case, dismissing the flyout would cancel the changes.
I’ll again encourage you to read the Guidelines for Flyouts topic that goes into detail about how and when to use the different designs that are possible with this control. It also outlines when not to use the control: for example, don’t use flyouts to surface errors not related to user action (use a message dialog instead), don’t use them for primary commands (use the app bar), don’t use them for text selection context menus, and avoid them for UI that is part of a workflow and should be directly on the app canvas. These guidelines also suggest keeping a flyout small and focused (omitting unnecessary controls) and making sure a flyout is positioned close to the object that invoked it. Let’s now see how that works in the code.
WinJS.UI.Flyout Properties, Methods, and Events
Most of the properties, methods, and events of the WinJS.UI.Flyout control are exactly the same as we’ve already seen for the app bar. The show and hide methods control its visibility, a hidden property indicates its visible state, and same the beforeshow, aftershow, beforehide, and afterhideevents fire as appropriate. The afterhide event is typically used to detect dismissal of the flyout.
Like the app bar, the flyout also has a placement property, but it has different values that are only meaningful in the context of the flyout’s own alignment and anchor properties. In fact, all three properties are optional parameters to the show method because they determine where, exactly, the flyout appears on the screen; the default placement and alignment can also be set on the control itself because these are optional with show. (Note also that if you don’t specify an anchor in the show method; the anchor property must already be set on the control or show will throw an exception.)
The anchor property identifies the control that invokes the flyout or whatever other operation might bring up a flyout (as for confirmation). The placement property (a string) then indicates how the flyout should appear in relation to the anchor: top, bottom, left, right, or auto(the default). Typically, you use a specific placement only if you don’t want the flyout to possibly obscure important content. Otherwise, you run the risk of the flyout element being shrunk down to fit the available space. The flyout’s content will remain the same size, mind you, so it means that—ick!—you’ll get scrollbars! So, unless you have a really good reason and a note from your doctor, stick with auto placement so that the control will be placed where it can be shown full size. Along these same lines, if you’re supporting the 320px minimum width, limit your flyouts also to that size.
The alignment property, for its part (also a string), when used with a placement of top or bottom, determines how the flyout aligns to the edge of the anchor: left, right, or center (the default). The content of the flyout itself is aligned through CSS as with any other HTML.
If you need to style the flyout control itself, you can set styles in the win-flyout class, like fonts, default alignments, margins, and so on. As with other WinJS style classes like this, use win-flyout as a basis for more specific selectors unless you really want to style every flyout in the app. Typically you also exclude win-menu from the rule so that menu flyouts aren’t affected by such styling. For example, most of the scenarios in the HTML flyout control sample have rules like this:
.win-flyout:not(.win-menu)button,
.win-flyout:not(.win-menu)input[type="button"] {
margin-top: 16px;
margin-left: 20px;
float: right;
}
Finally, if for some reason you need to know when a flyout is loaded, listen to the DOMNodeInserted method on document.body:
document.body.addEventListener("DOMNodeInserted", insertionHandler, false);
Flyout Examples
A flyout control is created like any other WinJS control with data-win-control and data-win-options attributes and processed by WinJS.UI.process/processAll. Flyouts with relatively fixed content will typically be declared in markup where you can use data binding on specific properties of the elements within the flyout. Flyouts that are very dynamic, on the other hand, can be created directly from code by using new WinJS.UI.Flyout(<element>, <options>), and you can certainly change its child elements at any time. It’s all just part of the DOM! (Am I repeating myself?)
Like I said before (apparently I am repeating myself), a Flyout control can contain arbitrary HTML, styled as always with CSS. The flyout for scenario 1 in the sample appears as follows in html/confirm-action.html (condensed slightly):
<div id="confirmFlyout" data-win-control="WinJS.UI.Flyout"
aria-label="{Confirm purchase flyout}">
<div>Your account will be charged $252.</div>
<button id="confirmButton">Complete Order</button>
</div>
The login flyout in scenario 2 is similar, and it even employs an HTML form to attach the Login button to the Enter key (html/collect-information.html):
<div id="loginFlyout" data-win-control="WinJS.UI.Flyout" aria-label="{Login flyout}">
<form onsubmit="returnfalse;">
<p>
<label for="username">Username <br/></label>
<span id="usernameError" class="error"></span>
<input type="text" id="username"/>
</p>
<p>
<label for="password">Password<br/></label>
<span id="passwordError" class="error"></span>
<input type="password" id="password"/>
</p>
<button id="submitLoginButton">Login</button>
</form>
</div>
The flyout is displayed by calling its show method. In scenario 1, for instance, the button’s click event is wired to the showConfirmFlyout function (js/confirm-action.js), where the Buy button is given as the anchor element. Handling the Complete Order button just happens through aclick handler attached to that element, and here we want to make sure to call hide to programmatically dismiss the flyout. Finally, the afterhide event is used to detect dismissal:
var bought;
var page = WinJS.UI.Pages.define("/html/confirm-action.html", {
ready: function (element, options) {
document.getElementById("buyButton").addEventListener("click",
showConfirmFlyout, false);
document.getElementById("confirmButton").addEventListener("click",
confirmOrder, false);
document.getElementById("confirmFlyout").addEventListener("afterhide",
onDismiss, false);
}
function showConfirmFlyout() {
bought = false;
var buyButton = document.getElementById("buyButton");
document.getElementById("confirmFlyout").winControl.show(buyButton);
}
// When the Buy button is pressed, hide the flyout since the user is done with it.
function confirmOrder() {
bought = true;
document.getElementById("confirmFlyout").winControl.hide();
}
// On dismiss of the flyout, determine if it closed because the user pressed the buy button.
// If not, then the flyout was light dismissed.
function onDismiss() {
if (!bought) {
// (Sample displays a dismissal message on the canvas)
}
}
Tip To create a default button in a flyout, use an <input type="submit"> element. Just be sure that it doesn’t steal Enter key behavior from other buttons when the flyout isn’t showing.
Handling the login controls in scenario 2 is pretty much the same, with some added code to make sure that both a username and password have been given. If not, the Login button handler displays an inline error and sets the focus to the appropriate input field:
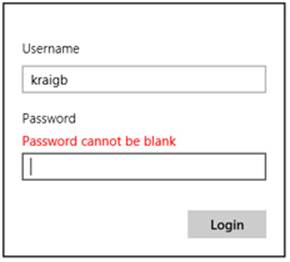
As the flyout of scenario 2 is a little larger, the default placement of auto on a 1366x768 display (as in the simulator) makes it appear below the button that invokes it. There isn’t quite enough room above that button. So try setting placement to top in the call to show:
function showLoginFlyout() {
// ...
document.getElementById("loginFlyout").winControl.show(loginButton, "top");
}
Then you can see how the flyout gets scrollbars because the overall control element is too short:
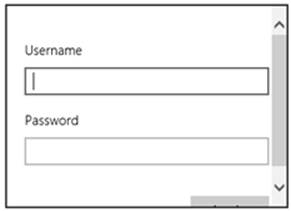
What was that word I used before? “Ick”?
To move on, scenario 3 again declares a flyout in markup, where it contains some label, select, and input controls. In JavaScript, though, it listens for change events on the latter and applies those new values to the output element on the app canvas:
var page = WinJS.UI.Pages.define("/html/change-settings.html", {
ready: function (element, options) {
// ...
document.getElementById("textColor").addEventListener("change", changeColor, false);
document.getElementById("textSize").addEventListener("change", changeSize, false);
}
});
// Change the text color
function changeColor() {
document.getElementById("outputText").style.color =
document.getElementById("textColor").value;
}
// Change the text size
function changeSize() {
document.getElementById("outputText").style.fontSize =
document.getElementById("textSize").value + "pt";
}
If this flyout had an Apply button rather than applying the changes immediately, its click handler would obtain the current selection and slider values and use them like changeColor and changeSize.
Finally, in scenario 4 we see a flyout with a title, which is just a piece of larger text in the markup; the flyout control itself doesn’t have a separate notion of a header:
<div id="moreInfoFlyout" data-win-control="WinJS.UI.Flyout" aria-label="{More info flyout}">
<div class="win-type-x-large">Lorem Ipsum</div>
<div>
Lorem Ipsum is text used as a placeholder by designers...
</div>
</div>
The point of this last example is to show that unlike traditional desktop dialog boxes, flyouts don’t often need a title because they already have context within the app itself. Dialog boxes in desktop applications need titles because that’s what appears in task-switching UI alongside other apps.
Hint If you find that beforeshow, aftershow, beforehide, or afterhide events triggered from a flyout are getting propagated to a containing app bar or nav bar, which shares the same event names, include a call to eventArgs.stopPropagation()inside your flyout’s handler.
Menus and Menu Commands
What distinguishes a WinJS.UI.Menu control from a more generic Flyout is that a menu expects that all its child elements are WinJS.UI.MenuCommand objects, similar to how the standard command layout of the app bar expects AppBarCommand objects (and won’t instantiate if you declare something else). Other common characteristics between the menu control and other flyouts include:
• show and hide methods.
• getCommandById, showCommands, hideCommands, and showOnlyCommands, along with the commands property, meaning that you can use the same strategies to manage commands as discussed in “Showing, Hiding, Enabling, and Updating Commands” in the app bar section, including specifying commands using a JSON array rather than discrete elements.
• beforeshow, aftershow, beforehide, and afterhide events.
• anchor, alignment, and placement properties.
The menu also has two styles for its appearance—win-menu and win-command—that you use to create more specific selectors, as we’ve seen, for the entire menu and for the individual text commands.
MenuCommand objects are also very similar to AppBarCommand objects. Both share many of the same properties: id, label, type (a string: button, toggle, flyout, or separator), disabled, extraClass, flyout, hidden, onclick, and selected. Menu commands do not have icons, sections, and tooltips but you can see from type that menu items can be buttons (including just text items), checkable items, separators, and also another flyout. In the latter case, the secondary menu will replace the first rather than show up alongside, and to be honest, I’ve yet to see secondary menus used in a real app. Still, it’s supported in the control!
We’ve already seen how to use a flyout menu from an app bar command, which is covered in scenario 6 of the HTML flyout control sample (see the earlier “Command Menus” section). Another primary use case is to provide what looks like drop-down menu from a header element, covered in scenario 5. Here (see html/header-menu.html), the standard design is to place a down chevron symbol () at the end of the header:
<header aria-label="Header content" role="banner">
<button class="win-backbutton" aria-label="Back"></button>
<div class="titlearea win-type-ellipsis">
<button class="titlecontainer">
<h1>
<span class="pagetitle">Music</span>
<span class="chevron win-type-x-large"></span>
</h1>
</button>
</div>
</header>
Notice that the whole header is wrapped in a button, so its click handler can display the menu with show:
document.querySelector(".titlearea").addEventListener("click", showHeaderMenu, false);
function showHeaderMenu() {
var title = document.querySelector("header .titlearea");
var menu = document.getElementById("headerMenu").winControl;
menu.anchor = title;
menu.placement = "bottom";
menu.alignment = "left";
menu.show();
}
The flyout (defined as headerMenu in html/header-menu.html) appears when you click anywhere on the header (not just the chevron, as that’s just a character in the header text):

The individual menu commands are just button elements themselves, so you can attach click handlers to them as you need. As with the app bar, it’s best to use the menu control’s getCommandById to locate these elements because it’s more direct than document.getElementById (as the SDK sample uses…sigh).
To see a secondary menu in action, try adding the following secondaryMenu element in html/header-menu.html before the headerMenu element and adding a button within headerMenu whose flyout property refers to secondaryMenu:
<div id="secondaryMenu" data-win-control="WinJS.UI.Menu">
<button data-win-control="WinJS.UI.MenuCommand"
data-win-options="{id:'command1', label:'Command 1'}"></button>
<button data-win-control="WinJS.UI.MenuCommand"
data-win-options="{id:'command2', label:'Command 2'}"></button>
<button data-win-control="WinJS.UI.MenuCommand"
data-win-options="{id:'command3', label:'Command 3'}"></button>
</div>
<div id="headerMenu" data-win-control="WinJS.UI.Menu">
<!-- ... -->
<button data-win-control="WinJS.UI.MenuCommand"
data-win-options="{id:'showFlyout', label:'Show secondary menu',
type:'flyout', flyout:'secondaryMenu'}"></button>
</div>
Also, go into css/header-menu.css and adjust the width style of #headerMenu to 200px. With these changes, the first menu will appear as follows where the color change in the header is the hover effect:
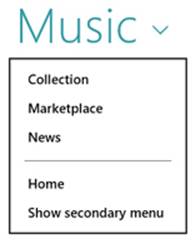
When you select Show secondary menu, the first menu will be dismissed and the secondary one will appear in its place:
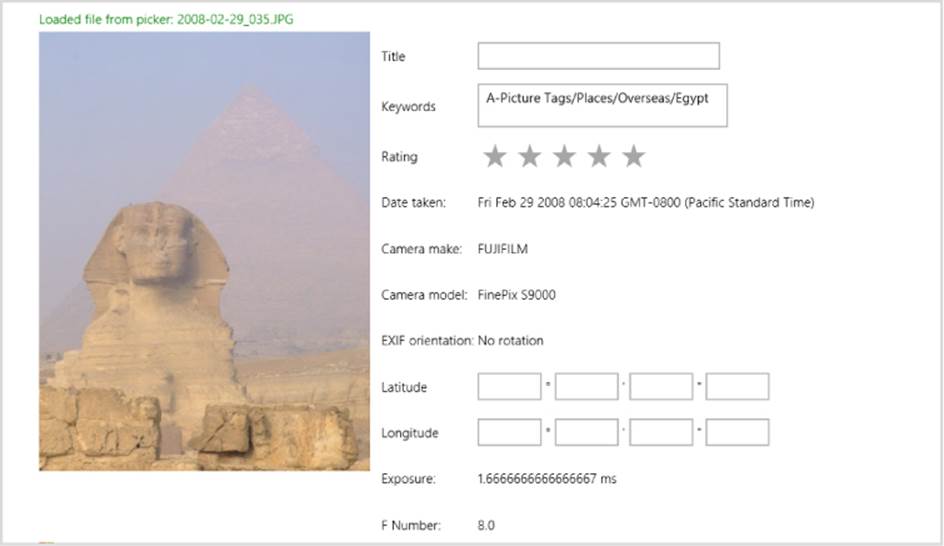
Another example of a header flyout menu can be found in the Adaptive layout with CSS sample we saw in Chapter 8, “Layout and Views.” It’s implemented the same way we see above, with the added detail that it actually changes the page contents in response to a selection.
Context Menus
Besides the flyout menu that we’ve seen so far, there are also context menus as described in Guidelines for context menus. These are specifically used for commands that are directly relevant to a selection of some kind, like clipboard commands for text, and are invoked with a right mouse click on that selection, a tap-and-hold gesture, or the context menu key on the keyboard. Text and hyperlink controls already provide such menus by default. Context menus are also good for providing commands on objects that cannot be selected (like parts of an instant messaging conversation), because app bar commands can’t be contextually sensitive to such items. They’re also recommended for actions that cannot be accomplished with a direct interaction of some kind. However, don’t use them on page backgrounds—that’s what the app bar is for because the app bar will automatically appear with a right-click gesture.
Hint If you process the right mouse button click event for an element, be aware that the default behavior to show the app/nav bar will be suppressed over that element. Therefore, use the right-click event judiciously, because users will become accustomed to right-clicking around the app to bring up the app/nav bar. Note also that you can programmatically invoke the app bar using its show method.
The Context menu sample gives us some context here—I know, it’s a bad pun! In all cases, you need only listen to the HTML contextmenu event on the appropriate element; you don’t need to worry about mouse, touch, and keyboard separately. Scenario 1 of the sample, for instance, has a nonselectable attachment element on which it listens for the event (html/scenario1.html):
document.getElementById("attachment").addEventListener("contextmenu",
attachmentHandler, false);
In the event handler, you then create a Windows.UI.Popups.PopupMenu object (which comes from WinRT, not WinJS!), populate it with Windows.UI.Popups.UICommand objects (that contain an item label and click handler) or UICommandSeparator objects, and then call the menu’s showAsyncmethod (js/scenario1.js):
function attachmentHandler(e) {
var menu = new Windows.UI.Popups.PopupMenu();
menu.commands.append(new Windows.UI.Popups.UICommand("Open with", onOpenWith));
menu.commands.append(new Windows.UI.Popups.UICommand("Save attachment",
onSaveAttachment));
menu.showAsync({ x: e.clientX, y: e.clientY }).done(function (invokedCommand) {
if (invokedCommand === null) {
// The command is null if no command was invoked.
}
});
}
Notice that the results of the showAsync method78 is the UICommand object that was invoked; you can examine its id property to take further action. Also, the parameter you give to showAsync is a Windows.Foundation.Pointobject that indicates where the menu should appear relative to the mouse pointer or the touch point. The menu is placed above and centered on this point.
The PopupMenu object also supports a method called showForSelectionAsync, whose first argument is a Windows.Foundation.Rect that describes the applicable selection. Again, the menu is placed above and centered on this rectangle. This is demonstrated in scenario 2 of the sample in js/scenario2.js:
//In the contextmenu handler
menu.showForSelectionAsync(
clientToWinRTRect(window.getSelection().getRangeAt(0).getBoundingClientRect()))
.done(function (invokedCommand) {
//...
// Converts from client to WinRT coordinates, which take scale factor into consideration.
function clientToWinRTRect(rect) {
var zoomFactor = document.documentElement.msContentZoomFactor;
return {
x: (rect.left + document.documentElement.scrollLeft - window.pageXOffset) * zoomFactor,
y: (rect.top + document.documentElement.scrollTop - window.pageYOffset) * zoomFactor,
width: rect.width * zoomFactor,
height: rect.height * zoomFactor
};
}
This scenario also demonstrates that you can use a contextmenu event handler on text to override the default commands that such controls otherwise provide.
Two final notes for context menus. First, even though the menus are created with WinRT APIs, they do not cause a blur event for the app as a whole, unlike system flyouts like the message dialog. Second, because context menus originate in WinRT, they don’t exist in the DOM and are not DOM-aware, which explains the use of other WinRT constructs like Point and Rect rather than plain JavaScript objects. Message dialogs, our final subject for this chapter, share this characteristic.
Message Dialogs
Our last piece of commanding UI for this chapter is the message dialog. Like the context menu, this flyout element comes not from WinJS but from WinRT via the Windows.UI.Popups.MessageDialog API. Again, this means that the message dialog simply appears on top of the current page and doesn’t participate in the DOM. Message dialogs automatically dim the app’s current page and block input events from the app until the user responds to the dialog. They will also cause a window.onblur event in the app.
The Guidelines for message dialogs topic explains the use cases for this UI:
• To display urgent information that the user must acknowledge to continue, especially conditions that are not related to a user command of some kind.
• Errors that apply to the overall app, as opposed to a workflow where the error is better surfaced inline on the app canvas. Loss of network connectivity is a good example of this.
• Questions that require user input and cannot be light dismissed like a flyout. That is, use a message dialog to block progress when user input is essential to continue.
The interface for message dialogs is very straightforward. You create the dialog object with a new Windows.UI.Popups.MessageDialog. The constructor accepts a required string with the message content and an optional second string containing a title. The dialog also has content and titleproperties that you can use independently. In all cases the strings support only plain text (not HTML).
You then configure the dialog through its commands, options, defaultCommandIndex (the command tied to the Enter key), and cancelCommandIndex (the command tied to the ESC key).
The options come from the MessageDialogOptions enumeration where there are only two members: none (the default, for no special behavior) and acceptUserInputAfterDelay (which causes the message dialog to ignore user input for a short time to prevent possible clickjacking; this exists primarily for Internet browsers loading arbitrary web content and isn’t typically needed for most apps).
The commands property then contains up to three UICommand objects, the same ones used in context menus. Each command again contains an id, a label, and an invoked property to which you assign the handler for the command. Note that the defaultCommandIndex and cancelCommandIndexproperties work on the indices of the commands array, not the id properties of those commands. Also, if you don’t add any commands of your own, the message dialog will default to a single Close command.
Finally, once the dialog is configured, you display it with a call to its showAsync method. Like the context menu, the result is the selected UICommand object that’s given to the completed handler you provide to the promise’s then/done method. Typically, you don’t need to obtain that result because the selected command will have triggered the invoked handler you associated with it.
Note If the Search, Share, Devices, or Settings charm is invoked while a message dialog is active, or if an app is activated to service a contract, a message dialog will be dismissed without any command being selected. The completed handler for showAsync will be called, however, with the result set to the default command. Be aware of his if you’re using the completed handler to process such commands.
The Message dialog sample—one of the simplest samples in the whole Windows SDK!—demonstrates various uses of this API. Scenario 1 displays a message dialog with a title and two command buttons, setting the second command (index 1) as the default. This appears as follows:

Scenario 2 shows the default Close command with a message and no title:

Scenario 3 is identical to scenario 1 but uses the completed handler of the showAsync().done method to process the selected command. You can use this to see the effect of invoking a charm while the dialog is shown.
Finally, scenario 4 assigns the first command to be the default and marks the second as the cancel command, so the message is dismissed with that command or the ESC key:

And that’s really all there is to it!
Improving Error Handling in Here My Am!
To complete this chapter and bring together much of what we’ve discussed, let’s make some changes to Here My Am!—last seen in Chapter 4—to improve its handling of various error conditions. As it stands right now, Here My Am! doesn’t behave very well in a few areas:
• If the Bing Maps control script fails to load from a remote source, the code in html/map.html just throws an exception and the app terminates.
• If we’re using the app on a mobile device and have changed our location, there isn’t a way to refresh the location on the map other than dragging the pin; that is, the geolocation API is used only on startup.
• When WinRT’s geolocation API is trying to obtain a location without a network connection, a several-second timeout period occurs, during which the user doesn’t have any idea what’s happening.
• If our attempt to use WinRT’s geolocation API fails, typically due to timeout or network connectivity problems, but also possibly due to a denial of user consent, there isn’t any way to try again.
• If the app’s view is smaller than 500px, the camera capture UI will not appear.
The Here My Am! (9) app for this chapter addresses these concerns. First, I’ve added code to html/map.html to generate a placeholder image for the Location area just like we have in pages/home/home.js for the Photo area. This way a failure to load the Bing maps script will display that message in place of the map (the display style of none is removed in that case):
<img id="errorImage" style=" display: none; width: 100%; height: 100%;" src="#"/>
I’ve also added a click handler to the image that reloads the webview contents with document.-location.reload(true). With this in place, we prevent the exceptions that were previously raised when the map couldn’t be created, which caused the app to be terminated. Here’s how it looks now if the map can’t be created:
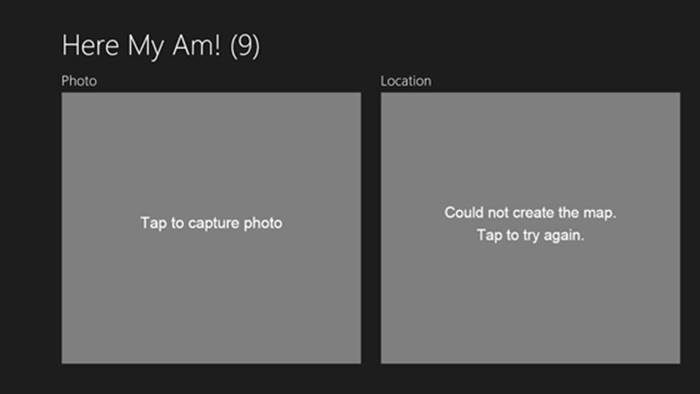
To test this, you need to disconnect from the Internet, uninstall the app (to clearany cached map script; otherwise, it will continue to load!), and run the app again. It should hit the error case at the beginning of the init method in html/map.html, which shows the (dynamically-generated) error image by removing the default display: none style and wiring up the click handler. Then reconnect the Internet and click the image, and the map should reload, but if there are continued issues the error message will again appear.
The second problem—adding the ability to refresh our location—is easily done with an app bar. I’ve added such a control to default.html with one command:
<div id="appbar" data-win-control="WinJS.UI.AppBar" data-win-options="">
<button data-win-control="WinJS.UI.AppBarCommand"
data-win-options="{id:'cmdRefreshLocation', label:'Refresh location',
icon:'globe', section:'global', tooltip:'Refresh your location'}"></button>
</div>
This command is wired up within pages/home/home.js in the page control’s ready method:
var appbar = document.getElementById("appbar").winControl;
appbar.getCommandById("cmdRefreshLocation").addEventListener("click",
this.tryRefresh.bind(this));
where the tryRefresh handler, also in the page control, hides the app bar and calls another new method, refreshPosition, where I moved the code that obtains the geolocation and updates the map:
tryRefresh: function () {
//Hide the app barand retry
var appbar = document.getElementById("appbar").winControl.hide();
this.refreshPosition();
},
I also needed to tweak the pinLocation function within html/map.html. Without a location refresh command, this function was only ever called once on app startup. Because it can now be called multiple times, we need to remove any existing pin on the map before adding one for the new location. This is done with a call to map.entities.pop prior to the existing call to map.entities.-push that pins the new location.
The app bar now appears as follows, and we can refresh the location as needed. (If you aren’t on a mobile device in your car, try dragging the first pin to another location and then refreshing to see the pin return to your current location.)

For the third problem—letting the user know that geolocation is trying to happen—we can show a small flyout message just before attempting to call the WinRT geolocator’s getGeopositionAsync call. The flyout is defined in pages/home/home.html (our page control) to be centered along the bottom of the map area itself:
<div id="retryFlyout" data-win-control="WinJS.UI.Flyout" aria-label="{Trying geolocation}"
data-win-options="{anchor: 'map', placement: 'bottom', alignment: 'center'}">
<div class="win-type-large">Attempting to obtain geolocation...</div>
</div>
The refreshPosition function that we just added to pages/home/home.js makes a great place to display the flyout just before calling getGeopositionAsync:
refreshPosition: function () {
document.getElementById("retryFlyout").winControl.show();
locator.getGeopositionAsync().done(function (position) {
//...
//Always hide the flyout
document.getElementById("retryFlyout").winControl.hide();
//...
}, function (error) {
//...
//Always hide the flyout
document.getElementById("retryFlyout").winControl.hide();
});
},
Note that we want to hide the flyout inside the completed and error handlers so that the message stays visible while the async operation is happening. If we placed a single call to hide outside these handlers, the message would flash only very briefly before being dismissed, which isn’t what we want. As we’ve written it, the user will have enough time to see the notice along the bottom of the map (subject to light dismiss):

The next piece is to notify the user when obtaining geolocation fails. We could do this with another flyout with a Retry button, or with an inline message as below. We would not use a message dialog in this case, however, because the message could appear in response to a user-initiated refresh action. A message dialog might be allowable on startup, but with an inline message combined with the flyout we already added we have all the bases covered.
For an inline message, I’ve added a floating div that’s positioned about a third of the way down on top of the map. It’s defined in pages/home/home.html as follows, as a sibling of the map webview:
<div id="locationSection" class="subsection" aria-label="Location section">
<h2 class="group-title" role="heading">Location</h2>
<iframe id="map" class="graphic" src="ms-appx-web:///html/map.html"
aria-label="Map"></iframe>
<div id="noLocation" class="errorOverlay win-type-x-large">
Unable to obtain geolocation;<br/>use the app bar to try again.
</div>
</div>
The styles for the .errorOverlay and #noLocation rules in pages/home/home.css provide for its placement in the same grid cell as the map, with a semitransparent background; most of the styling is placed in the .errorOverlay rule, so we can use it for a camera capture message too:
.errorOverlay {
display: block;
-ms-grid-column: 1;
-ms-grid-row: 2;
width: 100%;
text-align: center;
background-color: rgba(128,0,0,0.75);
opacity: 0.9999;
}
#noLocation {
-ms-grid-row-align: start;
margin-top: 20%;
}
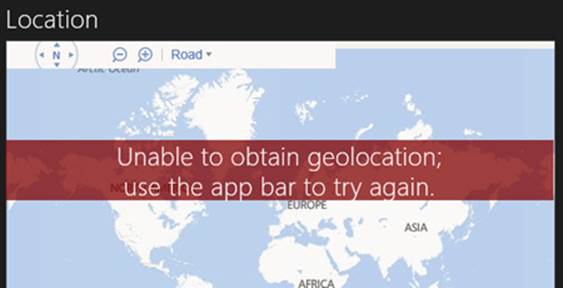
Important When overlaying any element on top of a webview, you must follow the rules for independent composition that normally apply to animation, otherwise the webview will render as black. As demonstrated here in the .errorOverlay rule, the key piece is that you set the opacitystyle to something other than 1.0 or 0.0; those values will fail “layer candidacy” and cause the webview to go black. In this case I’m using an RGBA background-color for the semitransparent red overlay and opacity: 0.9999 (effectively solid, but different from 1.0). Alternately, I could use background-color: rgb(128, 0, 0) and set opacity: 0.75, though in that case the white text also becomes partly transparent with the rest of the element, reducing contrast.
This message will appear if the user denies geolocation consent at startup or allows it but later uses the Settings charm to deny the capability. You can use these variations to test the appearance of the message. It’s also possible, if you run the app the first time without network connectivity, for this message to appear on top of the map error image; this is why I’ve positioned the geolocation error toward the top so that it doesn’t obscure the message in the image. But if you’ve successfully run the app once and then lose connectivity, the map should still get created because the Bing maps script will have been cached.
With display:blockin the CSS, the error message is initially visible, so we make sure to hide it on startup, setting display: none. If we get to the error handler for getGeolocationAsync, we set style.display to block again, which reveals the element:
document.getElementById("noLocation").style.display = "block";
We again hide the message within the tryRefresh function, which is again invoked from the app bar command, so that the message stays hidden unless the error persists:
tryRefresh: function () {
document.getElementById("noLocation").style.display = "none";
//...
},
We can reuse the .errorOverlay class to add a similar message on top of the Photo area when the view width falls below 500px. In this case we need another element in the photoSectiondiv:
<div id="cannotCapture" class="errorOverlay win-type-x-large">
Widen the view to capture a photo.
</div>
In home.css we can make this initially hidden and then show it automatically through the media query for max-width: 499px:
#cannotCapture {
-ms-grid-row-align: end;
margin-bottom: 15%;
display: none;
}
@mediascreenand( orientation: portrait)and( max-width: 499px) {
/*Other styles omitted*/
#cannotCapture {
display: block;
}
}
This shows a small message on top of the Photo in narrow views:
![]()
A little code added to the top of the capturePhoto function also prevents calls to the camera capture UI for narrow widths (this prevents excess debug output too):
if (window.innerWidth < 500) {
return;
}
One more piece that could be added, if desired, is a message dialog if connectivity is lost and we can’t update our position. I’ve not done this in the app because it’s simply relying on the geolocation APIs directly, which on some devices might not depend on network connectivity at all. In any case, if this is an appropriate scenario for your app, use the NetworkInformation.onnetworkstatuschanged event we met in Chapter 4. This is a case where a message dialog is appropriate because such a condition does not arise from direct user action.
Also, it’s worth noting that if we used the Bing Maps SDK control in this app, the script we’re normally loading from a remote source would instead exist in our app package, thereby eliminating the first error case altogether. We’ll make this change in the next revision of the app.
What We’ve Just Learned
• In Windows Store app design, commands that are essential to a workflow should appear on the app canvas or on a popup menu from an element like a header. Those that can be placed on the Setting charm should also go there; doing so greatly simplifies the overall app implementation. Those commands that remain typically appear on an app bar or nav bar, which can contain flyout menus for some commands. Context menus (Windows.UI.Popups.PopupMenu) can also be used for specific commands on content.
• The app bar is a WinJS control (WinJS.UI.AppBar) on which you can place standard commands or other command controls, using the commands layout, or any HTML of your choice, using the custom layout. Custom icons are also possible, using different fonts or custom graphics. An app can have both a top and a bottom app bar, where the top is typically used for navigation and can employ the WinJS.UI.NavBarcontrol or a custom layout. App bars and nav bars can be sticky to keep them visible instead of being light-dismissed.
• The app/nav bar’s showCommands, hideCommands, and showOnlyCommands methods, along with the extraClass property of commands, make it easy to define an app bar in a single location in the app and to selectively show specific command sets by using querySelectorAll with a class that represents that set.
• The NavBar, being a custom layout AppBar, can host arbitrary HTML but is designed to host NavBarContainer controls that provide a paging UI for collections of NavBarCommand objects. A container can use a WinJS.Binding.List as a data source for commands and also supports vertical layout for narrow views.
• The WinJS.UI.Flyout control is used for confirmations and other questions in response to user action; they can also just display a message, collect additional information, or provide controls to change settings for some part of the page. Flyouts are light-dismissed, meaning that clicking outside the control or pressing ESC will dismiss it, which is the equivalent of canceling the question.
• Message dialogs (Windows.UI.Popups.MessageDialog) are used to ask questions that the user must answer or acknowledge before the app can proceed; a message dialog disables the rest of the app. Message dialogs are best used for errors or conditions that affect the whole app; error messages that are specific to page content should appear inline.
• Command menus, as appear from an app bar command or an on-canvas control of some kind, are implemented with the WinJS.UI.Menu control.
• As an example of using many of these features, the Here My Am! app is updated in this chapter to greatly improve its handling of various error conditions.
77 Three notes: First, within data-win-options the Unicode escape sequence can also be in the HTML form of &#xNNNN; I prefer the JSON form because it has less ceremony and is less prone to error. Second, you can use the Character Map desktop applet (charmap.exe) to examine all the symbols within any particular font. Third, if you need to localize an icon, you can specify the icon property in the data-win-res string because the iconproperty ultimately resolves to a string.
78 The sample actually calls then and not done here. If you’re wondering why such consistencies exist, it’s because the donemethod was introduced mid-way during the production of Windows 8 when it became clear that we needed a better mechanism for surfacing exceptions within chained promises. As a result, a few SDK samples and code in the documentation still use then instead of donewhen handling the last promise in a chain. It still works; it’s just that exceptions in the chain will be swallowed, thus hiding possible errors.
All materials on the site are licensed Creative Commons Attribution-Sharealike 3.0 Unported CC BY-SA 3.0 & GNU Free Documentation License (GFDL)
If you are the copyright holder of any material contained on our site and intend to remove it, please contact our site administrator for approval.
© 2016-2026 All site design rights belong to S.Y.A.