Neo4j in Action (2015)
Part 2. Application Development with Neo4j
Chapter 8. Traversals in depth
This chapter covers
· How traversal ordering impacts performance and memory footprint
· Using expanders during traversal
· Controlling the number of visits to each node using the uniqueness property
· Improving graph query performance using bidirectional traversals
Writing efficient traversals is the key to successfully querying graph data. You learned the basic concepts of the Neo4j Traversal API in chapter 4. In this chapter we’re going to dig a little deeper into the inner workings of the Traversal API so you can learn how to solve the most complex graph problems in an efficient manner.
8.1. Traversal ordering
Every time a traverser visits a node, it needs to make a decision about which relationship to follow and which node to visit next, repeating the process until the traversal completes. By selecting an optimal path through the graph, the traversal can complete more quickly and use less memory. There are two main ordering algorithms in graph theory, and they’re used for most traversals in Neo4j: depth-first and breadth-first algorithms.
To see how traversal efficiency and performance can depend on the selected ordering, look at the graph in figure 8.1.
Figure 8.1. Simple graph with nine nodes and eight relationships
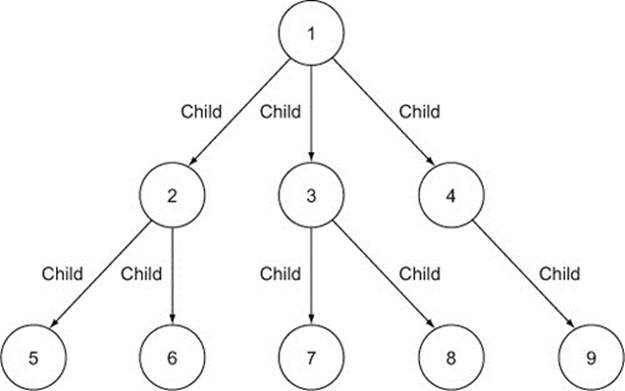
The graph in figure 8.1 has nine nodes. It represents a tree, which is a graph type where each two nodes are connected via a single path. In other words, a tree is a graph without any cycles. To make our illustration of traversal ordering simpler, we’ll use the tree graph as an example. (For an example of a graph with cycles, and therefore not a tree, see figure 8.4.)
The root node of the graph is marked as 1. Nodes directly connected to the root node (branches) are marked 2, 3, and 4. The rest of the nodes (leaves) are two relationships away from the root node (nodes 5–9).
Let’s look at the differences between walking this graph using the depth-first and breadth-first traversal orderings. Our goal is to walk the graph so that we visit each node in the graph exactly once.
8.1.1. Depth-first
Every time you visit a node, you need to decide which relationship to follow next, or which nodes to hop to next. Depth-first ordering says that you should first hop to the first child of the node you’re currently on that hasn’t been visited before. If all descendant nodes have already been visited, you should go backwards to the first node that has a child you haven’t yet visited. Figure 8.2 illustrates the order of visits to each node using depth-first traversal.
Figure 8.2. Walking the graph using depth-first ordering
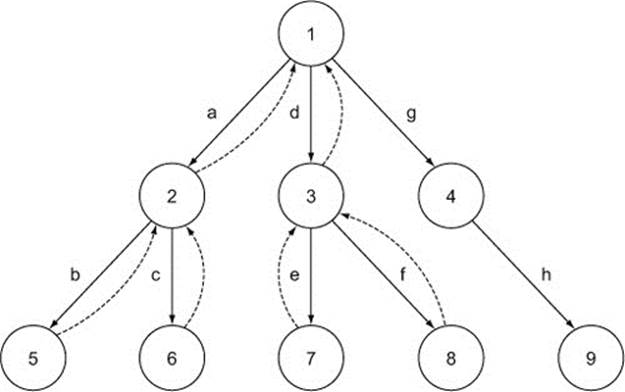
You start the traversal at node 1. Node 1 has relationships to three other nodes (2, 3, and 4) and you’re going to visit the first child node you haven’t visited before—in this case, node 2. You can imagine the traverser as a little robot that jumps from node 1 to node 2 via relationship a.
Once you inspect node 2, you have to decide where to go next. Remember the depth-first rule: visit a child of the node that hasn’t been visited before, if one is available. So you’ll make the next hop from node 2 to node 5 (via relationship b). In only two hops, you’ve made it to the deepest point in the graph—from the root node (node 1) to node 5. This is why the depth-first algorithm is named that: you’re traversing the graph so that you go as deep as you can, as soon as you can.
Now that you’re on node 5, you should go to its child node, but node 5 is a leaf in the graph, so it doesn’t have any child nodes to hop to. In that case, the depth-first algorithm has a rule that says to go backwards to the first node that has a descendant that hasn’t been visited before. You return to node 2 and then apply the original rule. Node 2 has two descendants (nodes 5 and 6), and you’ve already visited node 5, so the next stop is node 6 (via relationship c).
Using the same rules, you’ll end up walking the graph in the following order of nodes:
1 → 2 → 5 → 6 → 3 → 7 → 8 → 4 → 9
If you’re looking at figure 8.2, you’ve hopped via relationships a, b, c, d, e, f, g, and h during the traversal, in that order.
It’s interesting to realize that you visited node 4 next to last, although that node is very close to the root node, the starting point. You’ll also notice that you visited the nodes in the left part of the graph (nodes 1, 2, 5, and 6) much sooner than the nodes in the right part of the graph (nodes 4, 8, and 9). This is a consequence of the depth-first traversal, and you should use it to your advantage when modeling a graph and designing the traversals. We’ll discuss this again when we compare the depth-first and breadth-first orderings.
The question now is how we can make use of the depth-first algorithm in the Neo4j Traversal API. Let’s do just that: implement the traversal we just described using the Neo4j Traversal API. You can see the solution in the following listing.
Listing 8.1. Walking the entire graph depth-first using the Neo4j Traversal API

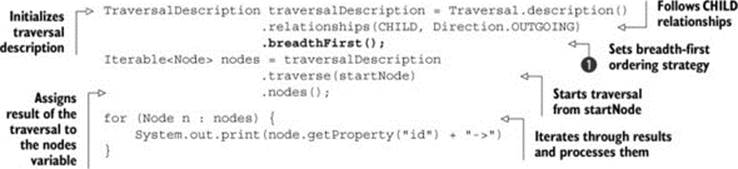
First, you need to initialize a traversal description, just like you did when you used the Neo4j Traversal API in chapter 4 ![]() . Then you configure the traversal to follow only outgoing relationships of type CHILD
. Then you configure the traversal to follow only outgoing relationships of type CHILD ![]() . Next, you set the traversal ordering to depth-first. To do so, you use the dedicated method depthFirst() as part of the TraversalDescription builder
. Next, you set the traversal ordering to depth-first. To do so, you use the dedicated method depthFirst() as part of the TraversalDescription builder ![]() .
.
Once the description is complete, you start the traversal by specifying the starting node ![]() , and return all nodes you visit during the traversal
, and return all nodes you visit during the traversal ![]() . Remember, the return type of the traversal result is a lazy Java Iterable instance. Just specifying the starting node and calling nodes() on the traverser won’t visit any nodes at that point. You need to start iterating through the results for the traverser to start moving through the graph, which is exactly what you do here
. Remember, the return type of the traversal result is a lazy Java Iterable instance. Just specifying the starting node and calling nodes() on the traverser won’t visit any nodes at that point. You need to start iterating through the results for the traverser to start moving through the graph, which is exactly what you do here ![]() . During iteration, you can process the visited nodes as you wish, depending on your software requirements. In this example, you simply print the node property "id" to the console.
. During iteration, you can process the visited nodes as you wish, depending on your software requirements. In this example, you simply print the node property "id" to the console.
The resulting output will prove that you’ve indeed used depth-first algorithm rules when walking the graph:
1 -> 2 -> 5 -> 6 -> 3 -> 7 -> 8 -> 4 -> 9 ->
Note
Depth-first is the default branch-ordering strategy in Neo4j. If you don’t specify the traversal ordering when building your traversal description, depth-first will be used.
Let’s now take a look at the other built-in branch selector strategy: breadth-first.
8.1.2. Breadth-first
As its name suggests, the breadth-first algorithm tries to go as wide in the graph as possible, before visiting nodes more distant from the starting node. As part of the breadth-first algorithm, the traversal will first visit all siblings of the current node before moving on to their children. Siblingsin this sense means nodes the same distance from the root node as the node you’re currently visiting. Figure 8.3 shows the breadth-first traversal order for the same graph used earlier.
Figure 8.3. Breadthfirst traversal of the sample graph
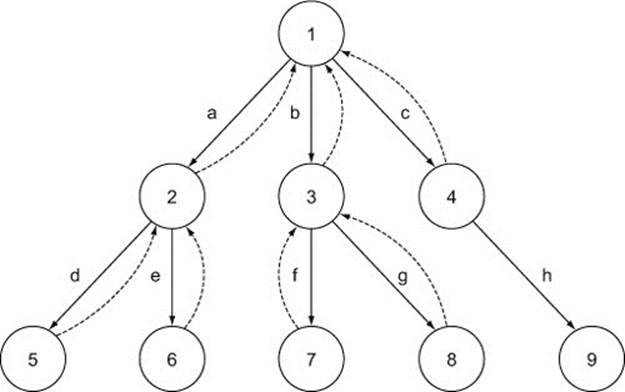
You start from root node 1, as before, and continue by visiting its first descendant, node 2 (via relationship a). Next, you visit the siblings of node 2, moving to nodes 3 and then 4. Once you visit node 4, there are no more nodes the same distance from the root node to visit, so you move to the nodes on the next depth level, starting with the descendants of node 2, visiting nodes 5 and 6, in that order. Then you continue to nodes 7 and 8, and finally you visit the descendant of node 4 (node 9). The order of nodes you visited using the breadth-first algorithm is as follows:
1 → 2 → 3 → 4 → 5 → 6 → 7 → 8 → 9
In breadth-first traversal, you visit nodes closer to the root node earlier, leaving nodes further away from the root node for later.
Let’s now update the traversal implementation to use the breadth-first strategy. The traversal description builder in the Neo4j Traversal API has a dedicated method to do just that, as the following listing illustrates.
Listing 8.2. Breadth-first traversal using the Neo4j Traversal API
As you can see, the code is very similar. The only difference is that you use a different method to specify the traversal ordering when building a traversal description ![]() . The console output will match the order established earlier in this section:
. The console output will match the order established earlier in this section:
1 -> 2 -> 3 -> 4 -> 5 -> 6 -> 7 -> 8 -> 9 ->
8.1.3. Comparing depth-first and breadth-first ordering
As you’ve seen in the last two sections, a depth-first traversal will favor searches with the solution in the left part of the graph. A breadth-first traversal will be faster when the result is closer to the starting node than if it’s a longer distance from the starting node. These two characteristics are very important when designing the graph and the traversal you need to execute.
Take node 4 in figure 8.1, as an example. If you start to traverse the graph from root node 1 using depth-first ordering, the traversal will need to walk almost the entire graph before node 4 is found, because it’s visited next to last. If you do the same using breadth-first ordering, node 4 will be visited fourth from the start, with half as many nodes visited on its path. As traversal speed is directly proportionate to the number of hops (or nodes visited on the path), you could find the result in half the time if you used breadth-first ordering rather than depth-first ordering.
If you’re looking for node 5, the depth-first algorithm would yield the result in three hops, and the breadth-first algorithm would need five.
The larger the graph gets, the bigger the impact of traversal ordering on traversal performance. To illustrate, create a graph where each node has exactly three descendants. Create a starting node and connect it with three child nodes. Then take each of the three child nodes and add three descendants to each of them. Then continue like that up to depth level 12. The resulting graph will have 797,161 nodes and 797,160 relationships.
Now run a traversal to find a particular node at a specific depth level. As a measure of performance, we’ll use the number of nodes visited until the solution is found.
Note
The number of hops and nodes visited is directly related to the time needed to perform the traversal. Using actual times to measure performance would make the results dependent on available hardware resources as well as the state of the caches, which we’re trying to avoid in this simple experiment. Neo4j can visit between tens of thousands and millions of nodes per second, depending on the hardware, caches, and traversal complexity.
Table 8.1 illustrates the results of the experiment.
Table 8.1. The performance of a traversal depending on the location of node searched for and the traversal algorithm used
|
Depth level |
Node location |
Depth-first |
Breadth-first |
|
3 |
First on left side |
3 |
13 |
|
3 |
Last on right side |
767,637 |
39 |
|
6 |
First on left side |
6 |
364 |
|
6 |
Last on right side |
796,068 |
1,092 |
|
9 |
First on left side |
9 |
9,841 |
|
9 |
Last on right side |
797,121 |
29,523 |
|
12 |
First on left side |
12 |
265,720 |
|
12 |
Last on right side |
797,160 |
797,160 |
As you can see from the table, when the result is close to the starting node, breadth-first ordering will generally yield better performance. But further away from the starting node, breadth-first ordering is always slow, and depth-first ordering can be extremely efficient, depending on whether the resulting node is located in the left or right part of the graph.
In the worst-case scenario, where the entire graph needs to be traversed (when the resulting node is in the bottom-right corner of the graph), both depth-first and breadth-first ordering need to visit all nodes. But due to the larger memory footprint of breadth-first traversals, it’s better to use depth-first ordering in this case.
In addition to speed, another aspect you need to consider when deciding on the traversal ordering is memory consumption of the traversals. Imagine once again that the traverser is like a little robot that jumps from node to node via relationships. This robot will have to remember some state about which node it came from, and which nodes it has yet to visit. The larger the graph, the more memory is needed to store that state. But the selected traversal ordering affects the memory it needs. Let’s see how.
When using depth-first ordering, you try to go deep into the graph as soon as you can. As soon as you come to the bottom of the graph (visit a node that has no descendants that have not been visited before), you can completely forget about that branch of the graph—from the traversal perspective, it’s considered complete. In the Neo4j Java world, that means you can dereference that path from memory and leave it for garbage collection cleanup. Because some of these paths will be visited early during the traversal, you can start deallocating memory as soon as you start traversing.
Breadth-first traversal tries to go as wide as it can in the graph, before starting with the nodes on the next depth level. As a result, during traversal you need to remember all the nodes you’ve visited and which descendants you haven’t yet visited. The larger and more complex the graph, the more nodes you have to remember, resulting in a larger memory footprint.
In general, the more relationships there are per node, the more memory is needed for breadth-first traversal.
How do you choose between depth-first and breadth-first ordering? You have to realize that you, as an application architect and developer, have one big advantage: you know and understand the domain model you operate on. Based on your domain insight, you can determine which ordering to use for each of your traversals (and it can vary from case to case on the same graph).
If the solution is close to the starting node, breadth-first ordering would probably be better. But if the graph is very dense (that is, has a lot of relationships per node), breadth-first ordering may use too much memory to be practical.
An understanding of traversal ordering and insight into your problem domain will give you a good starting point, but to determine the best traversal overall, you’ll need to experiment with different options. If Neo4j’s built-in ordering options don’t match your requirements, you can implement your own ordering by using the org.neo4j.graphdb.traversal.BranchSelector interface, which is part of the Neo4j Traversal API. Custom traversal implementations are out of scope for this book, but you can find useful information by looking at the Neo4j Manual (http://docs.neo4j.org/) and visiting the Neo4j Google Groups (https://groups.google.com/forum/#!forum/neo4j).
Let’s look at the Neo4j mechanisms that can help you decide how to follow relationships from the current node during traversal: path expanders.
8.2. Expanding relationships
The expander is the component of the Neo4j Traversal API that’s responsible for deciding which relationships should be followed from any node visited during the traversal. In addition to selecting relationship types and directions, the expander is responsible for the order in which relationships are followed.
Neo4j provides a number of expander implementations out of the box. The default implementation, which is the one most commonly used, is StandardExpander.
8.2.1. StandardExpander
The standard expander is encapsulated in the StandardExpander class, and it provides a collection of built-in expanders that allow you to specify the relationships you want to follow, including their direction. The relationships will be expanded in the order they were added to the graph.
Note
StandardExpander is the default implementation used by the Neo4j Traversal API.
To illustrate the use of StandardExpander, consider the following example: in a social network, people who work with each other are connected via a WORKS_WITH relationship, and people who are close friends are connected via an IS_FRIEND_OF relationship. In addition, users in the network can link to the films they liked (a LIKES relationship). Figure 8.4 shows the sample graph we’ll be using.
Figure 8.4. A social network of users and movies they like
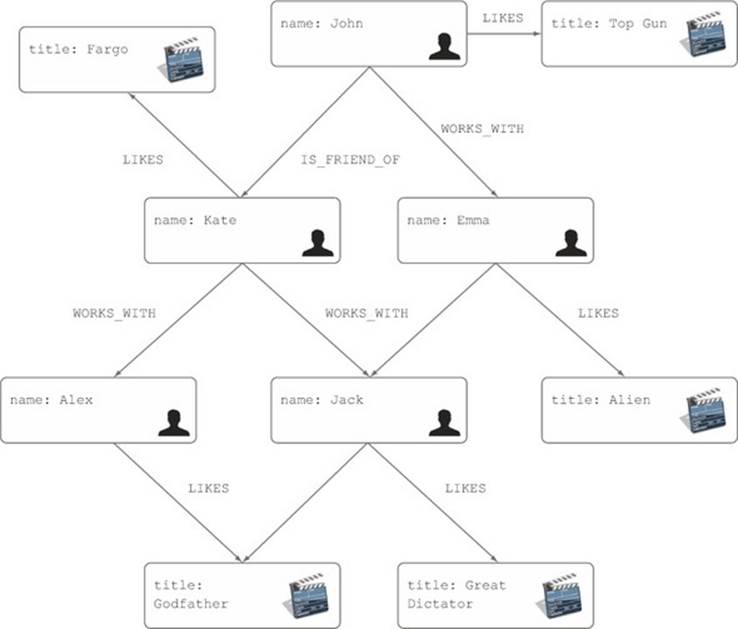
What we want to do now is find all movies that John’s direct contacts (both friends and work colleagues) like. Looking at figure 8.4, you’d expect the result to contain the movies Fargo and Alien. Top Gun shouldn’t be part of the result as it’s liked by John himself. Godfather and Great Dictator shouldn’t be part of the result because only John’s friends’ friends like them (and you only want the movies liked by John’s direct contacts).
The following listing illustrates the traversal implementation.
Listing 8.3. Finding all movies John’s friends and colleagues like
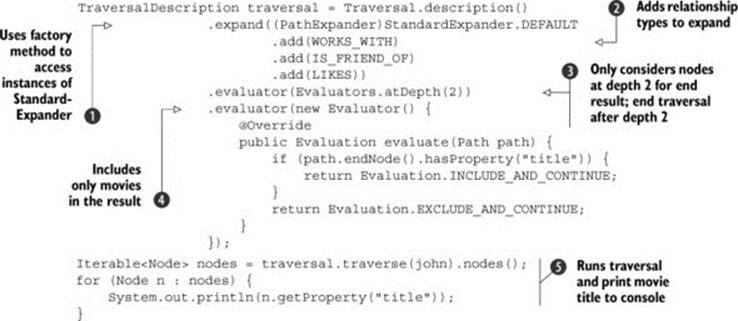
You use the TraversalDescription.expand(...) method to set the expander you want to use for the traversal ![]() . You instantiate StandardExpander using the static factory method, then add the relationships you’d like to follow
. You instantiate StandardExpander using the static factory method, then add the relationships you’d like to follow ![]() . Because you’re looking at movies that John’s direct contacts have seen, you want to include only nodes at depth 2 and stop the traversal after that
. Because you’re looking at movies that John’s direct contacts have seen, you want to include only nodes at depth 2 and stop the traversal after that ![]() . To make sure you’re only returning movie nodes in the result (and not user nodes, for example), you add another evaluator to check the title property on the nodes, because only movie nodes have this property
. To make sure you’re only returning movie nodes in the result (and not user nodes, for example), you add another evaluator to check the title property on the nodes, because only movie nodes have this property ![]() . Finally, you execute the traversal starting from the node representing John, and print the movie titles to the console
. Finally, you execute the traversal starting from the node representing John, and print the movie titles to the console ![]() .
.
Once the query is executed, the expected result is printed to the console:
Fargo
Alien
In the code, you passed the expander built into the StandardExpander class to the TraversalDescription.expand(...) method to select which relationships to follow from each node. But because StandardExpander is the default expander used by the TraversalDescriptionbuilder, you can conveniently use its shortcut methods to select which relationships to expand, resulting in code that’s much clearer and more concise. The following snippet shows how you can update the traversal from listing 8.3 to use this syntax. A portion of the code from listing 8.3 has been omitted for clarity:

In this snippet, you use the TraversalDescription.relationships(...) method to add the relationship types you want to expand ![]() . Because StandardExpander is used by default, this will result in exactly the same code being executed under the hood as for the code in listing 8.3, with slightly more concise syntax.
. Because StandardExpander is used by default, this will result in exactly the same code being executed under the hood as for the code in listing 8.3, with slightly more concise syntax.
The code in listing 8.3 looks much more like the code you used for traversals earlier in the book, but you now know that behind it is the StandardExpander in action. Using the TraversalDescription.expand(...) method, you can have control over which expander is used for any traversal, which is the flexibility we’ll be taking advantage of in the following sections.
In the next two sections, you’re going to learn how to use nondefault expander implementations in your traversals. First, let’s start with ordered relationship expanders.
8.2.2. Ordering relationships for expansion
As you’ve seen, StandardExpander has a limitation—the order of the relationships to be expanded is fixed, and it uses the order in which the relationships were created. In most cases this is a reasonable limitation, as most traversals treat each relationship type the same way. But in some scenarios it would be preferable to expand relationships in a particular order. Let’s use the same graph as in the previous section (figure 8.4) to demonstrate the use case for ordering relationships.
Just as in the previous section, we’ll find all movies that any of John’s direct contacts liked (including both friends and work colleagues). This time, we’ll prefer the movies liked by John’s close friends, putting them at the top of the result list. You’d expect the same traversal results as before, but in a specific order (different than before):
1. Alien (as recommended by John’s friend Emma)
2. Fargo (as recommended by Kate, who is John’s work colleague)
You can easily order relationships by type prior to expansion by using OrderedByTypeExpander instead of the default StandardExpander, as the next listing shows.
Listing 8.4. Expanding relationships in the order of relationship types
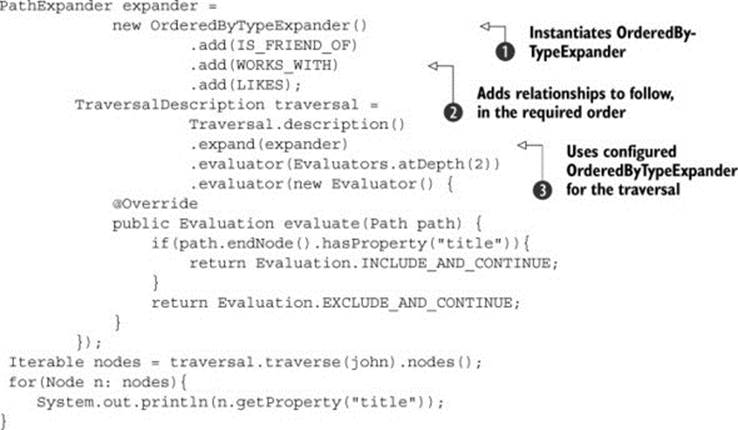
You instantiate the new expander using its default constructor ![]() ; then you add the relationship type to follow
; then you add the relationship type to follow ![]() . The specified relationship types are guaranteed to be expanded in the same order as they’re added to the expander, for every visited node. Because you want theIS_FRIEND_OF relationships to always be traversed first, you add it first in your code.
. The specified relationship types are guaranteed to be expanded in the same order as they’re added to the expander, for every visited node. Because you want theIS_FRIEND_OF relationships to always be traversed first, you add it first in your code.
To use the newly created expander, you specify it using the TraversalDescription.expand(...) method ![]() . The rest of the code is the same as before.
. The rest of the code is the same as before.
When you execute this traversal, the result will be exactly as expected:
Alien
Fargo
OrderedByTypeExpander gives you more power when you’re designing traversals. In some cases, however, none of Neo4j’s built-in traversals provides the functionality that the problem requires. In that case, you can implement your own custom expanders using the Neo4j Traversal API; that’s what we’re going to show you in the next section.
8.2.3. Custom expanders
Neo4j has an extension point readily available for when you need to build a custom expander that meets your requirements. The extension API is defined with the Path-Expander interface, which is part of the Neo4j kernel library.
The PathExpander interface defines two methods you need to implement:
· Iterable<Relationship> expand( Path path, BranchState<STATE> state ); —This method contains the logic that determines which relationships the traverser should follow (and in which order) from the current node of the traversal. The argument path contains the full path (including nodes and relationships) that was traversed up to the current point in the graph. You can use all available methods of the path object as usual. For example,
o Path.endNode() gets the node you’re currently visiting.
o Path.startNode() gets the node from which the traversal started.
o Path.lastRelationship() retrieves the last relationships traversed before you reached the current point in the graph.
In addition to the traversal path, you have access to another method argument, BranchState, which represents the state associated with the current branch of the traversal. It’s optional, and typically expanders won’t use it.
· PathExpander<STATE> reverse(); —This method returns the expander with the same expanding logic, but with reversed direction, and it’s typically used in bidirectional traversals (which we’ll discuss later in this chapter). Think of the reverse method as the expander you’d need to use to get from the current node back to the starting node of the traversal.
Let’s now implement a sample custom expander. Based on the same social network graph used earlier in this section (see figure 8.4), we’ll design a traversal that will again find all movies that John’s direct contacts like. But instead of using the standard Neo4j Traversal API components, including custom evaluators, we’ll use the custom PathExpander implementation.
The main challenge with this query is to avoid any movies John likes, and also any movies liked by John’s friends’ friends. To do this, we’ll use a custom expander with the following characteristics:
· Follow only the IS_FRIEND_OF and WORKS_WITH relationships from the start node (representing John).
· For all nodes visited at depth 1 (representing John’s friends and work colleagues), follow only the LIKES relationships.
Using built-in TraversalDescription methods and StandardExpander, it’s not possible to build a traversal with these characteristics. But you can implement a custom PathExpander that does just that. The following listing shows the implementation of such an expander.
Listing 8.5. Expanding relationships based on distance from the starting node
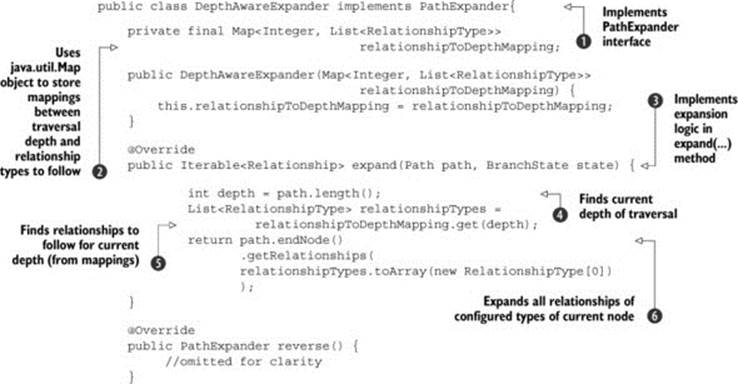
The DepthAwareExpander implements the PathExpander interface from the Neo4j kernel API ![]() . To map the distance from the starting node (or depth) to the relationship types, you use a simple java.util.Map
. To map the distance from the starting node (or depth) to the relationship types, you use a simple java.util.Map ![]() .
.
The key method to implement is expand(...), which expands the relationships you should follow from the node you’re currently visiting ![]() . The depth of the currently visited node can be found with the Path.length() method
. The depth of the currently visited node can be found with the Path.length() method ![]() . Next, you look up the relationships for the given depth from the configured mappings
. Next, you look up the relationships for the given depth from the configured mappings ![]() . Finally, you return the expanded relationships of specified types from the current node
. Finally, you return the expanded relationships of specified types from the current node ![]() . The current node is located using the Path.endNode() method.
. The current node is located using the Path.endNode() method.
The next step is to use the custom expander in the actual traversal. The following listing shows a traversal that prints query results to the console (titles of all movies John’s direct friends like).
Listing 8.6. Finding all movies John’s friends like using a custom expander
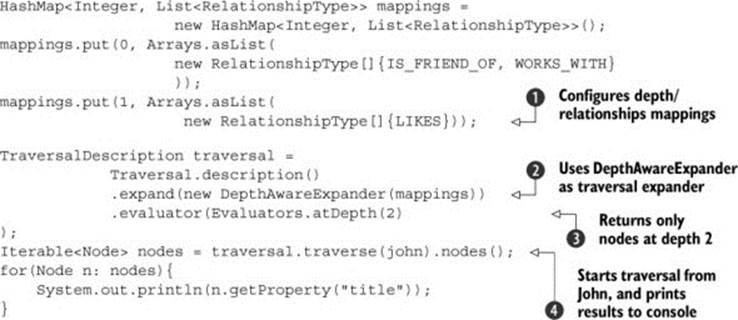
The first step is to configure which relationships to follow at each depth ![]() . The mappings are to follow the IS_FRIEND_OF and WORKS_WITH relationships directly from the starting node (depth 0) and the LIKES relationships from nodes at depth 1. The key point in the traversal implementation is to configure the traversal description to use the custom expander
. The mappings are to follow the IS_FRIEND_OF and WORKS_WITH relationships directly from the starting node (depth 0) and the LIKES relationships from nodes at depth 1. The key point in the traversal implementation is to configure the traversal description to use the custom expander ![]() . As you’re only interested in the nodes up to depth 2, you use the atDepth evaluator to stop the traversal at the specified depth
. As you’re only interested in the nodes up to depth 2, you use the atDepth evaluator to stop the traversal at the specified depth ![]() . Finally, you start the traversal from the node representing John and iterate through the results in the usual manner
. Finally, you start the traversal from the node representing John and iterate through the results in the usual manner ![]() .
.
When you execute the traversal, the console output will display the expected movies, Alien and Fargo, which are liked by John’s direct contacts. The full demo, including all the code in this section, is available as part of this book’s sample code.
The next advanced Neo4j Traversal API topic we’ll cover is uniqueness, so read on to learn how to control how many times the traverser can visit any node or relationship.
8.3. Managing uniqueness
The uniqueness aspect of the traversal determines how many times you can visit a node over the duration of the traversal. There are a few different uniqueness settings in the Neo4j Traversal API that you can apply to your traversals, and in this section we’re going to demonstrate their uses and behavior. All available uniqueness options are accessible as constants in the Uniqueness class in the Neo4j Java library.
8.3.1. NODE_GLOBAL uniqueness
The most typical uniqueness setting in Neo4j traversals is NODE_GLOBAL. It basically means that each node can be visited once and only once during the traversal.
Note
NODE_GLOBAL is the default traversal setting, so if you don’t specify the uniqueness, this setting will be applied to your traversals.
NODE_GLOBAL is a common requirement for traversals, so let’s illustrate it with an example. Let’s look at a simple social network graph, with six nodes representing users, and KNOWS relationships between users who know each other. Figure 8.5 illustrates this.
Figure 8.5. A simple social network graph
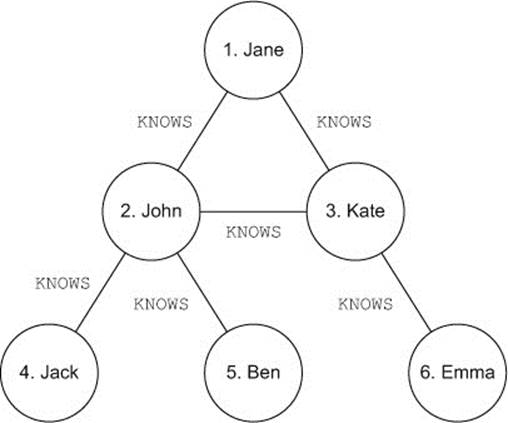
Let’s implement a traversal to find the solution to the following problem: who of user 1’s (Jane’s) direct connections can introduce her to user 5 (Ben)?
The following listing shows the implementation of the required traversal using the NODE_GLOBAL uniqueness.
Listing 8.7. Finding Jane’s direct connections who can introduce her to Ben
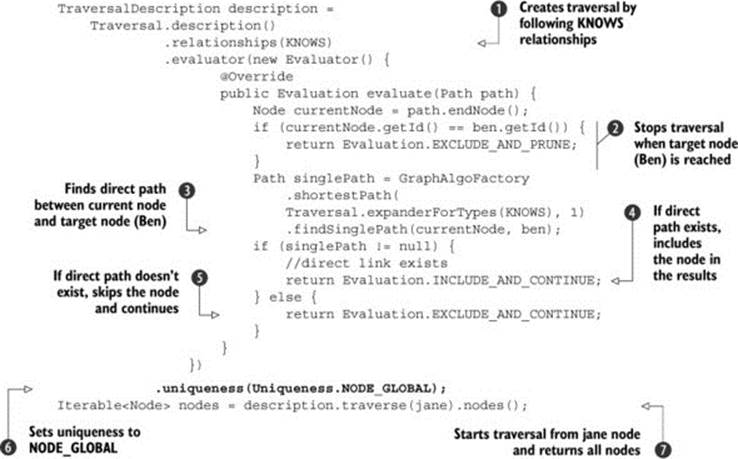
You create the traversal in the usual manner, and configure it to follow the KNOWS relationships in any direction ![]() . You then implement the custom evaluator to determine whether or not each visited node should be included in the results. The first step in the evaluator is to stop the traversal if the target node (Ben, in this case) is reached
. You then implement the custom evaluator to determine whether or not each visited node should be included in the results. The first step in the evaluator is to stop the traversal if the target node (Ben, in this case) is reached ![]() —there is no point in checking who can introduce Jane to Ben after she meets him! Next, you try to find a direct path between the current node and the target node representing Ben
—there is no point in checking who can introduce Jane to Ben after she meets him! Next, you try to find a direct path between the current node and the target node representing Ben ![]() . You’re using Neo4j’s built-in graph algorithm to calculate the direct path (using the GraphAlgoFactory class). If a direct path exists, that means you found a node that can introduce Jane to Ben, so you include the current node in the result
. You’re using Neo4j’s built-in graph algorithm to calculate the direct path (using the GraphAlgoFactory class). If a direct path exists, that means you found a node that can introduce Jane to Ben, so you include the current node in the result ![]() . If there’s no direct link, skip the node and continue with the traversal
. If there’s no direct link, skip the node and continue with the traversal ![]() .
.
The main reason for this experiment is to demonstrate uniqueness, so you set it to the required NODE_GLOBAL setting using the uniqueness() method of the traversal description builder ![]() . Finally, start the traversal from the node representing Jane and return all collected nodes
. Finally, start the traversal from the node representing Jane and return all collected nodes ![]() .
.
If you run the traversal and output the result to the console, you’ll see a single result:
John
You can confirm, by looking at the graph in figure 8.5, that John is the only person in Jane’s network who can introduce her to Ben.
So far, so good. Let’s expand this experiment to the NODE_PATH uniqueness setting.
8.3.2. NODE_PATH uniqueness
The NODE_PATH uniqueness setting specifies that no path from the starting node to the current node can be traversed twice. Multiple visits to the same node are allowed, but only if they belong to different paths.
Let’s update the code in listing 8.7 by changing the uniqueness for the traversal to NODE_PATH, and, keeping all other traversal settings exactly the same, run the query again. The code will look very similar, as the following listing shows. A portion of the code has been omitted for clarity.
Listing 8.8. Making connections using NODE_PATH uniqueness
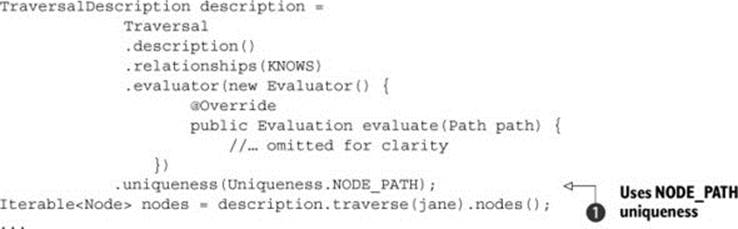
The only difference in the code is the different constant used to configure the uniqueness: NODE_PATH ![]() .
.
If you run this query, the output will look like this:
John
John
John is printed twice—you have two entries in your result, although both represent the same node. Why did this happen? Take a careful look at the graph in figure 8.5. Jane is indeed connected to Ben via John. But there is another path that connects Jane and Ben—one via Kate and John! These are different paths in the graph, and because you’re using NODE_PATH uniqueness, both represent valid results.
Previously, you only had one result because both paths (Jane–John–Ben and Jane–Kate–John–Ben) go via the john node, and since you used NODE_GLOBAL uniqueness, the second path was never realized.
To illustrate this further, let’s change the traversal query slightly, and find what paths Jane has to Ben via her direct contacts.
To answer this, you must understand that you’re not only interested in the users who know Ben, but rather in all nodes on paths between Jane and Ben. All you have to do is change the result of your traversal, as the next snippet shows:
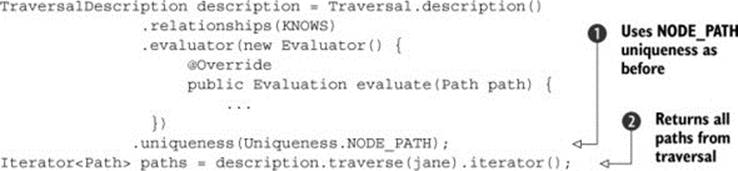
The traversal description stays exactly the same as before, including NODE_PATH uniqueness ![]() . The only change is that you’re returning paths instead of nodes from the traversal
. The only change is that you’re returning paths instead of nodes from the traversal ![]() .
.
The console output of this code would look like this:
(Jane)--[KNOWS,0]-->(John)
(Jane)--[KNOWS,1]-->(Kate)<--[KNOWS,4]--(John)
This time it’s clear why there were two john nodes as results previously—they’re parts of different paths, and these results illustrate that. Based on these results, Jane has two options:
· She can contact John, who knows Ben, directly.
· She can contact Kate, who can contact John. This could be a valid alternative if Jane knows John only slightly, whereas Kate is her best friend and works with John!
NODE_GLOBAL and NODE_PATH are the most typical uniqueness types used, but Neo4j offers other uniqueness types that can be useful in some situations. We’ll briefly introduce other uniqueness types in the next section.
8.3.3. Other uniqueness types
NODE_GLOBAL and NODE_PATH are probably the two most common uniqueness types for traversals. But for completeness, the Neo4j Traversal API includes six other types.
RELATIONSHIP_GLOBAL uniqueness states that each relationship in the graph can be visited only once. If there are multiple relationships between nodes in a graph, each node can be visited as many times as there are relationships that connect them.
RELATIONSHIP_PATH uniqueness is similar to NODE_PATH uniqueness in that relationships can be visited multiple times as long as the combination of relationships between the starting node and the current node is unique. Nodes can be visited multiple times with this uniqueness setting as well.
When either NODE_GLOBAL or RELATIONSHIP_GLOBAL is set, the traversal can be memory-hungry, especially in very connected, large graphs. Each node (in the case of NODE_GLOBAL) or relationship (in the case of RELATIONSHIP_GLOBAL) must be remembered for uniqueness constraint reasons. This is where the NODE_RECENT and RELATIONSHIP_RECENT settings come into play. When using these settings, the uniqueness constraint is loosened slightly.
With NODE_RECENT, there’s a cap to the number of visited nodes that are remembered. The rule is the same as for NODE_GLOBAL—a node can be visited only once—but only the collection of recently visited nodes are remembered for comparison. The number of recent nodes to be remembered can be passed as the second argument to the uniqueness method, as in the following snippet:
TraversalDescription description = Traversal.description()
.uniqueness(Uniqueness.NODE_RECENT, 1000)
With RELATIONSHIP_RECENT, the same rule as RELATIONSHIP_GLOBAL applies, so relationships can be visited only once. But during the traversal, only a specified number of relationships are remembered for comparison. The number of recent relationships that are remembered can be configured using the second argument to the uniqueness method, as in the following snippet:
TraversalDescription description = Traversal.description()
.uniqueness(Uniqueness.RELATIONSHIP_RECENT, 1000)
Since Neo4j version 1.8, the Traversal API has included two more settings:
· NODE_LEVEL —Guarantees that nodes on the same level (nodes that have the same distance from the starting node) are only visited once during traversal
· RELATIONSHIP_LEVEL —Guarantees that relationships on the same level (from nodes that have the same distance from the starting node) are visited only once during traversal
In the next section we’re going to look at bidirectional traversals, which allow you to significantly increase the performance of one type of traversal.
8.4. Bidirectional traversals
In all the traversals you’ve tried so far, you walked the graph from the single selected starting node until you found the solution, or until you walked the entire graph. You haven’t had multiple starting points from which to start traversing the graph. This was a limitation of the Neo4j Traversal API until Neo4j version 1.8, which introduced the concept of bidirectional traversals.
Let’s consider a typical social network graph with thousands of users, similar to the graph in figure 8.5. Users who know each other are connected via a KNOWS relationship. One of the typical traversal queries in such a graph would be “Are the selected two users (user 1 and user 2) in the same network?” (In other words, are the selected users connected, and, if so, how?)
You can solve this problem by using the standard Traversal API: starting from user 1, follow the KNOWS relationships; for each node you visit, check if that node is user 2. If it is, you found the connection; if it isn’t, you continue further, until you exhaust the entire graph. This is a perfectly valid solution, but if the graph is very large and densely connected, finding the solution can be quite time-consuming.
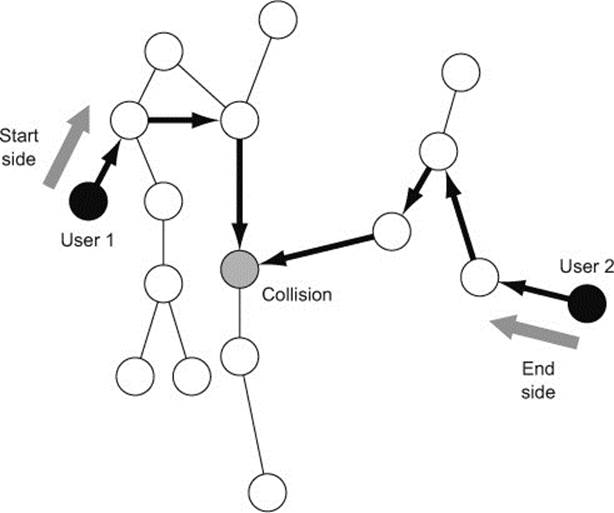
What if you could start the traversal from user 1 in the direction of user 2, and at the same time start another traversal from user 2 in the opposite direction? When the two traversals meet (called the collision point), you’ll have found the connection, and you can determine the full path between the users. This is exactly what bidirectional traversal allows you to do. Figure 8.6 illustrates bidirectional traversal in action.
Figure 8.6. Bidirectional traversal used to find the path between two nodes
Bidirectional traversal involves additional Traversal API components, which we haven’t seen before:
· Start-side traversal —A traversal definition for the start (outgoing or normal) side of the bidirectional traversal. The traversal description is created using the standard one-direction Traversal API used throughout this book.
· End-side traversal —A traversal definition for the end (incoming) side of the bidirectional traversal.
· Collision evaluator —Each time the start-side and end-side traversals collide, you have a potential solution of the traversal. The collision evaluator allows you to determine if the solution should be included in the traversal end result.
· Side selector —This component determines how quickly you should move the traverser on each side. The alternating side selector is the most commonly used; it alternates between moving the start-side and end-side traversals one step at a time.
The following listing shows the implementation of a bidirectional traverser using the Neo4j Traversal API.
Listing 8.9. Bidirectional traversal that finds paths between two users in a social network
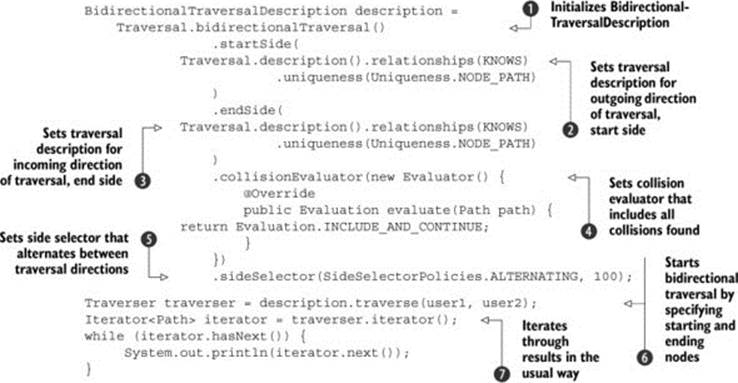
To initiate the bidirectional traversal description, you use the static helper method Traversal.bidirectionalTraversal(), which is similar to the regular traversal initialization ![]() . Next, you set the traversal description for the outgoing direction
. Next, you set the traversal description for the outgoing direction ![]() . Use the standard one-directional Traversal API to create the BidirectionalTraversal-Description and follow the KNOWS relationships with NODE_PATH uniqueness.
. Use the standard one-directional Traversal API to create the BidirectionalTraversal-Description and follow the KNOWS relationships with NODE_PATH uniqueness.
Next you repeat the same process for the incoming direction of the bidirectional traversal, using the same traversal description ![]() , but note that there’s nothing stopping you from using a different traversal in the incoming direction (for example, by following different relationships).
, but note that there’s nothing stopping you from using a different traversal in the incoming direction (for example, by following different relationships).
The next step is to configure the collision evaluator ![]() . The collision evaluator is the regular Evaluator implementation, which is used to determine what should happen when incoming and outgoing traversals collide. You want to return all such collisions, so your evaluator simply returnsEvaluation.INCLUDE_AND_CONTINUE.
. The collision evaluator is the regular Evaluator implementation, which is used to determine what should happen when incoming and outgoing traversals collide. You want to return all such collisions, so your evaluator simply returnsEvaluation.INCLUDE_AND_CONTINUE.
The last step in building the BidirectionalTraversalDecription is setting the side selector ![]() , responsible for determining how traversals from both sides progress. You provide the built-in ALTERNATING side selector, which, as its name states, alternates between traversal directions (one step in one direction, and one step in the opposite direction).
, responsible for determining how traversals from both sides progress. You provide the built-in ALTERNATING side selector, which, as its name states, alternates between traversal directions (one step in one direction, and one step in the opposite direction).
With that, your bidirectional traversal is ready, so you can kick it off by calling the traverse method and specifying the starting and ending nodes ![]() . As usual, you iterate through the results until you exhaust the traversal
. As usual, you iterate through the results until you exhaust the traversal ![]() .
.
What benefit do you get from using bidirectional traversal? As we mentioned before, doing a standard, one-direction traversal on a large graph can have less-than-optimal performance. By using a bidirectional traversal in such scenarios, you effectively employ two traversals to walk the graph, splitting the size of the problem in half. With typical one-directional traversal, the number of relationships traversed increases exponentially with the depth of the traversal. When using bidirectional traversal, each side of the traversal will have to visit half of the graph depth, resulting in fewer node–relationship–node hops to perform, in turn resulting in much better performance.
Note
Built-in graph algorithms available in Neo4j, such as shortestPath or a* graph searches (from the GraphAlgoFactory class), use bidirectional traversal starting with Neo4j version 1.8.
You’re not limited to one starting point in each direction. Bidirectional traversal allows for multiple starting points for both directions. To use that feature, all you have to do is use the overloaded BidirectionalTraversalDescription.traverse method:
BidirectionalTraversalDescription.traverse( Iterable<Node> start,
Iterable<Node> end )
All this makes bidirectional traversal a very powerful tool. In a few lines of code, you can write fast traversals to find patterns based on a number of fixed nodes, such as finding all users who know each of the users from a given set. Although bidirectional traversals are a bit more difficult to set up, they offer better performance and use less memory than standard traversal, especially for longer paths.
8.5. Summary
Traversal is a very powerful way to query graph data, and in this chapter you learned advanced concepts and techniques that can help you write fast and efficient traversals.
Using correct traversal ordering can make a huge difference in the speed and memory footprint of a traversal, especially on large graph data sets. In section 8.1 you saw how different traversals benefit from common depth-first and breadth-first branch ordering strategies.
You also learned about the key concept of relationship expansion. You’ve seen a standard expander in action, which is good for all typical traversal use cases. But for more specific scenarios, we demonstrated how you can order relationships with an ordered expander and also how you can implement custom relationship expanders, taking full advantage of the power of Neo4j’s flexible Traversal API.
The uniqueness of visited nodes and relationships was the next advanced traversal topic we covered. You learned how to make sure you visited each node or relationship only once during the traversal. We also illustrated how to use different uniqueness constraints to solve some queries.
Finally, you’ve seen one of the lesser known but powerful features of Neo4j: bidirectional traversals. We implemented a bidirectional traversal that started from multiple points and converged to a single point, significantly shortening the time it takes to find a solution.
You’ve learned a lot of new complex concepts and features of Neo4j in this chapter. But how does Neo4j work with existing popular Java frameworks? And is there an easy way you can apply graph mappings to the object-oriented programming model? This is exactly what you’re going to learn about in the next chapter, which covers one of the most popular general-purpose Java frameworks—Spring Framework—and how it integrates with Neo4j.
All materials on the site are licensed Creative Commons Attribution-Sharealike 3.0 Unported CC BY-SA 3.0 & GNU Free Documentation License (GFDL)
If you are the copyright holder of any material contained on our site and intend to remove it, please contact our site administrator for approval.
© 2016-2026 All site design rights belong to S.Y.A.