Node.js in Practice (2015)
Part 2. Real-world recipes
In the first section of this book, we took a deep dive into Node’s standard library. Now we’ll take a broader look at real-world recipes many Node programs encounter. Node is most famously known for writing fast network-based programs (high-performance HTTP parsing, ease-of-use frameworks like Express), so we devoted a whole chapter to web development.
In addition, there are chapters to help you grasp what a Node program is doing preemptively with tests, and post-mortem with debugging. In closing, we set you up for success when deploying your applications to production environments.
Chapter 9. The Web: Build leaner and meaner web applications
This chapter covers
· Using Node for client-side development
· Node in the browser
· Server-side techniques and WebSockets
· Migrating Express 3 applications to Express 4
· Testing web applications
· Full-stack frameworks and real-time services
The purpose of this chapter is to bring together the things you’ve learned about networking, buffers, streams, and testing to write better web applications with Node. There are practical techniques for browser-based JavaScript, server-side code, and testing.
Node can help you to write better web applications, no matter what your background is. If you’re a client-side developer, then you’ll find it can help you work more efficiently. You can use it for preprocessing client-side assets and for managing client-side workflows. If you’ve ever wanted to quickly spin up an HTTP server that builds your CSS or CoffeeScript for a single-page web app, or even just a website, then Node is a great choice.
The previous book in this series, Node.js in Action, has a detailed introduction to web development with Connect and Express, and also templating languages like Jade and EJS. In this chapter we’ll build on some of these ideas, so if you’re completely new to Node, we recommend readingNode.js in Action as well. If you’re already using Express, then we hope you’ll find something new in this chapter; we’ve included techniques for structuring Express applications to make them easier to scale as your projects grow and mature.
The first section in this chapter has some techniques that focus on the browser. If you’re a perplexed front-end developer who’s been using Node because your client-side libraries need it, then you should start here. If you’re a server-side developer who wants to bring Node to the browser, then skip ahead to technique 66 to see how to use Node modules in the browser.
9.1. Front-end techniques
This section is all about Node and its relationship to client-side technology. You’ll see how to use the DOM in Node and Node in the DOM, and run your own local development servers. If you’ve come to Node from a web design background, then these techniques should help you get into the swing of things before we dive in to deeper server-side examples. But if you’re from a server-side background, then you might like to see how Node can help automate front-end chores.
The first technique shows you how to create a quick, static server for simple websites or single-page web applications.
Technique 64 Quick servers for static sites
Sometimes you just want to start a web server to work on a static site, or a single-page web application. Node’s a good choice for this, because it’s easy to get a web server running. It can also neatly encapsulate client-side workflows, making it easier to collaborate with others. Rather than manually running programs over your client-side JavaScript and CSS, you can write Node programs that you can share with other people.
This technique introduces three solutions for starting up a web server: a short Connect script, a command-line web server, and a mini–build system that uses Grunt.
Problem
You want to quickly start a web server so you can develop a static site, or a single-page application.
Solution
Use Connect, a command-line web server, or a client-side workflow tool like Grunt.
Discussion
Plain old HTML, JavaScript, CSS, and images can be viewed in a browser without a server. But because most web development tasks end up with files on a server somewhere, you often need a server just to make a static site. It’s a chore, but it doesn’t need to be! The power of browsers also means you can create sophisticated web applications by contacting external web APIs: single-page web applications, or so-called serverless apps.
In the case of serverless web applications, you can work more efficiently by using build tools to preprocess and package client-side assets. This technique will show you how to start a web server for developing static sites, and also how to use tools like Grunt to get a small project going without too much trouble.
Although you could use Node’s built in http module to serve static sites, it’s a lot of work. You’ll need to do things like detect the content type of each file to send the right HTTP headers. While the http core module is a solid foundation, you can save time by using a third-party module.
First, let’s look at how to start a web server with Connect, the HTTP middleware module used to create the popular Express web framework. The first listing demonstrates just how simple this is.
Listing 9.1. A quick static web server

To use the example in listing 9.1, you’ll need to install Connect. You can do that by running npm install connect, but it’s a better idea to create a package.json file so it’s easier for other people to see how your project works. Even if your project is a simple static site, creating a package.json file will help your project to grow in the future. All you need to do is memorize these commands: npm init and npm install --save connect. The first command creates a manifest file for the current directory, and the second will install Connect and save it to the list of dependencies in the new package.json file. Learn these and you’ll be creating new Node projects in no time.
The createServer method ![]() is derived from Node’s http.createServer, but it’s wrapped with a few things that Connect adds behind the scenes. The static server middleware component
is derived from Node’s http.createServer, but it’s wrapped with a few things that Connect adds behind the scenes. The static server middleware component ![]() is used to serve files from the current directory (__dirname with two underscores means “current directory”), but you can change the directory if you like. For example, if you have client-side assets in public/, then you can use connect.static(__dirname + '/public') instead.
is used to serve files from the current directory (__dirname with two underscores means “current directory”), but you can change the directory if you like. For example, if you have client-side assets in public/, then you can use connect.static(__dirname + '/public') instead.
Finally, the server is set to listen on port 8080 ![]() . That means if you run this script and visit http://localhost:8080/file.html in a browser, you should see file.html.
. That means if you run this script and visit http://localhost:8080/file.html in a browser, you should see file.html.
If you’ve been sent a bunch of HTML files from a designer, and you want to use a server to view them because they make use of paths to images and CSS files with a leading forward slash (/), then you can also use a command-line web server. There are many of these available on npm, and they all support different options. One example is glance by Jesse Keane. You can find it on GitHub at https://github.com/jarofghosts/glance, and on npm as glance.
To use glance on the command line, navigate to a directory where you have some HTML files that you want to look at. Then install glance systemwide with npm install --global glance, and type glance. Now go to http://localhost:61403/file, where file is a file you want to look at, and you should see it in your browser.
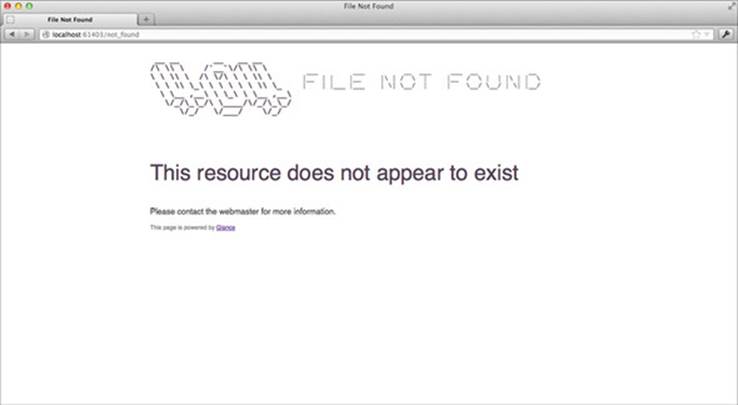
glance can be configured in various ways—you can change the port from 61403 to something else with --port, and specify the directory to be served with --dir. Type --help to get a list of options. It also has some nice defaults for things like 404s—figure 9.1 shows what a 404 looks like.
Figure 9.1. Glance has built-in pages for errors.
The third way of running a web server is to use a task runner like Grunt. This allows you to automate your client-side tasks in a way that others can replicate. Using Grunt is a bit like a combination of the previous two approaches: it requires a web server module like Connect, and a command-line tool.
To use Grunt for a client-side project you’ll need to do three things:
1. Install the grunt-cli module.
2. Make a package.json to manage the dependencies for your project.
3. Use a Grunt plugin that runs a web server.
The first step is easy: install grunt-cli as a global module with npm install -g grunt-cli. Now you can run Grunt tasks from any project that includes them by typing grunt.
Next, make a new directory for your project. Change to this new directory and type npm init—you can press Return to accept each of the defaults. Now you need to install a web server module: npm install --save-dev grunt grunt-contrib-connect will do the job.
The previous command also installed grunt as a development dependency. The reason for this is it locks Grunt to the current version—if you look at package.json you’ll see something like "grunt": "~0.4.2", which means Grunt was installed first at 0.4.2, but newer versions on the0.4 branch will be used in the future. The popularity of modules like Grunt forced npm to support something known as peer dependencies. Peer dependencies allow Grunt plugins to express a dependency on a specific version of Grunt, so the Connect module we’ll use actually has apeerDependencies property in its package.json file. The benefit of this is you can be sure plugins will work as Grunt changes—otherwise, as Grunt’s API changes, plugins might just break with no obvious cause.
Alternatives to Grunt
At the time of writing, Grunt was the most popular build system for Node. But new alternatives have appeared and are rapidly gaining adoption. One example is Gulp (http://gulpjs.com/), which takes advantage of Node’s streaming APIs and has a light syntax that is easy to learn.
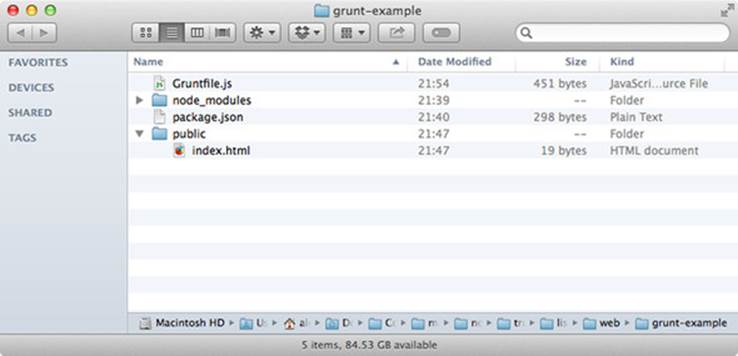
In case all this is new to you, we’ve included a screenshot of what your project should look like in figure 9.2.
Figure 9.2. Projects that use Grunt typically have a package.json and a Gruntfile.js.
Now that we have a fresh project set up, the final thing to do is create a file called Gruntfile.js. This file contains a list of tasks that grunt will run for you. The next listing shows an example that uses the grunt-contrib-connect module.
Listing 9.2. A Gruntfile for serving static files
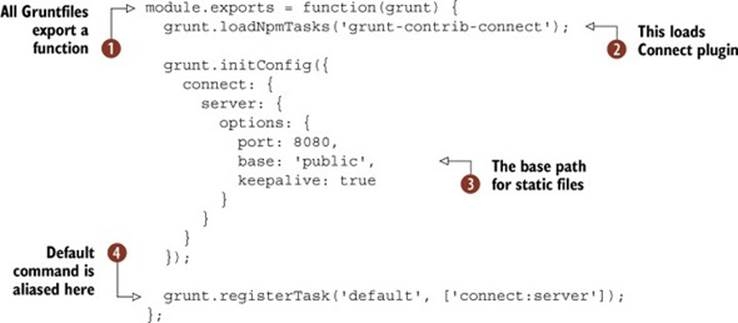
You should also create a directory called public with an index.html file—the HTML file can contain anything you like. After that, type grunt connect from the same directory as your Gruntfile.js, and the server should start. You can also type grunt by itself, because we set the default task to connect:server ![]() .
.
Gruntfiles use Node’s standard module system, and receive an object called grunt ![]() that can be used to define tasks. Plugins are loaded with grunt.loadNpmTasks, allowing you to reference modules installed with npm
that can be used to define tasks. Plugins are loaded with grunt.loadNpmTasks, allowing you to reference modules installed with npm ![]() . Most plugins have different options, and these are set by passing objects to grunt.initConfig—we’ve defined a server port and base path, which you can change by modifying the base property
. Most plugins have different options, and these are set by passing objects to grunt.initConfig—we’ve defined a server port and base path, which you can change by modifying the base property ![]() .
.
Using Grunt to start a web server is more work than writing a tiny Connect script or running glance, but if you take a look at Grunt’s plugin list (http://gruntjs.com/plugins), you’ll see over 2,000 entries that cover everything from building optimized CSS files to Amazon S3 integration. If you’ve ever needed to concatenate client-side JavaScript or generate image sprites, then chances are there’s a plugin that will help you automate it.
In the next technique you’ll learn how to reuse client-side code in Node. We’ll also show you how to render web content inside Node processes.
Technique 65 Using the DOM in Node
With a bit of work, it’s possible to simulate a browser in Node. This is useful if you want to make web scrapers—programs that convert web pages into structured content. This is technically rather more complicated than it may seem. Browsers don’t just provide JavaScript runtimes; they also have Document Object Model (DOM) APIs that don’t exist in Node.
Such a rich collection of libraries has evolved around the DOM that it’s sometimes hard to imagine solving problems without them. If only there were a way to run libraries like jQuery inside Node! In this technique you’ll learn how to do this by using browser JavaScript in a Node program.
Problem
You want to reuse client-side code that depends on the DOM in Node, or render entire web pages.
Solution
Use a third-party module that provides a DOM layer.
Discussion
The W3C DOM is a well-defined standard. When designers struggle with browser incompatibilities, they’re often dealing with the fact that standards require a degree of interpretation, and browser manufacturers have naturally interpreted the standards slightly differently. If your goal is just to run JavaScript that depends on the JavaScript DOM APIs, then you’re in luck: these standards can be re-created well enough that you can run popular client-side libraries in Node.
One early solution to this problem was jsdom (https://github.com/tmpvar/jsdom). This module accepts an environment specification and then provides a window object. If you install it with npm install -g jsdom, you should be able to run the following example:
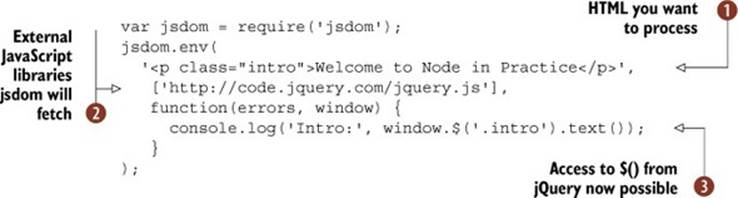
This example takes in HTML ![]() , fetches some remote scripts
, fetches some remote scripts ![]() , and then gives you a window object that looks a lot like a browser window object
, and then gives you a window object that looks a lot like a browser window object ![]() . It’s good enough that you can use jQuery to manipulate the HTML snippet—jQuery works as if it’s running in a browser. This is useful because now you can write scripts that process HTML documents in the way you’re probably used to: rather than using a parser, you can query and manipulate HTML using the tools you’re familiar with. This is amazing for writing succinct code for tasks like web scraping, which would otherwise be frustrating and tedious.
. It’s good enough that you can use jQuery to manipulate the HTML snippet—jQuery works as if it’s running in a browser. This is useful because now you can write scripts that process HTML documents in the way you’re probably used to: rather than using a parser, you can query and manipulate HTML using the tools you’re familiar with. This is amazing for writing succinct code for tasks like web scraping, which would otherwise be frustrating and tedious.
Others have iterated on jsdom’s approach, simplifying the underlying dependencies. If you really just want to process HTML in a jQuery-like way, then you could use cheerio (https://npmjs.org/package/cheerio). This module is more suited to web scraping, so if you’re writing something that downloads, processes, and indexes HTML, then cheerio is a good choice.
In the following example, you’ll see how to use cheerio to process HTML from a real web page. The actual HTML is from manning.com/index.html, but as designs change frequently, we’ve kept a copy of the page we used in our code samples. You can find it in cheerio-manning/index.html. The following listing opens the HTML file and queries it using a CSS selector, courtesy of cheerio.
Listing 9.3. Scraping a web page with cheerio
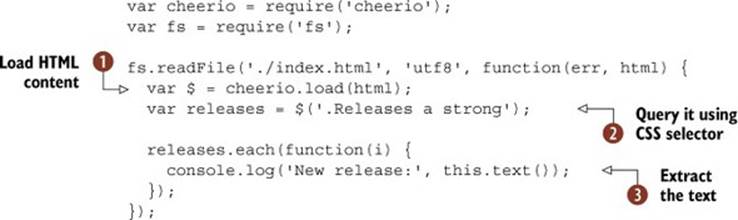
The HTML is loaded with fs.readFile. If you were doing this for real then you’d probably want to download the page using HTTP—feel free to replace fs.readFile with http.get to fetch Manning’s index page over the network. We have a detailed example of http.get in chapter 7, technique 51, “Following redirects.”
Once the HTML has been fetched, it’s passed to cheerio.load ![]() . Setting the result as a variable called $ is just a convention that will make your code easier to read if you’re used to jQuery, but you could name it something else.
. Setting the result as a variable called $ is just a convention that will make your code easier to read if you’re used to jQuery, but you could name it something else.
Now that everything is set up, you can query the HTML; $('.Releases a strong') is used ![]() to query the document for the latest books that have been released. They’re in a div with a class of Releases, as anchor tags.
to query the document for the latest books that have been released. They’re in a div with a class of Releases, as anchor tags.
Each element is iterated over using releases.each, just like in jQuery. The callback’s context is changed to be the current element, so this.text() is called to get the text contained by the node ![]() .
.
Because Node has such a wide collection of third-party modules, you could take this example and make all sorts of amazing things with it. Add Redis for caching and queueing websites to process, then scrape the results and throw it at Elasticsearch, and you’ve got your own search engine!
Now you’ve seen how to run JavaScript intended for browsers in Node, but what about the opposite? You might have some Node code that you want to reuse client-side, or you might want to just use Node’s module system to organize your client-side code. Much like we can simulate the DOM in Node, we can do the same in the browser. In the next technique you’ll learn how to do this by running your Node scripts in browsers.
Technique 66 Using Node modules in the browser
One of Node’s selling points for JavaScript is that you can reuse your existing browser programming skills on servers. But what about reusing Node code in browsers without any changes? Wouldn’t that be cool? Here’s an example: you’ve defined data models in Node that do things like data validation, and you want to reuse them in the browser to automatically display error messages when data is invalid.
This is almost possible, but not quite: unfortunately browsers have quirks that must be ironed out. Also, important features like require don’t exist in client-side JavaScript. In this technique you’ll see how you can take code intended for Node, and convert it to work with most web browsers.
Problem
You want to use require() to structure your client-side code, or reuse entire Node modules in the browser.
Solution
Use a program like Browserify that is capable of converting Node JavaScript into browser-friendly code.
Discussion
In this technique we’ll use Browserify (http://browserify.org/) to convert Node modules into browser-friendly code. Other solutions also exist, but at this point Browserify is one of the more mature and popular solutions. It doesn’t just patch in support for require(), though: it can convert code that relies on Node’s stream and network APIs. You can even use it to recursively convert modules from npm.
To see how it works, we’ll first look at a short self-contained example. To get started, install Browserify with npm: npm install -g browserify. Once you’ve got Browserify installed, you can convert your Node modules into Browser scripts with browserify index.js -o bundle.js. Any require statements will cause the files to be included in bundle.js, so you shouldn’t change this file. Instead, overwrite it whenever your original files have changed.
Listing 9.4 shows a sample Node program that uses EventEmitter and utils.inherit to make the basis of a small messaging class.
Listing 9.4. Node modules in the browser
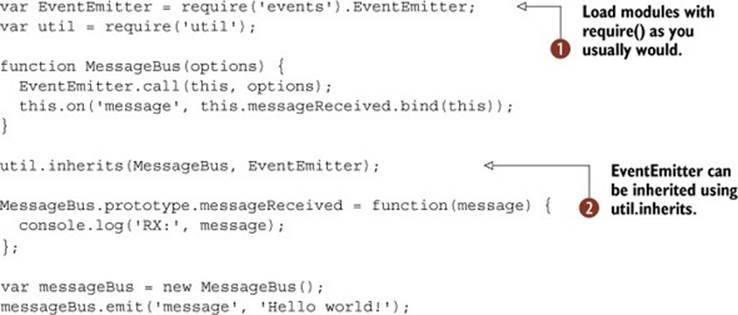
Running Browserify on this script generates a bundle that’s about 1,000 lines long! But we can use require as we would in any Node program ![]() , and the Node modules we know and love will work, as you can see in listing 9.4 by the use of util.inherits and EventEmitter
, and the Node modules we know and love will work, as you can see in listing 9.4 by the use of util.inherits and EventEmitter ![]() .
.
With Browserify, you can also use require and module.exports, which is better than having to juggle <script> tags. The previous example can be extended to do just that. In listing 9.5, Browserify is used to make a client-side script that can load MessageBus and jQuery withrequire, and then modify the DOM when messages are emitted.
Listing 9.5. Node modules in the browser
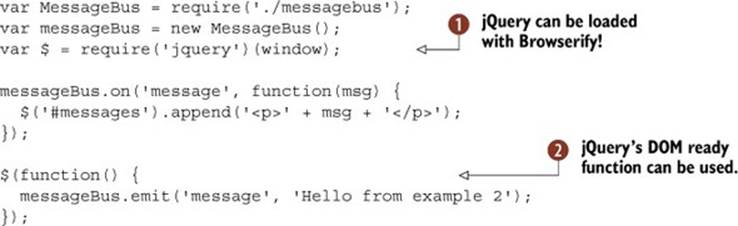
By creating a package.json file with jquery as a dependency, you can load jQuery using Browserify ![]() . Here we’ve used it to attach a DOMContentLoaded listener
. Here we’ve used it to attach a DOMContentLoaded listener ![]() and append paragraphs to a container element when messages are received.
and append paragraphs to a container element when messages are received.
Source maps
If the JavaScript files you generate with Browserify raise errors, then it can be hard to untangle the line numbers in stack traces, because they refer to line numbers in the monolithic bundle. If you include the --debug flag when building the bundle, then Browserify will generate mappings that point to the original files and line numbers.
These mappings require a compatible debugger—you’ll also need to tell your browser’s debugging tools to use them. In Chrome you’ll need to select Enable source maps, under the options in Chrome’s DevTools.
To make this work, all you need to do is add module.exports = MessageBus to the example from listing 9.4, and then generate the bundle with browserify index.js -o bundle.js, where index.js is listing 9.5. Browserify will dutifully follow the require statements from index.js to pull in jQuery from ./node_modules and the MessageBus class from messagebus.js.
Because people might forget how to build the script, you can add a scripts entry to your package.json file, like this: "build": "browserify index.js -o bundle.js". The downloadable code samples for this book include both a sample package.json file and a suitable HTML file for running the entire example in a browser.
There’s another way to build bundles with Browserify: by using Browserify as a module in a Node program. To use it, you need to create a Browserify instance ![]() and then tell it what files you want to build
and then tell it what files you want to build ![]() :
:

You could use this as part of a more complex build process, or put in a Grunt task to automate your build process. Now that you’ve seen how to use Node modules in the browser and how to simulate the browser in Node, it’s time to learn how to improve your server-side web applications.
9.2. Server-side techniques
This section includes general techniques for building web applications. If you’re already using Express, then you’ll be able to use these techniques to improve how your Express programs are organized. Express aims to be simple, which makes it flexible, but sometimes it’s not easy to see how to use it in the best way. The patterns and solutions we’ve created have come from using Express to build commercial and open source web applications over the last few years. We hope they’ll help you to write better web applications.
Express 3 and 4
The techniques in this section refer to Express 3. Most will work with Express 4, or may require minor modifications. For more about migrating to Express 4, see technique 75.
Technique 67 Express route separation
The documentation and popular tutorials for Express usually organize all the code in a single file. In real projects, this eventually becomes unmanageable. This technique uses Node’s module system to separate related routes into files, and also includes ways to get around the Express appobject being in a different file.
Problem
Your main Express application file has become extremely large, and you want a better way to organize all of those routes.
Solution
Use route separation to split related routes into modules.
Discussion
Express is a minimalist framework, so it doesn’t hold your hand when it comes to organizing projects. Projects that start simple can become unwieldy if you don’t pay attention. The secret to successfully organizing larger projects is to embrace Node’s module system.
The first avenue of attack is routes, but you can apply this technique to every facet of development with Express. You can even treat applications as self-contained Node modules, and mount them within other applications.
Here’s a typical example of some Express routes:

The full example project can be found in listings/web/route_separation/app_monolithic.js. It contains a set of CRUD routes for creating, finding, and updating notes. An application like this would have other CRUD routes as well: perhaps notes can be organized into notebooks, and there will definitely be some user account management, and extra features like setting reminders. Once you have about four or five of these sets of routes, the application file could be hundreds of lines of code.
If you wrote this project as a single, large file, then it would be prone to many problems. It would be easy to make mistakes where variables are accidentally global instead of local, so dangerous side effects can be encountered under certain conditions. Node has a built-in solution which can be applied to Express and other web frameworks: directories as modules.
To refactor your routes using modules, first create a directory called routes, or controllers if you prefer. Then create a file called index.js. In our case it’ll be a simple three-line file that exports the notes routes:

Here we have just one routing module, which can be loaded with require and a relative path ![]() . Next, copy and paste the entire set of routes into routes/notes.js. Then delete the route definition part—for example, app.get('/notes',, and replace it with an export:module.exports.index = function(req, res) {.
. Next, copy and paste the entire set of routes into routes/notes.js. Then delete the route definition part—for example, app.get('/notes',, and replace it with an export:module.exports.index = function(req, res) {.
The refactored files should look like the next listing.
Listing 9.6. A routing module without the rest of the application
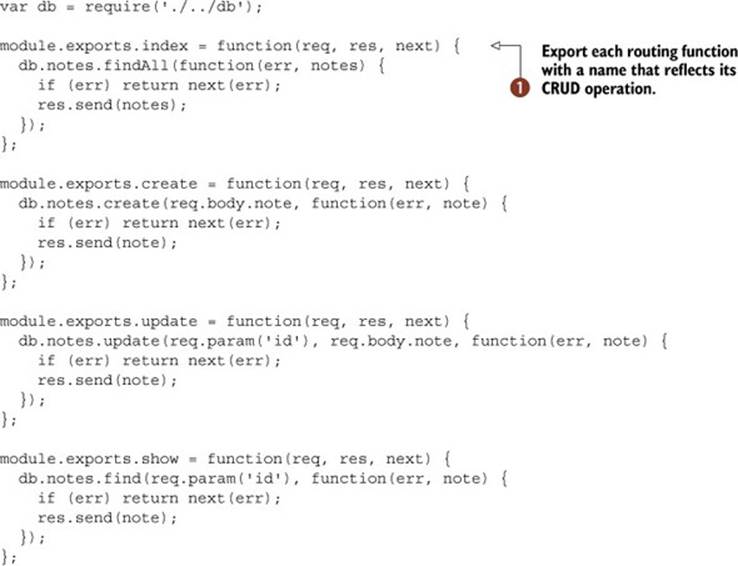
Each routing function is exported with a CRUD-inspired name (index, create, update, show) ![]() . The corresponding app.js file can now be cleared up. The next listing shows just how clean this can look.
. The corresponding app.js file can now be cleared up. The next listing shows just how clean this can look.
Listing 9.7. A refactored app.js file
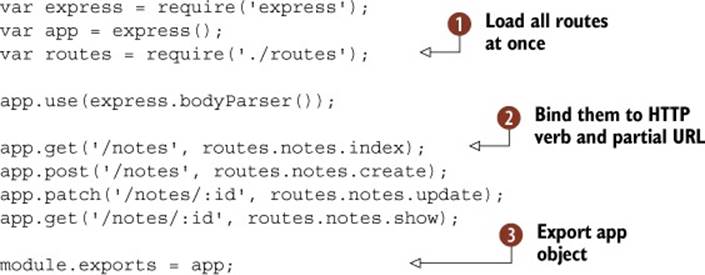
All of the routes can be loaded at once with require('./routes')![]() . This is convenient and clean, because there are fewer require statements that would otherwise clutter app.js. All you need to do is remove the old route callbacks and add in references to each routing function
. This is convenient and clean, because there are fewer require statements that would otherwise clutter app.js. All you need to do is remove the old route callbacks and add in references to each routing function ![]() .
.
Don’t put an app.listen call in this file; export app instead ![]() . This makes it easier to test the application. Another advantage of exporting the app object is that you can easily load the app.js module from anywhere within the application. Express allows you to get and set configuration values, so making app accessible can be useful if you want to refer to these settings in places outside the routes. Also note that res.app is available from within routes, so you don’t need to pass the app object around too often.
. This makes it easier to test the application. Another advantage of exporting the app object is that you can easily load the app.js module from anywhere within the application. Express allows you to get and set configuration values, so making app accessible can be useful if you want to refer to these settings in places outside the routes. Also note that res.app is available from within routes, so you don’t need to pass the app object around too often.
If you want to easily load app.js without creating a server, then name the application file app.js, and have a separate server.js file that calls app.listen. You can set up the server property in package.json to use node server.js, which allows people to start the application with npm start—you can also leave out the server property, because node server.js is the default, but it’s better to define it so people know how you intend them to use it.
Directories as modules
This technique puts all of the routes in a directory, and then exports them with an index.js file so they can be loaded in one go with require('./routes').
This pattern can be reused in other places. It’s great for organizing middleware, database modules, and configuration files.
For an example of using directories as modules to organize configuration files, see technique 69.
The full example for this technique can be found in listings/web/route-separation, and it includes sample tests in case you want to unit test your own projects.
Properly organizing your Express projects is important, but there are also workflow issues that can slow down development. For example, when you’re working on a web application, you’ll typically make many small changes and then refresh the browser to see the results. Most Node frameworks require the process to be restarted before seeing the changes take effect, so the next technique explores how this works and how to efficiently solve this problem.
Technique 68 Automatically restarting the server
Although Node comes with tools for monitoring changes to files, it can be a lot of work to use them productively. This technique looks at fs.watch, and introduces a popular third-party tool for automatically restarting web applications as files are edited.
Problem
You need to restart your Node web application every time you edit files.
Solution
Use a file watcher to restart the application automatically.
Discussion
If you’re used to languages like PHP or ASP, Node’s in-process server-based model might seem unusual. One of the big differences about Node’s model is that you need to restart the process when files change. If you think about how require and V8 work, then this makes sense—files are generally loaded and interpreted once.
One way to get around this is to detect when files change, and then restart the application. Node makes good use of non-blocking I/O, and one of the properties of non-blocking file system APIs is that listeners can be used to wait for specific events. To solve this problem, you could set up file system event handlers for all of the files in your project. Then, when files change, your event handler can restart the project.
Node provides an API for this in the fs module called fs.watch. At the time of writing, this API is unstable—that means it may be changed in subsequent versions of Node. This method has been covered in chapter 6, section 6.1.4. Let’s look at how it could be used with a web application.Figure 9.8 shows a program that can watch and reload a simple web server.
Listing 9.8. Reloading a Node process
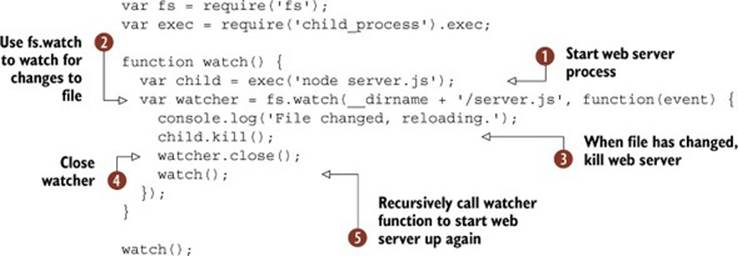
Watching a file for changes with fs.watch is slightly convoluted, but you can use fs.watchFile, which is based on file polling instead of I/O events. The way listing 9.8 works is to start a child process—in this case node server.js ![]() —and then watch that file for changes
—and then watch that file for changes ![]() . Starting and stopping processes is managed with the child_process core module, and the kill method is used to stop the child process
. Starting and stopping processes is managed with the child_process core module, and the kill method is used to stop the child process ![]() .
.
On Mac OS we found it’s best to also stop watching the file with watcher.close ![]() , although Node’s documentation indicates that fs.watch should be “persistent.” Once all of that is done, the watch function is called recursively to launch the web server again
, although Node’s documentation indicates that fs.watch should be “persistent.” Once all of that is done, the watch function is called recursively to launch the web server again ![]() .
.
This example could be run with a server.js file like this:
var http = require('http');
var server = http.createServer(function(req, res) {
res.writeHead(200, { 'Content-Type': 'text/plain' });
res.end('This is a super basic web application');
});
server.listen(8080);
This works, but it’s not exactly elegant. And it’s not complete, either. Most Node web applications consist of multiple files, so the file-watching logic will become more complicated. It’s not enough to recurse over the parent directories, because there are lots of files that you don’t want to watch—you don’t want to watch the files in .git, and if you’re writing an Express application you probably don’t want to watch view templates, because they’re loaded on demand without caching in development mode.
Suddenly automatically restarting Node programs seems less trivial, and that’s where third-party modules can help. One of the most widely used modules that solves this problem is Remy Sharp’s nodemon (http://nodemon.io/). It works well for watching Express applications out of the box, and you can even use it to automatically restart any kind of program, whether it’s written in Node or Python, Ruby, and so on.
To try it out, type npm install -g nodemon, and then navigate to a directory that contains a Node web application. If you want to use a small sample script, you can use our example from listings/web/watch/server.js.
Start running and watching server.js by typing nodemon server.js, and you’ll find you can edit the text in res.end and the change will be reflected the next time you load http://localhost:8080/.
You might notice a small delay before changes are visible—that’s just Nodemon setting up fs.watch, or fs.watchFile if it’s not available on your OS. You can force it to reload by typing rs and pressing Return.
Nodemon has some other features that will help you work on web applications. Typing nodemon --help will show a list of command-line options, but you can get greater, VCS-friendly control by creating a nodemon.json file. This allows you to specify an array of files to ignore, and you can also map file extensions to program names by using the execMap setting. Nodemon’s documentation includes a sample file that illustrates each of the features.
The next listing is an example Nodemon configuration that you can adapt for your own projects.
Listing 9.9. Nodemon’s configuration file
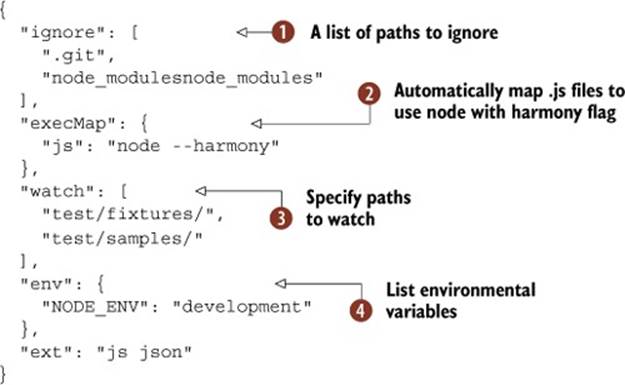
The basic options allow you to ignore specific paths ![]() , and list multiple paths to watch
, and list multiple paths to watch ![]() . This example uses execMap to automatically run node with the --harmony flag[1] for all JavaScript files
. This example uses execMap to automatically run node with the --harmony flag[1] for all JavaScript files ![]() . Nodemon can also set environmental variables—just add some values to the envproperty
. Nodemon can also set environmental variables—just add some values to the envproperty ![]() .
.
1 --harmony is used to enable all of the newer ECMAScript features available to Node.
Once your workflow is streamlined thanks to Nodemon, the next thing to do is to improve how your project is configured. Most projects need some level of configuration—examples include the database connection details and authorization credentials for remote APIs. The next technique looks at ways to configure your web application so you can easily deploy it to multiple environments, run it in test mode, and even tweak how it behaves during local development.
Technique 69 Configuring web applications
This technique looks at the common patterns for configuring Node web applications. We’ll include examples for Express, but you can use these patterns with other web frameworks as well.
Problem
You have configuration options that change between development, testing, and production.
Solution
Use JSON configuration files, environmental variables, or a module for managing settings.
Discussion
Most web applications require some configuration values to operate correctly: database connection strings, cache settings, and email server credentials are typical. There are many ways to store application settings, but before you install a third-party module to do it, consider your requirements:
· Is it acceptable to leave database credentials in your version control repository?
· Do you really need configuration files, or can you embed settings into the application?
· How can configuration values be accessed in different parts of the application?
· Does your deployment environment offer a way to store configuration values?
The first point depends on your project or organization’s policies. If you’re building an open source web application, you don’t want to leave database accounts in the public repository, so configuration files might not be the best solution. You want people to install your application quickly and easily, but you don’t want to accidentally leak your passwords. Similarly, if you work in a large organization with database administrators, they might not be comfortable about letting everyone have direct access to databases.
In such cases, you can set configuration values as part of the deployment environment. Environmental variables are a standard way to configure the behavior of Unix and Windows programs, and you can access them with process.env. The basic example of this is switching between deployment environments, using the NODE_ENV setting. The following listing shows the pattern Express uses for storing configuration values.
Listing 9.10. Configuring an Express application
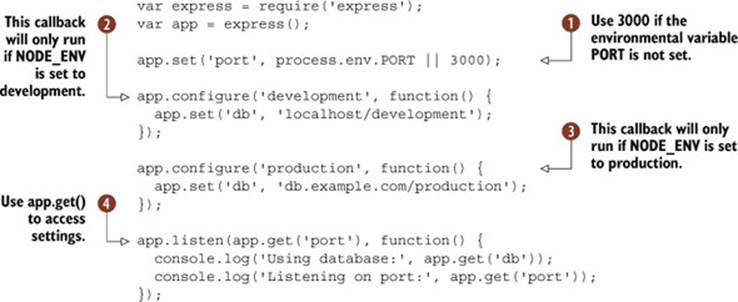
Express has a small API for setting application configuration values: app.set, app.get ![]() , and app.configure. You can also use app.enable and app.disable to toggle Boolean values, and app.enabled and app.disabled to query them. The app.configure blocks are equivalent to if (process.env.NODE_ENV === 'development')
, and app.configure. You can also use app.enable and app.disable to toggle Boolean values, and app.enabled and app.disabled to query them. The app.configure blocks are equivalent to if (process.env.NODE_ENV === 'development') ![]() and if (process.env.NODE_ENV === 'production')
and if (process.env.NODE_ENV === 'production')![]() , so you don’t really need to use app.configure if you don’t want to. It will be removed in Express 4. If you’re not using Express, you can just query process.env.
, so you don’t really need to use app.configure if you don’t want to. It will be removed in Express 4. If you’re not using Express, you can just query process.env.
The NODE_ENV environmental variable is controlled by the shell. If you want to run listing 9.10 in production mode, you can type NODE_ENV=production node config.js, and you should see it print the production database string. You could also type export NODE_ENV=production, which will cause the application to always run in production mode while the current shell is running.
The reason we’ve used PORT ![]() to set the port is because that’s the default name Heroku uses. This allows Heroku’s internal HTTP routers to override the port your application listens on.
to set the port is because that’s the default name Heroku uses. This allows Heroku’s internal HTTP routers to override the port your application listens on.
You could use process.env throughout your code instead of app.get, but using the app object feels cleaner. You don’t need to pass app around—if you’ve used the route separation pattern from technique 67, then you’ll be able to access it through res.app.
If you’d rather use configuration files, the easiest and quickest way is to use the folder as a module technique with JSON files. Create a folder called config/, and then create an index.js file, and a JSON file for each environment. The next listing shows what the index.js file should look like.
Listing 9.11. A JSON configuration file loader
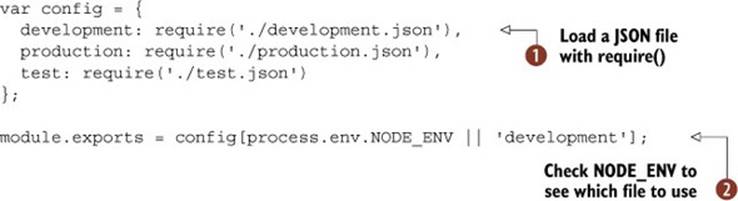
Node’s module system allows you to load a JSON file with require ![]() , so you can load each environment’s configuration file and then export the relevant one using NODE_ENV
, so you can load each environment’s configuration file and then export the relevant one using NODE_ENV ![]() . Then whenever you need to access settings, just use var config = require('./config')—you’ll get a plain old JavaScript object that contains the settings for the current environment. The next listing shows an example Express application that uses this technique.
. Then whenever you need to access settings, just use var config = require('./config')—you’ll get a plain old JavaScript object that contains the settings for the current environment. The next listing shows an example Express application that uses this technique.
Listing 9.12. Loading the configuration directory
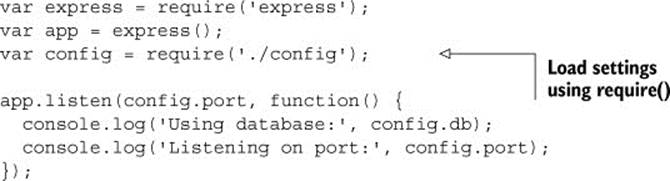
This is so easy it almost feels like cheating! All you have to do is call require ('./config') and you’ve got your settings. Node’s module system should cache the file as well, so once you’ve called require it shouldn’t need to evaluate the JSON files again. You can repeatedly callrequire('./config') throughout your application.
This technique takes advantage of JavaScript’s lightweight syntax for setting and accessing values on objects, as well as Node’s module system. It works well for lots of types of projects.
There’s one more approach to configuration: using a third-party module. After the last technique, you might think this is overkill, but third-party modules can offer a lot of functionality, including command-line option parsing. It might be that you often need to switch between different options, so overriding application settings with command-line options is attractive.
The web framework Flatiron (http://flatironjs.org/) has an application configuration module called nconf (https://npmjs.org/package/nconf) that handles configuration files, environmental variables, and command-line options. Each can be given precedence, so you can make command-line options override configuration files. It’s a unifying framework for processing options.
The following listing shows how nconf can be used to configure an Express application.
Listing 9.13. Using nconf to configure an Express application
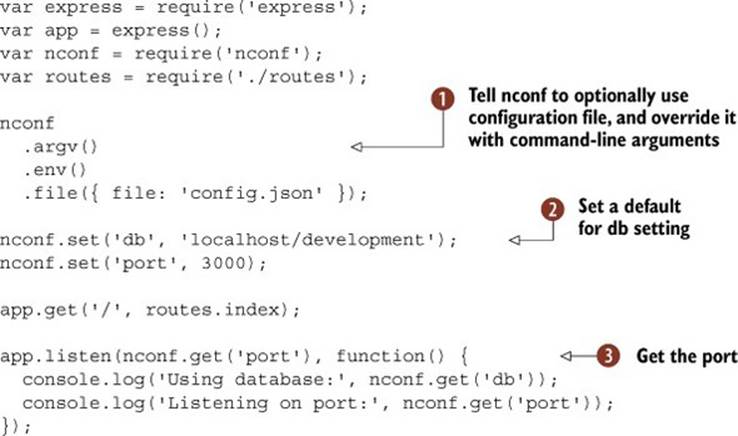
Here we’ve told nconf to prioritize options from the command line, but to also read a configuration file if one is available ![]() . You don’t need to create a configuration file, and nconf can create one for you if you use nconf.save. That means you could allow users of your application to change settings and persist them. This works best when nconf is set up to use a database to save settings—it comes with built-in Redis support.
. You don’t need to create a configuration file, and nconf can create one for you if you use nconf.save. That means you could allow users of your application to change settings and persist them. This works best when nconf is set up to use a database to save settings—it comes with built-in Redis support.
Default values can be set with nconf.set ![]() . If you run this example without any options, it should use port 3000, but if you start it with node app.js --port 3001, it’ll use whatever you pass with --port. Getting settings is as simple as nconf.get
. If you run this example without any options, it should use port 3000, but if you start it with node app.js --port 3001, it’ll use whatever you pass with --port. Getting settings is as simple as nconf.get ![]() .
.
And you don’t need to pass the nconf object around! Settings are stored in memory. Other files in your project can access settings by loading nconf with require, and then calling nconf.get. The next listing loads nconf again, and then tries to access the db setting.
Listing 9.14. Loading nconf elsewhere in the application

Even though it seems like var nconf = require('nconf') might return a pristine copy of nconf, it doesn’t ![]() .
.
A well-organized and carefully configured web application can still go wrong. When your application crashes, you’ll want logs to help debug the problem. The next technique will help you improve how your application handles errors.
Technique 70 Elegant error handling
This technique looks at using the Error constructor to catch and handle errors in your application.
Problem
You want to centralize error handling to simplify your web applications.
Solution
Inherit from Error with error classes that include HTTP status codes, and use a middleware component to handle errors based on content type.
Discussion
JavaScript has an Error constructor that you can inherit from to represent specific types of errors. In web development, some errors frequently crop up: incorrect URLs, incorrect parameters for query parameters or form values, and authentication failures. That means you can define errors that include HTTP codes alongside the typical things Error provides.
Rather than branching on error conditions in HTTP routers, you should call next(err). The next listing shows how that works.
Listing 9.15. Passing errors to middleware
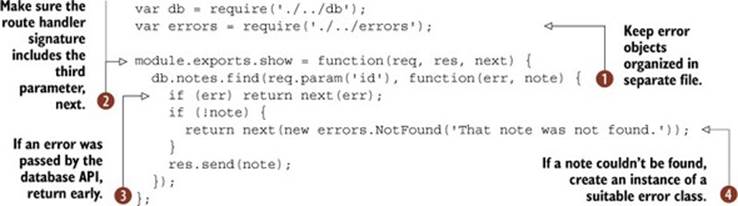
In this example, error classes have been defined in a separate file ![]() , which you can find in listing 9.16. The route handler includes a third argument, next
, which you can find in listing 9.16. The route handler includes a third argument, next ![]() , after the standard req, res arguments that we’ve used in previous techniques.
, after the standard req, res arguments that we’ve used in previous techniques.
Many of your route handlers will load data from a database, whether it’s MySQL, PostgreSQL, MongoDB, or Redis, so this example is based around a generic asynchronous database API. If an error was encountered by the database API, then return early and call next, including the error object as the first argument. This will pass the error along to the next middleware component ![]() . This route handler has an additional piece of logic—if a note wasn’t found in the database, then an error object is instantiated and passed along using next
. This route handler has an additional piece of logic—if a note wasn’t found in the database, then an error object is instantiated and passed along using next ![]() .
.
The following listing shows how to inherit from Error.
Listing 9.16. Inheriting errors and including status codes
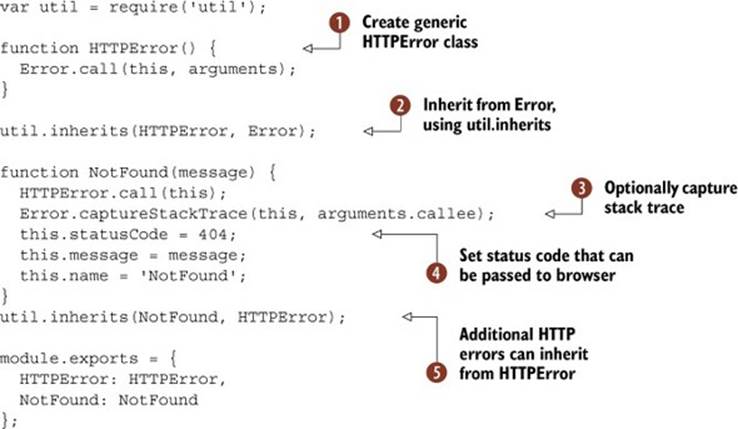
Here we’ve opted to create two classes. Instead of just defining NotFound, we’ve created HTTPError ![]() and inherited from it
and inherited from it ![]() . This is so it’s easier to track if an error is related to HTTP, or if it’s something else. The base HTTPError class inherits from Error
. This is so it’s easier to track if an error is related to HTTP, or if it’s something else. The base HTTPError class inherits from Error ![]() .
.
In the NotFound error, we’ve captured the stack trace to aid with debugging ![]() , and set a statusCode property
, and set a statusCode property ![]() that can be reported to the browser.
that can be reported to the browser.
The next listing shows how to create an error-handling middleware component in a typical Express application.
Listing 9.17. Using an error-handling middleware component
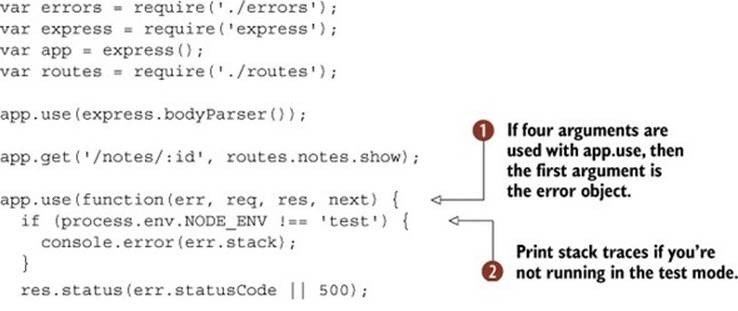
This middleware component is fairly simple, but it has some tweaks that we’ve found work well in production. To get the error objects passed by next, make sure to use the four-parameter form of app.use’s callback ![]() . Also note that this middleware component comes at the end of the chain, so you need to put it after all your other middleware and route definitions.
. Also note that this middleware component comes at the end of the chain, so you need to put it after all your other middleware and route definitions.
You can conditionally print stack traces so they’re not visible when specifically testing expected errors ![]() —errors may be triggered as part of testing, and you wouldn’t want stack traces cluttering the test output.
—errors may be triggered as part of testing, and you wouldn’t want stack traces cluttering the test output.
Because this centralizes error handling into the main application file, it’s a good idea to conditionally return different formats. This is useful if your application provides a JSON API as well as HTML pages. You can use app.format to do this ![]() , and it works by checking the MIME type in the request’s Accept header. The JSON response might not be needed, but it’s possible that your API would return well-formed errors that can be consumed by clients—it can be difficult to deal with APIs that suddenly respond with HTML when you’re asking for JSON.
, and it works by checking the MIME type in the request’s Accept header. The JSON response might not be needed, but it’s possible that your API would return well-formed errors that can be consumed by clients—it can be difficult to deal with APIs that suddenly respond with HTML when you’re asking for JSON.
Somewhere in your tests you should check that these errors do what you want. The following snippet shows a Mocha test that makes sure 404s are returned when expected, and in the expected format:
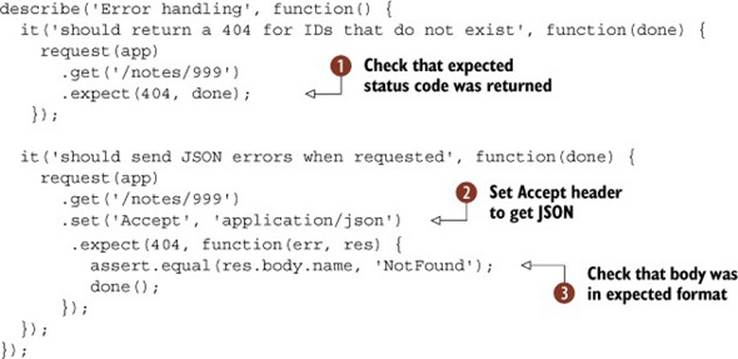
This snippet includes two requests. The first checks that we get an error with a 404 ![]() , and the second sets the Accept header to make sure we get back JSON
, and the second sets the Accept header to make sure we get back JSON ![]() . This is implemented with SuperTest, which will give us JSON in responses, so the assertion can check to make sure we get an object in the format we expect
. This is implemented with SuperTest, which will give us JSON in responses, so the assertion can check to make sure we get an object in the format we expect ![]() . The full source for this example can be found in listings/web/error-handling.
. The full source for this example can be found in listings/web/error-handling.
Error email cheat sheet
If you’re going to make your application send email notifications when unexpected errors occur, here’s a list of things you should include in the email to aid with debugging:
· A string version of the error object
· The contents of err.stack—this is a nonstandard property of error objects that Node includes
· The request method and URL
· The Express req.route property, if available
· The remote IP, which is req.ip in Express
· The request body, which you can convert to a string with inspect(req.body)
This error-handling pattern is widely used in Express apps, and it’s even built into the restify framework (https://npmjs.org/package/restify). If you remember to pass error objects to next, you’ll find testing and debugging Express applications easier.
Errors can also be sent as emails with useful transcripts. To make the most out of error emails, include the request and error objects in the email so you can see exactly where things broke. Also, you probably don’t want to send details about errors with certain status codes, but that’s up to you.
In this technique we mentioned adapting code to work with REST APIs. The next technique delves deeper into the world of REST, and has examples for both Express and restify.
Technique 71 RESTful web applications
At some stage you might want to add an API to your application. This technique is all about building RESTful APIs. There are examples for both Express and restify, and tips on how to create APIs that use the right HTTP verbs and idiomatic URLs.
Problem
You want to create a RESTful web service in Express, restify, or another web framework.
Solution
Use the right HTTP methods, URLs, and headers to build an intuitive, RESTful API.
Discussion
REST stands for representational state transfer,[2] which isn’t terribly useful to memorize unless you want to impress someone in a job interview. The way web developers talk about it is usually in contrast to SOAP (Simple Object Access Protocol), which is seen as a more corporate and strict way to create web APIs. In fact, there’s such a thing as a strict REST API, but the key distinction is that REST embraces HTTP at a fundamental level—the HTTP methods themselves have semantic meaning.
2 For more about REST, see Fielding’s dissertation on the subject at http://mng.bz/7Fhj.
You should be familiar with using GET and POST requests if you’ve ever made a basic HTML form. In REST, these HTTP verbs have specific meanings. For example, POST will create a resource, and GET means fetch a resource.
Node developers typically create APIs that use JSON. JSON is the easiest structured data format to generate and read in Node, but it also works well in client-side JavaScript. But REST doesn’t imply JSON—you’re free to use any data format. Certain clients and services expect XML, and we’ve even seen those that work with CSV and spreadsheet formats like Excel.
The desired data format is specified by the request’s Accept header. For JSON that should be application/json, and application/xml for XML. There are other useful request headers as well—Accept-Version can be used to request a different version of the API. This allows clients to lock themselves against a supported version, while you’re free to improve the server without breaking backward compatibility—you can always update your server faster than people can update their clients.
Express provides a lightweight layer over Node’s http core module, but it doesn’t include any data persistence functionality outside of in-memory sessions and cookies. You’ll have to decide which database and database module to use. The same is true with restify: it doesn’t automatically map data from HTTP to be stored offline; you’ll need to find a way to do that.
Restify is superficially similar to Express. The difference is that Express has features that help you build web applications, which includes rendering templates. Conversely, restify is focused on building REST APIs, and that brings a different set of requirements. Restify makes it easy to serve multiple versions of an API with semantic versioning using HTTP headers, and has an event-based API for emitting and listening for HTTP-related events and errors. It also supports throttling, so you can control how quickly responses are made.
Figure 9.3 shows a typical RESTful API that allows page objects to be created, read, updated, and deleted.
Figure 9.3. Making requests to a REST API
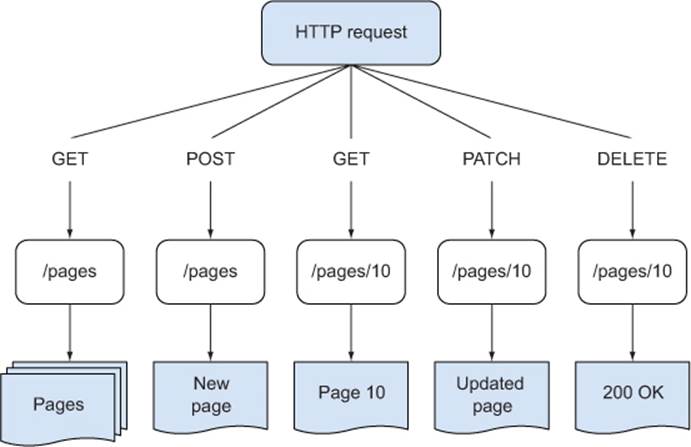
To get started building REST APIs, you should consider what your objects are. Imagine you’re building a content management system: it probably has pages, users, and images. If you want to add a button that allows pages to be toggled between “published” and “draft,” and if you’ve already got a REST API and it supports requests to PATCH /pages/:id, you could just tie the button to some client-side JavaScript or a form that posts to /pages/:id with { state: 'published' } or { state: 'draft' }. If you’ve been given an Express application that only has PUT /pages/:id, then you could probably derive the code for PATCH from the existing implementation.
Plural or singular?
When you design your API’s URI endpoints, you should generally use plural nouns. That means /pages and also /pages/1 for a specific page, not /page/1. It’ll be easier to use your API if the endpoints are consistent.
You may find there are certain resources that should be singular nouns, because there’s only ever one such item. If it makes semantic sense, use a singular noun, but use it consistently. For example, if your API requires that users sign in, and you don’t want to expose a unique user ID, then/account might be a sensible endpoint for user account management, if there’s only ever one account for a given user.
Table 9.1 shows HTTP verbs alongside the typical response. Note that PUT and PATCH have different but similar meanings—PATCH means modify some of the fields in a resource, while PUT means replace the entire resource. It can take some practice to get the hang of building applications this way, but it’s pragmatic and easy to test, so it’s worth learning properly. If these HTTP terms are new to you, then use table 9.1 when you’re designing the API for your application.
Table 9.1. Choosing the correct HTTP verbs
|
Verb |
Description |
Response |
|
GET /animals |
Get a list of animals. |
An array of animal objects |
|
GET /animals/:id |
Get a single animal. |
A single animal object, or an error |
|
POST /animals |
Create an animal by sending the properties of a single animal. |
The new animal |
|
PUT /animals/:id |
Update a single animal record. All properties will be replaced. |
The updated animal |
|
PATCH /animals/:id/ |
Update a single animal record, but only change the fields specified. |
The updated animal |
In an Express application, these URLs and methods are mapped using routes. Routes specify the HTTP verb and a partial URL. You can map these to any function that you like, but if you use the route separation pattern from technique 67, which is advisable, then you should use the method names that are close to their associated HTTP verbs. Listing 9.18 shows the routes for a RESTful resource in Express, and some of the required configuration to make it work.
Listing 9.18. A RESTful resource in Express
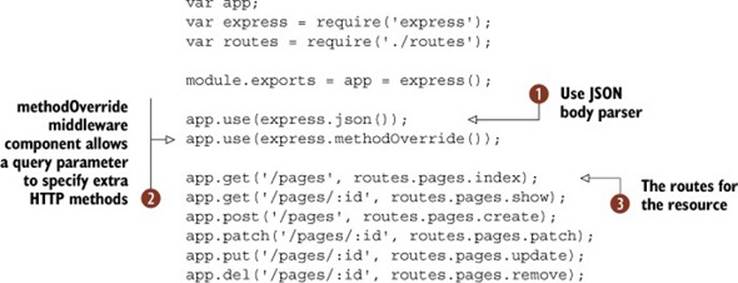
This example uses some middleware for automatically parsing JSON requests ![]() , and overrides the HTTP method POST with the query parameter, _method
, and overrides the HTTP method POST with the query parameter, _method ![]() . That means that the PUT, PATCH, and DELETE HTTP verbs are actually determined by the _method query parameter. This is because most browsers can only send a GET or POST, so _method is a hack used by many web frameworks.
. That means that the PUT, PATCH, and DELETE HTTP verbs are actually determined by the _method query parameter. This is because most browsers can only send a GET or POST, so _method is a hack used by many web frameworks.
The routes in listing 9.18 define each of the usual RESTful resource methods ![]() . Table 9.1 shows how these routes map to actions.
. Table 9.1 shows how these routes map to actions.
Table 9.2. Mapping routes to responses
|
Verb, URL |
Description |
|
GET /pages |
An array of pages. |
|
GET /pages/:id |
An object containing the page specified by id. |
|
POST /pages |
Create a page. |
|
PATCH /pages/:id |
Load the page for id, and change some of the fields. |
|
PUT /pages/:id |
Replace the page for id. |
|
DELETE /pages/:id |
Remove the page for id. |
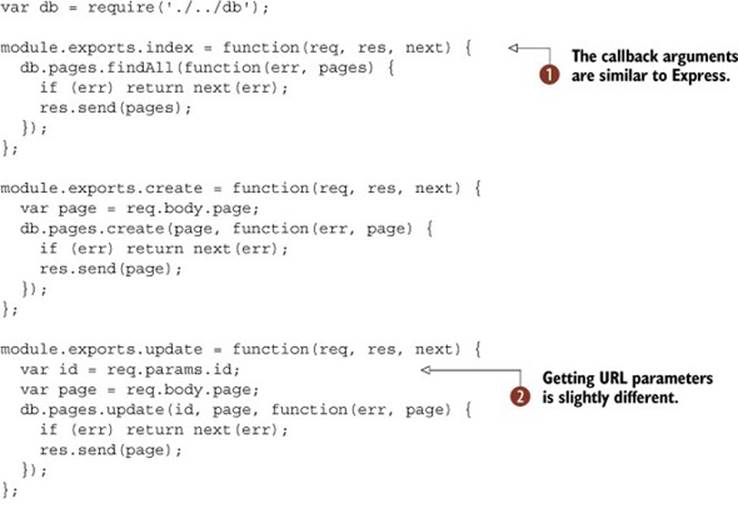
Listing 9.19 is an example implementation for the route handlers. It has a generic Node database API—a real Redis, MongoDB, MySQL, or PostgreSQL database module wouldn’t be too far off, so you should be able to adapt it.
Listing 9.19. RESTful route handlers
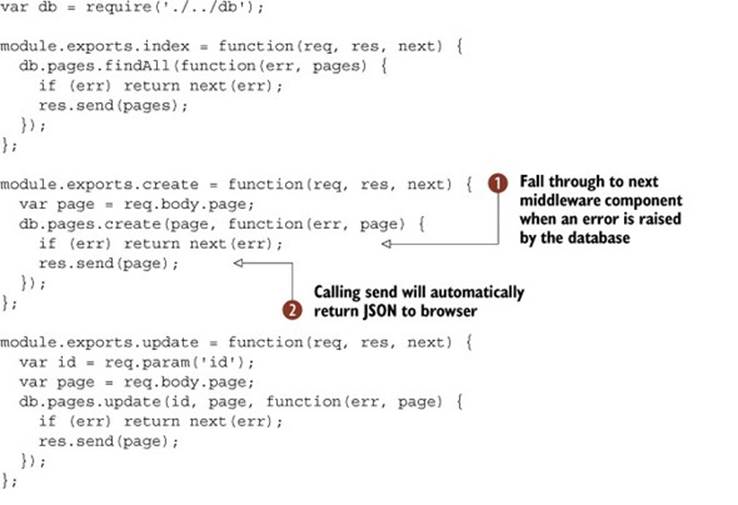
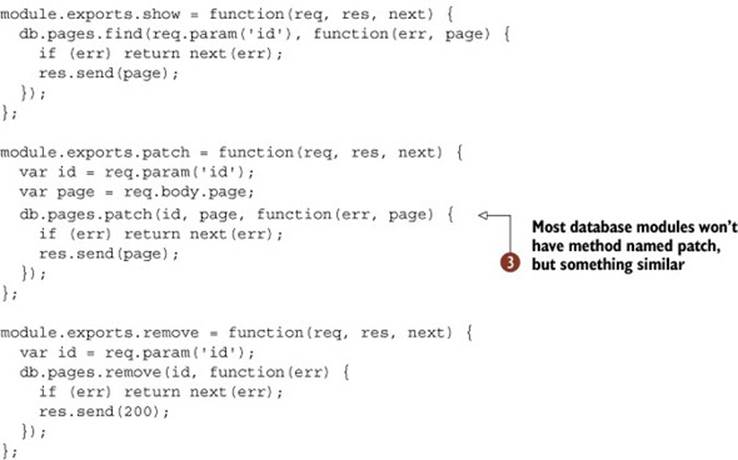
Although this example is simple, it illustrates something important: you should keep your route handlers lightweight. They deal with HTTP and then let other parts of your code handle the underlying business logic. Another pattern used in this example is the error handling—errors are passed by calling next(err) ![]() . Try to keep error-handling code centralizing and generic—technique 70 has more details on this.
. Try to keep error-handling code centralizing and generic—technique 70 has more details on this.
To return the JSON to the browser, res.send() is called with a JavaScript object ![]() . Express knows how to convert the object to JSON, so that’s all you need to do.
. Express knows how to convert the object to JSON, so that’s all you need to do.
All of these route handlers use the same pattern: map the query or body to something the database can use, and then call the corresponding database method. If you’re using an ORM or ODM—a more abstracted database layer—then you’ll probably have something analogous to PATCH ![]() . This could be an API method that allows you to update only the specified fields. Relational databases and MongoDB work that way.
. This could be an API method that allows you to update only the specified fields. Relational databases and MongoDB work that way.
If you download this book’s source code, you’ll get the other files required to try out the full example. To run it, type npm start. Once the server is running, you can use some of the following Curl commands to communicate with the server.
The first command creates a page:

First we specify the Content-Type using the -H option ![]() . Next, the request is set to use POST, and the request body is included as a JSON string
. Next, the request is set to use POST, and the request body is included as a JSON string ![]() . The URL is /pages because we’re creating a resource
. The URL is /pages because we’re creating a resource ![]() .
.
Curl is a useful tool for exploring APIs, once you understand the basic options. The ones to remember are -H for setting headers, -X for setting the HTTP method, and -d for the request body.
To see the list of pages, just use curl http://localhost:3000/pages. To change the contents, try PATCH:
curl -H "Content-Type: application/json" \
-X PATCH -d '{ "page": { "title": "The Moon" } }' \
http://localhost:3000/pages/1
Express has a few other tricks up its sleeves for creating RESTful web services. Remember that some REST APIs use other data formats, like XML? What if you want both? You can solve this by using res.format:
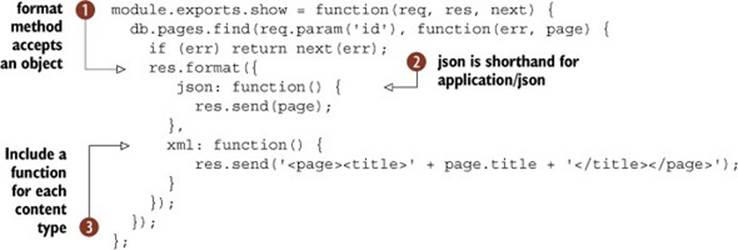
To use XML instead of JSON, you have to include the Accept header in the request. With Curl, you can do this:
curl -H 'Accept: application/xml' \
http://localhost:3000/pages/1
Just remember that Accept is used to ask the server for a specific format, and Content-Type is used to tell the server what format you’re sending it. It sometimes makes sense to include both in a single request!
Now that you’ve seen how REST APIs in Express work, we can compare them with restify. The patterns used to structure Express applications can be reused for restify projects. The two important patterns are route separation, as described in technique 67, and defining the application in a separate file to the server (for easier testing and internal reuse). Listing 9.20 is the restify equivalent of listing 9.18.
Listing 9.20. A restify application
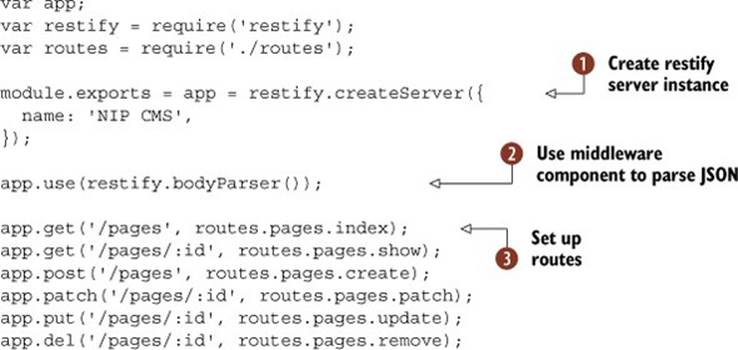
Using restify, instances of servers are created with some initial configuration options ![]() . You don’t have to pass in any options, but here we’ve specified a name. The options are actually the same as Node’s built-in http.Server.listen, so you can pass in options for SSL/TLS certificates, if you want to use encryption. Restify-specific options that aren’t available in Express include formatters, which allows you to set up functions that res.send will use for custom content types.
. You don’t have to pass in any options, but here we’ve specified a name. The options are actually the same as Node’s built-in http.Server.listen, so you can pass in options for SSL/TLS certificates, if you want to use encryption. Restify-specific options that aren’t available in Express include formatters, which allows you to set up functions that res.send will use for custom content types.
This example uses bodyParser to parse JSON in the request bodies ![]() . This is like the Express middleware component in the previous example.
. This is like the Express middleware component in the previous example.
The route definitions are identical to Express ![]() . The actual route callbacks are slightly different. Listing 9.21 shows a translation of listing 9.19. See if you can spot the differences.
. The actual route callbacks are slightly different. Listing 9.21 shows a translation of listing 9.19. See if you can spot the differences.
Listing 9.21. Restify routes
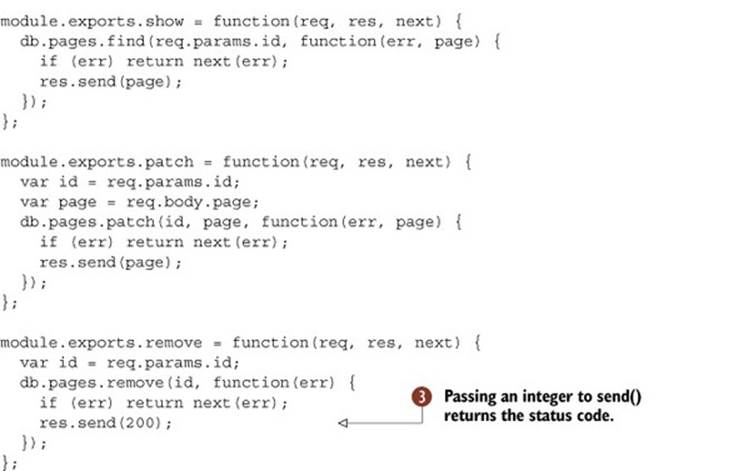
The first thing to note is the callback arguments for route handlers are the same as Express ![]() . In fact, you can almost lift the equivalent code directly from Express applications. There are a few differences though: req.param() doesn’t exist—you need to use req.params instead, and note this is an object rather than a method
. In fact, you can almost lift the equivalent code directly from Express applications. There are a few differences though: req.param() doesn’t exist—you need to use req.params instead, and note this is an object rather than a method ![]() . Like Express, calling res.send() with an integer will return a status code to the client
. Like Express, calling res.send() with an integer will return a status code to the client ![]() .
.
Using other HTTP headers
In this technique you’ve seen how the Content-Type and Accept headers can be used to deal with different data formats. There are other useful headers that you should take into account when building APIs.
One such header, supported by restify, is Accept-Version. When you define a route, you can include an optional first parameter that includes options, instead of the usual string. The version property allows your API to respond differently based on the Accept-Version header.
For example, using app.get({ path: '/pages', version: '1.1.8' }, routes .v1.pages); allows you to bind specific route handlers to version 1.1.8. If you have to change your API in 2.0.0, then you can do this without breaking older clients.
There’s nothing to stop you from using this header in an Express application, but it’s easier in restify. If you decide to take this approach, you should learn how major.minor.patch works in semantic versioning (http://semver.org/).
If you download the full example and run it (listings/web/restify), you can try out some of the Curl commands we described earlier. Create, update, and show should work the same way.
Knowing that Express and restify applications are similar is useful, because you can start to compose applications made from both frameworks. Both are based on Node’s http module, which means you could technically mount a restify application inside Express usingapp.use(restifyApp). This works well if the restify application is in its own module—you could install it using npm, or put it in its own directory.
Both Express and restify use middleware, and you’ll find well-structured applications have loosely coupled middleware that can be reused across different projects. In the next technique you’ll see how to write your own middleware, so you can start decorating applications with useful features like custom logging.
Technique 72 Using custom middleware
You’ve seen middleware being used for error handling, and you’ve also used some of Express’s built-in middleware. You can also use middleware to add custom behavior to routes; this might add new functionality, improve logging, or control access based on authentication or permissions.
The benefit of middleware is that it can improve code reuse in your application. This technique will teach you how to write your own middleware, so you can share code between projects, and structure projects in a more readable way.
Problem
You want to add behavior—in a reusable, testable manner—that’s triggered when certain routes are accessed.
Solution
Write your own middleware.
Discussion
When you first start using Express, middleware sounds like a complicated concept that other people use for writing plugins that extend Express. But in fact, writing middleware is a fundamental part of using Express, and you should start writing middleware as soon as possible. And if you can write routes, then you can write middleware: it’s basically the same API!
In technique 70, you saw how to handle errors with a middleware component. Error handling is a special case—you have to include a fourth parameter to capture the error object: app.use(function(err, req, res, next) {. With other middleware, you can just use three arguments, like standard route handlers. This is the simplest middleware component:

By passing an anonymous callback to app.use ![]() , the middleware component will always run, unless a previous middleware component fails to call next. When your code is finished, you can call next
, the middleware component will always run, unless a previous middleware component fails to call next. When your code is finished, you can call next ![]() to trigger the next middleware component in the stack. That means two things: asynchronous APIs are supported, and the order in which you add middleware is important.
to trigger the next middleware component in the stack. That means two things: asynchronous APIs are supported, and the order in which you add middleware is important.
The following example shows how you can use asynchronous APIs inside middleware. This example is based on the idea of loading a user based on a user ID that has been set in the session:
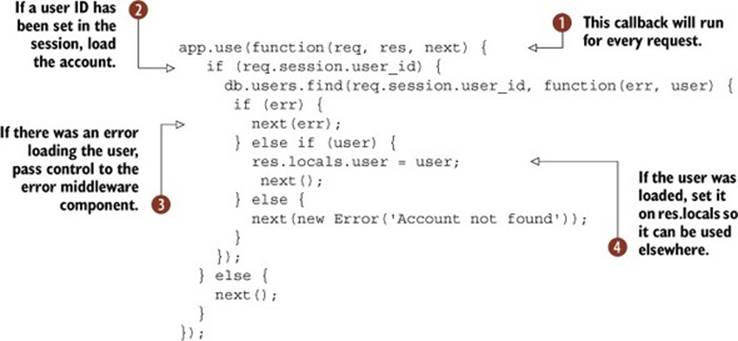
This middleware will be triggered for every request ![]() . It loads user accounts from a database, but only when the user’s ID has been set in the session
. It loads user accounts from a database, but only when the user’s ID has been set in the session ![]() . The code that loads the user is asynchronous, so next could be called after a short delay. There are several points where next is called: for example, if an error was encountered when loading the user, next will be called with an error
. The code that loads the user is asynchronous, so next could be called after a short delay. There are several points where next is called: for example, if an error was encountered when loading the user, next will be called with an error ![]() .
.
In this example the loaded user is set as a property of res.locals ![]() . By using res.locals, you’ll be able to access the user in other middleware, route handlers, and templates.
. By using res.locals, you’ll be able to access the user in other middleware, route handlers, and templates.
This isn’t necessarily the best way to use middleware. Including an anonymous function this way means it can be hard to test—you can only test middleware by starting up the entire Express application. You might want to write simpler unit tests that don’t use HTTP requests, so it would be better to refactor this code into a function. The function would have the same signature, and would be used like this:
![]()
By grouping all the middleware together as modules ![]() , you can load the middleware from other locations, whether they’re entirely different projects, test code, or inside separated routes. This function has decoupled the middleware to improve how it can be reused.
, you can load the middleware from other locations, whether they’re entirely different projects, test code, or inside separated routes. This function has decoupled the middleware to improve how it can be reused.
If you’re using the route separation pattern from technique 67, then this makes sense, because middleware can be applied to specific routes that might be defined in different files. Let’s say you’re using the RESTful API style from technique 71, and your page resource can only be updated by signed-in users, but other parts of the application should be accessible to anyone. You can restrict access to the page resource routes like this:
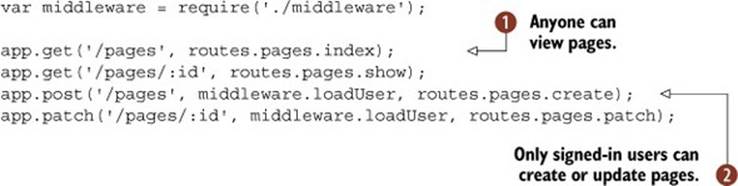
In this fragment, routes are defined for a resource called pages. Some routes are accessible to anyone ![]() , but creating or updating pages is limited to people with accounts on the system
, but creating or updating pages is limited to people with accounts on the system ![]() . This is done by supplying the loadUser middleware component as the second argument when defining a route. In fact, multiple arguments could be used—you could have a generic user loading route, and then a more specific permission checking route that ensures users are administrators, or have the necessary rights to change pages.
. This is done by supplying the loadUser middleware component as the second argument when defining a route. In fact, multiple arguments could be used—you could have a generic user loading route, and then a more specific permission checking route that ensures users are administrators, or have the necessary rights to change pages.
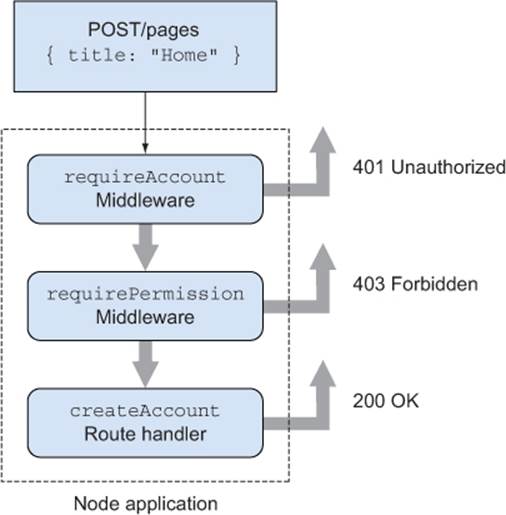
Figure 9.4 shows how requests can pass through several callbacks until the final response is sent back to the client. Sometimes this might cause a response to finish before other middleware has had a chance to run—if an error is encountered and passed to next(err).
Figure 9.4. Requests can pass through several callbacks until the final response is sent.
You can even apply middleware to batches of routes. It’s common to see something like app.all('/admin/*', middleware.loadUser); in Express applications.
If you use modules to manage your middleware, and simplify route handlers by moving shared functionality into separate files, then you’ll find that organizing middleware into modules becomes a fundamental architectural tool for organizing applications.
If you’re designing a new Express application, you should think in terms of middleware. Ask yourself what kinds of HTTP requests you’re going to deal with, and what kinds of filtering they might need.
Now it’s time to combine all of these ideas into a worked example. Listing 9.22 demonstrates one way of parsing requests that contain XML. Middleware has been used to parse the XML, turning it into plain old JavaScript objects. That means two things: only a small part of your code has to worry about XML, and you could potentially add support for other data formats as well.
Listing 9.22. Three types of middleware
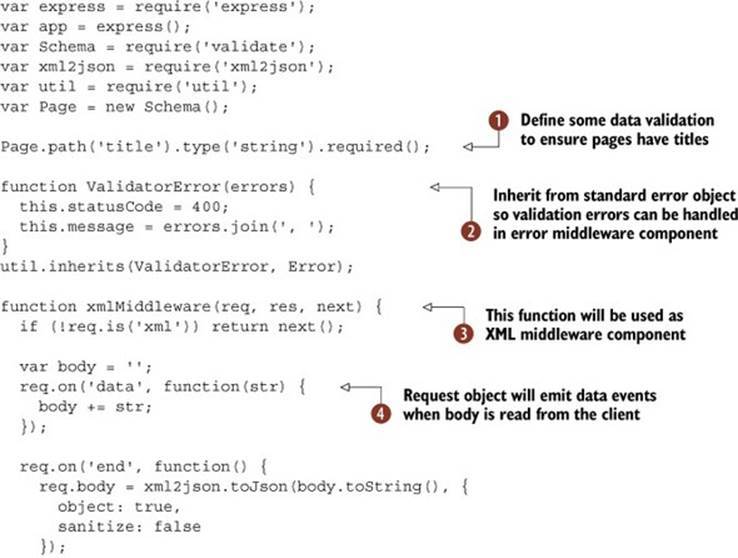
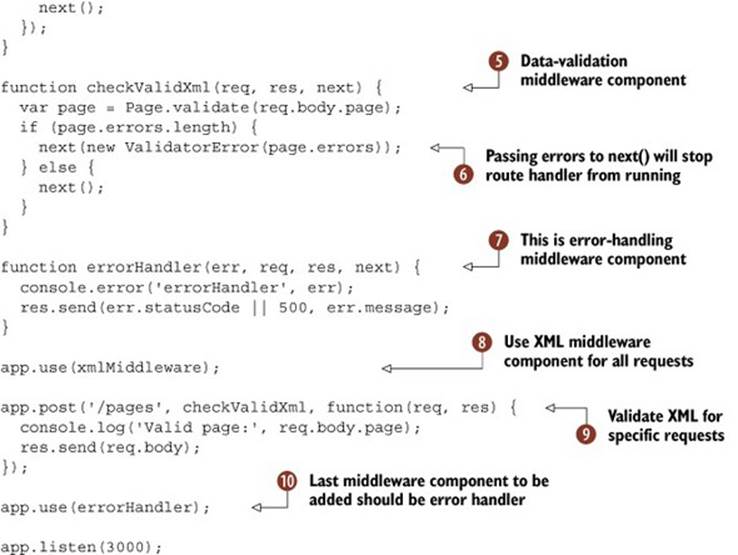
In summary, this example defines three middleware components to parse XML, validate it, and then either respond with a JSON object or display an error. We’ve used an arbitrary data-validation library here ![]() —your database module may come with something similar.
—your database module may come with something similar.
The routes deal with page resources, and the expected format for pages is XML. It’s passed in as request bodies and validated. An error object, ValidatorError ![]() , is used to return a 400 error when invalid data is sent to the server. The XML parser
, is used to return a 400 error when invalid data is sent to the server. The XML parser ![]() reads in the request body using the standard event-based API
reads in the request body using the standard event-based API ![]() . This middleware component is called for every request
. This middleware component is called for every request ![]() because it’s passed directly to app.use, but it only runs if the Content-Type is set to XML.
because it’s passed directly to app.use, but it only runs if the Content-Type is set to XML.
The data-validation middleware component ![]() ensures a page title has been set—this is just an arbitrary example we’ve chosen to illustrate how this kind of validation works. If the data is invalid, an instance of ValidatorError is passed when next is called
ensures a page title has been set—this is just an arbitrary example we’ve chosen to illustrate how this kind of validation works. If the data is invalid, an instance of ValidatorError is passed when next is called ![]() . This will trigger the error-handling middleware component
. This will trigger the error-handling middleware component ![]() .
.
Data is only validated for certain requests. This is done by passing checkValidXml when the /pages route is defined ![]() .
.
The global error handler is the last middleware component to be added ![]() . This should always be the case, because middleware is executed in the order it’s defined. Once res.send has been called, then no more processing will occur, so errors won’t be triggered.
. This should always be the case, because middleware is executed in the order it’s defined. Once res.send has been called, then no more processing will occur, so errors won’t be triggered.
To try this example out, run node server.js and then try posting XML to the server using curl:
curl -H "Content-Type: application/xml" \
-X POST -d '<page><title>Node in Practice</title></page>' \
http://localhost:3000/pages
You should try leaving out a title to ensure a 400 error is raised!
This approach can be used for XML, JSON, CSV, or any other data formats you like. It works well for minimizing the code that has to deal with XML, but there are other ways you can write decoupled code in Node web applications. In the next technique you’ll see how something fundamental to Node—events—can be used as another useful architectural pattern.
Technique 73 Using events to decouple functionality
In the average Express application, most code is organized into methods and modules. This can make sharing functionality inconvenient in some cases, particularly if you want to neatly separate concerns within your application. This technique uses sending emails as an example of something that doesn’t fit neatly into routers, models, or views. Events are used to decouple emails from routers, which keeps email-related code outside of HTTP code.
Problem
You want to do things that aren’t related to HTTP, like send emails, but aren’t sure how to structure the code so it’s neatly decoupled and easy to test.
Solution
Use easily accessible EventEmitter objects, like the Express app object.
Discussion
Express and restify applications generally follow the Model-View-Controller (MVC) pattern. Models are used to save data, controllers are route handlers, and views are the templates in the views/directory.
Some code doesn’t fit neatly into these categories. For example, where would you keep email-handling code? Email generation clearly doesn’t belong in routes, because email isn’t related to HTTP. But like route handlers, it does require templates. It also isn’t really a model, because it doesn’t interact with the database.
What if you did put the email-handling code into models? In that case, given an instance of a User model, you want to send an email when a new account is created. You could put the email code in the User.prototype.registerUser method. The problem with that is you might not always want to send emails when users are created. It might not be convenient during testing, or some kind of periodic maintenance tasks.
The reason why sending email isn’t quite suitable for models or HTTP routes can be understood by thinking about the SOLID principles (http://en.wikipedia.org/wiki/SOLID). There are two principles that are relevant to us: the single responsibility principle and the dependency inversion principle.
Single responsibility dictates that the class that deals with HTTP routes really shouldn’t send emails, because these are different responsibilities that shouldn’t be mixed together. Inversion of control is a specific type of dependency inversion, and can be done by removing direct invocation—rather than calling emails.sendAccount-Creation, your email-handling class should respond to events.
For Node programmers, events are one of the most important tools available. And fortunately for us, the SOLID principles indicate that we can write better HTTP routers by removing our email code, and replacing it with abstract and generalized events. These events can then be responded to by the relevant classes.
Figure 9.5 shows what our idealized application structure might look like. But how do we achieve this? Take Express applications as an example; they don’t typically have a suitable global event object. You could technically create a global variable somewhere central, like the file that callsexpress(), but that would introduce a global shared state, and that would break the principles we described earlier.
Figure 9.5. Applications can be easier to understand if organized according to the SOLID principles.
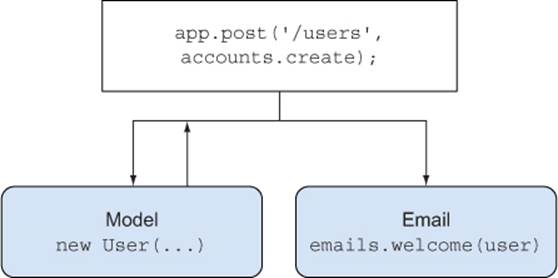
Fortunately, Express includes a reference to the app object in the request. Route handlers, which accept the req, res parameters, always have access to app in res.app. The app object inherits from EventEmitter, so we can use it to broadcast when things happen. If your route handler creates and saves new users, then it can also call res.app.emit('user:created', user), or something similar—you can use any naming scheme for events as long as it’s consistent. Then you can listen for user:created events and respond accordingly. This could include sending email notifications, or perhaps even logging useful statistics about users.
The following listing shows how to listen for events on the application object.
Listing 9.23. Using events to structure an application
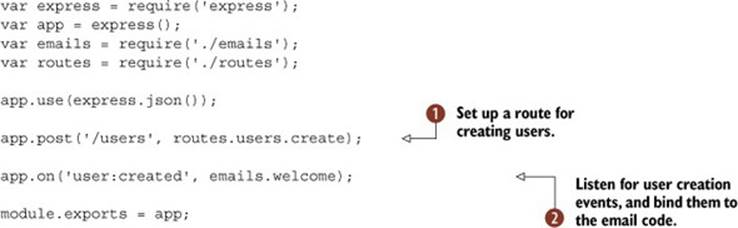
In this example a route for registering users is defined ![]() , and then an event listener is defined and bound to a method that sends emails
, and then an event listener is defined and bound to a method that sends emails ![]() .
.
The route is shown in the next listing.
Listing 9.24. Emitting events
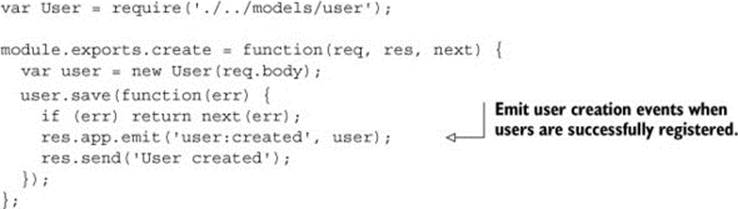
This listing contains an example model for User objects. If a user is successfully created, then user:created is emitted on the app object. The downloadable code for this book includes a more complete example with the code that sends emails, but the basic principle for removing direct invocation and adhering to the single responsibility principle is represented here.
Communication with events inside applications is useful when you need to make the code easier for other developers to understand. There are also times when you need to communicate with client-side code. The next technique shows you how to take advantage of WebSockets in your Node applications, while still being able to access resources like sessions.
Technique 74 Using sessions with WebSockets
Node has strong support for the real-time web. Adopting event-oriented, asynchronous APIs means supporting WebSockets is a natural fit. Also, it’s trivial to run two servers in the same process: a WebSocket server and a standard Node HTTP server can coexist happily.
This technique shows you how to reuse the Connect and Express middleware that we’ve been using so far with a WebSocket server. If your application allows users to sign in, and you want to add WebSocket support, then read on to learn how to master sessions in WebSockets.
Problem
You want to add WebSocket support to an existing Express application, but you’re not sure how to access session variables, like whether the user is currently signed in.
Solution
Reuse Connect’s cookie and session middleware with your WebSocket server.
Discussion
This technique assumes you have a passing familiarity with WebSockets. To recap: HTTP requests are stateless and relatively short-lived. They’re great for downloading documents, and requesting a state change for a resource. But what about streaming data to and from a server?
Certain types of events originate from servers. Think about a web mail service. When you create and send a message, you push it to the server, and the server sends it to the recipients. If the recipient is sitting watching their inbox, there’s no easy way for their browser to get updated. It could periodically check for new messages using an Ajax request, but this isn’t very elegant. The server knows it has a new message for the recipient, so it would be much better if it could push that message directly to the user.
That’s where WebSockets come in. They’re conceptually like the TCP sockets we saw in chapter 7: a bidirectional bridge is set up between the client and server. To do this you need a WebSocket server in addition to your standard Express server, or plain old Node http server. Figure 9.6illustrates how this works in a typical Node web application.
Figure 9.6. A Node web application should support both standard HTTP requests and WebSockets.
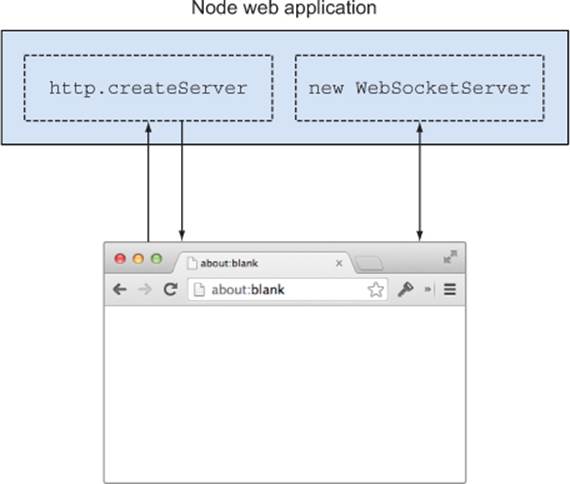
HTTP requests are short-lived, have specific endpoints, and use methods like POST and PUT. WebSockets are long-lived, don’t have specific endpoints, and don’t have methods. They’re conceptually different, but since they’re used to communicate with the same application, they typically need access to the same data.
This presents a problem for sessions. The Express examples we’ve looked at used middleware to automatically load the session. Connect middleware is based on the HTTP request and response, so how do we map this to WebSockets, which are long-lived and bidirectional? To understand this, we need to look at how WebSockets and sessions work.
Sessions are loaded based on unique identifiers that are included in cookies. Cookies are sent with every HTTP request. WebSockets are initiated with a standard HTTP request that asks to be upgraded to a WebSocket. This means there’s a point where you can grab the cookie from the request, and then load the session. For each WebSocket, you can store a reference to the user’s session. Now you can do all the usual things you need to do with a session: verify the user is signed in, set preferences, and so on.
Figure 9.7 extends figure 9.6 to show how sessions can be used with WebSockets, by incorporating the Connect middleware for parsing cookies and loading the session.
Figure 9.7. Accessing sessions from WebSockets
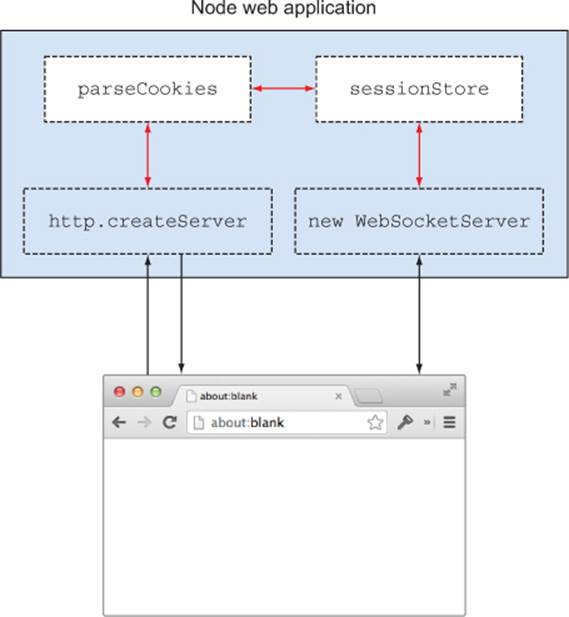
Now that you know how the parts fit together, how do you go about building it? The cookie-parsing middleware component can be found in express.cookieParser. This is actually a simple method that gets the cookie from the request headers, and then parses the cookie string into separate values. It accepts an argument, secret, which is the value used to sign the cookie. Once the cookie is decrypted, you can get the session ID from it and load the session.
Sessions in Express are modeled on an asynchronous API for storing and retrieving values. They can be backed by a database, or you can use the built-in memory-based class. Passing the session ID and a callback to sessionStore.get will load the session, if the session ID is correct.
In this technique we’ll use the ws WebSocket module (https://www.npmjs.org/package/ws). This is a fast-but-minimal implementation that has a very different API than Socket.IO. If you want to learn about Socket.IO, then Node in Action has some excellent tutorials. Here we’re using a simpler module so you can really see how WebSockets work.
To make ws load the session, you need to parse the cookies from the HTTP upgrade request, and then call sessionStore.get. A full example that shows how it all works follows.
Listing 9.25. An Express application that uses WebSockets
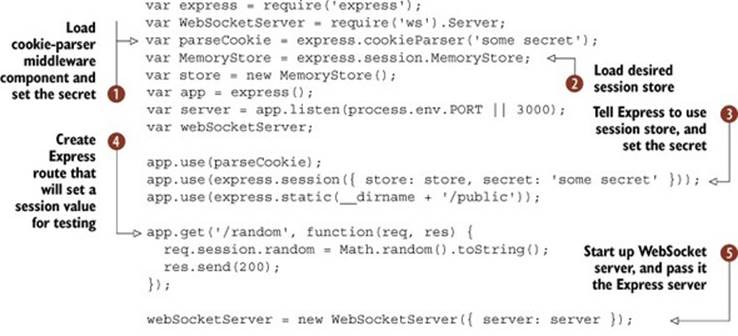
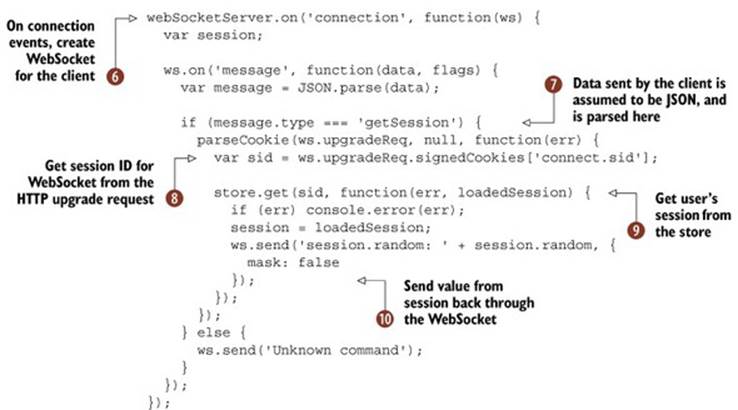
This example starts by loading and configuring the cookie parser ![]() and the session store
and the session store ![]() . We’re using signed cookies, so note that ws.upgradeReq.signedCookies is used when loading the session later.
. We’re using signed cookies, so note that ws.upgradeReq.signedCookies is used when loading the session later.
Express is set up to use the session middleware component ![]() , and we’ve created a route that you can use for testing
, and we’ve created a route that you can use for testing ![]() . Just load http://localhost:3000/random in your browser to set a random value in the session, and then visit http://localhost:3000/ to see it printed back.
. Just load http://localhost:3000/random in your browser to set a random value in the session, and then visit http://localhost:3000/ to see it printed back.
The ws module works by using a plain old constructor, WebSocketServer, to handle WebSockets. To use it, you instantiate it with a Node HTTP server object—we’ve just passed in the Express server here ![]() . Once the server is started, it’ll emit events when connections are created
. Once the server is started, it’ll emit events when connections are created ![]() .
.
The client code for this example sends JSON to the server, so there’s some code to parse the JSON string and check whether it’s valid ![]() . This wasn’t entirely necessary for this example, but we included it to show that ws requires this kind of extra work to be used in most practical situations.
. This wasn’t entirely necessary for this example, but we included it to show that ws requires this kind of extra work to be used in most practical situations.
Once the WebSocket server has a connection, the session ID can be accessed through the cookies on the upgrade request ![]() . This is similar to what Express does behind the scenes—we just need to manually pass a reference to the upgrade request to the cookie-parser middleware component. Then the session is loaded using the session store’s get method
. This is similar to what Express does behind the scenes—we just need to manually pass a reference to the upgrade request to the cookie-parser middleware component. Then the session is loaded using the session store’s get method ![]() . Once the session has been loaded, a message is sent back to the client that contains a value from the session
. Once the session has been loaded, a message is sent back to the client that contains a value from the session ![]() .
.
The associated client-side implementation that’s required to run this example is shown in the following listing.
Listing 9.26. The client-side WebSocket implementation
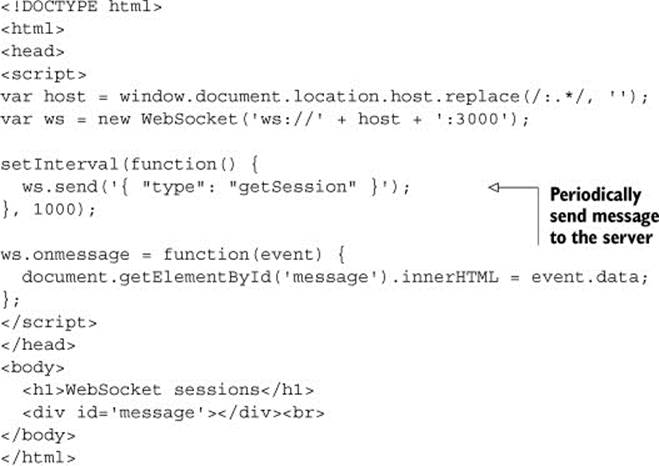
All it does is periodically send a message to the server. It’ll display undefined until you visit http://localhost:3000/random. If you open two windows, one to http://localhost:3000/random and the other to http://localhost:3000/, you’ll be able to keep refreshing the random page so the WebSocket view shows new values.
Running this example requires Express 3 and ws 0.4—we’ve included a package.json with everything you need in the book’s full listings.
The next technique has tips for migrating from Express 3 to Express 4.
Technique 75 Migrating Express 3 applications to Express 4
This book was written before Express 4 was released, so our Express examples are written with version 3 of the framework in mind. We’ve included this technique to help you migrate, and also so you can see how version 4 differs from the previous versions.
Problem
You have an Express 3 application and want to upgrade it to use Express 4.
Solution
Update your application configuration, install missing middleware, and take advantage of the new routing API.
Discussion
Most of the updates from Express 3 to 4 were a long time coming. Certain changes have been hinted at in Express 3’s documentation, so the API changes weren’t unexpected or even too dramatic for the most part. You’ll probably spend most of your time replacing the middleware that used to ship with Express, because Express 4 no longer has any built-in middleware components, apart from express.static.
The express.static middleware component enables Express to mount your public folder that contains JavaScript, CSS, and image assets. This has been left in because it’s convenient, but the rest of the middleware components have gone. That means you’ll need to use npm install --save body-parser if you previously used bodyParser, for example. Refer to table 9.1 that has the old middleware names and the newer equivalents. Just remember that you need to npm install --save each one that you need, and then require it in your app.js file.
Table 9.3. Migrating Express middleware components
|
Express 3 |
Express 4 npm package |
Description |
|
bodyParser |
body-parser |
Parses URL-encoded and JSON POST bodies |
|
compress |
compression |
Compresses the server’s responses |
|
timeout |
connect-timeout |
Allows requests to timeout if they take too long |
|
cookieParser |
cookie-parser |
Parses cookies from HTTP headers, leaving the result in req.cookies |
|
cookieSession |
cookie-session |
Simple session support using cookies |
|
csrf |
csurf |
Adds a token to the session that you can use to protect forms from CSRF attacks |
|
error-handler |
errorhandler |
The default error handler used by Connect |
|
session |
express-session |
Simple session handler that can be extended with stores that write sessions to databases or files |
|
method-override |
method-override |
Maps new HTTP verbs to the _method request variable |
|
logger |
morgan |
Log formatting |
|
response-time |
response-time |
Track response time |
|
favicon |
serve-favicon |
Send favicons, including a built-in default if you don’t have one yet |
|
directory |
serve-index |
Directory listings, similar to Apache’s directory indexing |
|
vhost |
vhost |
Allow routes to match on subdomains |
You might not use most of these modules. In my applications I (Alex) usually have only body-parser, cookie-parser, csurf, express-session, and method-override, so migration isn’t too difficult. The following listing shows a small application that uses these middleware components.
Listing 9.27. Express 4 middleware
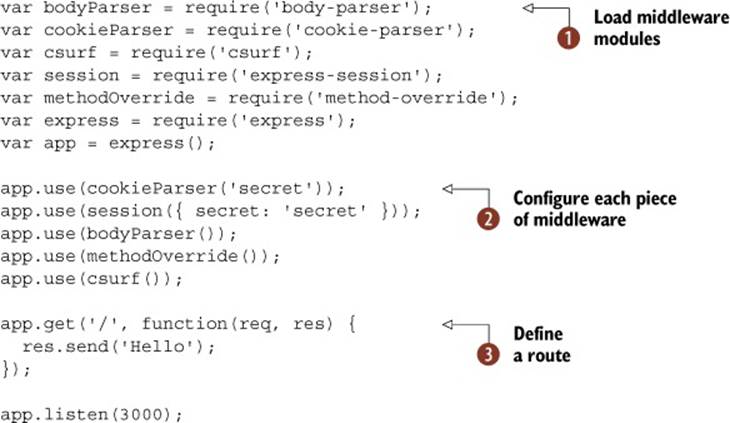
To install Express 4 and the necessary middleware, you should run the following command in a new directory:
npm install --save body-parser cookie-parser \
csurf express-session method-override \
serve-favicon express
This will install all of the required middleware modules along with Express 4, and save them to a package.json file. Once you’ve loaded the middleware components with require ![]() , you can add them to your application’s stack with app.use as you did in Express 3
, you can add them to your application’s stack with app.use as you did in Express 3 ![]() . Route handlers can be added exactly as they were in Express 3
. Route handlers can be added exactly as they were in Express 3 ![]() .
.
Official migration guide
The Express authors have written a migration guide that’s available in the Express wiki on GitHub.[3] This includes a quick rundown of every change.
3 https://github.com/visionmedia/express/wiki/Migrating-from-3.x-to-4.x
You can’t use app.configure anymore, but it should be easy to stop using it. If you’re using app.configure to do only certain things for specific environments, then just use a conditional statement with process.env.NODE_ENV. The following example assumes a fictitious middleware component called logger that can be set to be noisy, which might not be desirable when the tests are running:
if (process.env.NODE_ENV !== 'test') {
app.use(logger({ verbose: true }));
}
The new routing API reinforces the concept of mini-applications that can be mounted on different endpoints. That means your RESTful resources can leave off the resource name from URLs. Instead of writing app.get('/songs', songs.index), you can now write songs.get('/', index) and mount songs on /songs with app.use. This fits in well with the route separation pattern in technique 67.
The next listing shows how to use the new router API.
Listing 9.28. Express 4 middleware
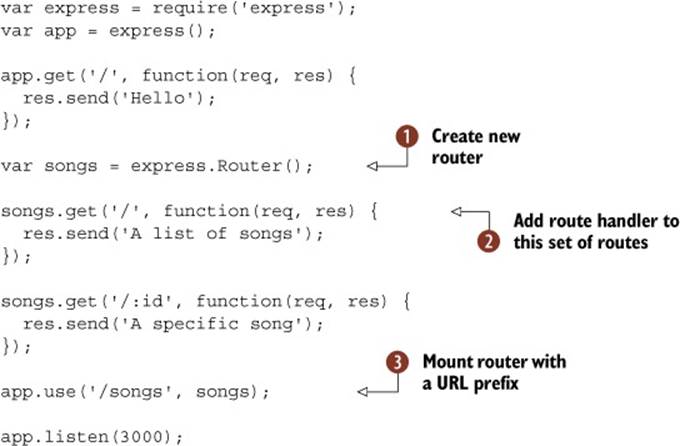
After creating a new router ![]() , you can add routes the same way you always did, using HTTP verbs like get
, you can add routes the same way you always did, using HTTP verbs like get ![]() . The cool thing about this is you can also add middleware that will be confined to these routes only: just call songs.use. That was previously trickier in older versions of Express.
. The cool thing about this is you can also add middleware that will be confined to these routes only: just call songs.use. That was previously trickier in older versions of Express.
Once you’ve set up a router, you can mount it using a URL prefix ![]() . That means you could do things like mount the same route handler on different URLs to easily alias them.
. That means you could do things like mount the same route handler on different URLs to easily alias them.
If you put the routers in their own files and mount them in your main app.js file, then you could even distribute routers as modules on npm. That means you could compose applications from reusable routers.
The final thing we’ll mention about Express 4 is the new router.param method. This allows you to run asynchronous code when certain route parameters are present. Let’s say you have '/songs/:song_id', and :song_id should only ever be a valid song that’s in the database. Withroute.param you can validate that the value is a number and exists in the database, before any route handlers run!
router.param('song_id', function(req, res, next, id) {
Song.find(id, function(err, song) {
if (err) {
return next(err);
} else if (!song) {
return next(new Error('Song not found'));
}
req.song = song;
next();
});
});
router.get('/songs/:song_id', function(req, res, next) {
res.send(req.song);
});
In this example, Song is assumed to be a class that fetches songs from a database. The actual route handler is now extremely simple, because it only runs if a valid song has been found. Otherwise, next will shortcut execution and pass an error to the error-handling middleware.
That wraps up our section on web application development techniques. There’s one more important thing before we move on to the next chapter. Like everything else, web applications should be well tested. The next section has some techniques that we’ve found useful when testing web applications.
9.3. Testing web applications
Testing can feel like a chore, but it can also be an indispensable tool for verifying ideas, particularly if you’re creating web APIs without user interfaces.
Chapter 10 has an introduction to testing in Node, and technique 84 has an example for testing web applications. In the next technique we extend this example to show you how to test authenticated routes.
Technique 76 Testing authenticated routes
Test frameworks like Mocha make tests easy to read and write, and SuperTest helps keep HTTP-related tests clean. But authentication support isn’t usually built into such modules. In this technique you’ll learn one way to handle authentication in tests, and the approach is general enough that it can be reused with other test modules as well.
Problem
You want to test parts of your application that are behind a session-based username and password.
Solution
Make a request that signs in during the setup phase of the tests, and then reuse the cookies for subsequent tests.
Discussion
Some web frameworks and testing libraries handle sessions for you, so you can test routes without worrying too much about logging in. This isn’t true for Mocha and SuperTest, which we’ve used before in this book, so you’ll need to know a bit about how sessions work.
The session handling that Express uses from Connect is based around a cookie. Once the cookie has been set, it can be used to load the user’s session. That means that to write a test that accesses a secure part of your application, you’ll need to make a request that signs in the user, grabs the cookies, and then use the cookies for subsequent requests. This process is shown in figure 9.8.
Figure 9.8. You can test authenticated routes by catching cookies.
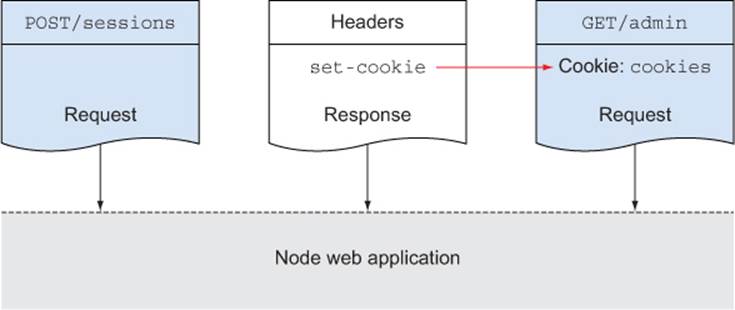
To write tests that access authenticated routes, you’ll need a test user account, which usually involves creating database fixtures. You’ll read about fixtures in chapter 10, technique 87.
Once the data is ready, you can use a library like SuperTest to make a POST to your session-handling endpoint with a username and password. Cookies are transmitted using HTTP headers, so you can read them from res.headers['set-cookie']. You should also make an assertion to ensure the account was signed in.
Now any new requests just need to set the Cookie header with the value from res.headers, and your test user will be signed in. The next listing shows how this works.
Listing 9.29. Testing authenticated requests
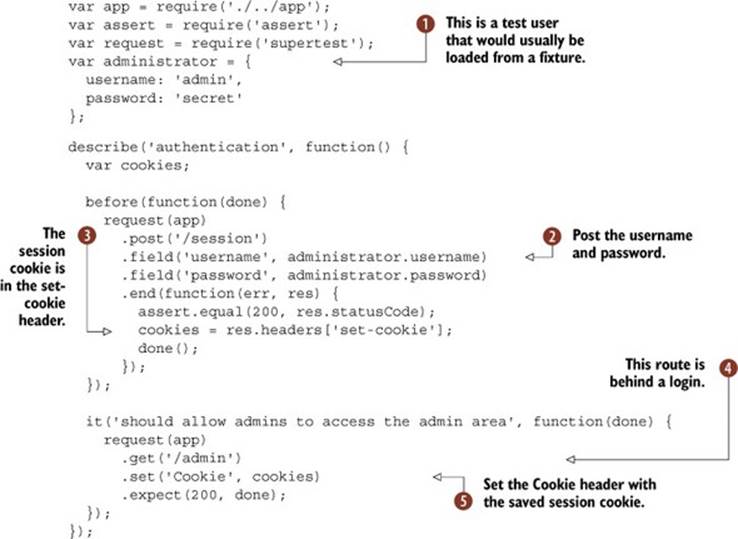
The first part of this test loads the required modules and sets up an example user ![]() . This would usually be stored in a database, or set by a fixture. Next, a POST is made with the username and password
. This would usually be stored in a database, or set by a fixture. Next, a POST is made with the username and password ![]() . The session cookie will be available in the set-cookie header
. The session cookie will be available in the set-cookie header ![]() .
.
To access a route that’s behind a login ![]() , set the Cookie header with the previously saved cookies
, set the Cookie header with the previously saved cookies ![]() . You should find that the request is handled as if the user had signed in normally.
. You should find that the request is handled as if the user had signed in normally.
The trick to understanding testing with sessions can be learned by looking at how Connect’s session middleware component works. Other middleware isn’t as easy to manage during testing, so the next technique introduces the concept of test seams, which will allow you to bring middleware under control during testing.
Technique 77 Creating seams for middleware injection
Middleware is flexible and composable. This modular approach makes Connect-based applications a joy to work on. But there’s a downside to middleware: testability. Some middleware makes routes inherently difficult to test. This technique looks at ways to get around this by creatingseams.
Problem
You’re using middleware that has made your application difficult to test.
Solution
Find seams where middleware can be replaced for the duration of the tests.
Discussion
The term seam is a formal way of describing places in code that can be changed without editing the original code. The concept is extended to apply to languages like JavaScript by Stephen Vance in his book Quality Code: Software Testing Principles, Practices, and Patterns.[4]
4 https://www.informit.com/store/quality-code-software-testing-principles-practices-9780321832986
A seam in our code gives us the opportunity to take control of that code and exercise it in a testing context. Any place that we can execute, override, inject, or control the code could be a seam.
One example of this is the csrf middleware component from Connect. It creates a session variable that can be included in forms to avoid cross-site request forgery attacks. Let’s say you have a web application that allows registered users to create calendar entries. If your site didn’t use CSRF protection, someone could create a web page that tricks a user of your site into deleting items from their calendar. The attack might look like this:
<img src="http://calendar.example.com/entry/1?_method=delete">
The user’s browser will dutifully load the image source that’s hosted on an external site. But it references your site in a potentially dangerous way. To prevent this, a random token is generated on each request and inserted into forms. The attacker doesn’t have access to the token, so the attack is mitigated.
Unfortunately, simply adding express.csrf to routes that render forms isn’t entirely testable. Tests can no longer post to route handlers without first loading the form and scraping out the session variable that contains the secret CSRF token.
To get around this, you need to take express.csrf under your control. Refactor it to create a seam: place it in a module that contains your other custom middleware, and then change it during tests. You don’t need to test express.csrf because the authors of Express and Connect have done that for you—instead, change its behavior during tests.
Two other options are available: checking if process.env.NODE_ENV is set to test and then branching to a test-only version of the CSRF middleware component, or patching express.csrf’s internals so you can extract the secret token. There are problems with both of these approaches: the first means you can’t get 100% code coverage—your production code has to include test code. The second approach is potentially brittle: it’s too sensitive to Connect changing the way CSRF works in the future.
The seam-based concept that we’ll use requires that you create a middleware file if you don’t already have one. This is just a file that groups all of your middleware together into a module that can be easily loaded. Then you need to create a function that wraps around express.csrf, or just returns it. A basic example follows.
Listing 9.30. Taking control of middleware
![]()
All this does is export the original csrf middleware component ![]() , but now it’s much easier to inject different behavior during tests. The next listing shows what such a test might look like.
, but now it’s much easier to inject different behavior during tests. The next listing shows what such a test might look like.
Listing 9.31. Injecting new behavior during tests
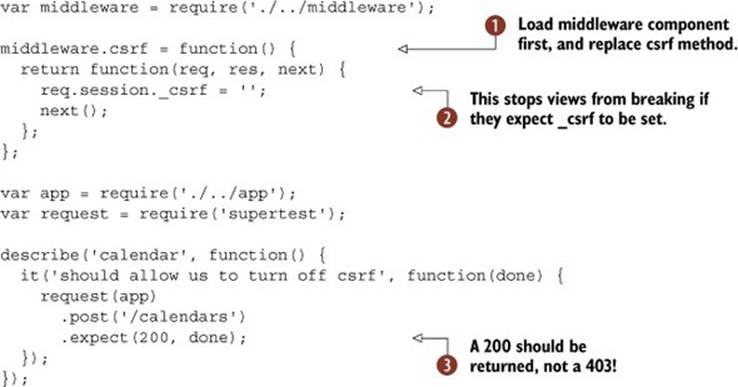
This test loads our custom middleware module before anything else, and then replaces the csrf method ![]() . When it loads app and fires off a request using Super-Test, Express will use our injected middleware component because middleware.js will be cached. The _csrf value is set just in case any views expected it
. When it loads app and fires off a request using Super-Test, Express will use our injected middleware component because middleware.js will be cached. The _csrf value is set just in case any views expected it ![]() , and the request should return a 200 instead of a 403 (forbidden)
, and the request should return a 200 instead of a 403 (forbidden) ![]() .
.
It might not seem like we’ve done much, but by refactoring how express.csrf is loaded, we’ve been able to run our application in a more testable way. You may prefer to make two requests to ensure the csrf middleware component is used normally, but this technique can be used for other things as well. You can bring any middleware under control for testing. If there’s something you don’t want to run during tests, look for seams that allow you to inject the desired behavior, or try to create a seam using simple JavaScript or Node patterns—you don’t need a complex dependency injection framework; you can take advantage of Node’s module system.
The next technique builds on some of these ideas to allow tests to interact with simulated versions of remote services. This will make it easier if you’re writing tests for an application that accesses remote services, like a payment gateway.
Technique 78 Testing applications that depend on remote services
Third-party modules can help you integrate your applications with remote services like GitHub, Twitter, and Facebook. But how do you test applications that depend on such remote services? This technique looks at ways to insert stubs for remote dependencies, to make your tests faster and more maintainable.
Problem
You’re using a social network for authentication, or a service to accept payments, and you don’t want your tests to access these remote dependencies.
Solution
Find the seams between your application, the remote service, and the things you want to test, and then insert your own HTTP servers to simulate parts of the remote dependency.
Discussion
One of the things that most web applications need, yet is easy to get dangerously wrong, is user accounts. Using a Node module that supports the authorization services provided by companies like GitHub, Google, Facebook, and Twitter is both quick and potentially safer than creating a bespoke solution.
It’s comparatively easy to adopt one of these services, but how do you test it? In technique 76, you saw how to write tests for authenticated routes. This involved signing in and saving the session cookies so subsequent requests appeared authenticated. You can’t use the same approach with remote services, because your tests would have to make requests to real-life production services. You could use a test account, but what if you wanted to run your tests offline?
To get around this, you need to create a seam between your application and the remote service. Whenever your application attempts to communicate with the remote service, you need to slot in a fake version that emits similar responses. In unit tests, mock objects simulate other objects. What you want is to mock a service.
There are two requirements that your application needs to satisfy to make this possible:
· Configurable remote services
· A web server that can stand in for the remote service
The first condition means your application should allow the URLs of remote services to be changed. If it needs to connect to http://auth.example.com/signin, then you’ll need to specify http://localhost:3001/signin during testing. The port is entirely up to you—some solutions we’ve seen use a sequence of port numbers so multiple services can be run at once for the same tests.
The second condition can be handled however you want. If you’re using Express, you could start an Express server with a limited set of routes defined—just enough routes and code to simulate the remote service. This server can be kept in its own module, and loaded in the tests that need it.
In practice this doesn’t require much code, so once you understand the principle it shouldn’t be too difficult to reuse it to handle practically any API. If the API you’re attempting to simulate isn’t well documented, then you may need to capture real requests to figure out how it works.
Investigating remote APIs
There are times when remote APIs aren’t well documented. Once you get beyond the basic API calls, there are bound to be parts that aren’t easy to understand. In cases like this, we find it’s best to make requests with a command-line tool like curl, and watch the requests and responses in an HTTP logging tool.
If you’re using Windows, then Fiddler (http://www.telerik.com/fiddler) is absolutely essential. It’s described as a HTTP debugging proxy, and it supports HTTPS as well.
Glance has built-in pages for errors.
For Linux and Mac OS, mitmproxy (http://mitmproxy.org/) is a powerful choice. It allows HTTP traffic to be observed in real time, dumped, saved, and replayed. We’ve found it perfect for debugging our own Node-powered APIs that support desktop apps, as well as figuring out the quirks of certain popular payment gateways.
In the following three listings, you’ll see how to create a mock server that a test can use to simulate some of PayPal’s behavior. The first listing shows the application itself.
Listing 9.32. A small web store that uses PayPal
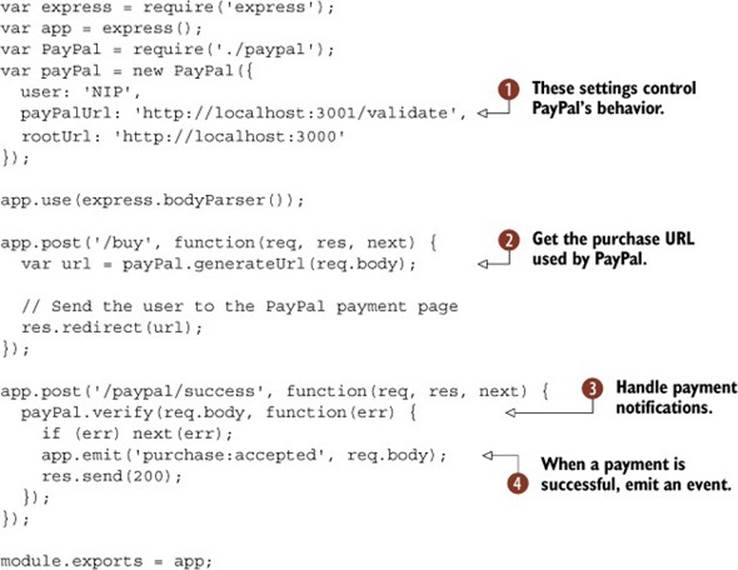
The settings passed to the PayPal class near the top of the file ![]() are used to control PayPal’s behavior. One of them, payPalUrl, could be https://www.sandbox.paypal.com/cgi-bin/webscr for testing against PayPal’s staging server. Here we use a local URL, because we’re going to run our own mock server.
are used to control PayPal’s behavior. One of them, payPalUrl, could be https://www.sandbox.paypal.com/cgi-bin/webscr for testing against PayPal’s staging server. Here we use a local URL, because we’re going to run our own mock server.
If this were a real project, you should use a configuration file to store these options. One for each environment would make sense. Then the test configuration could point to a local server, staging could use PayPal sandbox, and live would use PayPal.com. For more on configuration files, seetechnique 69.
To make a payment, the user is forwarded to PayPal’s hosted forms. Our demonstration PayPal class has the ability to generate this URL, and it’ll use payPalUrl ![]() . This example also features payment notification handling
. This example also features payment notification handling ![]() —known as IPN in PayPal’s nomenclature.
—known as IPN in PayPal’s nomenclature.
An extra feature we’ve added here is the call to emit ![]() . This makes it easier to test, because our tests can now listen for purchase:accepted events. It’s also useful for setting up email handling—see technique 73 for more on that.
. This makes it easier to test, because our tests can now listen for purchase:accepted events. It’s also useful for setting up email handling—see technique 73 for more on that.
Now for the mock PayPal server. All it needs to do is handle IPN requests. It basically needs to say, “Yes, that purchase has been validated.” It could also optionally report errors so we can test error handling on our side as well. The next listing shows what the tiny mocked server looks like.
Listing 9.33. Mocking PayPal’s IPN requests
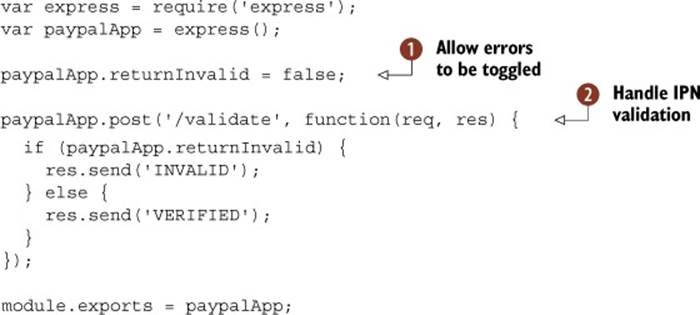
Real-life PayPal stores receive a POST from PayPal with an order’s details, near the end of the sales process. You need to take that order and send it back to PayPal for verification. This prevents attackers from crafting a POST request that tricks your application into thinking a fake purchase was made.
This example includes a toggle so errors can be turned on ![]() . We’re not going to use it here, but it’s useful in real projects because you’ll want to test how errors are handled. There will be customers that encounter errors, so ensuring they’re handled gracefully is critical.
. We’re not going to use it here, but it’s useful in real projects because you’ll want to test how errors are handled. There will be customers that encounter errors, so ensuring they’re handled gracefully is critical.
Once all that’s in place, all we need to do is send back the text VERIFIED ![]() . That’s all PayPal does—it can be frustratingly abstruse at times!
. That’s all PayPal does—it can be frustratingly abstruse at times!
Finally, let’s look at a test that puts all of this together. The next listing uses both the mocked PayPal server and our application to make purchases.
Listing 9.34. Testing PayPal
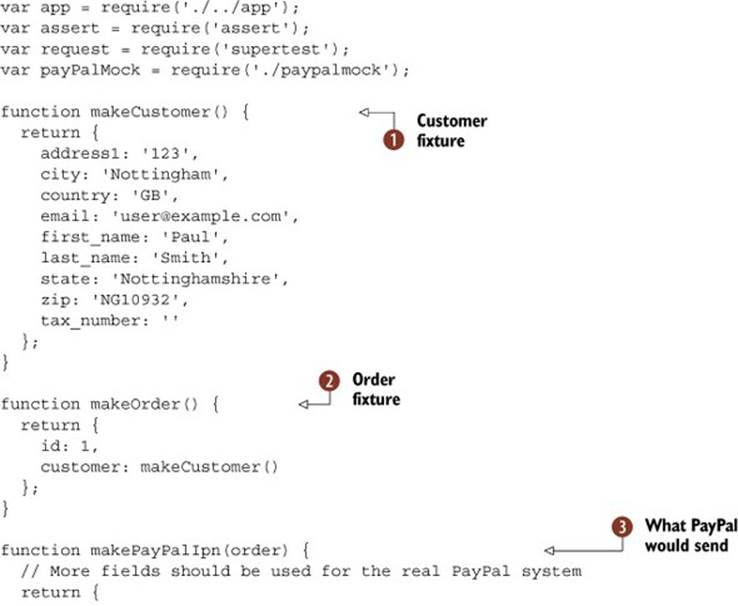
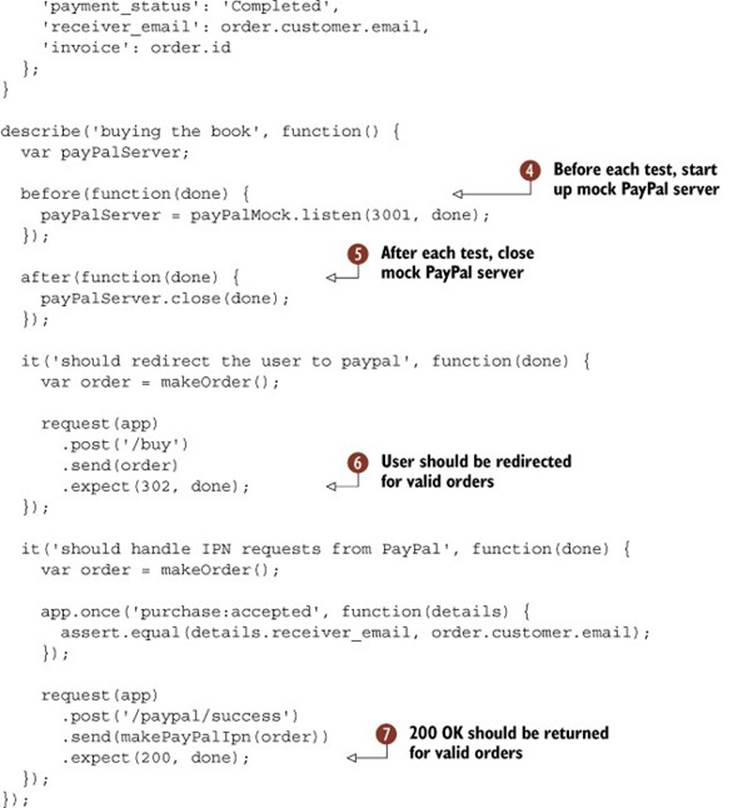
This test sets up a sample order ![]() , which requires a customer
, which requires a customer ![]() . We also create an object that has the same fields as a PayPal IPN request—this is what we’re going to send to our mock PayPal server for validation. Before
. We also create an object that has the same fields as a PayPal IPN request—this is what we’re going to send to our mock PayPal server for validation. Before ![]() and after
and after ![]() each test, we have to start and stop the mock PayPal server. That’s because we don’t want servers running when they’re not needed—it might cause other tests to behave strangely.
each test, we have to start and stop the mock PayPal server. That’s because we don’t want servers running when they’re not needed—it might cause other tests to behave strangely.
When the user fills out the order form on our site, it will be posted to a route that generates a PayPal URL. The PayPal URL will forward the user’s browser to PayPal for payment. Listing 9.34 includes a test for this ![]() , and the URL it generates will start with our local test PayPal URL fromlisting 9.32.
, and the URL it generates will start with our local test PayPal URL fromlisting 9.32.
There’s also a test for the notification sent by PayPal ![]() . This is the one we’re focusing on that requires the PayPal mocked server. First we have to POST to our server at /paypal/success with the notification object
. This is the one we’re focusing on that requires the PayPal mocked server. First we have to POST to our server at /paypal/success with the notification object ![]() —this is what PayPal would normally do—and then our application will make an HTTP request to PayPal, which will hit the mocked server, and then return VERIFIED. The test simply ensures a 200 is returned, but it’s also able to listen for the purchase:accepted event, which indicates a given purchase is complete.
—this is what PayPal would normally do—and then our application will make an HTTP request to PayPal, which will hit the mocked server, and then return VERIFIED. The test simply ensures a 200 is returned, but it’s also able to listen for the purchase:accepted event, which indicates a given purchase is complete.
It might seem like a lot of work, but you’ll be able to work more efficiently once your remote services are simulated with mock servers. Your tests run faster, and you can work offline. You can also make your mocked services generate all kinds of unusual responses, which will help you get better test coverage if that’s one of your goals.
This is the last web-related technique that we cover in this chapter. The next sections discuss emerging trends in Node web development.
9.4. Full stack frameworks
In this chapter you’ve seen how to build web applications with Node’s built-in modules, Connect, and Express. There’s an emerging class of new frameworks known as full stack frameworks. They provide features that are needed to make rich, browser-based applications with modern tools like data binding, but also handle server-side concerns like modeling business logic and data persistence.
If you’re set on using Express, then you can still start working with full stack frameworks today. The MEAN solution stack uses MongoDB, Express, AngularJS, and Node. There could be many MEAN implementations out there, but the MEAN Stack from Linnovate (https://github.com/linnovate/mean) is currently the most popular. It comes with Mongoose for data models, Passport for authorization, and Twitter Bootstrap for the user interface. If you’re working in a team that’s already familiar with Bootstrap, AngularJS, and Mongoose, then this is a great way to get new projects off the ground quickly.
The book Getting MEAN[5] introduces full stack development and covers Mongoose models, RESTful API design, and account management with Facebook and Twitter.
5 Getting MEAN by Simon Holmes: http://www.manning.com/sholmes/.
Another framework that builds on Express and MongoDB is Derby (http://derbyjs.com/). Instead of Mongoose, Derby uses Racer to implement data models. This allows data from different clients to be synchronized, using operational transformation (OT). OT is specifically designed to support collaborative systems, so Derby is a good choice for developing software inspired by Etherpad (http://etherpad.org/). It also has client-side features like templates and data binding.
If you like Express but want more features, then one option that we haven’t covered is Kraken (http://krakenjs.com/) by PayPal. This framework adds more structure to Express projects by adding subdirectories for configuration, controllers, Grunt tasks, and tests. It also supports internationalization out of the box.
Some frameworks are almost entirely focused on the browser, relying on Node only for sensitive operations and data persistence. One popular example is Meteor (https://www.meteor.com/). Like Derby and MEAN Stack, it uses MongoDB, but the creators are planning support for other databases. It’s based around a pub/sub architecture, where JSON documents are pushed between the client and server. Clients retain an in-memory copy of the documents—servers publish sets of documents, while clients subscribe to them. This means most model-related code in the browser can be written synchronously.
Meteor embraces reactive programming, a paradigm that’s currently popular in desktop development circles. This allows reactive computations to be bound to methods. If you subscribe a function to such a value, the function will be rerun when the value changes. The overall effect in a real application is streamlined code—there’s essentially less pub/sub management and event-handling code.
Hoodie (http://hood.ie/) is a competitor to Meteor. It uses CouchDB, and is suitable for mobile applications because it synchronizes data when possible. Almost everything can happen locally. It comes with built-in account management, which is as simple ashoodie.account.signUp('alex@example.com', 'pass'). There’s even a global public store, so data can be saved for specific users or made available to everyone using a given application.
There’s lots of activity in the Node web framework scene, but there’s another aspect to Node web development that we haven’t mentioned yet: real-time development.
9.5. Real-time services
Node is the natural choice for web-based real-time services. Broadly speaking, this involves three types of applications: statistics servers, collaboration services, and latency-sensitive applications like game servers.
It’s not that difficult to start a server with Express and collect data about your other applications, servers, weather sensor data, or dog-feeding robot. Unfortunately, doing this well isn’t trivial. If you’re logging something every time someone plays your free-to-play iOS game, what happens when there are thousands of events a minute? How do you scale this, or view critical information in real time?
Some companies have this problem on a huge scale, and fortunately some of them have created open source tools that we can reuse. One example is Cube (http://square.github.io/cube/) by Square. Cube allows you to collect timestamped events and then derive metrics on them. It uses MongoDB, so you could feed data out to something that generates graphs. Square has a solution for visualizing the data called Cubism.js (http://square.github.io/cubism/), which renders new values in real-time (see figure 9.9).
Figure 9.9. Cubism.js shows time series values in real time.

The Etherpad project (http://etherpad.org/) is a Node-powered collaborative document editor. It allows users to chat as they make changes to documents, and color-codes the changes so it’s easy to see what each person is doing. It’s based on some of the modules you’ve seen in this book: Mikeal Rogers’ request, Express, and Socket.IO.
WebSockets make these projects possible. Without WebSockets, pushing data to the client would be more cumbersome. Node has a rich set of WebSockets implementations—Socket.IO (http://socket.io/) is the most popular, but there’s also ws (https://www.npmjs.org/package/ws), which claims to be the fastest WebSocket implementation.
There’s a parallel between sockets and streams; SocketStream (http://socketstream.org/) aims to bridge the gap by building web applications entirely around streams. It uses the HTML5 history.pushState API with single-page applications, Connect middleware, and code sharing with the browser.
9.6. Summary
In this chapter you’ve seen how Node fits in with modern web development. It can be used to improve client-side tooling—it’s now normal for client-side developers to install Node and a Node build tool.
Node is also used for server-side development. Express is the major web framework, but many projects can get off the ground with a subset from Connect. Other frameworks are similar to Express, but have a different focus. Restify is one example, and can be used to make strict RESTful APIs (technique 71).
Writing well-structured Express applications means you should adopt certain patterns and idioms that the Node community has adopted. This includes error handling (technique 70), folders as modules and route separation (technique 67), and decoupling through events (technique 73).
It’s also increasingly common to use Node modules in the browser (technique 66), and client-side code in Node (technique 65).
If you want to write better code, you should adopt test-driven development as soon as possible. We’ve included some techniques that enable you to test things like authentication (technique 76) and mocking remote APIs (technique 78), but the simple act of writing a test to think about new code is one of the best ways to improve your Node web applications. One way you can do this is every time you want to add a new route to a web application, write the test first. Practice using Super-Test, or a comparable HTTP request library, and use it to plan out new API methods, web pages, and forms.
The next chapter shows you how to write better tests, whether they’re simple scripts or database-driven web applications.
All materials on the site are licensed Creative Commons Attribution-Sharealike 3.0 Unported CC BY-SA 3.0 & GNU Free Documentation License (GFDL)
If you are the copyright holder of any material contained on our site and intend to remove it, please contact our site administrator for approval.
© 2016-2026 All site design rights belong to S.Y.A.