Node.js in Practice (2015)
Part 3. Writing modules
As we dove deep into Node’s core libraries and looked into real-world recipes, we’ve been building a narrative that leads to the biggest part of the Node ecosystem: community-driven innovation through third-party module development. As the core provides the Legos with which we build, and the recipes provide the tooling and insight to build confidently, what we ultimately build is up to us!
We have one last chapter that will take you through the ins and outs of building a module and contributing it back to the community.
Chapter 13. Writing modules: Mastering what Node is all about
This chapter covers
· Planning a module
· Setting up a package.json file
· Working with dependencies and semantic versioning
· Adding executable scripts
· Testing out a module
· Publishing modules
The Node package manager (npm) is arguably the best package manager any platform has seen to date. npm at its core is a set of tools for installing, managing, and creating Node modules. The barrier to entry is low and uncluttered with ceremony. Things “just work” and work well. If you aren’t convinced yet, we hope this chapter will encourage you to take another look.
The subtitle for this chapter is “Mastering what Node is all about.” We chose this because user-contributed modules make up the vast majority of the Node ecosystem. The core team decided early on that Node would have a small standard library, containing just enough core functionality to build great modules upon. We knew understanding this core functionality was paramount to building modules, so we saved this chapter for the end. In Node, you may find 5 or 10 different implementations for a particular protocol or client, and we’re OK with that because it allows experimentation to drive innovation in the space.
One thing we’ve learned through our experimentation is that smaller modules matter. Larger modules tend to be hard to maintain and test. Node enables smaller modules to be stuck together simply to solve more and more complex problems.
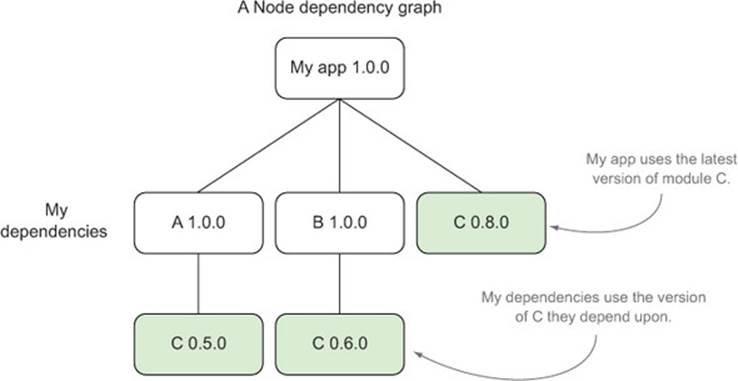
Node’s require system (based on CommonJS; http://wiki.commonjs.org/wiki/Modules/1.1) manages those dependencies in a way that avoids dependency hell. It’s perfectly fine for modules to depend on different versions of the same module, as shown in figure 13.1.
Figure 13.1. Node avoids dependency hell
In addition to standard dependencies, you can specify development and peer dependencies (more on that later) and have npm keep those in check for you.
Dependency graphs
If you ever want to see a dependency graph for your project, just type npm ls at the project root to get a listing.
Another difference that was decided early on in the history of npm was to manage dependencies at a local level by default as popularized by the bundler Ruby gem. This bundles modules inside your project (sitting in the node_modules folder), making dependency hell a non-issue across multiple projects since there’s no globally shared module state.
Installing global modules
You can still install global modules if you want with npm install -g module-name, which can be useful when you need a system-wide executable, for instance.
Hopefully we’ve whetted your appetite for exploring a range of module-authoring techniques! In this chapter we’ll focus on a variety of techniques that center around
· Effectively making the most of the package.json file
· Using npm for various module-authoring tasks
· Best practices for developing modules
Our techniques will follow a logical order from an empty project directory to a completed and published npm module. Although we tried to stuff as many concepts as possible into one module, you may find your module may only need a handful of these steps. When we can’t fit a concept into the module, we’ll focus on an isolated use case to illustrate the point.
13.1. Brainstorming
What kind of API do we want to build? How should someone consume it? Does it have a clear purpose? These are some of the questions we need to ask as we begin to write a module. In this section we’ll walk through researching and proving out a module idea. But first, let’s introduce a problem we want to solve, which will provide a context as we progress.
13.1.1. A faster Fibonacci module
One of the most famous Node critiques (although arguably misguided) early on in its history was “Node.js is Cancer” (http://pages.citebite.com/b2x0j8q1megb), where the author argued that a CPU-bound task on a running web server was miserably handled in Node’s single-threaded system.
The implementation was a common recursive approach to calculating a Fibonacci sequence (http://en.wikipedia.org/wiki/Fibonacci_number), which could be implemented as follows:

This implementation is slow in V8, and since proper tail calls don’t yet exist in JavaScript, it wouldn’t be able to calculate very high numbers due to a stack overflow.
Let’s write a module to help rid the world of slow Fibonacci calculations in order to learn about module development from start to finish.
Technique 106 Planning for our module
So we want to start writing a module. How should we approach it? Is there anything we can do before we even start writing a line of code? It turns out that planning ahead of time can be extremely helpful and save pain down the road. Let’s take a peek on how to do that well.
Problem
You want to write a module. What steps should you take in planning?
Solution
Research what already exists, and ensure that your module does just one thing.
Discussion
It’s important to clearly articulate the purpose of your module. If you can’t boil it down to one sentence, it may be doing too much. Here’s where an important aspect of the Unix philosophy comes in: make each program do one thing well.
Surveying the landscape
First, it’s good to know what exists already. Has someone else implemented a solution to my problem? Can I contribute there? How did others approach this? A great way to do that is searching on npmjs.org or doing a search from the command line:

Let’s look at some of the more interesting results:
fibonacci Calculates fibonacci numbers for one or endless iterations....
=franklin 2013-05-01 1.2.3 fibonacci math bignum endless
fibonacci-async So, you want to benchmark node.js with fibonacci once...
=gottox 2012-10-29 0.0.2
fibonacci-native A C++ addon to compute the nth fibonacci number.
=avianflu 2012-03-21 0.0.0
Here we can see the names and descriptions of three different implementations. We also see what version was released last and on what date. It looks like a couple are older and have a lower version number, which may mean the API is in flux or still in progress. But the top result looks pretty mature at version 1.2.3 and has been updated most recently. Let’s get more information on that by running the following:
npm docs fibonacci
The npm docs command will load the module’s homepage if specified, or the npmjs search result, which looks like figure 13.2.
Figure 13.2. npmjs.com package details page
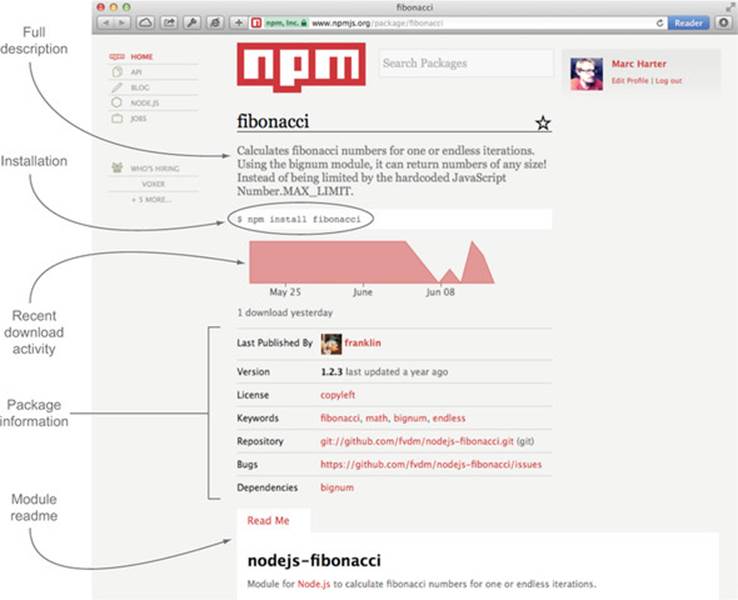
The npmjs result page helps give you an overall picture for a module. We can see this module depends on the bignum module and was updated a year ago, and we can view its readme to get a sense of the API.
Although this module looks pretty good, let’s create a module as an experiment to try out some other ideas for handling Fibonacci sequences. In our case, let’s create a module where we’ll experiment with different implementations and benchmark our results using straight JavaScript with no required bignum dependency.
Embrace doing one thing well
A module should be simple and pluggable. In this case, let’s try to define our module’s purpose in one phrase:
Calculates a Fibonacci number as quickly as possible with only JavaScript
That’s a pretty good start: it’s clear and succinct. When that concept doesn’t ring true anymore, we’ve blown our scope, and it may be time to write another module that extends this one rather than adding more to it. For this project, adding a web server endpoint that returns the result of this function may be better served in a new module that depends on this one.
Of course, this isn’t a rigid requirement, but it helps us clarify the module’s purpose and makes it clear for our end users. This statement will be great to add to our package.json (which we’ll look at later) and to the top of our readme file.
We’ll eventually need a module name, which isn’t vital at the start, but in order to refer to it in future techniques, let’s call ours fastfib. Go ahead and make a fastfib directory that will serve as our project directory:
mkdir fastfib && cd fastfib
Now that we’ve defined our “one thing” we want our module to do and have our bare project directory, let’s prove out our module idea in the next technique to see if it will actually work.
Technique 107 Proving our module idea
So we have a focus now; what next? Time to prove our idea. This is the step where we think about the API surface of our module. Is it usable? Does it accomplish its purpose? Let’s look at this next.
Problem
What should you code first when proving out your module idea?
Solution
Look at the API surface through TDD.
Discussion
It’s important to know how you want your module to function. In fastfib, we’ll calculate a Fibonacci sequence synchronously. What would be the simplest and easiest-to-use API we can think of?
fastfib(3) // => 2
Right, just a simple function call that returns the result.
When building an asynchronous API, it’s recommended to use the Node callback signature, as it will work well with pretty much any control flow library. If our module were asynchronous, it would look like this:
fastfib(3, function (err, result) {
console.log(result); // => 2
});
We have our synchronous API. In the beginning of this chapter, we showed you an implementation that we wanted to improve on. Since we want a baseline to compare other implementations, let’s bring that recursive implementation into our project by creating a lib folder with a file called recurse.js with the following content:

Defining an entry point
Every module has an entry point: the object/function/constructor that we get when it’s required elsewhere using the require keyword. Since we know that we’ll be trying different implementations inside our lib directory, we don’t want lib/recurse.js to be the entry point, as it may change.
Usually index.js in the project root makes the most sense as an entry point. Many times it makes sense to have the entry point be minimal in nature and just tie together the parts needed to provide the API to the end user. Let’s create that file now:
module.exports = require('./lib/recurse');
Now when a consumer of the module does a require('fastfib'), they will get this file and in turn get our recursive implementation. We can then just switch this file whenever we need to change the exposed implementation.
Testing our implementation
Now that we have our first implementation of fastfib, let’s ensure that we actually have a legit Fibonacci implementation. For that, let’s make a folder called test with a single index.js file inside:
var assert = require('assert');
var fastfib = require ('../');
assert.equal(fastfib(0), 0);
assert.equal(fastfib(1), 1);
assert.equal(fastfib(2), 1);
assert.equal(fastfib(3), 2);
assert.equal(fastfib(4), 3);
assert.equal(fastfib(5), 5);
assert.equal(fastfib(6), 8);
assert.equal(fastfib(7), 13);
assert.equal(fastfib(8), 21);
assert.equal(fastfib(9), 34);
assert.equal(fastfib(10), 55);
assert.equal(fastfib(11), 89);
assert.equal(fastfib(12), 144);
// if we get this far we can assume we are on the right track
Now we can run our test suite to see if we’re on track:
node test
We didn’t get any errors thrown, so it looks like we’re at least accurate in our implementation.
Benchmarking our implementation
Now that we have a well-defined API and tests around our implementation of fastfib, how do we determine how fast it is? For this we’ll use a reliable JavaScript benchmarking tool behind the jsperf.com project called Benchmark.js (http://benchmarkjs.com/). Let’s include it in our project:
npm install benchmark
Let’s create another folder called benchmark and add an index.js file inside of it with the following code:
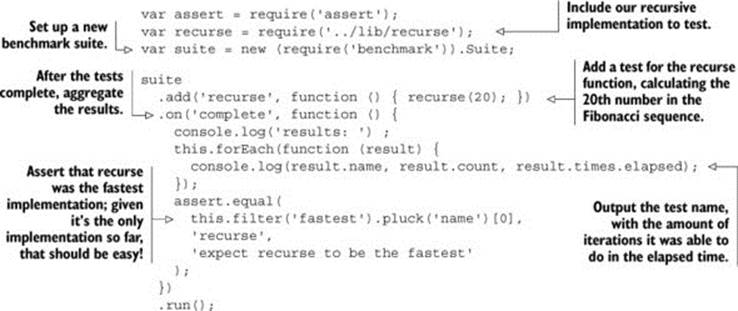
Let’s run our benchmark now from the root module directory:
$ node benchmark
results:
recurse 392 5.491
Looks like we were able to calculate recurse(20) 392 times in ~5.5 seconds. Let’s see if we can improve on that. The original recursive implementation wasn’t tail call optimized, so we should be able to get a boost there. Let’s add another implementation to the lib folder called tail.js with the following content:

Now, add the test to our benchmark/index.js file and see if we did any better by adding the implementation to the top of the file:

Let’s see how we did:

Wow! Tail position really helped speed up our Fibonacci calculation. So let’s switch that to be our default implementation in our main index.js file:
module.exports = require('lib/tail');
And make sure our tests pass:
node test
No errors; it looks like we’re still good. As noted earlier, a proper tail call implementation will still blow our stack when it gets too large, due to it not being supported yet in JavaScript. So let’s try one more implementation and see if we can get any better. To avoid a stack overflow on larger sequences of numbers, let’s make an iterative implementation and create it at lib/iter.js:

Let’s add this implementation to the benchmark/index.js file:

Let’s see how we did:
$ node benchmark
results:
recurse 392 5.456
tail 266836 5.455
iter 1109532 5.474
An iterative approach turns out to be 4x faster than the tail version, and 2830x faster than the original function. Looks like we have a fastfib indeed, and have proven our implementation. Let’s update our benchmark/index.js file to assert that iter should be the fastest now:
assert.equal(
this.filter('fastest').pluck('name')[0],
'iter',
'expect iter to be the fastest'
);
Then update our main index.js to point to our fastest version:
module.exports = require('./lib/iter');
And test that our implementation is still correct:
node test
No errors still, so we’re good! If we later find that V8 optimizes tail call flows to be even faster than our iterative approach, our benchmark test will fail and we can switch implementations. Let’s review our overall module structure at this point:
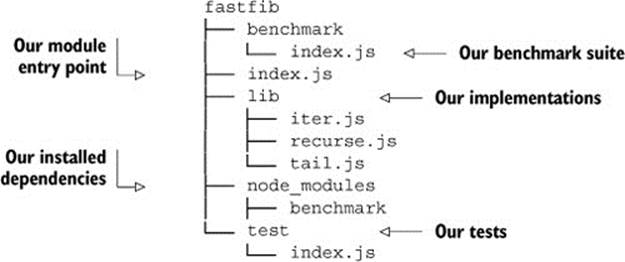
Looks like we’ve proved our idea. What’s important to take away is to experiment! Try different implementations! You likely won’t get it right initially, so take this time to experiment until you’re satisfied. In this particular technique, we tried three different implementations until we landed one.
Time to look at the next step in module development: setting up a package.json file.
13.2. Building out the package.json file
Now we have an idea we like and we’ve proven that our idea does what we intend it to do, we’ll turn to describing that module though a package.json file.
Technique 108 Setting up a package.json file
A package.json is the central file for managing core data about your module, common scripts, and dependencies. Whether you ultimately publish your module or simply use it to manage your internal projects, setting up a package.json will help drive your development. In this technique we’ll talk about how to get a package.json set up and how to populate your package json using npm.
Problem
You need to create a package.json file.
Solution
Use the built-in npm tools.
Discussion
The npm init command provides a nice step-by-step interface for setting up a package.json. Let’s run this command on our fastfib project directory:
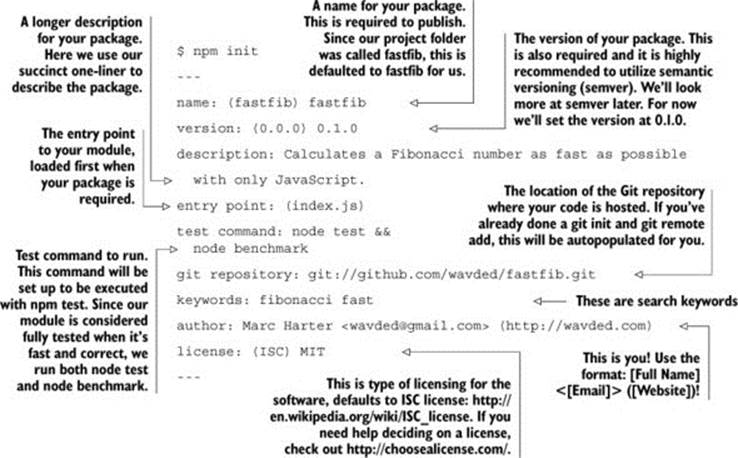
Package options
For extensive detail on each package option, view the official documentation (https://www.npmjs.org/doc/json.html) by running npm help json.
Running npm init gets even simpler when you set up your user config ($HOME/.npmrc) to prepopulate the values for you. Here are all the options you can set:
npm config set init.author.name "Marc Harter"
npm config set init.author.email "wavded@gmail.com"
npm config set init.author.url "http://wavded.com"
npm config set init.license "MIT"
With these options, npm init won’t ask you for an author, but instead autopopulate the values. It will also default the license to MIT.
A note about existing modules
If you already have modules that you installed prior to setting up your package.json file, npm init is smart enough to add them to package.json with the correct versions!
Once you’ve finished initializing, you’ll have a nice package.json file in your directory that looks something like this:
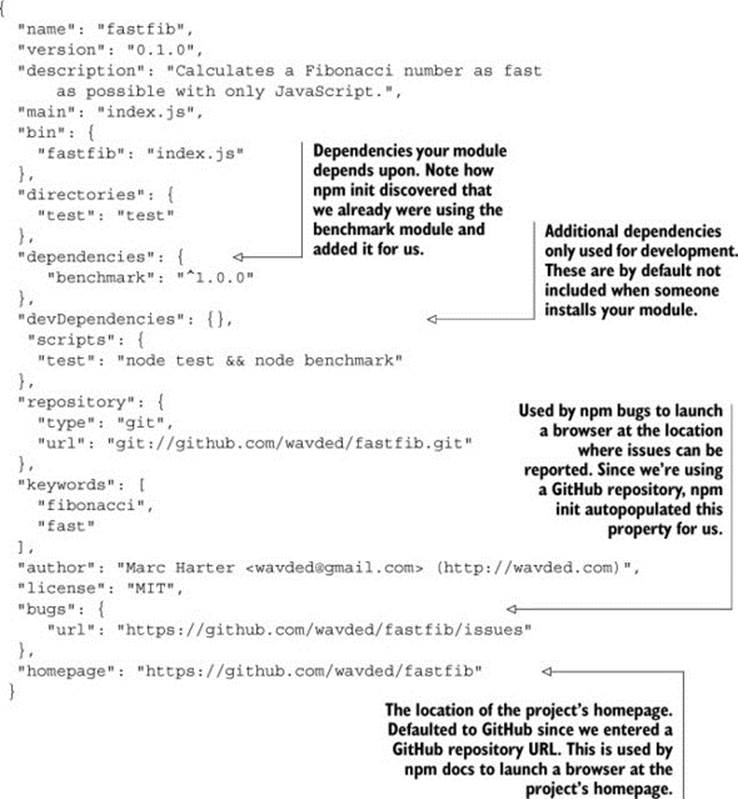
Now that we have a good start on a package.json file, we can add more properties by either directly modifying the JSON file or using other npm commands that modify different parts of the file for you. The npm init command just scratches the surface on what we can do with a package.json file. We’ll look at more things we can add as we continue.
In order to look at more package.json configuration and other aspects of module development, let’s head to the next technique.
Technique 109 Working with dependencies
Node has over 80,000 published modules on npm. In our fastfib module, we’ve already tapped into one of those: the benchmark module. Having dependencies well defined in our package.json file helps maintain the integrity of our module when it’s installed and worked on by ourselves and others. A package.json file tells npm what to fetch and at what version to fetch our dependencies when using npm install. Failing to include dependencies inside our package.json file will result in errors.
Problem
How do you effectively manage dependencies?
Solution
Keep the package.json file in sync with your module requirements using npm.
Discussion
The package.json file allows you to define four types of dependency objects, shown in figure 13.3.
Figure 13.3. The different types of dependencies
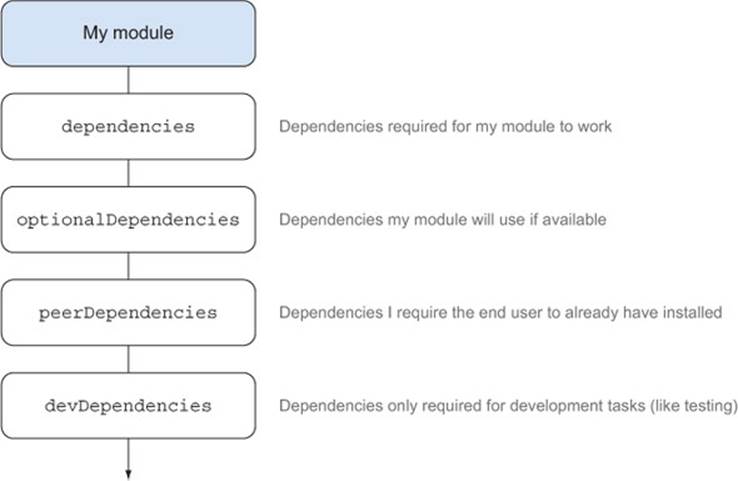
The types of dependencies are as listed here:
· dependencies —Required for your module to function properly
· devDependencies —Required solely for development, like testing, benchmarking, and server reloading tools
· optionalDependencies —Not required for your module to work, but may enhance the functionality in some way
· peerDependencies —Requires another module to be installed in order to run properly
Let’s look at these in turn with our project and talk about adding and removing within your package.json file as we go.
Main and development dependencies
Currently the package.json file that was generated with npm init has benchmark listed in the dependencies object. If we look at our list, that doesn’t hold true for a couple reasons. The first is because our main entry point (index.js) will never require benchmark in its require chain, so an end user has no need for it:
index.js requires ./lib/iter.js which requires nothing
The second reason is because benchmarking is typically a development-only thing for those who work on our module. To remove that out of our dependencies, we can use npm remove and have it removed from our package.json file using the --save flag:
$ npm remove benchmark --save
unbuild benchmark@1.0.0
Then we can install it into our development dependencies using npm install with the --save-dev flag:
$ npm install benchmark --save-dev
benchmark@1.0.0 node_modules/benchmark
Now if we look at our package.json file, we’ll see that benchmark is now a part of the devDependencies object:
"devDependencies": {
"benchmark": "^1.0.0"
},
This was somewhat of a brute force way to show you the commands to remove and install with npm. We could have also just moved benchmark inside the package.json file in our text editor, avoiding the uninstall and re-install.
Now we have benchmark in the right spot, so it won’t be installed when others want to use our module.
Optional dependencies
Optional dependencies aren’t required for a project to run, but they will be installed along with the regular dependencies. The only difference from normal dependencies is that if an optional dependency fails to install, it will be ignored and the module should continue to install properly.
This typically plays out for modules that can get a boost by including a native add-on. For example, hiredis is a native C add-on to boost performance for the redis module. But it can’t be installed everywhere, so it attempts to install, but if it fails, the redis module falls back to a JavaScript implementation. A typical pattern to check for the dependency in the parent module is this:

Let’s say we wanted to support a larger set of sequence numbers for our fastfib. We could add the bignum native add-on to enable that functionality by running
npm install bignum --save-optional
Then we could optionally use that iteration instead if we detect the bignum module was able to be installed in our index.js file:

Unfortunately, the bignum implementation would be much slower, as it can’t be optimized by the V8 compiler. We’d be violating our goal of having the fastest Fibonacci if we included that optional dependency and implementation, so we’ll scratch it out for now. But this illustrates how you may want to use optional dependencies (for example, if you wanted to support the highest possible Fibonacci numbers as your goal).
Homework
The code and tests were intentionally left out for the bignum implementation; try implementing a version that uses bignum and see what performance benchmarks you get from our test suite.
Peer dependencies
Peer dependencies (http://blog.nodejs.org/2013/02/07/peer-dependencies/) are the newest to the dependency scene. Peer dependencies say to someone installing your module: I expect this module to exist in your project and to be at this version in order for my module to work. The most common type of this dependency is a plugin.
Some popular modules that have plugins are
· Grunt
· Connect
· winston
· Mongoose
Let’s say we really wanted to add a Connect middleware component that calculates a Fibonacci number on each request; who wouldn’t, right? In order for that to work, we need to make sure the API we write will work against the right version of Connect. For example, we may trust that for Connect 2 we can reliably say our module will work, but we can’t speak for Connect 1 or 3. To do this we can add the following to our package.json file:

In this technique we looked at the four types of dependencies you can define in your package.json file. If you’re wondering what ^1.0.0 or 2.x means, we’ll cover that in depth in the next technique, but let’s first talk about updating existing dependencies.
Keeping dependencies up to date
Keeping a module healthy also means keeping your dependencies up to date. Thankfully there are tools to help with that. One built-in tool is npm outdated, which will strictly match your package.json file as well as all the package.json files in your dependencies, to see if any newer versions match.
Let’s purposely change our package.json file to make the benchmark module out of date, since npm install gave us the latest version:

Then let’s run npm outdated and see what we get:
$ npm outdated
Package Current Wanted Latest Location
benchmark 1.0.0 0.2.2 1.0.0 benchmark
Looks like we have 1.0.0 currently installed, but according to our package.json we just changed, we want the latest package matching ^0.2.0, which will give us version 0.2.2. We also see the latest package available is 1.0.0. The location line will tell us where it found the outdated dependencies.
Outdated dependencies that you directly require
Often it’s nice to see just your outdated dependencies, not your subdependencies (which can get very large on bigger projects). You can do that by running npm outdated --depth 0.
If we want to update to the wanted version, we can run
npm update benchmark --save-dev
This will install 0.2.2 and update our package.json file to ^0.2.2.
Let’s run npm outdated again:
$ npm outdated
Package Current Wanted Latest Location
benchmark 0.2.2 0.2.2 1.0.0 benchmark
Looks like our current and our desired versions match now. What if we wanted to update to the latest? That’s easy: we can install just the latest and save it to our package.json by running
npm install benchmark@latest --save-dev
Version tags and ranges
Note the use of the @latest tag in order to get the latest published version of a module. npm also supports the ability to specify versions and version ranges, too! (https://www.npmjs.org/doc/cli/npm-install.html)
We’ve talked a little about version numbers so far, but they really need a technique unto their own, as it’s important to understand what they mean and how to use them effectively. Understanding semantic versioning will help you define versions better for your module and for your dependencies.
Technique 110 Semantic versioning
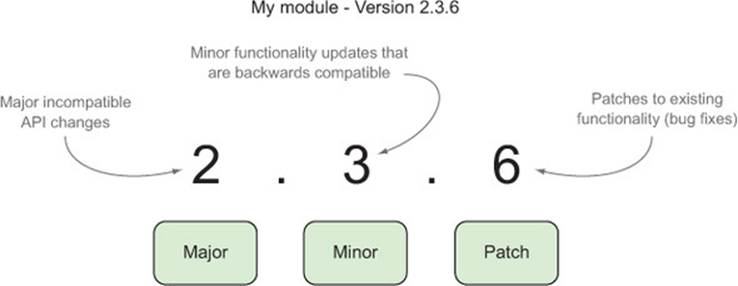
If you’re not familiar with semantic versioning, you can read up on it at http://semver.org. Figure 13.4 captures the major points.
Figure 13.4. Semantic versioning
Here is how it’s described in the official documentation:[1]
1 From http://semver.org/.
Given a version number MAJOR.MINOR.PATCH, increment the:
1. MAJOR version when you make incompatible API changes,
2. MINOR version when you add functionality in a backwards-compatible manner, and
3. PATCH version when you make backwards-compatible bug fixes.
In practice, these rules can be ignored or loosely followed, since, after all, nobody is mandating your version numbers. Also, many authors like to play around with their API in the early stages and would prefer not to be at version 24.0.0 right away! But semver can give you, as a module author and as a module consumer, clues within the version number itself as to what may have happened since the last release.
In this technique we’ll look at how to use semver effectively within our fastfib library.
Problem
You want to use semver effectively in your module and when including dependencies.
Solution
Understand your underlying projects in order to have a safe upgrade path, and clearly communicate the intent of your module version.
Discussion
We currently have one development dependency in our project, which looks like this in the package.json file:
"devDependencies": {
"benchmark": "^1.0.0"
},
This is how npm, by default, will include the version inside the package.json file. This plays nice for how most modules authors behave:
· If the version is less than 1.0.0, like ^0.2.0, then allow any greater PATCH version to be installed. In the previous technique, we saw this ended up being 0.2.2 for the benchmark module.
· If the version is 1.0.0 or greater, like ^1.0.0, then allow any greater MINOR version to be installed. Typically 1.0.0 is considered stable and MINOR versions aren’t breaking in nature.
This means that when another user installs your module dependencies, they’ll get the latest version that’s allowed in your version range. For example, if Benchmark.js released version 1.1.0 tomorrow, although you currently have 1.0.0 on your machine, they would get version 1.1.0, since it still matches the version range.
Version operators
Node supports a whole host of special operators to customize multiple versions or version ranges. You can view them in the semver documentation (https://www.npmjs.org/doc/misc/semver.html).
Versioning dependencies
When writing modules, it can increase the confidence in your dependencies to use a specific version number a user will install along with your module. This way, you know what you’ve tested will run the same down the dependency chain. Since we know our test suite works with benchmark 1.0.0, let’s lock it in to be only that version by running the following:
![]()
We could’ve so updated our package.json manually. Let’s take a look at what it looks like now:

Now that we’ve locked in our dependency, we can always use npm outdated to see if a new version exists and then npm install using the --save-exact flag to update our package.json!
Versioning the module
As already noted, many module authors use versions less than 1.0.0 to indicate that the API hasn’t been fully implemented yet and may change in subsequent versions. Typically, when the version number hits 1.0.0, there’s some good stability to the module, and although the API surface may grow, existing functionality shouldn’t change that much. This matches how npm behaves when a module is saved to the package.json file.
Currently we have our fastfib module at version 0.1.0 in the package.json file. It’s pretty stable, but there may be other changes we want to make before we give it the 1.0.0 status, so we’ll leave it at 0.1.0.
The change log
It’s also helpful for module authors to have a change log summarizing anything users should be aware of when new releases happen. Here’s one such format:
Version 0.5.0?--?2014-04-03
---
added; feature x
removed; feature y [breaking change!]
updated; feature z
fixed; bug xx
Version 0.4.3?--?2014-03-25
---
Breaking changes, especially in a minor version, should be noted clearly in the change log so users know how to prepare for the update. Some authors like to keep a change log inside their main readme or have a separate change log file.
We’ve covered some understanding and tooling around versioning our dependencies and our module; let’s look at what else we can expose to the consumers of our modules.
13.3. The end user experience
Before we push our module out for consumption, it would be nice to test that it actually works. Of course, we already have a test suite, so we know our logic is sound, but what is the experience of an end user installing the module? How do we expose executable scripts to a user in addition to an API? What versions of Node can we support? In this section we’ll take a look at those questions, starting with adding executable scripts.
Technique 111 Adding executable scripts
Want to expose an executable when your module is installed? Express, for example, includes an express executable you can run from the command line to help initialize new projects:

npm itself is an installable module with an npm executable, which we’ve been using all over in this chapter.
Executables can help end users use your module in different ways. In this technique we’ll look at adding an executable script to fastfib and include it in our package.json to be installed along with our module.
Problem
How do you add an executable script?
Solution
How do you add command-line tools and scripts for a package and link it inside the package.json file?
Discussion
We have our fastfib module built, but what if we wanted to expose a fastfib executable to the end user where they could run a command like fastfib 40 and get the 40th Fibonacci number printed out? This would allow our module to be used on the command line as well as programmatically.
In order to do this, let’s create a bin directory with an index.js file inside containing the following:
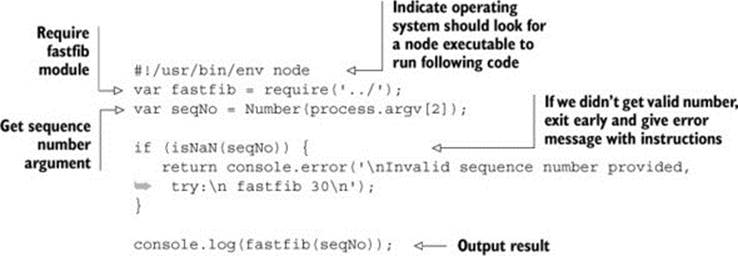
Now that we have our application executable, how do we expose it as the fastfib command when someone installs our module? For that, we need to update our package.json file. Add the following lines underneath main:

Testing executables with npm link
We can test our executable by using npm link. The link command will create a global symbolic link to our live module, simulating installing the package globally, as a user would if they installed the module globally.
Let’s run npm link from our fastfib directory:

Now that we’ve globally linked up our executable, let’s try it out:
$ fastfib 40
102334155
Since these links are in place now, any edits will be reflected globally. Let’s update the last line of our bin/index.js file to announce our result:
console.log('The result is', fastfib(seqNo));
If we run the fastfib executable again, we get our update immediately:
$ fastfib 40
The result is 102334155
We’ve added a fastfib executable to our module. It’s important to note that everything discussed in this technique is completely cross-platform compatible. Windows doesn’t have symbolic links or #! statements, but npm wraps the executable with additional code to get the same behavior when you run npm link or npm install.
Linking is such a powerful tool, we’ve devoted the next technique to it!
Technique 112 Trying out a module
Besides using npm link to test our executables globally, we can use npm link to try out our module elsewhere. Say we wanted to try out our shiny new module in another project and see if it’ll work out. Instead of publishing our module and installing it, we can just link to it and play around with the module as we see it used in the context of another project.
Problem
You want to try out your module before publishing it or you want to make changes to your module and test them in another project without having to republish first.
Solution
Use npm link
Discussion
In the previous technique we showed how to use npm link to test an executable script’s behavior. This showed that we can test our executables while we’re developing, but now we want to simulate a local install of our module, not a global one.
Let’s start by setting up another project. Since we started this chapter with our cancerous implementation of a Fibonacci web server, let’s go full circle and make a little project that exposes fastfib as a web service.
Create a new project called fastfibserver and put a single server.js file inside with the following content:

We have our server set up, but if we were to run node server, it wouldn’t work yet because we haven’t installed the fastfib module in this project yet. To do that we use npm link:

Now if we run our web server, it will run successfully:
$ node server
fastfibber running on port 3000
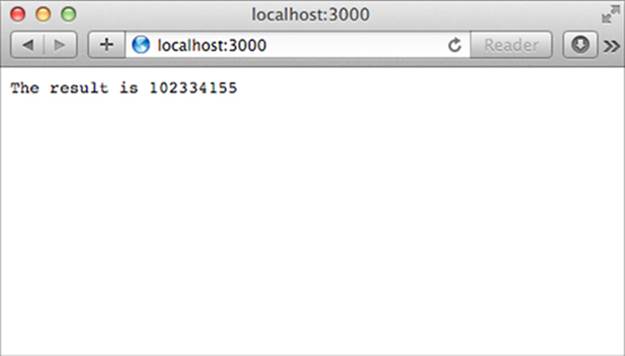
And a visit to our site will give us the 40th Fibonacci number, as shown in figure 13.5.
Figure 13.5. Sample output from fastfibserver
Another way to link
Since we already linked our module globally in the previous technique running npm link inside the fastfib project, we could’ve also run npm link fastfib in our fastfibserver project to set up the link.
Using npm link also helps a lot in debugging your module in the context of another module. Edge cases come up that can best be debugged while running the project that’s requiring your module. Once you npm link the module, any changes will take effect immediately without the need to republish and re-install. This allows you to fix the problem in your module’s code base as you debug.
So far we’ve defined and implemented our module with tests, set up our dependencies, locked our versions down for our dependencies and our module, added a command-line executable, and practiced using our module. Next we’ll look at another aspect of the package.json file—the engines section, and testing our module across multiple versions of Node.
Technique 113 Testing across multiple Node versions
Unfortunately, not everybody is able to upgrade to the latest and greatest Node version when it comes on the scene. It takes time for companies to adapt all their code to newer versions, and some may never update. It’s important that we know what versions of Node our module can run on so npm knows who can install and run it.
Problem
You want to test your module across multiple versions of Node, and you want your application to be installed only for those versions.
Solution
Keep the engines object accurate in the package.json file by running tests across multiple versions of Node.
Discussion
The npm init script we ran when first setting up our package.json doesn’t include an engines section, which means that npm will install it on any version of Node. At first glance, we may think that’s OK, since we’re running pretty vanilla JavaScript code. But we don’t really know that without actually testing it.
Typically patch version updates (Node 0.10.2 to 0.10.3, for instance) shouldn’t break your modules. But it’s a good idea at a minimum to test your modules across minor and major version updates, as V8 receives a decent upgrade and Node’s APIs can change. Currently, we’ve been working off 0.10 branch of Node and things have been working well. So let’s start with that. Let’s add the following to the end of our package.json file:

That’s a start, but it really seems like we should be able to support earlier versions of Node. How do we test for that?
A variety of popular options are available:
· Install multiple versions of Node on your machine
· Use Travis CI’s multi-Node version support (https://travis-ci.org/)
· Use a third-party multiversion test module that works for your environment (like dnt—https://github.com/rvagg/dnt)
About Node versions
In Node, all odd-numbered minor versions are considered unstable. So 0.11.0 is the unstable version for 0.12.0, and so on. You shouldn’t need to test any existing unstable releases. Typically, module authors will only test the latest unstable release as it nears completion.
For our technique we’ll focus on installing multiple versions of Node, as that can come in handy for testing new features in upcoming versions of Node, as well as for testing our module.
The tool we’ll use is nvm (https://github.com/creationix/nvm; the Windows counterpart is nvmw: https://github.com/hakobera/nvmw). The following instructions will be for nvm, but the commands will be similar in nvmw once installed.
To install, run

Now that we have it installed, let’s go ahead and test Node version 0.8 of our fastfib module. First let’s install Node 0.8:
$ nvm install 0.8
######################################################## 100.0%
Now using node v0.8.26
nvm went out and grabbed the latest version of the 0.8 branch to test against. We could have specified a patch if we wanted, but this will work for now. Note how we’re also using this version. We can validate that by running
$ node -v
v0.8.26
Now, all Node and npm interaction happens within an isolated environment just for Node 0.8.26. If we were to install more versions, they would be in their own isolated environments. We use nvm use to switch between them. For example, if you wanted to go back to your system install of Node, you could do the following:
nvm use system
And to go back to Node version 0.8.26:
nvm use 0.8
Let’s run our test suite in 0.8.26 and see how we do:
$ npm test
> fastfib@0.1.0 test /Users/wavded/Dev/fastfib
> node test && node benchmark
results:
recurse 432 5.48
tail 300770 5.361
iter 1109759 5.428
Looks good! Let’s update our package.json to include 0.8 versions:

What if my module loses support for a particular Node version?
That’s totally fine. Users of an older version of Node will get the last-published package that’s supported for their version.
We’ve tested Node version 0.10 and 0.8; try testing a few other versions on your own. When you’re done, switch back to the system Node version.
Now that we’ve looked through a variety of steps to get our module into a usable state for others, let’s publish it!
13.4. Publishing
As we wrap up this chapter, we’ll turn our focus on module distribution by looking at publishing modules publicly on npm or privately for internal use.
Technique 114 Publishing modules
Whew! We’ve gone through a lot of different techniques getting our module ready to publish. We know there will likely be changes, but we’re ready to release our first version out in the wild to be required in other projects. This technique explores the various aspects of publishing.
Problem
You want to get your module published publicly.
Solution
Register with npm if you haven’t and npm publish.
Discussion
If it’s your first time publishing a module, you’ll need to register yourself with npm. Thankfully, it couldn’t be any easier. Run the following command and follow the prompts:
npm adduser
Once finished, npm will save your credentials to the .npmrc file.
Changing existing account details
The adduser command can also be used to change account details (except username) and register a fresh install with an existing account.
Once registered, publishing a module is just as simple as adding a user. But before we get to that, let’s cover some good practices when publishing modules.
Before you publish
One of the biggest things before publishing is to review technique 110 about semantic versioning:
· Does your version number accurately reflect the changes since the last push? If this is your first push, this doesn’t matter as much.
· Do you do a changelog update with your release? Although not required, it can be extremely helpful to those who depend on your project to get a high-level view of what they can expect in this release.
Also, check whether your tests pass to avoid publishing broken code.
Publishing to npm
Once you’re ready to publish, it’s as simple as running the following command from the project root directory:
npm publish
npm will respond with the success or failure of the publish. If successful, it will indicate the version that was pushed to the public registry.
Can you tell that npm wants you to get your modules out there as painlessly as possible?
Undoing a publish
Although we want a publish to go well, sometimes we miss things we wanted to release, or have some things we realize are broken after the fact. It’s recommended you don’t unpublish modules (although the ability exists). The reason is that people who are depending on that module and/or version can no longer get it.
Typically, make the fix, increase the PATCH version, and npm publish again. A simple way to do that is by running the following commands:

npm does not allow you to publish over an existing version, since that also would affect people who have already downloaded that particular version.
There are some cases where you really want to discourage users from using a particular version. For example, maybe a severe security flaw was fixed in versions 0.2.5 and above, yet you have users depending on versions earlier than that. npm can help you get the word out by using npm deprecate.
Let’s say in the future, we find a critical bug in fastfib version 0.2.5 and below, and we wanted to warn users who are using those modules. We could run the following:

Now if any user installs fastfib 0.2.5 or less, they’ll receive the specified warning from npm.
Technique 115 Keeping modules private
Although open source can be a fun and collaborative environment, there are times when you want your project to remain private. This is especially true for work done for clients. It can also be handy to bake a module first internally before deciding whether to publish. npm can safeguard your module and keep it private for you. In this technique we’ll talk about configuring your module to stay private and including private modules in your projects.
Problem
You want to keep your module private and use it internally.
Solution
Configure private in your package.json file and share it internally.
Discussion
Let’s say we want to let fastfib to only be used internally. To ensure it doesn’t get accidentally published, we add the following to our package.json file:
"private": true
This tells npm to refuse to publish your package with npm publish.
This setting works well for client-specific projects. But what if you have a core set of internal modules you want to share across projects within your development team? For that there are a few different options.
Sharing private modules with Git
npm supports a couple of ways you can share your internal modules that are minimal to set up out of the box. If you’re using a Git repository, npm makes this incredibly simple to do.
Let’s use GitHub as an example (although it can be any Git remote). Let’s say we had our private repo at
git@github.com:mycompany/fastfib.git
We can then include it in our package.json dependencies with npm install (or modify the package.json directly):
npm install git+ssh://git@github.com:mycompany/fastfib.git --save
Pretty sweet! This by default will pull the contents of the master branch. If we wanted to specify a particular commit-ish (tag, branch, or SHA-1—http://git-scm.com/book/en/Git-Internals-Git-Objects), we can do that too! Here are some examples within a package.json file:

Including public repositories
You may have guessed it, but you can also use public Git repositories as well. This can be helpful if you really need a feature or fix that hasn’t been published on npm yet. For more examples, see the package.json documentation (https://www.npmjs.org/doc/json.html#Git-URLs-as-Dependencies).
Sharing private modules as a URL
If you aren’t using Git or prefer to have your build system spit out packages, you can specify a URL endpoint where npm can find a tarball. To package up your module, you can use the tar command like the following:

tar -czf fastfib.tar.gz fastfib
From here, we can throw that file on a web server and install it using the following:
npm install http://internal-server.com/fastfib.tar.gz --save
A note about public endpoints
Although typically not used often, tarballs of packages can be used with public endpoints too; it’s usually better and easier to publish to npm instead.
Sharing modules with a private npm registry
Another option for private repositories is hosting your own private npm registry and having npm publish push to that repository. For the complete functionality of npm, this will require an installation of a recent version of CouchDB, which, in turn, requires Erlang.
Since this involves a variety of tricks/headaches depending on your operating system, we won’t cover setting up an instance here. Hopefully, the process will get streamlined soon. If you want to experiment, check out the npm-registry-couchapp project (https://github.com/npm/npm-registry-couchapp).
13.5. Summary
Third-party modules are where innovation happens. npm makes this trivial and fun! With the rise of social coding sites like GitHub, collaboration on modules is also easy to do. In this chapter we looked at many different aspects of module development. Let’s summarize what we learned.
When starting to work on a module, consider the following:
· Define your module idea. Can you summarize it in one sentence?
· Check your module idea. Is there another module out there doing what you want to do? Search it out with npm search or npmjs.org.
Once you’ve landed on an idea, prove it out. Start with a simple API you’d like to work with. Write an implementation and tests installing any dependencies you need along the way.
After you’ve proven your idea (or perhaps during), think about these things:
· Have you initialized your package.json file? Run npm init to get a skeleton representing the state of the current project.
· Work with your dependencies. Are some optional, development-only? Make sure that’s indicated in your package.json file.
· Check your semver ranges in package.json. Do you trust the version ranges specified in your package.json file? Check for updates with npm outdated.
· What versions of Node will your code run on? Check it out by using nvm or a build system like Travis CI. Specify the version range in your package.json file.
· Try out your module using npm link in another project.
When you’re ready to publish, it’s as simple as npm publish. Consider keeping a changelog for your users and try to follow semantic versioning, so users have a reasonable idea of what to expect from version to version.
And that’s a wrap for this book! We hope at this point you were able to grasp the core foundations of Node, understand how to apply those foundations in real-world scenarios, and how to go beyond standard development by writing your own Node modules (which we hope to see on npm!).
A growing Node community is available to help you continue to level up on your journey. Please check out the appendix to make the most of that community. If you have specific questions for us, please visit the #nodejsinpractice Google group (https://groups.google.com/forum/#!forum/nodejsinpractice), and thanks for reading!