Node.js in Practice (2015)
Part 1. Node fundamentals
Chapter 2. Globals: Node’s environment
This chapter covers
· Using modules
· What you can do without requiring a single module
· The process and console objects
· Timers
Global objects are available in all modules. They’re universal. Whether you’re writing network programs, command-line scripts, or web applications, your program will have access to these objects. That means you can always depend on features like console.log and __dirname—both are explained in detail in this chapter.
The goal of this chapter is to introduce Node’s global objects and methods to help you learn what functionality is available to all Node processes. This will help you better understand Node and its relationship to the operating system, and how it compares with other JavaScript environments like browsers.
Node provides some important functionality out of the box, even without loading any modules. In addition to the features provided by the ECMAScript language, Node has several host objects—objects supplied by Node to help programs to execute.
A key global object is process, which is used to communicate with the operating system. Unix programmers will be familiar with standard I/O streams, and these are accessible through the process object using Node’s streaming API.
Another important global is the Buffer class. This is included because JavaScript has traditionally lacked support for binary data. As the ECMAScript standards evolve, this is being addressed, but for now most Node developers rely on the Buffer class. For more about buffers, see chapter 3.
Some globals are a separate instance for each module. For example, module is available in every Node program, but is local to the current module. Since Node programs may consist of several modules, that means a given program has several different module objects—they behave like globals, but are in module scope.
In the next section you’ll learn how to load modules. The objects and methods relating to modules are globals, and as such are always available and ready to be used.
2.1. Modules
Modules can be used to organize larger programs and distribute Node projects, so it’s important to be familiar with the basic techniques required to install and create them.
Technique 1 Installing and loading modules
Whether you’re using a core module provided by Node or a third-party module from npm, support for modules is baked right into Node and is always available.
Problem
You want to load a third-party module from npm.
Solution
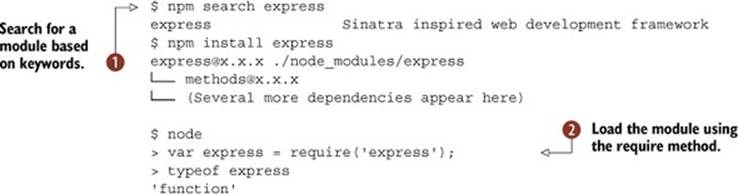
Install the module with the command-line tool, npm, and then load the module using require. The following listing shows an example of installing the express module.
Listing 2.1. Using npm
Discussion
The npm command-line tool is distributed with Node, and can be used to search, install, and manage packages. The website https://npmjs.org provides another interface for searching modules, and each module has its own page that displays the associated readme file and dependencies.
Once you know the name of a module, installation is easy: type npm install module-name ![]() and it will be installed into ./node_modules. Modules can also be “globally” installed—running npm install -g module_name will install it into a global folder. This is usually /usr/local/lib/node_modules on Unix systems. In Windows it should be wherever the node.exe binary is located.
and it will be installed into ./node_modules. Modules can also be “globally” installed—running npm install -g module_name will install it into a global folder. This is usually /usr/local/lib/node_modules on Unix systems. In Windows it should be wherever the node.exe binary is located.
After a module has been installed, it can be loaded with require('module-name') ![]() . The require method usually returns an object or a method, depending on how the module has been set up.
. The require method usually returns an object or a method, depending on how the module has been set up.
Searching npm
By default, npm searches across several fields in each module’s package.json file. This includes the module’s name, description, maintainers, URL, and keywords. That means a simple search like npm search express yields hundreds of results.
You can reduce the number of matches by searching with a regular expression. Wrap a search term in slashes to trigger npm’s regular expression matching: npm search /^express$/
However, this is still limited. Fortunately, there are open source modules that improve on the built-in search command. For example, npmsearch by Gorgi Kosev will order results using its own relevance rankings.
The question of whether to install a module globally is critical to developing maintainable projects. If other people need to work on your project, then you should consider adding modules as dependencies to your project’s package.json file. Keeping project dependencies tightly managed will make it easier to maintain them in the future when new versions of dependencies are released.
Technique 2 Creating and managing modules
In addition to installing and distributing open source modules, “local” modules can be used to organize projects.
Problem
You want to break a project up into separate files.
Solution
Use the exports object.
Discussion
Node’s module system provides a solution to splitting code across multiple files. It’s very different from include in C, or even require in Ruby and Python. The main difference is that require in Node returns an object rather than loading code into the current namespace, as would occur with a C preprocessor.
In technique 1 you saw how npm can be used to install modules, and how require is used to load them. npm isn’t the only thing that manages modules, though—Node has a built-in module system based on the CommonJS Modules/1.1 specification (http://wiki.commonjs.org/wiki/Modules/1.1).
This allows objects, functions, and variables to be exported from a file and used elsewhere. The exports object is always present and, although this chapter specifically explores global objects, it’s not really a global. It’s more accurate to say that the exports object is in module scope.
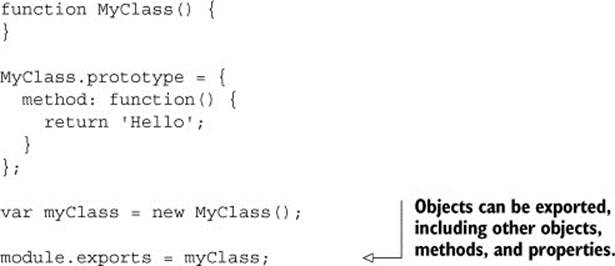
When a module is focused around a single class, then users of the module will prefer to type var MyClass = require('myclass'); rather than var MyClass = require('myclass').MyClass, so you should use modules.export. Listing 2.2 shows how this works. This is different from using the exports object, which requires that you set a property to export something.
Listing 2.2. Exporting modules
Listing 2.3 shows how to export multiple objects, methods, or values, a technique that would typically be used for utility libraries that export multiple things.
Listing 2.3. Exporting multiple objects, methods, and values
exports.method = function() {
return 'Hello';
};
exports.method2 = function() {
return 'Hello again';
};
Finally, listing 2.4 shows how to load these modules with require, and how to use the functionality they provide.
Listing 2.4. Loading modules with require
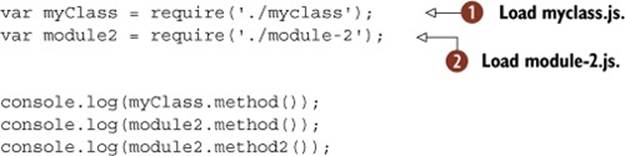
Note that loading a local module always requires a path name—in these examples the path is just ./. Without it, Node will attempt to find a matching module in $NODE_PATH, and then ./node_modules, $HOME/.node_modules, $HOME/.node_libraries, or $PREFIX/lib/node.
In listing 2.4 notice that ./myclass is automatically expanded to ./myclass.js ![]() , and ./module-2 is expanded to ./module-2.js
, and ./module-2 is expanded to ./module-2.js ![]() .
.
The output from this program would be as follows:
Hello
Hello
Hello again
Which module?
To determine the exact module Node will load, use require.resolve(id). This will return a fully expanded filename.
Once a module is loaded, it’ll be cached. That means that loading it multiple times will return the cached copy. This is generally efficient, and helps you heavily reuse modules within a project without worrying about incurring an overhead when using require. Rather than centrally loading all of the dependencies, you can safely call require on the same module.
Unloading modules
Although automatically caching modules fits many use cases in Node development, there may be rare occasions when you want to unload a module. The require.cache object makes this possible.
To remove a module from the cache, use the delete keyword. The full path of the module is required, which you can obtain with require.resolve. For example:
delete require.cache[require.resolve('./myclass')];
This should return true, which means the module was unloaded.
In the next technique you’ll learn how to group related modules together and load them in one go.
Technique 3 Loading a group of related modules
Node can treat directories as modules, offering opportunities for logically grouping related modules together.
Problem
You want to group related files together under a directory, and only have to load it with one call to require.
Solution
Create a file called index.js to load each module and export them as a group, or add a package.json file to the directory.
Discussion
Sometimes a module is logically self-contained, but it still makes sense to separate it into several files. Most of the modules you’ll find on npm will be written this way. Node’s module system supports this by allowing directories to act as modules. The easiest way to do this is to create a file called index.js that has a require statement to load each file. The following listing demonstrates how this works.
Listing 2.5. The group/index.js file

The group/one.js and group/two.js files can then export values or methods ![]() as required. The next listing shows an example of such a file.
as required. The next listing shows an example of such a file.
Listing 2.6. The group/one.js file
module.exports = function() {
console.log('one');
};
Code that needs to use a folder as a module can then use a single require statement to load everything in one go. The following listing demonstrates this.
Listing 2.7. A file loading the group of modules

The output of listing 2.7 should look like this:
one
two
This approach is often used as an architectural technique to structure web applications. Related items, like controllers, models, and views, can be kept in separate folders to help separate concerns within the application. Figure 2.1 shows how to structure applications following this style.
Figure 2.1. Folders as modules

Node also offers an alternative technique that supports this pattern. Adding a package.json file to a directory can help the module system figure out how to load all of the files in the directory at once. The JSON file should include a main property to point to a JavaScript file. This is actually the default file Node looks for when loading modules—if no package.json is present, it’ll then look for index.js. The next listing shows an example of a package.json file.
Listing 2.8. A package.json file for a directory containing a module
![]()
File extensions
When loading a file, Node is configured to search for files with the .js, .json, and .node extensions. The require.extensions array can be used to tell require to load files with other extensions. Node’s module system will take this into account when treating directories as modules, as well.
This feature is marked as deprecated in Node’s documentation, but the module system is also marked as “locked” so it shouldn’t go away. If you want to use it, you should check Node’s documentation first.[1] If you’re just trying to load a JavaScript file from a legacy system that has an unusual extension, then it might be suitable for experimentation.
1 See http://nodejs.org/api/globals.html#globals_require_extensions.
The require API provides many ways to manage files. But what about when you want to load something relative to the current module, or the directory where the module is saved? Read on for an explanation in technique 4.
Technique 4 Working with paths
Sometimes you need to open files based on the relative location. Node provides tools for determining the path to the current file, directory, and module.
Problem
You want to access a file that isn’t handled by the module system.
Solution
Use __dirname or __filename to determine the location of the file.
Discussion
Sometimes you need to load data from a file that clearly shouldn’t be handled by Node’s module system, but you need to take the path of the current script into account—for example, a template in a web application. The __dirname and __filename variables are extremely useful in such cases.
Running the following listing will print the output of these values.
Listing 2.9. Path variables

Most developers join these variables with path fragments using simple string concatenation: var view = __dirname + '/views/view.html';. This works with both Windows and Unix—the Windows APIs are clever enough to automatically switch the slashes to the native format, so you don’t need special handling to support both operating systems.
If you really want to ensure paths are joined correctly, you can use the path.join method from Node’s path module: path.join(__dirname, 'views', 'view.html');.
Apart from module management, there are globally available objects for writing to the standard I/O streams. The next set of techniques explores process.stdout and the console object.
2.2. Standard I/O and the console object
Text can be piped to a Node process by using command-line tools in Unix or Windows. This section includes techniques for working with these standard I/O streams, and also how to correctly use the console object for a wide range of logging-related tasks.
Technique 5 Reading and writing to standard I/O
Whenever you need to get data into and out of a program, one useful technique is using the process object to read and write to standard I/O streams.
Problem
You want to pipe data to and from a Node program.
Solution
Use process.stdout and process.stdin.
Discussion
The process.stdout object is a writable stream to stdout. We’ll look at streams in more detail in chapter 5, but for now you just need to know it’s part of the process object that every Node program has access to, and is helpful for displaying and receiving text input.
The next listing shows how to pipe text from another command, process it, and output it again.
Listing 2.10. Path variables

Every time a chunk of text is read from the input stream, it’ll be transformed with toUpperCase() and then written to the output stream. Figure 2.2 shows how data flows from one operating system process, through your Node program, and then out through another program. In the terminal, these programs would be linked together with the pipe (|) symbol.
Figure 2.2. Data flows in a simple program that uses stdio.
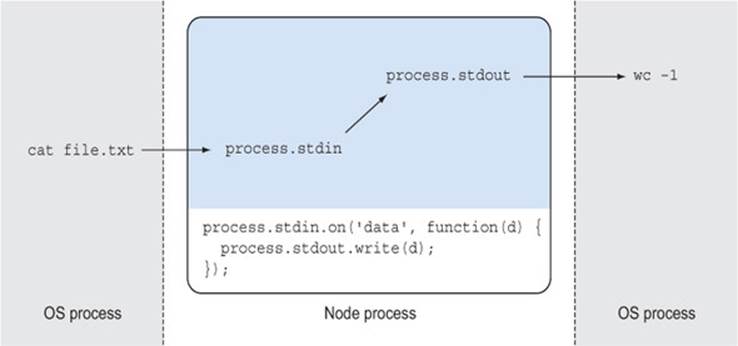
This pipe-based approach works well when dealing with input in Unix, because many other commands are designed to work this way. That brings a LEGO-like modularity to Node programs that facilitates reuse.
If you just want to print out messages or errors, Node provides an easier API specifically tailored for this purpose through the console object. The next technique explains how to use it, and some of its less obvious features.
Technique 6 Logging messages
The easiest way to log information and errors from a program is by using the console object.
Problem
You want to log different types of messages to the console.
Solution
Use console.log, console.info, console.error, and console.warn. Be sure to take advantage of the built-in formatting facilities provided by these methods.
Discussion
The console object has several methods that can be used to output different types of messages. They’ll be written to the relevant output stream, which means you can pipe them accordingly on a Unix system.
Although the basic usage is console.log('message'), more functionality is packed in. Variables can be interpolated, or simply appended alongside string literals. This makes it extremely easy to log messages that display the contents of primitive values or objects. The following listing demonstrates these features.
Listing 2.11. Path variables
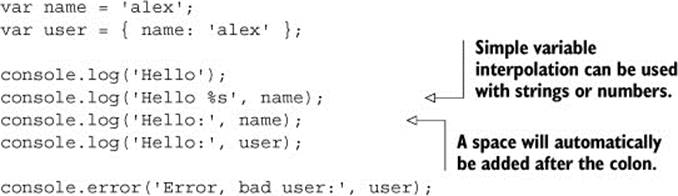
The output of listing 2.11 looks like this:

When message strings are formatted, util.format is used. Table 2.1 shows the supported formatting placeholders.
Table 2.1. Formatting placeholders
|
Placeholder |
Type |
Example |
|
%s |
String |
'%s', 'value' |
|
%d |
Number |
'%f', 3.14 |
|
%j |
JSON |
'%j', { name: 'alex' } |
These formatting placeholders are convenient, but just being able to simply include objects in console.log messages without manually appending strings is a handy way to log messages.
The info and warn methods are synonyms for log and error. The difference between log and error is the output stream used. In technique 5, you saw how Node makes standard input and output streams available to all programs. It also exposes the standard error stream throughprocess.stderr. The console.error method will write to this stream, rather than process.stdout. This means you can redirect a Node process’s error messages in the terminal or in a shell script.
If you ran the previous listing with 2> error-file.log, the error messages would be redirected to error-file.log. The other messages would be printed to the console as usual:
node listings/globals/console-1.js 2> errors-file.log
The 2 handle refers to the error stream; 1 is standard output. That means you could redirect errors to a log file without having to open files within your Node program, or use a specific logging module. Good old-fashioned shell redirection is good enough for many projects.
Standard streams
Standard streams come in three flavors: stdin, stdout, and stderr. In Unix terminals, these are referred to with numbers. 0 is used for standard input, 1 is standard output, and 2 is standard error.
The same applies to Windows: running a program from the command prompt and adding 2> errors-file.log will send the error messages to errors-file.log, just like Unix.
Stack traces
Another feature of the console object is console.trace(). This method generates a stack trace at the current point of execution. The generated stack trace includes line numbers for the code that invokes asynchronous callbacks, which can help when reporting errors that would otherwise be difficult to track down. For example, a trace generated inside an event listener will show where the event was triggered from. Technique 28 in chapter 5 explores this in more detail.
Another slightly more advanced use of console is its benchmarking feature. Continue reading for a detailed look.
Technique 7 Benchmarking a program
Node makes it possible to benchmark programs without any additional tools.
Problem
You need to benchmark a slow operation.
Solution
Use console.time() and console.timeEnd().
Discussion
In your career as a Node programmer, there will come a time when you’re trying to determine why a particular operation is slow. Fortunately, the console object comes with some built-in benchmarking features.
Invoking console.time('label') records the current time in milliseconds, and then later calling console.timeEnd('label') displays the duration from that point. The time in milliseconds will be automatically printed alongside the label, so you don’t have to make a separate call toconsole.log to print a label.
Listing 2.12 is a short program that accepts command-line arguments (see technique 9 for more on handling arguments), with benchmarking to see how fast the file input is read.
Listing 2.12. Benchmarking a function
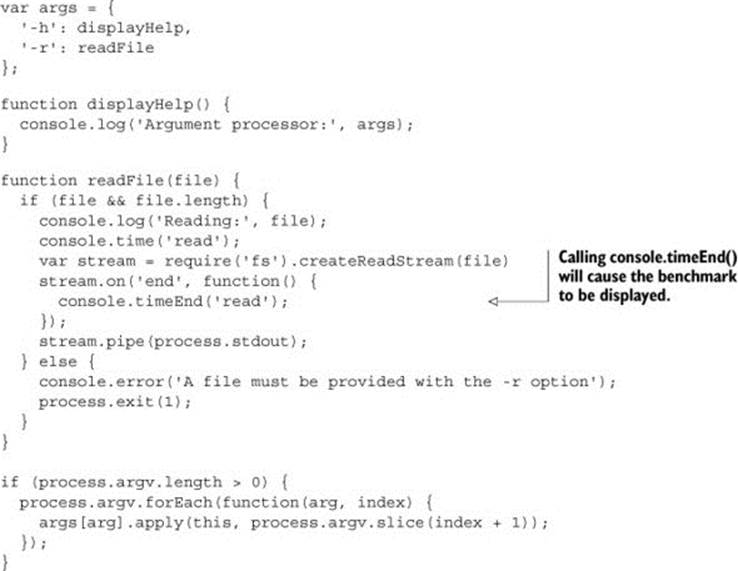
Using several interleaved calls to console.time with different labels allows multiple benchmarks to be performed, which is perfect for exploring the performance of complex, nested asynchronous programs.
These functions calculate duration based on Date.now(), which gives accuracy in milliseconds. To get more accurate benchmarks, the third-party benchmark module (https://npmjs.org/package/benchmark) can be used in conjunction with microtime(https://npmjs.org/package/microtime).
The process object is used for working with standard I/O streams, and used correctly, console handles many of the tasks that the uninitiated may tackle with third-party modules. In the next section we’ll further explore the process object to look at how it helps integrate with the wider operating system.
2.3. Operating system and command-line integration
The process object can be used to obtain information about the operating system, and also communicate with other processes using exit codes and signal listeners. This section contains some more-advanced techniques for using these features.
Technique 8 Getting platform information
Node has some built-in methods for querying operating system functionality.
Problem
You need to run platform-specific code based on the operating system or processor architecture.
Solution
Use the process.arch and process.platform properties.
Discussion
Node JavaScript is generally portable, so it’s unlikely that you’ll need to branch based on the operating system or process architecture. But you may want to tailor projects to take advantage of operating system–specific features, or simply collect statistics on what systems a script is executing on. Certain Windows-based modules that include bindings to binary libraries could switch between running a 32- or 64-bit version of a binary. The next listing shows how this could be supported.
Listing 2.13. Branching based on architecture
switch (process.arch) {
case 'x64':
require('./lib.x64.node');
break;
case 'ia32':
require('./lib.Win32.node');
break;
default:
throw new Error('Unsupported process.arch:', process.arch);
}
Other information from the system can also be gleaned through the process module. One such method is process.memoryUsage()—it returns an object with three properties that describe the process’s current memory usage:
· rss —The resident set size, which is the portion of the process’s memory that is held in RAM
· heapTotal —Available memory for dynamic allocations
· heapUsed —Amount of heap used
The next technique explores handling command-line arguments in more detail.
Technique 9 Passing command-line arguments
Node provides a simple API to command-line arguments that you can use to pass options to programs.
Problem
You’re writing a program that needs to receive simple arguments from the command line.
Solution
Use process.argv.
Discussion
The process.argv array allows you to check if any arguments were passed to your script. Because it’s an array, you can use it to see how many arguments were passed, if any. The first two arguments are node and the name of the script.
Listing 2.14 shows just one way of working with process.argv. This example loops over process.argv and then slices it to “parse” argument flags with options. You could run this script with node arguments.js -r arguments.js and it would print out its own source.
Listing 2.14. Manipulating command-line arguments
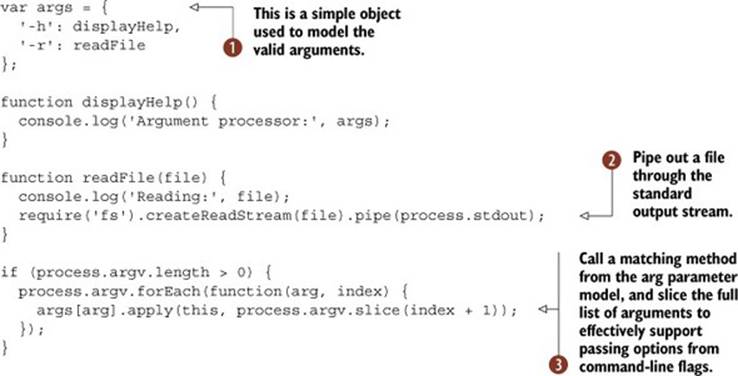
The args object ![]() holds each switch that the script supports. Then createReadStream is used
holds each switch that the script supports. Then createReadStream is used ![]() to pipe the file to the standard output stream. Finally, the function referenced by the command-line switch in args is executed using Function.prototype.apply
to pipe the file to the standard output stream. Finally, the function referenced by the command-line switch in args is executed using Function.prototype.apply ![]() .
.
Although this is a toy example, it illustrates how handy process.argv can be without relying on a third-party module. Since it’s a JavaScript Array, it’s extremely easy to work with: you can use methods like map, forEach, and slice to process arguments with little effort.
Complex arguments
For more complex programs, use an option parsing module. The two most popular are optimist (https://npmjs.org/package/optimist) and commander (https://npmjs.org/package/commander). optimist converts arguments into an Object, which makes them easier to manipulate. It also supports default values, automatic usage generation, and simple validation to ensure certain arguments have been provided. commander is slightly different: it uses an abstracted notion of a program that allows you to specify your program’s accepted arguments using a chainable API.
Good Unix programs handle arguments when needed, and they also exit by returning a suitable status code. The next technique presents how and when to use process.exit to signal the successful—or unsuccessful—completion of a program.
Technique 10 Exiting a program
Node allows you to specify an exit code when a program terminates.
Problem
Your Node program needs to exit with specific status codes.
Solution
Use process.exit().
Discussion
Exit status codes are significant in both Windows and Unix. Other programs will examine the exit status to determine whether a program ran correctly. This becomes more important when writing Node programs that take part in larger systems, and helps with monitoring and debugging later on.
By default, a Node program returns a 0 exit status. This means the program ran and terminated correctly. Any non-zero status is considered an error. In Unix, this status code is generally accessed by using $? in a shell. The Windows equivalent is %errorlevel%.
Listing 2.15 shows a modification to listing 2.14 that causes the program to exit cleanly with a relevant status code when no filename is specified with the -r option.
Listing 2.15. Returning meaningful exit status codes
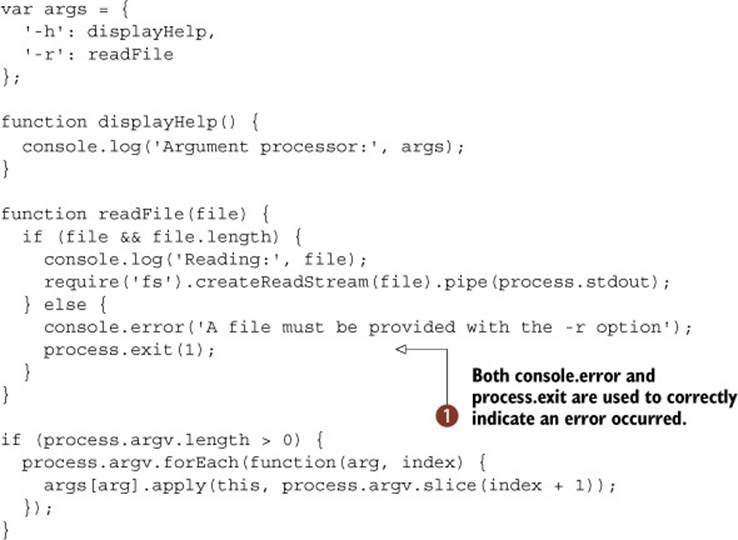
After running listing 2.15, typing echo $? in a Unix terminal will display 1. Also note that console.error ![]() is used to output an error message. This will cause the message to be written to process.stderr, which allows users of the script to easily pipe error messages somewhere.
is used to output an error message. This will cause the message to be written to process.stderr, which allows users of the script to easily pipe error messages somewhere.
Exit codes with special meanings
In the Advanced Bash-Scripting Guide (http://tldp.org/LDP/abs/html/index.html), a page is dedicated to status codes called Exit Codes With Special Meanings (http://tldp.org/LDP/abs/html/exitcodes.html). This attempts to generalize error codes, although there’s no standard list of status codes for scripting languages, outside of non-zero indicating an error occurred.
Because many Node programs are asynchronous, there are times when you may need to specifically call process.exit() or close down an I/O connection to cause the Node process to end gracefully. For example, scripts that use the Mongoose database library (http://mongoosejs.com/) need to call mongoose.connection.close() before the Node process will be able to exit.
You may need to track the number of pending asynchronous operations in order to determine when it’s safe to call mongoose.connection.close(), or the equivalent for another database module. Most people do this using a simple counter variable, incrementing it just before asynchronous operations start, and then decrementing it once their callbacks fire. Once it reaches 0, it’ll be safe to close the connection.
Another important facet to developing correct programs is creating signal handlers. Continue reading to learn how Node implements signal handlers and when to use them.
Technique 11 Responding to signals
Node programs can respond to signals sent by other processes.
Problem
You need to respond to signals sent by other processes.
Solution
Use the signal events that are sent to the process object.
Discussion
Most modern operating systems use signals as a way of sending a simple message to a program. Signal handlers are typically used in programs that run in the background, because it might be the only way of communicating with them. There are other cases where they can be useful in the kinds of programs you’re most likely write—consider a web application that cleanly closes its connection to a database when it receives SIGTERM.
The process object is an EventEmitter, which means you can add event listeners to it. Adding a listener for a POSIX signal name should work—on a Unix system, you can type man sigaction to see the names of all of the signals.
Signal listeners enable you to cater to the expected behavior of Unix programs. For example, many servers and daemons will reload configuration files when they receive a SIGHUP signal. The next listing shows how to attach a listener to SIGHUP.
Listing 2.16. Adding a listener for a POSIX signal
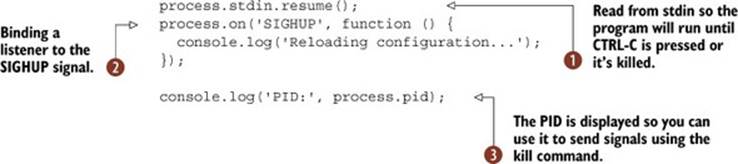
Before doing anything with standard input, resume should be called ![]() to prevent Node from exiting straight away. Next, a listener is added to the SIGHUP event on the process object
to prevent Node from exiting straight away. Next, a listener is added to the SIGHUP event on the process object ![]() . Finally, the PID is displayed for the current process
. Finally, the PID is displayed for the current process ![]() .
.
Once the program in listing 2.16 is running, it’ll display the process’s PID. The PID can be used with the kill command to send the process signals. For example, kill-HUP 94962 will send the HUP signal to PID 94962. If you send another signal, or just type kill 94962, then the process will exit.
It’s important to realize that signals can be sent from any process to any other, permissions notwithstanding. Your Node process can send another process a signal by using process.kill(pid, [signal])—in this case kill doesn’t mean the process will be “killed,” but simply sent a given signal. The method is named kill after the C standard library function in signal.h.
Figure 2.3 shows a broad overview of how signals originate from any process in an operating system and can be received by your Node processes.
Figure 2.3. Signals originate from a process, and are handled with an event listener.
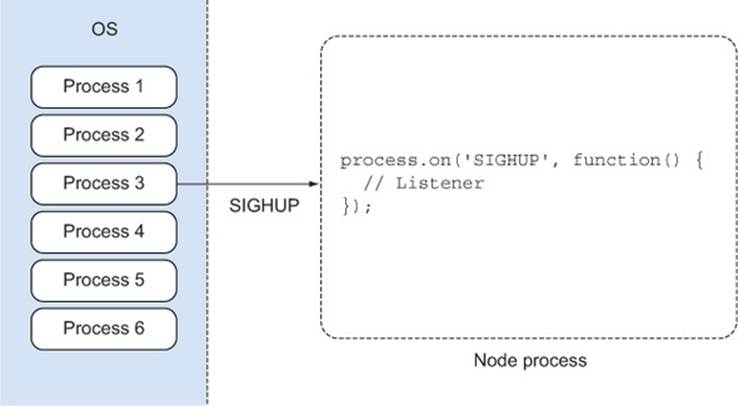
You don’t have to respond to signals in your Node programs, but if you’re writing a long-running network server, then signal listeners can be extremely useful. Supporting signals like SIGHUP will make your program fit into existing systems more naturally.
A large part of Node’s appeal is its asynchronous APIs and non-blocking I/O features. Sometimes it’s desirable to fake this behavior—perhaps in automated tests—or simply to just force code to execute later on. In the next section we’ll look at how Node implements JavaScript timers, which support this type of functionality.
2.4. Delaying execution with timers
Node implements the JavaScript timer functions setTimeout, setInterval, clear-Timeout, and clearInterval. These functions are globally available. Although they’re part of JavaScript as defined by Mozilla, they’re not defined in the ECMAScript standard. Instead, timers are part of the HTML DOM Level 0 specification.
Technique 12 Executing functions after a delay with setTimeout
It’s possible to run code once after a delay using Node’s setTimeout global method.
Problem
You want to execute a function after a delay.
Solution
Use setTimeout, and use Function.prototype.bind if necessary.
Discussion
The most basic usage of setTimeout is simple: pass it a function to execute and a delay in milliseconds:
setTimeout(function() {
console.log('Hello from the past!');
}, 1000);
This seems simple and contrived, but you’ll see it used most commonly in tests where asynchronous APIs are being tested and a small delay is necessary to simulate real-world behavior. Node supports JavaScript timers for just such cases.
Methods can also easily be passed to setTimeout by using Function.prototype .bind. This can be used to bind the first argument to this, or more often the object that the method belongs to. The following listing shows how bind can be used with a simple object.
Listing 2.17. Combining setTimeout with Function.prototype.bind
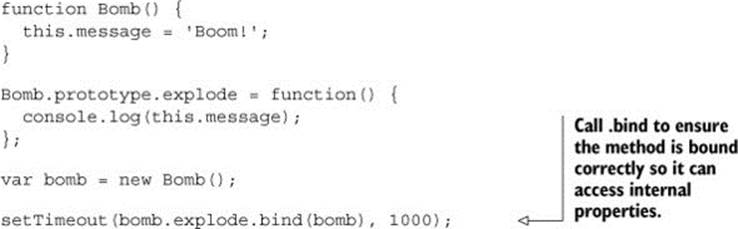
Binding ensures that the code inside the method can access the object’s internal properties. Otherwise, setTimeout would cause the method to run with this bound to the global object. Binding a method can be more readable than creating a new anonymous function.
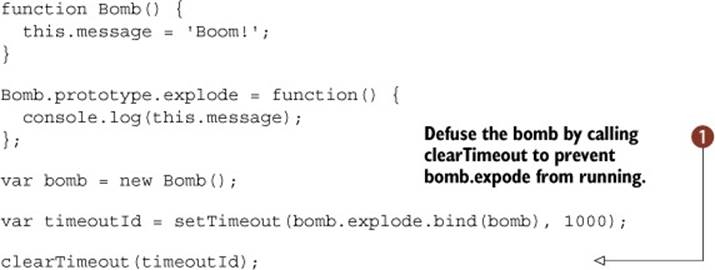
To cancel scheduled functions, retain a reference to the timeoutId returned by setTimeout and then call clearTimeout(timeoutId)![]() . The next listing demonstrates clearTimeout.
. The next listing demonstrates clearTimeout.
Listing 2.18. Using clearTimeout to prevent scheduled functions
When exactly does the callback run?
Although you can specify when a callback runs in milliseconds, Node isn’t quite that precise. It can guarantee that the callback will run after the specified time, but it may be slightly late.
As well as delaying execution, you can also call functions periodically. The next technique discusses how to achieve this by using setInterval.
Technique 13 Running callbacks periodically with timers
Node can also run callbacks at regular intervals using setInterval, which works in a fashion similar to setTimeout.
Problem
You want to run a callback at a regular interval.
Solution
Use setInterval, and clearInterval to stop the timer.
Discussion
The setInterval method has been around for years in browsers, and it behaves in Node much like the client-side counterparts. The callback will be executed on or just after the specified delay, and will run in the event loop just after I/O (and any calls to setImmediate, as detailed intechnique 14).
The next listing shows how to combine setInterval with setTimeout to schedule two functions to execute in a sequence.
Listing 2.19. Using setInterval and setTimeout together
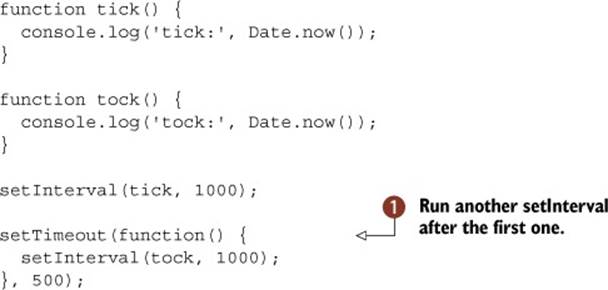
The setInterval method itself returns a reference to the timer, which can be stopped by calling clearInterval and passing the reference. Listing 2.19 uses a second call to setTimeout ![]() to trigger a second interval timer that runs 500 milliseconds after the first.
to trigger a second interval timer that runs 500 milliseconds after the first.
Because setInterval prevents a program from exiting, there are cases where you might want to exit a program if it isn’t doing anything else. For example, let’s say you’re running a program that should exit when a complex operation has finished, and you’d like to monitor it at regular intervals using setInterval. Once the complex operation has finished, you don’t want to monitor it any more.
Rather than calling clearInterval, Node 0.10 allows you to call timerRef .unref() at any time before the complex operation has finished. This means you can use setTimeout or setInterval with operations that don’t signal their completion.
Listing 2.20 uses setTimeout to simulate a long-running operation that will keep the program running while the timer displays the process’s memory usage. Once the timeout’s delay has been reached, the program will exit without calling clearTimeout.
Listing 2.20. Keeping a timer alive until the program cleanly exits
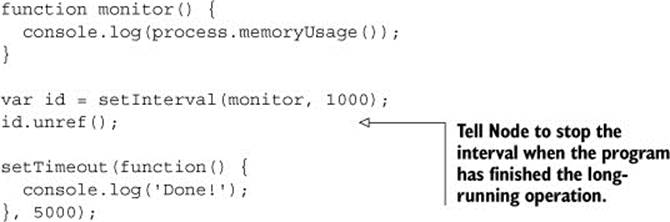
This is extremely useful in situations where there isn’t a good place to call clearInterval.
Once you’ve mastered timers, you’ll encounter cases where it’s useful to run a callback after the briefest possible delay. Using setTimeout with a delay of zero isn’t the optimum solution, even though it seems like the obvious strategy. In the next technique you’ll see how to do this correctly in Node by using process.nextTick.
Technique 14 Safely managing asynchronous APIs
Sometimes you want to delay an operation just slightly. In traditional JavaScript, it might be acceptable to use setTimeout with a small delay value. Node provides a more efficient solution: process.nextTick.
Problem
You want to write a method that returns an instance of EventEmitter or accepts a callback that sometimes makes an asynchronous API call, but not in all cases.
Solution
Use process.nextTick to wrap the synchronous operation.
Discussion
The process.nextTick method allows you to place a callback at the head of the next cycle of the run loop. That means it’s a way of slightly delaying something, and as a result it’s more efficient than just using setTimeout with a zero delay argument.
It can be difficult to visualize why this is useful, but consider the following example. Listing 2.21 shows a function that returns an EventEmitter. The idea is to provide an event-oriented API, allowing users of the API to subscribe to events as needed, while being able to run asynchronous calls internally.
Listing 2.21. Incorrectly triggering asynchronous methods with events
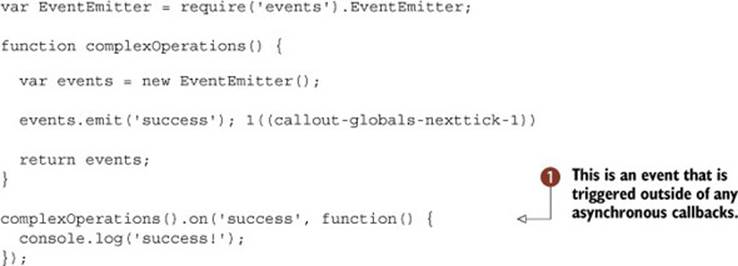
Running this example will fail to trigger the success listener ![]() at the end of the example. Why is this the case? Well, the event is emitted before the listener has been subscribed. In most cases, events would be emitted inside callbacks for some asynchronous operation or another, but there are times when it makes sense to emit events early—perhaps in cases where arguments are validated and found to contain errors, so error can be emitted very quickly.
at the end of the example. Why is this the case? Well, the event is emitted before the listener has been subscribed. In most cases, events would be emitted inside callbacks for some asynchronous operation or another, but there are times when it makes sense to emit events early—perhaps in cases where arguments are validated and found to contain errors, so error can be emitted very quickly.
To correct this subtle flaw, any sections of code that emit events can be wrapped in process.nextTick. The following listing demonstrates this by using a function that returns an instance of EventEmitter, and then emits an event.
Listing 2.22. Triggering events inside process.nextTick
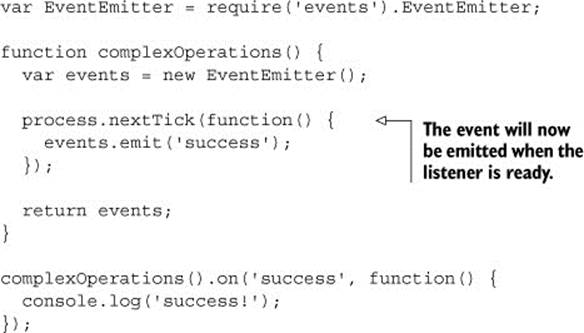
Node’s documentation recommends that APIs should always be 100% asynchronous or synchronous. That means if you have a method that accepts a callback and may call it asynchronously, then you should wrap the synchronous case in process.nextTick so users can rely on the order of execution.
Listing 2.23 uses an asynchronous call to read a file from the disk. Once it has read the file, it’ll keep a cached version in memory. Subsequent calls will return the cached version. When returning the cached version, process.nextTick is used so the API still behaves asynchronously. That makes the output in the terminal read in the expected order.
Listing 2.23. Creating the illusion of an always asynchronous API
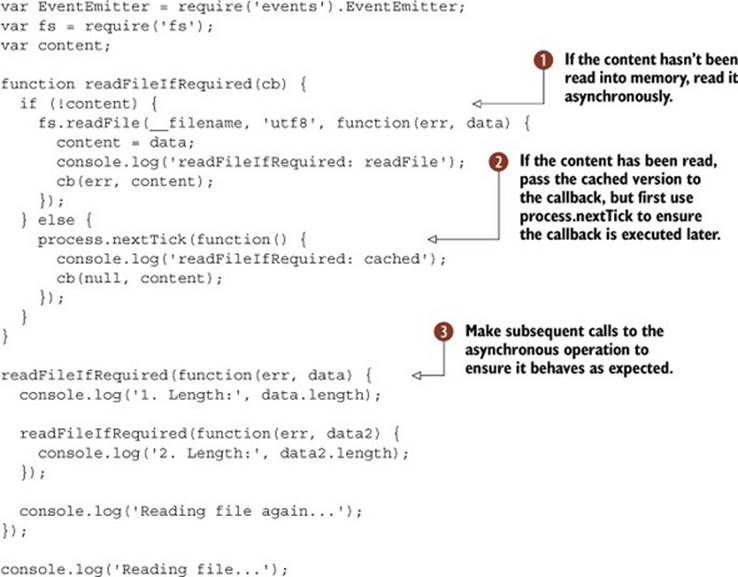
In this example, a file is cached to memory by using fs.readFile to read it ![]() , and then return a copy of it
, and then return a copy of it ![]() for every subsequent call. This is wrapped in a process that’s called multiple times
for every subsequent call. This is wrapped in a process that’s called multiple times ![]() so you can compare the behavior of the non-blocking file system operation toprocess.nextTick.
so you can compare the behavior of the non-blocking file system operation toprocess.nextTick.
Visualizing the event loop: setImmediate and process.maxTickDepth
The setImmediate and clearImmediate global functions accept a callback and optional arguments, and will run after any upcoming I/O events but before setTimeout and setInterval.
Callbacks added this way are pushed onto a queue, and one callback will be executed per run loop. This is different from process.nextTick, which causes process.maxTickDepth callbacks to run per iteration of the run loop.
The callbacks that have been passed with process.nextTick are usually run at the end of the current event loop. The number of callbacks that can be safely run is controlled by process.maxTickDepth, which is 1000 by default to allow I/O operations to continue to be handled.
Figure 2.4 illustrates how each of the timer functions is positioned within a single iteration of the event loop.
Figure 2.4. Scheduling nextTick on the event loop

When you’re creating your own classes and methods that behave asynchronously, keep behavior consistent and predictable by using process.nextTick.
Node’s implementation of the standard browser-based JavaScript timers fits in well with its event loop and non-blocking I/O. Although these functions are typically used for testing asynchronous code, a deep understanding of when setTimeout, setImmediate, and process.nextTickwill be executed provides mastery over the event loop.
2.5. Summary
In this chapter you’ve seen some of the surprisingly powerful things that are built into Node programs without going to the trouble of loading a module. The next time you want to group related modules together, you can create an index.js file, as described in technique 3. And if you need to read standard input, you can use the process object’s stdin property (technique 5).
In addition to the process object, there’s also the often overlooked console object, which will help you debug and maintain programs (technique 6).
In the next chapter you’ll learn about buffers. Buffers are great for working with binary data, which has traditionally been seen as a weakness of JavaScript. Buffers also underpin some of Node’s powerful features such as streams.
All materials on the site are licensed Creative Commons Attribution-Sharealike 3.0 Unported CC BY-SA 3.0 & GNU Free Documentation License (GFDL)
If you are the copyright holder of any material contained on our site and intend to remove it, please contact our site administrator for approval.
© 2016-2026 All site design rights belong to S.Y.A.