Node.js in Practice (2015)
Part 1. Node fundamentals
Chapter 3. Buffers: Working with bits, bytes, and encodings
This chapter covers
· Introduction to the Buffer data type
· Changing data encodings
· Converting binary files to JSON
· Creating your own binary protocol
JavaScript has historically had subpar binary support. Typically, parsing binary data would involve various tricks with strings to extract the data you want. Not having a good mechanism to work with raw memory in JavaScript was one of the problems Node core developers had to tackle when the project started getting traction. This was mostly for performance reasons. All of the raw memory accumulated in the Buffer data type.
Buffers are raw allocations of the heap, exposed to JavaScript in an array-like manner. They’re exposed globally and therefore don’t need to be required, and can be thought of as just another JavaScript type (like String or Number):
![]()
If you haven’t worked much with binary data, don’t worry; this chapter is designed to be friendly to newcomers but also equip those who are more familiar with the concept. We’ll cover simple and more advanced techniques:
· Converting a Buffer to different encodings
· Using the Buffer API to transform a binary file to JSON
· Encoding and decoding your own binary protocol
Let’s look first at changing encodings for buffers.
3.1. Changing data encodings
If no encoding is given, file operations and many network operations will return data as a Buffer. Take this fs.readFile as an example:

But many times you already know a file’s encoding, and it’s more useful to get the data as an encoded string instead. We’ll look at converting between Buffers and other formats in this section.
Technique 15 Converting buffers into other formats
By default, Node’s core APIs return a buffer unless an encoding is specified. But buffers easily convert to other formats. In this next technique we’ll look at how to convert buffers.
Problem
You want to turn a Buffer into plain text.
Solution
The Buffer API allows you to convert a Buffer into a string value.
Discussion
Let’s say we have a file that we know is just plain text. For our purposes we’ll call this file names.txt and it will include a person’s name on each line of the file:
Janet
Wookie
Alex
Marc
If we were to load the file using a method from the file system (fs) API, we’d get a Buffer (buf) by default
var fs = require('fs');
fs.readFile('./names.txt', function (er, buf) {
console.log(buf);
});
which, when logged out, is shown as a list of octets (using hex notation):
<Buffer 4a 61 6e 65 74 0a 57 6f 6f 6b 69 65 0a 41 6c 65 78 0a
4d 61 72 63 0a>
This isn’t very useful since we know that the file is plain text. The Buffer class provides a method called toString to convert our data into a UTF-8 encoded string:

This will yield the same output as our original file:
Janet
Wookie
Alex
Marc
But since we know that this data is only comprised of ASCII characters,[1] we could also get a performance benefit by changing the encoding to ASCII rather than UTF-8. To do this, we provide the type of encoding as the first argument for toString:
1 See http://en.wikipedia.org/wiki/ASCII.

The Buffer API provides other encodings such as utf16le, base64, and hex, which you can learn more about by viewing the Buffer API online documentation.[2]
2 See http://nodejs.org/api/buffer.html.
Technique 16 Changing string encodings using buffers
In addition to converting buffers, you can also utilize buffers to turn one string encoding into another.
Problem
You want to change from one string encoding to another.
Solution
The Node Buffer API provides a mechanism to change encodings.
Discussion
Example 1: Creating a Basic authentication header
Sometimes it’s helpful to build a string of data and then change its encoding. For example, if you wanted to request data from a server that uses Basic authentication,[3] you’d need to send the username and password encoded using Base64:
3 See http://en.wikipedia.org/wiki/Basic_access_authentication.
![]()
Before Base64 encoding is applied, Basic authentication credentials combine the username and password, separating the two using a : (colon). For our example, we’ll use johnny as the username and c-bad as the password:

Now we have to convert this into a Buffer in order to change it into another encoding. Buffers can be allocated by bytes, as we’ve seen already by simply passing in a number (for example, new Buffer(255)). They also can be allocated by passing in string data:
![]()
Specifying an encoding
When strings are used to allocate a Buffer, they’re assumed to be UTF-8 strings, which is typically what you want. But you can specify the encoding of the incoming data using a second, optional, encoding argument:
new Buffer('am9obm55OmMtYmFk', 'base64')
Now that we have our data as a Buffer, we can turn it back into a Base64-encoded string by using toString('base64'):
![]()
This process can be compacted as well, since instance methods can be called on the returned Buffer instance right away and the new keyword can be omitted:
var encoded = Buffer(user + ':' + pass).toString('base64');
Example 2: Working with data URIs
Data URIs[4] are another example of when using the Buffer API can be helpful. Data URIs allow a resource to be embedded inline on a web page using the following scheme:
4 See http://en.wikipedia.org/wiki/Data_URI_scheme.
data:[MIME-type][;charset=<encoding>[;base64],<data>
For example, this PNG image of a monkey can be represented as a data URI:
data:image/png;base64,iVBORw0KGgoAAAANSUhEUgAAACsAAAAoCAYAAABny...
And when read in the browser, the data URI will display our primate as shown in figure 3.1.
Figure 3.1. Data URI read in a browser displays the monkey as an image

Let’s look at how we can create a data URI using the Buffer API. In our primate example, we were using a PNG image that has the MIME type of image/png:
var mime = 'image/png';
Binary files can be represented in data URIs using Base64 encoding, so let’s set up a variable for that:
var encoding = 'base64';
With our MIME type and encoding, we can construct the start of our data URI:
var mime = 'image/png';
var encoding = 'base64';
var uri = 'data:' + mime + ';' + encoding + ',';
We need to add the actual data next. We can use fs.readFileSync to read in our data synchronously and return the data inline. fs.readFileSync will return a Buffer, so we can then convert that to a Base64 string:
var encoding = 'base64';
var data = fs.readFileSync('./monkey.png').toString(encoding);
Let’s put this all together and make a program that will output our data URI:

The output of this program will be
data:image/png;base64,iVBORw0KGgoAAAANSUhEUgAAACsAAAAoCAYAAABny...
Let’s flip the scenario around. What if you have a data URI but you want to write it out to an actual file? Again, we’ll work with our monkey example. First, we split the array to grab only the data:[5]
5 This is not prescriptive for all data URIs, as commas could appear elsewhere.
var uri = 'data:image/png;base64,iVBORw0KGgoAAAANSUhEUgAAACsAAAAo...';
var data = uri.split(',')[1];
We can then create a Buffer using our data string and specifying the encoding:
var buf = Buffer(data, 'base64');
Next, we use fs.writeFileSync to write this synchronously to disk, giving it a file name and the Buffer:
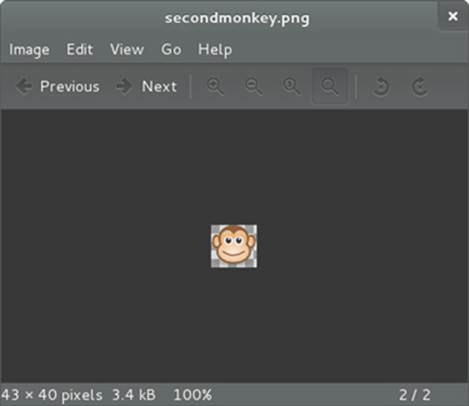
fs.writeFileSync('./secondmonkey.png', buf);
Putting this example all together looks like this:

When opened in our default image viewer, this gives us our monkey, as shown in figure 3.2.
Figure 3.2. Generated secondmonkey.png file from a data URI
Most of the time, when you deal with Buffer objects in Node, it will be to convert them to other formats, and sometimes you’ll change encodings. But you may find yourself having to deal with a binary file format, and the Buffer API—which we’ll look at next—provides a rich set of tools to work with that as well.
3.2. Converting binary files to JSON
Working with binary data is kind of like solving a puzzle. You’re given clues by reading a specification of what the data means and then you have to go out and turn that data into something usable in your application.
Technique 17 Using buffers to convert raw data
What if you could utilize a binary format to do something useful in your Node program? In this technique we’ll cover, in depth, working with binary data to convert a common file format into JSON.
Problem
You want to convert a binary file into a more usable format.
Solution
The Node API extends JavaScript with a Buffer class, exposing an API for raw binary data access and tools for dealing more easily with binary data.
Discussion
For the purposes of our example, namely, file conversion, you can think of the process in terms of figure 3.3.
Figure 3.3. The transformation of binary data into a more usable/programmable format
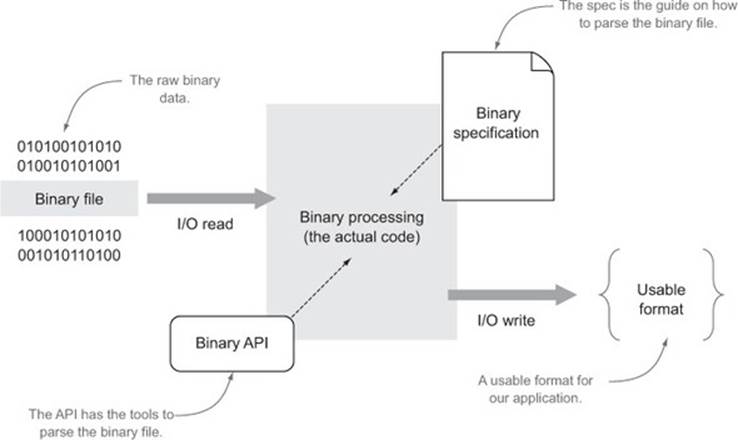
Binary data is read, processed, and written out in a more usable format using the binary specification as a guide and the binary API as the mechanism for accomplishing the transformation. This is not the only use of binary data. For example, you could do processing on a binary protocol to pass messages back and forth and the diagram would look different.
For our technique, the binary file format we’ll work with is DBase 5.0 (.dbf). That format may sound obscure, but (to put it into context) it was a popular database format that’s still heavily in use for attribution of geospatial data. You could think of it as a simplified Excel spreadsheet. The sample we’ll work with is located at buffers/world.dbf.
The file contains geospatial information for the countries of the world. Unfortunately, if you were to open it in your text editor, it wouldn’t be very useful.
Why are we covering in depth a binary format that I may never use?
Although we could’ve picked a number of binary formats, DBase 5.0 is one that will teach you a lot of different ways of approaching problems with reading binary files that are common to many other formats. In addition, binary formats are unfamiliar to many coming from a web development background, so we’re taking some time to focus on reading binary specifications. Please feel free to skim if you’re already familiar.
Since we want to use it in our Node application, JSON would be a good format choice because it can be natively parsed in JavaScript and resembles native JavaScript objects. This is illustrated in figure 3.4.
Figure 3.4. Binary data is read using FileSystem API into Node.js, transformed using the Buffer API into an easier-to-use JSON format.
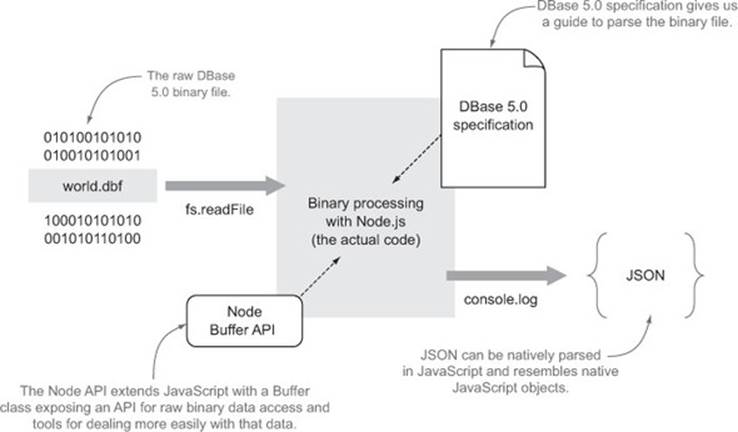
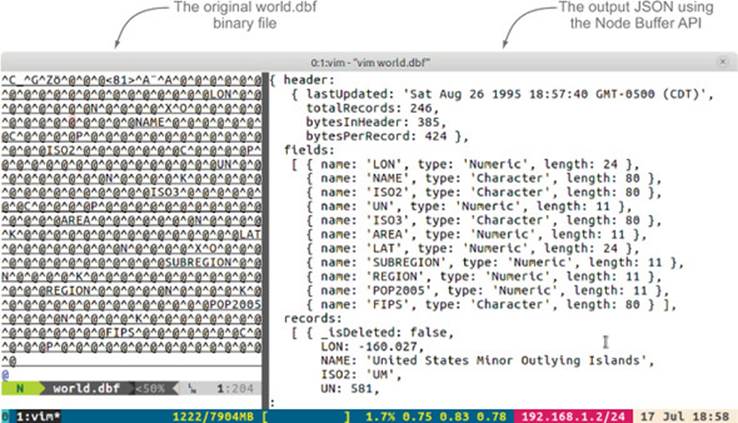
Figure 3.5 shows an example of the transformation we want to make: on the left is the raw binary opened in a text editor, and on the right is the converted JSON format.
Figure 3.5. Final result of our transformation
The header
Before we can start tackling this problem, we’ll need to do some research to find out the specification for the binary format we want to deal with. In our case, a number of similar specifications were found online from search engine queries. For DBase 5.0, the primary specification we’ll use for this example is found at http://mng.bz/i7K4.
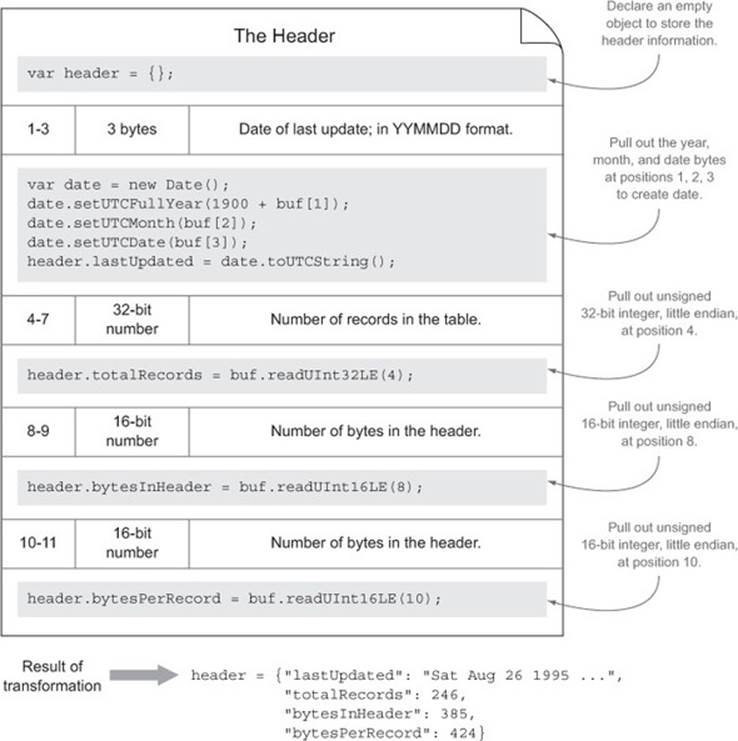
The first portion of the specification is called the header. Many binary formats will use a header as a place to store metadata about the file; table 3.1 shows what the specification looks like for DBase 5.0.
Table 3.1. DBase 5.0 header specification
|
Byte |
Contents |
Description |
|
0 |
1 byte |
Valid dBASE for Windows table file; bits 0-2 indicate version number ... |
|
1-3 |
3 bytes |
Date of last update; in YYMMDD format |
|
4-7 |
32-bit number |
Number of records in the table |
|
8-9 |
16-bit number |
Number of bytes in the header |
|
10-11 |
16-bit number |
Number of bytes in the record |
|
... |
... |
... |
|
32-n each |
32 bytes |
Field descriptor array |
|
n+1 |
1 byte |
0Dh stored as the field terminator |
Let’s take a peek at the first row.
|
Byte |
Contents |
Description |
|
0 |
1 byte |
Valid dBASE for Windows table file; bits 0-2 indicate version number ... |
This row tells us the byte located at position 0 contains the information specified in the description. So how do we access the byte at position 0? Thankfully, this is really simple with buffers.
In Node, unless you specify a particular encoding for the data you’re reading in, you’ll get back a Node Buffer, as seen in this example:
var fs = require('fs');
fs.readFile('./world.dbf', function (er, buf) {
Buffer.isBuffer(buf); // true
});
fs.readFile isn’t the only way to get back a buffer but, for the sake of simplicity, we’ll use that method so we get the entire buffer back as an object after it’s read. This method may not be ideal for large binary files where you wouldn’t want to load the whole buffer into memory at once. In that case, you could stream the data with fs.createReadStream or manually read in parts of the file at a time with fs.read. It should also be noted that buffers aren’t available only for files; they exist pretty much anywhere you can get streams of data (for example, post data on an HTTP request).
If you wanted to view a string representation of a buffer, a simple buf.toString() call would suffice (this defaults to UTF-8 encoding). This is nice if you’re pulling in data that you know is just text:

In our case, buf.toString() would be just as bad as opening up the world.dbf file in a text editor: unusable. We need to make sense of the binary data first.
Note
From here forward, whenever you see our variable buf, it refers to an instance of a Buffer, therefore part of the Node Buffer API.
In the table we talked about byte position 0. Buffers in Node act very similar to JavaScript arrays but the indices are byte positions in memory. So byte position 0 is buf[0]. In Buffer syntax, buf[0] is synonymous with the byte, the octet, the unsigned 8-bit integer, or positive signed 8-bit integer at position 0.
For this example, we don’t really care about storing information about this particular byte. Let’s move on to the next byte definition.
|
Byte |
Contents |
Description |
|
1-3 |
3 bytes |
Date of last update; in YYMMDD format |
Here’s something interesting: the date of the last update. But this spec doesn’t tell us anything more than that it’s 3 bytes and in YYMMDD format. All this is to say that you may not find all you’re looking for in one spot. Subsequent web searches landed this information:
Each byte contains the number as a binary. YY is added to a base of 1900 decimal to determine the actual year. Therefore, YY has possible values from 0x00-0xFF, which allows for a range from 1900-2155.[6]
6 See http://www.dbase.com/Knowledgebase/INT/db7_file_fmt.htm.
That’s more helpful. Let’s look at parsing this in Node:
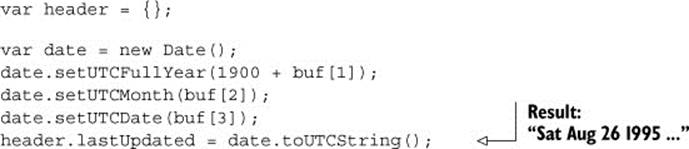
Here we use a JavaScript Date object and set its year to 1900 plus the integer we pulled out of buf[1]. We use integers at positions 2 and 3 to set the month and date. Since JSON doesn’t store JavaScript Date types, we’ll store it as a UTC Date string.
Let’s pause to recap. “Sat Aug 26 1995...” as shown here is the result of parsing a portion of world.dbf binary data into a JavaScript string. We’ll see more examples of this as we continue.
|
Byte |
Contents |
Description |
|
4-7 |
32-bit number |
Number of records in the table |
This next definition gives us two clues. We know the byte starts at offset 4 and it’s a 32-bit number with the least significant byte first. Since we know the number shouldn’t be negative, we can assume either a positive signed integer or an unsigned integer. Both are accessed the same way in the Buffer API:
![]()
buf.readUInt32LE will read an unsigned 32-bit integer with little-endian format from the offset of 4, which matches our description from earlier.
The next two definitions follow a similar pattern except they’re 16-bit integers. Following are their definitions.
|
Byte |
Contents |
Description |
|
8-9 |
16-bit number |
Number of bytes in the header |
|
10-11 |
16-bit number |
Number of bytes in the record |
And here’s the corresponding code:

The transformation that has taken place between the specification and the code for this header section is illustrated in figure 3.6.
Figure 3.6. The header: transformation from the specification to code using the Node Buffer API
The field descriptor array
Only one more relevant piece of information for this example remains in the header of the world.dbf file. It’s the definitions for the fields, including type and name information, seen in the following lines.
|
Byte |
Contents |
Description |
|
32-n each |
32 bytes |
Field descriptor array |
|
n+1 |
1 byte |
0Dh stored as the field terminator |
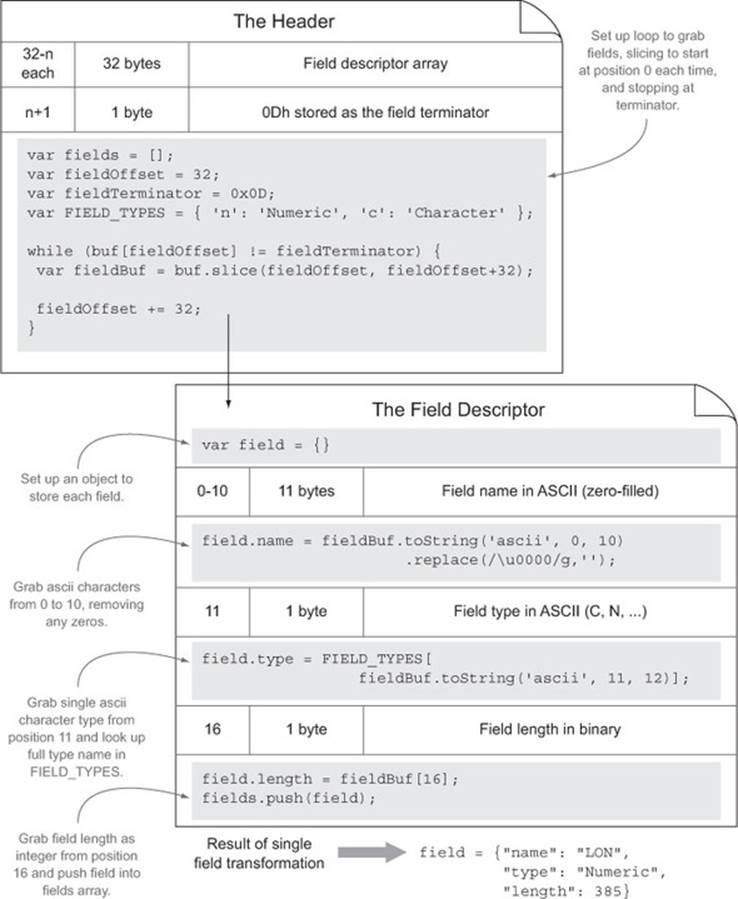
From this we know that each field description is stored as 32 bytes of information. Since this database could have one or more fields for data, we’ll know it’s finished when we hit the 1 byte field terminator (0Dh) shown in the second row. Let’s write a structure to handle this:
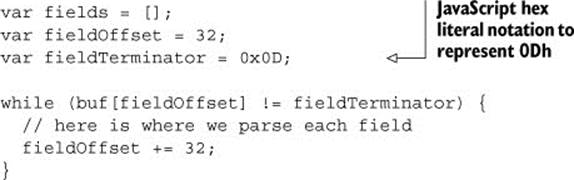
Here we loop through the buffer 32 bytes at a time until we hit the fieldTerminator, which is represented in hexadecimal notation.
Now we need to handle the information concerning each field descriptor. The specification has another table specifically for this; the relevant information for our example is shown in table 3.2.
Table 3.2. DBase 5.0 field descriptor array specification
|
Byte |
Contents |
Description |
|
0-10 |
11 bytes |
Field name in ASCII (zero-filled) |
|
11 1 |
byte |
Field type in ASCII (C, N, ...) |
|
... |
... |
... |
|
16 |
1 byte |
Field length in binary |
Note that the indexing for the bytes starts over at 0, even though we’re well past byte position 0 in our reading of the file. It would be nice to start over at each record so we could follow the specification more closely. Buffer provides a slice method for us to do just that:
var fields = [];
var fieldOffset = 32;
var fieldTerminator = 0x0D;
while (buf[fieldOffset] != fieldTerminator) {
var fieldBuf = buf.slice(fieldOffset, fieldOffset+32);
// here is where we parse each field
fieldOffset += 32;
}
buf.slice(start, end) is very similar to a standard array slice method in that it returns a buffer indexed at start to end. But it differs in that it doesn’t return a new copy of the data. It returns just a snapshot of the data at those points. So if you manipulate the data in the sliced buffer in any way, it will also be manipulated in the original buffer.
With our new fieldBuf indexed at zero for each iteration, we can approach the specification without doing extra math in our heads. Let’s look at the first line.
|
Byte |
Contents |
Description |
|
0-10 |
11 bytes |
Field name in ASCII (zero-filled) |
Here’s the code to extract the field name:
![]()
By default, buf.toString() assumes utf8, but Node Buffers support other encodings as well,[7] including ascii, which is what our spec calls for. buf.toString() also allows you to pass in the range that you want converted. We also have to replace() the zero-filled characters with empty strings if the field was shorter than 11 bytes so we don’t end up with zero-filled characters (\u0000) in our names.
7 See http://nodejs.org/api/buffer.html#buffer_buffer.
The next relevant field is a field data type.
|
Byte |
Contents |
Description |
|
11 |
1 byte |
Field type in ASCII (C, N, ...) |
But the characters C and N don’t really mean anything to us yet. Further down the specification, we get definitions for these types, as shown in table 3.3.
Table 3.3. Field types specification
|
Data type |
Data input |
|
C (Character) |
All OEM code page characters |
|
N (Numeric) |
- . 0 1 2 3 4 5 6 7 8 9 |
It would be nice to convert this data to relevant types for our application. JavaScript doesn’t use the language character or numeric, but it does have String and Number; let’s keep that in mind when we parse the actual records. For now we can store this in a little lookup object to do the conversion later:
var FIELD_TYPES = {
C: 'Character',
N: 'Numeric'
}
Now that we have a lookup table, we can pull out the relevant information as we continue converting the binary data:
![]()
buf.toString() will give us our one ASCII character that we then look up in the hash to get the full type name.
There’s only one other bit of information we need to parse the remaining file from each field description—the field size.
|
Byte |
Contents |
Description |
|
16 |
1 byte |
Field length in binary |
We write this now-familiar code:
![]()
The transformation that has taken place between the specification and the code for this field descriptor array section is illustrated in figure 3.7.
Figure 3.7. The field descriptor array: transformation from the specification to code using the Node Buffer API
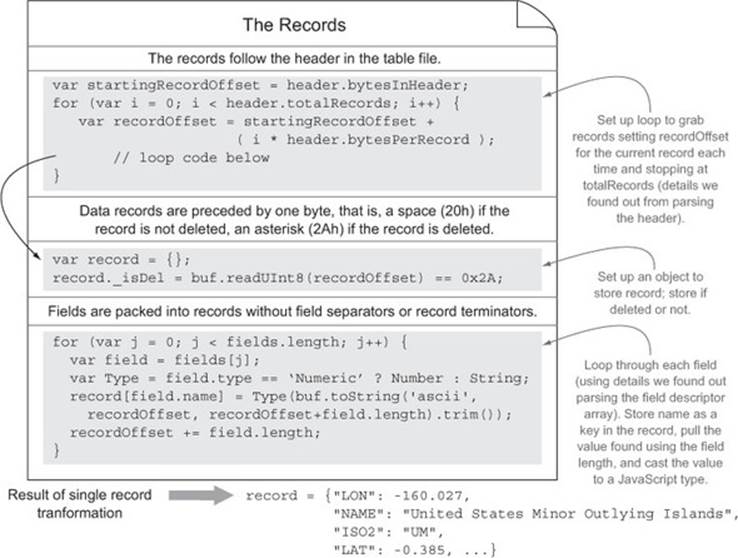
The records
Now that we’ve parsed the header, including the field descriptors, we have one more part to process: the actual record data. The specification tells us this:
The records follow the header in the table file. Data records are preceded by one byte, that is, a space (20h) if the record is not deleted, an asterisk (2Ah) if the record is deleted. Fields are packed into records without field separators or record terminators. The end of the file is marked by a single byte, with the end-of-file marker, an OEM code page character value of 26 (1Ah).
Let’s break this down for discussion:
The records follow the header in the table file.
Although we could’ve kept track of the byte position after the fieldOffset, the header had a field for number of bytes in the header, which we stored as header.bytesInHeader. So we know we need to start there:
var startingRecordOffset = header.bytesInHeader;
We also learned a couple other things from our parsing of the header. The first is how many records exist in the data, which we stored as header.totalRecords. The second is how many bytes are allocated for each record, which was stored as header.bytesPerRecord. Knowing where to start, how many to iterate, and how much of a jump per iteration helps us set up a nice for loop for handling each record:
for (var i = 0; i < header.totalRecords; i++) {
var recordOffset = startingRecordOffset +
(i * header.bytesPerRecord);
// here is where we parse each record
}
Now, at the beginning of each iteration, we know the byte position we want to start at is stored as recordOffset. Let’s continue reading the specification:
Data records are preceded by one byte, that is, a space (20h) if the record is not deleted, an asterisk (2Ah) if the record is deleted.
Next we have to check that first byte to see if the record was deleted:

Similar to when we tested for the fieldTerminator in our header file, here we test to see if the integer matches 0x2A or the ASCII “asterisk” character. Let’s continue reading:
Fields are packed into records without field separators or record terminators.
Lastly, we can pull in the actual record data. This pulls in the information we learned from parsing the field descriptor array. We stored a field.type, field.name, and field.length (in bytes) for each field. We want to store the name as a key in the record where the value is the data for that length of bytes converted to the correct type. Let’s look at it in simple pseudo code:
record[name] = cast type for (characters from length)
e.g.
record['pop2005'] = Number("13119679")
We also want to do this type conversion for every field per record, so we use another for loop:
for (var j = 0; j < fields.length; j++) {
var field = fields[j];
var Type = field.type == 'Numeric' ? Number : String;
record[field.name] = Type(buf.toString('ascii', recordOffset,
recordOffset+field.length).trim());
recordOffset += field.length;
}
We loop through each of the fields:
1. First, we find out which JavaScript type we want to cast the value to and store it in a variable Type.
2. Then, we use buf.toString to pull out the characters from recordOffset to the next field.length. We also have to trim() the data because we don’t know if all the bytes were used to store relevant data or just filled with spaces.
3. Lastly, we increment the recordOffset with the field.length so that we keep the location to start at for the next field when we go around the for loop again.
The transformation that has taken place between the specification and the code for this records section is illustrated in figure 3.8.
Figure 3.8. The records: transformation from the specification to code using the Node Buffer API
Still with me? I hope so. The complete code sample is shown in figure 3.9.
Figure 3.9. The full set of code for parsing a DBF file into JSON
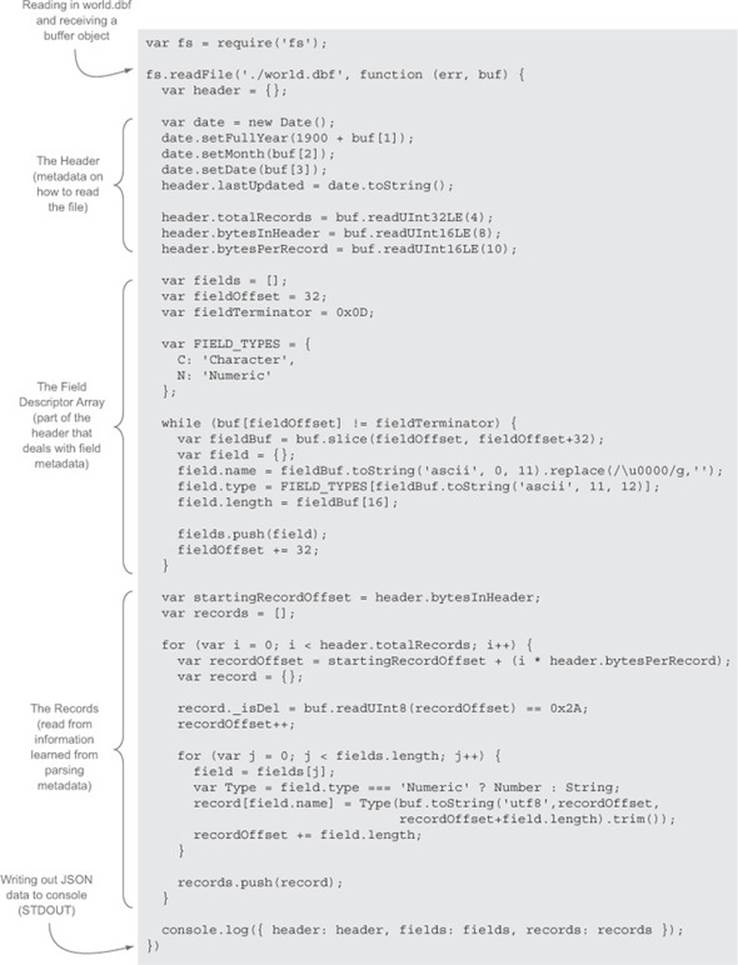
Using the Node Buffer API, we were able to turn a binary file into a usable JSON format. The output of running this application is shown next:
{ header:
{ lastUpdated: 'Sat Aug 26 1995 21:55:03 GMT-0500 (CDT)',
totalRecords: 246,
bytesInHeader: 385,
bytesPerRecord: 424 },
fields:
[ { name: 'LON', type: 'Numeric', length: 24 },
{ name: 'NAME', type: 'Character', length: 80 },
{ name: 'ISO2', type: 'Character', length: 80 },
{ name: 'UN', type: 'Numeric', length: 11 },
{ name: 'ISO3', type: 'Character', length: 80 },
{ name: 'AREA', type: 'Numeric', length: 11 },
{ name: 'LAT', type: 'Numeric', length: 24 },
{ name: 'SUBREGION', type: 'Numeric', length: 11 },
{ name: 'REGION', type: 'Numeric', length: 11 },
{ name: 'POP2005', type: 'Numeric', length: 11 },
{ name: 'FIPS', type: 'Character', length: 80 } ],
records:
[ { _isDel: false,
LON: -160.027,
NAME: 'United States Minor Outlying Islands',
ISO2: 'UM',
UN: 581,
ISO3: 'UMI',
AREA: 0,
LAT: -0.385,
SUBREGION: 0,
REGION: 0,
POP2005: 0,
FIPS: '' },
{ _isDel: false,
LON: 35.278,
NAME: 'Palestine',
ISO2: 'PS',
UN: 275,
ISO3: 'PSE',
AREA: 0,
LAT: 32.037,
SUBREGION: 145,
REGION: 142,
POP2005: 3762005,
FIPS: '' },
...
}
And almost magically a binary file that wasn’t human-readable is turned into, not only a readable format, but also a usable data format to work with and do more transformations with. Of course, it isn’t magic, but rather investing the time to learn a binary format and using the tools available to do a conversion. The Buffer API provides good tools to do this.
Using fs methods
We could’ve also chosen to write the resulting code out to a file using fs.writeFile and friends.[a] Just like most APIs in Node can read in a buffer object, most also can write out a buffer object. In our case we didn’t end up with a buffer but rather a JSON object, so we could’ve usedJSON.stringify in conjunction with fs.writeFile to write that data out:
a See http://nodejs.org/api/fs.html.
fs.writeFile('world.json', JSON.stringify(result), ...
Binary file formats can be a lot of fun to crack. Another fun but practical use for Buffers is working binary protocols, which we’ll tackle next.
3.3. Creating your own binary protocol
It feels like you’ve cracked a code when you read a binary file and make sense out of it. It can be just as fun to write your own puzzles and decode them. Of course, this isn’t just for fun. Using a well-defined binary protocol can be a compact and efficient way to transfer data.
Technique 18 Creating your own network protocol
In this technique we’ll cover some additional aspects of working with binary data, like bit masks and protocol design. We’ll also look into compressing binary data.
Problem
You want create an efficient transport of messages across the network or in process.
Solution
JavaScript and the Node Buffer API give you tools to create your own binary protocol.
Discussion
To create a binary protocol, you first have to define what kind of information you want to send across the wire and how you’ll represent that information. Like you learned in the last technique, a specification provides a good roadmap for this.
For this technique, we’ll develop a simple and compact database protocol. Our protocol will involve
· Using a bitmask to determine which database(s) to store the message in
· Writing data to a particular key that will be an unsigned integer between 0-255 (one byte)
· Storing a message that is compressed data of any length using zlib
Table 3.4 shows how we could write the specification.
Table 3.4. Simple key-value database protocol
|
Byte |
Contents |
Description |
|
0 |
1 byte |
Determines which database(s) to write the data to based on which bits are toggled on. Each bit position represents a database from 1–8. |
|
1 |
1 byte |
An unsigned integer of one byte (0–255) used as the database key to store the data in. |
|
2-n |
0-n bytes |
The data to store, which can be any amount of bytes that have been compressed using deflate (zlib). |
Playing with bits to select databases
Our protocol states that the first byte will be used to represent which databases should record the information transferred. On the receiving end, our main database will be a simple multidimensional array that will hold spots for eight databases (since there are eight bits in a byte). This can be simply represented using array literals in JavaScript:
var database = [ [], [], [], [], [], [], [], [] ];
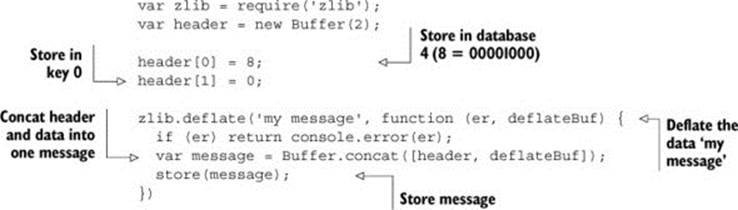
Whatever bits are turned on will indicate which database or databases will store the message received. For example, the number 8 is represented as 00001000 in binary. In this case we’d store the information in database 4, since the fourth bit is on (bits are read from right to left).
Zero-indexed arrays
Arrays are zero-indexed in JavaScript, so database 4 is in array position 3, but to avoid complicating things, we’re intentionally calling our databases 1 through 8 instead of 0 through 7 to match our language more closely when talking about bits in a byte.
If you’re ever curious about a number’s binary representation in JavaScript, you can use the built-in toString method, giving it a base 2 as the first argument:

Numbers can have more than one bit turned on as well; for example, 20 is 00010100 in binary, and for our application that would mean we wanted to store the message in databases 3 and 5.
So how do we test to see which bits are turned on for any given number? To solve this, we can use a bitmask. A bitmask represents the bit pattern we’re interested in testing. For example, if we were interested in finding out whether we should store some data in database 5, we could create a bitmask that has the fifth bit turned on. In binary, this would look like 00010000, which is the number 32 (or 0x20 in hex notation).
We then have to test our bitmask against a value, and JavaScript includes various bitwise operators[8] to do this. One is the & (bitwise AND) operator. The & operator behaves similarly to the && operator, but instead of testing for two conditions to be true, it tests for two bits to be on (have ones and not zeros) and keeps the bits on (or one) where that’s the case:
8 See https://developer.mozilla.org/en-US/docs/JavaScript/Reference/Operators/Bitwise_Operators.
000101000
& 000100000
-----------
000100000
Bit position 5 was on for both values, so it remains when using &. Armed with this knowledge, we can see that a value compared with the bitmask will be the bitmask if it has the same bit or bits turned on. With this information, we can set up a simple conditional to test:
if ((value & bitmask) === bitmask) { .. }
It’s important that the & expression be surrounded by parentheses; otherwise, the equality of the bitmasks would be checked first because of operator precedence.[9]
9 See https://developer.mozilla.org/en-US/docs/JavaScript/Reference/Operators/Operator_Precedence.
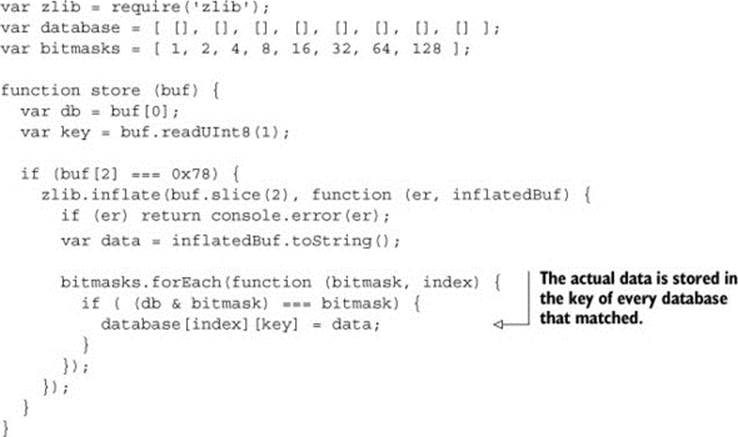
To test the first byte received in our binary protocol, we’ll want to set up a list of bitmasks that correspond with the indexes of our databases. If the bitmask matches, we know the database at that index will need the data written to it. The “on” bits for every position are an array
var bitmasks = [ 1, 2, 4, 8, 16, 32, 64, 128 ]
which corresponds to this:
1 2 4 8 16 32 64 128
-----------------------------------------------------------------------
00000001 00000010 00000100 00001000 00010000 00100000 01000000 10000000
Now we know that if a byte matches 1 in our bitmasks array, it will match database 1 or array position 0. We can set up a simple loop to test each bitmask against the value of the first byte:
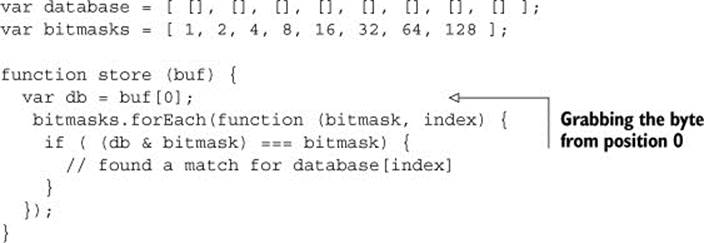
Working with bits can be tricky at first, but once you understand more about how they work, they become more manageable. So far all of what we’ve covered is available not only in Node, but in browser JavaScript too. We’ve made it far enough to determine which database we should put our incoming data in; we still have to find out which key to store the data in.
Looking up the key to store the data
This is the easiest part of our example, because you’ve already learned this from the previous technique. Before we begin, let’s look at the relevant part of the specification defined earlier in table 3.4.
|
Byte |
Contents |
Description |
|
1 |
1 byte |
An unsigned integer of one byte (0–255) used as the database key to store the data in. |
We know we’ll be receiving at byte position 1 an unsigned integer of one byte (0-255) that will be used as a database key to store the data in. We purposely set up the database to be a multidimensional array where the first dimension is the databases. Now we can use the second dimension as a place to store the keys and values, and since the keys are numbers, an array will work.[10] Let’s illustrate to make this more concrete. Here’s what storing the value 'foo' inside the first and third databases at key 0 would look like:
10 Although there are more-ideal alternatives coming in ECMAScript 6.
[
['foo'],
[],
['foo'],
[],
[],
[],
[],
[]
]
To get the key value out of position 1, we can use the hopefully now familiar readUInt8 method:
![]()
Let’s add that to our previous main code sample we’re building:
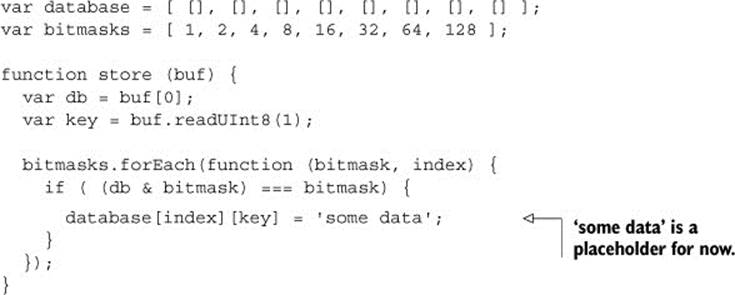
Now that we’re able to parse the database(s) and the keys within those database(s), we can get to parsing the actual data to store.
Inflating data with zlib
It’s a smart idea to compress string/ASCII/UTF-8 data when sending it across the wire, as compression can really cut down on bandwidth usage. In our simple database protocol, we assume that the data we get to store has been compressed; let’s look at the specification to see the relevant description.
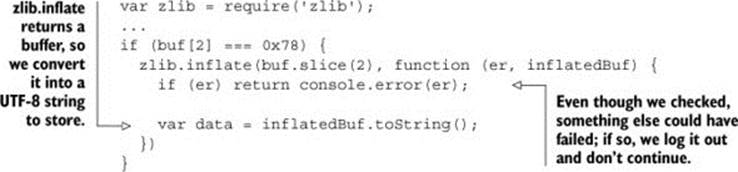
Node includes a built-in zlib module that exposes deflate (compress) and inflate (uncompress) methods. It also includes gzip compression. To avoid getting malformed messages, we can check that the received message was indeed properly compressed, and if not, we’ll refuse to inflate it. Typically, the first byte of zlib “deflated” data is 0x78,[11] so we can test for that accordingly:
11 A more robust implementation should do more checks; see http://tools.ietf.org/html/rfc6713.

Now that we know that we’re most likely dealing with deflated data, we can inflate it using zlib.inflate. We’ll also need to use buf.slice() to get just the data portion of our message (since leaving the first two bytes would cause an error):
We have everything we need to store some data in our database using our simple database protocol. Let’s put all the components together:
Now we have the code in place to store some data. We could generate a message by using the following:
We could write an example that sends messages over TCP and do more error handling. But let’s leave that as an exercise for you to tackle as you learn about networking in Node in a later chapter.
3.4. Summary
In this chapter you learned about buffers and how to turn buffers into different encoded strings using the toString method. We dove into the complicated task of turning a binary file into something more usable using the Buffer API. Lastly, we had some fun creating our own protocol and learning about bitmasks and compression.
We covered some common uses of buffers in Node, varying in difficulty to hopefully make you more comfortable using them and making the most of them. Go forth and tackle a binary format conversion and publish your work on NPM, or maybe a protocol that better fits your business needs is waiting to be written.
In the next chapter we’ll look at another core part of Node—events.
All materials on the site are licensed Creative Commons Attribution-Sharealike 3.0 Unported CC BY-SA 3.0 & GNU Free Documentation License (GFDL)
If you are the copyright holder of any material contained on our site and intend to remove it, please contact our site administrator for approval.
© 2016-2026 All site design rights belong to S.Y.A.