Building Polyfills: Web Platform APIs for the Present and Future (2014)
Part I. Building Polyfills
Chapter 4. Building Your First Polyfill, Part 2: Build Workflows and Cross-Browser Testing
In Chapter 3, you got your first taste of cross-browser polyfill development via the construction of an HTML5 Forms polyfill. We managed to cover a lot of ground in a short time, but there’s no doubt that our polyfill is missing some critical pieces. Some of these relate to our build and deploy process, while others relate to improving the quality and performance of the code itself with some unit and performance tests. Over these next two chapters, we’ll round out the construction of our first polyfill. In this chapter, we’ll cover the ins and outs of setting up your build process and performing automated testing. Then, in Chapter 5, we’ll discuss how to deal with hairy edge cases in a spec, and testing/refactoring for performance.
Setting Up Your Project Workflow
In Chapter 3, we got right to work building our polyfill without considering much beyond simple project and source control setup. At this point, I’d like to back up and discuss some important workflow considerations that polyfill developers should address when starting up a project. Specifically, we want to begin with the end in mind. That is, before we write a single line of code, we should think about how we plan to distribute our hard work, and how we expect other developers to leverage our polyfill in their apps, and even how we can enable others to contribute to our project. All of these considerations can be addressed at the start of a project with a solid development workflow, which includes several core pieces:
§ Source control and collaboration
§ Package and dependency management
§ Build and workflow management
§ Automated and cross-browser testing
§ Continuous integration
Source control and collaboration were discussed in Chapter 3, so let’s look next at package and dependency management.
Package and Dependency Management
Once you’ve chosen a source control solution, you’ll want to think about how to manage dependencies. By dependencies, I’m not referring to “this polyfill depends on jQuery,” but, rather, the third-party libraries that your polyfill depends on for things like static analysis, minification, testing, and more. We’ll talk about those specific tools in a bit, but before you start using these, you need to think about how you plan to include them in your project, and how to declare those dependencies for others who download your work. In the world of JavaScript development, there’s no better general-purpose package manager than npm, or node packaged modules. If you have Node.js installed, you already have npm. If not, head over to the Node.js site and grab the appropriate installer for your OS. You’ll be using Node and npm heavily throughout your polyfill project, and these tools are also a prerequisite for the next few items on our list.
Build and Workflow Management
Developing open source software, including polyfills, is about more than just throwing together a quick sample, some basic tests, and a source file. Sure, it’s possible to put something online that consists of only these things; I’ve even done it myself before. Five years ago, it was a common practice among frontend developers. But as our community has matured, our tools and our processes have evolved.
As a frontend developer, I have a workflow that’s shared by many others. I write tests. I write code until those tests pass. I repeat. I test across browsers. I write some more code. During development, I keep my source files small and separate, but I want the code I distribute to be in a single file, minified and ready to use in production environments.
Executing all of these tasks—from testing to minification—by hand is a pain. Thankfully, there are great build and workflow tools out there for frontend devs. These tools, which you integrate into your project, can quickly perform these tasks on your behalf, either at your command or when a change to a project file is observed.
One such tool is Grunt, a simple JavaScript task runner created by Ben Alman. Grunt is a bit of a youngster in the build system world, but it’s caught fire among frontend developers and, with lots of community participation, has managed to achieve a good deal of stability in a short time.
I use Grunt in my projects and will do so in this book as well. The tool can be installed via npm (npm install -g grunt-cli). For more information, see the online getting started guide. We’ll walk through configuring an initial Grunt setup in a moment.
Automated and Cross-Browser Testing
If you’re building a frontend library, testing is important, and it’s vitally important if you’re building a shim or polyfill. Almost every programming language out there has one or more options for unit testing, and JavaScript is no different. Unit testing (that is, the act of writing and executing code that exercises program code and performs assertions to verify that the program functioned as expected) has become quite popular over the last decade, especially in agile, eXtreme Programming, and Lean Software circles. Not only does unit testing aid developers in properly shaping the API and behavior of their libraries by writing code (via tests) in the mindset of the consumer, but a suite of tests, over time, serve as a wonderful safety net. With this net in place, developers are free to refactor, rework, and otherwise enhance their libraries, and remain confident in the fact that their tests will catch any regressions that fall through the cracks.
In the world of JavaScript development, there are countless unit-testing libraries. I prefer Jasmine, a BDD-style unit testing library. Other popular options include QUnit, which is maintained by the jQuery team, and NodeUnit.
Unit testing is a great foundation, but we also need to consider cross-browser testing for this project. It is a cross-browser polyfill, after all. As such, our project will also need to include an automated tool that can launch multiple browsers and load our unit tests up in each, thereby ensuring at least basic test coverage across browsers. The tool that I prefer to use for such a task is Karma, which you can also install via npm. There’s a bit of setup involved in getting Karma up and running the way I like, and we’ll cover that in this chapter.
Continuous Integration
The last tool you should consider for your initial project setup is a remote CI server. This step is completely optional, so if you want to take my advice on items 1–4 and ignore me on this one, that’s OK. That said, the biggest advantage of a remote CI server for an open source project is, in my mind, the ability to run basic project setup and unit tests in a clean environment. Doing so ensures that you properly declare dependencies via npm and that you never check in code that fails one or more tests and just walk away. It’s better to get the news that you did something wrong from a CI server than from a human struggling to run the latest bits from your project.
For my projects, I prefer to use Travis, a CI server used by many in the open source community. It’s easy to set up and configure, and you can even place status badges on your project’s home page signifying its current pass/fail status on the server. Another, newer option that I’ve recently discovered is Wercker. I’ll be using Travis for this book, but Wercker is certainly worth checking out for your next project, open source or otherwise.
Jump-Starting Your Workflow
In Chapter 3, I covered initial project setup, including a recommended directory structure and essential files. With your basic project structure in place, your next key workflow steps are to configure npm and Grunt, which we’ll cover in this section.
Configuring npm
To configure npm, I’ll run npm init inside my project directory and follow the interactive prompts. You can see the result of running the command in my terminal in Figure 4-1. Once done, npm will create a package.json file that looks similar to Example 4-1. While this file isn’t strictly required unless you plan to publish your polyfill to npm, it will make it easier to work with Grunt, which we’ll set up next.
Example 4-1. Sample package.json file
{
"name": "html5-forms-polyfill",
"version": "0.0.1",
"description": "A cross-browser polyfill for HTML5 forms features",
"repository": {
"type": "git",
"url": "git://github.com/bsatrom/html5-forms-polyfill.git"
},
"keywords": [
"html5",
"polyfill",
"forms",
"validation"
],
"author": "Brandon Satrom",
"license": "MIT",
"readmeFilename": "README.md",
"gitHead": "4a2f3578443f539d52c645563fe47824bf4fb377"
}
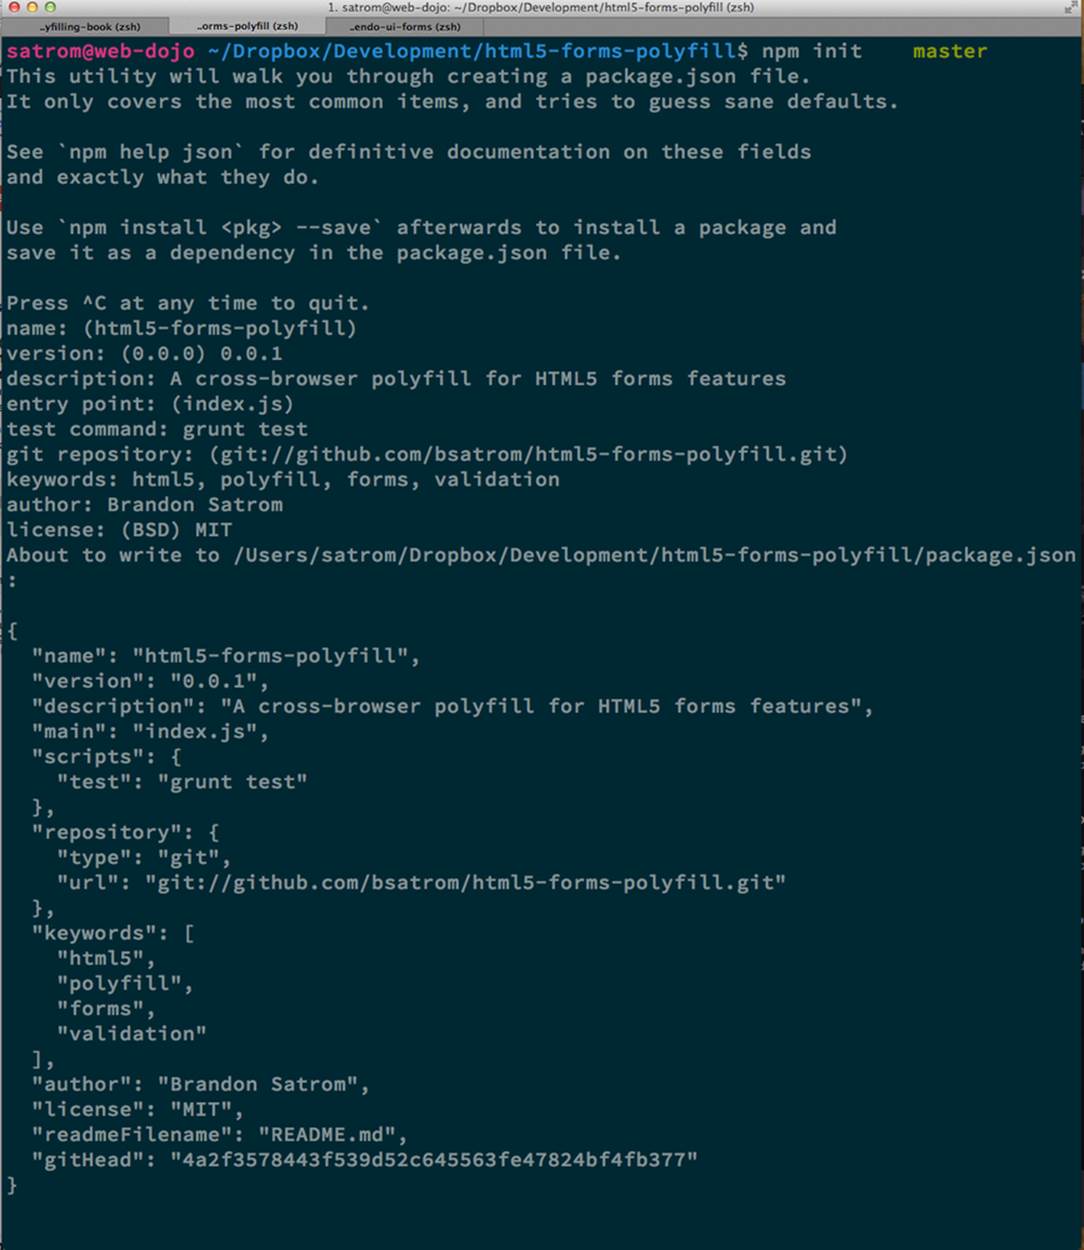
Figure 4-1. Running npm init to configure your package.json file
Configuring Grunt
Now, let’s install Grunt. Before you run the Grunt config step, you’ll need to add the following to your package.json, within the outer curly brace of the root object literal, and run npm install from the terminal. The settings in Example 4-2 will make sure that the Grunt command-line interface is available in your project.
Example 4-2. Grunt dependencies in package.json
"devDependencies": {
"grunt": "~0.4.1",
"grunt-contrib-jshint": "~0.6.0",
"grunt-contrib-uglify": "~0.2.2",
"grunt-contrib-concat": "~0.3.0",
"grunt-contrib-cssmin": "~0.6.1"
}
Once you’ve installed Grunt, configuring the tool is a bit more manual. While there are several grunt-init tasks available, I find it easier to start with a very basic gruntfile, which you can pull from Example 4-3. Create a new file at the project root called gruntfile.js and copy the contents of Example 4-3 into that new file.
Example 4-3. Starter gruntfile.js for our polyfill
module.exports = function(grunt) {
// Project configuration.
grunt.initConfig({
pkg: grunt.file.readJSON('package.json'),
concat: { ![]()
options: {
separator: ';',
banner: '// kendo-ui-forms v<%= pkg.version %> \n'
},
dist: {
src: [ 'src/js/*.js' ],
dest: 'dist/js/kendo.forms.js'
}
},
uglify: { ![]()
options: {
banner: '// kendo-ui-forms v<%= pkg.version %> \n'
},
dist: {
files: {
'dist/js/kendo.forms.min.js': '<%= concat.dist.dest %>'
}
}
},
cssmin: { ![]()
options: {
banner: '// kendo-ui-forms v<%= pkg.version %> \n'
},
combine: {
files: {
'dist/css/kendo.forms.css': 'src/css/*.css'
}
},
minify: {
expand: true,
cwd: 'src/css/',
src: ['*.css', '!*.min.css'],
dest: 'dist/css/',
ext: '.forms.min.css'
}
},
jshint: { ![]()
files: ['gruntfile.js', 'src/**/*.js', 'spec/js/*.js'],
options: {
globals: {
jQuery: true,
console: true,
module: true,
document: true
}
}
}
});
// Plug-ins for other grunt tasks.
grunt.loadNpmTasks('grunt-contrib-uglify');
grunt.loadNpmTasks('grunt-contrib-jshint');
grunt.loadNpmTasks('grunt-contrib-concat');
grunt.loadNpmTasks('grunt-contrib-cssmin');
// Default task(s).
grunt.registerTask('default', ['jshint']);
grunt.registerTask('minify', ['jshint', 'concat', 'cssmin', 'uglify']);
};
![]()
Combines all of the JavaScript files in the src/ directory into a single file
![]()
Minifies the concatenated JavaScript file
![]()
Combines and minifies any CSS files defined in src/
![]()
Performs static analysis on my JavaScript source files to make sure I’m following a consistent coding style. See JSHint for more information
Though it seems like there’s a lot going on here, a gruntfile is pretty easy to parse once you get the hang of it. A gruntfile is made up of a series of named tasks, like concat, uglify, and the like. Each task tells Grunt what actions to perform, and which files to perform those actions on when that task is executed.
At the bottom of my gruntfile, I’ve also defined two additional tasks: a default task, which runs when I execute the grunt command with no other task, and a custom minify command, which is a combination of several commands defined in the preceding code.
Once your gruntfile is complete and the options match your project, run grunt from the terminal. If your gruntfile checks out, you’ll get a “Done, without errors” message, which means we can continue on! If not, Grunt will point you in the direction of the problem, which is usually a minor syntax issue. Now, let’s get some unit tests set up!
Adding Unit Tests to Your Polyfill
Testing is critical for a good, “responsible” polyfill, and I recommend that your own project be covered by a good set of unit tests. Testing frameworks like Jasmine and QUnit are easy to set up and configure and, once you get going with them, you’ll be glad that you have a full suite of tests backing up your polyfill development.
Configuring Unit Tests with Jasmine
To start using Jasmine for my unit tests, I’ll create a lib directory inside my spec/ directory and place the Jasmine bits inside. I’m also going to include the jasmine-jquery library, which I’ll need in order to automatically execute my tests.
Next, I’ll create a runner.html file at the root of the spec/ folder, and I’ll populate it with the contents of Example 4-4. Many JavaScript frameworks, Jasmine included, use an HTML file as their test runner by loading up dependencies and the project source, and then executing those tests against DOM interactions on the page. On this page, we’ll specify all of the CSS and JavaScript dependencies for our polyfill, including jQuery and Kendo UI for widgets and framework features, and then load up our tests via fixtures.js. Note that, for external dependencies, I’m following the directory structure outlined in Chapter 3.
Example 4-4. Jasmine’s main runner.html file
<!DOCTYPE html>
<html>
<head>
<title>Kendo UI Forms Test Runner (Jasmine)</title>
<meta charset="UTF-8">
<!-- Styles -->
<link rel="shortcut icon" type="image/png"
href="lib/jasmine-1.3.1/jasmine_favicon.png">
<link rel="stylesheet" type="text/css" href="lib/jasmine-1.3.1/jasmine.css">
<link rel="stylesheet" href="../lib/css/kendo.common.min.css" />
<link rel="stylesheet" href="../lib/css/kendo.default.min.css" /> ![]()
<!-- Jasmine and Jasmine-jQuery -->
<script type="text/javascript" src="lib/jasmine-1.3.1/jasmine.js"></script>
<script type="text/javascript" src="lib/jasmine-1.3.1/jasmine-html.js"></script>
<script src="../lib/js/jquery.min.js"></script>
<script type="text/javascript" src="lib/jasmine-jquery.js"></script>
<!-- Kendo UI -->
<script src="../lib/js/kendo.web.min.js"></script> ![]()
<script src="../src/js/kendo.forms.js"></script> ![]()
<!-- Specs -->
<script src="js/fixtures.js"></script> ![]()
</head>
<body>
<!-- Jasmine -->
<script type="text/javascript">
(function() {
var jasmineEnv = jasmine.getEnv();
jasmineEnv.updateInterval = 1000;
var htmlReporter = new jasmine.HtmlReporter();
jasmineEnv.addReporter(htmlReporter);
jasmineEnv.specFilter = function(spec) {
return htmlReporter.specFilter(spec);
};
var currentWindowOnload = window.onload;
window.onload = function() {
if (currentWindowOnload) {
currentWindowOnload();
}
execJasmine();
};
function execJasmine() {
jasmineEnv.execute();
}
})();
</script>
</body>
</html>
![]()
These two lines include the Kendo UI CSS styles
![]()
The main source file for Kendo UI Web, which our polyfill needs for UI widgets and framework features
![]()
This is the main source file for our polyfill
![]()
This file contains all of our test fixtures
With the runner done, let’s create the key file for our testing, fixtures.js. Example 4-5 contains an initial test file with a couple of tests. You’ll notice that Jasmine uses functions like describe, it, and expect, and that my test names are written in narrative form. Because Jasmine is a BDD-style testing framework, you’ll hopefully find, as I do, that it’s easy to write readable test names and assertions that make sense, not just now, but when you’re hunting down regressions later.
Example 4-5. A basic Jasmine fixtures.js file for our polyfill
describe('Kendo Forms Widget Test Suite', function() {
describe('Form initialization tests', function() {
describe('Form Widget initialization', function() {
it('should exist in the kendo.ui namespace', function() {
expect(kendo.ui.Form).toBeDefined();
});
it('should be able to perform imperative initialization with JavaScript', function() {
expect($('#imperative-form').kendoForm).toBeDefined();
});
});
});
});
With this setup done, let’s go ahead and run these tests in the browser. First, if you’re following along and you created the kendo.forms.js source file in Chapter 3, the preceding tests should pass. That’s nice, but for the sake of exploration, let’s delete everything from that file and rerun our tests. If Jasmine is properly configured, you should see two failing tests, as we do in Figure 4-2. So we have successfully configured our testing framework. Now, let’s go make these tests pass!
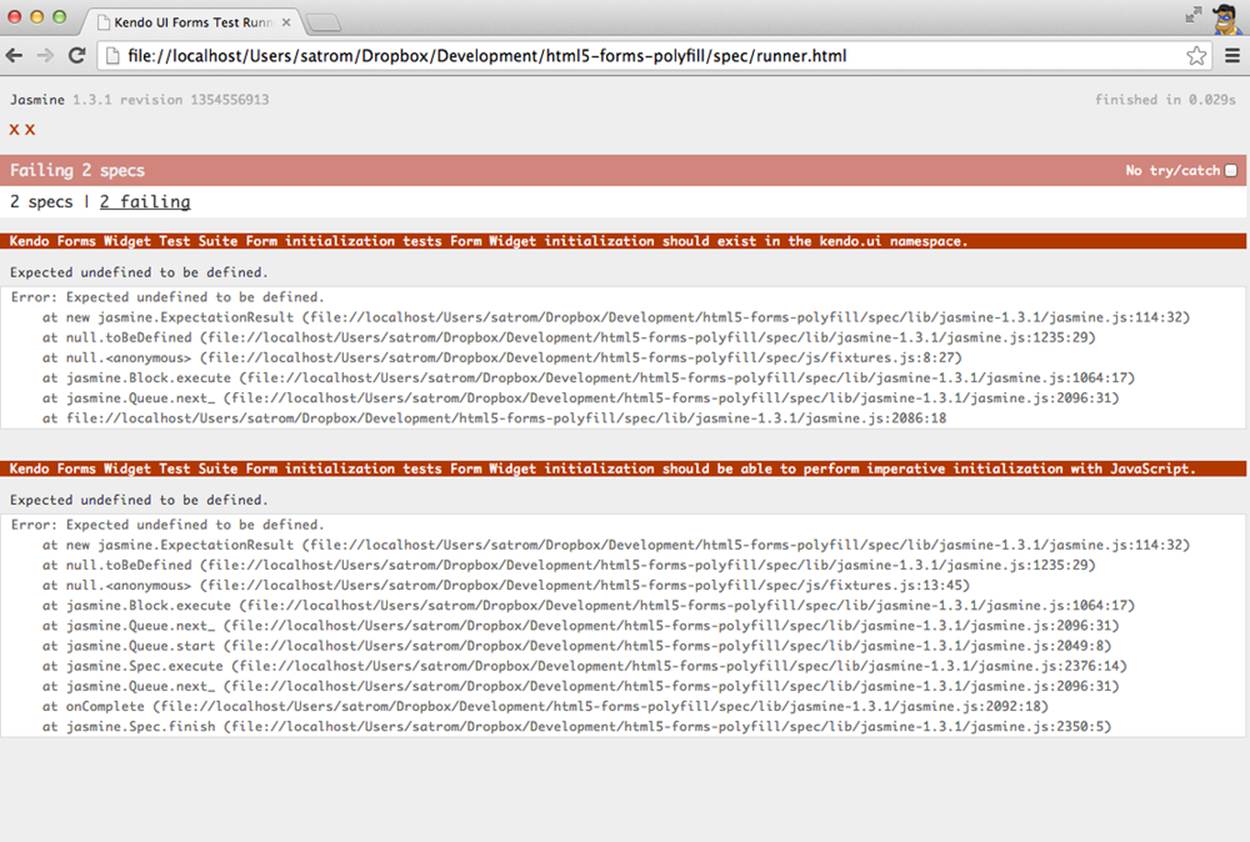
Figure 4-2. Jasmine running in the browser
Red to Green: Making the First Tests Pass
When I start a new project, or add unit tests to an existing project, I like to start small and try to get a few quick win tests under my belt. This is partly because I’m still feeling out functionality in the early stages of a project, but also because I want to see my test suite running and passing as quickly as possible. It’s far easier to suss out problems with my test suite setup with a smaller number of tests.
With that in mind, the first two failing specs we’ve added to my project are minor and easy to fix, but they help lay the foundation for my polyfill. As discussed in Chapter 3, Kendo UI itself exposes its UI widgets to developers in two ways, and the preceding tests are designed to exercise that behavior. The tests in Example 4-5 are looking for key pieces of information. First, we check to make sure that our polyfill exists as a widget in the Kendo UI namespace, as kendo.ui.Form. Next, we want to ensure that the polyfill widget is available as a jQuery plug-in. To make those tests pass, we can create the initial skeleton of our polyfill in a new file (in src/) called kendo.forms.js and add the code in Example 4-6, or add the code back in if you already did so in Chapter 3.
Example 4-6. Creating the core widget definition for our Kendo UI Forms polyfill in kendo.forms.js
(function($, kendo) {
var ui = kendo.ui,
Widget = ui.Widget,
formWidget;
var Form = Widget.extend({
init: function(element, options) {
// base call to widget initialization
Widget.fn.init.call(this, element, options);
},
options: {
// the name is what will appear in the kendo namespace (kendo.ui.Form).
// The jQuery plug-in would be jQuery.fn.kendoForm.
name: 'Form'
}
});
ui.plugin(Form);
} (jQuery, kendo));
We added a lot more code to this file in Chapter 3 before all was said and done, but this skeleton code we’ve written so far lays the foundation for my library, and it’s also enough to make my first tests pass, as you can see in Figure 4-3.

Figure 4-3. Basic Jasmine tests passing
Running Jasmine Tests via Grunt
So far, we’ve gotten Jasmine configured for our unit tests, and we’ve even gotten a couple of failing tests to pass. This is a great start, but all of our work is in the browser, and running our tests requires that we refresh a browser tab to verify. This is probably fine for many projects, but I’d like to be able to execute my tests in both the browser and via the command line, the latter of which is required when I start working with Karma and Travis CI later. This also allows me to streamline my development workflow by automatically running tests whenever I save certain files in my project.
Thankfully, I’m not alone in my desire for console-based JavaScript testing, and there just so happens to be a Grunt plug-in for Jasmine that I can add to my project. First, I’ll want to configure Jasmine by adding a few lines to my gruntfile. I’ll add the grunt-contrib-jasmine task declaration to the bottom of the file, like so:
grunt.loadNpmTasks('grunt-contrib-jasmine');
Then, I need to add a Jasmine task to the initConfig section of the file, as shown in Example 4-7. This task definition tells Jasmine where to look to find my project source, the specs to run, and finally, any third-party vendor libraries that should also be loaded.
Example 4-7. Adding a Jasmine Grunt task to gruntfile.js
jasmine: {
src: ['lib/**/*.js', 'src/js/kendo.forms.utils.js',
'src/js/kendo.forms.types.js',
'src/js/kendo.forms.features.js',
'src/js/kendo.forms.js'
],
options: {
specs: 'spec/js/*.js',
vendor: [
'spec/lib/jasmine-jquery.js'
]
}
}
Next, I’ll want to install the Jasmine Grunt plug-in via the following terminal command:
npm install grunt-contrib-jasmine --save-dev
Once I’ve done so, I can run the command grunt jasmine via the console, and I’ll get a result that looks like Example 4-8.
NOTE
The --save-dev switch will automatically save the package as a development dependency in your package.json file, ensuring that other devs and your CI environment can quickly replicate your setup.
Example 4-8. Running Jasmine via the console
$ grunt jasmine
Running "jasmine:src" (jasmine) task
Testing jasmine specs via phantom
..
2 specs in 0.001s.
>> 0 failures
Done, without errors.
Now I’ve got Jasmine running in the browser, and in the terminal, which is nice! Unfortunately, our configuration work isn’t quite done yet. Everything works great so far because neither of our initial tests access the DOM. Once we need to access the DOM, though, things get a bit tricky, so I’ll need to add a little more configuration to keep this happy testing party going.
Let’s add our third test, and the first to access the DOM. I’ll open fixtures.js back up and add the test in Example 4-9.
Example 4-9. Testing declarative form initialization in fixtures.js
it('should be able to perform declarative initialization with data attributes',
function() {
kendo.init(document.body);
expect($('#declarative-form').data('kendoForm')).not.toBe(null);
});
As discussed previously, Kendo UI widgets can be declared one of two ways: either using JavaScript, or via data-role declaration and calling kendo.init on a container, which creates widgets for every element inside that container. The preceding test calls kendo.init ondocument.body, which will look for every element with a data-role attribute, and initialize that element accordingly.
When I first add this test and refresh the browser, it will fail, but I can make it pass by adding the code in Example 4-10 to the runner.html file, just inside the <body> element.
Example 4-10. Declarative initialization of a Form widget in runner.html
<form id="declarative-form" data-role="form"></form>
Configuring Jasmine for the Browser and the Console
After adding the markup in Example 4-10, all three of my tests will pass. That’s nice, but in the spirit of keeping our test options open, let’s rerun the grunt jasmine command and see what happens. Spoiler alert: it looks like Figure 4-4. That’s a failing test. Why did our test fail in my terminal, even though it worked in the browser? The answer lies in the DOM, or lack thereof, that is. When I’m using Jasmine via the console, there is no DOM available for my tests, so in order to leverage the DOM for testing, I need to do a bit of additional setup. For that, I’ll use thejasmine-jquery library, which allows me to load HTML files into my specs and execute my tests against them.
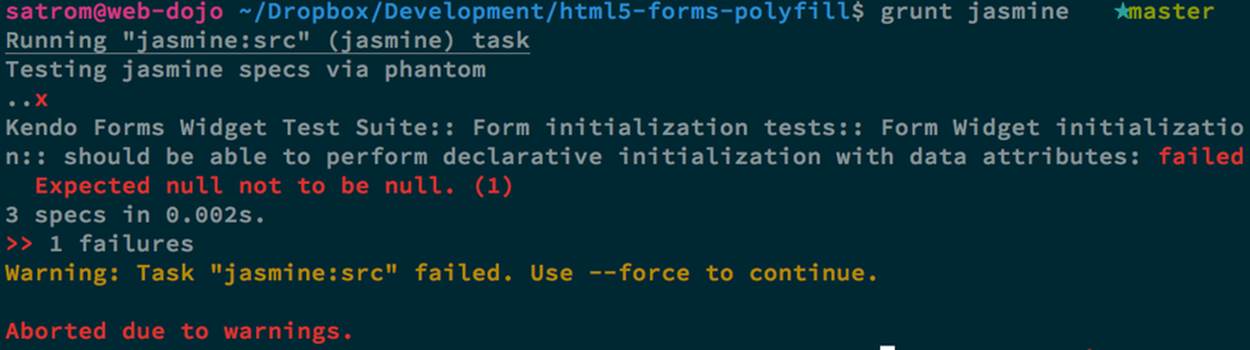
Figure 4-4. Running Jasmine DOM tests in the console
First, I’ll need to move the form tag from Example 4-10 into a standalone HTML file named declarative-form.html, and I’ll place that file in a spec/javascripts/fixtures/ directory—the location is a convention jasmine-jquery uses. Then, I need to add the jasmine-jquery fixture loader to myfixtures.js file, so I’ll add the path shown in Example 4-11 to line 4.
Example 4-11. Setup for loading external fixtures from fixtures.js
var fixtures = jasmine.getFixtures();
if (document.location.pathname.indexOf('runner.html') > 0) {
// We're running jasmine in the browser
fixtures.fixturesPath = '../spec/javascripts/fixtures';
}
In order to run Jasmine in multiple environments, I do have to add a bit of path manipulation, as you can see in the preceding sample. If I’m running my tests in the console, the default path (spec/javascripts/fixtures) works for loading fixtures. If I’m in the browser, however, I need to adjust things a little. Finally, in my latest test, Example 4-9, I’ll add a call to jasmine-jquery’s load method to load up my HTML fixture. The complete test is listed in Example 4-12.
Example 4-12. Loading an external fixture from fixtures.js
it('should be able to perform declarative initialization with data attributes',
function() {
fixtures.load('declarative-form.html');
kendo.init(document.body);
expect($('#declarative-form').data('kendoForm')).not.toBe(null);
});
When I rerun grunt jasmine in the console, I should see all green. I can also rerun the tests in my browser, where everything also passes with flying colors.
I now have a complete unit test setup that works in the browser and via the console, which is about to come in quite handy!
Automating Cross-Browser Polyfill Testing
Now that we have a good testing setup with Jasmine and Grunt, let’s take this party to the next level and add in some cross-browser testing. While automated cross-browser testing might be considered overkill for some types of projects, it’s a must when building a polyfill. As you build your polyfill, you’ll quickly discover cases where a certain test isn’t needed in your everyday development browser because the feature is present, but the feature still needs a good solid test because your polyfill provides capabilities for another browser to leverage. Performing automated testing across several installed browsers can be a quick sanity check to ensure that development of your polyfill is progressing along without a hitch and, thankfully, there are some great tools out there that we can pair with our existing Grunt workflow. My tool of choice is Karma, a simple test runner that can call out to all major browsers using test runner plug-ins and also integrates nicely with Grunt.
NOTE
As I discussed in Chapter 3, automated cross-browser testing is a great safety net for the polyfill developer, but it’s no substitute for real, actual testing across browsers, especially those older versions of IE, where browser quirks lie in wait.
Configuring Cross-Browser Tests with Karma
To get started with Karma, I’ll need to install grunt-karma via npm:
npm install grunt-karma --save-dev
Both Karma and grunt-karma will be installed, and a series of Karma-related dependencies will be added to your package.json file. Next, you’ll want to add the line grunt.loadNpmTasks(grunt-karma); to the end of the loadNpmTasks calls in your gruntfile. Then, I’ll add the Karma task to my gruntfile, starting with a bit of logic to populate an array of browsers I want to test with, at the top of the file, as shown in Example 4-13.
Example 4-13. Adding a browser array to gruntfile.js
var browsers;
(function() {
var os = require('os');
browsers = ['Chrome', 'Firefox', 'Opera'];
if (os.type() === 'Darwin') {
browsers.push('ChromeCanary');
browsers.push('Safari');
}
if (os.type() === 'Windows_NT') {
browsers.push('IE');
}
})();
In this snippet, I’m using Node to figure out which OS I’m testing. If I’m using OS X (which reports as Darwin), I’ll add Chrome Canary and Safari. If, on the other hand, I’m on Windows, I’ll add IE to my browsers array.
NOTE
Both Internet Explorer and, recently, Safari are single-OS browsers, meaning that they run only on Windows and Mac OS X, respectively. This means that it’s not possible to run a complete set of cross-browser tests for your polyfills on a single OS. You’ll need either a few Windows VMs on hand for various versions of IE, or a cheap Mac OS X box for Safari testing if either of these is not your primary operating system.
Next, I’ll add a task for Karma to the grunt.initConfig method, as shown in Example 4-14:
Example 4-14. Adding a Karma task to gruntfile.js
karma: {
options: {
configFile: 'conf/karma.conf.js',
keepalive: true
},
forms: {
browsers: browsers
}
}
Key in this section is the configFile property, which accepts a path to a separate Karma configuration file. Karma has a lot of configuration options, so placing these in a separate file is usually a good approach. The contents of my karma.conf.js can be found in Example 4-15.
Example 4-15. karma.conf.js Karma configuration file for our forms polyfill
module.exports = function(config) {
config.set({
// base path that will be used to resolve files and exclude
basePath: '../',
// list of files / patterns to load in the browser
files: [
'lib/js/*.js',
'dist/js/kendo.forms.min.js',
{pattern: 'lib/js/jquery.min.js', watched: false, served: true,
included: true},
{pattern: 'spec/lib/jasmine-jquery.js', watched: false, served: true,
included: true},
{pattern: 'src/js/*.js', watched: true, served: true,
included: false},
{pattern: 'spec/**/*.html', included: false},
'spec/js/*.js',
],
// list of files to exclude
exclude: [],
frameworks: ['jasmine'],
reporters: ['progress'],
port: 9876,
runnerPort: 9100,
colors: true,
logLevel: config.LOG_INFO,
autoWatch: true,
browsers: ['ChromeCanary'],
captureTimeout: 50000,
singleRun: true,
reportSlowerThan: 500,
preprocessors: {},
plugins: [
'karma-jasmine',
'karma-chrome-launcher',
'karma-firefox-launcher',
'karma-safari-launcher',
'karma-opera-launcher',
'karma-ie-launcher',
'karma-script-launcher'
]
});
};
This file contains a couple of key sections. First, the files array contains all of the source files from my project that Karma needs to know about in order to properly execute my tests. Next, I include a series of options regarding the test runner (Jasmine), which ports to use, and the like. Finally, I specify a series of Karma plug-ins, which the framework needs to communicate with my test runner and browsers. By default, Karma includes the launchers for Firefox and Chrome, so I’ll need to install the Opera, Safari, and IE launchers to use them:
npm install karma-opera-launcher --save-dev
npm install karma-safari-launcher --save-dev
npm install karma-ie-launcher --save-dev
Making Karma, Jasmine, and the Browser Play Nice
Once I’ve installed those two additional launchers, I should be able to run Karma using Grunt with the grunt karma command. If I do that, I should see all of my browsers launch, but one of my three initial tests will fail. Can you guess which ones? That’s right, the DOM test. Much as I did for Jasmine in the console, I need to add a path condition for Karma to my fixtures.js file, as shown in Example 4-16.
Example 4-16. Modifying the fixtures.js external fixtures load path for Karma
if (document.location.pathname === '/context.html') {
// Karma is running the test, so change the base
fixtures.fixturesPath = 'base/spec/javascripts/fixtures';
} else if (document.location.pathname.indexOf('runner.html') > 0) {
// We're running jasmine in the browser
fixtures.fixturesPath = '../spec/javascripts/fixtures';
}
With this additional condition, I’m looking for context.html in my path, which is the environment under which Karma runs. If that value is found, I’ll adjust the base fixturesPath to account for the location from which Karma loads these files. Otherwise, I’ll look for my in-browserrunner.html, as before. And that’s it. I can return to the console and run grunt karma and watch all my tests pass in five browsers, as shown in Figure 4-5. It’s a thing of beauty!
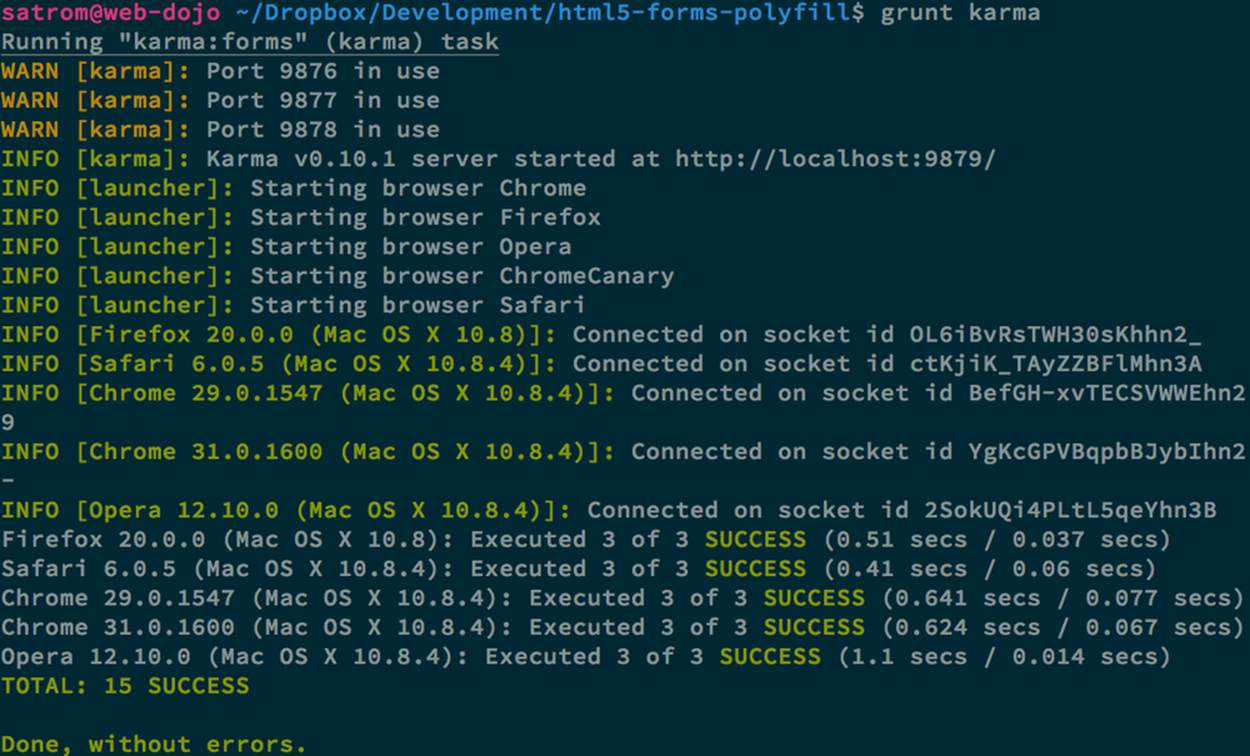
Figure 4-5. Running cross-browser tests with Karma
Automating Polyfill Development with Grunt Tasks
Thus far in this chapter, we’ve set up a new polyfill project, we’ve configured npm and Grunt for our development workflow, and we’ve added Jasmine and Karma for unit and cross-browser testing. All of these moving pieces work great alone, but we’re now going to bring them together for a killer polyfill development workflow. As mentioned earlier, Grunt gives you the ability to create custom tasks that chain together predefined tasks in interesting ways. One example is the minify task in Example 4-3, which automatically runs JSHint, concatenates your source files, and then runs uglifyJS to minify them.
Now that we’ve added some testing, let’s add a few more custom tasks that combine our test frameworks with our JSHint and magnification tasks, as shown in Example 4-17.
Example 4-17. Adding tasks to gruntfile.js
grunt.registerTask('test', ['minify', 'jasmine']);
grunt.registerTask('x-test', ['minify', 'jasmine', 'karma:forms']);
Now I can run grunt test in the console and have my files linted, minified, combined, and tested, or I can run grunt x-test, which will do all of the above and then run my tests across all browsers using Karma.
TIP
Linting is the practice of checking source code for syntax errors or style violations. In the JavaScript space, two popular code-linting tools are JSLint and JSHint.
While task customization is nice, what I’d really like to be able to do is execute a Grunt command once, and have that command watch my source files for changes. Then, when one of those files is saved, Grunt will execute one or more tasks automatically. Sounds awesome, right? It is, and with Grunt, it’s built in. All I need is the grunt-contrib-watch plug-in, which I can install via npm:
npm install grunt-contrib-watch --save-dev
Once I’ve installed this plug-in, I’ll include the task via a call to loadNpmTasks:
grunt.loadNpmTasks('grunt-contrib-watch');
And finally, I’ll add the task to grunt.initConfig:
watch: {
scripts: {
files: ['<%= jshint.files %>'],
tasks: ['test'],
options: {
nospawn: true
}
}
}
Now I can run grunt watch before I begin working on my polyfill. As I make changes to important files, Grunt will pick those up, lint the files, and run my Jasmine tests automatically, as shown in Figure 4-6.
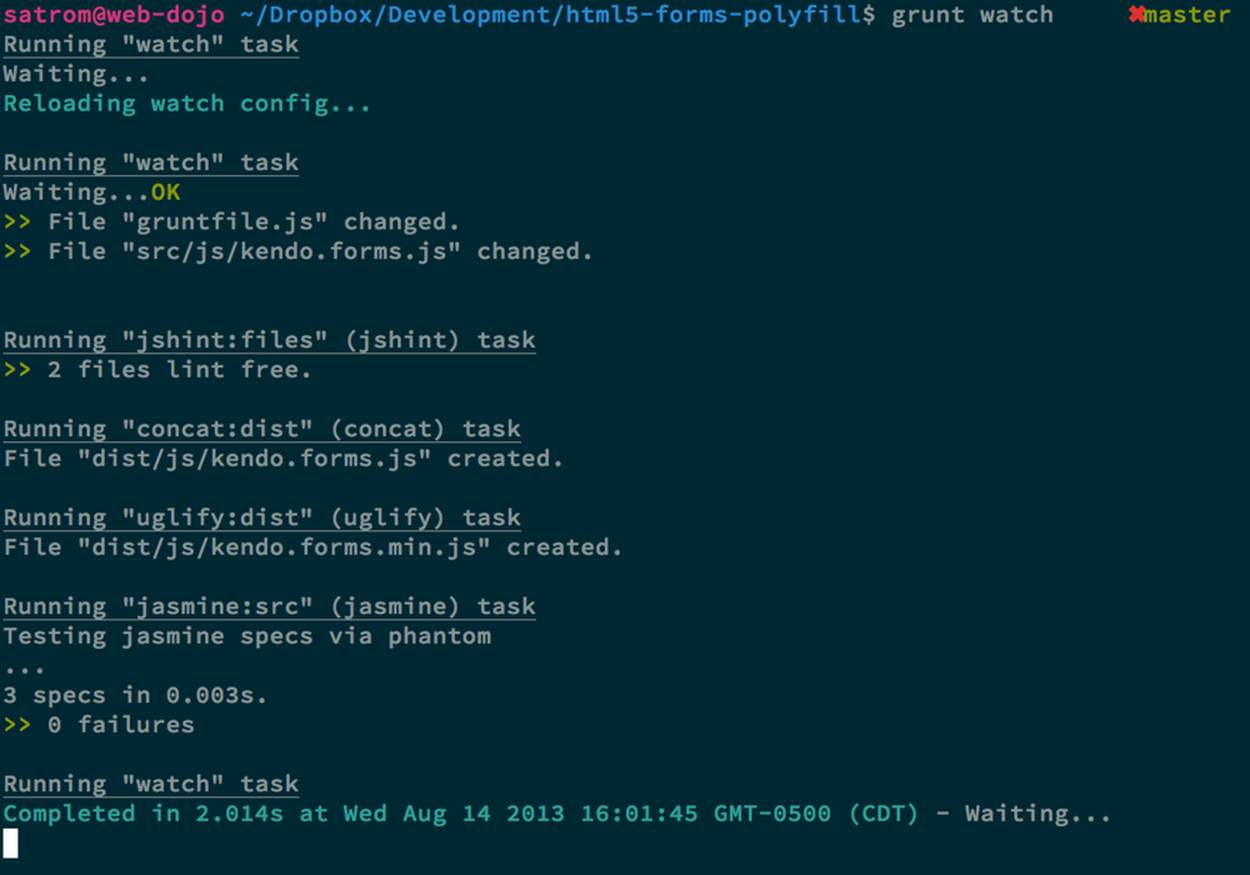
Figure 4-6. Developing iteratively with grunt watch
Performing Remote Testing with Travis CI
Before we wrap up this chapter, there’s one final piece of setup I suggest you perform when building a cross-browser polyfill: configuring a CI server to run your tests and provide you with that extra-level sanity check. As I said previously, I prefer Travis CI because the service is free for open source projects, and it’s dead-simple to configure. In fact, all I need in my project is to add a file called .travis.yml with a few options, as shown in Example 4-18.
Example 4-18. A Travis CI configuration file, .travis.yml, for our Forms polyfill
language: node_js
node_js:
- "0.10"
- "0.8"
before_script:
- npm install -g grunt-cli
This file, which I’ll include in my Git repository and push to GitHub, tells Travis that I’m running a NodeJS app, and that I’d like to test it using Node v0.10 and v0.8. I’ve also included the before_script option to ensure that the CI server has the Grunt CLI installed, which I need to run my tests. Once I’ve added this file and pushed it to GitHub, I can head over to the Travis website and follow their Getting Started guide to configure my project with their service.
Once everything is set up, any time I push a commit to my repo from GitHub to Travis, the service will spin up and run my tests, giving me that extra measure of defense for my polyfill. Figure 4-7 shows an example status screen for my HTML5 Forms polyfill. Looks like a success!
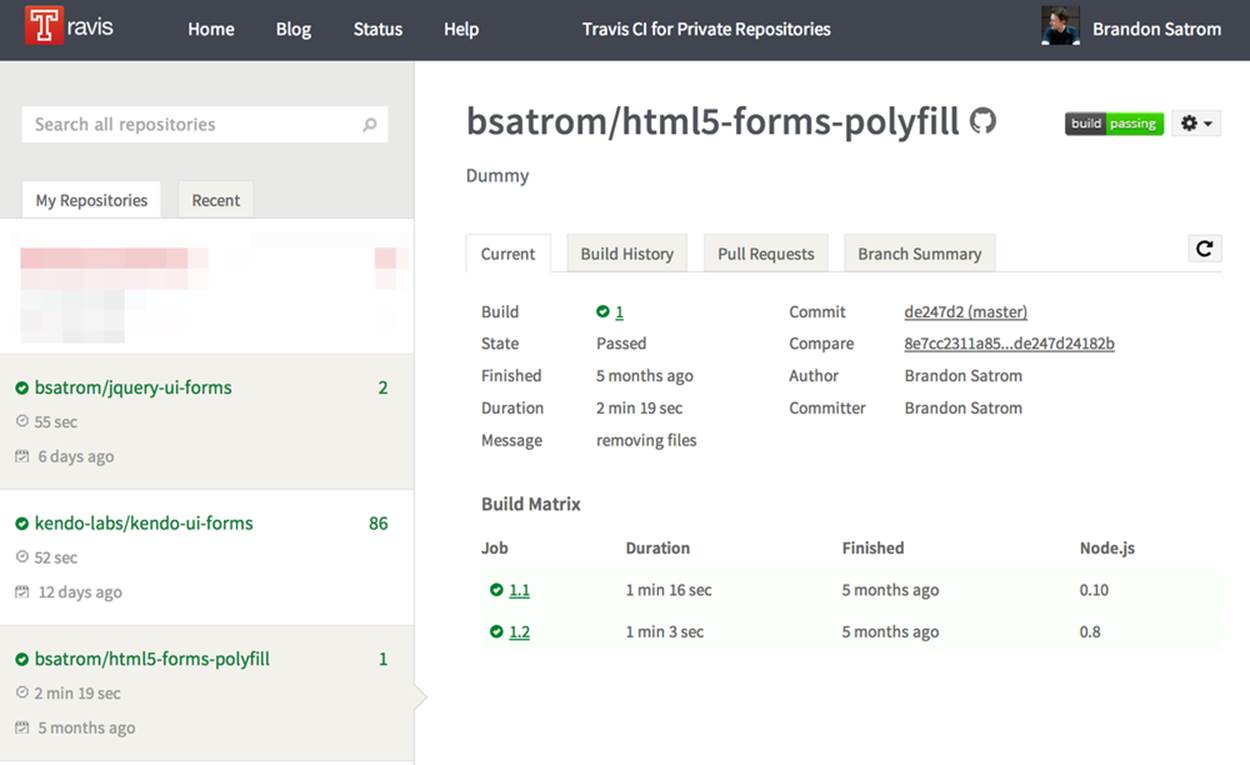
Figure 4-7. The Travis dashboard with test results for our polyfill
Since there are so many moving pieces involved in getting cross-browser testing set up, I’ve purposely kept our fixtures file small, covering only three tests. However, the full kendo-ui-forms polyfill contains a much larger test suite, and I suggest you check it out for yourself when venturing into testing for your own polyfills.
The Bottom Line: Use What Works for You!
We’ve covered a ton of ground in this chapter, and while much of it is not specific to polyfill development, I felt this chapter was an important one to include because a great polyfill needs tests—and lots of ‘em—and a rock-solid development workflow. As you’ll see in the next chapter, polyfill development can get hairy at times, especially as you delve into oldIE, so the more thorough your tests and your workflow, the better off you’ll be as you head down the narrow road.
In this chapter, I mentioned a lot of third-party and open source technologies that I prefer to use when building polyfills. Some of these might work for you as well, while in other cases you have a personal favorite you like to use. That’s OK! All that matters is that you get a good dev and test workflow in place early on, no matter which tools you choose to use.
Now that our development and testing workflow is in place and we’ve built a nice cross-browser polyfill, let’s take a look at edge cases, performance considerations, and finally, how to release your polyfill into the wild.