Pro JavaScript Techniques, Second Edition (2015)
9. Web Production Tools
John Resig1, Russ Ferguson1 and John Paxton1
(1)
NJ, United States
The tools for developing websites have matured over the years. We went from using simple editors like Notepad to full-scale development environments like WebStorm. We also have libraries like JQuery. We can use Handlebars as a templating engine and AngularJS as a full MVC framework. There are also unit testing frameworks and version control systems to help us do our jobs better and faster. So now that we have all of these things available, how do we keep them all organized?
To answer that, we are going to break this down into two parts. First, we’ll look at tools for the creation of a site, then at tools for keeping track of the changes to that site. In order to create a site we will explore Yeoman, Grunt, Bower, and Node Package Manager (NPM). To track changes we will use Git.
All of these tools work together, so let’s break down what each one does:
· Bower is a package management system. Its purpose is to make sure that all the client-side code that your project depends on has been downloaded and installed. Site: http://bower.io/
· Grunt is what’s called a build tool. It lets you automate many types of tasks, including unit testing, linting (checking JavaScript for errors), and adding your code to version control. It can also be used in deploying your code to a server. Site: http://gruntjs.com/
· Yeoman is what’s called the scaffolding tool. It creates the files and folders needed to make a bare-bones version of the project. It then uses Bower to gather all the code that the project is dependent on. Finally it uses a build tool (like Grunt) to automate tasks. It does this by way of using generators. Site: http://yeoman.io/
· Node Package Manager (NPM), as you can see from its name, manages packages. These packages run on top of Node.js. As Node became more popular, some of these packages were developed for client-side development instead of just server-side, where Node.js is used. Site:https://nodejs.org/
· Git is a version control system. If you have heard of tools like Subversion or Perforce, Git is similar. It will keep track of all the files you work with and can tell you the difference between the files. Site: http://git-scm.com/
Scaffolding Your Projects
Computers are great at doing tasks that people don’t want to do, and they can do them over and over again without getting bored. No one wants to make folders for the images, CSS, and JavaScript files every time you create a project. There are plenty of small tasks that we take for granted that can now be automated. Wouldn’t it be nice to start a project that just has all the folders worked out for you with a single command?
That’s the idea behind scaffolding. Because most websites are organized the same way, there isn’t a need to work out the structure manually. Yeoman lets you scaffold just about any type of web project you want. Using best practices from the community, Yeoman uses generators to set up our project quickly and easily.
Generators are really templates that anyone can make. There are teams that sponsor projects to create “official” generators, but if that one doesn’t do the thing you want, someone else may have made one that does. Generators are also open source so you can look under one’s hood and see how it was made. In order to work with Yeoman, we first need to install Node.js.
NPM is the Foundation for Everything
Node Package Manager (NPM) gives you the ability to manage dependencies in an application. This means that if you need code for your project (say JQuery), NPM makes it easy to add to your project. It is also what is running behind the scenes with most of the tools we are about to install. NPM is part of Node.js, which is an open source cross-platform environment for making server-side applications with JavaScript. Even though we are not going to create a Node.js project here, we do need to install node. There are a few ways to do this; for our example, we will try to make it as simple as possible.
When you go to nodejs.org, the site will figure out what operating system you have. Click the Install button to download and run the installer.
Once it is installed, you can go to terminal mode (Mac, Linux) or the command prompt (Windows) and type node –version. You should see the current version of node displayed in the window.
With node installed, now we can get everything else we need. To install Yeoman, type npm install –g yo, for Grunt type npm install –g grunt-cli, and for Bower type npm install –g bower. Using -g means that the install will happen globally; you can run these utilities in any folder as you create new projects. The cli stands for command line interface. For our exercise, we will be spending time at the command line. It’s a good thing to get used to it, and worth the effort. Now we can install a generator and start looking at the other tools.
Generators
As we talked about before, generators are really templates that describe the structure of the site. You can adjust these templates by passing different parameters to Yeoman. At Yeoman.io you can find a list of generators and links back to the GitHub repositories. The repositories have all the instructions on how to use the generators. For example, if you wanted to make a site using AngularJS, you would enter
npm install –g generator-angular
This will install the AngularJS generator. If you wanted an AngularJS site and also wanted to add Karma (a JavaScript test runner) to help run your unit tests, the install would look like this:
npm install –g generator-angular generator-karma
Now that you have a generator installed, by typing yo at the command line you can look at a list of generators that are installed and update them. From here you can also install new generators.
At this point, you should make a folder for your project and, while you are in that folder, the next command should be
yo angular
Yeoman will start to ask you questions about your app. For example, it will ask whether you would like to use Sass, as shown in Figure 9-1.
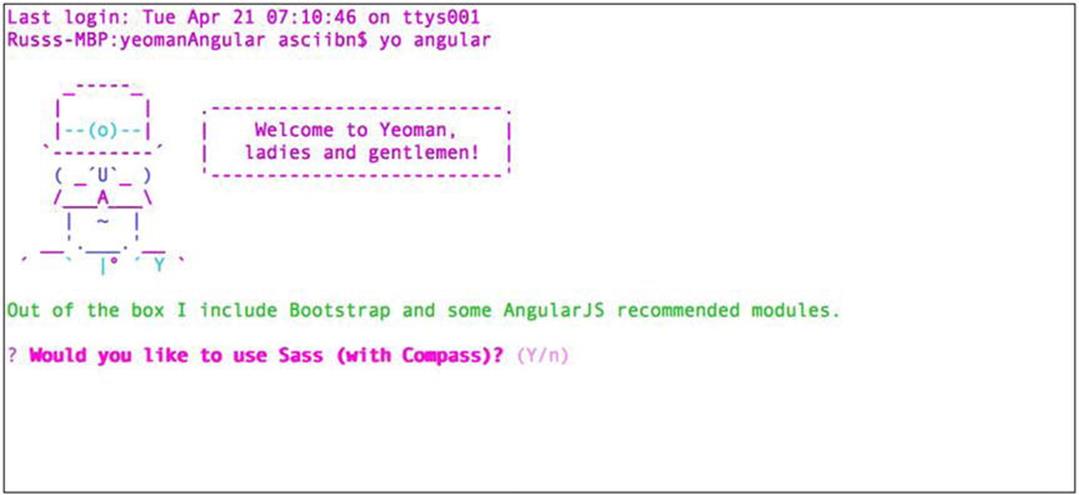
Figure 9-1.
Yeoman setting up an AngularJS site
You will be asked a few other questions about how you want the project set up. Once it is finished, Bower will grab the latest versions of all the libraries you need from GitHub and scaffold your project together for you. Once everything is installed, type the following to see the site in action:
grunt serve
This time we are using Grunt to create a local web server in your current folder and serve the home page (Figure 9-2).
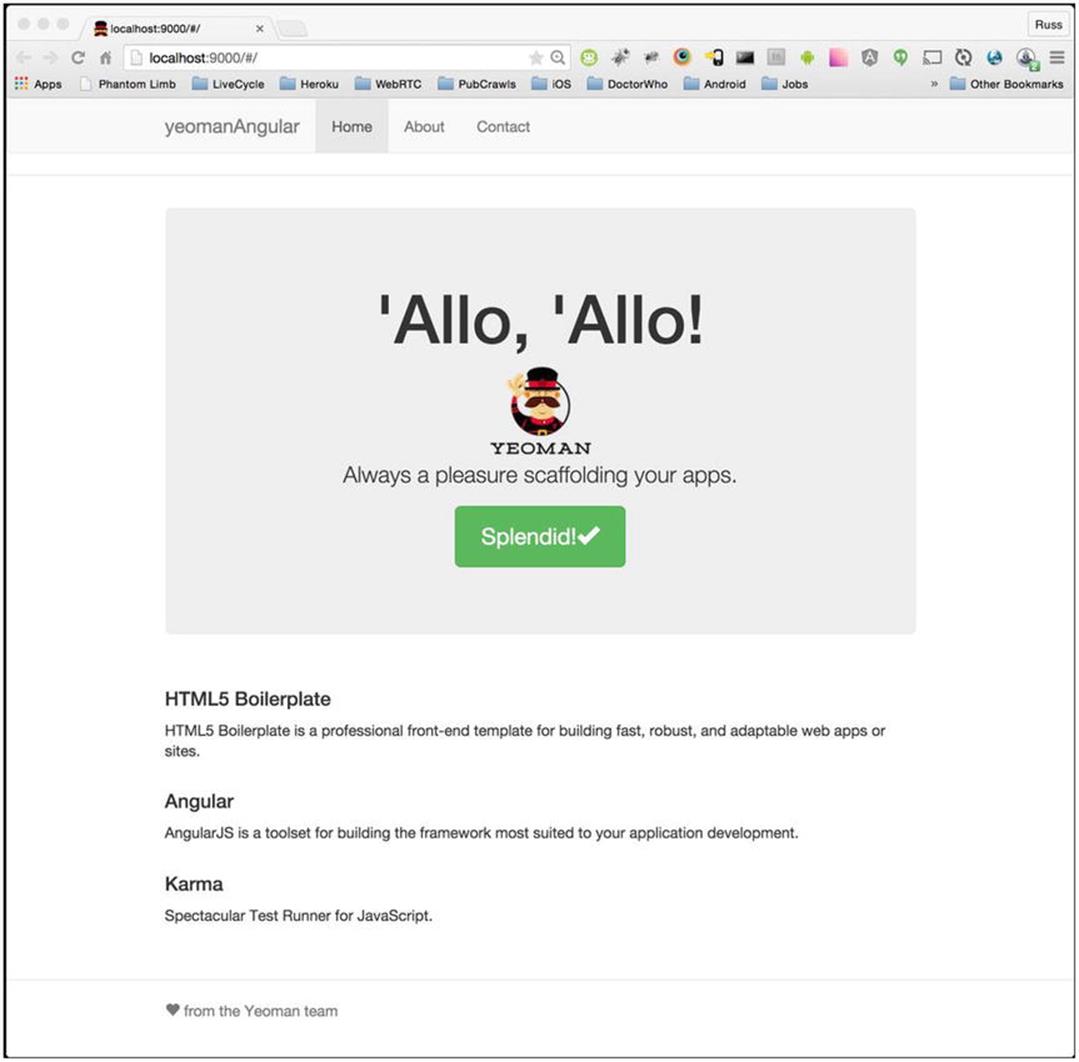
Figure 9-2.
Yeoman running AngularJS on a local server
That’s all you need to do. You now have a site that is ready to go. This would be a good time to put our code in version control.
Version Control
Change is constant. Our files are updated over and over again. As we work, things sometimes break. In some cases, a simple undo is fine. At other times we may need to revert to a previous state, especially when working with a team and there are many changes. One change can break the whole site, and it can be difficult to track down the problem. This is where version control can be very helpful.
Git is the version control system we are going to use. It’s popular and has GUI clients as well. Just as we did with the Node.js example, we are going to take the quickest way to get it installed. To do that, go to git-scm.com to download and install Git.
Once it is installed, you can configure it by using the command line. To add your identity, type git config –global user.name "your name" and git config –global user.email your@email.com.
Now that you have Git installed and configured, we are going to quickly add files and then commit them locally. Make sure you are in a project folder. Type git init inside that folder. That creates a .Git folder that will hold all the information about the project. This folder is usually invisible, so you may need to change some settings in your operating system if you want to see it. Next, let’s check the status of our commit. Type git status and you can see that at this point, no files have been added to version control (Figure 9-3).
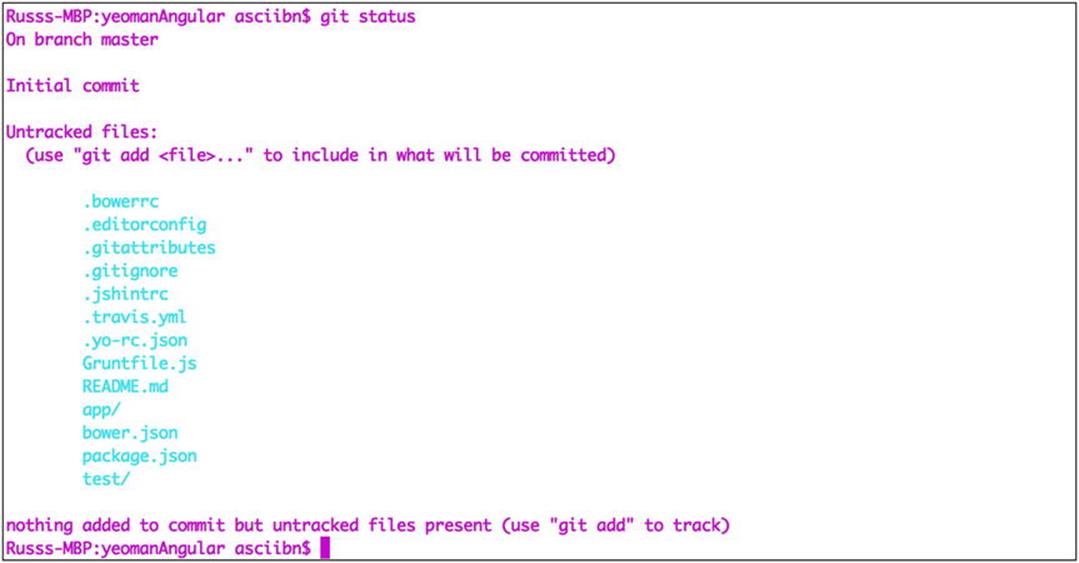
Figure 9-3.
Files have not yet been added to Git
Adding Files, Updates, and the First Commit
Next we add files so they can be tracked by Git. Adding files to the repository is as simple as typing git add file name/folder. Git will then start to track the files. In Figure 9-4 we added the app folder by typing git add app/. You can check the status again and see the results.

Figure 9-4.
The app folder has been added to Git
Continue adding files, especially bower.json and package.json. These files keep track of your dependent modules and the versions of those modules. Gruntfile.js will have all the tasks you can run. We ran a task before by typing grunt serve. That task ran a local server for us.
As a best practice, the node_modules and bower_components folders are not added to version control. You can reinstall them later by using the npm install and bower install commands.
Files that you do not want to add to Git are defined in the .gitignore file. You can modify this file to include file types or anything else you would like Git to ignore.
We talked about how files change over time, so you may ask how Git knows when a file is changed. First, the file needs to be added to the repository. We did that with the git add command. Then, when a change happens, you can ask for the status again. This will list any files that have changed since the last time it’s been added. Just remember that you need Git to know about the file before you make the change, so that can track the changes over time. In Figure 9-5 we can change the README.md file to illustrate our point.
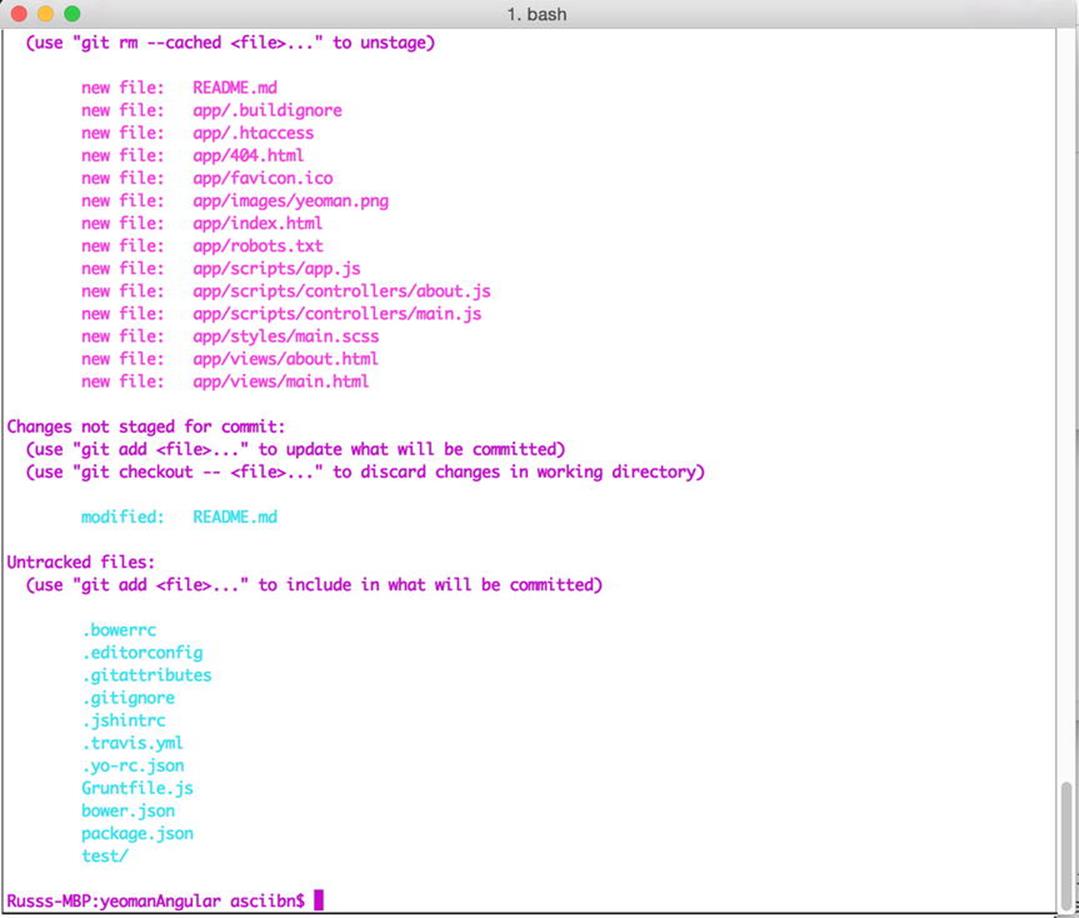
Figure 9-5.
Git can see when a file has been modified
When a file has been changed you can add it again just as you did before. The next time you check the status it will be back on the list of tracked items.
Now that you have all the files being tracked by Git, you can commit all the files. Think of a commit as a snapshot of the project at its current state (Figure 9-6). If anything were to happen to the project, you can always revert back to the last state.
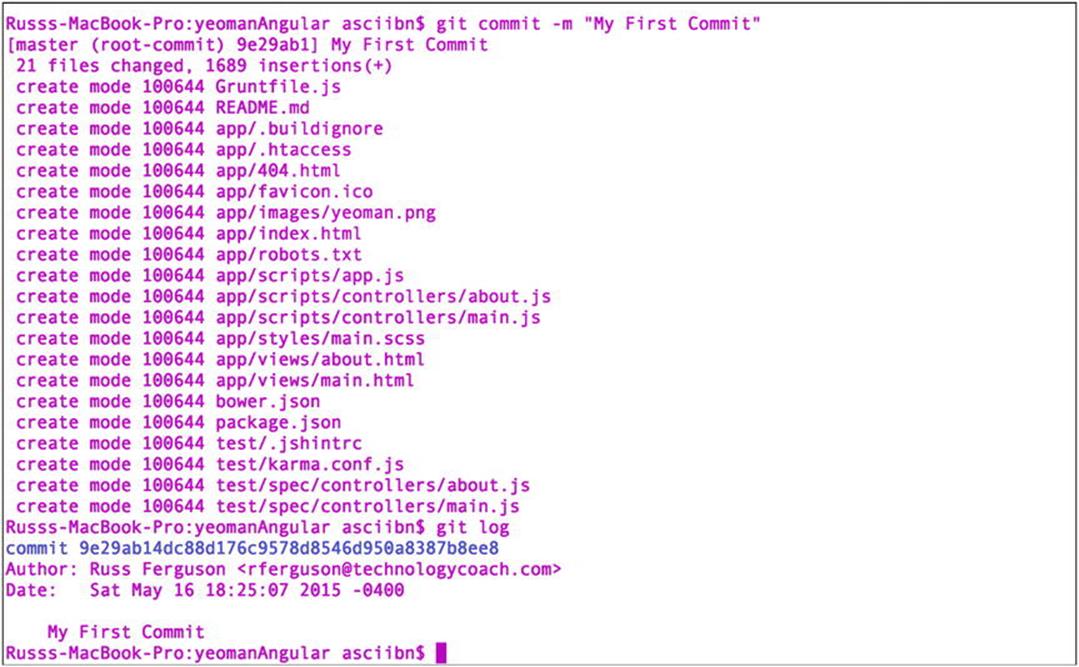
Figure 9-6.
Files committed and shown in the log
To commit, type git commit –m "notes about the commit". The –m flag stands for message. Alternatively, you can use a text editor to make your message. If you want to see the history of messages, you can type git log.
We now have a way of keeping track of changes on our local machine. This will work just fine if you are a lone developer.
If you want to share the code or work with a team, however, you will need to add a server-side component. Two of the most popular options are GitHub ( https://github.com/ ) and BitBucket ( https://bitbucket.org/ ). Using either of these options, you can have a remote repository in addition to the files on your local machine.
Summary
We hope that after reading this chapter, you see the large amount of resources available to you. The ability to put a site together quickly, using Yeoman generators, will save you time and effort as you put new projects together. Yeoman can also be used as a learning tool to understand how different frameworks work.
We gave just a basic overview of Git. It’s a subject that could be a book by itself. Fortunately, there is Pro Git by Scott Chacon and Ben Straub (Apress, 2nd edition 2014). A link to it can also be found on the Git home page ( http://git-scm.com/ ). It’s online or as a digital file. Now that we can quickly put a site together, let’s take a look in Chapter 10 at a very popular framework, AngularJS.
All materials on the site are licensed Creative Commons Attribution-Sharealike 3.0 Unported CC BY-SA 3.0 & GNU Free Documentation License (GFDL)
If you are the copyright holder of any material contained on our site and intend to remove it, please contact our site administrator for approval.
© 2016-2026 All site design rights belong to S.Y.A.