Hands-On Sencha Touch 2 (2014)
Part II. Building the FindACab App
Chapter 10. Offline Storage (Client Proxies)
We discussed how to save and load remote data via the server proxy in Chapter 8. Proxies can also save and load data from the client side via the client proxy. This comes in handy when you want to load or save data offline. When working with external APIs, you might want to think about offline storage. For example, for the FindACab app, you are using the Yelp web service, so every time you load the app you retrieve data from the API. But suddenly your console throws an error message. Bummer: you’ve reached the daily API request limit. There’s nothing you can do anymore, but there is a way to prevent this scenario from happening in the first place: storing your data results in the app itself. So what are the options, and how can you save all your data?
Although mobile devices are portable, this doesn’t necessarily mean that users are always online. They could have a bad WiFi signal, they may be on the subway, or they might have a limited data plan, for example.
This is why offline storage is so important. HTML5 offers a powerful way to achieve this with Local Storage, Session Storage, Web SQL, and Application Cache.
HTML5 Local Storage
HTML5 Local Storage saves its data with no expiration date. You use it to save key/value pairs. The Sencha framework uses it internally to save persisted JavaScript (Sencha) classes. When you open a Sencha Touch app while you are offline, the Sencha Touch app itself can run because all the assets are stored offline in the Local Storage. The FindACab app makes use of Local Storage by saving the user settings offline.
HTML5 Session Storage
This method saves its data in a session. The session will be over after the browser is closed. This is the main difference from Local Storage, which won’t lose its data at all. Usually, the HTML5 Session Storage is used for online shopping baskets. It stores all the products in the session. After the products are purchased, the session can be cleared.
Web SQL Databases
This method, formerly known as “WebDB,” provides a thin wrapper around a SQL database. In 2007, Google launched Google Gears, an open source cross-browser plug-in that included an embedded database based on SQLite. This early prototype later influenced the creation of the HTML5 Web SQL Database specification.
Application Cache
This can make your application available offline, and can cache files and assets into the browser. You will need to set up an AppCache manifest file.
CAUTION
There is a SQL client proxy available in Sencha Touch 2.3. However, unfortunately, on November 18, 2010, the W3C announced that Web SQL database is a deprecated specification. This means that web developers should no longer use the technology, as the spec will receive no further updates, and browser vendors aren’t encouraged to support this technology. You can still use Web SQL databases in Google Chrome and in Safari browsers, but at your own risk. That said, it works very well with Sencha Touch, and there is no officially supported alternative.
You might want to check out IndexDB instead. See Grgur Grisogono’s Sencha IndexDB Proxy.
The Sencha Touch client proxy saves and loads the data locally on its device or in its memory. Sencha Touch’s client proxy has four important subclasses:
§ Ext.data.proxy.Memory
§ Ext.data.proxy.LocalStorage
§ Ext.data.proxy.SessionStorage
§ Ext.data.proxy.Sql
The MemoryProxy uses a local variable for data storage and retrieval, but the contents are lost on every page refresh. For that reason, I will not discuss it in this chapter.
This is not the case with the LocalStorage proxy, the SessionStorage proxy, and the SQL proxy. When the browser provides support for these, it will save the model data as a key/value data store into the browser, so it will remain after the browser is closed and reopened. If the HTML5 Storage API is not supported by the browser, the constructor will throw an error.
Because the data is saved as key/value pairs, where the key needs to be unique, you cannot save complex objects like JSON—unless you convert these JSON objects to strings with Ext.JSON.encode(). LocalStorageProxy automatically serializes and deserializes data when saving and retrieving it.
Here is an example showing how to implement a client proxy to your model or store class:
proxy: {
type: "<client-proxy>"
}
The type can be set to memory (the default), localstorage, sessionstorage, or sql.
In this chapter, you’ll learn:
§ How to save data into Local Storage
§ How to save data into Session Storage
§ How to save data into a Web SQL database
§ How to save assets locally by using the Application Cache
Saving Data into Local Storage
When you want to save data locally so that it can always be accessed offline, you should use Local Storage.
Local Storage is like a super-cookie. You use it to save key/value pairs, like a cookie does, but you can save much more data than that. A cookie can save up to 4KB, whereas Local Storage has space for 5MB. (When that amount is exceeded, the user will get a QUOTA_EXCEEDED_ERRexception.) Also, Local Storage is much faster and more secure than cookies. Cookies are included with every HTTP request, and thereby send data unencrypted over the Internet (unless your entire web application is served over SSL), while the Local Storage data will always be available.
To save data in the Local Storage with Sencha Touch, you will have to implement a client proxy to your model or store with the type localstorage.
CAUTION
When this proxy is used in a browser where Local Storage is not supported, the constructor will throw an error.
You will require Ext.data.proxy.LocalStorage at the top of your model or store class, so the Ext.Loader knows to load the LocalStorage framework class first.
Every key/value pair in the Local Storage should have a unique key, to refer to its model data. Sencha Touch can generate a unique record id for you; you will only need to set an id on the proxy, which will be prefixed to the unique record id to make the Local Storage key.
In the FindACab app, you will use the LocalStorage proxy for saving user settings locally on the device. The Settings model in the FindACab app will contain a proxy like this:
proxy: {
type: 'localstorage',
id: "Setting"
}
Later, you will create a user form for the app, so users can save their settings to the device. You will only need to save the model (MyModel.save) or sync the store (MyStore.sync()). to make sure the data will be saved offline.
Note that the key/value pairs in the client proxies are strings! When you retrieve this data later from a store—by using, for example, the command Ext.getStore("MyStore").getAt(0)—it will decode this string to a JavaScript object for you. In other words, it serializes and deserializes data automatically when saving or retrieving it. Awesome!
An example Local Storage key/value pair for the FindACab app could look like this:
"Setting-51726e64-ae85-4fe8-9bea-aa085f499da6" : "{
"id":"51726e64-ae85-4fe8-9bea-aa085f499da6",
"gps":null,
"city":"Amsterdam",
"country":"NL"
}"
To generate an id with Sencha Touch, you need to implement an id strategy. There are three strategies you can use:
§ Ext.data.identifier.Sequential is a sequential id generator. It generates ids in sequential order (1, 2, 3, etc.).
§ Ext.data.identifier.Simple is the default id generator in Sencha Touch. It generates ids in sequential order, prefixed with a prefix parameter. When no prefix parameter is set, it prefixes ids by default with ext-record- (e.g., ext-record-1, ext-record-2, ext-record-3, etc.).
§ Ext.data.identifier.Uuid is a UUID (Universally Unique IDentifier, also known as GUIDs (Globally Unique IDentifier generator). A UUID is a 128-bits id that can guarantee uniqueness across space and time. UUIDs were originally used in the Apollo Network Computing System and later in the Open Software Foundation’s (OSF) Distributed Computing Environment (DCE), and then in Microsoft Windows platforms.
To set an id strategy, you have to require one of the identifiers at the top of your model; for example: requires: ["Ext.data.identifier.Uuid]. The model should also have the idProperty set to the model field that can be used as an id, which defaults to the fieldname: id. (Make sure the field type matches!) In addition, the model should contain the identifier property. In this case, it can be set to uuid, which is why you are requiring this class at the top of the file.
Let’s take a look at the full code for the Settings model of the FindACab app, FindACab.model.Setting:
Ext.define('FindACab.model.Setting', {
extend: 'Ext.data.Model',
requires: ['Ext.data.identifier.Uuid'],
config: {
idProperty: 'id',
identifier: 'uuid',
fields: [
{ name: 'id', type: 'auto' },
{ name: 'gps', type: 'boolean' },
{ name: 'city', type: 'string' },
{ name: 'country', type: 'string' }
],
validations: [{
type: 'presence',
field: 'city',
message: "Please provide a city."
},
{
type: 'presence',
field: 'country',
message: "Please provide a country."
}],
proxy: {
type: 'localstorage',
id: "Setting"
}
}
});
As you can see, there is an identifier and an idProperty set. The type of the id field is set to int.
The model also contains a client proxy object with the type set to localstorage and the id name (prefix) set to the word "Setting". Let’s see if this works. Open the FindACab app in your browser and open Google Developer Tools.
Open the browser’s console and enter the following line of code to create a Settings model:
var m = Ext.create('FindACab.model.Setting', {
city: "Amsterdam",
country:"NL"
});
This line saves some data into a variable called m. From now on, you can log the data that is saved in the m variable with the line console.log(m), because it is saved in the browser’s memory. However, it is not saved into the Local Storage yet. For that, you will need to save the model instance. You can do this with the command m.save(). Now you can see the data entry that is saved into the browser’s Local Storage. Open the Resources tab and select Local Storage. You should see two settings, a key/value pair. One contains the id, and the other contains the data. SeeFigure 10-1.
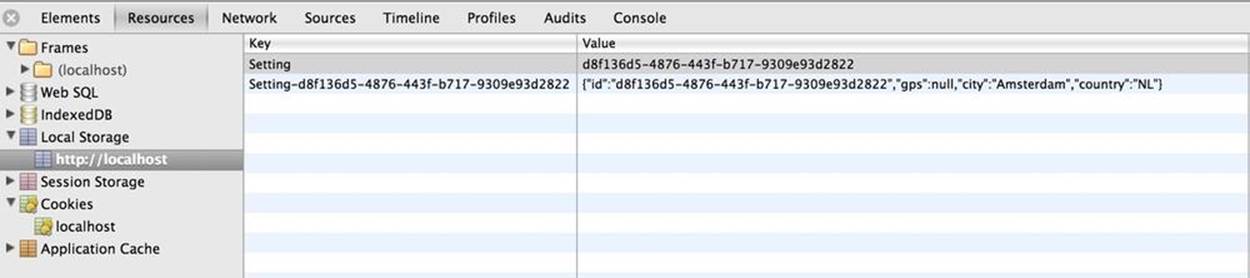
Figure 10-1. Chrome Developer Tools, Resources → Local Storage
TIP
Find more information about HTML5 storage in the article “The Past, Present, and Future of Local Storage for Web Applications.”
Saving Data into Session Storage
When you want to save data locally so that it can be accessed offline temporarily as long the session exists, you might want to use Session Storage. A use case for this could be when you have a mobile web shop and you want to save the products a user has selected in a shopping cart. The data is present as long as the session exists, but as soon as the user closes the mobile browser, the data is gone.
Implementing a SessionStorageProxy works exactly the same as the LocalStorage proxy. If you want to read more about implementing Session Storage, flip back to the examples about Local Storage.
You will require Ext.data.proxy.SessionStorage at the top of your model or store class, so the Ext.Loader knows to load the SessionStorage framework class first.
Then create a proxy. Instead of setting the type to localstorage, you will set it to sessionstorage (see Figure 10-2):
proxy: {
type: "sessionstorage",
id: "session-id-prefix"
}
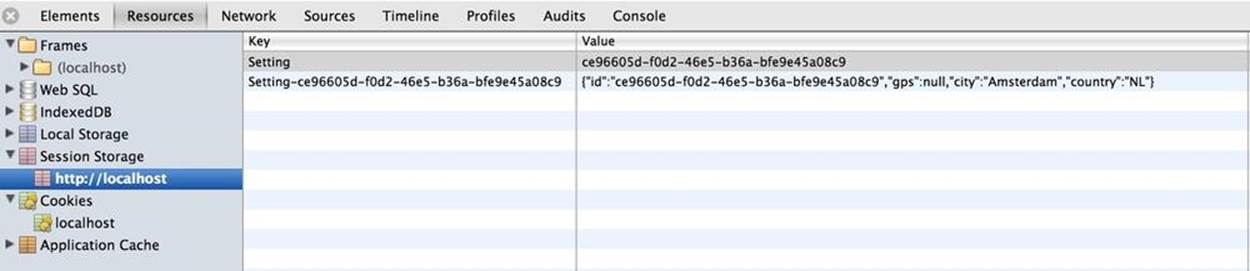
Figure 10-2. Chrome Developer Tools, Resources → Session Storage
Saving Data into a Web SQL Database
Sencha Touch provides a solution to save data in a Web SQL database. You might want to choose a local database instead of Local Storage when your app needs to save a lot of data offline.
The Web SQL local database can save many megabytes and has good performance. The storage limit is by default set to 5MB for most browsers but you can scale up, although it differs per browser and device. For example, Safari desktop supports 500MB of database storage and Safari mobile supports 50MB of database storage. Safari prompts you if you try to create a database over the size of the default database size, 5MB. It will ask you whether you want to grant the database permission to scale up to the next size of database: 5, 10, 50, and so on. Refusing the permission will throw a security error exception. If the Web SQL quota is an issue for you and you want to create a hybrid app, you could look into Adobe PhoneGap or Apache Cordova, which provide a database wrapper via a plug-in, and pass the native class data that it will then store on the device.
WARNING
At the time of writing, there is a bug in iOS 7, when you’re using Web SQL in mobile Safari that can cause big problems if you’re trying to create a database bigger than 5MB. You will still see the permission dialog, but even if you grant permission, the quota stays at 5MB and you will get a DOMException.
To save data in the Web SQL database with Sencha Touch, you will have to implement a client proxy to your model or store with the type sql and specify the database and table names.
At the top of your model or store class, you will require Ext.data.proxy.Sql, so the Ext.Loader knows to load the Sql framework class first. Next you will create a proxy object:
proxy: {
type: "sql",
database: "MyDbName",
table: "MyTableName"
}
Once you have the proxy connected to your model or store, you will still need to have some content for the SQL proxy. When you want to save user input into your database, it will work as designed. You would just save your model, and the input is saved. The next time you want to request some data, you can request it from the store. For example, Ext.getStore("Users").getById(1) would get from a Users store the record whose id equals 1. But what if you want to request some data from some external source and save this to your Web SQL database? You can create just one proxy per store. There are a few ways of doing this:
§ You set the proxy to sql, create an Ext.data.JSONP call, and then in the callback save the data to the store with Ext.getStore("MyStore").sync(), which will save it to the local database.
§ You set the proxy to sql, and when no data is available, switch the proxy to jsonp. You load the data through the model or store and in the callback, switch the proxy back to sql. Now you can sync the store with Ext.getStore("MyStore").sync() and it will save the data to the local Web SQL database.
§ You create a second store, which has a proxy that is set to sql; the other store’s proxy is set to jsonp. On the callback of the data load, you save the data to the offline store. While this solution works, you have to maintain two stores, so it might not be ideal.
TIP
Find more information about HTML5 Web SQL databases at “Introducing Web SQL Databases.” Read more about IndexDB at “A Simple TODO list using HTML5 IndexedDB.”
Saving Data into a Web SQL Database for the FindACab App
Let’s take a look at your FindACab app Cabs store, Example 10-1. It will take the second approach; see Figure 10-3 for the full flow.
Example 10-1. store/Cabs.js
Ext.define('FindACab.store.Cabs', {
extend: 'Ext.data.Store',
requires: [
'Ext.data.proxy.JsonP',
'Ext.data.proxy.Sql'
],
config: {
model: 'FindACab.model.Cab',
autoLoad: false,
//sort on Taxi name
sorters: [{
property: "name",
direction: "ASC"
}],
//group on the first character of Taxi name
grouper: {
groupFn: function(record) {
return record.get('name')[0].toUpperCase();
}
},
//groupField: 'name',
//groupDir: 'DESC',
//only display Taxi services that contain a phone number
filters: [{
filterFn: function(item) {
return item.get("phone").length > 0;
}
}],
proxy: {
type: 'sql',
database: "FindACab",
table: "Cabs"
}
}
});
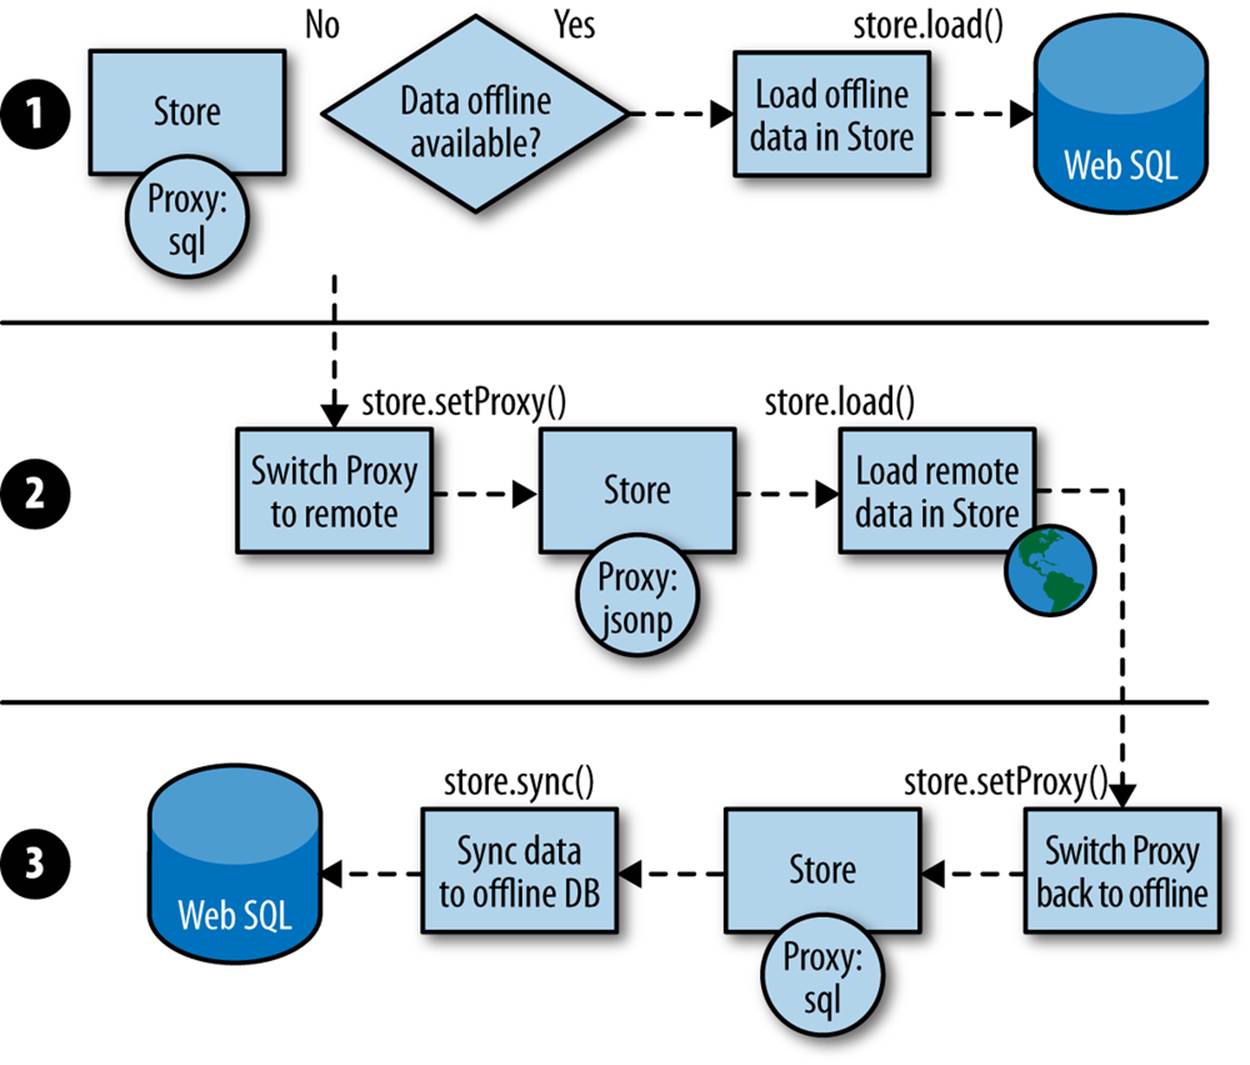
Figure 10-3. The FindACab app flow for saving data offline
Now you want to make sure that the FindACab app saves taxi addresses offline so that users can order taxis without the Internet.
I have defined a store class definition and some sorters, groupers, and filters are set. You don’t need to worry about this now, but if you want to find out more, see Chapter 9. What is important in this store is the client proxy. I have created a proxy with the type sql. It has thedatabase name FindACab, and the database table is called Cabs.
There is not much magic in the store file, apart from the proxy. The real coding fun comes from the FindACab.controller.CabController class:
Ext.define('FindACab.controller.CabController', {
extend: 'Ext.app.Controller',
config: {
models: ['Cab'],
stores: ['Cabs']
},
OK, here you go. I moved from the app.js file the models and stores array because the functionality of the Cab model and the Cabs store belongs to the CabController. Why would I do this? If the FindACab app ever becomes bigger and gets more functionality, it will be easier to maintain.
If I ever decide to remove this functionality from my application, I don’t need to browse through all my models and stores—I could simply disconnect the CabController from the app.js controllers array:
launch: function() {
Ext.Viewport.setMasked({
xtype: 'loadmask',
indicator: true,
message: 'Fetching Data...'
});
this.loadLocal();
},
As soon as the controller is ready and launched, it will show a loading mask (Ext.Viewport.mask()) to indicate to the user that it is loading some data. Then it runs the controller function loadLocal():
loadLocal: function() {
var me = this;
Ext.getStore('Cabs').load(function(item) {
var count = Ext.getStore('Cabs').getCount();
if (count < 1) {
me.downloadData();
} else {
Ext.Viewport.unmask();
}
});
},
It will load the data from the offline Web SQL database and it checks whether the database has records. If it has records, then later you will code a Google Map to center to a lat/long position. For now, the loading mask just hides, but when it has no records it should download the data from an external source. In that case, it will run the downloadData() function from the controller scope:
downloadData: function(location) {
var me = this;
location = Utils.Commons.LOCATION;
Let’s hardcode the location to the value written in the static member Utils.Commons.LOCATION. (this way, the rest of the function won’t fail):
if (!location) {
Ext.getStore('Settings').load(function() {
try {
var data = Ext.getStore('Settings').getAt(0);
var loc = data.get('city') + " " + data.get('country');
me.downloadData(loc);
} catch (e) {
Ext.Viewport.unmask();
Ext.Msg.confirm(
"No location saved",
"Please prefill your location,
to detect nearby Taxiservices.",
function(buttonId) {
if (buttonId === 'yes') {
me.getApplication
().getController
('SettingsController')
.toggleSettings();
}
}
);
}
});
}
Later in this book, the hardcoded value will be replaced for a settings form that can pass in a location entered by the user.
The downloadData() method has one argument: location. When no location is passed, the FindACab app will show a messagebox with a warning. When the user clicks OK, it will pop up a settings form where the user can enter the location. After posting the form, it should come back to the downloadData() function, now with a valid location:
else {
![]()
var store = Ext.getStore('Cabs');
store.setProxy({
type: 'jsonp',
url: Utils.Commons.YELP_API,
extraParams: {
term: Utils.Commons.YELP_TERM,
ywsid: Utils.Commons.YELP_KEY,
location: location
},
![]()
reader: {
type: 'json',
rootProperty: 'businesses',
}
});
![]()
store.load(function(records) {
me.syncRecords(records, location);
});
}
}, //end downloadData
![]()
When a location is passed in, the downloadData() function switches the proxy of the Cabs store, which is by default set to the sql proxy, to a jsonp proxy. It will set the url to the Yelp business_review_search web service URL. This one is set in the Utils.Commons static member. It will also set some extraParams in the jsonp server proxy, like the search term for Taxi, the ywsid that has my personal Yelp key, and the location, which is still hardcoded to Amsterdam NL but later can be set to be prefilled by a form.
![]()
The proxy reader is set to json and the rootProperty is set to businesses because the Yelp web service will send a JSON response back and then can start looping through the business nodes.
![]()
After the store proxy is switched, the store needs to load. In the load callback, it will run the syncRecords() controller method and pass in the records and a location.
Here’s the code for the syncRecords() function:
syncRecords: function(records, userinput) {
/*
* Loop through all the items that are downloaded
* and add these to the items array.
*/
var items = [],
me = this,
total = records.length,
i = 0,
store = Ext.getStore('Cabs');
for(i;i<total;i++) {
var item = records[i];
items.push({
'name': item.get('name'),
'latitude': item.get('latitude'),
'longitude': item.get('longitude'),
'address1': item.get('address1'),
'phone': item.get('phone'),
'state_code': item.get('state_code'),
'zip': item.get('zip'),
'city': item.get('city'),
'country_code': item.get('country_code'),
'avg_rating': item.get('avg_rating'),
'distance': item.get('distance'),
'userinput': userinput
});
};
The syncRecords() method creates an items array and loops through all the downloaded items. It pushes every item nicely to the items array, so it will save only the item fields that are declared in the Cab model, and it will be saved in one batch:
store.setProxy({
type: 'sql',
database: "FindACab",
table: 'Cabs'
});
After that, it will do the same trick—switch back to the original client sql proxy:
store.removeAll();
store.sync({
success: function(batch){
/*
* Add the downloaded items array to the Cabs Store
* and sync() the store to start saving the
* records locally.
* When it is done, we can remove the Loading mask.
*/
store.add(items);
store.sync({
success: function(batch){
me.setTitleCount(store.getCount());
store.load();
Ext.Viewport.unmask();
}
});
}
});
}
});
At last, remove the items from the offline database store, sync() it, and when the sync succeeds, start adding the complete items array to the offline database store and sync() again. In the callback, set the Cab counter and remove the loading mask because the data is present. You will load the store again, to make sure it sorts the offline database store. In Chapter 11, you will code a loadMarkers() method, which will be invoked from here.
You can test the FindACab app by opening the Chrome Developer Tools → Resources → Web SQL tab. It will show the FindACab database and the Cabs table with all the records. See Figure 10-4.
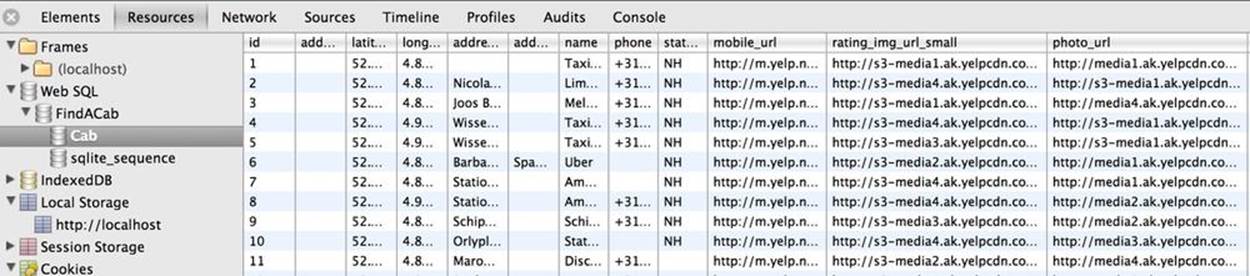
Figure 10-4. Chrome Developer Tools → Resources → Web SQL
The next time I load the app, you will notice that there is no request to Yelp made. This is because the database has records!
Do you want to test the downloading process again? In the Chrome Developer Tools → Console, enter the following command: Ext.getStore("Cabs").removeAll();. This removes all the items from the store. But you do need to sync the store to see the changes:Ext.getStore("Cabs").sync(). Now refresh the application and notice that the data will download again.
TIP
Argh, isn’t it annoying that you cannot delete a Web SQL database directly with the Google Chrome Dev Tools? Well, there is a solution to remove a database (and its tables). Just open the following URL in your Google Chrome browser: chrome://settings/cookies. Here you can search for any particular site or remove all locally stored data. In my case, I just search for localhost, and I get an exact overview of all my cookies, Local Storage, and Web SQL databases. I can double-click a database, and I’ll be prompted to remove the database. I click the Remove button, and it is gone!
Saving Assets Locally by Using the Application Cache
The last technique in this chapter I would like to discuss is not a client proxy. However, it is a technique for making your application available offline, without downloading the stylesheets, images, Sencha Touch framework, and custom classes. It will create a cached version of your mobile app by setting up a HTML5 cache manifest file, better known as the HTML5 AppCache.
AppCache is extremly handy for users who want to bookmark their mobile apps to their phone home screen. This is nice because the browser address bar will be gone, so it will give you a more native experience.
Whereas Web Storage saves key/value pairs in the browser’s Local or Session Storage, AppCache has the HTML5 ability to save (cache) a whole web app (the index.html file and all its assets, such as stylesheets, JavaScript, images, icons, fonts, etc.) in the browser’s cache to make it available, even if the client has no Internet connection at all.
The Application Cache manifest file is a simple text file that lists the resources that the browser should cache for offline access. Another reason for using AppCache is speed (because it caches and therefore loads faster) and performance (it reduces server load).
TIP
Read the W3C spec about AppCache. Also, take a look at Jake Archibald’s blog post at A List Apart about troubleshooting AppCache.
Now how can you implement this? You don’t have to do much to make Application Cache work. First, you will have to edit the app.json file; it should define the appCache object. Let’s take a look:
"appCache": {
"cache": [
"index.html",
"resources/css/app.css"
],
The cache section lists all the items that need to be cached. Make sure that these files exist, or else the caching will fail (and if it fails, you will not be happy):
"network": [
"*"
],
The network section is basically used for (white) listing files that require an online connection. All requests to these resources bypass the cache, even if the browser is offline. Note you can also set this to a wildcard, *. This might be handy when the files from the cache section are cached but some assets are not listed and therefore missing. It will make sure that those unlisted assets will still be downloaded, no matter what. If I didn’t create a network section that points to the wildcard, then the application would miss these files:
"fallback": [
//fall back items
]
}//end appCache
The fallback section in the app cache file will let us list fallback solutions for when a request fails. See, for example, the line resources/images/resources/images/placeholder.gif. If any image in the resources/images folder fails, it will display the placeholder.png file.
Then build the application with Sencha Cmd:
sencha app build
Be aware that the Application Cache can be a pain sometimes for the following reasons:
§ You cannot specify an expiration date/time for files in the cache. But you can expire the cache by making a change to the manifest file—for example, by adding a comment. Any change to the file causes all files to be recached. This is what Sencha does: it changes the Application Cache manifest by adding comments that represent generated unique keys.
§ If any of the files listed on the manifest are not found, no caching will occur.
§ While waiting for the manifest file, the browser will load the site from the cache. Therefore, changes to your cache manifest are acted upon only after a second refresh from when the file was modified.
§ Manually clearing the browser cache from the Google Chrome Dev Tools does not force all files to be recached.
Let’s see how the Application Cache manifest for a Sencha production build will look after we build the application. Sencha generated the cache.appcache manifest file shown in Example 10-2.
Example 10-2. build/FindACab/production/cache.appcache
CACHE MANIFEST
# 012e27c4c1189aa484c92bd7bf3740cb89395da7
index.html
FALLBACK:
NETWORK:
*
The Sencha production build of the app makes sure that the manifest file is loaded by adding the following attribute into the <html> tag of the index.html file: manifest="cache.appcache". The manifest file will be present in the project root.
TIP
A manifest file must be served with the MIME-type text/cache-manifest. You may need to add this custom file type to your web server or to a .htaccess file: AddType text/cache-manifest .appcache.
It might be handy to get an overview to see which files are cached by the browser. When using the Google Chrome Developer Tools (or Safari Dev Tools), you can inspect the files in your AppCache under the Resources → Application Cache heading. See Figure 10-5.
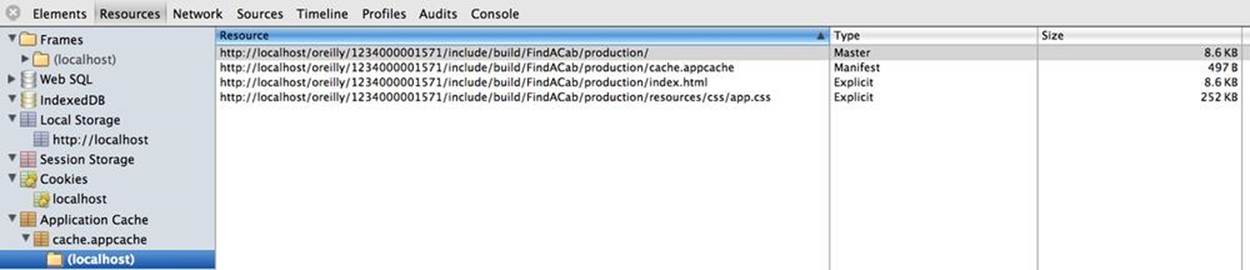
Figure 10-5. Resources → Application Cache
TIP
How do you clean app.cache files? Browse with Google Chrome to chrome://appcache-internals/, and click the Remove link for the corresponding website or app.
So actually that is all there is to it. Creating a production build will do the trick; you just have to maintain the list of the files to cache.
Summary
This chapter explained all the possible ways to save application data offline. You can use one of the client proxies, which allows you to sync the data store with the browser memory (default), HTML5 Local Storage, HTML5 Session Storage (saved in the session), or a Web SQL database. When you want to make the full application available for offline usage, you can set up the HTML5 AppCache manifest file, which will cache a version of your app automatically.
If you have followed the tutorials in this book, you will now have the base of the FindACab app ready: a configured Cabs store that loads data from the Yelp web service and saves it offline with a client Web SQL proxy. Also, you created a Settings model that can be validated and eventually can save the data to the Local Storage with a localstorage client proxy.
But the FindACab app doesn’t display anything yet. That’s because we still haven’t talked about views and UI (user interface) components. So now is the time to do that—let’s create some good-looking applications!
All materials on the site are licensed Creative Commons Attribution-Sharealike 3.0 Unported CC BY-SA 3.0 & GNU Free Documentation License (GFDL)
If you are the copyright holder of any material contained on our site and intend to remove it, please contact our site administrator for approval.
© 2016-2026 All site design rights belong to S.Y.A.