Spring in Action, 4th Edition: Covers Spring 4 (2015)
Part 3. Spring in the back end
Chapter 11. Persisting data with object-relational mapping
This chapter covers
· Working with Spring and Hibernate
· Writing Spring-free repositories with contextual sessions
· Using JPA with Spring
· Automatic JPA repositories with Spring Data
When we were kids, riding a bike was fun, wasn’t it? We’d ride to school in the mornings. When school let out, we’d cruise to our best friend’s house. When it got late and our parents were yelling at us for staying out past dark, we’d peddle home for the night. Gee, those days were fun.
Then we grew up, and now we need more than a bike. Sometimes we have to travel a long distance to work. Groceries have to be hauled, and our kids need to get to soccer practice. And if we live in Texas, air conditioning is a must! Our needs have outgrown our bikes.
JDBC is the bike of the persistence world. It’s great for what it does, and for some jobs it works fine. But as applications become more complex, so do our persistence requirements. We need to be able to map object properties to database columns and have our statements and queries created for us, freeing us from typing an endless string of question marks. We also need features that are more sophisticated:
· Lazy loading —As object graphs become more complex, you sometimes don’t want to fetch entire relationships immediately. To use a typical example, suppose you’re selecting a collection of PurchaseOrder objects, and each of these objects contains a collection of LineItemobjects. If you’re only interested in PurchaseOrder attributes, it makes no sense to grab the LineItem data. That could be expensive. Lazy loading allows you to grab data only as it’s needed.
· Eager fetching —This is the opposite of lazy loading. Eager fetching allows you to grab an entire object graph in one query. In the cases where you know you need a PurchaseOrder object and its associated LineItems, eager fetching lets you get this from the database in one operation, saving you from costly round-trips.
· Cascading —Sometimes changes to a database table should result in changes to other tables as well. Going back to the purchase order example, when an Order object is deleted, you also want to delete the associated LineItems from the database.
Several frameworks are available that provide these services. The general name for these services is object-relational mapping (ORM). Using an ORM tool for your persistence layer can save you literally thousands of lines of code and hours of development time. This lets you switch your focus from writing error-prone SQL code to addressing your application’s requirements.
Spring provides support for several persistence frameworks, including Hibernate, iBATIS, Java Data Objects (JDO), and the Java Persistence API (JPA). As with Spring’s JDBC support, Spring’s support for ORM frameworks provides integration points to the frameworks as well as some additional services:
· Integrated support for Spring declarative transactions
· Transparent exception handling
· Thread-safe, lightweight template classes
· DAO support classes
· Resource management
I don’t have enough space in this chapter to cover all the ORM frameworks that are supported by Spring. But that’s okay, because Spring’s support for one ORM solution is similar to the next. Once you get the hang of using one ORM framework with Spring, you’ll find it easy to switch to another.
In this chapter, we’ll look at how Spring integrates with two of the most commonly used ORM solutions: Hibernate and JPA. You’ll also get your first look at the Spring Data project by looking at Spring Data JPA. In doing so, you’ll not only learn how Spring Data JPA can take away a lot of the boilerplate code in your JPA repositories, but you’ll also have a foundation to build on in the next chapter when we look at using Spring Data for schemaless storage options.
Let’s get started by exploring Spring’s support for Hibernate.
11.1. Integrating Hibernate with Spring
Hibernate is an open source persistence framework that has gained significant popularity in the developer community. It provides not only basic object-relational mapping but also all the other sophisticated features you’d expect from a full-featured ORM tool, such as caching, lazy loading, eager fetching, and distributed caching.
In this section, we’ll focus on how Spring integrates with Hibernate, without dwelling too much on the intricate details of using Hibernate. If you need to learn more about working with Hibernate, I recommend either Java Persistence with Hibernate, Second Edition by Christian Bauer, Gavin King, and Gary Gregory (Manning, 2014, www.manning.com/bauer3/) or the Hibernate website at www.hibernate.org.
11.1.1. Declaring a Hibernate session factory
Natively, the main interface for working with Hibernate is org.hibernate.Session. The Session interface provides basic data-access functionality such as the ability to save, update, delete, and load objects from the database. Through the Hibernate Session, an application’s repository performs all of its persistence needs.
The standard way to get a reference to a Hibernate Session object is through an implementation of Hibernate’s SessionFactory interface. Among other things, SessionFactory is responsible for opening, closing, and managing Hibernate Sessions.
In Spring, the way to get a Hibernate SessionFactory is through one of Spring’s Hibernate session-factory beans. As of version 3.1, Spring comes with three session-factory beans to choose from:
· org.springframework.orm.hibernate3.LocalSessionFactoryBean
· org.springframework.orm.hibernate3.annotation.AnnotationSession-FactoryBean
· org.springframework.orm.hibernate4.LocalSessionFactoryBean
These session-factory beans are implementations of Spring’s FactoryBean interface that produce a Hibernate SessionFactory when wired into any property of type SessionFactory. This makes it possible to configure your Hibernate session factory alongside the other beans in your application’s Spring context.
Choosing which of these session factory beans to use comes down to which version of Hibernate you’re using and whether you’ll be defining your object-to-database mapping in XML or using annotations. If you’re using Hibernate 3.2 or higher (up to but not including Hibernate 4.0) and doing the mapping in XML, you’ll need to configure LocalSessionFactoryBean from the org.springframework.orm.hibernate3 package in Spring:
@Bean
public LocalSessionFactoryBean sessionFactory(DataSource dataSource) {
LocalSessionFactoryBean sfb = new LocalSessionFactoryBean();
sfb.setDataSource(dataSource);
sfb.setMappingResources(new String[] { "Spitter.hbm.xml" });
Properties props = new Properties();
props.setProperty("dialect", "org.hibernate.dialect.H2Dialect");
sfb.setHibernateProperties(props);
return sfb;
}
LocalSessionFactoryBean is configured here with three properties. The dataSource property is wired with a reference to a DataSource bean. The mappingResources property lists one or more Hibernate mapping files that define the persistence strategy for the application. Finally,hibernateProperties is where you configure the minutia of how Hibernate should operate. In this case, you’re saying that Hibernate will be working with an H2 database and should use the H2Dialect to construct SQL accordingly.
If annotation-oriented persistence is more your style, and if you’re not yet using Hibernate 4, then you’ll want to use AnnotationSessionFactoryBean instead of LocalSessionFactoryBean:
@Bean
public AnnotationSessionFactoryBean sessionFactory(DataSource ds) {
AnnotationSessionFactoryBean sfb = new AnnotationSessionFactoryBean();
sfb.setDataSource(ds);
sfb.setPackagesToScan(new String[] { "com.habuma.spittr.domain" });
Properties props = new Properties();
props.setProperty("dialect", "org.hibernate.dialect.H2Dialect");
sfb.setHibernateProperties(props);
return sfb;
}
Or, if you’re using Hibernate 4, you should use the LocalSessionFactoryBean from the org.springframework.orm.hibernate4 package. Although it shares a name with the LocalSessionFactoryBean from the Hibernate 3 package, this new session factory bean added in Spring 3.1 is like a mashup of the Hibernate 3 LocalSessionFactoryBean and AnnotationSessionFactoryBean. It has many of the same properties and can be configured for either XML-based mapping or annotation-based mapping. Here’s how you’d configure it for annotation-based mapping:
@Bean
public LocalSessionFactoryBean sessionFactory(DataSource dataSource) {
LocalSessionFactoryBean sfb = new LocalSessionFactoryBean();
sfb.setDataSource(dataSource);
sfb.setPackagesToScan(new String[] { "com.habuma.spittr.domain" });
Properties props = new Properties();
props.setProperty("dialect", "org.hibernate.dialect.H2Dialect");
sfb.setHibernateProperties(props);
return sfb;
}
In either case, the dataSource and hibernateProperties properties specify where to find a database connection and what kind of database you’ll be dealing with. But instead of listing Hibernate mapping files, you can use the packagesToScan property to tell Spring to scan one or more packages, looking for domain classes that are annotated for persistence with Hibernate. This includes classes that are annotated with JPA’s @Entity or @MappedSuperclass and Hibernate’s own @Entity annotation.
If you’d prefer, you may also explicitly list all of your application’s persistent classes by specifying a list of fully qualified class names in the annotatedClasses property:
sfb.setAnnotatedClasses(
new Class<?>[] { Spitter.class, Spittle.class }
);
The annotatedClasses property is fine for hand-picking a few domain classes. But packagesToScan is more appropriate if you have a lot of domain classes and don’t want to list them all or if you want the freedom to add or remove domain classes without revisiting the Spring configuration.
With a Hibernate session factory bean declared in the Spring application context, you’re ready to start creating your repository classes.
11.1.2. Building Spring-free Hibernate
In the early days of Spring and Hibernate, writing a repository class would involve working with Spring’s HibernateTemplate. HibernateTemplate would ensure that only one Hibernate session would be used per transaction. The downside of this approach is that your repository implementation would be directly coupled to Spring.
The best practice now, however, is to take advantage of Hibernate contextual sessions and not use HibernateTemplate at all. This can be done by wiring a Hibernate SessionFactory directly into your repository and using it to obtain a session, as shown in the following listing.
Listing 11.1. Spring-free Hibernate repositories, enabled by Hibernate sessions
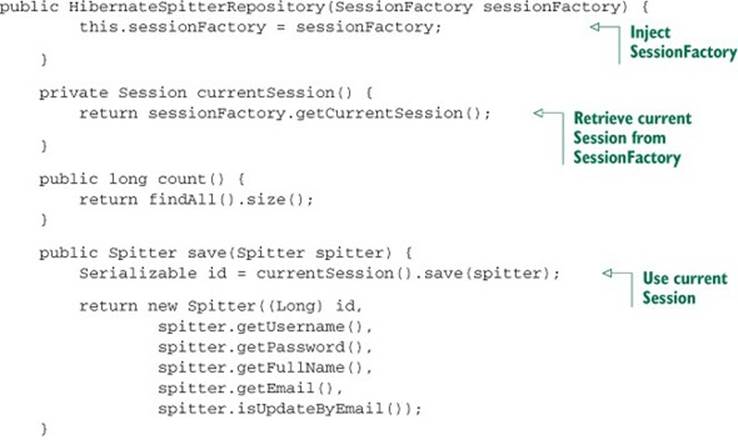
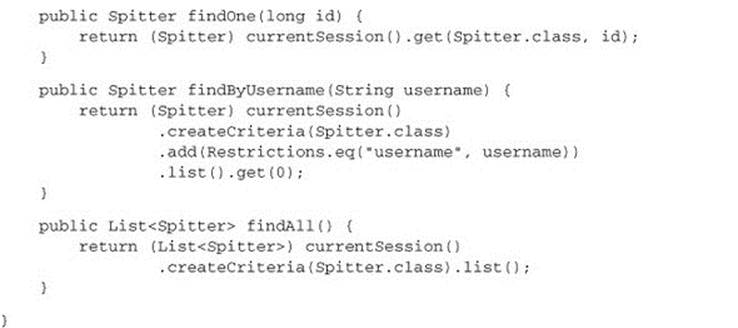
There are several things to take note of in listing 11.1. First, you’re using the @Inject annotation to have Spring automatically inject a SessionFactory into Hibernate-SpitterRepository’s sessionFactory property. Then, in the currentSession() method, you use thatSessionFactory to get the current transaction’s session.
Also note that you annotate the class with @Repository. This accomplishes two things. First, @Repository is another one of Spring’s stereotype annotations that, among other things, are scanned by Spring component-scanning. This means you won’t have to explicitly declare aHibernateSpitterRepository bean, as long as the repository class is in a package covered by component-scanning.
In addition to helping to reduce explicit configuration, @Repository serves another purpose. Recall that one of the jobs of a template class is to catch platform-specific exceptions and rethrow them as one of Spring’s unified unchecked exceptions. But if you’re using Hibernate contextual sessions and not a Hibernate template, how can the exception translation take place?
To add exception translation to a template-less Hibernate repository, you just need to add a PersistenceExceptionTranslationPostProcessor bean to the Spring application context:
@Bean
public BeanPostProcessor persistenceTranslation() {
return new PersistenceExceptionTranslationPostProcessor();
}
PersistenceExceptionTranslationPostProcessor is a bean post-processor that adds an adviser to any bean that’s annotated with @Repository so that any platform-specific exceptions are caught and then rethrown as one of Spring’s unchecked data-access exceptions.
Now the Hibernate version of your repository is complete. And you were able to develop it without directly depending on any Spring-specific classes (aside from the @Repository annotation). That same template-less approach can be applied when developing a pure JPA-based repository. Let’s take one more stab at developing a SpitterRepository implementation, this time using JPA.
11.2. Spring and the Java Persistence API
The Java Persistence API (JPA) emerged out of the rubble of EJB 2’s entity beans as the next-generation Java persistence standard. JPA is a POJO-based persistence mechanism that draws ideas from both Hibernate and Java Data Objects (JDO) and mixes Java 5 annotations in for good measure.
With the Spring 2.0 release came the premiere of Spring integration with JPA. The irony is that many blame (or credit) Spring with the demise of EJB. But now that Spring provides support for JPA, many developers are recommending JPA for persistence in Spring-based applications. In fact, some say that Spring-JPA is the dream team for POJO development.
The first step toward using JPA with Spring is to configure an entity manager factory as a bean in the Spring application context.
11.2.1. Configuring an entity manager factory
In a nutshell, JPA-based applications use an implementation of EntityManager-Factory to get an instance of an EntityManager. The JPA specification defines two kinds of entity managers:
· Application-managed —Entity managers are created when an application directly requests one from an entity manager factory. With application-managed entity managers, the application is responsible for opening or closing entity managers and involving the entity manager in transactions. This type of entity manager is most appropriate for use in standalone applications that don’t run in a Java EE container.
· Container-managed —Entity managers are created and managed by a Java EE container. The application doesn’t interact with the entity manager factory at all. Instead, entity managers are obtained directly through injection or from JNDI. The container is responsible for configuring the entity manager factories. This type of entity manager is most appropriate for use by a Java EE container that wants to maintain some control over JPA configuration beyond what’s specified in persistence.xml.
Both kinds of entity manager implement the same EntityManager interface. The key difference isn’t in the EntityManager itself, but rather in how the EntityManager is created and managed. Application-managed EntityManagers are created by an Entity-ManagerFactoryobtained by calling the createEntityManagerFactory() method of the PersistenceProvider. Meanwhile, container-managed EntityManagerFactorys are obtained through PersistenceProvider’s createContainerEntityManager-Factory() method.
What does this all mean for Spring developers wanting to use JPA? Not much. Regardless of which variety of EntityManagerFactory you want to use, Spring will take responsibility for managing EntityManagers for you. If you’re using an application-managed entity manager, Spring plays the role of an application and transparently deals with the EntityManager on your behalf. In the container-managed scenario, Spring plays the role of the container.
Each flavor of entity manager factory is produced by a corresponding Spring factory bean:
· LocalEntityManagerFactoryBean produces an application-managed EntityManagerFactory.
· LocalContainerEntityManagerFactoryBean produces a container-managed EntityManagerFactory.
It’s important to point out that the choice made between an application-managed EntityManagerFactory and a container-managed EntityManagerFactory is completely transparent to a Spring-based application. When you’re working with Spring and JPA, the intricate details of dealing with either form of EntityManagerFactory are hidden, leaving your data-access code to focus on its true purpose: data access.
The only real difference between application-managed and container-managed entity manager factories, as far as Spring is concerned, is how each is configured in the Spring application context. Let’s start by looking at how to configure the application-managedLocalEntityManagerFactoryBean in Spring. Then you’ll see how to configure a container-managed LocalContainerEntityManagerFactoryBean.
Configuring application-managed JPA
Application-managed entity-manager factories derive most of their configuration information from a configuration file called persistence.xml. This file must appear in the META-INF directory in the classpath.
The purpose of the persistence.xml file is to define one or more persistence units. A persistence unit is a grouping of one or more persistent classes that correspond to a single data source. In simple terms, persistence.xml enumerates one or more persistent classes along with any additional configuration such as data sources and XML-based mapping files. Here’s a typical example of a persistence.xml file as it pertains to the Spittr application:
<persistence xmlns="http://java.sun.com/xml/ns/persistence"
version="1.0">
<persistence-unit name="spitterPU">
<class>com.habuma.spittr.domain.Spitter</class>
<class>com.habuma.spittr.domain.Spittle</class>
<properties>
<property name="toplink.jdbc.driver"
value="org.hsqldb.jdbcDriver" />
<property name="toplink.jdbc.url" value=
"jdbc:hsqldb:hsql://localhost/spitter/spitter" />
<property name="toplink.jdbc.user"
value="sa" />
<property name="toplink.jdbc.password"
value="" />
</properties>
</persistence-unit>
</persistence>
Because so much configuration goes into a persistence.xml file, little configuration is required (or even possible) in Spring. The following <bean> declares a LocalEntityManagerFactoryBean in Spring:
@Bean
public LocalEntityManagerFactoryBean entityManagerFactoryBean() {
LocalEntityManagerFactoryBean emfb
= new LocalEntityManagerFactoryBean();
emfb.setPersistenceUnitName("spitterPU");
return emfb;
}
The value given to the persistenceUnitName property refers to the persistence unit name as it appears in persistence.xml.
The reason much of what goes into creating an application-managed Entity-ManagerFactory is contained in persistence.xml has everything to do with what it means to be application-managed. In the application-managed scenario (not involving Spring), an application is entirely responsible for obtaining an EntityManagerFactory through the JPA implementation’s PersistenceProvider. The application code would become incredibly bloated if it had to define the persistence unit every time it requested an EntityManagerFactory. By specifying it in persistence.xml, JPA can look in this well-known location for persistence unit definitions.
But with Spring’s support for JPA, you’ll never deal directly with the Persistence-Provider. Therefore, it seems silly to extract configuration information into persistence.xml. In fact, doing so prevents you from configuring the EntityManagerFactory in Spring (so that, for example, you can provide a Spring-configured data source).
For that reason, we’ll turn our attention to container-managed JPA.
Configuring container-managed JPA
Container-managed JPA takes a different approach. When running in a container, an EntityManagerFactory can be produced using information provided by the container—Spring, in this case.
Instead of configuring data-source details in persistence.xml, you can configure this information in the Spring application context. For example, the following <bean> declaration shows how to configure container-managed JPA in Spring usingLocalContainerEntityManagerFactoryBean:
@Bean
public LocalContainerEntityManagerFactoryBean entityManagerFactory(
DataSource dataSource, JpaVendorAdapter jpaVendorAdapter) {
LocalContainerEntityManagerFactoryBean emfb =
new LocalContainerEntityManagerFactoryBean();
emfb.setDataSource(dataSource);
emfb.setJpaVendorAdapter(jpaVendorAdapter);
return emfb;
}
Here you configured the dataSource property with a Spring-configured data source. Any implementation of javax.sql.DataSource is appropriate. Although a data source may still be configured in persistence.xml, the data source specified through this property takes precedence.
You can use the jpaVendorAdapter property to provide specifics about the particular JPA implementation to use. Spring comes with a handful of JPA vendor adapters to choose from:
· EclipseLinkJpaVendorAdapter
· HibernateJpaVendorAdapter
· OpenJpaVendorAdapter
· TopLinkJpaVendorAdapter (deprecated in Spring 3.1)
In this case, you’re using Hibernate as a JPA implementation, so you configure it with a HibernateJpaVendorAdapter:
@Bean
public JpaVendorAdapter jpaVendorAdapter() {
HibernateJpaVendorAdapter adapter = new HibernateJpaVendorAdapter();
adapter.setDatabase("HSQL");
adapter.setShowSql(true);
adapter.setGenerateDdl(false);
adapter.setDatabasePlatform("org.hibernate.dialect.HSQLDialect");
return adapter;
}
Several properties are set on the vendor adapter, but the most important is the database property, where you specify the Hypersonic database as the database you’ll be using. Other values supported for this property include those listed in table 11.1.
Table 11.1. The Hibernate JPA vendor adapter supports several databases. You can specify which database to use by setting its database property.
|
Database platform |
Value for database property |
|
IBM DB2 |
DB2 |
|
Apache Derby |
DERBY |
|
H2 |
H2 |
|
Hypersonic |
HSQL |
|
Informix |
INFORMIX |
|
MySQL |
MYSQL |
|
Oracle |
ORACLE |
|
PostgresQL |
POSTGRESQL |
|
Microsoft SQL Server |
SQLSERVER |
|
Sybase |
SYBASE |
Certain dynamic persistence features require that the class of persistent objects be modified with instrumentation to support the feature. Objects whose properties are lazily loaded (they won’t be retrieved from the database until they’re accessed) must have their class instrumented with code that knows to retrieve unloaded data on access. Some frameworks use dynamic proxies to implement lazy loading. Others, such as JDO, perform class instrumentation at compile time.
Which entity manager factory bean you choose will depend primarily on how you’ll use it. But here’s a trick that may swing your favor in the direction of Local-ContainerEntityManagerFactoryBean.
The primary purpose of the persistence.xml file is to identify the entity classes in a persistence unit. But as of Spring 3.1, you can do that directly with LocalContainer-EntityManagerFactoryBean by setting the packagesToScan property:
@Bean
public LocalContainerEntityManagerFactoryBean entityManagerFactory(
DataSource dataSource, JpaVendorAdapter jpaVendorAdapter) {
LocalContainerEntityManagerFactoryBean emfb =
new LocalContainerEntityManagerFactoryBean();
emfb.setDataSource(dataSource);
emfb.setJpaVendorAdapter(jpaVendorAdapter);
emfb.setPackagesToScan("com.habuma.spittr.domain");
return emfb;
}
As configured here, LocalContainerEntityManagerFactoryBean will scan the com.habuma.spittr.domain package for classes that are annotated with @Entity. Therefore, there’s no need to declare them explicitly in persistence.xml. And because the DataSource is also injected into LocalContainerEntityManagerFactoryBean, there’s no need to configure details about the database in persistence.xml. Therefore, there’s no need for persistence.xml whatsoever! Delete it, and let LocalContainer-EntityManagerFactoryBean handle it for you.
Pulling an EntityManagerFactory from JNDI
It’s also worth noting that if you’re deploying your Spring application in some application servers, an EntityManagerFactory may have already been created for you and may be waiting in JNDI to be retrieved. In that case, you can use the <jee:jndi-lookup> element from Spring’sjee namespace to nab a reference to the Entity-ManagerFactory:
<jee:jndi-lookup id="emf" jndi-name="persistence/spitterPU" />
You can also configure the EntityManagerFactory bean with Java configuration by using
@Bean
public JndiObjectFactoryBean entityManagerFactory() {}
JndiObjectFactoryBean jndiObjectFB = new JndiObjectFactoryBean();
jndiObjectFB.setJndiName("jdbc/SpittrDS");
return jndiObjectFB;
}
Although this method doesn’t return an EntityManagerFactory, it will result in an EntityManagerFactory bean. That’s because it returns JndiObjectFactoryBean, which is an implementation of the FactoryBean interface that produces an EntityManagerFactory.
Regardless of how you get your hands on an EntityManagerFactory, once you have one, you’re ready to start writing a repository. Let’s do that now.
11.2.2. Writing a JPA-based repository
Just like all of Spring’s other persistence integration options, Spring-JPA integration comes in template form with JpaTemplate. Nevertheless, template-based JPA has been set aside in favor of a pure JPA approach. This is analogous to the Hibernate contextual sessions you used in section 11.1.2.
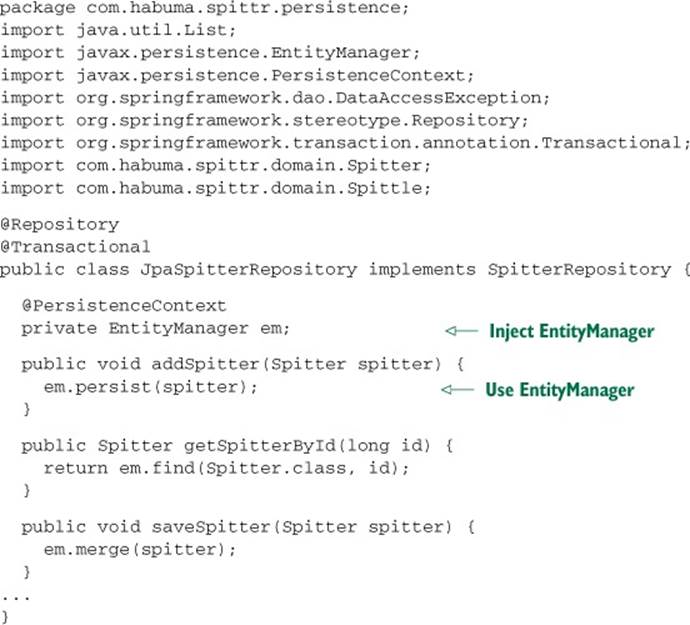
Because pure JPA is favored over template-based JPA, this section focuses on building Spring-free JPA repositories. Specifically, JpaSpitterRepository in the following listing shows how you can develop a JPA repository without resorting to using Spring’s JpaTemplate.
Listing 11.2. A pure JPA repository that doesn’t use Spring templates

The main thing to notice in listing 11.2 is the EntityManagerFactory property. It’s annotated with @PersistenceUnit so that Spring can inject the EntityManager-Factory into the repository. With an EntityManagerFactory in hand, JpaSpitter-Repository’s methods use it to create an EntityManager and then use that EntityManager to perform operations against the database.
The only gotcha with JpaSpitterRepository as it stands is that each method ends up calling createEntityManager(). Aside from presenting a troubling code-duplication situation, it also means a new EntityManager is created every time one of the repository methods is called. This complicates matters concerning transactions. Wouldn’t it be handy if you just had the EntityManager up front?
The problem is that an EntityManager isn’t thread-safe and generally shouldn’t be injected into a shared singleton bean like your repository. But that doesn’t mean you can’t ask for an EntityManager anyway. The next listing shows how to use @PersistenceContext to giveJpaSpitterRepository an EntityManager.
Listing 11.3. Injecting a repository with a proxy to the EntityManager
This new version of JpaSpitterRepository is now given an EntityManager directly; there’s no need for it to create one from an EntityManagerFactory in each of its methods. Although this is much more convenient, you’re probably wondering about the thread-safety issues of working with an injected EntityManager.
The truth is that @PersistenceContext doesn’t inject an EntityManager—at least, not exactly. Instead of giving the repository a real EntityManager, it gives a proxy to a real EntityManager. That real EntityManager either is one associated with the current transaction or, if one doesn’t exist, creates a new one. Thus, you know that you’re always working with an entity manager in a thread-safe way.
It’s important to understand that @PersistenceUnit and @PersistenceContext aren’t Spring annotations; they’re provided by the JPA specification. In order for Spring to understand them and inject an EntityManagerFactory or EntityManager, Spring’sPersistenceAnnotationBeanPostProcessor must be configured. If you’re already using <context:annotation-config> or <context:component-scan>, then you’re good to go because those configuration elements automatically register aPersistenceAnnotationBeanPostProcessor bean. Otherwise, you’ll need to register that bean explicitly:
@Bean
public PersistenceAnnotationBeanPostProcessor paPostProcessor() {
return new PersistenceAnnotationBeanPostProcessor();
}
You also may have noticed that JpaSpitterRepository is annotated with @Repository and @Transactional. @Transactional indicates that the persistence methods in this repository are involved in a transactional context.
@Repository serves the same purpose here as it did when you developed the Hibernate contextual session version of the repository. Without a template to handle exception translation, you need to annotate your repository with @Repository soPersistenceExceptionTranslationPostProcessor knows that this is a bean for which exceptions should be translated into one of Spring’s unified data-access exceptions.
Speaking of PersistenceExceptionTranslationPostProcessor, you need to remember to wire it up as a bean in Spring just as you did for the Hibernate example:
@Bean
public BeanPostProcessor persistenceTranslation() {
return new PersistenceExceptionTranslationPostProcessor();
}
Note that exception translation, whether with JPA or Hibernate, isn’t mandatory. If you’d prefer that your repository throw JPA-specific or Hibernate-specific exceptions, you’re welcome to forgo PersistenceExceptionTranslationPostProcessor and let the native exceptions flow freely. But if you do use Spring’s exception translation, you’ll be unifying all of your data-access exceptions under Spring’s exception hierarchy, which will make it easier to swap out persistence mechanisms later.
11.3. Automatic JPA repositories with Spring Data
Even though the methods in listings 11.2 and 11.3 are fairly simple, they still interact directly with the EntityManager to query the database. And, on closer inspection, those methods start looking a bit boilerplate-ish. For example, let’s reexamine the addSpitter() method:
public void addSpitter(Spitter spitter) {
entityManager.persist(spitter);
}
In any reasonably-sized application, you’re likely to write that same method almost exactly the same way many times. In fact, aside from the fact that it’s a Spitter that’s being persisted, I’ll bet you’ve written a similar method before. And the other methods in JpaSpitterRepositoryaren’t too innovative, either. The domain types will be different, but those methods are fairly common across all kinds of repositories.
Why keep writing the same persistence methods over and over again, just because you’re dealing with different domain types? Spring Data JPA brings an end to this boilerplate madness. Rather than write the same repository implementations again and again, Spring Data lets you stop at writing the repository interface. No implementation is required.
For instance, take a look at the following SpitterRepository interface.
Listing 11.4. Creating a repository from an interface definition with Spring Data
public interface SpitterRepository
extends JpaRepository<Spitter, Long> {
}
At this point, SpitterRepository doesn’t appear all that useful. But there’s a lot more here than meets the eye.
The key to writing a Spring Data JPA repository is to extend one of a handful of interfaces. Here, SpitterRepository extends Spring Data JPA’s JpaRepository (I’ll mention a few of the other interfaces in a moment). In doing so, JpaRepository is parameterized such that it knows this is a repository for persisting Spitter objects and that Spitters have an ID of type Long. It also inherits 18 methods for performing common persistence operations, such as saving a Spitter, deleting a Spitter, and finding a Spitter by its ID.
At this point, you might be expecting that the next step is to write a class that implements SpitterRepository and its 18 methods. If that were true, then this chapter would be about to take a tedious turn. Fortunately, however, you won’t be writing any implementations ofSpitterRepository. Instead, you’ll let Spring Data do it for you. All you need to do is ask.
To ask Spring Data to create an implementation of SpitterRepository, you need to add a single element to your Spring configuration. The following listing shows the XML configuration needed to put Spring Data JPA into motion.
Listing 11.5. Configuring Spring Data JPA
<?xml version="1.0" encoding="UTF-8"?>
<beans xmlns="http://www.springframework.org/schema/beans"
xmlns:xsi="http://www.w3.org/2001/XMLSchema-instance"
xmlns:jpa="http://www.springframework.org/schema/data/jpa"
xsi:schemaLocation="http://www.springframework.org/schema/data/jpa
http://www.springframework.org/schema/data/jpa/spring-jpa-1.0.xsd">
<jpa:repositories base-package="com.habuma.spittr.db" />
...
</beans>
The <jpa:repositories> element holds all the magic of Spring Data JPA. Much like the <context:component-scan> element, <jpa:repositories> is given a base-package to scan. But where <context:component-scan> scans a package (and its subpackages) for classes that are annotated with @Component, <jpa:repositories> scans its base package for any interfaces that extend Spring Data JPA’s Repository interface. When it finds any interface extending Repository, it automatically (at application startup time) generates an implementation of that interface.
Instead of using the <jpa:repositories> element, you can use @EnableJpa-Repositories in your Java configuration class. What follows is a Java configuration class annotated with @EnableJpaRepositories to scan the com.habuma.spittr.db package:
@Configuration
@EnableJpaRepositories(basePackages="com.habuma.spittr.db")
public class JpaConfiguration {
...
}
Getting back to the SpitterRepository interface, it extends JpaRepository. JpaRepository extends the marker Repository interface (albeit indirectly). Therefore, SpitterRepository transitively extends the Repository interface that repository-scanning is looking for. When Spring Data finds it, it creates an implementation of SpitterRepository, including an implementation of all 18 methods inherited from JpaRepository, PagingAndSortingRepository, and CrudRepository.
It’s important to understand that the repository implementation is generated at application startup time, as the Spring application context is being created. It isn’t the product of build-time code generation. Nor is it created at the time any of the interface’s methods are called.
Nifty, huh?
It’s awesome that Spring Data JPA can give you 18 convenient methods for common JPA operations on Spitter objects without you having to write that persistence code. But what if you need something more than what those 18 methods offer? Fortunately, Spring Data JPA provides a few ways to add custom methods to a repository. Let’s see how to define a custom query method using Spring Data JPA.
11.3.1. Defining query methods
One thing your SpitterRepository will need is a means of looking up a Spitter object given a username. For example, let’s say you modify the SpitterRepository interface to look like this:
public interface SpitterRepository
extends JpaRepository<Spitter, Long> {
Spitter findByUsername(String username);
}
The new findByUsername() method is simple enough and should satisfy your requirement. Now, how do you get Spring Data JPA to incorporate an implementation of that method?
Actually, nothing else needs to be done to implement findByUsername(). The method signature tells Spring Data JPA everything it needs to know in order to create an implementation for the method.
When creating the repository implementation, Spring Data will examine any methods in the repository interface, parse the method name, and attempt to understand the method’s purpose in the context of the persisted object. In essence, Spring Data defines a sort of miniature domain-specific language (DSL) where persistence details are expressed in repository method signatures.
Spring Data knows that this method is intended to find Spitters, because you parameterized JpaRepository with Spitter. The method name, findByUsername, makes it clear that this method should find Spitters by matching their username property with the username passed in as a parameter to the method. Moreover, because the signature defines the method as returning a single Spitter and not a collection, it knows that it should look for only one Spitter whose username matches.
The findByUsername() method is simple enough, but Spring Data can handle even more interesting method names as well. Repository methods are composed of a verb, an optional subject, the word By, and a predicate. In the case of findBy-Username(), the verb is find and the predicate is Username; the subject isn’t specified and is implied to be a Spitter.
As another example of how to write repository method names, consider how the method parts are mapped to a method named readSpitterByFirstnameOr-Lastname(). Figure 11.1 illustrates how the method breaks down.
Figure 11.1. Repository methods are named following a pattern that helps Spring Data generate queries against the database.
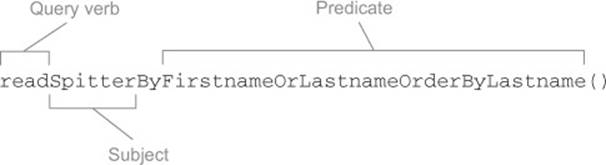
As you can see, the verb is read, as opposed to find from the previous example. Spring Data allows for four verbs in the method name: get, read, find, and count. The get, read, and find verbs are synonymous; all three result in repository methods that query for data and return objects. Thecount verb, on the other hand, returns a count of matching objects, rather than the objects themselves.
The subject of a repository method is optional. Its primary purpose is to allow you some flexibility in how you name the method. If it suits you to name a method readSpittersByFirstnameOrLastname() instead of readByFirstnameOrLastname(), you’re welcome to do that.
The subject is ignored for the most part. readSpittersByFirstnameOrLastname() is no different from readPuppiesByFirstnameOrLastname(), which is no different from readThoseThingsWeWantByFirstnameOrLastname(). The type of object being retrieved is determined by how you parameterize the JpaRepository interface, not the subject of the method name.
There is one exception to the subject being ignored. If the subject starts with the word Distinct, then the generated query will be written to ensure a distinct result set.
The predicate is the most interesting part of the method name. It specifies the properties that will constrain the result set. In the case of readByFirstnameOr-Lastname(), the results are constrained by the value of either the firstname property or the lastname property.
Within the predicate, you’ll find one or more conditions that constrain the results. Each condition must reference a property and may also specify a comparison operation. If the comparison operator is left off, it’s implied to be an equals operation. But you may choose any other comparison operations, including the following:
· IsAfter, After, IsGreaterThan, GreaterThan
· IsGreaterThanEqual, GreaterThanEqual
· IsBefore, Before, IsLessThan, LessThan
· IsLessThanEqual, LessThanEqual
· IsBetween, Between
· IsNull, Null
· IsNotNull, NotNull
· IsIn, In
· IsNotIn, NotIn
· IsStartingWith, StartingWith, StartsWith
· IsEndingWith, EndingWith, EndsWith
· IsContaining, Containing, Contains
· IsLike, Like
· IsNotLike, NotLike
· IsTrue, True
· IsFalse, False
· Is, Equals
· IsNot, Not
The values that the properties will be compared against are the parameters of the method. The full method signature looks like this:
List<Spitter> readByFirstnameOrLastname(String first, String last);
When dealing with String properties, the condition may also include IgnoringCase or IgnoresCase to perform the comparison with no regard for whether the characters are uppercase or lowercase. For example, to ignore case on the firstname and lastname properties, you can write the method signature like this:
List<Spitter> readByFirstnameIgnoringCaseOrLastnameIgnoresCase(
String first, String last);
Notice that IgnoringCase and IgnoresCase are synonymous. You may choose whichever one suits you best.
As an alternative to IgnoringCase/IgnoresCase, you may also use AllIgnoringCase or AllIgnoresCase after all the conditions to ignore case for all conditions:
List<Spitter> readByFirstnameOrLastnameAllIgnoresCase(
String first, String last);
Note that the parameter names are irrelevant, but they must be ordered to match up with the method name’s comparators.
Finally, you can sort the results by adding OrderBy at the end of the method name. For example, you can sort the results in ascending order by the lastname property:
List<Spitter> readByFirstnameOrLastnameOrderByLastnameAsc(
String first, String last);
To sort by multiple properties, add them to the OrderBy class. For example, this sorts by the lastname property in ascending order and then by the firstname property in descending order:
List<Spitter> readByFirstnameOrLastnameOrderByLastnameAscFirstnameDesc(
String first, String last);
As you’ve seen already, the conditional parts are separated by either And or Or.
It would be impossible (or at least very difficult) to offer a definitive list of the kinds of methods you can write with Spring Data’s method-naming convention. But here are a few more method signatures that adhere to the method-naming conventions:
· List<Pet> findPetsByBreedIn(List<String> breed)
· int countProductsByDiscontinuedTrue()
· List<Order> findByShippingDateBetween(Date start, Date end)
This has been only a taste of the kinds of methods you can declare and have Spring Data JPA implement for you. For now, just know that by carefully constructing a repository method signature using a mix of property names and keywords, you can make Spring Data JPA generate an implementation method to query for almost anything you can imagine.
Nevertheless, Spring Data’s mini-DSL has its limits, and sometimes it isn’t convenient or even possible to express the desired query in a method name. When that happens, Spring Data has you covered with its @Query annotation.
11.3.2. Declaring custom queries
Suppose you want to create a repository method to find all Spitters whose email address is a Gmail address. One way to do this is to define a findByEmailLike() method and pass in %gmail.com any time you want to find Gmail users. But it would be nice to define a more convenientfindAllGmailSpitters() method that doesn’t require the partial email address to be passed in:
List<Spitter> findAllGmailSpitters();
Unfortunately, this method name doesn’t adhere to Spring Data’s method-naming conventions. When Spring Data attempts to generate an implementation for this method, it can’t match the contents of the method name with the Spitter metamodel and throws an exception.
In situations where the desired data can’t be adequately expressed in the method name, you can use the @Query annotation to provide Spring Data with the query that should be performed. For the findAllGmailSpitters() method, you might use @Query like this:
@Query("select s from Spitter s where s.email like '%gmail.com'")
List<Spitter> findAllGmailSpitters();
You still don’t write the implementation of the findAllGmailSpitters() method. You only give the query, hinting to Spring Data JPA about how it should implement the method.
As you’ve seen here, @Query is useful when it’s difficult to express the query you want using the method-naming convention. It can also be useful when, if you followed the naming convention, the method name would be incredibly long. For example, consider this finder method:
List<Order>
findByCustomerAddressZipCodeOrCustomerNameAndCustomerAddressState();
Now that’s a method name! I had to split it after the return type just to get it to fit in the margins of this book.
I’ll grant that this is a contrived example. But there could be a real-world need to write a repository method to perform a query that could be defined using a long method name. In that situation, you’d probably rather come up with a shorter method name and use @Query to specify how the method should query the database.
The @Query annotation is handy for adding custom query methods to a Spring Data JPA-enabled interface. But it’s limited to a single JPA query. What if you need to mix in something more complex than can be handled in a simple query?
11.3.3. Mixing in custom functionality
It’s likely that at some point you’ll want functionality in your repository that can’t be described with Spring Data’s method-naming conventions or even with a query given in the @Query annotation. As awesome as Spring Data JPA is, it still has its limits, and you may need to write a repository method the old-fashioned way: by working with the EntityManager directly. When that happens, do you give up on Spring Data JPA and go back to writing your repositories as you did in section 11.2.2?
In short, yes. When you need to do something that Spring Data JPA can’t do, you’ll have to work with JPA at a lower level than Spring Data JPA offers. But the good news is, you don’t have to give up on Spring Data JPA completely. You only need to work at the lower level for those methods that require it. You can still let Spring Data JPA do the grunt work for the stuff it knows how to do.
When Spring Data JPA generates the implementation for a repository interface, it also looks for a class whose name is the same as the interface’s name postfixed with Impl. If the class exists, Spring Data JPA merges its methods with those generated by Spring Data JPA. For theSpitterRepository interface, the class it looks for is named SpitterRepositoryImpl.
To illustrate, suppose you need a method in your SpitterRepository that updates all Spitters who have posted 10,000 or more Spittles, setting them to Elite status. There’s no good way to declare such a method using Spring Data JPA’s method-naming conventions or with @Query. The most practical way to do it is using the following eliteSweep() method.
Listing 11.6. Repository that promotes frequent Spitter users to Elite status
public class SpitterRepositoryImpl implements SpitterSweeper {
@PersistenceContext
private EntityManager em;
public int eliteSweep() {
String update =
"UPDATE Spitter spitter " +
"SET spitter.status = 'Elite' " +
"WHERE spitter.status = 'Newbie' " +
"AND spitter.id IN (" +
"SELECT s FROM Spitter s WHERE (" +
" SELECT COUNT(spittles) FROM s.spittles spittles) > 10000" +
")";
return em.createQuery(update).executeUpdate();
}
}
As you can see, the eliteStatus() method isn’t much different from any of the repository methods you created earlier in section 11.2.2. There’s nothing special about SpitterRepositoryImpl. It uses the injected EntityManager to do its work.
Notice that SpitterRepositoryImpl doesn’t implement the SpitterRepository interface. Spring Data JPA is still responsible for implementing that interface. Instead, SpitterRepositoryImpl implements SpitterSweeper, which looks like this (the only thing that ties it into your Spring Data-enabled repository is its name):
public interface SpitterSweeper{
int eliteSweep();
}
You should also make sure the eliteSweep() method is declared in the Spitter-Repository interface. The easy way to do that and avoid duplicating code is to change SpitterRepository so that it extends SpitterSweeper:
public interface SpitterRepository
extends JpaRepository<Spitter, Long>,
SpitterSweeper {
....
}
As I mentioned, Spring Data JPA associates the implementation class with the interface because the implementation’s name is based on the name of the interface. The Impl postfix is only the default, though. If you’d prefer to use some other postfix, you need to specify it when configuring@EnableJpaRepositories by setting the repository-ImplementationPostfix attribute:
@EnableJpaRepositories(
basePackages="com.habuma.spittr.db",
repositoryImplementationPostfix="Helper")
Or, if you’re configuring Spring Data JPA in XML using <jpa:repositories>, you can specify the postfix with the repository-impl-postfix attribute:
<jpa:repositories base-package="com.habuma.spittr.db"
repository-impl-postfix="Helper" />
With the postfix set to Helper, Spring Data JPA will look for a class named Spitter-RepositoryHelper to match up with the SpitterRepository interface.
11.4. Summary
Relational databases have been the go-to data store for several applications and for many years. When working with JDBC and mapping objects to tables is too tedious, ORM options such as Hibernate and JPA enable a more declarative model for data persistence. Although Spring doesn’t offer direct support for ORM, it does integrate with several popular ORM solutions, including Hibernate and the Java Persistence API.
In this chapter, we looked at how to use Hibernate’s contextual sessions in a Spring application such that your repositories contain little or no Spring-specific code. Likewise, you saw how to write Spring-free JPA repositories by injecting an EntityManagerFactory or anEntityManager into your repository implementations.
You then got your first taste of Spring Data by seeing how to declare JPA repository interfaces while letting Spring Data JPA automatically generate implementations of those interfaces at runtime. And when you need more out of those repository methods than Spring Data JPA can handle on its own, you can help it out with the @Query annotation and by writing custom repository method implementations.
But you have just dipped your toe into the Spring Data pool. Coming up in the next chapter, we’ll dig deeper into Spring Data’s method-naming DSL and explore how Spring Data is good for more than just relational databases. That’s right: you’ll see how Spring Data also supports the new contingent of NoSQL databases that have become popular in the past few years.
All materials on the site are licensed Creative Commons Attribution-Sharealike 3.0 Unported CC BY-SA 3.0 & GNU Free Documentation License (GFDL)
If you are the copyright holder of any material contained on our site and intend to remove it, please contact our site administrator for approval.
© 2016-2026 All site design rights belong to S.Y.A.