Spring in Action, 4th Edition: Covers Spring 4 (2015)
Part 4. Integrating Spring
No application is an island. These days, enterprise applications must coordinate with other systems to achieve their purpose. In part 4, you’ll learn how to take your application beyond its own boundaries and integrate it with other applications and enterprise services.
In chapter 15, “Working with remote services,” you’ll learn how to expose your application objects as remote services. You’ll learn how to transparently access remote services as though they’re any other object in your application. In doing so, you’ll explore various remoting technologies, including RMI, Hessian/Burlap, and SOAP web services with JAX-WS.
In contrast to RPC-style remote services presented in chapter 15, chapter 16, “Creating Rest APIs with Spring MVC,” explores how to build RESTful services that are focused on application resources using Spring MVC.
Chapter 17, “Messaging with Spring,” explores a different approach to application integration by showing how Spring can be used with the Java Message Service (JMS) and the Advanced Message Queuing Protocol (AMQP) to achieve asynchronous communication between applications.
Increasingly, web applications are expected to be responsive and show near real-time data. Chapter 18, “Messaging with WebSocket and STOMP,” showcases Spring’s new support for building asynchronous communication between a server and its web clients.
Another form of asynchronous communication isn’t necessarily application-to-application. Chapter 19, “Sending email with Spring,” shows how to send asynchronous messages to people in the form of email using Spring.
Management and monitoring of Spring beans is the subject of chapter 20, “Managing Spring beans with JMX.” In this chapter, you’ll learn how Spring can automatically expose beans configured in Spring as JMX MBeans.
Wrapping up the book is a late but necessary addition to the table of contents. Chapter 21, “Simplifying Spring development with Spring Boot,” presents an exciting new game-changing development in Spring. You’ll see how Spring Boot takes away the chore of writing much of the boilerplate configuration that is typical in Spring applications and leaves you to focus on implementing business functionality.
Chapter 15. Working with remote services
This chapter covers
· Accessing and exposing RMI services
· Using Hessian and Burlap services
· Working with Spring’s HTTP invoker
· Using Spring with web services
Imagine for a moment that you’re stranded on a deserted island. This may sound like a dream come true. After all, who wouldn’t want some solitude on a beach, blissfully ignorant of the goings-on of the outside world?
But on a deserted island, it’s not pina coladas and sunbathing all the time. Even if you enjoy the peaceful seclusion, it won’t be long before you’ll get hungry, bored, and lonely. You can only live on coconuts and spear-caught fish for so long. You’ll eventually need food, fresh clothing, and other supplies. And if you don’t get in contact with another human soon, you may end up talking to a volleyball!
Many applications that you’ll develop are like island castaways. On the surface they might seem self-sufficient, but in reality, they probably collaborate with other systems, both within your organization and externally.
For example, consider a procurement system that needs to communicate with a vendor’s supply-chain system. Maybe your company’s human resources system needs to integrate with the payroll system. Or the payroll system may need to communicate with an external system that prints and mails paychecks. No matter what the circumstances, your application will need to communicate with other systems to access services remotely.
Several remoting technologies are available to you as a Java developer, including these:
· Remote Method Invocation (RMI)
· Caucho’s Hessian and Burlap
· Spring’s own HTTP-based remoting
· Web services with JAX-RPC and JAX-WS
Regardless of which remoting technology you choose, Spring provides broad support for accessing and creating remote services with several different technologies. In this chapter, you’ll learn how Spring both simplifies and complements these remoting services. But first, let’s set the stage for this chapter with an overview of how remoting works in Spring.
15.1. An overview of Spring remoting
Remoting is a conversation between a client application and a service. On the client side, some functionality is required that isn’t within the scope of the application, so the application reaches out to another system that can provide the functionality. The remote application exposes the functionality through a remote service.
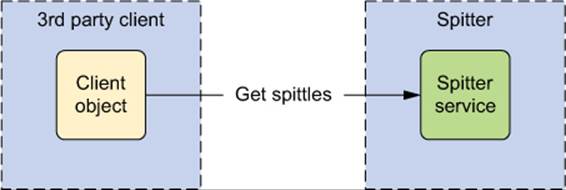
Suppose you’d like to make some of the Spittr application’s functionality available as remote services for other applications to use. Perhaps in addition to the existing browser-based user interface, you’d like to make a desktop or mobile front end for Spittr, as illustrated in figure 15.1. To support that, you’ll need to expose the basic functions of the SpitterService interface as a remote service.
Figure 15.1. A third-party client can interact with the Spittr application by making remote calls to a service exposed by Spittr.
The conversation between the other applications and Spittr begins with a remote procedure call (RPC) from the client applications. On the surface, an RPC is similar to a call to a method on a local object. Both are synchronous operations, blocking execution in the calling code until the called procedure is complete.
The difference is a matter of proximity, with an analogy to human communication. If you’re at the proverbial water cooler at work discussing the outcome of the weekend’s football game, you’re conducting a local conversation—the conversation takes place between two people in the same room. Likewise, a local method call is one where execution flow is exchanged between two blocks of code in the same application.
On the other hand, if you were to pick up the phone to call a client in another city, your conversation would be conducted remotely over the telephone network. Similarly, during an RPC, execution flow is handed off from one application to another application, theoretically on a different machine in a remote location over the network.
As I mentioned, Spring supports remoting for several different RPC models, including RMI, Caucho’s Hessian and Burlap, and Spring’s HTTP invoker. Table 15.1 outlines each of these models and briefly discusses their usefulness in various situations.
Table 15.1. Spring supports RPC via several remoting technologies.
|
RPC model |
Useful when... |
|
Remote Method Invocation (RMI) |
Accessing/exposing Java-based services when network constraints such as firewalls aren’t a factor. |
|
Hessian or Burlap |
Accessing/exposing Java-based services over HTTP when network constraints are a factor. Hessian is a binary protocol, whereas Burlap is XML-based. |
|
HTTP invoker |
Accessing/exposing Spring-based services when network constraints are a factor and you desire Java serialization over XML or proprietary serialization. |
|
JAX-RPC and JAX-WS |
Accessing/exposing platform-neutral, SOAP-based web services. |
Regardless of which remoting model you choose, you’ll find that a common theme runs through Spring’s support for each model. This means that once you understand how to configure Spring to work with one of the models, you’ll have a modest learning curve if you decide to use a different model.
In all models, services can be configured into your application as Spring-managed beans. This is accomplished using a proxy factory bean that enables you to wire remote services into properties of your other beans as if they were local objects. Figure 15.2 illustrates how this works.
Figure 15.2. In Spring, remote services are proxied so that they can be wired into client code as if they were any other Spring bean.
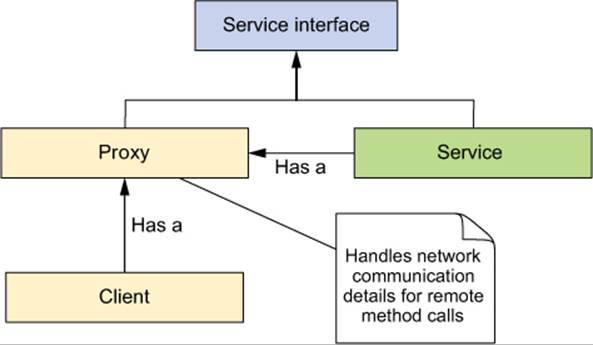
The client makes calls to the proxy as if the proxy were providing the service functionality. The proxy communicates with the remote service on behalf of the client. It handles the details of connecting and making remote calls to the remote service.
What’s more, if the call to the remote service results in a java.rmi.Remote-Exception, the proxy handles that exception and rethrows it as an unchecked RemoteAccessException. Remote exceptions usually signal problems such as network or configuration issues that can’t be gracefully recovered from. Because a client can usually do little to recover from a remote exception, rethrowing a RemoteAccess-Exception makes it optional for the client to handle the exception.
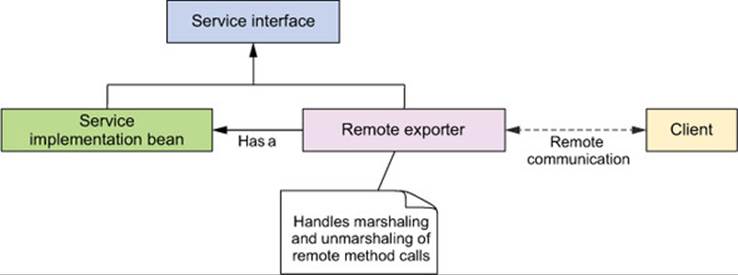
On the service side, you’re able to expose the functionality of any Spring-managed bean as a remote service using any of the models listed in table 15.1. Figure 15.3 illustrates how remote exporters expose bean methods as remote services.
Figure 15.3. Spring-managed beans can be exported as remote services using remote exporters.
Whether you’ll be developing code that consumes remote services, implements those services, or both, working with remote services in Spring is purely a matter of configuration. You won’t have to write any Java code to support remoting. Your service beans don’t have to be aware that they’re involved in an RPC (although any beans passed to or returned from remote calls may need to implement java.io .Serializable).
Let’s start our exploration of Spring’s remoting support by looking at RMI, the original remoting technology for Java.
15.2. Working with RMI
If you’ve been working in Java for any length of time, you’ve no doubt heard of (and probably used) RMI. RMI—first introduced into the Java platform in JDK 1.1—gives Java programmers a powerful way to communicate between Java programs. Before RMI, the only remoting options available to Java programmers were CORBA (which at the time required the purchase of a third-party object request broker [ORB]) and handwritten socket programming.
But developing and accessing RMI services is tedious, involving several steps, both programmatic and manual. Spring simplifies the RMI model by providing a proxy factory bean that enables you to wire RMI services into your Spring application as if they were local JavaBeans. Spring also provides a remote exporter that makes short work of converting your Spring-managed beans into RMI services.
For the Spittr application, I’ll show you how to wire an RMI service into a client application’s Spring application context. But first, let’s see how to use the RMI exporter to publish the SpitterService implementation as an RMI service.
15.2.1. Exporting an RMI service
If you’ve ever created an RMI service, you know that it involves the following steps:
1. Write the service implementation class with methods that throw java.rmi .RemoteException.
2. Create the service interface to extend java.rmi.Remote.
3. Run the RMI compiler (rmic) to produce client stub and server skeleton classes.
4. Start an RMI registry to host the services.
5. Register the service in the RMI registry.
Wow! That’s a lot of work just to publish a simple RMI service. What’s perhaps worse than all the steps required is that, as you may have noticed, RemoteExceptions and MalformedURLExceptions are thrown around a lot. These exceptions usually indicate a fatal error that can’t be recovered from in a catch block, but you’re still expected to write boilerplate code that catches and handles those exceptions—even if there’s not much you can do to fix them.
Clearly a lot of code and manual work are involved in publishing an RMI service. Is there anything Spring can do to make this situation less knotty?
Configuring an RMI service in Spring
Fortunately, Spring provides an easier way to publish RMI services. Instead of writing RMI-specific classes with methods that throw RemoteException, you write a POJO that performs the functionality of your service. Spring handles the rest.
The RMI service that you’ll create exposes the methods from the SpitterService interface. As a reminder, the following listing shows what that interface looks like.
Listing 15.1. SpitterService: defines the service layer of the Spittr application
package com.habuma.spittr.service;
import java.util.List;
import com.habuma.spittr.domain.Spitter;
import com.habuma.spittr.domain.Spittle;
public interface SpitterService {
List<Spittle> getRecentSpittles(int count);
void saveSpittle(Spittle spittle);
void saveSpitter(Spitter spitter);
Spitter getSpitter(long id);
void startFollowing(Spitter follower, Spitter followee);
List<Spittle> getSpittlesForSpitter(Spitter spitter);
List<Spittle> getSpittlesForSpitter(String username);
Spitter getSpitter(String username);
Spittle getSpittleById(long id);
void deleteSpittle(long id);
List<Spitter> getAllSpitters();
}
If you were using traditional RMI to expose this service, all of those methods in SpitterService and in SpitterServiceImpl would need to throw java.rmi.RemoteException. But you’re going to turn it into an RMI service using Spring’s RmiServiceExporter, so the existing implementations will do fine.
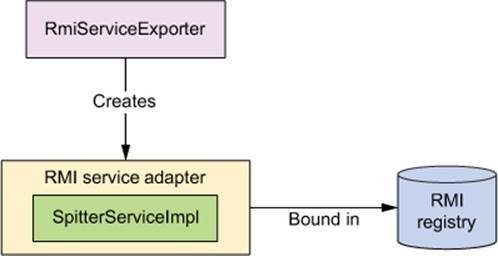
RmiServiceExporter exports any Spring-managed bean as an RMI service. As shown in figure 15.4, RmiServiceExporter works by wrapping the bean in an adapter class. The adapter class is then bound to the RMI registry and proxies requests to the service class—SpitterServiceImpl, in this case.
Figure 15.4. RmiServiceExporter turns POJOs into RMI services by wrapping them in a service adapter and binding the service adapter to the RMI registry.
The simplest way to use RmiServiceExporter to expose SpitterServiceImpl as an RMI service is to configure it in Spring with the following @Bean method:
@Bean
public RmiServiceExporter rmiExporter(SpitterService spitterService) {
RmiServiceExporter rmiExporter = new RmiServiceExporter();
rmiExporter.setService(spitterService);
rmiExporter.setServiceName("SpitterService");
rmiExporter.setServiceInterface(SpitterService.class);
return rmiExporter;
}
Here the spitterService bean is wired into the service property to indicate that the RmiServiceExporter is to export the bean as an RMI service. The serviceName property names the RMI service. And the serviceInterface property specifies the interface that the service implements.
By default, RmiServiceExporter attempts to bind to an RMI registry on port 1099 of the local machine. If no RMI registry is found at that port, RmiServiceExporter will start one. If you’d rather bind to an RMI registry at a different port or host, you can specify that with theregistryPort and registryHost properties. For example, the following RmiServiceExporter attempts to bind to an RMI registry on port 1199 on the host rmi.spitter.com:
@Bean
public RmiServiceExporter rmiExporter(SpitterService spitterService) {
RmiServiceExporter rmiExporter = new RmiServiceExporter();
rmiExporter.setService(spitterService);
rmiExporter.setServiceName("SpitterService");
rmiExporter.setServiceInterface(SpitterService.class);
rmiExporter.setRegistryHost("rmi.spitter.com");
rmiExporter.setRegistryPort(1199);
return rmiExporter;
}
That’s all you need to do to have Spring turn a bean into an RMI service. Now that the Spitter service has been exposed as an RMI service, you can create alternative user interfaces or invite third parties to create new clients for Spittr that use the RMI service. The developers of those clients will have an easy time connecting to the Spitter RMI service if they’re using Spring.
Let’s switch gears and see how to write a client of the Spitter RMI service.
15.2.2. Wiring an RMI service
Traditionally, RMI clients must use the RMI API’s Naming class to look up a service from the RMI registry. For example, the following snippet of code might be used to retrieve the RMI Spitter service:
try {
String serviceUrl = "rmi:/spitter/SpitterService";
SpitterService spitterService =
(SpitterService) Naming.lookup(serviceUrl);
...
}
catch (RemoteException e) { ... }
catch (NotBoundException e) { ... }
catch (MalformedURLException e) { ... }
Although this snippet of code would certainly retrieve a reference to the RMI Spitter service, it presents two problems:
· Conventional RMI lookups could result in any one of three checked exceptions (RemoteException, NotBoundException, and MalformedURLException) that must be caught or rethrown.
· Any code that needs the Spitter service is responsible for retrieving the service itself. That’s plumbing code and probably is not directly cohesive with the client’s functionality.
The exceptions thrown in the course of an RMI lookup are the kinds that typically signal a fatal and unrecoverable condition in the application. MalformedURLException, for instance, indicates that the address given for the service isn’t valid. To recover from this exception, the application will, at a minimum, need to be reconfigured and may have to be recompiled. No try/catch block will be able to recover gracefully, so why should your code be forced to catch and handle it?
But perhaps more sinister is the fact that this code is in direct opposition to the principles of dependency injection (DI). Because the client code is responsible for looking up the Spitter service and the service is an RMI service, there’s no opportunity to provide a different implementation ofSpitterService from some other source. Ideally, you should be able to inject a SpitterService object into any bean that needs one, instead of having the bean look up the service itself. Using DI, any client of SpitterService can be ignorant of where that service comes from.
Spring’s RmiProxyFactoryBean is a factory bean that creates a proxy to an RMI service. Using RmiProxyFactoryBean to reference an RMI SpitterService is as simple as adding the following @Bean method to the client’s Spring configuration:
@Bean
public RmiProxyFactoryBean spitterService() {
RmiProxyFactoryBean rmiProxy = new RmiProxyFactoryBean();
rmiProxy.setServiceUrl("rmi://localhost/SpitterService");
rmiProxy.setServiceInterface(SpitterService.class);
return rmiProxy;
}
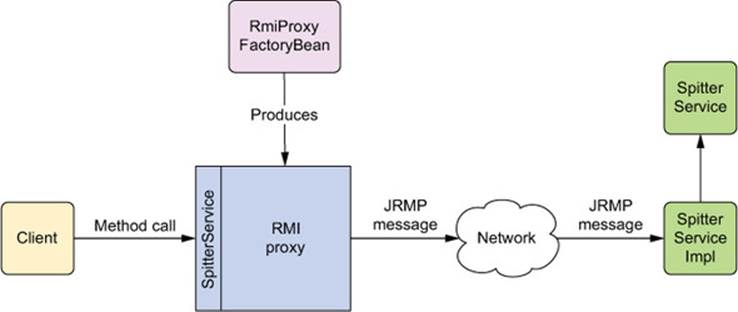
The URL of the service is set through RmiProxyFactoryBean’s serviceUrl property. Here, the service is named SpitterService and is hosted on the local machine. Meanwhile, the interface that the service provides is specified with the serviceInterface property. The interaction between the client and the RMI proxy is illustrated in figure 15.5.
Figure 15.5. RmiProxyFactoryBean produces a proxy object that talks to remote RMI services on behalf of the client. The client talks to the proxy through the service’s interface as if the remote service were a local POJO.
Now that you’ve declared the RMI service as a Spring-managed bean, you can wire it as a dependency into another bean just as you would a regular non-remote bean. For example, suppose the client needs to use the Spitter service to retrieve a list of Spittles for a given user. You might use @Autowired to wire the service proxy into the client:
@Autowired
SpitterService spitterService;
Then you can invoke methods on it as if it were a local bean:
public List<Spittle> getSpittles(String userName) {
Spitter spitter = spitterService.getSpitter(userName);
return spitterService.getSpittlesForSpitter(spitter);
}
What’s great about accessing an RMI service this way is that the client code doesn’t even know it’s dealing with an RMI service. It’s given a SpitterService object via injection, without any concern for where it comes from. In fact, who’s to say the client was even given an RMI-based implementation?
Furthermore, the proxy catches any RemoteExceptions that may be thrown by the service and rethrows them as unchecked exceptions that you may safely ignore. This makes it possible to easily swap out the remote service bean with another implementation of the service—perhaps a different remote service, or maybe a mock implementation used when unit-testing the client code.
Even though the client code isn’t aware that the SpitterService it was given is a remote service, you may want to take care when you design the service’s interface. Note that the client had to make two calls to the service: one to look up the Spitter by username, and another to retrieve the list of Spittle objects. That’s two remote calls that are affected by network latency and that will impact the performance of the client. Knowing that this is how the service will be used, it may be worthwhile to revisit the service’s interface to consolidate those two calls into a single method. But for now, you’ll accept the service as is.
RMI is an excellent way to communicate with remote services, but it has some limitations. First, RMI has difficulty working across firewalls. That’s because RMI uses arbitrary ports for communication—something that firewalls typically don’t allow. In an intranet environment, this usually isn’t a concern. But if you’re working on the internet, you’ll probably run into trouble with RMI. Even through RMI has support for tunneling over HTTP (which is usually allowed by firewalls), setting up RMI tunneling can be tricky.
Another thing to consider is that RMI is Java-based. That means both the client and the service must be written in Java. And because RMI uses Java serialization, the types of the objects being sent across the network must have the exact same version of the Java runtime on both sides of the call. These may or may not be issues for your application, but bear them in mind when choosing RMI for remoting.
Caucho Technology (the same company behind the Resin application server) has developed a remoting solution that addresses the limitations of RMI. Actually, Caucho has come up with two solutions: Hessian and Burlap. Let’s see how to use Hessian and Burlap to work with remote services in Spring.
15.3. Exposing remote services with Hessian and Burlap
Hessian and Burlap are two solutions provided by Caucho Technology that enable lightweight remote services over HTTP. Each aims to simplify web services by keeping both its API and its communication protocols as simple as possible.
You may be wondering why Caucho has two solutions to the same problem. Hessian and Burlap are two sides of the same coin, but each serves slightly different purposes.
Hessian, like RMI, uses binary messages to communicate between client and service. But unlike other binary remoting technologies (such as RMI), the binary message is portable to languages other than Java, including PHP, Python, C++, and C#.
Burlap is an XML-based remoting technology, which automatically makes it portable to any language that can parse XML. And because it’s XML, it’s more easily human-readable than Hessian’s binary format. Unlike other XML-based remoting technologies (such as SOAP and XML-RPC), Burlap’s message structure is as simple as possible and doesn’t require an external definition language (such as WSDL or IDL).
How do you choose between Hessian and Burlap? For the most part, they’re identical. The only difference is that Hessian messages are binary and Burlap messages are XML. Because Hessian messages are binary, they’re more bandwidth-friendly. If human readability is important to you (for debugging purposes), or if your application will be communicating with a language for which there’s no Hessian implementation, Burlap’s XML messages may be preferable.
To demonstrate Hessian and Burlap services in Spring, let’s revisit the Spitter service example that we addressed with RMI in the previous section. This time, we’ll look at how to solve the problem using Hessian and Burlap as the remoting models.
15.3.1. Exposing bean functionality with Hessian/Burlap
As before, suppose you want to expose the functionality of the SpitterServiceImpl class as a service—a Hessian service, this time. Even without Spring, doing this would be fairly trivial. You’d write a service class that extends com.caucho.hessian.server .HessianServletand make sure all the service methods are public (all public methods are considered service methods to Hessian).
Because Hessian services are already easy to implement, Spring doesn’t do much to simplify the Hessian model further. But when used with Spring, a Hessian service can take full advantage of the Spring Framework in ways that a pure Hessian service can’t. This includes using Spring AOP to advise a Hessian service with system-wide services, such as declarative transactions.
Exporting a Hessian service
Exporting a Hessian service in Spring is remarkably similar to implementing an RMI service in Spring. To expose the Spitter service bean as an RMI service, you had to configure an RmiServiceExporter bean in the Spring configuration. Similarly, to expose the Spitter service as a Hessian service, you need to configure another exporter bean. This time it’ll be a HessianServiceExporter.
HessianServiceExporter performs the same function for a Hessian service as RmiServiceExporter does for an RMI service: it exposes the public methods of a POJO as methods of a Hessian service. But, as shown in figure 15.6, how it pulls off this feat is different from howRmiServiceExporter exports POJOs as RMI services.
Figure 15.6. HessianServiceExporter is a Spring MVC controller that exports a POJO as a Hessian service by receiving Hessian requests and translating them into calls to the POJO.
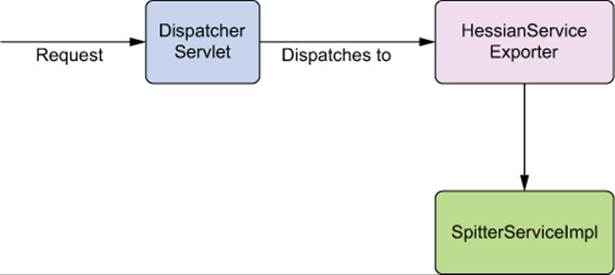
HessianServiceExporter is a Spring MVC controller (more on that in a moment) that receives Hessian requests and translates them into method calls on the exported POJO. The following declaration of HessianServiceExporter in Spring exports the spitterService bean as a Hessian service:
@Bean
public HessianServiceExporter
hessianExportedSpitterService(SpitterService service) {
HessianServiceExporter exporter = new HessianServiceExporter();
exporter.setService(service);
exporter.setServiceInterface(SpitterService.class);
return exporter;
}
Just as with RmiServiceExporter, the service property is wired with a reference to the bean that implements the service. Here, that’s a reference to the spitterService bean. The serviceInterface is set to indicate that SpitterService is the interface the service implements.
Unlike RmiServiceExporter, you don’t need to get a serviceName property. With RMI, the serviceName property is used to register a service in the RMI registry. Hessian doesn’t have a registry, and, therefore, there’s no need to name a Hessian service.
Configuring the Hessian controller
Another major difference between RmiServiceExporter and HessianService-Exporter is that because Hessian is HTTP-based, HessianServiceExporter is implemented as a Spring MVC controller. This means that in order to use exported Hessian services, you’ll need to perform two additional configuration steps:
· Configure a Spring DispatcherServlet in web.xml, and deploy your application as a web application.
· Configure a URL handler in your Spring configuration to dispatch Hessian service URLs to the appropriate Hessian service bean.
You first saw how to configure Spring’s DispatcherServlet and URL handlers in chapter 5, so these steps should be somewhat familiar by now. First, you need a DispatcherServlet. Fortunately, you have one already configured in the Spittr application’s web.xml file. But for the purposes of handling Hessian services, that DispatcherServlet needs a servlet mapping that catches *.service URLs:
<servlet-mapping>
<servlet-name>spitter</servlet-name>
<url-pattern>*.service</url-pattern>
</servlet-mapping>
If you’re configuring DispatcherServlet in Java by implementing WebApplicationInitializer, you’ll want to add that URL pattern as a mapping to the Servlet-Registration.Dynamic you got when adding DispatcherServlet to the container:
ServletRegistration.Dynamic dispatcher = container.addServlet(
"appServlet", new DispatcherServlet(dispatcherServletContext));
dispatcher.setLoadOnStartup(1);
dispatcher.addMapping("/");
dispatcher.addMapping("*.service");
Or, if you’re configuring DispatcherServlet by extending AbstractDispatcher-ServletInitializer or AbstractAnnotationConfigDispatcherServletInitializer, you’ll need to include the mapping when you override getServletMappings():
@Override
protected String[] getServletMappings() {
return new String[] { "/", "*.service" };
}
Configured this way, any request whose URL ends with .service will be given to DispatcherServlet, which will in turn hand off the request to the Controller that’s mapped to the URL. Thus, requests to /spitter.service will ultimately be handled by the hessianSpitterServicebean (which is a proxy to SpitterServiceImpl).
How do you know the request will go to hessianSpitterService? Because you’re also going to configure a URL mapping to have DispatcherServlet send the request to hessianSpitterService. The following SimpleUrlHandlerMapping bean will make that happen:
@Bean
public HandlerMapping hessianMapping() {
SimpleUrlHandlerMapping mapping = new SimpleUrlHandlerMapping();
Properties mappings = new Properties();
mappings.setProperty("/spitter.service",
"hessianExportedSpitterService");
mapping.setMappings(mappings);
return mapping;
}
An alternative to Hessian’s binary protocol is Burlap’s XML-based protocol. Let’s see how to export a service as a Burlap service.
Exporting a Burlap service
BurlapServiceExporter is virtually identical to HessianServiceExporter in every way, except that it uses an XML-based protocol instead of a binary protocol. The following bean definition shows how to expose the Spitter service as a Burlap service usingBurlapServiceExporter:
@Bean
public BurlapServiceExporter
burlapExportedSpitterService(SpitterService service) {
BurlapServiceExporter exporter = new BurlapServiceExporter();
exporter.setService(service);
exporter.setServiceInterface(SpitterService.class);
return exporter;
}
As you can see, the only differences between this bean and its Hessian counterpart are the bean method and the exporter class. Configuring a Burlap service is otherwise the same as configuring a Hessian service. This includes the need to set up a URL handler and a DispatcherServlet.
Now let’s look at the other side of the conversation and consume the service that you published using Hessian (or Burlap).
15.3.2. Accessing Hessian/Burlap services
As you’ll recall from section 15.2.2, client code that consumes the Spitter service using RmiProxyFactoryBean has no idea the service is an RMI service. In fact, it has no clue that it’s a remote service. It only deals with the SpitterService interface—all the RMI details are contained in the configuration of the beans in Spring’s configuration. The good news is that because of the client’s ignorance of the service’s implementation, switching from an RMI client to a Hessian client is extremely easy, requiring no changes to the client’s Java code.
The bad news is that if you love writing Java code, this section may be a letdown. That’s because the only difference between wiring the client side of an RMI-based service and wiring the client side of a Hessian-based service is that you’ll use Spring’s HessianProxyFactoryBean instead of RmiProxyFactoryBean. A Hessian-based Spitter service can be declared in the client code like this:
@Bean
public HessianProxyFactoryBean spitterService() {
HessianProxyFactoryBean proxy = new HessianProxyFactoryBean();
proxy.setServiceUrl("http://localhost:8080/Spitter/spitter.service");
proxy.setServiceInterface(SpitterService.class);
return proxy;
}
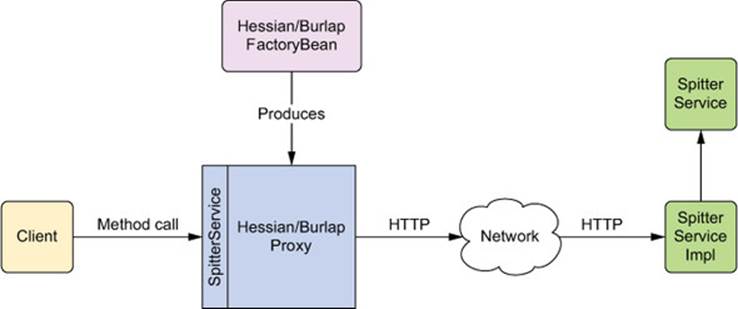
Just as with an RMI-based service, the serviceInterface property specifies the interface that the service implements. And, as with RmiProxyFactoryBean, serviceUrl indicates the URL of the service. Because Hessian is HTTP-based, it’s set to an HTTP URL here (determined in part by the URL mapping you defined earlier). Figure 15.7 shows the interaction between a client and the proxy produced by HessianProxy-FactoryBean.
Figure 15.7. HessianProxyFactoryBean and BurlapProxyFactoryBean produce proxy objects that talk to a remote service over HTTP (Hessian in binary, Burlap in XML).
As it turns out, wiring a Burlap service into the client is equally uninteresting. The only difference is that you use BurlapProxyFactoryBean instead of HessianProxyFactoryBean:
@Bean
public BurlapProxyFactoryBean spitterService() {
BurlapProxyFactoryBean proxy = new BurlapProxyFactoryBean();
proxy.setServiceUrl("http://localhost:8080/Spitter/spitter.service");
proxy.setServiceInterface(SpitterService.class);
return proxy;
}
Although I’ve made light of how uninteresting the configuration differences are among RMI, Hessian, and Burlap, this tedium is a benefit. It demonstrates that you can switch effortlessly between the various remoting technologies supported by Spring without having to learn a completely new model. Once you’ve configured a reference to an RMI service, it’s short work to reconfigure it as a Hessian or Burlap service.
Because both Hessian and Burlap are based on HTTP, they don’t suffer from the same firewall issues as RMI. But RMI has both Hessian and Burlap beat when it comes to serializing objects that are sent in RPC messages. Whereas Hessian and Burlap both use a proprietary serialization mechanism, RMI uses Java’s own serialization mechanism. If your data model is complex, the Hessian/Burlap serialization model may not be sufficient.
There is, however, a best-of-both-worlds solution. Let’s look at Spring’s HTTP invoker, which offers RPC over HTTP (like Hessian/Burlap) while at the same time using Java serialization of objects (like RMI).
15.4. Using Spring’s HttpInvoker
The Spring team recognized a void between RMI services and HTTP-based services such as Hessian and Burlap. On the one side, RMI uses Java’s standard object serialization but is difficult to use across firewalls. On the other side, Hessian and Burlap work well across firewalls but use a proprietary object-serialization mechanism.
Thus Spring’s HTTP invoker was born. The HTTP invoker is a new remoting model created as part of the Spring Framework to perform remoting across HTTP (to make the firewalls happy) and using Java’s serialization (to make programmers happy). Working with HTTP invoker-based services is similar to working with Hessian/Burlap-based services.
To get started with the HTTP invoker, let’s take another look at the Spitter service—this time implemented as an HTTP invoker service.
15.4.1. Exposing beans as HTTP services
To export a bean as an RMI service, you used RmiServiceExporter. To export it as a Hessian service, you used HessianServiceExporter. And to export it as a Burlap service, you used BurlapServiceExporter. Continuing this monotony over to Spring’s HTTP invoker, it shouldn’t surprise you that to export an HTTP invoker service, you’ll need to use HttpInvokerServiceExporter.
To export the Spitter service as an HTTP invoker–based service, you need to configure an HttpInvokerServiceExporter bean like this:
@Bean
public HttpInvokerServiceExporter
httpExportedSpitterService(SpitterService service) {
HttpInvokerServiceExporter exporter =
new HttpInvokerServiceExporter();
exporter.setService(service);
exporter.setServiceInterface(SpitterService.class);
return exporter;
}
Feeling a sense of déjà vu? You may have a hard time spotting the difference between this bean declaration and the ones in section 15.3.2. The only material difference is the class name: HttpInvokerServiceExporter. Otherwise, this exporter isn’t much different from the other remote service exporters.
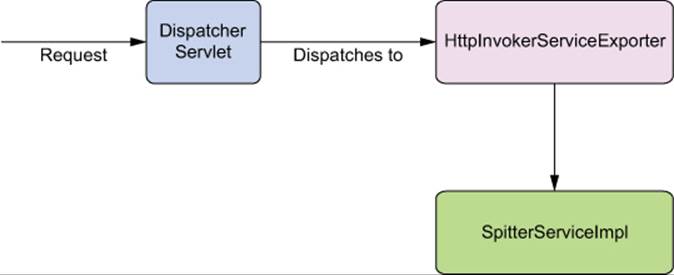
As illustrated in figure 15.8, HttpInvokerServiceExporter works much like HessianServiceExporter and BurlapServiceExporter. It’s a Spring MVC controller that receives requests from a client through DispatcherServlet and translates those requests into method calls on the service implementation POJO.
Figure 15.8. HttpInvokerServiceExporter works much like its Hessian and Burlap cousins, receiving requests from a Spring MVC DispatcherServlet and translating them into method calls on a Spring-managed bean.
Because HttpInvokerServiceExporter is a Spring MVC controller, you need to set up a URL handler to map an HTTP URL to the service, just like with the Hessian and Burlap exporters:
@Bean
public HandlerMapping httpInvokerMapping() {
SimpleUrlHandlerMapping mapping = new SimpleUrlHandlerMapping();
Properties mappings = new Properties();
mappings.setProperty("/spitter.service",
"httpExportedSpitterService");
mapping.setMappings(mappings);
return mapping;
}
Also as before, you need to make sure you map DispatcherServlet such that it handles requests with a *.service extension. See the instructions in section 15.3.1 for details on how to set this mapping.
You’ve already seen how to consume remote services through RMI, Hessian, and Burlap. Now let’s rework the Spitter client to use the service that you just exposed with HTTP invoker.
15.4.2. Accessing services via HTTP
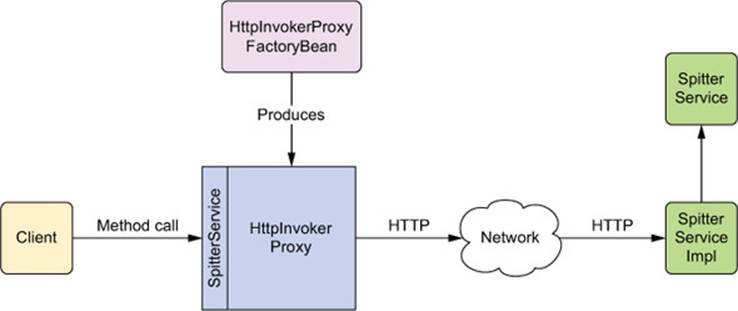
At the risk of sounding like a broken record, I must tell you that consuming an HTTP invoker-based service is much like what you’ve already seen with the other remote service proxies. It’s virtually identical. As you can see from figure 15.9, HttpInvokerProxyFactoryBean fills the same hole as the other remote service proxy factory beans you’ve seen in this chapter.
Figure 15.9. HttpInvokerProxyFactoryBean is a proxy factory bean that produces a proxy for remoting with a Spring-specific HTTP-based protocol.
To wire the HTTP invoker–based service into your client’s Spring application context, you must configure a bean that proxies it using HttpInvokerProxyFactoryBean, as follows:
@Bean
public HttpInvokerProxyFactoryBean spitterService() {
HttpInvokerProxyFactoryBean proxy = new HttpInvokerProxyFactoryBean();
proxy.setServiceUrl("http://localhost:8080/Spitter/spitter.service");
proxy.setServiceInterface(SpitterService.class);
return proxy;
}
Comparing this bean definition to those in sections 15.2.2 and 15.3.2, you’ll find that little has changed. The serviceInterface property is still used to indicate the interface implemented by the Spitter service. And the serviceUrl property is still used to indicate the location of the remote service. Because HTTP invoker is HTTP-based, like Hessian and Burlap, the serviceUrl can contain the same URL as with the Hessian and Burlap versions of the bean.
Don’t you love the symmetry?
Spring’s HTTP invoker presents a best-of-both-worlds remoting solution combining the simplicity of HTTP communication with Java’s built-in object serialization. This makes HTTP invoker services an appealing alternative to either RMI or Hessian/Burlap.
HttpInvoker has one significant limitation that you should keep in mind: it’s a remoting solution offered by the Spring Framework only. This means both the client and the service must be Spring-enabled applications. This also implies, at least for now, that both the client and the service must be Java-based. And because Java serialization is being used, both sides must have the same version of the classes as well as the same version of the Java runtime (much like RMI).
RMI, Hessian, Burlap, and the HTTP invoker are great remoting options. But when it comes to ubiquitous remoting, none hold a candle to web services. Next up, we’ll look at how Spring supports remoting through SOAP-based web services.
15.5. Publishing and consuming web services
One of the most hyped TLAs (three-letter acronyms) in recent years is SOA (service-oriented architecture). SOA means many things to different people. But at the center of SOA is the idea that applications can and should be designed to lean on a common set of core services instead of reimplementing the same functionality for each application.
For example, a financial institution may have many applications, some of which need access to borrower account information. Rather than build account-access logic into each application (much of which would be duplicated), the applications can all rely on a common service to retrieve the account information.
Java and web services have a long history together, and various options are available for working with web services in Java. Many of those options integrate with Spring in some way. Although it would be impossible for me to cover every Spring-enabled web service framework and toolkit in this book, Spring comes with some capable support for publishing and consuming SOAP web services using the Java API for XML Web Services (JAX-WS).
In this section, we’ll revisit the Spitter service example one more time. This time, you’ll expose and consume the Spitter service as a web service using Spring’s JAX-WS support. Let’s start by seeing what it takes to create a JAX-WS web service in Spring.
15.5.1. Creating Spring-enabled JAX-WS endpoints
Earlier in this chapter, you created remote services using Spring’s service exporters. These service exporters magically turn Spring-configured POJOs into remote services. You saw how to create RMI services using RmiServiceExporter, Hessian services usingHessianServiceExporter, Burlap services using BurlapServiceExporter, and HTTP invoker services using HttpInvokerServiceExporter. Now you probably expect me to show you how to create web services using a JAX-WS service exporter in this section.
Spring does provide a JAX-WS service exporter, SimpleJaxWsServiceExporter, and you’ll see it soon enough. But before you get there, you should know that it may not be the best choice in all situations. You see, SimpleJaxWsServiceExporter requires that the JAX-WS runtime support publishing of endpoints to a specified address. The JAX-WS runtime that ships with Sun’s JDK 1.6 fits the bill, but other JAX-WS implementations, including the reference implementation of JAX-WS, may not.
If you’ll be deploying to a JAX-WS runtime that doesn’t support publishing to a specified address, you’ll have write your JAX-WS endpoints in a more conventional way. That means the lifecycle of the endpoints will be managed by the JAX-WS runtime and not by Spring. But that doesn’t mean they can’t be wired with beans from a Spring application context.
Autowiring JAX-WS endpoints in Spring
The JAX-WS programming model involves using annotations to declare a class and its methods as web service operations. A class that’s annotated with @WebService is considered a web service endpoint, and its methods—annotated with @WebMethod—are the operations.
Just as with any other object in a sizable application, a JAX-WS endpoint will likely depend on other objects to do its work. That means JAX-WS endpoints could benefit from dependency injection. But if the endpoint’s lifecycle is managed by the JAX-WS runtime and not by Spring, it would seem to be impossible to wire Spring-managed beans into a JAX-WS–managed endpoint instance.
The secret to wiring JAX-WS endpoints is to extend SpringBeanAutowiring-Support. By extending SpringBeanAutowiringSupport, you can annotate an endpoint’s properties with @Autowired, and its dependencies will be met. Spitter-Service-Endpoint in the following listing shows how this works.
Listing 15.2. SpringBeanAutowiringSupport on JAX-WS endpoints
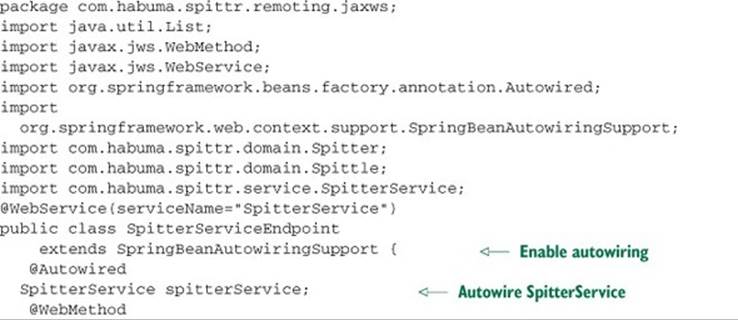

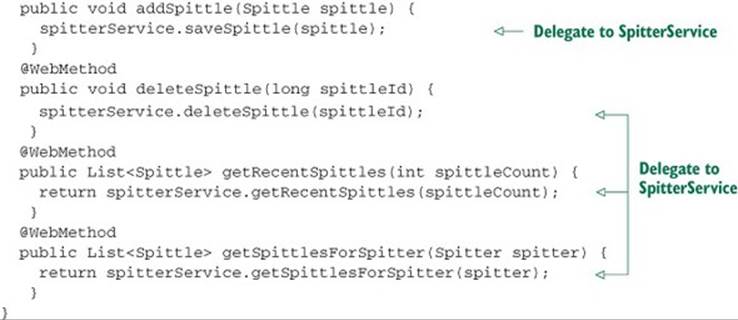
You annotate the spitterService property with @Autowired to indicate that it should be automatically injected with a bean from the Spring application context. From there, this endpoint delegates to the injected SpitterService to do the real work.
Exporting standalone JAX-WS endpoints
As I said, SpringBeanAutowiringSupport is useful when the object whose properties are being injected doesn’t have its lifecycle managed by Spring. But under the right circumstances, it’s possible to export a Spring-managed bean as a JAX-WS endpoint.
Spring’s SimpleJaxWsServiceExporter works much like the other service exporters that you saw earlier in this chapter, in that it publishes Spring-managed beans as service endpoints in a JAX-WS runtime. Unlike those other service exporters, SimpleJaxWsServiceExporterdoesn’t need to be given a reference to the bean it’s supposed to export. Instead, it publishes all beans that are annotated with JAX-WS annotations as JAX-WS services.
You can configure SimpleJaxWsServiceExporter using the following @Bean method:
@Bean
public SimpleJaxWsServiceExporter jaxWsExporter() {
return new SimpleJaxWsServiceExporter();
}
As you can see, SimpleJaxWsServiceExporter needs nothing else to do its job. When it gets started, it digs through the Spring application context looking for beans that are annotated with @WebService. When it finds one, it publishes the bean as a JAX-WS endpoint with a base address of http://localhost:8080/. One such bean that it may find is SpitterServiceEndpoint.
Listing 15.3. SimpleJaxWsServiceExporter turns beans into JAX-WS endpoints
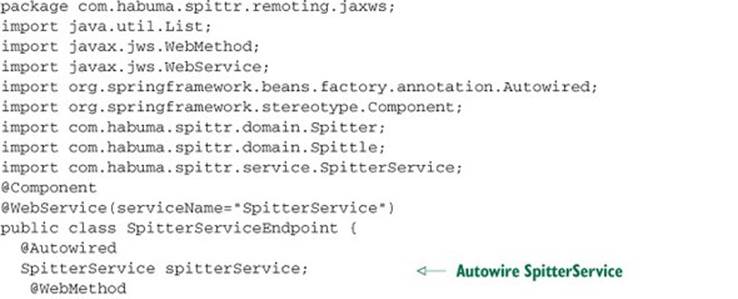
Notice that this new implementation of SpitterServiceEndpoint no longer extends SpringBeanAutowiringSupport. As a full-fledged Spring bean, it qualifies for autowiring without extending a special support class.
Because SimpleJaxWsServiceEndpoint’s base address defaults to http://localhost:8080/, and because SpitterServiceEndpoint is annotated with @Web-Service (serviceName="SpitterService"), the matchup of these two beans results in a web service at http://localhost:8080/SpitterService. But you’re in total control of the service URL, so if you’d like, you can set the base address to something else. For example, the following configuration of SimpleJaxWsServiceEndpoint publishes the same service endpoint to http://localhost:8888/services/SpitterService.
@Bean
public SimpleJaxWsServiceExporter jaxWsExporter() {
SimpleJaxWsServiceExporter exporter =
new SimpleJaxWsServiceExporter();
exporter.setBaseAddress("http://localhost:8888/services/");
}
As simple as SimpleJaxWsServiceEndpoint seems, you should be aware that it only works with a JAX-WS runtime that supports publication of endpoints with an address. That includes the JAX-WS runtime that comes with Sun’s 1.6 JDK. Other JAX-WS runtimes, such as the JAX-WS 2.1 reference implementation, don’t support this type of endpoint publication and thus can’t be used with SimpleJaxWsServiceEndpoint.
15.5.2. Proxying JAX-WS services on the client side
Publishing web services with Spring is different from the way you publish services in RMI, Hessian, Burlap, and the HTTP invoker. But as you’ll soon see, consuming web services with Spring involves client-side proxies in much the same way that Spring-based clients consume those other remoting technologies.
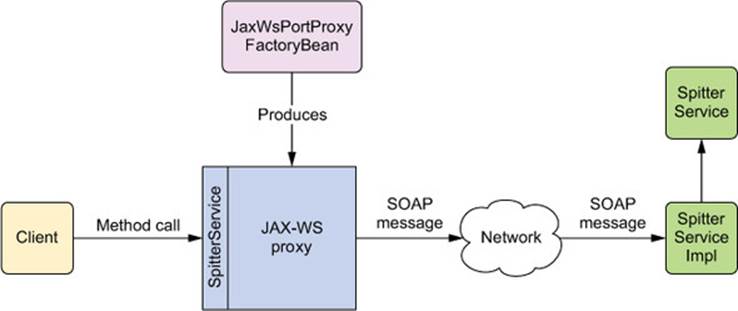
Using JaxWsPortProxyFactoryBean, you can wire the Spitter web service in Spring as if it were any other bean. JaxWsPortProxyFactoryBean is a Spring FactoryBean that produces a proxy that knows how to talk to a SOAP web service. The proxy is created to implement the service’s interface (see figure 15.10). Consequently, JaxWsPortProxyFactoryBean makes it possible to wire and use a remote web service as if it were any other local POJO.
Figure 15.10. JaxWsPortProxyFactoryBean produces proxies that talk to remote web services. These proxies can then be wired into other beans as if they were local POJOs.
You configure JaxWsPortProxyFactoryBean to reference the Spitter web service like this:
@Bean
public JaxWsPortProxyFactoryBean spitterService() {
JaxWsPortProxyFactoryBean proxy = new JaxWsPortProxyFactoryBean();
proxy.setWsdlDocument(
"http://localhost:8080/services/SpitterService?wsdl");
proxy.setServiceName("spitterService");
proxy.setPortName("spitterServiceHttpPort");
proxy.setServiceInterface(SpitterService.class);
proxy.setNamespaceUri("http://spitter.com");
return proxy;
}
As you can see, several properties must be set for JaxWsPortProxyFactoryBean to work. The wsdlDocumentUrl property identifies the location of the remote web service’s definition file. JaxWsPortProxyFactoryBean will use the WSDL available at that URL to construct a proxy to the service. The proxy that’s produced by JaxWsPortProxyFactoryBean will implement the SpitterService interface, as specified by the serviceInterface property.
You can usually determine the values for the remaining three properties by looking at the service’s WSDL. For illustration’s sake, suppose the WSDL for the Spitter service looked like this:
<wsdl:definitions targetNamespace="http://spitter.com">
...
<wsdl:service name="spitterService">
<wsdl:port name="spitterServiceHttpPort"
binding="tns:spitterServiceHttpBinding">
...
</wsdl:port>
</wsdl:service>
</wsdl:definitions>
Although not likely, it’s possible for multiple services and/or ports to be defined in the service’s WSDL. For that reason, JaxWsPortProxyFactoryBean requires that you specify the port and service names in the portName and serviceName properties. A quick glance at the nameattributes of the <wsdl:port> and <wsdl:service> elements in the WSDL will help you figure out what these properties should be set to.
Finally, the namespaceUri property specifies the namespace of the service. Among other things, the namespace helps JaxWsPortProxyFactoryBean locate the service definition in the WSDL. As with the port and service names, you can find the correct value for this property by looking in the WSDL. It’s usually available in the target-Namespace attribute of the <wsdl:definitions> element.
15.6. Summary
Working with remote services is usually a tedious chore. But Spring provides remoting support that makes working with remote services as simple as working with regular JavaBeans.
On the client side, Spring provides proxy factory beans that enable you to configure remote services in your Spring application. Regardless of whether you’re using RMI, Hessian, Burlap, Spring’s own HTTP invoker, or web services for remoting, you can wire remote services into your application as if they were POJOs. Spring even catches any RemoteExceptions that are thrown and rethrows runtime RemoteAccess-Exceptions in their place, freeing your code from having to deal with an exception that it probably can’t recover from.
Even though Spring hides many of the details of remote services, making them appear as though they’re local JavaBeans, you should bear in mind the consequences of remote services. Remote services, by their nature, are typically less efficient than local services. You should consider this when writing code that accesses remote services, limiting remote calls to avoid performance bottlenecks.
In this chapter, you saw how you can use Spring to expose and consume services based on basic remoting technologies. Although these remoting options are useful in distributing applications, this was just a taste of what’s involved in working in a service-oriented architecture (SOA).
We also looked at how to export beans as SOAP-based web services. Although this is an easy way to develop web services, it may not be the best choice from an architectural standpoint. In the next chapter, we’ll look at a different approach to building distributed applications by exposing portions of the application as RESTful resources.
All materials on the site are licensed Creative Commons Attribution-Sharealike 3.0 Unported CC BY-SA 3.0 & GNU Free Documentation License (GFDL)
If you are the copyright holder of any material contained on our site and intend to remove it, please contact our site administrator for approval.
© 2016-2026 All site design rights belong to S.Y.A.