Spring in Action, 4th Edition: Covers Spring 4 (2015)
Part 4. Integrating Spring
Chapter 17. Messaging in Spring
This chapter covers
· Introduction to asynchronous messaging
· Messaging with JMS
· Sending messages with Spring and AMQP
· Message-driven POJOs
It’s 4:55 p.m. on Friday. You’re minutes away from starting a much-anticipated vacation. You have just enough time to drive to the airport and catch your flight. But before you pack up and head out, you need to be sure your boss and colleagues know the status of the work you’ve been doing so that on Monday they can pick up where you left off. Unfortunately, some of your colleagues have already skipped out for the weekend, and your boss is tied up in a meeting. What do you do?
You could call your boss’s cell phone—but it’s not necessary to interrupt him for a mere status report. Maybe you could stick around and wait until he returns. But it’s anyone’s guess how long the meeting will last, and you have a plane to catch. Perhaps you could leave a sticky note on his monitor ... next to a hundred other sticky notes it will blend in with.
The most practical way to communicate your status and still catch your plane is to send a quick email to your boss and your colleagues, detailing your progress and promising to send a postcard. You don’t know where they are or when they’ll read the email, but you do know they’ll eventually return to their desks and read it. Meanwhile, you’re on your way to the airport.
Sometimes it’s necessary to talk to someone directly. If you injure yourself and need an ambulance, you’re probably going to pick up the phone—emailing the hospital just won’t do. But often, sending a message is sufficient and offers some advantages over direct communication, such as letting you get on with your vacation.
A couple of chapters back, you saw how to use RMI, Hessian, Burlap, the HTTP invoker, and web services to enable communication between applications. All of these communication mechanisms employ synchronous communication in which a client application directly contacts a remote service and waits for the remote procedure to complete before continuing.
Synchronous communication has its place, but it’s not the only style of interapplication communication available to developers. Asynchronous messaging is a way of indirectly sending messages from one application to another without waiting for a response. Asynchronous messaging has several advantages over synchronous messaging, as you’ll soon see.
With Spring, you have a few options for asynchronous messaging. In this chapter, we’ll look at how to send and receive messages in Spring using both the Java Message Service (JMS) and the Advanced Message Queuing Protocol (AMQP). In addition to basic sending and receiving of messages, we’ll look at Spring’s support for message-driven POJOs: a way to receive messages that resembles EJB’s message-driven beans (MDBs).
17.1. A brief introduction to asynchronous messaging
Much like the remoting mechanisms and REST APIs we’ve covered so far in this part of the book, asynchronous messaging is all about applications communicating with one another. But it differs from those other communication mechanisms in how information is transferred between systems.
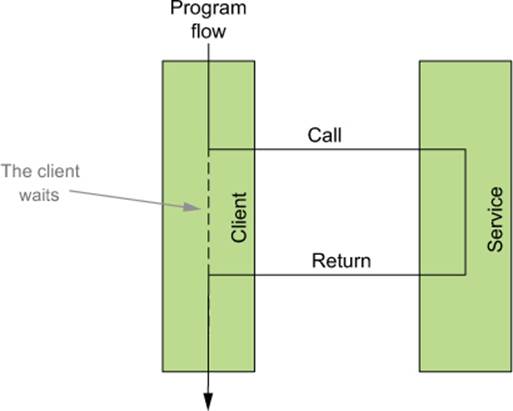
Remoting options such as RMI and Hessian/Burlap are synchronous. As illustrated in figure 17.1, when the client invokes a remote method, the client must wait for the method to complete before moving on. Even if the remote method doesn’t return anything to the client, the client is put on hold until the service is done.
Figure 17.1. When communicating synchronously, the client must wait for the operation to complete.
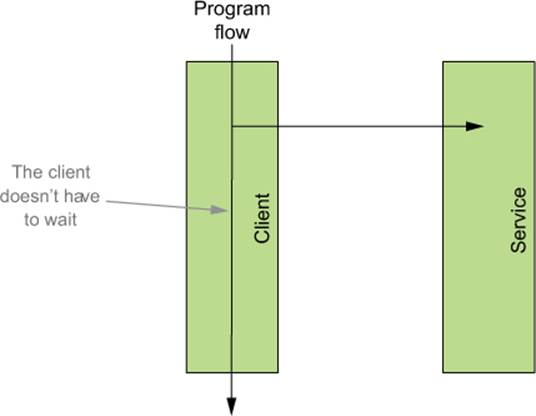
On the other hand, when messages are sent asynchronously, as shown in figure 17.2, the client doesn’t have to wait for the service to process the message or even for the message to be delivered. The client sends its message and then moves along, assuming that the service will eventually receive and process the message.
Figure 17.2. Asynchronous communication is a no-wait form of communication.
Asynchronous communication offers several advantages over synchronous communication. We’ll take a closer look at these advantages in a moment, but first let’s examine how the messages are sent asynchronously.
17.1.1. Sending messages
Most of us take the postal service for granted. Millions of times every day, people place letters, cards, and packages in the hands of postal workers, trusting that those items will reach the desired destinations. The world’s too big for us to hand-deliver these things ourselves, so we rely on the postal system to handle them for us. We address our items, place the necessary postage on them, and then drop them in the mail to be delivered without giving a second thought to how they might get where they’re going.
The key to the postal service is indirection. When Grandma’s birthday comes around, it would be inconvenient if we had to deliver a card directly to her. Depending on where she lives, we’d have to set aside anywhere from a few hours to a few days to deliver a birthday card. Fortunately, the postal service will deliver the card to her while we go about our lives.
Similarly, indirection is the key to asynchronous messaging. When one application sends a message to another, there’s no direct link between the two applications. Instead, the sending application places the message in the hands of a service that will ensure delivery to the receiving application.
There are two main actors in asynchronous messaging: message brokers and destinations. When an application sends a message, it hands it off to a message broker. A message broker is analogous to the post office. The message broker ensures that the message is delivered to the specified destination, leaving the sender free to go about other business.
When you send a letter through the mail, it’s important to address it so that the postal service knows where it should be delivered. Likewise, asynchronously sent messages are addressed with a destination. Destinations are like mailboxes where the messages are placed until someone comes to pick them up.
But unlike mail addresses, which may indicate a specific person or street address, destinations are less specific. Destinations are only concerned about where messages will be picked up—not who will pick them up. In this way, a destination is like sending a letter addressed “To current resident.”
Although different messaging systems may offer a variety of message-routing schemes, there are two common types of destinations: queues and topics. Each of these is associated with a specific messaging model: either point-to-point (for queues) or publish/subscribe (for topics).
Point-to-point messaging
In the point-to-point model, each message has exactly one sender and one receiver, as illustrated in figure 17.3. When the message broker is given a message, it places the message in a queue. When a receiver comes along and asks for the next message in the queue, the message is pulled from the queue and delivered to the receiver. Because the message is removed from the queue as it’s delivered, it’s guaranteed that the message will be delivered to only one receiver.
Figure 17.3. A message queue decouples a message sender from the message receiver. Although a queue may have several receivers, each message is picked up by exactly one receiver.

Although each message in a message queue is delivered to only one receiver, this doesn’t imply that only one receiver is pulling messages from the queue. It’s likely that several receivers are processing messages from the queue. But they’ll each be given their own messages to process.
This is analogous to waiting in line at the bank. As you wait, you may notice that multiple tellers are available to help you with your financial transaction. When a teller finishes helping a customer, the teller calls for the next person in line. When it’s your turn at the front of the line, you’re called to the counter and helped by one teller. The other tellers help other banking customers.
Another observation to be made at the bank is that when you get in line, you probably don’t know which teller will eventually help you. You could count how many people are in line, match that with the number of available tellers, note which teller is fastest, and come up with a guess as to which teller will call you to their window. But chances are you’ll be wrong and end up at a different teller’s window.
Likewise, with point-to-point messaging, if multiple receivers are listening to a queue, there’s no way of knowing which one will process a specific message. This uncertainty is a good thing, because it enables an application to scale up message processing by adding another listener to the queue.
Publish-subscribe messaging
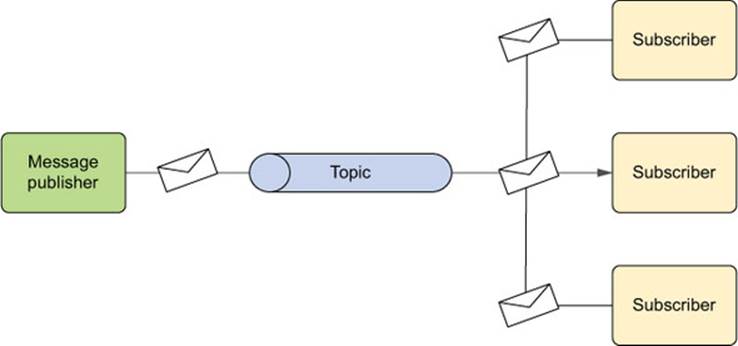
In the publish/subscribe messaging model, messages are sent to a topic. As with queues, many receivers may be listening to a topic. But unlike with queues, where a message is delivered to exactly one receiver, all subscribers to a topic receive a copy of the message, as shown in figure 17.4.
Figure 17.4. Like queues, topics decouple message senders from message receivers. Unlike queues, a topic message may be delivered to many topic subscribers.
As you may have guessed from its name, the publish/subscribe message model is much like the model of a magazine publisher and its subscribers. The magazine (a message) is published and sent to the postal service, and all subscribers receive their own copy.
The magazine analogy breaks down when you realize that the publisher has no idea who its subscribers are. The publisher only knows that its message will be published to a particular topic—not who’s listening to that topic. This also implies that the publisher has no idea how the message will be processed.
Now that we’ve covered the basics of asynchronous messaging, let’s see how it compares to synchronous RPC.
17.1.2. Assessing the benefits of asynchronous messaging
Even though it’s intuitive and simple to set up, synchronous communication imposes several limitations on the client of a remote service. These are the most significant:
· Synchronous communication implies waiting. When a client invokes a method on a remote service, the client must wait for the remote method to complete before continuing. If the client communicates frequently with the remote service or the remote service is slow to respond, this could negatively impact performance of the client application.
· The client is coupled to the service through the service’s interface. If the interface of the service changes, all of the service’s clients will need to change accordingly.
· The client is coupled to the service’s location. A client must be configured with the service’s network location so that it knows how to contact the service. If the network topology changes, the client will need to be reconfigured with the new location.
· The client is coupled to the service’s availability. If the service becomes unavailable, the client is effectively crippled.
Although synchronous communication has its place, these shortcomings should be taken into account when deciding what communication mechanism is a best fit for your application’s needs. If these constraints are a concern for you, you may want to consider how asynchronous communication addresses them.
No waiting
When a message is sent asynchronously, the client doesn’t need to wait for it to be processed or delivered. The client drops off the message with the message broker and moves along, confident that the message will make it to the appropriate destination.
Because it doesn’t have to wait, the client is freed up to perform other activities. With all this free time, the client’s performance can be dramatically improved.
Message orientation and decoupling
Unlike RPC communication, which is typically oriented around a method call, messages sent asynchronously are data-centric. This means the client isn’t fixed to a specific method signature. Any queue or topic subscriber that can process the data sent by the client can process the message. The client doesn’t need to be aware of any service specifics.
Location independence
Synchronous RPC services are typically located by their network address. The implication is that clients aren’t resilient to changes in network topology. If a service’s IP address changes or if it’s configured to listen on a different port, the client must be changed accordingly, or the client will be unable to access the service.
In contrast, messaging clients have no idea what service will process their messages or where the service is located. The client only knows the queue or topic through which the messages will be sent. As a result, it doesn’t matter where the service is located, as long as it can retrieve messages from the queue or topic.
In the point-to-point model, it’s possible to take advantage of location independence to create a cluster of services. If the client is unaware of the service’s location, and if the service’s only requirement is that it must be able to access the message broker, there’s no reason multiple services can’t be configured to pull messages from the same queue. If the service is overburdened and falling behind in its processing, all you need to do is start a few more instances of the service to listen to the same queue.
Location independence takes on another interesting side effect in the publish/subscribe model. Multiple services could all subscribe to a single topic, receiving duplicate copies of the same message. But each service could process that message differently. For example, let’s say you have a set of services that together process a message that details the new hire of an employee. One service might add the employee to the payroll system, another adds them to the HR portal, and yet another makes sure the employee is given access to the systems they’ll need to do their job. Each service works independently on the same data that they all received from a topic.
Guaranteed delivery
In order for a client to communicate with a synchronous service, the service must be listening at the IP address and port specified. If the service were to go down or otherwise become unavailable, the client wouldn’t be able to proceed.
But when sending messages asynchronously, the client can rest assured that its messages will be delivered. Even if the service is unavailable when a message is sent, the message will be stored until the service is available again.
Now that you have a feel for the basics of asynchronous messaging, let’s see it in action. We’ll start by using JMS to send and receive messages.
17.2. Sending messages with JMS
The Java Message Service (JMS) is a Java standard that defines a common API for working with message brokers. Before JMS, each message broker had a proprietary API, making an application’s messaging code less portable between brokers. But with JMS, all compliant implementations can be worked with via a common interface in much the same way that JDBC has given database operations a common interface.
Spring supports JMS through a template-based abstraction known as JmsTemplate. Using JmsTemplate, it’s easy to send messages across queues and topics from the producer side and also to receive those messages on the consumer side. Spring also supports the notion of message-driven POJOs: simple Java objects that react to messages arriving on a queue or topic in an asynchronous fashion.
We’re going to explore Spring’s JMS support, including JmsTemplate and message-driven POJOs. But before you can send and receive messages, you need a message broker ready to relay those messages between producers and consumers. Let’s kick off our exploration of Spring JMS by setting up a message broker in Spring.
17.2.1. Setting up a message broker in Spring
ActiveMQ is a great open source message broker and a wonderful option for asynchronous messaging with JMS. As I’m writing this, the current version of ActiveMQ is 5.9.1. To get started with ActiveMQ, you’ll need to download the binary distribution from http://activemq.apache.org. Once you’ve downloaded ActiveMQ, unzip it to your local hard drive. In the lib directory of the unzipped distribution, you’ll find activemq-core-5.9.1.jar. This is the JAR file you’ll need to add to the application’s classpath to be able to use ActiveMQ’s API.
Under the bin directory, you’ll find subdirectories for various operating systems. In those, you’ll find scripts that you can use to start ActiveMQ. For example, to start ActiveMQ on OS X, run activemq start from the bin/macosx directory. In moments, ActiveMQ will be ready and waiting to broker your messages.
Creating a connection factory
Throughout this chapter, you’ll see different ways you can use Spring to both send and receive messages through JMS. In all cases, you’ll need a JMS connection factory to be able to send messages through the message broker. Because you’re using ActiveMQ as your message broker, you’ll have to configure the JMS connection factory so that it knows how to connect to ActiveMQ. ActiveMQConnectionFactory is the JMS connection factory that comes with ActiveMQ. You can configure it in Spring like this:
<bean id="connectionFactory"
class="org.apache.activemq.spring.ActiveMQConnectionFactory" />
By default, ActiveMQConnectionFactory assumes that the ActiveMQ broker is listening at port 61616 on localhost. That’s fine for development purposes, but it’s likely that your production ActiveMQ broker will be on a different host and/or port. In that case, you can specify the broker URL with the brokerURL property:
<bean id="connectionFactory"
class="org.apache.activemq.spring.ActiveMQConnectionFactory"
p:brokerURL="tcp://localhost:61616"/>
Optionally, because you know you’re dealing with ActiveMQ, you can use ActiveMQ’s own Spring configuration namespace (available with all versions of ActiveMQ since version 4.1) to declare the connection factory. First, be sure to declare the amq namespace in the Spring configuration XML file:
<?xml version="1.0" encoding="UTF-8"?>
<beans xmlns="http://www.springframework.org/schema/beans"
xmlns:xsi="http://www.w3.org/2001/XMLSchema-instance"
xmlns:jms="http://www.springframework.org/schema/jms"
xmlns:amq="http://activemq.apache.org/schema/core"
xsi:schemaLocation="http://activemq.apache.org/schema/core
http://activemq.apache.org/schema/core/activemq-core.xsd
http://www.springframework.org/schema/jms
http://www.springframework.org/schema/jms/spring-jms.xsd
http://www.springframework.org/schema/beans
http://www.springframework.org/schema/beans/spring-beans.xsd">
...
</beans>
Then you can use the <amq:connectionFactory> element to declare the connection factory:
<amq:connectionFactory id="connectionFactory"
brokerURL="tcp://localhost:61616"/>
Note that the <amq:connectionFactory> element is specific to ActiveMQ. If you’re using a different message-broker implementation, there may or may not be a Spring configuration namespace available. If not, you’ll need to wire the connection factory as a <bean>.
Later in this chapter, you’ll use this connectionFactory bean a lot. But for now, suffice it to say that brokerURL tells the connection factory where the message broker is located. In this case, the URL given to brokerURL tells the connection factory to connect to ActiveMQ on the local machine at port 61616 (which is the port that ActiveMQ listens to by default).
Declaring an ActiveMQ message destination
In addition to a connection factory, you need a destination for the messages to be passed to. The destination can be either a queue or a topic, depending on the needs of the application.
Regardless of whether you’re using a queue or a topic, you must configure the destination bean in Spring using a message broker–specific implementation class. For example, the following <bean> declaration declares an ActiveMQ queue:
<bean id="queue"
class="org.apache.activemq.command.ActiveMQQueue"
c:_="spitter.queue" />
Similarly, the following <bean> declares a topic for ActiveMQ:
<bean id="topic"
class="org.apache.activemq.command.ActiveMQTopic"
c:_="spitter.queue" />
In either case, the constructor is given the name of the queue, as it’s known to the message broker—spitter.topic in this case.
As with the connection factory, the ActiveMQ namespace offers an alternative way to declare queues and topics. For queues, you can also use the <amq:queue> element:
<amq:queue id="spittleQueue" physicalName="spittle.alert.queue" />
Or, if it’s a JMS topic that’s in order, use the <amq:topic>:
<amq:topic id="spittleTopic" physicalName="spittle.alert.topic" />
Either way, the physicalName attribute sets the name of the message channel.
At this point you’ve seen how to declare the essential components of working with JMS. Now you’re ready to start sending and receiving messages. For that, you’ll use Spring’s JmsTemplate, the centerpiece of Spring’s JMS support. But first, let’s gain an appreciation for whatJmsTemplate provides by looking at what JMS is like without JmsTemplate.
17.2.2. Using Spring’s JMS template
As you’ve seen, JMS gives Java developers a standard API for interacting with message brokers and for sending and receiving messages. Furthermore, virtually every message broker implementation supports JMS. So there’s no reason to learn a proprietary messaging API for every message broker you deal with.
But although JMS offers a universal interface to all message brokers, its convenience comes at a cost. Sending and receiving messages with JMS isn’t a simple matter of licking a stamp and placing it on an envelope. As you’ll see, JMS demands that you also (figuratively) fuel the mail carrier’s truck.
Tackling runaway JMS code
In section 10.3.1, I showed you how conventional JDBC code can be an unwieldy mess when you need to handle connections, statements, result sets, and exceptions. Unfortunately, conventional JMS follows a similar model, as you’ll observe in the following listing.
Listing 17.1. Sending a message using conventional (non-Spring) JMS
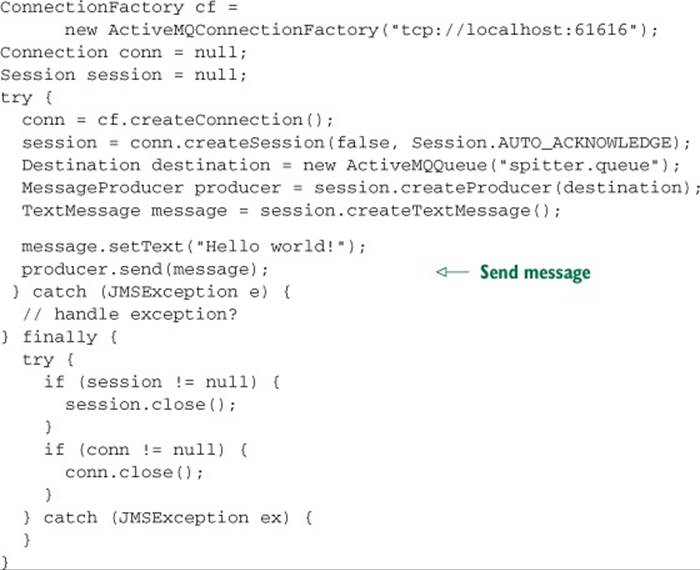
At the risk of sounding repetitive—holy runaway code, Batman! As with the JDBC example, there are almost 20 lines of code here just to send a simple “Hello world!” message. Only a few of those lines actually send the message; the rest merely set the stage for sending the message.
It isn’t much better on the receiving end, as you can see in the next listing.
Listing 17.2. Receiving a message using conventional (non-Spring) JMS
ConnectionFactory cf =
new ActiveMQConnectionFactory("tcp://localhost:61616");
Connection conn = null;
Session session = null;
try {
conn = cf.createConnection();
conn.start();
session = conn.createSession(false, Session.AUTO_ACKNOWLEDGE);
Destination destination =
new ActiveMQQueue("spitter.queue");
MessageConsumer consumer = session.createConsumer(destination);
Message message = consumer.receive();
TextMessage textMessage = (TextMessage) message;
System.out.println("GOT A MESSAGE: " + textMessage.getText());
conn.start();
} catch (JMSException e) {
// handle exception?
} finally {
try {
if (session != null) {
session.close();
}
if (conn != null) {
conn.close();
}
} catch (JMSException ex) {
}
}
As in listing 17.1, that’s a lot of code to do something so darn simple. If you take a line-by-line comparison, you’ll find that the listings are almost identical. And if you were to look at a thousand other JMS examples, you’d find them all to be strikingly similar. Some may retrieve their connection factories from JNDI, and some may use a topic instead of a queue. Nevertheless, they all follow roughly the same pattern.
A consequence of this boilerplate code is that you repeat yourself every time you work with JMS. Worse still, you’ll find yourself repeating other developers’ JMS code.
You saw in chapter 10 how Spring’s JdbcTemplate handles runaway JDBC boilerplate. Now let’s look at how Spring’s JmsTemplate can do the same thing for JMS boilerplate code.
Working with JMS templates
JmsTemplate is Spring’s answer to verbose and repetitive JMS code. JmsTemplate takes care of creating a connection, obtaining a session, and ultimately sending or receiving messages. This leaves you to focus your development efforts on constructing the message to send or processing messages that are received.
What’s more, JmsTemplate can handle any clumsy JMSException that may be thrown along the way. If a JMSException is thrown in the course of working with Jms-Template, JmsTemplate will catch it and rethrow it as one of the unchecked subclasses of Spring’s ownJmsException. Table 17.1 shows how Spring maps standard JMS-Exceptions to Spring’s unchecked JmsExceptions.
Table 17.1. Spring’s JmsTemplate catches standard JMSExceptions and rethrows them as unchecked subclasses of Spring’s own JmsException.
|
Spring (org.springframework.jms.*) |
Standard JMS (javax.jms.*) |
|
DestinationResolutionException |
Spring-specific—thrown when Spring can’t resolve a destination name |
|
IllegalStateException |
IllegalStateException |
|
InvalidClientIDException |
InvalidClientIDException |
|
InvalidDestinationException |
InvalidDestinationException |
|
InvalidSelectorException |
InvalidSelectorException |
|
JmsSecurityException |
JmsSecurityException |
|
ListenerExecutionFailedException |
Spring-specific—thrown when execution of a listener method fails |
|
MessageConversionException |
Spring-specific—thrown when message conversion fails |
|
MessageEOFException |
MessageEOFException |
|
MessageFormatException |
MessageFormatException |
|
MessageNotReadableException |
MessageNotReadableException |
|
MessageNotWriteableException |
MessageNotWriteableException |
|
ResourceAllocationException |
ResourceAllocationException |
|
SynchedLocalTransactionFailedException |
Spring-specific—thrown when a synchronized local transaction fails to complete |
|
TransactionInProgressException |
TransactionInProgressException |
|
TransactionRolledBackException |
TransactionRolledBackException |
|
UncategorizedJmsException |
Spring-specific—thrown when no other exception applies |
In fairness to the JMS API, JMSException does come with a rich and descriptive set of subclasses that give you a better sense of what went wrong. Nevertheless, all these subclasses of JMSException are checked exceptions and thus must be caught. Jms-Template attends to that for you by catching each exception and rethrowing an appropriate unchecked subclass of JmsException.
To use JmsTemplate, you’ll need to declare it as a bean in the Spring configuration file. The following XML should do the trick:
<bean id="jmsTemplate"
class="org.springframework.jms.core.JmsTemplate"
c:_-ref="connectionFactory" />
Because JmsTemplate needs to know how to get connections to the message broker, you must set the connectionFactory property with a reference to the bean that implements JMS’s ConnectionFactory interface. Here, you wire it with a reference to the connectionFactory bean that you declared earlier in section 17.2.1.
That’s all you need to do to configure JmsTemplate—it’s ready to go. Let’s start sending messages!
Sending messages
One of the features you’d like to build into the Spittr application is the option of alerting (perhaps by email) other users whenever a spittle has been created. You could build that feature directly into the application at the point where a spittle is added. But figuring out whom to send alerts to and sending those alerts may take a while, which could hurt the perceived performance of the application. When a new spittle is added, you want the application to be snappy and respond quickly.
Rather than taking the time to send a message the moment a spittle is added, it makes more sense to queue up that work and deal with it later, after the response has gone back to the user. The time it takes to send a message to a message queue or a topic is negligible, especially compared to the time it may take to send alerts to other users.
To support sending spittle alerts asynchronously with the creation of spittles, let’s introduce AlertService to the Spittr application:
package com.habuma.spittr.alerts;
import com.habuma.spittr.domain.Spittle;
public interface AlertService {
void sendSpittleAlert(Spittle spittle);
}
As you can see, AlertService is an interface that defines a single operation, sendSpittleAlert().
AlertServiceImpl, shown in listing 17.3, is an implementation of the Alert-Service interface that uses an injected JmsOperations (the interface that Jms-Template implements) to send Spittle objects to a message queue to be processed at some later time.
Listing 17.3. Sending a Spittle using JmsTemplate
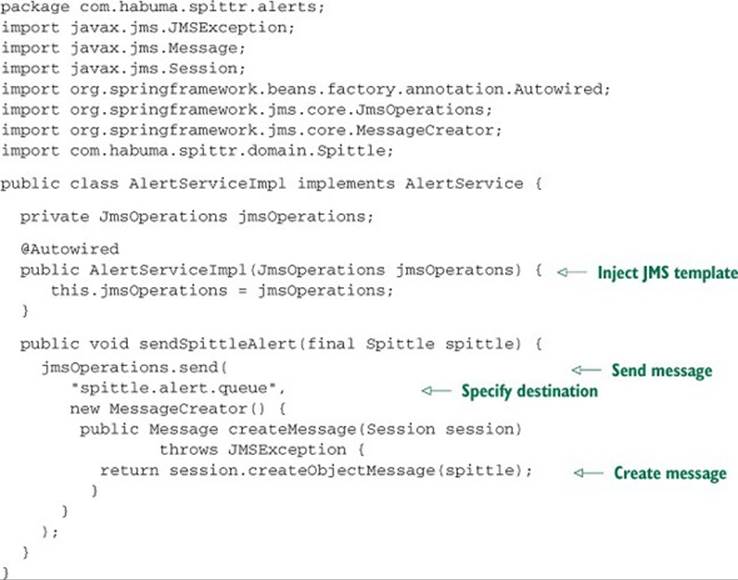
The first parameter to JmsOperations’ send() method is the name of the JMS destination to which the message will be sent. When the send() method is called, Jms-Template deals with obtaining a JMS connection and session and sends the message on behalf of the sender (see figure 17.5).
Figure 17.5. JmsTemplate deals with the complexities of sending a message on behalf of the sender.

The message is constructed using a MessageCreator, implemented here as an anonymous inner class. In MessageCreator’s createMessage() method, you ask for an object message from the session, giving it the Spittle object from which to build the object message.
And that’s it! Note that the sendSpittleAlert() method is focused entirely on assembling and sending a message. There’s no connection or session-management code; JmsTemplate handles all that for you. And there’s no need to catch JMS-Exception; JmsTemplate will catch anyJMSException that’s thrown and then rethrow it as one of Spring’s unchecked exceptions from table 17.1.
Setting a default destination
In listing 17.3, you explicitly specify a destination where the spittle message should be sent in the send() method. That form of send() comes in handy when you want to programmatically choose a destination. But in the case of AlertServiceImpl, you’ll always be sending the spittle message to the same destination, so the benefits of that form of send() aren’t as clear.
Instead of explicitly specifying a destination each time you send a message, you can opt for wiring a default destination into JmsTemplate:
<bean id="jmsTemplate"
class="org.springframework.jms.core.JmsTemplate"
c:_-ref="connectionFactory"
p:defaultDestinationName="spittle.alert.queue" />
Here you set the destination name to spittle.alert.queue. But that’s only a name: it doesn’t say what kind of destination you’re dealing with. If an existing queue or topic exists with that name, it will be used. If not, then a new destination (usually a queue) will be created. But if you want to be specific about what type of destination to create, you can instead wire in a reference to a queue or destination bean that you declared earlier:
<bean id="jmsTemplate"
class="org.springframework.jms.core.JmsTemplate"
c:_-ref="connectionFactory"
p:defaultDestination-ref="spittleTopic" />
Now the call to JmsOperations’ send() method can be simplified slightly by removing the first parameter:
jmsOperations.send(
new MessageCreator() {
...
}
);
This form of the send() method only takes a MessageCreator. There’s no need to specify a destination, because the default destination is the one you want to send messages to.
Getting rid of the explicit destination in the call to send() made things a bit simpler. But sending messages can be even easier if you take advantage of a message converter.
Converting messages when sending
In addition to the send() method, JmsTemplate offers convertAndSend(). Unlike send(), the convertAndSend() method doesn’t take a MessageCreator as an argument. That’s because convertAndSend() uses a built-in message converter to create the message for you.
When you use convertAndSend(), the sendSpittleAlert() method can be reduced to a single line in its body:
public void sendSpittleAlert(Spittle spittle) {
jmsOperations.convertAndSend(spittle);
}
Just like magic, the Spittle is converted into a Message before it’s sent. But as with any magic trick, JmsTemplate has a little something up its sleeve. It uses an implementation of MessageConverter to do the dirty work of converting objects to Messages.
MessageConverter is a Spring-defined interface that has only two methods to be implemented:
public interface MessageConverter {
Message toMessage(Object object, Session session)
throws JMSException, MessageConversionException;
Object fromMessage(Message message)
throws JMSException, MessageConversionException;
}
Although this interface is simple enough to implement, you often won’t need to create a custom implementation. Spring already offers a handful of implementations, such as those described in table 17.2.
Table 17.2. Spring offers several message converters for common conversion tasks. (All of these message converters are in the org.springframework.jms.support.converter package.)
|
Message converter |
What it does |
|
MappingJacksonMessageConverter |
Uses the Jackson JSON library to convert messages to and from JSON |
|
MappingJackson2MessageConverter |
Uses the Jackson 2 JSON library to convert messages to and from JSON |
|
MarshallingMessageConverter |
Uses JAXB to convert messages to and from XML |
|
SimpleMessageConverter |
Converts Strings to/from TextMessage, byte arrays to/from BytesMessage, Maps to/from MapMessage, and Serializable objects to/from ObjectMessage |
By default, JmsTemplate uses a SimpleMessageConverter when sending messages in convertAndSend(). But you can override that by declaring the message converter as a bean and injecting it into JmsTemplate’s messageConverter property. For example, if you want to work with JSON messages, you can declare a MappingJacksonMessage-Converter bean:
<bean id="messageConverter"
class="org.springframework.jms.support.converter.
![]() MappingJacksonMessageConverter" />
MappingJacksonMessageConverter" />
Then you can wire it into JmsTemplate like this:
<bean id="jmsTemplate"
class="org.springframework.jms.core.JmsTemplate"
c:_-ref="connectionFactory"
p:defaultDestinationName="spittle.alert.queue"
p:messageConverter-ref="messageConverter" />
The various message converters may have additional configuration for finer-grained control of the conversion process. MappingJacksonMessageConverter, for instance, allows you to configure things such as encoding and a custom Jackson ObjectMapper. Consult the JavaDoc for each message converter for more details on how to configure the finer details of these message converters.
Consuming messages
Now you’ve seen how to send a message using JmsTemplate. But what if you’re on the receiving end? Can JmsTemplate be used to receive messages, too?
Yes, it can. In fact, it’s even easier to receive messages with JmsTemplate than it is to send them. All you need to do is call JmsOperations’ receive() method, as shown in the following listing.
Listing 17.4. Receiving a message using JmsTemplate
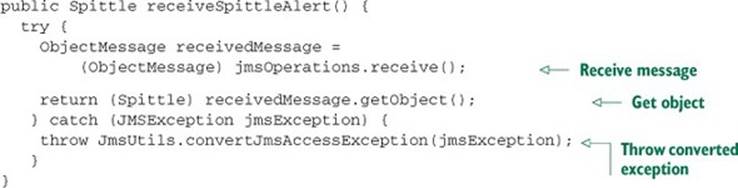
When the JmsOperations’ receive() method is called, it attempts to retrieve a message from the message broker. If no message is available, receive() waits until a message becomes available. This interaction is illustrated in figure 17.6.
Figure 17.6. Receiving messages from a topic or queue using JmsTemplate is as simple as calling the receive() method. JmsTemplate takes care of the rest.

Because you know that the spittle message was sent as an object message, it can be cast to ObjectMessage on arrival. After that, you call getObject() to extract the Spittle object from the ObjectMessage and return it.
The one gotcha is that you have to do something about the JMSException that may be thrown. As I already mentioned, JmsTemplate is good about handling any checked JMSExceptions that are thrown and then rethrowing them as Spring unchecked JmsExceptions. But that’s only applicable when you call one of JmsTemplate’s methods. JmsTemplate can’t do much about the JMSException that may be thrown by the call to ObjectMessage’s getObject() method.
Therefore, you must either catch that JMSException or declare that the method throws it. In keeping with Spring’s philosophy of avoiding checked exceptions, you don’t want to let the JMSException escape this method, so you’ll catch it instead. In the catch block, you can use theconvertJmsAccessException() method from Spring’s JmsUtils class to convert the checked JMSException to an unchecked JmsException. This is effectively the same thing JmsTemplate does for you in other cases.
One thing you can do to clear up the message in receiveSpittleAlert() is to take advantage of a message converter. You’ve seen how message converters can convert objects to Messages in convertAndSend(). But they can also be used on the receiving end with JmsTemplate’sreceiveAndConvert():
public Spittle retrieveSpittleAlert() {
return (Spittle) jmsOperations.receiveAndConvert();
}
Now there’s no need to cast the Message to ObjectMessage, retrieve the Spittle by calling getObject(), or muck about with the checked JMSException. This new retrieveSpittleAlert() is much cleaner. But there’s still a small, not-so-obvious problem.
The big downside of consuming messages with JmsTemplate is that both the receive() and receiveAndConvert() methods are synchronous. This means the receiver must wait patiently for the message to arrive, because those methods will block until a message is available (or until a timeout condition occurs). Doesn’t it seem odd to synchronously consume a message that was asynchronously sent?
That’s where message-driven POJOs come in handy. Let’s see how to receive messages asynchronously using components that react to messages rather than wait on them.
17.2.3. Creating message-driven POJOs
During one summer in college, I had the privilege of working at Yellowstone National Park. I didn’t have a high-profile job like being a park ranger or the guy who turns Old Faithful on and off. Instead, I held a position in housekeeping at Old Faithful Inn, changing sheets, cleaning bathrooms, and vacuuming floors. Not glamorous, but at least I was working in one of the most beautiful places on Earth.
Every day after work, I’d head over to the local post office to see if I had any mail. I was away from home for several weeks, so it was nice to receive a letter or card from my friends back at school. I didn’t have my own post box, so I’d walk up and ask the man sitting on the stool behind the counter if I had received any mail. That’s when the wait would begin.
You see, the man behind the counter was approximately 195 years old. And like most people that age, he had a difficult time getting around. He’d drag his keister off the stool, slowly scoot his feet across the floor, and then disappear behind a partition. After a few moments, he’d emerge, shuffle his way back to the counter, and lift himself back up onto the stool. Then he’d look at me and say, “No mail today.”
JmsTemplate’s receive() method is a lot like that aged postal employee. When you call receive(), it goes away and looks for a message in the queue or topic and doesn’t return until a message arrives or until the timeout has passed. Meanwhile, your application is sitting there doing nothing, waiting to see if there’s a message. Wouldn’t it be better if your application could go about its business and be notified when a message arrives?
One of the highlights of the EJB 2 specification was the inclusion of the message-driven bean (MDB). MDBs are EJBs that process messages asynchronously. In other words, MDBs react to messages in a JMS destination as events and respond to those events. This is in contrast to synchronous message receivers, which block until a message is available.
MDBs were a bright spot in the EJB landscape. Even many of EJB’s most rabid detractors would concede that MDBs were an elegant way of handling messages. The only blemish to be found in EJB 2 MDBs was that they had to implement javax.ejb.MessageDrivenBean. In doing so, they also had to implement a few EJB lifecycle callback methods. Put simply, EJB 2 MDBs were very un-POJO.
With the EJB 3 specification, MDBs were cleaned up to have a slightly more POJO feel to them. No longer must you implement the MessageDrivenBean interface. Instead, you implement the more generic javax.jms.MessageListener interface and annotate MDBs with@MessageDriven.
Spring 2.0 addresses the need for asynchronous consumption of messages by providing its own form of message-driven bean that’s similar to EJB 3’s MDBs. In this section, you’ll learn how Spring supports asynchronous message consumption using message-driven POJOs (we’ll call themMDPs, for short).
Creating a message listener
If you were to build your spittle alert handler using EJB’s message-driven model, it would need to be annotated with @MessageDriven. And although it’s not strictly required, it’s recommended that the MDB implement the MessageListener interface. The result would look something like this:
@MessageDriven(mappedName="jms/spittle.alert.queue")
public class SpittleAlertHandler implements MessageListener {
@Resource
private MessageDrivenContext mdc;
public void onMessage(Message message) {
...
}
}
For a moment, try to imagine a simpler world where message-driven components don’t have to implement the MessageListener interface. In such a happy place, the sky would be the brightest of blues, the birds would always whistle your favorite song, and you wouldn’t have to implement the onMessage() method or have a MessageDrivenContext injected.
Okay, maybe the demands placed on an MDB by the EJB 3 specification aren’t that arduous. But the fact is that the EJB 3 implementation of SpittleAlertHandler is too tied to EJB’s message-driven APIs and isn’t as POJO-ish as you’d like. Ideally, you’d like the alert handler to be capable of handling messages, but not coded as if it knows that’s what it will be doing.
Spring offers the ability for a method on a POJO to handle messages from a JMS queue or topic. For example, the following POJO implementation of SpittleAlert-Handler is sufficient.
Listing 17.5. Spring MDP that asynchronously receives and processes messages
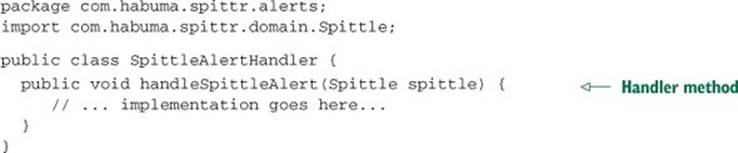
Although changing the color of the sky and training birds to sing are out of the scope of Spring, listing 17.5 shows that the dream world I described is much closer to reality. You’ll fill in the details of the handleSpittleAlert() method later. For now, consider that nothing inSpittleAlertHandler shows any hint of JMS. It’s a POJO in every sense of the term. It can nevertheless handle messages just like its EJB cousin. All it needs is some special Spring configuration.
Configuring message listeners
The trick to empowering a POJO with message-receiving abilities is to configure it as a message listener in Spring. Spring’s jms namespace provides everything you need to do that. First, you must declare the handler as a <bean>:
<bean id="spittleHandler"
class="com.habuma.spittr.alerts.SpittleAlertHandler" />
Then, to turn SpittleAlertHandler into a message-driven POJO, you can declare the bean to be a message listener:
<jms:listener-container connection-factory="connectionFactory">
<jms:listener destination="spitter.alert.queue"
ref="spittleHandler" method="handleSpittleAlert" />
</jms:listener-container>
Here you have a message listener that’s contained in a message-listener container. A message-listener container is a special bean that watches a JMS destination, waiting for a message to arrive. Once a message arrives, the bean retrieves the message and passes it on to any message listeners that are interested. Figure 17.7 illustrates this interaction.
Figure 17.7. A message-listener container listens to a queue/topic. When a message arrives, it’s forwarded to a message listener (such as a message-driven POJO).

To configure the message-listener container and message listener in Spring, you use two elements from Spring’s jms namespace. The <jms:listener-container> is used to contain <jms:listener> elements. Here its connectionFactory attribute is configured with a reference to the connectionFactory that’s to be used by each of the child <jms:listener>s as they listen for messages. In this case, the connection-factory attribute could have been left off, because it defaults to connectionFactory.
The <jms:listener> element is used to identify a bean and a method that should handle incoming messages. For the purposes of handling spittle alert messages, the ref element refers to your spittleHandler bean. When a message arrives on spitter.alert.queue (as designated by the destination attribute), the spittleHandler bean’s handleSpittleAlert() method gets the call (per the method attribute).
It’s also worth noting that if the bean identified by the ref attribute implements MessageListener, then there’s no need to specify the method attribute. The onMessage() will be called by default.
17.2.4. Using message-based RPC
Chapter 15 explored several of Spring’s options for exposing bean methods as remote services and for making calls on those services from clients. In this chapter, you’ve seen how to send messages between applications over message queues and topics. Now we’ll bring those two concepts together and cover how to make remote calls that use JMS as a transport.
To support message-based RPC, Spring offers JmsInvokerServiceExporter for exporting beans as message-based services and JmsInvokerProxyFactoryBean for clients to consume those services. As you’ll see, these two options are similar, but each has advantages and disadvantages. I’ll show you both approaches and let you decide which works best for you. Let’s start by looking at how to work with Spring’s support for JMS-backed services.
As you’ll recall from chapter 15, Spring provides several options for exporting beans as remote services. You used RmiServiceExporter to export beans as RMI services, HessianExporter and BurlapExporter for Hessian and Burlap services over HTTP, andHttpInvokerServiceExporter to create HTTP invoker services over HTTP. But Spring has one more service exporter that we didn’t talk about in chapter 15.
Exporting JMS-based services
JmsInvokerServiceExporter is much like those other service exporters. In fact, note that there’s some symmetry in the names of JmsInvokerServiceExporter and HttpInvokerServiceExporter. If HttpInvokerServiceExporter exports services that communicate over HTTP, then JmsInvokerServiceExporter must export services that converse over JMS.
To demonstrate how JmsInvokerServiceExporter works, consider Alert-ServiceImpl.
Listing 17.6. AlertServiceImpl: a JMS-free POJO to handle JMS messages
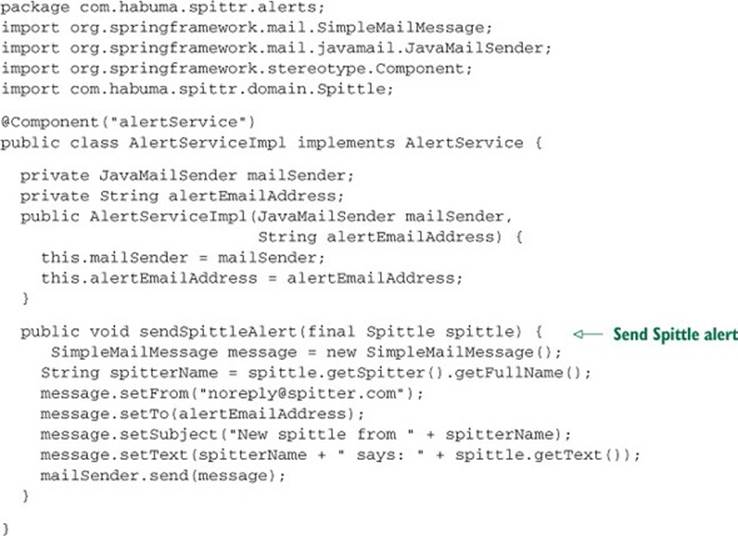
Don’t concern yourself too much with the inner details of the sendSpittleAlert() method at this point. We’ll talk more about how to send emails with Spring later, in chapter 20. The important thing to notice is that AlertServiceImpl is a simple POJO and has nothing that indicates it will be used to handle JMS messages. It does implement the AlertService interface, as shown here:
package com.habuma.spittr.alerts;
import com.habuma.spittr.domain.Spittle;
public interface AlertService {
void sendSpittleAlert(Spittle spittle);
}
As you can see, AlertServiceImpl is annotated with @Component so that it will be automatically discovered and registered as a bean in the Spring application context with an ID of alertService. You’ll refer to this bean as you configure a JmsInvokerService-Exporter:
<bean id="alertServiceExporter"
class="org.springframework.jms.remoting.JmsInvokerServiceExporter"
p:service-ref="alertService"
p:serviceInterface="com.habuma.spittr.alerts.AlertService" />
This bean’s properties describe what the exported service should look like. The service property is wired to refer to the alertService bean, which is the implementation of the remote service. Meanwhile, the serviceInterface property is set to the fully qualified class name of the interface that the service provides.
The exporter’s properties don’t describe the specifics of how the service will be carried over JMS. But the good news is that JmsInvokerServiceExporter qualifies as a JMS listener. Therefore, you can configure it as such in a <jms:listener-container> element:
<jms:listener-container connection-factory="connectionFactory">
<jms:listener destination="spitter.alert.queue"
ref="alertServiceExporter" />
</jms:listener-container>
The JMS listener container is given the connection factory so that it can know how to connect to the message broker. Meanwhile, the <jms:listener> declaration is given the destination on which the remote message will be carried.
Consuming JMS-based services
At this point, the JMS-based alert service should be ready and waiting for RPC messages to arrive on the spitter.alert.queue queue. On the client side, JmsInvokerProxyFactoryBean will be used to access the service.
JmsInvokerProxyFactoryBean is a lot like the other remoting proxy factory beans that we looked at in chapter 15. It hides the details of accessing a remote service behind a convenient interface, through which the client interacts with the service. The big difference is that instead of proxying RMI- or HTTP-based services, JmsInvokerProxyFactoryBean proxies a JMS-based service that was exported by JmsInvokerServiceExporter.
To consume the alert service, you can wire the JmsInvokerProxyFactoryBean like this:
<bean id="alertService"
class="org.springframework.jms.remoting.JmsInvokerProxyFactoryBean"
p:connectionFactory-ref="connectionFactory"
p:queueName="spittle.alert.queue"
propp:serviceInterface="com.habuma.spittr.alerts.AlertService" />
The connectionFactory and queueName properties specify how RPC messages should be delivered—here, on the spitter.alert.queue queue at the message broker configured in the given connection factory. The serviceInterface specifies that the proxy should be exposed through the AlertService interface.
JMS has been the go-to messaging solution for Java applications for many years. But JMS isn’t the only messaging choice available to Java and Spring developers. In the past few years, the Advanced Message Queuing Protocol (AMQP) has been getting a lot of attention. As it turns out, Spring has support for sending messages with AMQP, as you’ll see next.
17.3. Messaging with AMQP
You may be wondering why you need another messaging specification. Isn’t JMS good enough? What does AMQP bring to the table that is missing from JMS?
As it turns out, AMQP offers several advantages over JMS. First, AMQP defines a wire-level protocol for messaging, whereas JMS defines an API specification. JMS’s API specification ensures that all JMS implementations can be used through a common API but doesn’t mandate that messages sent by one JMS implementation can be consumed by a different JMS implementation. AMQP’s wire-level protocol, on the other hand, specifies the format that messages will take when en route between the producer and consumer. Consequently, AMQP is more interoperable than JMS—not only across different AMQP implementations, but also across languages and platforms.[1]
1 If you read this to mean that AMQP goes beyond the Java language and platform, then you’re catching on quickly.
Another significant advantage of AMQP over JMS is that AMQP has a much more flexible and transparent messaging model. With JMS, there are only two messaging models to choose from: point-to-point and publish/subscribe. Both of those models are certainly possible with AMQP, but AMQP enables you to route messages in a number of ways, and it does this by decoupling the message producer from the queue(s) in which the messages will be placed.
Spring AMQP is an extension to the Spring Framework that enables AMQP-style messaging in Spring applications. As you’ll see, Spring AMQP provides an API that makes working with AMQP remarkably similar to Spring’s JMS abstraction. That means much of what you learned earlier in this chapter for JMS can be used to help you understand how to send and receive messages with Spring AMQP.
You’ll see how to work with Spring AMQP soon enough. But before we dig deep into how to send and receive AMQP messages in Spring, let’s take a quick look at what makes AMQP tick.
17.3.1. A brief introduction to AMQP
To understand the AMQP messaging model, it may help to briefly recall the JMS messaging model. In JMS, there are just three primary participants: the message producer, the message consumer(s), and a channel (either a queue or a topic) to carry the message between producers and consumers. These essentials of the JMS messaging model are illustrated in figures 17.3 and 17.4.
In JMS, the channel helps to decouple the producer from the consumer, but both are still coupled to the channel. A producer publishes messages to a specific queue or topic, and the consumer receives those message from a specific queue or topic. The channel has the double duty of relaying messages and determining how those messages will be routed; queues route using a point-to-point algorithm, and topics route in publish/subscribe fashion.
In contrast, AMQP producers don’t publish directly to a queue. Instead, AMQP introduces a new level of indirection between the producer and any queues that will carry the message: the exchange. This relationship is illustrated in figure 17.8.
Figure 17.8. In AMQP, message producers are decoupled from message queues by an exchange that handles message routing.

As you can see, a message producer publishes a message to an exchange. The exchange, which is bound to one or more queues, routes the message to the queue(s). Consumers pull messages from the queue and process them.
What’s not apparent from figure 17.8 is that the exchange isn’t a pass-through mechanism to a queue. AMQP defines four different types of exchanges, each with a different routing algorithm that decides whether to place a message in a queue. Depending on an exchange’s algorithm, it may consider the message’s routing key and/or arguments and compare those with the routing key and arguments of the binding between the exchange and a queue. (A routing key can be loosely thought of as the To address in an email, specifying the intended recipient.) If the algorithm is satisfied with the comparison, the message will be routed to the queue. If not, then it won’t be routed to the queue.
The four standard types of AMQP exchanges are as follows:
· Direct —A message will be routed to a queue if its routing key is a direct match for the routing key of the binding.
· Topic —A message will be routed to a queue if its routing key is a wildcard match for the routing key of the binding.
· Headers —A message will be routed to a queue if the headers and values in its table of arguments match those in the binding’s table of arguments. A special header named x-match can specify whether all values must match or if any can match.
· Fanout —A message will be routed to all queues that are bound to the exchange, regardless of the routing key or headers/values in the table of arguments.
With these four types of exchanges, it’s easy to imagine how you can define any number of routing schemes that go beyond simple point-to-point or publish/subscribe.[2] Fortunately, when it comes to sending and receiving messages, the routing algorithm(s) in play have little impact on how you develop the message producers and consumers. Put simply, producers publish to an exchange with a routing key; consumers retrieve from a queue.
2 And I haven’t even mentioned that it’s possible to bind exchanges to other exchanges to create a nested hierarchy of routing.
This has been a quick overview of the basics of AMQP messaging—you should have just enough understanding to start sending and receiving messages using Spring AMQP. But I encourage you to dig deeper into AMQP by reading the specification and other materials at www.amqp.org or by reading RabbitMQ in Action by Alvaro Videla and Jason J.W. Williams (Manning, 2012, www.manning.com/videla/).
Now let’s step away from the abstract discussion of AMQP so you can get your hands dirty writing code that sends and receives messages using Spring AMQP. You’ll start by seeing some of the common Spring AMQP configuration needed for both producers and consumers.
17.3.2. Configuring Spring for AMQP messaging
When you first started working with Spring’s JMS abstraction, you began by configuring a connection factory. Similarly, working with Spring AMQP starts with configuring a connection factory. But instead of configuring a JMS connection factory, you need to configure an AMQP connection factory. More specifically, you’ll configure a RabbitMQ connection factory.
What is RabbitMQ?
RabbitMQ is a popular open source message broker that implements AMQP. Spring AMQP comes ready with RabbitMQ support, including a RabbitMQ connection factory, template, and Spring configuration namespace.
You’ll need to install RabbitMQ before you can send and receive messages with it. You can find installation instructions at www.rabbitmq.com/download.html. They vary depending on what OS you’re running, so I’ll leave it to you to follow the instructions appropriate for your environment.
The easiest way to configure a RabbitMQ connection factory is to use the rabbit configuration namespace provided by Spring AMQP. To use it, you need to be sure the schema is declared in your Spring configuration XML:
<?xml version="1.0" encoding="UTF-8"?>
<beans:beans xmlns="http://www.springframework.org/schema/rabbit"
xmlns:beans="http://www.springframework.org/schema/beans"
xmlns:xsi="http://www.w3.org/2001/XMLSchema-instance"
xsi:schemaLocation="http://www.springframework.org/schema/rabbit
http://www.springframework.org/schema/rabbit/spring-rabbit-1.0.xsd
http://www.springframework.org/schema/beans
http://www.springframework.org/schema/beans/spring-beans.xsd">
...
</beans:beans>
Although it’s optional, in this case I’ve decided to declare the rabbit namespace as the primary namespace in the configuration and demote the beans namespace to being a secondary namespace. That’s because I anticipate declaring more rabbits than beans in this configuration and would rather prefix the few bean elements with beans: and leave the rabbit elements prefix-less.
The rabbit namespace includes several elements for configuring RabbitMQ in Spring. But the one you’re most interested in at this point is the <connection-factory> element. In its simplest form, you can configure a RabbitMQ connection factory with no attributes:
<connection-factory/>
This will work, but it leaves the resulting connection factory bean without a usable bean ID, which makes it hard to wire the connection factory into any other bean that needs it. Therefore, you’ll probably want to give it a bean ID with the id attribute:
<connection-factory id="connectionFactory" />
By default, the connection factory will assume that the RabbitMQ server is listening on localhost at post 5672 and that the username and password are both guest. Those are reasonable defaults for development, but you’ll probably want to change those for production. Here’s a<connection-factory> with settings to override those defaults:
<connection-factory id="connectionFactory"
host="${rabbitmq.host}"
port="${rabbitmq.port}"
username="${rabbitmq.username}"
password="${rabbitmq.password}" />
You use placeholders to specify the values so that the configuration can be managed outside of the Spring configuration (most likely in a properties file).
In addition to the connection factory, there are a few more configuration elements that you may want to consider using. Let’s see how to configure Spring AMQP to lazily create queues, exchanges, and bindings.
Declaring queues, exchanges, and bindings
Unlike JMS, where the routing behavior of queues and topics is established by the specification, AMQP routing is richer and more flexible and thus depends on you to define the queues and exchanges and how they’re bound to each other. One way of declaring queues, exchanges, and bindings is via a variety of methods on the RabbitMQ Channel interface. But working with RabbitMQ’s Channel directly is involved. Can Spring AMQP help you declare your message-routing components?
Fortunately, the rabbit namespace includes several elements to help declare queues, exchanges, and the bindings that tie them together. These elements are listed in table 17.3.
Table 17.3. Spring AMQP’s rabbit namespace includes several elements for lazily creating queues, exchanges, and the bindings between them.
|
Element |
What it does |
|
<queue> |
Creates a queue. |
|
<fanout-exchange> |
Creates a fanout exchange. |
|
<header-exchange> |
Creates a headers exchange. |
|
<topic-exchange> |
Creates a topic exchange. |
|
<direct-exchange> |
Creates a direct exchange. |
|
<bindings> <binding/> </bindings> |
The <bindings> element defines a set of one or more <binding> elements. The <binding> element creates a binding between an exchange and a queue. |
These configuration elements are used alongside the <admin> element. The <admin> element creates a RabbitMQ administrative component that automatically creates (in the RabbitMQ broker, if they don’t already exist) any queues, exchanges, and bindings declared using the elements intable 17.3.
For example, if you want to declare a queue named spittle.alert.queue, you only need to add the following two elements to your Spring configuration:
<admin connection-factory="connectionFactory"/>
<queue id="spittleAlertQueue" name="spittle.alerts" />
For simple messaging, this may be all you need. That’s because there’s a default direct exchange with no name, and all queues are bound to that exchange with a routing key that’s the same as the queue’s name. With this simple configuration, you could send messages to the no-name exchange and specify a routing key of spittle .alert.queue to have messages routed to the queue. Essentially, this re-creates a JMS-style point-to-point model.
More interesting routing, however, will require that you declare one or more exchanges and bind them to queues. For example, to have a message routed to multiple queues with no regard for the routing key, you can configure a fanout exchange and several queues like this:
<admin connection-factory="connectionFactory" /> <queue name="spittle.alert.queue.1" > <queue name="spittle.alert.queue.2" > <queue name="spittle.alert.queue.3" > <fanout-exchange name="spittle.fanout"> <bindings> <binding queue="spittle.alert.queue.1" /> <binding queue="spittle.alert.queue.2" /> <binding queue="spittle.alert.queue.3" /> </bindings> </fanout-exchange>
Using the elements in table 17.3, there are countless ways to configure routing in RabbitMQ. But I don’t have countless pages to describe them all to you, so in the interest of keeping this discussion on track, I’ll leave routing creativity as an exercise for you and move on to discussing how to send messages.
17.3.3. Sending messages with RabbitTemplate
As its name implies, the RabbitMQ connection factory is used to create connections with RabbitMQ. If you want to send messages via RabbitMQ, you could inject the connectionFactory bean into your AlertServiceImpl class, use it to create a Connection, use that Connection to create a Channel, and use that Channel to publish a message to an exchange.
Yep, you could do that.
But that would be a lot of work and would involve a lot of boilerplate coding on your part. One thing that Spring abhors is boilerplate code. You’ve already seen several examples where Spring offers templates to eliminate boilerplate—including JmsTemplate, earlier in this chapter, which eliminates JMS boilerplate code. It should be no surprise that Spring AMQP provides RabbitTemplate to eliminate boilerplate associated with sending and receiving messages with RabbitMQ.
The simplest configuration for RabbitTemplate can be done using the <template> element from the rabbit configuration namespace as follows:
<template id="rabbitTemplate"
connection-factory="connectionFactory" />
Now all you need to do to send a message is inject the template bean into Alert-ServiceImpl and use it to send a Spittle. The following listing shows a new version of AlertServiceImpl that uses RabbitTemplate instead of JmsTemplate to send a Spittle alert.
Listing 17.7. Sending a Spittle using RabbitTemplate
package com.habuma.spitter.alerts;
import org.springframework.amqp.rabbit.core.RabbitTemplate;
import org.springframework.beans.factory.annotation.Autowired;
import com.habuma.spitter.domain.Spittle;
public class AlertServiceImpl implements AlertService {
private RabbitTemplate rabbit;
@Autowired
public AlertServiceImpl(RabbitTemplate rabbit) {
this.rabbit = rabbit;
}
public void sendSpittleAlert(Spittle spittle) {
rabbit.convertAndSend("spittle.alert.exchange",
"spittle.alerts",
spittle);
}
}
As you can see, the sendSpittleAlert() method now calls the convertAndSend() method on the injected RabbitTemplate. It passes in three parameters: the name of the exchange, the routing key, and the object to be sent. Notice that what’s not specified is how the message will be routed, what queues it will be sent on, or any consumers that are expected to receive the message.
RabbitTemplate has several overloaded versions of convertAndSend() to simplify its use. For example, using one of the overloaded convertAndSend() methods, you can leave out the exchange name when calling convertAndSend():
rabbit.convertAndSend("spittle.alerts", spittle);
Or, with another, you can leave out both the exchange name and routing key if you want:
rabbit.convertAndSend(spittle);
When the exchange name or the exchange name and routing key are left out of the parameter list, RabbitTemplate uses its default exchange name and routing key. As you have configured the template, the default exchange name is blank (or the default no-name exchange) and the default routing key is also blank. But you can configure different defaults using the exchange and routing-key attributes on the <template> element:
<template id="rabbitTemplate"
connection-factory="connectionFactory"
exchange="spittle.alert.exchange"
routing-key="spittle.alerts" />
No matter what you set the defaults to, you’re always able to override them when calling convertAndSend() by explicitly specifying them as parameters.
You might be interested in considering one of RabbitTemplate’s other methods for sending messages. For instance, you can use the lower-level send() method to send an org.springframework.amqp.core.Message object like this:
Message helloMessage =
new Message("Hello World!".getBytes(), new MessageProperties());
rabbit.send("hello.exchange", "hello.routing", helloMessage);
As with convertAndSend(), the send() method is overloaded to not require the exchange name and/or routing key.
The trick to using the send() methods is constructing a Message object to send. In the Hello World example, you construct a Message instance by giving it the string’s byte array. That’s easy enough for String values but can get more complicated when the message payload is a complex object.
For that reason, convertAndSend() exists to automatically convert an object to a Message. It does this with the assistance of a message converter. The default message converter is SimpleMessageConverter, which is suitable for working with Strings, Serializable instances, and byte arrays. Spring AMQP provides a few other message converters that you might find useful, including some for working with JSON and XML data.
Now that you’ve sent a message, let’s shift to the other side of the conversation and see how to retrieve the message.
17.3.4. Receiving AMQP messages
As you’ll recall, Spring’s JMS support offers two ways to fetch a message from a queue: synchronously via JmsTemplate and asynchronously with message-driven POJOs. Spring AMQP offers similar options for retrieving messages sent over AMQP. Because you already have aRabbitTemplate handy, let’s first look at how to use it to synchronously fetch a message from a queue.
Receiving messages with RabbitTemplate
RabbitTemplate offers a handful of methods for receiving messages. The simplest ones are the receive() methods, which are the consumer-side analogues to RabbitTemplate’s send() methods. Using the receive() methods, you can fetch a Message object from the queue:
Message message = rabbit.receive("spittle.alert.queue");
Or, if you prefer, you can configure a default queue for receiving messages by setting the queue attribute when configuring the template:
<template id="rabbitTemplate"
connection-factory="connectionFactory"
exchange="spittle.alert.exchange"
routing-key="spittle.alerts"
queue="spittle.alert.queue" />
This enables you to call the receive() method without any arguments to receive from the default queue:
Message message = rabbit.receive();
Once you have a Message object, you’ll probably need to convert the array of bytes in its body property to whatever object you want. Just as it was tricky to convert domain objects into Messages for sending, it’s messy to convert received Messages to domain objects. Therefore, consider using RabbitTemplate’s receiveAndConvert() method instead:
Spittle spittle =
(Spittle) rabbit.receiveAndConvert("spittle.alert.queue");
Or you can leave the queue name out of the call parameters to fall back on the template’s default queue name:
Spittle spittle = (Spittle) rabbit.receiveAndConvert();
The receiveAndConvert() method uses the same message converters as sendAnd-Convert() to turn a Message object into the type it originated as.
Calls to both receive() and receiveAndConvert() return immediately, possibly with a null if no messages are waiting in the queue. That leaves it up to you to manage any polling and threading necessary to monitor the queue.
Instead of synchronously polling and waiting for messages to arrive, Spring AMQP offers message-driven POJO support that’s reminiscent of the same feature in Spring JMS. Let’s see how to consume messages with message-driven AMQP POJOs.
Defining message-driven AMQP POJOs
The first thing you’ll need in order to consume a Spittle object asynchronously in a message-driven POJO is the POJO itself. Here’s SpittleAlertHandler, which fills that role:
package com.habuma.spittr.alerts;
import com.habuma.spittr.domain.Spittle;
public class SpittleAlertHandler {
public void handleSpittleAlert(Spittle spittle) {
// ... implementation goes here ...
}
}
Notice that this is exactly the same SpittleAlertHandler that you used when consuming Spittle messages using JMS. You can get away with reusing the same POJO because nothing about it is dependent on JMS or AMQP. It’s just a POJO and is ready to process a Spittleregardless of what messaging mechanism it’s carried over.
You also need to declare SpittleAlertHandler as a bean in the Spring application context:
<bean id="spittleListener"
class="com.habuma.spittr.alert.SpittleAlertHandler" />
But again, you already did this when you were working with JMS-based MDPs. There’s no difference.
Finally, you need to declare a listener container and a listener to call on Spittle-AlertHandler when a message arrives. You did this for JMS-based MDPs, but there is a slight difference in the configuration for AMQP-based MDPs:
<listener-container connection-factory="connectionFactory">
<listener ref="spittleListener"
method="handleSpittleAlert"
queue-names="spittle.alert.queue" />
</listener-container>
Do you see the difference? I’ll agree that it’s not obvious. The <listener-container> and <listener> elements appear to be similar to their JMS counterparts. These elements, however, come from the rabbit namespace instead of the JMS namespace.
I said it wasn’t obvious.
Well, there is one other slight difference. Instead of specifying a queue or topic to listen on through the destination attribute (as you did for JMS), here you specify the queue on which to listen for messages via the queue-names attribute. But otherwise, AMQP-based MDPs and JMS-based MDPs work similarly.
In case you’re wondering, yes: the queue-names attribute name indicates plurality. Here you only specify a single queue to listen on, but you can list as many queue names as you want, separated with commas.
Another way of specifying the queues to listen on is to reference the queue beans you declared with the <queue> element. You can do this via the queues attribute:
<listener-container connection-factory="connectionFactory">
<listener ref="spittleListener"
method="handleSpittleAlert"
queues="spittleAlertQueue" />
</listener-container>
Again, this attribute can take a comma-separated list of queue IDs. This, of course, requires that you declare the queues with IDs. For example, here’s the alert queue redeclared, this time with an ID:
<queue id="spittleAlertQueue" name="spittle.alert.queue" />
Note that the id attribute is used to assign a bean ID for the queue in the Spring application context. The name attribute specifies the queue’s name in the RabbitMQ broker.
17.4. Summary
Asynchronous messaging presents several advantages over synchronous RPC. Indirect communication results in applications that are loosely coupled with respect to one another and thus reduces the impact of any one system going down. Additionally, because messages are forwarded to their recipients, there’s no need for a sender to wait for a response. In many circumstances, this can be a boost to application performance and scalability.
Although JMS provides a standard API for all Java applications wishing to participate in asynchronous communication, it can be cumbersome to use. Spring eliminates the need for JMS boilerplate code and exception-handling code and makes asynchronous messaging easier to use.
In this chapter, you’ve seen several ways that Spring can help establish asynchronous communication between two applications by way of message brokers and JMS. Spring’s JMS template eliminates the boilerplate that’s commonly required by the traditional JMS programming model. And Spring-enabled message-driven beans make it possible to declare bean methods that react to messages that arrive in a queue or topic. We also looked at using Spring’s JMS invoker to provide message-based RPC with Spring beans.
You’ve seen how to use asynchronous communication between applications in this chapter. Coming up in the next chapter, we’ll continue this theme by looking at how to enable asynchronous communication between a browser-based client and a server using WebSocket.
All materials on the site are licensed Creative Commons Attribution-Sharealike 3.0 Unported CC BY-SA 3.0 & GNU Free Documentation License (GFDL)
If you are the copyright holder of any material contained on our site and intend to remove it, please contact our site administrator for approval.
© 2016-2026 All site design rights belong to S.Y.A.