Spring in Action, 4th Edition: Covers Spring 4 (2015)
Part 1. Core Spring
Spring does a lot of things. But underneath all of the fantastic functionality it adds to enterprise development, its primary features are dependency injection (DI) and aspect-oriented programming (AOP).
Starting in chapter 1, “Springing into action,” I’ll give you a quick overview of the Spring Framework, including a quick overview of DI and AOP in Spring and show how they help with decoupling application components.
In chapter 2, “Wiring beans,” we’ll dive deeper into how to piece together the components of an application. We’ll look at automatic configuration, Java-based configuration, and XML configuration options offered by Spring.
Chapter 3, “Advanced wiring,” goes beyond the basics and shows you a few tricks and techniques that will help you get the most power out of Spring, including conditional configuration, dealing with ambiguity when autowiring, scoping, and the Spring Expression Language.
Chapter 4, “Aspect-oriented Spring,” explores how to use Spring’s AOP features to decouple system-wide services (such as security and auditing) from the objects they service. This chapter sets the stage for later chapters such as chapters 9, 13, and 14 where you’ll see how to leverage Spring AOP for declarative security and caching.
Chapter 1. Springing into action
This chapter covers
· Spring’s bean container
· Exploring Spring’s core modules
· The greater Spring ecosystem
· What’s new in Spring
It’s a good time to be a Java developer.
In its almost 20 year history, Java has seen some good times and some bad times. Despite a handful of rough spots, such as applets, Enterprise JavaBeans (EJB), Java Data Objects (JDO), and countless logging frameworks, Java has enjoyed a rich and diverse history as the platform on which much enterprise software has been built. And Spring has been a big part of that story.
In its early days, Spring was created as an alternative to heavier enterprise Java technologies, especially EJB. Spring offered a lighter and leaner programming model as compared to EJB. It empowered plain old Java objects (POJOs) with powers previously only available using EJB and other enterprise Java specifications.
Over time, EJB and the Java 2 Enterprise Edition (J2EE) evolved. EJB started offering a simple POJO-oriented programming model of its own. Now EJB employs ideas such as dependency injection (DI) and aspect-oriented programming (AOP), arguably inspired by the success of Spring.
Although J2EE (now known as JEE) was able to catch up with Spring, Spring never stopped moving forward. Spring has continued to progress in areas where, even now, JEE is just starting to explore or isn’t innovating at all. Mobile development, social API integration, NoSQL databases, cloud computing, and big data are just a few areas where Spring has been and is innovating. And the future continues to look bright for Spring.
As I said, it’s a good time to be a Java developer.
This book is an exploration of Spring. In this chapter, we’ll examine Spring at a high level, providing you with a taste of what Spring is about. This chapter will give you a good idea of the types of problems Spring solves, and it will set the stage for the rest of the book.
1.1. Simplifying Java development
Spring is an open source framework, originally created by Rod Johnson and described in his book Expert One-on-One: J2EE Design and Development (Wrox, 2002, http://amzn.com/0764543857). Spring was created to address the complexity of enterprise application development and makes it possible to use plain-vanilla JavaBeans to achieve things that were previously only possible with EJB. But Spring’s usefulness isn’t limited to server-side development. Any Java application can benefit from Spring in terms of simplicity, testability, and loose coupling.
A bean by any other name... Although Spring uses the words bean and JavaBean liberally when referring to application components, this doesn’t mean a Spring component must follow the JavaBeans specification to the letter. A Spring component can be any type of POJO. In this book, I assume a loose definition of JavaBean, which is synonymous with POJO.
As you’ll see throughout this book, Spring does many things. But at the root of almost everything Spring provides are a few foundational ideas, all focused on Spring’s fundamental mission: Spring simplifies Java development.
That’s a bold statement! A lot of frameworks claim to simplify something or other. But Spring aims to simplify the broad subject of Java development. This begs for more explanation. How does Spring simplify Java development?
To back up its attack on Java complexity, Spring employs four key strategies:
· Lightweight and minimally invasive development with POJOs
· Loose coupling through DI and interface orientation
· Declarative programming through aspects and common conventions
· Eliminating boilerplate code with aspects and templates
Almost everything Spring does can be traced back to one or more of these four strategies. Throughout the rest of this chapter, I’ll expand on each of these ideas, showing concrete examples of how Spring makes good on its promise to simplify Java development. Let’s start with seeing how Spring remains minimally invasive by encouraging POJO-oriented development.
1.1.1. Unleashing the power of POJOs
If you’ve been doing Java development for long, you’ve probably seen (and may have even worked with) frameworks that lock you in by forcing you to extend one of their classes or implement one of their interfaces. The easy-target example of such an invasive programming model was EJB 2-era stateless session beans. But even though early EJBs were such an easy target, invasive programming could easily be found in earlier versions of Struts, WebWork, Tapestry, and countless other Java specifications and frameworks.
Spring avoids (as much as possible) littering your application code with its API. Spring almost never forces you to implement a Spring-specific interface or extend a Spring-specific class. Instead, the classes in a Spring-based application often have no indication that they’re being used by Spring. At worst, a class may be annotated with one of Spring’s annotations, but it’s otherwise a POJO.
To illustrate, consider the HelloWorldBean class shown in the following listing.
Listing 1.1. Spring doesn’t make any unreasonable demands on HelloWorldBean.
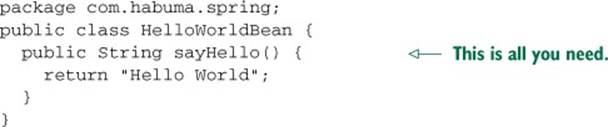
As you can see, this is a simple, garden-variety Java class—a POJO. Nothing special about it indicates that it’s a Spring component. Spring’s non-invasive programming model means this class could function equally well in a Spring application as it could in a non-Spring application.
Despite their simple form, POJOs can be powerful. One of the ways Spring empowers POJOs is by assembling them using DI. Let’s see how DI can help keep application objects decoupled from each other.
1.1.2. Injecting dependencies
The phrase dependency injection may sound intimidating, conjuring up notions of a complex programming technique or design pattern. But as it turns out, DI isn’t nearly as complex as it sounds. By applying DI in your projects, you’ll find that your code will become significantly simpler, easier to understand, and easier to test.
How DI works
Any nontrivial application (pretty much anything more complex than a Hello World example) is made up of two or more classes that collaborate with each other to perform some business logic. Traditionally, each object is responsible for obtaining its own references to the objects it collaborates with (its dependencies). This can lead to highly coupled and hard-to-test code.
For example, consider the Knight class shown next.
Listing 1.2. A DamselRescuingKnight can only embark on RescueDamselQuests.
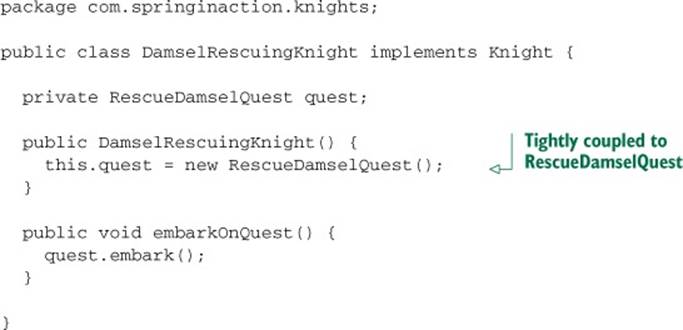
As you can see, DamselRescuingKnight creates its own quest, a RescueDamselQuest, in the constructor. This makes a DamselRescuingKnight tightly coupled to a RescueDamselQuest and severely limits the knight’s quest-embarking repertoire. If a damsel needs rescuing, this knight’s there. But if a dragon needs slaying or a round table needs ... well ... rounding, then this knight’s going to have to sit it out.
What’s more, it’d be terribly difficult to write a unit test for DamselRescuingKnight. In such a test, you’d like to be able to assert that the quest’s embark() method is called when the knight’s embarkOnQuest() method is called. But there’s no clear way to accomplish that here. Unfortunately, DamselRescuingKnight will remain untested.
Coupling is a two-headed beast. On the one hand, tightly coupled code is difficult to test, difficult to reuse, and difficult to understand, and it typically exhibits “whack-a-mole” bug behavior (fixing one bug results in the creation of one or more new bugs). On the other hand, a certain amount of coupling is necessary—completely uncoupled code doesn’t do anything. In order to do anything useful, classes need to know about each other somehow. Coupling is necessary but should be carefully managed.
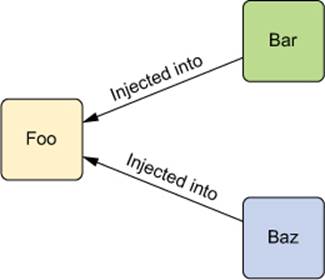
With DI, objects are given their dependencies at creation time by some third party that coordinates each object in the system. Objects aren’t expected to create or obtain their dependencies. As illustrated in figure 1.1, dependencies are injected into the objects that need them.
Figure 1.1. Dependency injection involves giving an object its dependencies as opposed to an object having to acquire those dependencies on its own.
To illustrate this point, let’s look at BraveKnight in the next listing: a knight who’s not only brave, but also capable of embarking on any kind of quest that comes along.
Listing 1.3. A BraveKnight is flexible enough to take on any Quest he’s given.
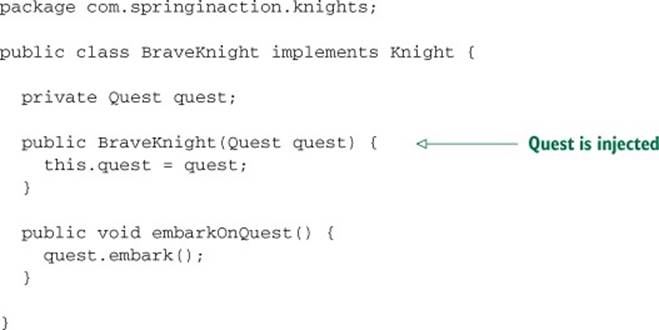
As you can see, BraveKnight, unlike DamselRescuingKnight, doesn’t create his own quest. Instead, he’s given a quest at construction time as a constructor argument. This is a type of DI known as constructor injection.
What’s more, the quest he’s given is typed as Quest, an interface that all quests implement. So BraveKnight could embark on a RescueDamselQuest, a SlayDragonQuest, a MakeRoundTableRounderQuest, or any other Quest implementation he’s given.
The point is that BraveKnight isn’t coupled to any specific implementation of Quest. It doesn’t matter to him what kind of quest he’s asked to embark on, as long as it implements the Quest interface. That’s the key benefit of DI—loose coupling. If an object only knows about its dependencies by their interface (not by their implementation or how they’re instantiated), then the dependency can be swapped out with a different implementation without the depending object knowing the difference.
One of the most common ways a dependency is swapped out is with a mock implementation during testing. You were unable to adequately test DamselRescuingKnight due to tight coupling, but you can easily test BraveKnight by giving it a mock implementation of Quest, as shown next.
Listing 1.4. To test BraveKnight, inject it with a mock Quest.
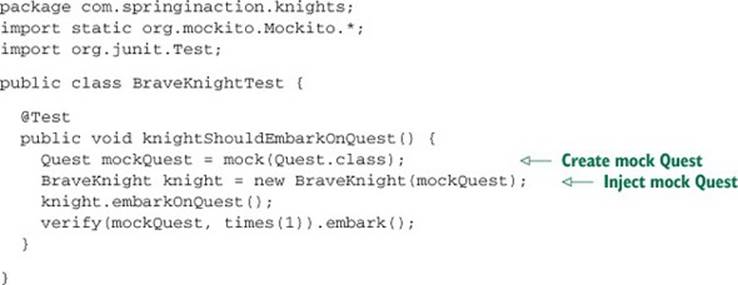
Here you use a mock object framework known as Mockito to create a mock implementation of the Quest interface. With the mock object in hand, you create a new instance of BraveKnight, injecting the mock Quest via the constructor. After calling the embarkOnQuest() method, you ask Mockito to verify that the mock Quest’s embark() method was called exactly once.
Injecting a quest into a knight
Now that the BraveKnight class is written in such a way that you can give a knight any quest you want, how can you specify which Quest to give him? Suppose, for instance, that you’d like for the BraveKnight to embark on a quest to slay a dragon. Perhaps SlayDragonQuest, shown in the following listing, would be appropriate.
Listing 1.5. SlayDragonQuest is a Quest to be injected into BraveKnight
package com.springinaction.knights;
import java.io.PrintStream;
public class SlayDragonQuest implements Quest {
private PrintStream stream;
public SlayDragonQuest(PrintStream stream) {
this.stream = stream;
}
public void embark() {
stream.println("Embarking on quest to slay the dragon!");
}
}
As you can see, SlayDragonQuest implements the Quest interface, making it a good fit for BraveKnight. You may also notice that rather than lean on System.out .println() like many small getting-started Java samples, SlayDragonQuest more generically asks for aPrintStream through its constructor. The big question here is, how can you give SlayDragonQuest to BraveKnight? And how can you give a Print-Stream to SlayDragonQuest?
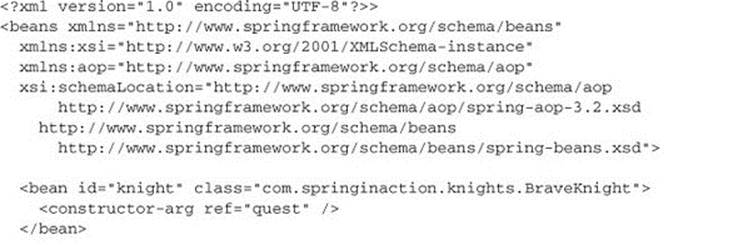
The act of creating associations between application components is commonly referred to as wiring. In Spring, there are many ways to wire components together, but a common approach has always been via XML. The next listing shows a simple Spring configuration file, knights.xml, that wires a BraveKnight, a SlayDragonQuest, and a PrintStream together.
Listing 1.6. Injecting a SlayDragonQuest into a BraveKnight with Spring
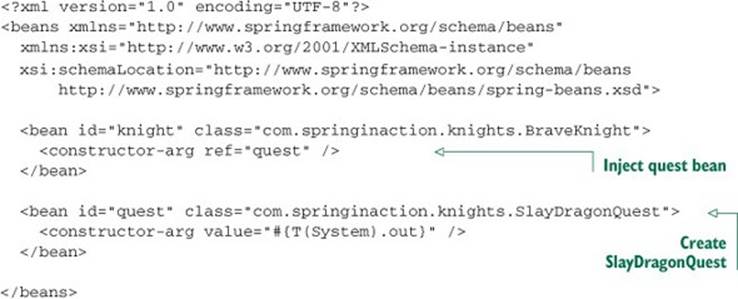
Here, BraveKnight and SlayDragonQuest are declared as beans in Spring. In the case of the BraveKnight bean, it’s constructed, passing a reference to the SlayDragonQuest bean as a constructor argument. Meanwhile, the SlayDragonQuest bean declaration uses the Spring Expression Language to pass System.out (which is a PrintStream) to SlayDragonQuest’s constructor.
If XML configuration doesn’t suit your tastes, you might like to know that Spring also allows you to express configuration using Java. For example, here you see a Java-based equivalent to listing 1.6.
Listing 1.7. Spring offers Java-based configuration as an alternative to XML.
package com.springinaction.knights.config;
import org.springframework.context.annotation.Bean;
import org.springframework.context.annotation.Configuration;
import com.springinaction.knights.BraveKnight;
import com.springinaction.knights.Knight;
import com.springinaction.knights.Quest;
import com.springinaction.knights.SlayDragonQuest;
@Configuration
public class KnightConfig {
@Bean
public Knight knight() {
return new BraveKnight(quest());
}
@Bean
public Quest quest() {
return new SlayDragonQuest(System.out);
}
}
Whether you use XML-based or Java-based configuration, the benefits of DI are the same. Although BraveKnight depends on a Quest, it doesn’t know what type of Quest it will be given or where that Quest will come from. Likewise, SlayDragonQuest depends on a PrintStream, but it isn’t coded with knowledge of how that Print-Stream comes to be. Only Spring, through its configuration, knows how all the pieces come together. This makes it possible to change those dependencies with no changes to the depending classes.
This example has shown a simple approach to wiring beans in Spring. Don’t concern yourself too much with the details right now. We’ll dig more into Spring configuration when we get to chapter 2. We’ll also look at other ways that beans can be wired in Spring, including a way to let Spring automatically discover beans and create the relationships between them.
Now that you’ve declared the relationship between BraveKnight and a Quest, you need to load the XML configuration file and kick off the application.
Seeing it work
In a Spring application, an application context loads bean definitions and wires them together. The Spring application context is fully responsible for the creation of and wiring of the objects that make up the application. Spring comes with several implementations of its application context, each primarily differing only in how it loads its configuration.
When the beans in knights.xml are declared in an XML file, an appropriate choice for application context might be ClassPathXmlApplicationContext.[1] This Spring context implementation loads the Spring context from one or more XML files located in the application’s classpath. The main() method in the following listing uses Class-PathXmlApplicationContext to load knights.xml and to get a reference to the Knight object.
1 For Java-based configurations, Spring offers AnnotationConfigApplicationContext.
Listing 1.8. KnightMain.java loads the Spring context containing a Knight.
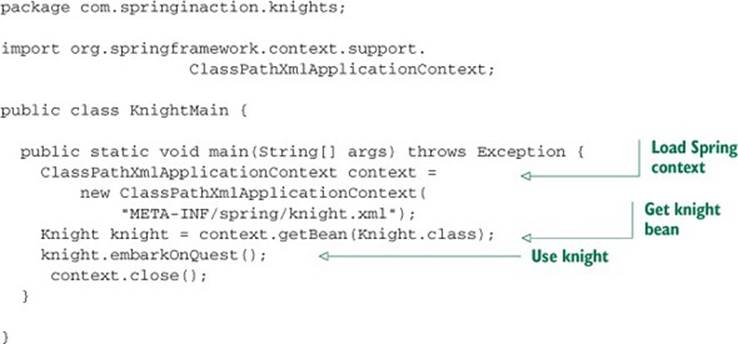
Here the main() method creates the Spring application context based on the knights.xml file. Then it uses the application context as a factory to retrieve the bean whose ID is knight. With a reference to the Knight object, it calls the embarkOnQuest() method to have the knight embark on the quest he was given. Note that this class knows nothing about which type of Quest your hero has. For that matter, it’s blissfully unaware of the fact that it’s dealing with BraveKnight. Only the knights.xml file knows for sure what the implementations are.
And with that you have a quick introduction to dependency injection. You’ll see a lot more DI throughout this book. But if you want even more DI, I encourage you to look at Dhanji R. Prasanna’s Dependency Injection (Manning, 2009, www.manning.com/prasanna/), which covers DI in fine detail.
Now let’s look at another of Spring’s Java-simplifying strategies: declarative programming through aspects.
1.1.3. Applying aspects
Although DI makes it possible to tie software components together loosely, aspect-oriented programming (AOP) enables you to capture functionality that’s used throughout your application in reusable components.
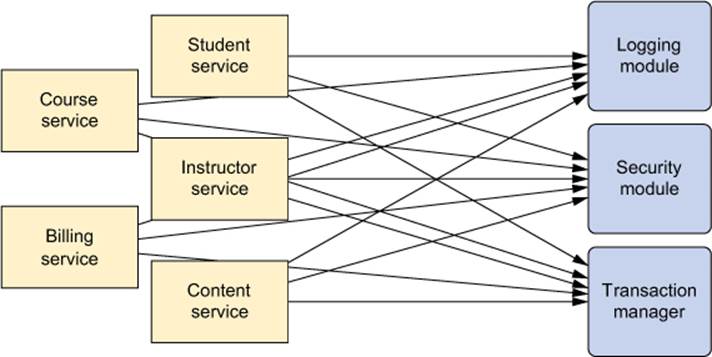
AOP is often defined as a technique that promotes separation of concerns in a software system. Systems are composed of several components, each responsible for a specific piece of functionality. But often these components also carry additional responsibilities beyond their core functionality. System services such as logging, transaction management, and security often find their way into components whose core responsibilities is something else. These system services are commonly referred to as cross-cutting concerns because they tend to cut across multiple components in a system.
By spreading these concerns across multiple components, you introduce two levels of complexity to your code:
· The code that implements the system-wide concerns is duplicated across multiple components. This means that if you need to change how those concerns work, you’ll need to visit multiple components. Even if you’ve abstracted the concern to a separate module so that the impact to your components is a single method call, that method call is duplicated in multiple places.
· Your components are littered with code that isn’t aligned with their core functionality. A method that adds an entry to an address book should only be concerned with how to add the address and not with whether it’s secure or transactional.
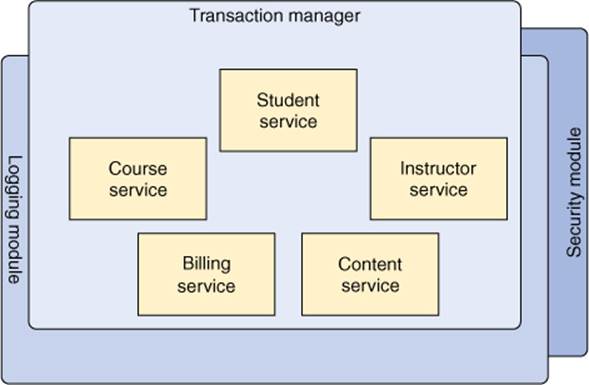
Figure 1.2 illustrates this complexity. The business objects on the left are too intimately involved with the system services on the right. Not only does each object know that it’s being logged, secured, and involved in a transactional context, but each object also is responsible for performing those services for itself.
Figure 1.2. Calls to system-wide concerns such as logging and security are often scattered about in modules where those tasks are not their primary concern.
AOP makes it possible to modularize these services and then apply them declaratively to the components they should affect. This results in components that are more cohesive and that focus on their own specific concerns, completely ignorant of any system services that may be involved. In short, aspects ensure that POJOs remain plain.
It may help to think of aspects as blankets that cover many components of an application, as illustrated in figure 1.3. At its core, an application consists of modules that implement business functionality. With AOP, you can then cover your core application with layers of functionality. These layers can be applied declaratively throughout your application in a flexible manner without your core application even knowing they exist. This is a powerful concept, because it keeps the security, transaction, and logging concerns from littering the application’s core business logic.
Figure 1.3. Using AOP, system-wide concerns blanket the components they impact. This leaves the application components to focus on their specific business functionality.
To demonstrate how aspects can be applied in Spring, let’s revisit the knight example, adding a basic Spring aspect to the mix.
AOP in action
Anyone who knows anything about knights only knows about them because their deeds were chronicled in song by the musically inclined storytellers known as minstrels. Let’s suppose that you want to record the comings and goings of your BraveKnight using the services of a minstrel. The following listing shows the Minstrel class you might use.
Listing 1.9. A Minstrel is a musically inclined logging system from medieval times.
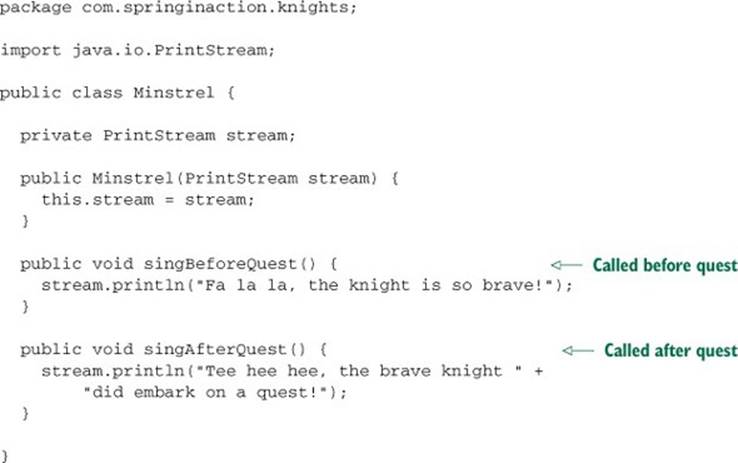
As you can see, Minstrel is a simple class with two methods. The singBeforeQuest() method is intended to be invoked before a knight embarks on a quest, and the sing-AfterQuest() method should be invoked after the knight has completed a quest. In both cases, the Minstrelsings of the knight’s deeds via a PrintStream injected through its constructor.
It should be simple to work this into your code—you can just inject it into Brave-Knight, right? Let’s make the appropriate tweaks to BraveKnight to use Minstrel. The next listing shows a first attempt at bringing BraveKnight and Minstrel together.
Listing 1.10. A BraveKnight that must call Minstrel methods
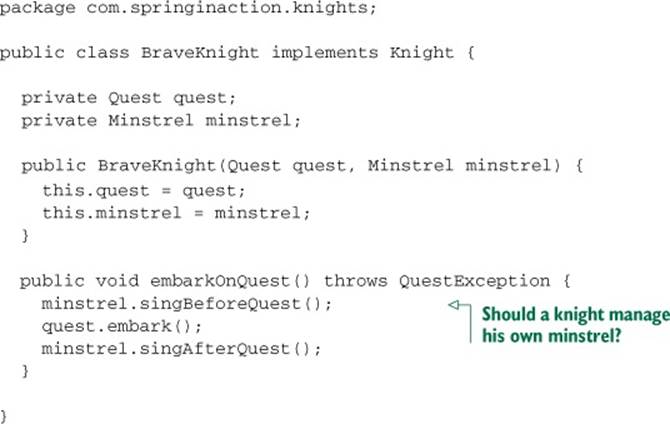
That should do the trick. Now all you need to do is go back to your Spring configuration to declare a Minstrel bean and inject it into the BraveKnight bean’s constructor. But hold on...
Something doesn’t seem right. Is it really within the knight’s range of concern to manage his minstrel? It seems to me that minstrels should just do their job without having to be asked to do so. After all, that’s a minstrel’s job—to sing about the knight’s endeavors. Why should the knight have to keep reminding the minstrel?
Furthermore, because the knight needs to know about the minstrel, you’re forced to inject Minstrel into BraveKnight. This not only complicates the BraveKnight code but also makes me wonder if you’d ever want a knight who didn’t have a minstrel. What if Minstrel is null? Should you introduce some null-checking logic to cover that case?
Your simple BraveKnight class is starting to get more complicated and would become more so if you were to handle the nullMinstrel scenario. But using AOP, you can declare that the minstrel should sing about a knight’s quests and free the knight from having to deal with theMinstrel methods directly.
To turn Minstrel into an aspect, all you need to do is declare it as one in the Spring configuration file. Here’s the updated knights.xml file, revised to declare Minstrel as an aspect.
Listing 1.11. Declaring the Minstrel as an aspect
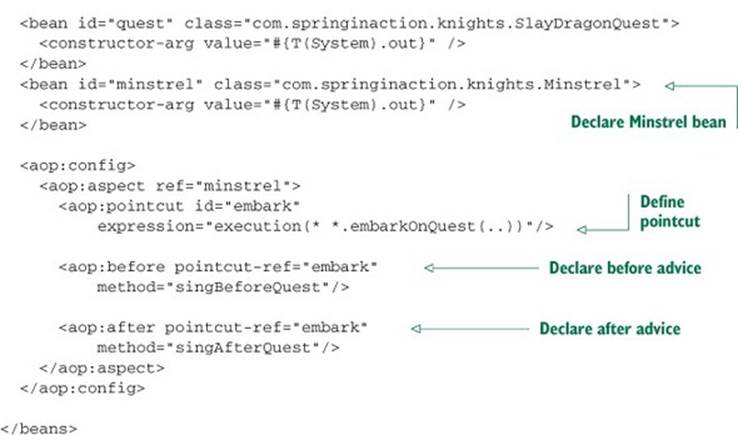
Here you’re using Spring’s aop configuration namespace to declare that the Minstrel bean is an aspect. First you declare Minstrel as a bean. Then you refer to that bean in the <aop:aspect> element. Defining the aspect further, you declare (using <aop:before>) that before theembarkOnQuest() method is executed, the Minstrel’s singBefore-Quest() should be called. This is called before advice. And you (using <aop:after>) declare that the singAfterQuest() method should be called after embarkOnQuest() has executed. This is known as after advice.
In both cases, the pointcut-ref attribute refers to a pointcut named embark. This pointcut is defined in the preceding <pointcut> element with an expression attribute set to select where the advice should be applied. The expression syntax is AspectJ’s pointcut expression language.
Don’t worry if you don’t know AspectJ or the details of how AspectJ pointcut expressions are written. We’ll talk more about Spring AOP later, in chapter 4. For now it’s enough to know that you’ve asked Spring to call Minstrel’s singBeforeQuest() and singAfterQuest() methods before and after BraveKnight embarks on a quest.
That’s all there is to it! With a tiny bit of XML, you’ve turned Minstrel into a Spring aspect. Don’t worry if this doesn’t make complete sense yet—you’ll see plenty more examples of Spring AOP in chapter 4 that should help clear this up. For now, there are two important points to take away from this example.
First, Minstrel is still a POJO—nothing about it indicates that it’s to be used as an aspect. Instead, Minstrel became an aspect when you declared it as such in the Spring context.
Second, and most important, Minstrel can be applied to BraveKnight without BraveKnight needing to explicitly call on it. In fact, BraveKnight remains completely unaware of Minstrel’s existence.
I should also point out that although you used some Spring magic to turn Minstrel into an aspect, it was declared as a Spring <bean> first. The point is that you can do anything with Spring aspects that you can do with other Spring beans, such as inject them with dependencies.
Using aspects to sing about knights can be fun. But Spring’s AOP can be used for even more practical things. As you’ll see later, Spring AOP can be employed to provide services such as declarative transactions and security (chapters 9 and 14).
But for now, let’s look at one more way that Spring simplifies Java development.
1.1.4. Eliminating boilerplate code with templates
Have you ever written some code and then felt like you’d already written the same code before? That’s not déjà vu, my friend. That’s boilerplate code—the code that you often have to write over and over again to accomplish common and otherwise simple tasks.
Unfortunately, there are a lot of places where Java APIs involve a bunch of boilerplate code. A common example of boilerplate code can be seen when working with JDBC to query data from a database. If you’ve ever worked with JDBC, you’ve probably written something similar to the following.
Listing 1.12. Many Java APIs, such as JDBC, involve writing boilerplate code.
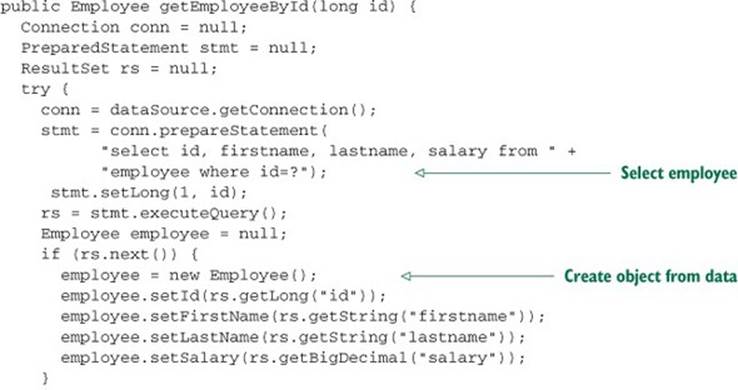
As you can see, this JDBC code queries the database for an employee’s name and salary. But I’ll bet you had to look hard to see that. That’s because the small bit of code that’s specific to querying for an employee is buried in a heap of JDBC ceremony. You first have to create a connection, then create a statement, and finally query for the results. And, to appease JDBC’s anger, you must catch SQLException, a checked exception, even though there’s not a lot you can do if it’s thrown.
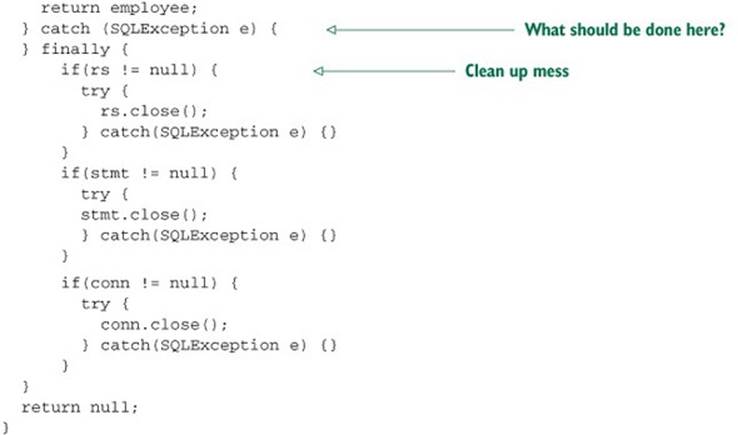
Finally, after all is said and done, you have to clean up the mess, closing down the connection, statement, and result set. This could also stir JDBC’s anger, so you must catch SQLException here as well.
What’s most notable about listing 1.12 is that much of it is the exact same code you’d write for pretty much any JDBC operation. Little of it has anything to do with querying for an employee, and much of it is JDBC boilerplate.
JDBC is not alone in the boilerplate code business. Many activities require similar boilerplate code. JMS, JNDI, and the consumption of REST services often involve a lot of commonly repeated code.
Spring seeks to eliminate boilerplate code by encapsulating it in templates. Spring’s JdbcTemplate makes it possible to perform database operations without all the ceremony required by traditional JDBC.
For example, using Spring’s SimpleJdbcTemplate (a specialization of Jdbc-Template that takes advantage of Java 5 features), the getEmployeeById() method can be rewritten so that its focus is on the task of retrieving employee data and not catering to the demands of the JDBC API. The following shows what such an updated getEmployeeById() method might look like.
Listing 1.13. Templates let your code focus on the task at hand.
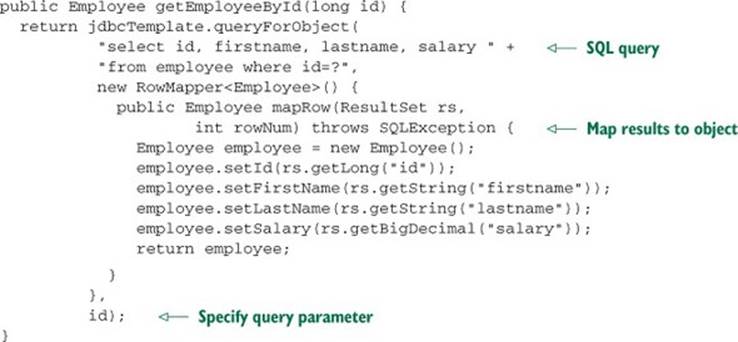
As you can see, this new version of getEmployeeById() is much simpler and acutely focused on selecting an employee from the database. The template’s queryFor-Object() method is given the SQL query, a RowMapper (for mapping result set data to a domain object), and zero or more query parameters. What you don’t see in getEmployeeById() is any of the JDBC boilerplate from before. Everything is handled inside the template.
I’ve shown you how Spring attacks complexity in Java development using POJO-oriented development, DI, aspects, and templates. Along the way, I showed you how to configure beans and aspects in XML-based configuration files. But how do those files get loaded? And what are they loaded into? Let’s look at the Spring container, the place where your application’s beans reside.
1.2. Containing your beans
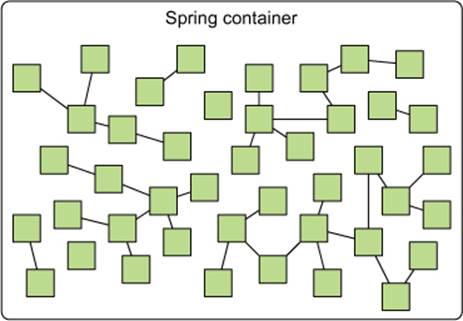
In a Spring-based application, your application objects live in the Spring container. As illustrated in figure 1.4, the container creates the objects, wires them together, configures them, and manages their complete lifecycle from cradle to grave (or new to finalize(), as the case may be).
Figure 1.4. In a Spring application, objects are created, are wired together, and live in the Spring container.
In the next chapter, you’ll see how to configure Spring so it knows what objects it should create, configure, and wire together. First, though, it’s important to get to know the container where your objects will be hanging out. Understanding the container will help you grasp how your objects will be managed.
The container is at the core of the Spring Framework. Spring’s container uses DI to manage the components that make up an application. This includes creating associations between collaborating components. As such, these objects are cleaner and easier to understand, they support reuse, and they’re easy to unit test.
There’s no single Spring container. Spring comes with several container implementations that can be categorized into two distinct types. Bean factories (defined by the org.springframework.beans.factory.BeanFactory interface) are the simplest of containers, providing basic support for DI. Application contexts (defined by the org.springframework.context.ApplicationContext interface) build on the notion of a bean factory by providing application-framework services, such as the ability to resolve textual messages from a properties file and the ability to publish application events to interested event listeners.
Although it’s possible to work with Spring using either bean factories or application contexts, bean factories are often too low-level for most applications. Therefore, application contexts are preferred over bean factories. We’ll focus on working with application contexts and not spend any more time talking about bean factories.
1.2.1. Working with an application context
Spring comes with several flavors of application context. Here are a few that you’ll most likely encounter:
· AnnotationConfigApplicationContext —Loads a Spring application context from one or more Java-based configuration classes
· AnnotationConfigWebApplicationContext —Loads a Spring web application context from one or more Java-based configuration classes
· ClassPathXmlApplicationContext —Loads a context definition from one or more XML files located in the classpath, treating context-definition files as classpath resources
· FileSystemXmlApplicationContext —Loads a context definition from one or more XML files in the filesystem
· XmlWebApplicationContext —Loads context definitions from one or more XML files contained in a web application
We’ll talk more about AnnotationConfigWebApplicationContext and XmlWebApplicationContext in chapter 8 when we discuss web-based Spring applications. For now, let’s load the application context from the filesystem using FileSystemXmlApplicationContext or from the classpath using ClassPathXmlApplicationContext.
Loading an application context from the filesystem or from the classpath is similar to how you load beans into a bean factory. For example, here’s how you’d load a File-SystemXmlApplicationContext:
ApplicationContext context = new
FileSystemXmlApplicationContext("c:/knight.xml");
Similarly, you can load an application context from the application’s classpath using ClassPathXmlApplicationContext:
ApplicationContext context = new
ClassPathXmlApplicationContext("knight.xml");
The difference between using FileSystemXmlApplicationContext and ClassPathXmlApplicationContext is that FileSystemXmlApplicationContext looks for knight.xml in a specific location within the filesystem, whereas ClassPathXmlApplicationContext looks for knight.xml anywhere in the classpath (including JAR files).
Alternatively, if you’d rather load your application context from a Java configuration, you can use AnnotationConfigApplicationContext:
ApplicationContext context = new AnnotationConfigApplicationContext(
com.springinaction.knights.config.KnightConfig.class);
Instead of specifying an XML file from which to load the Spring application context, AnnotationConfigApplicationContext has been given a configuration class from which to load beans.
With an application context in hand, you can retrieve beans from the Spring container by calling the context’s getBean() method.
Now that you know the basics of how to create a Spring container, let’s take a closer look at the lifecycle of a bean in the bean container.
1.2.2. A bean’s life
In a traditional Java application, the lifecycle of a bean is simple. Java’s new keyword is used to instantiate the bean, and it’s ready to use. Once the bean is no longer in use, it’s eligible for garbage collection and eventually goes to the big bit bucket in the sky.
In contrast, the lifecycle of a bean in a Spring container is more elaborate. It’s important to understand the lifecycle of a Spring bean, because you may want to take advantage of some of the opportunities that Spring offers to customize how a bean is created. Figure 1.5 shows the startup lifecycle of a typical bean as it’s loaded into a Spring application context.
Figure 1.5. A bean goes through several steps between creation and destruction in the Spring container. Each step is an opportunity to customize how the bean is managed in Spring.
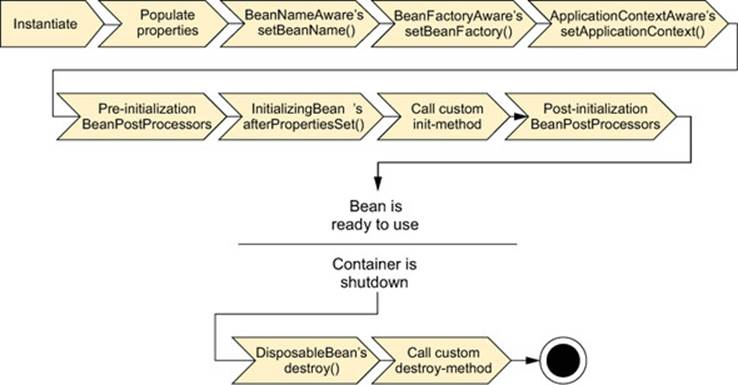
As you can see, a bean factory performs several setup steps before a bean is ready to use. Let’s break down figure 1.5 in more detail:
1. Spring instantiates the bean.
2. Spring injects values and bean references into the bean’s properties.
3. If the bean implements BeanNameAware, Spring passes the bean’s ID to the setBeanName() method.
4. If the bean implements BeanFactoryAware, Spring calls the setBeanFactory() method, passing in the bean factory itself.
5. If the bean implements ApplicationContextAware, Spring calls the setApplicationContext() method, passing in a reference to the enclosing application context.
6. If the bean implements the BeanPostProcessor interface, Spring calls its postProcessBeforeInitialization() method.
7. If the bean implements the InitializingBean interface, Spring calls its afterPropertiesSet() method. Similarly, if the bean was declared with an init-method, then the specified initialization method is called.
8. If the bean implements BeanPostProcessor, Spring calls its postProcess-AfterInitialization() method.
9. At this point, the bean is ready to be used by the application and remains in the application context until the application context is destroyed.
10. If the bean implements the DisposableBean interface, Spring calls its destroy() method. Likewise, if the bean was declared with a destroy-method, the specified method is called.
Now you know how to create and load a Spring container. But an empty container isn’t much good by itself; it doesn’t contain anything unless you put something in it. To achieve the benefits of Spring DI, you must wire your application objects into the Spring container. We’ll go into bean wiring in more detail in chapter 2.
First, let’s survey the modern Spring landscape to see what the Spring Framework is made up of and what the latest versions of Spring have to offer.
1.3. Surveying the Spring landscape
As you’ve seen, the Spring Framework is focused on simplifying enterprise Java development through DI, AOP, and boilerplate reduction. Even if that were all Spring did, it’d be worth using. But there’s more to Spring than meets the eye.
Within the Spring Framework proper, you’ll find several ways that Spring can ease Java development. But beyond the Spring Framework is a greater ecosystem of projects that build on the core framework, extending Spring into areas such as web services, REST, mobile, and NoSQL.
Let’s first break down the core Spring Framework to see what it brings to the table. Then we’ll expand our sights to review the other members of the greater Spring portfolio.
1.3.1. Spring modules
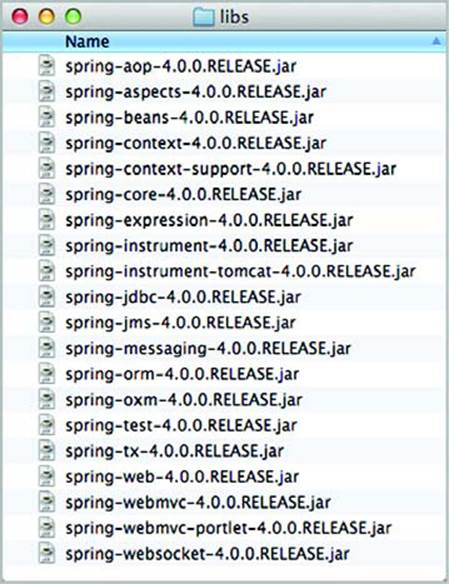
When you download the Spring distribution and dig into its libs folder, you’ll find several JAR files. As of Spring 4.0, there are 20 distinct modules in the Spring Framework distribution, with three JAR files for each module (the binary class library, the source JAR file, and a JavaDoc JAR file). The complete list of library JAR files is shown in figure 1.6.
Figure 1.6. Spring 4.0 is made up of 20 distinct modules.
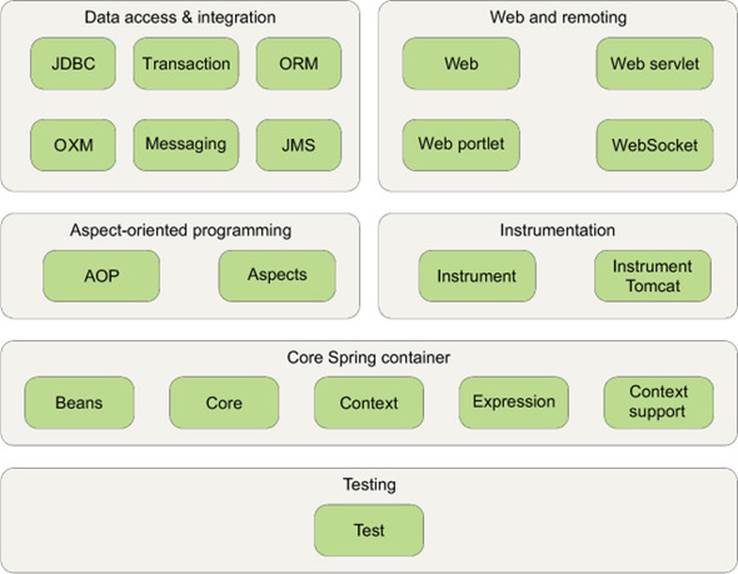
These modules can be arranged into six categories of functionality, as illustrated in figure 1.7.
Figure 1.7. The Spring Framework is made up of six well-defined module categories.
Taken as a whole, these modules give you everything you need to develop enterprise-ready applications. But you don’t have to base your application fully on the Spring Framework. You’re free to choose the modules that suit your application and look to other options when Spring doesn’t fit the bill. Spring even offers integration points with several other frameworks and libraries so that you don’t have to write them yourself.
Let’s look at each of Spring’s modules, one at a time, to see how each fits in the overall Spring picture.
Core Spring container
The centerpiece of the Spring Framework is a container that manages how the beans in a Spring-enabled application are created, configured, and managed. In this module is the Spring bean factory, which is the portion of Spring that provides DI. Building on the bean factory, you’ll find several implementations of Spring’s application context, each of which provides a different way to configure Spring.
In addition to the bean factory and application context, this module also supplies many enterprise services such as email, JNDI access, EJB integration, and scheduling.
All of Spring’s modules are built on top of the core container. You’ll implicitly use these classes when you configure your application. We’ll discuss the core module throughout this book, starting in chapter 2 where we’ll dig deep into Spring DI.
Spring’s AOP module
Spring provides rich support for aspect-oriented programming in its AOP module. This module serves as the basis for developing your own aspects for your Spring-enabled application. Like DI, AOP supports loose coupling of application objects. But with AOP, application-wide concerns (such as transactions and security) are decoupled from the objects to which they’re applied.
We’ll dig into Spring’s AOP support in chapter 4.
Data access and integration
Working with JDBC often results in a lot of boilerplate code that gets a connection, creates a statement, processes a result set, and then closes the connection. Spring’s JDBC and data-access objects (DAO) module abstracts away the boilerplate code so that you can keep your database code clean and simple, and prevents problems that result from a failure to close database resources. This module also builds a layer of meaningful exceptions on top of the error messages given by several database servers. No more trying to decipher cryptic and proprietary SQL error messages!
For those who prefer using an object-relational mapping (ORM) tool over straight JDBC, Spring provides the ORM module. Spring’s ORM support builds on the DAO support, providing a convenient way to build DAOs for several ORM solutions. Spring doesn’t attempt to implement its own ORM solution but does provide hooks into several popular ORM frameworks, including Hibernate, Java Persistence API, Java Data Objects, and iBATIS SQL Maps. Spring’s transaction management supports each of these ORM frameworks as well as JDBC.
You’ll see how Spring’s template-based JDBC abstraction can greatly simplify JDBC code when we look at Spring data access in chapter 10.
This module also includes a Spring abstraction over the Java Message Service (JMS) for asynchronous integration with other applications through messaging. And, as of Spring 3.0, this module includes the object-to-XML mapping features that were originally part of the Spring Web Services project.
In addition, this module uses Spring’s AOP module to provide transaction-management services for objects in a Spring application.
Web and remoting
The Model-View-Controller (MVC) paradigm is a commonly accepted approach to building web applications such that the user interface is separate from the application logic. Java has no shortage of MVC frameworks, with Apache Struts, JSF, WebWork, and Tapestry being among the most popular MVC choices.
Even though Spring integrates with several popular MVC frameworks, its web and remoting module comes with a capable MVC framework that promotes Spring’s loosely coupled techniques in the web layer of an application. We’ll look at Spring’s MVC framework in chapters 5–7.
In addition to user-facing web applications, this module also provides several remoting options for building applications that interact with other applications. Spring’s remoting capabilities include Remote Method Invocation (RMI), Hessian, Burlap, JAX-WS, and Spring’s own HTTP invoker. Spring also offers first-class support for exposing and consuming REST APIs.
In chapter 15, we’ll check out Spring remoting. And you’ll learn how to create and consume REST APIs in chapter 16.
Instrumentation
Spring’s instrumentation module includes support for adding agents to the JVM. Specifically, it provides a weaving agent for Tomcat that transforms class files as they’re loaded by the classloader.
If that sounds like a lot to understand, don’t worry too much about it. The instrumentation provided by this module has a narrow set of use cases and we won’t be dealing with this module at all in this book.
Testing
Recognizing the importance of developer-written tests, Spring provides a module dedicated to testing Spring applications.
In this module you’ll find a collection of mock object implementations for writing unit tests against code that works with JNDI, servlets, and portlets. For integration-level testing, this module provides support for loading a collection of beans in a Spring application context and working with the beans in that context.
Throughout this book, many of the examples will be driven by tests, utilizing the testing facilities offered by Spring.
1.3.2. The Spring portfolio
When it comes to Spring, there’s more than meets the eye. In fact, there’s more than what comes in the Spring Framework download. If you stop at just the core Spring Framework, you’ll miss out on a wealth of potential afforded by the larger Spring portfolio. The whole Spring portfolio includes several frameworks and libraries that build on the core Spring Framework and on each other. All together, the entire Spring portfolio brings the Spring programming model to almost every facet of Java development.
It would take several volumes to cover everything the Spring portfolio has to offer, and much of it is outside the scope of this book. But we’ll look at some of the elements of the Spring portfolio; here’s a taste of what lies beyond the core Spring Framework.
Spring Web Flow
Spring Web Flow builds on Spring’s core MVC framework to provide support for building conversational, flow-based web applications that guide users toward a goal (think wizards or shopping carts). We’ll talk more about Spring Web Flow in chapter 8, and you can learn more about it athttp://projects.spring.io/spring-webflow/.
Spring Web Services
Although the core Spring Framework provides for declaratively publishing Spring beans as web services, those services are based on an arguably architecturally inferior contract-last model. The contract for the service is determined from the bean’s interface. Spring Web Services offers a contract-first web services model where service implementations are written to satisfy the service contract.
I won’t be talking about Spring-WS in this book, but you can read more about it at http://docs.spring.io/spring-ws/site/.
Spring Security
Security is a critical aspect of many applications. Implemented using Spring AOP, Spring Security offers a declarative security mechanism for Spring-based applications. You’ll see how to add Spring Security to an application’s web layer in chapter 9. We’ll return to Spring Security again inchapter 14 to examine how to secure method invocations. For further exploration, Spring Security’s home page is at http://projects.spring.io/spring-security/.
Spring Integration
Many enterprise applications must interact with other enterprise applications. Spring Integration offers implementations of several common integration patterns in Spring’s declarative style.
We won’t cover Spring Integration in this book, but if you want more information, look at Spring Integration in Action by Mark Fisher, Jonas Partner, Marius Bogoevici, and Iwein Fuld (Manning, 2012, www.manning.com/fisher/). Or you can visit the Spring Integration home page athttp://projects.spring.io/spring-integration/.
Spring Batch
When it’s necessary to perform bulk operations on data, nothing beats batch processing. If you’re going to be developing a batch application, you can use Spring’s robust, POJO-oriented development model to do it using Spring Batch.
Spring Batch is beyond the scope of this book, but Arnaud Cogoluegnes, Thierry Templier, Gary Gregory, and Olivier Bazoud will enlighten you in their book, Spring Batch in Action (Manning, 2011, www.manning.com/templier/). You can also learn about Spring Batch from its home page at http://projects.spring.io/spring-batch/.
Spring Data
Spring Data makes it easy to work with all kinds of databases in Spring. Although the relational database has been ubiquitous in enterprise applications for many years, modern applications are recognizing that not all data is best served by columns and rows in a table. A new breed of databases, commonly referred to as NoSQL databases,[2] offer new ways of working with data that are more fitting than the traditional relational database.
2 I prefer the term non-relational or schema-less over NoSQL. Calling these databases NoSQL places the blame on the query language and not the database model.
Whether you’re using a document database like MongoDB, a graph database such as Neo4j, or even a traditional relational database, Spring Data offers a simplified programming model for persistence. This includes, for many database types, an automatic repository mechanism that creates repository implementations for you.
We’ll look at using Spring Data to simplify Java Persistence API (JPA) development in chapter 11 and then expand the discussion to include a few NoSQL databases in chapter 12.
Spring Social
Social networking is a rising trend on the internet, and more and more applications are being outfitted with integration into social networking sites such as Facebook and Twitter. If this is the kind of thing that interests you, you’ll want to look at Spring Social, a social networking extension to Spring.
But Spring Social is about more than just tweets and friends. Despite its name, Spring Social is less about the word social and more about the word connect. It helps you connect your Spring application with REST APIs, including many that may not have any social purpose to them.
Due to space constraints, we won’t cover Spring Social in this book. But if you’re interested in how Spring can help you connect with Facebook or Twitter, have a look at the Getting Started guides at https://spring.io/guides/gs/accessing-facebook/ and https://spring.io/guides/gs/accessing-twitter/.
Spring Mobile
Mobile applications are another significant area of software development. Smartphones and tablet devices are taking over as the preferred client for many users. Spring Mobile is a new extension to Spring MVC to support development of mobile web applications.
Spring for Android
Related to Spring Mobile is the Spring Android project. This project aims to bring some of the simplicity afforded by the Spring Framework to development of native applications for Android-based devices. Initially, this project is offering a version of Spring’s RestTemplate that can be used in an Android application. It also works with Spring Social to enable native Android apps to connect with REST APIs.
I won’t discuss Spring for Android in this book, but you can learn more about it at http://projects.spring.io/spring-android/.
Spring Boot
Spring greatly simplifies many programming tasks, reducing or even eliminating much of the boilerplate code you might normally be required to write without it. Spring Boot is an exciting new project that takes an opinionated view of developing with Spring to simplify Spring itself.
Spring Boot heavily employs automatic configuration techniques that can eliminate most (and in many cases, all) Spring configuration. It also provides several starter projects to help reduce the size of your Spring project build files, whether you’re using Maven or Gradle.
We’ll look at Spring Boot near the end of the book in chapter 21.
1.4. What’s new in Spring
When the third edition of this book went to press, the latest version of Spring was version 3.0.5. That was around three years ago, and a lot has changed since then. The Spring Framework has seen three significant releases—3.1, 3.2, and now 4.0—each bringing new features and improvements to ease application development. And several of the other members of the Spring portfolio have undergone major changes.
This edition of Spring in Action has been updated to cover many of the most exciting and useful features in these releases. But for now, let’s briefly size up what’s new in Spring.
1.4.1. What was new in Spring 3.1?
Spring 3.1 had several useful new features and improvements, many of which were focused on simplifying and improving configuration. In addition, Spring 3.1 provided declarative caching support as well as many improvements to Spring MVC. Here’s a brief list of some of the highlights of Spring 3.1:
· To address the common issue of selecting distinct configurations for various environments (such as development, test, and production), Spring 3.1 introduced environment profiles. Profiles make it possible, for instance, to select a different data source bean depending on which environment the application is deployed in.
· Building on Spring 3.0’s Java-based configuration, Spring 3.1 added several enable annotations to switch on certain features of Spring with a single annotation.
· Declarative caching support made its way into Spring, making it possible to declare caching boundaries and rules with simple annotations, similar to how you could already declare transaction boundaries.
· A new c namespace brought constructor injection the same succinct attribute-oriented style as Spring 2.0’s p namespace brought to property injection.
· Spring began to support Servlet 3.0, including the ability to declare servlets and filters in Java-based configuration instead of web.xml.
· Improvements to Spring’s JPA support made it possible to completely configure JPA in Spring without needing a persistence.xml file.
Spring 3.1 also included several enhancements to Spring MVC:
· Automatic binding of path variables to model attributes
· @RequestMappingproduces and consumes attributes, for matching against a request’s Accept and Content-Type headers
· A @RequestPart annotation that enables binding parts of a multipart request to handler method parameters
· Support for flash attributes (attributes that survive a redirect) and a RedirectAttributes type to carry the flash attributes between requests
Just as important as what was new in Spring 3.1 is what was no longer available in Spring as of Spring 3.1. Specifically, Spring’s JpaTemplate and JpaDaoSupport classes were deprecated in favor of native EntityManager usage. Even though they were deprecated, they were still around in Spring 3.2. But you shouldn’t use them, because they weren’t upgraded to support JPA 2.0 and have been removed in Spring 4.
Now let’s look at what was new in Spring 3.2.
1.4.2. What was new in Spring 3.2?
Whereas Spring 3.1 was largely focused on configuration improvements with a small set of other enhancements, including Spring MVC enhancements, Spring 3.2 was primarily a Spring MVC-focused release. Spring MVC 3.2 boasted the following improvements:
· Spring 3.2 controllers can take advantage of Servlet 3’s asynchronous requests to spin off request processing in separate threads, freeing up the servlet thread to process more requests.
· Although Spring MVC controllers have been easily testable as POJOs since Spring 2.5, Spring 3.2 included a Spring MVC test framework for writing richer tests against controllers, asserting their behavior as controllers, but without a servlet container.
· In addition to improved controller testing, Spring 3.2 included support for testing RestTemplate-based clients without sending requests to the real REST endpoint.
· An @ControllerAdvice annotation enables common @ExceptionHandler, @InitBinder, and @ModelAttributes methods to be collected in a single class and applied to all controllers.
· Prior to Spring 3.2, full content negotiation support was only available via ContentNegotiatingViewResolver. But in Spring 3.2, full content negotiation became available throughout Spring MVC, even on controller methods relying on message converters for content consumption and production.
· Spring MVC 3.2 included a new @MatrixVariable annotation for binding a request’s matrix variables to handler method parameters.
· The abstract base class AbstractDispatcherServletInitializer can be used for conveniently configuring DispatcherServlet without web.xml. Likewise, a subclass named AbstractAnnotationConfigDispatcherServletInitializer can be used when you wish to configure Spring with Java-based configuration.
· The ResponseEntityExceptionHandler class was added to be used as an alternative to DefaultHandlerExceptionResolver. ResponseEntityException-Handler methods return ResponseEntity<Object> instead of ModelAndView.
· RestTemplate and @RequestBody arguments support generic types.
· RestTemplate and @RequestMapping methods support the HTTP PATCH method.
· Mapped interceptors support URL patterns to be excluded from interceptor processing.
Although Spring MVC was the main story of Spring 3.2, a few other non-MVC improvements were added as well. Here are a few of the most interesting new features in Spring 3.2:
· @Autowired, @Value, and @Bean annotations can be used as meta-annotations to create custom injection and bean-declaration annotations.
· The @DateTimeFormat annotation no longer has a hard dependency on Joda-Time. If JodaTime is present, it is used. Otherwise, SimpleDateFormat is used.
· Spring’s declarative caching support has initial support for JCache 0.5.
· You can define global formats for parsing and rendering dates and times.
· Integration tests can configure and load a WebApplicationContext.
· Integration tests can test against request- and session-scoped beans.
You’ll see a lot of Spring 3.2’s features across several chapters in this book, especially in the web and REST chapters.
1.4.3. What’s new in Spring 4.0?
Spring 4.0 is the freshest release of Spring available. There are a lot of exciting new features in Spring 4.0, including the following:
· Spring now includes support for WebSocket programming, including support for JSR-356: Java API for WebSocket.
· Recognizing that WebSocket offers a low-level API, screaming for a higher-level abstraction, Spring 4.0 includes a higher level message-oriented programming model on top of WebSocket that’s based on SockJS and includes STOMP subprotocol support.
· A new messaging module with many types carried over from the Spring Integration project. This messaging module supports Spring’s SockJS/STOMP support. It also includes template-based support for publishing messages.
· Spring 4.0 is one of the first (if not the first) Java frameworks to support Java 8 features, including lambdas. Among other things, this makes working with certain callback interfaces (such as RowMapper with JdbcTemplate) much cleaner and easier to read.
· Along with Java 8 support comes support for JSR-310: Data and Time API, offering the opportunity for developers to work with dates and times in a richer API than that offered with java.util.Date or java.util.Calendar.
· A smooth programming experience for applications developed in Groovy has also been added, essentially enabling a Spring application to be developed easily entirely in Groovy. With this comes the BeanBuilder from Grails, enabling Spring applications to be configured with Groovy.
· Generalized support for conditional bean creation has been added, wherein beans can be declared to be created only if a developer-defined condition is met.
· Spring 4.0 also includes a new asynchronous implementation of Spring’s Rest-Template that returns immediately but allows for callbacks once the operation completes.
· Support for many JEE specs has been added, including JMS 2.0, JTA 1.2, JPA 2.1, and Bean Validation 1.1.
As you can see, a lot of exciting new stuff has found its way into the latest versions of the Spring Framework. Throughout this book, we’ll look at many of these new features as well as many of the long-standing features of Spring.
1.5. Summary
You should now have a good idea of what Spring brings to the table. Spring aims to make enterprise Java development easier and to promote loosely coupled code. Vital to this are dependency injection and aspect-oriented programming.
In this chapter, you got a taste of DI in Spring. DI is a way of associating application objects such that the objects don’t need to know where their dependencies come from or how they’re implemented. Rather than acquiring dependencies on their own, dependent objects are given the objects that they depend on. Because dependent objects often only know about their injected objects through interfaces, coupling is kept low.
In addition to DI, you also saw a glimpse of Spring’s AOP support. AOP enables you to centralize in one place—an aspect—logic that would normally be scattered throughout an application. When Spring wires your beans together, these aspects can be woven in at runtime, effectively giving the beans new behavior.
DI and AOP are central to everything in Spring. Thus you must understand how to use these principal functions of Spring to be able to use the rest of the framework. In this chapter, we’ve just scratched the surface of Spring’s DI and AOP features. Over the next few chapters, we’ll dig deeper into DI and AOP.
Without further ado, let’s move on to chapter 2 to learn how to wire objects together in Spring using DI.
All materials on the site are licensed Creative Commons Attribution-Sharealike 3.0 Unported CC BY-SA 3.0 & GNU Free Documentation License (GFDL)
If you are the copyright holder of any material contained on our site and intend to remove it, please contact our site administrator for approval.
© 2016-2026 All site design rights belong to S.Y.A.