Spring in Action, 4th Edition: Covers Spring 4 (2015)
Part 1. Core Spring
Chapter 2. Wiring beans
This chapter covers
· Declaring beans
· Injecting constructors and setters
· Wiring beans
· Controlling bean creation and destruction
Have you ever stuck around long enough after a movie to watch the credits? It’s incredible how many different people it takes to pull together a major motion picture. In addition to the obvious participants—the actors, scriptwriters, directors, and producers—there are the not-so-obvious—the musicians, special effects crew, and art directors. And that’s not to mention the key grip, sound mixer, costumers, makeup artists, stunt coordinators, publicists, first assistant to the cameraperson, second assistant to the cameraperson, set designers, gaffer, and (perhaps most important) caterers.
Now imagine what your favorite movie would’ve been like had none of these people talked to one another. Let’s say that they all showed up at the studio and started doing their own thing without any coordination of any kind. If the director keeps to himself and doesn’t say “Roll’em,” then the cameraperson wouldn’t start shooting. It probably wouldn’t matter anyway, because the lead actress would still be in her trailer and the lighting wouldn’t work because the gaffer wouldn’t have been hired. Maybe you’ve seen a movie where it looks like this is what happened. But most movies (the good ones, anyway) are the product of thousands of people working together toward the common goal of making a blockbuster film.
In this respect, a great piece of software isn’t much different. Any nontrivial application is made up of several objects that must work together to meet some business goal. These objects must be aware of one another and communicate with one another to get their jobs done. In an online shopping application, for instance, an order-manager component may need to work with a product-manager component and a credit-card authorization component. All of these will likely need to work with a data-access component to read from and write to a database.
But as you saw in chapter 1, the traditional approach to creating associations between application objects (via construction or lookup) leads to complicated code that’s difficult to reuse and unit-test. At best, these objects do more work than they should. At worst, they’re highly coupled to one another, making them hard to reuse and hard to test.
In Spring, objects aren’t responsible for finding or creating the other objects that they need to do their jobs. Instead, the container gives them references to the objects that they collaborate with. An order-manager component, for example, may need a credit-card authorizer—but it doesn’t have to create the credit-card authorizer. It just needs to show up empty-handed, and it’s given a credit-card authorizer to work with.
The act of creating these associations between application objects is the essence of dependency injection (DI) and is commonly referred to as wiring. In this chapter, we’ll explore the basics of bean wiring using Spring. DI is the most elemental thing Spring does, so these are techniques you’ll use almost every time you develop Spring-based applications.
There are many ways to wire beans in Spring. To begin, let’s take a moment to get a feel for the three most common approaches for configuring the Spring container.
2.1. Exploring Spring’s configuration options
As mentioned in chapter 1, the Spring container is responsible for creating the beans in your application and coordinating the relationships between those objects via DI. But it’s your responsibility as a developer to tell Spring which beans to create and how to wire them together. When it comes to expressing a bean wiring specification, Spring is incredibly flexible, offering three primary wiring mechanisms:
· Explicit configuration in XML
· Explicit configuration in Java
· Implicit bean discovery and automatic wiring
At first glance, it may seem that offering these three configuration options complicates Spring. There is some overlap in what each configuration technique offers, and it can be overwhelming to decide which technique is most applicable for a given situation. But don’t be distressed—in many cases, the choice is largely a matter of personal taste, and you’re welcome to choose the approach that feels best for you.
It’s great that you have many choices about how to wire beans in Spring, but at some point you must select one.
There’s no single right answer here. Any choice you make must be suitable for you and your project. And who says that you must make one choice? Spring’s configuration styles are mix-and-match, so you could choose XML to wire up some beans, use Spring’s Java-based configuration (JavaConfig) for other beans, and let other beans be automatically discovered by Spring.
Even so, my recommendation is to lean on automatic configuration as much as you can. The less configuration you have to do explicitly, the better. When you must explicitly configure beans (such as when you’re configuring beans for which you don’t maintain the source code), I’d favor the type-safe and more powerful JavaConfig over XML. Finally, fall back on XML only in situations where there’s a convenient XML namespace you want to use that has no equivalent in JavaConfig.
We’ll explore all three of these techniques in detail in this chapter and apply them throughout the book. At this point, let’s test-taste each one to get an idea of what they’re like. For your first sampling of Spring configuration, let’s look at Spring’s automatic configuration.
2.2. Automatically wiring beans
A little bit later in this chapter, you’ll see how to express Spring wiring in both Java and XML. Even though you’ll find a lot of use for those explicit wiring techniques, nothing beats Spring’s automatic configuration for ease of use. Why bother explicitly wiring beans together if Spring can be configured to automatically do it for you?
Spring attacks automatic wiring from two angles:
· Component scanning —Spring automatically discovers beans to be created in the application context.
· Autowiring —Spring automatically satisfies bean dependencies.
Working together, component scanning and autowiring are a powerful force and can help keep explicit configuration to a minimum.
To demonstrate component scanning and autowiring, you’re going to create a few beans that represent some of the components in a stereo system. You’ll start by creating a CompactDisc class that Spring will discover and create as a bean. Then you’ll create a CDPlayer class and have Spring discover it and inject it with the CompactDisc bean.
2.2.1. Creating discoverable beans
In this age of MP3 files and streaming music, the compact disc may seem a bit quaint and archaic. Not as much as cassette tapes, eight-tracks, or vinyl records, of course, but CDs are becoming more and more scarce as the last remnant of physical music delivery.
In spite of that, the CD provides a nice illustration of how DI works. CD players are of little value unless you insert (or inject) a CD into them. You could say that a CD player depends on a CD to do its job.
To bring this illustration to life in Spring, let’s establish the concept of a CD in Java. The following listing shows CompactDisc, an interface that defines a CD.
Listing 2.1. The CompactDisc interface defines the concept of a CD in Java.
package soundsystem;
public interface CompactDisc {
void play();
}
The specifics of the CompactDisc interface aren’t important. What is important is that you’ve defined it as an interface. As an interface, it defines the contract through which a CD player can operate on the CD. And it keeps the coupling between any CD player implementation and the CD itself to a minimum.
You still need an implementation of CompactDisc, though. In fact, you could have several CompactDisc implementations. In this case, you’ll start with one: the SgtPeppers class, as shown in the next listing.
Listing 2.2. @CompactDisc-annotated SgtPeppers implements CompactDisc
package soundsystem;
import org.springframework.stereotype.Component;
@Component
public class SgtPeppers implements CompactDisc {
private String title = "Sgt. Pepper's Lonely Hearts Club Band";
private String artist = "The Beatles";
public void play() {
System.out.println("Playing " + title + " by " + artist);
}
}
As with the CompactDisc interface, the specifics of SgtPeppers aren’t important to this discussion. What you should take note of is that SgtPeppers is annotated with @Component. This simple annotation identifies this class as a component class and serves as a clue to Spring that a bean should be created for the class. There’s no need to explicitly configure a SgtPeppers bean; Spring will do it for you because this class is annotated with @Component.
Component scanning isn’t turned on by default, however. You’ll still need to write an explicit configuration to tell Spring to seek out classes annotated with @Component and to create beans from them. The configuration class in the following listing shows the minimal configuration to make this possible.
Listing 2.3. @ComponentScan enables component scanning
package soundsystem;
import org.springframework.context.annotation.ComponentScan;
import org.springframework.context.annotation.Configuration;
@Configuration
@ComponentScan
public class CDPlayerConfig {
}
The CDPlayerConfig class defines a Spring wiring specification, expressed in Java. We’ll look at Java-based Spring configuration more in section 2.3. But for now, observe that CDPlayerConfig doesn’t explicitly define any beans itself. Instead, it’s annotated with @ComponentScan to enable component scanning in Spring.
With no further configuration, @ComponentScan will default to scanning the same package as the configuration class. Therefore, because CDPlayerConfig is in the soundsystem package, Spring will scan that package and any subpackages underneath it, looking for classes that are annotated with @Component. It should find the Compact-Disc class and automatically create a bean for it in Spring.
If you’d rather turn on component scanning via XML configuration, then you can use the <context:component-scan> element from Spring’s context namespace. Here is a minimal XML configuration to enable component scanning.
Listing 2.4. Enabling component scanning in XML
<?xml version="1.0" encoding="UTF-8"?>
<beans xmlns="http://www.springframework.org/schema/beans"
xmlns:xsi="http://www.w3.org/2001/XMLSchema-instance"
xmlns:context="http://www.springframework.org/schema/context"
xsi:schemaLocation="http://www.springframework.org/schema/beans
http://www.springframework.org/schema/beans/spring-beans.xsd
http://www.springframework.org/schema/context
http://www.springframework.org/schema/context/spring-context.xsd">
<context:component-scan base-package="soundsystem" />
</beans>
Even though XML is an option for enabling component scanning, I’m going to focus on using the preferred Java-based configuration for the remainder of this discussion. If XML is more your style, though, you’ll be happy to know that the <context:component-scan> element has attributes and sub-elements that mirror the attributes you’ll use when working with @ComponentScan.
Believe it or not, with only two classes created, you already have something that you can try out. To test that component scanning works, let’s write a simple JUnit test that creates a Spring application context and asserts that the CompactDisc bean is, in fact, created. CDPlayerTest in the next listing does precisely that.
Listing 2.5. Testing that a CompactDisc was found by component scanning
package soundsystem;
import static org.junit.Assert.*;
import org.junit.Test;
import org.junit.runner.RunWith;
import org.springframework.beans.factory.annotation.Autowired;
import org.springframework.test.context.ContextConfiguration;
import org.springframework.test.context.junit4.SpringJUnit4ClassRunner;
@RunWith(SpringJUnit4ClassRunner.class)
@ContextConfiguration(classes=CDPlayerConfig.class)
public class CDPlayerTest {
@Autowired
private CompactDisc cd;
@Test
public void cdShouldNotBeNull() {
assertNotNull(cd);
}
}
CDPlayerTest takes advantage of Spring’s SpringJUnit4ClassRunner to have a Spring application context automatically created when the test starts. And the @Context-Configuration annotation tells it to load its configuration from the CDPlayerConfig class. Because that configuration class includes @ComponentScan, the resulting application context should include the CompactDisc bean.
To prove that, the test has a property of type CompactDisc that is annotated with @Autowired to inject the CompactDisc bean into the test. (I’ll talk more about @Autowired in a moment.) Finally, a simple test method asserts that the cd property isn’t null. If it’s not null, that means Spring was able to discover the CompactDisc class, automatically create it as a bean in the Spring application context, and inject it into the test.
The test should pass with flying colors (or, hopefully, the color green in your test runner). Your first simple component-scanning exercise was a success! Even though you’ve only used it to create a single bean, that same small amount of configuration is good for discovering and creating any number of beans. Any classes in or under the soundsystem package that are annotated with @Component will also be created as beans. One line with @ComponentScan in exchange for countless automatically created beans is a good trade-off.
Now let’s dig a bit deeper into @ComponentScan and @Component and see what else you can do with component scanning.
2.2.2. Naming a component-scanned bean
All beans in a Spring application context are given an ID. What may not have been apparent from the previous example is that although you didn’t explicitly give the SgtPeppers bean an ID, it was given one derived from its class name. Specifically, the bean was given an ID ofsgtPeppers by lowercasing the first letter of the class name.
If you’d rather give the bean a different ID, all you have to do is pass the desired ID as a value to the @Component annotation. For example, if you wanted to identify the bean as lonelyHeartsClub, then you’d annotate the SgtPeppers class with @Component like this:
@Component("lonelyHeartsClub")
public class SgtPeppers implements CompactDisc {
...
}
Another way to name a bean is to not use the @Component annotation at all. Instead, you can use the @Named annotation from the Java Dependency Injection specification (JSR-330) to provide a bean ID:
package soundsystem;
import javax.inject.Named;
@Named("lonelyHeartsClub")
public class SgtPeppers implements CompactDisc {
...
}
Spring supports the @Named annotation as an alternative to @Component. There are a few subtle differences, but in most common cases they’re interchangeable.
With that said, I have a strong preference for the @Component annotation, largely because @Named is ... well ... poorly named. It doesn’t describe what it does as well as @Component. Therefore, I won’t use @Named any further in this book or its examples.
2.2.3. Setting a base package for component scanning
Thus far, you’ve used @ComponentScan with no attributes. That means it will default to the configuration class’s package as its base package to scan for components. But what if you want to scan a different package? Or what if you want to scan multiple base packages?
One common reason for explicitly setting the base package is so that you can keep all of your configuration code in a package of its own, separate from the rest of your application’s code. In that case, the default base package won’t do.
No problem. To specify a different base package, you only need to specify the package in @ComponentScan’s value attribute:
@Configuration
@ComponentScan("soundsystem")
public class CDPlayerConfig {}
Or, if you’d rather it be clear that you’re setting the base package, you can do so with the basePackages attribute:
@Configuration
@ComponentScan(basePackages="soundsystem")
public class CDPlayerConfig {}
You probably noticed that basePackages is plural. If you’re wondering whether that means you can specify multiple base packages, you can. All you need to do is set basePackages to an array of packages to be scanned:
@Configuration
@ComponentScan(basePackages={"soundsystem", "video"})
public class CDPlayerConfig {}
The one thing about setting the base packages as shown here is that they’re expressed as String values. That’s fine, I suppose, but it’s not very type-safe. If you were to refactor the package names, the specified base packages would be wrong.
Rather than specify the packages as simple String values, @ComponentScan also offers you the option of specifying them via classes or interfaces that are in the packages:
@Configuration
@ComponentScan(basePackageClasses={CDPlayer.class, DVDPlayer.class})
public class CDPlayerConfig {}
As you can see, the basePackages attribute has been replaced with basePackage-Classes. And instead of identifying the packages with String names, the array given to basePackageClasses includes classes. Whatever packages those classes are in will be used as the base package for component scanning.
Although I’ve specified component classes for basePackageClasses, you might consider creating an empty marker interface in the packages to be scanned. With a marker interface, you can still have a refactor-friendly reference to an interface, but without references to any actual application code (that could later be refactored out of the package you intended to component-scan).
If all the objects in your applications were standalone and had no dependencies, like the SgtPeppers bean, then component scanning would be everything you need. But many objects lean on other objects for help to get their job done. You need a way to wire up your component-scanned beans with any dependencies they have. To do that, we’ll need to look at autowiring, the other side of automatic Spring configuration.
2.2.4. Annotating beans to be automatically wired
Put succinctly, autowiring is a means of letting Spring automatically satisfy a bean’s dependencies by finding other beans in the application context that are a match to the bean’s needs. To indicate that autowiring should be performed, you can use Spring’s @Autowired annotation.
For example, consider the CDPlayer class in the following listing. Its constructor is annotated with @Autowired, indicating that when Spring creates the CDPlayer bean, it should instantiate it via that constructor and pass in a bean that is assignable to CompactDisc.
Listing 2.6. Injecting a CompactDisc into a CDPlayer bean using autowiring
package soundsystem;
import org.springframework.beans.factory.annotation.Autowired;
import org.springframework.stereotype.Component;
@Component
public class CDPlayer implements MediaPlayer {
private CompactDisc cd;
@Autowired
public CDPlayer(CompactDisc cd) {
this.cd = cd;
}
public void play() {
cd.play();
}
}
The @Autowired annotation’s use isn’t limited to constructors. It can also be used on a property’s setter method. For example, if CDPlayer had a setCompactDisc() method, you might annotate it for autowiring like this:
@Autowired
public void setCompactDisc(CompactDisc cd) {
this.cd = cd;
}
After Spring has instantiated the bean, it will try to satisfy the dependencies expressed through methods such as the setCompactDisc() method that are annotated with @Autowired.
Actually, there’s nothing special about setter methods. @Autowired can also be applied on any method on the class. Pretending that CDPlayer has an insertDisc() method, @Autowired would work equally well there as on setCompactDisc():
@Autowired
public void insertDisc(CompactDisc cd) {
this.cd = cd;
}
Whether it’s a constructor, a setter method, or any other method, Spring will attempt to satisfy the dependency expressed in the method’s parameters. Assuming that one and only one bean matches, that bean will be wired in.
If there are no matching beans, Spring will throw an exception as the application context is being created. To avoid that exception, you can set the required attribute on @Autowired to false:
@Autowired(required=false)
public CDPlayer(CompactDisc cd) {
this.cd = cd;
}
When required is false, Spring will attempt to perform autowiring; but if there are no matching beans, it will leave the bean unwired. You should be careful setting required to false, however. Leaving the property unwired could lead to NullPointer-Exceptions if you don’t check for null in your code.
In the event that multiple beans can satisfy the dependency, Spring will throw an exception indicating ambiguity in selecting a bean for autowiring. We’ll talk more about managing ambiguity in autowiring later, in chapter 3.
@Autowired is a Spring-specific annotation. If it troubles you to be scattering Spring-specific annotations throughout your code for autowiring, you might consider using the @Inject annotation instead:
package soundsystem;
import javax.inject.Inject;
import javax.inject.Named;
@Named
public class CDPlayer {
...
@Inject
public CDPlayer(CompactDisc cd) {
this.cd = cd;
}
...
}
@Inject comes from the Java Dependency Injection specification, the same specification that gave us @Named. Spring supports the @Inject annotation for autowiring alongside its own @Autowired. Although there are some subtle differences between @Inject and @Autowired, they’re interchangeable in many cases.
I have no strong preference between @Autowired and @Inject. In fact, I sometimes find myself using both in a given project. For the purposes of the examples in this book, however, I’ll consistently use @Autowired. You’re welcome to use whichever one suits you best.
2.2.5. Verifying automatic configuration
Now that you’ve annotated CDPlayer’s constructor with @Autowired, you can be assured that Spring will automatically inject it with a bean assignable to CompactDisc. To be certain, let’s change CDPlayerTest to play the compact disc through the CDPlayer bean:
package soundsystem;
import static org.junit.Assert.*;
import org.junit.Rule;
import org.junit.Test;
import org.junit.contrib.java.lang.system.StandardOutputStreamLog;
import org.junit.runner.RunWith;
import org.springframework.beans.factory.annotation.Autowired;
import org.springframework.test.context.ContextConfiguration;
import org.springframework.test.context.junit4.SpringJUnit4ClassRunner;
@RunWith(SpringJUnit4ClassRunner.class)
@ContextConfiguration(classes=CDPlayerConfig.class)
public class CDPlayerTest {
@Rule
public final StandardOutputStreamLog log =
new StandardOutputStreamLog();
@Autowired
private MediaPlayer player;
@Autowired
private CompactDisc cd;
@Test
public void cdShouldNotBeNull() {
assertNotNull(cd);
}
@Test
public void play() {
player.play();
assertEquals(
"Playing Sgt. Pepper's Lonely Hearts Club Band" +
" by The Beatles\n",
log.getLog());
}
}
Now, in addition to injecting CompactDisc, you’re injecting the CDPlayer bean into the test’s player member variable (as the more generic MediaPlayer type). In the play() test method, you call the play() method on the CDPlayer and assert that it does what you expect.
Testing code that uses System.out.println() is a tricky business. Therefore, this example uses StandardOutputStreamLog, a JUnit rule from the System Rules library (http://stefanbirkner.github.io/system-rules/index.html) that lets you make assertions against whatever is written to the console. Here it’s asserting that the message from the SgtPeppers.play() method was sent to the console.
Now you know the basics of component scanning and autowiring. We’ll revisit component scanning in chapter 3 when we look at ways to address autowiring ambiguity.
But at this point, let’s set aside component scanning and autowiring and see how you can explicitly wire beans in Spring. We’ll start with Spring’s facility for expressing configuration in Java.
2.3. Wiring beans with Java
Although automatic Spring configuration with component scanning and automatic wiring is preferable in many cases, there are times when automatic configuration isn’t an option and you must configure Spring explicitly. For instance, let’s say that you want to wire components from some third-party library into your application. Because you don’t have the source code for that library, there’s no opportunity to annotate its classes with @Component and @Autowired. Therefore, automatic configuration isn’t an option.
In that case, you must turn to explicit configuration. You have two choices for explicit configuration: Java and XML. In this section, we’ll look at how to use Java-Config. We’ll then follow up in the next section on Spring’s XML configuration.
As I mentioned earlier, JavaConfig is the preferred option for explicit configuration because it’s more powerful, type-safe, and refactor-friendly. That’s because it’s just Java code, like any other Java code in your application.
At the same time, it’s important to recognize that JavaConfig code isn’t just any other Java code. It’s conceptually set apart from the business logic and domain code in your application. Even though it’s expressed in the same language as those components, JavaConfig is configuration code. This means it shouldn’t contain any business logic, nor should JavaConfig invade any code where business logic resides. In fact, although it’s not required, JavaConfig is often set apart in a separate package from the rest of an application’s logic so there’s no confusion as to its purpose.
Let’s see how to explicitly configure Spring with JavaConfig.
2.3.1. Creating a configuration class
Earlier in this chapter, in listing 2.3, you got your first taste of JavaConfig. Let’s revisit CDPlayerConfig from that example:
package soundsystem;
import org.springframework.context.annotation.Configuration;
@Configuration
public class CDPlayerConfig {
}
The key to creating a JavaConfig class is to annotate it with @Configuration. The @Configuration annotation identifies this as a configuration class, and it’s expected to contain details on beans that are to be created in the Spring application context.
So far, you’ve relied on component scanning to discover the beans that Spring should create. Although there’s no reason you can’t use component scanning and explicit configuration together, we’re focusing on explicit configuration in this section, so I’ve removed the @ComponentScanannotation from CDPlayerConfig.
With @ComponentScan gone, the CDPlayerConfig class is ineffective. If you were to run CDPlayerTest now, the test would fail with a BeanCreationException. The test expects to be injected with CDPlayer and CompactDisc, but those beans are never created because they’re never discovered by component scanning.
To make the test happy again, you could put @ComponentScan back in. Keeping the focus on explicit configuration, however, let’s see how you can wire the CDPlayer and CompactDisc beans in JavaConfig.
2.3.2. Declaring a simple bean
To declare a bean in JavaConfig, you write a method that creates an instance of the desired type and annotate it with @Bean. For example, the following method declares the CompactDisc bean:
@Bean
public CompactDisc sgtPeppers() {
return new SgtPeppers();
}
The @Bean annotation tells Spring that this method will return an object that should be registered as a bean in the Spring application context. The body of the method contains logic that ultimately results in the creation of the bean instance.
By default, the bean will be given an ID that is the same as the @Bean-annotated method’s name. In this case, the bean will be named compactDisc. If you’d rather it have a different name, you can either rename the method or prescribe a different name with the name attribute:
@Bean(name="lonelyHeartsClubBand")
public CompactDisc sgtPeppers() {
return new SgtPeppers();
}
No matter how you name the bean, this bean declaration is about as simple as they come. The body of the method returns a new instance of SgtPeppers. But because it’s expressed in Java, it has every capability afforded it by the Java language to do almost anything to arrive at theCompactDisc that is returned.
Unleashing your imagination a bit, you might do something crazy like randomly selecting a CompactDisc from a selection of choices:
@Bean
public CompactDisc randomBeatlesCD() {
int choice = (int) Math.floor(Math.random() * 4);
if (choice == 0) {
return new SgtPeppers();
} else if (choice == 1) {
return new WhiteAlbum();
} else if (choice == 2) {
return new HardDaysNight();
} else {
return new Revolver();
}
}
I’ll let you daydream a bit about all the ways you can exploit the power of Java to produce a bean from an @Bean-annotated method. When you’re done, we’ll pick it back up and look at how you can inject the CompactDisc bean into the CDPlayer in JavaConfig.
2.3.3. Injecting with JavaConfig
The CompactDisc bean you declared was simple and had no dependencies of its own. But now you must declare the CDPlayer bean, which depends on a CompactDisc. How can you wire that up in JavaConfig?
The simplest way to wire up beans in JavaConfig is to refer to the referenced bean’s method. For example, here’s how you might declare the CDPlayer bean:
@Bean
public CDPlayer cdPlayer() {
return new CDPlayer(sgtPeppers());
}
The cdPlayer() method, like the sgtPeppers() method, is annotated with @Bean to indicate that it will produce an instance of a bean to be registered in the Spring application context. The ID of the bean will be cdPlayer, the same as the method’s name.
The body of the cdPlayer() method differs subtly from that of the sgtPeppers() method. Rather than construct an instance via its default method, the CDPlayer instance is created by calling its constructor that takes a CompactDisc.
It appears that the CompactDisc is provided by calling sgtPeppers, but that’s not exactly true. Because the sgtPeppers() method is annotated with @Bean, Spring will intercept any calls to it and ensure that the bean produced by that method is returned rather than allowing it to be invoked again.
For example, suppose you were to introduce another CDPlayer bean that is just like the first:
@Bean
public CDPlayer cdPlayer() {
return new CDPlayer(sgtPeppers());
}
@Bean
public CDPlayer anotherCDPlayer() {
return new CDPlayer(sgtPeppers());
}
If the call to sgtPeppers() was treated like any other call to a Java method, then each CDPlayer would be given its own instance of SgtPeppers. That would make sense if we were talking about real CD players and compact discs. If you have two CD players, there’s no physical way for a single compact disc to simultaneously be inserted into two CD players.
In software, however, there’s no reason you couldn’t inject the same instance of SgtPeppers into as many other beans as you want. By default, all beans in Spring are singletons, and there’s no reason you need to create a duplicate instance for the second CDPlayer bean. So Spring intercepts the call to sgtPeppers() and makes sure that what is returned is the Spring bean that was created when Spring itself called sgtPeppers() to create the CompactDisc bean. Therefore, both CDPlayer beans will be given the same instance of SgtPeppers.
I can see how referring to a bean by calling its method can be confusing. There’s another way that might be easier to digest:
@Bean
public CDPlayer cdPlayer(CompactDisc compactDisc) {
return new CDPlayer(compactDisc);
}
Here, the cdPlayer() method asks for a CompactDisc as a parameter. When Spring calls cdPlayer() to create the CDPlayer bean, it autowires a CompactDisc into the configuration method. Then the body of the method can use it however it sees fit. With this technique, thecdPlayer() method can still inject the CompactDisc into the CDPlayer’s constructor without explicitly referring to the CompactDisc’s @Bean method.
This approach to referring to other beans is usually the best choice because it doesn’t depend on the CompactDisc bean being declared in the same configuration class. In fact, there’s nothing that says the CompactDisc bean even needs to be declared in JavaConfig; it could have been discovered by component scanning or declared in XML. You could break up your configuration into a healthy mix of configuration classes, XML files, and automatically scanned and wired beans. No matter how the CompactDisc was created, Spring will be happy to hand it to this configuration method to create the CDPlayer bean.
In any event, it’s important to recognize that although you’re performing DI via the CDPlayer’s constructor, there’s no reason you couldn’t apply other styles of DI here. For example, if you wanted to inject a CompactDisc via a setter method, it might look like this:
@Bean
public CDPlayer cdPlayer(CompactDisc compactDisc) {
CDPlayer cdPlayer = new CDPlayer(compactDisc);
cdPlayer.setCompactDisc(compactDisc);
return cdPlayer;
}
Once again, it bears repeating that the body of an @Bean method can utilize whatever Java is necessary to produce the bean instance. Constructor and setter injection just happen to be two simple examples of what you can do in an @Bean-annotated method. The possibilities are limited only by the capabilities of the Java language.
2.4. Wiring beans with XML
So far, you’ve seen how to let Spring automatically discover and wire beans. And you’ve seen how to step in and explicitly wire beans using JavaConfig. But there’s another option for bean wiring that, although less desirable, has a long history with Spring.
Since the beginning of Spring, XML has been the primary way of expressing configuration. Countless lines of XML have been created in the name of Spring. And for many, Spring has become synonymous with XML configuration.
Although it’s true that Spring has long been associated with XML, let’s be clear that XML isn’t the only option for configuring Spring. And now that Spring has strong support for automatic configuration and Java-based configuration, XML should not be your first choice.
Nevertheless, because so much XML-based Spring configuration has already been written, it’s important to understand how to use XML with Spring. I hope, however, that this section will only serve to help you work with existing XML configuration, and that you’ll lean on automatic configuration and JavaConfig for any new Spring work you do.
2.4.1. Creating an XML configuration specification
Before you can start using XML to wire together beans in Spring, you’ll need to create the empty configuration specification. With JavaConfig, that meant creating a class annotated with @Configuration. For XML configuration, that means creating an XML file rooted with a <beans>element.
The simplest possible Spring XML configuration looks like this:
<?xml version="1.0" encoding="UTF-8"?>
<beans xmlns="http://www.springframework.org/schema/beans"
xmlns:xsi="http://www.w3.org/2001/XMLSchema-instance"
xsi:schemaLocation="http://www.springframework.org/schema/beans
http://www.springframework.org/schema/beans/spring-beans.xsd
http://www.springframework.org/schema/context">
<!-- configuration details go here -->
</beans>
It doesn’t take much to see that this basic XML configuration is already much more complex than an equivalent JavaConfig class. Whereas JavaConfig’s @Configuration annotation was all you needed to get started, the XML elements for configuring Spring are defined in several XML schema (XSD) files that must be declared in the preamble of the XML configuration file.
Creating XML Configurations With Spring Tool Suite
An easy way to create and manage Spring XML configuration files is to use Spring Tool Suite (https://spring.io/tools/sts). Select File > New > Spring Bean Configuration File from Spring Tool Suite’s menu to create a Spring XML configuration file, and select from one of the available configuration namespaces.
The most basic XML elements for wiring beans are contained in the spring-beans schema, which is declared as the root namespace of this XML file. The <beans> element, the root element of any Spring configuration file, is one of the elements in this schema.
Several other schemas are available for configuring Spring in XML. Although I’m going to focus on automatic and Java configuration throughout this book, I’ll at least keep you informed along the way when some of these other schemas might come into play.
As it is, you have a perfectly valid Spring XML configuration. It’s also a perfectly useless configuration, because it doesn’t (yet) declare any beans. To give it some life, let’s re-create the CD example, this time using XML configuration instead of Java-Config or automatic configuration.
2.4.2. Declaring a simple <bean>
To declare a bean in Spring’s XML-based configuration, you’re going to use another element from the spring-beans schema: the <bean> element. The <bean> element is the XML analogue to JavaConfig’s @Bean annotation. You can use it to declare the CompactDisc bean like this:
<bean class="soundsystem.SgtPeppers" />
Here you declare a very simple bean. The class used to create this bean is specified in the class attribute and is expressed as the fully qualified class name.
For lack of an explicitly given ID, the bean will be named according to the fully qualified class name. In this case, the bean’s ID will be soundsystem.SgtPeppers#0. The #0 is an enumeration used to differentiate this bean from any other bean of the same type. If you were to declare another SgtPeppers bean without explicitly identifying it, it would automatically be given an ID of soundsystem.SgtPeppers#1.
Even though it’s convenient to have beans named automatically for you, the generated names will be less useful if you need to refer to them later. Therefore, it’s usually a good idea to give each bean a name of your own choosing via the id attribute:
<bean id="compactDisc" class="soundsystem.SgtPeppers" />
You’ll use this explicit name in a moment when you wire this bean into the CDPlayer bean.
Reducing Verbosity
To cut down on XML verbosity, only explicitly name a bean if you’ll need to refer to it by name (such as if you were to inject a reference to it into another bean).
But before we go any further, let’s take a moment to examine some of the characteristics of this simple bean declaration.
The first thing to notice is that you aren’t directly responsible for creating an instance of SgtPeppers as you were when using JavaConfig. When Spring sees this <bean> element, it will create a SgtPeppers bean for you by calling its default constructor. Bean creation is much more passive with XML configuration. But it’s also less powerful than JavaConfig, where you can do almost anything imaginable to arrive at the bean instance.
Another notable thing about this simple <bean> declaration is that you express the type of the bean as a string set to the class attribute. Who’s to say that the value given to class even refers to a real class? Spring’s XML configuration doesn’t benefit from compile-time verification of the Java types being referred to. And even if it does refer to an actual type, what will happen if you rename the class?
Check XML validity with an IDE
Using a Spring-aware IDE such as Spring Tool Suite can help a lot to ensure the validity of your Spring XML configuration.
These are just a few of the reasons why JavaConfig is preferable over XML configuration. I encourage you to be mindful of these shortcomings of XML configuration when choosing the configuration style for your application. Nevertheless, let’s continue this study of Spring’s XML configuration to see how you can inject your SgtPeppers bean into the CDPlayer.
2.4.3. Initializing a bean with constructor injection
There’s only one way to declare a bean in Spring XML configuration: use the <bean> element, and specify a class attribute. Spring takes it from there.
But when it comes to declaring DI in XML, there are several options and styles. With specific regard to constructor injection, you have two basic options to choose from:
· The <constructor-arg> element
· Using the c-namespace introduced in Spring 3.0
The difference between these two choices is largely one of verbosity. As you’ll see, the <constructor-arg> element is generally more verbose than using the c-namespace and results in XML that is more difficult to read. On the other hand, <constructor-arg> can do a few things that the c-namespace can’t.
As we look at constructor injection in Spring XML, we’ll stack these two options side by side. First, let’s see how each fares at injecting bean references.
Injecting constructors with bean references
As currently defined, the CDPlayer bean has a constructor that accepts a Compact-Disc. This makes it a perfect candidate for injection with a bean reference.
Because you’ve already declared a SgtPeppers bean, and because the SgtPeppers class implements the CompactDisc interface, you have a bean to inject into a CDPlayer bean. All you need to do is declare the CDPlayer bean in XML and reference the SgtPeppers bean by its ID:
<bean id="cdPlayer" class="soundsystem.CDPlayer">
<constructor-arg ref="compactDisc" />
</bean>
When Spring encounters this <bean> element, it will create an instance of CDPlayer. The <constructor-arg> element tells it to pass a reference to the bean whose ID is compactDisc to the CDPlayer’s constructor.
Alternatively, you can use Spring’s c-namespace. The c-namespace was introduced in Spring 3.0 as a more succinct way of expressing constructor args in XML. To use it, you must declare its schema in the preamble of the XML, like this:
<?xml version="1.0" encoding="UTF-8"?>
<beans xmlns="http://www.springframework.org/schema/beans"
xmlns:c="http://www.springframework.org/schema/c"
xmlns:xsi="http://www.w3.org/2001/XMLSchema-instance"
xsi:schemaLocation="http://www.springframework.org/schema/beans
http://www.springframework.org/schema/beans/spring-beans.xsd">
...
</beans>
With the c-namespace and schema declared, you can use it to declare a constructor argument like this:
<bean id="cdPlayer" class="soundsystem.CDPlayer"
c:cd-ref="compactDisc" />
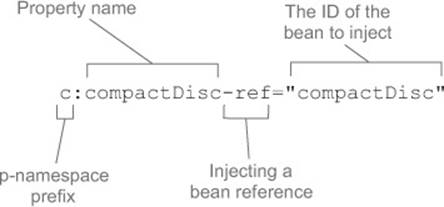
Here you’re using the c-namespace to declare the constructor argument as an attribute of the <bean> element. And it’s a rather odd-looking attribute name. Figure 2.1 illustrates how the pieces of the attribute name come together.
Figure 2.1. Injecting a bean reference into a constructor argument with Spring’s c-namespace

The attribute name starts with c:, the namespace prefix. Following that is the name of the constructor argument being wired. After that is -ref, a naming convention that indicates to Spring that you’re wiring a reference to a bean named compactDisc and not the literal String value"compactDisc".
It’s clear that using c-namespace attributes is much more terse than using the <constructor-arg> element. That’s one of the reasons that I like it a lot. Aside from being slightly easier to read, c-namespace attributes are especially helpful when I have to write code samples that fit neatly within the margins of a book.
But one thing that bugs me about the c-namespace as I’ve used it in the previous example is that it directly refers to the name of the constructor argument. Referring to a parameter name seems a bit flaky to me. Referring to a parameter by name requires that you compile your code with debug symbols stored in the class code. If you optimize your builds to leave out debug symbols, then this probably won’t work.
Instead, you could refer to the parameter’s position in the parameter list:
<bean id="cdPlayer" class="soundsystem.CDPlayer"
c:_0-ref="compactDisc" />
This c-namespace attribute looks even more bizarre than the last one. I’ve replaced the name of the parameter with 0, the parameter index. But because XML doesn’t allow digits as the first character of an attribute, I had to add an underscore as a prefix.
Using an index to identify the constructor argument feels better than referencing it by its name. Even if debug symbols are excluded from the build, the parameters will still be in the same order. And if there were multiple constructor arguments, it would certainly be useful. But because you have only one constructor argument, you have one more option—don’t identify the parameter at all:
<bean id="cdPlayer" class="soundsystem.CDPlayer"
c:_-ref="compactDisc" />
This is by far the most peculiar c-namespace attribute. There’s no parameter index or parameter name. There’s just an underscore placeholder followed by -ref to indicate that you’re wiring a reference.
Now that you’ve tried wiring a reference to other beans, let’s see how to wire literal values into constructors.
Injecting constructors with literal values
Although DI often refers to the type of wiring you’ve done thus far—wiring references to objects into other objects that depend on them—sometimes all you need to do is configure an object with a literal value. To illustrate, suppose you were to create a new implementation ofCompactDisc, as shown here:
package soundsystem;
public class BlankDisc implements CompactDisc {
private String title;
private String artist;
public BlankDisc(String title, String artist) {
this.title = title;
this.artist = artist;
}
public void play() {
System.out.println("Playing " + title + " by " + artist);
}
}
Unlike SgtPeppers, which was hard-coded with a title and artist, this implementation of CompactDisc is considerably more flexible. Much like a real-world blank disc, it can be set to contain any artist and title you want. Now you can change the existing SgtPeppers bean to use this class instead:
<bean id="compactDisc"
class="soundsystem.BlankDisc">
<constructor-arg value="Sgt. Pepper's Lonely Hearts Club Band" />
<constructor-arg value="The Beatles" />
</bean>
Once again, the <constructor-arg> element is used to inject into constructor arguments. But this time, instead of using the ref attribute to reference another bean, you use the value attribute to indicate that the given value is to be taken literally and injected into the constructor.
How would this look if you were to use c-namespace attributes instead? One possible rendition might reference the constructor arguments by name:
<bean id="compactDisc"
class="soundsystem.BlankDisc"
c:_title="Sgt. Pepper's Lonely Hearts Club Band"
c:_artist="The Beatles" />
As you can see, wiring literal values via the c-namespace differs from wiring references in that the -ref suffix is left off the attribute name. Similarly, you could wire the same literal values using parameter indexes, like this:
<bean id="compactDisc"
class="soundsystem.BlankDisc"
c:_0="Sgt. Pepper's Lonely Hearts Club Band"
c:_1="The Beatles" />
XML doesn’t allow more than one attribute on a given element to share the same name. Therefore, you can’t use the simple underscore when you have two or more constructor arguments. But you can use it when there’s only one constructor argument. For the sake of completeness, let’s pretend that BlankDisc has a single-argument constructor that takes the album’s title. In that case, you could declare it in Spring like this:
<bean id="compactDisc" class="soundsystem.BlankDisc"
c:_="Sgt. Pepper's Lonely Hearts Club Band" />
When it comes to wiring bean reference and literal values, both <constructor-arg> and the c-namespace attributes are equally capable. But there’s one thing that <constructor-arg> can do that the c-namespace can’t do. Let’s look at how to wire collections to constructor arguments.
Wiring collections
Up until now, we’ve assumed that CompactDisc was defined by merely a title and an artist name. But if that’s all that came with a real-world CD, the technology would’ve never taken off. What makes CDs worth buying is that they carry music on them. Most CDs carry roughly a dozen tracks, each holding a song.
If CompactDisc is to truly model a real-world CD, then it must also have the notion of a list of tracks. Consider the new BlankDisc shown here:
package soundsystem.collections;
import java.util.List;
import soundsystem.CompactDisc;
public class BlankDisc implements CompactDisc {
private String title;
private String artist;
private List<String> tracks;
public BlankDisc(String title, String artist, List<String> tracks) {
this.title = title;
this.artist = artist;
this.tracks = tracks;
}
public void play() {
System.out.println("Playing " + title + " by " + artist);
for (String track : tracks) {
System.out.println("-Track: " + track);
}
}
}
This change has implications for how you configure the bean in Spring. You must provide a list of tracks when declaring the bean.
The simplest thing you could do is leave the list null. Because it’s a constructor argument, you must specify it, but you can still pass null like this:
<bean id="compactDisc" class="soundsystem.BlankDisc">
<constructor-arg value="Sgt. Pepper's Lonely Hearts Club Band" />
<constructor-arg value="The Beatles" />
<constructor-arg><null/></constructor-arg>
</bean>
The <null/> element does as you’d expect: it passes null into the constructor. It’s a dirty fix, but it will work at injection time. You’ll get a NullPointerException when the play() method is called, so it’s far from ideal.
A better fix would be to supply a list of track names. For that you have a couple of options. First, you could specify it as a list, using the <list> element:
<bean id="compactDisc" class="soundsystem.BlankDisc">
<constructor-arg value="Sgt. Pepper's Lonely Hearts Club Band" />
<constructor-arg value="The Beatles" />
<constructor-arg>
<list>
<value>Sgt. Pepper's Lonely Hearts Club Band</value>
<value>With a Little Help from My Friends</value>
<value>Lucy in the Sky with Diamonds</value>
<value>Getting Better</value>
<value>Fixing a Hole</value>
<!-- ...other tracks omitted for brevity... -->
</list>
</constructor-arg>
</bean>
The <list> element is a child of <constructor-arg> and indicates that a list of values is to be passed into the constructor. The <value> element is used to specify each element of the list.
Similarly, a list of bean references could be wired using the <ref> element instead of <value>. For example, suppose you have a Discography class with the following constructor:
public Discography(String artist, List<CompactDisc> cds) { ... }
You can then configure a Discography bean like this:
<bean id="beatlesDiscography"
class="soundsystem.Discography">
<constructor-arg value="The Beatles" />
<constructor-arg>
<list>
<ref bean="sgtPeppers" />
<ref bean="whiteAlbum" />
<ref bean="hardDaysNight" />
<ref bean="revolver" />
...
</list>
</constructor-arg>
</bean>
It makes sense to use <list> when wiring a constructor argument of type java.util.List. Even so, you could also use the <set> element in the same way:
<bean id="compactDisc" class="soundsystem.BlankDisc">
<constructor-arg value="Sgt. Pepper's Lonely Hearts Club Band" />
<constructor-arg value="The Beatles" />
<constructor-arg>
<set>
<value>Sgt. Pepper's Lonely Hearts Club Band</value>
<value>With a Little Help from My Friends</value>
<value>Lucy in the Sky with Diamonds</value>
<value>Getting Better</value>
<value>Fixing a Hole</value>
<!-- ...other tracks omitted for brevity... -->
</set>
</constructor-arg>
</bean>
There’s little difference between <set> and <list>. The main difference is that when Spring creates the collection to be wired, it will create it as either a java.util.Set or a java.util.List. If it’s a Set, then any duplicate values will be discarded and the ordering may not be honored. But in either case, either a <set> or a <list> can be wired into a List, a Set, or even an array.
Wiring collections is one place where the <constructor-arg> has an advantage over the c-namespace attributes. There’s no obvious way to wire collections like this via c-namespace attributes.
There are a handful of other nuances to using both <constructor-arg> and the c-namespace for constructor injection. But what we’ve covered here should carry you quite far, especially considering my earlier advice to favor Java configuration over XML configuration. Therefore, rather than belabor the topic of constructor injection in XML, let’s move on to see how to wire properties in XML.
2.4.4. Setting properties
Up to this point, the CDPlayer and BlankDisc classes have been configured entirely through constructor injection and don’t have any property setter methods. In contrast, let’s examine how property injection works in Spring XML. Suppose that your new property-injected CDPlayerlooks like this:
package soundsystem;
import org.springframework.beans.factory.annotation.Autowired;
import soundsystem.CompactDisc;
import soundsystem.MediaPlayer;
public class CDPlayer implements MediaPlayer {
private CompactDisc compactDisc;
@Autowired
public void setCompactDisc(CompactDisc compactDisc) {
this.compactDisc = compactDisc;
}
public void play() {
compactDisc.play();
}
}
Choosing between constructor injection and property injection
As a general rule, I favor constructor injection for hard dependencies and property injection for any optional dependencies. In light of that rule, we could argue that the title, artist, and track list are hard dependencies for a Blank-Disc and that constructor injection was the right choice. It’s debatable, however, whether a CompactDisc is a hard or optional dependency for a CDPlayer. I stand by that choice, but you could say that a CDPlayer might still have some limited functionality even without a CompactDisc being injected into it.
Now that CDPlayer doesn’t have any constructors (aside from the implicit default constructor), it also doesn’t have any hard dependencies. Therefore, you could declare it as a Spring bean like this:
<bean id="cdPlayer"
class="soundsystem.CDPlayer" />
Spring will have absolutely no problem creating that bean. Your CDPlayerTest would fail with a NullPointerException, however, because you never injected CDPlayer’s compactDisc property. But you can fix that with the following change to the XML:
<bean id="cdPlayer"
class="soundsystem.CDPlayer">
<property name="compactDisc" ref="compactDisc" />
</bean>
The <property> element does for property setter methods what the <constructor-arg> element does for constructors. In this case, it references (with the ref attribute) the bean whose ID is compactDisc to be injected into the compactDisc property (via the setCompactDisc()method). Now if you run your test, it should pass.
You may also like to know that just as Spring offers the c-namespace as an alternative to the <constructor-arg> element, Spring also offers a succinct p-namespace as an alternative to the <property> element. To enable the p-namespace, you must declare it among the other namespaces in the XML file:
<?xml version="1.0" encoding="UTF-8"?>
<beans xmlns="http://www.springframework.org/schema/beans"
xmlns:p="http://www.springframework.org/schema/p"
xmlns:xsi="http://www.w3.org/2001/XMLSchema-instance"
xsi:schemaLocation="http://www.springframework.org/schema/beans
http://www.springframework.org/schema/beans/spring-beans.xsd">
...
</bean>
Using the p-namespace, you can wire the compactDisc property like this:
<bean id="cdPlayer"
class="soundsystem.CDPlayer"
p:compactDisc-ref="compactDisc" />
The p-namespace attributes follow a naming convention similar to that of the c-namespace attributes. Figure 2.2 illustrates how this p-namespace attribute name breaks down.
Figure 2.2. Injecting a bean reference into a property with Spring’s p-namespace
First, the attribute name is prefixed with p: to indicate that you’re setting a property. Next up is the name of the property to be injected. Finally, the name ends with -ref as a clue to Spring that you’re wiring a reference to a bean and not a literal value.
Injecting properties with literal values
Properties can be injected with literal values in much the same way as constructor arguments. As an example, let’s revisit the BlankDisc bean. This time, however, BlankDiscs will be configured entirely by property injection, not constructor injection. The new BlankDisc class looks like this:
package soundsystem;
import java.util.List;
import soundsystem.CompactDisc;
public class BlankDisc implements CompactDisc {
private String title;
private String artist;
private List<String> tracks;
public void setTitle(String title) {
this.title = title;
}
public void setArtist(String artist) {
this.artist = artist;
}
public void setTracks(List<String> tracks) {
this.tracks = tracks;
}
public void play() {
System.out.println("Playing " + title + " by " + artist);
for (String track : tracks) {
System.out.println("-Track: " + track);
}
}
}
Now you’re no longer obligated to wire any of these properties. You could create a BlankDisc bean in its most blank form as follows:
<bean id="reallyBlankDisc"
class="soundsystem.BlankDisc" />
Of course, wiring the bean without setting those properties wouldn’t play out well at runtime. The play() method would claim that it’s playing null by null just before a NullPointerException is thrown because there are no tracks. Therefore, you probably should wire up those properties. You can do that using the value attribute of the <property> element:
<bean id="compactDisc"
class="soundsystem.BlankDisc">
<property name="title"
value="Sgt. Pepper's Lonely Hearts Club Band" />
<property name="artist" value="The Beatles" />
<property name="tracks">
<list>
<value>Sgt. Pepper's Lonely Hearts Club Band</value>
<value>With a Little Help from My Friends</value>
<value>Lucy in the Sky with Diamonds</value>
<value>Getting Better</value>
<value>Fixing a Hole</value>
<!-- ...other tracks omitted for brevity... -->
</list>
</property>
</bean>
Aside from using the <property> element’s value attribute to set the title and artist properties, notice how you set the tracks property with a nested <list> element, the same as before when wiring the tracks through <constructor-arg>.
Optionally, you can accomplish the same thing using p-namespace attributes:
<bean id="compactDisc"
class="soundsystem.BlankDisc"
p:title="Sgt. Pepper's Lonely Hearts Club Band"
p:artist="The Beatles">
<property name="tracks">
<list>
<value>Sgt. Pepper's Lonely Hearts Club Band</value>
<value>With a Little Help from My Friends</value>
<value>Lucy in the Sky with Diamonds</value>
<value>Getting Better</value>
<value>Fixing a Hole</value>
<!-- ...other tracks omitted for brevity... -->
</list>
</property>
</bean>
As with c-namespace attributes, the only difference between wiring a bean reference and wiring a literal value is the presence or absence of a -ref suffix. Without the -ref suffix, you’re wiring literal values.
Notice, however, that you can’t use the p-namespace when wiring a collection. Unfortunately, there’s no convenient way to specify a list of values (or bean references) with the p-namespace. But you can take advantage of something from Spring’s util-namespace to simplify theBlankDisc bean.
First, you need to declare the util-namespace and its schema in the XML:
<?xml version="1.0" encoding="UTF-8"?>
<beans xmlns="http://www.springframework.org/schema/beans"
xmlns:xsi="http://www.w3.org/2001/XMLSchema-instance"
xmlns:p="http://www.springframework.org/schema/p"
xmlns:util="http://www.springframework.org/schema/util"
xsi:schemaLocation="http://www.springframework.org/schema/beans
http://www.springframework.org/schema/beans/spring-beans.xsd
http://www.springframework.org/schema/util
http://www.springframework.org/schema/util/spring-util.xsd">
...
</beans>
One of the things that the util-namespace offers is the <util:list> element, which creates a list bean. Using <util:list>, you can shift the track list out of the Blank-Disc bean and into a bean of its own, like this:
<util:list id="trackList">
<value>Sgt. Pepper's Lonely Hearts Club Band</value>
<value>With a Little Help from My Friends</value>
<value>Lucy in the Sky with Diamonds</value>
<value>Getting Better</value>
<value>Fixing a Hole</value>
<!-- ...other tracks omitted for brevity... -->
</util:list>
Now you can wire the track-list bean into the BlankDisc bean’s tracks property just like any other bean:
<bean id="compactDisc"
class="soundsystem.BlankDisc"
p:title="Sgt. Pepper's Lonely Hearts Club Band"
p:artist="The Beatles"
p:tracks-ref="trackList" />
The <util:list> element is just one of several elements in the util-namespace. Table 2.1 lists everything the util-namespace has to offer.
Table 2.1. Elements in Spring’s util-namespace
|
Element |
Description |
|
<util:constant> |
References a public static field on a type and exposes it as a bean |
|
<util:list> |
Creates a bean that is a java.util.List of values or references |
|
<util:map> |
Creates a bean that is a java.util.Map of values or references |
|
<util:properties> |
Creates a bean that is a java.util.Properties |
|
<util:property-path> |
References a bean property (or nested property) and exposes it as a bean |
|
<util:set> |
Creates a bean that is a java.util.Set of values or references |
You’ll occasionally call on members of the util-namespace as you need them. For now, though, let’s wrap up this chapter by seeing how you can mix and match automatic configuration, JavaConfig, and XML configuration.
2.5. Importing and mixing configurations
In a typical Spring application, you’re likely to need to use both automatic and explicit configuration. And even if you favor JavaConfig for explicit configuration, there may be times when XML configuration is the best choice.
Fortunately, none of the configuration options available in Spring are mutually exclusive. You’re free to mix component scanning and autowiring with JavaConfig and/or XML configuration. In fact, as you saw in section 2.2.1, you’ll need at least a little explicit configuration to enable component scanning and autowiring.
The first thing to know about mixing configuration styles is that when it comes to autowiring, it doesn’t matter where the bean to be wired comes from. Autowiring considers all beans in the Spring container, regardless of whether they were declared in JavaConfig or XML or picked up by component scanning.
That leaves you with how to reference beans when doing explicit configuration, either with XML configuration or with Java configuration. Let’s start by seeing how to reference XML-configured beans from JavaConfig.
2.5.1. Referencing XML configuration in JavaConfig
Pretend for a moment that CDPlayerConfig is getting unwieldy and you want to split it apart. Sure, it only declares two beans, which is a far cry from a complex Spring configuration. Nevertheless, let’s pretend that two beans is two beans too many.
What you could do is break out the BlankDisc bean from CDPlayerConfig into its own CDConfig class, like this:
package soundsystem;
import org.springframework.context.annotation.Bean;
import org.springframework.context.annotation.Configuration;
@Configuration
public class CDConfig {
@Bean
public CompactDisc compactDisc() {
return new SgtPeppers();
}
}
Now that the compactDisc() method is gone from CDPlayerConfig, you need a way to bring the two configuration classes together. One way is to import CDConfig from CDPlayerConfig using the @Import annotation:
package soundsystem;
import org.springframework.context.annotation.Bean;
import org.springframework.context.annotation.Configuration;
import org.springframework.context.annotation.Import;
@Configuration
@Import(CDConfig.class)
public class CDPlayerConfig {
@Bean
public CDPlayer cdPlayer(CompactDisc compactDisc) {
return new CDPlayer(compactDisc);
}
}
Or, better yet, you can leave @Import out of CDPlayerConfig and instead create a higher-level SoundSystemConfig that uses @Import to bring both configurations together:
package soundsystem;
import org.springframework.context.annotation.Configuration;
import org.springframework.context.annotation.Import;
@Configuration
@Import({CDPlayerConfig.class, CDConfig.class})
public class SoundSystemConfig {
}
Either way, you’ve separated the configuration of CDPlayer from the configuration of BlankDisc. Now let’s suppose that (for whatever reason) you want to configure the BlankDisc bean in XML like this:
<bean id="compactDisc"
class="soundsystem.BlankDisc"
c:_0="Sgt. Pepper's Lonely Hearts Club Band"
c:_1="The Beatles">
<constructor-arg>
<list>
<value>Sgt. Pepper's Lonely Hearts Club Band</value>
<value>With a Little Help from My Friends</value>
<value>Lucy in the Sky with Diamonds</value>
<value>Getting Better</value>
<value>Fixing a Hole</value>
<!-- ...other tracks omitted for brevity... -->
</list>
</constructor-arg>
</bean>
With BlankDisc being declared in XML, how can you have Spring load it in along with the rest of your Java-based configuration?
The answer lies with the @ImportResource annotation. Assuming that the Blank-Disc bean is declared in a file named cd-config.xml that can be found at the root of the classpath, you can change SoundSystemConfig to use @ImportResource like this:
package soundsystem;
import org.springframework.context.annotation.Configuration;
import org.springframework.context.annotation.Import;
import org.springframework.context.annotation.ImportResource;
@Configuration
@Import(CDPlayerConfig.class)
@ImportResource("classpath:cd-config.xml")
public class SoundSystemConfig {
}
Both beans—CDPlayer configured in JavaConfig and BlankDisc configured in XML—will be loaded into the Spring container. And because CDPlayer’s @Bean method accepts a CompactDisc as a parameter, the BlankDisc bean will be wired into it, even though it’s configured in XML.
Let’s run through this exercise again. But this time, you’ll reference a JavaConfig-declared bean from XML.
2.5.2. Referencing JavaConfig in XML configuration
Suppose you’re working with Spring’s XML-based configuration and you’ve decided that the XML is getting out of hand. As before, you’re only dealing with two beans, and things could be worse. But before you’re inundated with a flood of angle brackets, you decide to break the XML configuration file apart.
With JavaConfig, I showed you how to use @Import and @ImportResource to split up your JavaConfig classes. In XML, you can use the <import> element to split up the XML configuration.
For example, suppose you were to split out the BlankDisc bean into its own configuration file called cd-config.xml, as you did when working with @ImportResource. You can reference that file from the XML configuration file using <import>:
<?xml version="1.0" encoding="UTF-8"?>
<beans xmlns="http://www.springframework.org/schema/beans"
xmlns:xsi="http://www.w3.org/2001/XMLSchema-instance"
xmlns:c="http://www.springframework.org/schema/c"
xsi:schemaLocation="http://www.springframework.org/schema/beans
http://www.springframework.org/schema/beans/spring-beans.xsd">
<import resource="cd-config.xml" />
<bean id="cdPlayer"
class="soundsystem.CDPlayer"
c:cd-ref="compactDisc" />
</beans>
Now, suppose that instead of configuring BlankDisc in XML, you want to configure it in XML while leaving the CDPlayer configuration in JavaConfig. How can your XML-based configuration reference a JavaConfig class?
As it turns out, the answer isn’t intuitive. The <import> element only works to import other XML configuration files, and there isn’t an XML element whose job it is to import JavaConfig classes.
There is, however, an element you already know that can be used to bring a Java configuration into an XML configuration: the <bean> element. To import a JavaConfig class into an XML configuration, you declare it as a bean like this:
<?xml version="1.0" encoding="UTF-8"?>
<beans xmlns="http://www.springframework.org/schema/beans"
xmlns:xsi="http://www.w3.org/2001/XMLSchema-instance"
xmlns:c="http://www.springframework.org/schema/c"
xsi:schemaLocation="http://www.springframework.org/schema/beans
http://www.springframework.org/schema/beans/spring-beans.xsd">
<bean class="soundsystem.CDConfig" />
<bean id="cdPlayer"
class="soundsystem.CDPlayer"
c:cd-ref="compactDisc" />
</beans>
And just like that, the two configurations—one expressed in XML and one expressed in Java—have been brought together. Similarly, you might consider creating a higher-level configuration file that doesn’t declare any beans but that brings two or more configurations together. For example, you could leave the CDConfig bean out of the previous XML configuration and instead have a third configuration file that joins them:
<?xml version="1.0" encoding="UTF-8"?>
<beans xmlns="http://www.springframework.org/schema/beans"
xmlns:xsi="http://www.w3.org/2001/XMLSchema-instance"
xmlns:c="http://www.springframework.org/schema/c"
xsi:schemaLocation="http://www.springframework.org/schema/beans
http://www.springframework.org/schema/beans/spring-beans.xsd">
<bean class="soundsystem.CDConfig" />
<import resource="cdplayer-config.xml" />
</beans>
Whether I’m using JavaConfig or XML wiring, I often create a root configuration, as I’ve shown here, that brings together two or more wiring classes and/or XML files. It’s in this root configuration that I’ll also usually turn on component scanning (with either <context:component-scan> or @ComponentScan). You’ll see this technique employed for many of the examples in this book.
2.6. Summary
At the core of the Spring Framework is the Spring container. This container manages the lifecycle of the components of an application, creating those components and ensuring that their dependencies are met so that they can do their job.
In this chapter, we’ve looked at three primary ways of wiring beans together in Spring: automatic configuration, explicit Java-based configuration, and explicit XML-based configuration. No matter which you choose, these techniques describe the components in a Spring application and the relationships between those components.
I’ve also strongly recommended that you favor automatic configuration as much as possible to avoid the maintenance costs involved with explicit configuration. But when you must explicitly configure Spring, you should favor Java-based configuration—which is more powerful, type-safe, and refactorable—over XML configuration. This preference will guide my choice of wiring techniques as I present the examples throughout this book.
Because dependency injection is an essential part of working with Spring, the techniques shown in this chapter will play a role in almost everything else you do in this book. Building on this foundation, the next chapter will present some more advanced bean-wiring techniques that will help you make the most of the Spring container.
All materials on the site are licensed Creative Commons Attribution-Sharealike 3.0 Unported CC BY-SA 3.0 & GNU Free Documentation License (GFDL)
If you are the copyright holder of any material contained on our site and intend to remove it, please contact our site administrator for approval.
© 2016-2026 All site design rights belong to S.Y.A.