Spring in Action, 4th Edition: Covers Spring 4 (2015)
Part 1. Core Spring
Chapter 3. Advanced wiring
This chapter covers
· Spring profiles
· Conditional bean declaration
· Autowiring and ambiguity
· Bean scoping
· The Spring Expression Language
In the previous chapter, we looked at some essential bean-wiring techniques. You’re likely to find a lot of use for what you learned in that chapter. But there’s more to bean wiring than what we explored in chapter 2. Spring has several other tricks up its sleeve for more advanced bean wiring.
In this chapter, we’ll dig in to some of these advanced techniques. You won’t get as much day-to-day use out of the techniques in this chapter, but that doesn’t mean they’re any less valuable.
3.1. Environments and profiles
One of the most challenging things about developing software is transitioning an application from one environment to another. Certain environment-specific choices made for development aren’t appropriate or won’t work when the application transitions from development to production. Database configuration, encryption algorithms, and integration with external systems are just a few examples of things that are likely to vary across deployment environments.
Consider database configuration, for instance. In a development environment, you’re likely to use an embedded database preloaded with test data. For example, in a Spring configuration class, you might use EmbeddedDatabaseBuilder in an @Bean method like this:
@Bean(destroyMethod="shutdown")
public DataSource dataSource() {
return new EmbeddedDatabaseBuilder()
.addScript("classpath:schema.sql")
.addScript("classpath:test-data.sql")
.build();
}
This will create a bean of type javax.sql.DataSource. But it’s how that bean is created that’s most interesting. Using EmbeddedDatabaseBuilder sets up an embedded Hypersonic database whose schema is defined in schema.sql and loaded with test data from test-data.sql.
This DataSource is useful in a development environment when you’re running integration tests or firing up an application for manual testing. You can count on your database being in a given state every time you start it.
Although that makes an EmbeddedDatabaseBuilder-created DataSource perfect for development, it makes it a horrible choice for production. In a production setting, you may want to retrieve a DataSource from your container using JNDI. In that case, the following @Bean method is more appropriate:
@Bean
public DataSource dataSource() {
JndiObjectFactoryBean jndiObjectFactoryBean =
new JndiObjectFactoryBean();
jndiObjectFactoryBean.setJndiName("jdbc/myDS");
jndiObjectFactoryBean.setResourceRef(true);
jndiObjectFactoryBean.setProxyInterface(javax.sql.DataSource.class);
return (DataSource) jndiObjectFactoryBean.getObject();
}
Retrieving a DataSource from JNDI allows your container to make decisions about how it’s created, including handing off a DataSource from a container-managed connection pool. Even so, using a JNDI-managed DataSource is more fitting for production and unnecessarily complicated for a simple integration test or developer test.
Meanwhile, in a QA environment you could select a completely different Data-Source configuration. You might choose to configure a Commons DBCP connection pool like this:
@Bean(destroyMethod="close")
public DataSource dataSource() {
BasicDataSource dataSource = new BasicDataSource();
dataSource.setUrl("jdbc:h2:tcp://dbserver/~/test");
dataSource.setDriverClassName("org.h2.Driver");
dataSource.setUsername("sa");
dataSource.setPassword("password");
dataSource.setInitialSize(20);
dataSource.setMaxActive(30);
return dataSource;
}
Clearly, all three versions of the dataSource() method presented here are different from each other. They all produce a bean whose type is javax.sql.DataSource, but that’s where the similarities end. Each applies a completely different strategy for producing the DataSource bean.
Again, this discussion isn’t about how to configure a DataSource (we’ll talk more about that in chapter 10). But certainly the seemingly simple DataSource bean isn’t so simple. It’s a good example of a bean that might vary across different environments. You must find a way to configure a DataSource bean so that the most appropriate configuration is chosen for each environment.
One way of doing this is to configure each bean in a separate configuration class (or XML file) and then make a build-time decision (perhaps using Maven profiles) about which to compile into the deployable application. The problem with this solution is that it requires that the application be rebuilt for each environment. A rebuild might not be that big a problem when going from development to QA. But requiring a rebuild between QA and production has the potential to introduce bugs and cause an epidemic of ulcers among the members of your QA team.
Fortunately, Spring has a solution that doesn’t require a rebuild.
3.1.1. Configuring profile beans
Spring’s solution for environment-specific beans isn’t much different from build-time solutions. Certainly, an environment-specific decision is made as to which beans will and won’t be created. But rather than make that decision at build time, Spring waits to make the decision at runtime. Consequently, the same deployment unit (perhaps a WAR file) will work in all environments without being rebuilt.
In version 3.1, Spring introduced bean profiles. To use profiles, you must gather all the varying bean definitions into one or more profiles and then make sure the proper profile is active when your application is deployed in each environment.
In Java configuration, you can use the @Profile annotation to specify which profile a bean belongs to. For example, the embedded database DataSource bean might be configured in a configuration class like this:
package com.myapp;
import javax.activation.DataSource;
import org.springframework.context.annotation.Bean;
import org.springframework.context.annotation.Configuration;
import org.springframework.context.annotation.Profile;
import
org.springframework.jdbc.datasource.embedded.EmbeddedDatabaseBuilder;
import
org.springframework.jdbc.datasource.embedded.EmbeddedDatabaseType;
@Configuration
@Profile("dev")
public class DevelopmentProfileConfig {
@Bean(destroyMethod="shutdown")
public DataSource dataSource() {
return new EmbeddedDatabaseBuilder()
.setType(EmbeddedDatabaseType.H2)
.addScript("classpath:schema.sql")
.addScript("classpath:test-data.sql")
.build();
}
}
The main thing I want to draw your attention to is the @Profile annotation applied at the class level. It tells Spring that the beans in this configuration class should be created only if the dev profile is active. If the dev profile isn’t active, then the @Bean methods will be ignored.
Meanwhile, you may have another configuration class for production that looks like this:
package com.myapp;
import javax.activation.DataSource;
import org.springframework.context.annotation.Bean;
import org.springframework.context.annotation.Configuration;
import org.springframework.context.annotation.Profile;
import org.springframework.jndi.JndiObjectFactoryBean;
@Configuration
@Profile("prod")
public class ProductionProfileConfig {
@Bean
public DataSource dataSource() {
JndiObjectFactoryBean jndiObjectFactoryBean =
new JndiObjectFactoryBean();
jndiObjectFactoryBean.setJndiName("jdbc/myDS");
jndiObjectFactoryBean.setResourceRef(true);
jndiObjectFactoryBean.setProxyInterface(
javax.sql.DataSource.class);
return (DataSource) jndiObjectFactoryBean.getObject();
}
}
In this case, the bean won’t be created unless the prod profile is active.
In Spring 3.1, you could only use the @Profile annotation at the class level. Starting with Spring 3.2, however, you can use @Profile at the method level, alongside the @Bean annotation. This makes it possible to combine both bean declarations into a single configuration class, as shown in the following listing.
Listing 3.1. The @Profile annotation wires beans based on active files
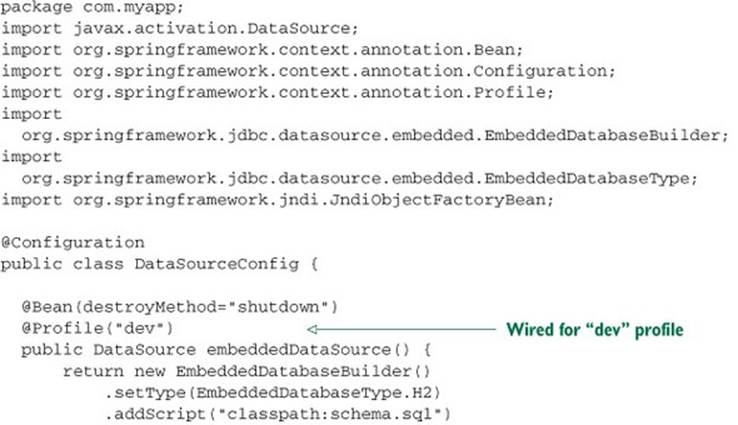
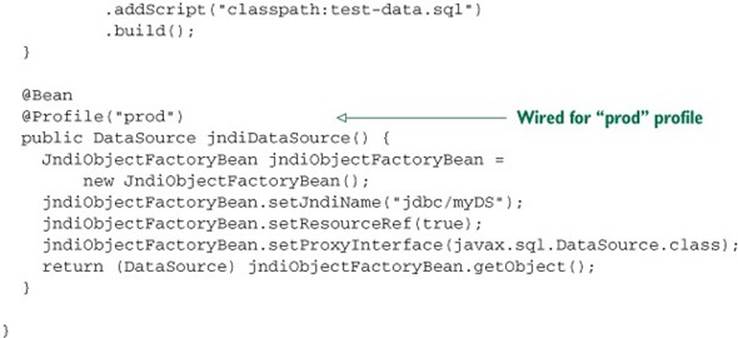
What’s not apparent here is that although each of the DataSource beans is in a profile and will only be created if the prescribed profile is active, there are probably other beans that aren’t defined in the scope of a given profile. Any bean that isn’t given a profile will always be created, regardless of what profile is active.
Configuring profiles in XML
You can also configure profiled beans in XML by setting the profile attribute of the <beans> element. For example, to define the embedded database DataSource bean for development in XML, you can create a configuration XML file that looks like this:
<?xml version="1.0" encoding="UTF-8"?>
<beans xmlns="http://www.springframework.org/schema/beans"
xmlns:xsi="http://www.w3.org/2001/XMLSchema-instance"
xmlns:jdbc="http://www.springframework.org/schema/jdbc"
xsi:schemaLocation="
http://www.springframework.org/schema/jdbc
http://www.springframework.org/schema/jdbc/spring-jdbc.xsd
http://www.springframework.org/schema/beans
http://www.springframework.org/schema/beans/spring-beans.xsd"
profile="dev">
<jdbc:embedded-database id="dataSource">
<jdbc:script location="classpath:schema.sql" />
<jdbc:script location="classpath:test-data.sql" />
</jdbc:embedded-database>
</beans>
Likewise, you could create another configuration file, with profile set to prod for the production-ready JNDI-obtained DataSource bean. And you could create yet another XML file for the connection pool–defined DataSource bean specified by the qa profile. All the configuration XML files are collected into the deployment unit (likely a WAR file), but only those whose profile attribute matches the active profile will be used.
Rather than creating a proliferation of XML files for each environment, you also have the option of defining <beans> elements embedded in the root <beans> element. This helps to collect all profiled bean definitions into a single XML file, as shown next.
Listing 3.2. <beans> elements can be repeated to specify multiple profiles
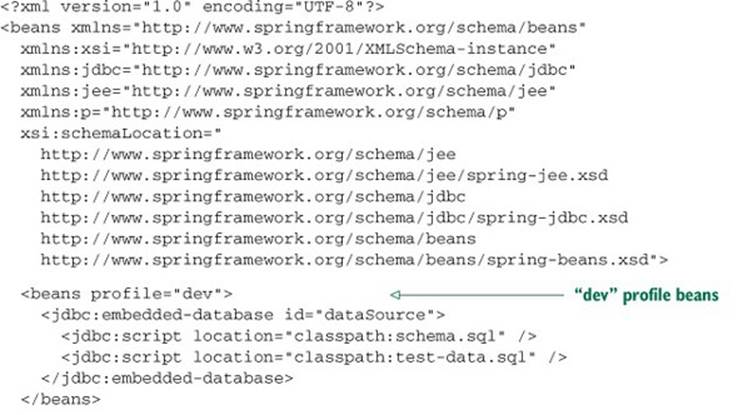
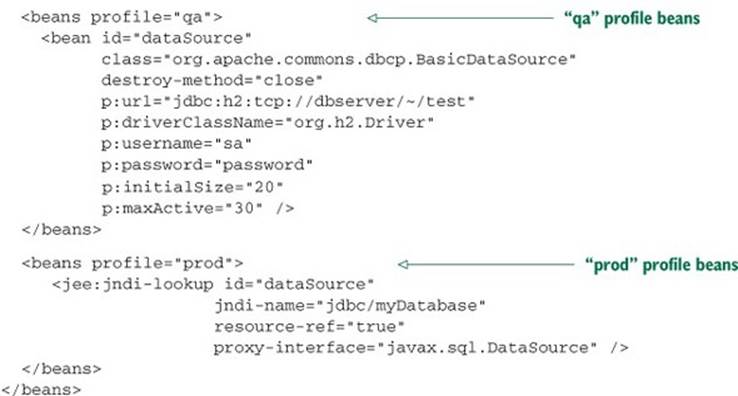
Aside from the fact that all these beans are now defined in the same XML file, the effect is the same as if they were defined in separate XML files. There are three beans, all of type javax.sql.DataSource and all with an ID of dataSource. But at runtime, only one bean will be created, depending on which profile is active.
That raises the question: how do you make a profile active?
3.1.2. Activating profiles
Spring honors two separate properties when determining which profiles are active: spring.profiles.active and spring.profiles.default. If spring.profiles.active is set, then its value determines which profiles are active. But if spring .profiles.active isn’t set, then Spring looks to spring.profiles.default. If neither spring.profiles.active nor spring.profiles.default is set, then there are no active profiles, and only those beans that aren’t defined as being in a profile are created.
There are several ways to set these properties:
· As initialization parameters on DispatcherServlet
· As context parameters of a web application
· As JNDI entries
· As environment variables
· As JVM system properties
· Using the @ActiveProfiles annotation on an integration test class
I’ll leave it to you to choose the best combination of spring.profiles.active and spring.profiles.default to suit your needs.
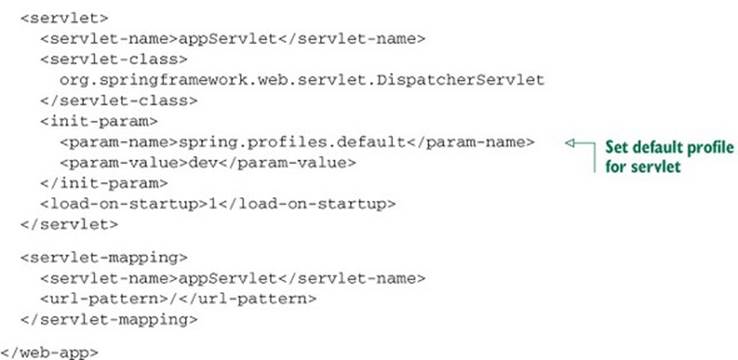
One approach that I like is to set spring.profiles.default to the development profile using parameters on DispatcherServlet and in the servlet context (for the sake of ContextLoaderListener). For example, a web application’s web.xml file might setspring.profiles.default as shown in the next listing.
Listing 3.3. Setting default profiles in a web application’s web.xml file
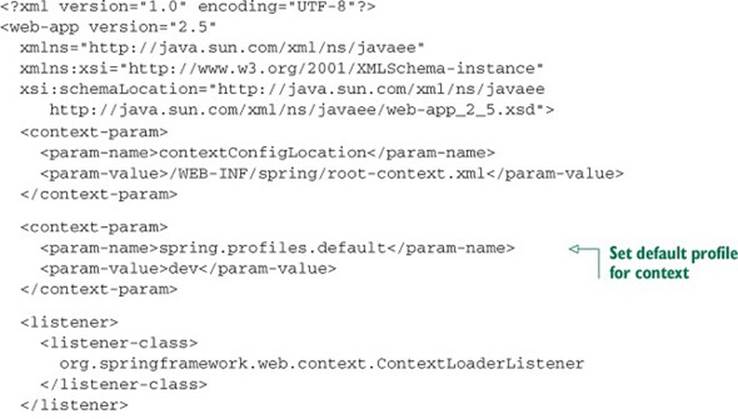
With spring.profiles.default set this way, any developer can retrieve the application code from source control and run it using development settings (such as an embedded database) without any additional configuration.
Then, when the application is deployed in a QA, production, or other environment, the person responsible for deploying it can set spring.profiles.active using system properties, environment variables, or JNDI as appropriate. When spring .profiles.active is set, it doesn’t matter what spring.profiles.default is set to; the profiles set in spring.profiles.active take precedence.
You’ve probably noticed that the word profiles is plural in spring.profiles.active and spring.profiles.default. This means you can activate multiple profiles at the same time by listing the profile names, separated by commas. Of course, it probably doesn’t make much sense to enable both dev and prod profiles at the same time, but you could enable multiple orthogonal profiles simultaneously.
Testing with profiles
When running an integration test, you’ll often want to test using the same configuration (or some subset thereof) you’d use in production. But if your configuration references beans that are in profiles, you need a way to enable the appropriate profile when running those tests.
Spring offers the @ActiveProfiles annotation to let you specify which profile(s) should be active when a test is run. Often it’s the development profile that you’ll want to activate during an integration test. For example, here’s a snippet of a test class that uses @ActiveProfiles to activate the dev profile:
@RunWith(SpringJUnit4ClassRunner.class)
@ContextConfiguration(classes={PersistenceTestConfig.class})
@ActiveProfiles("dev")
public class PersistenceTest {
...
}
Spring profiles are a great way to conditionally define beans where the condition is based on which profile is active. But Spring 4 offers a more general-purpose mechanism for conditional bean definitions where the condition is up to you. Let’s see how to define conditional beans using Spring 4 and the @Conditional annotation.
3.2. Conditional beans
Suppose you want one or more beans to be configured if and only if some library is available in the application’s classpath. Or let’s say you want a bean to be created only if a certain other bean is also declared. Maybe you want a bean to be created if and only if a specific environment variable is set.
Until Spring 4, it was difficult to achieve this level of conditional configuration, but Spring 4 introduced a new @Conditional annotation that can be applied to @Bean methods. If the prescribed condition evaluates to true, then the bean is created. Otherwise the bean is ignored.
For example, suppose you have a class named MagicBean that you only want Spring to instantiate if a magic environment property has been set. If the environment has no such property, then the MagicBean should be ignored. The following listing shows a configuration that conditionally configures the MagicBean using @Conditional.
Listing 3.4. Conditionally configuring a bean

As you can see, @Conditional is given a Class that specifies the condition—in this case, MagicExistsCondition. @Conditional comes paired with a Condition interface:
public interface Condition {
boolean matches(ConditionContext ctxt,
AnnotatedTypeMetadata metadata);
}
The class given to @Conditional can be any type that implements the Condition interface. As you can see, it’s a straightforward interface to implement, requiring only that you provide an implementation for the matches() method. If the matches() method returns true, then the@Conditional-annotated beans are created. If matches() returns false, then those beans aren’t created.
For this example, you need to create an implementation of Condition that hinges its decision on the presence of a magic property in the environment. The next listing shows MagicExistsCondition, an implementation of Condition that does the trick.
Listing 3.5. Checking for the presence of magic in a Condition
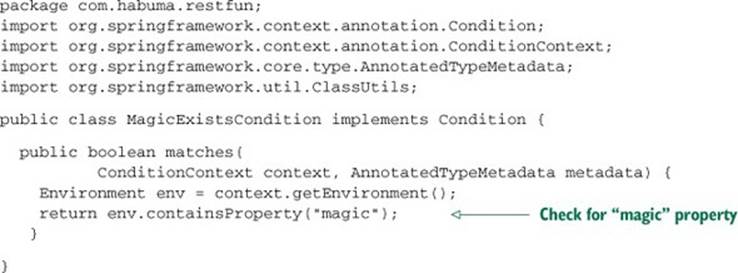
The matches() method in this listing is simple but powerful. It uses the Environment obtained from the given ConditionContext object to check for the presence of an environment property named magic. For this example, the value of the property is irrelevant; it only needs to exist. This results in true being returned from matches(). Consequently, the condition is met, and any beans whose @Conditional annotation refers to MagicExistsCondition will be created.
On the other hand, if the property doesn’t exist, the condition will fail, false will be returned from matches(), and none of those beans will be created.
MagicExistsCondition only uses the Environment from the ConditionContext, but there’s much more that a Condition implementation can consider. The matches() method is given a ConditionContext and an AnnotatedTypeMetadata to use in making its decision.
ConditionContext is an interface that looks something like this:
public interface ConditionContext {
BeanDefinitionRegistry getRegistry();
ConfigurableListableBeanFactory getBeanFactory();
Environment getEnvironment();
ResourceLoader getResourceLoader();
ClassLoader getClassLoader();
}
From the ConditionContext, you can do the following:
· Check for bean definitions via the BeanDefinitionRegistry returned from getRegistry().
· Check for the presence of beans, and even dig into bean properties via the ConfigurableListableBeanFactory returned from getBeanFactory().
· Check for the presence and values of environment variables via the Environment retrieved from getEnvironment().
· Read and inspect the contents of resources loaded via the ResourceLoader returned from getResourceLoader().
· Load and check for the presence of classes via the ClassLoader returned from getClassLoader().
As for the AnnotatedTypeMetadata, it offers you a chance to inspect annotations that may also be placed on the @Bean method. Like ConditionContext, Annotated-TypeMetadata is an interface. It looks like this:
public interface AnnotatedTypeMetadata {
boolean isAnnotated(String annotationType);
Map<String, Object> getAnnotationAttributes(String annotationType);
Map<String, Object> getAnnotationAttributes(
String annotationType, boolean classValuesAsString);
MultiValueMap<String, Object> getAllAnnotationAttributes(
String annotationType);
MultiValueMap<String, Object> getAllAnnotationAttributes(
String annotationType, boolean classValuesAsString);
}
Using the isAnnotated() method, you can check to see if the @Bean method is annotated with any particular annotation type. Using the other methods, you can check on the attributes of any annotation applied to the @Bean method.
Interestingly, starting with Spring 4, the @Profile annotation has been refactored to be based on @Conditional and the Condition interface. As another example of how to work with @Conditional and Condition, let’s look at how @Profile is implemented in Spring 4.
The @Profile annotation looks like this:
@Retention(RetentionPolicy.RUNTIME)
@Target({ElementType.TYPE, ElementType.METHOD})
@Documented
@Conditional(ProfileCondition.class)
public @interface Profile {
String[] value();
}
Notice that @Profile is itself annotated with @Conditional and refers to Profile-Condition as the Condition implementation. As shown next, ProfileCondition implements Condition and considers several factors from both ConditionContext andAnnotatedTypeMetadata in making its decision.
Listing 3.6. ProfileCondition checking whether a bean profile is acceptable
class ProfileCondition implements Condition {
public boolean matches(
ConditionContext context, AnnotatedTypeMetadata metadata) {
if (context.getEnvironment() != null) {
MultiValueMap<String, Object> attrs =
metadata.getAllAnnotationAttributes(Profile.class.getName());
if (attrs != null) {
for (Object value : attrs.get("value")) {
if (context.getEnvironment()
.acceptsProfiles(((String[]) value))) {
return true;
}
}
return false;
}
}
return true;
}
}
As you can see, ProfileCondition fetches all the annotation attributes for the @Profile annotation from AnnotatedTypeMetadata. With that, it checks explicitly for the value attribute, which contains the name of the bean’s profile. It then consults with the Environment retrieved from the ConditionContext to see whether the profile is active (by calling the acceptsProfiles() method).
3.3. Addressing ambiguity in autowiring
In chapter 2, you saw how to use autowiring to let Spring do all the work when injecting bean references into constructor arguments or properties. Autowiring is a huge help because it reduces the amount of explicit configuration necessary to assemble application components.
But autowiring only works when exactly one bean matches the desired result. When there’s more than one matching bean, the ambiguity prevents Spring from autowiring the property, constructor argument, or method parameter.
To illustrate autowiring ambiguity, suppose you’ve annotated the following set-Dessert() method with @Autowired:
@Autowired
public void setDessert(Dessert dessert) {
this.dessert = dessert;
}
In this example, Dessert is an interface and is implemented by three classes: Cake, Cookies, and IceCream:
@Component
public class Cake implements Dessert { ... }
@Component
public class Cookies implements Dessert { ... }
@Component
public class IceCream implements Dessert { ... }
Because all three implementations are annotated by @Component, they’re all picked up during component-scanning and created as beans in the Spring application context. Then, when Spring tries to autowire the Dessert parameter in setDessert(), it doesn’t have a single, unambiguous choice. Although most people wouldn’t have any problem making choices when faced with multiple dessert options, Spring can’t choose. Spring has no option but to fail and throw an exception. To be precise, Spring throws a NoUniqueBeanDefinitionException:
nested exception is
org.springframework.beans.factory.NoUniqueBeanDefinitionException:
No qualifying bean of type [com.desserteater.Dessert] is defined:
expected single matching bean but found 3: cake,cookies,iceCream
Of course, this dessert-eating example is contrived to illustrate how autowiring can run into trouble with ambiguity. In reality, autowiring ambiguity is more rare than you’d expect. Even though such ambiguity is a real problem, more often than not there’s only one implementation of a given type, and autowiring works perfectly.
For those times when ambiguity does happen, however, Spring offers a couple of options. You can declare one of the candidate beans as the primary choice, or you can use qualifiers to help Spring narrow its choices to a single candidate.
3.3.1. Designating a primary bean
If you’re like me, you enjoy all kinds of desserts. Cake ... cookies ... ice cream ... it’s all good. But if you were forced to choose only a single dessert, which is your favorite?
When declaring beans, you can avoid autowiring ambiguity by designating one of the candidate beans as a primary bean. In the event of any ambiguity, Spring will choose the primary bean over any other candidate beans. Essentially, you’re declaring your “favorite” bean.
Let’s say that ice cream is your favorite dessert. You can express that favorite choice in Spring using the @Primary annotation. @Primary can be used either alongside @Component for beans that are component-scanned or alongside @Bean for beans declared in Java configuration. For example, here’s how you might declare the @Component-annotated IceCream bean as the primary choice:
@Component
@Primary
public class IceCream implements Dessert { ... }
Or, if you’re declaring the IceCream bean explicitly in Java configuration, the @Bean method might look like this:
@Bean
@Primary
public Dessert iceCream() {
return new IceCream();
}
If you’re configuring your beans in XML, you’re not left out. The <bean> element has a primary attribute to specify a primary bean:
<bean id="iceCream"
class="com.desserteater.IceCream"
primary="true" />
No matter how you designate a primary bean, the effect is the same. You’re telling Spring that it should choose the primary bean in the case of ambiguity.
This works well right up to the point where you designate two or more primary beans. For example, suppose the Cake class looks like this:
@Component
@Primary
public class Cake implements Dessert { ... }
Now there are two primary Dessert beans: Cake and IceCream. This poses a new ambiguity issue. Just as Spring couldn’t choose among multiple candidate beans, it can’t choose among multiple primary beans. Clearly, when more than one bean is designated as primary, there are no primary candidates.
For a more powerful ambiguity-busting mechanism, let’s look at qualifiers.
3.3.2. Qualifying autowired beans
The limitation of primary beans is that @Primary doesn’t limit the choices to a single unambiguous option. It only designates a preferred option. When there’s more than one primary, there’s not much else you can do to narrow the choices further.
In contrast, Spring’s qualifiers apply a narrowing operation to all candidate beans, ultimately arriving at the single bean that meets the prescribed qualifications. If ambiguity still exists after applying all qualifiers, you can always apply more qualifiers to narrow the choices further.
The @Qualifier annotation is the main way to work with qualifiers. It can be applied alongside @Autowired or @Inject at the point of injection to specify which bean you want to be injected. For example, let’s say you want to ensure that the IceCream bean is injected intosetDessert():
@Autowired
@Qualifier("iceCream")
public void setDessert(Dessert dessert) {
this.dessert = dessert;
}
This is a prime example of qualifiers in their simplest form. The parameter given to @Qualifier is the ID of the bean that you want to inject. All @Component-annotated classes will be created as beans whose ID is the uncapitalized class name. Therefore, @Qualifier("iceCream")refers to the bean created when component-scanning created an instance of the IceCream class.
Actually, there’s a bit more to the story than that. To be more precise, @Qualifier ("iceCream") refers to the bean that has the String “iceCream” as a qualifier. For lack of having specified any other qualifiers, all beans are given a default qualifier that’s the same as their bean ID. Therefore, the setDessert() method will be injected with the bean that has “iceCream” as a qualifier. That just happens to be the bean whose ID is iceCream, created when the IceCream class was component-scanned.
Basing qualification on the default bean ID qualifier is simple but can pose some problems. What do you suppose would happen if you refactored the IceCream class, renaming it Gelato? In that case, the bean’s ID and default qualifier would be gelato, which doesn’t match the qualifier on setDessert(). Autowiring would fail.
The problem is that you specified a qualifier on setDessert() that is tightly coupled to the class name of the bean being injected. Any change to that class name will render the qualifier ineffective.
Creating custom qualifiers
Instead of relying on the bean ID as the qualifier, you can assign your own qualifier to a bean. All you need to do is place the @Qualifier annotation on the bean declaration. For example, it can be applied alongside @Component like this:
@Component
@Qualifier("cold")
public class IceCream implements Dessert { ... }
In this case, a qualifier of cold is assigned to the IceCream bean. Because it’s not coupled to the class name, you can refactor the name of the IceCream class all you want without worrying about breaking autowiring. It will work as long as you refer to the cold qualifier at the injection point:
@Autowired
@Qualifier("cold")
public void setDessert(Dessert dessert) {
this.dessert = dessert;
}
It’s worth noting that @Qualifier can also be used alongside the @Bean annotation when explicitly defining beans with Java configuration:
@Bean
@Qualifier("cold")
public Dessert iceCream() {
return new IceCream();
}
When defining custom @Qualifier values, it’s a good practice to use a trait or descriptive term for the bean, rather than using an arbitrary name. In this case, I’ve described the IceCream bean as a “cold” bean. At the injection point, it reads as “give me the cold dessert,” which happens to describe IceCream. Similarly, I might describe Cake as “soft” and Cookies as “crispy.”
Defining custom qualifier annotations
Trait-oriented qualifiers are better than those based on the bean ID. But they still run into trouble when you have multiple beans that share common traits. For example, imagine what would happen if you introduced this new Dessert bean:
@Component
@Qualifier("cold")
public class Popsicle implements Dessert { ... }
Oh no! Now you have two “cold” desserts. Once again you’re faced with ambiguity in autowiring dessert beans. You need more qualifiers to narrow the selection to a single bean.
Perhaps the solution is to tack on another @Qualifier at both the injection point and at the bean definition. Maybe the IceCream class could look like this:
@Component
@Qualifier("cold")
@Qualifier("creamy")
public class IceCream implements Dessert { ... }
Perhaps the Popsicle class could also use another @Qualifier:
@Component
@Qualifier("cold")
@Qualifier("fruity")
public class Popsicle implements Dessert { ... }
And at the injection point, you could narrow it down to IceCream like this:
@Autowired
@Qualifier("cold")
@Qualifier("creamy")
public void setDessert(Dessert dessert) {
this.dessert = dessert;
}
There’s only one small problem: Java doesn’t allow multiple annotations of the same type to be repeated on the same item.[1] The compiler will complain with errors if you try this. There’s no way you can use @Qualifier (at least not directly) to narrow the list of autowiring candidates to a single choice.
1 Java 8 allows repeated annotations, as long as the annotation is annotated with @Repeatable. Even so, Spring’s @Qualifier annotation isn’t annotated with @Repeatable.
What you can do, however, is create custom qualifier annotations to represent the traits you want your beans to be qualified with. All you have to do is create an annotation that is itself annotated with @Qualifier. Rather than use @Qualifier("cold"), you can use a custom @Coldannotation that’s defined like this:
@Target({ElementType.CONSTRUCTOR, ElementType.FIELD,
ElementType.METHOD, ElementType.TYPE})
@Retention(RetentionPolicy.RUNTIME)
@Qualifier
public @interface Cold { }
Likewise, you can create a new @Creamy annotation as a replacement for @Qualifier ("creamy"):
@Target({ElementType.CONSTRUCTOR, ElementType.FIELD,
ElementType.METHOD, ElementType.TYPE})
@Retention(RetentionPolicy.RUNTIME)
@Qualifier
public @interface Creamy { }
And, similarly, you can create @Soft, @Crispy, and @Fruity annotations to use wherever you’d otherwise use the @Qualifier annotation. By annotating these annotations with @Qualifier, they take on the characteristics of @Qualifier. They are, in fact, qualifier annotations in their own right.
Now you can revisit IceCream and annotate it with @Cold and @Creamy, like this:
@Component
@Cold
@Creamy
public class IceCream implements Dessert { ... }
Similarly, the Popsicle class can be annotated with @Cold and @Fruity:
@Component
@Cold
@Fruity
public class Popsicle implements Dessert { ... }
Finally, at the injection point, you can use any combination of qualifier annotations necessary to narrow the selection to the one bean that meets your specifications. To arrive at the IceCream bean, the setDessert() method can be annotated like this:
@Autowired
@Cold
@Creamy
public void setDessert(Dessert dessert) {
this.dessert = dessert;
}
By defining custom qualifier annotations, you’re able to use multiple qualifiers together with no limitations or complaints from the Java compiler. Also, your custom annotations are more type-safe than using the raw @Qualifier annotation and specifying the qualifier as a String.
Take a closer look at the setDessert() method and how it’s annotated. Nowhere do you explicitly say that you want that method to be autowired with the IceCream bean. Instead, you identify the desired bean by its traits, @Cold and @Creamy. Thus set-Dessert() remains decoupled from any specific Dessert implementation. Any bean that satisfies those traits will do fine. It just so happens that in your current selection of Dessert implementations, the IceCream bean is the single matching candidate.
In this section and the previous section, we explored a couple of ways to extend Spring with custom annotations. To create a custom conditional annotation, you create a new annotation and annotate it with @Conditional. And to create a custom qualifier annotation, you can create a new annotation and annotate it with @Qualifier. This technique can be applied using many of Spring’s annotations, composing them into custom special-purpose annotations.
Now let’s take a moment to see how you can declare beans to be created in different scopes.
3.4. Scoping beans
By default, all beans created in the Spring application context are created as singletons. That is to say, no matter how many times a given bean is injected into other beans, it’s always the same instance that is injected each time.
Most of the time, singleton beans are ideal. The cost of instantiating and garbage-collecting instances of objects that are only used for small tasks can’t be justified when an object is stateless and can be reused over and over again in an application.
But sometimes you may find yourself working with a mutable class that does maintain some state and therefore isn’t safe for reuse. In that case, declaring the class as a singleton bean probably isn’t a good idea because that object can be tainted and create unexpected problems when reused later.
Spring defines several scopes under which a bean can be created, including the following:
· Singleton —One instance of the bean is created for the entire application.
· Prototype —One instance of the bean is created every time the bean is injected into or retrieved from the Spring application context.
· Session —In a web application, one instance of the bean is created for each session.
· Request —In a web application, one instance of the bean is created for each request.
Singleton scope is the default scope, but as we’ve discussed, it isn’t ideal for mutable types. To select an alternative type, you can use the @Scope annotation, either in conjunction with the @Component annotation or with the @Bean annotation.
For example, if you’re relying on component-scanning to discover and declare a bean, then you can annotate the bean class with @Scope to make it a prototype bean:
@Component
@Scope(ConfigurableBeanFactory.SCOPE_PROTOTYPE)
public class Notepad { ... }
Here, you specify prototype scope by using the SCOPE_PROTOTYPE constant from the ConfigurableBeanFactory class. You could also use @Scope("prototype"), but using the SCOPE_PROTOTYPE constant is safer and less prone to mistakes.
Alternatively, if you’re configuring the Notepad bean as a prototype in Java configuration, you can use @Scope along with @Bean to specify the desired scoping:
@Bean
@Scope(ConfigurableBeanFactory.SCOPE_PROTOTYPE)
public Notepad notepad() {
return new Notepad();
}
And, in the event that you’re configuring the bean in XML, you can set the scope using the scope attribute of the <bean> element:
<bean id="notepad"
class="com.myapp.Notepad"
scope="prototype" />
Regardless of how you specify prototype scope, an instance of the bean will be created each and every time it’s injected into or retrieved from the Spring application context. Consequently, everyone gets their own instance of Notepad.
3.4.1. Working with request and session scope
In a web application, it may be useful to instantiate a bean that’s shared within the scope of a given request or session. For instance, in a typical e-commerce application, you may have a bean that represents the user’s shopping cart. If the shopping cart bean is a singleton, then all users will be adding products to the same cart. On the other hand, if the shopping cart is prototype-scoped, then products added to the cart in one area of the application may not be available in another part of the application where a different prototype-scoped shopping cart was injected.
In the case of a shopping cart bean, session scope makes the most sense, because it’s most directly attached to a given user. To apply session scope, you can use the @Scope annotation in a way similar to how you specified prototype scope:
@Component
@Scope(
value=WebApplicationContext.SCOPE_SESSION,
proxyMode=ScopedProxyMode.INTERFACES)
public ShoppingCart cart() { ... }
Here you’re setting the value attribute to the SCOPE_SESSION constant from Web-ApplicationContext (which has a value of session). This tells Spring to create an instance of the ShoppingCart bean for each session in a web application. There will be multiple instances of theShoppingCart bean, but only one will be created for a given session and it will essentially be a singleton as far as that session is concerned.
Notice that @Scope also has a proxyMode attribute set to ScopedProxyMode.INTERFACES. This attribute addresses a problem encountered when injecting a session- or request-scoped bean into a singleton-scoped bean. But before I explain proxyMode, let’s look at a scenario that presents the problem that proxyMode addresses.
Suppose you want to inject the ShoppingCart bean into the following setter method on a singleton StoreService bean:
@Component
public class StoreService {
@Autowired
public void setShoppingCart(ShoppingCart shoppingCart) {
this.shoppingCart = shoppingCart;
}
...
}
Because StoreService is a singleton bean, it will be created as the Spring application context is loaded. As it’s created, Spring will attempt to inject ShoppingCart into the setShoppingCart() method. But the ShoppingCart bean, being session scoped, doesn’t exist yet. There won’t be an instance of ShoppingCart until a user comes along and a session is created.
Moreover, there will be many instances of ShoppingCart: one per user. You don’t want Spring to inject just any single instance of ShoppingCart into StoreService. You want StoreService to work with the ShoppingCart instance for whichever session happens to be in play whenStoreService needs to work with the shopping cart.
Instead of injecting the actual ShoppingCart bean into StoreService, Spring should inject a proxy to the ShoppingCart bean, as illustrated in listing 3.2. This proxy will expose the same methods as ShoppingCart so that for all StoreService knows, it is the shopping cart. But when StoreService calls methods on ShoppingCart, the proxy will lazily resolve it and delegate the call to the actual session-scoped Shopping-Cart bean. See figure 3.1.
Figure 3.1. Scoped proxies enable deferred injection of request- and session-scoped beans.
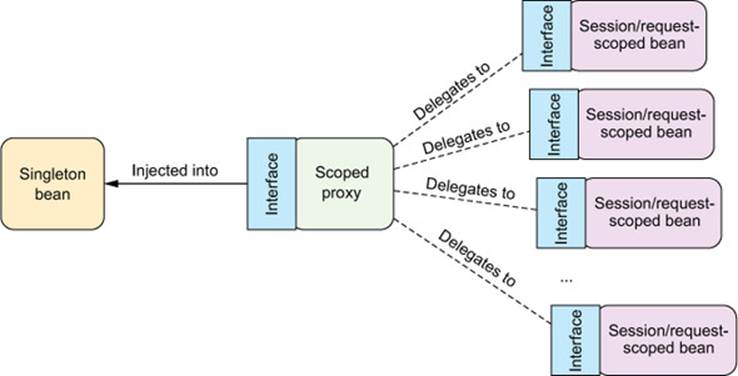
Now let’s take this understanding of scoped proxies and discuss the proxyMode attribute. As configured, proxyMode is set to ScopedProxyMode.INTERFACES, indicating that the proxy should implement the ShoppingCart interface and delegate to the implementation bean.
This is fine (and the most ideal proxy mode) as long as ShoppingCart is an interface and not a class. But if ShoppingCart is a concrete class, there’s no way Spring can create an interface-based proxy. Instead, it must use CGLib to generate a class-based proxy. So, if the bean type is a concrete class, you must set proxyMode to ScopedProxyMode.TARGET_CLASS to indicate that the proxy should be generated as an extension of the target class.
Although I’ve focused on session scope, know that request-scoped beans pose the same wiring challenges as session-scoped beans. Therefore, request-scoped beans should also be injected as scoped proxies.
3.4.2. Declaring scoped proxies in XML
If you’re declaring your session-scoped or request-scoped beans in XML, then you can’t use the @Scope annotation or its proxyMode attribute. The scope attribute of the <bean> element lets you set the bean scope, but how can you specify the proxy mode?
To set the proxy mode, you must use a new element from Spring’s aop namespace:
<bean id="cart"
class="com.myapp.ShoppingCart"
scope="session">
<aop:scoped-proxy />
</bean>
<aop:scoped-proxy> is the Spring XML configuration’s counterpart to the @Scope annotation’s proxyMode attribute. It tells Spring to create a scoped proxy for the bean. By default, it uses CGLib to create a target class proxy. But you can ask it to generate an interface-based proxy by setting the proxy-target-class attribute to false:
<bean id="cart"
class="com.myapp.ShoppingCart"
scope="session">
<aop:scoped-proxy proxy-target-class="false" />
</bean>
In order to use the <aop:scoped-proxy> element, you must declare Spring’s aop namespace in your XML configuration:
<?xml version="1.0" encoding="UTF-8"?>
<beans xmlns="http://www.springframework.org/schema/beans"
xmlns:xsi="http://www.w3.org/2001/XMLSchema-instance"
xmlns:aop="http://www.springframework.org/schema/aop"
xsi:schemaLocation="
http://www.springframework.org/schema/aop
http://www.springframework.org/schema/aop/spring-aop.xsd
http://www.springframework.org/schema/beans
http://www.springframework.org/schema/beans/spring-beans.xsd">
...
</beans>
We’ll talk more about Spring’s aop namespace in chapter 4 when you work with Spring and aspect-oriented programming. For now, let’s wrap up this chapter by looking at one more of Spring’s advanced wiring options: Spring Expression Language.
3.5. Runtime value injection
When we talk about dependency injection and wiring, we’re often talking about wiring a bean reference into a property or constructor argument of another bean. It’s often about associating one object with another object.
But another side to bean wiring is when you wire a value into a bean property or into its constructor as an argument. You did a lot of value wiring in chapter 2, such as wiring the name of an album into the constructor or title property of a BlankDisc bean. For example, you might have wired up a BlankDisc like this:
@Bean
public CompactDisc sgtPeppers() {
return new BlankDisc(
"Sgt. Pepper's Lonely Hearts Club Band",
"The Beatles");
}
Although this accomplished what you needed, setting the title and artist for the BlankDisc bean, it did so with values hard-coded in the configuration class. Likewise, if you had done this in XML, the values would have also been hard-coded:
<bean id="sgtPeppers"
class="soundsystem.BlankDisc"
c:_title="Sgt. Pepper's Lonely Hearts Club Band"
c:_artist="The Beatles" />
Sometimes hard-coded values are fine. Other times, however, you may want to avoid hard-coded values and let the values be determined at runtime. For those cases, Spring offers two ways of evaluating values at runtime:
· Property placeholders
· The Spring Expression Language (SpEL)
You’ll soon see that the application of these two techniques is similar, although their purposes and behavior are different. Let’s start with a look at property placeholders, the simpler of the two, and then dig into the more powerful SpEL.
3.5.1. Injecting external values
The simplest way to resolve external values in Spring is to declare a property source and retrieve the properties via the Spring Environment. For example, the following listing shows a basic Spring configuration class that uses external properties to wire up a BlankDisc bean.
Listing 3.7. Using the @PropertySource annotation and Environment
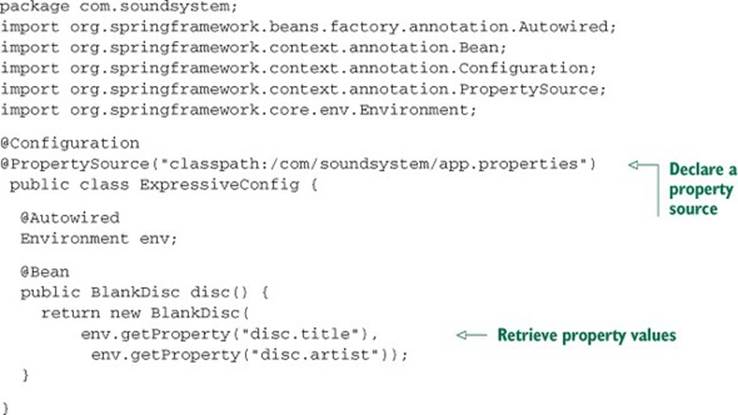
In this example, @PropertySource references a file named app.properties in the classpath. It might look something like this:
disc.title=Sgt. Peppers Lonely Hearts Club Band
disc.artist=The Beatles
This properties file is loaded into Spring’s Environment, from which it can be retrieved later. Meanwhile, in the disc() method, a new BlankDisc is created; its constructor arguments are resolved from the properties file by calling getProperty().
Digging into Spring’s Environment
While we’re on the subject of Environment, you might find it helpful to know that the getProperty() method shown in listing 3.7 isn’t the only method you can use to fetch a property value. getProperty() is overloaded into four variations:
· String getProperty(String key)
· String getProperty(String key, String defaultValue)
· T getProperty(String key, Class<T> type)
· T getProperty(String key, Class<T> type, T defaultValue)
The first two forms of getProperty() always return a String value. You saw how to use the first form in listing 3.7. But you can tweak the @Bean method slightly to work with default values if the specified properties don’t exist:
@Bean
public BlankDisc disc() {
return new BlankDisc(
env.getProperty("disc.title", "Rattle and Hum"),
env.getProperty("disc.artist", "U2"));
}
The second two forms of getProperty() work much like the first two, but they recognize that not all values may be Strings. For example, suppose you’re retrieving a value representing the number of connections to maintain in a connection pool. If you receive a String value from the properties file, then you’ll need to convert it to an Integer before you can use it. But using one of the overloaded getProperty() methods handles that conversion for you:
int connectionCount =
env.getProperty("db.connection.count", Integer.class, 30);
A few more property-related methods are offered by Environment. If you use either of the getProperty() methods without specifying a default value, you’ll receive null if the property isn’t defined. If you want to require that the property be defined, you can usegetRequiredProperty() like this:
@Bean
public BlankDisc disc() {
return new BlankDisc(
env.getRequiredProperty("disc.title"),
env.getRequiredProperty("disc.artist"));
}
Here, if either the disc.title property or the disc.artist property is undefined, an IllegalStateException will be thrown.
If you want to check for the existence of a property, you can call contains-Property() on Environment:
boolean titleExists = env.containsProperty("disc.title");
Finally, if you need to resolve a property into a Class, you can use the getProperty-AsClass() method:
Class<CompactDisc> cdClass =
env.getPropertyAsClass("disc.class", CompactDisc.class);
Digressing a bit from the subject of properties, Environment also offers some methods for checking which profiles are active:
· String[] getActiveProfiles() —Returns an array of active profile names
· String[] getDefaultProfiles() —Returns an array of default profile names
· boolean acceptsProfiles(String... profiles) —Returns true if the environment supports the given profile(s)
You saw how to use the acceptsProfiles() method in listing 3.6. In that case, Environment was retrieved from ConditionContext, and the acceptsProfiles() method was used to ensure that a given bean’s profile was in play before allowing the bean to be created. You often won’t need the profile-focused methods from Environment, but it’s good to know that they’re available.
Retrieving properties directly from Environment is handy, especially when you’re wiring beans in Java configuration. But Spring also offers the option of wiring properties with placeholder values that are resolved from a property source.
Resolving property placeholders
Spring has always supported the option of externalizing properties into a properties file and then plugging them into Spring beans using placeholder values. In Spring wiring, placeholder values are property names wrapped with ${ ... }. As an example, you can resolve the constructor arguments for a BlankDisc in XML like this:
<bean id="sgtPeppers"
class="soundsystem.BlankDisc"
c:_title="${disc.title}"
c:_artist="${disc.artist}" />
As shown here, the title constructor argument is given a value that’s resolved from the property whose name is disc.title. And the artist argument is wired with the value of the property whose name is disc.artist. In this way, the XML configuration doesn’t use any hard-coded values. Instead, the values are resolved from a source external to the configuration file. (We’ll talk about how those properties are resolved in a moment.)
When relying on component-scanning and autowiring to create and initialize your application components, there’s no configuration file or class where you can specify the placeholders. Instead, you can use the @Value annotation in much the same way as you might use the @Autowiredannotation. In the BlankDisc class, for example, the constructor might be written like this:
public BlankDisc(
@Value("${disc.title}") String title,
@Value("${disc.artist}") String artist) {
this.title = title;
this.artist = artist;
}
In order to use placeholder values, you must configure either a Property-Placeholder-Configurer bean or a PropertySourcesPlaceholderConfigurer bean. Starting with Spring 3.1, PropertySourcesPlaceholderConfigurer is preferred because it resolves placeholders against the Spring Environment and its set of property sources.
The following @Bean method configures PropertySourcesPlaceholder-Configurer in Java configuration:
@Bean
public
static PropertySourcesPlaceholderConfigurer placeholderConfigurer() {
return new PropertySourcesPlaceholderConfigurer();
}
If you’d rather use XML configuration, the <context:property-placeholder> element from Spring’s context namespace will give you a PropertySourcesPlaceholder-Configurer bean:
<?xml version="1.0" encoding="UTF-8"?>
<beans xmlns="http://www.springframework.org/schema/beans"
xmlns:xsi="http://www.w3.org/2001/XMLSchema-instance"
xmlns:context="http://www.springframework.org/schema/context"
xsi:schemaLocation="
http://www.springframework.org/schema/beans
http://www.springframework.org/schema/beans/spring-beans.xsd
http://www.springframework.org/schema/context
http://www.springframework.org/schema/context/spring-context.xsd">
<context:property-placeholder />
</beans>
Resolving external properties is one way to defer value resolution until runtime, but its focus is finely tuned on resolving properties, by name, from Spring’s Environment and property sources. Spring Expression Language, on the other hand, offers a more general way of calculating values for injection at runtime.
3.5.2. Wiring with the Spring Expression Language
Spring 3 introduced Spring Expression Language (SpEL), a powerful yet succinct way of wiring values into a bean’s properties or constructor arguments using expressions that are evaluated at runtime. Using SpEL, you can pull off amazing feats of bean wiring that would be much more difficult (or in some cases impossible) using other wiring techniques.
SpEL has a lot of tricks up its sleeves, including the following:
· The ability to reference beans by their IDs
· Invoking methods and accessing properties on objects
· Mathematical, relational, and logical operations on values
· Regular expression matching
· Collection manipulation
As you’ll see later in this book, SpEL can also be used for purposes other than dependency injection. Spring Security, for example, supports defining security constraints using SpEL expressions. And if you’re using Thymeleaf templates as the views in your Spring MVC application, those templates can use SpEL expressions to reference model data.
To get started, let’s consider a few examples of SpEL expressions and see how to wire them into beans. Then we’ll take a deeper dive into some of SpEL’s primitive expressions that can be pieced together into more powerful expressions.
A few SpEL examples
SpEL is such a flexible expression language that it would be impossible to show you all the ways it can be used in the space allowed in this book. But there is enough room to show you a few basic examples from which you can draw inspiration for your own expressions.
The first thing to know is that SpEL expressions are framed with #{ ... }, much as property placeholders are framed with ${ ... }. What follows is possibly one of the simplest SpEL expressions you can write:
#{1}
Stripping away the #{ ... } markers, what’s left is the body of a SpEL expression, which is a numeric constant. It probably won’t surprise you much to learn that this expression evaluates to the numeric value of 1.
Of course, you’re not likely to use such a simple expression in a real application. You’re more likely to build up more interesting expressions, such as this one:
#{T(System).currentTimeMillis()}
Ultimately this expression evaluates to the current time in milliseconds at the moment when the expression is evaluated. The T() operator evaluates java.lang.System as a type so that the staticcurrentTimeMillis() method can be invoked.
SpEL expressions can also refer to other beans or properties on those beans. For example, the following expression evaluates to the value of the artist property on a bean whose ID is sgtPeppers:
#{sgtPeppers.artist}
You can also refer to system properties via the systemProperties object:
#{systemProperties['disc.title']}
These are just a few basic examples of SpEL. You’ll see more before this chapter ends. But first, let’s consider how you might use these expressions during bean wiring.
When injecting properties and constructor arguments on beans that are created via component-scanning, you can use the @Value annotation, much as you saw earlier with property placeholders. Rather than use a placeholder expression, however, you use a SpEL expression. For example, here’s what the BlankDisc constructor might look like, drawing the album title and artist from system properties:
public BlankDisc(
@Value("#{systemProperties['disc.title']}") String title,
@Value("#{systemProperties['disc.artist']}") String artist) {
this.title = title;
this.artist = artist;
}
In XML configuration, you can pass in the SpEL expression to the value attribute of <property> or <constructor-arg>, or as the value given to a p-namespace or c-namespace entry. For example, here’s the XML declaration of the BlankDisc bean that has its constructor arguments set from a SpEL expression:
<bean id="sgtPeppers"
class="soundsystem.BlankDisc"
c:_title="#{systemProperties['disc.title']}"
c:_artist="#{systemProperties['disc.artist']}" />
Now that we’ve looked at a few simple examples and how to inject values resolved from SpEL expressions, let’s go over some of the primitive expressions supported in SpEL.
Expressing literal values
You’ve already seen an example of using SpEL to express a literal integer value. But it can also be used for floating-point numbers, String values, and Boolean values.
Here’s an example of a SpEL expression that is a floating-point value:
#{3.14159}
Numbers can also be expressed in scientific notation. For example, the following expression evaluates to 98,700:
#{9.87E4}
A SpEL expression can also evaluate literal String values, such as
#{'Hello'}
Finally, Boolean literals true and false are evaluated to their Boolean value. For example,
#{false}
Working with literal values in SpEL is mundane. After all, you don’t need SpEL to set an integer property to 1 or a Boolean property to false. I admit there’s not much use in SpEL expressions that only contain literal values. But remember that more interesting SpEL expressions are composed of simpler expressions, so it’s good to know how to work with literal values in SpEL. You’ll eventually need them as you compose more complex expressions.
Referencing beans, properties, and methods
Another basic thing that a SpEL expression can do is reference another bean by its ID. For example, you could use SpEL to wire one bean into another bean’s property by using the bean ID as the SpEL expression (in this case, a bean whose ID is sgtPeppers):
#{sgtPeppers}
Now let’s say that you want to refer to the artist property of the sgtPeppers bean in an expression:
#{sgtPeppers.artist}
The first part of the expression body refers to the bean whose ID is sgtPeppers. What follows the period delimiter is a reference to the artist property.
In addition to referencing a bean’s properties, you can also call methods on a bean. For example, suppose you have another bean whose ID is artistSelector. You can call that bean’s selectArtist() method in a SpEL expression like this:
#{artistSelector.selectArtist()}
You can also call methods on the value returned from the invoked method. For example, if selectArtist() returns a String, you can call toUpperCase() to make the entire artist name uppercase lettering:
#{artistSelector.selectArtist().toUpperCase()}
This will work fine, as long as selectArtist() doesn’t return null. To guard against a NullPointerException, you can use the type-safe operator:
#{artistSelector.selectArtist()?.toUpperCase()}
Instead of a lonely dot (.) to access the toUpperCase() method, now you’re using the ?. operator. This operator makes sure the item to its left isn’t null before accessing the thing on its right. So, if selectArtist() returns null, then SpEL won’t even try to invoke toUpperCase(). The expression will evaluate to null.
Working with types in expressions
The key to working with class-scoped methods and constants in SpEL is to use the T() operator. For example, to express Java’s Math class in SpEL, you need to use the T() operator like this:
T(java.lang.Math)
The result of the T() operator, as shown here, is a Class object that represents java.lang.Math. You can even wire it into a bean property of type Class, if you want. But the real value of the T() operator is that it gives you access to static methods and constants on the evaluated type.
For example, suppose you need to wire the value of pi into a bean property. The following SpEL expression does the trick:
T(java.lang.Math).PI
Similarly, static methods can be invoked in the type resolved with the T() operator. You’ve seen an example of using T() to make a call to System.currentTimeMillis(). Here’s another example that evaluates to a random value between 0 and 1:
T(java.lang.Math).random()
SpEL operators
SpEL offers several operators that you can apply on values in SpEL expressions. Table 3.1 summarizes these operators.
Table 3.1. SpEL operators for manipulating expression values
|
Operator type |
Operators |
|
Arithmetic |
+, -, *, /, %, ^ |
|
Comparison |
<, lt, >, gt, ==, eq, <=, le, >=, ge |
|
Logical |
and, or, not, | |
|
Conditional |
?: (ternary), ?: (Elvis) |
|
Regular expression |
matches |
As a simple example of using one of these operators, consider the following SpEL expression:
#{2 * T(java.lang.Math).PI * circle.radius}
Not only is this a great example of using SpEL’s multiplication operator (*), but it also shows how you can compose simpler expressions into a more complex expression. Here the value of pi is multiplied by 2, and that result is multiplied by the value of the radius property of a bean whose ID is circle. Essentially, it evaluates to the circumference of the circle defined in the circle bean.
Similarly, you can use the carat symbol (^) in an expression to calculate a circle’s area:
#{T(java.lang.Math).PI * circle.radius ^ 2}
The carat symbol is the power-of operator. In this case, it’s used to calculate the square of the circle’s radius.
When working with String values, the + operator performs concatenation, just as in Java:
#{disc.title + ' by ' + disc.artist}
SpEL also offers comparison operators for comparing values in an expression. Notice in table 3.1 that the comparison operators come in two forms: symbolic and textual. For the most part, the symbolic operators are equivalent to their textual counterparts, and you’re welcome to use whichever one suits you best.
For example, to compare two numbers for equality, you can use the double-equal (==) operator:
#{counter.total == 100}
Or you can use the textual eq operator:
#{counter.total eq 100}
Either way, the result is the same. The expression evaluates to a Boolean: true if counter.total is equal to 100 or false if it’s not.
SpEL also offers a ternary operator that works much like Java’s ternary operator. For example, the following expression evaluates to the String “Winner!” if scoreboard .score > 1000 or “Loser” if not:
#{scoreboard.score > 1000 ? "Winner!" : "Loser"}
A common use of the ternary operator is to check for a null value and offer a default value in place of the null. For example, the following expression evaluates to the value of disc.title if it isn’t null. If disc.title is null, then the expression evaluates to “Rattle and Hum”.
#{disc.title ?: 'Rattle and Hum'}
This expression is commonly referred to as the Elvis operator. This strange name comes from using the operator as an emoticon, where the question mark appears to form the shape of Elvis Presley’s hair style.[2]
2 Don’t blame me. I didn’t come up with that name. But you gotta admit—it does kinda look like Elvis’s hair.
Evaluating regular expressions
When working with text, it’s sometimes useful to check whether that text matches a certain pattern. SpEL supports pattern matching in expressions with its matches operator. The matches operator attempts to apply a regular expression (given as its right-side argument) against a Stringvalue (given as the left-side argument). The result of a matches evaluation is a Boolean value: true if the value matches the regular expression, and false otherwise.
To demonstrate, suppose you want to check whether a String contains a valid email address. In that case, you can apply matches like this:
#{admin.email matches '[a-zA-Z0-9._%+-]+@[a-zA-Z0-9.-]+\\.com'}
Exploring the mysteries of the enigmatic regular-expression syntax is outside the scope of this book. And I realize that the regular expression given here isn’t robust enough to cover all scenarios. But for the purposes of showing off the matches operator, it’ll have to suffice.
Evaluating collections
Some of SpEL’s most amazing tricks involve working with collections and arrays. The most basic thing you can do is reference a single element from a list:
#{jukebox.songs[4].title}
This evaluates to the title property of the fifth (zero-based) element from the songs collection property on the bean whose ID is jukebox.
To spice things up a bit, I suppose you could randomly select a song from the jukebox:
#{jukebox.songs[T(java.lang.Math).random() *
jukebox.songs.size()].title}
As it turns out, the [] operator used to fetch an indexed element from a collection or array can also be used to fetch a single character from a String. For example,
#{'This is a test'[3]}
This references the fourth (zero-based) character in the String, or s.
SpEL also offers a selection operator (.?[]) to filter a collection into a subset of the collection. As a demonstration, suppose you want a list of all songs in the jukebox where the artist property is Aerosmith. The following expression uses the selection operator to arrive at the list of available Aerosmith songs:
#{jukebox.songs.?[artist eq 'Aerosmith']}
As you can see, the selection operator accepts another expression within its square brackets. As SpEL iterates over the list of songs, it evaluates that expression for each entry in the songs collection. If the expression evaluates to true, then the entry is carried over into the new collection. Otherwise it’s left out of the new collection. In this case, the inner expression checks to see if the song’s artist property equals Aerosmith.
SpEL also offers two other selection operations: .^[] for selecting the first matching entry and .$[] for selecting the last matching entry. To demonstrate, consider this expression, which finds the first song in the list whose artist property is Aerosmith:
#{jukebox.songs.^[artist eq 'Aerosmith']}
Finally, SpEL offers a projection operator (.![]) to project properties from the elements in the collection onto a new collection. As an example, suppose you don’t want a collection of the song objects, but a collection of all the song titles. The following expression projects the titleproperty into a new collection of Strings:
#{jukebox.songs.![title]}
Naturally, the projection operator can be combined with any of SpEL’s other operators, including the selection operator. For example, you could use this expression to obtain a list of all of Aerosmith’s songs:
#{jukebox.songs.?[artist eq 'Aerosmith'].![title]}
We’ve only scratched the surface of what SpEL can do. There will be more opportunities to tinker with SpEL throughout this book, especially when defining security constraints.
For now, however, let me wrap up this discussion of SpEL with a warning. SpEL expressions are handy and powerful ways to dynamically inject values into Spring beans. It can be tempting to get crafty and write very involved expressions. But take care not to get too clever with your expressions. The more clever your expressions become, the more important it will be to test them. Ultimately, SpEL expressions are given as String values and can be difficult to test. For that reason, I encourage you to keep your expressions simple so that testing isn’t as big a concern.
3.6. Summary
We’ve covered a lot of ground in this chapter. In doing so, we’ve built on the foundational bean-wiring techniques explored in chapter 2 with some powerful advanced wiring tricks.
We started by using Spring profiles to address a common problem where Spring beans must vary across deployment environments. By resolving environment-specific beans at runtime by matching them against one or more active profiles, Spring makes it possible to deploy the same deployment unit across multiple environments without rebuilding.
Profiled beans are one way to conditionally create beans at runtime, but Spring 4 offers a more generic way to declare beans that are created (or not created) depending on the outcome of a given condition. The @Conditional annotation, paired with an implementation of Spring’sCondition interface, offers developers a powerful and flexible mechanism for conditionally creating beans.
We also looked at two techniques for resolving autowiring ambiguity: primary beans and qualifiers. Although designating a bean as a primary bean is simple, it’s also limited, so we discussed using qualifiers to narrow the list of autowire candidates to a single bean. In addition, you saw how to create custom qualifier annotations that describe a bean by its traits.
Although most Spring beans are created as singletons, there are times when other creation strategies are more appropriate. Out of the box, Spring allows beans to be created as singletons, prototypes, request-scoped, or session-scoped. When declaring request- or session-scoped beans, you also learned how to control the way scoped proxies are created, either as class-based proxies or interface-based proxies.
Finally, we looked at the Spring Expression Language, which gives you a way to resolve values to be injected into bean properties at runtime.
With a strong foundation in bean wiring established, we’ll now turn our attention to aspect-oriented programming (AOP). Much as dependency injection helps decouple components from the other components they collaborate with, AOP helps decouple your application components from tasks that span multiple components in an application. In the next chapter, we’ll dig into creating and working with aspects in Spring.
All materials on the site are licensed Creative Commons Attribution-Sharealike 3.0 Unported CC BY-SA 3.0 & GNU Free Documentation License (GFDL)
If you are the copyright holder of any material contained on our site and intend to remove it, please contact our site administrator for approval.
© 2016-2026 All site design rights belong to S.Y.A.