Spring in Action, 4th Edition: Covers Spring 4 (2015)
Part 1. Core Spring
Chapter 4. Aspect-oriented Spring
This chapter covers
· Basics of aspect-oriented programming
· Creating aspects from POJOs
· Using @AspectJ annotations
· Injecting dependencies into AspectJ aspects
As I’m writing this chapter, summertime is upon Texas (where I reside). And in Texas, it’s very common to go through several days of record-high temperatures. It’s hot. In weather like this, air conditioning is a must. But the downside of air conditioning is that it uses electricity, and electricity costs money. There’s little we can do to avoid paying for a cool and comfortable home. That’s because every home has a meter that measures every kilowatt, and once a month someone comes by to read that meter so that the electric company knows how much to bill us.
Now imagine what would happen if the meter went away and nobody came by to measure our electricity usage. Suppose it was up to each homeowner to contact the electric company and report their electricity usage. Although it’s possible that some obsessive homeowners would keep careful records of how much they used their lights, televisions, and air conditioning, most wouldn’t bother. Electricity on the honor system might be great for consumers, but it would be less than ideal for the electric companies.
Monitoring electricity consumption is an important function, but it isn’t foremost in most homeowners’ minds. Mowing the lawn, vacuuming the carpet, and cleaning the bathroom are the kinds of things that homeowners are actively involved in. Monitoring the amount of electricity used by their house is a passive event from the homeowner’s point of view. (Although it’d be great if mowing the lawn was also a passive event—especially on these hot days.)
Some functions of software systems are like the electric meters on our homes. The functions need to be applied at multiple points within the application, but it’s undesirable to explicitly call them at every point. Logging, security, and transaction management are important, but should they be activities that your application objects are actively participating in? Or would it be better for your application objects to focus on the business domain problems they’re designed for, and to leave certain aspects to be handled by someone else?
In software development, functions that span multiple points of an application are called cross-cutting concerns. Typically, these cross-cutting concerns are conceptually separate from (but often embedded directly within) the application’s business logic. Separating these cross-cutting concerns from the business logic is where aspect-oriented programming (AOP) goes to work.
In chapter 2, you learned how to use dependency injection to manage and configure application objects. Whereas DI helps you decouple application objects from each other, AOP helps you decouple cross-cutting concerns from the objects they affect.
Logging is a common example of the application of aspects, but it’s not the only thing aspects are good for. Throughout this book, you’ll see several practical applications of aspects, including declarative transactions, security, and caching.
This chapter explores Spring’s support for aspects, including how to declare regular classes to be aspects and how to use annotations to create aspects. In addition, you’ll see how AspectJ—another popular AOP implementation—can complement Spring’s AOP framework. But first, before we get carried away with transactions, security, and caching, let’s see how aspects are implemented in Spring, starting with a primer on a few of AOP’s fundamentals.
4.1. What is aspect-oriented programming?
As stated earlier, aspects help to modularize cross-cutting concerns. In short, a cross-cutting concern can be described as any functionality that affects multiple points of an application. Security, for example, is a cross-cutting concern, in that many methods in an application can have security rules applied to them. Figure 4.1 gives a visual depiction of cross-cutting concerns.
Figure 4.1. Aspects modularize cross-cutting concerns, applying logic that spans multiple application objects.
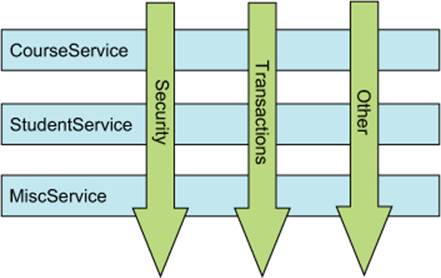
This figure represents a typical application that’s broken down into modules. Each module’s main concern is to provide services for its particular domain. But each module also requires similar ancillary functionality, such as security and transaction management.
A common object-oriented technique for reusing common functionality is to apply inheritance or delegation. But inheritance can lead to a brittle object hierarchy if the same base class is used throughout an application, and delegation can be cumbersome because complicated calls to the delegate object may be required.
Aspects offer an alternative to inheritance and delegation that can be cleaner in many circumstances. With AOP, you still define the common functionality in one place, but you can declaratively define how and where this functionality is applied without having to modify the class to which you’re applying the new feature. Cross-cutting concerns can now be modularized into special classes called aspects. This has two benefits. First, the logic for each concern is in one place, as opposed to being scattered all over the code base. Second, your service modules are cleaner because they only contain code for their primary concern (or core functionality), and secondary concerns have been moved to aspects.
4.1.1. Defining AOP terminology
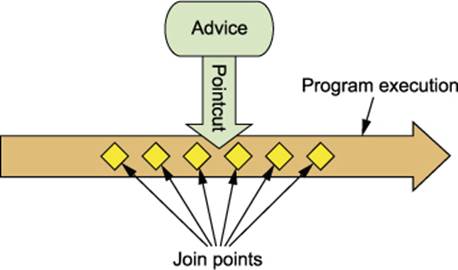
Like most technologies, AOP has its own jargon. Aspects are often described in terms of advice, pointcuts, and join points. Figure 4.2 illustrates how these concepts are tied together.
Figure 4.2. An aspect’s functionality (advice) is woven into a program’s execution at one or more join points.
Unfortunately, many of the terms used to describe AOP features aren’t intuitive. Nevertheless, they’re now part of the AOP idiom, and in order to understand AOP, you must know these terms. Before you walk the walk, you have to learn to talk the talk.
Advice
When a meter reader shows up at your house, his purpose is to report the number of kilowatt hours back to the electric company. Sure, he has a list of houses that he must visit, and the information he reports is important. But the actual act of recording electricity usage is the meter reader’s main job.
Likewise, aspects have a purpose—a job they’re meant to do. In AOP terms, the job of an aspect is called advice.
Advice defines both the what and the when of an aspect. In addition to describing the job that an aspect will perform, advice addresses the question of when to perform the job. Should it be applied before a method is invoked? After the method is invoked? Both before and after method invocation? Or should it be applied only if a method throws an exception?
Spring aspects can work with five kinds of advice:
· Before —The advice functionality takes place before the advised method is invoked.
· After —The advice functionality takes place after the advised method completes, regardless of the outcome.
· After-returning —The advice functionality takes place after the advised method successfully completes.
· After-throwing —The advice functionality takes place after the advised method throws an exception.
· Around —The advice wraps the advised method, providing some functionality before and after the advised method is invoked.
Join points
An electric company services several houses, perhaps even an entire city. Each house has an electric meter that needs to be read, so each house is a potential target for the meter reader. The meter reader could potentially read all kinds of devices, but to do her job, she needs to target electric meters that are attached to houses.
In the same way, your application may have thousands of opportunities for advice to be applied. These opportunities are known as join points. A join point is a point in the execution of the application where an aspect can be plugged in. This point could be a method being called, an exception being thrown, or even a field being modified. These are the points where your aspect’s code can be inserted into the normal flow of your application to add new behavior.
Pointcuts
It’s not possible for any one meter reader to visit all houses serviced by the electric company. Instead, each one is assigned a subset of all the houses to visit. Likewise, an aspect doesn’t necessarily advise all join points in an application. Pointcuts help narrow down the join points advised by an aspect.
If advice defines the what and when of aspects, then pointcuts define the where. A pointcut definition matches one or more join points at which advice should be woven. Often you specify these pointcuts using explicit class and method names or through regular expressions that define matching class and method name patterns. Some AOP frameworks allow you to create dynamic pointcuts that determine whether to apply advice based on runtime decisions, such as the value of method parameters.
Aspects
When a meter reader starts his day, he knows both what he’s supposed to do (report electricity usage) and which houses to collect that information from. Thus he knows everything he needs to know to get his job done.
An aspect is the merger of advice and pointcuts. Taken together, advice and pointcuts define everything there is to know about an aspect—what it does and where and when it does it.
Introductions
An introduction allows you to add new methods or attributes to existing classes. For example, you could create an Auditable advice class that keeps the state of when an object was last modified. This could be as simple as having one method, setLast-Modified(Date), and an instance variable to hold this state. The new method and instance variable can then be introduced to existing classes without having to change them, giving them new behavior and state.
Weaving
Weaving is the process of applying aspects to a target object to create a new proxied object. The aspects are woven into the target object at the specified join points. The weaving can take place at several points in the target object’s lifetime:
· Compile time —Aspects are woven in when the target class is compiled. This requires a special compiler. AspectJ’s weaving compiler weaves aspects this way.
· Class load time —Aspects are woven in when the target class is loaded into the JVM. This requires a special ClassLoader that enhances the target class’s bytecode before the class is introduced into the application. AspectJ 5’s load-time weaving (LTW) support weaves aspects this way.
· Runtime —Aspects are woven in sometime during the execution of the application. Typically, an AOP container dynamically generates a proxy object that delegates to the target object while weaving in the aspects. This is how Spring AOP aspects are woven.
That’s a lot of new terms to get to know. Revisiting figure 4.1, you can now see how advice contains the cross-cutting behavior that needs to be applied to an application’s objects. The join points are all the points within the execution flow of the application that are candidates to have advice applied. The pointcut defines where (at what join points) that advice is applied. The key concept you should take from this is that pointcuts define which join points get advised.
Now that you’re familiar with some basic AOP terminology, let’s see how these core AOP concepts are implemented in Spring.
4.1.2. Spring’s AOP support
Not all AOP frameworks are created equal. They may differ in how rich their join point models are. Some allow you to apply advice at the field-modification level, whereas others only expose the join points related to method invocations. They may also differ in how and when they weave the aspects. Whatever the case, the ability to create pointcuts that define the join points at which aspects should be woven is what makes it an AOP framework.
Because this is a Spring book, we’ll focus on Spring AOP. Even so, there’s a lot of synergy between the Spring and AspectJ projects, and the AOP support in Spring borrows a lot from the AspectJ project.
Spring’s support for AOP comes in four styles:
· Classic Spring proxy-based AOP
· Pure-POJO aspects
· @AspectJ annotation-driven aspects
· Injected AspectJ aspects (available in all versions of Spring)
The first three styles are all variations on Spring’s own AOP implementation. Spring AOP is built around dynamic proxies. Consequently, Spring’s AOP support is limited to method interception.
The term classic usually carries a good connotation. Classic cars, classic golf tournaments, and classic Coca-Cola are all good things. But Spring’s classic AOP programming model isn’t so great. Oh, it was good in its day. But now Spring supports much cleaner and easier ways to work with aspects. When held up against simple declarative AOP and annotation-based AOP, Spring’s classic AOP seems bulky and overcomplicated. Therefore, I won’t be covering classic Spring AOP.
With Spring’s aop namespace, you can turn pure POJOs into aspects. In truth, those POJOs will only supply methods that are called in reaction to a pointcut. Unfortunately, this technique requires XML configuration, but it’s an easy way to declaratively turn any object into an aspect.
Spring borrows AspectJ’s aspects to enable annotation-driven AOP. Under the covers, it’s still Spring’s proxy-based AOP, but the programming model is almost identical to writing full-blown AspectJ annotated aspects. The perk of this AOP style is that it can be done without any XML configuration.
If your AOP needs exceed simple method interception (constructor or property interception, for example), you’ll want to consider implementing aspects in AspectJ. In that case, the fourth style listed will enable you to inject values into AspectJ-driven aspects.
We’ll explore more of these Spring AOP techniques in this chapter. But before we get started, it’s important to understand a few key points of Spring’s AOP framework.
Spring advice is written in Java
All the advice you create in Spring is written in a standard Java class. That way, you get the benefit of developing your aspects in the same integrated development environment (IDE) you’d use for normal Java development. The pointcuts that define where advice should be applied may be specified with annotations or configured in a Spring XML configuration, but either will be familiar to Java developers.
Contrast this with AspectJ. Although AspectJ now supports annotation-based aspects, it also comes as a language extension to Java. This approach has benefits and drawbacks. By having an AOP-specific language, you get more power and fine-grained control, as well as a richer AOP toolset. But you’re required to learn a new tool and syntax to accomplish this.
Spring advises objects at runtime
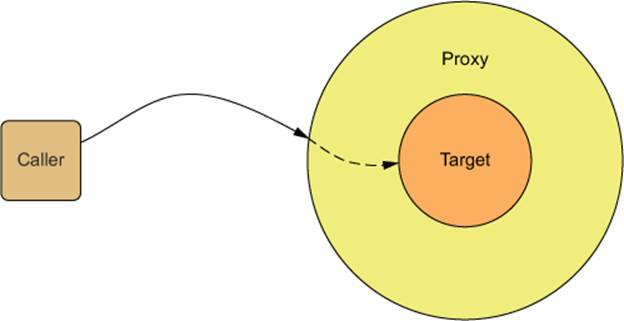
In Spring, aspects are woven into Spring-managed beans at runtime by wrapping them with a proxy class. As illustrated in figure 4.3, the proxy class poses as the target bean, intercepting advised method calls and forwarding those calls to the target bean. Between the time when the proxy intercepts the method call and the time when it invokes the target bean’s method, the proxy performs the aspect logic.
Figure 4.3. Spring aspects are implemented as proxies that wrap the target object. The proxy handles method calls, performs additional aspect logic, and then invokes the target method.
Spring doesn’t create a proxied object until that proxied bean is needed by the application. If you’re using an ApplicationContext, the proxied objects will be created when it loads all the beans from the BeanFactory. Because Spring creates proxies at runtime, you don’t need a special compiler to weave aspects in Spring’s AOP.
Spring only supports method join points
As mentioned earlier, multiple join-point models are available through various AOP implementations. Because it’s based on dynamic proxies, Spring only supports method join points. This is in contrast to some other AOP frameworks, such as AspectJ and JBoss, which provide field and constructor join points in addition to method pointcuts. Spring’s lack of field pointcuts prevents you from creating very fine-grained advice, such as intercepting updates to an object’s field. And without constructor pointcuts, there’s no way to apply advice when a bean is instantiated.
But method interception should suit most, if not all, of your needs. If you find yourself in need of more than method interception, you’ll want to complement Spring AOP with AspectJ.
Now you have a general idea of what AOP does and how it’s supported by Spring. It’s time to get your hands dirty creating aspects in Spring. Let’s start with Spring’s declarative AOP model.
4.2. Selecting join points with pointcuts
As mentioned before, pointcuts are used to pinpoint where an aspect’s advice should be applied. Along with an aspect’s advice, pointcuts are among the most fundamental elements of an aspect. Therefore, it’s important to know how to write pointcuts.
In Spring AOP, pointcuts are defined using AspectJ’s pointcut expression language. If you’re already familiar with AspectJ, then defining pointcuts in Spring should feel natural. But in case you’re new to AspectJ, this section will serve as a quick lesson on writing AspectJ-style pointcuts. For a more detailed discussion of AspectJ and AspectJ’s pointcut expression language, I strongly recommend Ramnivas Laddad’s AspectJ in Action, Second Edition (Manning, 2009, www.manning.com/laddad2/).
The most important thing to know about AspectJ pointcuts as they pertain to Spring AOP is that Spring only supports a subset of the pointcut designators available in AspectJ. Recall that Spring AOP is proxy-based, and certain pointcut expressions aren’t relevant to proxy-based AOP. Table 4.1 lists the AspectJ pointcut designators that are supported in Spring AOP.
Table 4.1. Spring uses AspectJ’s pointcut expression language to define Spring aspects.
|
AspectJ designator |
Description |
|
args() |
Limits join-point matches to the execution of methods whose arguments are instances of the given types |
|
@args() |
Limits join-point matches to the execution of methods whose arguments are annotated with the given annotation types |
|
execution() |
Matches join points that are method executions |
|
this() |
Limits join-point matches to those where the bean reference of the AOP proxy is of a given type |
|
target() |
Limits join-point matches to those where the target object is of a given type |
|
@target() |
Limits matching to join points where the class of the executing object has an annotation of the given type |
|
within() |
Limits matching to join points within certain types |
|
@within() |
Limits matching to join points within types that have the given annotation (the execution of methods declared in types with the given annotation when using Spring AOP) |
|
@annotation |
Limits join-point matches to those where the subject of the join point has the given annotation |
Attempting to use any of AspectJ’s other designators will result in an IllegalArgumentException being thrown.
As you browse through the supported designators, note that the execution designator is the only one that actually performs matches. The other designators are used to limit those matches. This means execution is the primary designator you’ll use in every pointcut definition you write. You’ll use the other designators to constrain the pointcut’s reach.
4.2.1. Writing pointcuts
To demonstrate aspects in Spring, you need something to be the subject of the aspect’s pointcuts. For that purpose, let’s define a Performance interface:
package concert;
public interface Performance {
public void perform();
}
Performance represents any kind of live performance, such as a stage play, a movie, or a concert. Let’s say that you want to write an aspect that triggers off Performance’s perform() method. Figure 4.4 shows a pointcut expression that can be used to apply advice whenever theperform() method is executed.
Figure 4.4. Selecting Performance's perform() method with an AspectJ pointcut expression
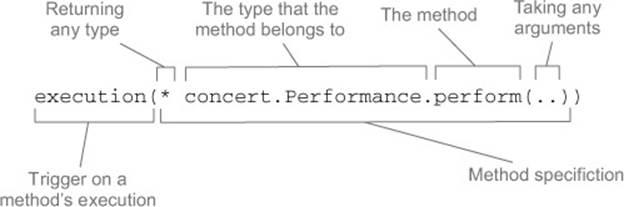
You use the execution() designator to select Performance’s perform() method. The method specification starts with an asterisk, which indicates that you don’t care what type the method returns. Then you specify the fully qualified class name and the name of the method you want to select. For the method’s parameter list, you use the double dot (..), indicating that the pointcut should select any perform() method, no matter what the argument list is.
Now let’s suppose that you want to confine the reach of that pointcut to only the concert package. In that case, you can limit the match by tacking on a within() designator, as shown in figure 4.5.
Figure 4.5. Limiting a pointcut’s reach by using the within() designator
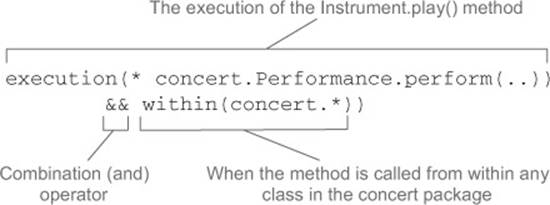
Note that you use the && operator to combine the execution() and within() designators in an “and” relationship (where both designators must match for the pointcut to match). Similarly, you could use the || operator to indicate an “or” relationship. And the ! operator can be used to negate the effect of a designator.
Because ampersands have special meaning in XML, you’re free to use and in place of && when specifying pointcuts in a Spring XML-based configuration. Likewise, or and not can be used in place of || and !, respectively.
4.2.2. Selecting beans in pointcuts
In addition to the designators listed in table 4.1, Spring adds a bean() designator that lets you identify beans by their ID in a pointcut expression. bean() takes a bean ID or name as an argument and limits the pointcut’s effect to that specific bean.
For example, consider the following pointcut:
execution(* concert.Performance.perform())
and bean('woodstock')
Here you’re saying that you want to apply aspect advice to the execution of Performance’s perform() method, but limited to the bean whose ID is woodstock.
Narrowing a pointcut to a specific bean may be valuable in some cases, but you can also use negation to apply an aspect to all beans that don’t have a specific ID:
execution(* concert.Performance.perform())
and !bean('woodstock')
In this case, the aspect’s advice will be woven into all beans whose ID isn’t woodstock.
Now that we’ve covered the basics of writing pointcuts, let’s see how to write the advice and declare the aspects that use those pointcuts.
4.3. Creating annotated aspects
A key feature introduced in AspectJ 5 is the ability to use annotations to create aspects. Prior to AspectJ 5, writing AspectJ aspects involved learning a Java language extension. But AspectJ’s annotation-oriented model makes it simple to turn any class into an aspect by sprinkling a few annotations around.
You’ve already defined the Performance interface as the subject of your aspect’s pointcuts. Now let’s use AspectJ annotations to create an aspect.
4.3.1. Defining an aspect
A performance isn’t a performance without an audience. Or is it? When you think about it from the perspective of a performance, an audience is important but isn’t central to the function of the performance itself; it’s a separate concern. Therefore, it makes sense to define the audience as an aspect that’s applied to a performance.
The following listing shows the Audience class that defines the aspect you’ll need.
Listing 4.1. Audience class: an aspect that watches a performance
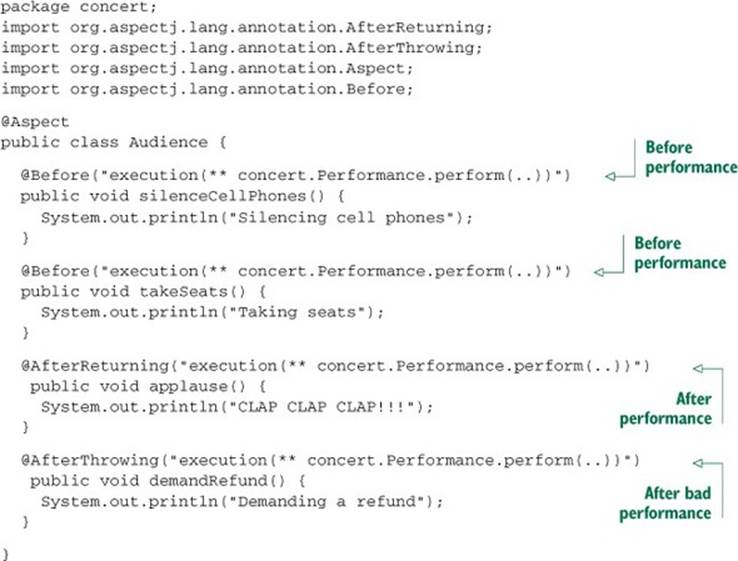
Notice how the Audience class is annotated with @Aspect. This annotation indicates that Audience isn’t just any POJO—it’s an aspect. And throughout the Audience class are methods that are annotated to define the specifics of the aspect.
Audience has four methods that define things an audience might do as it observes a performance. Before the performance, the audience should take their seats (takeSeats()) and silence their cell phones (silenceCellPhones()). If the performance goes well, the audience should applaud (applause()). But if the performance fails to meet the audience’s expectations, then the audience should demand a refund (demandRefund()).
As you can see, those methods are annotated with advice annotations to indicate when those methods should be called. AspectJ provides five annotations for defining advice, as listed in table 4.2.
Table 4.2. Spring uses AspectJ annotations to declare advice methods.
|
Annotation |
Advice |
|
@After |
The advice method is called after the advised method returns or throws an exception. |
|
@AfterReturning |
The advice method is called after the advised method returns. |
|
@AfterThrowing |
The advice method is called after the advised method throws an exception. |
|
@Around |
The advice method wraps the advised method. |
|
@Before |
The advice method is called before the advised method is called. |
The Audience class makes use of three out of the five advice annotations. The takeSeats() and silenceCellPhones() methods are both annotated with @Before, indicating that they should be called before a performance is performed. The applause() method is annotated with@AfterReturning so that it will be called after a performance returns successfully. And the @AfterThrowing annotation is placed on demandRefund() so that it will be called if any exceptions are thrown during a performance.
You’ve probably noticed that all of these annotations are given a pointcut expression as a value. And you may have noticed that it’s the same pointcut expression on all four methods. They could each be given a different pointcut expression, but this particular pointcut suits your needs for all the advice methods. Taking a closer look at the pointcut expression given to the advice annotations, you’ll see that it triggers on the execution of the perform() method on a Performance.
It’s a shame that you had to repeat that same pointcut expression four times. Duplication like this doesn’t feel right. It’d be nice if you could define the pointcut once and then reference it every time you need it.
Fortunately, there’s a way: the @Pointcut annotation defines a reusable pointcut within an @AspectJ aspect. The next listing shows the Audience aspect, updated to use @Pointcut.
Listing 4.2. Declaring a frequently used pointcut expression with @Pointcut
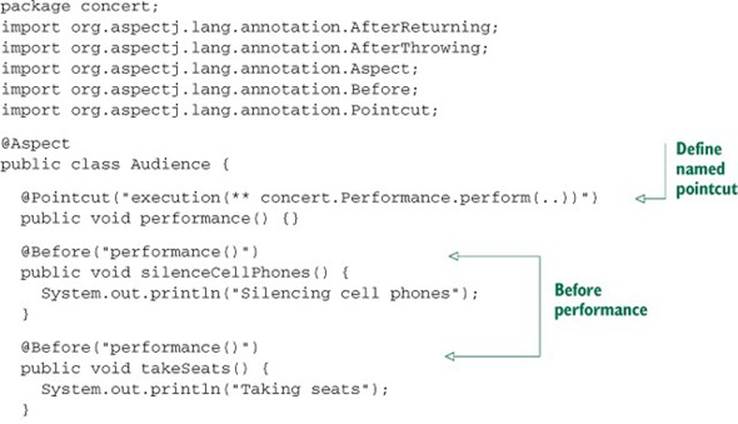
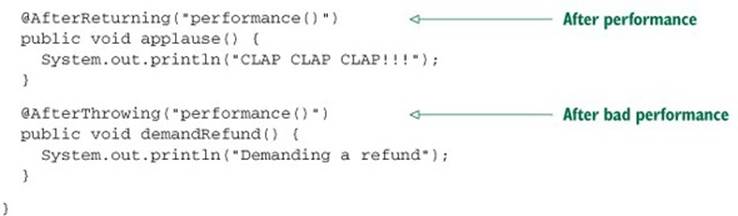
In Audience, the performance() method is annotated with @Pointcut. The value given to the @Pointcut annotation is a pointcut expression, just like the ones you used previously with the advice annotations. By annotating performance() with @Pointcut in this way, you essentially extend the pointcut expression language so that you can use performance() in your pointcut expressions anywhere you’d otherwise use the longer expression. As you can see, you replace the longer expression in all the advice annotations with performance().
The body of the performance() method is irrelevant and, in fact, should be empty. The method itself is just a marker, giving the @Pointcut annotation something to attach itself to.
Note that aside from the annotations and the no-op performance() method, the Audience class is essentially a POJO. Its methods can be called just like methods on any other Java class. Its methods can be individually unit-tested just as in any other Java class. Audience is just another Java class that happens to be annotated to be used as an aspect.
And, just like any other Java class, it can be wired as a bean in Spring:
@Bean
public Audience audience() {
return new Audience();
}
If you were to stop here, Audience would only be a bean in the Spring container. Even though it’s annotated with AspectJ annotations, it wouldn’t be treated as an aspect without something that interpreted those annotations and created the proxies that turn it into an aspect.
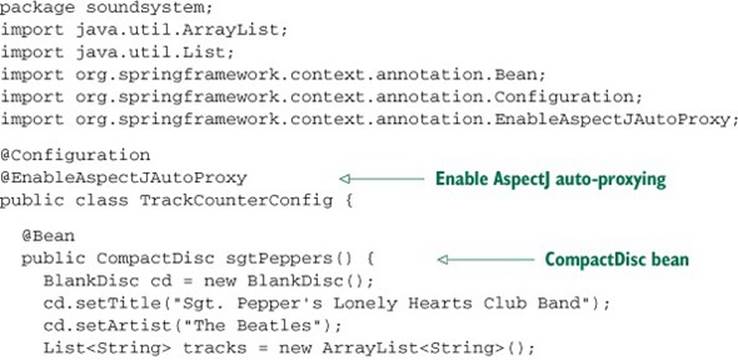
If you’re using JavaConfig, you can turn on auto-proxying by applying the @EnableAspectJAutoProxy annotation at the class level of the configuration class. The following configuration class shows how to enable auto-proxying in JavaConfig.
Listing 4.3. Enabling auto-proxying of AspectJ annotations in JavaConfig

If, however, you’re using XML to wire your beans in Spring, then you need to use the <aop:aspectj-autoproxy> element from Spring’s aop namespace. The XML configuration in the following listing shows how this is done.
Listing 4.4. Enabling AspectJ auto-proxying in XML using Spring’s aop namespace
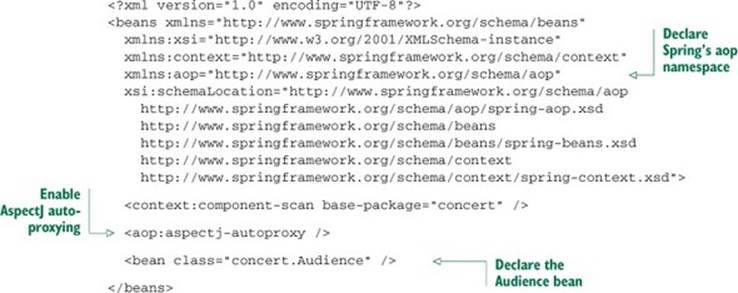
Whether you use JavaConfig or XML, AspectJ auto-proxying uses the @Aspect-annotated bean to create a proxy around any other beans for which the aspect’s pointcuts are a match. In this case, a proxy will be created for the Concert bean, with the advice methods in Audience being applied before and after the perform() method.
It’s important to understand that Spring’s AspectJ auto-proxying only uses @AspectJ annotations as a guide for creating proxy-based aspects. Under the covers, it’s still Spring’s proxy-based aspects. This is significant because it means that although you’re using @AspectJ annotations, you’re still limited to proxying method invocations. If you want to be able to exploit the full power of AspectJ, you’ll have to use the AspectJ runtime and not rely on Spring to create proxy-based aspects.
At this point, your aspect is defined using distinct advice methods for before and after advice. But table 4.2 mentions another kind of advice: around advice. Around advice is just different enough from the other advice types that it’s worth spending a moment seeing how to write it.
4.3.2. Creating around advice
Around advice is the most powerful advice type. It allows you to write logic that completely wraps the advised method. It’s essentially like writing both before advice and after advice in a single advice method.
To illustrate around advice, let’s rewrite the Audience aspect. This time you’ll use a single around advice method instead of distinct before and after advice methods.
Listing 4.5. Reimplementing the Audience aspect using around advice

Here the @Around annotation indicates that the watchPerformance() method is to be applied as around advice to the performance() pointcut. In this advice, the audience will silence their cell phones and take their seats before the performance and will applaud after the performance. And just like before, if an exception is thrown during the performance, the audience will ask for their money back.
As you can see, the effect of this advice is identical to what you did earlier with before and after advice. But here it’s all in a single advice method, whereas before it was spread across four distinct advice methods.
The first thing you’ll notice about this new advice method is that it’s given a ProceedingJoinPoint as a parameter. This object is necessary because it’s how you can invoke the advised method from within your advice. The advice method will do everything it needs to do; and when it’s ready to pass control to the advised method, it will call ProceedingJoinPoint’s proceed() method.
Note that it’s crucial that you remember to include a call to the proceed() method. If you don’t, then your advice will effectively block access to the advised method. Maybe that’s what you want, but chances are good that you do want the advised method to be executed at some point.
What’s also interesting is that just as you can omit a call to the proceed() method to block access to the advised method, you can also invoke it multiple times from within the advice. One reason for doing this may be to implement retry logic to perform repeated attempts on the advised method should it fail.
4.3.3. Handling parameters in advice
So far, your aspects have been simple, taking no parameters. The only exception is that the watchPerformance() method you wrote for the around advice example took a ProceedingJoinPoint as a parameter. Other than that, the advice you’ve written hasn’t bothered to look at any parameters passed to the advised methods. That’s been okay, though, because the perform() method you were advising didn’t take any parameters.
But what if your aspect was to advise a method that does take parameters? Could the aspect access the parameters that are passed into the method and use them?
To illustrate, let’s revisit the BlankDisc class from section 2.4.4. As it is, the play() method cycles through all the tracks and calls playTrack() for each track. But you could call the playTrack() method directly to play an individual track.
Suppose you want to keep a count of how many times each track is played. One way to do this is to change the playTrack() method to directly keep track of that count each time it’s called. But track-counting logic is a separate concern from playing a track and therefore doesn’t belong in the playTrack() method. This looks like a job for an aspect.
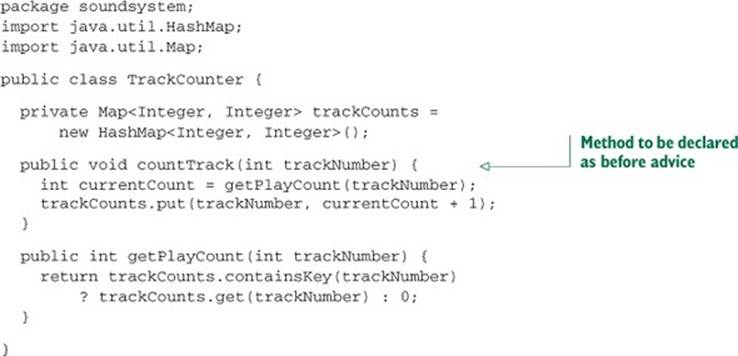
To keep a running count of how many times a track is played, let’s create Track-Counter, an aspect that advises playTrack(). The following listing shows just such an aspect.
Listing 4.6. Using parameterized advice to count how many times a track is played
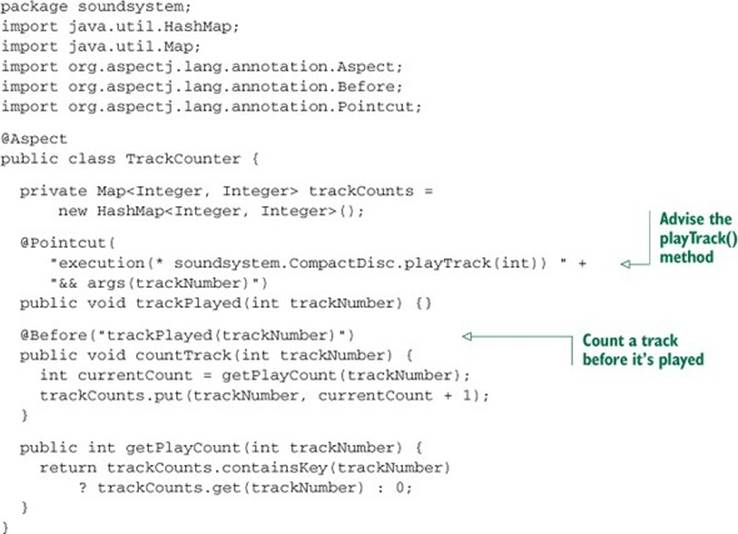
As with the other aspects you’ve created so far, this aspect uses @Pointcut to define a named pointcut and @Before to declare a method as supplying before advice. What’s different here, however, is that the pointcut also declares parameters to be supplied to the advice method. Figure 4.6breaks down the pointcut expression to show where the parameter is specified.
Figure 4.6. Declaring a parameter in a pointcut expression that’s to be passed into an advice method
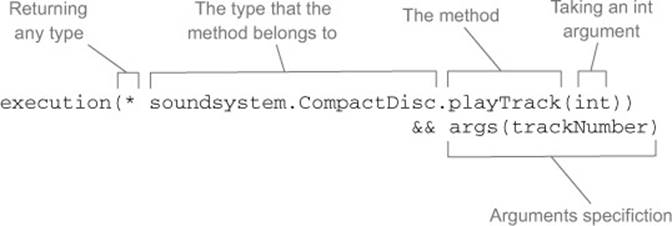
The thing to focus on in the figure is the args(trackNumber) qualifier in the pointcut expression. This indicates that any int argument that is passed into the execution of playTrack() should also be passed into the advice. The parameter name, trackNumber, also matches the parameter in the pointcut method signature.
That carries over into the advice method where the @Before annotation is defined with the named pointcut, trackPlayed(trackNumber). The parameter in the pointcut aligns with the parameter of the same name in the pointcut method, completing the path of the parameter from the named pointcut to the advice method.
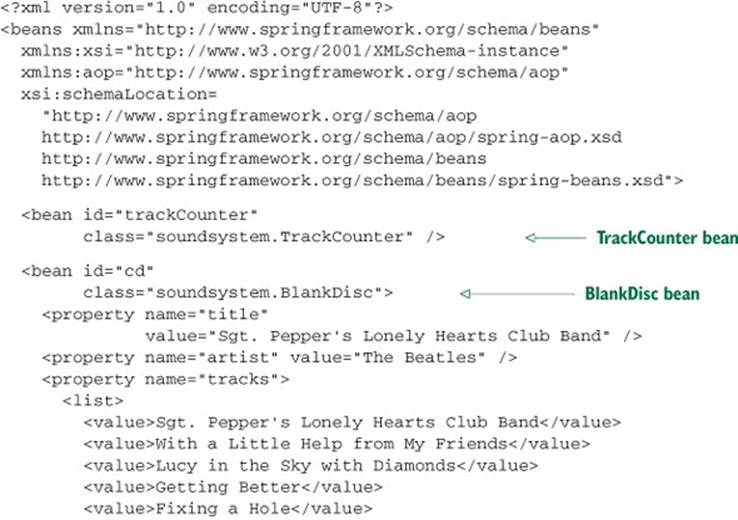
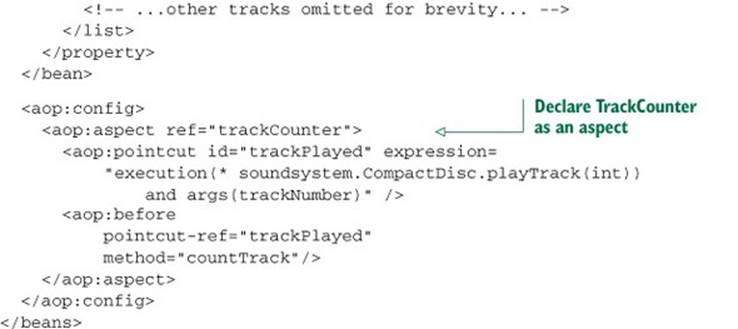
Now you can configure BlankDisc and TrackCounter as beans in the Spring configuration and enable AspectJ auto-proxying, as shown next.
Listing 4.7. Configuring TrackCounter to count the number of times a track is played
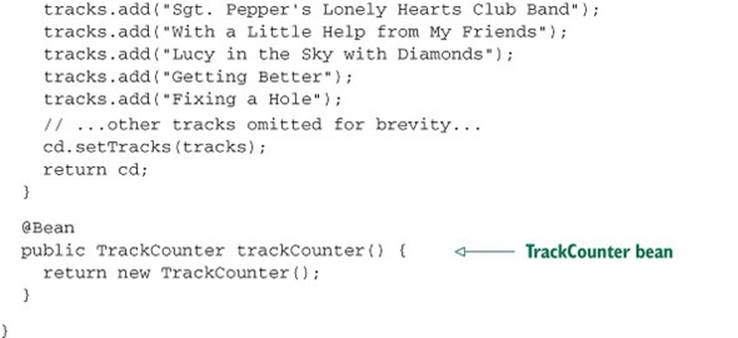
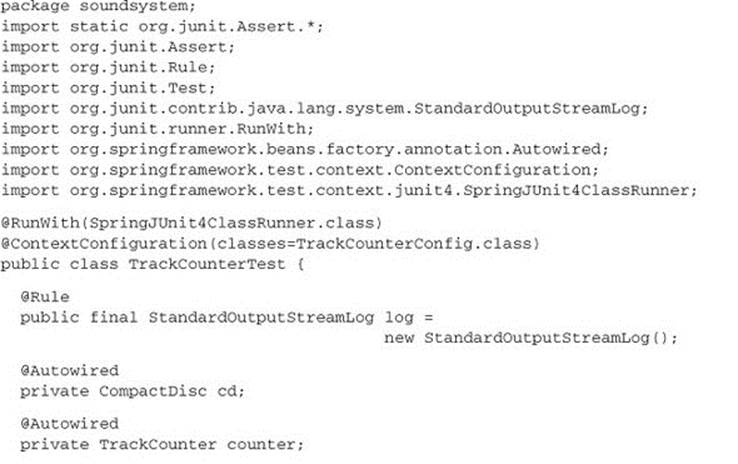
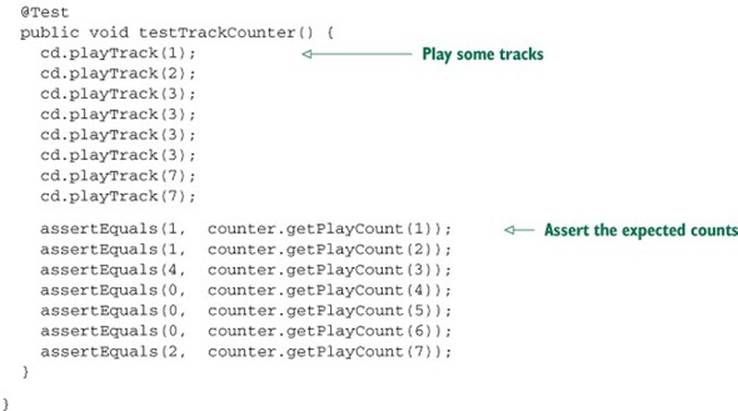
Finally, to prove that this all works, you can write the following simple test. It plays a few tracks and then asserts the play count through the TrackCounter bean.
Listing 4.8. Testing the TrackCounter aspect
The aspects you’ve worked with thus far wrap existing methods on the advised object. But method wrapping is just one of the tricks that aspects can perform. Let’s see how to write aspects that introduce completely new functionality into an advised object.
4.3.4. Annotating introductions
Some languages, such as Ruby and Groovy, have the notion of open classes. They make it possible to add new methods to an object or class without directly changing the definition of those objects or classes. Unfortunately, Java isn’t that dynamic. Once a class has been compiled, there’s little you can do to append new functionality to it.
But if you think about it, isn’t that what you’ve been doing in this chapter with aspects? Sure, you haven’t added any new methods to objects, but you’re adding new functionality around the methods that the objects already have. If an aspect can wrap existing methods with additional functionality, why not add new methods to the object? In fact, using an AOP concept known as introduction, aspects can attach new methods to Spring beans.
Recall that in Spring, aspects are proxies that implement the same interfaces as the beans they wrap. What if, in addition to implementing those interfaces, the proxy is also exposed through some new interface? Then any bean that’s advised by the aspect will appear to implement the new interface, even if its underlying implementation class doesn’t. Figure 4.7 illustrates how this works.
Figure 4.7. With Spring AOP, you can introduce new methods to a bean. A proxy intercepts the calls and delegates to a different object that provides the implementation.
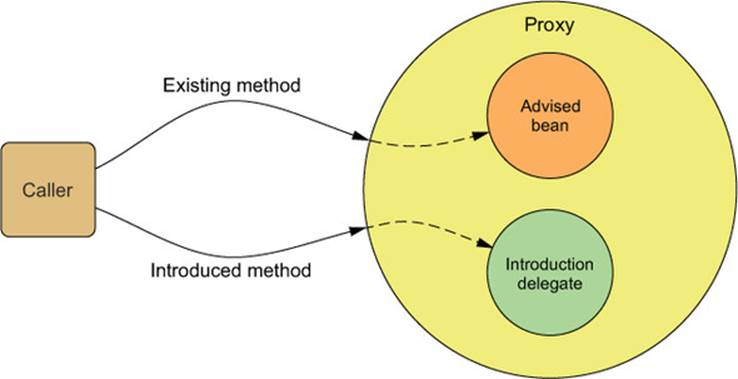
Notice that when a method on the introduced interface is called, the proxy delegates the call to some other object that provides the implementation of the new interface. Effectively, this gives you one bean whose implementation is split across multiple classes.
Putting this idea to work, let’s say you want to introduce the following Encoreable interface to any implementation of Performance:
package concert;
public interface Encoreable {
void performEncore();
}
Setting aside any debates as to whether Encoreable is a real word, you need a way to apply this interface to your Performance implementations. I suppose you could visit all implementations of Performance and change them so that they also implement Encoreable. But from a design standpoint, that may not be the best move. Not all Performances will necessarily be Encoreable. Moreover, it may not be possible to change all implementations of Performance, especially if you’re working with third-party implementations and don’t have the source code.
Fortunately, AOP introductions can help you without compromising design choices or requiring invasive changes to the existing implementations. To pull it off, you create a new aspect:
package concert;
import org.aspectj.lang.annotation.Aspect;
import org.aspectj.lang.annotation.DeclareParents;
@Aspect
public class EncoreableIntroducer {
@DeclareParents(value="concert.Performance+",
defaultImpl=DefaultEncoreable.class)
public static Encoreable encoreable;
}
As you can see, EncoreableIntroducer is an aspect. But unlike the aspects you’ve created so far, it doesn’t provide before, after, or around advice. Instead, it introduces the Encoreable interface to Performance beans using the @DeclareParents annotation.
The @DeclareParents annotation is made up of three parts:
· The value attribute identifies the kinds of beans that should be introduced with the interface. In this case, that’s anything that implements the Performance interface. (The plus sign at the end specifies any subtype of Performance, as opposed to Performance itself.)
· The defaultImpl attribute identifies the class that will provide the implementation for the introduction. Here you’re saying that DefaultEncoreable will provide that implementation.
· The static property that is annotated by @DeclareParents specifies the interface that’s to be introduced. In this case, you’re introducing the Encoreable interface.
As with any aspect, you need to declare EncoreableIntroducer as a bean in the Spring application context:
<bean class="concert.EncoreableIntroducer" />
Spring auto-proxying will take it from there. When Spring discovers a bean annotated with @Aspect, it will automatically create a proxy that delegates calls to either the proxied bean or to the introduction implementation, depending on whether the method called belongs to the proxied bean or to the introduced interface.
Annotations and auto-proxying provide a convenient programming model for creating aspects in Spring. It’s simple and involves only minimal Spring configuration. But annotation-oriented aspect declaration has one clear disadvantage: you must be able to annotate the advice class. And to do that, you must have the source code.
When you don’t have the source code, or if you don’t want to place AspectJ annotations in your code, Spring offers another option for aspects. Let’s see how you can declare aspects in a Spring XML configuration file.
4.4. Declaring aspects in XML
Early in this book, I established a preference for annotation-based configuration over Java-based configuration, and Java-based configuration over XML configuration. But if you need to declare aspects without annotating the advice class, then you must turn to XML configuration.
Spring’s aop namespace offers several elements that are useful for declaring aspects in XML, as described in table 4.3.
Table 4.3. Spring’s AOP configuration elements enable non-invasive declaration of aspects.
|
AOP configuration element |
Purpose |
|
<aop:advisor> |
Defines an AOP advisor. |
|
<aop:after> |
Defines an AOP after advice (regardless of whether the advised method returns successfully). |
|
<aop:after-returning> |
Defines an AOP after-returning advice. |
|
<aop:after-throwing> |
Defines an AOP after-throwing advice. |
|
<aop:around> |
Defines an AOP around advice. |
|
<aop:aspect> |
Defines an aspect. |
|
<aop:aspectj-autoproxy> |
Enables annotation-driven aspects using @AspectJ. |
|
<aop:before> |
Defines an AOP before advice. |
|
<aop:config> |
The top-level AOP element. Most \<aop:\*\> elements must be contained within \<aop:config\>. |
|
<aop:declare-parents> |
Introduces additional interfaces to advised objects that are transparently implemented. |
|
<aop:pointcut> |
Defines a pointcut. |
You’ve already seen the <aop:aspectj-autoproxy> element and how it can enable auto-proxying of AspectJ-annotated advice classes. But the other elements in the aop namespace let you declare aspects directly in your Spring configuration without using annotations.
For example, let’s have another look at the Audience class. This time, let’s remove all of those AspectJ annotations:
package concert;
public class Audience {
public void silenceCellPhones() {
System.out.println("Silencing cell phones");
}
public void takeSeats() {
System.out.println("Taking seats");
}
public void applause() {
System.out.println("CLAP CLAP CLAP!!!");
}
public void demandRefund() {
System.out.println("Demanding a refund");
}
}
As you can see, without the AspectJ annotations, there’s nothing remarkable about the Audience class. It’s a basic Java class with a handful of methods. And you can register it as a bean in the Spring application context like any other class.
Despite its unassuming appearance, what’s remarkable about Audience is that it has all the makings of AOP advice. It just needs a little help to become the advice it’s meant to be.
4.4.1. Declaring before and after advice
You could put back all the AspectJ annotations, but that isn’t the point of this section. Instead, you’ll use some of the elements from Spring’s aop namespace to turn the annotation-free Audience into an aspect. The next listing shows the XML you need.
Listing 4.9. Annotation-free Audience class, declared in XML as an aspect
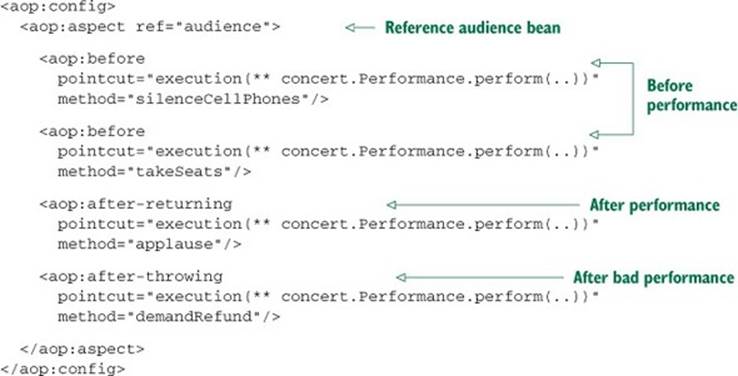
The first thing to notice about the Spring AOP configuration elements is that most of them must be used in the context of the <aop:config> element. There are a few exceptions to this rule, but when it comes to declaring beans as aspects, you’ll always start with <aop:config>.
In <aop:config>, you may declare one or more advisers, aspects, or pointcuts. In listing 4.9, you declare a single aspect using the <aop:aspect> element. The ref attribute references the POJO bean that will be used to supply the functionality of the aspect—in this case, audience. The bean that’s referenced by the ref attribute will supply the methods called by any advice in the aspect.
It’s worth noting that the referenced advice bean can be any type that provides methods to be called at the designated pointcuts. This makes Spring’s XML configuration for AOP a handy way to use types defined in third-party libraries as advice, even though you can’t annotate them with AspectJ aspects.
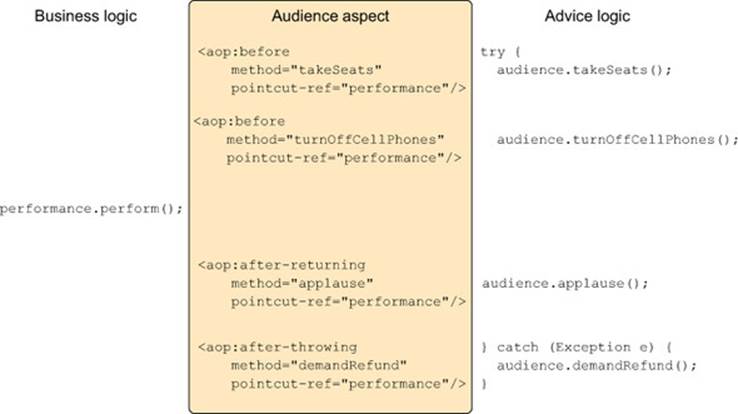
The aspect has four different bits of advice. The two <aop:before> elements define before advice that will call the takeSeats() and silenceCellPhones() methods (declared by the method attribute) of the Audience bean before any methods matching the pointcut are executed. The <aop:after-returning> element defines after-returning advice to call the applause() method after the pointcut. Meanwhile, the <aop:after-throwing> element defines an after-throwing advice to call the demandRefund() method if any exceptions are thrown. Figure 4.8shows how the advice logic is woven into the business logic.
Figure 4.8. The Audience aspect includes four bits of advice that weave advice logic around methods that match the aspect’s pointcut.
In all advice elements, the pointcut attribute defines the pointcut where the advice will be applied. The value given to the pointcut attribute is a pointcut defined in AspectJ’s pointcut expression syntax.
You’ve probably noticed that the value of the pointcut attribute is the same for all the advice elements. That’s because all the advice is being applied to the same pointcut.
When you found the same kind of duplication in your AspectJ-annotated advice, you eliminated it by using the @Pointcut annotation. For XML-based aspect declarations, however, you’ll need to use the <aop:pointcut> element. The following XML shows how to extract the common pointcut expression into a single pointcut declaration that can be used across all advice elements.
Listing 4.10. Defining a named pointcut with <aop:pointcut>

Now the pointcut is defined in a single location and is referenced across multiple advice elements. The <aop:pointcut> element defines the pointcut to have an id of performance. Meanwhile, all the advice elements have been changed to reference the named pointcut with thepointcut-ref attribute.
As used in listing 4.10, the <aop:pointcut> element defines a pointcut that can be referenced by all advice in the same <aop:aspect> element. But you can also define pointcuts that can be used across multiple aspects by placing the <aop:pointcut> elements within the scope of the<aop:config> element.
4.4.2. Declaring around advice
The current implementation of Audience works great. But basic before and after advice have some limitations. Specifically, it’s tricky to share information between before advice and after advice without resorting to storing that information in member variables.
For example, suppose that in addition to putting away cell phones and applauding at the end, you also want the audience to keep their eyes on their watches and report how long the performance takes. The only way to accomplish this with before and after advice is to note the start time in before advice and report the length of time in after advice. But you’d have to store the start time in a member variable. Because Audience is a singleton, it wouldn’t be thread-safe to retain state like that.
Around advice has an advantage over before and after advice in this regard. With around advice, you can accomplish the same thing you could with distinct before and after advice, but you can do it in a single method. Because the entire set of advice takes place in a single method, there’s no need to retain state in a member variable.
For example, consider the new annotation-free Audience class with a single watchPerformance() method.
Listing 4.11. Providing around advice with the watchPerformance() method
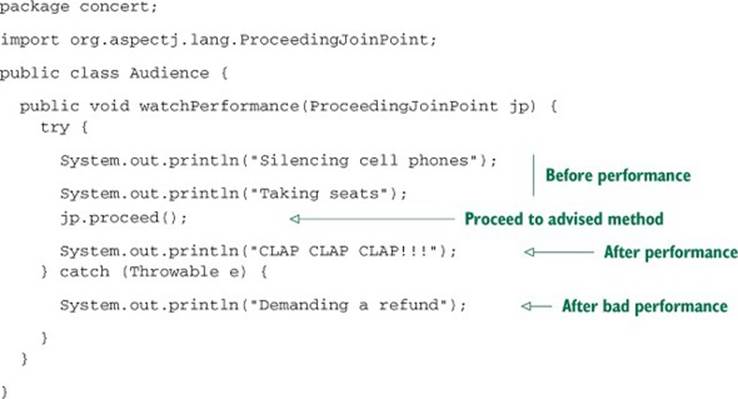
In the case of the audience aspect, the watchPerformance() method contains all the functionality of the previous four advice methods. But all of it is contained in this single method, and this method is responsible for its own exception handling.
Declaring around advice isn’t dramatically different from declaring other types of advice. All you need to do is use the <aop:around> element, as shown next.
Listing 4.12. Declaring around advice in XML with the <aop:around> element
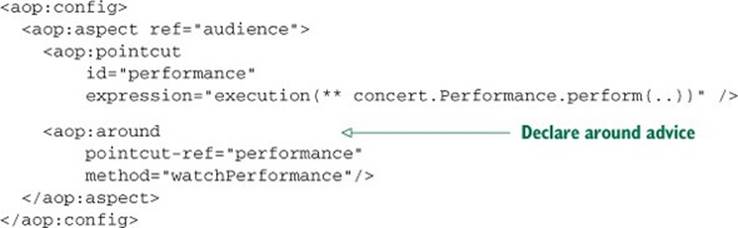
As with the other advice XML elements, <aop:around> is given a pointcut and the name of an advice method. Here you’re using the same pointcut as before, but you set the method attribute to point to the new watchPerformance() method.
4.4.3. Passing parameters to advice
In section 4.3.3, you used AspectJ annotations to create an aspect that kept a running count of the number of times tracks were played on a CompactDisc. Now that you’re configuring your aspects in XML, let’s see how you can accomplish the same thing.
First, let’s strip all the @AspectJ annotations out of the TrackCounter.
Listing 4.13. Annotation-free TrackCounter
Without the AspectJ annotations, TrackCounter seems kind of bare. And as it stands now, TrackCounter won’t count any tracks unless you explicitly call the countTrack() method. But with a little XML Spring configuration, you can reinstate TrackCounter’s status as an aspect.
The following listing shows the complete Spring configuration that declares both the TrackCounter bean and the BlankDisc bean and enables TrackCounter as an aspect.
Listing 4.14. Configuring TrackCounter as a parameterized aspect in XML
As you can see, you’re using the same XML elements from the aop namespace as before; they declare a POJO to be treated as an aspect. The only significant difference is that your pointcut expression now includes a parameter to be passed into the advice method. If you compare this expression with the one from listing 4.6, you’ll see that they’re almost identical. The only real difference is that here you use the and keyword instead of && (because ampersands are interpreted as the beginning of an entity in XML).
Now that you’ve exercised Spring’s aop namespace to declare a few basic aspects in XML, let’s see how the aop namespace can help you declare introduction aspects.
4.4.4. Introducing new functionality with aspects
Earlier, in section 4.3.4, I showed you how to use AspectJ’s @DeclareParents annotation to magically introduce a new method into an advised bean. But AOP introductions aren’t exclusive to AspectJ. Using the <aop:declare-parents> element from Spring’s aop namespace, you can do similar magic in XML.
The following snippet of XML is equivalent to the AspectJ-based introduction you created earlier:
<aop:aspect>
<aop:declare-parents
types-matching="concert.Performance+"
implement-interface="concert.Encoreable"
default-impl="concert.DefaultEncoreable"
/>
</aop:aspect>
As its name implies, <aop:declare-parents> declares that the beans it advises will have new parents in its object hierarchy. Specifically, in this case you’re saying that the beans whose type matches the Performance interface (per the types-matching attribute) should haveEncoreable in their parentage (per the implement-interface attribute). The final matter to settle is where the implementation of the Encoreable’s methods will come from.
There are two ways to identify the implementation of the introduced interface. In this case, you’re using the default-impl attribute to explicitly identify the implementation by its fully qualified class name. Alternatively, you could identify it using the delegate-ref attribute:
<aop:aspect>
<aop:declare-parents
types-matching="concert.Performance+"
implement-interface="concert.Encoreable"
delegate-ref="encoreableDelegate"
/>
</aop:aspect>
The delegate-ref attribute refers to a Spring bean as the introduction delegate. This assumes that a bean with an ID of encoreableDelegate exists in the Spring context:
<bean id="encoreableDelegate"
class="concert.DefaultEncoreable" />
The difference between directly identifying the delegate using default-impl and indirectly using delegate-ref is that the latter will be a Spring bean that itself may be injected, advised, or otherwise configured through Spring.
4.5. Injecting AspectJ aspects
Although Spring AOP is sufficient for many applications of aspects, it’s a weak AOP solution when contrasted with AspectJ. AspectJ offers many types of pointcuts that aren’t possible with Spring AOP.
Constructor pointcuts, for example, are convenient when you need to apply advice on the creation of an object. Unlike constructors in some other object-oriented languages, Java constructors are different from normal methods. This makes Spring’s proxy-based AOP woefully inadequate for advising the creation of an object.
For the most part, AspectJ aspects are independent of Spring. Although they can be woven into any Java-based application, including Spring applications, there’s little involvement on Spring’s part in applying AspectJ aspects.
But any well-designed and meaningful aspect will likely depend on other classes to assist in its work. If an aspect depends on one or more classes when executing its advice, you can instantiate those collaborating objects with the aspect itself. Or, better yet, you can use Spring’s dependency injection to inject beans into AspectJ aspects.
To illustrate, let’s create a new aspect for performances. Specifically, let’s create an aspect that plays the role of a critic who watches a performance and provides a critical review afterward. CriticAspect is such an aspect.
Listing 4.15. Implementing a performance critic using AspectJ
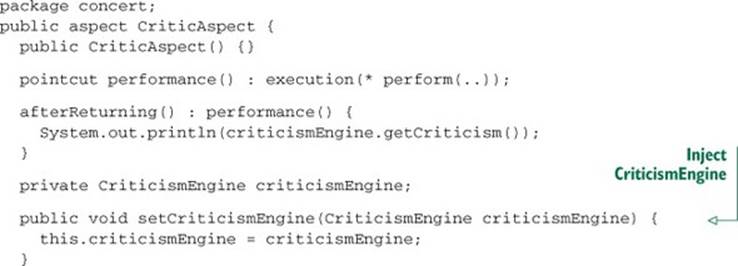
}
The chief responsibility for CriticAspect is to comment on a performance after the performance has completed. The performance() pointcut in listing 4.15 matches the perform() method. When it’s married with the afterReturning() advice, you get an aspect that reacts to the completion of a performance.
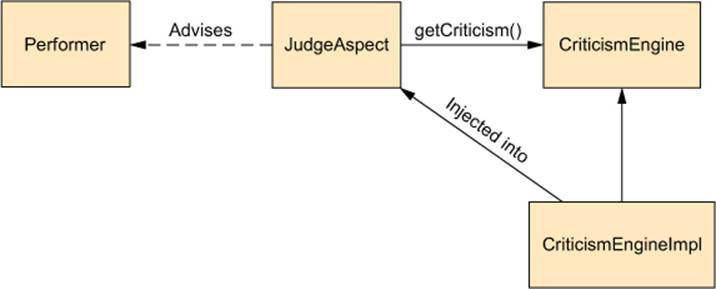
What makes listing 4.15 interesting is that the critic doesn’t make commentary on its own. Instead, CriticAspect collaborates with a CriticismEngine object, calling its getCriticism() method, to produce critical commentary after a performance. To avoid unnecessary coupling between CriticAspect and CriticismEngine, Critic-Aspect is given a reference to CriticismEngine through setter injection. This relationship is illustrated in figure 4.9.
Figure 4.9. Aspects need injection, too. Spring can inject AspectJ aspects with dependencies just as if they were another bean.
CriticismEngine is an interface that declares a simple getCriticism() method. The next listing shows the implementation of CriticismEngine.
Listing 4.16. CriticismEngine to be injected into CriticAspect
package com.springinaction.springidol;
public class CriticismEngineImpl implements CriticismEngine {
public CriticismEngineImpl() {}
public String getCriticism() {
int i = (int) (Math.random() * criticismPool.length);
return criticismPool[i];
}
// injected
private String[] criticismPool;
public void setCriticismPool(String[] criticismPool) {
this.criticismPool = criticismPool;
}
}
CriticismEngineImpl implements the CriticismEngine interface by randomly choosing a critical comment from a pool of injected criticisms. This class can be declared as a Spring <bean> using the following XML:
<bean id="criticismEngine"
class="com.springinaction.springidol.CriticismEngineImpl">
<property name="criticisms">
<list>
<value>Worst performance ever!</value>
<value>I laughed, I cried, then I realized I was at the
wrong show.</value>
<value>A must see show!</value>
</list>
</property>
</bean>
So far, so good. You now have a CriticismEngine implementation to give to Critic-Aspect. All that’s left is to wire CriticismEngineImpl into CriticAspect.
Before I show you how to do the injection, you should know that AspectJ aspects can be woven into your application without involving Spring at all. But if you want to use Spring’s dependency injection to inject collaborators into an AspectJ aspect, you’ll need to declare the aspect as a<bean> in Spring’s configuration. The following <bean> declaration injects the criticismEngine bean into CriticAspect:
<bean class="com.springinaction.springidol.CriticAspect"
factory-method="aspectOf">
<property name="criticismEngine" ref="criticismEngine" />
</bean>
For the most part, this <bean> declaration isn’t much different from any other <bean> you may find in Spring. The big difference is the use of the factory-method attribute. Normally, Spring beans are instantiated by the Spring container, but AspectJ aspects are created by the AspectJ runtime. By the time Spring gets a chance to inject CriticismEngine into CriticAspect, CriticAspect has already been instantiated.
Because Spring isn’t responsible for the creation of CriticAspect, it isn’t possible to declare CriticAspect as a bean in Spring. Instead, you need a way for Spring to get a handle to the CriticAspect instance that has already been created by AspectJ so that you can inject it with aCriticismEngine. Conveniently, all AspectJ aspects provide a static aspectOf() method that returns the singleton instance of the aspect. So to get an instance of the aspect, you must use factory-method to invoke the aspectOf() method instead of trying to call CriticAspect’s constructor.
In short, Spring doesn’t use the <bean> declaration from earlier to create an instance of the CriticAspect—it has already been created by the AspectJ runtime. Instead, Spring retrieves a reference to the aspect through the aspectOf() factory method and then performs dependency injection on it as prescribed by the <bean> element.
4.6. Summary
AOP is a powerful complement to object-oriented programming. With aspects, you can group application behavior that was once spread throughout your applications into reusable modules. You can then declare exactly where and how this behavior is applied. This reduces code duplication and lets your classes focus on their main functionality.
Spring provides an AOP framework that lets you insert aspects around method executions. You’ve learned how to weave advice before, after, and around a method invocation, as well as to add custom behavior for handling exceptions.
You have several choices in how you can use aspects in your Spring applications. Wiring advice and pointcuts in Spring is much easier with the addition of @AspectJ annotation support and a simplified configuration schema.
Finally, there are times when Spring AOP isn’t enough, and you must turn to AspectJ for more powerful aspects. For those situations, we looked at how to use Spring to inject dependencies into AspectJ aspects.
At this point, we’ve covered the basics of the Spring Framework. You’ve seen how to configure the Spring container and how to apply aspects to Spring-managed objects. These core techniques offer you a great opportunity to create applications composed of loosely coupled objects.
Now we’ll move past the essentials and look at what it takes to build real applications in Spring. Starting in the next chapter, you’ll see how to build web applications using Spring.
All materials on the site are licensed Creative Commons Attribution-Sharealike 3.0 Unported CC BY-SA 3.0 & GNU Free Documentation License (GFDL)
If you are the copyright holder of any material contained on our site and intend to remove it, please contact our site administrator for approval.
© 2016-2026 All site design rights belong to S.Y.A.