Spring in Action, 4th Edition: Covers Spring 4 (2015)
Part 2. Spring on the web
Chapter 6. Rendering web views
This chapter covers
· Rendering model data as HTML
· Using JSP views
· Defining view layout with tiles
· Working with Thymeleaf views
In the previous chapter, we primarily focused on writing the controllers that handle web requests. You also created some simple views to render the model data produced by those controllers, but we didn’t spend too much time discussing the views or what happens between the time a controller finishes handling a request and the time the results are displayed in the user’s web browser. That’s the topic of this chapter.
6.1. Understanding view resolution
None of the methods in the controllers you wrote in chapter 5 directly produce the HTML that is rendered in the browser. Instead, they populate the model with some data and then pass the model off to a view for rendering. Those methods return a String value that is the logical name of the view but that doesn’t directly refer to a specific view implementation. Although you wrote a few simple JavaServer Page (JSP) views, nothing in the controllers is aware of that fact.
Decoupling request-handling logic in the controller from the view-rendering of a view is an important feature of Spring MVC. If the controller methods were directly responsible for producing HTML, it would be difficult to maintain and update the view without getting your hands dirty in request-handling logic. At most, the controller methods and view implementations should agree on the contents of the model; apart from that, they should keep an arms-length distance from each other.
But if the controller only knows about the view by a logical view name, how does Spring determine which actual view implementation it should use to render the model? That’s a job for Spring’s view resolvers.
In chapter 5, you used a view resolver known as InternalResourceViewResolver. It was configured to apply a prefix of /WEB-INF/views/ and a suffix of .jsp to a view name to arrive at the physical location of the JSP that would render the model. Now let’s take a step back and look at view resolution in general and some of the other view resolvers that Spring offers.
Spring MVC defines an interface named ViewResolver that looks a little something like this:
public interface ViewResolver {
View resolveViewName(String viewName, Locale locale)
throws Exception;
}
The resolveViewName() method, when given a view name and a Locale, returns a View instance. View is another interface that looks like this:
public interface View {
String getContentType();
void render(Map<String, ?> model,
HttpServletRequest request,
HttpServletResponse response) throws Exception;
}
The View interface’s job is to take the model, as well as the servlet request and response objects, and render output into the response.
It looks simple enough. All you need to do is start writing implementations of ViewResolver and View to render content into the response to be displayed in your users’ browsers. Right?
Not necessarily. Although you can write your own custom implementations of ViewResolver and View, and although there are some special cases where that’s necessary, typically you needn’t worry yourself with these interfaces. I only mention them to give you some insight into how view resolution works. Fortunately, Spring provides several out-of-the-box implementations, listed in table 6.1, that fit most circumstances.
Table 6.1. Spring comes with 13 view resolvers to translate logical view names into physical view implementations.
|
View resolver |
Description |
|
BeanNameViewResolver |
Resolves views as beans in the Spring application context whose ID is the same as the view name. |
|
ContentNegotiatingViewResolver |
Resolves views by considering the content type desired by the client and delegating to another view resolver that can produce that type. |
|
FreeMarkerViewResolver |
Resolves views as FreeMarker templates. |
|
InternalResourceViewResolver |
Resolves views as resources internal to the web application (typically JSPs). |
|
JasperReportsViewResolver |
Resolves views as JasperReports definitions. |
|
ResourceBundleViewResolver |
Resolves views from a resource bundle (typically a properties file). |
|
TilesViewResolver |
Resolves views as Apache Tile definitions, where the tile ID is the same as the view name. Note that there are two different TilesViewResolver implementations, one each for Tiles 2.0 and Tiles 3.0. |
|
UrlBasedViewResolver |
Resolves views directly from the view name, where the view name matches the name of a physical view definition. |
|
VelocityLayoutViewResolver |
Resolves views as Velocity layouts to compose pages from different Velocity templates. |
|
VelocityViewResolver |
Resolves views as Velocity templates. |
|
XmlViewResolver |
Resolves views as bean definitions from a specified XML file. Similar to BeanNameViewResolver. |
|
XsltViewResolver |
Resolves views to be rendered as the result of an XSLT transformation. |
Note that all the view resolvers in table 6.1 are available in both Spring 4 and Spring 3.2. And all but one of them (the Tiles 3 TilesViewResolver) are supported by Spring 3.1.
We don’t have room in this book to cover all 13 view resolvers offered by Spring. But that’s okay, because there are only a handful of them that you’ll ever need in most applications.
For the most part, each of the view resolvers in table 6.1 corresponds to a specific view technology available for Java web applications. InternalResourceViewResolver is typically used for JSP, TilesViewResolver is for Apache Tiles views, and FreeMarker-ViewResolver andVelocityViewResolver map to FreeMarker and Velocity template views respectively.
In this chapter, we’ll focus our attention on the view technologies that are most relevant to the majority of Java developers. Because most Java web applications use JSP, we’ll start by looking at InternalResourceViewResolver, the view resolver that’s typically used to resolve JSP views. Then we’ll try out TilesViewResolver to achieve layout control over JSP pages.
To wrap up this chapter, we’ll look at a viewresolver option that isn’t listed in table 6.1. Thymeleaf is a compelling alternative to JSP that offers a view resolver for working with Thymeleaf’s natural templates: templates that have more in common with the HTML they produce than with the Java code that drives them. Thymeleaf is such an exciting view option that I wouldn’t blame you if you flipped a few pages ahead to section 6.4 to see how to use it with Spring.
If you’re still on this page, it’s probably because you know that JSP has been, and still is, the dominant view technology for Java. You’ve probably used JSP on several projects before and are likely to need it again. So let’s start with a look at how you can use JSP views with Spring MVC.
6.2. Creating JSP views
Believe it or not, JavaServer Pages has been the go-to view technology for Java-based web applications for almost 15 years. Although it started out as an ugly, Java-centric twist on similar templating technologies (such as Microsoft’s Active Server Pages), JSP has evolved over the years to include support for an expression language and custom tag libraries.
Spring supports JSP views in two ways:
· InternalResourceViewResolver can be used to resolve view names into JSP files. Moreover, if you’re using JavaServer Pages Standard Tag Library (JSTL) tags in your JSP pages, InternalResourceViewResolver can resolve view names into JSP files fronted byJstlView to expose JSTL locale and resource bundle variables to JSTL’s formatting and message tags.
· Spring provides two JSP tag libraries, one for form-to-model binding and one providing general utility features.
Whether or not you use JSTL or intend to use Spring’s JSP tag libraries, it’s important to configure a view resolver to resolve JSP views. Although a few of Spring’s other view resolvers could be used to map view names to JSP files, InternalResourceViewResolver is the simplest and most commonly used view resolver for this task. We touched on configuring InternalResourceViewResolver in chapter 5. But that was done in haste just so you could exercise your controllers in a web browser. Let’s take a closer look at InternalResourceViewResolver and see how to tweak it to do your bidding.
6.2.1. Configuring a JSP-ready view resolver
Whereas some view resolvers, such as ResourceBundleViewResolver, directly map a logical view name to a specific implementation of the View interface, InternalResourceViewResolver takes a more indirect approach. It follows a convention whereby a prefix and a suffix are attached to the view name to determine the physical path to a view resource in the same web application.
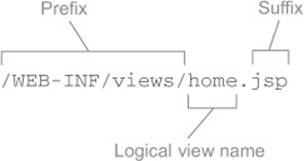
As an example, consider the simple case where the logical view name is home. It’s a common practice to place JSP files under the web application’s WEB-INF folder to prevent direct access. If you were to keep all your JSP files in /WEB-INF/views/, and if your home page JSP is named home.jsp, then you could derive the physical view path by prefixing the logical view name home with /WEB-INF/views/ and adding a suffix of .jsp. This is illustrated in figure 6.1.
Figure 6.1. InternalResourceViewResolver resolves views by adding a prefix and a suffix to the view name.
You can configure InternalResourceViewResolver to apply this convention when resolving views by configuring it with this @Bean-annotated method:
@Bean
public ViewResolver viewResolver() {
InternalResourceViewResolver resolver =
new InternalResourceViewResolver();
resolver.setPrefix("/WEB-INF/views/");
resolver.setSuffix(".jsp");
return resolver;
}
Optionally, if you prefer to use Spring’s XML-based configuration, you can configure InternalResourceViewResolver like this:
<bean id="viewResolver"
class="org.springframework.web.servlet.view.
InternalResourceViewResolver"
p:prefix="/WEB-INF/views/"
p:suffix=".jsp" />
With this configuration of InternalResourceViewResolver in place, you can expect it to resolve logical view names into JSP files such as this:
· home resolves to /WEB-INF/views/home.jsp
· productList resolves to /WEB-INF/views/productList.jsp
· books/detail resolves to /WEB-INF/views/books/detail.jsp
Let me call particular attention to that last example. When a logical view name has a slash in it, that slash is carried over into the resource path name. Therefore, it maps to a JSP file that’s in a subdirectory of whatever directory is referenced by the prefix property. This offers a handy way of organizing your view templates under a hierarchy of directories rather than keeping them all in a single directory.
Resolving JSTL views
So far you’ve configured the basic, garden-variety InternalResourceViewResolver. It ultimately resolves logical view names into instances of InternalResourceView that reference JSP files. But if those JSP files are using JSTL tags for formatting or messages, then you may want to configure InternalResourceViewResolver to resolve a JstlView instead.
JSTL’s formatting tags need a Locale to properly format locale-specific values such as dates and money. And its message tags can use a Spring message source and a Locale to properly choose messages to render in HTML. By resolving JstlView, the JSTL tags will be given the Localeand any message source configured in Spring.
All that’s needed to have InternalResourceViewResolver resolve JstlView instead of InternalResourceView is to set its viewClass property:
@Bean
public ViewResolver viewResolver() {
InternalResourceViewResolver resolver =
new InternalResourceViewResolver();
resolver.setPrefix("/WEB-INF/views/");
resolver.setSuffix(".jsp");
resolver.setViewClass(
org.springframework.web.servlet.view.JstlView.class);
return resolver;
}
Again, you can accomplish the same thing with XML:
<bean id="viewResolver"
class="org.springframework.web.servlet.view.
InternalResourceViewResolver"
p:prefix="/WEB-INF/views/"
p:suffix=".jsp"
p:viewClass="org.springframework.web.servlet.view.JstlView" />
Whether you use Java configuration or XML, this will ensure that JSTL’s formatting and message tags will get the Locale and message sources configured in Spring.
6.2.2. Using Spring’s JSP libraries
Tag libraries are a powerful way to bring functionality to a JSP template without resorting to writing Java code directly in scriptlet blocks. Spring offers two JSP tag libraries to help define the view of your Spring MVC web views. One tag library renders HTML form tags that are bound to amodel attribute. The other has a hodgepodge of utility tags that come in handy from time to time.
You’re likely to find the form-binding tag library to be the more useful of the two tag libraries. So that’s where you’ll start with Spring’s JSP tags. You’ll see how to bind the Spittr application’s registration form to the model so that the form will be prepopulated and validation errors can be displayed after a failed form submission.
Binding forms to the model
Spring’s form-binding JSP tag library includes 14 tags, most of which render HTML form tags. But what makes these different from the raw HTML tags is that they’re bound to an object in the model and can be populated with values from the model object’s properties. The tag library also includes a tag that can be used to communicate errors to the user by rendering them into the resulting HTML.
To use the form-binding tag library, you’ll need to declare it in the JSP pages that will use it:
<%@ taglib uri="http://www.springframework.org/tags/form" prefix="sf" %>
Notice that I specified a prefix of sf, but it’s also common to use a prefix of form. You may specify any prefix you’d like. I chose sf because it’s succinct, easy to type, and an abbreviation for Spring forms. Throughout this book, I’ll assume a prefix of sf whenever the form-binding library is used.
Once you declare the form-binding tag library, you’re afforded 14 tags. These are listed in table 6.2.
Table 6.2. Spring’s form-binding tag library includes tags to bind model objects to and from rendered HTML forms.
|
JSP tag |
Description |
|
<sf:checkbox> |
Renders an HTML <input> tag with type set to checkbox. |
|
<sf:checkboxes> |
Renders multiple HTML <input> tags with type set to checkbox. |
|
<sf:errors> |
Renders field errors in an HTML <span> tag. |
|
<sf:form> |
Renders an HTML <form> tag and exposed binding path to inner tags for data-binding. |
|
<sf:hidden> |
Renders an HTML <input> tag with type set to hidden. |
|
<sf:input> |
Renders an HTML <input> tag with type set to text. |
|
<sf:label> |
Renders an HTML <label> tag. |
|
<sf:option> |
Renders an HTML <option> tag. The selected attribute is set according to the bound value. |
|
<sf:options> |
Renders a list of HTML <option> tags corresponding to the bound collection, array, or map. |
|
<sf:password> |
Renders an HTML <input> tag with type set to password. |
|
<sf:radiobutton> |
Renders an HTML <input> tag with type set to radio. |
|
<sf:radiobuttons> |
Renders multiple HTML <input> tags with type set to radio. |
|
<sf:select> |
Renders an HTML <select> tag. |
|
<sf:textarea> |
Renders an HTML <textarea> tag. |
It would be hard to cook up an example to demonstrate all of these tags, and any attempt would certainly be contrived. For the Spittr example, you’ll only use the tags that are fitting for the Spittr application’s registration form. Specifically, you’ll start by using <sf:form>, <sf:input>, and <sf:password>. Applying those tags to the registration JSP, you get the following:
<sf:form method="POST" commandName="spitter">
First Name: <sf:input path="firstName" /><br/>
Last Name: <sf:input path="lastName" /><br/>
Email: <sf:input path="email" /><br/>
Username: <sf:input path="username" /><br/>
Password: <sf:password path="password" /><br/>
<input type="submit" value="Register" />
</sf:form>
The <sf:form> tag renders an HTML <form> tag. But it also sets some context around a model object designated in the commandName attribute. Properties on the model object will be referenced in the other form-binding tags you use.
In the preceding code, you set commandName to spitter. Therefore, there must be an object in the model whose key is spitter, or else the form won’t be able to render (and you’ll get JSP errors). That means you need to make a small change to SpitterController to ensure that aSpitter object is in the model under the spitter key:
@RequestMapping(value="/register", method=GET)
public String showRegistrationForm(Model model) {
model.addAttribute(new Spitter());
return "registerForm";
}
This tweak to showRegistrationForm() now has that method adding a new Spitter instance to the model. The model key will be inferred from the object type to be spitter—exactly what you need it to be.
Going back to the form, the first three fields have had their HTML <input> tag replaced with <sf:input>. This tag renders an HTML <input> tag with the type attribute set to text. Its value attribute will be set to the value of the model object’s property specified in the pathattribute. For instance, if the Spitter object in the model has Jack as the value of its firstName property, then <sf:input path="firstName"/> will render an <input> tag with value="Jack".
The password field uses <sf:password> instead of <sf:input>. <sf:password> is similar to <sf:input> but renders an HTML <input> whose type attribute is set to password so that the value will be masked as it’s typed.
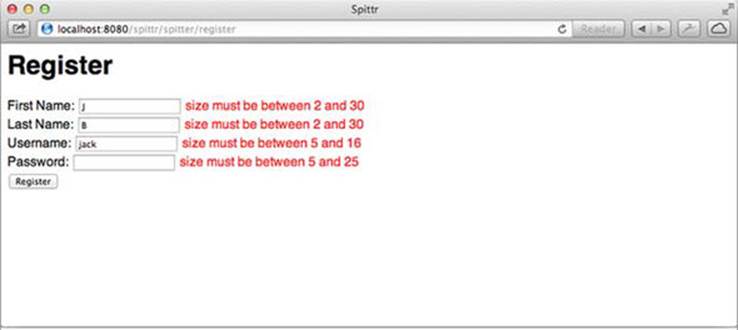
To help you visualize what the resulting HTML will look like, suppose that a user has already submitted the form with invalid values for all the fields. After validation fails and the user is forwarded back to the registration form, the resulting HTML <form> element looks like this:
<form id="spitter" action="/spitter/spitter/register" method="POST">
First Name:
<input id="firstName"
name="firstName" type="text" value="J"/><br/>
Last Name:
<input id="lastName"
name="lastName" type="text" value="B"/><br/>
Email:
<input id="email"
name="email" type="text" value="jack"/><br/>
Username:
<input id="username"
name="username" type="text" value="jack"/><br/>
Password:
<input id="password"
name="password" type="password" value=""/><br/>
<input type="submit" value="Register" />
</form>
It’s worth noting that starting with Spring 3.1, the <sf:input> tag allows you to specify a type attribute so that you can declare HTML 5–specific type text fields such as data, range, and email, among other options. For example, you could declare the email field like this:
Email: <sf:input path="email" type="email" /><br/>
This is rendered to HTML as
Email:
<input id="email" name="email" type="email" value="jack"/><br/>
Using Spring’s form-binding tags gives you a slight improvement over using standard HTML tags—the form is prepopulated with the previously entered values after failed validation. But it still fails to tell the user what they did wrong. To guide the user in fixing their mistakes, you’ll need the <sf:errors> tag.
Displaying errors
When there are validation errors, the details of those errors are carried in the request along with model data. All you need to do is dig into the model and extract the errors to display to the user. The <sf:errors> tag makes this a simple task.
For example, look at how <sf:errors> is used in this snippet from registerForm.jsp:
<sf:form method="POST" commandName="spitter">
First Name: <sf:input path="firstName" />
<sf:errors path="firstName" /><br/>
...
</sf:form>
Even though I’m only showing you <sf:errors> as applied to the First Name field, it’s just as easy to use on all the fields in the registration form. Here its path attribute is set to firstName, the name of the Spitter model object property for which errors should be displayed. If there are no errors for the firstName property, then <sf:errors> won’t render anything. But if there is a validation error, it will render that error message in an HTML <span> tag.
For example, if the user submits J as the first name, the following HTML is rendered for the First Name field:
First Name: <input id="firstName"
name="firstName" type="text" value="J"/>
<span id="firstName.errors">size must be between 2 and 30</span>
Now you’re communicating the error to the user, and they have a chance to fix it. You can take this a step further by changing the style of the error so that it stands out. To do that, set the cssClass attribute:
<sf:form method="POST" commandName="spitter" >
First Name: <sf:input path="firstName" />
<sf:errors path="firstName" cssClass="error" /><br/>
...
</sf:form>
Again, for brevity’s sake, I’ve only shown how to set the cssClass attribute for the <sf:errors> tag whose path is firstName. You can certainly apply it to the other fields as well.
Now the errors<span> has a class attribute set to error. All that’s left is to define a CSS style for that class. Here’s a simple CSS style that renders the error in red:
span.error {
color: red;
}
Figure 6.2 shows how the form might look in a web browser at this point.
Figure 6.2. Displaying validation errors next to form fields
Displaying validation errors next to the fields that have errors is a nice way to draw the user’s attention to problems they need to fix. But it could be problematic with regard to layout. Another way to handle validation errors is to display them all together. To do this, you can remove the<sf:errors> element from each field and place it at the top of the form like this:
<sf:form method="POST" commandName="spitter" >
<sf:errors path="*" element="div" cssClass="errors" />
...
</sf:form>
What’s noticeably different about this <sf:errors> as compared to the ones you’ve used before is that its path is set to *. This is a wildcard selector that tells <sf:errors> to render all errors for all properties.
Also notice that you set the element attribute to div. By default, errors are rendered in an HTML <span> tag, which is fine when there’s only one error to display. But when you’re rendering errors for all fields, there could easily be more than one error to display, and a <span> tag (an inline tag) is not ideal. A block tag such as <div> would be better. Therefore, you can set the element attribute to div so that errors render in a <div> tag.
As before, cssClass is set to errors so that you can style the <div>. Here’s some CSS to style the <div> with a red border and a light red background:
div.errors {
background-color: #ffcccc;
border: 2px solid red;
}
Now you’ve shoved all the errors to the top of the form, which may make laying out the page easier. But you’ve lost the ability to highlight the fields that need to be corrected. That’s easily addressed by setting the cssErrorClass attribute on each field. You can also wrap each label with<sf:label> and set its cssErrorClass. Here’s the First Name field with the necessary changes applied:
<sf:form method="POST" commandName="spitter" >
<sf:label path="firstName"
cssErrorClass="error">First Name</sf:label>:
<sf:input path="firstName" cssErrorClass="error" /><br/>
...
</sf:form>
The <sf:label> tag, much like the other form-binding tags, has a path attribute to indicate which property of the model object it belongs to. In this case, it’s set to firstName so it will be bound to the Spitter object’s firstName property. Assuming there are no validation errors, this will render an HTML <label> element like this:
<label for="firstName">First Name</label>
On its own, setting the path attribute on <sf:label> doesn’t accomplish much. But you’re also setting cssErrorClass. If the bound property has any errors, the rendered <label> element’s class attribute will be set to error like this:
<label for="firstName" class="error">First Name</label>
Similarly, the <sf:input> tag now has its cssErrorClass set to error. If there’s a validation error, the rendered <input> tag’s class attribute will be set to error. Now you can style the label and the fields so that the user’s attention is drawn to them if there are any errors. For example, the following CSS renders the label in red and the input field with a light red background:
label.error {
color: red;
}
input.error {
background-color: #ffcccc;
}
Now you have a fairly nice way of presenting validation errors to the user. There’s one more thing you can do to make those errors friendlier to read. Revisiting the Spitter class, you can set the message attribute on the validation annotations to reference a friendly message that you’ll define in a properties file:
@NotNull
@Size(min=5, max=16, message="{username.size}")
private String username;
@NotNull
@Size(min=5, max=25, message="{password.size}")
private String password;
@NotNull
@Size(min=2, max=30, message="{firstName.size}")
private String firstName;
@NotNull
@Size(min=2, max=30, message="{lastName.size}")
private String lastName;
@NotNull
@Email(message="{email.valid}")
private String email;
For each of the fields, the @Size annotation has message set to a string whose value is wrapped in curly braces. If you left the curly braces out, the value given to message would be the error message displayed to the user. But by using curly braces, you designate a property in a properties file that contains the actual message.
All that’s left to do is to create a file named ValidationMessages.properties at the root of the classpath:
firstName.size=
First name must be between {min} and {max} characters long.
lastName.size=
Last name must be between {min} and {max} characters long.
username.size=
Username must be between {min} and {max} characters long.
password.size=
Password must be between {min} and {max} characters long.
email.valid=The email address must be valid.
Notice how the key for each message in ValidationMessages.properties corresponds to the placeholder values in the message attributes. Also, so that the minimum and maximum lengths aren’t hard-coded in ValidationMessages.properties, the friendly messages have placeholders of their own—{min} and {max}—that reference the min and max attributes given on the @Size annotation.
When the user submits a registration form that fails validation, they might see something like figure 6.3 in their browser.
Figure 6.3. Validation errors displayed with friendly error messages pulled from a properties file

What’s nice about extracting the error messages to a properties file is that you can display language- and locale-specific messages by creating a locale-specific properties file. For example, to display the errors in Spanish if the user’s browser has its language set to Spanish, you can create a file named ValidationErrors_es.properties with the following content:
firstName.size=
Nombre debe ser entre {min} y {max} caracteres largo.
lastName.size=
El apellido debe ser entre {min} y {max} caracteres largo.
username.size=
Nombre de usuario debe ser entre {min} y {max} caracteres largo.
password.size=
Contraseña debe estar entre {min} y {max} caracteres largo.
email.valid=La dirección de email no es válida
You can create as many renditions of ValidationMessages.properties as necessary to cover all the languages and locales your application will support.
Spring’s general tag library
In addition to the form-binding tag library, Spring also offers a more general JSP tag library. In fact, this tag library was the first JSP tag library available in Spring. It has grown a bit over the years, but it was available in the earliest versions of Spring.
To use Spring’s general tag library, you must declare it in the pages that will use it:
<%@ taglib uri="http://www.springframework.org/tags" prefix="s" %>
As with any JSP tag library, the prefix can be anything you want. Commonly, spring is given as the prefix for this tag library. But I prefer to use s because it’s much more succinct and easier to type and read.
With the tag library declared, you can now use the 10 JSP tags listed in table 6.3.
Table 6.3. Spring’s other JSP tag library offers a handful of convenient utility tags in addition to some legacy data-binding tags.
|
JSP tag |
Description |
|
<s:bind> |
Exports a bound property status to a page-scoped status property. Used along with <s:path> to obtain a bound property value. |
|
<s:escapeBody> |
HTML and/or JavaScript escapes the content in the body of the tag. |
|
<s:hasBindErrors> |
Conditionally renders content if a specified model object (in a request attribute) has bind errors. |
|
<s:htmlEscape> |
Sets the default HTML escape value for the current page. |
|
<s:message> |
Retrieves the message with the given code and either renders it (default) or assigns it to a page-, request-, session-, or application-scoped variable (when using the var and scope attributes). |
|
<s:nestedPath> |
Sets a nested path to be used by <s:bind>. |
|
<s:theme> |
Retrieves a theme message with the given code and either renders it (default) or assigns it to a page-, request-, session-, or application-scoped variable (when using the var and scope attributes). |
|
<s:transform> |
Transforms properties not contained in a command object using a command object’s property editors. |
|
<s:url> |
Creates context-relative URLs with support for URI template variables and HTML/XML/JavaScript escaping. Can either render the URL (default) or assign it to a page-, request-, session-, or application-scoped variable (when using the var and scope attributes). |
|
<s:eval> |
Evaluates Spring Expression Language (SpEL) expressions, rendering the result (default) or assigning it to a page-, request-, session-, or application-scoped variable (when using the var and scope attributes). |
Several of the tags in table 6.3 have been made obsolete by Spring’s form-binding tag library. The <s:bind> tag, for instance, was Spring’s original form-binding tag, and it was much more complex than the tags covered in the previous section.
Because this tag library sees a lot less action than the form-binding tags, I won’t cover each tag in detail. Instead, I’ll quickly go over a handful of the most valuable tags and leave it to you to explore the others on your own. (Odds are good that you won’t need them often—if at all.)
Displaying internationalized messages
As it stands, your JSP templates contain a lot of hard-coded text. There’s nothing horribly wrong with that, but it doesn’t lend itself to easily changing the text. Moreover, there’s no way to internationalize the text so it’s tailored to the user’s language settings.
For instance, consider the welcome message on the home page:
<h1>Welcome to Spittr!</h1>
The only way to modify that message is to open home.jsp and change it. Not a big deal, I suppose. But spreading your application’s text across multiple templates means changing a lot of JSP files for large-scale changes of the application’s messaging.
A more significant issue is that no matter what text you choose for the welcome message, all users see the same message. The web is a global network, and the applications you build for it are likely to have a global audience. Therefore, it’s wise to communicate to your users in their language and not force them to use a single language.
The <s:message> tag is perfect for rendering text that’s externalized in one or more properties files. Using <s:message>, you can replace the hard-coded welcome message with the following:
<h1><s:message code="spittr.welcome" /></h1>
As used here, <s:message> will render the text available from a message source where the key is spittr.welcome. Therefore, you’ll need to configure such a message source if you expect <s:message> to be able to do its job.
Spring has a handful of message-source classes, all implementing the Message-Source interface. One of the more common and useful implementations is Resource-BundleMessageSource. It loads messages from a properties file whose name is derived from a base name. The following @Bean method configures ResourceBundleMessage-Source:
@Bean
public MessageSource messageSource() {
ResourceBundleMessageSource messageSource =
new ResourceBundleMessageSource();
messageSource.setBasename("messages");
return messageSource;
}
The key thing in this bean declaration is the setting of the basename property. You can set it to any value you’d like, but here I’ve chosen to set it to messages. By setting it to messages, you can expect ResourceBundleMessageResolver to resolve messages from properties files at the root of the classpath whose names are derived from that base name.
Optionally, you may choose ReloadableResourceBundleMessageSource, which works much like ResourceBundleMessageSource, but it has the ability to reload message properties without recompiling or restarting the application. Here’s a sample configuration forReloadableResourceBundleMessageSource:
@Bean
public MessageSource messageSource() {
ReloadableResourceBundleMessageSource messageSource =
new ReloadableResourceBundleMessageSource();
messageSource.setBasename("file:///etc/spittr/messages");
messageSource.setCacheSeconds(10);
return messageSource;
}
The key difference here is that the basename property is configured to look outside of the application (not in the classpath, like ResourceBundleMessageSource). The basename property can be set to look for messages in the classpath (with a classpath: prefix), in the filesystem (with a file: prefix), or at the root of the web application (with no prefix). Here, it’s configured to look for messages in properties files in the /etc/spittr directory of the server’s filesystem and with a base filename of “messages”.
Now let’s create those properties files. To start, you’ll create the default properties file named messages.properties. It will be located either at the root of the classpath (if you’re using ResourceBundleMessageSource) or at the path specified in the basename property (if you’re usingReloadableResourceBundleMessageSource). It needs the following entry for the spittr.welcome message:
spittr.welcome=Welcome to Spittr!
If you create no other messages files, then all you’ve accomplished is extracting the hard-coded message from the JSP into a properties file as a hard-coded message. It does give you one-stop editing for all of your application’s messages, but little more than that.
Nevertheless, the essential pieces are in place to start internationalizing the message. If, for example, you wanted to show the welcome message in Spanish for anyone whose language settings are set to Spanish, you’d need to create another properties file named messages_es.properties with this entry:
spittr.welcome=Bienvenidos a Spittr!
Now you’ve accomplished something big. Your application is only a few more <s:message> tags and language-specific properties files away from being an international success! I’ll leave it to you to internationalize the rest of the application.
Creating URLs
The <s:url> tag is a modest little tag. Its main job is to create a URL and either assign it to a variable or render it in the response. It’s a drop-in replacement for JSTL’s <c:url> tag, but with a few new tricks up its sleeve.
In its simplest form, <s:url> takes a servlet-context-relative URL and renders it with the servlet context path prepended. For example, consider this basic use of <s:url>:
<a href="<s:url href="/spitter/register" />">Register</a>
If the application’s servlet context is named spittr, then the following HTML will be rendered in the response:
<a href="/spittr/spitter/register">Register</a>
This enables you to create URLs without worrying about what the servlet context path will be. The <s:url> tag takes care of it for you.
Optionally, you can have <s:url> construct the URL and assign it to a variable to be used later in the template:
<s:url href="/spitter/register" var="registerUrl" />
<a href="${registerUrl}">Register</a>
By default, URL variables are created in page scope. But you can have <s:url> create them in application, session, or request scope instead by setting the scope attribute:
<s:url href="/spitter/register" var="registerUrl" scope="request" />
If you’d like to add parameters to the URL, you can do so with the <s:param> tag. For instance, here’s a <s:url> tag with two nested <s:param> tags to set the max and count parameters for /spittles:
<s:url href="/spittles" var="spittlesUrl">
<s:param name="max" value="60" />
<s:param name="count" value="20" />
</s:url>
So far, you’ve seen nothing that <s:url> can do that JSTL’s <c:url> can’t do. But what if you need to create a URL with a path parameter? How can you write the href value such that it has a replaceable path parameter?
For instance, suppose you need to create a URL for a particular user’s profile page. No problem. Once again, the <s:param> tag is up to the task:
<s:url href="/spitter/{username}" var="spitterUrl">
<s:param name="username" value="jbauer" />
</s:url>
When the href value is a placeholder that matches a parameter specified by <s:param>, the parameter is inserted into the placeholder’s spot. If the <s:param> parameter doesn’t match any placeholders in href, then the parameter is used as a query parameter.
The <s:url> tag can also address any escaping needs for the URL. For example, if you intend to render the URL to be displayed as part of the content on a web page (as opposed to being used as a hypertext link), you may want to ask <s:url> to do HTML escaping on the URL by setting the htmlEscape attribute to true. For example, the following <s:url> tag renders an HTML-escaped URL:
<s:url value="/spittles" htmlEscape="true">
<s:param name="max" value="60" />
<s:param name="count" value="20" />
</s:url>
This results in the URL being rendered like this:
/spitter/spittles?max=60&count=20
On the other hand, if you intend to use the URL in JavaScript code, you may want to set the javaScriptEscape attribute to true:
<s:url value="/spittles" var="spittlesJSUrl" javaScriptEscape="true">
<s:param name="max" value="60" />
<s:param name="count" value="20" />
</s:url>
<script>
var spittlesUrl = "${spittlesJSUrl}"
</script>
This renders the following to the response:
<script>
var spittlesUrl = "\/spitter\/spittles?max=60&count=20"
</script>
Speaking of escaping, there’s another tag for escaping content other than tags. Let’s have a look.
Escaping content
The <s:escapeBody> tag is a general-purpose escaping tag. It renders any content nested in its body, escaping as necessary.
For example, suppose you want to display a snippet of HTML code on a page. In order for it to be displayed properly, the < and > characters need to be replaced with < and > or the browser will interpret the HTML as any other HTML in the page.
Nothing’s stopping you from putting in < and > escaping by hand, but it’s cumbersome and doesn’t read well. Instead, you can use <s:escapeBody> and let Spring take care of it for you:
<s:escapeBody htmlEscape="true">
<h1>Hello</h1>
</s:escapeBody>
This renders the following to the body of the response:
<h1>Hello</h1>
Of course, even though it looks horrible in its escaped form, the browser is happy to render it as the un-escaped HTML you want the user to see.
The <s:escapeBody> tag also supports JavaScript escaping with the javaScript-Escape attribute:
<s:escapeBody javaScriptEscape="true">
<h1>Hello</h1>
</s:escapeBody>
<s:escapeBody> does one job and does it well. Unlike <s:url>, it only renders content and doesn’t let you assign that content to a variable.
Now that you’ve seen how to use JSP to define Spring views, let’s consider what would be required to make them aesthetically appealing. There’s a lot you can do by adding common elements to the pages, such as inserting a header with a site logo, applying a stylesheet, and maybe even showing a copyright in the footer. But rather than do that in each of the JSP files in the Spittr application, let’s see how to employ Apache Tiles to bring some common and reusable layouts to your templates.
6.3. Defining a layout with Apache Tiles views
At this point, you’ve done very little with regard to the layout of your application’s web pages. Each JSP is fully responsible for defining its own layout, and they’re not doing much in that regard.
Suppose you want to add a common header and footer to all pages in the application. The naive way to do this is to visit every JSP template and add the HTML for the header and footer. But that approach doesn’t scale well with regard to maintenance. There’s an initial cost of adding those elements to each and every page, and any future changes will incur a similar cost.
A better approach is to use a layout engine such as Apache Tiles to define a common page layout that will be applied to all pages. Spring MVC provides support for Apache Tiles in the form of a view resolver that can resolve logical view names into tile definitions.
6.3.1. Configuring a Tiles view resolver
In order to use Tiles with Spring, you’ll have to configure a couple of beans. You need a TilesConfigurer bean whose job is to locate and load tile definitions and generally coordinate Tiles. In addition, you need a TilesViewResolver bean to resolve logical view names to tile definitions.
This pair of components comes in two forms: a pair for Apache Tiles 2 and another pair for Apache Tiles 3. The most significant difference between the two sets of Tiles components is in their package names. The TilesConfigurer/TilesViewResolver pair for Apache Tiles 2 comes in the org.springframework.web.servlet .view.tiles2 package, whereas the Tiles 3 variety comes in the org.springframework .web.servlet.view.tiles3 package. For our purposes, I’ll assume that you’re using Tiles 3.
First, let’s add the TilesConfigurer bean as shown in the following listing.
Listing 6.1. Configuring TilesConfigurer to resolve tile definitions
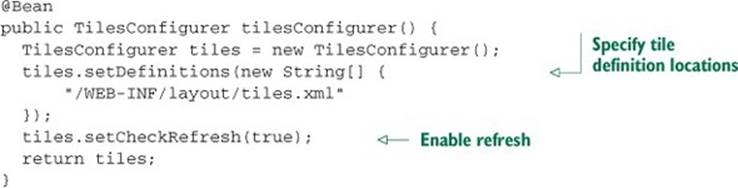
When configuring a TilesConfigurer, the most important property you set is definitions. This property takes an array of Strings where each entry specifies the location of tile-definition XML files. For the Spittr application, you’ll have it look for a file named tiles.xml in the /WEB-INF/layout/ directory.
Although you’re not taking advantage of it here, it’s also possible to specify multiple tile-definition files and even use wildcards in the location path. For example, you could ask that TilesConfigurer look for any file named tiles.xml anywhere under the /WEB-INF/ directory by setting the definitions property like this:
tiles.setDefinitions(new String[] {
"/WEB-INF/**/tiles.xml"
});
In this case, you’re using Ant-style wildcards (**) so that TilesConfigurer will recursively dig under all subdirectories in /WEB-INF/ in its search for tile definitions.
Next, let’s configure TilesViewResolver. As you can see, it’s a rather basic bean definition, with no properties to set:
@Bean
public ViewResolver viewResolver() {
return new TilesViewResolver();
}
Optionally, if you prefer working with XML configuration, you may choose to configure TilesConfigurer and TilesViewResolver like this:
<bean id="tilesConfigurer" class=
"org.springframework.web.servlet.view.tiles3.TilesConfigurer">
<property name="definitions">
<list>
<value>/WEB-INF/layout/tiles.xml.xml</value>
<value>/WEB-INF/views/**/tiles.xml</value>
</list>
</property>
</bean>
<bean id="viewResolver" class=
"org.springframework.web.servlet.view.tiles3.TilesViewResolver" />
Whereas TilesConfigurer loads tile definitions and coordinates with Apache Tiles, TilesViewResolver resolves logical view names to views that reference tile definitions. It does this by looking for a tile definition whose name matches the logical view name. You’ll need to create a few tile definitions to see how this works.
Defining tiles
Apache Tiles provides a document type definition (DTD) for specifying tile definitions in an XML file. Each definition consists of a <definition> element that generally has one or more <put-attribute> elements. For example, the following XML document defines several tiles for the Spittr application.
Listing 6.2. Defining tiles for the Spittr application
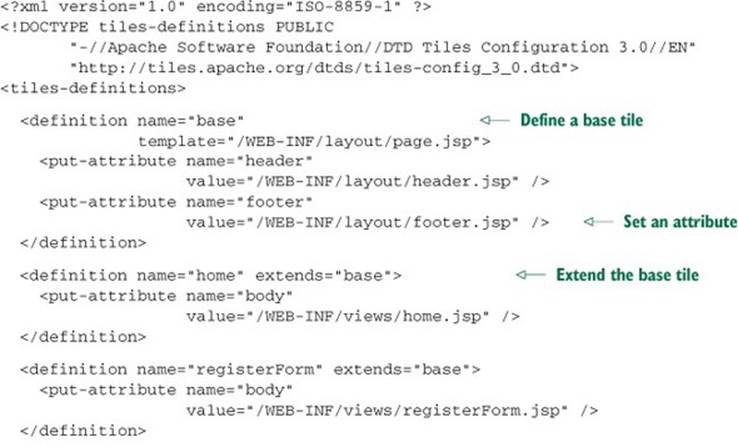
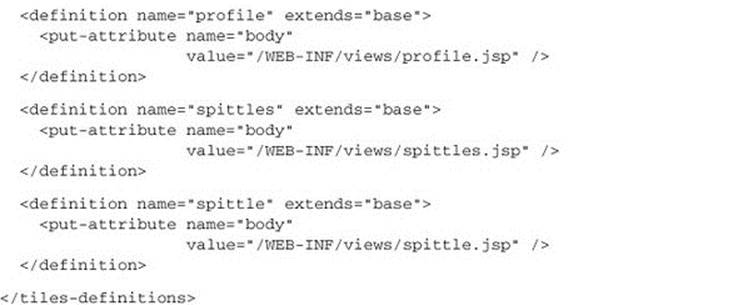
Each <definition> element defines a tile that ultimately references a JSP template. In the case of the tile whose name is base, the template referenced is at /WEB-INF/layout/page.jsp. A tile may also reference other JSP templates to be embedded in the main template. For the base tile, it references a header JSP template and a footer JSP template.
The page.jsp template referenced by the base tile is shown next.
Listing 6.3. Main layout template: references other templates to create a view
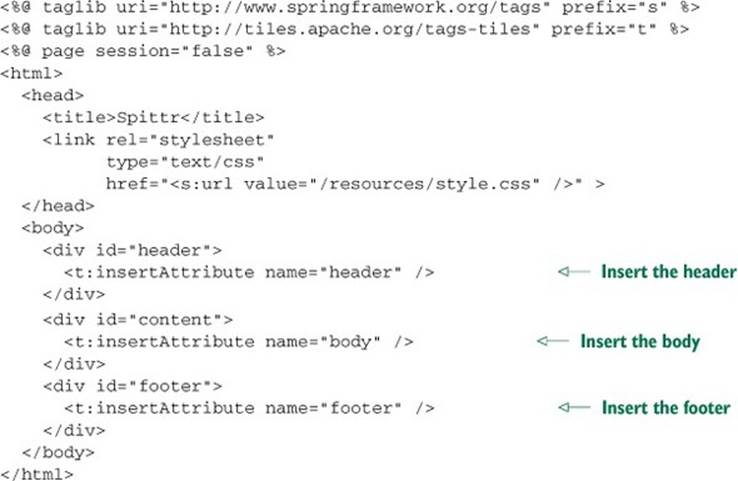
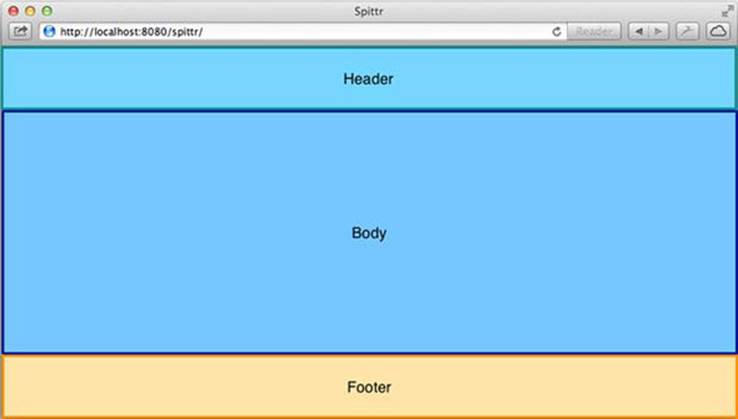
The key thing to observe in listing 6.3 is how it uses the <t:insertAttribute> JSP tag from the Tiles tag library to insert other templates. It’s used to insert the attributes named header, body, and footer. Ultimately, this gives you a layout that somewhat resembles figure 6.4.
Figure 6.4. A general layout defining a header, a body, and a footer
The header and footer attributes were set in the base tile definition to point at / WEB-INF/layout/header.jsp and /WEB-INF/layout/footer.jsp respectively. But what about the body attribute? Where is it set?
The base tile is never expected to be used on its own. It serves as a base definition (thus the meaning behind its name) for other tile definitions to extend. Throughout the rest of listing 6.2, you can see that the other tile definitions all extend base. This means they inherit its settings for theheader and footer attributes (although they could choose to override them). But each also sets a body attribute to reference a JSP template specific to that tile.
Focusing on the home tile, notice that it extends base. Because it extends base, it inherits the template and all the attributes from base. Even though the home tile definition is relatively simple, it has the following effective definition:
<definition name="home" template="/WEB-INF/layout/page.jsp">
<put-attribute name="header" value="/WEB-INF/layout/header.jsp" />
<put-attribute name="footer" value="/WEB-INF/layout/footer.jsp" />
<put-attribute name="body" value="/WEB-INF/views/home.jsp" />
</definition>
The individual templates referenced by the attributes are simple. Here’s the header.jsp template:
<%@ taglib uri="http://www.springframework.org/tags" prefix="s" %>
<a href="<s:url value="/" />"><img
src="<s:url value="/resources" />/images/spittr_logo_50.png"
border="0"/></a>
The footer.jsp template is even simpler:
Copyright © Craig Walls
Each tile that extends base defines its own body template, so each will differ from the others. But to complete the picture for the home tile, here’s home.jsp:
<%@ taglib uri="http://java.sun.com/jsp/jstl/core" prefix="c" %>
<%@ page session="false" %>
<h1>Welcome to Spittr</h1>
<a href="<c:url value="/spittles" />">Spittles</a> |
<a href="<c:url value="/spitter/register" />">Register</a>
The key point here is that the common elements of a page are captured in page.jsp, header.jsp, and footer.jsp and are absent in each of the other tile templates. This makes them reusable across all pages and simplifies maintenance of those elements.
To see how this all comes together, look at figure 6.5. As you can see, the page includes some styling and imagery to increase the application’s aesthetics. These weren’t pertinent to the discussion of page layout with Tiles, so I chose not to cover the details in this section. Nevertheless, you can see how the various components of the page are brought together by the tile definitions to render the Spittr home page.
Figure 6.5. The Spittr home page, laid out using Apache Tiles

JSP has long been the go-to option for templating in Java web applications. But there’s a new contender for the job, known as Thymeleaf. Let’s see how to use Thymeleaf templates with a Spring MVC application.
6.4. Working with Thymeleaf
Even though JSP has been around for a long time and is ubiquitous among Java web servers, it has a few unfortunate flaws. One significant issue with JSP is that it appears to be a form of HTML or XML, but it’s really neither. Most JSP templates take the form of HTML, littered with tags from various JSP tag libraries. Although these tag libraries bring dynamic rendering power to JSP in a succinct form, they break any hope of authoring a well-formed document. As an extreme example, consider that a JSP tag can even be used as the value of an HTML parameter:
<input type="text" value="<c:out value="${thing.name}"/>" />
A side effect of tag libraries and JSP’s lack of good form is that a JSP template often only coincidentally resembles the HTML it produces. Indeed, viewing an unrendered JSP template in a web browser or an HTML editor gives some puzzling and ugly results. The results aren’t just incompletely rendered—they’re a visual disaster! Because JSP isn’t truly HTML, many web browsers and editors struggle to display anything that aesthetically approximates what the template will render.
Also, JSP is a specification that’s tightly coupled to the servlet specification. This means it can only be used for web views in a servlet-based web application. JSP templates aren’t an option for general-purpose templating (such as formatted emails) or in web applications that aren’t based on servlets.
Several attempts have been made over the years to supplant JSP as the dominant view technology for Java applications. The most recent contender, Thymeleaf, shows some real promise and is an exciting choice to consider. Thymeleaf templates are natural and don’t rely on tag libraries. They can be edited and rendered anywhere that raw HTML is welcome. And because they’re not coupled to the servlet specification, Thymeleaf templates can go places JSPs dare not tread. Let’s look at how to use Thymeleaf with Spring MVC.
6.4.1. Configuring a Thymeleaf view resolver
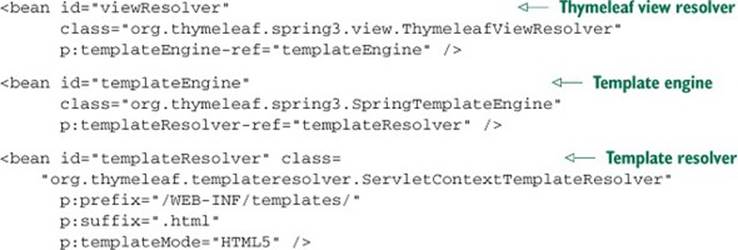
In order to use Thymeleaf with Spring, you’ll need to configure three beans that enable Thymeleaf-Spring integration:
· A ThymeleafViewResolver that resolves Thymeleaf template views from logical view names
· A SpringTemplateEngine to process the templates and render the results
· A TemplateResolver that loads Thymeleaf templates
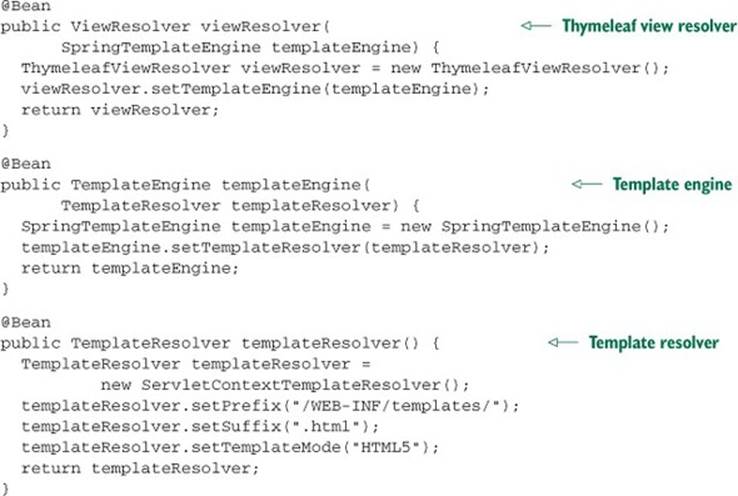
Here’s the Java configuration that declares those beans.
Listing 6.4. Configuring Thymeleaf support for Spring in Java configuration
If you’d prefer to configure the beans in XML, the following <bean> declarations will do the trick.
Listing 6.5. Configuring Thymeleaf support for Spring in XML
No matter which configuration style you use, Thymeleaf is now ready to render its templates in response to requests handled by Spring MVC controllers.
ThymeleafViewResolver is an implementation of Spring MVC’s ViewResolver. Just like any view resolver, it takes a logical view name and resolves a view. But in this case, that view is ultimately a Thymeleaf template.
Notice that the ThymeleafViewResolver bean is injected with a reference to the SpringTemplateEngine bean. SpringTemplateEngine is a Spring-enabled Thymeleaf engine for parsing templates and rendering results based on those templates. As you can see, it’s injected with a reference to the TemplateResolver bean.
TemplateResolver is what ultimately locates the templates. It’s configured much as you previously configured InternalResourceViewResolver with prefix and suffix properties. The prefix and suffix are applied to the logical view name to locate the Thymeleaf template. ItstemplateMode property is also set to HTML5, indicating that the templates resolved are expected to render HTML5 output.
Now that all the Thymeleaf beans have been configured, it’s time to create a few of those templates.
6.4.2. Defining Thymeleaf templates
Thymeleaf templates are primarily just HTML files. There are no special tags or tag libraries as with JSP. What makes Thymeleaf tick, however, is that it adds Thymeleaf attributes to the standard set of HTML tags via a custom namespace. The following listing shows home.html, the home page template that uses the Thymeleaf namespace.
Listing 6.6. home.html: home page template using the Thymeleaf namespace
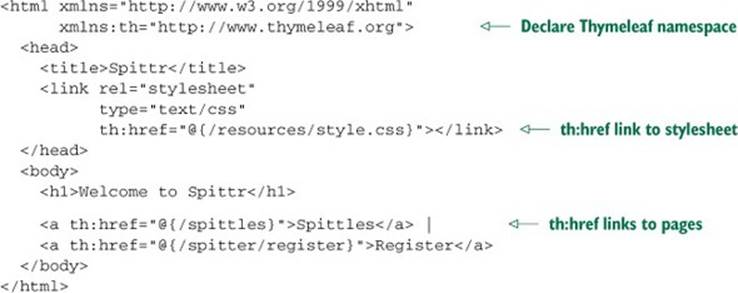
The home page template is relatively simple and only takes advantage of the th:href attribute. This attribute greatly resembles its native HTML counterpart, the href attribute, and can be used the same way. What makes th:href special is that its value can contain Thymeleaf expressions to evaluate dynamic values. It will render a standard href attribute containing a value that’s dynamically created at render time. This is how many of the attributes in the Thymeleaf namespace work: they mirror the standard HTML attribute that they share a name with, to render some computed value. In this case, all three uses of the th:href attribute use the @{} expressions to calculate context-sensitive URL paths (much as you might use JSTL’s <c:url> tag or Spring’s <s:url> tag in a JSP page).
Even though home.html is a rather basic specimen of a Thymeleaf template, it’s still remarkable in that it’s a near-pure HTML template. The only thing that stands out is the th:href attribute. Otherwise, it’s your basic, garden-variety HTML file.
This means Thymeleaf templates, unlike JSPs, can be edited and even rendered naturally, without going through any sort of processor. Sure, you’ll need Thymeleaf to process the templates to fully render the desired output. But as is, without any special processing, home.html can be loaded into a web browser and will appear much as it will when fully rendered. To illustrate, figure 6.6 shows a comparison of home.jsp (top) and home.html (bottom) when viewed in a web browser.
Figure 6.6. Thymeleaf templates, unlike JSPs, are HTML and can be rendered and edited just like HTML.

As you can see, the JSP template renders poorly in the web browser. Although you can see familiar elements, the JSP tag library declarations are also displayed. And there’s some odd unfinished markup just before the links, the result of the <s:url> tag not being properly interpreted by the web browser.
In contrast, the Thymeleaf template renders almost flawlessly. The only things that aren’t quite right are the links. The web browser doesn’t treat the th:href attribute like href, so the links aren’t rendered as links. Aside from that minor issue, the template renders exactly as you’d expect.
Simple templates like home.html are a nice introduction to Thymeleaf. But form binding is something that Spring’s JSP tags excel at. If you’re abandoning JSP, must you abandon form binding as well? Fear not. Thymeleaf has a little something up its sleeve.
Form binding with Thymeleaf
Form binding is an important feature of Spring MVC. It makes it possible for controllers to receive command objects populated with data submitted in a form and for the form to be prepopulated with values from the command object when displaying the form. Without proper form binding, you’d have to ensure that the HTML form fields were properly named to map to the backing command object’s properties. And you’d also be responsible for ensuring that the fields’ values were set to the command object’s properties when redisplaying a form after validation failure.
But with form binding, this is taken care of for you. As a reminder of how form binding works, here’s the First Name field from registration.jsp:
<sf:label path="firstName"
cssErrorClass="error">First Name</sf:label>:
<sf:input path="firstName" cssErrorClass="error" /><br/>
Here the <sf:input> tag from Spring’s form-binding tag library is called on to render an HTML <input> tag with its value attribute set to the value of the backing object’s firstName property. It also uses Spring’s <sf:label> and its cssErrorClass to render the label in red if there are any validation errors.
But in this section we’re not talking about JSP. On the contrary, we’re talking about replacing JSP with Thymeleaf. So instead of using Spring’s JSP tags to achieve form binding, you’ll take advantage of features of Thymeleaf’s Spring dialect.
As a demonstration, consider this snippet of a Thymeleaf template that renders the First Name field:
<label th:class="${#fields.hasErrors('firstName')}? 'error'">
First Name</label>:
<input type="text" th:field="*{firstName}"
th:class="${#fields.hasErrors('firstName')}? 'error'" /><br/>
Instead of using the cssClassName attribute as you did with Spring’s JSP tags, here you use Thymeleaf’s th:class attribute on standard HTML tags. The th:class attribute renders a class attribute with a value calculated from the given expression. In both uses of th:class, it directly checks to see if there are any field errors for the firstName field. If so, the class attribute is rendered with a value of error. If there are no field errors, the class attribute isn’t rendered at all.
The <input> tag uses the th:field attribute to reference the firstName field from the backing object. This may be slightly different than you expected. Many times in a Thymeleaf template, you’ll use a Thymeleaf attribute that mirrors a standard HTML attribute, so it might seem appropriate to use the th:value attribute to set the <input> tag’s value attribute.
Instead, because you’re binding the field to the backing object’s firstName property, you use the th:field attribute, referring to the firstName field. By using th:field, you get both a value attribute set to the value of firstName and also a name attribute set to firstName.
To demonstrate Thymeleaf data binding in action, the following listing shows the complete registration form template.
Listing 6.7. Registration page, using Thymeleaf to bind a form to a command object
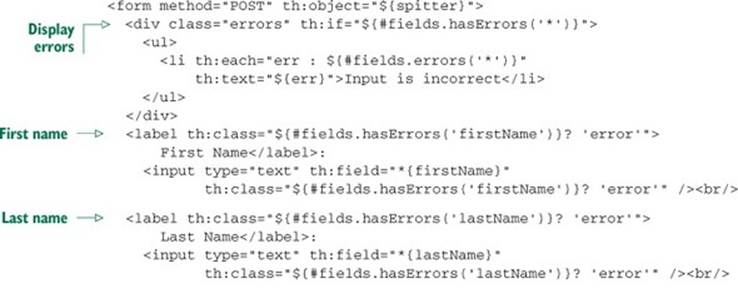
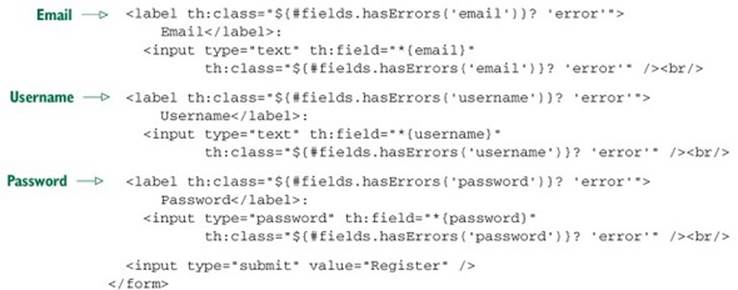
Listing 6.7 shows that all the form fields use the same Thymeleaf attributes and the *{} expression to bind to the backing object. This repeats what you already did with the First Name field.
But also notice that Thymeleaf is used near the top of the form to render all errors. The <div> element has a th:if attribute that checks to see if there are any errors. If there are, the <div> will be rendered. Otherwise, it won’t be rendered.
In the <div> is an unordered list to display each of the errors. The th:each attribute on the <li> tag instructs Thymeleaf to render the <li> one time for each error, assigning the current error in each iteration to a variable named err.
The <li> tag also has a th:text attribute. This attribute instructs Thymeleaf to evaluate an expression (in this case, the value of the err variable) and render its value as the body of the <li> tag. In effect, there will be one <li> for each error, displaying the text of that error.
You may be wondering about the difference between the expressions wrapped with ${} and those wrapped with *{}. The ${} expressions (such as ${spitter}) are variable expressions. Normally, these are Object-Graph Navigation Language (OGNL) expressions (http://commons.apache.org/proper/commons-ognl/). But when used with Spring, they’re SpEL expressions. In the case of ${spitter}, it resolves to the model property whose key is spitter.
As for *{} expressions, they’re selection expressions. Whereas variable expressions are evaluated against the entire SpEL context, selection expressions are evaluated on a selected object. In the case of the form, the selected object is the one given in the <form> tag’s th:object attribute: aSpitter object from the model. Therefore the *{firstName} expression evaluates to the firstName property on the Spitter object.
6.5. Summary
Processing requests is only half of the story of Spring MVC. If the results coming from the controllers you write are ever to be seen, the model data they produce needs to be rendered into views and displayed in the user’s web browser. Spring is flexible with regard to view rendering and offers several out-of-the-box options, including conventional JavaServer Pages and the popular Apache Tiles layout engine.
In this chapter, you’ve had a quick look at all the view and view-resolution options offered by Spring. We also took a deeper dive to show how you can use JSP and Apache Tiles with Spring MVC.
You also saw how to use Thymeleaf, an alternative to JSP, as the view layer of a Spring MVC application. Thymeleaf is a compelling option because it enables the creation of natural templates that are still pure HTML and can be edited and viewed in the raw as if they were static HTML, but still render dynamic model data at runtime. Moreover, Thymeleaf templates are largely decoupled from servlets, enabling them to be used in places where JSPs can’t.
With the view of the Spittr application defined, you have a small but deployable and functional web application written with Spring MVC. We still need to flesh out some other concerns like data persistence and security, and we’ll get to those in due time. But the application is starting to take shape nicely.
Before we dive deeper into the application stack, the next chapter continues our discussion of Spring MVC, looking at some of the more useful and advanced capabilities in the framework.
All materials on the site are licensed Creative Commons Attribution-Sharealike 3.0 Unported CC BY-SA 3.0 & GNU Free Documentation License (GFDL)
If you are the copyright holder of any material contained on our site and intend to remove it, please contact our site administrator for approval.
© 2016-2026 All site design rights belong to S.Y.A.