PROFESSIONAL JAVA FOR WEB APPLICATIONS (2014)
Part II Adding Spring Framework Into the Mix
Chapter 13 Replacing Your Servlets with Controllers
IN THIS CHAPTER
· What is @RequestMapping?
· How to utilize Spring Framework’s model and view pattern
· Easing your life with form objects
· Keeping the Customer Support application up-to-date
WROX.COM CODE DOWNLOADS FOR THIS CHAPTER
You can find the wrox.com code downloads for this chapter at http://www.wrox.com/go/projavaforwebapps on the Download Code tab. The code for this chapter is divided into the following major examples:
· Model-View-Controller Project
· Spring-Forms Project
· Customer-Support-v10 Project
NEW MAVEN DEPENDENCY FOR THIS CHAPTER
In addition to the Maven dependencies introduced in previous chapters, you also need the following Maven dependency:
<dependency>
<groupId>org.springframework</groupId>
<artifactId>spring-oxm</artifactId>
<version>4.0.2.RELEASE</version>
<scope>compile</scope>
</dependency>
UNDERSTANDING @REQUESTMAPPING
In Chapter 12, you were introduced to Spring Framework controllers and how to use the @RequestMapping annotation to map requests to methods within your controllers. @RequestMapping is an extraordinarily powerful tool in the Spring toolset, enabling you to map a request with the URL, the Content-Type or Accept header of the request, the HTTP request method, the presence or value of specified request parameters or headers, or any combination of these.
With @RequestMapping, you no longer need complex switches or logic branches within Servlet doGet or similar methods to select the proper method to execute. Instead, requests are automatically routed to the proper controller and method on your behalf. How a request maps to the proper controller and method is established through the various @RequestMapping annotation attributes. A mapped method may have any name, any number of different arguments, and one of numerous supported return types. In this section, you learn about all these capabilities.
Using @RequestMapping Attributes to Narrow Request Matching
The @RequestMapping annotation narrows which requests are mapped to a particular method. You can place @RequestMapping on just a controller method or on both a controller class and its methods. Placing the annotation on both a controller class and its methods establishes certain inheritance and precedence rules regarding the mappings. Some @RequestMapping attributes established for the controller class are inherited by and additive to those established for the method, whereas others established for the method override those established for the class. Thus, it is important to understand each attribute, its purpose, and whether values on the method add to or override values on the class.
NOTE Only @RequestMappings specified on a controller class are considered, not those specified on its superclasses. Thus, you cannot annotate an abstract class and have derived classes inherit the abstract class’s mappings.
URL Restrictions
You have already used @RequestMapping to narrow which requests a method can respond to based on their URLs. Using the value attribute (implicitly or explicitly if using other attributes), you can specify any Ant-style URL pattern. This is significantly more flexible than Servlet URL mappings (which may only begin with or end with a wildcard and cannot have multiple wildcards or wildcards in the middle of the URL). Controller method URL mappings are constructed using the Servlet URL mapping for the DispatcherServlet, the controller mapping (if applicable), and the method mapping, all separated by forward slashes if not specified. To demonstrate, consider the following methods mapped to different URLs:
@RequestMapping("viewProduct")
public String viewProduct(...) { ... }
@RequestMapping("addToCart")
public String addProductToCart(...) { ... }
@RequestMapping("writeReview")
public String writeProductReview(...) { ... }
In this case, if you map the DispatcherServlet to the context root (/), the application-relative URLs for these methods become /viewProduct, /addToCart, and /writeReview, respectively. Assuming that you instead map the DispatcherServlet to /store/*, the URLs for these methods become /store/viewProduct, /store/addToCart, and /store/writeReview, respectively.
NOTE If you are not familiar with Ant-style patterns, taken a minute to review the Apache Ant pattern documentation.
If you find that many URLs in a controller share a common element, you can use mapping inheritance to reduce redundancy in your mappings:
@RequestMapping("product")
public class ProductController
{
@RequestMapping("view")
public String viewProduct(...) { ... }
@RequestMapping("addToCart")
public String addProductToCart(...) { ... }
@RequestMapping("writeReview")
public String writeProductReview(...) { ... }
}
In this case, the method URLs become /product/view, /product/addToCart, and /product/writeReview if the DispatcherServlet maps to the context root. Likewise, the URLs become /store/product/view, /store/product/addToCart, and /store/product/writeReview if theDispatcherServlet maps to /store/*.
Another important aspect of URL mappings is that if a request matches multiple different URL mappings, the most-specific mapping wins. Thus, consider the following mappings:
@RequestMapping("view/*")
public String viewAll(...) { ... }
@RequestMapping("view/*.json")
public String viewJson(...) { ... }
@RequestMapping("view/id/*")
public String view(...) { ... }
@RequestMapping("view/other*")
public String viewOther(...) { ... }
Many different URLs could potentially match more than one of these methods:
· The URL /view/other.json could match the viewAll, viewJson, or viewOther methods, but viewOther is more specific, so it’s routed there.
· /view/id/anything.json would likewise match viewAll, viewJson, or view, but it is mapped to view.
· Because viewAll has the least-specific mapping of any of these methods, only requests that match none of the other methods are routed to viewAll.
Using this technique, you can create a catchall method that catches any requests not otherwise mapped to a controller method:
public class HomeController
{
@RequestMapping(value="/*")
public String catchAll(...) { ... }
}
However, this is generally not recommended. When users navigate to an invalid URL on your site, seeing the site homepage instead of a 404-error page can lead to confusion. If Spring Framework finds no methods matching a request, it automatically responds with a 404 error. If you want to customize this error page, you can do so using the <error-page> deployment descriptor element.
One final thing to understand about the @RequestMapping value attribute: It can also accept an array of URL mappings. Because of this, you can map more than one URL to a given method. In this example, the home method responds to the URLs /, /home, and/dashboard:
@RequestMapping({"/", "home", "dashboard"})
public String home(...) { ... }
Though not strictly required, you typically always use the value attribute, even if you use other attributes, too. It rarely makes sense, for example, to map a controller method to POST requests without specifying a URL as well.
HTTP Request Method Restrictions
You can also narrow the matching of requests to controller methods using HTTP methods. The @RequestMapping method attribute accepts one or more org.springframework.web.bind.annotation.RequestMethod enum constants. If a controller method mapping includes one or more values for the method attribute, a request only maps to this controller method if the request’s HTTP method matches one of the specified constants. You might find this particularly useful to map the same URL to different controller methods depending on the HTTP method, as in the following example:
@RequestMapping("account")
public class AccountManagementController
{
@RequestMapping(value="add", method=RequestMethod.GET)
public String addForm(...) { ... }
@RequestMapping(value="add", method=RequestMethod.POST)
public View addSubmit(...) { ... }
}
The /account/add URL matches both the addForm and addSubmit methods. GET requests to this URL route to the addForm method, whereas POST requests route to the addSubmit method. A request to the same URL using any other HTTP method is rejected. In fact, it’s best practice to always specify the supported HTTP method or methods for every mapping. This makes it more difficult to compromise your application, and also makes it obvious when a form that should be submitted as a POST request (such as a login) accidentally gets submitted with a GET request. RequestMethod supports OPTIONS, HEAD, GET, POST, PUT, DELETE, PATCH, and TRACE.
It’s important to understand that, when inherited from the class, the method attribute is a restriction at both levels. A request’s HTTP method is checked against the class-level restrictions first. If it makes it past these restrictions, it is then checked against the method-level restrictions. Thus, the following AccountManagementController is semantically the same as the previous version.
@RequestMapping(value="account", method={RequestMethod.GET, RequestMethod.POST})
public class AccountManagementController
{
@RequestMapping(value="add", method=RequestMethod.GET)
public String addForm(...) { ... }
@RequestMapping(value="add", method=RequestMethod.POST)
public View addSubmit(...) { ... }
}
Request Parameter Restrictions
The params attribute of the @RequestMapping annotation is another feature you briefly explored in Chapter 12. Using this attribute you can specify one or more parameter expressions that must hold true. The expression "myParam=myValue" indicates that the myParamrequest parameter must be present and its value must equal “myValue,” whereas "myParam!=myValue" indicates that the myParam request parameter must not equal “myValue.” You can also use the expression "myParam", meaning the myParam request parameter must be present with any value (including blank), and "!myParam", meaning the myParam request parameter must not be present (blank values are not allowed). If a request does not match all the expressions specified in the params attribute, it does not map to the controller method.
The following request mapping narrows the matching so that the method is invoked only if the employee parameter is present with any value and the confirm parameter is present and equals true:
@RequestMapping(value="can", params={"employee", "confirm=true"})
public String can(...) { ... }
Like HTTP request method restrictions, parameter restrictions are inherited. Spring Framework first checks the parameter restrictions on the controller class and then checks the parameter restrictions on the method. It only maps the request if it passes both sets of restrictions.
Request Header Restrictions
Header restrictions using @RequestMapping’s headers attribute work nearly identically to parameter restrictions, including the way they are inherited. You can specify value or presence expressions for any header and negate those expressions with an exclamation point, just like with parameter restrictions.
Header restrictions have the additional feature that you can specify value wildcards for media-type headers. So the following request mapping matches only requests that contain the X-Client header and whose Content-Type header is any text type. Note that header name matching is case-insensitive.
@RequestMapping(value="user", headers={"X-Client", "content-type=text/*"})
public User user(...) { ... }
Content Type Restrictions
You can further narrow request mapping using the request content type or the request’s expected response content type (or both). Although either of these restrictions are possible using the headers attribute, the consumes and produces attributes are conveniences to make this task easier.
The consumes attribute takes one or more media types (or media type wildcards) that must match the request’s Content-Type header. Thus, it defines what content type the method can consume. Likewise, the produces attribute takes one or more media types (or wildcards) that must match the request’s Accept header. As such, it specifies which content types the method can produce so that Spring can determine whether those match the content types the client expects the response to contain. The following request mapping matches only requests with a Content-Type of application/json or text/json and an Accept header containing application/json or text/json.
@RequestMapping(value="song", consumes={"text/json", "application/json"},
produces={"text/json", "application/json"})
public Song song(...) { ... }
If specified in both the class @RequestMapping and the method @RequestMapping, the consumes and produces attributes on the method override those specified on the class. (In other words, the values for the class are ignored if values are also specified for the method.)
NOTE Content type restrictions are useful but are not always the best way to achieve content negotiation. The “Configuring Content Negotiation” section of this chapter goes into more detail about this topic.
Specifying Controller Method Parameters
Controller methods can have any number of parameters of many different types. Spring Framework is extremely flexible as to the number and types of parameters. The simplest methods may have zero parameters, whereas complex methods may have a dozen or more. Spring can understand the purpose of these parameters and provide the proper value at call time. Additionally, some simple configuration can expand the parameter types that Spring understands.
Standard Servlet Types
When needed, Spring can provide arguments to your methods for numerous parameter types related to the Servlet API. The values passed to these parameters are never null because Spring guarantees values for them. Your methods can specify none, any, or all of these parameter types:
· HttpServletRequest, for using request properties
· HttpServletResponse, for manipulating the response
· HttpSession, for manipulating the HTTP session object
· InputStream or Reader, but not both, for reading the request body. You should not close this object when finished with it.
· OutputStream or Writer, but not both, for writing to the response body. You should not close this object when finished with it.
· The java.util.Locale that the client has identified should be used for localization purposes (or the default locale, if none is specified).
· An org.springframework.web.context.request.WebRequest, which is for using request properties and manipulating the HTTP session object without using the Servlet API directly. You should not use this parameter type if you also have parameters of typesHttpServletRequest, HttpServletResponse, or HttpSession in the same method.
Annotated Request Properties
You can use several parameter annotations (which are all in the package org.springframework.web.bind.annotation) to indicate that a method parameter’s value should be taken from some property of the request. In most cases, a parameter marked with one of these annotations can be any primitive or primitive wrapper type, String, Class, File, Locale, Pattern, java.util.Properties, or java.net.URL, or an array or any Collection of any of these types. Spring automatically converts the value to that type, if possible. You can also register your own custom java.beans.PropertyEditors or org.springframework.core.convert.converter.Converters with Spring Framework to handle other types.
The @RequestParam annotation indicates that the annotated method parameter should be derived from the named request parameter. You specify the request parameter name using the value attribute (implicitly or explicitly). By default, this annotation indicates that the request parameter is required, and the request will not map without it. You can set the required attribute to false to disable this behavior (making the request parameter optional), in which case the method argument value is null if the request does not contain that request parameter. You can also use the defaultValue attribute to specify a value other than null to pass in if the request lacks the parameter. The following method accepts a required id request parameter, an optional name request parameter with a default value of null, and an optional key request parameter with a blank string as the default value. Request parameter names are case sensitive.
@RequestMapping("user")
public String user(@RequestParam("id") long userId,
@RequestParam(value="name", required=false) String name,
@RequestParam(value="key", defaultValue="") String key)
{ ... }
NOTE When using @RequestParam, you are not strictly required to specify the request parameter name using the value attribute. Spring Framework will infer that the request parameter name is equal to the method parameter name. However, this works only if your code compiles with local symbol debug information; otherwise, Spring cannot detect the parameter name. As an alternative to enabling local debug symbols, Spring also supports the new parameter name reflection tools added in Java 8, which require your code to be compiled with the -parameters command-line argument enabled. If you cannot rely on either of these, you should stick to explicitly specifying the request parameter name.
If you expect a request parameter to have multiple values, make the corresponding method parameter an array or Collection of the appropriate type.
You can also obtain all request parameter values in a Map by annotating a single parameter of type Map<String, String> or org.springframework.util.MultiValueMap<String, String> with @RequestParam.
@RequestHeader works identically to @RequestParam in providing access to request header values. It specifies a required (default) or optional request header to use as the value of the corresponding method parameter. Because HTTP headers can also have multiple values, you should use array or Collection parameter types if you expect this to be the case. You can annotate a single parameter of type Map<String, String>, MultiValueMap<String, String>, or org.springframework.http.HttpHeaders with @RequestHeader to obtain the values of all request headers. Of the following three methods, foo obtains two headers by name, while bar and baz obtain all headers. Header names are not case sensitive.
@RequestMapping("foo")
public String foo(@RequestHeader("Content-Type") String contentType,
@RequestHeader(value="X-Custom-Header", required=false)
Date customHeader)
{ ... }
@RequestMapping("bar")
public String bar(@RequestHeader MultiValueMap<String, String> headers)
{ ... }
@RequestMapping("baz")
public String baz(@RequestHeader HttpHeaders headers)
{ ... }
URL mappings in Spring Framework do not have to be static values. Instead, the URL can contain a template indicating that part of the URL is variable and its value is required at run time. URI template variables are often much friendlier to search engines and are part of the RESTful web services standard. The following code snippet demonstrates specifying a URI template variable in a URL mapping and using that template variable value as a value for a method parameter by way of @PathVariable.
@RequestMapping(value="user/{userId}", method=RequestMethod.GET)
public String user(@PathVariable("userId") long userId) { ... }
By default, Spring allows template variable values to contain any character other than a period (regular expression [^.]*). You can customize this behavior by specifying a regular expression in the URL mapping to decrease the allowed characters or increase it to include periods. The following mapping is essentially the same as the previous one but restricts the userId template variable to numeric characters only. A request URL that does not contain this template variable or that contains invalid characters will not map to the controller method.
@RequestMapping(value="user/{userId:\d+}", method=RequestMethod.GET)
public String user(@PathVariable("userId") long userId) { ... }
A URL mapping may contain multiple template variables, and each can have an associated method parameter. In addition, you can annotate a single method parameter of type Map<String, String> as @PathVariable and it will contain all URI template variable values from the URL.
@RequestMapping(value="foo/{var1}/bar/{var2}")
public String fooBar(@PathVariable("foo") String foo,
@PathVariable("bar") long bar)
{ ... }
@RequestMapping(value="bar/{var1}/foo/{var2}")
public String barFoo(@PathVariable Map<String, String> variables)
{ ... }
RFC 3986 defines the concept of URI path parameters. Unlike query parameters, which go in the query string and belong to the URI as a whole, path parameters belong to specific segments of a path.
For example, in the URL http://www.example.com/hotel/43;floor=8;room=15/guest, the path parameters floor and room belong to the path segment 43 (likely the hotel ID in this example). The Servlet API specification requires that path parameters be removed from the URL prior to matching it to a Servlet mapping. For the hotel URL, this means that the URL used to match the request to a Servlet is actually /hotel/43/guest. Spring Framework does the same thing when it matches requests to controller method mappings. In addition, Spring provides the @MatrixVariable annotation for extracting path parameters as method parameters. Similar to @RequestParameter, @MatrixVariable has value, required, and defaultValue attributes.
@RequestMapping("hotel/{hotelId:\d+}/guest")
public String guestForRoom(@PathVariable("hotelId") long hotelId,
@MatrixVariable("floor") short floorNumber,
@MatrixVariable("room") short roomNumber)
{ ... }
This mapping matches the previous hotel URL. Because path parameters are ignored when matching requests to URL mappings, the mapping doesn’t actually declare the parameters.
@MatrixVariable also has a pathVar attribute for specifying to which URI template variable (@PathVariable) the URI path parameter belongs. The pathVar attribute is optional, however. If only one path segment in your URL can contain a path parameter with the given name, you have no reason to specify the pathVar. If more than one path segment in your URL can contain a path parameter with the given name, you must specify pathVar to disambiguate which parameter you are referencing. The following example is semantically the same as the previous example, but completely unambiguous:
@RequestMapping("hotel/{hotelId:\d+}/guest")
public String guestForRoom(@PathVariable("hotelId") long hotelId,
@MatrixVariable(pathVar="hotelId", value="floor")
short floorNumber,
@MatrixVariable(pathVar="hotelId", value="room")
short roomNumber)
{ ... }
Input-Bound Form Objects
When working with HTML forms, a client submission can often contain a dozen or more fields. Consider a user sign-up form, which could have the username, password, confirmed password, e-mail address, first and last name, phone numbers, addresses, and more.
Although @RequestParam is certainly a valuable tool, having dozens of parameters for your method is tedious at best and makes unit testing fragile. Instead of this, Spring Framework enables you to specify a form object, also called a command object, as one of a controller method’s parameters. Form objects are simple POJOs with accessor and mutator methods. They don’t have to implement any special interface, and you don’t have to mark the controller method parameter with any special annotation for Spring to recognize it as a form object.
public class UserRegistrationForm
{
private String username;
private String password;
private String emailAddress;
// other fields, and mutators and accessors
}
@RequestMapping("user")
public class UserController
{
@RequestMapping(value="join", method=RequestMethod.POST)
public String join(UserRegistrationForm form) { ... }
}
In this example, Spring looks through the UserRegistrationForm class for methods starting with set. It then maps request parameters to the form object properties using the parameter names. For example, the setUsername method is called with the value of the request parameter username, and the setEmailAddress method is called with the value of the emailAddress request parameter. If a request parameter doesn’t match any form object properties, it is simply ignored. Likewise, if you have form object properties that aren’t satisfied with request parameters, they are also ignored. The string-based request parameter values are converted to their destination property types using the registered PropertyEditors and Converters (the same ones that convert controller method arguments).
Spring can also validate the details of your form object automatically, which means you can avoid embedding that validation logic in your controller method. If you have bean validation enabled and if you mark your form object parameter with@javax.validation.Valid, the parameter that immediately follows the form object parameter may be of type org.springframework.validation.Errors or org.springframework.validation.BindingResult. When Spring calls the method, the value for that parameter is the result of the validation process. If the parameter immediately following the form object parameter is not an Errors or BindingResult object and validation of the form object fails, Spring simply throws an org.springframework.web.bind.MethodArgumentNotValidException.
@RequestMapping(value="join", method=RequestMethod.POST)
public String join(@Valid UserRegistrationForm form,
BindingResult validation) { ... }
The details of how form object validation works, and how you enable it, are covered in Chapter 16.
Request Body Conversion and Entities
So far, the tools you have seen that coordinate with @RequestMapping have dealt with traditional features of GET and POST web requests: headers, URL query parameters, and x-www-form-urlencoded request bodies (form submissions). However, POST and PUT requests can contain data in formats other than x-www-form-urlencoded. For example, in a RESTful web service, a POST or PUT request may contain a request body in JSON or XML format to represent more complex data than possible with x-www-form-urlencoded. Request bodies can also contain binary, base64-encoded data or, for that matter, pretty much any format that the client and server can understand. When this data represents some kind of object, it is often referred to as the request entity or HTTP entity. Using the @RequestBodyannotation, Spring automatically converts a request entity to a controller method parameter.
public class Account
{
public long accountId;
public String accountName;
public String emailAddress;
// other fields, and mutators and accessors
}
@RequestMapping("account")
public class AccountController
{
@RequestMapping(value="update", method=RequestMethod.POST)
public String update(@RequestBody Account account) { ... }
}
By default, @RequestBody parameters are required, but you can make them optional using the required attribute. Request entities are automatically converted using Spring’s HTTP message converters. Although other parameter types, such as @RequestParam and@RequestHeader parameters, are simple types converted automatically from their string representation to the target type using PropertyEditors and Converters, request entities must have specialized message converters that can understand both the source format (JSON, XML, binary, and so on) and the destination format (a POJO or other complex object). You learn more about using HTTP message converters in Chapter 17.
Like form objects, you can also mark @RequestBody method parameters as @Valid to trigger content validation and can optionally follow the parameters with Error or BindingResult parameters. Again, validation throws a MethodArgumentNotValidException if validation fails and there is no Error or BindingResult parameter following the request entity parameter.
@RequestMapping(value="update", method=RequestMethod.POST)
public String update(@Valid @RequestBody Account account,
BindingResult validation) { ... }
Instead of using @RequestBody, your method could take an argument of type org.springframework.http.HttpEntity<?>. This type provides access to the request headers (HttpHeaders) and to the request body as the type argument specified. So, you could replace the previous method with this:
@RequestMapping(value="update", method=RequestMethod.POST)
public String update(HttpEntity<Account> request) { ... }
However, validation of the request body object does not happen automatically using the HttpEntity parameter, so there is really no compelling benefit to using it.
Multipart Request Data
In Chapter 3, you learned how to accept file uploads in your Servlets using Servlet 3.0’s multipart request support. In a browser environment, you almost always use a multipart request for uploading files along with regular form data. In these cases, the request has aContent-Type of multipart/form-data, and it contains a part for each form field submitted. Each part of the request, separated by a specified boundary, has a Content-Disposition of form-data and a name matching the form input name. If the form field is a standard form field, its part simply contains the data from the form field. If the form field is a file-type field for a single file, its part has a Content-Type matching the file MIME type and the file contents, binary encoded if necessary.
The following is a sample POST of a form with a single field username with the value “John” and a single-file upload of a text file, similar to what you would see using a network monitoring tool like Wireshark or Fiddler:
POST /form/upload HTTP/1.1
Hostname: www.example.org
Content-Type: multipart/form-data; boundary=X3oABba8
Content-Length: 236
--X3oABba8
Content-Disposition: form-data; name="username"
John
--X3oABba8
Content-Disposition: form-data; name="upload"; filename="sample.txt"
Content-Type: text/plain; charset=UTF-8
This is the contents of sample.txt
--X3oABba8--
If the form field is a file-type field for multiple files, its part has a Content-Type of multipart/mixed and contains its own parts, one for each file, as in the following example:
POST /form/upload HTTP/1.1
Hostname: www.example.org
Content-Type: multipart/form-data; boundary=X3oABba8
Content-Length: 512
--X3oABba8
Content-Disposition: form-data; name="username"
John
--X3oABba8
Content-Disposition: form-data; name="uploads"
Content-Type: multipart/mixed; boundary=Bc883CXNc
--Bc883CXNc
Content-Disposition: file; filename="sample.txt"
Content-Type: text/plain; charset=UTF-8
This is the contents of sample.txt
--Bc883CXNc
Content-Disposition: file; filename="blank-pixel.gif"
Content-Type: image/gif
Content-Transfer-Encoding: base64
R0lGODlhAQABAHAAACH5BAUAAAAALAAAAAABAAEAAAICRAEAOw==
--Bc883CXNc--
--X3oABba8--
Marking a controller method parameter with @RequestParam results in Spring pulling that value from the URL query parameter with that name, the x-www-form-urlencoded POST request body parameter with that name, or from the multipart request part with that name. However, the available PropertyEditors and Converters convert these parameters only from string values to simple types. File uploads are neither string values nor simple types.
The @RequestPart annotation can mark any controller method parameter that should come from a part in a multipart request and should be converted with an HTTP message converter instead of a PropertyEditor or Converter. Like so many of the other annotations, it also has a required attribute that defaults to true.
@RequestMapping(value="form/upload", method=RequestMethod.POST)
public String upload(@RequestParam("username") String username,
@RequestPart("upload") Part upload) { ... }
This method can respond to the previously demonstrated multipart request containing a single file. This works because Spring has a built-in HTTP message converter that recognizes file parts. In addition to the javax.servlet.http.Part type, you can also convert file uploads to org.springframework.web.multipart.MultipartFile. If the file field permits multiple file uploads, as demonstrated in the second multipart request, simply use an array or Collection of Parts or MultipartFiles.
@RequestMapping(value="form/upload", method=RequestMethod.POST)
public String upload(@RequestParam("username") String username,
@RequestPart("uploads") List<MultipartFile> uploads)
{ ... }
You are not limited to using multipart file uploads directly as controller method parameters. Your form objects can contain Part or MultipartFile fields, and Spring knows automatically that it must obtain the values from file parts and converts the values appropriately.
public class UploadForm
{
private String username;
private List<Part> uploads;
// mutators and accessors
}
@RequestMapping(value="form/upload", method=RequestMethod.POST)
public String upload(UploadForm form) { ... }
So far, you have seen multipart processing used exclusively for file uploads, but for Spring request processing, file uploads are not the only multipart contents supported. Instead of multipart/form-data, a request might be multipart/mixed. Its parts could then contain any content, including request entities in JSON, XML, or binary form. Spring can then convert these parts to any type for which it has an appropriate HTTP message converter. You can even use validation with non-file parts, just like you can with @RequestBodyparameters and form objects.
@RequestMapping(value="update", method=RequestMethod.POST)
public String update(@Valid @RequestPart("account") Account account,
BindingResult validation) { ... }
It should be noted that using multipart requests in this manner is extremely unusual. Typically, entity requests have a one-part body; multipart requests come from browsers uploading files.
Model Types
In the next section you explore using models and views in the Spring MVC architecture. It should be noted here, however, that your controller methods may have a single non-annotated parameter of type Map<String, Object>, org.springframework.ui.ModelMap, ororg.springframework.ui.Model. A method parameter of one of these types represents the model that Spring passes to your views for rendering, and you may add any attributes to it, as needed, while your method executes.
Selecting Valid Return Types for Controller Methods
As you have undoubtedly concluded, Spring Framework is extraordinarily flexible as to what method parameters your @RequestMapping methods may specify. Likewise, Spring is quite flexible on which types your controller methods may return. Generally speaking, while the method parameters are usually related to the request contents, the return type is typically related to the response. A void return type, for example, tells Spring that your method handles writing to the response manually, and so Spring does no further request handling after your method returns. More typically, however, a controller method returns some type (sometimes with an annotation) indicating how Spring should respond to the request.
Model Types
Controller methods may return a Map<String, Object>, a ModelMap, or a Model. This is an alternative to specifying one of these types as a method parameter. Spring can recognize this return type as the model and determine the view automatically using the configuredorg.springframework.web.servlet.RequestToViewNameTranslator (defaults to org.springframework.web.servlet.view.DefaultRequestToViewNameTranslator).
View Types
To instruct Spring to use a specific view to render a response, your controller methods may return a number of view types. The org.springframework.web.servlet.View interface (or any class implementing View) indicates that your method returns an explicit view object. After your method returns, request handling is passed off to that view. Spring Framework provides dozens of View implementations (such as RedirectView, for example), or you may create your own. Your controller methods may also return a String indicating thename of a view to resolve. You learn more about view resolution in the next section. Finally, your methods may return an org.springframework.web.servlet.ModelAndView. This class provides the ability to return both a View and a model type, or a String view name and a model type, at the same time.
Response Body Entities
Just like request bodies can contain HTTP entities (request entities), response bodies can contain HTTP entities (response entities). Controller methods can return HttpEntity<?> or org.springframework.http.ResponseEntity<?>, and Spring converts the body object in the entity to the correct response content using the appropriate HTTP message converter based on the negotiated content type. HttpEntity permits setting of the response body and various headers. ResponseEntity, which extends HttpEntity, adds the ability to set the response status code in the form of an org.springframework.http.HttpStatus.
@RequestMapping(value="user/{userId}", method=RequestMethod.GET)
public ResponseEntity<User> getUser(@PathVariable("userId") long userId)
{
User user = this.userService.getUser(id);
return new ResponseEntity<User>(user, HttpStatus.OK);
}
If you don’t want to use the HttpEntity or ResponseEntity, you can return the body object itself and annotate the method with @ResponseBody, which has the same effect. You can then also annotate the method with @ResponseStatus to specify the response status code (which defaults to 200 OK if you don’t use @ResponseStatus).
@RequestMapping(value="user/{userId}", method=RequestMethod.GET)
@ResponseBody
@ResponseStatus(HttpStatus.OK)
public User getUser(@PathVariable("userId") long userId)
{
return this.userService.getUser(id);
}
In Chapter 12, you used a return type of String with the @ResponseBody annotation for one of the examples. When @ResponseBody is specified, other handlers for the returned type (such as view resolution) are ignored. Because of this, Spring returned the String as the actual response body for that example instead of resolving a view by name. @ResponseBody always takes precedence over all other controller method return value handlers.
Any Return Type
Your methods may return any other object, and Spring assumes this object should be an attribute in the model. It uses the camelCase version of the return type class name as the model attribute name unless the method is annotated with @ModelAttribute, in which case Spring uses the name specified in the annotation as the attribute name. In either scenario, Spring determines the view automatically using the configured RequestToViewNameTranslator. In the following example, the first method’s return value becomes a model attribute named userAccount, and the second method’s return value becomes a model attribute named user.
@RequestMapping("user/{userId}")
public UserAccount viewUser(@PathVariable("userId") long userId)
{ ... }
@RequestMapping("user/{userId}")
@ModelAttribute("user")
public UserAccount viewUser(@PathVariable("userId") long userId)
{ ... }
Asynchronous Types
In addition to all the return type options previously listed, controller methods may return java.util.concurrent.Callable<?> or org.springframework.web.context.request.async.DeferredResult<?>. These types cause Spring to execute the Callable or DeferredResult in a separate thread using asynchronous request handling, freeing up the request thread to answer another request. You would typically do this for requests that may take a long time to respond to, especially if they spend much of that time blocking for network or disk I/O. The type parameter (return type) for the Callable or DeferredResult should be the type you would normally return from the controller method if you did not want to invoke asynchronous request handling (View, String, ModelMap, ModelAndView, ResponseEntity, and so on). You can still annotate the controller method with @ResponseBody, @ResponseStatus, or @ModelAttribute to trigger the appropriate handling after the Callable or DeferredResult returns. The same cautions expressed in Chapters 9 and 11 regarding asynchronous request handling with filters and logging apply here as well.
USING SPRING FRAMEWORK’S MODEL AND VIEW PATTERN
As you have probably concluded by this point, Spring Framework’s MVC architecture gets its name due to its reliance on the Model-View-Controller (MVC) design pattern. If you are not familiar with the MVC pattern, it may be helpful at this point to pick up a copy of Head First Design Patterns (O’Reilly, ISBN 978-0596007126) and read about it.
To sum it up in one sentence, controllers manipulate data in a model that represents information the user is interested in and pass that model on to the view, which renders the model in a way useful to the user. The user only ever knowingly interacts with the view, but he unknowingly interacts with the controller when he performs actions of some kind. The MVC pattern works great in a Java Enterprise Edition environment, and indeed you have already been using it since Chapter 4! A Servlet can be thought of as a controller, performing actions on behalf of the user when requested. The Servlet manipulates the model in the form of HttpServletRequest attributes and then forwards that model on to the view, the JSP, for rendering.
Spring takes this two steps further by separating the model from the request entirely (remember: Map<String, Object>, ModelMap, or Model) and providing the high-level View interface that can be implemented in infinite ways. The InternalResourceView and JstlViewimplement traditional JSP and JSTL-enhanced-JSP views, respectively. They take care of translating model attributes to request attributes and forwarding the request on to the proper JSP. If you aren’t a fan of JSP, you can choose FreeMarkerView (which supports the FreeMarker template engine), VelocityView (which supports the Apache Velocity template engine), and TilesView (which supports the Apache Tiles template engine). You can also implement support for some other template engine.
If you need to transform the model into a JSON or an XML response — typical for RESTful web services and Ajax-backing request endpoints — Spring provides the MappingJackson2JsonView and MarshallingView. These support JSON and XML, respectively. You can also use the RedirectView, which sends a Location-header redirect response with status code 302 Found (for HTTP 1.0 compatibility) or 303 See Other (the correct status code for HTTP 1.1 clients) depending on how you construct it. Later, in the section “Updating the Customer Support Application,” you write your own custom view called DownloadView to send the content of a server-side file to the user’s browser.
When a controller method returns an implementation of View, or ModelAndView with an implementation of View passed into the ModelAndView constructor, Spring uses that View directly and requires no further logic to determine how to present your model to the client. If the controller method returns a String view name, or a ModelAndView constructed with a String view name, Spring must resolve that view name into an actual View using the configured org.springframework.web.servlet.ViewResolver. If the method returns a model or model attribute, Spring must first implicitly translate the request into a view name using the configured RequestToViewNameTranslator (as previously described) and then resolve that named view using the ViewResolver. Finally, when a controller method returns a response entity, ResponseEntity, or HttpEntity, Spring uses content negotiation to determine which view to present the entity with.
This section covers each of these techniques. Your application may use one of them exclusively or some or all of them throughout your controllers. You can follow along in the Model-View-Controller project available for download on the wrox.com code download site.
Using Explicit Views and View Names
The Model-View-Controller project is bootstrapped and configured programmatically just like you learned in Chapter 12: A WebApplicationInitializer starts Spring Framework, which is configured with two @Configuration classes, RootContextConfiguration andServletContextConfiguration. For this project, all requests are mapped to the HomeController class.
Using the Redirect View
Generally, the most common view you would explicitly return is the org.springframework.web.servlet.view.RedirectView for sending the client to a different URL. If the URL begins with a protocol (http://, https://, and so on) or network prefix (//), it is assumed to be an absolute URL. If the URL is relative (no protocol, prefix, or leading forward slash) it is assumed to be relative to the current URL (typical web and file system behavior). Perhaps counter-intuitively, RedirectView normally considers URLs starting with a forward slash to be relative to the server URL as opposed to the application context URL (which, in almost all cases, is not the intended behavior). So, when you construct a RedirectView, it is important to enable context-relative absolute URLs, as demonstrated in the first method in the HomeController.
@RequestMapping("/")
public View home(Map<String, Object> model)
{
model.put("dashboardUrl", "dashboard");
return new RedirectView("/{dashboardUrl}", true);
}
The second, true argument to the RedirectView constructor tells RedirectView that the URL is context-relative, not server-relative. Notice the replacement template {dashboardUrl} in the URL for the RedirectView. RedirectView replaces such templates with attributes from the model. Of course, in this case it would have been easier to construct the view with the static URL string (new RedirectView("/dashboard", true)), but using this template demonstrates the power of the RedirectView.
The eventual URL to which the view is redirecting the client is rather useless without a handler method, and the second method in the HomeController takes care of this.
@RequestMapping(value = "/dashboard", method = RequestMethod.GET)
public String dashboard(Map<String, Object> model)
{
model.put("text", "This is a model attribute.");
model.put("date", Instant.now());
return "home/dashboard";
}
This method responds to the /dashboard URL, adding text and date attributes and returning the String name of a view. But what does this name mean? How does Spring take this name and figure out the view from it?
Configuring View Resolution
To match this view name to an actual view, Spring needs a ViewResolver instance that can understand it. Creating a view resolver is a simple task of instantiating a framework bean within the dispatcher servlet application context. For this, you should use theInternalResourceViewResolver, which can turn view names into JSP filenames. This is accomplished with the viewResolver method of the ServletContextConfiguration.
@Bean
public ViewResolver viewResolver()
{
InternalResourceViewResolver resolver =
new InternalResourceViewResolver();
resolver.setViewClass(JstlView.class);
resolver.setPrefix("/WEB-INF/jsp/view/");
resolver.setSuffix(".jsp");
return resolver;
}
As configured, the view resolver constructs JSP file names using the prefix /WEB-INF/jsp/view followed by the view name followed by .jsp. There’s nothing else you need to do to get view resolution working. You should note that it’s important to name the beanviewResolver, and thus you must also name the @Bean method viewResolver.
Creating a JSP View
Naturally, given the configured view resolver and the view name returned by the dashboard handler method, the application needs a /WEB-INF/jsp/view/home/dashboard.jsp file. There is nothing special about this JSP file. You can use all the same features within it — scriptlets, expressions, expression language, JSP tags, and more — as you can within any other JSP. Notice the @elvariable type hints, which you learned in Part I, help your IDE provide validation and code suggestion services for your JSPs.
<%--@elvariable id="text" type="java.lang.String"--%>
<%--@elvariable id="date" type="java.time.Instant"--%>
<!DOCTYPE html>
<html>
<head>
<title>Dashboard</title>
</head>
<body>
Text: ${text}<br />
Date: ${date}
</body>
</html>
The view in this case is simple: It just prints out the two attributes on the model. Notice that you access the model attributes just as you used to access HttpServletRequest attributes. You don’t have to do anything special because the JstlView ensures all your model attributes are exposed as EL variables for the JSP. To test this, compile your application and start Tomcat from your IDE. Go to http://localhost:8080/mvc and you should immediately be redirected to http://localhost:8080/mvc/dashboard. This is the RedirectViewdoing its job in the HomeController’s home method. Your browser should now display the text from the model and the current time in ISO 8601 format. This means view resolution is working properly and your JSP view displayed your model through the JstlView.
Using Implicit Views with Model Attributes
If a controller method returns a model or model attribute, Spring must determine which view to use automatically. To do this, it needs a RequestToViewNameTranslator bean coupled with a ViewResolver.
Configuring View Name Translation
Although you can create your own RequestToViewNameTranslator if needed, the DefaultRequestToViewNameTranslator is usually sufficient. It strips off the web application context URL and any file extension at the end of the URL. What remains of the URL becomes the view name. For example, the URL http://localhost:8080/mvc/foo turns into the view name foo, whereas the URL http://localhost:8080/mvc/foo/bar.html turns into the view name foo/bar. As with the ViewResolver, all you have to do is add a bean to theServletContextConfiguration in order to configure the RequestToViewNameTranslator.
@Bean
public RequestToViewNameTranslator viewNameTranslator()
{
return new DefaultRequestToViewNameTranslator();
}
You can customize how the DefaultRequestToViewNameTranslator translates the name with various configuration methods, but here the default configuration is sufficient. You must name the bean viewNameTranslator, so you must also name the @Bean methodviewNameTranslator.
Using @ModelAttribute
After you configure view name translation, taking advantage of it is simple. The userHome method of the HomeController, mapped to the /user/home URL, creates a User object, sets some values on it, and returns the User. The User class, in this case, is a simple POJO with fields userId, username, and name, accompanied by standard mutators and accessors.
@RequestMapping(value = "/user/home", method = RequestMethod.GET)
@ModelAttribute("currentUser")
public User userHome()
{
User user = new User();
user.setUserId(1234987234L);
user.setUsername("adam");
user.setName("Adam Johnson");
return user;
}
The @ModelAttribute annotation tells Spring that the User returned should be added to the model with the attribute key currentUser. Without the annotation, Spring uses the default attribute key user (based on the class name of the type returned). You need a view to display this user, and based on the configured view name translation, the view name becomes user/home, so you can create the JSP /WEB-INF/jsp/view/user/home.jsp.
<%--@elvariable id="currentUser" type="com.wrox.site.User"--%>
<!DOCTYPE html>
<html>
<head>
<title>User Home</title>
</head>
<body>
ID: ${currentUser.userId}<br />
Username: ${currentUser.username}<br />
Name: ${currentUser.name}<br />
</body>
</html>
Now compile the project, start Tomcat from your IDE, and go to http://localhost:8080/mvc/user/home in your browser. You should see the ID, username, and name for the user as created in the userHome controller method. View name translation and view resolution worked together to detect and display the proper view for the request.
Returning Response Entities
Getting request entities and returning response entities is a task typically reserved for RESTful web services or other automated tasks. In the majority of cases, browsers are involved in these situations only when a JavaScript application makes an Ajax GET from orPOST to the server. For this reason, HTTP entities and content negotiation are covered in greater detail in Chapter 17. This section covers the basics of handling response entities and configuring message converters and content negotiation.
Configuring Message Converters
When a server receives a POST or PUT with a request body, this body is typically called an HTTP entity or request entity, but may also be called a message. That message, in whatever format it might be, must be converted to a Java object of some type for your controller methods to consume. This happens based on the Content-Type header of the request.
You have already learned about one message converter and may not have even realized it: The org.springframework.http.converter.FormHttpMessageConverter is responsible for converting x-www-form-urlencoded messages into form objects for your controller methods. Message converters work both ways: They can convert incoming messages to Java objects as well as convert Java objects to outgoing messages. They operate on the simple principle of recognized MIME content types and target Java types. Each converter has one or more supported MIME and Java types, and it can convert messages with those MIME types to Java objects of those types and back. This is the tail end of the content-negotiation process. When Spring establishes a negotiated content type, it picks a converter that supports the source and target type and uses it for the incoming or outgoing entities, or both if applicable. (In a single request, it’s possible for the request to include a message of one content type while the server responds with a message of a different content type.)
Spring Framework automatically creates certain message converters on your behalf if you don’t configure any manually. In many cases, this automatic configuration is sufficient. For the purposes of demonstration and extra configuration, the Model-View-Controller project configures the message converters manually. To do this, the ServletContextConfiguration class must extend WebMvcConfigurerAdapter and override the configureMessageConverters method.
...
public class ServletContextConfiguration extends WebMvcConfigurerAdapter
{
@Inject ObjectMapper objectMapper;
@Inject Marshaller marshaller;
@Inject Unmarshaller unmarshaller;
@Override
public void configureMessageConverters(
List<HttpMessageConverter<?>> converters
) {
converters.add(new ByteArrayHttpMessageConverter());
converters.add(new StringHttpMessageConverter());
converters.add(new FormHttpMessageConverter());
converters.add(new SourceHttpMessageConverter<>());
MarshallingHttpMessageConverter xmlConverter =
new MarshallingHttpMessageConverter();
xmlConverter.setSupportedMediaTypes(Arrays.asList(
new MediaType("application", "xml"),
new MediaType("text", "xml")
));
xmlConverter.setMarshaller(this.marshaller);
xmlConverter.setUnmarshaller(this.unmarshaller);
converters.add(xmlConverter);
MappingJackson2HttpMessageConverter jsonConverter =
new MappingJackson2HttpMessageConverter();
jsonConverter.setSupportedMediaTypes(Arrays.asList(
new MediaType("application", "json"),
new MediaType("text", "json")
));
jsonConverter.setObjectMapper(this.objectMapper);
converters.add(jsonConverter);
}
...
}
The ByteArrayHttpMessageConverter, StringHttpMessageConverter, FormHttpMessageConverter, and SourceHttpMessageConverter are all converters that Spring would configure automatically. They are configured here, in the same order they would be normally. Order is important because some converters have broader MIME type and Java type nets that might mask other converters you prefer to use.
The MarshallingHttpMessageConverter is not typically added to the list of message converters, but it is in this case to support translation to and from XML entities. The MappingJackson2HttpMessageConverter is normally created automatically as long as the Jackson Data Processor 2 is on the classpath. However, it is created with a default, non-configured com.fasterxml.jackson.databind.ObjectMapper and supports only the application/json MIME content type. The configuration here adds support for text/json and uses a preconfiguredObjectMapper.
You undoubtedly noticed that the org.springframework.oxm.Marshaller, org.springframework.oxm.Unmarshaller, and ObjectMapper are injected in the configuration class, and you are probably wondering where they come from. To enable these beans to be configured and shared throughout the application, they are created in the RootContextConfiguration. Because the org.springframework.oxm.jaxb.Jaxb2Marshaller is both a Marshaller and an Unmarshaller, it fulfills both dependencies.
@Bean
public ObjectMapper objectMapper()
{
ObjectMapper mapper = new ObjectMapper();
mapper.findAndRegisterModules();
mapper.configure(SerializationFeature.WRITE_DATES_AS_TIMESTAMPS, false);
mapper.configure(DeserializationFeature.ADJUST_DATES_TO_CONTEXT_TIME_ZONE,
false);
return mapper;
}
@Bean
public Jaxb2Marshaller jaxb2Marshaller()
{
Jaxb2Marshaller marshaller = new Jaxb2Marshaller();
marshaller.setPackagesToScan(new String[] { "com.wrox.site" });
return marshaller;
}
The Jackson ObjectMapper configuration does some important things. First, it tells Jackson to find and register all extension modules, such as the JSR 310 (Java 8 Date and Time) support module. It then disables serializing dates as timestamp integers (meaning they will be written as ISO 8601 strings) and adjustment of deserialized dates to the current time zone (so that date strings without time zones are assumed to be UTC). The Jaxb2Marshaller has a fairly simple configuration — it is simply told which package to scan for XML-annotated entities.
Configuring Content Negotiation
Content negotiation is the process whereby the client conveys to the server a list of preferred response content types, in order of preference, and the server chooses a suitable content type from those (or a default if none of them are suitable). The largest and most challenging part of content negotiation is figuring out what format the client wants its data in. If the request contains a request entity, it will also have a Content-Type header for that entity, but that is not necessarily the format the client wants the response to be in. (Although it usually is.) Then there’s the Accept header, meant to indicate which response formats the client is willing to accept. The key here is that the word “formats” is plural; the client may indicate many acceptable formats and a preference or precedence for each one. Older browsers sent long, confusing Accept headers that were difficult to comply by and often listed text/html last or not at all. Internet Explorer 8 on a Windows 7 machine with Microsoft Office installed sends an Accept header of more than 200 bytes with 14 MIME types in it, and none of them are text/html!
Thankfully, the latest versions of all the major browsers today send sensible Accept headers containing at least text/html. Also, when using JavaScript applications or RESTful web service clients, the client application has complete control over the Accept header, making its contents a much more reliable factor in negotiating content type. To be realistic, the browser is rarely involved in content negotiation anyway. In almost all cases, a request to your web application will fall into one of three categories:
· If it’s a request due to someone clicking a link or otherwise entering an address in their browser’s address bar, the target is some resource with a fixed content type that isn’t subject to negotiation — an HTML page (text/html or application/xhtml+xml), a file to download, and so on.
· If it’s an Ajax request from a client-side JavaScript browser application, the client application has complete control over the Accept header for performing content negotiation.
· If it’s a client application accessing your web services, it has complete control over the Accept header for performing content negotiation.
Content negotiation in Spring uses a multistep approach for determining the content type the client wants to receive back. Sometimes the same message converter is used for the request and the response and sometimes it is not. When the request contains a request entity, the incoming message converter is always chosen based on the request’s Content-Type header. When the response contains a response entity, the outgoing message converter is chosen in a multistep process:
1. Spring first looks for a file extension on the request URL. If it contains a file extension (such as .html, .xml, .json, and so on), it determines the requested format based on that. If it does not contain a file extension, or if the file extension is not recognized, it moves on.
2. Spring next looks for a request parameter named format. (You can configure this to change the parameter name.) If this exists, it uses the requested format (html, xml, json, and so on). If the format parameter does not exist or is not recognized, it moves on.
3. Finally, Spring uses the Accept header to determine the wanted response format.
You can customize this entire process to meet your needs. You can completely eliminate one or more steps and change how each step works based on how you want your application to perform content negotiation. (However, you cannot reorder the steps.) TheServletContextConfiguration class in the Model-View-Controller project overrides the configureContentNegotiation method of WebMvcConfigurerAdapter to accomplish this.
@Override
public void configureContentNegotiation(
ContentNegotiationConfigurer configurer)
{
configurer.favorPathExtension(true).favorParameter(false)
.parameterName("mediaType").ignoreAcceptHeader(false)
.useJaf(false).defaultContentType(MediaType.APPLICATION_XML)
.mediaType("xml", MediaType.APPLICATION_XML)
.mediaType("json", MediaType.APPLICATION_JSON);
}
This configuration enables file extension checking, disables request parameter checking, sets the request parameter name to mediaType (unnecessary because this is disabled, but shown here for demonstration purposes), and ensures the Accept header is not ignored. It also disables using Java Activation Framework (JAF) — a tool that can map file extensions to media types, among other things — in favor of manually specifying the supported media types. Finally, it sets the default content type to application/xml, and adds support for application/xml and application/json.
Using @ResponseBody
Now that content negotiation is properly configured, you can use it with a controller method. The getUser method of the HomeController does just that.
@RequestMapping(value = "/user/{userId}", method = RequestMethod.GET)
@ResponseBody
public User getUser(@PathVariable("userId") long userId)
{
User user = new User();
user.setUserId(userId);
user.setUsername("john");
user.setName("John Smith");
return user;
}
Notice the use of @ResponseBody, which is what triggers the content negotiation strategy you configured. Also, this method uses URI template variables and the @PathVariable annotation to get the user ID from the URL instead of a request parameter. Now compile the application, start Tomcat for your IDE, and go to http://localhost:8080/mvc/user/12 in your favorite browser. You should see the user represented as XML (shown in Figure 13-1), either because the Accept header your browser sends includes application/xml or because XML was set as the default in your content negotiation configuration.
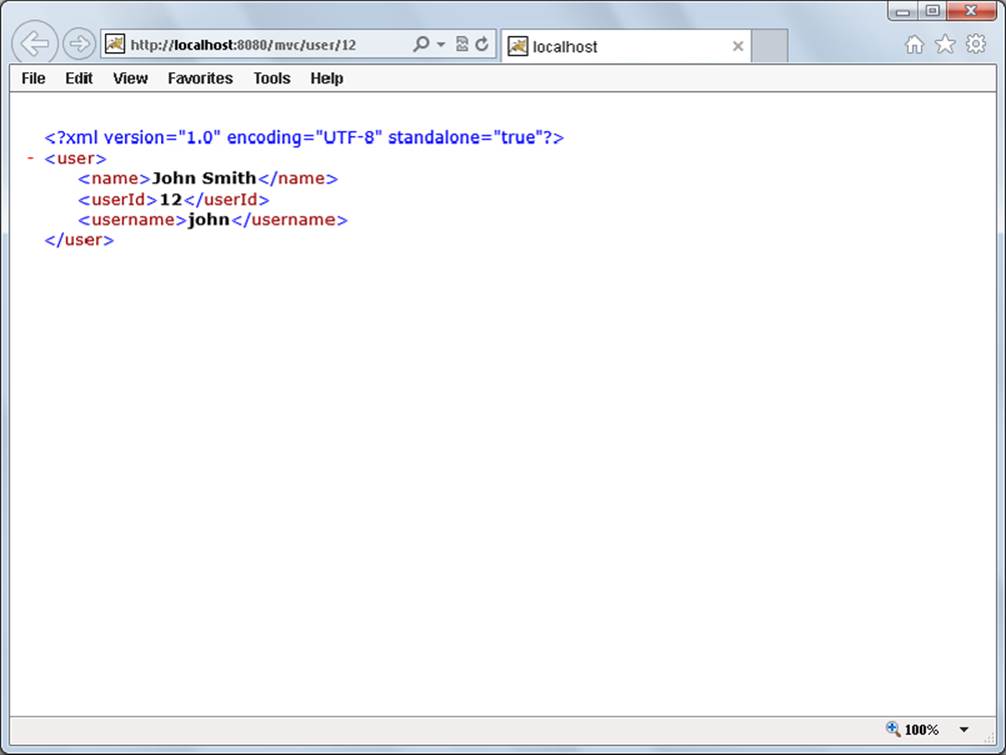
FIGURE 13-1
If you change the ID at the end of the URL, the XML changes to reflect the new ID. Now go to http://localhost:8080/mvc/user/13.json and the presentation changes from XML to JSON. (I recommend you use Chrome or Firefox for this because Internet Explorer will prompt you to download a JSON file.) You don’t have to change the URL mapping for your controller method because Spring recognizes the extension, ignores it for request mapping, and uses it for content negotiation. Now if you change the extension from JSON to XML, the presentation changes back to XML.
NOTE The Jaxb2Marshaller can marshal the User object to its XML representation because the User class is annotated with @javax.xml.bind.annotation.XmlRootElement.
MAKING YOUR LIFE EASIER WITH FORM OBJECTS
Form objects in Spring Framework are one of the biggest conveniences when you write browser-based web applications. The work of locating, casting, and translating request parameters to business objects can be tedious, and that tedium just gets greater with each additional property a business object has. Using form objects is simple, and the Spring-Forms project available on the wrox.com code download site demonstrates just how it’s done with a simple controller and a few JSP views.
The UserManagementController has two private fields and a synchronized private method for generating user IDs atomically. To start, it also has a request handler method displayUsers for displaying a list of the existing users.
@Controller
public class UserManagementController
{
private final Map<Long, User> userDatabase = new Hashtable<>();
private volatile long userIdSequence = 1L;
@RequestMapping(value = "user/list", method = RequestMethod.GET)
public String displayUsers(Map<String, Object> model)
{
model.put("userList", this.userDatabase.values());
return "user/list";
}
...
private synchronized long getNextUserId()
{
return this.userIdSequence++;
}
}
The User class is a simple POJO class with fields userId, username, and name, and appropriate mutators and accessors. The /WEB-INF/jsp/view/user/list.jsp view provides a link to add a new user and uses the <c:forEach> tag to loop over and display the existing users.
<%--@elvariable id="userList" type="java.util.Collection<com.wrox.site.User>"--%>
<!DOCTYPE html>
<html>
<head>
<title>User List</title>
</head>
<body>
<h2>Users</h2>
[<a href="<c:url value="/user/add" />">new user</a>]<br />
<br />
<c:forEach items="${userList}" var="user">
${user.name} (${user.username})
[<a href="<c:url value="/user/edit/${user.userId}"/>">edit</a>]<br/>
</c:forEach>
</body>
</html>
Adding the Form Object to Your Model
For you to use a form object, it first needs to be accessible in the view displaying the form. The createUser(Map) method adds a new UserForm object to the model and returns the user/add view name. You’d be right to wonder why the code uses both User and UserFormobjects. Admittedly, this is overkill in this case. But it highlights that your business objects won’t always look exactly like your form objects.
As an example, you might simply have many fields you don’t need or want to display or have users edit on a web form. Also, you may have some fields in a different format or of a different type in your form objects than in your business objects. You might even use more than one form (and, thus, form object) to edit a single business object. Actually, many times you must have separate form objects and business objects, and this example demonstrates how to do that.
@RequestMapping(value = "user/add", method = RequestMethod.GET)
public String createUser(Map<String, Object> model)
{
model.put("userForm", new UserForm());
return "user/add";
}
...
@RequestMapping(value = "user/edit/{userId}", method = RequestMethod.GET)
public String editUser(Map<String, Object> model,
@PathVariable("userId") long userId)
{
User user = this.userDatabase.get(userId);
UserForm form = new UserForm();
form.setUsername(user.getUsername());
form.setName(user.getName());
model.put("userForm", form);
return "user/edit";
}
Notice that the editUser(Map, long) method also adds a UserForm to the model, but it does so differently. It first retrieves the User being edited, copies that user’s information to the form, and then puts the form on the model before returning the user/edit view name.
Using the Spring Framework <form> Tags
The /WEB-INF/jsp/view/user/add.jsp and /WEB-INF/jsp/view/user/edit.jsp views are quite simple. All they do is set the title EL variable and include the /WEB-INF/jsp/view/user/form.jspf file.
<c:set var="title" value="Add User" />
<%@ include file="form.jspf" %>
The previous two lines of code make up the entire add.jsp file, and edit.jsp is nearly identical except that title is set to “Edit User.” The form.jspf file outputs the form using the userForm model attribute.
<%--@elvariable id="userForm" type="com.wrox.site.UserForm"--%>
<!DOCTYPE html>
<html>
<head>
<title>${title}</title>
</head>
<body>
<h1>${title}</h1>
<form:form method="post" modelAttribute="userForm">
<form:label path="username">Username</form:label><br />
<form:input path="username" /><br />
<br />
<form:label path="name">Name:</form:label><br />
<form:input path="name" /><br />
<br />
<input type="submit" value="Save" />
</form:form>
</body>
</html>
The first thing you probably noticed is the use of tags in the form namespace. This tag library, provided by Spring Framework, is a wrapper around standard <form>, <input>, and <textarea> fields and provides automatic field binding to form object contents. When creating a new user, this doesn’t mean much. However, when editing an existing user, the values from the model attribute are automatically placed in the form fields that belong to them. This simplifies your code and eliminates the worry over properly escaping values for use in the form. Of course, to use a tag library, you must first declare it. The form tag library is declared with all the other tag libraries in the base.jspf file, which is automatically included in all your JSPs.
<%@ taglib prefix="form" uri="http://www.springframework.org/tags/form" %>
The form namespace includes 14 tags that encapsulate a wide range of web form features. In addition to its own attributes, each tag supports all the standard HTML attributes for the HTML tag to which it is equivalent. The <form:form> tag is the parent tag of all the others, indicating which model attribute form object the form fields will bind to. You don’t have to specify the action attribute (although you can) because by default <form:form> always submits to the URL of the current page. The remaining 13 tags bind to various bean properties of the form object, indicated by the path attributes on the tags.
· <form:errors> is equivalent to a <span> and is related to automatic form object validation. You learn more about this tag in Chapter 16.
· <form:label>, which indicates label text for a field, is the equivalent of <label>.
· <form:hidden> is the equivalent of <input type="hidden">.
· <form:input>, as you have already seen, is the equivalent of <input type="text">.
· <form:password> is normally the equivalent of <input type="password"> and has a showPassword attribute (defaulting to false) that specifies whether the password should display. When showPassword is true, this tag is actually equivalent to <input type="text">.
· <form:textarea> is equivalent to <textarea>.
· <form:checkbox> is the equivalent of <input type="checkbox"> and can support multiple types of properties, such as booleans, Booleans, and numeric types.
· <form:checkboxes> is a variation of <form:checkbox> that automatically creates multiple check box fields on your behalf. You use the items attribute to specify a Collection, Map, or array of objects with which to generate the tags . The itemValue and itemLabel attributes specify the names of the field value and field label properties, respectively, for the objects in the collection.
· <form:radiobutton> is the equivalent of <input type="radio">. Typically, you bind two or more of these to the same path (form object property), and Spring automatically selects the proper one based on the property value.
· <form:radiobuttons> is to <form:radiobutton> as <form:checkboxes> is to <form:checkbox>. It has the same items, itemValue, and itemLabel attributes to help generate the radio buttons. Both <form:radiobuttons> and <form:checkboxes> are great for deriving fields from enums.
· <form:select> is the equivalent of a <select> drop-down or multiselect box. It works with <form:option> and <form:options>. It automatically selects the correct option based on the value of the path the select is bound to.
· <form:option> belongs nested within a <form:select> and is the equivalent of <option>.
· <form:options>, like <form:checkboxes> and <form:radiobuttons>, has items, itemValue, and itemLabel attributes that help generate multiple <option> elements.
Obtaining Submitted Form Data
When a user submits a form to your controller, obtaining the data from that submission is simple. The createUser(UserForm) and editUser(UserForm, long) methods both receive submitted UserForm objects translated automatically from request parameters because of the FormHttpMessageConverter.
@RequestMapping(value = "user/add", method = RequestMethod.POST)
public View createUser(UserForm form)
{
User user = new User();
user.setUserId(this.getNextUserId());
user.setUsername(form.getUsername());
user.setName(form.getName());
this.userDatabase.put(user.getUserId(), user);
return new RedirectView("/user/list", true, false);
}
...
@RequestMapping(value = "user/edit/{userId}", method = RequestMethod.POST)
public View editUser(UserForm form, @PathVariable("userId") long userId)
{
User user = this.userDatabase.get(userId);
user.setUsername(form.getUsername());
user.setName(form.getName());
return new RedirectView("/user/list", true, false);
}
Now compile the application, launch Tomcat from the IDE, and go to http://localhost:8080/forms/user/list in your favorite browser. Click the new user link and enter a username and name to create a new user. Add one or two more users, and then try to edit one. You’ll notice that Spring automatically bound your UserForm object on the model to the form fields in the view. On submission it automatically converted the request parameters to the form object. This is a Spring MVC feature that you can use over and over again, both throughout this book and throughout your time developing Spring Framework applications.
UPDATING THE CUSTOMER SUPPORT APPLICATION
You should now take a look at the Customer-Support-v10 project available for download from the wrox.com code download site. The application has changed significantly from Part I of the book in that it bootstraps Spring Framework, moves existing classes into thecom.wrox.site package, and replaces Servlets with Spring MVC controllers. In the interest of space this book cannot reprint the entire project. You should, however, understand some key differences.
Enabling Multipart Support
First, the Configurator class has gone away. This class was a ServletContextListener that programmatically configured the LoggingFilter and AuthenticationFilter so that they executed in the proper order. Whenever you configure Servlet API features programmatically, it’s best to do so within a single class. The Bootstrap class you have come to know in this and the previous chapter is the perfect place for the programmatic configuration of filters that used to be in Configurator. Also, because the ticket system enables files to be uploaded as attachments, the DispatcherServlet configured in the Bootstrap class now has multipart support configured. The Bootstrap class for the Customer Support application is in Listing 13-1.
LISTING 13-1: Bootstrap.java
public class Bootstrap implements WebApplicationInitializer {
@Override
public void onStartup(ServletContext container) throws ServletException {
container.getServletRegistration("default").addMapping("/resource/*");
AnnotationConfigWebApplicationContext rootContext =
new AnnotationConfigWebApplicationContext();
rootContext.register(RootContextConfiguration.class);
container.addListener(new ContextLoaderListener(rootContext));
AnnotationConfigWebApplicationContext servletContext =
new AnnotationConfigWebApplicationContext();
servletContext.register(ServletContextConfiguration.class);
ServletRegistration.Dynamic dispatcher = container.addServlet(
"springDispatcher", new DispatcherServlet(servletContext)
);
dispatcher.setLoadOnStartup(1);
dispatcher.setMultipartConfig(new MultipartConfigElement(
null, 20_971_520L, 41_943_040L, 512_000
));
dispatcher.addMapping("/");
FilterRegistration.Dynamic registration = container.addFilter(
"loggingFilter", new LoggingFilter()
);
registration.addMappingForUrlPatterns(null, false, "/*");
registration = container.addFilter(
"authenticationFilter", new AuthenticationFilter()
);
registration.addMappingForUrlPatterns(
null, false, "/ticket", "/ticket/*", "/chat", "/chat/*",
"/session", "/session/*"
);
}
}
Enabling multipart support on the DispatcherServlet is not quite enough to get file uploads working with Spring MVC. Spring Framework also supports older versions of the Servlet API. Recall that before Servlet 3.0, the Servlet API did not have built-in multipart support and third-party tools were necessary to accomplish file uploads. Spring MVC needs a MultipartResolver instance to tell it whether to use Servlet 3.0+ multipart support or some third-party tool. The ServletContextConfiguration class has an additional @Beanmethod to create that bean, which must be called multipartResolver.
@Bean
public MultipartResolver multipartResolver()
{
return new StandardServletMultipartResolver();
}
Converting Servlets to Spring MVC Controllers
The index.jsp file has been removed and replaced with the IndexController. The SessionListServlet of old is now the SessionListController. The code isn’t really that different except that Spring MVC patterns are used instead of HttpServletRequest andHttpServletResponse tools.
LoginServlet has become the AuthenticationController. This code has changed somewhat. Instead of doGet and doPost methods checking for the presence of various request parameters, each action has been replaced with a simple controller method. ChatServlet has become the ChatController, and TicketServlet has become the TicketController. These Servlets both used the action pattern, where the action request parameter controlled execution of the doGet or doPost methods. This resulted in lengthy doGet and doPost methods just to determine which method to execute. Now Spring takes care of that using @RequestMapping, eliminating much of the code in these controllers.
The TicketController uses a form object for ticket submissions, and this form object uses Spring’s MultipartFile to gain easy access to uploaded files.
public static class Form
{
private String subject;
private String body;
private List<MultipartFile> attachments;
// mutators and accessors
}
This makes the code for the create handler method vastly more concise than the code in the Servlet previously was.
@RequestMapping(value = "create", method = RequestMethod.POST)
public View create(HttpSession session, Form form) throws IOException
{
Ticket ticket = new Ticket();
ticket.setId(this.getNextTicketId());
ticket.setCustomerName((String)session.getAttribute("username"));
ticket.setSubject(form.getSubject());
ticket.setBody(form.getBody());
ticket.setDateCreated(Instant.now());
for(MultipartFile filePart : form.getAttachments())
{
log.debug("Processing attachment for new ticket.");
Attachment attachment = new Attachment();
attachment.setName(filePart.getOriginalFilename());
attachment.setMimeContentType(filePart.getContentType());
attachment.setContents(filePart.getBytes());
if((attachment.getName() != null &&
attachment.getName().length() > 0) ||
(attachment.getContents() != null &&
attachment.getContents().length > 0))
ticket.addAttachment(attachment);
}
this.ticketDatabase.put(ticket.getId(), ticket);
return new RedirectView("/ticket/view/" + ticket.getId(), true, false);
}
Creating a Custom Downloading View
The final thing you should note about the new Spring-enabled Customer Support application is the use of the custom com.wrox.site.DownloadView class in Listing 13-2 for downloading files from your Spring controllers. You can utilize this reusable view anywhere in the application to send a file attached to the response back to the client for downloading.
LISTING 13-2: DownloadView.java
public class DownloadingView implements View
{
private final String filename;
private final String contentType;
private final byte[] contents;
public DownloadingView(String filename, String contentType, byte[] contents)
{
this.filename = filename;
this.contentType = contentType;
this.contents = contents;
}
@Override
public String getContentType()
{
return this.contentType;
}
@Override
public void render(Map<String, ?> model, HttpServletRequest request,
HttpServletResponse response) throws Exception
{
response.setHeader("Content-Disposition",
"attachment; filename=" + this.filename);
response.setContentType("application/octet-stream");
ServletOutputStream stream = response.getOutputStream();
stream.write(this.contents);
}
}
This downloading view is greatly simplified and has some hard-coded behavior in it. In the real world, it would likely have several settings for customization. It does the job, though, and one line of code in the TicketController sends the attachment to be downloaded in the client’s browser.
return new DownloadingView(attachment.getName(),
attachment.getMimeContentType(), attachment.getContents());
As usual, you can test the refactored Customer Support application by compiling the project, starting Tomcat from your IDE, and going to http://localhost:8080/support/ in your favorite browser. Test the usual features—listing tickets, creating tickets, chatting, and so on. To the user it should seem largely the same, but it is on its way to being a better-designed application.
SUMMARY
This chapter covered a host of information regarding Spring MVC controllers and request mapping methods. You learned about the infinite ways you can use @RequestMapping as well as many other annotations and types to create powerful controller methods that can handle and respond to any type of request. You experimented with Spring’s support for the Model-View-Controller pattern and designed form objects that Spring can automatically create from request parameters. Finally, you saw the refactored Customer Support application for the Multinational Widget Corporation, which now uses Spring Framework and controllers instead of Servlets with the action pattern. You then learned how to create your own Spring View for pushing file downloads to the client browser.
In the next chapter you explore how services and repositories can enrich your applications further; they help separate the different types of program logic into independent layers that can be abstracted away and mocked for independent testing.
All materials on the site are licensed Creative Commons Attribution-Sharealike 3.0 Unported CC BY-SA 3.0 & GNU Free Documentation License (GFDL)
If you are the copyright holder of any material contained on our site and intend to remove it, please contact our site administrator for approval.
© 2016-2026 All site design rights belong to S.Y.A.