PROFESSIONAL JAVA FOR WEB APPLICATIONS (2014)
Part II Adding Spring Framework Into the Mix
Chapter 14 Using Services and Repositories to Support Your Controllers
IN THIS CHAPTER
· What is Model-View-Controller plus Controller-Service-Repository?
· Using the root application context instead of a web application context
· Enhancing services with asynchronous and scheduled execution
· Using logic layer separation with WebSockets
WROX.COM CODE DOWNLOADS FOR THIS CHAPTER
You can find the wrox.com code downloads for this chapter at http://www.wrox.com/go/projavaforwebapps on the Download Code tab. The code for this chapter is divided into the following major examples:
· Discussion-Board Project
· Customer-Support-v11 Project
NEW MAVEN DEPENDENCIES FOR THIS CHAPTER
In addition to the Maven dependencies introduced in previous chapters, you also need the following Maven dependencies:
<dependency>
<groupId>org.springframework</groupId>
<artifactId>spring-websocket</artifactId>
<version>4.0.2.RELEASE</version>
<scope>compile</scope>
</dependency>
UNDERSTANDING MODEL-VIEW-CONTROLLER PLUS CONTROLLER-SERVICE-REPOSITORY
In Chapter 13, you learned about the powerful tools available to you for replacing Servlets with Spring MVC controllers. You explored the Model-View-Controller (MVC) pattern as implemented in Spring Framework. By now, you’re probably quite familiar with the pattern in general, even if you had never seen it before. You may have already noticed a problem with this pattern, however. Despite its simplicities and the fact that controllers are cleaner than Servlets, your controller methods can still get out of hand. Up to this point your business logic has been fairly simple: Save submitted data somewhere in memory. But think about all the other things that need to happen when you create or edit data in your application:
· Validation — The data needs to be validated in some way to ensure that the proper rules were followed when creating it. For example, some fields may not be optional, and other fields may have restricted values.
· Alerts — These may need to be sent out via e-mail, text message, or mobile notification regarding the change.
· Other, existing data in the application — This may need to change. Consider an online forum system, for example, where you typically see the number of posts and the user and date of the last post in each forum. Then, within the forum, each post usually shows you the number of replies and the user and date of the last reply in each post. To improve performance, the statistical data for replies is usually rolled up to the post, while statistical data for posts is usually rolled up to the forum. Thus, when adding a reply to a forum post, you must also update the post and forum data.
· Data persistence — Application data is rarely just persisted in memory. Usually it resides in a data store of some type, such as a relational database, a NoSQL database, or a set of flat files. Persisting this data involves a whole set of logic in and of itself, and that logic can sometimes be quite complex and consume a lot of code.
So, with all that in mind, is it really best to put all this logic in a controller? Consider Figure 14-1, which demonstrates the basic operation of the three components in an MVC system. What if after creating a fantastic web application that does exactly what your boss wants, he asks you to add RESTful and SOAP web services to the application? Can you reuse the controllers you created for your web application? Probably not. Instead, you’ll find yourself performing a significant refactoring of your codebase to separate out user interface logic from business logic.

FIGURE 14-1
Recognizing Different Types of Program Logic
User interface logic is any logic that exists solely to support a particular user interface. If a piece of code logic is needed no matter how the user is interacting with the application, that logic is business logic. However, if that piece of code logic is needed only for a particular user interface, it is user interface logic. In an ideal application, you would want these types of logic separated into different layers. By doing this, you make it possible to easily swap out the user interface or, even better, utilize multiple user interfaces simultaneously, without having to change any business logic. You could also write a library that handles your business logic and then use that library in web applications and desktop applications.
When persisting application data to a data store of some type, often there is a lot of logic dedicated to the persistence of that data and unrelated to other business logic. This persistence logic is recognizable by its uselessness when the underlying data store changes dramatically. For example, a piece of code may still be necessary when you change from using MySQL to PostreSQL, but if it becomes unnecessary when you switch to an in-memory data store or a NoSQL database, that probably means it is persistence logic. As with separating user interface logic from business logic, you should also keep persistence logic separate from business logic. Doing so creates two distinct advantages:
· If you decide at a later date to switch the data store to which you persist your data, you can do so without changing your business logic.
· Testing your business logic becomes vastly simpler because you can mock your persistence logic and isolate only the business logic for testing.
Depending on the nature of your applications, you might be able to think of other forms of program logic that can and should be separated into distinct layers. Using @Component (or custom annotations meta-annotated with @Component) you can create any beans dependent on any other beans, and Spring instantiates and injects as necessary to create your program structure. However, Spring also provides a Controller-Service-Repository pattern that naturally satisfies the need to separate these three common types of program logic. This pattern is not structurally enforced in Spring like the MVC pattern is. Instead, Spring simply provides a set of markers that guide and support the optional implementation of this pattern in your application.
Repositories Provide Persistence Logic
In the Controller-Service-Repository pattern, repositories are the lowest layer, responsible for all logic related to saving data to a data store and retrieving saved data from a data store. You mark a repository with the @Repository annotation to indicate its semantic purpose. With component scanning enabled, @Repository classes are automatically instantiated, injected, and managed within the Spring application context they belong to. Typically, each repository is responsible for a single persistence object, or entity. This breaks the repository layer into small units of easily testable code that you can replace one entity at a time if you decide that a particular entity belongs in a different data store.
Repositories are created from interfaces, and dependents of a repository program against its interface instead of against the implementation itself. This way the repository can be faked using a mocking framework like EasyMock or Mockito to facilitate testing its dependents without relying on the real implementation. Typically, repositories that perform similar storage operations inherit from a mutual base class that provides common operations to all similar repositories. Repositories may also consume other repositories but should not consume resources in higher application layers such as services or controllers. (However, this is not something that Spring actively enforces.)
Services Provide Business Logic
Services are the next layer above repositories. Services encapsulate the business logic of the application and consume other services and repositories but do not consume resources in higher application layers like controllers (again, something that Spring does not actively enforce). Services are marked with the @Service annotation, making them eligible for automatic instantiation and dependency injection, among other benefits. Like repositories, services are created from interfaces so that dependent resources may program against an interface. This pattern of basing each layer on a set of interfaces allows each layer to be tested in isolation from all the other layers. From a transactional point of view, the execution of a service method from a higher layer (such as a controller) can be thought of as a transactional unit of work. It may perform several operations on multiple repositories and other services in the context that all operations must either succeed or fail as a single unit. When a service method is executed from another service method, it is generally thought of as belonging to the same unit of work that the calling method belongs to.
It should be noted that this concept of unit of work does not imply that it can always be handled with traditional relational database transactions. The operations performed during a unit of work may have multiple consequences across different data stores or file media. These operations may include transmission of intra- or inter-application messages, e-mails, text messages, or mobile notifications that in most cases cannot be rolled back. How this logical unit of work maintains atomicity is outside the scope of this book and must be dealt with on a case-by-case basis. Suffice it to say that, in a simple application dealing with a single ACID-compliant data store, units of work are roughly equivalent to database transactions. Spring does provide support for these transactional needs, and you explore that further in Part III of this book.
Some developers do not like to use the term “service” to describe this layer of the application, as that can sometimes be confused with web services. What you call your business logic layer doesn’t matter. You don’t even have to use the @Service annotation. You could instead use the @Component annotation or a custom annotation meta-annotated with @Component. What you call it and how you mark it does not change its purpose. The rest of this book, however, refers to them as services.
Controllers Provide User Interface Logic
You are already quite familiar with the concept of controllers, @Controller, @RequestMapping, and how that all works together in Spring MVC. Controllers are the top layer of the food chain in the Controller-Service-Repository pattern. In fact, this three-layer system can easily be compared to a natural food chain. In this system, repositories are the plant life and absorb only nutrients from nature (the database). Services are omnivores that consume repositories (plant life) or other services (omnivores). Continuing this analogy to its logical conclusion, controllers are carnivores. They consume services (the omnivores), but they never consume repositories (plant life) directly, and they never consume other controllers. Controllers, in some form or another, control the user interface and, using services for assistance, prepare the model for presentation in the view.
In the MVC paradigm, services and repositories are considered part of the controller (not the @Controller). This is shown in Figure 14-2. A @Controller, the @Services it depends on, the @Repositorys those @Services depend on, and any caching layers that lie between these components all act together to form the controller in the Model-View-Controller pattern. All these components use the model in some form or another. Ultimately, the @Controller — which could be for a web GUI or a web service API — passes the necessary parts of the model to the view for rendering. This view could be a JSP (for a web GUI), or it could be a JSON or XML rendering engine (for a web GUI or a web service API).
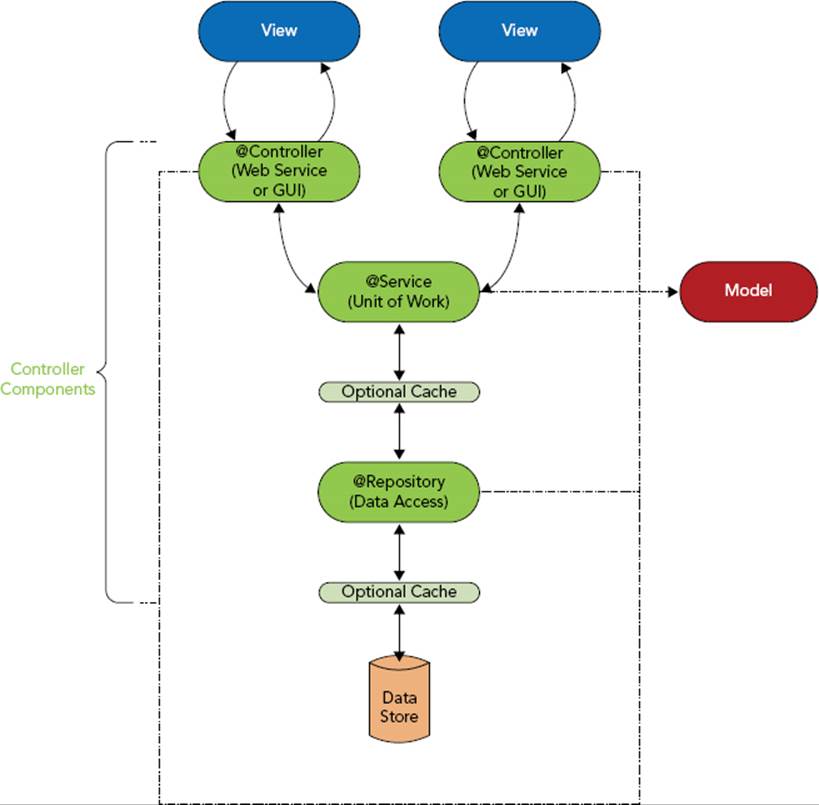
FIGURE 14-2
USING THE ROOT APPLICATION CONTEXT INSTEAD OF A WEB APPLICATION CONTEXT
Think about the ServletContextConfiguration class you have become familiar with over the past two chapters. Of course, you can name this class whatever you want to name it, but its purpose remains the same. As the configuration for the Spring application context for the DispatcherServlet, this class is responsible for establishing how Spring operates when receiving HTTP requests in a Servlet container. That description immediately limits the scope for this configuration.
Outside of a Servlet container, the ServletContextConfiguration has no purpose. The contents of the configuration reflect this. Every bean configured in this class is somehow related to accepting, handling, and responding to HTTP requests. If you were to create a RESTful or SOAP web service for your application, you would likely create a separate DispatcherServlet with its own application context and @Configuration, and the configuration would be different to reflect the different way the controllers in this context handle requests. You would probably disable unnecessary beans like the ByteArrayHttpMessageConverter, StringHttpMessageConverter, and FormHttpMessageConverter, as these wouldn’t be applicable to RESTful or SOAP web services. You also wouldn’t need things like theViewResolver and RequestToViewNameTranslator.
Reusing the Root Application Context for Multiple User Interfaces
Given the previous discussion, remember that your different user interfaces typically share the same services. This way, your business logic remains consistent across all user interfaces. To accomplish this, you should not manage your services and repositories in a web application context, but in the root application context that serves as the parent for all the web application contexts. All these services and repositories are inherited by the web application contexts that control the various user interfaces. If at some point you want to create a desktop application using the services and repositories written for your web application, you can use the same root application context configuration, albeit bootstrapped through a different mechanism.
You already spent considerable time in Chapter 12 learning about application context hierarchy and inheritance, configuring a root application context (RootContextConfiguration) with a web application context (ServletContextConfiguration), and modifying component scanning to scan for only the proper components in each context. Component scanning is the key to this separation. If you use component scanning, you must configure it properly. Otherwise, you may get duplicate bean definitions, or worse some bean definitions may not be picked up. Component scanning works on two principals: package scanning and class filtering.
When using the @ComponentScan annotation, you tell Spring which Java package or packages to scan for candidate classes using the String[] basePackages attribute. Spring locates all classes belonging to these packages or subpackages and applies the resource filters against each class. The downside of basePackages is that it is not type-safe, and so a typo can easily go unnoticed. As an alternative, you can use the Class<?>[] basePackageClasses attribute. Spring determines the package names to scan from the classes specified.
For each class that Spring finds in the base packages, it applies the filter or filters configured. Filters are segregated as include filters and exclude filters. If the class triggers any one of the include filters and doesn’t trigger any of the exclude filters, it becomes a Spring bean, meaning it is constructed, injected, initialized, and anything else that applies to Spring-managed beans. When the @ComponentScan’s useDefaultFilters attribute is true (it is unless explicitly set to false), there are no exclude filters and only one include filter by default. The one default include filter flags a class if it is marked with @Component or if it is marked with an annotation meta-annotated with @Component. Thus, the following two component scan configurations are equivalent:
@ComponentScan(basePackages = "com.wrox.site")
@ComponentScan(
basePackages = "com.wrox.site",
useDefaultFilters = false,
includeFilters = @ComponentScan.Filter(value = Component.class,
type = FilterType.ANNOTATION)
)
If you specify include or exclude filters, they are in addition to the default filter if useDefaultFilters is true. If you set useDefaultFilters to false, the filters you specify replace the default filter. You can customize component scan filters quite extensively.
You could, for example, create your own set of annotations and tell Spring to scan for those. You could also use assignable type filters, which trigger when a class extends or implements the class or one of the classes specified. Another possibility is to useorg.springframework.context.annotation.FilterType.CUSTOM, in which case the class or classes specified should be implementations of org.springframework.core.type.filter.TypeFilter. Or you could apply a combination of some or all of these techniques with or without the default filters in place.
Take a look at the following component scan configuration, which comes from the RootContextConfiguration you have seen previously.
@ComponentScan(
basePackages = "com.wrox.site",
excludeFilters = @ComponentScan.Filter(Controller.class)
)
This configuration scans the com.wrox.site package for any classes that pass the default filters but aren’t marked with @Controller. So classes marked with @Component, @Service, @Repository, or any annotations marked with those annotations become beans, but@Controllers don’t. This is the complement of the component scan configuration for ServletContextConfiguration, which finds only beans annotated with @Controller.
@ComponentScan(
basePackages = "com.wrox.site",
useDefaultFilters = false,
includeFilters = @ComponentScan.Filter(Controller.class)
)
Using these component scans for the separate application contexts accomplishes the objective: Business logic and repository logic are centralized in the root application context, whereas user interface logic lives in the Servlet application context. Recall from Chapter 13 that if you don’t specify these component-scanning filters in the root and Servlet application contexts, your beans are instantiated multiple times — once in each context.
Moving Your Business Logic from Controllers to Services
In a perfect world every engineer gets to write every program from the ground up using the best tools and the best practices available. In the real world you are usually required to work with legacy applications that don’t always use the good tools or good practices. Not only must you maintain these applications and address issues reported by your users, often you also must add new features to them, and often adding these new features requires refactoring the code to support new business needs.
Think about a simple discussion board and what type of business logic it might require. Assuming you have no categories or other ways to classify or group discussions, your users need the ability to create discussions and reply to discussions. When creating a discussion, you should make sure that its title and body are not blank. When replying to a discussion, you should not only check that the reply isn’t blank, but also that the reply is written for a discussion that actually exists. Both discussions and replies need to be timestamped, but this timestamp is automatic, not user-supplied, so it is business logic. In this hypothetical scenario you have an existing application with two controllers. The BoardController provides the ability to list and create discussions, whereas theDiscussionController permits viewing a discussion and replying to it. These controllers encompass the entire codebase for your application, minus configuration and views. They manage user interface logic, perform business logic, and persist discussions and replies to the database.
Now your boss assigns you three new tasks:
· Users have requested to receive e-mails when discussions they post or reply to are replied to.
· Users have also requested the ability to view the board and discussions as RSS feeds.
· The server administrators want to automatically delete topics that were posted or last replied to more than a year ago to save on storage and improve performance.
Think about some of the changes you need to make to support these new features. Each discussion requires a list of all unique users who have replied to the discussion to make sending notifications easier. As is usually the case, users will eventually ask to unsubscribe from a discussion, so keeping this list on the discussion instead of aggregating it from all replies every time is much simpler and less expensive. Also, each discussion needs to have a date field that represents the last time it was replied to or when it was posted if there are no replies. Both of these changes pose a problem because these updates to a discussion when replies are posted are triggered from the DiscussionController, but the BoardController contains the logic for saving discussion records. Also, you already have methods that retrieve discussions and replies from the database and return JSP views. Now you need new methods that do the same things but return RSS views. This smells of code duplication.
It shouldn’t take you long to realize you need to separate your business logic from your user interface logic before you can approach any of these tasks. You’ll do exactly that in the rest of this section using the Discussion-Board project available for download on thewrox.com code download site. To get a good idea of what kind of interface your services need, take a look at the request handler methods of the BoardController and DiscussionController. Don’t worry about the code right now. Just think about the interface. TheBoardController contains methods for listing and creating discussions.
@Controller
@RequestMapping("discussion")
public class BoardController
{
@RequestMapping(value = {"", "list"}, method = RequestMethod.GET)
public String listDiscussions(Map<String, Object> model) { ... }
@RequestMapping(value = "create", method = RequestMethod.GET)
public String createDiscussion(Map<String, Object> model) { ... }
@RequestMapping(value = "create", method = RequestMethod.POST)
public View createDiscussion(DiscussionForm form) { ... }
}
The DiscussionController, meanwhile, contains methods for viewing a discussion and replying to it.
@Controller
@RequestMapping("discussion/{discussionId:\d+}")
public class DiscussionController
{
@RequestMapping(value = {"", "*"}, method = RequestMethod.GET)
public String viewDiscussion(Map<String, Object> model,
@PathVariable("discussionId") long id) { ... }
@RequestMapping(value = "reply", method = RequestMethod.POST)
public ModelAndView reply(ReplyForm form,
@PathVariable("discussionId") long id) { ... }
}
Think about the POJOs you need to support this. For simplicity, assume users are just e-mail addresses that you can represent with Strings instead of some user object. You need a Discussion object and a Reply object for persisting data with and passing to the view.
public class Discussion
{
private long id;
private String user;
private String subject;
private String uriSafeSubject;
private String message;
private Instant created;
private Instant lastUpdated;
private Set<String> subscribedUsers = new HashSet<>();
// mutators and accessors
}
public class Reply
{
private long id;
private long discussionId;
private String user;
private String message;
private Instant created;
// mutators and accessors
}
It seems logical to have a service for each entity. Based on what you know about the controllers, the DiscussionService and ReplyService interfaces should be simple. Notice that the ReplyService has no method for getting an individual Reply by its ID. There’s no business need for it right now. If you ever need to add the ability to edit a reply, then you would need to add this method.
public interface DiscussionService
{
List<Discussion> getAllDiscussions();
Discussion getDiscussion(long id);
void saveDiscussion(Discussion discussion);
}
public interface ReplyService
{
List<Reply> getRepliesForDiscussion(long discussionId);
void saveReply(Reply reply);
}
Now at this moment how your service implementations work doesn’t matter. You can already refactor your controllers to use the interfaces of the services. If you take a look at the code for the BoardController, you can see how simple it is. Its methods contain only the code necessary to support interacting with the user. createDiscussion, in particular, doesn’t even set all of the properties on the Discussion. It sets only user-provided properties, leaving it up to the service to set the generated properties, such as the ID and URI-safe subject. It doesn’t need to know how this happens, nor does it care.
@Inject DiscussionService discussionService;
@RequestMapping(value = {"", "list"}, method = RequestMethod.GET)
public String listDiscussions(Map<String, Object> model)
{
model.put("discussions", this.discussionService.getAllDiscussions());
return "discussion/list";
}
@RequestMapping(value = "create", method = RequestMethod.GET)
public String createDiscussion(Map<String, Object> model)
{
model.put("discussionForm", new DiscussionForm());
return "discussion/create";
}
@RequestMapping(value = "create", method = RequestMethod.POST)
public View createDiscussion(DiscussionForm form)
{
Discussion discussion = new Discussion();
discussion.setUser(form.getUser());
discussion.setSubject(form.getSubject());
discussion.setMessage(form.getMessage());
this.discussionService.saveDiscussion(discussion);
return new RedirectView("/discussion/" + discussion.getId() + "/" +
discussion.getUriSafeSubject(), true, false);
}
The code for the DiscussionController is equally simple. Most of the work is delegated to the DiscussionService and the ReplyService, leaving the controller to concern itself with only the user interface.
@Inject DiscussionService discussionService;
@Inject ReplyService replyService;
@RequestMapping(value = {"", "*"}, method = RequestMethod.GET)
public String viewDiscussion(Map<String, Object> model,
@PathVariable("discussionId") long id)
{
Discussion discussion = this.discussionService.getDiscussion(id);
if(discussion != null)
{
model.put("discussion", discussion);
model.put("replies", this.replyService.getRepliesForDiscussion(id));
model.put("replyForm", new ReplyForm());
return "discussion/view";
}
return "discussion/errorNoDiscussion";
}
@RequestMapping(value = "reply", method = RequestMethod.POST)
public ModelAndView reply(ReplyForm form,
@PathVariable("discussionId") long id)
{
Discussion discussion = this.discussionService.getDiscussion(id);
if(discussion != null)
{
Reply reply = new Reply();
reply.setDiscussionId(id);
reply.setUser(form.getUser());
reply.setMessage(form.getMessage());
this.replyService.saveReply(reply);
return new ModelAndView(new RedirectView("/discussion/" + id + "/" +
discussion.getUriSafeSubject(), true, false));
}
return new ModelAndView("discussion/errorNoDiscussion");
}
Using Repositories for Data Storage
When you start to write the implementations of DiscussionService and ReplyService, you quickly realize much of the necessary code is dedicated to saving data to and retrieving data from the database. To keep the service code purely business-related, it’s best to create a repository layer to deal with data persistence. This makes your service methods more concise and easily testable. The interfaces for the DiscussionRepository and the ReplyRepository are simple and, unsurprisingly, mirror the service interfaces significantly.
public interface DiscussionRepository
{
List<Discussion> getAll();
Discussion get(long id);
void add(Discussion discussion);
void update(Discussion discussion);
}
public interface ReplyRepository
{
List<Reply> getForDiscussion(long id);
void add(Reply reply);
void update(Reply reply);
}
Now that you have an interface for persisting data to program against, you can implement the services. The DefaultDiscussionService’s getDiscussion method doesn’t have any additional business logic (although someday you may need to have it), but getAllDiscussionssorts the list before returning it and saveDiscussion performs some interesting tasks. First, it sterilizes the subject to make it safe for a URI and sets the sterilized value to the uriSafeSubject property. This is used when creating URLs for discussions to make them search engine-friendly. It also updates the lastUpdated timestamp. Finally, if the discussion is new, it updates the creation timestamp and subscribes the user who created it before adding the discussion; otherwise, it updates the discussion.
@Service
public class DefaultDiscussionService implements DiscussionService
{
@Inject DiscussionRepository discussionRepository;
@Override
public List<Discussion> getAllDiscussions()
{
List<Discussion> list = this.discussionRepository.getAll();
list.sort((d1, d2) -> d1.getLastUpdated().compareTo(d2.getLastUpdated()));
return list;
}
@Override
public Discussion getDiscussion(long id)
{
return this.discussionRepository.get(id);
}
@Override
public void saveDiscussion(Discussion discussion)
{
String subject = discussion.getSubject();
subject = Normalizer.normalize(subject.toLowerCase(), Normalizer.Form.NFD)
.replaceAll("\p{InCombiningDiacriticalMarks}+", "")
.replaceAll("[^\p{Alnum}]+", "-")
.replace("--", "-").replace("--", "-")
.replaceAll("[^a-z0-9]+$", "")
.replaceAll("^[^a-z0-9]+", "");
discussion.setUriSafeSubject(subject);
Instant now = Instant.now();
discussion.setLastUpdated(now);
if(discussion.getId() < 1)
{
discussion.setCreated(now);
discussion.getSubscribedUsers().add(discussion.getUser());
this.discussionRepository.add(discussion);
}
else
this.discussionRepository.update(discussion);
}
}
NOTE The getAllDiscussions method shows off the power of Java 8 lambda expressions, and in some cases, it might be appropriate to do sorting of this nature in Java code. However, in most cases sorting is much more efficient in the database itself, and usually you pass sorting instructions on to the repository somehow.
DefaultReplyService’s getRepliesForDiscussion method also sorts the list returned by the repository before returning it. saveReply uses both the repository and the DiscussionService (notice, again, the use of the interface instead of the implementation) to perform some business tasks. If the reply is new, it subscribes the replier to the discussion, sets the reply creation timestamp, and adds the reply. If it’s not new it just updates the reply. Either way, it then saves the discussion using the DiscussionService. This ensures that all business rules are still followed.
@Service
public class DefaultReplyService implements ReplyService
{
@Inject ReplyRepository replyRepository;
@Inject DiscussionService discussionService;
@Override
public List<Reply> getRepliesForDiscussion(long discussionId)
{
List<Reply> list = this.replyRepository.getForDiscussion(discussionId);
list.sort((r1, r2) -> r1.getId() < r2.getId() ? -1 : 1);
return list;
}
@Override
public void saveReply(Reply reply)
{
Discussion discussion =
this.discussionService.getDiscussion(reply.getDiscussionId());
if(reply.getId() < 1)
{
discussion.getSubscribedUsers().add(reply.getUser());
reply.setCreated(Instant.now());
this.replyRepository.add(reply);
}
else
{
this.replyRepository.update(reply);
}
this.discussionService.saveDiscussion(discussion);
}
}
NOTE The getRepliesForDiscussion method is a key example of where sorting may actually be appropriate in the Java code instead of the database because this data set size is always extremely limited. However, do you think this logic is appropriate in the service, or is it more appropriate in the controller, instead?
Now the only thing left is to implement the repositories. For this example, just use an in-memory map like you have for all the other projects in the book so far. The InMemoryDiscussionRepository is fairly predictable, but it should be noted that the code becomes more complex if you actually persist to a database of some type.
@Repository
public class InMemoryDiscussionRepository implements DiscussionRepository
{
private final Map<Long, Discussion> database = new Hashtable<>();
private volatile long discussionIdSequence = 1L;
@Override
public List<Discussion> getAll()
{
return new ArrayList<>(this.database.values());
}
@Override
public Discussion get(long id)
{
return this.database.get(id);
}
@Override
public void add(Discussion discussion)
{
discussion.setId(this.getNextDiscussionId());
this.database.put(discussion.getId(), discussion);
}
@Override
public void update(Discussion discussion)
{
this.database.put(discussion.getId(), discussion);
}
private synchronized long getNextDiscussionId()
{
return this.discussionIdSequence++;
}
}
InMemoryReplyRepository is interesting because of its getForDiscussion method, which uses a lambda expression like a WHERE clause in a SQL statement to exclude the replies that don’t belong to the selected discussion. Notice the use of the volatile keyword, which ensures different threads never see stale values of ID sequence fields.
@Repository
public class InMemoryReplyRepository implements ReplyRepository
{
private final Map<Long, Reply> database = new Hashtable<>();
private volatile long replyIdSequence = 1L;
@Override
public List<Reply> getForDiscussion(long id)
{
ArrayList<Reply> list = new ArrayList<>(this.database.values());
list.removeIf(r -> r.getDiscussionId() != id);
return list;
}
@Override
public synchronized void add(Reply reply)
{
reply.setId(this.getNextReplyId());
this.database.put(reply.getId(), reply);
}
@Override
public synchronized void update(Reply reply)
{
this.database.put(reply.getId(), reply);
}
private synchronized long getNextReplyId()
{
return this.replyIdSequence++;
}
}
Now it’s time to test it all. There’s not enough space to print all the JSP views in the book, but they’re all there in the Discussion-Board project to take a look at if you want. When you’re ready, compile the application and start Tomcat from your IDE; then go tohttp://localhost:8080/board/. Try creating and replying to various discussions. When you’re satisfied that the code works, take a look back over it all and imagine how much uglier the code would have been — and how much harder to test and extend it would have been — if you had put all this code in the controllers. The task of creating the RSS views that users are asking for is suddenly much easier now that you can reuse the service calls. This book doesn’t cover that particular task, but feel fry to do it yourself!
IMPROVING SERVICES WITH ASYNCHRONOUS AND SCHEDULED EXECUTION
With refactoring to separate business logic from UI logic out of the way, you still have two tasks to tackle: deleting old discussions automatically and notifying users of replies. Think about both of these tasks for a minute. You probably realize that automatically deleting old discussions means no user interaction, indicating that no controller calls a service method to perform this task. So what does call this method?
Also, what you may not have thought of is how long it can take to send e-mails to multiple people about a reply. E-mails sent to users should not reveal the e-mail addresses of other users — that’s a privacy breach. At the same time, using the blind carbon copy (BCC) feature tends to land e-mails in the spam filter — or worse, land your e-mail server on a blacklist. So, if you need to notify 20 people about a reply, you must send 20 e-mails, and this can take more than a few seconds. So how do you do this without hurting performance for the user? You must do this in a background thread, asynchronously.
Spring Framework has tools to tackle both these responsibilities. When you schedule tasks to run on some schedule, or execute code asynchronously, one of the biggest obstacles is thread management. Your web application cannot simply spin up as many threads as it wants to whenever it wants. Thread growth must be controlled to prevent thread usage from over-taxing the hardware your application runs on. In a Servlet container, creating threads and leaving them running can result in memory leaks — and those almost always end badly.
The problem that most developers forget — or don’t know about — is that creating and destroying threads often involves a lot of overhead, and that can cause performance issues, also. What you really need is a central thread pool that reuses threads instead of creating and destroying, and that queues tasks to execute when the pool is exhausted running other tasks. Not only does Spring provide such a system, it also provides the annotations @org.springframework.scheduling.annotation.Async and@org.springframework.scheduling.annotation.Scheduled to indicate that a method should run asynchronously and automatically (without manual execution), respectively.
You cannot just go slap some annotations on methods that need them without some configuration, however. First, you need to enable these features. Next, @Async methods and @Scheduled methods do not use the same thread pool by default, but you want them to. Using the same thread pool ensures that you can always use resources in the most efficient manner possible. As such, it’s important to take a minute and understand the plumbing that supports this.
Understanding Executors and Schedulers
Spring Framework defines the distinct but closely related concepts of executors and schedulers. An executor is exactly what it sounds like: It executes tasks. The contract does not mandate that this happen asynchronously; instead, that is handled differently in different implementations. Schedulers are responsible for remembering when a task is supposed to execute, and then executing it on time (using an executor).
· The java.util.concurrent.Executor interface defines an executor that can execute a simple Runnable.
· Spring extends this interface with org.springframework.core.task.TaskExecutor.
· Spring also provides the org.springframework.scheduling.TaskScheduler interface that specifies several methods for scheduling tasks to run one or more times at some point in the future.
There are many implementations of both these Spring interfaces, and most of them implement both interfaces. The most common of these is the org.springframework.scheduling.concurrent.ThreadPoolTaskScheduler, which provides both an executor and a scheduler (backed by the executor) and a thread pool for executing tasks in an orderly and efficient manner. When your application shuts down, this class makes sure that all the threads it created are shut down properly to prevent memory leaks and other issues.
This class also implements the java.util.concurrent.ThreadFactory interface. Because of this, you can define a ThreadPoolTaskScheduler bean, and it fulfills any dependencies you have on an Executor, TaskExecutor, TaskScheduler, or ThreadFactory. This is about to come in handy because you need it to configure asynchronous and scheduled method execution.
Configuring a Scheduler and Asynchronous Support
To enable asynchronous method execution on @Async methods, annotate your @Configuration class with @EnableAsync. Likewise, to enable scheduled method execution on @Scheduled methods, use the @EnableScheduling annotation. You want to place these annotations on the RootContextConfiguration to share this configuration across all beans in your application. However, @EnableAsync and @EnableScheduling by themselves simply establish default asynchronous and scheduling configurations. To customize this behavior, you need to implement the AsyncConfigurer interface to return the proper asynchronous executor and implement the SchedulingConfigurer class to assign the proper executor to the scheduler.
@Configuration
@EnableAsync(proxyTargetClass = true)
@EnableScheduling
...
public class RootContextConfiguration
implements AsyncConfigurer, SchedulingConfigurer
{
private static final Logger log = LogManager.getLogger();
private static final Logger schedulingLogger =
LogManager.getLogger(log.getName() + ".[scheduling]");
...
@Bean
public ThreadPoolTaskScheduler taskScheduler()
{
log.info("Setting up thread pool task scheduler with 20 threads.");
ThreadPoolTaskScheduler scheduler = new ThreadPoolTaskScheduler();
scheduler.setPoolSize(20);
scheduler.setThreadNamePrefix("task-");
scheduler.setAwaitTerminationSeconds(60);
scheduler.setWaitForTasksToCompleteOnShutdown(true);
scheduler.setErrorHandler(t -> schedulingLogger.error(
"Unknown error occurred while executing task.", t
));
scheduler.setRejectedExecutionHandler(
(r, e) -> schedulingLogger.error(
"Execution of task {} was rejected for unknown reasons.",r
)
);
return scheduler;
}
@Override
public Executor getAsyncExecutor()
{
Executor executor = this.taskScheduler();
log.info("Configuring asynchronous method executor {}.", executor);
return executor;
}
@Override
public void configureTasks(ScheduledTaskRegistrar registrar)
{
TaskScheduler scheduler = this.taskScheduler();
log.info("Configuring scheduled method executor {}.", scheduler);
registrar.setTaskScheduler(scheduler);
}
}
Only new parts of this class are shown; existing parts are hidden. The proxyTargetClass attribute in the @EnableAsync annotation tells Spring to use the CGLIB library to proxy classes with asynchronous or scheduled methods instead of using Java interface proxies. This allows you to have asynchronous and scheduled methods on your beans that aren’t specified in an interface. If you set this attribute to false, only interface-specified methods could be executed on a schedule or asynchronously. The new @Bean method exposes the scheduler as a bean that any of your beans may use. The getAsyncExecutor method (specified in AsyncConfigurer) tells Spring to use the same scheduler for asynchronous method execution, and the configureTasks method (specified in SchedulingConfigurer) tells Spring to use the same scheduler for scheduled method execution.
You may immediately wonder how this can possibly work. getAsyncExecutor and configureTasks each call taskScheduler, so aren’t two TaskSchedulers instantiated? And isn’t a third TaskScheduler instantiated when Spring calls the @Bean method? Actually, only oneTaskScheduler is instantiated. Spring proxies calls to all @Bean methods so that they are never called more than once. The result of the first invocation of a @Bean method is cached and used for all future invocations. This allows multiple methods in your configuration to use other @Bean methods. Because of this, only one TaskScheduler is instantiated in this configuration, and that instance is used for the bean definition, in the getAsyncExecutor method, and in the configureTasks method. When you execute the example later, the log statements in these methods will prove this.
Creating and Using @Async Methods
Spring Framework provides support for @Async methods by wrapping affected beans in a proxy. When Spring injects a bean with @Async methods in other beans that depend on it, it actually injects the proxy, not the bean itself. Those beans then call methods on the proxy. For normal methods, the proxy just delegates directly to the underlying method. For methods annotated with @Async or @javax.ejb.Asynchronous, the proxy instructs the executor to execute the method and then returns immediately. How this works has one important consequence: If a bean calls one of its own @Async methods, that method will not execute asynchronously because this cannot be proxied. Because of this, if you want to call a method asynchronously, it must be on another object. (And that object must be a Spring-managed bean, of course.)
NOTE This isn’t entirely true. With Java interface-based proxies, you cannot proxy this. With CGLIB proxies, you can proxy this by overriding every method in the original class. This is how configuration @Bean method caching works — Spring always proxies @Configuration classes using CGLIB. Because you have enabled CGLIB proxies here, you can call @Async methods on the same class, and they will execute asynchronously. However, you should not rely on this — a configuration change could break it.
The NotificationService and FakeNotificationService in the Discussion-Board project demonstrate how this works. Notice that the method is marked @Async on both the interface and the implementation. This is not strictly required. However, when the intention is for all implementations to execute asynchronously, it’s considered polite to annotate the interface so that consumers are aware of this.
public interface NotificationService
{
@Async
void sendNotification(String subject, String message,
Collection<String> recipients);
}
@Service
public class FakeNotificationService implements NotificationService
{
private static final Logger log = LogManager.getLogger();
@Override
@Async
public void sendNotification(String subject, String message,
Collection<String> recipients)
{
log.info("Started notifying recipients {}.", recipients);
try {
Thread.sleep(5_000L);
} catch (InterruptedException ignore) { }
log.info("Finished notifying recipients.");
}
}
The DefaultReplyService obtains an @Injected NotificationService and, with a few simple lines of code, calls the asynchronous method in saveReply if the reply is new.
Set<String> recipients = new HashSet<>(discussion.getSubscribedUsers());
recipients.remove(reply.getUser()); // no need to email replier
this.notificationService.sendNotification(
"Reply posted", "Someone replied to \"" + discussion.getSubject()
+ ".\"", recipients
);
Creating and Using @Scheduled Methods
Creating @Scheduled methods isn’t all that different from creating @Async methods. All you have to do is write a method that does what you want and annotate it. The only important thing to note about @Scheduled methods is that they can’t have any parameters. (How would Spring know what to use as arguments?) Just because a method is @Scheduled doesn’t mean you can’t call in manually. You can, any time you want to; though you certainly don’t have to. In fact, you can also annotate a @Scheduled method with @Async so that it executes asynchronously if executed manually.
The scheduled execution you need in the Discussion-Board project deletes discussions that were posted longer than a year ago or replied to longer than a year ago, whichever was more recent. This first requires some tweaks to the repositories to support deletions. InReplyRepository and its implementation, you now need a deleteForDiscussion method.
@Override
public synchronized void deleteForDiscussion(long id)
{
this.database.entrySet()
.removeIf(e -> e.getValue().getDiscussionId() == id);
}
DiscussionRepository and its implementation also need a delete method. However, deletions need to cascade to replies, so this class needs an @Injected ReplyRepository.
@Override
public void delete(long id)
{
this.database.remove(id);
this.replyRepository.deleteForDiscussion(id);
}
Now that the repositories support deleting, you just need to add a @Scheduled method to the DefaultDiscussionService:
@Scheduled(fixedDelay = 15_000L, initialDelay = 15_000L)
public void deleteStaleDiscussions()
{
Instant oneYearAgo = Instant.now().minus(365L, ChronoUnit.DAYS);
log.info("Deleting discussions stale since {}.", oneYearAgo);
List<Discussion> list = this.discussionRepository.getAll();
list.removeIf(d -> d.getLastUpdated().isAfter(oneYearAgo));
for(Discussion old : list)
this.discussionRepository.delete(old.getId());
}
This method starts executing 15 seconds after Spring starts and executes again and again with 15 seconds between the end of one invocation and the start of the next. You can use @Scheduled in many different ways to control when a method executes. Notice thatdeleteStaleDiscussions isn’t part of the DiscussionService interface, but the method still executes on a schedule because @EnableAsync’s proxyTargetClass attribute is set to true. (Of course, in the real world this method would execute much less often, such as once per day.)
Now that you have asynchronous and scheduled methods created and configured, compile the application, start up Tomcat from your IDE, and go to http://localhost:8080/board/. Watch the log and you can see that the TaskScheduler is instantiated only once and the scheduled method executes every 15 seconds. Create discussions and replies and you can see the asynchronous notification method writing to the log. The 5-second sleep during the method proves that it is executing asynchronously because, as you see, the server responds in much less than 5 seconds when you post a reply.
APPLYING LOGIC LAYER SEPARATION TO WEBSOCKETS
If you take a look at the Customer-Support-v11 project on the wrox.com code download site, you can see that its business logic has also been moved into services, leaving the controllers to worry only about user interface logic.
· InMemoryUserRepository, which implements UserRepository, stores all the users in memory.
· TemporaryAuthenticationService, which implements AuthenticationService, uses the UserRepository interface.
· The AuthenticationController now uses the AuthenticationService interface to conduct business logic.
· Likewise, you should see the InMemoryTicketRepository, the DefaultTicketService that uses the TicketRepository interface, and the TicketController that now uses the TicketService interface.
· The authentication code uses the java.security.Principal interface now, and the AuthenticationFilter wraps the underlying connection to expose the Principal as a shortcut alternative to querying the session attributes. To see where this can come in handy, take a look at the POST-handling create method on the TicketController. It now takes a Principal instead of the HttpSession as its first parameter, and Spring knows how to supply that value.
Adding Container-Managed Objects to the Spring Application Context
Another thing that has changed is that the former class SessionRegistry is now an interface of instance methods, and the DefaultSessionRegistry implements it. This works fine for the SessionListController, but by now you should realize that the SessionListener causes problems. SessionListener is instantiated and managed by the Servlet container, not by Spring Framework. That’s why SessionRegistry used to be a class of static methods. So how does the SessionListener get a hold of the SessionRegistry bean instance?
You actually have a few options here. One, which uses bytecode instrumentation and Aspect-Oriented Programming, is very automatic at run time. The only thing you have to do is annotate classes that aren’t Spring-managed beans with@org.springframework.beans.factory.annotation.Configurable if you want them converted to Spring beans automatically upon instantiation. However, the configuration necessary to accomplish this is quite tricky, and it wouldn’t be fair to hide all the magic from you without explaining how it works.
Alternatively, you can programmatically add an existing object to the Spring application context at run time. The first thing you must do is remove the @WebListener annotation from SessionListener because the order in which the listener is invoked can be unpredictable with this annotation. Instead, programmatically configure the listener in the Bootstrap class to make sure that it is invoked after Spring’s ContextLoaderListener.
...
container.addListener(new ContextLoaderListener(rootContext));
container.addListener(SessionListener.class);
...
Now, you need to change SessionListener so that it also implements ServletContextListener. This way the SessionListener can initialize itself within Spring when the container starts up, right after Spring starts up.
public class SessionListener
implements HttpSessionListener, HttpSessionIdListener,
ServletContextListener
{
...
}
You can use the contextInitialized method in the listener to get the root application context from the ServletContext, retrieve the bean factory from the application context, and configure the SessionListener instance as a bean in the root application context.
@Override
public void contextInitialized(ServletContextEvent event)
{
WebApplicationContext context =
WebApplicationContextUtils.getRequiredWebApplicationContext(
event.getServletContext());
AutowireCapableBeanFactory factory =
context.getAutowireCapableBeanFactory();
factory.autowireBeanProperties(this,
AutowireCapableBeanFactory.AUTOWIRE_BY_TYPE, true);
factory.initializeBean(this, "sessionListener");
log.info("Session listener initialized in Spring application context.");
}
When the contextInitialized method completes execution, the SessionRegistry implementation is injected, and the SessionListener can begin using it immediately.
WARNING The listener may now be eligible for wiring and other amenities, but it is not a fully-fledged Spring bean. Other beans cannot have the listener @Autowired or @Injected into them, and calling the getBean method of ApplicationContext does not return the listener. This is because the listener is never placed into the bean registry for the application context. You can partially resolve this by calling the bean factory’s registerSingleton method, but some services will still not work, such as scheduled method execution and post-construction/pre-destruction callback methods.
Using the Spring WebSocket Configurator
As you likely already realize, WebSocket server endpoints are also container-managed objects. You can, therefore, use the same technique to wire up your WebSocket server endpoints that you used for your SessionListener. You might wonder why Spring doesn’t have a controller-equivalent replacement for WebSocket endpoints. The answer to this question is simple: Controllers were meant to be a flexible replacement for Servlets that abstracted away the details of the underlying connection. The Java WebSockets API already does a good job of this, and it is unnecessary for Spring to replace it. However, to avoid having to programmatically register a server endpoint with Spring every time it is instantiated (remember, you get a new endpoint instance for each connection), Spring provides first-class support for server endpoints by way of the org.springframework.web.socket.server.endpoint.SpringConfigurator.
The SpringConfigurator class extends javax.websocket.server.ServerEndpointConfig.Configurator to ensure that instances of your server endpoint are properly injected and initialized before any of the event- or message-handling methods are called. Normally, you declare your endpoint using the SpringConfigurator, as in the following example:
@ServerEndpoint(value="/chat/{sessionId}", configurator=SpringConfigurator.class)
However, the ChatEndpoint.EndpointConfigurator class already extends ServerEndpointConfig.Configurator to expose the HttpSession as a user property, and ChatEndpoint uses this custom configurator. So, you just need to change the custom configurator to extendSpringConfigurator instead of ServerEndpointConfig.Configurator.
public static class EndpointConfigurator extends SpringConfigurator
{
@Override
public void modifyHandshake(ServerEndpointConfig config,
HandshakeRequest request,
HandshakeResponse response) { ... }
}
That’s really all there is to it. With this simple change, your EndpointConfigurator can have @Autowired or @Injected properties and implement any of the magic Spring interfaces (such as the Aware interfaces), just like a first-class bean. However, as with the listener, the endpoint is never placed in the singleton bean registry, meaning other beans cannot access it and it is not eligible for pre-destroy life-cycle notification or scheduled method execution (although post-construct methods will work). If you want the endpoint to exist in the bean registry and be eligible for these services, you can declare a singleton instance of the endpoint in the root application context configuration, instead:
@Bean
public ChatEndpoint chatEndpoint()
{
return new ChatEndpoint();
}
When you do this, the SpringConfigurator (or extending class) specified in the @ServerEndpoint annotation no longer returns a new instance for every WebSocket connection. Instead, it returns that singleton instance to handle every connection. Thus, one instance of the endpoint handles multiple connections, just like a Servlet or controller. This requires careful coordination, because if you do this the endpoint can no longer hold the Session, HttpSession, ChatSession, Principal, and other objects as instance variables — they have to be looked up on the invocation of every method. So then what are the benefits of using a singleton ChatEndpoint bean? First, it consumes less memory, especially if you have many thousands of WebSocket connections. Also, it takes less time to establish a connection, because Spring only injects dependencies once instead of on each connection. In the Customer-Support-v11 application, the endpoint is not configured this way, but instead adheres to the traditional model of one endpoint instance per WebSocket connection. Refactoring it to be a singleton bean is an exercise left up to the reader.
Remember: A WebSocket Is Just Another Interface for Business Logic
At first it might seem very difficult to separate business logic from user interface logic in a WebSocket endpoint. In some ways it’s very much like a controller and can react to each incoming message like a controller might react to an incoming HTTP request. Admittedly, the fact that server endpoints can send messages to clients without first receiving messages (something that controllers cannot do) definitely complicates matters. The lines are blurred here. Nobody can tell you where to draw the line; only you and your organization can make that determination. However, it’s important to keep in mind that, whatever way you spin it, a WebSocket connection is just another interface for some unit of business logic. A service can be extracted from the tangle of business and user interface logic.
Recall that previous ChatEndpoint versions also implemented HttpSessionListener to receive notifications of logouts or session timeouts mid-chat. The use case was that if a user logged out of his web session in a separate window from the chat, the chat needed to end for security reasons.
However, implementing HttpSessionListener was a messy solution because it meant that the container created a singleton instance of ChatEndpoint that didn’t actually handle connections, and a host of static fields were needed to maintain information about theSession-to-HttpSession link across instances of the ChatEndpoint. Fortunately, there’s a cleaner way to do that now. The SessionRegistry has two new methods that enable beans to register callbacks to execute when a session is destroyed.
void registerOnRemoveCallback(Consumer<HttpSession> callback);
void deregisterOnRemoveCallback(Consumer<HttpSession> callback);
ChatEndpoint has an @Injected SessionRegistry, and in its @PostContsruct method, it registers a callback. Notice that the callback is registered and deregistered using Java 8 method references (bold), which makes the code significantly cleaner.
private final Consumer<HttpSession> callback = this::httpSessionRemoved;
...
@PostConstruct
public void initialize()
{
this.sessionRegistry.registerOnRemoveCallback(this.callback);
}
private void httpSessionRemoved(HttpSession httpSession)
{
if(httpSession == this.httpSession)
{
synchronized(this)
{
if(this.closed)
return;
log.info("Chat session ended abruptly by {} logging out.",
this.principal.getName());
this.close(ChatService.ReasonForLeaving.LOGGED_OUT, null);
}
}
}
private void close(ChatService.ReasonForLeaving reason, String unexpected)
{
...
this.sessionRegistry.deregisterOnRemoveCallback(this.callback);
...
}
This code is much cleaner and completely eliminates the need for a complex map of Sessions to HttpSessions and HttpSessions to Sessions.
NOTE You might wonder why the ChatEndpoint has the callback instance variable instead of simply passing this::httpSessionRemoved to the registerOnRemoveCallback and deregisterOnRemoveCallback methods. Method references (this::something) in Java have no object identity. Because of this, the references passed to registerOnRemoveCallback and deregisterOnRemoveCallback would appear to be different instances, making it impossible to deregister the callback. Using the callback instance variable solves this problem.
ChatEndpoint also uses a scheduled method — sendPing — to send ping messages every 25 seconds. Browsers respond to pings with pongs, and this keeps a connection alive if no other activity occurs for a period of time. The WebSocket container does not send pings automatically on your behalf, so it’s up to your code to accomplish this. This would be a perfect application of Spring Framework’s scheduled method execution, eliminating the need to manage a thread for sending ping messages. However, you can’t just marksendPing with @Scheduled because ChatEndpoint is not a singleton bean. Spring Framework only supports @Scheduled on singleton beans, and would ignore it on the ChatEndpoint.
To solve this problem, you need to use Spring’s TaskScheduler bean directly. The following code sends pings and accepts pongs. After the ChatEndpoint is constructed, it schedules sendPing to run after 25 seconds and every 25 seconds thereafter. When the connection closes, it cancels all future execution of sendPing.
private static final byte[] pongData =
"This is PONG country.".getBytes(StandardCharsets.UTF_8);
...
private ScheduledFuture<?> pingFuture;
...
@Inject TaskScheduler taskScheduler;
...
private void sendPing()
{
if(!this.wsSession.isOpen())
return;
log.debug("Sending ping to WebSocket client.");
try
{
this.wsSession.getBasicRemote()
.sendPing(ByteBuffer.wrap(ChatEndpoint.pongData));
}
catch(IOException e)
{
log.warn("Failed to send ping message to WebSocket client.", e);
}
}
@OnMessage
public void onPong(PongMessage message)
{
ByteBuffer data = message.getApplicationData();
if(!Arrays.equals(ChatEndpoint.pongData, data.array()))
log.warn("Received pong message with incorrect payload.");
else
log.debug("Received good pong message.");
}
@PostConstruct
public void initialize()
{
...
this.pingFuture = this.taskScheduler.scheduleWithFixedDelay(
this::sendPing,
new Date(System.currentTimeMillis() + 25_000L),
25_000L
);
}
...
private void close(ChatService.ReasonForLeaving reason, String unexpected)
{
...
if(!this.pingFuture.isCancelled())
this.pingFuture.cancel(true);
...
}
The ChatService (implemented in DefaultChatService) handles business logic, such as creating ChatSession objects (and assigning them IDs), maintaining the list of pending chat sessions, and writing messages to a chat log. This leaves the ChatEndpoint class to concern itself only with handling WebSocket Session objects and sending and receiving messages, using the @Injected ChatService for business logic application.
One of the ways the ChatEndpoint is less complicated now is when you replace the system of maps between different session types with instance variables for the user’s WebSocket Session (wsSession) and the opposite party’s WebSocket Session (otherWsSession). One challenge in achieving this is notifying the user requesting a chat session when the customer service representative connects to and responds to that chat session. Java 8 lambdas make this a trivial task by simply declaring an event handler on the ChatSession object.
public class ChatSession
{
...
private Consumer<Session> onRepresentativeJoin;
...
public void setRepresentative(Session representative)
{
this.representative = representative;
if(this.onRepresentativeJoin != null)
this.onRepresentativeJoin.accept(representative);
}
public void setOnRepresentativeJoin(Consumer<Session> onRepresentativeJoin)
{
this.onRepresentativeJoin = onRepresentativeJoin;
}
...
}
Now when a new chat session is created, the customer session uses a simple lambda expression to respond to the act of the support representative joining the session. When the support representative joins and the setRepresentative method is called, this triggers the callback that ensures both sides know about the presence of each other.
public void onOpen(Session session, @PathParam(sessionId) long sessionId)
{
...
if(sessionId < 1)
{
CreateResult result =
this.chatService.createSession(this.principal.getName());
this.chatSession = result.getChatSession();
this.chatSession.setCustomer(session);
this.chatSession.setOnRepresentativeJoin(
s -> this.otherWsSession = s
);
session.getBasicRemote().sendObject(result.getCreateMessage());
}
else
{
JoinResult result = this.chatService.joinSession(sessionId,
this.principal.getName());
if(result == null)
{
log.warn("Attempted to join non-existent chat session {}.",
sessionId);
session.close(new CloseReason(
CloseReason.CloseCodes.UNEXPECTED_CONDITION,
"The chat session does not exist!"
));
return;
}
this.chatSession = result.getChatSession();
this.chatSession.setRepresentative(session);
this.otherWsSession = this.chatSession.getCustomer();
session.getBasicRemote()
.sendObject(this.chatSession.getCreationMessage());
session.getBasicRemote().sendObject(result.getJoinMessage());
this.otherWsSession.getBasicRemote()
.sendObject(result.getJoinMessage());
}
...
}
Now that you’ve reviewed the updates to the Customer Support application and have a grasp for the improvements made, compile the project, start Tomcat, and go to http://localhost:8080/support to give it a try. Create tickets and look at the session list, which all work as they did before, but on a simpler code base. Be sure to open a second browser and try out the Support Chat feature to see how it works, as well.
SUMMARY
In this chapter you explored complementing the Model-View-Controller pattern with Controller-Service-Repository. You learned why it’s important to separate user interface logic, business logic, and data persistence logic into separate layers, and saw how much simpler this made your code. Simpler code is easier to test and generally more stable, which should always be a goal in software development. You also learned how to separate these different layers, and you discovered the support Spring Framework offers you through the @Controller, @Service, and @Repository annotations.
Later in the chapter you discovered the powerful asynchronous and scheduled method execution tools that Spring offers, and used them to do things, such as send e-mail notifications in the background and clear old data out of the data store periodically. Finally, you learned about wiring and initializing non-Spring beans and about Spring Framework’s support for managing WebSocket endpoints.
In the next chapter you revisit an old topic, internationalization and localization, and learn how much simpler Spring Framework makes the task of readying your application for global distribution.
All materials on the site are licensed Creative Commons Attribution-Sharealike 3.0 Unported CC BY-SA 3.0 & GNU Free Documentation License (GFDL)
If you are the copyright holder of any material contained on our site and intend to remove it, please contact our site administrator for approval.
© 2016-2026 All site design rights belong to S.Y.A.