PROFESSIONAL JAVA FOR WEB APPLICATIONS (2014)
Part II Adding Spring Framework Into the Mix
Chapter 16 Using JSR 349, Spring Framework, and Hibernate Validator for Bean Validation
IN THIS CHAPTER
· An Introduction to Bean Validation
· Configuring validation in the Spring Framework container
· Adding constraint validation annotations to your beans
· Configuring Spring beans for method validation
· Writing your own validation constraints
· Integrating validation in the Customer Support application
WROX.COM CODE DOWNLOADS FOR THIS CHAPTER
You can find the wrox.com code downloads for this chapter at http://www.wrox.com/go/projavaforwebapps on the Download Code tab. The code for this chapter is divided into the following major examples:
· HR-Portal Project
· Custom-Constraints Project
· Customer-Support-v13 Project
NEW MAVEN DEPENDENCIES FOR THIS CHAPTER
In addition to the Maven dependencies introduced in previous chapters, you also need the following Maven dependencies:
<dependency>
<groupId>javax.validation</groupId>
<artifactId>validation-api</artifactId>
<version>1.1.0.Final</version>
<scope>compile</scope>
</dependency>
<dependency>
<groupId>org.hibernate</groupId>
<artifactId>hibernate-validator</artifactId>
<version>5.1.0.Final</version>
<scope>runtime</scope>
<exclusions>
<exclusion>
<groupId>org.jboss.logging</groupId>
<artifactId>jboss-logging</artifactId>
</exclusion>
</exclusions>
</dependency>
<dependency>
<groupId>org.jboss.logging</groupId>
<artifactId>jboss-logging</artifactId>
<version>3.2.0.GA</version>
<scope>runtime</scope>
</dependency>
WHAT IS BEAN VALIDATION?
In a large application, chances are that you’ll have many different types of objects that get “saved” in some fashion. The meaning of the word saved here doesn’t matter; the objects might get stored in a collection in memory, transmitted over a network connection to some other system, or persisted to a database.
Whatever the goal, you undoubtedly have rules that these objects must follow. An object representing a user, for example, is probably required to have a non-null, non-blank value in the username field. An item added to a shopping cart requires a product identifier and a quantity, and the quantity must be greater than zero. An e-mail sent might require the recipient address, subject, and body fields to have values. An employee added to a human resources system must have a first and last name, and a date of birth that is before some date.
Sometimes these business rules can get quite complex. For example, a property representing an e-mail address must match the following regular expression to be a valid RFC 2822 address. (And even this expression isn’t complete because it omits non-English characters, as well as quoted and bracketed characters in the domain part.)
^[a-z0-9`!#$%^&*'{}?/+=|_~-]+(.[a-z0-9`!#$%^&*'{}?/+=|_~-]+)*@
([a-z0-9]([a-z0-9-]*[a-z0-9])?)+(.[a-z0-9]([a-z0-9-]*[a-z0-9])?)*$
It should not take a lot to convince you that evaluating these business rules throughout your application can become cumbersome and downright inefficient when code like evaluating that e-mail address regular expression is duplicated many times over. At the very least, evaluating all these rules consumes many lines of code. Consider this sample evaluation of an employee entity.
if(employee.getFirstName() == null ||
employee.getFirstName().trim().length() == 0)
throw new ValidationException("validate.employee.firstName");
if(employee.getLastName() == null || employee.getLastName().trim().length() == 0)
throw new ValidationException("validate.employee.lastName");
if(employee.getGovernmentId() == null ||
employee.getGovernmentId().trim().length() == 0)
throw new ValidationException("validate.employee.governmentId");
if(employee.getBirthDate() == null ||
employee.getBirthDate().isAfter(yearsAgo(18)))
throw new ValidationException("validate.employee.birthDate");
if(employee.getGender() == null)
threw new ValidationException("validate.employee.gender");
if(employee.getBadgeNumber() == null ||
employee.getBadgeNumber().trim().length() == 0)
throw new ValidationException("validate.employee.badgeNumber");
if(employee.getAddress() == null || employee.getAddress().trim().length() == 0)
throw new ValidationException("validate.employee.address");
if(employee.getCity() == null || employee.getCity().trim().length() == 0)
throw new ValidationException("validate.employee.city");
if(employee.getState() == null || employee.getState().trim().length() == 0)
throw new ValidationException("validate.employee.state");
if(employee.getPhoneNumber() == null ||
employee.getPhoneNumber().trim().length() == 0)
throw new ValidationException("validate.employee.phoneNumber");
if(employee.getEmail() == null || employee.getEmail().trim().length() == 0 ||
!EMAIL_REGEX.matcher(employee.getEmail()).matches())
throw new ValidationException("validate.employee.email");
if(employee.getDepartment() == null ||
lookupService.getDepartment(employee.getDepartment()) == null)
throw new ValidationException("validate.employee.department");
if(employee.getLocation() == null ||
lookupService.getLocation(employee.getLocation()) == null)
throw new ValidationException("validate.employee.location");
if(employee.getPosition() == null ||
lookupService.getPosition(employee.getPosition()) == null)
throw new ValidationException("validate.employee.position");
if(employee.getManager() == null && !"President".equals(employee.getPosition()))
throw new ValidationException("validate.employee.manager");
Are you tired yet? You haven’t even written the code to save the employee! This code just tests whether you’re allowed to save the employee. Worse, you’ll find out about only one violation at a time, meaning you may have to submit the employee multiple times to get it right. You could, instead, add to a collection of error codes and throw the exception if the collection is not empty after validation, but that’s yet again more code.
Thankfully, there’s an easier way. Bean Validation is a Java EE API for automatically validating declared business rules on Java beans. It consists of a metadata model — a set of annotations with which you declare the business rules for a given class — and an API for using the validation tools.
JSR 303 is the original specification for JavaBean Validation 1.0, and it was added as part of the Java EE 6 platform. JavaBean Validation 1.1, specified in JSR 349, is the successor to JSR 303 in Java EE 7. It includes a couple of major improvements, such as supporting validation of method arguments and return values, and enabling Unified Expression Language expressions within validation error messages. You use Hibernate Validator 5.1 to power Bean Validation in this book.
Why Hibernate Validator?
JSR 349 is just the specification of the metadata model and the validation API. You still require an implementation of this API to make Bean Validation in your applications work. Hibernate Validator 5.0 is the reference implementation for JSR 349, meaning it is compliant with the specification. In addition, you can generally count on it to be ahead of other implementations as far as identifying and fixing issues because it is the most used of any Bean Validation implementation. (Hibernate Validator 5.1 includes several important enhancements, bug fixes, and performance improvements to better support JSR 349.)
In fact, Hibernate Validator was the inspiration for the Bean Validation standard, which is evident from the fact that Hibernate Validator’s version number is far ahead of the specification’s version number. Hibernate Validator has been around for many years. Originally it was part of the Hibernate ORM project (which you learn about in Part III of this book) and provided declarative validation of entities before they were persisted to the database. It eventually became its own project and, after more years still, evolved into the Bean Validation standard.
Understanding the Annotation Metadata Model
Bean Validation works by way of annotating fields, methods, and more, to indicate that a particular constraint applies to the annotated target. Any annotation whose retention policy is run time (meaning the annotation survives compilation and is available in class metadata at run time) and which is annotated with @javax.validation.Constraint represents a constraint annotation. The API comes with several predefined constraint annotations, but you can create your own and provide correspondingjavax.validation.ConstraintValidator implementations that correspond to your custom annotations. A ConstraintValidator is responsible for evaluating a particular constraint type. The API does not define ConstraintValidators for the built-in constraints because it is up to the implementation how to handle these built-in annotations.
Constraint annotations may be placed on fields, methods, or method parameters. When placed on a field, this indicates that the validator should check that field for constraint compliance whenever the validation method is called on an instance of the class. When placed on a JavaBean accessor method, this simply serves as an alternative to annotating the underlying field. Annotating an interface method indicates that the constraint should be applied against the return value of the method after method execution. Annotating one or more method parameters of an interface method means that the constraints should be applied against the method parameters before method execution.
These last two patterns facilitate a programming style known as programming by contract or PbC. The creator of the interface specifies a contract that the interface follows, such as certain return values never being null, or certain method parameters having to follow certain rules. Consumers of the interface can then rely on that contract, and implementers and consumers of the interface alike know that the contract is enforced if they violate it.
When using Bean Validation annotations as PbC constraints, you must create a proxy to validate the target implementation classes. This requires some form of dependency injection for consumers of an interface to actually call the proxy of its implementation. Full Java EE application servers implementing Java EE 7 provide the capability to DI proxied implementations that are appropriately validated. When using simple Servlet containers such as Tomcat, however, you must provide some other DI solution.
Using Bean Validation with Spring Framework
Obviously, Spring Framework’s dependency injection is the solution to this problem. Spring Framework automatically proxies Spring-managed beans that use Java Bean Validation. Calls to annotated methods are intercepted and validated appropriately, whether to check that the consumer provides valid arguments or that the implementation returns legal values. As such, it is quite common to use Bean Validation on @Services because these are the conceptual Spring-managed beans that handle business logic. Spring Framework also validates any form objects or other constraint-annotated arguments passed to controller handler methods if the parameters are marked with @javax.validation.Valid.
In this chapter, you explore how to configure Bean Validation in Spring Framework and how to use all the provided constraint annotations to apply business rules to your beans. You also learn how to create your own, custom constraint annotations for rules that aren’t satisfied by the built-in constraints.
CONFIGURING VALIDATION IN THE SPRING FRAMEWORK CONTAINER
Before you can easily use any of the validation tools, you must first set up Bean Validation in the Spring Framework configuration. This is not to say that configuring Bean Validation in Spring is required to use the validator, as the following standard validation code still works, even without the Spring container:
ValidatorFactory factory = Validation.buildDefaultValidatorFactory();
Validator validator = factory.getValidator();
Set<ConstraintViolation<Employee>> violations = validator.validate(employee);
if(violations.size() > 0)
throw new ConstraintViolationException(violations);
But you don’t want to have to use it like that. You want this to be automatic, which means Spring Framework’s dependency injection and proxy support have to get involved. To accomplish this you must configure four things:
· A validator
· Message localization for the validator
· A method validation processor
· Spring MVC form validation
For this, use the HR-Portal project, available for download from the wrox.com code download site.
NOTE You’ve likely noticed that the Maven dependency for Hibernate Validator excludes the transient JBoss Logging API dependency (Hibernate projects use this instead of Commons Logging as their logging API), and that a runtime JBoss Logging dependency is separately declared. The hibernate-validator artifact declares a dependency on a jboss-logging version that doesn’t support Log4j 2, so it is necessary to declare a newer dependency that does. The exclusion isn’t strictly necessary, but is shown for clarity.
WARNING Prior to Spring Framework 4.0, Spring’s support for Bean Validation 1.0 was specifically targeted to Hibernate Validator 4.2 or 4.3. This is because Hibernate Validator provided some nonstandard features that were necessary to solve certain problems, such as integration with Spring i18n. As of Spring 4.0, any Bean Validation 1.1 implementation works because these features are standardized in 1.1. However, if you, for some reason, are restricted to Bean Validation 1.0, you must still use Hibernate Validator.
Configuring the Spring Validator Bean
Spring Framework had support for automatic validation of objects long before the Bean Validation standard was formalized. The org.springframework.validation.Validator interface specifies a tool for validating objects based on annotation constraints. Those constraints and their application were originally defined in a separate project know as Spring Modules Validation, which was killed before it left beta status in favor of the emerging JSR 303 standard. Now this Spring Validator interface serves as a façade for the Bean Validation API.
It’s important to understand this because Spring’s validation reports errors using the org.springframework.validation.Errors interface, as opposed to returning a Set<javax.validation.ConstraintViolation<?>>. This Errors interface provides access to one or moreorg.springframework.validation.ObjectErrors and one or more org.springframework.validation.FieldErrors. To this day, you may use either the Spring Validator or the javax.validation.Validator to suit your preferences in most cases, but in one particular case, you must use the Spring Validator and its Errors.
NOTE To avoid confusion, when you see the code word “Validator” throughout the rest of this book, it refers to the javax.validation.Validator unless specified otherwise. However, if it is preceded with the word “Spring” as in “Spring Validator” it refers to the org.springframework.validation.Validator.
When configuring Spring Framework’s validation support, you define a special type of bean (a class that extends org.springframework.validation.beanvalidation.SpringValidatorAdapter) that implements both Validator and Spring Validator. Internally, this bean uses aValidator to support the operations of both interfaces. You have the choice of using either of the following:
· javax.validation.beanvalidation.CustomValidatorBean
· javax.validation.beanvalidation.LocalValidatorFactoryBean.
In most cases, you want to use the LocalValidatorFactoryBean because it supports retrieval of the underlying Validator and enables you to use the same MessageSource and bundle files that you use for internationalizing the rest of your application. At its simplest, configuring Spring Framework’s LocalValidatorFactoryBean is as simple as instantiating it and returning it in a @Bean method in the RootContextConfiguration class:
@Bean
public LocalValidatorFactoryBean localValidatorFactoryBean()
{
return new LocalValidatorFactoryBean();
}
The LocalValidatorFactoryBean automatically detects the Bean Validation implementation on the classpath, whether that’s Hibernate Validator or some other implementation, and uses its default javax.validation.ValidatorFactory as the backing factory. There’s no need to set up the META-INF/validation.xml file usually required to take advantage of Bean Validation in your application. However, sometimes there is more than one Bean Validation Provider on the classpath (for example, when running within a full Java EE application server such as GlassFish or WebSphere). In these cases, which provider Spring selects is unpredictable (it might even change each time!), so you should set the provider class manually if you prefer the provider to be predictable.
@Bean
public LocalValidatorFactoryBean localValidatorFactoryBean()
{
LocalValidatorFactoryBean validator = new LocalValidatorFactoryBean();
validator.setProviderClass(HibernateValidator.class);
return validator;
}
The only downside to doing this is that it requires Hibernate Validator to be a compile-time dependency instead of a runtime dependency. This pollutes your compile time classpath, meaning your IDE will sometimes make code suggestions that you don’t want. You can avoid this by loading the class dynamically, which of course has its own downside in that any mistakes in the name will not be caught at compile time.
@Bean
public LocalValidatorFactoryBean localValidatorFactoryBean()
throws ClassNotFoundException
{
LocalValidatorFactoryBean validator = new LocalValidatorFactoryBean();
validator.setProviderClass(Class.forName(
"org.hibernate.validator.HibernateValidator"
));
return validator;
}
Because setting the provider class manually is not necessary when using Tomcat, the examples in this book do not do this.
Setting Up Error Code Localization
In the next section, you explore adding constraint annotations to your classes and entities. When you do this, you can specify an error message to accompany each constraint. Alternatively, you can specify an error code.
Error codes enable you to internationalize the constraints you use so that they are localized before you display them to the user. The default internationalization in Bean Validation uses resource bundle files ValidationMessages.properties, ValidationMessages_[language].properties, ValidationMessages_[language]_[region].properties, and so on. These files must be on the classpath (in /WEB-INF/classes). However, using any Bean Validation 1.1 implementation, you can provide your own internationalization using a javax.validation.MessageInterpolator. (Hibernate Validator 4.2 and 4.3 also supplied nonstandard support for interpolators before Bean Validation 1.1 was released.) Either way, you also need to specify the Locale for the validator to use each time it’s activated.
Again, Spring comes to the rescue, making it easy to provide a custom MessageInterpolator and eliminate the worry over the Locale. You need only to set the validation MessageSource on the LocalValidatorFactoryBean defined in RootContextConfiguration and it automatically provides an interpolator backed by that MessageSource:
...
@Bean
public MessageSource messageSource()
{
ReloadableResourceBundleMessageSource messageSource =
new ReloadableResourceBundleMessageSource();
messageSource.setCacheSeconds(-1);
messageSource.setDefaultEncoding(StandardCharsets.UTF_8.name());
messageSource.setBasenames(
"/WEB-INF/i18n/titles", "/WEB-INF/i18n/messages",
"/WEB-INF/i18n/errors", "/WEB-INF/i18n/validation"
);
return messageSource;
}
@Bean
public LocalValidatorFactoryBean localValidatorFactoryBean()
{
LocalValidatorFactoryBean validator = new LocalValidatorFactoryBean();
validator.setValidationMessageSource(this.messageSource());
return validator;
}
...
Now that you have configured the LocalValidatorFactoryBean to use your MessageSource, you can create your localized validation messages alongside all the other localized messages in your application and also take advantage of Spring’s support for tracking the Localeof the current user so that messages are properly localized at run time.
Using a Method Validation Bean Post-Processor
Spring Framework uses the concept of bean post-processors to configure, customize, and, if necessary, replace beans defined in your configuration before the container completes the startup process. Configuredorg.springframework.beans.factory.config.BeanPostProcessor implementations are executed before a bean is injected in other beans that depend on it. For example:
· The AutowiredAnnotationBeanPostProcessor is a framework bean created automatically when you configure Spring. It’s responsible for looking for @Autowired and @Injected properties and injecting their values.
· The InitDestroyAnnotationBeanPostProcessor looks for InitializingBean implementations (or @PostConstruct methods) and DisposableBean implementations (or @PreDestroy methods) and executes those methods at the appropriate stages in the life cycle.
· Some post-processors are actually capable of replacing the bean. The AsyncAnnotationBeanPostProcessor looks for beans with @Async methods and replaces those beans with proxies so that the @Async methods can be called asynchronously.
Most bean post-processors that you require, like the ones mentioned previously, are created for you automatically. However, to support validation of method arguments and return values, you need to create anorg.springframework.validation.beanvalidation.MethodValidationPostProcessor to proxy the execution of validated methods. This isn’t as simple as just instantiating a MethodValidationPostProcessor bean because by default it uses the validation provider on the classpath (without your MessageSource). Instead, you want to configure it to use the LocalValidatorFactoryBean you created earlier.
...
@Bean
public LocalValidatorFactoryBean localValidatorFactoryBean() { ... }
@Bean
public MethodValidationPostProcessor methodValidationPostProcessor()
{
MethodValidationPostProcessor processor =
new MethodValidationPostProcessor();
processor.setValidator(this.localValidatorFactoryBean());
return processor;
}
@Bean
public ObjectMapper objectMapper() { ... }
...
This MethodValidationPostProcessor looks for classes annotated with @org.springframework.validation.annotation.Validated or @javax.validation.executable.ValidateOnExecution and proxies them so that argument validation occurs on annotated parameters before method execution and return value validation occurs on annotated methods after method execution. Two sections from now you learn how to annotate class methods to activate this process.
Making Spring MVC Use the Same Validation Beans
Unlike the MethodValidationPostProcessor you just created, which uses a Validator instance, Spring MVC controller form object and argument validation uses a Spring Validator instance. This supports providing Errors arguments to methods that expect @Validparameters because the Errors interface is simpler to use than a set of ConstraintViolations. Fortunately, the LocalValidatorFactoryBean implements both validator interfaces, but by default Spring MVC creates a separate Spring Validator instance that masks the one created in the root application context.
To alter this default configuration, you just need to change the ServletContextConfiguration class you created in previous chapters to override WebMvcConfigurerAdapter’s getValidator method and return the validator created in the root application context.
@Inject SpringValidatorAdapter validator;
...
@Override
public Validator getValidator()
{
return this.validator;
}
...
With this change, Spring MVC uses your configured validator to validate appropriate controller handler method arguments, and your Spring Bean Validation is now complete.
ADDING CONSTRAINT VALIDATION ANNOTATIONS TO YOUR BEANS
For Bean Validation, your Spring applications mainly deal with two types of beans:
· POJOs or JavaBeans-like entities and form objects that are typically method parameters or return types
· Spring Beans like @Controllers and @Services that use those POJOs as method parameters and return types
Both these types of beans use Bean Validation constraint annotations, but in different ways. In this section you experiment with applying constraint annotations to POJOs, and in the next section you learn how to complete this process by applying annotations to your Spring Beans.
Understanding the Built-in Constraint Annotations
Although you can create your own constraint annotations any time you like, the Bean Validation API comes with several built-in annotations that satisfy the most common validation requirements. These are all very simple constraints, but in many cases they are all you need to use. All these constraints are in the package javax.validation.constraints.
· @Null — You can apply this to any type, and it ensures that the annotated target is null.
· @NotNull — You can also apply this to any type. It ensures that the target is not null.
· @AssertTrue and @AssertFalse — These ensure that their annotated targets are true and false, respectively. As such, the field, parameter, or method (return value) that they annotate must be of the type boolean or Boolean. A null Boolean is considered valid for either constraint, so combine these with @NotNull if you do not accept null values.
· @DecimalMax — This defines an upper limit for a numeric type, specified with the value attribute. It may annotate fields, parameters, and methods (return values) of type BigDecimal, BigInteger, CharSequence (String), byte, Byte, short, Short, int, Int, long, andLong. The primitives double, Double, float, and Float are not supported due to precision concerns. CharSequences are converted to a decimal before validation, and null values are considered valid. The optional inclusive attribute specifies whether the test should be inclusive (less than or equal to) or exclusive (less than), and defaults to inclusive (true).
· @DecimalMin — This is the counterpart to @DecimalMax. It applies to all the same types with the same rules. It also contains an inclusive attribute.
· @Digits — You can use this to ensure that the annotated target is a parseable number (if it’s a CharSequence) and then tests the limits of that number’s parts (whether it’s a CharSequence, BigDecimal, BigInteger, byte, Byte, short, Short, int, Int, long, or Long). The mandatory integer attribute specifies the maximum number of integral digits (before the decimal point) allowed, whereas the required fraction attribute specifies the maximum number of fractional digits (after the decimal point) allowed. As always, null values are considered valid.
· @Future — Ensures that the Date or Calendar field, parameter, or method (return value) is at some point in the future, however near or distant. As of Bean Validation 1.1, there is no support for Java 8 Date and Time API types. null values are considered valid.
· @Past — Ensures that Date and Calendar targets are at some point in the past.
· @Max and @Min — These are similar to @DecimalMax and @DecimalMin, but they do not support CharSequence targets, and they do not host an inclusive attribute — they are always inclusive. Targets that are null are considered valid.
· @Pattern — This defines a regular expression regexp that the target CharSequence (String) must match, and it considers null values to be valid. It hosts an optional flags attribute that supports an array of any of Pattern.Flag enum values. Supported flags are:
· CANON_EQ — Enables canonical equivalence
· CASE_INSENSITIVE — Enables case-insensitive matching
· COMMENTS — Enables white space and comments in the pattern
· DOTALL — Turns dotall mode on
· MULTILINE — Turns multiline mode on
· UNICODE_CASE — Enables Unicode case folding
· UNIX_LINES — Turns Unix lines mode on
· @Size — This defines inclusive max and min limits for the length of a CharSequence (String), the number of values in a Collection, the number of entries in a Map, or the number of elements in an array of any type.
Understanding Common Constraint Attributes
As you can see, you have a wide array of constraints to choose from. In addition to the constraint-specific annotation attributes already mentioned, all constraint annotations also have the following optional attributes. These attributes must also be present in any custom constraints you create.
· message — This String attribute defines what message should be displayed to the user. If the message is enclosed in curly braces (for example, message="{employee.firstName.notBlank}") it represents a message code that must be localized prior to display. Otherwise, it is simply a hard-coded message. This defaults to a message code that is different for each constraint type.
· groups — This is an array of Classes that defines what validation group or groups this constraint belongs to. By default the array is empty, meaning the constraint belongs only to the default group. Validation groups will be covered in more detail later in this section.
· payload — This is another array of Classes, and the classes must extend javax.validation.Payload. Payloads provide some type of meta-information to the validation provider or ConstraintValidator evaluating the constraint. This makes payloads nonportable between validation providers for built-in constraint types (the API defines no payload types), but it can be useful for custom constraints. You can use payloads for just about anything you put your mind to on custom constraints, so their theoretical use is outside the scope of this book.
Finally, all these constraint annotations define inner annotations called @List that permit the application of multiple constraints of that type to a target. For example, you can annotate a target with multiple @Max constraints using the @Max.List annotation. The segment on validation groups later in this section demonstrates one possible use for these lists.
Putting Constraints to Use
To gain an understanding of the basic use of these built-in constraints, take a look at the Employee POJO from the HR-Portal project. It is based on the hypothetical employee validation business logic you saw at the beginning of the chapter.
public class Employee
{
private long id;
@NotNull(message = "{validate.employee.firstName}")
private String firstName;
@NotNull(message = "{validate.employee.lastName}")
private String lastName;
private String middleName;
@NotNull(message = "{validate.employee.governmentId}")
private String governmentId;
@NotNull(message = "{validate.employee.birthDate}")
@Past(message = "{validate.employee.birthDate}")
private Date birthDate;
@NotNull(message = "{validate.employee.gender}")
private Gender gender;
@NotNull(message = "{validate.employee.badgeNumber}")
private String badgeNumber;
@NotNull(message = "{validate.employee.address}")
private String address;
@NotNull(message = "{validate.employee.city}")
private String city;
@NotNull(message = "{validate.employee.state}")
private String state;
@NotNull(message = "{validate.employee.phoneNumber}")
private String phoneNumber;
@NotNull(message = "{validate.employee.email}")
@Pattern(
regexp = "^[a-z0-9`!#$%^&*'{}?/+=|_~-]+(\.[a-z0-9`!#$%^&*'{}?/+=" +
"|_~-]+)*@([a-z0-9]([a-z0-9-]*[a-z0-9])?)+(\.[a-z0-9]" +
"([a-z0-9-]*[a-z0-9])?)*$",
flags = {Pattern.Flag.CASE_INSENSITIVE},
message = "{validate.employee.email}"
)
private String email;
@NotNull(message = "{validate.employee.department}")
private String department;
@NotNull(message = "{validate.employee.location}")
private String location;
@NotNull(message = "{validate.employee.position}")
private String position;
// mutators and accessors
}
You should notice some things right away:
· Most of the fields are annotated @NotNull except for manager and middleName.
· There is no replacement for the trim().length() > 0 check performed on so many of the fields earlier, which could become a problem quickly.
· The e-mail regular expression could become cumbersome if used in many places.
· birthDate is checked only to ensure it’s in the past, not to ensure the employee is at least 18 years old. For that matter, birthDate must be a legacy date type to use the built-in constraints, but you’d probably prefer to use the Java 8 date types.
· The employee department, location, and position are not checked to make sure that they exist.
You can address many of the issues with custom constraints. However, not every check is appropriate for Bean Validation tools. Checking that the department, location, and position exist requires other business logic and, likely, database queries, so tasks like these are best left up to manual validation.
NOTE Near the end of this chapter, you learn how to write your own custom validation constraints and meet needs like string length, date boundary, and e-mail validation. However, there are also options other than creating custom constraints. Hibernate Validator has proprietary constraints you can use, but doing so ties you to always using Hibernate Validator as your provider.
Another option is the Bean Validation Constraint Extensions project (Maven artifact net.nicholaswilliams.java.validation:validation-api-constraint-extensions), which provides null-intolerant versions of all the built-in constraints, as well as constraints for e-mail, credit card number, IP address, Java 8 Date and Time, Joda Time, and other targets. Because this library contains only constraints and is not a Bean Validation provider, it is safe to use with any provider.
Using @Valid for Recursive Validation
So far you have been annotating simple field types like Strings and primitives with validation constraints. But what if your bean contains a complex field that itself is annotated with validation constraints? For example, consider the following beans:
public class Train
{
@NotNull
private String name;
@NotNull
private Station origin;
@NotNull
private Station destination;
@NotNull
private Person engineer;
@NotNull
private Person conductor;
// mutators and accessors
}
The Station and Person fields in this case are POJOs with their own fields, and those fields are also annotated with validation constraints. These nested objects are not automatically validated. To ensure that they are validated, you annotate the fields of these types with @Valid, which indicates that a field, parameter, or method (return value) should result in cascading validation.
public class Train
{
@NotNull
private String name;
@NotNull
@Valid
private Station origin;
@NotNull
@Valid
private Station destination;
@NotNull
@Valid
private Person engineer;
@NotNull
@Valid
private Person conductor;
// mutators and accessors
}
If Station or Person contains fields that are also marked with @Valid, validation continues recursively as deep as it needs to. However, validators detect infinite loops caused by cyclical references and terminate validation of a field without error after it circles back on itself.
Using Validation Groups
Validation groups provide a way to enable and disable certain constraints based on the groups to which they belong as well as which groups are currently active. This is extremely similar to Spring Framework’s Bean Definition Profiles. A group is represented by any arbitrary marker interface. The interface need not have any constants or methods because they are not used. Instead, the interface’s Class object identifies the group when declaring the constraint. Then, at validation time, the Validator applies only constraints whose group Classes are specified in the call to the validate, validateProperty, or validateValue methods.
For example, consider a multistep data entry UI, where fields are successively filled out on each page. You would want to validate that the appropriate field values are provided for each step, but you might want to store all this in the same form object. Using groups, this is easy:
public interface UiScreen1 { }
public interface UiScreen2 { }
public interface UiScreen3 { }
public class Form
{
@NotNull(groups = UiScreen1.class)
private String field1;
@NotNull(groups = UiScreen2.class)
private String field2;
@NotNull(groups = UiScreen2.class)
private String field3;
@NotNull(groups = UiScreen3.class)
private String field4;
// mutators and accessors
}
Then, when you’re ready to validate, you just pass in the appropriate group class or classes on each call to the Validator, and it applies constraints matching those groups. Use the javax.validation.groups.Default group if you also want to evaluate constraints without defined groups.
// in method for step 1
Set<ConstraintViolation<Form>> violations =
validator.validate(form, Default.class, UiScreen1.class)
// in method for step 2
Set<ConstraintViolation<Form>> violations =
validator.validate(form, Default.class, UiScreen1.class, UiScreen2.class)
// in method for step 3
Set<ConstraintViolation<Form>> violations =
validator.validate(form, Default.class, UiScreen1.class, UiScreen2.class,
UiScreen3.class)
If a constraint declares no groups, it is assumed to be in the Default group. Likewise, if a call to validate, validateProperty, or validateValue specifies no groups, it is assumed to apply to the Default group.
Validation groups are also useful for applying the same constraint different ways depending on the group. Using @Size.List and @Size, for example, you can specify that a String field must be one length if validated in one group and another length if validated in another group (or groups).
public class BusinessObject
{
@Size.List({
@Size(min = 5, max = 100, groups = {Default.class, Group1.class}),
@Size(min = 20, max = 75, groups = Group2.class)
})
private String value;
// mutators and accessors
}
As usual, Spring also makes it easier to utilize validation groups. Instead of having to access the validator directly, you can specify in an annotation which groups should be active when validating an object. You learn more about that in the next section.
Checking Constraint Legality at Compile-Time
The Java language has rules about which annotations you can use where, specified with the java.lang.annotation.ElementType values provided in the @java.lang.annotation.Target annotation on a particular annotation definition. However, the rules about where you can apply validation constraints are much more complex than supported natively.
For example, constraint annotations are allowed for ElementyType.METHOD (and others) at compile time, but this ignores the fact that constraints are allowed only on instance methods and not static methods (a distinction that ElementType does not make). Likewise, constraints are allowed only on instance fields and not static fields, but the compiler cannot enforce that, either. Even more important, different constraints are limited to different types (you cannot use @Future on Strings, for example), and you need a way to ensure that you use these constraints correctly.
Hibernate Validator comes with a compile-time annotation processor that hooks into the compiler and causes the code to not compile if the stricter constraint application rules are not followed. This makes applying validation constraints much easier because you know when you compile whether you’ve used them correctly. Otherwise, you won’t find out until validation of an object fails with a javax.annotation.ConstraintDeclarationException. Using the annotation processor is easy: simply add the following Maven dependency to your project.
<dependency>
<groupId>org.hibernate</groupId>
<artifactId>hibernate-validator-annotation-processor</artifactId>
<version>5.1.0.Final</version>
<scope>compile</scope>
<optional>true</optional>
</dependency>
The reason this dependency is marked as optional is that the library isn’t actually needed at run time. It’s needed only at compile time so that the compiler can detect and use the annotation processor it contains. The upside of doing it this way is that the processor gets applied automatically in both your Maven build and your IDE compilation. The downside is that the classes in the artifact are technically available to your classes at compile time, meaning your IDE will suggest them. (Though you don’t have to use them.)
You have other ways to apply annotation processors in Maven and your IDE. For example, you can add the dependency to the compiler plug-in’s dependencies instead of the project dependencies, and this then removes the classes from your classpath but forces you to separately set up the processor in your IDE. Examination of this technique and others is outside the scope of this book. You should consult the documentation for the Java compiler, Maven, and your IDE for more information.
CONFIGURING SPRING BEANS FOR METHOD VALIDATION
So far, you’ve created a bean capable of validation (Employee), but you haven’t written any code to validate it yet. By now, you have likely discovered that you can use the Validator’s validate, validateProperty, or validateValue methods to validate this bean, but what you really want is for the validation to happen automatically without using the Validator directly. As usual, Spring makes this easy. You’ve already done half the work by setting up the MethodValidationPostProcessor, which proxies Spring beans that should have their method parameters and return values validated. Now you just need to mark your Spring bean methods to indicate which return values or parameter should be validated.
Annotating Interfaces, Not Implementations
Using the programming by contract paradigm, developers rely on the contract of a bit of code to fulfill certain requirements or perform certain actions without concerning themselves with how those requirements are met. In Java, interfaces are considered the primary approach to programming by contract. You already explored this significantly in Chapter 14. You create an interface with methods defined indicating what implementations are supposed to do. Often you use Javadoc documentation to elaborate on the contract that the interface guarantees. Then consumers of the interface use it blindly without needing to know or even caring how the implementation works.
Constraint annotations are an extension of a programming contract. In addition to telling the Validator how to validate an object, they also tell the consumer of an API what to expect of a class’s behavior. For example, a method annotated @NotNull is guaranteed to never return null, so you don’t have to check for null before using its return value. Naturally, you might wonder what good these constraints would do on an implementation class, and the answer is: none. In fact, they could do harm.
Consider this scenario: You are calling a method on an interface and none of its parameters have constraint annotations. However, the underlying implementation indicates that one of the integer parameters is @Max(12L). When you call the interface method, you might supply a value of 15 thinking it’s okay, but the implementation throws an exception because you violated a constraint that you didn’t know applied. For this reason, you are forbidden from constraint annotating the implementation of a method specified in an interface. If you annotate such a method, the Validator throws a ConstraintDeclarationException at run time. This is another area in which the Hibernate Validator Annotation Processor comes in handy because it detects errors like this during compilation.
When using constraint annotations for method validation, you must always annotate the interface, not the implementation. This ensures that the annotations expand on the contract that the programmer relies on. If developers use an intelligent IDE with code completion, it informs them of these additional contract requirements as they use each method.
Using Constraints and Recursive Validation on Method Parameters
Now that you have an Employee entity to work with, you need a service for saving and retrieving Employees. The following interface defines such a service as simply as possible.
public interface EmployeeService
{
public void saveEmployee(Employee employee);
public Employee getEmployee(long id);
public List<Employee> getAllEmployees();
}
Think about the business rules that need to be applied to the arguments to getEmployee and saveEmployee. When retrieving a single Employee, you know that the ID is always positive. So to indicate this contract, annotate the id parameter with @Min.
public Employee getEmployee(
@Min(value = 1L,
message = "{validate.employeeService.getEmployee.id}") long id
);
This is simple enough; the Validator ensures that the ID is greater than or equal to 1 and returns a validation error with the given message code otherwise. Saving an Employee is slightly more complex. You want to ensure that the employee parameter is not null, but you also want the Employee to be validated so that its constraints are met. To do this, you simply need the @NotNull constraint and the @Valid annotation to indicate recursive validation.
public void saveEmployee(
@NotNull(message = "{validate.employeeService.saveEmployee}")
@Valid Employee employee
);
Now the Validator first checks that the Employee isn’t null and returns a validation error with the given message code if it is. If it’s not null, the Validator applies all the constraints you previously declared on the Employee’s properties and returns the appropriate validation error or errors if the Employee isn’t valid.
Validating Method Return Values
In addition to ensuring that consumers of your interfaces follow the proper rules when supplying values to methods, you also want to guarantee that implementations follow the rules regarding return values. The getAllEmployee method from the EmployeeServiceinterface should never return null. If there are no Employees to retrieve, it should return an empty list instead. Enforcing this contract is as simple as annotating the method @NotNull.
@NotNull
public List<Employee> getAllEmployees();
Notice that no message code is provided for this constraint. Unlike a method parameter constraint, whose status is typically driven by user input, a return value constraint indicates an implementation problem, which is an unexpected problem that should be addressed in code, not by the user. This is similar to the conceptual difference between checked and unchecked exceptions. Checked exceptions should be expected and handled gracefully, whereas unchecked exceptions usually indicate a programming error. You certainly may provide a message code for return value constraints, but it is unnecessary. This constraint never fails if the application is programmed correctly, so creating localized messages is a waste of time.
Also notice that the getEmployee method is not annotated @NotNull. This is intentional; if the employee doesn’t exist, the consumer wants to get a null value back. To make it clearer that a null return value is permitted, you could create a @Nullable annotation and decorate such methods with that. An annotation such as this would not be enforced in the Validator (it indicates only that the return value may be null, not that it must be null), but it would improve the contract of your interface.
NOTE You can, of course, enforce these restrictions at compile time using a static code analyzer. Various tools are available (such as FindBugs and IntelliJ Contract Annotations) that provide annotations such as @NonNull and @Nullable, as well as annotation processors that check for these annotations and make sure the byte code isn’t capable of violating the restriction (or checks @Nullable values before using them). Such tools can ensure during compilation that you don’t violate the contract, and they can cut down on the number of possible bugs and runtime NullPointerExceptions and UnsupportedOperationExceptions. There were discussions of creating a standard set of static code analysis-eligible annotations (@NonNull, @Nullable, and@Readonly) in Java 8, but that did not happen.
Indicating That a Class Is Eligible for Method Validation
So now that you have defined your interface’s method validation contract, you need to tell Spring’s MethodValidationPostProcessor to actually apply validation to executions of the method. You have a couple of options here. You can either use the standard@ValidateOnExecution annotation or Spring’s @Validated annotation. Each has its advantages and disadvantages. @ValidateOnExecution is more granular because you can annotate individual methods as well as an interface (to apply to all its methods), whereas you can use @Validated only on a class or interface. On the other hand, you can use @Validated on method parameters, but you cannot use @ValidateOnExecution on method parameters.
If you want to specify the validation groups that should be applied during method execution, you can use @javax.validation.GroupSequence with @ValidateOnExecution on the class. @Validated, on the other hand, enables you to specify validation groups directly within it without an extra annotation and also enables you to specify different groups for different MVC controller method parameters in the same controller class. (You cannot do this with @ValidateOnExecution and @GroupSequence, because @GroupSequence can only be used on a class.) Unfortunately, neither the standard annotations nor @Validated enables specification of different groups for method parameters in the same non-controller class. In nearly all cases, @Validated is simpler to use.
@Validated
public interface EmployeeService
{
...
}
If you wanted the validation to use only those constraints in a certain group or groups, you could specify those groups in the @Validated annotation.
@Validated({Default.class, Group1.class})
public interface EmployeeService
{
...
}
Your application needs an implementation of the EmployeeService. The default implementation that follows is full of no-operation methods because you don’t need to actually save any data to demonstrate that validation works properly. Notice that the implementation lacks any validation-related annotations. This is the way it should be because the interface contains that contract. The getAllEmployees method returns null, which is in violation of the contract. You demonstrate that as well later in the section.
@Service
public class DefaultEmployeeService implements EmployeeService
{
@Override
public void saveEmployee(Employee employee)
{
// no-op
}
@Override
public Employee getEmployee(long id)
{
return null;
}
@Override
public List<Employee> getAllEmployees()
{
return null;
}
}
Using Parameter Validation in Spring MVC Controllers
In addition to validating the method execution of your services, repositories, and other beans, Spring can also validate specified parameters in MVC controller handler methods. To demonstrate this you need an EmployeeController and EmployeeForm. The EmployeeFormlacks many of the fields in Employee, but that’s okay. You’re not trying to actually create Employees; you’re trying to demonstrate Bean Validation. The EmployeeForm uses both @NotNull and @Size because some browsers send blank strings and other browsers send nullvalues for form fields.
public class EmployeeForm
{
@NotNull(message = "{validate.employee.firstName}")
@Size(min = 1, message = "{validate.employee.firstName}")
private String firstName;
@NotNull(message = "{validate.employee.lastName}")
@Size(min = 1, message = "{validate.employee.lastName}")
private String lastName;
private String middleName;
// mutators and accessors
}
The controller contains a listEmployee handler method that responds to the index request and lists employees. As you might expect, this request fails with a ConstraintViolationException because the default getAllEmployees method returns null in violation of the contract. It also contains a simple handler method for getting the employee creation form. All this is standard fare that you have seen and done before.
@Controller
public class EmployeeController
{
@Inject EmployeeService employeeService;
@RequestMapping(value = "/", method = RequestMethod.GET)
public String listEmployees(Map<String, Object> model)
{
model.put("employees", this.employeeService.getAllEmployees());
return "employee/list";
}
@RequestMapping(value = "/create", method = RequestMethod.GET)
public String createEmployee(Map<String, Object> model)
{
model.put("employeeForm", new EmployeeForm());
return "employee/create";
}
...
}
The last method that the controller contains is responsible for handling submission of the employee creation form. It does some new things that probably aren’t familiar to you. First, the form parameter is annotated @Valid, which tells Spring to validate theEmployeeForm before executing the method. Normally, constraint violations would result in an exception, but the presence of the Errors parameter means Spring passes the validation errors in to the method instead of throwing an exception, allowing you to handle them gracefully. (This only works for controller methods.) The method first checks for the presence of form errors and returns the user to the form view if errors exist. It then copies the form contents into an Employee object and attempts to save the employee, which fails because the employee is not complete. If constraint violations are detected, it sets those to the model and returns the user to the form view.
@RequestMapping(value = "/create", method = RequestMethod.POST)
public ModelAndView createEmployee(Map<String, Object> model,
@Valid EmployeeForm form, Errors errors)
{
if(errors.hasErrors())
{
model.put("employeeForm", form);
return new ModelAndView("employee/create");
}
Employee employee = new Employee();
employee.setFirstName(form.getFirstName());
employee.setLastName(form.getLastName());
employee.setMiddleName(form.getMiddleName());
try
{
this.employeeService.saveEmployee(employee);
}
catch(ConstraintViolationException e)
{
model.put("validationErrors", e.getConstraintViolations());
return new ModelAndView("employee/create");
}
return new ModelAndView(new RedirectView("/", true, false));
}
Displaying Validation Errors to the User
This process has likely raised some questions about why you validate the submitted data twice. Remember that the EmployeeService encapsulates your core business logic. The controller is just a user interface that sits in front of it. You could have other user interfaces — such as web services or desktop applications — that sit in front of it. The same business rules should apply evenly across all user interfaces; thus, the constraints should be applied in the service.
Why validate the form at all, then? Well, as you can see in the following JSP code, Spring can associate form validation errors with form fields on the screen. This enables you to display an error related to the firstName property, for example, next to the First Name field — a much better user experience. However, this works only if it’s the form object that was validated, so you must validate the form object. To catch validation errors that were omitted from the form validation or that can be applied only in the business logic (such as testing that the department exists), you must also validate the object in the business layer and have a way of displaying non-form validation errors to users gracefully. The /WEB-INF/jsp/view/employee/create.jsp file, part of which is shown in the following code snippet, displays both types of errors.
<h2><spring:message code="title.create.employee" /></h2>
<c:if test="${validationErrors != null}"><div class="errors">
<ul>
<c:forEach items="${validationErrors}" var="error">
<li><c:out value="${error.message}" /></li>
</c:forEach>
</ul>
</div></c:if>
<form:form method="post" modelAttribute="employeeForm">
<form:label path="firstName"><spring:message code="form.first.name" />
</form:label><br />
<form:input path="firstName" /><br />
<form:errors path="firstName" cssClass="errors" /><br />
<form:label path="middleName">
<spring:message code="form.middle.name" />
</form:label><br />
<form:input path="middleName" /><br />
<form:errors path="middleName" cssClass="errors" /><br />
<form:label path="lastName"><spring:message code="form.last.name" />
</form:label><br />
<form:input path="lastName" /><br />
<form:errors path="lastName" cssClass="errors" /><br />
<input type="submit" value="Submit" />
</form:form>
Now that you have a user interface, it’s time to take Bean Validation for a test drive:
1. Compile the application and start Tomcat in your IDE.
2. Go to http://localhost:8080/portal/ and you should immediately see an HTTP 500 error with a ConstraintViolationException in your browser window. This is expected and means Bean Validation is working properly because the DefaultEmployeeService illegally returned null from the getAllEmployees method.
3. Now go to http://localhost:8080/portal/create and you should see the employee creation form.
4. Without filling in any of the fields, submit the form. You should see a screen like that in Figure 16-1, where the First Name and Last Name fields have errors below them. This means that your form object failed to validate because you didn’t supply these values.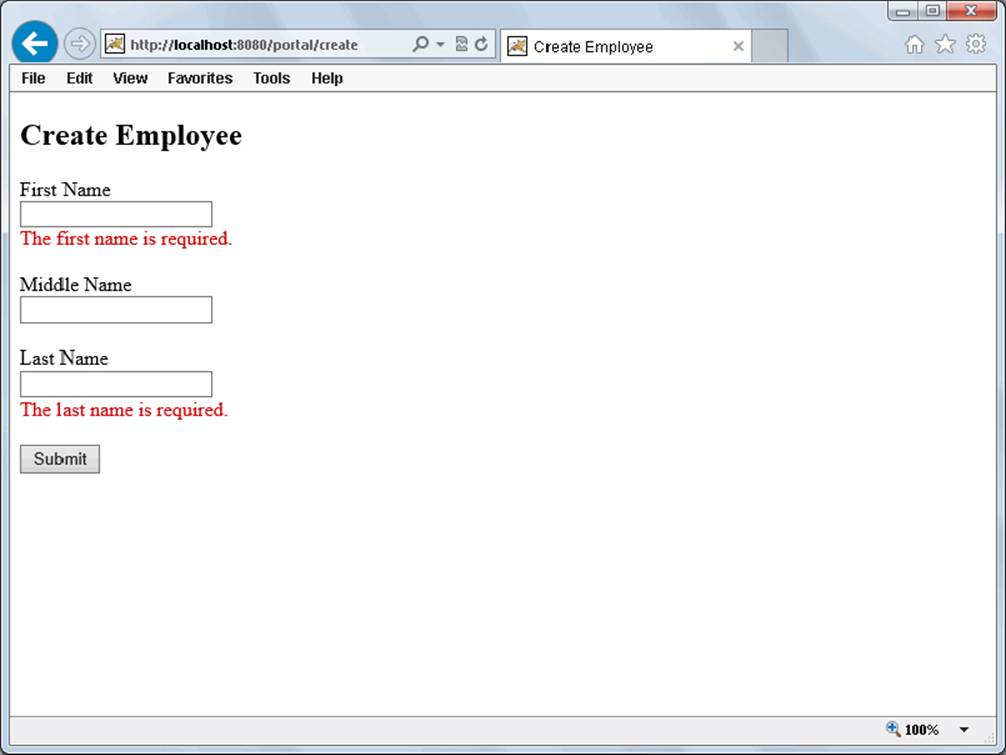
FIGURE 16-1
5. Fill in these fields and submit the form again. Now you should see a different set of errors, as shown in Figure 16-2. These errors are the result of Bean Validation intercepting the saveEmployee method on the EmployeeService and ensuring that your Employee met all the business rules.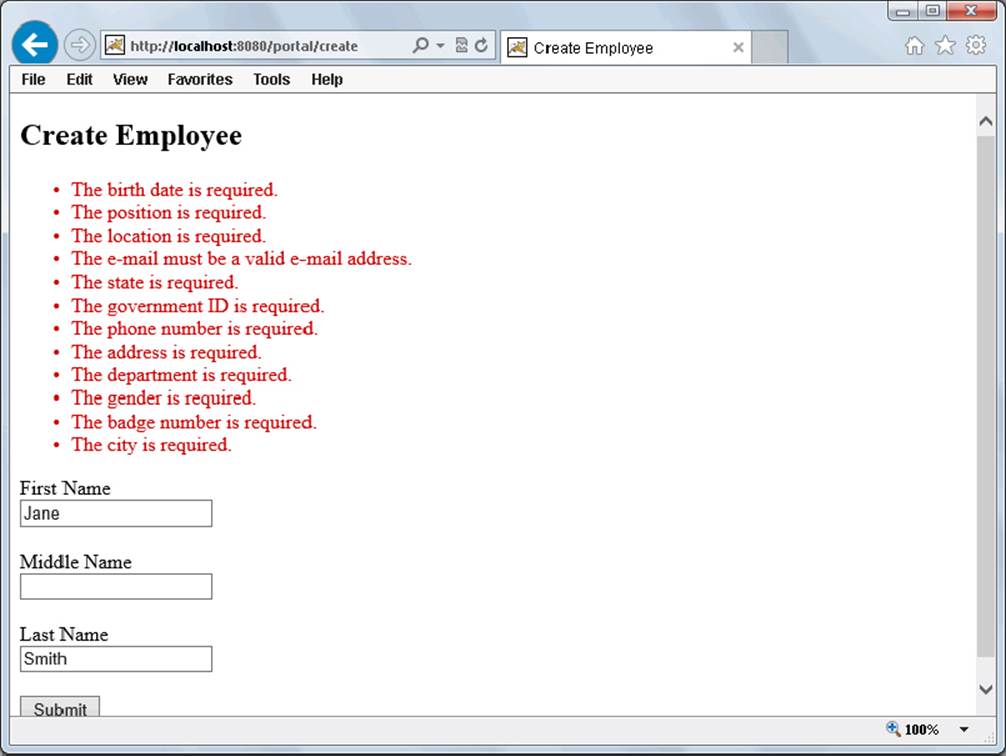
FIGURE 16-2
WRITING YOUR OWN VALIDATION CONSTRAINTS
By now, you’ve probably noticed that your application can use a few custom constraints. For example, the use of @NotNull throughout Employee is not sufficient to detect blank strings. EmployeeForm uses @NotNull and @Size, but this still does not detect strings that are only spaces. What you really need is a @NotBlank constraint. Furthermore, that e-mail regular expression is aggravating if you need to use it many times, and an @Email constraint would sure help with that.
Fortunately, writing custom constraints in Bean Validation is exceptionally easy. The Custom-Constraints project available on the wrox.com code download site is an extension of the HR-Portal project that adds the custom constraints@com.wrox.site.validation.NotBlank and @com.wrox.site.validation.Email. Now start with the @Email constraint first because, believe it or not, it’s easier.
Inheriting Other Constraints in a Custom Constraint
In Bean Validation, constraints can inherit from one another. Of course, this is not the same thing as one class inheriting from another because you cannot extend annotations. However, per convention, constraint annotations usually include a target ofElementType.ANNOTATION_TYPE. When a constraint annotation is located, the Validator determines if the annotation definition is annotated with any other constraints. If so, it combines all the additional constraints with the logic defined by the original constraint (if any) into a single, composite constraint. In this sense, the constraint inherits all the constraints with which it is annotated. If for some reason you need to create a constraint that cannot be inherited, you simply omit ElementType.ANNOTATION_TYPE from the definition. With all this in mind, take a look at the @Email definition.
@Target({ElementType.METHOD, ElementType.FIELD, ElementType.ANNOTATION_TYPE,
ElementType.CONSTRUCTOR, ElementType.PARAMETER})
@Retention(RetentionPolicy.RUNTIME)
@Documented
@Constraint(validatedBy = {})
@Pattern(regexp = "^[a-z0-9`!#$%^&*'{}?/+=|_~-]+(\.[a-z0-9`!#$%^&*'{}?/+=|" +
"_~-]+)*@([a-z0-9]([a-z0-9-]*[a-z0-9])?)+(\.[a-z0-9]" +
"([a-z0-9-]*[a-z0-9])?)*$", flags = {Pattern.Flag.CASE_INSENSITIVE})
@ReportAsSingleViolation
public @interface Email
{
String message() default "{com.wrox.site.validation.Email.message}";
Class<?>[] groups() default {};
Class<? extends Payload>[] payload() default {};
@Target({ElementType.METHOD, ElementType.FIELD, ElementType.ANNOTATION_TYPE,
ElementType.CONSTRUCTOR, ElementType.PARAMETER})
@Retention(RetentionPolicy.RUNTIME)
@Documented
static @interface List {
Email[] value();
}
}
There’s a lot going on here, so take a look at it line by line, starting with the annotations:
· @Target — This annotation indicates which language features this annotation can be placed on. The values listed are pretty standard and should be used for most constraints.
· @Retention — Indicates that the annotation must be retained at run time. If not, Bean Validation will not detect it.
· @Documented — This means that the Javadoc of targets marked with this annotation should indicate the annotation’s presence. This is especially useful when programming in an IDE because it makes the contract more visible.
· @Constraint — This is a must: It’s what indicates that this annotation represents a Bean Validation constraint, so all constraint definitions have to be annotated with this. Without this, your constraint is ignored. @Constraint also indicates which ConstraintValidatorimplementation or implementations are responsible for validating your constraint. However, in this case no ConstraintValidator is necessary.
· @Pattern — This is another constraint, indicating that this constraint inherits the constraint declared with @Pattern. This is the same regular expression seen earlier, but now you won’t have to duplicate the regular expression every time you use it. You can just use the @Email annotation, instead.
· @ReportAsSingleViolation — Indicates that the composite constraint should be considered one constraint and use @Email’s message instead of @Pattern’s message. It is very rare that you should ever create a constraint that inherits other constraints without using@ReportAsSingleViolation.
Within the annotation are three attributes: message, groups, and payload. These are the standard attributes that must be present in all constraints. Without one or more of these, use of @Email would result in a ConstraintDefinitionException. The @Email.List inner annotation, like all the Bean Validation list annotations, defines a way to specify multiple @Email constraints on a target.
Creating a Constraint Validator
The @NotBlank constraint looks nearly identical to @Email. For the most part, it has the same annotations, attributes, and features. Instead of being annotated with @Pattern, it’s annotated with @NotNull. In this case @NotBlank should imply non-null, so you inherit the@NotNull constraint to accomplish this. (If you anticipate needing to define targets that can be null but cannot be blank strings, you would simply remove @NotNull from this annotation.)
@Target({ElementType.METHOD, ElementType.FIELD, ElementType.ANNOTATION_TYPE,
ElementType.CONSTRUCTOR, ElementType.PARAMETER})
@Retention(RetentionPolicy.RUNTIME)
@Documented
@Constraint(validatedBy = {NotBlankValidator.class})
@NotNull
@ReportAsSingleViolation
public @interface NotBlank
{
String message() default "{com.wrox.site.validation.NotBlank.message}";
Class<?>[] groups() default {};
Class<? extends Payload>[] payload() default {};
@Target({ElementType.METHOD, ElementType.FIELD, ElementType.ANNOTATION_TYPE,
ElementType.CONSTRUCTOR, ElementType.PARAMETER})
@Retention(RetentionPolicy.RUNTIME)
@Documented
static @interface List {
NotBlank[] value();
}
}
However, unlike @Email, it can’t inherit all its functionality. It needs a ConstraintValidator to test whether the value is blank. The following NotBlankValidator class, declared in the @Constraint annotation on the @NotBlank annotation, accomplishes this.
public class NotBlankValidator
implements ConstraintValidator<NotBlank, CharSequence>
{
@Override
public void initialize(NotBlank annotation)
{
}
@Override
public boolean isValid(CharSequence value, ConstraintValidatorContext context)
{
if(value instanceof String)
return ((String) value).trim().length() > 0;
return value.toString().trim().length() > 0;
}
}
With both new constraints in place, take a look at the Employee and EmployeeForm POJOs. Both have had most of their @NotNull constraints replaced with @NotBlank, and EmployeeForm no longer uses @Size. The email field in Employee is changed to use @Email, and a similar email field is added to EmployeeForm so that you can see e-mail validation in action.
@NotNull(message = "{validate.employee.email}")
@Email(message = "{validate.employee.email}")
private String email;
Also, an e-mail form field is added to the employee/create view JSP. To finish up:
1. Compile and start the application and go to http://localhost:8080/portal/create.
2. Submit the form with no values in any fields, and you see that the @NotBlank constraint works.
3. Now enter data in all the fields, but in the Email Address field enter an invalid e-mail address, such as one without the @ character.
4. When you submit the form again, the Email Address field is still marked in error because the value is not a valid e-mail address.
5. Enter a valid e-mail address and submit the form again and form validation passes, showing instead the business layer validation errors.
Understanding the Constraint Validator Life Cycle
@NotBlank and its NotBlankValidator are, of course, very simple. You could perform many advanced tasks within this validator depending on the constraint type, value type, and constraint attributes available. To understand the things you can do, you first need to understand the life cycle of a ConstraintValidator.
When the Validator comes across a constraint annotation on a field, parameter, other constraint, and so on, it first checks whether the constraint is annotated with other constraints. If it is, it handles those constraints first. Next, it checks whether the constraint has any defined ConstraintValidators. If it does not, the value is considered valid as long as it also passes all the inherited constraints. If it does, it finds the ConstraintValidator that is the closest compatible match with the target type. For example, you may create a constraint that supports CharSequences, ints, and Integers. For such a constraint, you likely need two different ConstraintValidators:
public class IntValidator
implements ConstraintValidator<MyConstraint, Integer> { ... }
public class StringValidator
implements ConstraintValidator<MyConstraint, CharSequence> { ... }
@Constraint(validatedBy = {IntValidator.class, StringValidator.class})
...
After it finds a matching ConstraintValidator, the Validator instantiates and calls the initialize method on the ConstraintValidator. This method is called once per use of the constraint. If you have a class with 10 fields and 5 of them use your constraint, 5 instances of the ConstraintValidator are constructed and initialized. Those instances are cached and reused, the same instance each time for a given field. The initialize method enables your code to obtain values from the specific annotation instance for a particular use (such as the min and max attributes of the @Size annotation). This way, you can make decisions about how your constraint validates the target value just once, making execution of the isValid method more efficient. Only after initialize returns does the Validator call isValid, and it then calls isValid each subsequent time the field, parameter, or other target is validated.
With this knowledge, you can do some pretty complex things with custom constraints. For example, you can create a constraint that applies only to types instead of fields or parameters and use it to apply some business rule that considers the values of multiple fields of the annotated type. The possibilities are quite numerous and largely outside the scope of this book. The Hibernate Validator reference documentation and JSR 349 specification both have plenty of information about the ways you can create custom validators. You can also look through the source code of the Bean Validation Constraint Extensions project mentioned in a note earlier in the chapter.
INTEGRATING VALIDATION IN THE CUSTOMER SUPPORT APPLICATION
The Customer-Support-v13 project, available for download from the wrox.com code download site, demonstrates a more thorough integration of Bean Validation 1.1. It doesn’t really use anything new that you haven’t seen yet in this chapter, but it is a more stable application with validation business logic applied to forms, POJOs, and beans. The TicketController.TicketForm and AuthenticationController.LoginForm objects now use constraint annotations to ensure that form fields aren’t left blank, and the corresponding submit methods in the controller use the Errors object and the ConstraintViolationException to detect and report errors back to the user.
@RequestMapping(value = "create", method = RequestMethod.POST)
public ModelAndView create(Principal principal, @Valid TicketForm form,
Errors errors, Map<String, Object> model)
throws IOException
{
if(errors.hasErrors())
return new ModelAndView("ticket/add");
...
try
{
this.ticketService.save(ticket);
}
catch(ConstraintViolationException e)
{
model.put("validationErrors", e.getConstraintViolations());
return new ModelAndView("ticket/add");
}
...
}
@RequestMapping(value = "login", method = RequestMethod.POST)
public ModelAndView login(Map<String, Object> model, HttpSession session,
HttpServletRequest request, @Valid LoginForm form,
Errors errors)
{
if(UserPrincipal.getPrincipal(session) != null)
return this.getTicketRedirect();
if(errors.hasErrors())
{
form.setPassword(null);
return new ModelAndView("login");
}
Principal principal;
try
{
principal = this.authenticationService.authenticate(
form.getUsername(), form.getPassword()
);
}
catch(ConstraintViolationException e)
{
form.setPassword(null);
model.put("validationErrors", e.getConstraintViolations());
return new ModelAndView("login");
}
...
}
One interesting thing to note is that the Attachment has constraints to ensure that name and content type are not blank and that the attachment contents contain at least 1 byte. Then the list of attachments in the Ticket uses the @Valid annotation to ensure recursive validation of all the attachments for the ticket.
public class Attachment
{
@NotBlank(message = "{validate.attachment.name}")
private String name;
@NotBlank(message = "{validate.attachment.mimeContentType}")
private String mimeContentType;
@Size(min = 1, message = "{validate.attachment.contents}")
private byte[] contents;
// mutators and accessors
}
public class Ticket
{
// other fields
@Valid
private Map<String, Attachment> attachments = new LinkedHashMap<>();
// mutators and accessors
}
To ensure that Tickets are valid before they are saved, the TicketService is @Validated and contains constraints on all its methods to enforce the contract of the interface.
@Validated
public interface TicketService
{
@NotNull
List<Ticket> getAllTickets();
Ticket getTicket(
@Min(value = 1L, message = "{validate.ticketService.getTicket.id}")
long id
);
void save(@NotNull(message = "{validate.ticketService.save.ticket}")
@Valid Ticket ticket);
}
Likewise, the AuthenticationService is also @Validated with constraints to ensure that the username and password aren’t blank.
@Validated
public interface AuthenticationService
{
Principal authenticate(
@NotBlank(message = "{validate.authenticate.username}")
String username,
@NotBlank(message = "{validate.authenticate.password}")
String password
);
}
With these notes made, compile the project, start Tomcat from your IDE, and go to http://localhost:8080/support/. You should notice that validation now works on the login screen and the ticket creation screen, and you can still log in and create tickets.
SUMMARY
In this chapter you learned about Bean Validation 1.1 (JSR 349, which replaced JSR 303), Hibernate Validator 5.1, and using Bean Validation and Hibernate Validator with Spring Framework. You explored the various aspects of configuring Bean Validation in the Spring container, as well as adding constraint annotations to POJOs and form objects that you want validated. You also learned how to qualify your Spring beans for automatic method validation and trigger form validation in your Spring MVC controller handler methods. Finally, you experimented with creating custom constraints and got a glimpse of some of the many things you can do with custom Bean Validation constraints.
In the next chapter, you explore using Spring MVC controllers as RESTful web services and learn about many of the intricacies involved with that, including error handling and HTTP response status codes.
All materials on the site are licensed Creative Commons Attribution-Sharealike 3.0 Unported CC BY-SA 3.0 & GNU Free Documentation License (GFDL)
If you are the copyright holder of any material contained on our site and intend to remove it, please contact our site administrator for approval.
© 2016-2026 All site design rights belong to S.Y.A.