PROFESSIONAL JAVA FOR WEB APPLICATIONS (2014)
Part II Adding Spring Framework Into the Mix
Chapter 17 Creating RESTful and SOAP Web Services
IN THIS CHAPTER
· What are web services?
· How do you use Spring MVC to configure RESTful web services?
· How to test your web service endpoints
· How best to utilize Spring Web Services for SOAP
WROX.COM CODE DOWNLOADS FOR THIS CHAPTER
You can find the wrox.com code downloads for this chapter at http://www.wrox.com/go/projavaforwebapps on the Download Code tab. The code for this chapter is divided into the following major examples:
· Web-Service Project
· Customer-Support-v14 Project
NEW MAVEN DEPENDENCIES FOR THIS CHAPTER
In addition to the Maven dependencies introduced in previous chapters, you also need the following Maven dependencies:
<dependency>
<groupId>org.springframework</groupId>
<artifactId>spring-aop</artifactId>
<version>4.0.2.RELEASE</version>
<scope>compile</scope>
</dependency>
UNDERSTANDING WEB SERVICES
Creating web services for your applications is a task that you will inevitably face in the future, if you haven’t already. This is because web services provide a way for non-human clients to interact with your web application. Usually there is still a human interacting with a web service client, but at this stage that doesn’t matter. You aren’t creating clients that use web services in this chapter — just web services. (In the section “Creating an OAuth Client Application” of Chapter 28, you use Spring Framework tools to create a web service client.)
Typically to create a web service, you need a way to allow non-human clients to programmatically use and even discover your web application’s resources. This is becoming increasingly important as mobile applications become more prevalent and the traditional desktop browser experience approaches retirement. Mobile applications tend to rely on a web application to perform their main tasks, serving only as user interfaces on the mobile device. This enables someone who has many devices (mobile or otherwise) to share an experience across devices.
Today, many application developers are opting to exclusively create web services and write single-page JavaScript applications that interact directly with those web services. This model will eventually become the rule rather than the exception because it means demanding less development time from application developers while giving user interface developers greater power to create elegant applications across platforms.
Traditional web service developers — the pioneers who thought up the concepts and invented the technologies that empower web services — will tell you that you have only one kind of web service: SOAP. Anything else (RESTful, for example) is perhaps good on its own merits, but not technically a web service. Indeed, the World Wide Web Consortium (W3C) states:
A Web service is a software system designed to support interoperable machine-to-machine interaction over a network. It has an interface described in a machine-processable format (specifically WSDL). Other systems interact with the Web service in a manner prescribed by its description using SOAP-messages, typically conveyed using HTTP with an XML serialization in conjunction with other Web-related standards.
This book does not debate the merits of calling or not calling certain technologies web services. Instead, it abides by the spirit of the first sentence in the quote from the W3C. For the purposes of this book, a web service is any software system that supports machine-to-machine interaction over a computer network using an interoperable, machine-processable protocol and format. This includes SOAP and RESTful web services, and other web service technologies created in their own right. In this chapter, you explore SOAP and RESTful web service creation in Spring Framework. You get only an introduction into the concepts of these two web service technologies because entire books have been written about each.
In the Beginning There Was SOAP
No, we’re not talking about the substances you use to wash your hands and take a shower. In fact, some developers claim to feel dirtier after using SOAP, not cleaner. But I digress. SOAP, which originally stood for Simple Object Access Protocol, is a protocol for machine-to-machine interaction using structured data in the form of XML messages. In version 1.2 of the protocol (the first adopted by the W3C) the acronym was dropped and the word SOAP stood on its own. Of course, SOAP wasn’t really the beginning of web services in the general sense because other technologies such as XML-RPC existed long before SOAP did. However, the adoption of SOAP is generally thought of as the turning point when web services started to become more prevalent among enterprises.
SOAP sports three main characteristics that drive its popularity:
· It’s extensible because it’s easy to add other features, such as security, on top of the base protocol.
· It’s neutral because it doesn’t matter what transport mechanism you use — HTTP, JMS, AMQP, SMTP, TCP, and others are all options.
· It’s independent because SOAP doesn’t rely on or endorse any particular programming model.
SOAP does, however, encourage the development concept of contract-first design. The Web Services Descriptive Language (WSDL) technology defines a way to establish a contract that users should observe and the web service promises to abide by. It defines the location of the web services available at a particular location and the data format for requests to and responses from those web services. Generally written using XSD (sometimes referred to as XML Schema Definition), the contract is usually created before any code for the web service is written, and the web service is created to follow the contract. This is similar to the concept of test-driven development — in which unit and application tests are written before the application, and then the application is written to make the tests pass — and stands in stark contrast to contract-last design, where the web service is created first and then the contract is written to match it.
Contract-first design has its merits, and of course it’s always best to clearly define your users’ needs and write an application that meets them instead of writing an application and then figuring out how it meets your users’ needs. But clearly defining users’ needs and writing a WSDL are two different things, and often it is much easier to explicitly define the contract in plain human language, write web service code that meets the requirements, and then automatically generate the very complex WSDL document using XML tools. In this book, you take this approach and avoid having to deal with writing a WSDL file manually.
SOAP is not a simple protocol. Each SOAP message (request or response) starts with a root element called the SOAP Envelope. All the information about the message is contained within this envelope. The envelope has an optional SOAP Header element (not to be confused with HTTP headers) that contains application-specific information such as authentication details. Also within the envelope is the mandatory SOAP Body element, which contains the instructions and data of the request or response. Finally, the envelope of a response can also have an optional SOAP Fault element describing any errors that occur while processing a request.
The details of each of these elements are many and largely defined by the WSDL. Writing and dealing with WSDL documents can be a complicated and convoluted task at times, and the more automation you can cleanly integrate into the process, the better. To make matters worse, XML is one of the most verbose and bandwidth- and processor-hungry data formats known. Although SOAP can be very useful and very powerful, it is, thankfully, not the only option.
RESTful Web Services Provide a Simpler Approach
Representational State Transfer (REST) is a web service concept that, in a lot of ways, is very similar to SOAP. The REST architecture consists of servers and clients. Clients make state transitions through actions (requests to servers to obtain or change the state of resources) and servers process the requests and return appropriate resources. A resource may be any logical concept that is understood by both the client and the server, and it is transmitted in an agreed-upon representation. REST does not depend on or specify the resource type or representation. Resources may be absolutely any type of data imaginable. Their representations may be plain text, HTML, XML, YAML, JSON, binary data, or any other format understood by both the client and the server. REST systems operate using URLs that indicate the resource type, verbs that indicate the action to be performed on the resource, and media types (MIME types) that indicate the representation of the resource in the request and in the response. It would be quite natural if this reminded you of HTTP and the World Wide Web, and this is not by coincidence. Roy Fielding is one of the authors of HTTP 1.0 and 1.1 and defined representational state transfer as part of his doctoral dissertation in 2000. The World Wide Web is, by its nature, the largest REST system in existence.
A major principle behind RESTful web services is that there aren’t a lot of major operations that need to be performed on a resource. These procedures are generally referred to as CRUD operations: Create, Read, Update, and Delete. The methods designated in the HTTP specification easily map to these verbs: POST, GET, PUT, and DELETE, respectively. SOAP uses the envelope element to describe the action to perform (method to execute), whereas REST relies on the HTTP protocol to provide the envelope. SOAP also uses the envelope to identify the resource being acted upon, whereas REST relies on the HTTP URL.
In a RESTful web service, the Content-Type request header informs the server of the representation of the request body, the Accept header or file extension requests a particular response representation, and the Content-Type response header informs the client of the representation of the response body.
With this information you should start to see some advantages and disadvantages forming for each protocol. RESTful web services are tied to HTTP, whereas SOAP is protocol-independent, a win for SOAP to be sure. Although it would not be impossible to create a RESTful web service without using HTTP, remember that a RESTful web service is a web service built on top of a REST protocol; it is not REST itself. So creating a non-HTTP RESTful web service would involve creating a REST protocol with URLs, verbs, and media types similar to HTTP that could serve as an envelope for the request and response. At that point you might as well use HTTP. RESTful web services are completely independent of data format, however, which is not something SOAP can boast; it requires XML. SOAP also has redundancies when used with HTTP because it is essentially an envelope within an envelope. The envelope element duplicates functionality that could be provided with the URL and HTTP methods. (It must do this to remain protocol-neutral.)
One of the key selling points for RESTful web services is the lack of a WSDL. To be clear, this does not mean that RESTful web services are contract-last. They can be contract-first just as easily as SOAP can be, but the contract is defined using plain-language documentation and freely available, public APIs as opposed to a complex XSD.
Some RESTful web services providers do still go so far as to publish XML Schema (XSD) or JSON Schema documents for their XML- or JSON-based RESTful web services, respectively, and that can also help define the contract. For this reason and many others, REST has become the predominant web service architecture, overtaking and surpassing SOAP in both adoption and first-class support in software frameworks. Spring Framework, for example, supports REST directly within the MVC framework, but for SOAP web services, you must use the separate Spring Web Services project. In this chapter you primarily explore the creation of RESTful web services using Spring, but near the end of the chapter you get a glimpse of using Spring Web Services to create SOAP web services.
Understanding Discoverability
Another important feature of RESTful web services is their discoverability. Using a combination of URLs and, at times, the OPTIONS HTTP method, clients can discover the resources available at a web service without access to a contract, and then at each resource, clients can then discover the actions available for the resource. Although many RESTful web service providers do not support discovery today, it is a central tenet of the REST architecture. The World Wide Web is discoverable automatically. As a user, you can open a web browser and go to any home page. From that home page, you can discover other pages within the website using hyperlinks. Clicking a hyperlink takes you to a new page that could have its own hyperlinks. In this way, without any prior knowledge of the contents of the site, you can find resources on it and interact with those resources in some fashion.
This same constraint is placed on the official REST application architecture. REST clients should be able to use a RESTful web service without any prior knowledge of the resources available on this web service. This concept, known as Hypermedia as the Engine of Application State (HATEOAS), uses hypertext (XML, YAML, JSON, or whatever format you choose) combined with hyperlinks to inform the client of the structure of the web service. For example, a request and response to a web service’s base URL using GET might look something like this:
> GET /services/Rest/ HTTP/1.1
> Accept: application/json
< 200 OK
< Content-Type: application/hal+json
<
< {
< "_links": {
< "self": { "href": "http://example.net/services/Rest" },
< "account": { "href": "http://example.net/services/Rest/account" },
< "order": { "href": "http://example.net/services/Rest/order" }
< }
< }
With this data, the client now knows the resources available at the web service. If it wants to explore accounts further, it has a couple of choices. First, it can simply make a GET request to the resource. This is called a collection request, or a request to a collection URI, and returns every resource of that type available.
> GET /services/Rest/account HTTP/1.1
> Accept: application/json
< 200 OK
< Content-Type: application/json
<
< {
< "value": [
< {
< "id": 1075,
< "name": "John Smith",
< ...
< }, {
< "id": 1076,
< "name": "Adam Green",
< ...
< }
< ]
< }
This has a couple of disadvantages. First, this collection could be very large — enormous, even. Imagine asking Amazon.com’s web service to return every product, and you can quickly understand the problem. The obvious solution is paging resources, and in most cases requiring pagination to avoid nightmare response scenarios. (In the next section you explore pagination in more detail when implementing a Spring REST controller.) Another problem is that this list contains the resource data but not links to the resources. One option is to return a list of links, but that makes using the collection request useless for displaying lists of resources to an end user. For this reason, many web services use a combination of properties and a link within a collection response.
Another action a client can take to explore the accounts resource further is to make an OPTIONS request to the resource.
> OPTIONS /services/Rest/account HTTP/1.1
> Accept: application/json
< 200 OK
< Allow: OPTIONS,HEAD,GET,POST,PUT,PATCH,DELETE
<
< {
< "GET": {
< "description": "Get a resource or resources",
< "resourceTemplate": "http://example.net/services/Rest/account/{id}",
< "parameters": {
< "$select": {
< "type": "array/string",
< "description": "The properties to be returned for each resource.",
< },
< "$filter" ...
< }
< },
< "POST" ...
< }
The OPTIONS response can be especially powerful. Not only can it tell a client what actions are available for a resource type, but also it can be filtered according to the client’s privileges. For example, if a client has permission to view but not create, update, or delete, theAllow response header value would be OPTIONS,HEAD,GET. In addition, different actions might be available for different individual resources based on any number of factors (including privileges), as demonstrated in the following two requests and their responses:
> OPTIONS /services/Rest/account/1075 HTTP/1.1
> Accept: application/json
< 200 OK
< Allow: OPTIONS,HEAD,GET,PUT,PATCH,DELETE
< ...
> OPTIONS /services/Rest/account/1076 HTTP/1.1
> Accept: application/json
< 200 OK
< Allow: OPTIONS,HEAD,GET
< ...
The primary problem with discoverability in RESTful web services is that there is no single agreed-upon standard for the content of discovery responses. The links response in the first example is the JSON representation of Hypertext Application Language (HAL), one of several emerging standards but by no means the only one. The collection request for accounts was just a standard JSON collection, nothing more. And the Allow header in the OPTIONS response is standard and universal, but the response body is completely made up, which is what many vendors do.
The lack of a universal standard has likely led to so few vendors implementing discoverability. You need to evaluate your needs and the technology at the time to determine the best discoverability standard to use. You may even decide not to support discoverability and to tell clients to read the manual, and that’s okay. The good news is that implementing RESTful web services in Spring Framework doesn’t depend on the resources or representations you decide on, so adopting one standard over another won’t change the Spring techniques you learn about in this chapter.
Using URLs, HTTP Methods, and HTTP Status Codes
As you read earlier, RESTful web services use request URLs to identify the requested resource and HTTP methods to ascertain the action wanted. They also use HTTP status codes to reveal the result of a request. Different status codes apply to different types of requests. However, there are a few status codes that are universal and apply to all types of requests:
· 400 Bad Request indicates that the request made by the client was unsupported or unrecognized. This is usually because the proper request syntax was not followed. For example, if a required field of a resource were left blank on a POST or PUT, that would result in a400 Bad Request response. The response body should include information about why the request was bad in the representation format agreed upon or in the default representation in absence of agreement.
· 401 Unauthorized signals that authentication and authorization are required before accessing the resource or performing the requested state transition. The content of the response varies based on the authentication protocol in use (such as OAuth).
· 403 Forbidden indicates that the client, though authenticated, does not have permission to access the resource or perform the requested state transition. Depending on the authentication protocol in use, it’s possible that re-authenticating with more requested privileges could resolve this condition.
· 404 Not Found, quite simply, tells the client that the requested resource does not exist. It should never be used to indicate that a resource exists but the state transition is simply not supported or allowed. That is what 405 Method Not Allowed and 403 Forbidden are for.
· 405 Method Not Allowed means that the state transition (HTTP method) requested is not supported. This should never be used to indicate that the client does not have permission to perform the state transition; 403 Forbidden is reserved for that.
· 406 Not Acceptable indicates that the representation format requested in the Accept header is not supported by the server. For example, the client may have requested application/xml, but the server can generate only application/json. In these cases, the server may simply return the default supported representation instead of 406 Not Acceptable, and that is what most vendors do.
· 415 Unsupported Media Type is very similar to 406 Not Acceptable. It indicates that the Content-Type header in the request (the representation of the request entity) is a type that is not supported by the server. The server may also include an Accept response header indicating which media types the server supports. It’s possible that both the Accept request header value and the Content-Type request header value can be unsupported media types. In such a case, the 415 Unsupported Media Type response takes precedence because406 Not Acceptable is an optional response.
· 500 Internal Server Error signals that an error occurred while processing the request. The response content should include as much information about the error as is safe and possible in the representation format agreed upon or in the default representation in absence of agreement.
The rest of this section covers the syntax and semantics of each HTTP method supported by RESTful web services, including other HTTP status codes meaningful to these methods.
OPTIONS
As demonstrated previously, OPTIONS is one of the few standardized discovery mechanisms available. When a request is made to a resource URL with the OPTIONS method, the server must return a 200 OK response containing an Allow header whose contents is a comma-separated list of the HTTP methods supported for the resource. If the client is authenticated, the Allow header may instead contain the HTTP methods that the client is authorized to invoke for the resource. Optionally, the server may also return a response body describing how to use each HTTP method for that resource. The response body should be in the representation form agreed upon or in the default representation in the absence of any agreement. If the PATCH method is one of the supported methods, the response should also contain the Allow-Patch header, which specifies a comma-separated list of the representations (media types) permitted for PATCH requests, which may differ for other types of requests.
There are some exceptions to these requirements:
· If the resource does not exist, the server should return 404 Not Found instead of 200 OK with the Allow header.
· If no methods are permitted on a resource without authentication, the server should return 401 Unauthorized.
· If the client is authenticated but does not have permission to invoke any actions on the resource, the server should return 403 Forbidden.
OPTIONS requests are considered nullipotent (safe); that is, they should never, under any circumstances, result in modification of any resources.
NOTE Some web services enable Cross-Origin Resource Sharing (CORS). This special, relatively new protocol enables authorized browser applications to bypass the AJAX same-origin policy using a set of specialized headers. If you want your web services to be directly accessible from JavaScript applications, you need to enable CORS support. The full details of this are outside the scope of this book. However, CORS-enabled web services must support OPTIONS requests for all resources and, when responding to OPTIONS requests, must include the Access-Control-Allow-Methods response header, whose contents are identical to the Allow header.
HEAD and GET
Whenever GET is supported and allowed on a resource, HEAD must also be supported and allowed. The only difference between GET and HEAD is that a HEAD response must have no response body. The HEAD response must have headers identical to what would be in a GETresponse. GET requests are used to obtain a resource or resources. A URL such as /services/Rest/account indicates that the client wants to obtain all accounts or a filtered list of accounts. Typically, filter, order, and pagination instructions are included in query string parameters.
A request URL such as /services/Rest/account/1075 indicates that the client wants to obtain a single account with the unique identifier 1075. Some vendors also support relational URLs such as /services/Rest/account/1075/order and/services/Rest/account/1075/order/1522, signaling requests for a (possibly filtered) list of orders for account 1075 and for order 1522 belonging to account 1075, respectively. This recursion can, theoretically, continue as far as the limits on URL length will permit./services/Rest/account/1075/order/1522/item/12 could return a particular line item from an order for an account.
NOTE In the URLs demonstrated here, the account and order path segments are singular. This is not required — it’s just a choice. The URLs could instead contain accounts and orders path segments. Which you use is up to you, but you should pick one and remain consistent across your resources. Generally speaking, using singular path segments does result in shorter URLs, which permit more contents in the query string when needed.
The server should respond 200 OK for successful GET and HEAD requests and include the resource or resources requested in the agreed-upon (or default) representation in the response body for GET requests.
GET and HEAD requests are also nullipotent and should not have any side effects for resources on the server.
POST
POST requests are used to create new resources on the server. A POST request should always be directed at a collection URI (/services/Rest/account), but it can also be directed at a subordinate collection URI (/services/Rest/account/1075/order). A POST request to an individual element URI (/services/Rest/account/1075) should result in a 405 Method Not Allowed response. In a successful POST request, the server creates the requested resource and returns 201 Created. The response should include a Location header with the URL for the newly created resource.
For example, a POST request to /services/Rest/account to create a new account might return http://www.example.com/services/Rest/account/9156 in the Location header. The response body should be the created resource because it would be returned with a GETrequest to the URL in the Location header.
A POST request is non-nullipotent (non-safe — the request does result in modification of one or more resources) and non-idempotent (making multiple identical POST requests results in multiple created resources).
PUT
A PUT request results in the replacement of a resource on the server. For this reason, PUT requests are used to update existing resources. PUT requests, unlike POST requests, are never made to collection URIs. Instead, they are made to individual element URIs and subordinate element URIs (/services/Rest/account/1075, /services/Rest/account/1075/order/5122). A PUT request to a collection URI or subordinate collection URI should result in a 405 Method Not Allowed response. The response to a successful PUT request should be204 No Content and its body should be empty.
PUT requests are, obviously, non-nullipotent. They should, however, be idempotent. Two or more successive, identical PUT requests should have no side effects other than those in the first PUT request.
One area that this can be a challenge is if the resource being updated includes a “last modified” timestamp or a version number. To abide by the restriction of idempotence, the service should update the resource timestamp and/or version number for PUT requests only if the underlying entity truly changed. Such a requirement can actually be quite challenging to implement, so many vendors implement PUT in a partially idempotent manner, documenting that the timestamp and version number will still be updated in identicalPUT requests.
PATCH
PATCH requests are very similar to PUT requests in both purpose and semantics. PATCH is a relatively new HTTP method, added only in the last several years. It is not part of the original HTTP/1.1 specification. PATCH requests, like PUT requests, are also intended to update resources at individual element URIs. However, a PATCH request indicates only a partial update of a resource, not a complete replacement of the resource.
For example, if a PATCH request to /service/Rest/account/1075/order/5122 contains only the shippingAddress property, then only the shippingAddress on the order will be updated. Other properties will remain unchanged (except, possibly, timestamps and version numbers). This is an extremely powerful request method, but it is also quite challenging to implement. To support PATCH, your application must accept a very flexible set of properties in the request entity, and then update only those resource properties that are present in the request. You cannot merely use a check for null because the PATCH may be intentionally setting a property value to null.
The response to a successful PATCH request should be either 200 OK or 204 No Content. It’s your choice whether to return the full, updated entity or no content in the response body. If PATCH is supported, the requested media type is supported, and the PATCH request content is understood and parsed successfully, but the server still cannot apply the patch (for example, because the patch would make the entity invalid), the server should respond with 422 Unprocessable Entity. If the client uses the If-Match request header or If-Unmodified-Since request header to define a precondition for the patch and that precondition fails, the server should return 412 Precondition Failed. If multiple requests attempt to patch a resource simultaneously and that is not permitted, the server should return 409 Conflict.
PATCH requests, like PUT requests, are non-nullipotent and should be idempotent.
DELETE
A DELETE request, naturally, is used to delete a resource. A DELETE request may be made against an individual element URI — in which case that single resource is deleted — or it may be made against a (possibly filtered) collection URI — in which case all the matching resources are deleted. Allowing the deletion of multiple resources is often not desirable, so this capability is usually not supported. Upon successful deletion of a resource, the server should respond 200 OK with the deleted resource in the response body or 204 No Content with no content in the response body. If for some reason the server accepts the delete command but cannot execute it immediately (perhaps the resource is in use), it may return 202 Accepted. In this case, the response body should contain a resource URL that the client can use to follow up on the request and check on its status at a later time.
DELETE requests are obviously non-nullipotent, but their idempotence is an interesting topic. Deleting a resource may result in setting a flag on that resource but retaining its data (a soft delete), or it may result in actually permanently and irrevocably eliminating the resource’s data (a hard delete). When employing soft deletes, multiple identical DELETE requests always return the same response and have no additional side effects, making DELETE idempotent. However, when using hard deletes a second identical DELETE request always results in 404 Not Found because the resource no longer exists. Technically this is considered non-idempotent because the response differs, but it doesn’t actually have different side effects and is still the best practice when accepting DELETE requests for hard deletes.
CONFIGURING RESTFUL WEB SERVICES WITH SPRING MVC
One of the great things about RESTful web services is how neatly they work within an existing HTTP infrastructure, and this is demonstrated plainly in Spring Framework. Technically speaking, you don’t have to do anything special to create RESTful web services. You can simply create a @Controller, add some @RequestMapping methods to it, and begin operating a RESTful web service. Practically speaking, however, it is unlikely that you will want to reuse your existing DispatcherServlet application context for your web services. Think about some of the beans you have previously configured in this application context: There are various message converters for handling all sorts of request and response formats; there’s the SessionLocaleResolver that certainly doesn’t apply to stateless REST requests; and there are the ViewResolver and RequestToViewNameResolver that are completely unnecessary for responding to web service requests. It’s only logical, then, to create a separate DispatcherServlet and application context configured appropriately to form your RESTful web services.
In this section you explore configuring this separate DispatcherServlet and creating REST controllers. You start by looking at how to segregate your web and REST controllers so that they don’t cross contexts, and then you create and bootstrap another application context configuration. You also look at how to properly handle error conditions in your services. Finally, you create a REST controller and use @RequestMapping for discovery and representational state transfer for both XML and JSON clients. You can follow along in the Web-Service project available for download from the wrox.com code download site.
Segregating Controllers with Stereotype Annotations
Recall from Chapters 12 and 13 that the @Controller annotation serves two purposes. As an @Component, it is responsible for marking your controllers as Spring-managed beans eligible for instantiation and dependency injection. However, in the context of Spring MVC, it is also responsible for marking beans to be scanned for @RequestMapping. A bean marking with @RequestMapping cannot respond to requests if it is not annotated with @Controller. Thus, your REST controllers must, like your web controllers, be marked with@Controller.
Of course, this presents some challenges. You don’t want your REST controllers to be picked up by component scanning for your web DispatcherServlet, and you don’t want your web controllers to be picked up by component scanning for your RESTDispatcherServlet, either. The obvious solution is to place your web controllers in a separate package from your REST controllers and component scan only the appropriate package in each application context. This is certainly an easy approach as well, and in most cases it can satisfy any use cases you might have. However, there is another way to tackle this problem: meta-annotations.
Spring Framework’s @Component stereotype annotations are, for lack of a better word, inherited. @Controller, @Service, and @Repository are all annotated with @Component. This means you can create your own stereotype annotations, too, by meta-annotating them with an existing @Component. It isn’t just @Component that is inherited, either. You can meta-annotate a custom annotation with @Controller, for example, giving your annotation the same force as @Controller. This is especially important because it means that your custom annotations can mark controllers for request mapping, which solves the controller segregation problem quite nicely. With this in mind, take a look at the @com.wrox.config.annotation.WebController and @com.wrox.config.annotation.RestEndpoint annotations in the Web-Service project.
@Target({ ElementType.TYPE })
@Retention(RetentionPolicy.RUNTIME)
@Documented
@Controller
public @interface WebController
{
String value() default "";
}
@Target({ ElementType.TYPE })
@Retention(RetentionPolicy.RUNTIME)
@Documented
@Controller
public @interface RestEndpoint
{
String value() default "";
}
These annotations are practically identical, but their semantic meanings have important differences. Both indicate that the target bean is a controller eligible for request mapping. However, @WebController marks controllers for traditional web requests, whereas@RestEndpoint denotes RESTful web service endpoints. The lone value attribute serves the same purpose here as it does in other stereotype annotations: It provides a way to specify the bean name that overrides the default bean name pattern.
Creating Separate Web and REST Application Contexts
On their own, these custom annotations don’t do you any good. You can place them on your controllers and endpoints, but the ServletContextConfiguration class you have used in previous chapters picks them all up in its component scan for @Controller. As such, you need to update this configuration to scan only for your @WebController annotation. To remove any ambiguity about its purpose, it’s also a good idea to rename this class to WebServletContextConfiguration.
@Configuration
@EnableWebMvc
@ComponentScan(
basePackages = "com.wrox.site",
useDefaultFilters = false,
includeFilters = @ComponentScan.Filter(WebController.class)
)
public class WebServletContextConfiguration extends WebMvcConfigurerAdapter
{
...
}
None of the code within this class has changed from previous chapters. All you have done here is change the types of stereotype annotations that mark beans belonging to this application context. Now you need to create a new application context — one that looks for@RestEndpoint and that is more suited to RESTful web services. The RestServletContextConfiguration in Listing 17-1 does just that.
LISTING 17-1: RestServletContextConfiguration.java
@Configuration
@EnableWebMvc
@ComponentScan(
basePackages = "com.wrox.site",
useDefaultFilters = false,
includeFilters = @ComponentScan.Filter(RestEndpoint.class)
)
public class RestServletContextConfiguration extends WebMvcConfigurerAdapter
{
@Inject ObjectMapper objectMapper;
@Inject Marshaller marshaller;
@Inject Unmarshaller unmarshaller;
@Inject SpringValidatorAdapter validator;
@Override
public void configureMessageConverters(
List<HttpMessageConverter<?>> converters
) {
converters.add(new SourceHttpMessageConverter<>());
MarshallingHttpMessageConverter xmlConverter =
new MarshallingHttpMessageConverter();
xmlConverter.setSupportedMediaTypes(Arrays.asList(
new MediaType("application", "xml"),
new MediaType("text", "xml")
));
xmlConverter.setMarshaller(this.marshaller);
xmlConverter.setUnmarshaller(this.unmarshaller);
converters.add(xmlConverter);
MappingJackson2HttpMessageConverter jsonConverter =
new MappingJackson2HttpMessageConverter();
jsonConverter.setSupportedMediaTypes(Arrays.asList(
new MediaType("application", "json"),
new MediaType("text", "json")
));
jsonConverter.setObjectMapper(this.objectMapper);
converters.add(jsonConverter);
}
@Override
public void configureContentNegotiation(
ContentNegotiationConfigurer configurer)
{
configurer.favorPathExtension(false).favorParameter(false)
.ignoreAcceptHeader(false)
.defaultContentType(MediaType.APPLICATION_JSON);
}
@Override
public Validator getValidator()
{
return this.validator;
}
@Bean
public LocaleResolver localeResolver()
{
return new AcceptHeaderLocaleResolver();
}
}
This class is similar to WebServletContextConfiguration in several ways, but it also has many important differences. It lacks any view resolution or multipart support because those features are simply not needed. It has fewer message converters, focusing only on the tasks of marshalling and unmarshalling JSON and XML and forgetting about Strings, forms, and byte arrays. The configureContentNegotiation method takes a slightly different approach, supporting only the Accept header for content negotiation (that is, after all, the RESTful standard). You still need a Spring Validator, of course. Bean validation has its uses in RESTful web services, too: You can mark @RequestBody entity parameters with @Valid.
A LocaleResolver can also come in handy: Language does not affect request and response representation, but it can be used to localize error messages at the client’s request. In this case you’d use the AcceptHeaderLocaleResolver instead of the SessionLocaleResolver (as a general rule, there are no sessions in REST), and you no longer need the LocaleChangeInterceptor because the client specifies the wanted locale (if any) on every request.
With a new REST application context read to go, you need to bootstrap it properly. This is done in the Bootstrap class as usual. The existing DispatcherServlet declaration has been renamed so that it is less ambiguous, and a new DispatcherServlet declaration has been added.
AnnotationConfigWebApplicationContext webContext =
new AnnotationConfigWebApplicationContext();
webContext.register(WebServletContextConfiguration.class);
ServletRegistration.Dynamic dispatcher = container.addServlet(
"springWebDispatcher", new DispatcherServlet(webContext)
);
dispatcher.setLoadOnStartup(1);
dispatcher.setMultipartConfig(new MultipartConfigElement(
null, 20_971_520L, 41_943_040L, 512_000
));
dispatcher.addMapping("/");
AnnotationConfigWebApplicationContext restContext =
new AnnotationConfigWebApplicationContext();
restContext.register(RestServletContextConfiguration.class);
DispatcherServlet servlet = new DispatcherServlet(restContext);
servlet.setDispatchOptionsRequest(true);
dispatcher = container.addServlet(
"springRestDispatcher", servlet
);
dispatcher.setLoadOnStartup(2);
dispatcher.addMapping("/services/Rest/*");
You’ll notice that the new Servlet lacks a multipart configuration, which is to be expected. You can use multipart requests with RESTful web services, but that is rare and the topic is beyond the scope of this book. The code also sets the DispatcherServlet’sdispatchOptionsRequest property to true. Normally DispatcherServlet ignores OPTIONS requests and defers to the default HttpServlet behavior in these cases. To support discovery, you must tell the DispatcherServlet to dispatch OPTIONS requests to your RESTful endpoints just like any other request.
Handling Error Conditions in RESTful Web Services
How you handle and respond to erroneous requests and error conditions in your RESTful web services is almost as important as how you handle and respond to successful requests. Consumers of your RESTful APIs expect meaningful status codes and error messages when something goes wrong, and they certainly don’t want to get back the standard container HTML-formatted error pages.
Spring Framework’s support for graceful error handling has evolved a lot in the last 3 or 4 years. You can easily find a half-dozen approaches or more in a quick search of the web, and most of them still use old, outdated, and even deprecated tactics. This chapter does not address these old ways of handling errors but instead focuses on the features added in Spring 3.0 and 3.2.
Changing HTTP Response Codes
One of the things you need to handle in your web services is requests to resources that don’t exist. Sure, Spring can return 404 Not Found when requests are made to URLs without method mappings, but what if a request is made to /services/Rest/account/10 and the account with identifier 10 doesn’t exist. According to the RESTful standards, you’re also suppose to return 404 Not Found. In the earliest days you simply had to use the HttpServletRequest everywhere to set the response status. Now it is much simpler. From a coding standpoint, the easiest way to report such an issue is to throw an exception. So, create an exception.
@ResponseStatus(HttpStatus.NOT_FOUND)
public class ResourceNotFoundException extends RuntimeException
{
...
}
The only thing special about this exception is the @org.springframework.web.bind.annotation.ResponseStatus annotation, added in Spring 3.0. When placed on an exception declaration, this tells Spring Framework to return a 404 Not Found status code. Without this, throwing such an exception from a controller method would normally result in a 500 Internal Server Error. There are other uses for @ResponseStatus as well, but you’ll see those later in this section.
Declaring Exception Handlers
Another thing to consider is the problem of bean validation. In your web controllers in Chapter 16, you caught ConstraintViolationExceptions and then added the individual violations to your model to display to the user. It would be great if there was an easy way to do something similar in your endpoint controllers, and indeed there is. The @org.springframework.web.bind.annotation.ExceptionHandler annotation, also added in Spring 3.0, enables you to mark a method as an exception handler. It has nearly the same semantics as@RequestMapping, enabling you to return most of the same return types and accept most of the same method arguments.
@ExceptionHandler({ ConstraintViolationException.class })
@ResponseStatus(HttpStatus.BAD_REQUEST)
@ResponseBody
public ErrorResponse handleBeanValidationError(ConstraintViolationException e)
{
...
}
The problem with this pattern is that it requires you to have the necessary @ExceptionHandler methods on all your controllers. You could inherit from a base controller with these methods defined, but that then prevents you from extending other classes when needed.
Using the Controller Advice Pattern
Spring 3.2 introduced the concept of the controller advice pattern with the @org.springframework.web.bind.annotation.ControllerAdvice annotation. Classes marked with @ControllerAdvice, which is a @Component, are Spring-managed beans that advise controllers. At this time you can add @ExceptionHandler, @InitBinder, and @ModelAttribute methods to a controller advice class, and the advice those methods supply apply to all controllers. Being a @Component, @ControllerAdvice classes would normally get automatically instantiated in your root application context. You don’t want this because you don’t want such advice to apply to web controllers and endpoint controllers alike, so you need to exclude this annotation from your root component scanning.
...
@ComponentScan(
basePackages = "com.wrox.site",
excludeFilters =
@ComponentScan.Filter({Controller.class, ControllerAdvice.class})
)
public class RootContextConfiguration
...
Before you can create controller advice for your endpoint controllers, consider that you might want to also create advice for your web controllers at some point. So, instead of using @ControllerAdvice directly, it would be best to create your own stereotype annotation specific to RESTful endpoint controllers.
@Target({ ElementType.TYPE })
@Retention(RetentionPolicy.RUNTIME)
@Documented
@ControllerAdvice
public @interface RestEndpointAdvice
{
String value() default "";
}
The last thing you need to do is configure the component scanning for the REST application context to make it pick up @RestEndpointAdvice classes.
...
@ComponentScan(
basePackages = "com.wrox.site",
useDefaultFilters = false,
includeFilters =
@ComponentScan.Filter({RestEndpoint.class, RestEndpointAdvice.class})
)
public class RestServletContextConfiguration extends WebMvcConfigurerAdapter
...
Now you can create a controller advice to handle errors. The com.wrox.site.exception.RestExceptionHandler in Listing 17-2 does just that. It has two inner classes, ErrorItem and ErrorResponse, which help it achieve the goal of cleanly reporting errors back to the user. The lone handle method, annotated with @ExceptionHandler, converts all the constraint violations into ErrorItems, places them in an ErrorResponse, and returns the ErrorResponse wrapped in a ResponseEntity with the status code set to 400 Bad Request.
Notice how the @ExceptionHandler annotation indicates which exceptions the method is capable of handling. You could put multiple exceptions in this annotation to have a single method handle multiple errors. Because Spring always calls the most specific match, you could also create a catchall handle method that took any instance of Exception. Spring would call the method that most closely matched the thrown exception and then only call your catchall method as a last resort.
LISTING 17-2: RestExceptionHandler.java
@RestEndpointAdvice
public class RestExceptionHandler
{
@ExceptionHandler(ConstraintViolationException.class)
public ResponseEntity<ErrorResponse> handle(ConstraintViolationException e)
{
ErrorResponse errors = new ErrorResponse();
for(ConstraintViolation violation : e.getConstraintViolations())
{
ErrorItem error = new ErrorItem();
error.setCode(violation.getMessageTemplate());
error.setMessage(violation.getMessage());
errors.addError(error);
}
return new ResponseEntity<>(errors, HttpStatus.BAD_REQUEST);
}
public static class ErrorItem
{
private String code;
private String message;
@XmlAttribute
public String getCode() { ... }
public void setCode(String code) { ... }
@XmlValue
public String getMessage() { ... }
public void setMessage(String message) { ... }
}
@XmlRootElement(name = "errors")
public static class ErrorResponse
{
private List<ErrorItem> errors = new ArrayList<>();
@XmlElement(name = "error")
public List<ErrorItem> getErrors() { ... }
public void setErrors(List<ErrorItem> errors) { ... }
public void addError(ErrorItem error) { ... }
}
}
You may have realized this by now, but the @ResponseStatus annotation you placed on your ResourceNotFoundException isn’t all that helpful in a REST context. For exceptions thrown within web controllers, it would be helpful, and you could leave the annotation there to make the exception remain useful in a web context, but because it results in the container HTML error page being returned, it’s not ideal for REST responses. A better idea would be to add a second handle method to the RestExceptionHandler to handle that exceptionand Spring’s NoSuchRequestHandlingMethodException (thrown when the incoming request matches no controller methods). That exercise and the exercise of creating a catchall method are left upto you.
Mapping RESTful Requests to Controller Methods
To create a web service, you first need a business layer to expose with it. The AccountService interface continues with the account example URLs used so far in this chapter. It specifies methods for listing, getting, saving, and deleting accounts. The details of theDefaultAccountService implementation are unimportant; it’s a standard in-memory store of accounts. You can look at it in the Web-Service project.
@Validated
public interface AccountService
{
@NotNull
public List<Account> getAllAccounts();
public Account getAccount(long id);
public Account saveAccount(
@NotNull(message = "{validate.accountService.saveAccount.account}")
@Valid Account account
);
public void deleteAccount(long id);
}
The implementation of this service, which is managed in the root application context, is accessible to both the web and REST DispatcherServlet application contexts, as demonstrated at the top of the AccountController and AccountRestEndpoint. The details of theAccountController are also unimportant. It is the standard web controller that you are used to creating.
@WebController
public class AccountController
{
@Inject AccountService accountService;
...
}
@RestEndpoint
public class AccountRestEndpoint
{
@Inject AccountService accountService;
...
}
Using @RequestMapping in a RESTful endpoint is very much like using it in a web controller. Technically speaking, you can write request handler methods with all the same parameter rules and return types; although in reality this is usually not the case. It doesn’t make sense to return a ModelAndView, View, String view name, Model, Map, model attribute, Callable, or DeferredResult from a RESTful web service handler method. Typically you want to return a @ResponseBody response entity object or an explicit ResponseEntity<?> that can be written back to the client, or void or ResponseEntity<Void> if no content should be returned to the client. Method parameters usually consist of @PathVariable and @RequestParam parameters and, for POST and PUT requests, @RequestBody request entities. As with web controllers, request entities should be form or command objects lacking the fields that you don’t want your clients to set (usually at least the resource identifier). Response entities returned from your methods can be the same business objects you normally operate on (not form objects), but you should refrain from returning any type of Collection or Map. Although these can easily be converted to a JSON representation, they cannot be converted into an XML representation.
The first methods you’ll notice in the AccountRestEndpoint are the discovery methods, which respond to OPTIONS requests. There are two methods: one for collection requests and one for individual resource requests. These methods are fairly simple and always return the same allowed options, but you could implement security checks here and return only those options that the authenticated client has access to.
@RequestMapping(value = "account", method = RequestMethod.OPTIONS)
public ResponseEntity<Void> discover()
{
HttpHeaders headers = new HttpHeaders();
headers.add("Allow", "OPTIONS,HEAD,GET,POST");
return new ResponseEntity<>(null, headers, HttpStatus.NO_CONTENT);
}
@RequestMapping(value = "account/{id}", method = RequestMethod.OPTIONS)
public ResponseEntity<Void> discover(@PathVariable("id") long id)
{
if(this.accountService.getAccount(id) == null)
throw new ResourceNotFoundException();
HttpHeaders headers = new HttpHeaders();
headers.add("Allow", "OPTIONS,HEAD,GET,PUT,DELETE");
return new ResponseEntity<>(null, headers, HttpStatus.NO_CONTENT);
}
As indicated in the OPTIONS response, clients may GET either the collection or individual resources. This is implemented in the read methods. The collection read is dangerous because it doesn’t page the results. If the database contained 1,000,000 accounts, this method would return all 1,000,000 of them. Normally you would use request parameters or headers to filter and limit the results returned from this method. It’s also best to automatically limit the number of results returned if the client fails to specify any filters or limits. These methods demonstrate the use of @ResponseBody for returning response entities and @ResponseStatus to indicate which HTTP status Spring should respond to the request with.
@RequestMapping(value = "account", method = RequestMethod.GET)
@ResponseBody @ResponseStatus(HttpStatus.OK)
public AccountList read()
{
AccountList list = new AccountList();
list.setValue(this.accountService.getAllAccounts());
return list;
}
@RequestMapping(value = "account/{id}", method = RequestMethod.GET)
@ResponseBody @ResponseStatus(HttpStatus.OK)
public Account read(@PathVariable("id") long id)
{
Account account = this.accountService.getAccount(id);
if(account == null)
throw new ResourceNotFoundException();
return account;
}
Notice that the individual read returns a single Account and throws a ResourceNotFoundException (which results it a 404 Not Found) if the Account requested isn’t found. The @ResponseStatus for the method is ignored in this case, and the @ResponseStatus for the exception (or the exception handler) is given higher precedence. Meanwhile, the collection read returns an AccountList (instead of a List<Account>). If your web service were supporting JSON only, you would just need a List<Account> and not the specialized AccountList object.AccountList enables the response to be represented with XML as well. This is something you must pay particular attention to when writing RESTful web service endpoints. Representing request and response entities is much simpler with JSON than it is with XML, and so special considerations must be made when supporting both. Some service providers opt to support only JSON requests and responses to avoid these complexities, and you may decide to take that route as well. You could also create separate handler methods for XML and JSON responses; although, that can sometimes make your job even more complicated.
@XmlRootElement(name = "accounts")
public static class AccountList
{
private List<Account> value;
@XmlElement(name = "account")
public List<Account> getValue()
{
return value;
}
public void setValue(List<Account> accounts)
{
this.value = accounts;
}
}
The create and update methods (POST and PUT, respectively) shown in the following code snippet are responsible for adding new accounts and saving changes to existing accounts. Notice that update throws a ResourceNotFoundException, just like the individual readmethod, if the resource being updated doesn’t exist. It also returns void and responds 204 No Content when the resource is successfully updated, whereas create responds 201 Created, returns the created entity, and includes a Location header in the response with the URL for the created resource. It uses Spring’s org.springframework.web.servlet.support.ServletUriComponentsBuilder to create the URL so that it contains your application’s domain name and context path.
@RequestMapping(value = "account", method = RequestMethod.POST)
public ResponseEntity<Account> create(@RequestBody AccountForm form)
{
Account account = new Account();
account.setName(form.getName());
account.setBillingAddress(form.getBillingAddress());
account.setShippingAddress(form.getShippingAddress());
account.setPhoneNumber(form.getPhoneNumber());
account = this.accountService.saveAccount(account);
String uri = ServletUriComponentsBuilder.fromCurrentServletMapping()
.path("/account/{id}").buildAndExpand(account.getId()).toString();
HttpHeaders headers = new HttpHeaders();
headers.add("Location", uri);
return new ResponseEntity<>(account, headers, HttpStatus.CREATED);
}
@RequestMapping(value = "account/{id}", method = RequestMethod.PUT)
@ResponseStatus(HttpStatus.NO_CONTENT)
public void update(@PathVariable("id") long id, @RequestBody AccountForm form)
{
Account account = this.accountService.getAccount(id);
if(account == null)
throw new ResourceNotFoundException();
account.setName(form.getName());
account.setBillingAddress(form.getBillingAddress());
account.setShippingAddress(form.getShippingAddress());
account.setPhoneNumber(form.getPhoneNumber());
this.accountService.saveAccount(account);
}
Though simple, the final method of interest in the AccountRestEnpdoint is delete. Like read and update it throws a ResourceNotFoundException if the resource doesn’t exist. It then deletes the resource if it does exist and responds 204 No Content.
@RequestMapping(value = "account/{id}", method = RequestMethod.DELETE)
@ResponseStatus(HttpStatus.NO_CONTENT)
public void delete(@PathVariable("id") long id)
{
if(this.accountService.getAccount(id) == null)
throw new ResourceNotFoundException();
this.accountService.deleteAccount(id);
}
Improving Discovery with an Index Endpoint
The discovery methods in the AccountRestEndpoint help clients learn about the account resource and what they can do with it, but it doesn’t complete the RESTful discovery mechanism. Typically you would create an index endpoint that lists your web service’s available resources. In the simplest sense, this is just a static list of links in your code, created with your application’s domain name and context path in front. The IndexRestEndpoint in Listing 17-3 does just this. It returns resource links using the HAL standard, and because this standard has very different XML and JSON representations, it uses some helper POJOs and two different discovery methods to return the appropriate response. @RequestMapping’s produces attribute helps identify which method should be called based on the request’s Accept header.
LISTING 17-3: IndexRestEndpoint.java
@RestEndpoint
public class IndexRestEndpoint
{
@RequestMapping(value = {"", "/"}, method = RequestMethod.GET,
produces = {"application/json", "text/json"})
@ResponseBody @ResponseStatus(HttpStatus.OK)
public Map<String, Object> discoverJson()
{
ServletUriComponentsBuilder builder =
ServletUriComponentsBuilder.fromCurrentServletMapping();
Map<String, JsonLink> links = new Hashtable<>(2);
links.put("self", new JsonLink(builder.path("").build().toString()));
links.put("account",
new JsonLink(builder.path("/account").build().toString()));
Map<String, Object> response = new Hashtable<>(1);
response.put("_links", links);
return response;
}
@RequestMapping(value = {"", "/"}, method = RequestMethod.GET,
produces = {"application/xml", "text/xml"})
@ResponseBody @ResponseStatus(HttpStatus.OK)
public Resource discoverXml()
{
ServletUriComponentsBuilder builder =
ServletUriComponentsBuilder.fromCurrentServletMapping();
Resource resource = new Resource();
resource.addLink(new Link("self", builder.path("").build().toString()));
resource.addLink(new Link("account",
builder.path("/account").build().toString()));
return resource;
}
public static class JsonLink
{
private String href;
public JsonLink(String href) { ... }
@XmlAttribute
public String getHref() { ... }
public void setHref(String href) { ... }
}
public static class Link extends JsonLink
{
private String rel;
public Link(String rel, String href) { ... }
@XmlAttribute
public String getRel() { ... }
public void setRel(String rel) { ... }
}
@XmlRootElement
public static class Resource
{
private List<Link> links = new ArrayList<>();
@XmlElement(name = "link")
public List<Link> getLinks() { ... }
public void setLinks(List<Link> links) { ... }
public void addLink(Link link) { ... }
}
}
TESTING YOUR WEB SERVICE ENDPOINTS
Testing web services, whether RESTful or SOAP, is an interesting challenge. Unlike standard web pages, you can’t just open up your browser and go to your application’s URL. This might work for GET requests, but that’s about it. You could create a user interface for the service, and indeed that’s how many people test their web services. But this has the disadvantage of adding another variable to the equation: What if your user interface has bugs? Sometimes you need to test your web services absent all other variables, and for that you need some kind of web service testing tool.
Choosing a Testing Tool
There are a lot of tools available, and which one you choose depends on what type of testing you want to perform. Of course, you can (and should) unit test your web services, just like you unit test your business logic and repositories, for which you would use an automated unit-testing tool such as JUnit or TestNG. There’s also integration testing, which involves testing many components of your system interacting as they would in the real world. Among other tools used by quality assurance teams around the world, JUnit and TestNG can also lend a hand in this arena. Another common testing requirement is load testing, which helps determine the performance characteristics, bottlenecks, and breaking points of a system. There are many tools available for this, including free tools such as JMeter and The Grinder, and expensive, enterprise tools such as NeoLoad and LoadRunner.
However, another common testing approach (one you have used throughout this book) is functional testing. Sometimes the easiest and quickest way to tell if a system works is to open it up and try it out. With a mobile app, that involves using the app on your phone or tablet. Functional testing a desktop application, likewise, involves opening and using the application on your desktop or notebook computer. Testing a web application is as simple as opening your browser and entering the application’s URL.
But how do you functionally test a web service? You need a tool that enables you to easily create and manipulate HTTP requests and view the responses. The command-line tool cURL is a contender, but it involves a lot of overhead and manual typing for each request, and any authentication more complicated than HTTP basic authentication is difficult. It would be helpful if the tool could remember authentication and preset header values and format the JSON and XML responses to make it more readable. Fiddler is one option that can be very useful for functional testing web services, and it supports these features. Fiddler has many other uses, though, and can be a little cumbersome to use for just that purpose. There are several REST client web browser plug-ins for Chrome and Firefox that are handy specifically for testing RESTful web services. In this section you use the RESTClient Firefox add-on, but there are a lot of tools to choose from, and you can and should choose the one that works best for you. You can download the RESTClient Firefox add-on here.
Making Requests to Your Web Service
After installing the RESTClient extension in Firefox, follow these steps:
1. ![]() Open up RESTClient by clicking the square red button with the orange circle — shown here in the margin — to the right of the address and search bars.
Open up RESTClient by clicking the square red button with the orange circle — shown here in the margin — to the right of the address and search bars.
2. Click the Headers menu and click Custom Header.
3. Enter Content-Type in the Name and application/json in the Value, check the favorites box, and click Okay.
4. Repeat step 3 for Content-Type and application/xml, Accept and application/json, and Accept and application/xml. This saves quick-access headers that you can easily grab whenever needed. Make sure you clear the Headers bar in RESTClient when you are done. To do this, click the Remove All button.
5. Compile and start the Web-Service application from your IDE.
6. Add the application/json Content-Type and Accept headers to the Headers bar in RESTClient, select GET from the method, enter http://localhost:8080/financials/services/Rest/ in the URL, and press Send. The response body will be a list of links returned by the RestIndexEndpoint controller.
7. Try changing the method to OPTIONS and the URL to http://localhost:8080/financials/services/Rest/account. The AccountRestController will respond with 204 No Content and an Allow header of all the actions you are allowed to perform on the collection resource.
8. Change the method back to GET, enter http://localhost:8080/financials/services/Rest/account in the URL, and press Send. The response body should have an empty list in it. Try the URLhttp://localhost:8080/financials/services/Rest/account/1, and your web service should respond with a 404 Not Found. This is because you don’t have any accounts yet.
9. To fix this, change the URL back to http://localhost:8080/financials/services/Rest/account, change the method to POST, and enter the value shown in Figure 17-1 in the Body field. After you send this request your web service will respond 400 Bad Request.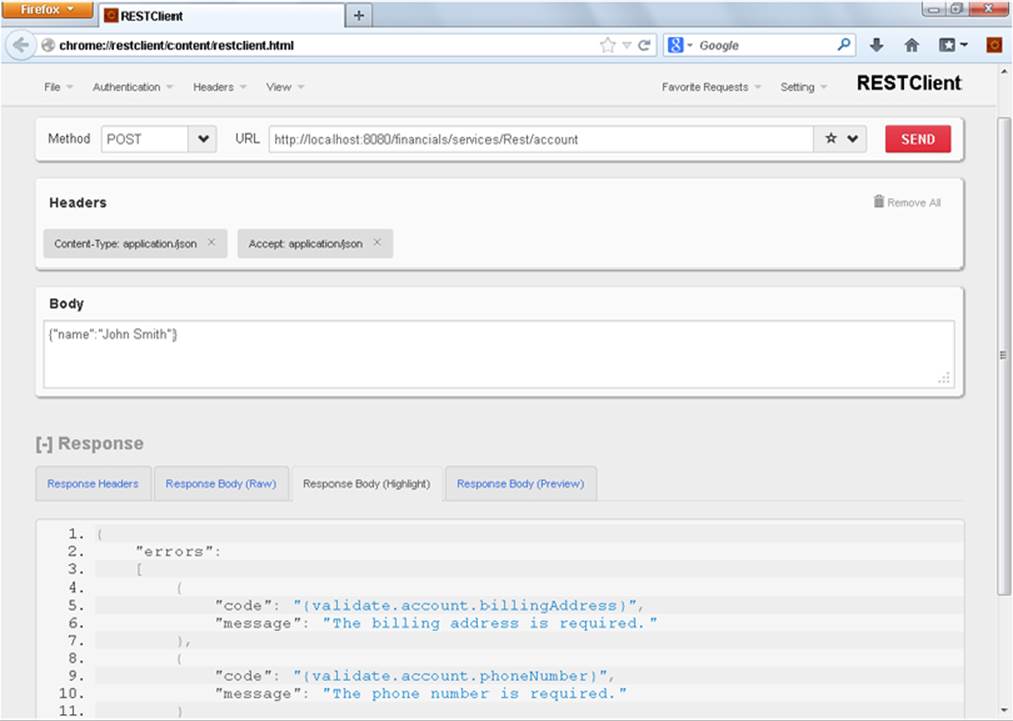
FIGURE 17-1
10.Check the response body, and it should look like Figure 17-1. This means that bean validation threw a ConstraintViolationException and your RestExceptionHandler converted the exception into a JSON REST response.
11.Now repeat this process with XML: Change the Content-Type and Accept headers to application/xml and the Body field to the value shown in Figure 17-2. You’ll get the same response back, only formatted XML instead of JSON.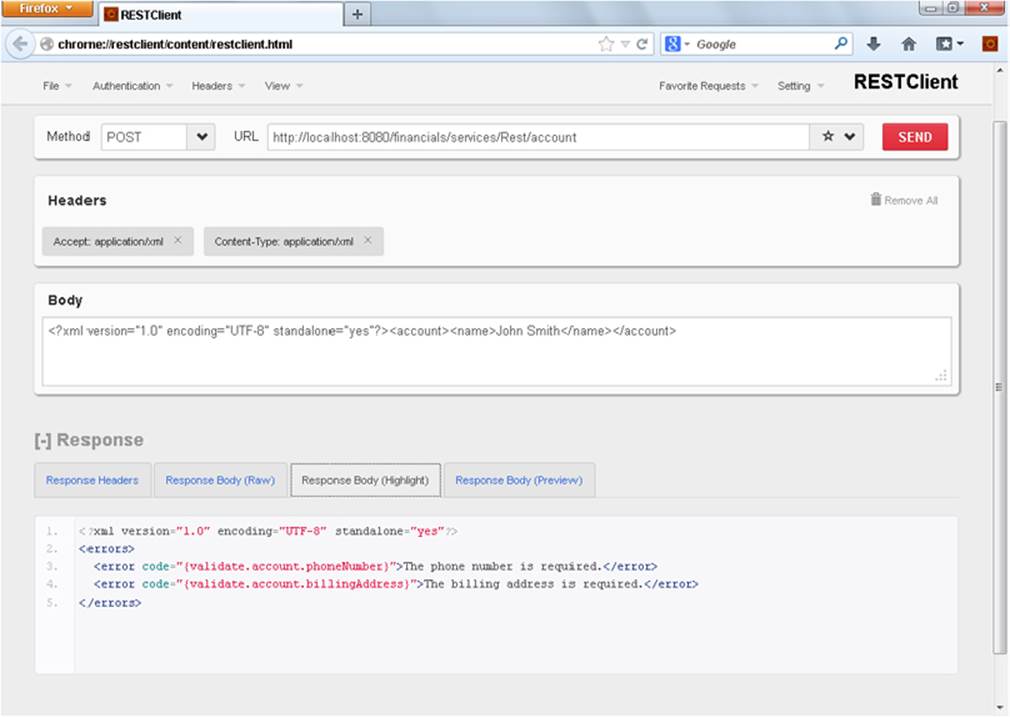
FIGURE 17-2
12.Figure 17-3 shows a successful POST with the complete JSON request body to successfully create an account. Perform this POST and take a look at the response headers, where you’ll see a Location URL for the resource that was just created.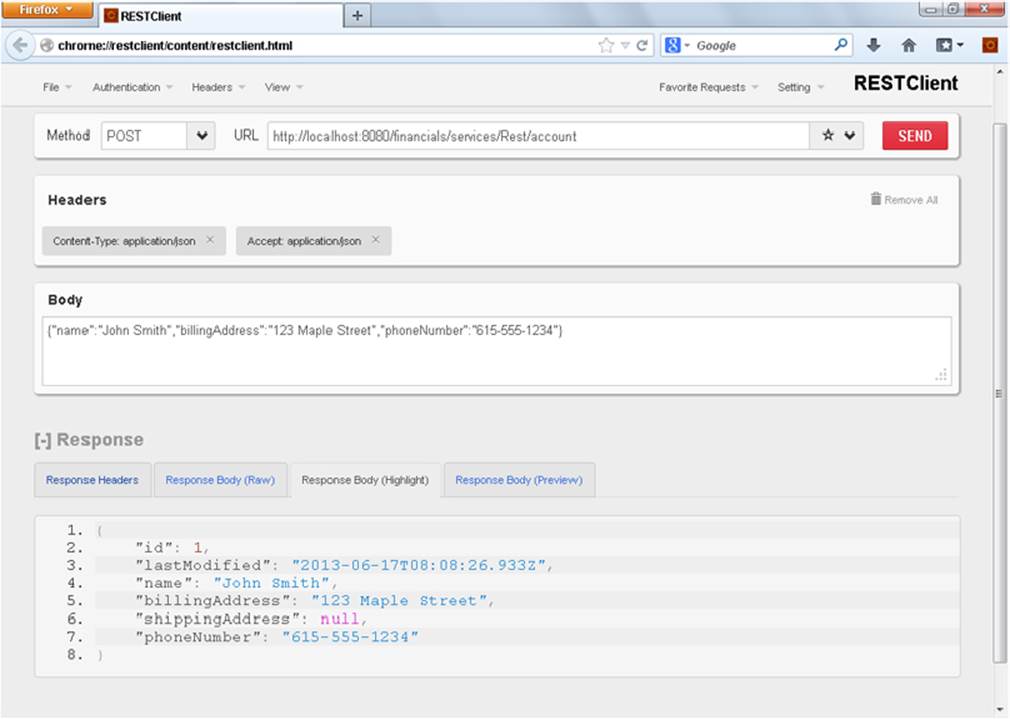
FIGURE 17-3
13.Copy this URL and paste it into the URL field, clear the request body, and change the method to GET. The response will be the account you just created.
14.Create a few more accounts, using XML as well, and then try the collection GET again. Instead of an empty list, you should see all the accounts you have created so far. This testing means you have a fully functioning RESTful web service capable of responding to both JSON and XML requests.
USING SPRING WEB SERVICES FOR SOAP
There’s a decent chance you will need to provide SOAP web services to your clients someday, especially if you work on very large enterprise applications. SOAP is a complex topic, and you can’t get a full understanding of it from an entire chapter, let alone a single section. In this section you are briefly introduced to a tool that can help you easily and quickly create simple SOAP services: Spring Web Services. You cannot possibly consider the entire toolset offered by this project in this section, and it would do you little good if you didn’t understand SOAP thoroughly.
If this topic interests you and you want to learn more, check out the reference documentation for the Spring Web Services project at http://static.springsource.org/spring-ws/sites/2.0/reference/html/index.html. Spring Web Services is a separate project related to and dependent on Spring Framework. It is meant to work side-by-side with existing Spring-based code, such as web controllers and RESTful endpoints.
To use Spring Web Services, you need an additional Maven dependency not mentioned at the beginning of this chapter:
<dependency>
<groupId>org.springframework.ws</groupId>
<artifactId>spring-ws-core</artifactId>
<version>2.1.4.RELEASE</version>
<scope>compile</scope>
<exclusions>
<exclusion>
<groupId>javax.xml.stream</groupId>
<artifactId>stax-api</artifactId>
</exclusion>
</exclusions>
</dependency>
The transient Java Streaming API for XML (StAX) dependency is excluded because it is part of the Java 6 and higher Standard Edition API.
To follow along with the work for this section, see the Customer-Support-v14 project available for download from the wrox.com code download site. It already contains a RestServletContextConfiguration, a RestExceptionHandler, and an IndexRestEndpoint — all similar to what you’ve seen so far in this chapter. It also contains a TicketRestEndpoint for managing tickets via a RESTful JSON or XML API, and you should examine it and test it as much as you want. In this section you focus on creating an endpoint for managing tickets via a SOAP web service.
NOTE You’ll probably notice that the TicketRestEndpoint has no security protecting it from unauthorized access. For that matter, the SOAP endpoint has no security, either. The simple form authentication this application uses is not appropriate for web services. In Part IV of this book you learn how to secure web services using OAuth. Until then, your web services remain unprotected.
Writing Your Contract-First XSD and WSDL
Spring Web Services enforces contract-first development strictly. You must define your XML contract before you can do anything else. The good news is that there are some tools that can help you do this. Consider what you might want a Ticket to look like in XML format.
<ticket xmlns="http://example.com/xmlns/support">
<id>12</id>
<customerName>John Doe</customerName>
<dateCreated>2014-01-17T12:36:00Z</dateCreated>
<subject>Foo</subject>
<body>Bar</body>
<attachment>
<name>spacer.gif</name>
<mimeContentType>image/gif</mimeContentType>
<contents>R0lGODlhAQABAAAAACH5BAEKAAEALAAAAAABAAEAAAICTAEAOw==</contents>
</attachment>
</ticket>
You also know that you want to create new tickets, so you need a <ticketForm> element.
<ticketForm xmlns="http://example.com/xmlns/support">
<subject>Foo</subject>
<body>Bar</body>
<attachment>
<name>spacer.png</name>
<mimeContentType>image/png</mimeContentType>
<contents>iVBORw0KGgoAAAANSUhEUgAAAAEAAAABAQMAAAAl21bKAAAAA1BMVEUAAACne
j3aAAAAAXRSTlMAQObYZgAAAApJREFUCB1jYAAAAAIAAc/INeUAAAAASUVORK5CYII=</contents>
</attachment>
</ticketForm>
You need to read and delete an individual ticket, so you need a <ticketRequest> element and an identical <deleteTicket> element. Finally, you need a way to select all tickets, so an empty <ticketsRequest> element should do the trick.
<ticketRequest xmlns="http://example.com/xmlns/support">
<id>12</id>
</ticketRequest>
Given these examples, your IDE can help generate XSD schema code. In IntelliJ IDEA, for example, you can create temporary XML files with each element by following these steps:
1. Right-click anywhere within XML contents, and click Generate XSD Schema from XML File.
2. In the dialog that appears, make sure that the Design Type field is set to local elements/global complex types, and then click OK.
3. The generated XSD schema file is quite close to what you want and requires only a few minor changes to indicate expected element types, specify how often types can appear, and so on. The XSD files need to be merged into one XSD file for all actions on your web service.
Listing 17-4 shows the resulting XSD schema file /WEB-INF/xsd/soap/support.xsd.
LISTING 17-4: support.xsd
<?xml version="1.0" encoding="UTF-8"?>
<xs:schema attributeFormDefault="unqualified" elementFormDefault="qualified"
targetNamespace="http://example.com/xmlns/support"
xmlns:xs="http://www.w3.org/2001/XMLSchema"
xmlns:support="http://example.com/xmlns/support">
<xs:element name="ticketsRequest" type="support:ticketsRequestType" />
<xs:element name="ticketRequest" type="support:selectTicketType" />
<xs:element name="createTicket" type="support:createTicketType"/>
<xs:element name="deleteTicket" type="support:selectTicketType"/>
<xs:element name="ticket" type="support:ticketType" />
<xs:element name="tickets" type="support:ticketsType" />
<xs:complexType name="ticketType">
<xs:sequence>
<xs:element type="xs:long" name="id" minOccurs="0"/>
<xs:element type="xs:string" name="customerName" minOccurs="0"/>
<xs:element type="xs:dateTime" name="dateCreated" minOccurs="0"/>
<xs:element type="xs:string" name="subject"/>
<xs:element type="xs:string" name="body"/>
<xs:element type="support:attachmentType" name="attachment"
minOccurs="0" maxOccurs="unbounded"/>
</xs:sequence>
</xs:complexType>
<xs:complexType name="ticketsRequestType">
<xs:sequence />
</xs:complexType>
<xs:complexType name="selectTicketType">
<xs:sequence>
<xs:element type="xs:long" name="id"/>
</xs:sequence>
</xs:complexType>
<xs:complexType name="createTicketType">
<xs:sequence>
<xs:element type="support:ticketType" name="ticket"/>
</xs:sequence>
</xs:complexType>
<xs:complexType name="ticketsType">
<xs:sequence>
<xs:element type="support:ticketType" name="ticket" minOccurs="0"
maxOccurs="unbounded"/>
</xs:sequence>
</xs:complexType>
<xs:complexType name="attachmentType">
<xs:sequence>
<xs:element type="xs:string" name="name"/>
<xs:element type="xs:string" name="mimeContentType"/>
<xs:element type="xs:base64Binary" name="contents"/>
</xs:sequence>
</xs:complexType>
</xs:schema>
The XSD is all you need in this case: Spring Web Services considers this enough contract and creates the WSDL for you automatically. To effect this WSDL creation, you have to first configure Spring Web Services.
Adding the SOAP Dispatcher Servlet Configuration
Unlike Spring Framework, Spring Web Services does not support Java-based programmatic configuration. However, you need component scanning for your SOAP application context, so it’s easiest to create a hybrid configuration. TheSoapServletContextConfiguration scans for @org.springframework.ws.server.endpoint.annotation.Endpoint components and imports the soapServletContext.xml XML configuration.
@Configuration
@ComponentScan(
basePackages = "com.wrox.site",
useDefaultFilters = false,
includeFilters = @ComponentScan.Filter(Endpoint.class)
)
@ImportResource("classpath:com/wrox/config/soapServletContext.xml")
public class SoapServletContextConfiguration
{
@Bean
public WebServiceMessageFactory messageFactory()
{
SaajSoapMessageFactory factory = new SaajSoapMessageFactory();
factory.setSoapVersion(SoapVersion.SOAP_12);
return factory;
}
}
The explicit messageFactory bean (the name is important) overrides the default message factory so that the supported SOAP version is 1.2 instead of the default 1.1. There are several enhancements in SOAP 1.2 regarding protocol binding, extensibility, and XML formats that are beyond the scope of this book. The soapServletContext.xml file tells Spring Web Services to configure endpoints based on annotations and to use the XSD schema file you created earlier to generate the WSDL.
<?xml version="1.0" encoding="UTF-8"?>
<beans xmlns="http://www.springframework.org/schema/beans"
xmlns:sws="http://www.springframework.org/schema/web-services"
xmlns:xsi="http://www.w3.org/2001/XMLSchema-instance"
xsi:schemaLocation="http://www.springframework.org/schema/beans
http://www.springframework.org/schema/beans/spring-beans-4.0.xsd
http://www.springframework.org/schema/web-services
http://www.springframework.org/schema/web-services/web-services-2.0.
xsd">
<sws:annotation-driven marshaller="jaxb2Marshaller"
unmarshaller="jaxb2Marshaller" />
<sws:dynamic-wsdl id="support" portTypeName="Support"
locationUri="/services/Soap/" createSoap11Binding="false"
createSoap12Binding="true"
targetNamespace="http://example.com/xmlns/support">
<sws:xsd location="/WEB-INF/xsd/soap/support.xsd" />
</sws:dynamic-wsdl>
</beans>
Because @Endpoint is also a @Component, you need to change the RootContextConfiguration to ensure that only the SOAP dispatcher Servlet context instantiates and manages SOAP endpoint classes.
...
@ComponentScan(
basePackages = "com.wrox.site",
excludeFilters = @ComponentScan.Filter({
Controller.class, ControllerAdvice.class, Endpoint.class
})
)
public class RootContextConfiguration
...
You’ll need to bootstrap the SOAP dispatcher Servlet so that it uses the SoapServletContextConfiguration. Spring Web Services has a special DispatcherServlet implementation org.springframework.ws.transport.http.MessageDispatcherServlet that handles SOAP requests. The following code from the Bootstrap class creates this Servlet, sets its application context, and instructs it to transform WSDL locations to requests.
...
AnnotationConfigWebApplicationContext soapContext =
new AnnotationConfigWebApplicationContext();
soapContext.register(SoapServletContextConfiguration.class);
MessageDispatcherServlet soapServlet =
new MessageDispatcherServlet(soapContext);
soapServlet.setTransformWsdlLocations(true);
dispatcher = container.addServlet("springSoapDispatcher", soapServlet);
dispatcher.setLoadOnStartup(3);
dispatcher.addMapping("/services/Soap/*");
...
Having configured Spring Web Services, you are now ready to create a SOAP endpoint.
Creating a SOAP Endpoint
Endpoints are the key concept of Spring Web Service’s server support. Unlike controllers, whose handler methods are directly tied to HTTP requests and responses, Spring Web Service SOAP endpoints can serve SOAP requests made via HTTP, XMPP, SMTP, JMS, and more. Just like @Controller marks a controller whose @RequestMapping methods should be scanned and mapped to requests, @Endpoint marks an endpoint whose @org.springframework.ws.server.endpoint.annotation.PayloadRoot methods,@org.springframework.ws.soap.server.endpoint.annotation.SoapAction methods, and/or @org.springframework.ws.soap.addressing.server.annotation.Action methods are handlers for incoming SOAP requests on any protocol. Endpoint methods’ parameters correspond to elements of the request, whereas return types indicate response contents.
As far as method parameters are concerned, you have a great deal of flexibility as to which content types you want to accept depending on how you prefer to access the XML content in requests. For example, a method parameter of type SoapMessage, SoapBody, SoapEnvelope, or SoapHeader (all in package org.springframework.ws.soap) is passed the corresponding content from the SOAP request. Similar to @RequestBody, if a method parameter is annotated @org.springframework.ws.server.endpoint.annotation.RequestPayload, Spring Web Services converts the request payload to the designated type. Supported request payload types are:
· javax.xml.transform.Source or its subinterfaces
· org.w3c.dom.Element
· org.dom4j.Element if dom4j is on the classpath
· org.jdom.Element if JDOM is on the classpath
· nu.xom.Element if XOM is on the classpath
· javax.xml.stream.XMLStreamReader or javax.xml.stream.XMLEventReader in Java SE 6 or higher, or if StAX is on the classpath
· Any type annotated with @javax.xml.bind.annotation.XmlRootElement in Java 6 or higher, or if JAXB is on the classpath
· Any type supported by the Spring OXM Unmarshaller if <sws:annotation-driven> is configured with the unmarshaller attribute.
Similarly, methods annotated @org.springframework.ws.server.endpoint.annotation.ResponsePayload can have return types Source or its subinterfaces, org.w3c.dom.Element, org.dom4j.Element, org.jdom.Element, nu.xom.Element, any type annotated @XmlRootElement, and any type supported by the Spring OXM Marshaller (if <sws:annotation-driven> is configured with the marshaller attribute). A method that returns void has no response content (an empty SOAP envelope).
Because of this method parameter and return type support, you can reuse several of the parameter and return types created for the TicketRestEndpoint in the TicketSoapEndpoint in Listing 17-5. As you can see, this endpoint has many similarities with the REST endpoint, but it also has several differences. This endpoint uses the payload root element names to match to endpoint action methods using the @PayloadRoot annotation, but you could instead use the SOAPAction header with the @SoapAction annotation or the Web Services Addressing standard with the @Action annotation.
17-5: TicketSoapEndpoint.java
@Endpoint
public class TicketSoapEndpoint
{
private static final String NAMESPACE = "http://example.com/xmlns/support";
@Inject TicketService ticketService;
@PayloadRoot(namespace = NAMESPACE, localPart = "ticketsRequest")
@ResponsePayload
public TicketWebServiceList read()
{
TicketWebServiceList list = new TicketWebServiceList();
list.setValue(this.ticketService.getAllTickets());
return list;
}
@PayloadRoot(namespace = NAMESPACE, localPart = "ticketRequest")
@Namespace(uri = NAMESPACE, prefix = "s")
@ResponsePayload
public Ticket read(@XPathParam("/s:ticketRequest/id") long id)
{
return this.ticketService.getTicket(id);
}
@PayloadRoot(namespace = NAMESPACE, localPart = "createTicket")
@ResponsePayload
public Ticket create(@RequestPayload CreateTicket form)
{
Ticket ticket = new Ticket();
ticket.setCustomerName("WebServiceAnonymous");
ticket.setSubject(form.getSubject());
ticket.setBody(form.getBody());
if(form.getAttachments() != null)
ticket.setAttachments(form.getAttachments());
this.ticketService.save(ticket);
return ticket;
}
@PayloadRoot(namespace = NAMESPACE, localPart = "deleteTicket")
@Namespace(uri = NAMESPACE, prefix = "s")
public void delete(@XPathParam("/s:deleteTicket/id") long id)
{
this.ticketService.deleteTicket(id);
}
@XmlRootElement(namespace = NAMESPACE, name = "createTicket")
public static class CreateTicket
{
private String subject;
private String body;
private List<Attachment> attachments;
public String getSubject() { ... }
public void setSubject(String subject) { ... }
public String getBody() { ... }
public void setBody(String body) { ... }
@XmlElement(name = "attachment")
public List<Attachment> getAttachments() { ... }
public void setAttachments(List<Attachment> attachments) { ... }
}
}
Compile and start the Customer Support application and test it out. Go to http://localhost:8080/support/services/Soap/support.wsdl in any normal browser window to view your auto-generated WSDL. Create some tickets with the graphical user interface, and then try out the RESTful web service interface with the RESTClient browser plug-in. You can also use RESTClient to test the SOAP web service interface. You need to use Accept and Content-Type request headers with the value application/soap+xml. Because SOAP envelope requests can be so complex to create by hand, included are the four following requests that you can use to test your service. Requests should be made to http://localhost:8080/support/services/Soap/ with method POST regardless of action.
<soap:Envelope xmlns:soap="http://www.w3.org/2003/05/soap-envelope">
<soap:Header/>
<soap:Body>
<support:ticketsRequest xmlns:support="http://example.com/xmlns/support"/>
</soap:Body>
</soap:Envelope>
<soap:Envelope xmlns:soap="http://www.w3.org/2003/05/soap-envelope">
<soap:Header/>
<soap:Body>
<support:ticketRequest xmlns:support="http://example.com/xmlns/support">
<id>1</id>
</support:ticketRequest>
</soap:Body>
</soap:Envelope>
<soap:Envelope xmlns:soap="http://www.w3.org/2003/05/soap-envelope">
<soap:Header/>
<soap:Body>
<support:deleteTicket xmlns:support="http://example.com/xmlns/support">
<id>1</id>
</support:deleteTicket>
</soap:Body>
</soap:Envelope>
<soap:Envelope xmlns:soap="http://www.w3.org/2003/05/soap-envelope">
<soap:Header/>
<soap:Body>
<support:createTicket xmlns:support="http://example.com/xmlns/support">
<subject>Foo</subject>
<body>Bar</body>
<attachment>
<name>spacer.gif</name>
<mimeContentType>image/gif</mimeContentType>
<contents>R0lGODlhAQABAAAAACH5BAEKAAEALAAAAAABAAEAAAICTAEAOw==</contents>
</attachment>
</support:createTicket>
</soap:Body>
</soap:Envelope>
SUMMARY
You have covered a lot of content in this chapter. First, you were introduced to the concept of web services and learned about SOAP, the beginning of modern web services. You explored the RESTful web service standard and learned how to provide RESTful web services to your clients. You investigated how to create RESTful web services using standard Spring MVC controllers and created your own stereotype annotations to differentiate web controllers and RESTful web service endpoints. You also very briefly learned about the Spring Web Services project and how it can be used to create SOAP web service endpoints for your application.
In the next and final chapter of Part II, you explore how Spring Framework messages and web application clustering can make your application more flexible, scalable, and reliable.
All materials on the site are licensed Creative Commons Attribution-Sharealike 3.0 Unported CC BY-SA 3.0 & GNU Free Documentation License (GFDL)
If you are the copyright holder of any material contained on our site and intend to remove it, please contact our site administrator for approval.
© 2016-2026 All site design rights belong to S.Y.A.