PROFESSIONAL JAVA FOR WEB APPLICATIONS (2014)
Part II Adding Spring Framework Into the Mix
Chapter 18 Using Messaging and Clustering for Flexibility and Reliability
IN THIS CHAPTER
· Deciding when to use messaging and clustering
· How to add messaging support to your application
· Distributing your messages across a cluster
· Using Advanced Message Queuing Protocol to distribute events
WROX.COM CODE DOWNLOADS FOR THIS CHAPTER
You can find the wrox.com code downloads for this chapter at http://www.wrox.com/go/projavaforwebapps on the Download Code tab. The code for this chapter is divided into the following major examples:
· Publish-Subscribe Project
· WebSocket-Messaging Project
· AMQP-Messaging Project
NEW MAVEN DEPENDENCIES FOR THIS CHAPTER
This chapter has no new Maven dependencies that you will use in future chapters. You’ll continue to use the Maven dependencies introduced in all previous chapters. You’ll use the following dependency only in the last section of this chapter and not in any other chapters.
<dependency>
<groupId>com.rabbitmq</groupId>
<artifactId>amqp-client</artifactId>
<version>3.2.3</version>
<scope>compile</scope>
</dependency>
RECOGNIZING WHEN YOU NEED MESSAGING AND CLUSTERING
Messaging and clustering are two critical features of enterprise applications. Interestingly, messaging and clustering capabilities can stand on their own and enhance your applications independently, but they can also work hand-in-hand to improve the flexibility, reliability, scalability, and availability of your applications. In this chapter you learn about what each topic brings to the table individually and how to use them together with Spring Framework in a Java EE web application environment.
What Is Application Messaging?
The term messaging can have a lot of meanings. When you communicate with your friends and colleagues using e-mails and text messages, you participate in messaging. If you use an instant messaging service such as Jabber, AIM, Skype, or Lync, that’s messaging, too. Even signaling someone with Morse code is a form of messaging.
Application messaging, however, doesn’t apply to any of these behaviors. Application messaging is the exchanging of information, usually regarding events, between disparate units of an application. Though some type of human interaction usually triggers the exchange of application messages, it rarely happens at the instruction of or to the knowledge of the application users. Application messaging is a crucial component of any large application. It enables parts of an application to notify other parts of the application about activities taking place, data changing, caches becoming stale, and any number of other events. Application messaging can potentially take many forms, but the most common are Remote Procedure Call (RPC) and the publish-subscribe pattern (pub/sub).
Understanding Publish-Subscribe
In RPC, messages are exchanged by way of the client-server paradigm. A client connects to a server (perhaps with a persistent connection, or possibly once per procedure call) and executes a specified procedure (or method). In Java, this is more commonly known as Remote Method Invocation (RMI), which is really just the Java-specific native RPC protocol that uses interfaces and Java serialization.
In general, the problem with RPC and the client-server paradigm is that the caller (or client) must know something about the message recipient (or server). In a local sense (within the same running application) RPC doesn’t even apply. A simple method invocation is the analog to RPC within a single running application. To understand how this can be problematic, consider a human resources management system that, at first, contains a simple database of employee data. A new component of the system needs to send a tax record to the local government when a new employee is hired, so the employee service is updated to call the tax record service. Now a payroll system needs to create a payroll entry for the employee, so the employee service is updated to call the payroll service. Also, the system needs an insurance component for managing employees on the group policy, so the employee service is updated once again to call the insurance service.
Before you know it, 10 or 20 system components all have hooks hard-wired into the employee service. Not only must the employee service have knowledge of these systems and how they work to call them, but also the tests for the employee service must provide mock implementations for all these components to test that they are properly called. As each of these systems interlocks with the rest, you discover you have created an inordinately complex system not unlike a ball of yarn, and pulling on the wrong thread to change a feature can unravel the whole thing. Yes, RPC has its purposes but not for application messaging in this nature.
Such a system is tightly coupled. To better understand the drawbacks of this pattern, apply it to your social networking activities. When you sign up for a social networking platform, you add “friends” to your account, and those friends in return add you to theirs. If you were to follow the same client-server paradigm, each time you update your status or post a link, you must send a message to each of your friends about it so that they see it. This can get out of hand quickly.
Actually, social networking is a perfect example of the publish-subscribe pattern. On Twitter, for example, users subscribe to other users. When a user publishes content, his subscribers are notified of that content automatically — he doesn’t have to manually send the content to each of his subscribers. This system is loosely coupled. The publisher of the content doesn’t care who is subscribed and doesn’t need to know anything about its subscribers for them to receive his published content. The subscriber, likewise, doesn’t need to know who is publishing a particular type of content. (It could be multiple sources.) A publisher may have zero subscribers or it may have hundreds of subscribers. This decouples the systems and makes them less complex (and easier to test).
A pub/sub system contains three roles: publisher, subscriber, and broker. The broker is responsible for maintaining a list of who is subscribed to which topics and dispatching messages to the appropriate subscribers when a publisher broadcasts content to a relevant topic, as shown in Figure 18-1. In the Twitter example, Twitter is the broker and you are both publisher and subscriber. When you subscribe to another Twitter user, you notify Twitter (by clicking the Follow button) that you want to subscribe to his content. When that user publishes a tweet, Twitter makes sure that it appears on the Tweets list on your Twitter homepage. By now you may realize that a pub/sub publisher may also be a subscriber (and often is). For that matter, there is no technical reason why a broker cannot also be a publisher and/or a subscriber (though that is less common). You can never have more than one broker, however, except when two or more brokers work together in a load-sharing or failover configuration that mimics one logical broker (a broker cluster).
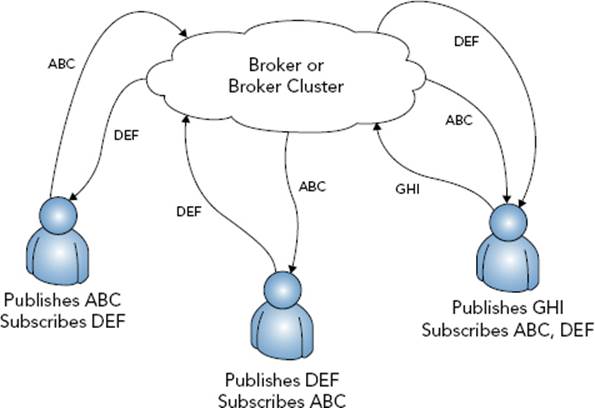
FIGURE 18-1
Using Spring Framework’s Application Events and Listeners
Without any special configuration, Spring Framework automatically acts as a message broker in a pub/sub environment. To publish messages, you call the publishEvent method on an instance of org.springframework.context.ApplicationEventPublisher and pass it an instance of org.springframework.context.ApplicationEvent. You can obtain an ApplicationEventPublisher in a Spring-managed bean either through dependency injection or by implementing org.springframework.context.ApplicationEventPublisherAware. With anApplicationEventPublisher instance, you can publish as many events as you want as often as you need to.
Subscribing to events is equally easy. Given an event FooEvent extends ApplicationEvent, a Spring bean needs only to implement org.springframework.context.ApplicationListener<FooEvent> to subscribe to FooEvent messages. To subscribe to BarEvent, implementApplicationListener<BarEvent>. You can create and subscribe to a hierarchy of events, too. For example, consider the following event definitions:
public class TopEvent extends ApplicationEvent { }
public class MiddleEvent extends TopEvent { }
public class CenterEvent extends TopEvent { }
public class BottomEvent extends MiddleEvent { }
Given this, a bean that implements:
· ApplicationListener<ApplicationEvent> subscribes to all events
· ApplicationListener<TopEvent> subscribes to TopEvent, MiddleEvent, CenterEvent, and BottomEvent
· ApplicationListener<MiddleEvent> subscribes to MiddleEvent and BottomEvent
· ApplicationListener<CenterEvent> subscribes only to CenterEvent
· ApplicationListener<BottomEvent> subscribes only to BottomEvent
Because Java does not permit you to implement the same interface more than once, even with different type arguments, you cannot subscribe to different events without subscribing to their common ancestor. This isn’t always desirable, especially if the only common ancestor is ApplicationEvent — Spring comes with dozens of built-in events that are published for many different reasons at any given time. You can, however, work around this with the clever use of @Bean and anonymous inner classes:
@Service
public class FooService
{
public void doSomething() { }
@Bean
public ApplicationListener<BarEvent> fooService$barEventListener()
{
return new ApplicationListener<BarEvent>()
{
@Override
public void onApplicationEvent(BarEvent e)
{
FooService.this.doSomething();
}
}
}
@Bean
public ApplicationListener<BazEvent> fooService$bazEventListener()
{
return new ApplicationListener<BazEvent>()
{
@Override
public void onApplicationEvent(BazEvent e)
{
FooService.this.doSomething();
}
}
}
}
Of course, as powerful as this pub/sub support built in to Spring Framework is, it’s local. It works only within a given Spring container or, more important, within a single JVM. In many cases, you need pub/sub to work across servers in a cluster, which begs the question, “What is clustering, exactly?”
What Is Clustering?
Clustering has many meanings. Speaking strictly in terms of a definition, a cluster is a group of something. Use of the word cluster can refer to geology, biology, chemistry, astronomy, food, technology, and a number of other things. Houses can be built in a cluster, cities can be formed in a cluster, and people can gather in clusters.
In computer terminology, however, an application cluster is a group of two or more applications working together toward the same goal so that you can use them as a single system. Typically, this involves two or more physical or virtual servers running the same services and performing the same tasks, sharing a load evenly distributed among the servers. It can also involve two or more identical services running on the same physical or virtual machine in the same manner. For example, two or more Apache Tomcat installations can form a cluster whether they run all on the same server, all on different servers, or in some combination. What matters most isn’t where these services live, but whether they are configured to work cooperatively on the same tasks.
Understanding Distributable Java EE Applications
Strictly speaking, a Java EE web application is considered distributable as long as the <distributable/> tag is present in its deployment descriptor and in all /META-INF/web-fragment.xml descriptors in any JAR files packaged in its /WEB-INF/lib directory. If a JAR file does not contain a web-fragment.xml file, it is not considered a web fragment, so it doesn’t count. If a single JAR with a web-fragment.xml lacking <distributable/> is present in an application, or if the deployment descriptor is lacking <distributable/>, the application is considered non-distributable.
This doesn’t mean anything without understanding what, precisely, a distributable Java EE application is. The <distributable/> element indicates that the web application was written to deploy to multiple JVMs running on the same host or on different hosts. In almost all cases, this means that all attributes written to HttpSessions are Serializable. Containers are allowed to support non-Serializable session attributes in distributable applications, but they are not required to, and most simple Servlet containers do not. Tomcat, for example, throws an IllegalArgumentException if a <distributable/> application adds a non-Serializable attribute to a session. The point of using Serializable session attributes is that it permits HttpSessions to be shared among servers in a cluster, which is perhaps the most important reason for using <distributable/>. If two or more containers are configured to work in a cluster, they may share HttpSession data across the cluster only for distributable applications.
Understanding HTTP Sessions, Stickiness, and Serialization
Why would you want to have HttpSession data shared across servers in a cluster? The answer to that is quite simple and boils down to the reasons you use a cluster to begin with: scalability and availability. A single server cannot service an infinitely increasing number of users. When a server fails, you want your users transparently shuffled to other servers. Because the majority of applications interact with users using sessions, it’s important for that session data to be shareable across a cluster. This can serve two purposes:
· If a server fails, a user can be sent to a different server and that server will have all the same session data for the user that the failed server had.
· In an ideal world, consecutive user requests can be handled independently of which server receives the request, so a user’s requests can conceivably be handled on different servers every time without losing session information.
For either of these scenarios to work properly, you must make your session attributes Serializable. Because Java objects cannot live beyond the confines of a single Java Virtual Machine, HttpSessions must be serialized before being sent to other servers in the cluster — whether over shared memory, a file system, or a network connection. This pattern presents two interesting challenges with solutions for both.
First, sometimes session attributes simply cannot be 100 percent Serializable. This is especially true for legacy applications that are upgraded and refactored. For example, a session attribute may (for whatever reason, however bad) hold on to a database connection or open file handle. These attributes obviously cannot be serialized and shared across the cluster — or can they? The javax.servlet.http.HttpSessionActivationListener interface specifies a special type of attribute that knows when it is about to be serialized and sent to other servers in a cluster or has just been deserialized on a server. Any session attribute that implements this interface is notified when it is about to be sent to other servers (via the sessionWillPassivate method) and when it has just been received from another server (via the sessionDidActivate method). In the aforementioned examples, a session attribute could re-open a database connection marked transient in sessionDidActivate.
A more common problem with clustered sessions is performance. For complete server independence to be possible, the server must serialize and share an HttpSession every time you update a session attribute as well as on every request (so that the lastAccessTimeproperty stays up-to-date). This can present a real performance issue in some cases. (Although it still has a net benefit over using only one server.)
For this reason and others, the concept of session stickiness is an important consideration whenever you deploy a distributable application. How session stickiness is configured varies from one container and load balancer to the next, but the concept is the same: Within a single session, all that session’s requests are handled in the same JVM. Sessions are serialized and shared across the cluster only periodically, as often as is practical by the performance standards set by the deployment team.
Sharing sessions less often can cause problems: Imagine having added several items to your shopping cart, and on the next request, the items are no longer in your shopping cart. With sticky sessions, you are always sent to the same server unless your session ends or the server fails, and the problem of session state inconsistency is mitigated. This is not without its downside. Server failures are not predictable, and sessions are rarely left in a consistent state when a failure occurs. When possible, it is always best to maintain session state across the cluster every time a session is updated.
Configuring Your Container to Support Clustered Applications
The process of configuring application clustering varies wildly across Java EE application servers and Servlet containers. For example, if you install GlassFish Domain Administration Server (DAS), you can use the web applications on that server to automatically create and configure GlassFish clusters and nodes. Then all you have to do is deploy a <distributable/> application to a cluster, and GlassFish distributes the application to the cluster nodes with session migration activated automatically.
Conversely, Tomcat and most standalone Servlet containers are a little more complicated to configure. Out-of-the-box, Tomcat does not perform any application distribution. Two Tomcat servers running the same application are just that — two different Tomcat servers running the same application. They have no knowledge of each other and no way to share session data. You must first configure all the Tomcat servers in a cluster to recognize each other and coordinate session migration. You must then tell them how to share session data with each other — via TCP sockets, a database, or some other means.
You also have to set up load balancing across your Tomcat cluster nodes. You can achieve this in many different ways, but you usually approach it using one of the techniques shown in Figures 18-2 and 18-3.
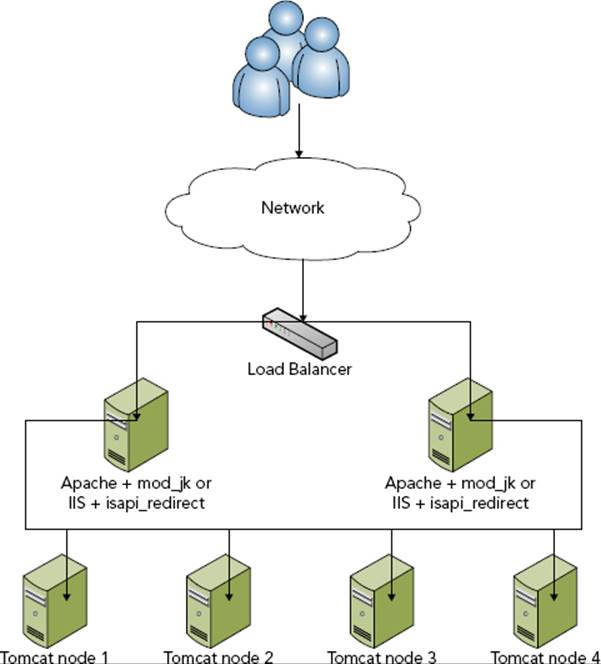
FIGURE 18-2
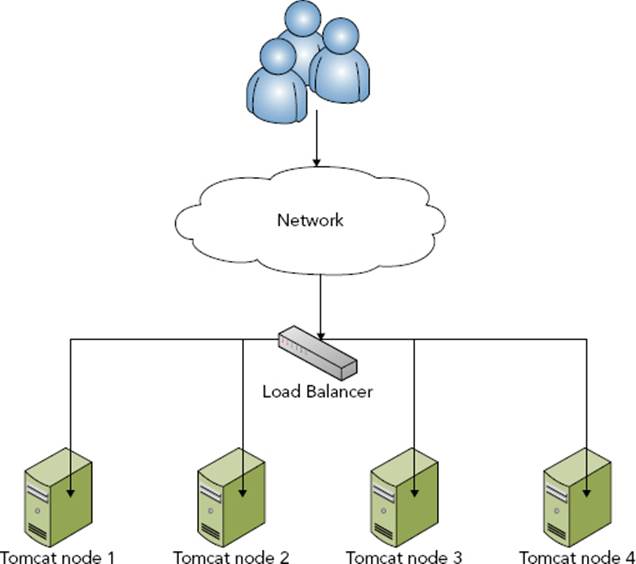
FIGURE 18-3
In the first, more common scenario, a standard network traffic load balancer accepts requests inbound to your website’s IP address and round-robins requests between two or more Apache HTTPD or Microsoft IIS web servers (refer to Figure 18-2). These web servers run a variation of the Apache Tomcat Connector — mod_jk for Apache or isapi_redirect for IIS. The Apache Tomcat Connector knows about the performance metrics of the Tomcat servers it is connected to and can route the request to the Tomcat server with the smallest load. This is a very valuable intelligent load balancing that is used in many enterprises across the world. It has some drawbacks, however — namely that it doesn’t support WebSocket traffic (yet).
An alternative and equally viable solution is using the network load balancer to intelligently balance traffic between the Tomcat instances directly (refer to Figure 18-3). Although this load balancer cannot measure the performance metrics that the Apache Tomcat Connector can, good network load balancers can make very accurate performance measurements by issuing simple, periodic health-check requests and then measuring the relative time it takes each server to respond.
When you have your cluster nodes in place and your load balancing configured, you must configure Tomcat cluster communications and session migration. The simplest way to do this is to add the following element inside the <Engine> or <Host> elements in Tomcat’sconf/server.xml:
<Cluster className="org.apache.catalina.ha.tcp.SimpleTcpCluster"/>
This activates the default session migration configuration. Nodes are assumed to always reside on different hosts (and can use the same ports) and announce themselves over the subnet multicast address. Sessions are transmitted over TCP connections established to all the nodes in the cluster. However, this is just the default, and you can customize many things about the cluster configuration. You can set it up to use a database or shared file system, and you can change the ports the clustering operates on. You can also adjust the algorithm that Tomcat uses to determine when to share sessions and with which nodes to share sessions. The process of configuring a cluster of two or more Tomcat servers is quite complex, and this book is not about Tomcat server administration. As such, this chapter does not walk you through setting up and testing a clustered Tomcat environment.
NOTE The load balancing techniques described here are also applicable to GlassFish clusters. In addition to supporting standard load balancing, GlassFish supports the mod_jk and isapi_redirect Apache Tomcat Connectors. Configuring cluster communications and session migration, however, is completely different.
How Do Messaging and Clustering Work Together?
As you may already realize, HttpSession migration across a cluster is useful but does not meet all the needs you may have when building a web application. Similarly, Spring’s support for local messaging is powerful, but it lacks the capability to send messages to other nodes in a cluster. Some form of distributed messaging can meet the needs that are not met with HttpSession migration in <distributable/> applications.
Identifying Uses for Distributed Messaging
To understand how a distributed messaging system should operate, you must first understand the possible uses for sending messages across a cluster. Why would you need such a system, and how could it benefit you? Here are just a few scenarios that can benefit from the addition of a clustered messaging system. With a little effort, you can probably think of others specific to your business needs.
· Large applications often store settings for controlling application behavior in a database of some type. Because the settings are usually numerous and frequently accessed, reloading the settings from the database on every request (or more often, if tasks run in the background) can introduce performance problems. On the other hand, caching the settings and refreshing them periodically can result in incorrect behavior on servers operating with a stale cache. With a distributed message system, the server that handles the request to update the settings can send a message to other servers in the cluster instructing them to clear their settings cache. Furthermore, you can tailor specialized messages to groups of settings so that a smaller number of cached settings are reloaded. You can apply this pattern to caches of all sorts, not just settings.
· Different services may run on different servers in a cluster. In cases in which this is desirable, services that want to subscribe to a particular topic must receive messages from across the cluster, not just locally.
· Some tasks cannot start and complete within the confines of a single HTTP request. You may start these tasks, such as data imports and exports, on a schedule or in reaction to a request, but usually they must be completed in the background. In these cases, it’s often necessary to provide a way to check on the status of a background task. Distributed messaging enables all the servers in your application cluster to know the task’s status so that a status-check request to any server can return a useful response.
Recognizing Problems with Distributed Messaging
Distributed messages across a cluster may seem like the magic bullet at this point, but it’s important to understand that it comes with its own set of problems. None of these problems are critical, and you can deal with them all so long as you understand them properly.
One common issue is the asynchronicity of messaging in a cluster. Of course, this is a drawback of the pub/sub pattern in general: Messages are published and then execution continues. There is no “reply” process in pub/sub. If you have a particular need for the send-and-reply model, RPC is better suited for this task — for that matter, any type of web service can meet this requirement as well as, sometimes better than, RPC. However, the asynchronicity issue is more exaggerated in a clustered environment. The same application usually receives and reacts to a message within milliseconds, but other applications in a cluster may not receive a message for whole seconds. This latency is something you should be aware of and plan for. Do not write your applications in such a way that they depend on these messages being delivered and handled quickly.
Another issue is deliverability. Messages sent within the same application are essentially guaranteed to be delivered to subscribers. Because of the short timeframes between message transmission and message delivery, it takes an extremely unusual situation (such as a JVM crash) to prevent message delivery. For that matter, in Spring Framework, the ApplicationEventPublisher’s publishEvent method does not return until all subscribers receive the message, so any code executed after this method can count on subscribers receiving the message.
Messages published to a cluster are a different story, however. Because of the latency involved in the publishing of cluster messages, this almost always happens in a separate thread. After you publish a message intended for the cluster from your code, you have no guarantee that any subscribers will receive it. Some systems do provide delivery receipts, but that’s a different subject. Generally speaking, when using clustered messaging you should make your application robust enough that delivery failures are not critical.
Understanding How WebSockets Can Help
In Chapter 10, you explored WebSockets and even experimented with using them to send simple messages between Servlets in a “cluster.” In reality, these Servlets were in the same web application, but the implication was clear. WebSockets are a game-changing technology that can drastically simplify communication between applications in a cluster. Indeed, a WebSocket channel can serve as a channel for the delivery of application messages. You have two primary ways to use WebSockets in application messaging:
· Your application can open WebSocket connections to every other application in your cluster and send messages over that connection. The target code (Spring Framework) acts as the message broker and delivers the messages to the appropriate subscribers. This works well but depends on some kind of discovery mechanism — a common method is to use subnet multicast packets. When an application completes its startup process, it sends a packet to the multicast address and all applications listening for this packet receive it. Using the information in the packet, other applications in the cluster open WebSocket connections to the application that sent it. In this way applications can automatically recover from a failure simply by rebroadcasting the multicast packet.
· You can use WebSockets to communicate with a message broker. Such a pattern is specified in the WebSocket Application Messaging Protocol (WAMP, not to be confused with Windows-Apache-MySQL-PHP), which you can read about here. In WAMP, the message broker resides within a different service (or on a different server). The logical broker may be a cluster of broker servers behind a load balancer. Applications open persistent WebSocket connections to the broker and send subscription requests and messages and receive messages over the connection. Spring Framework, in this case, is no longer the primary broker. Combined with Spring Framework you can implement this one of many ways. For example, you can use the broker to simply rebroadcast all ApplicationEvent messages and Spring’s pub/sub support to deliver the messages to the right subscribers. Or you can use Spring’s pub/sub support only for local messages and WAMP only for cluster messages, independently of each other. You could also forego Spring Framework’s pub/sub support altogether and use WAMP exclusively. Which approach you take is solely up to you and largely depends on the needs of your application.
Introducing Java Message Service 2.0 (JSR 343)
One older but industry-tested and reliable distributed messaging technology is Java Message Service (JMS). JMS was first specified in 2001 and updated with version 1.1 in 2002. It gained widespread adoption across the Java world and remained largely unchanged until JSR 343, which formalized JMS 2.0 in 2013. JMS 2.0 didn’t introduce any significant conceptual changes; instead, it cleared up ambiguities in the specification, simplified the API while leaving the existing API for backward compatibility, added support for Java 7 AutoCloseable resources, and integrated more completely with the entire Java EE suite.
JMS supports several different messaging patterns but has first-class support for pub/sub with the concept of topics, publishers, and subscribers. JMS, then, acts as a message broker. One advantage of using JMS is the optional ability to place a message in a queue. The message then sits there until an interested consumer processes the message. When processed, the message is removed from the queue and no other interested consumers can process it. This process can be transactional, too, guaranteeing that a message is nevermarked processed until a consumer successfully processes it and that exactly one consumer successfully consumes the message.
It’s important to understand that JMS is an API, not a protocol. JMS’s standard API makes it simple to swap out the JMS provider with little or no changes to your code. However, the JMS standard specifies only a set of interfaces for the provider to implement, and the provider implements the underlying protocol however it likes. In fact, it’s possible and even likely that different implementations cannot interoperate and share messages between them. This can have a lot of drawbacks, and for that reason, JMS is generally not the best choice if you anticipate your application ever having to communicate with other applications that are written against different providers or on different platforms.
You can integrate JMS with Spring Framework in many of the same ways that you can integrate WAMP, including making it operate exclusive to, independently of, and in cooperation with Spring’s pub/sub support. Spring also has first-class support for JMS features, abstracting away some of the headaches associated with the 1.1 API. Unfortunately, JMS is difficult to use outside of a full Java EE application server (including Tomcat and standalone applications). For this reason, this book does not cover JMS in more detail.
Introducing Advanced Message Queuing Protocol
The Advanced Message Queuing Protocol (AMQP) standard was formalized to solve the interoperability problems with JMS and other JMS-like specifications. Unlike JMS, which specifies a Java API, AMQP specifies a wire protocol for transmitting messages and enables providers to specify their own language-dependent APIs for using the protocol. This permits a multitude of applications written by different vendors on different platforms to use a common messaging protocol and communicate and collaborate with each other effectively.
The project began in 2003 with the goal of improving monetary transaction communications between financial institutions. AMQP 1.0 was released in 2011 and adopted as a standard exactly one year later. Though it originated in the financial services industry, it has gained widespread adoption across industries.
AMQP, like other standards, supports pub/sub as well as transactional message queuing and point-to-point (targeted) messaging. You can integrate it with Spring Framework using the same techniques as WAMP and JMS. Spring Framework does not have built-in AMQP support, but the Spring AMQP project provides the capability to seamlessly integrate AMQP messaging solutions into your Spring Framework application. You don’t have to use Spring AMQP to work with AMQP messaging, however. This chapter covers using an AMQP broker and an AMQP Java client library for messaging in the “Distributing Events with AMQP” section.
ADDING MESSAGING SUPPORT TO YOUR APPLICATION
Adding publish-subscribe messaging to an application is really easy with Spring Framework. One common use-case for this is to notify subscribers when users log in to or out of the application. The Publish-Subscribe project on the wrox.com code download site does just this. It contains the same Spring configuration you have progressively built over the last several chapters along with several events and listeners and a controller to publish events.
Creating Application Events
If your application is going to publish and subscribe to events when users log in or out, it probably makes sense for those events to inherit from a common, authentication-related ancestor. An AuthenticationEvent forms a good basis for this.
public abstract class AuthenticationEvent extends ApplicationEvent
{
public AuthenticationEvent(Object source)
{
super(source);
}
}
The LoginEvent and LogoutEvent, then, extend AuthenticationEvent to form a hierarchy of authentication events.
public class LoginEvent extends AuthenticationEvent
{
public LoginEvent(Object source)
{
super(source);
}
}
public class LogoutEvent extends AuthenticationEvent
{
public LogoutEvent(Object source)
{
super(source);
}
}
The mysterious event source, mandatory when constructing the event, is anything you want or need it to be. The point of the event source is to identify the cause of the event, and that cause only has meaning in the context of the event’s meaning. For example, an event published when an employee is added to a human resources system might have the employee entity or identifier as the source. Likewise, authentication-related events should probably contain the Principal, username, user credentials, or some other user identifier as the source of the event. With this in mind, the LoginEvent and LogoutEvent make more sense with a String username source.
public class LoginEvent extends AuthenticationEvent
{
public LoginEvent(String username)
{
super(username);
}
}
public class LogoutEvent extends AuthenticationEvent
{
public LogoutEvent(String username)
{
super(username);
}
}
Subscribing to Application Events
Of course, the whole purpose of creating application events is so that interested parties can subscribe to and receive the messages. In fact, it’s entirely likely that you will create events only on an as- and when-needed basis. After all, publishing thousands of different messages wastes effort and computer resources if nobody is listening for them. In this case, three different parties (pieces of program logic) are all interested in varying authentication messages. Why they’re interested in these messages is unimportant; the publisher doesn’t care — it just knows that it must publish them. The AuthenticationInterestedParty, for one reason or another, subscribes to all types of authentication messages.
@Service
public class AuthenticationInterestedParty
implements ApplicationListener<AuthenticationEvent>
{
private static final Logger log = LogManager.getLogger();
@Override
public void onApplicationEvent(AuthenticationEvent event)
{
log.info("Authentication event for IP address {}.", event.getSource());
}
}
The onApplicationEvent method of this bean is called for any login or logout messages. The LoginInterestedParty and LogoutInterestedParty beans, however, subscribe only to login and logout messages, respectively.
@Service
public class LoginInterestedParty implements ApplicationListener<LoginEvent>
{
private static final Logger log = LogManager.getLogger();
@Override
public void onApplicationEvent(LoginEvent event)
{
log.info("Login event for IP address {}.", event.getSource());
}
}
@Service
public class LogoutInterestedParty implements ApplicationListener<LogoutEvent>
{
private static final Logger log = LogManager.getLogger();
@Override
public void onApplicationEvent(LogoutEvent event)
{
log.info("Logout event for IP address {}.", event.getSource());
}
}
All these beans perform the same simple action: When they receive events to which they are subscribed, they write messages to the log. Of course, you can do so much more with this action than log it. You could send notifications like e-mails or text messages or create or delete a record in the database, just to name a few.
Keep in mind that message delivery is performed synchronously with the publication method execution, so an action that takes a long time to complete can slow down message delivery to other subscribers and delay return of control to the method that originally published the message. If you have a message-handling action that you know, or reasonably suspect, may take a long time to complete, you should run it asynchronously in a separate thread. Thankfully, this is somewhere that Spring’s asynchronous method execution can come in handy. An @Async onApplicationEvent method, like any other @Async method, hands off to Spring’s task executor. The revised LogoutInterestedParty takes advantage of this feature.
@Service
public class LogoutInterestedParty implements ApplicationListener<LogoutEvent>
{
private static final Logger log = LogManager.getLogger();
@Override
@Async
public void onApplicationEvent(LogoutEvent event)
{
log.info("Logout event for IP address {}.", event.getSource());
try
{
Thread.sleep(5000L);
}
catch(InterruptedException e)
{
log.error(e);
}
}
}
Publishing Application Events
Now that you have created several events and beans that subscribe to those event messages, you need a way to publish events so that you can test this publish-subscribe support. The simplest approach is to just create a standard web controller that enables you to alternate between publishing the LoginEvent and LogoutEvent.
@WebController
public class HomeController
{
@Inject ApplicationEventPublisher publisher;
@RequestMapping("")
public String login(HttpServletRequest request)
{
this.publisher.publishEvent(new LoginEvent(request.getRemoteAddr()));
return "login";
}
@RequestMapping("/logout")
public String logout(HttpServletRequest request)
{
this.publisher.publishEvent(new LogoutEvent(request.getRemoteAddr()));
return "logout";
}
}
The login method publishes a LoginEvent and returns the login view name. Because this simple application lacks an actual authentication system, the controller uses the IP address of the request origin so that the event source can be properly demonstrated. The /WEB-INF/view/login.jsp view is quite simple, providing only a link to the logout action.
<!DOCTYPE html>
<html>
<head>
<title>Login</title>
</head>
<body>
<a href="<c:url value="/logout" />">Logout</a>
</body>
</html>
The logout method is nearly identical to login, publishing a LogoutEvent and returning the logout view name. /WEB-INF/view/logout.jsp links back to the login page. This way, you can pull up either page and quickly alternate between “logging in” and “logging out.”
<!DOCTYPE html>
<html>
<head>
<title>Login</title>
</head>
<body>
<a href="<c:url value="/" />">Login</a>
</body>
</html>
Testing this pub/sub setup is easy.
1. Compile and start the application from your IDE and open your favorite browser.
2. Go to http://localhost:8080/messaging/ and then look at the application.log file in Tomcat’s logs directory. You should see log entries from the AuthenticationInterestedParty and LoginInterestedParty beans at the end of the log file.
3. Click the logout link in the browser, and log entries from AuthenticationInterestedParty and LogoutInterestedParty appear in the log tail. Notice that the log entry written in LogoutInterestedParty came from a different thread than the other entries. This is because of Spring’s asynchronous method execution, which invokes the @Async method in a background thread so that message publication can continue quickly.
You can continue to click the logout and login links, and the code keeps on writing entries to the log file.
NOTE You may wonder about the terms event and message and how they are related. You can think about this many different ways, but put simply there’s not really a difference, and this book uses the terms interchangeably. Spring Framework uses the word “event” largely because the system is based off Java’s java.util.EventObject and EventListener concepts (which are used heavily throughout Java Swing). But the notion of triggering events and the notification of event listeners really isn’t different from pub/sub messaging. It’s all about how you use the tools, not what they’re named. For that matter, application messages are, in all cases, published as a result of some type of event occurring, so the word “event” is a fair name for an object representing a message.
MAKING YOUR MESSAGING DISTRIBUTABLE ACROSS A CLUSTER
You’re probably pleasantly surprised by how easy it was to add local pub/sub messaging to your Spring Framework application. Distributing this messaging across all application nodes in your cluster is a more complicated task. First you must pick a protocol that you want to use for sending messages. Next you must create a custom event multicaster to correctly distribute events using the chosen protocol. In Spring Framework, the multicaster (an implementation oforg.springframework.context.event.ApplicationEventMulticaster) is the bean responsible for taking all published events and delivering them to the appropriate subscribers. Finally, testing is an interesting challenge because you can test distributed messages only by running two or more instances of the application.
In this section, you explore some of the basic event changes necessary to support distribution, and then you implement a WebSocket multicaster. This multicaster uses direct communication instead of a WAMP broker. As a result, the connections between nodes form a complete undirected simple graph — in a cluster with n nodes, each node has a degree of n−1 (meaning it has n−1 WebSocket connections because it connects to every other node in the cluster). This is demonstrated in Figure 18-4, which shows a four-node cluster.
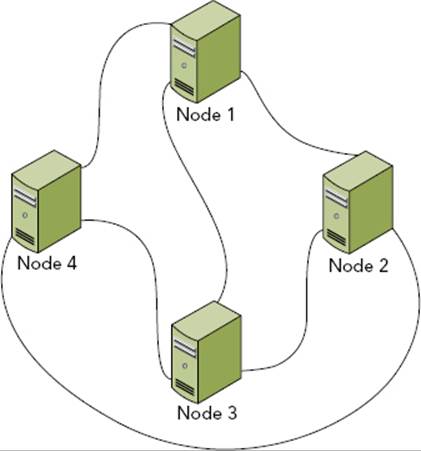
FIGURE 18-4
Of course, this pattern assumes you want to integrate Spring Framework’s pub/sub messaging with your distributed messaging protocol of choice. This chapter does not cover how to use these tools independently. You can follow along using the WebSocket-Messaging project available for download from the wrox.com code download site. It is an extension of the Publish-Subscribe project you saw earlier.
Updating Your Events to Support Distribution
Before you can start publishing events, you need to prepare them for distribution. But you must address a couple of problems with the standard ApplicationEvent.
First, EventObject (which ApplicationEvent extends) defines its source to be transient. This means that the source is excluded when the event is serialized. To eliminate this problem, you must ensure that the source is Serializable and then add some support to the event to properly deserialize the otherwise-transient value. The source can never be null; you will get NullPointerExceptions throughout Spring if an event has a null source.
Also, you need to put measures in place to stop events from repeatedly rebroadcasting. Because the multicaster ultimately re-multicasts events it receives from other nodes, it must know not to then rebroadcast those events back to the other nodes. Otherwise, the events will circle infinitely. A base ClusterEvent class can take care of these problems fairly easily.
public class ClusterEvent extends ApplicationEvent implements Serializable
{
private final Serializable serializableSource;
private boolean rebroadcasted;
public ClusterEvent(Serializable source)
{
super(source);
this.serializableSource = source;
}
final boolean isRebroadcasted()
{
return this.rebroadcasted;
}
final void setRebroadcasted()
{
this.rebroadcasted = true;
}
@Override
public Serializable getSource()
{
return this.serializableSource;
}
private void readObject(ObjectInputStream in)
throws IOException, ClassNotFoundException
{
in.defaultReadObject();
this.source = this.serializableSource;
}
}
The event implements Serializable so that it can be serialized. It defines a copy of source that is not transient and implements the special-purpose readObject deserialization method to copy the non-transient source to the original source after deserialization. It also overrides getSource so that users of the class know that the source is always Serializable. Finally, it adds a rebroadcasted flag to identify events that were already distributed across the cluster. The AuthenticationEvent in the WebSocket-Messaging project is different (from the event in the Publish-Subscribe project) in that it extends ClusterEvent (instead of ApplicationEvent) and takes a Serializable object as its source.
Creating and Configuring a Custom Event Multicaster
The standard event multicaster, org.springframework.context.event.SimpleApplicationEventMulticaster, doesn’t have any built-in support for message clustering. The ClusterEventMulticaster in Listing 18-1 extends SimpleApplicationEventMulticaster to implement special clustering behavior. The multicastEvent method executes the default behavior in the superclass and then, if the event is of type ClusterEvent, publishes the event to the cluster. This behavior is important because it means you can control whether a particular message type is local-only or cluster-wide by extending or not extending ClusterEvent. The publishClusteredEvent method sends the event to every endpoint registered in the multicaster.
You haven’t seen ClusterMessagingEndpoint yet, but you take a look at that next. registerEndpoint and deregisterEndpoint deal with the registration of endpoints — added when a connection is opened and removed when a connection is closed. The registerNode method connects to another node via WebSockets (you’ll see where this gets invoked soon), and handleReceivedClusteredEvent sets the rebroadcasted flag on an event before multicasting it. Finally, shutdown closes all WebSocket endpoints.
LISTING 18-1: ClusterEventMulticaster.java
public class ClusterEventMulticaster extends SimpleApplicationEventMulticaster {
private static final Logger log = LogManager.getLogger();
private final Set<ClusterMessagingEndpoint> endpoints = new HashSet<>();
@Inject ApplicationContext context;
@Override
public final void multicastEvent(ApplicationEvent event) {
try {
super.multicastEvent(event);
} finally {
try {
if(event instanceof ClusterEvent &&
!((ClusterEvent)event).isRebroadcasted())
this.publishClusteredEvent((ClusterEvent)event);
} catch(Exception e) {
log.error("Failed to broadcast distributable event to cluster.",
e);
}
}
}
protected void publishClusteredEvent(ClusterEvent event) {
synchronized(this.endpoints) {
for(ClusterMessagingEndpoint endpoint : this.endpoints)
endpoint.send(event);
}
}
protected void registerEndpoint(ClusterMessagingEndpoint endpoint) {
if(!this.endpoints.contains(endpoint)) {
synchronized(this.endpoints) {
this.endpoints.add(endpoint);
}
}
}
protected void deregisterEndpoint(ClusterMessagingEndpoint endpoint) {
synchronized(this.endpoints) {
this.endpoints.remove(endpoint);
}
}
protected void registerNode(String endpoint) {
log.info("Connecting to cluster node {}.", endpoint);
WebSocketContainer container = ContainerProvider.getWebSocketContainer();
try {
ClusterMessagingEndpoint bean =
this.context.getAutowireCapableBeanFactory()
.createBean(ClusterMessagingEndpoint.class);
container.connectToServer(bean, new URI(endpoint));
log.info("Connected to cluster node {}.", endpoint);
} catch (DeploymentException | IOException | URISyntaxException e) {
log.error("Failed to connect to cluster node {}.", endpoint, e);
}
}
protected final void handleReceivedClusteredEvent(ClusterEvent event) {
event.setRebroadcasted();
this.multicastEvent(event);
}
@PreDestroy
public void shutdown() {
synchronized(this.endpoints) {
for(ClusterMessagingEndpoint endpoint : this.endpoints)
endpoint.close();
}
}
}
Configuring Spring to use your multicaster is simple: The RootContextConfiguration class defines an applicationEventMulticaster bean as follows. It’s important that the bean name match the name used here for Spring to recognize it.
@Bean
public ClusterEventMulticaster applicationEventMulticaster()
{
return new ClusterEventMulticaster();
}
Using WebSockets to Send and Receive Events
ClusterMessagingEndpoint in Listing 18-2 is actually one of the simplest WebSocket endpoints you have seen so far in this book, but it’s also unique in that it’s annotated @ServerEndpoint and @ClientEndpoint. This is perfectly legal: After a connection is established, WebSocket clients and servers are identical in capabilities and responsibilities, so it’s possible to write an endpoint that can serve as both ends of the endpoint.
The way this endpoint is written, each node has exactly one connection to every other node and messages pass in both directions across the connection. On open the endpoint registers itself with the multicaster, and on close it deregisters itself. When it receives an event message, it sends the event to the multicaster, and its send method is called from the multicaster to send events to the cluster. Its Codec uses standard Java serialization to send event messages over the wire.
LISTING 18-2: ClusterMessagingEndpoint.java
@ServerEndpoint(
value = "/services/Messaging/{securityCode}",
encoders = { ClusterMessagingEndpoint.Codec.class },
decoders = { ClusterMessagingEndpoint.Codec.class },
configurator = SpringConfigurator.class
)
@ClientEndpoint(
encoders = { ClusterMessagingEndpoint.Codec.class },
decoders = { ClusterMessagingEndpoint.Codec.class }
)
public class ClusterMessagingEndpoint
{
private static final Logger log = LogManager.getLogger();
private Session session;
@Inject ClusterEventMulticaster multicaster;
@OnOpen
public void open(Session session) {
Map<String, String> parameters = session.getPathParameters();
if(parameters.containsKey("securityCode") &&
!"a83teo83hou9883hha9".equals(parameters.get("securityCode"))) {
try {
log.error("Received connection with illegal code {}.",
parameters.get("securityCode"));
session.close(new CloseReason(
CloseReason.CloseCodes.VIOLATED_POLICY, "Illegal Code"
));
} catch (IOException e) {
log.warn("Failed to close illegal connection.", e);
}
}
log.info("Successful connection onOpen.");
this.session = session;
this.multicaster.registerEndpoint(this);
}
@OnMessage
public void receive(ClusterEvent message) {
this.multicaster.handleReceivedClusteredEvent(message);
}
public void send(ClusterEvent message) {
try {
this.session.getBasicRemote().sendObject(message);
} catch (IOException | EncodeException e) {
log.error("Failed to send message to adjacent node.", e);
}
}
@OnClose
public void close() {
log.info("Cluster node connection closed.");
this.multicaster.deregisterEndpoint(this);
if(this.session.isOpen()) {
try {
this.session.close();
} catch (IOException e) {
log.warn("Error while closing cluster node connection.", e);
}
}
}
public static class Codec implements Encoder.BinaryStream<ClusterEvent>,
Decoder.BinaryStream<ClusterEvent> {
@Override
public ClusterEvent decode(InputStream stream)
throws DecodeException, IOException { ... }
@Override
public void encode(ClusterEvent event, OutputStream stream)
throws IOException { ... }
@Override public void init(EndpointConfig endpointConfig) { }
@Override public void destroy() { }
}
}
Discovering Nodes with Multicast Packets
You now have a multicaster and WebSocket endpoint that work together to coordinate event broadcasting and multicasting. However, neither of these can initiate communications with other nodes without knowing where those other nodes are. This can happen one of two ways: configuration or discovery. Configuration is a simple concept: You place a properties or XML file in each application node that provides instructions that node uses to connect to all other nodes. You should be able to figure out this approach on your own.
Discovery is the more challenging and interesting technique, so it’s covered here. The ClusterManager class in Listing 18-3 first starts listening on a multicast address for packets coming from other nodes. After the root application context starts, it begins periodically checking if the application’s URL is publicly accessible. This is important: If it sends a broadcast packet before the application completely starts, other nodes might fail trying to connect to it. When it can access the application’s URL, it sends a discovery packet to the multicast group announcing itself as joining the cluster. Nodes that are already running receive the packet and connect to the WebSocket URL in it. If other nodes start after this node, this node connects to the WebSocket URL in the packets it receives. This way, each node connects to all other nodes exactly once.
LISTING 18-3: ClusterManager.java
@Service
public class ClusterManager implements ApplicationListener<ContextRefreshedEvent>
{
private static final Logger log = LogManager.getLogger();
private static final String HOST= InetAddress.getLocalHost().getHostAddress();
private static final int PORT = 6789;
private static final InetAddress GROUP = InetAddress.getByName("224.0.0.3");
private final Object mutex = new Object();
private boolean initialized, destroyed = false;
private String pingUrl, messagingUrl;
private MulticastSocket socket;
private Thread listener;
@Inject ServletContext servletContext;
@Inject ClusterEventMulticaster multicaster;
@PostConstruct
public void listenForMulticastAnnouncements() throws Exception {
this.pingUrl = "http://" + HOST + ":8080" +
this.servletContext.getContextPath() + "/ping";
this.messagingUrl = "ws://" + HOST + ":8080" +
this.servletContext.getContextPath() +
"/services/Messaging/a83teo83hou9883hha9";
synchronized(this.mutex) {
this.socket = new MulticastSocket(PORT);
this.socket.joinGroup(GROUP);
this.listener = new Thread(this::listen, "cluster-listener");
this.listener.start();
}
}
private void listen() {
byte[] buffer = new byte[2048];
DatagramPacket packet = new DatagramPacket(buffer, buffer.length);
while(true) {
try {
this.socket.receive(packet);
String url = new String(buffer, 0, packet.getLength());
if(url.length() == 0)
log.warn("Received blank multicast packet.");
else if(url.equals(this.messagingUrl))
log.info("Ignoring our own multicast packet.");
else
this.multicaster.registerNode(url);
} catch (IOException e) {
if(!this.destroyed)
log.error(e);
return;
}
}
}
@PreDestroy
public void shutDownMulticastConnection() throws IOException {
this.destroyed = true;
try {
this.listener.interrupt();
this.socket.leaveGroup(GROUP);
} finally {
this.socket.close();
}
}
@Async
@Override
public void onApplicationEvent(ContextRefreshedEvent event) {
if(this.initialized)
return;
this.initialized = true;
try {
URL url = new URL(this.pingUrl);
log.info("Attempting to connect to self at {}.", url);
int tries = 0;
while(true) {
tries++;
URLConnection connection = url.openConnection();
connection.setConnectTimeout(100);
try(InputStream stream = connection.getInputStream()) {
String response = StreamUtils.copyToString(stream,
StandardCharsets.UTF_8);
if(response != null && response.equals("ok")) {
log.info("Broadcasting multicast announcement packet.");
DatagramPacket packet =
new DatagramPacket(this.messagingUrl.getBytes(),
this.messagingUrl.length(), GROUP, PORT);
synchronized(this.mutex) {
this.socket.send(packet);
}
return;
} else
log.warn("Incorrect response: {}", response);
} catch(Exception e) {
if(tries > 120) {
log.fatal("Could not connect to self within 60 seconds.",
e);
return;
}
Thread.sleep(400L);
}
}
} catch(Exception e) {
log.fatal("Could not connect to self.", e);
}
}
}
Simulating a Cluster with Multiple Deployments
In a cluster, you normally have a single application deployed on two or more different Servlet container installations at the exact same context path (for example, http://node1.example.org:8080/messaging and http://node2.example.org:8080/messaging). In fact, if you want to share HttpSession data across session nodes you must do this; you cannot share session data between applications deployed at different contexts (for security reasons).
There are no shortcuts for testing session clustering. There is, however, a shortcut for testing clustered messaging: You can deploy the same application to the same server at multiple context paths. This is easy to do, but you must change a few logging statements so that it’s obvious looking at the log file what’s going on.
First, the LoginEvent and LogoutEvent publish in the HomeController using the context path as the event source instead of the IP address. This enables you to know which node an event originated from.
...
this.publisher.publishEvent(new LoginEvent(request.getContextPath()));
...
this.publisher.publishEvent(new LogoutEvent(request.getContextPath()));
...
Also, the AuthenticationInterestedParty, LoginInterestedParty, and LogoutInterestedParty use @Injected ServletContexts to log the context path for the application that receives the event as well as the context path for the application that sends the event (via the event source).
...
@Inject ServletContext servletContext;
@Override
public void onApplicationEvent(AuthenticationEvent event)
{
log.info("Authentication event from context {} received in context {}.",
event.getSource(), this.servletContext.getContextPath());
}
...
You are now ready to test the distributed messaging. To start:
1. Make sure that the application is configured in your IDE to deploy to /messaging1 on your Tomcat server.
2. Build the WAR file artifact, and copy the artifact from the project output directory to Tomcat’s webapps directory, renaming the copied WAR file to messaging2.war in the process.
3. Start Tomcat from your IDE, and pay close attention to the log output. /messaging2 probably starts first (depending on which IDE you use), and when it sends its multicast packet it is the only node in the cluster. No other nodes connect to it. /messaging1 starts next and logs to the same file. When it sends its multicast packet, /messaging2 receives the packet and connects to /messaging1 using the WebSocket URL in the packet.
4. Open your browser and go to http://localhost:8080/messaging1; then look at the log file. You see a log entry with the message “Authentication event from context /messaging1 received in context /messaging1” followed shortly by another log entry “Authentication event from context /messaging1 received in context /messaging2.” You also see the log entries “Login event for context /messaging1 received in context /messaging1” and “Login event for context /messaging1 received in context /messaging2.” Click the logout link in the browser, and you see four similar log entries appear again notifying you about the logout.
5. Go to http://localhost:8080/messaging2 and look at the log file again. This time the log entries are reversed: “Authentication event from context /messaging2 received in context /messaging2,” “Authentication event from context /messaging2 received in context /messaging1,” and so on. This means you are successfully using Spring Framework’s pub/sub events and WebSockets to distribute messages throughout an application cluster.
6. If you feel really brave, shut down Tomcat and make another copy of the WAR file, naming it messaging3.war. Start Tomcat again and repeat the testing process, trying out the third URL as well.
7. When you finish testing, make sure you delete the messagingn.war files and corresponding /messagingn directories from Tomcat’s webapps directory.
DISTRIBUTING EVENTS WITH AMQP
Because you have lots of ways to implement distributed messaging in your applications, this book can cover only a limited number of them. In the previous section you explored using direct WebSocket connections, which formed a complete basic graph. The problem with this configuration is that it is not very scalable. It works well in small clusters, but the number of connections increases nonlinearly as the cluster size increases. If you took graph theory classes in school, you’ll remember that the number of edges in a connected graph Kn with n vertices is ![]() . Although a four-node cluster may have only six total connections, an 8-node cluster has 28 total connections and a 16-node cluster has 120 connections. If you’re running a cluster with hundreds of nodes, you’re looking at tens of thousands of connections (hundreds per node). You should understand the scalability issue at this point.
. Although a four-node cluster may have only six total connections, an 8-node cluster has 28 total connections and a 16-node cluster has 120 connections. If you’re running a cluster with hundreds of nodes, you’re looking at tens of thousands of connections (hundreds per node). You should understand the scalability issue at this point.
Other messaging protocols such as WAMP, JMS, and AMQP are much more scalable because all messages in the cluster flow through a central broker. As a result, the configuration forms a connected simple graph that is 1-regular (each node has one connection) with the exception of the broker (which has n−1 connections), and the total number of connections equals the number of nodes minus the broker. This is demonstrated in Figure 18-5, which shows a six-node cluster with a broker. For high-availability and scalability, you can arrange multiple brokers in a cluster to form a single logical broker. This increases the total number of connections only slightly, if at all.
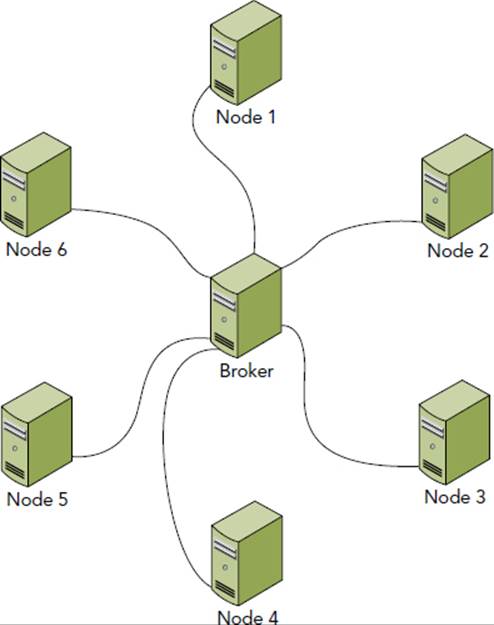
FIGURE 18-5
JMS is a natural selection for such a task in a Java EE environment. However, JMS is quite difficult to configure in a standalone application or in a Servlet-only container like Tomcat because it requires adding libraries to the Tomcat installation and changing the Tomcat configuration extensively to support them. Therefore, this section covers one way to use Advanced Message Queuing Protocol (AMQP) for distributed messaging in your application.
In this configuration, the broker does not manage multiple pub/sub topics. Instead, it simply delivers all messages to all nodes, and Spring Framework (acting as a local broker) delivers the correct messages to subscribers. You can alternatively use AMQP directly and independently of ApplicationListeners to manage pub/sub for multiple topics on the broker. Although this section does not cover the second option, it should be clear from the simple code samples how you can accomplish this.
Configuring an AMQP Broker
Several different AMQP provider implementations are available to give you options when choosing an AMQP broker to use in your environment. By far the most popular and powerful implementation is RabbitMQ, a free and open source AMQP server that also provides paid, enterprise support when necessary. This section does not serve as a configuration and administration guide for RabbitMQ, but it does walk you through downloading, installing, and using it in its default configuration in less than 10 minutes.
RabbitMQ is written with and runs on Erlang, a concurrent programming language with garbage collection and a virtual runtime environment, similar to Java. (Though the syntax is vastly different.) Before you can install RabbitMQ you must download and install Erlang. On most Linux distributions you can use the package management system, but on Red Hat/Fedora/CentOS systems you need to download it from the website. If you install on Windows, you also need to download and install handle.exe from Windows Sysinternals. (Place handle.exe somewhere in Program Files, such as C:\Program Files\Sysinternals, and then put that directory on the PATH system variable.)
After you install these prerequisites, follow these steps:
1. Download the server from the RabbitMQ website.
2. Click the Installation Guides link that corresponds with your operating system.
3. Install the server as directed. (For Windows, just run the executable and be sure to tell it to install the Windows service.)
4. If you installed RabbitMQ in a Unix environment, execute the following command:
rabbitmq-plugins enable rabbitmq_management
If you installed RabbitMQ in Windows instead, open a command prompt, change your current directory to the RabbitMQ sbin directory (for example, C:\Program Files (x86)\RabbitMQ Server\rabbitmq_server-3.1.3\sbin), and then execute the following command:
.\rabbitmq-plugins.bat enable rabbitmq_management
This command enables the web management console, which is disabled by default.
5. If you installed RabbitMQ in Windows, open up Service Manager and restart the RabbitMQ service. On other operating systems, start or restart the service or binary as applicable.
6. At this point you should now be able to access RabbitMQ in your favorite browser at http://localhost:15672/. Log in with the username guest and the password guest, which are the defaults upon installation. If you cannot access the management console, check your installation steps again and consult the documentation to see where you went wrong.
That’s all you need to do to get a basic RabbitMQ server up and running. In a production environment, of course, you would lock down security and fine-tune the configuration for performance.
Creating an AMQP Multicaster
Creating an ApplicationEventMulticaster that uses AMQP to distribute events is simple. You can follow along in the AMQP-Messaging project available for download on the wrox.com code download site. This project is very similar to the WebSocket-Messaging project you looked at earlier, and it contains the exact same ClusterEvent. There is no ClusterManager or ClusterMessagingEndpoint. All the logic is contained within the ClusterEventMulticaster in Listing 18-4, which has a multicastEvent method identical to the one in WebSocket-Messaging.
LISTING 18-4: ClusterEventMulticaster.java
public class ClusterEventMulticaster extends SimpleApplicationEventMulticaster {
private static final Logger log = LogManager.getLogger();
private static final String EXCHANGE_NAME = "AMQPMessagingTest";
private static final String HEADER = "X-Wrox-Cluster-Node";
private final AMQP.BasicProperties.Builder builder =
new AMQP.BasicProperties.Builder();
private Connection amqpConnection;
private Channel amqpChannel;
private String queueName;
private Thread listener;
private boolean destroyed = false;
@Override
public final void multicastEvent(ApplicationEvent event) { ... }
protected void publishClusteredEvent(ClusterEvent event) throws IOException {
this.amqpChannel.basicPublish(EXCHANGE_NAME, "", this.builder.build(),
SerializationUtils.serialize(event));
}
@PostConstruct
public void setupRabbitConnection() throws IOException {
ConnectionFactory factory = new ConnectionFactory();
factory.setHost("localhost");
this.amqpConnection = factory.newConnection();
this.amqpChannel = this.amqpConnection.createChannel();
this.amqpChannel.exchangeDeclare(EXCHANGE_NAME, "fanout");
this.queueName = this.amqpChannel.queueDeclare().getQueue();
this.amqpChannel.queueBind(this.queueName, EXCHANGE_NAME, "");
Map<String, Object> headers = new Hashtable<>();
headers.put(HEADER, this.queueName);
this.builder.headers(headers);
this.listener = new Thread(this::listen, "RabbitMQ-1");
this.listener.start();
}
@PreDestroy
public void shutdownRabbitConnection() throws IOException {
this.destroyed = true;
this.listener.interrupt();
this.amqpChannel.close();
this.amqpConnection.close();
}
private void listen() {
try {
QueueingConsumer consumer = new QueueingConsumer(this.amqpChannel);
this.amqpChannel.basicConsume(this.queueName, true, consumer);
while(!this.destroyed) {
QueueingConsumer.Delivery delivery = consumer.nextDelivery();
Object header = delivery.getProperties().getHeaders().get(HEADER);
if(header == null || !header.toString().equals(this.queueName)) {
ClusterEvent event = (ClusterEvent)SerializationUtils
.deserialize(delivery.getBody());
event.setRebroadcasted();
this.multicastEvent(event);
}
}
} catch(Exception e) {
if(!this.destroyed)
log.error("Error while listening for message deliveries.", e);
}
}
}
Most of the interesting work happens in the setupRabbitConnection and listen methods. publishClusteredEvent is one line of code, and the shutdownRabbitConnection method simply closes resources. setupRabbitConnection first establishes a connection to thelocalhost RabbitMQ server and then opens a channel. It then sets up an exchange called AMQPMessagingTest and sets the exchange to fanout mode.
NOTE An exchange is a mechanism for defining how messages are delivered to queues. Fanout mode means that all published messages get delivered to all queues. You can learn more about these topics, and channels, in the RabbitMQ documentation. Exploring them further is outside the scope of this book.
Next, this method asks RabbitMQ to create a random queue (which is unique to this node) and bind the queue to the channel and exchange. The properties builder to which it creates and assigns the custom X-Wrox-Cluster-Node header is used when sending each message. That way, when the message is received, the node can ignore messages that it sent. Finally, it starts a listener thread to listen for incoming messages.
The listen method is responsible for receiving and multicasting messages delivered from RabbitMQ. It creates a consumer and binds the consumer to the channel and queue. The consumer then blocks on each call to nextDelivery until the next message arrives. The listener checks all received messages to ensure they came from different nodes (not from itself) and then deserializes and multicasts the event to the local application. Notice that the sample code uses Java serialization to deliver messages, which ironically means only Java applications can use messages in this environment. For your purposes here, this is okay. If you want to communicate with applications on other platforms, you could simply use a more portable format, such as JSON.
Running the AMQP-Enabled Application
You can test the AMQP-Messaging application in the exact same manner that you tested WebSocket-Messaging:
1. Ensure that RabbitMQ is running.
2. Make sure that the application is configured in your IDE to deploy to /messaging1 on your Tomcat server.
3. Build the WAR file artifact, rename it to messaging2.war, and copy it into Tomcat’s webapps directory.
4. Start Tomcat for your IDE and the /messaging1 and /messaging2 applications should start up.
5. Navigate to http://localhost:8080/messaging1 and http://localhost:8080/messaging2 and alternate clicking the logout and login links. You should see identical log entries as when you tested the WebSocket-Messaging application. Again, you can also create and deploy a third WAR file named messaging3.war to try out a simulated cluster of three nodes.
6. With Tomcat running, go to the RabbitMQ web management console and click the Queues menu item at the top. You should see a screen like Figure 18-6, showing the random queues that RabbitMQ created for your application instances.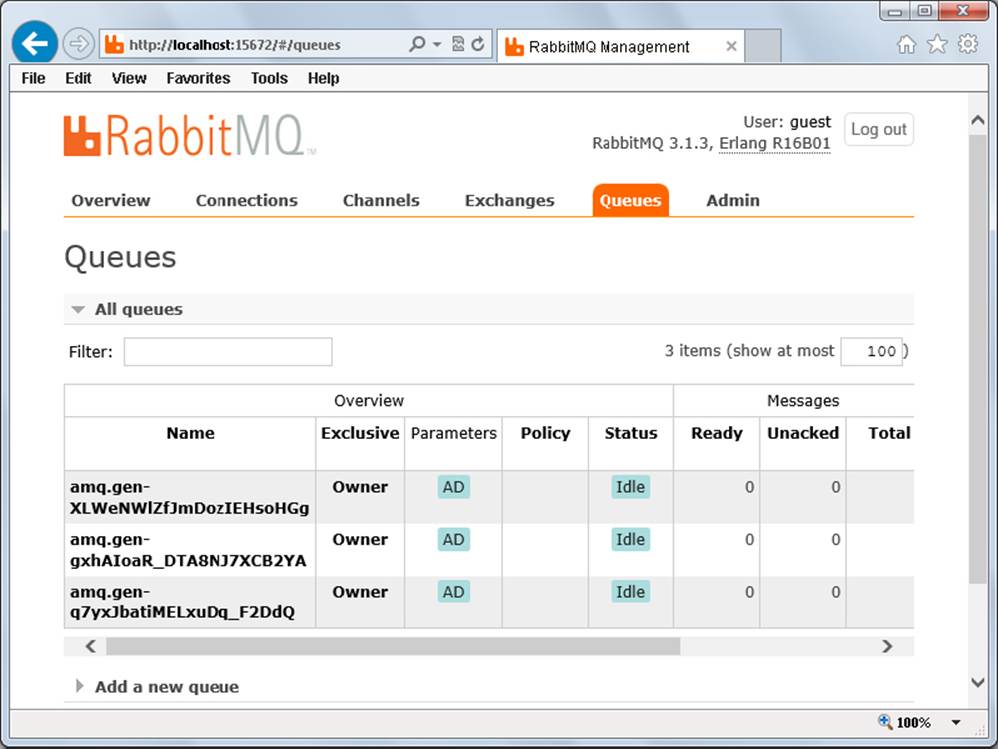
FIGURE 18-6
7. When you finish testing, make sure you delete the messagingn.war files and corresponding /messagingn directories from Tomcat’s webapps directory.
SUMMARY
You have covered a lot in this chapter. You were introduced to the concepts and challenges of clustering Java EE web applications, and you learned about technologies and approaches that empower this important feature of any enterprise application. You explored the publish-subscribe messaging pattern and learned about how you can use Spring Framework’s ApplicationEvent and ApplicationListener to implement publish-subscribe locally. You also learned about WebSockets, WAMP, JMS, and AMQP and how these technologies can all help you send application messages across a cluster. You experimented integrating Spring’s application messaging and WebSockets to directly send messages between applications. You then explored some reasons that this configuration isn’t very scalable. Finally, you learned how to install a RabbitMQ server and used it to broker AMQP messages using Spring’s application messaging.
This concludes Part II of the book, which introduced you to Spring Framework and its most powerful features. In Part III, you learn about persisting application data to a database using the Java Persistence API and Hibernate ORM within a Spring application.
All materials on the site are licensed Creative Commons Attribution-Sharealike 3.0 Unported CC BY-SA 3.0 & GNU Free Documentation License (GFDL)
If you are the copyright holder of any material contained on our site and intend to remove it, please contact our site administrator for approval.
© 2016-2026 All site design rights belong to S.Y.A.