PROFESSIONAL JAVA FOR WEB APPLICATIONS (2014)
Part I Creating Enterprise Applications
Chapter 2 Using Web Containers
IN THIS CHAPTER
· Choosing a web container
· Installing Tomcat on your machine
· Deploying and undeploying applications in Tomcat
· Debugging Tomcat from IntelliJ IDEA
· Debugging Tomcat from Eclipse
WROX.COM CODE DOWNLOADS FOR THIS CHAPTER
You can find the wrox.com code downloads for this chapter http://www.wrox.com/go/projavaforwebapps on the Download Code tab. The code for this chapter is divided into the following major examples:
· sample-deployment WAR Application File
· Sample-Debug-IntelliJ Project
· Sample-Debug-Eclipse Project
NEW MAVEN DEPENDENCIES FOR THIS CHAPTER
There are no Maven dependencies for this chapter.
CHOOSING A WEB CONTAINER
In the previous chapter you were introduced to the Java Platform, Enterprise Edition, and the concepts of Servlets, filters, and other Java EE components. You also learned about some of the new features in Java 7 and 8. Java EE web applications run within Java EEapplication servers and web containers (also known as Servlet containers, and this book uses the terms interchangeably).
Although the Java EE specification is full of many smaller sub-specifications, most web containers implement only the Servlet, JSP, and JSTL specifications. This is different from full-blown Java EE application servers, which implement the entire Java EE specification. Every application server contains a web container, which is responsible for managing the life cycle of Servlets, mapping request URLs to Servlet code, accepting and responding to HTTP requests, and managing the filter chain, where applicable. However, standalone web containers are often lighter-weight and easier to use when you don’t require the entire feature set of Java EE.
Choosing a web container (or an application server, for that matter) is a task that requires careful research and consideration for the requirements of your project. You have many options for choosing a web container, and each has its advantages and challenges. You may use a variety of web containers. For example, you may decide to use Apache Tomcat for local testing on your developers’ machines while using GlassFish for your production environment. Or you may write an application that your customers deploy on their own servers, in which case you probably want to test on many different application servers and web containers.
In this section you learn about some common web containers and application servers, and in the remaining sections you take a closer look at the one you use for the rest of this book.
Apache Tomcat
Apache Tomcat is the most common and popular web container available today. Sun Microsystems software engineers originally created this web container as the Sun Java Web Server, and it was the original reference implementation of the Java EE Servlet specification. Sun later donated it to the Apache Software Foundation in 1999, and at that point it became Jakarta Tomcat and eventually Apache Tomcat. It is also interesting to note that Apache’s evolution of Tomcat led to the development of the Apache Ant build tool, which thousands of commercial and open source projects use today.
Tomcat’s primary advantages are its small footprint, simple configuration, and long history of community involvement. Typically, developers can be up-and-running with a functional Tomcat installation in 5 to 10 minutes, including download time. Tomcat requires very little configuration out-of-the-box to run well on a development machine, but it can also be tuned significantly to perform well in high-load, high-availability production environments. You can create large Tomcat clusters to handle huge volumes of traffic reliably. Tomcat is often used in commercial production environments due to its simplicity and lightweight profile. However, Tomcat lacks the sophisticated web management interface than many of its competitors offer for configuring the server. Instead, Tomcat provides only a simple interface for basic tasks, such as deploying and undeploying applications. For further configuration, administrators must manipulate a collection of XML and Java properties files. In addition, because it is not a full application server, it lacks many Java EE components, such as the Java Persistence API, the Bean Validation API, and the Java Message Service.
As you can imagine, this makes Tomcat great for many tasks but does make deploying more complex enterprise applications challenging and, sometimes, impossible. If you like Tomcat but need a full Java EE application server, you can turn to Apache TomEE, which is built on Tomcat but offers a full implementation of all the Java EE components. Being built on Tomcat, it has the full force of the Tomcat community and more than a decade of testing behind it. Apache also offers Geronimo, another open source full Java EE application server.
NOTE TomEE and Geronimo are both Oracle-certified Java EE application servers, meaning they have been verified to be in compliance with all aspects of the Java EE specification. Because Tomcat is only a web container, it has no such certification. However, its huge user base and active community ensure that it accurately implements the Java EE components it provides.
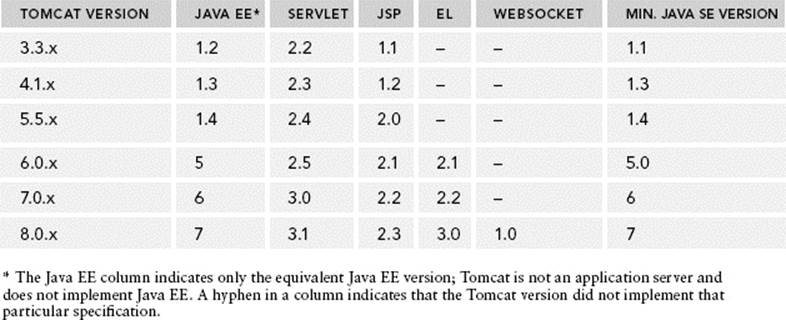
Tomcat provides implementations of the Servlet, Java Server Pages (JSP), Java Unified Expression Language (EL), and WebSocket specifications. Table 2-1 lists several Tomcat versions and the specifications they implement. Only Tomcat 6, 7, and 8 are still supported. Versions 3.3, 4.1, and 5.5 reached end of life years ago. You can read more about Apache Tomcat on the Tomcat website.
TABLE 2-1: Tomcat Versions and Their Specifications
GlassFish
GlassFish Server is an open source and commercial full Java EE application server implementation. It provides all the features in the Java EE specification, including a web container, and is currently the reference implementation for the Java EE specification. Its web container is actually a derivative of Apache Tomcat; however, it has evolved considerably since the Tomcat core was forked to create GlassFish, and the code is hardly recognizable today. The open source edition of GlassFish offers community support, whereas the commercial Oracle GlassFish Server provides paid, commercial support through Oracle Corporation. Oracle is only offering commercial support through Java EE 7. Starting with Java EE 8, GlassFish will not include a commercial support option.
One of GlassFish’s strengths is its management interface, which provides a graphical web user interface, a command-line interface, and configuration files to configure anything within the server. Server administrators can even use the management interface to deploy new GlassFish instances within a GlassFish cluster. As the reference implementation, it is also always the first server to roll out a new version whenever the specification is updated. The first version of GlassFish was released in May 2006, and implemented the Java EE 5 specification. In September 2007, version 2.0 added support for full clustering capabilities. Version 3.0 — the reference implementation for Java EE 6, released in December 2009 — included several enterprise improvements. This version represented a turning point in GlassFish’s popularity, and it became extremely simple to manage an enterprise clustered GlassFish environment. In July 2011, version 3.1.1 improved several enterprise features and added support for Java SE 7, though Java SE 6 was still the minimum required version. GlassFish 4.0 released in June 2013 as the reference implementation of Java EE 7 and requires a minimum Java SE 7.
You can read more about GlassFish, and download it if you want, at the GlassFish website.
JBoss and WildFly
Red Hat’s JavaBeans Open Source Software Application Server (JBoss AS) was the second-most popular Java EE server, next to Tomcat, as of early 2013. Historically, JBoss AS has been a web container with Enterprise JavaBeans support and some other Java EE features. Eventually it became Web Profile-certified and, in 2012, became certified as a full Java EE application server. Over time, the name JBoss also became synonymous with a development community (like Apache) that provided several products, as well as the commercial JBoss Enterprise Application Platform. The application server retained the name JBoss AS through version 7.1.x, but in 2012, the community decided that the name was the source of too much confusion due to other JBoss projects. The application server was renamed to WildFly as of version 8.0, released in early 2014.
Similar to GlassFish, WildFly is open source with free support provided by the JBoss Community and paid, commercial support provided by Red Hat. It has a comprehensive set of management tools and provides clustering and high-availability capabilities like Tomcat and GlassFish. JBoss AS versions 4.0.x through 4.2.x were built atop Tomcat 5.5 and supported Java EE 1.4 features. Version 5.0 introduced Java EE 5 support and a brand new web container, and 5.1 contained early implementations of some Java EE 6 features (although it was still a Java EE 5 application server). JBoss AS 6.0 implemented the Java EE 6 Web Profile, but it did not seek or obtain a Java EE 6 application server certification. JBoss AS 7.0 represented a complete rewrite of the product to dramatically decrease its footprint and increase its performance, and also supported only the Java EE 6 web profile. It was not until JBoss AS 7.1 that it again became a full application server, achieving Java EE 6 certification more than 2 years after Java EE 6 was released. WildFly 8.0 is a full Java EE 7 application server and requires a minimum of Java SE 7. (Actually, all Java EE 7 application servers and web containers require a minimum of Java SE 7.)
You can learn more about and download JBoss AS 7.1 and earlier at the JBoss website, whereas you can find WildFly 8.0 at the WildFly website.
Other Containers and Application Servers
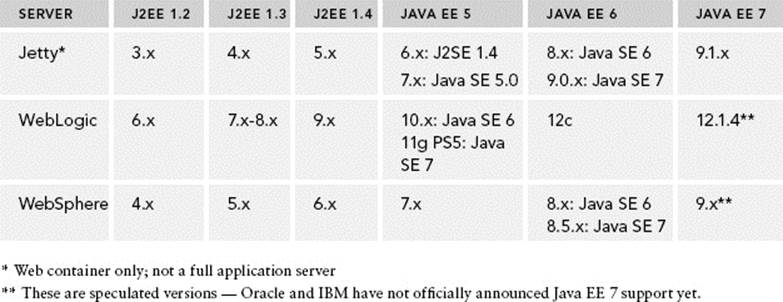
There are many other web containers, such as Jetty and Tiny, and open source full Java EE application servers, such as JOnAS, Resin, Caucho, and Enhydra. There are also a number of commercial full application servers, of which Oracle WebLogic and IBM WebSphere are the most popular. Table 2-2 shows some of these servers and the versions that supported various Java EE specifications.
TABLE 2-2: Container and Application Server Versions
Each web container or application server has its own advantages and disadvantages. The task of picking an application server cannot be covered in a single chapter and is beyond the scope of this book. The needs of your organization’s project must be understood, and the right web container or application server that meets those needs should be chosen. Operational budgets must be considered because commercial application servers tend to have an extremely high cost of licensing. All these factors will impact your decision, and you may pick a server that isn’t even listed in this book.
Why You’ll Use Tomcat in This Book
Many of the advantages of Apache Tomcat (which is referred to simply as Tomcat for the rest of this book) have already been outlined. Perhaps most important for this book is the ease with which developers can start using Tomcat. By far, Tomcat is easier to get running quickly than any other web container, and it provides all the features that you need to complete the examples in this book. In addition, all the major Java IDEs provide tools to run, deploy on, and debug Tomcat, making it easier for you to develop your application.
Although some developers prefer using other web containers — and with the right knowledge nearly any web container can serve you well on a development machine — it’s hard to make a case against using Tomcat. By using Tomcat for this book, you can focus on the code and development practices, paying little-to-no attention to the management of your container. The rest of this chapter helps you get Tomcat installed and set up on your machine. It also introduces you to deploying and undeploying applications with the Tomcat manager and debugging Tomcat in your Java IDE.
INSTALLING TOMCAT ON YOUR MACHINE
Before you can install Tomcat on your machine, you need to download it from the Tomcat project site. Go to the Tomcat 8.0 Downloads Page, and scroll down to the “Binary Distributions” section. There are many downloads on this page, and the only ones you need for this book are under the “Core” heading. As a Windows user, the two downloads you are concerned with are the “32-bit/64-bit Windows Service Installer” (works for any system architecture) and the “32-bit Windows zip” or “64-bit Windows zip” (depending on your machine architecture). If you run on Linux, Mac OS X, or some other operating system, you need the non-Windows zip, which is just called “zip.”
Installing as a Windows Service
Many developers want to install Tomcat as a Windows service. This has several advantages, especially in a quality assurance or production environment. It makes management of JVM memory and other resources easier, and it greatly simplifies starting Tomcat automatically when Windows boots. However, in a development environment, installing Tomcat as a service can have some drawbacks. This technique installs only the service and does not install the command-line scripts that run Tomcat from the command line. Most IDEs use these command-line scripts to run and debug Tomcat from within the IDE. You may install Tomcat as a service by downloading the “32-bit/64-bit Windows Service Installer,” but you also need to download the “Windows zip” to run Tomcat from your IDE.
This book does not cover installing Tomcat as a windows service because you would usually do this only for production or QA environments. The documentation on the Tomcat website is very helpful if you want to explore this further. Of course, if you are not using Windows, the Windows installer will be of no use to you. There are ways to start Tomcat automatically in other operating systems, but they are also outside the scope of this book.
Installing as a Command-Line Application
Most application developers need to run Tomcat only as a command-line application and usually only from their IDE. To do this, follow these steps:
1. Download the architecture-appropriate Windows zip (if you use Windows) or the non-Windows zip (if you use anything else) from the Tomcat 8.0 download page and unzip the directory.
2. Place the contents of the Tomcat directory in this zip file into the folder C:\Program Files\Apache Software Foundation\Tomcat 8.0 on your local machine (or into the appropriate directory for a server in your operating system). For example, the webapps directory should now be located at C:\Program Files\Apache Software Foundation\Tomcat 8.0\webapps.
3. If you use Windows 7 or newer, you need to change some permissions to make Tomcat accessible from your IDE. Right-click the Apache Software Foundation directory in C:\Program Files and click Properties. On the Security tab, click the Edit button. Add your user or the Users group, and give that entry full control over the directory.
4. To configure Tomcat for its first use, start by opening the file conf/tomcat-users.xml in your favorite text editor. Place the following tag between the <tomcat-users></tomcat-users> XML tags:
<user username="admin" password="admin" roles="manager-gui,admin-gui" />
WARNING This configures an admin user that you can use to log in to Tomcat’s web management interface. Of course, this username and password combination is very insecure and should never be used for production or publicly facing servers. However, for testing on your local machine it is sufficient.
5. Open the conf/web.xml file. Search the file for the text org.apache.jasper.servlet.JspServlet. Below the tag that contains this text are two <init-param> tags. You learn about Servlet init parameters in the next chapter, but for now add the following init parameters below the existing init parameters:
6. <init-param>
7. <param-name>compilerSourceVM</param-name>
8. <param-value>1.8</param-value>
9. </init-param>
10. <init-param>
11. <param-name>compilerTargetVM</param-name>
12. <param-value>1.8</param-value>
</init-param>
By default, Tomcat 8.0 compiles JavaServer Pages files with Java SE 6 language support even if it runs on Java SE 8. These new Servlet init parameters instruct Tomcat to compile JSP files with Java SE 8 language features, instead.
13.After you make these changes and save these files, you should now be ready to start up Tomcat and make sure that it runs properly. Open up a command prompt and change your directory to the Tomcat home directory (C:\Program Files\Apache Software Foundation\Tomcat 8.0).
14.Type the command echo %JAVA_HOME% (or echo $JAVA_HOME on a non-Windows operating system) and press Enter to check whether the JAVA_HOME environmental variable is properly set to your Java Development Kit (JDK) home directory. If it is not, configure the environmental variable, and then log out and back in before proceeding (see the Note that follows). Tomcat cannot run without this variable properly set.
15.Type the command bin\startup.bat (or bin/startup.sh if you do not use Windows) and press Enter. A Java console window should open showing the output of the running Tomcat process. After a few seconds, you should see the message “INFO [main] org.apache.catalina.startup.Catalina.start Server startup in 1827 ms” or something similar in the console window. This means Tomcat has started properly.
NOTE When starting, Tomcat initially looks for the JRE_HOME environmental variable and uses that if it is set. If it isn’t, it next looks for the JAVA_HOME variable. If neither is set, Tomcat fails to start. However, to debug Tomcat you must haveJAVA_HOME set, so it’s best to simply go ahead and configure that.
16.Open your favorite Web browser and navigate to http://localhost:8080/. You should see a page that looks like Figure 2-1. This means that Tomcat is running and JSPs are compiling properly with Java SE 8. If this screen does not come up or you observe an errorin the Java console, you need to check the preceding steps and possibly consult the Tomcat documentation.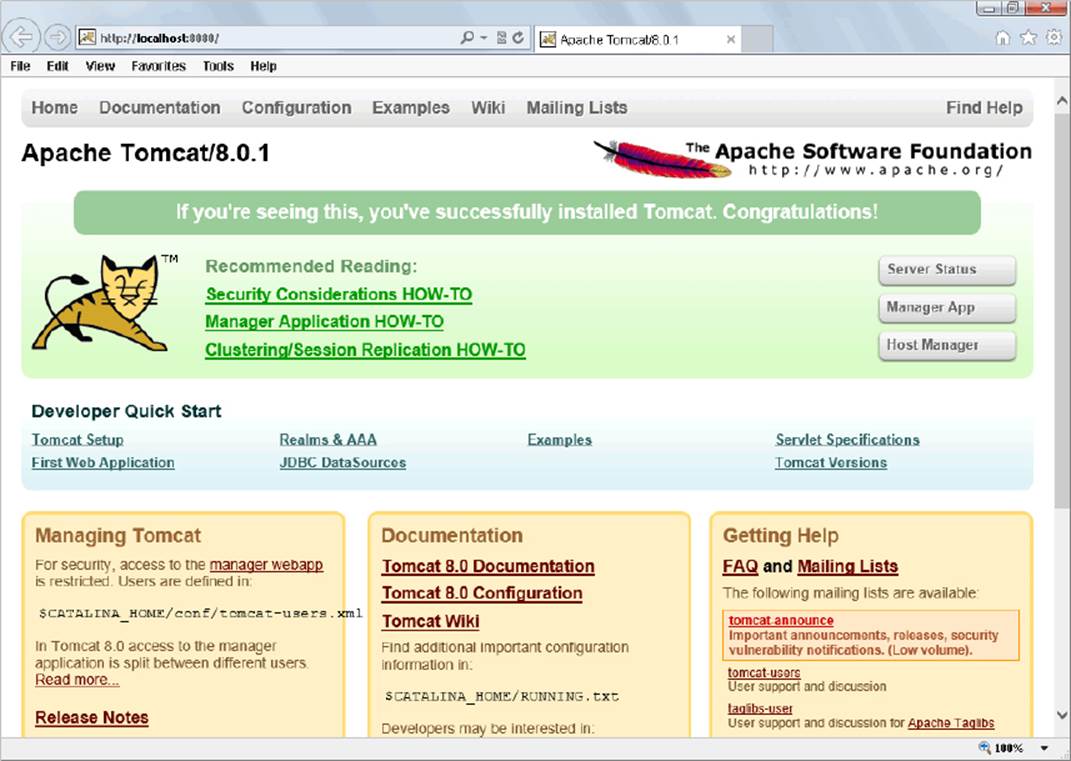
FIGURE 2-1
When you finish using Tomcat, you can stop it by running the command bin\shutdown.bat (or bin/shutdown.sh) in the command prompt in the Tomcat 8.0 home directory. The Java console window should close, and Tomcat will stop. However, do not do this yet; in the next section, you explore deploying and undeploying applications in Tomcat. (If you have already shut down Tomcat, don’t worry about it. It’s easy to start it back up again.)
WARNING The earliest releases of Tomcat 8.0 do not support compiling JSPs for Java 8. You’ll know that this is the case for your release if you see “WARNING: Unknown source VM 1.8 ignored” or similar in the Java console. If so, you need to complete the following steps for “Configuring a Custom JSP Compiler.”
Configuring a Custom JSP Compiler
Tomcat ships with and uses the Eclipse JDT compiler for compiling JavaServer Pages files in web applications. (You learn more about JSP files and how they compile in Chapter 4.) This enables Tomcat to run properly without requiring a JDK installation. Using the Eclipse compiler, all you need is a simple Java Runtime Edition (JRE) installation. Because JSPs are usually very simple, the Eclipse compiler is typically quite adequate for any Tomcat environment. However, there are circumstances for which you don’t want to use the Eclipse compiler. Perhaps you find a bug in the Eclipse compiler that prevents one of your JSPs from compiling. Or if a new version of Java comes out with language features you want to use in your JSPs, it could be some time before Eclipse has a compatible compiler. Whatever reason you may have, you can easily configure Tomcat to use the JDK compiler instead of Eclipse.
1. Open Tomcat’s conf/web.xml file back up and find the JspServlet again.
2. Add the following init parameter, which tells the Servlet to use Apache Ant with the JDK compiler to compile JSPs instead of the Eclipse compiler.
3. <init-param>
4. <param-name>compiler</param-name>
5. <param-value>modern</param-value>
</init-param>
6. Tomcat doesn’t have a way to use the JDK compiler directly, so you must have the latest version of Ant installed on your system. You also need to add the JDK’s tools.jar file and Ant’s ant.jar and ant-launcher.jar files to your classpath. The easiest way to do this is to create a bin\setenv.bat file and add the following line of code to it (ignore new lines here), replacing the file paths as necessary for your system.
7. set "CLASSPATH=C:\path\to\jdk8\lib\tools.jar;C:\path\to\ant\lib\ant.jar;
C:\path\to\ant\lib\ant-launcher.jar"
Of course, this applies only to Windows machines. For non-Windows environments, you should instead create a bin/setenv.sh file with the following contents, replacing the file paths as necessary for your system:
export CLASSPATH=/path/to/jdk8/lib/tools.jar:/path/to/ant/lib/ant.jar:
/path/to/ant/lib/ant-launcher.jar
When running Tomcat with such a custom JSP compilation configuration, be sure to carefully observe the output in the Tomcat logs. If Tomcat cannot find Ant or Ant cannot find the JDK compiler, Tomcat automatically falls back to the Eclipse compiler and outputs only a warning to the logs.
DEPLOYING AND UNDEPLOYING APPLICATIONS IN TOMCAT
In this section you learn how to deploy and undeploy Java EE web applications in Tomcat. You have two options for accomplishing this:
· Manually by placing the application in the webapps directory
· Using the Tomcat manager application
If you have not already done so, you should download the sample-deployment.war sample application from the Chapter 2 section on the wrox.com download site. This is what you should use to practice deployment and undeployment.
Performing a Manual Deploy and Undeploy
Deploying an application manually on Tomcat is simple — just place the sample-deployment.war file in Tomcat’s webapps directory. If Tomcat is running, within a few moments Tomcat should automatically unpack the application file into a directory with the same name minus the .war extension. If Tomcat is not running, you can start it, and the application file will unpack as Tomcat starts. When the application has unpacked, open your browser and navigate to http://localhost:8080/sample-deployment/. You should see a page that looks like Figure 2-2. This means that the sample application has successfully deployed.
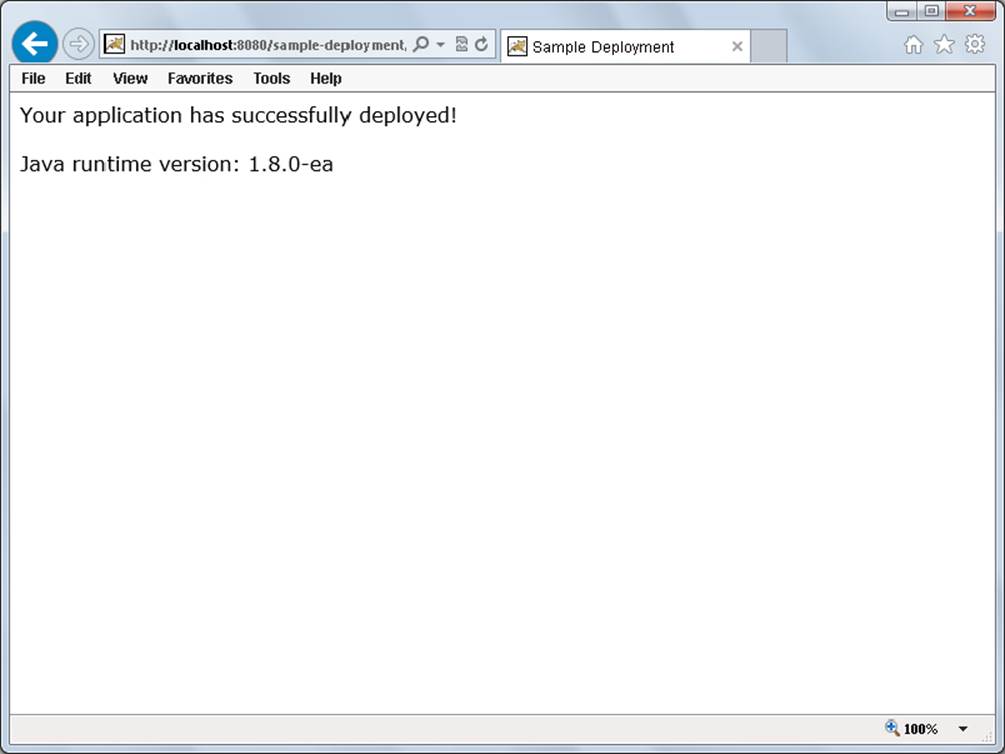
FIGURE 2-2
Undeploying the application is as simple as reversing the process. Delete the sample-deployment.war file and wait a few moments. When Tomcat detects that the file was deleted, it undeploys the application and deletes the unpacked directory, and the application will no longer be accessible from your browser. You do not need to shut down Tomcat to perform this task.
Using the Tomcat Manager
You can also deploy a Java EE application using the Tomcat manager web interface. To do so, follow these steps:
1. Open your browser and navigate to http://localhost:8080/manager/html.
2. When you are prompted for a username and password, enter admin for the username and admin for the password (or whatever you configured in conf/tomcat-users.xml). The page you are presented with should look like Figure 2-3.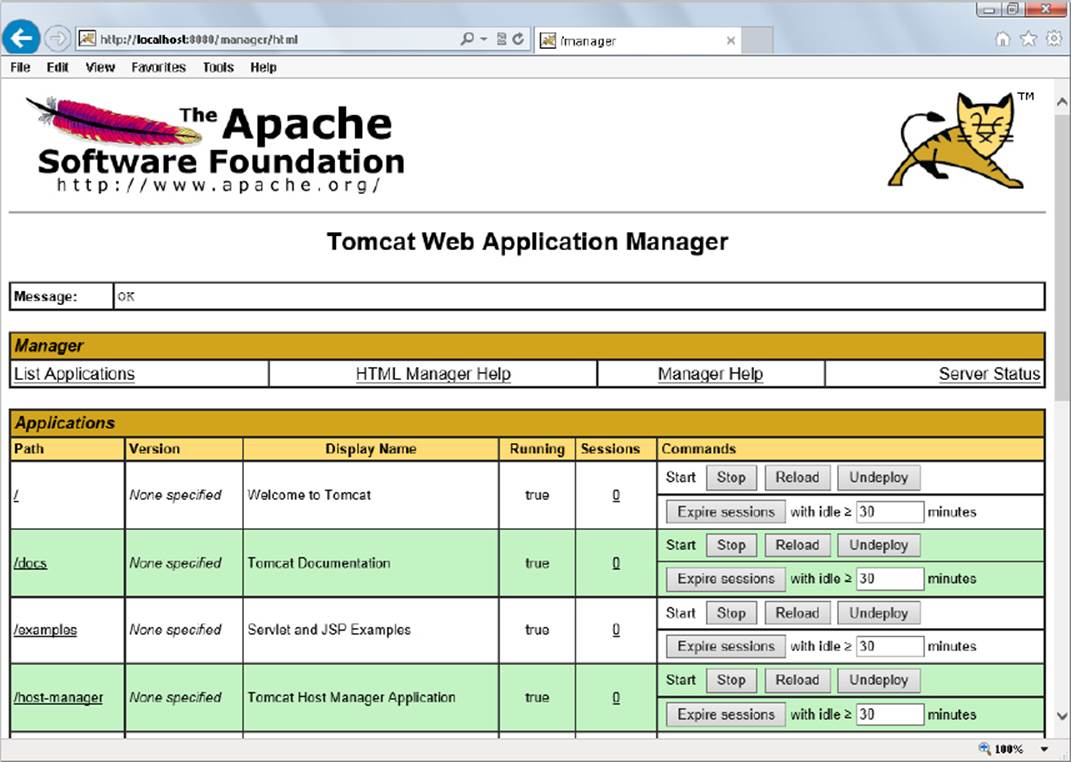
FIGURE 2-3
3. Scroll down to the Deploy section and find the form “WAR file to deploy.” In the “Select WAR file to upload” field, choose the sample-deployment.war file from your filesystem, as shown in Figure 2-4, and then click the Deploy button. The WAR file uploads to Tomcat, which deploys the application. The sample-deployment directory is again created in Tomcat’s webapps directory. When complete, Tomcat returns you to the list of applications where you can see that the sample application has been deployed, as shown inFigure 2-5.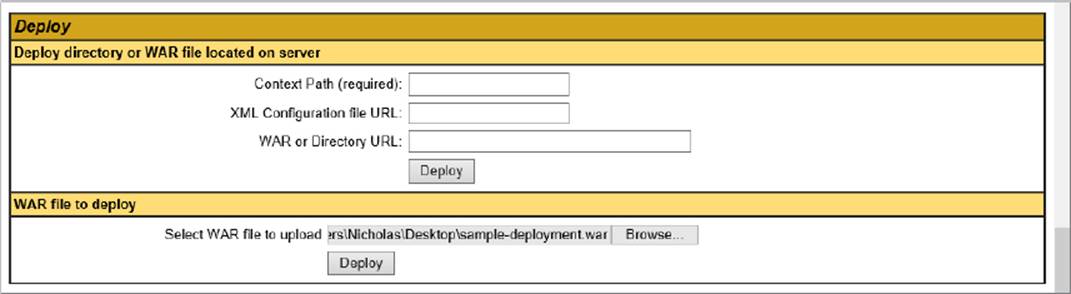
FIGURE 2-4
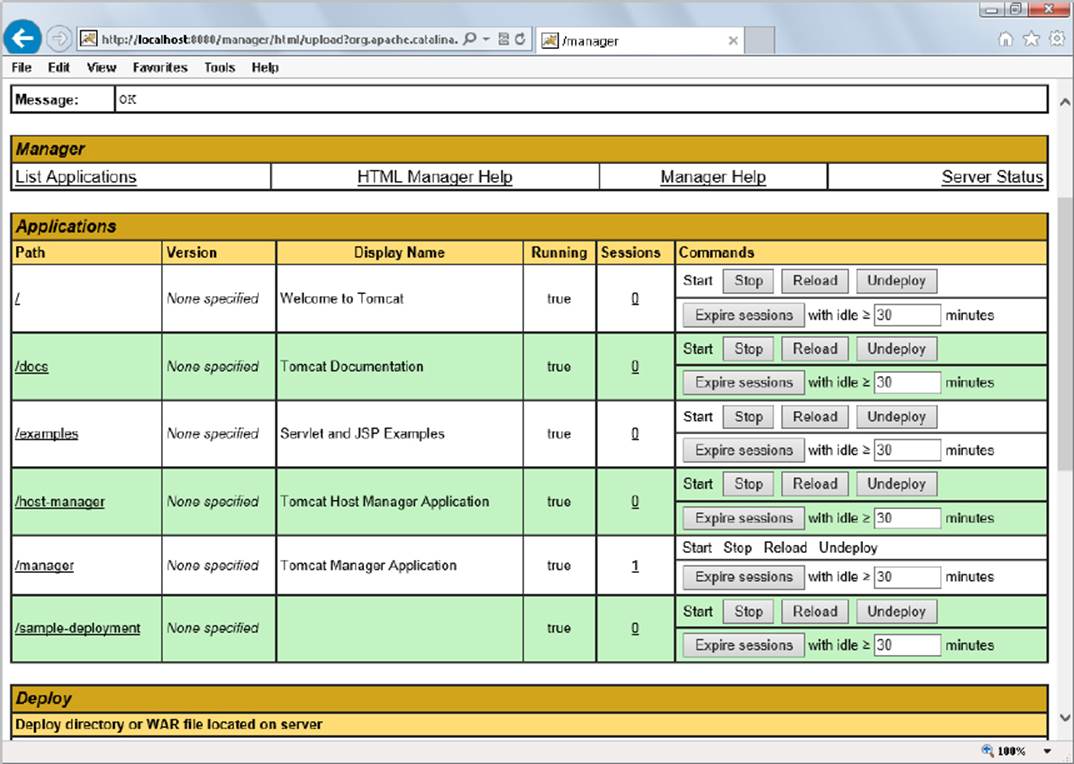
FIGURE 2-5
4. Like before, you can go to http://localhost:8080/sample-deployment/ and view the sample page in the sample application.
You have now deployed the application using the Tomcat manager.
Undeploying is just as easy to accomplish. On the Tomcat manager page you saw earlier, you should notice an Undeploy button next to the sample application (refer to Figure 2-5). Click this button and the sample application will be undeployed and removed from the webapps directory. When complete, you can no longer access the application at http://localhost:8080/sample-deployment/.
DEBUGGING TOMCAT FROM YOUR IDE
As a Java EE developer, one of the most important skills you can hold is the ability to deploy and debug applications in Tomcat from your Java IDE. This provides you with immeasurable troubleshooting skills for determining why an application won’t run or figuring out why the bug your customer reported occurs. This section covers setting up, running, and debugging web applications in Tomcat using both IntelliJ IDEA and Eclipse. You can read both sets of instructions or just the set that pertains to the IDE you have chosen — that choice is up to you.
Throughout the rest of this book is very little instruction for doing this. This keeps the text decoupled from any particular IDE. You also do not see any IDE-specific screenshots after this chapter. Be sure you are familiar and comfortable with deploying and debugging applications in Tomcat using your IDE before moving on, even if that means going over this section several times.
Using IntelliJ IDEA
If you use IntelliJ IDEA 13 or newer, you have just a few simple steps to take to get up and running with your web applications. The first thing you need to do is set up IntelliJ to recognize your local Tomcat or other container installation. This is a one-time-only step — you set it up once in your global IDE settings, then you can use the application server for any web application project. Next, set up each web application project to use your configured container. Finally, you just need to start your application from IntelliJ and place breakpoints where you’d like to debug your application.
Setting Up Tomcat 8.0 in IntelliJ
To start, you need to configure Tomcat in IntelliJ’s list of application servers.
1. ![]() Open up IntelliJ’s IDE settings dialog. With a project open you can go to File ⇒ Settings, or click the Settings icon in the toolbar (shown here in the margin), or press Ctrl + Alt + S. If you don’t have a project open, you can click the Configure button and then the Settings button.
Open up IntelliJ’s IDE settings dialog. With a project open you can go to File ⇒ Settings, or click the Settings icon in the toolbar (shown here in the margin), or press Ctrl + Alt + S. If you don’t have a project open, you can click the Configure button and then the Settings button.
2. In the left pane of the Settings dialog, click Application Servers under IDE Settings. Initially, you have no application servers configured.
3. ![]() Click the green plus icon to add a new application server. Click the browse button next to the Tomcat Home field to browse for and select the Tomcat home directory (for example, C:\Program Files\Apache Software Foundation\Tomcat 8.0). Then click OK. IntelliJ should automatically detect your Tomcat version, and the dialog should look like Figure 2-6.
Click the green plus icon to add a new application server. Click the browse button next to the Tomcat Home field to browse for and select the Tomcat home directory (for example, C:\Program Files\Apache Software Foundation\Tomcat 8.0). Then click OK. IntelliJ should automatically detect your Tomcat version, and the dialog should look like Figure 2-6.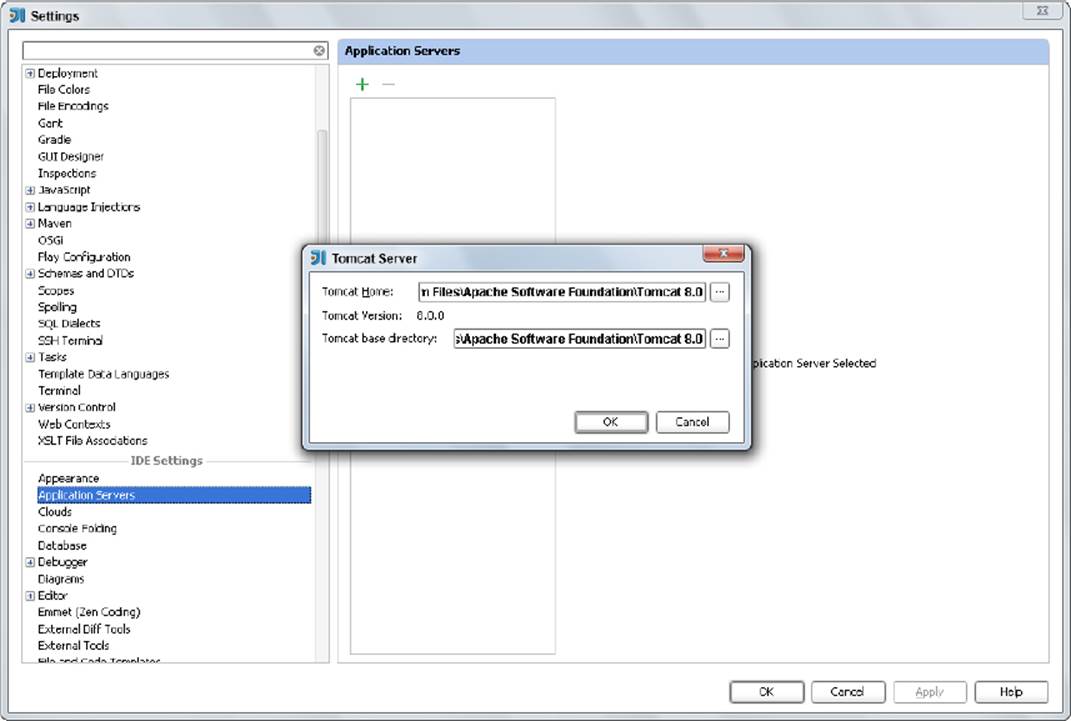
FIGURE 2-6
4. Click OK again to complete adding Tomcat to your list of application servers, and change the name if you want. All the IntelliJ code samples you can download for this book assume an application server name of Tomcat 8.0, so for maximum ease you should rename it to Tomcat 8.0 if it is named something else.
5. Click Apply to save the changes and OK to close the Settings dialog.
Adding a Tomcat Configuration to a Project
After you create a project and are ready to deploy it to Tomcat from IntelliJ, you need to add a Tomcat run/debug configuration to your project.
1. Click the run/debug configurations icon (a down arrow) on the toolbar, then click Edit Configurations.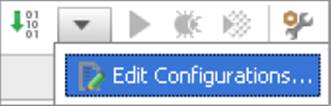
2. ![]() In the dialog that appears, click the green plus icon, scroll to the bottom of the Add New Configuration menu, hover over Tomcat Server, and click Local. This creates a run/debug configuration for running your project against a local Tomcat, as shown in Figure 2-7.
In the dialog that appears, click the green plus icon, scroll to the bottom of the Add New Configuration menu, hover over Tomcat Server, and click Local. This creates a run/debug configuration for running your project against a local Tomcat, as shown in Figure 2-7.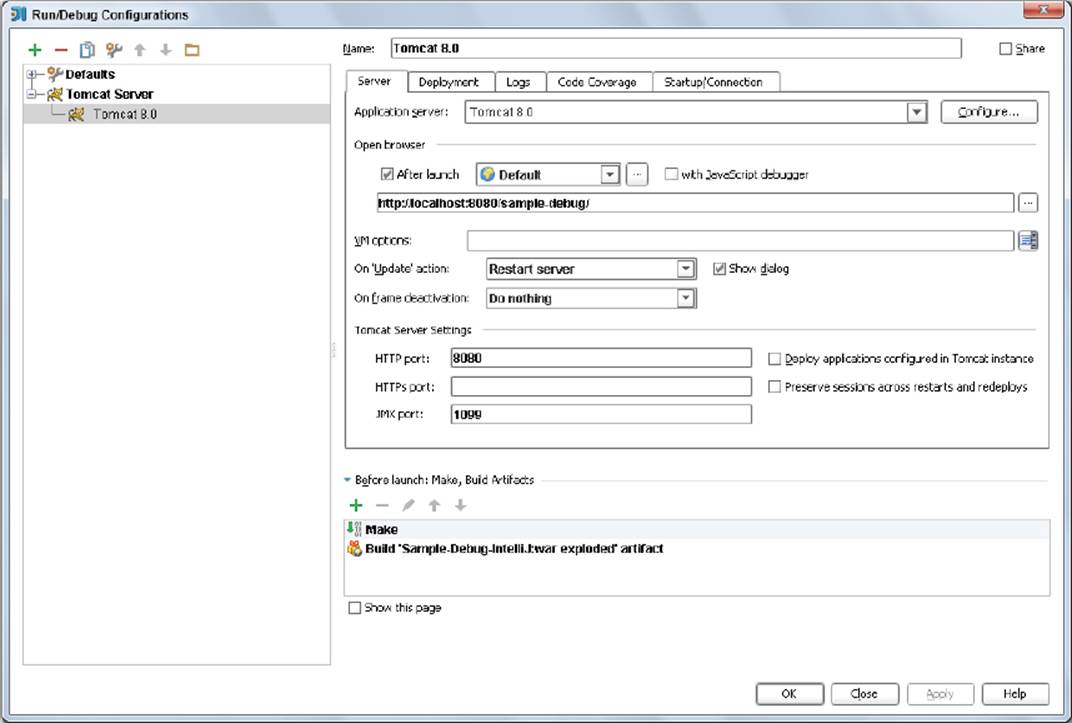
FIGURE 2-7
3. If Tomcat 8.0 is the only application server you have added to IntelliJ, it is automatically selected as the application server this run/debug configuration will use. If you have other application servers configured, one of those might be selected, in which case you need to click the “Application server” drop-down and select Tomcat 8.0 instead.
4. Name the run configuration something meaningful. In Figure 2-7 and in all the sample IntelliJ projects you download for this book, the run configuration is named Tomcat 8.0 like the application server it uses.
5. ![]() You’ll probably see a warning that no artifacts are marked for deployment. Correcting this is simple. Click the Deployment tab and then the green plus icon under the “Deploy at the server startup” heading. Click Artifact, and then click the exploded war file artifact. Click OK. Change the “Application context” name for the artifact deployment to the server-relative URL you want it deployed to, as shown in Figure 2-8.
You’ll probably see a warning that no artifacts are marked for deployment. Correcting this is simple. Click the Deployment tab and then the green plus icon under the “Deploy at the server startup” heading. Click Artifact, and then click the exploded war file artifact. Click OK. Change the “Application context” name for the artifact deployment to the server-relative URL you want it deployed to, as shown in Figure 2-8.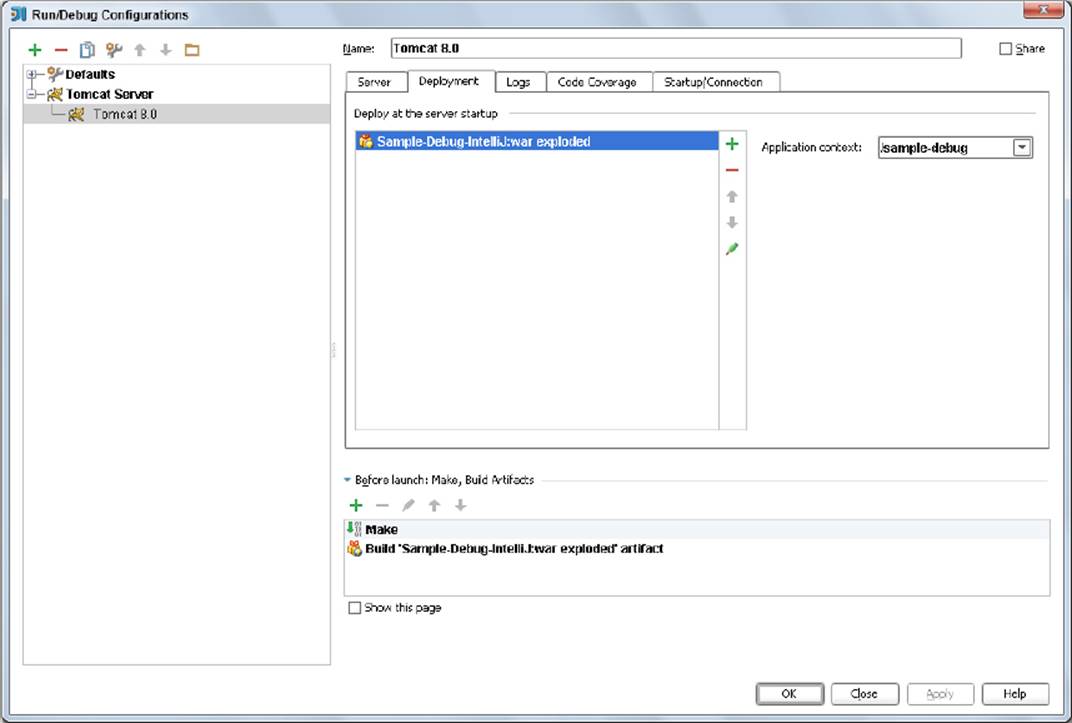
FIGURE 2-8
6. Click Apply and then OK to save the run/debug configuration and dismiss the dialog.
You can download the Sample-Debug-IntelliJ project from the wrox.com code download site to view a sample web application already configured to run on your local Tomcat 8.0 application server. (However, you still need to set up your Tomcat 8.0 installation in IntelliJ’s IDE settings.)
Starting an Application and Hitting Breakpoints
Now that you have set up Tomcat in IntelliJ and configured an IntelliJ project to run in Tomcat, you’re ready to start the application and debug it within your IDE.
1. Download the Sample-Debug-IntelliJ project from the wrox.com code download site, and open it with IntelliJ IDEA.
2. Make sure that its run/debug configuration is properly configured to use your local Tomcat 8.0 application server. You should perform this check for each sample project you download for this book before attempting to start it.
3. When opened, you should see a screen like Figure 2-9, with two breakpoints in place for index.jsp.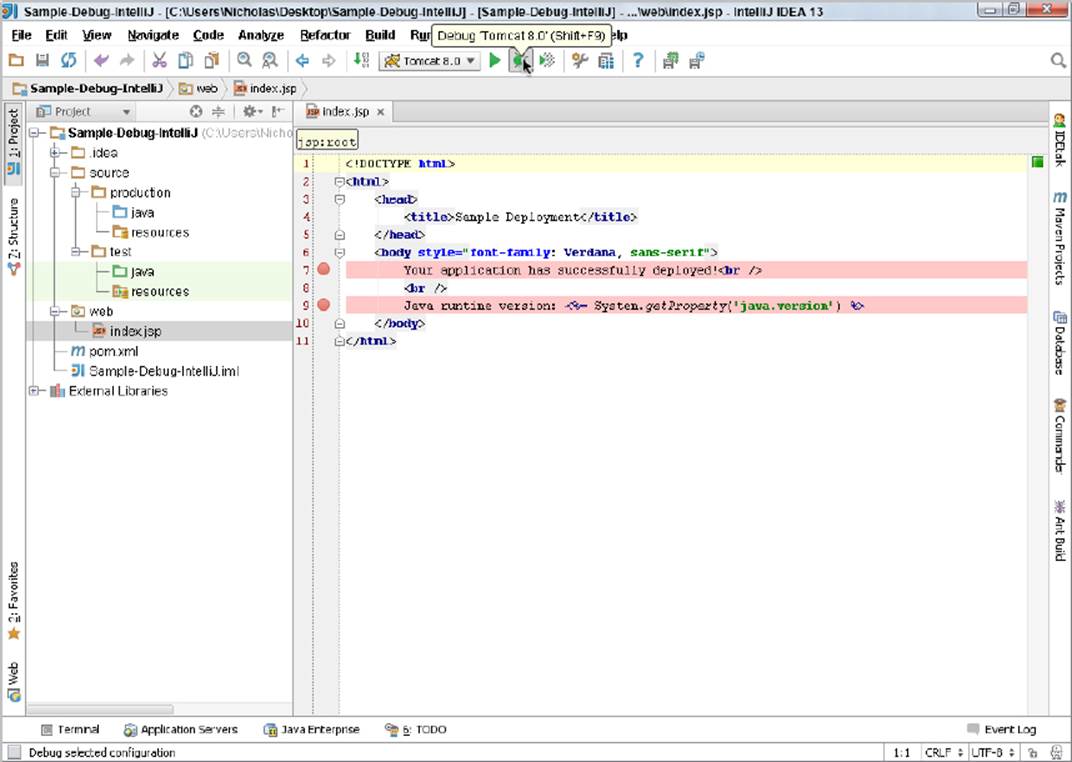
FIGURE 2-9
4. Click the Debug icon on the toolbar (highlighted by the mouse pointer in Figure 2-9) or press Shift + F9 to compile and start your application in debug mode. IntelliJ should launch your default browser, and you should immediately hit the breakpoints inindex.jsp.
You should again see the webpage from Figure 2-2 to indicate that your application successfully deployed.
NOTE IntelliJ may actually access http://localhost:8080/sample-debug/ before launching your browser. It does this to ensure that your application has been properly deployed. If this is the case, you will hit the breakpoints twice — once when IntelliJ accesses the application and once when your browser opens and accesses the application.
Using Eclipse
Using Tomcat in Eclipse has some similarities to using Tomcat in IntelliJ IDEA, but it also has many differences, and the screens look very different. The same basic process still applies — you need to set up Tomcat in Eclipse’s global settings, configure it for a project, and start and debug the project. In this last part of this section. you learn how to use Tomcat from Eclipse in case you have chosen that as your IDE for this book.
WARNING As discussed in the introduction, as of the date this book was published, Eclipse does not yet support Java SE 8, Java EE 7, or Tomcat 8.0. You must wait until Eclipse 4.4 Luna is released in June 2014 to realize support for these technologies. As such, the Eclipse instructions and figures in this section may not be completely accurate, and you should respond as needed to changes made to the release version of Eclipse Luna.
Setting Up Tomcat 8.0 in Eclipse
To begin, you must configure Tomcat 8.0 as a runtime environment in Eclipse’s global preferences. To do so, follow these steps:
1. Open your Eclipse IDE for Java EE Developers and go to Windows ⇒ Preferences.
2. In the Preferences dialog that appears, expand Server, and then click Runtime Environments. A Server Runtime Environments panel appears where you can manage the application servers and web containers available to all your Eclipse projects.
3. Click the Add button to open the New Server Runtime Environment dialog.
4. Expand the Apache folder and select Apache Tomcat v8.0, making sure you select the “Create a new local server” check box. Then click the Next button.
5. On the next screen, click the Browse button and browse to your Tomcat 8.0 home directory (for example, C:\Program Files\Apache Software Foundation\Tomcat 8.0). Then click OK.
6. In the JRE drop-down, select your local Java SE 8 JRE installation. Name the server whatever you want. The Eclipse sample projects you download throughout this book assume that the server is named Apache Tomcat v8.0, which is the Eclipse default. At this point you should see a screen like Figure 2-10.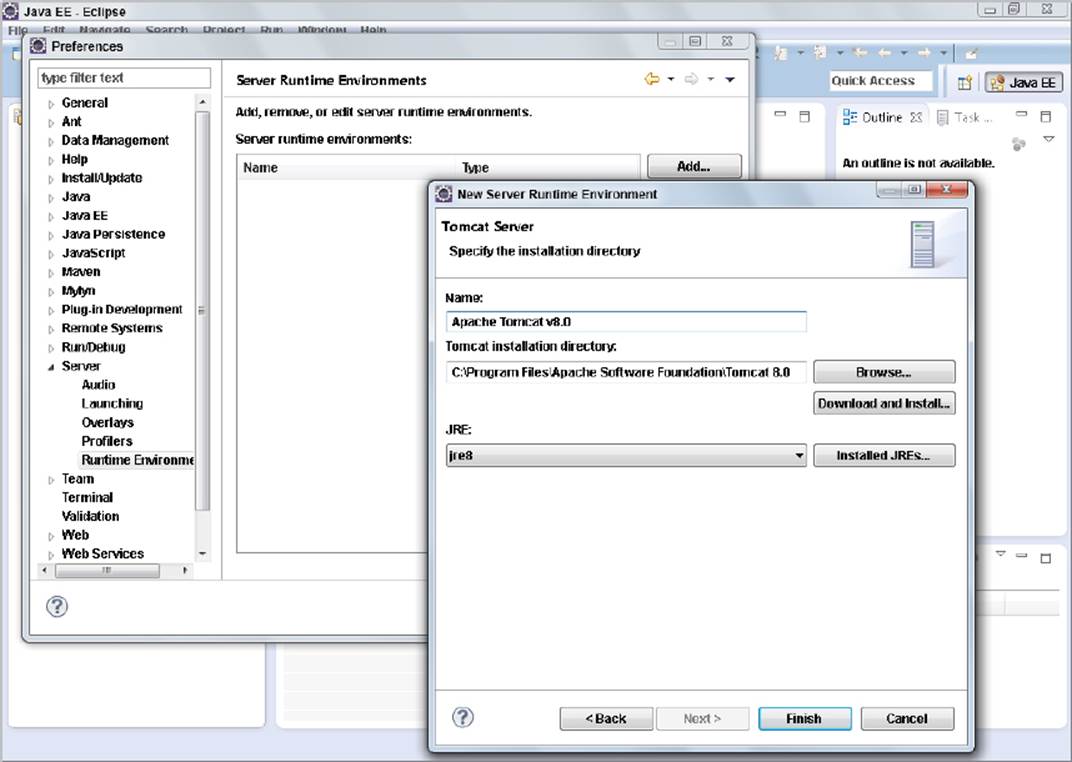
FIGURE 2-10
7. Click the Finish button to complete adding your local Tomcat server to Eclipse, and then click OK to close the preferences dialog.
You are now ready to use Tomcat 8.0 in your Eclipse projects.
One other thing to note is that, by default, Eclipse uses a built-in browser to open your web applications. You should disable this feature and use a mainstream browser, instead, such as Google Chrome, Mozilla Firefox, or Microsoft Internet Explorer. To change this setting, go to the Window ⇒ Web Browser menu, and select something other than “0 Internal Web Browser.” The option “1 Default System Web Browser” should be sufficient in most cases, but it’s easy to change this setting frequently to meet your needs at any given time.
Using the Tomcat Server in a Project
When creating a new project in Eclipse, you have to select the configured runtime server you are going to use for that project on the first dialog, as shown in Figure 2-11. However, this configures only the libraries for your application. It does not select the Tomcat 8.0 server you created. For that, follow these steps:
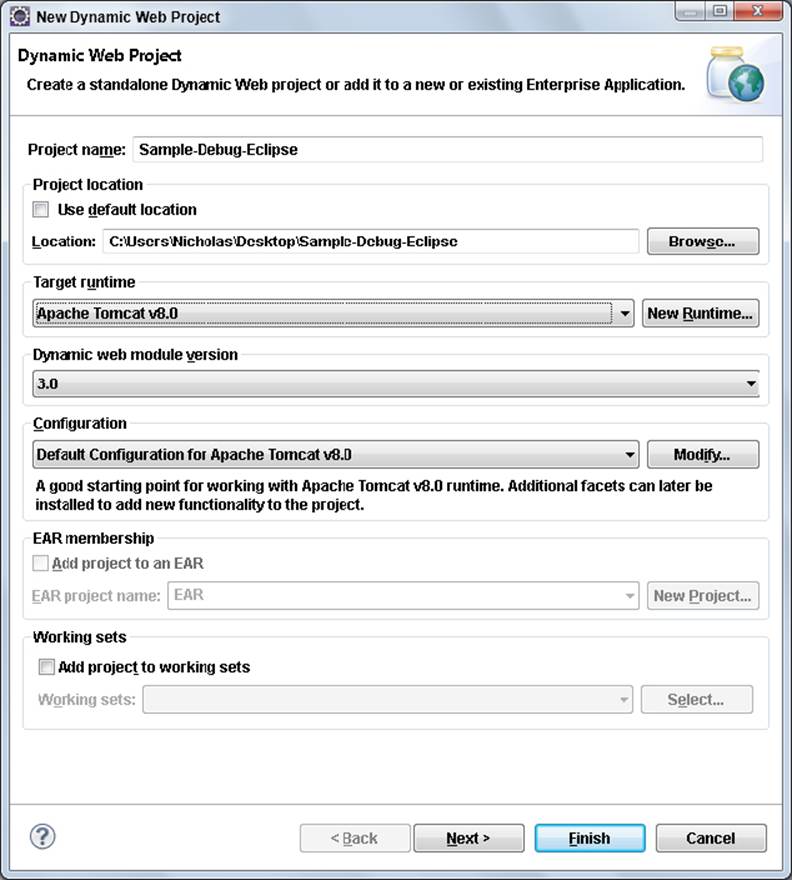
FIGURE 2-11
1. After you create or open the project, go to Project ⇒ Properties and click the Server menu item on the left side of the project Properties dialog that appears.
2. By default, the selected server is “<None>,” so you should change it to “Tomcat v8.0 Server at localhost” instead, as shown Figure 2-12.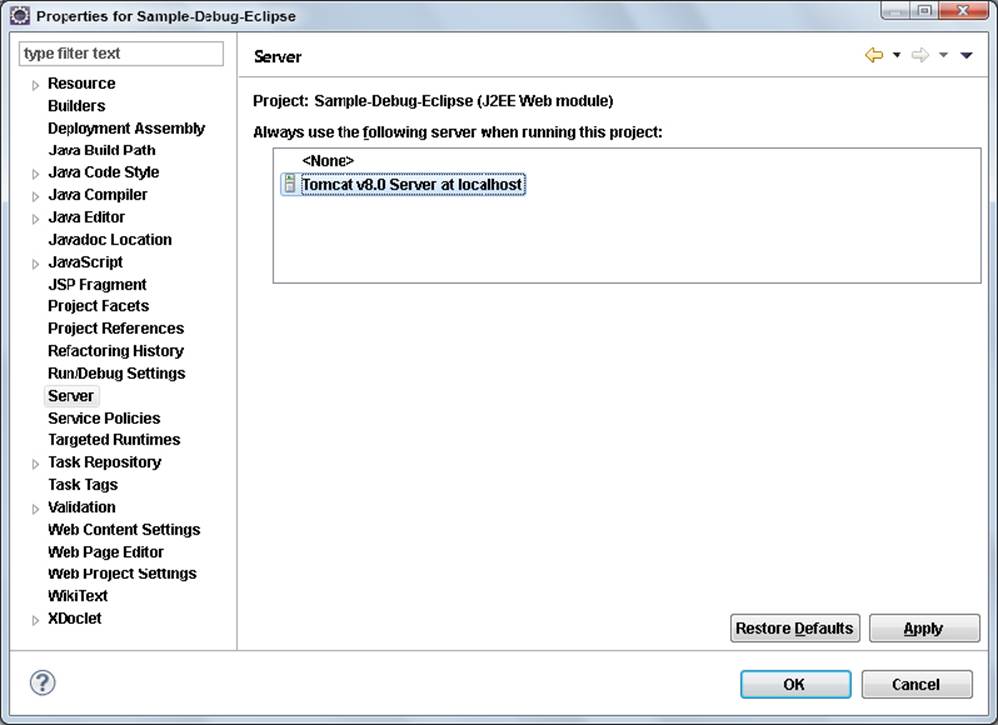
FIGURE 2-12
3. Click Apply to save the changes.
4. Change the application context URL that the application deploys to in Tomcat (assuming you didn’t configure it when you created the project). In the project Properties dialog, you can click the Web Project Settings menu item and update the “Context root” field to change this setting.
5. After clicking Apply to save the changes, click OK to dismiss the dialog.
You can download the Sample-Debug-Eclipse project from the wrox.com code download site to view a sample web application already configured to run on your local Tomcat 8.0 application server. (However, you still need to set up your Tomcat 8.0 installation in Eclipse’s IDE preferences.)
Starting an Application and Hitting Breakpoints
You’re now ready to start your application and debug it from Eclipse.
1. Download the Sample-Debug-Eclipse project from the wrox.com code download site, and open it with Eclipse IDE for Java EE Developers.
2. Make sure that its server settings are properly configured to use your local Tomcat 8.0 application server. You should perform this check for each sample project you download for this book before attempting to start it.
3. When opened you should see a screen like Figure 2-13, with one breakpoint already in place for index.jsp.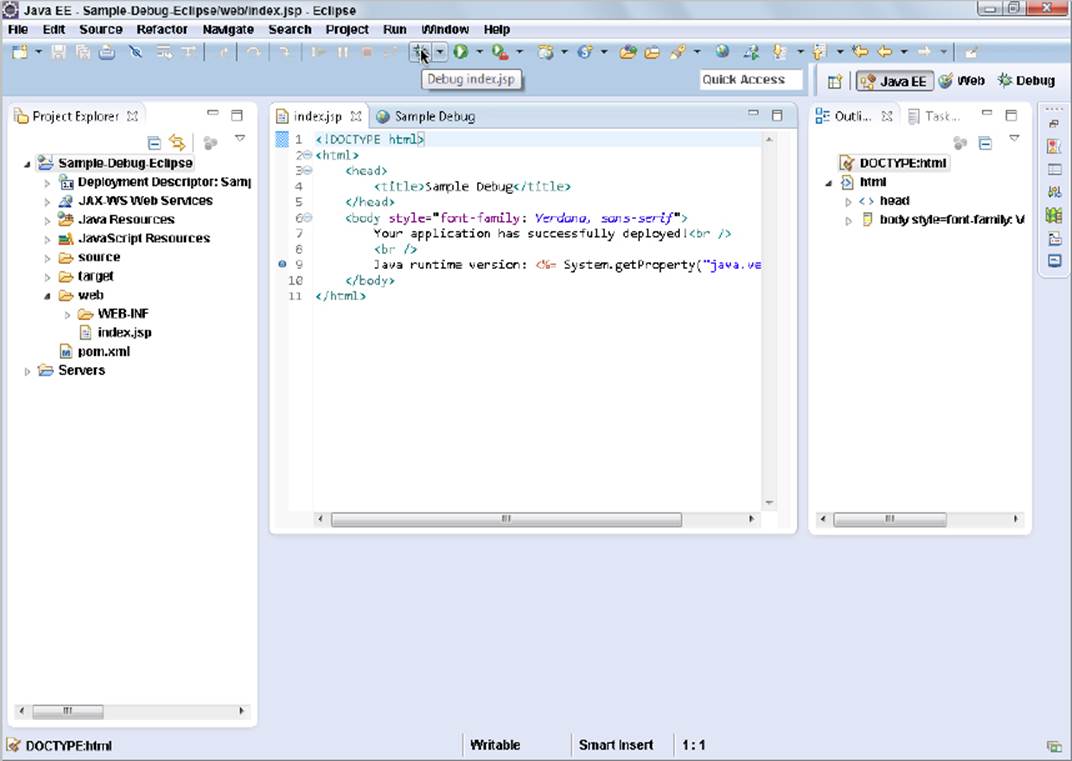
FIGURE 2-13
4. Click the Debug icon in the toolbar (highlighted by the mouse pointer in Figure 2-13) to compile and start your application in debug mode. Eclipse should launch the configured browser, and you should immediately hit the breakpoint in index.jsp. You can again see the webpage from Figure 2-2 to indicate that your application successfully deployed.
5. ![]() To continue from the breakpoint, click the continue icon (shown here in the margin) on the Eclipse toolbar.
To continue from the breakpoint, click the continue icon (shown here in the margin) on the Eclipse toolbar.
WARNING When you run Tomcat from Eclipse, Eclipse overrides any custom conf\setenv.bat or conf/setenv.sh file that you create to configure advanced JSP compilation. If you do not want to use the Eclipse JDT compiler to compile your JSPs, you need to add the CLASSPATH configuration in this file to some other Tomcat configuration file. Consult the Tomcat documentation to determine the appropriate file to place this in.
NOTE You likely noticed that the JSP in Eclipse only has one breakpoint, whereas the JSP in IntelliJ IDEA has two breakpoints. The Eclipse JSP debugger is much more limited than the IDEA JSP debugger, so placing a breakpoint on Line 7 in this JSP is not possible in Eclipse.
SUMMARY
In this chapter, you learned about Java EE application servers and web containers and explored several popular implementations of both. You installed Tomcat 8.0 on your local machine, configured JSP compilation, started it from the command line, and experimented with deploying and undeploying applications in Tomcat. Finally, you learned how to configure and run Tomcat 8.0 and debug your applications using both IntelliJ IDEA and Eclipse IDE for Java EE Developers.
In the next chapter you create Servlets and learn how Java EE web applications work.
All materials on the site are licensed Creative Commons Attribution-Sharealike 3.0 Unported CC BY-SA 3.0 & GNU Free Documentation License (GFDL)
If you are the copyright holder of any material contained on our site and intend to remove it, please contact our site administrator for approval.
© 2016-2026 All site design rights belong to S.Y.A.