PROFESSIONAL JAVA FOR WEB APPLICATIONS (2014)
Part III Persisting Data with JPA and Hibernate ORM
Chapter 22 Eliminating Boilerplate Repositories with Spring Data JPA
IN THIS CHAPTER
· Understanding Spring Data’s unified data access
· Creating Spring Data JPA repositories
· How to refactor the Customer Support application
WROX.COM CODE DOWNLOADS FOR THIS CHAPTER
You can find the wrox.com code downloads for this chapter at http://www.wrox.com/go/projavaforwebapps on the Download Code tab. The code for this chapter is divided into the following major examples:
· Spring-Data-JPA Project
· Customer-Support-v16 Project
NEW MAVEN DEPENDENCIES FOR THIS CHAPTER
In addition to the Maven dependencies introduced in previous chapters, you also need the following Maven dependency. The SLF4J JCL bridge is excluded because your use of Log4j 2 makes this bridge unnecessary.
<dependency>
<groupId>org.springframework.data</groupId>
<artifactId>spring-data-jpa</artifactId>
<version>1.5.0.RELEASE</version>
<scope>compile</scope>
<exclusions>
<exclusion>
<groupId>org.slf4j</groupId>
<artifactId>jcl-over-slf4j</artifactId>
</exclusion>
</exclusions>
</dependency>
<dependency>
<groupId>org.slf4j</groupId>
<artifactId>slf4j-api</artifactId>
<version>1.7.5</version>
<scope>runtime</scope>
</dependency>
UNDERSTANDING SPRING DATA’S UNIFIED DATA ACCESS
In Chapter 20, you learned how powerful the Java Persistence API can be, and in Chapter 21 you learned how Spring Framework can make using JPA even easier. Spring takes care of all your transaction management and EntityManager creation and closing so that you don’t have to. It even eliminates the need to include a persistence.xml file in your application! Perhaps most helpful of all, you created a generic, base repository that all your repositories can extend, providing the basic CRUD operations without having to write them for every repository.
But let’s face it: Most of your repositories need more than the standard CRUD operations. For starters, you often need to perform basic lookups with uniquely constrained columns other than the primary key. In the last chapter’s Spring-JPA project, you added a method to look up books by their ISBN, whereas in the Customer-Support-v15 project, your UserRepository included a method for looking up users by their usernames.
Then sometimes you need to filter entities with multiple fields. For example, as a system administrator you may need to find people by their first and last name or their phone number, which may return multiple results. Then there’s searching, such as looking for products with certain keywords or finding support tickets with content matching a search phrase. Finally, there is perhaps the most difficult task to tackle: You cannot simply return a List of all entities or even all entities matching a filter. This neither performs well nor is easy to utilize in your user interfaces. (Imagine returning 10,000,000 records from the database just to display 50 of them on the screen.) So you must implement paging of results somehow, and while doing this you must keep result ordering in mind at all times.
Avoiding Duplication of Code
Ordering and paging results is possible using both the Java Persistence Query Language and the criteria API. However, there are no shortcuts. Both operations require you to construct and execute two separate queries: one to return a count of results and another to return a subset of results. The following code demonstrates performing this using JPQL. You have already learned how to filter results, so the code focuses solely on pagination and applies no filtering.
TypedQuery<Long> countQuery = this.entityManager.createQuery(
"SELECT count(b) FROM Book b WHERE predicates...", Long.class
);
long totalRows = countQuery.getSingleResult();
TypedQuery<Book> pagedQuery = this.entityManager.createQuery(
"SELECT b FROM Book b WHERE predicates... " +
"ORDER BY b.title ASC, b.isbn DESC", Book.class
);
pagedQuery.setFirstResult(startRecordNumber);
pagedQuery.setMaxResults(maxPerPage);
List<Book> singlePage = pagedQuery.getResultList();
Performing the same task with the criteria API is more verbose but works better for generic queries of unknown entity types.
CriteriaBuilder builder = this.entityManager.getCriteriaBuilder();
CriteriaQuery<Long> pageCriteria = builder.createQuery(Long.class);
Root<Book> root = pageCriteria.from(Book.class);
TypedQuery<Long> countQuery = this.entityManager.createQuery(
pageCriteria.select(builder.count(root))
.where(predicates...)
);
long totalRows = countQuery.getSingleResult();
CriteriaQuery<Book> criteria = builder.createQuery(Book.class);
root = criteria.from(Book.class);
TypedQuery<Book> pagedQuery = this.entityManager.createQuery(
criteria.select(root)
.where(predicates...)
.orderBy(builder.asc(root.get("title")),
builder.desc(root.get("isbn")))
);
pagedQuery.setFirstResult(startRecordNumber);
pagedQuery.setMaxResults(maxPerPage);
List<Book> singlePage = pagedQuery.getResultList();
In both of these examples, startRecordNumber and maxPerPage are input variables indicating, respectively, the zero-based index of the first entity on the page and the maximum number of entities to return. totalRows is the number of matching rows that you would return, whereas singlePage is the list of entities that you would return. (Obviously, you would need to return some kind of holder object that contained both of these values.) Although both of these examples are still easier than writing database-specific SQL and using raw JDBC, they’re not exactly friendly. Where you see predicates... in both examples is where you would put WHERE statements to filter results, meaning you have to create these predicates and set parameters twice, identically. The Hibernate ORM-specific API is slightly easier, enabling you to construct criteria once and reuse them to generate the record count and the limited list of entities.
But even if you were to use the easier, Hibernate-proprietary API, you still have to do this anywhere you need to page results — and that’s most places that you return a list of entities. That’s a lot of code to write (and test). Eventually, you would try to create a generic way to specify filters, ordering information, and paging instructions for any generic lookup of any entity in your base repository class. But is that really necessary?
Thankfully, it’s not. Spring Data, a Spring project separate from but dependent on Spring Framework, can write your repositories for you. All you have to do is create an interface and Spring Data dynamically generates the necessary code to implement that interface at run time. Figure 22-1 shows the normal program execution path that you have become accustomed to in Spring Framework. Your controllers are written against your service interfaces. Spring intercepts calls to those interfaces and performs any necessary tasks, such as Bean Validation, starting a transaction, or invoking the method asynchronously. When the service method returns, Spring may also perform further Bean Validation and commit or rollback a transaction.
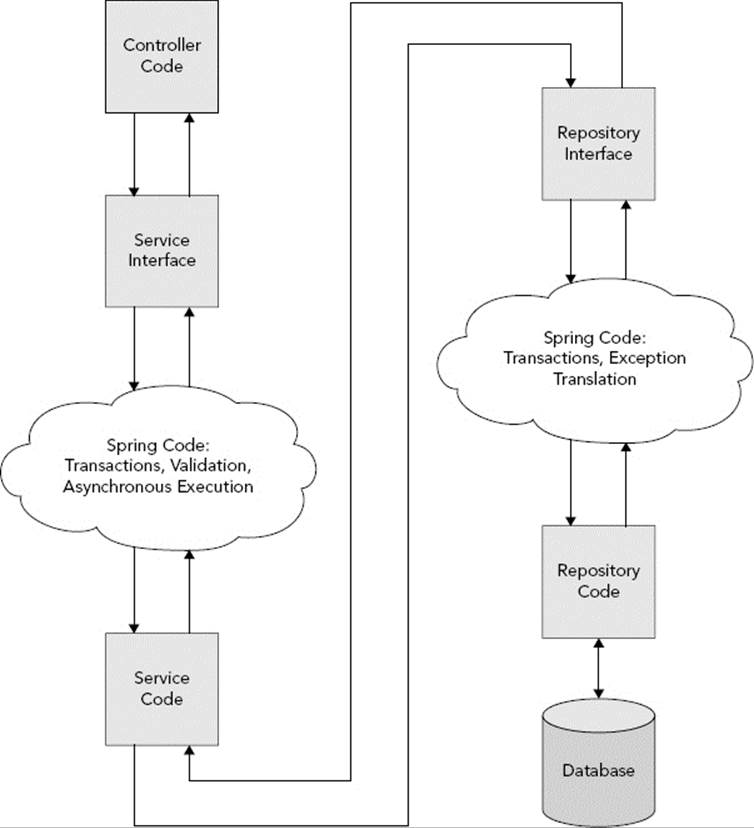
FIGURE 22-1
Likewise the service code is written against the repository interfaces. When you invoke a repository method, Spring again performs any necessary tasks like starting a transaction. When the method returns, Spring converts any thrown exception to aDataAccessException. It’s that repository code that you really don’t need. It contains no business logic (that should be in the service) or user interface logic (that should be in the controller), so there’s nothing special that your application should need to do in the repository. It’s boilerplate code for persisting and retrieving entities.
When you use Spring Data, that repository code gets written for you. There are very few cases when you would ever need to write repository code that Spring Data couldn’t handle automatically, and facilities exist to handle those rare occasions. Figure 22-2 shows this new program execution path. Much of it remains the same because controllers and services contain logic proprietary to your application. But after you execute a method on your repository interface, that’s the end of code written by you. Spring Framework and Spring Data handle everything that happens beyond that point.
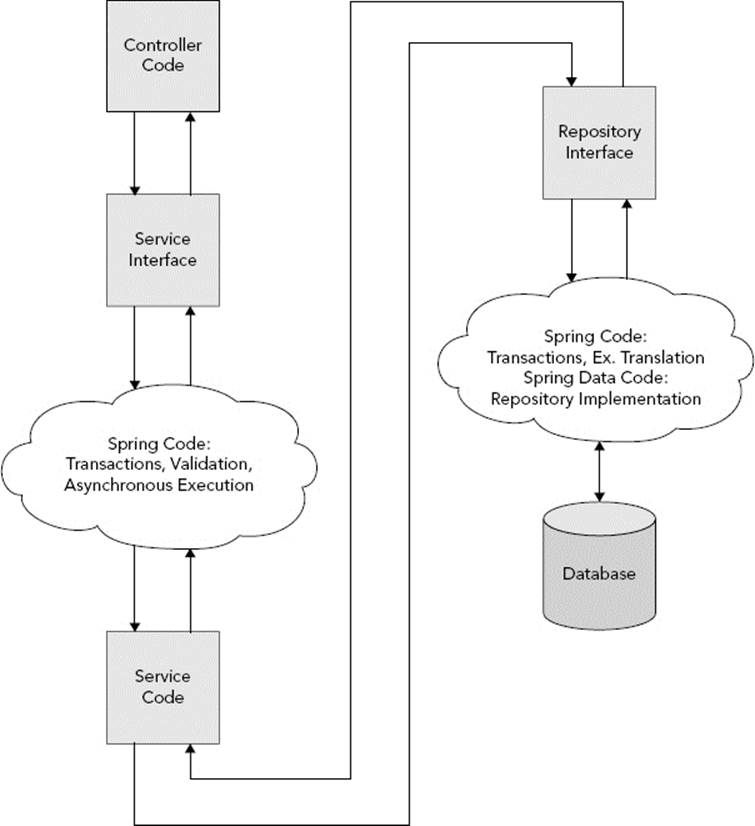
FIGURE 22-2
Spring Data supports a variety of data access methodologies, including JPA, JdbcTemplate, NoSQL, and more. Its primary subproject, Spring Data Commons, provides a core toolset that all other subprojects use to create repositories. The Spring Data JPA subproject provides support for repositories implemented against the Java Persistence API.
NOTE You use many different classes from Spring Data Commons and Spring Data JPA, and this book cannot tell you every detail about all of them. You should review and bookmark the Spring Data Commons API Documentation and the Spring Data JPA API Documentation for future reference.
Using the Stock Repository Interfaces
One of the tools supplied by Spring Data Commons is the org.springframework.data.repository.Repository<T, ID extends Serializable> interface. All Spring Data repository interfaces must extend this marker interface, which specifies no methods. Only interfaces extending Repository are eligible for dynamic implementation. The generic type parameters T and ID capture the entity type and identifier type, respectively, similar to the GenericRepository you created in Chapter 21.
NOTE The type parameters are reversed in Spring Data from what you created in GenericRepository. Also, the ID parameter must implement Serializable, but no such restriction is enforced for T.
You may create an interface that extends Repository directly, but because it specifies no methods, you will probably never do this. A more useful approach is to extend org.springframework.data.repository.CrudRepository<T, ID>, which specifies numerous methods for basic CRUD operations. This interface is very similar to the GenericRepository you created in Chapter 21, but uses a few different conventions.
· count() returns a long representing the total number of unfiltered entities extending T.
· delete(T) and delete(ID) delete the single, specified entity, whereas delete(Iterable<? extends T>) deletes multiple entities and deleteAll() deletes every entity of that type.
· exists(ID) returns a boolean indicating whether the entity of this type with the given surrogate key exists.
· findAll() returns all entities of type T, whereas findAll(Iterable<ID>) returns the entities of type T with the given surrogate keys. Both return Iterable<T>.
· findOne(ID) retrieves a single entity of type T given its surrogate key.
· save(S) saves the given entity (insert or update) of type S where S extends T, and returns S, the saved entity.
· save(Iterable<S>) saves all the entities (again, S extends T) and returns the saved entities as a new Iterable<S>.
All Spring Data projects already know how to implement all these methods for a given type. You’ll notice, however, that this repository still doesn’t specify methods that support paging and sorting. This is so that these methods don’t clutter any repositories that you don’t want to support paging and sorting. If you want a repository to provide paging and sorting methods, its interface can extend org.springframework.data.repository.PagingAndSortingRepository<T, ID extends Serializable>.
· findAll(Sort) returns all T entities as an Iterable<T> sorted with the provided Sort instructions.
· findAll(Pageable) returns a single org.springframework.data.domain.Page<T> of entities sorted and bounded with the provided Pageable instructions.
An org.springframework.data.domain.Sort object encapsulates information about the properties that should be used to sort a result set and in what direction they should be sorted. An org.springframework.data.domain.Pageable encapsulates a Sort as well as the number of entities per page and which page to return (both ints). In a web application, you don’t usually have to worry about creating Pageable objects on your own. Spring Data provides two org.springframework.web.method.support.HandlerMethodArgumentResolverimplementations that can turn HTTP request parameters into Pageable and Sort objects, respectively: org.springframework.data.web.PageableHandlerMethodArgumentResolver and org.springframework.data.web.SortHandlerMethodArgumentResolver.
All these predefined methods are helpful, and the standardized Sort and Pageable objects definitely come in handy, but you still have no way to find specific entities or lists of entities using anything other than surrogate keys — at least, not without creating your own method implementations. This is where Spring Data’s query methods come in to play.
Creating Query Methods for Finding Entities
Query methods are specially defined methods that tell Spring Data how to find entities. The name of a query method starts with find...By, get...By, or read...By and is followed by the names of properties that should be matched on. The method parameters provide the values that should match the properties specified in the method name (in the same order the properties are listed in the method name if the values are of the same type). The method return type tells Spring Data whether to expect a single result (T) or multiple results (Iterable<T>, List<T>, Collection<T>, Page<T>, and so on). So, for example, in a BookRepository you might need to locate a book by its ISBN, author, or publisher:
public interface BookRepository extends PagingAndSortingRepository<Book, Long>
{
Book findByIsbn(String isbn);
List<Book> findByAuthor(String author);
List<Book> findByPublisher(String publisher);
}
The algorithm that analyzes these methods knows that findByIsbn should match the Book’s isbn property to the method parameter and that the result should be unique. Likewise, it knows that findByAuthor and findByPublisher should match multiple records using theauthor and publisher Book properties, respectively. Notice that the property names referenced in the repository method names match the JPA property names of the Book entity — this is the convention that you must follow. In most cases, this is also the JavaBean property names. Of course, an author can write many books and a publisher most certainly publishes many, so you probably need your query methods to support pagination.
public interface BookRepository extends PagingAndSortingRepository<Book, Long>
{
Book findByIsbn(String isbn);
Page<Book> findByAuthor(String author, Pageable instructions);
Page<Book> findByPublisher(String publisher, Pageable instructions);
}
You can put multiple properties in your query method name and separate those properties with logical operators as well:
List<Person> findByFirstNameAndLastName(String firstName, String lastName);
List<Person> findByFirstNameOrLastName (String firstName, String lastName);
Many databases ignore case when matching string-based fields (either by default or as an optional configuration), but you can explicitly indicate that case should be ignored using IgnoreCase:
Page<Person> findByFirstNameOrLastNameIgnoreCase(String firstName,
String lastName,
Pageable instructions);
In the preceding example, only the last name ignores case. You can also ignore case on the first name using the method name findByFirstNameIgnoreCaseOrLastNameIgnoreCase, but that is very verbose. Instead, you can tell Spring Data to ignore the case for all Stringproperties using findByFirstNameOrLastNameAllIgnoreCase.
Sometimes properties are not simple types. For example, a Person might have an address property of type Address. Spring Data can also match against this property if the parameter type is Address, but often you don’t want to match on the whole address. You may want to return a list of people in a certain postal code, for example. This is easily accomplished using Spring Data property expressions.
List<Person> findByAddressPostalCode(PostalCode code);
Assuming Person has an address property and that property’s type has a postalCode property of type PostalCode, Spring Data can find the people in the database with the given postal code. However, property expressions can create ambiguity in the matching algorithm. Spring Data greedily matches the property name before looking for a property expression, not unlike a regular expression might greedily match an “or more” control character. The algorithm could match on a different property name than you intended, and then fail to find a property within that property’s type matching the property expression. For this reason, it’s best to always separate property expressions using an underscore:
Page<Person> findByAddress_PostalCode(PostalCode code, Pageable instructions);
This removes the ambiguity so that Spring Data matches on the correct property.
You undoubtedly remember that method names begin with find...By, get...By, or read...By. These are introducing clauses, and By is a delimiter separating the introducing clause and the criteria to match on. To a large extent, you can place whatever you want to between find, get, or read and By. For example, to be more “plain language,” you could name a method findBookByIsbn or findPeopleByFirstNameAndLastName. Book and People are ignored in this case. However, if the word Distinct (matching that case) is in the introducing clause (such as findDistinctBooksByAuthor), this triggers the special behavior of enabling the distinct flag on the underlying query. This may or may not apply to the storage medium in use, but for JPA or JdbcTemplate repositories, it’s the equivalent of using the DISTINCT keyword in the JPQL or SQL query.
In addition to the Or and And keywords that separate multiple criteria, the criteria in a query method name can contain many other keywords to refine the way the criteria match:
· Is and Equals are implied in the absence of other keywords, but you may explicitly use them. For example, findByIsbn is equivalent to findByIsbnIs and findByIsbnEquals.
· Not and IsNot negate any other keyword except for Or and And. Is and Equals are still implied in the absence of other keywords, so findByIsbnIsNot is equivalent to findByIsbnIsNotEqual.
· After and IsAfter indicate that the property is a date and/or time that should come after the given value, whereas Before and IsBefore indicate that the property should come before the given value. Example: findByDateFoundedIsAfter(Date date).
· Containing, IsContaining, and Contains indicate that the property’s value may start and end with anything but should contain the given value. This is similar to StartingWith, IsStartingWith, and StartsWith, which indicate that the property should start with the specified value. Likewise, EndingWith, IsEndingWith, and EndsWith indicate that the property should end with the specified value. Example: findByTitleContains(String value) is equivalent to the SQL criteria WHERE title = '%value%'.
· Like is similar to Contains, StartsWith, and EndsWith, except that value you provide should already contain the appropriate wildcards (instead of Spring Data adding them for you). This gives you the flexibility to specify more advanced patterns. NotLike simply negates Like. Example: findByTitleLike(String value) could be called with value "%Catcher%Rye%" and would match “The Catcher in the Rye” and “Catcher Brings Home Rye Bread.”
· Between and IsBetween indicate that the property should be between the two specified values. This means that you must provide two parameters for this property criterion. You can use Between on any type that may be compared mathematically in this manner, such as numeric and date types. Example: findByDateFoundedBetween(Date start, Date end).
· Exists indicates that something should exist. Its meaning may vary wildly between storage mediums. It is roughly equivalent to the EXISTS keyword in JPQL and SQL.
· True and IsTrue indicate that the named property should be true, whereas False and IsFalse indicate that the named property should be false. These keywords do not require method parameters because the value is implied by the keywords themselves. Example:findByApprovedIsFalse().
· GreaterThan and IsGreaterThan indicate that the property is greater than the parameter value. You can include the parameter value in the bounds with GreaterThanEqual or IsGreaterThanEqual. The inverse of these keywords are LessThan, IsLessThan, LessThanEqual, and IsLessThanEqual.
· In indicates that the property value must be equal to at least one of the values specified. The parameter matching this criterion should be an Iterable of the same type of the property. Example: findByAuthorIn(Iterable<String> authors).
· Null and IsNull indicate that the value should be null. These keywords also do not require method parameters because the value is implied.
· Near, IsNear, Within, and IsWithin are keywords useful for certain NoSQL database types but have no useful meaning in JPA.
· Regex, MatchesRegex, and Matches indicate that the property value should match the String regular expression (do not use Pattern) specified in the corresponding method parameter.
Providing Custom Method Implementations
As you can tell, the query method language is really quite powerful. There’s not a whole lot you can’t do with Spring Data interface methods. In almost all cases, you can simply create an interface, sit back, and let Spring Data do the work for you. Every once in a while, however, you’ll come across a situation that Spring Data can’t handle. One example of this is performing full-text searching, something you’ll explore more in Chapter 23.
Another example is user-generated dynamic queries. Usually you want to strictly structure the queries a user can perform on persisted data. Allowing a user to filter on virtually any property can have disastrous performance implications. But where you understand the risks and plan accordingly, such a tool can be extremely powerful and useful for your users. It is also not possible to achieve this using standard Spring Data query methods.
NOTE Although Spring Data does not provide a standard mechanism for performing dynamic queries, Spring Data JPA does provide two proprietary mechanisms for doing so using the JPA criteria API or Querydsl predicates. If you use JPA repositories, you can use one of these mechanisms. If you use some other Spring Data repository type, you may still have to create your own mechanism for dynamic queries.
Whatever feature you decide that Spring Data cannot achieve on its own, adding custom behavior to a Spring Data repository is generally very easy. You can take one of two approaches or both at once as the need arises: customizing an individual repository or customizing all repositories.
Customizing an Individual Repository
The first step in customizing an individual repository is to create an interface for that customization. This interface should be separate from the actual repository interface and should specify all methods (at least one) that have custom implementations for your repository. The repository interface should then extend the customization interface.
public interface BookRepositoryCustomization
{
public Page<Book> findBooksWithQuery(DynamicQuery query, Pageable p);
public Page<Book> searchBooks(String searchQuery, Pageable p);
}
public interface BookRepository
extends PagingAndSortingRepository<Book, Long>, BookRepositoryCustomization
{
}
You can name the repository and customization interfaces whatever you want; these names are just examples. When Spring Data finds BookRepository, it first looks for a class in the same package named BookRepositoryImpl (or whatever you named the interface plusImpl) and instantiates and wires that class as any ordinary Spring bean. This class should implement the BookRepositoryCustomization interface and provide the behavior for its methods. Spring Data delegates to this implementation when the customized methods are invoked on the BookRepository. For all other methods, Spring Data provides the standard Spring Data implementations. The following snippet demonstrates this implementation. The actual code that makes up the methods is unimportant, and the DynamicQuery class is just a hypothetical holder for dynamic query criteria.
NOTE You can change the class name suffix that Spring Data looks for from Impl to something else — more on that in the next section.
public class BookRepositoryImpl
implements BookRepositoryCustomization
{
@PersistenceContext EntityManager entityManager;
@Override
public Page<Book> findBooksWithQuery(DynamicQuery query, Pageable p)
{
// code to implement finding books
}
@Override
public Page<Book> searchBooks(String searchQuery, Pageable p)
{
// code to implement searching books
}
}
Customizing an individual repository may be a fairly common occurrence if you make heavy use of full-text searching or dynamic querying. You won’t see a working example in this chapter, but in Chapter 23 you use this customization technique to implement searching methods.
Customizing All Repositories
As you can see, customizing an individual repository is really easy. In nearly all customization scenarios, you’ll either customize only a few of your repositories or the customizations will be different for all repositories. In these cases, individual customization is the route you want to take. However, in the rarest circumstances you might want to provide the same customized method to all your repositories of a particular type (such as all your JPA repositories). This is a significantly more complicated process. First, you must create a new interface that extends the project-specific interface and specifies the custom method or methods.
@NoRepositoryBean
public interface CustomRepository<T, ID extends Serializable>
extends JpaRepository<T, ID>
{
public void customOperation(T entity);
}
Notice that the interface extends org.springframework.data.jpa.repository.JpaRepository (which in turn extends CrudRepository and PagingAndSortingRepository). Each Spring Data subproject provides one or more repository interfaces that extend the base Spring Data Commons repository interfaces. Using Spring Data JPA as an example here, the CustomRepository must extend JpaRepository, the interface that Spring Data JPA scans for.
You must also annotate CustomRepository with @org.springframework.data.repository.NoRepositoryBean. Because CustomRepository itself extends Repository (by way of JpaRepository extends PagingAndSortingRepository extends CrudRepository), Spring Data JPA would normally detect it and create an implementation of it. You don’t want this — CustomRepository is supposed to merely be a base interface for your repositories. @NoRepositoryBean tells Spring Data to not create an implementation for this interface. (If you look at the API documentation for CrudRepository, PagingAndSortingRepository, and JpaRepository, they are all annotated @NoRepositoryBean as well.)
After specifying your new interface, you must extend the base repository class provided by the Spring Data JPA project.
public class CustomRepositoryImpl<T, ID extends Serializable>
extends SimpleJpaRepository<T, ID>
implements CustomRepository<T, ID>
{
private Class<T> domainClass;
private EntityManager entityManager;
public CustomRepositoryImpl(Class<T> domainClass, EntityManager entityManager)
{
super(domainClass, entityManager);
this.domainClass = domainClass;
this.entityManager = entityManager;
}
public CustomRepositoryImpl(JpaEntityInformation<T, ?> information,
EntityManager entityManager)
{
super(information, entityManager);
this.domainClass = information.getJavaType();
this.entityManager = entityManager;
}
public void customOperation(T)
{
// code to implement custom operation
}
}
The org.springframework.data.jpa.repository.support.SimpleJpaRepository is the class that provides base support for predefined interface methods, such as findOne(ID) and save(T). If you want to also provide Querydsl support, you should extendorg.springframework.data.jpa.repository.support.QueryDslJpaRepository instead of SimpleJpaRepository.
Now comes the challenging bit of providing custom behavior for all your repositories. Spring Data JPA does not use your CustomRepositoryImpl as its base repository class automatically. You must create a factory bean to perform this task and replace the default factory bean with your factory bean.
public class CustomRepositoryFactoryBean<R extends JpaRepository<T, ID>, T,
ID extends Serializable>
extends JpaRepositoryFactoryBean<R, T, ID>
{
@Override
protected RepositoryFactorySupport createRepositoryFactory(EntityManager e)
{
return new CustomRepositoryFactory<T, ID>(e);
}
private static class CustomRepositoryFactory<T, ID extends Serializable>
extends JpaRepositoryFactory
{
private EntityManager entityManager;
public CustomRepositoryFactory(EntityManager entityManager)
{
super(entityManager);
this.entityManager = entityManager;
}
@Override
@SuppressWarnings("unchecked")
protected Object getTargetRepository(RepositoryMetadata metadata)
{
return new CustomRepositoryImpl<T, ID>(
(Class<T>) metadata.getDomainType(), this.entityManager
);
}
@Override
protected Class<?> getRepositoryBaseClass(RepositoryMetadata metadata)
{
return CustomRepositoryImpl.class;
}
}
}
Just like the LocalContainerEntityManagerFactoryBean acts as a factory for creating EntityManagerFactorys, CustomRepositoryFactoryBean acts as a factory for creating CustomRepositoryFactorys. The CustomRepositoryFactory stores the EntityManager and responds to calls for new CustomRepository instances. Because CustomRepositoryImpl (in its own code and by way of extending SimpleJpaRepository) already implements all the base methods specified in CrudRepository, PagingAndSortingRepository, JpaRepository, and CustomRepository, Spring Data JPA needs only to take the created CustomRepositoryImpl instance and dynamically add implementations for the methods specified in any extending interfaces (such as BookRepository or PersonRepository).
The final step of adding this custom behavior to all your JPA entities is to configure Spring Data JPA to use the CustomRepositoryFactoryBean instead of the default JpaRepositoryFactoryBean. You learn how to do that in the next section. Because you’ll probably never have to add the same custom method to all the repositories for a given database type, this book does not provide an actual working example; however, you can create one from the sample code shown here. In some cases, it may simply be easier to create a customization interface and implementation as if you were customizing an individual repository and then apply that interface to all your repositories.
CONFIGURING AND CREATING SPRING DATA JPA REPOSITORIES
In the previous section you explored using Spring Data to write repository interfaces and learned how it can completely replace your hand-written interfaces. Although the text occasionally mentioned Spring Data JPA (such as when adding custom method implementations), everything you read about applies to Spring Data in general, and you can apply the techniques you learned to not just Spring Data JPA, but also a host of other Spring Data projects that support different database types. Now you’ll switch gears and learn about Spring Data JPA specifically, how to use it, and how to configure it. In Chapter 21, you learned how to configure JPA in Spring Framework. If you did not read Chapter 21, you need to go back and catch up now. The configuration introduced in that chapter is heavily used in this section for setting up Spring Data JPA.
Configuring Spring Data JPA and creating repositories for it to implement are both very simple tasks. The beauty of using any Spring Data project is that there really isn’t a lot for you to do unless you need to implement custom behavior. In this section, you explore getting Spring Data JPA set up and running using the Spring-Data-JPA project available for download from the wrox.com code download site. It is based on the Spring-JPA project you worked on in Chapter 21. Its entities are identical and use the existing database, database table schema, and Tomcat DataSource resource.
Enabling Repository Auto-Generation
Configuring Spring Data JPA doesn’t involve very much effort. You have only a handful of options to consider. As with Spring Framework, you can take two different configuration approaches: XML or Java. This section tells you about both, but only Java configuration is demonstrated in the Spring-Data-JPA project. Be sure to read about the XML namespace configuration even if you don’t intend to use it because it introduces some concepts important to the Java configuration.
Using the XML Namespace Configuration
You use two XML namespaces when you configure Spring Data JPA. The first, http://www.springframework.org/schema/data/repository, is the core namespace for Spring Data Commons. (In this book, the namespace prefix is data.) All Spring Data projects use this namespace in some fashion to configure repository generation. In some cases, a Spring Data project, like Spring Data JPA, may extend some of the types defined in the Spring Data Commons namespace to create additional elements. That is, indeed, the case with the Spring Data JPA namespace, http://www.springframework.org/schema/data/jpa (with a data-jpa namespace prefix in this book).
Spring Data has the capability of populating your database with data using the repositories it generates. It does this using either XML or JSON files. This book does not go into details about this feature because you should only use it in a development environment, and it can be very dangerous in production systems. However, should you need to configure this feature you would use one of the following XML namespace elements, all from the Spring Data Commons namespace.
· <data:jackson-populator> defines a bean that populates entities using a JSON file by way of the Jackson Data Processor 1.x ObjectMapper. You must specify the name or names of your JSON files using the locations attribute. You can customize the name of this bean using the id attribute. If you have already created and configured an ObjectMapper 1.x bean, you should put the name of that bean in the object-mapper-ref attribute so that Spring Data uses that mapper.
· <data:jackson2-populator> also defines a bean that populates entities using a JSON file but makes use of the Jackson Data Processor 2.x ObjectMapper. It also has a required locations attribute, the optional id bean name attribute, and an object-mapper-ref attribute for referencing the ObjectMapper 2.x bean.
· <data:unmarshaller-populator> defines a bean that populates entities using an XML file. Its locations attribute must point to one or more XML files containing entity definitions. Because a Spring Unmarshaller requires some configuration (which you learned about in Chapter 17), you must specify the Unmarshaller bean name using the required unmarshaller-ref attribute. You can also customize the bean name with the id attribute.
In the current version of Spring Data Commons, these are the only elements the namespace contains. You’ll never need them unless you decide to enable entity auto-population. The Spring Data Commons namespace does define some core types that serve as the foundation for the two Spring Data JPA namespace elements.
The <data-jpa:repositories> element is the central element for configuring repository generation using Spring Data and Spring Data JPA. Most of its attributes and sub-elements come from the Commons namespace and are available to other project namespace elements, such as <data-mongo:repositories> and <data-neo4j:repositories>. The common attributes include:
· base-package — This is the only required attribute. Spring Data JPA looks in this package, and any subpackages for interfaces that extend Repository and aren’t annotated @NoRepositoryBean. Then it generates implementations for these interfaces.
· named-queries-location — If you use named queries with your Spring Data project of choice, you can use this attribute to define the location of a .properties file containing these named queries. This does not apply to Spring Data JPA, which instead uses the JPA standard <named-query> elements in orm.xml and @javax.persistence.NamedQuery and @javax.persistence.NamedQueries annotations on entity classes to define named queries.
· repository-impl-postfix — This defines the suffix that Spring Data appends to a repository interface to locate the custom method implementations. It defaults to Impl, which is why the BookRepository’s custom method implementation class in the previous section was named BookRepositoryImpl. You can use this attribute in most Spring Data projects including Spring Data JPA, but it does not apply to them all. If you use a good IDE, it tells you whether you can use this element.
· query-lookup-strategy — This attribute specifies how Spring Data creates queries for your query methods. The default, create-if-not-found, is usually sufficient. It means that Spring Data should look for a named query that matches the method name, and if it doesn’t exist, create a method automatically using the algorithm described in the previous section (remember: find...By). The value create disables looking up named queries and uses only the query method algorithm. The final value, use-declared-query, disables the query method algorithm, uses only named queries, and fails if a match is not found.
· factory-class — This enables you to specify a different default repository factory bean and is where you configure the CustomRepositoryFactoryBean you saw in the previous section. This attribute applies only to some Spring Data projects, including Spring Data JPA.
· transaction-manager-ref — Spring Data JPA and some other Spring Data projects support transactional repositories. If this is the case, you can specify the name of the PlatformTransactionManager bean that the repositories should use. If you do not specify this, Spring Data JPA determines the default PlatformTransactionManager using the same algorithm that Spring Framework uses. It’s safest to always specify this attribute when applicable.
The common sub-elements that you use within <data-jpa:repositories> and any other Spring Data project namespace repositories elements are:
· <data:include-filter> — Use one or more of these to define additional criteria that must be met before an interface is eligible for auto-generation. These criteria replace the standard Repository interface requirement. This element is identical to the<context:include-filter> element you learned about for <context:component-scan> in Chapter 12.
· <data:exclude-filter> — Use one or more of these to exclude certain repository interfaces from being eligible for auto-generation. This element is the analog of <context:exclude-filter> for <context:component-scan>.
As an example of using these sub-elements, consider the following code. Normally enabling Spring Data JPA repositories would scan for all interfaces extending Repository. However, if you were using both Spring Data JPA and Spring Data MongoDB, they would both scan for Repository, which would result in duplicate repositories and serious problems. Using the elements that follow eliminates the default scanning (for Repository) and activates more specific scanning — for interfaces that extend JpaRepository for Spring Data JPA and MongoRepository for Spring Data MongoDB. (Alternatively, you could simply place these repositories in separate packages.)
<data-jpa:repositories base-package="com.sample">
<data:include-filter type="assignable"
expression="org.springframework.data.jpa.
repository.JpaRepository" />
</data-jpa:repositories>
<data-mongo:repositories base-package="com.sample">
<data:include-filter type="assignable"
expression="org.springframework.data.mongodb.
repository.MongoRepository" />
</data-mongo:repositories>
Spring Data JPA defines an additional entity-manager-factory-ref attribute so that you can specify the EntityManagerFactory that Spring Data JPA should use for its JPA operations. Because you typically have a LocalContainerEntityManagerFactoryBean configured, you should reference that bean directly.
When using Spring Data JPA, you can configure entity auditing using the <data-jpa:auditing> element. With auditing enabled, Spring Data can set certain entity properties for you whenever an entity is saved, such as the user who saved it or the date and time saved. Some other Spring Data projects also have this element (but with a different namespace prefix). All projects that offer this element support the following attributes:
· auditor-aware-ref — This is the bean name of an org.springframework.data.domain.AuditorAware<U> implementation that determines the currently authenticated user or Principal. Without this reference, auditing does not record the user who modified a record.
· set-dates — This is a boolean attribute that indicates whether creation and modification dates should be set whenever an entity is created or saved. It defaults to true.
· date-time-provider-ref — Use this attribute to specify the bean name of an org.springframework.data.auditing.DateTimeProvider implementation for determining the date and time to use for auditing purposes. The default isorg.springframework.data.auditing.CurrentDateTimeProvider. Prior to Spring Data Commons 1.7, using a provider required you to have Joda Time on your classpath. As of version 1.7, the DateTimeProvider is now based on a Calendar, and Joda Time is no longer required.
· modify-on-creation — This attribute, which defaults to true, indicates whether you want to set the modification date on creation, too. If false, the modification date is saved only on update.
This may seem like a lot, but in reality the typical Spring Data JPA configuration is likely to look very much like this:
<?xml version="1.0" encoding="UTF-8"?>
<beans xmlns="http://www.springframework.org/schema/beans"
xmlns:xsi="http://www.w3.org/2001/XMLSchema-instance"
xmlns:data-jpa="http://www.springframework.org/schema/data/jpa"
xsi:schemaLocation="http://www.springframework.org/schema/beans
http://www.springframework.org/schema/beans/spring-beans-4.0.xsd
http://www.springframework.org/schema/data/jpa
http://www.springframework.org/schema/data/jpa/spring-jpa-1.3.xsd">
<data-jpa:repositories base-package="com.sample"
transaction-manager-ref="jpaTransactionManager"
entity-manager-factory-ref="entityManagerFactoryBean"/>
</beans>
If you’re configuring auditing, custom scanning filters, auto-population, and a different query method strategy, your configuration might look more like this:
<?xml version="1.0" encoding="UTF-8"?>
<beans xmlns="http://www.springframework.org/schema/beans"
xmlns:xsi="http://www.w3.org/2001/XMLSchema-instance"
xmlns:data="http://www.springframework.org/schema/data/repository"
xmlns:data-jpa="http://www.springframework.org/schema/data/jpa"
xsi:schemaLocation="http://www.springframework.org/schema/beans
http://www.springframework.org/schema/beans/spring-beans-4.0.xsd
http://www.springframework.org/schema/data/repository
http://www.springframework.org/schema/data/repository/spring-
repository-1.6.xsd
http://www.springframework.org/schema/data/jpa
http://www.springframework.org/schema/data/jpa/spring-jpa-1.3.xsd">
<data:jackson2-populator locations="classpath:com/sample/config/inserts.json"
object-mapper-ref="objectMapper" />
<data-jpa:repositories base-package="com.sample"
transaction-manager-ref="jpaTransactionManager"
entity-manager-factory-ref="entityManagerFactoryBean"
query-lookup-strategy="create">
<data:include-filter type="annotation"
expression="com.sample.MyRepository" />
</data-jpa:repositories>
<data-jpa:auditing auditor-aware-ref="auditorAwareImpl" />
</beans>
Using the Java Configuration
The @org.springframework.data.jpa.repository.config.EnableJpaRepositories annotation replaces the <data-jpa:repositories> namespace element. It registers the same necessary beans and contains the same configuration options as the XML namespace element. These include:
· basePackages and basePackageClasses replace the attribute base-package.
· namedQueriesLocation replaces the attribute named-queries-location.
· repositoryImplementationPostfix replaces repository-impl-postfix.
· queryLookupStrategy replaces query-lookup-strategy and uses the org.springframework.data.repository.query.QueryLookupStrategy.Key enum.
· repositoryFactoryBeanClass replaces factory-class.
· transactionManagerRef replaces the transaction-manager-ref attribute.
· entityManagerFactoryRef replaces the entity-manager-factory-ref attribute.
· includeFilters and excludeFilters replace the <data:include-filter> and <data:exclude-filter> elements and use the @ComponentScan.Filter annotation that you are already familiar with.
The RootContextConfiguration class in the Spring-Data-JPA project uses @EnableJpaRepositories to set up Spring Data JPA. It requires no other special beans to be configured.
@Configuration
...
@EnableJpaRepositories(
basePackages = "com.wrox.site.repositories",
entityManagerFactoryRef = "entityManagerFactoryBean",
transactionManagerRef = "jpaTransactionManager"
)
...
public class RootContextConfiguration implements
AsyncConfigurer, SchedulingConfigurer
{
...
}
If you are happy with the default values of Spring Data’s set-dates and modify-on-creation auditing settings, you can configure auditing with pure Java. Just define a bean that implements AuditorAware and Spring Data can find it. However, if you need to change one or both of these values to false, you must use the XML namespace and @ImportResource to include the XML configuration in your Java configuration.
For the most part, however, you configure auditing on an entity-by-entity basis. In previous versions of Spring Data Commons, auditable entities had to implement org.springframework.data.domain.Auditable<U, ID extends Serializable> where U is the user or Principaltype. This interface defined very rigid property names, and timestamps had to use Joda Time. All auditable entities had to have createdBy, createdDate, lastModifiedBy, and lastModifiedDate properties. As of Spring Data Commons 1.5, you can use annotations to flag entity properties as auditable properties. An entity class may have at most one of each of the following property annotations (including in properties inherited from superclasses). You may choose to have one auditable property or all four.
· @org.springframework.data.annotation.CreatedBy properties are set to the logged-in user when the entity is created. The Java type must match the type returned by the AuditorAware implementation.
· @org.springframework.data.annotation.CreatedDate properties are set to the current date and time when the entity is created. Prior to Spring Data Commons 1.7, the only supported Java types were long, Long, java.util.Date, and org.joda.time.DateTime. As of Spring Data Commons 1.7, you can also use Calendar and the Java 8 Date and Time types Instant, LocalDateTime, OffsetDateTime, and ZonedDateTime. You cannot, however, use Timestamp. Whatever type or types you choose, the persistence technology you are using (JPA, MongoDB, and so on) must also support those types.
· @org.springframework.data.annotation.LastModifiedBy properties are set to the logged-in user when the entity is updated. The Java type must match the type returned by the AuditorAware implementation.
· @org.springframework.data.annotation.LastModifiedDate properties are set to the current time when the entity is updated. It supports the same types as @CreatedDate.
Configuring Spring MVC Support
As mentioned in the previous section, Spring Data can automatically convert request parameters into Spring Web MVC handler method arguments for Pageable and Sort. In addition, using your repositories, it can automatically convert request parameters and path variables to your entity types as Spring Web MVC handler method arguments. For example, you could create a handler method like this:
@RequestMapping("/person/{id}")
public String viewPerson(@PathVariable("id") Person person)
{
// method implementation
}
Spring Data can take the ID from the URL, retrieve the Person object from the Person repository implementation it created using findOne(ID), and automatically provide that Person to your controller method. This eliminates the step of manually retrieving the Personfrom the repository using a long ID method parameter.
Configuring this support, which is new in Spring Data Commons 1.6, is really quite easy. Just annotate your DispatcherServlet configuration class (or classes, if you have multiple DispatcherServlets) with@org.springframework.data.web.config.EnableSpringDataWebSupport. This automatically registers an org.springframework.data.repository.support.DomainClassConverter, which converts request parameters and path variables into your entities. It also registers thePageableHandlerMethodArgumentResolver and SortHandlerMethodArgumentResolver beans, enabling conversion of Pageables and Sorts from request parameters. This is demonstrated in the WebServletContextConfiguration.
@Configuration
@EnableWebMvc
@EnableSpringDataWebSupport
@ComponentScan(
basePackages = "com.wrox.site",
useDefaultFilters = false,
includeFilters = @ComponentScan.Filter(WebController.class)
)
public class WebServletContextConfiguration extends WebMvcConfigurerAdapter
{
...
}
The beans registered by using @EnableSpringDataWebSupport contain many settings that are initialized to default values. These settings include things like parameter names, maximum page sizes, and default Pageable and Sort values when request parameters are missing. These defaults might be acceptable for you, but if they are not, you need to omit the @EnableSpringDataWebSupport annotation and register these beans manually. This is demonstrated in RestServletContextConfiguration.
@Configuration
@EnableWebMvc
@ComponentScan(
basePackages = "com.wrox.site",
useDefaultFilters = false,
includeFilters =
@ComponentScan.Filter({RestEndpoint.class, RestEndpointAdvice.class})
)
public class RestServletContextConfiguration extends WebMvcConfigurerAdapter
{
private static final Logger log = LogManager.getLogger();
@Inject ApplicationContext applicationContext;
...
@Override
public void addArgumentResolvers(List<HandlerMethodArgumentResolver>
resolvers)
{
Sort defaultSort = new Sort(new Sort.Order(Sort.Direction.ASC, "id"));
Pageable defaultPageable = new PageRequest(0, 20, defaultSort);
SortHandlerMethodArgumentResolver sortResolver =
new SortHandlerMethodArgumentResolver();
// sortParameter defaults to "sort"
sortResolver.setSortParameter("$paging.sort");
sortResolver.setFallbackSort(defaultSort);
PageableHandlerMethodArgumentResolver pageableResolver =
new PageableHandlerMethodArgumentResolver(sortResolver);
pageableResolver.setMaxPageSize(200);
pageableResolver.setOneIndexedParameters(true); // page starts at 1, not 0
// pageProperty defaults to "page" and sizeProperty to "size"
// The following is equal to .setPageProperty("$paging.page") and
// .setSizeProperty("$paging.size");
pageableResolver.setPrefix("$paging.");
pageableResolver.setFallbackPageable(defaultPageable);
resolvers.add(sortResolver);
resolvers.add(pageableResolver);
}
@Override
public void addFormatters(FormatterRegistry registry)
{
if(!(registry instanceof FormattingConversionService))
{
log.warn("Unable to register Spring Data JPA converter.");
return;
}
// DomainClassConverter adds itself to the registry
DomainClassConverter<FormattingConversionService> converter =
new DomainClassConverter<>((FormattingConversionService)registry);
converter.setApplicationContext(this.applicationContext);
}
...
}
Writing and Using Spring Data JPA Interfaces
Unless you have dozens or hundreds of repositories, you’ll likely spend more code configuring Spring Data JPA than creating repositories. The new AuthorRepository, BookRepository, and PublisherRepository interfaces in the Spring-Data-JPA project are practically empty. The GenericRepository, GenericBaseRepository, GenericJpaRepository, DefaultAuthorRepository, DefaultBookRepository, and DefaultPublisherRepository from the previous chapter’s Spring-JPA project are gone because they are no longer needed. Just think of all the code you’ve eliminated!
public interface AuthorRepository extends CrudRepository<Author, Long>
{
}
public interface BookRepository extends CrudRepository<Book, Long>
{
Book getOneByIsbn(String isbn);
}
public interface PublisherRepository extends CrudRepository<Publisher, Long>
{
}
Using these new interfaces requires only minor changes to the DefaultBookManager service. saveAuthor(), saveBook(), and savePublisher(), which previously called add() if the ID was less than one and update() otherwise, now simply call the save() method on the appropriate repository. The getAuthors(), getBooks() and getPublishers() methods previously used the getAll() repository methods and now use the findAll() repository methods.
...
@Override
@Transactional
public List<Author> getAuthors()
{
return this.toList(this.authorRepository.findAll());
}
...
@Override
@Transactional
public void saveAuthor(Author author)
{
this.authorRepository.save(author);
}
...
You may wonder why the repositories return an Iterable<T> instead of a List<T>, and why you have to take the extra step of iterating over the Iterable<T> to convert it to a List<T>. O/RMs usually back the Lists of entities they return directly with the JDBC ResultSet. This improves performance and allows the calling code to begin executing immediately while the database is still returning data to the application. However, returning from the @Transactional method commits the transaction and closing the JDBC Connection, thus closing the ResultSet. When an O/RM returns a List or other Iterable, it is best to iterate over the entire portion of the list that you require and copy the contents of the Iterable into another collection before exiting the transaction context. This ensures that all the entity data has been successfully read from the database before the transaction ends.
NOTE You probably noticed that the JPA repository interfaces you created extended CrudRepository from Spring Data Commons instead of JpaRepository from Spring Data JPA. You should only extend the interface whose methods you want to expose to your services. In most cases you shouldn’t need to expose the fact that your repositories use JPA, and so you shouldn’t extend JpaRepository. If you want to expose pagination capabilities, extend PagingAndSortingRepository. Only if you need to expose JPA-specific behavior, such as batch deletions or EntityManager flushing, should you extend JpaRepository.
Testing the application is just like testing the Spring-JPA project in Chapter 21:
1. If you never tested the Spring-JPA project from Chapter 21, be sure that you run the create.sql script in MySQL Workbench to create the necessary database tables, and that you create the DataSource resource in Tomcat’s context.xml file.
2. <Resource name="jdbc/SpringJpa" type="javax.sql.DataSource"
3. maxActive="20" maxIdle="5" maxWait="10000"
4. username="tomcatUser" password="password1234"
5. driverClassName="com.mysql.jdbc.Driver"
6. defaultTransactionIsolation="READ_COMMITTED"
url="jdbc:mysql://localhost/SpringJpa" />
7. Compile the code and start Tomcat from your IDE. Go to http://localhost:8080/repositories/ and you should see the entities that you created when you tested Spring-JPA in Chapter 21.
8. Click Add More Entities a few more times and more entities should appear on the screen and in the database tables.
You are using JPA and Hibernate ORM without having written any persistence code!
REFACTORING THE CUSTOMER SUPPORT APPLICATION
Of course, the Customer Support application that you have been building throughout the book can make thorough use of Spring Data and Spring Data JPA. In fact, you can significantly reduce the amount of code you need in the application and make improving the application even easier.
In this section, you can follow along in the Customer-Support-v16 project available for download on the wrox.com code download site. It uses the same @EnableJpaRepositories configuration that you created in the previous section in RootContextConfiguration. However, it does not use @EnableSpringDataWebSupport in WebServletContextConfiguration. Instead, it manually creates the SortHandlerMethodArgumentResolver and PageableHandlerMethodArgumentResolver so that sensible defaults are applied, just like inRestServletContextConfiguration.
Converting the Existing Repositories
Like in the Spring-Data-JPA project, you’ll notice that:
· The GenericRepository, GenericBaseRepository, and GenericJpaRepository no longer exist in the Customer-Support-v16 project.
· The DefaultAttachmentRepository, DefaultTicketRepository, and DefaultUserRepository are also gone.
· The AttachmentRepository, TicketRepository, and UserRepository interfaces now extend CrudRepository and moved to the com.wrox.site.repositories package.
You don’t even need to change the additional methods that AttachmentRepository and UserRepository define; they are already compatible with the Spring Data query method algorithm.
public interface AttachmentRepository extends CrudRepository<Attachment, Long>
{
Iterable<Attachment> getByTicketId(long ticketId);
}
public interface TicketRepository extends CrudRepository<TicketEntity, Long>
{
}
public interface UserRepository extends CrudRepository<UserPrincipal, Long>
{
UserPrincipal getByUsername(String username);
}
The changes to these repositories require a few tweaks to the services that use them. For example, the saveUser method in the DefaultAuthenticationService needs to use the repository’s new save method instead of add and update.
@Override
@Transactional
public void saveUser(UserPrincipal principal, String newPassword)
{
if(newPassword != null && newPassword.length() > 0)
{
String salt = BCrypt.gensalt(HASHING_ROUNDS, RANDOM);
principal.setPassword(BCrypt.hashpw(newPassword, salt).getBytes());
}
this.userRepository.save(principal);
}
In the DefaultTicketService, uses of:
· getAll become findAll.
· get become findOne.
· add and update become save.
· deleteById become delete.
The changes are minor but extend throughout the class, so the code is not included here. You’ll notice that the changes in the Customer-Support-v16 project do not include taking advantage of the pagination provided by Spring Data. Updating existing code for pagination is an exercise left up to you. Later in this section you’ll use pagination for ticket comments as an example.
NOTE In the former GenericRepository interface, both type parameters extended Serializable, so having delete(E) and delete(I) methods was ambiguous and wouldn’t compile. This is why GenericRepository defined delete(E) and deleteById(I)methods. In CrudRepository, only the ID type parameter extends Serializable, so it is possible to overload the delete method in this fashion. Thus, CrudRepository’s methods are delete(T) and delete(ID).
Adding Comments to Support Tickets
One of the major features missing from the Customer Support system right now is ticket commenting. What good is reporting a ticket if nobody can comment on it? With JPA, Spring Data, and Spring Data JPA, adding commenting to the Customer Support application is really easy. You’ll still have to change business logic and the user interface, but the persistence layer is taken care of for you. First you create the comment entity and repository and then update the services to manipulate comments. When done with this, you need to add comments to the user interface.
Creating the Entity and Repository
You want to start by creating a TicketComment POJO, of course. It looks remarkably similar to a ticket but lacks a subject.
public class TicketComment
{
private long id;
@NotBlank(message = "{validate.ticket.comment.customerName}")
private String customerName;
@NotBlank(message = "{validate.ticket.comment.body}")
private String body;
private Instant dateCreated;
// mutators and accessors omitted
}
Because you still can’t persist entities with Instant properties, you need to create a separate TicketCommentEntity. TicketComment then serves as a DTO.
@Entity
@Table(name = "TicketComment")
public class TicketCommentEntity implements Serializable
{
private static final long serialVersionUID = 1L;
private long id;
private long ticketId;
private long userId;
private String body;
private Timestamp dateCreated;
@Id
@Column(name = "CommentId")
@GeneratedValue(strategy = GenerationType.IDENTITY)
public long getId() { ... }
public void setId(long id) { ... }
@Basic
public long getTicketId() { ... }
public void setTicketId(long ticketId) { ... }
@Basic
public long getUserId() { ... }
public void setUserId(long userId) { ... }
@Basic
public String getBody() { ... }
public void setBody(String body) { ... }
@Basic
public Timestamp getDateCreated() { ... }
public void setDateCreated(Timestamp dateCreated) { ... }
}
You also need a new MySQL table to persist comments to. Be sure to run the following creation statement, which you can also find in create.sql, on your Customer Support database.
CREATE TABLE TicketComment (
CommentId BIGINT UNSIGNED NOT NULL AUTO_INCREMENT PRIMARY KEY,
TicketId BIGINT UNSIGNED NOT NULL,
UserId BIGINT UNSIGNED NOT NULL,
Body TEXT,
DateCreated TIMESTAMP(6) NULL,
CONSTRAINT TicketComment_UserId FOREIGN KEY (UserId)
REFERENCES UserPrincipal (UserId) ON DELETE CASCADE ,
CONSTRAINT TicketComment_TicketId FOREIGN KEY (TicketId)
REFERENCES Ticket (TicketId) ON DELETE CASCADE
) ENGINE = InnoDB;
Finally, creating the TicketCommentRepository is the simplest step of all because all you have to do is define an interface and let Spring Data take care of the rest.
public interface TicketCommentRepository
extends CrudRepository<TicketCommentEntity, Long>
{
Page<TicketCommentEntity> getByTicketId(long ticketId, Pageable p);
}
Updating the Services
The service layer should also be fairly easy to update. You need methods for getting the comments for a ticket, saving a comment, and deleting a comment. You won’t really need to do anything more than that with comments. The following three methods added to the TicketService interface take care of that well. The TicketService makes sense as a home for these because comments are inextricably linked to tickets.
@NotNull
Page<TicketComment> getComments(
@Min(value = 1L, message = "{validate.ticketService.getComments.id}")
long ticketId,
@NotNull(message = "{validate.ticketService.getComments.page}")
Pageable page
);
void save(
@NotNull(message = "{validate.ticketService.save.comment}")
@Valid TicketComment comment,
@Min(value = 1L, message = "{validate.ticketService.saveComment.id}")
long ticketId
);
void deleteComment(long id);
The implementations for save and deleteComment in DefaultTicketService are fairly standard and mimic the counterpart methods for tickets. getComments is interesting, however, because it must convert the Page<TicketCommentEntity> returned by the repository into aPage<TicketComment>. In Chapter 24, you’ll learn how to use Instants in entities so that you can get rid of this extra work.
@Override
@Transactional
public Page<TicketComment> getComments(long ticketId, Pageable page)
{
List<TicketComment> comments = new ArrayList<>();
Page<TicketCommentEntity> entities =
this.commentRepository.getByTicketId(ticketId, page);
entities.forEach(e -> comments.add(this.convert(e)));
return new PageImpl<>(comments, page, entities.getTotalElements());
}
private TicketComment convert(TicketCommentEntity entity)
{
TicketComment comment = new TicketComment();
comment.setId(entity.getId());
comment.setCustomerName(
this.userRepository.findOne(entity.getUserId()).getUsername()
);
comment.setBody(entity.getBody());
comment.setDateCreated(Instant.ofEpochMilli(
entity.getDateCreated().getTime()
));
return comment;
}
Commenting from the User Interface
Updating the user interface is the last step to adding comments to the customer support application. The changes to the TicketController are small. First, the view method needs a Pageable argument (which Spring Data automatically resolves for you) and two simple lines of added code.
model.put("comments", this.ticketService.getComments(ticketId, page));
model.put("commentForm", new CommentForm());
The controller also needs a method for adding new comments. The comment form exists on the ticket-viewing page so that the user can view the ticket and other comments while commenting. Therefore, this method defers to the view method if validation errors occur.
@RequestMapping(value = "comment/{ticketId}", method = RequestMethod.POST)
public ModelAndView comment(Principal principal, @Valid CommentForm form,
Errors errors, Map<String, Object> model,
Pageable page,
@PathVariable("ticketId") long ticketId)
{
Ticket ticket = this.ticketService.getTicket(ticketId);
if(ticket == null)
return this.getListRedirectModelAndView();
if(errors.hasErrors())
return this.view(model, page, ticketId);
TicketComment comment = new TicketComment();
comment.setCustomerName(principal.getName());
comment.setBody(form.getBody());
try
{
this.ticketService.save(comment, ticketId);
}
catch(ConstraintViolationException e)
{
model.put("validationErrors", e.getConstraintViolations());
return this.view(model, page, ticketId);
}
return new ModelAndView(new RedirectView(
"/ticket/view/" + ticketId, true, false
));
}
The JSP code for displaying and adding comments is long, and a large chunk of it is dedicated to pagination. You can view the code in /WEB-INF/jsp/view/ticket/view.jsp. Everything after line 21 displays and adds comments. As you read the code, you will probably determine that you could do even more with the page links (such as adding first and last page links, and not displaying links to every single page if there are many pages). You should quickly realize that duplicating that code everywhere you need paging is not desirable. A custom JSP tag is just the thing to solve this problem, and creating this tag is an exercise left up to you.
You are now ready to test the updated Customer Support application using these steps:
1. If you did not test the application in Chapter 21, make sure you run the create.sql script and add the DataSource resource to Tomcat’s context.xml file. If you did, make sure you add the TicketComment table to the database.
2. Compile the project and start Tomcat from your IDE.
3. Go to http://localhost:8080/support/ in your favorite browser, log in, and comment on some of the tickets you created in Chapter 21.
4. Create more tickets if you like, and try creating different comments signed in as different users.
5. Add more than 10 comments to a ticket so that you can test pagination. Using Spring Data JPA, you have easily refactored and added comments to the support system.
You may have noticed that the SOAP and RESTful web services are not updated to address creating and returning comments. This, also, is an exercise that is left to you.
SUMMARY
In this chapter, you explored how Spring Data and Spring Data JPA can eliminate the tedious, repetitive task of writing repository code. You learned about creating Spring Data repository interfaces and writing Spring Data query methods, and also how Spring Data creates the implementations for these interfaces on-the-fly. You were briefly introduced to adding custom behavior to Spring Data repositories, which you explore further in the next chapter. Finally, you added comments to support tickets in the Customer Support application with minimal effort thanks to Spring Data and demonstrated how easy it is to paginate data because of Spring Data’s Pageable, Page, and Sort objects.
In the next chapter you learn about various approaches to data searching and explore how to integrate native MySQL full-text searching and universal Apache Lucene full-text searching into your JPA repositories.
All materials on the site are licensed Creative Commons Attribution-Sharealike 3.0 Unported CC BY-SA 3.0 & GNU Free Documentation License (GFDL)
If you are the copyright holder of any material contained on our site and intend to remove it, please contact our site administrator for approval.
© 2016-2026 All site design rights belong to S.Y.A.