PROFESSIONAL JAVA FOR WEB APPLICATIONS (2014)
Part IV Securing Your Application with Spring Security
· CHAPTER 25: Introducing Spring Security
· CHAPTER 26: Authenticating Users with Spring Security
· CHAPTER 27: Using Authorization Tags and Annotations
· CHAPTER 28: Securing RESTful Web Services with OAuth
Chapter 25 Introducing Spring Security
IN THIS CHAPTER
· Understanding authentication and authorization
· Integrating Spring Security
WROX.COM CODE DOWNLOADS FOR THIS CHAPTER
There are no code downloads for this chapter.
NEW MAVEN DEPENDENCIES FOR THIS CHAPTER
There are no new Maven dependencies for this chapter. Continue to use the Maven dependencies introduced in all previous chapters.
WHAT IS AUTHENTICATION?
When many people think of authentication, they think of a mechanism that determines whether someone has access to a system. Although this process is related to authentication, it is actually authorization. When you check whether someone has access to some system, building, file, or other object, you are checking whether they are authorized to use the target resource in the requested manner. The first step to authorization is authentication. The president of a company may be authorized to view some confidential file, but until you authenticate his identity, you can’t be sure he is really the president or someone posing as the president. If he is someone posing as the president, you should not authenticate him and therefore not authorize him.
You encounter authentication and authorization on a daily basis. When you log in to your computer network at work in the morning, this authenticates you and establishes your identity. Your permissions on the network then determine which systems you are authorized to access based on your identity. If you go to pick up your niece from school one afternoon because her parents are stuck in traffic, the school first checks your ID to make sure you are who you say you are. This is authentication. They will then check the girl’s file to see if your name is among those authorized to pick her up. Assuming it is, then and only then, they let you leave with her. If you enter a military installation, they immediately check your ID to, again, make sure you are who you say you are. Sometimes, they’ll perform further checks, such as a fingerprint or retina scan, to more securely authenticate you. They may ask you for the “color of the day,” or the “password of the day.” When they are convinced that your authentication is valid, they check that you are authorized to access the area you are attempting to access.
Although it is true that authentication and authorization are necessarily and inextricably related, they are not the same concept. Going forward, you must remember the difference. In this chapter you explore the nuances and techniques involved in both authentication and authorization. You then take a look at Spring Security, a framework that you use in this fourth and final part of the book, so you can add security to your web applications.
Integrating Authentication
Though it does not necessarily have to be the first security component that you integrate into your application, authentication is the first step that your users must take to participate in protected activities or access protected resources in your application. Whether they authenticate through a trusted third party or directly through mechanisms your application provides, your users must establish their identity before you can authorize them. How this happens is a topic of great interest. You can take dozens of different approaches to create authentication mechanisms. Some are better than others, but most are roughly equivalent. Which you use is largely up to your particular business and security needs, and often the desires and technological savvy of your users drive it.
Anonymous Authentication
Anonymous authentication is certainly the simplest form of authentication that exists. You may be thinking, “How is anonymous authentication actually authentication? I thought authentication was about verifying someone’s identity?” This statement may be true, but it’s entirely relative to your definition of identity. For example, you may need to assert only that the browser visiting a page is the same browser that visited the previous page just a few moments ago. HTTP sessions achieve this by way of session ID tokens. Because a browser sends the same session ID token back to your server every time it visits a page on your site, you can tie these requests together as belonging to the same identity. You may simply not care who that visitor is. Instead, you just want to know whether it’s the same person. This is a form of anonymous authentication.
More broadly, you can think of anonymous authentication as merely the absence of any other form of authentication. Most web applications support anonymous authentication up to a point. Twitter, for example, enables you to view users’ feeds, trending topics, and more without “logging in.” This is anonymous authentication. However, if you want to tweet something or follow other users, you must authenticate in some way that establishes your Twitter ID.
Many sites permit you to perform some basic tasks and access some resources with anonymous authentication, requiring a higher level of authentication only if you want to perform protected activities or access protected resources. This is particularly true of many forums on sites throughout the Internet, where you usually can read any post anonymously but can create new posts only after authenticating. Still other sites require no authentication — you can do anything with anonymous authentication. Some sites, though rare, do not permit you to view or do anything anonymously. The Customer Support application you have worked on throughout this book is one example of disallowing anonymous authentication.
Password Authentication
Undoubtedly, when you were a kid you had some kind of fort, clubhouse, or tree house that you invited your friends over to. Before they could enter, you might have asked them for “the password.” Without the secret word or phrase that granted them access, they couldn’t come in. You didn’t ask them for their username and password. That was too complex. You just wanted to know if they knew “the password.” The earliest recorded use of passwords came from ancient Rome, where the Roman military used passwords, called watchwords, to authenticate members of the military whom they met. This was important because the military was so large that most of its members did not know every other member. The only way to tell friend from foe was to ask for the password. If the person knew the password, they were friend. If not, they were the enemy.
One of the problems with this system may already be immediately obvious to you. Roman enemies eventually caught on, and when confronting a Roman soldier they would ask for the password before the Roman soldier got the chance. The Roman soldier would then immediately state the password, not realizing he was handing it over to the enemy, who could then use the password maliciously. To counter this problem, the use of passwords eventually evolved into the use of passwords and counter-passwords. In World War II, the United States 101st Airborne Division used passwords and counter-passwords during the Battle of Normandy in Normandy, France. Paratroopers would yell out the password “flash” as a challenge, and ground forces would respond with “thunder.” In this way both the paratroopers and the ground forces mutually established their identities as U.S. forces.
This password/counter-password approach is very similar to modern approaches involving web applications, where users expect an HTTPS certificate confirming the identity of the site before they provide their authentication credentials. If a user were to give his credentials to a malicious site posing as the intended site, that site could then use those credentials to do harm. Mutual authentication helps prevent such attacks, known as man-in-the-middle attacks.
One of the earliest recorded uses of computerized password authentication occurred at MIT in 1961. Its Compatible Time-Sharing System had a LOGIN command that required a user password to access the time-shared resources. Since that time, protecting passwords on computers and websites has been a never-ending battle. In the 1970s Robert Morris, while working on a UNIX system, came up with the idea of storing one-way hashes of passwords instead of the passwords themselves. In theory, because these hashes were irreversible, hackers could not determine the actual passwords and use them to access protected resources. The technique of storing one-way hashes has continued to this day, and remains the most secure way of protecting user passwords in case a password data store is breached.
Of course, as you likely know, hash-cracking hardware and software has become continually more advanced, and the algorithms that calculate the hashes have had to become more advanced to stay ahead of the hackers. Modern password-hacking computers contain as many as 30 Graphics Processing Units (GPUs). A GPU, usually used for the intense number-crunching necessary for rendering graphics on a display, is better-suited for quickly computing hashes of passwords than is a standard CPU. Furthermore, it is much easier to create a system with dozens of GPUs than with dozens of CPUs. Using special software capable of taking advantage of this power, hackers can generate billions of password hashes per second. This enables hackers to quickly mount a dictionary attack on a password database by calculating hashes for billions of possible password combinations and comparing those hashes to the hashes in the password database. Today’s advanced hash-calculating algorithms, such as BCrypt, are designed to be very slow and utilize memory resources, making it difficult or impossible for GPU-based attacks.
Usernames and Passwords
It’s unlikely you will protect your applications with just a password. A single password means anyone who authenticates to your site has the same identity. It also makes changing the password more difficult — you must notify everyone who knows it — and makes the password less secure. Undoubtedly, you’re already familiar with the alternative approach of assigning usernames and passwords. Each user has a unique username that no other user shares and a password associated solely with that username.
To authenticate and establish his or her identity, the user must enter the username and password when prompted. Sometimes the username is a user-chosen value, such as a name, nickname, or a “handle” by which the user prefers to be known. Other times the username might be the user’s e-mail address, simplifying a system that would otherwise have to store both the username and e-mail address. And then sometimes the username is a system-assigned value over which the user has no control. This is common in employee portals to HR systems such as e-payroll sites. The username is often the employee’s assigned employee ID number. Banks sometimes use customers’ account numbers as their usernames.
The origin and meaning of the username is really unimportant to the purpose of username-password authentication. With this type of authentication, you establish a unique identity for each user. The username serves as that identity, while the password authenticates the identity as genuine. Username-password authentication is the basis for many different methods of authentication, such as form authentication, operating system authentication, and more. You likely use some form of username-password authentication most, if not all, of the times you authenticate for websites, applications, and systems.
Basic and Digest Authentication
Basic access authentication is an HTTP authentication protocol that enables both proactive authentication requests and authentication challenge responses. When a resource protected by basic authentication receives a request lacking credentials, it responds with HTTP status code 401 Not Authorized and the WWW-Authenticate header, as in the following sample response header:
HTTP/1.1 401 Not Authorized
Date: Sun, 25 Aug 2013 21:46:47 GMT
WWW-Authenticate: Basic realm="Multinational Widget Corp. Customer Support"
When the browser receives this response, it prompts the user for a username and password in a modal window containing the text from the realm header parameter. If the user cancels, the browser cancels the request. If the user enters a username and password, the browser re-sends the exact same request with an Authorization header containing the word Basic followed by a space and the Base64-encoded username and password separated by a colon. So if the username is “John” and the password is “green,” the browser encodes “John:green” and re-sends the request as follows:
GET /support HTTP/1.1
Host: www.example.org
Authorization: Basic Sm9objpncmVlbg==
The server decodes the header and compares the username and password to the credential database stored server-side. Although the credentials are incorrect, the server keeps responding with 401 Not Authorized and the WWW-Authenticate header. Assuming the credentials check out, the user is authenticated and a normal response is returned. The browser then caches the authentication and re-sends it automatically on every subsequent request to that resource or its children. Typically, this cache expires after some time of inactivity.
One of the upsides of basic authentication is that it doesn’t require login pages, cookies, or HTTP session ID tokens. It can also function without a server 401 challenge response and without the user having to manipulate the Authorization header. Users can embed credentials directly in the request URL, and their browser or command-line client, such as Wget or cURL, converts those credentials to the Authorization header automatically. Such a URL might look like http://John:green@www.example.org/support.
Of course, this protocol is extremely vulnerable in many ways. First and foremost, the username and password are sent in plain text. (Base64 is only an encoding algorithm; it does not employ any hashing or encryption.) Any malicious party sniffing packets on the network can observe and capture the credentials in transit. The party can then use those credentials for nefarious purposes. Even if the party is not interested in the credentials themselves, it can simply replay the request and access the protected resources. Both these problems are serious, but become nonexistent if the requests and responses take place over HTTPS. HTTPS protects the credentials from snooping (man-in-the-middle) and prevents replay attacks. However, a third problem remains; the password is often stored plaintext on the server side, which is an additional vulnerability. Most modern web servers, however, provide mechanisms for storing the passwords using one-way hashes, instead.
Where HTTPS is either not an option or not wanted, server and client can still achieve some level of security using a similar protocol known as digest access authentication. This protocol uses the MD5 checksum algorithm to calculate a series of one-way hashes so that the password is never transmitted over the wire. In addition, two different nonces (a server nonce and a client nonce or cnonce) and a serial request number prevent replay attacks so hackers cannot simply replay the requests and view the protected resources. In response to a request without credentials, a server responds with 401 Not Authorized and the header WWW-Authenticate: Digest, including the realm parameter and several other header parameters:
· algorithm indicates which technique the client should use to create the first hash. If unspecified, the default value is "MD5", and means that the first hash is calculated as MD5(username:realm:password). The other valid value is "MD5-sess", meaning the first hash is calculated as MD5(MD5(username:realm:password):nonce:cnonce).
· qop indicates the quality of protection and may either be "auth" (the default) or "auth-int", or it may be "auth,auth-int" (in which case the client chooses which to use). If the client chooses "auth", the second hash is calculated as MD5(requestMethod:requestUri). If the client chooses "auth-int", the second hash is calculated as MD5(requestMethod:requestUri:MD5(requestBody)). The "auth-int" option applies only to requests that include a request body (POST, PUT, and so on), so servers usually ask for "auth,auth-int" and clients respond with "auth-int" for requests with bodies and "auth" for requests without.
· opaque is a required parameter of random string data. It must be hexadecimal or Base64-encoded. The client must return the opaque parameter value untouched. It has no special meaning and it provides no instructions; it’s just a sanity check.
· nonce contains the server nonce. It must be random and guaranteed to never repeat for any two 401 Not Authorized responses. The client must return the nonce parameter value untouched. Because the server sends a 401 Not Authorized response only until the client authenticates, the client sends the same server nonce for every request — the most recent server nonce.
NOTE A nonce is a special token used to prevent replay attacks. Every time a client makes a request to a server it generates a random token and includes that token in the request. The server stores nonce tokens to ensure that no two requests use the same nonce. Often, nonces are paired with timestamps so that the server doesn’t have to store nonces forever — nonces with timestamps older than a certain amount of time are always rejected. This requires the nonce and timestamp to be involved in the hash calculation so that an attacker can’t simply change the nonce or timestamp to replay the request.
After the client has calculated the first and second hashes, it then calculates the final hash or response hash. (Response here means response to the authentication challenge, not server response.) If qop is unspecified, the final hash is calculated asMD5(firstHash:nonce:secondHash). If qop is specified, the final hash is MD5(firstHash:nonce:nc:cnonce:qop:secondHash) where nc is the client nonce counter, also called the serial request number.
The second approach is more secure, so modern servers almost always specify qop. When the client sends a follow-up request with credentials in response to the challenge response, it calculates all the hashes and puts the final hash in the response parameter of theAuthorization header. It also includes the qop parameter with the chosen quality of protection, unless the server omitted that parameter.
Finally, it includes username, realm, nonce, uri, nc, cnonce, and opaque parameters with the expected values. (cnonce must be regenerated at every request, and it and nc must never repeat.) When the server receives the request, it recalculates all the hashes the same way the client should have, basing them on the provided parameters. (Passwords are stored hashed as MD5(username:realm:password), so that hash is already calculated.) If the final hash matches the value in the response parameter, the client successfully authenticated.
This exchange is demonstrated in the following sample requests and responses, assuming the same username, realm, and password as before:
REQUEST 1
GET /support HTTP/1.1
Host: www.example.org
RESPONSE 1
HTTP/1.1 401 Not Authorized
Date: Sun, 25 Aug 2013 21:46:47 GMT
WWW-Authenticate: Digest realm="Multinational Widget Corp. Customer Support",
algorithm="MD5-sess", qop="auth,auth-int",
nonce="d41d8cd98f00b204e9800998ecf8427e",
opaque="66ffcd4fb3f0ceb07195b60fa7991592"
REQUEST 2
GET /support HTTP/1.1
Host: www.example.org
Authorization: Digest realm="Multinational Widget Corp. Customer Support",
username="John", qop="auth", uri="/support",
nc="000001"
nonce="d41d8cd98f00b204e9800998ecf8427e",
opaque="66ffcd4fb3f0ceb07195b60fa7991592",
cnonce="9dba9637e8635a4d912075cd6ea55530",
response="4b4a3883cc8d220fc105e81a9592331c"
RESPONSE 2
HTTP/1.1 200 OK
Date: Sun, 25 Aug 2013 21:47:10 GMT
Content-Type: text/html;charset=UTF-8
Content-Length: 11485
...
REQUEST 3
GET /support/ticket/list HTTP/1.1
Host: www.example.org
Authorization: Digest realm="Multinational Widget Corp. Customer Support",
username="John", qop="auth", uri="/support/ticket/list",
nc="000002"
nonce="d41d8cd98f00b204e9800998ecf8427e",
opaque="66ffcd4fb3f0ceb07195b60fa7991592",
cnonce="361a1ce4535219d9208b61a3f5aa9706",
response="456fd32109400477064cafce92090662"
RESPONSE 3
HTTP/1.1 200 OK
Date: Sun, 25 Aug 2013 21:49:31 GMT
Content-Type: text/html;charset=UTF-8
Content-Length: 15817
...
Because the cnonce and nc change every request and the server remembers their values for some time, replay attacks are prevented. Because the password is never sent across the wire and is stored in hashed format, it is kept secure. Fortunately, the server handles this process for you, so as a programmer you don’t have to worry about the details. Depending on the server environment, you need only to declare that a particular resource is protected by basic or digest authentication. However, due to the most recent attacks on MD5, which rendered it largely obsolete, digest authentication is generally not something you should rely on anymore, outside of the security of HTTPS. Even over HTTPS, you should still use digest over basic when possible. Note that although all modern browsers support digest authentication, none of the most popular browsers support auth-int quality of protection.
Form Authentication
HTTP form authentication is the protocol with which you are likely most familiar. Its implementation is simple: When the client attempts to access a protected resource, the server redirects the client with 302 Found, 303 See Other, or 307 Temporary Redirect to a different page with a login form containing username and password fields. The user enters the username and password in the form, just as he would in a modal window with basic or digest authentication. If the credentials are incorrect, the server continues to redirect the user back to the login form, informing him that the login attempt failed. If the credentials are correct, the server sends the user back to his original destination or (if the server is not well behaved) to the application homepage. There is nothing special or important to highlight about this authentication mechanism. You probably use it every day. Like basic authentication, the credentials are sent in plaintext form across the web, so you should utilize HTTPS to protect these credentials whenever possible.
Microsoft Windows Authentication
Like basic, digest, and form authentication, Windows authentication requires the user to provide a username and password. In fact, these credentials may be presented using basic or form authentication. In these cases, the primary difference is that the credentials are checked against a Windows domain controller instead of an internal credential database. However, these situations are still primarily basic or form authentication. Integrated Windows Authentication (IWA) uses SPNEGO, Kerberos, or NTLMSSP to capture the Windows credentials of clients on their machine and securely pass those to the server automatically without including the password in the request. When this works, the process is transparent to users. They are never prompted with a modal window or login form to provide credentials because the protocol detects the Windows credentials automatically.
However, this is only possible in certain situations. Typically, users must use Microsoft Internet Explorer. Mozilla Firefox can support NTLMSSP, but only if users go to about:config and configure the site address in the network.automatic-ntlm-auth.trusted-urisproperty (which contains a comma-separated list of trusted sites that may request IWA). Most Internet users are simply not technologically savvy enough to make this change, so often Firefox is not an option. Google Chrome supports IWA, but with stricter security settings that Internet Explorer defines. A site must be qualified in the Local Intranet security zone before Chrome permits IWA to proceed.
Of course, all this assumes that users connect from a Microsoft Windows machine, which today is much less likely than it was 10 years ago. Many users today are on Mac OS X or Linux machines, incapable of providing Windows domain credentials. For this reason, Integrated Windows Authentication is often deployed only for internal resources in corporate environments in which users work in uniform environments. Public sites rarely use IWA for user authentication. Also, when you cannot guarantee that all user environments are Windows machines running supported browsers, you must provide backup options such as basic or form authentication backed by the Windows domain controller.
NOTE Simple and Protected GSSAPI Negotiation Mechanism (SPNEGO), Kerberos, and NT LAN Manager Security Support Provider (NTLMSSP) are different and related protocols concerning protocol negotiation and challenge-response authentication. You do not use them in this book, so it is out of scope to define them further.
Client Certificates
Client certificate authentication is a different approach to certifying a user’s identify. In involves no usernames or passwords, making it significantly more secure. In fact, client certificate authentication is one of the most secure authentication protocols available. As a part of the SSL protocol, client certificate authentication requires HTTPS. When you connect to a server via HTTPS, that server identifies itself with a server SSL certificate. It presents its public key, signed by a trusted certificate authority, and signs its communications with your browser using its private key. Client certificates are essentially the reverse of this.
During “registration” (the process during which users would normally create a username and password), the server tells a user’s browser to generate a public/private key pair. The browser stores the private key securely on the user’s machine and transmits the public key to the server. From then on, the browser presents the public key to the server for identity purposes and signs the communications to the server with the private key. The disadvantage to using this protocol is that users can’t easily use a new or different computer to authenticate with your site. They must back up their public/private key pair and restore it on the other computers they want to use. However, the advantage to this is the added security: Users’ credentials cannot easily be compromised. A hacker must take control of a user’s computer to use his credentials.
Many highly sensitive applications requiring strong security utilize client certificate authentication. Its benefits are attractive, but it requires a higher level of technological know-how than most Internet users possess today, which also makes it one of the most rarely used web authentication protocols.
Smart Cards and Biometrics
Two other alternatives to username-password authentication variants are smart cards and biometrics. A smart card is a special integrated circuit that a user can carry around in his pocket and plug in to his computer when he needs to authenticate. Like a government-issued ID card or magnetic employee security passcard, the smart card contains information asserting the user’s identity. Presentation of this smart card serves to authenticate the holder as that user. Microsoft Internet Explorer, Mozilla Firefox, and Google Chrome all support smart cards, although with varying levels of configuration complexity.
Biometrics involves capturing the fingerprints, voiceprint, iris scan, DNA, or other biological identity from the user and requires re-presentation of this identity each time the user authenticates. Most browsers support biometrics in some fashion or another using vendor-supplied plug-ins that integrate with the biometrics hardware being used. Biometrics is an extremely complex topic that is far outside the scope of this book.
Although smart cards and biometrics are both possible solutions for web application authentication, they are more typically used for authenticating people entering buildings or signing on to corporate or government computer systems.
Claims-Based Authentication
So far you have learned about various authentication mechanisms that you can implement directly in your application. Claims-based authentication is the mechanism that you get to not implement. With claims-based authentication, your application trusts a third-party application to authenticate users on your behalf. You neither care nor need to know how this third-party application performs the authentication process. If you have ever used Facebook to authenticate for another site, you have used claims-based authentication. Typically in claims-based authentication, when users attempt to access a protected resource in your application, you simply redirect them to the third-party application. After successful authentication, they return to your site with one or more claims asserting their identity. These claims, issued by the third-party application, are easily validated using a callback request to the application to retrieve this validation, as shown in Figure 25-1. Many different protocols, such as OAuth and SAML, implement or enable claims-based authentication mechanisms. You can also use claims for authorization purposes, something you explore more later in this section.
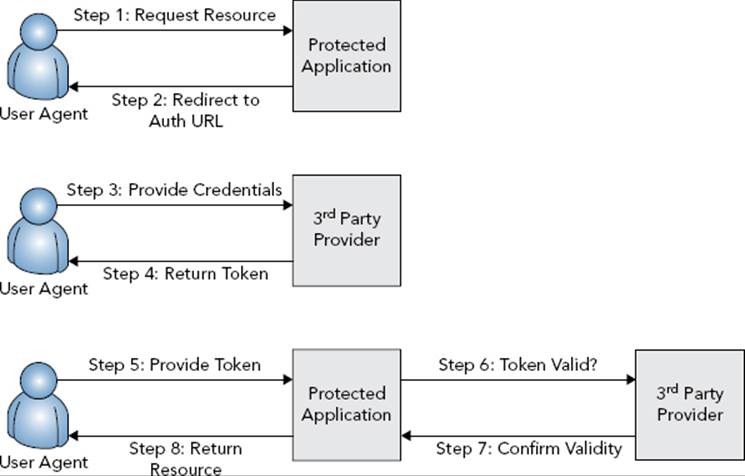
FIGURE 25-1
In some cases, your system communicates directly with the third-party system to exchange credentials for claims. Two common examples are Microsoft Windows’s Active Directory domain authentication and the Lightweight Directory Access Protocol (LDAP). The direct claims-based authentication process is shown in Figure 25-2.
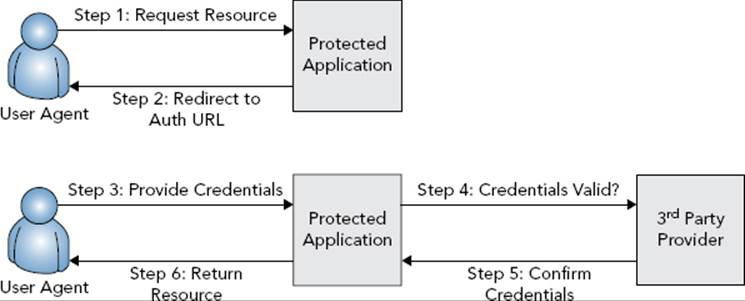
FIGURE 25-2
This may seem like a simpler, and therefore more desirable, approach to take, but it’s not always the best option (or even an available option). Users appreciate the feeling of security that comes from accessing the same login page whenever they use their credentials for a given security service. Consider this: If a site asked you to authenticate using your Google account, would you prefer to be redirected to Google’s website to log in, or would you prefer to give the potentially untrusted site your Google credentials? Your answer to this question should make it clear why the first approach is often the desired approach. Direct authentication is typically reserved for highly trusted applications, and usually only within the same organization or company that controls the authentication service.
Multi-Factor Authentication
All the mechanisms described so far have involved only one authentication factor. With username-password authentication and its many derivatives, providing a username and password is all the user must do. For client certificate authentication, the user must simply present the correct client certificate. The same is true for biometrics, smart cards, and claims-based authentication. In all these mechanisms, only the single step is required to successfully authenticate a user. Today, many web applications require or can require multi-factor authentication (MFA). Gmail, Twitter, Facebook, Amazon.com, WordPress, and many others all provide options for users to enable multi-factor authentication.
Multi-factor authentication requires a user to perform two or more steps to assert his identity. This may include, for example, presenting a client certificate and a username and password. More commonly, after submitting a username and password, many sites send a text message to the user’s known phone number containing a special code that the user must enter into the web application before proceeding.
More secure solutions include devices such as keychain dongles with simple LCD screens or smartphone apps that display a secure six- to nine-digit code, which rotates using a secure random generator every 30 to 60 seconds. These dongles contain a highly accurate clock and a factory-installed random seed, enabling the server that knows the random seed to predict the number being displayed at any given moment. The smartphone apps communicate securely with a token server to coordinate the display of the correct token. When users enter their normal credentials (username and password, certificate, and so on), they are challenged to enter the number displayed on their dongle or in their smartphone app.
Although the concept of multi-factor authentication is simple, its security advantages are significant and should be fairly obvious by this point. It is extremely unlikely that an attacker could both provide credentials and receive a text message sent to a user or view the numbers on a user’s dongle or smartphone app simultaneously. All these examples have included only two factors of authentication. Add in a third or fourth and the level of security increases even further. For these reasons, multi-factor authentication is becoming more popular every day, and you can expect this trend to continue.
Understanding Authorization
After users have been authenticated — by one of these methods or some other method — you can check their authorization to perform certain actions in the system. Even the simplest systems usually have at least two different types of users: low-privilege users and administrators. These two levels of access are different types of authorization. Users who are authorized to administer the application see additional menu items and can perform more tasks than users who aren’t authorized to administer the application. However, an authorization system does not require that access levels create a hierarchy of some type, where each level is more powerful than the next. More typical applications require many different authorizations, and some of them may have equal “power” but for different tasks.
A great example of this is a forum system. Consider a website with two different forums: a product forum and an art forum. User A may be authorized to moderate the topics in the product forum, whereas User B is authorized to moderate the topics in the art forum. Both users have equal “power” as moderators, but they are authorized to moderate different forums.
Similarly, in a very large application, you may have different administrator-like authorizations. For example, some employees can administer users, whereas others manage product listings and still others oversee news articles. All these employees have the same “power” over their respective areas, but the authorizations differ so that they cannot manage each other’s systems.
Using Principals and Identities
The first step to establishing a user’s authorization is to represent that user in some standard form. Although you may create this in whatever form you like, in Java the convention is to implement java.security.Principal. At a minimum, a Principal should hold the identity of a user. Remember, the identity is what you authenticate. You confirm the user is who she claims to be, so that identity should be stored in the Principal. An identity could simply be a username, or it could be lots of other information, such as legal name, birth date, address, and phone number. Any code in your system can then know by the presence of the Principal in the security context that the identity it contains has been authenticated. So what else is the Principal useful for?
In addition to storing the identity, a Principal can also store information about which actions the user is authorized to take. With this information, any code in the application can access the security context, obtain the current Principal, and determine whether the user is authorized to do what he is attempting. You have many ways to represent this information; you learn about some standard techniques next. More important, you should make the representations immutable, constant objects, such as enum constants or interned Strings. Otherwise, a Principal with many authorizations can have a significant memory footprint, which is not good for performance.
Roles, Groups, Activities, and Permissions
Choosing a method for representing authorization privileges is largely a matter of personal preference, but there are advantages and disadvantages of most techniques. No matter how you handle authorization, your goal essentially boils down to this: You need to establish whether a user has permission to do what he’s asking to do. On the surface, it sounds rather simple. But it’s a task that should be well thought-out and well planned because when you go down a particular road in a large application, it is very difficult to back out.
One of the most common and well-known approaches is to assign all your users to roles. For example, in a forum system you can create Poster, Moderator, and Administrator roles. Posters can post messages and replies; moderators can do these things and delete messages and replies; and administrators can do everything moderators can in addition to deleting and banning users and managing moderators. The advantages to this approach should be fairly obvious: With a simple radio button, you can indicate whether a user is a poster, moderator, or administrator, making the management of permissions straightforward. However, with this approach you end up with code that looks like this:
public void deleteMessage(long id)
{
if(security.userInRole("moderator"))
{
...
}
}
public void deleteReply(long id)
{
if(security.userInRole("moderator"))
{
...
}
}
What happens when you decide you want to have different moderators for messages and replies? You have to alter, recompile, retest, and redeploy your application. Planning for such a change is really as simple as making permissions as granular as possible. The best way to approach this is to think of which activities your users will undertake. In the forum example, these are the activities you might expect to see:
· Creating a post
· Creating a reply
· Editing your post
· Editing your reply
· Deleting your post
· Deleting your reply
· Deleting someone else’s post
· Deleting someone else’s reply
· Temporarily banning a user
· Permanently banning a user
· Deleting users
· Assigning user permissions
With this set of activities, checking a user’s authorization isn’t much different from the previous example:
public void deleteMessage(long id)
{
if(security.userHasActivity("DELETE_OTHER_MESSAGE") ||
isOwnMessage() && security.userHasActivity("DELETE_OWN_MESSAGE"))
{
...
}
}
public void deleteReply(long id)
{
if(security.userHasActivity("DELETE_OTHER_REPLY") ||
isOwnReply() && security.userHasActivity("DELETE_OWN_REPLY"))
{
...
}
}
Perhaps the easiest way to determine which activities you need is to simply look at the methods in your services. Odds are you need one activity per method. The method name is usually an indicator as to what the activity is. Some methods, such as those in the previous code, may need two activities. In this case, deleting one’s own message is a different activity from deleting another user’s message.
Although this granularity reduces the chances of your application requiring recompilation, it also increases the effort required to manage user permissions. When editing a user you must choose one or more permissions from a list of many permissions. In a very large system with hundreds of activities, this list quickly becomes hard to manage for every user. It is not strictly necessary, but you could employ the concept of user groups, where the users in a group inherit the ability to perform all the activities that the group can perform. You can easily change the activities that many users can perform by simply changing the group to which they belong. If you find that a particular user or users need different permissions, you just move them to a different group. This is nearly identical to the concept of roles, except that groups can be dynamically created and changed at run time instead of requiring a code change.
NOTE Okay. Roles? Permissions? Groups? What’s the difference, really? Who decides what these are called? In this book these terms simply differentiate several conventions. You can call them whatever you want internally. It doesn’t matter whether you name them roles or groups; it only matters how you use them.
One way to define groups is to make them Principals. With an abstract Principal implementation designed so that it holds activity permissions, you can then extend that Principal to form your user and group Principals. The user Principal can then have a groupPrincipal as an object property (or perhaps a list of group Principals, depending on your needs). This is just one example, and there are many different ways to approach it.
Claims-Based Authorization
Earlier in this section, you explored the concept of claims-based authentication. Claims-based authorization is the complement to this concept. In claims-based authorization, the user’s identity claim includes the activities for which the user has permission. One example of such a system is Microsoft’s Active Directory. When you authenticate on a machine using your Windows domain credentials, the domain controller gives that machine your identity claim (username, real name, e-mail address, and other information attached to your domain user) and your authorization claims (the domain permissions assigned to you). The domain groups you belong to are part of your identity claim, and thus you inherit the permissions assigned to those groups as well. This is a combination claims-based authentication and authorization system.
If you choose claims-based authentication, you may, but do not have to, use claims-based authorization. Often the third-party system with which you authenticate your users has no knowledge of your application, so any claimed authorizations it could present are useless to your application. In these cases, you have an extra step to take after a user’s identity claim is returned from the authentication system: You must locate the permissions within your own system that are assigned to the identity from the authentication system.
WHY SPRING SECURITY?
For the rest of this book, you learn how to integrate security into your applications using Spring Security. Although many Java security frameworks are available, Spring Security is perhaps the most popular for web applications and, being a Spring project, integrates seamlessly with Spring Framework. Note that just as a full Java EE application server can provide IoC, dependency injection, and persistence provider services, it can also provide a full security framework. However, as with Part II and III, this part focuses on an alternative to container security for those applications unable or unwilling to use container security.
Understanding the Spring Security Foundation
Spring Security provides authentication and authorization services. You can configure it to completely handle these services for you automatically, or you can provide code to perform key operations to customize its behavior. In addition to using JDBC or one of your services or repositories to authenticate users, Spring Security comes with built-in systems to authenticate and (if wanted) authorize using Microsoft’s Active Directory, Jasig’s Central Authentication Service (CAS), Java Authentication and Authorization Service orJAAS (a Pluggable Authentication Module, or PAM, implementation), LDAP, and OpenID, all of which are claims-based services. With Spring Security, you can secure web-based and client-side applications; however, it is certainly designed for web applications and requires additional effort to use in client-side applications.
The central interface around which Spring Security revolves is org.springframework.security.core.Authentication. It extends Principal to provide some additional information about an identity. For example, the getIdentity method returns an Object that represents the identity of the Principal. This object is commonly a username (a String, and therefore often the same value returned by getName) but can also be some other object, such as an X509 identity representation or e-mail address object. getCredentials returns the credentials that supposedly prove the identity is genuine. This property is generally used only during the authentication process and then erased when authentication is complete. In the common case, the Object it holds is a password (also a String). isAuthenticated indicates whether the principal is authenticated (and, thus, its identity has been proven sufficiently), whereas setAuthenticated is the mechanism for changing this indicator. This is also typically used only during the authentication process.
Authentication also provides the user’s org.springframework.security.core.GrantedAuthoritys by way of the getAuthorities method. A GrantedAuthority could be a role, if you use role-based authorization, or an activity permission, if you use activity-based authorization. Because it’s not the name that matters, only how you use it, GrantedAuthority can serve both purposes.
When you authenticate against a service like LDAP or Active Directory, Spring Security automatically fills the Authentication’s authorities with the directory groups to which the user belongs. In this case, the groups are actually acting like roles in role-based authentication. You can customize this behavior by writing a little more code to replace these groups with your local permission sets or with the permissions assigned to those groups, thereby turning it into activity-based authorization.
The final core interface that you will always use is org.springframework.security.authentication.AuthenticationProvider. As the name implies, this is the provider of authentication services in your application. Its authenticate method accepts an unauthenticatedAuthentication containing the credentials to prove the identity, and then it can either mark the Authentication as authenticated and return the same object, return a completely different Authentication instance representing the authenticated principal, or throw anorg.springframework.security.core.AuthenticationException if authentication fails. Spring Security comes with AuthenticationProvider implementations for Active Directory, CAS, JAAS, LDAP, OpenID, JDBC (using a table schema that you configure), and more. You can also provide your own implementation for more customized authentication behavior.
Using Spring Security’s Authorization Services
You have a few different ways to use authorization in Spring Security, and they are not mutually exclusive. One approach is to use global method security annotations. This is perhaps one of the best approaches because it can enforce security within your services instead of within your UI — particularly important if you have multiple user interfaces that utilize the same services. You simply annotate your service methods with one of several different security-related annotations, and Spring Security ensures the currentAuthentication has the proper GrantedAuthority(s) to execute the method. You learn more about which annotations you can use and how to use them in the upcoming chapters.
Another option is to define method interception rules within the Spring Security configuration. These rules are similar to Aspect Oriented Programming join points. As with the security annotations, you can define rules that intercept your service methods, making this another attractive option for protecting your code with authorization rules. Depending on the complexity of your application, you might find it easier to set up method interception rules than annotations. In addition, if you use XML configuration, you can change method interception rules without recompiling (which may or may not be something you want). You cannot achieve this using annotations.
Your final option is to define URL interception rules. This is sometimes the simplest approach, but it has several disadvantages. First, you can apply it only to web applications and not to other types of applications. Also, if you have multiple web user interfaces (for example, web, REST, and SOAP), you must define the interception rules for every user interface. It’s easy to define these rules inconsistently, which can lead to authorization vulnerabilities. In almost all cases, you want to secure your services using either annotations or configured rules, binding all existing and future user interfaces to these security requirements. Even if you use method security, you usually want to define a handful of URL security rules surrounding your login and logout screens. In the following chapters you explore all these options.
Configuring Spring Security
To be clear, you must use Spring Framework to utilize Spring Security. Spring Security’s configuration is closely tied to Spring Framework’s configuration, and it makes heavy use of the ApplicationContexts to manage its security contexts.
When setting up Spring Security, you can use an XML, Java, or hybrid configuration. Java configuration is new to Spring Security 3.2. In some ways, it is similar to Spring Framework’s Java configuration, but it also has many key differences. One important difference is you don’t have many configuration-related annotations (there are only two). Instead, your @Configuration classes implement configuration interfaces with methods that are called to set up your security context programmatically. This is because although Spring Framework has only one configuration per application context, Spring Security can have multiple configurations per application context.
For example, in a Web MVC context you can have one, two, or a dozen different security contexts based on URLs within that context. Each context requires a separate configuration, so you define methods within your @Configuration classes that use Spring Security configuration classes to add each security context you need to define. You explore this in more detail in the following chapters. More important, because the Java configuration is considerably more verbose than the Spring Framework Java configuration, you see each configuration using both XML and Java.
SUMMARY
In this short introductory chapter, you learned about the differences between authentication and authorization and came to understand why you need both for effective security. You explored the many different approaches you can take for authentication and authorization, such as username and password authentication, basic and digest authentication, form authentication, role-based authorization, and activity-based authorization. Finally, you were introduced to Spring Security, the authentication and authorization framework you use for the remainder of this book. You learned about its Authentication, GrantedAuthority, and AuthenticationProvider interfaces and how they form the foundation for Spring Security’s operation. You also took a quick look at the different ways you can use Spring Security’s authorization services and configure Spring Security within your Spring Framework applications.
In the next chapter you create your first Spring Security-enabled application and learn how to authenticate your users to meet your various needs.
All materials on the site are licensed Creative Commons Attribution-Sharealike 3.0 Unported CC BY-SA 3.0 & GNU Free Documentation License (GFDL)
If you are the copyright holder of any material contained on our site and intend to remove it, please contact our site administrator for approval.
© 2016-2026 All site design rights belong to S.Y.A.