PROFESSIONAL JAVA FOR WEB APPLICATIONS (2014)
Part I Creating Enterprise Applications
Chapter 5 Maintaining State Using Sessions
IN THIS CHAPTER
· Why sessions are necessary
· Working with cookies and URL parameters
· How to store data in a session
· Making sessions useful
· How to cluster an application that uses sessions
WROX.COM CODE DOWNLOADS FOR THIS CHAPTER
You can find the wrox.com code downloads for this chapter at www.wrox.com/go/projavaforwebapps on the Download Code tab. The code for this chapter is divided into the following major examples:
· Shopping-Cart Project
· Session-Activity Project
· Customer-Support-v3 Project
NEW MAVEN DEPENDENCIES FOR THIS CHAPTER
There are no new Maven dependencies for this chapter. Continue to use the Maven dependencies introduced in all previous chapters.
UNDERSTANDING WHY SESSIONS ARE NECESSARY
So far you’ve learned about web applications, web containers, Servlets, JSPs, and how Servlets and JSPs work together. You have also learned about the life cycle of a request, and it should be clear at this point that the tools you have been introduced to so far do not enable you to associate multiple requests coming from the same client and share data between those requests. You might think that you can use the IP address as a unique identifier and all requests from an IP address within some timeframe must belong to the same client. Unfortunately, due to Network Address Translation (NAT) this is not reliable. Thousands of students at a college campus can literally all use the same IP address, hidden behind a NAT router. For this reason the concept of HTTP sessions has achieved nearly universal adoption by all HTTP server-side technologies, and Java EE has session support written into its specification.
Not every application needs sessions. The Hello World examples you’ve seen in this book certainly don’t need sessions. So far the Customer Support application hasn’t needed sessions. It has been more like an anonymous message board. But if you think about the requirements Multinational Widget Corporation has for its customer support site, you may quickly realize that at some point you must create user accounts, and those users need to log in to the application. Customer support requests may contain private information, such as server configuration files that other customers shouldn’t see. Certainly you need a way to restrict access to certain support tickets so that only the posting customer and members of MWC’s support team can access any given ticket. You could have users provide a username and password on every page they access, but it’s a fair bet customers aren’t going to be happy with that solution.
Maintaining State
Sessions are used to maintain state between one request and the next. HTTP requests are completely stateless on their own. From the server’s perspective, the request begins when the user’s web browser opens a socket to the server, and it ends when the server sends the last packet back to the client and closes the connection. At that point there is no longer a link between the user’s browser and the server, and when the next connection comes in, there is no way to tie the new request to the previous request.
Applications often cannot function correctly in such a stateless manner. A classic example is the online shopping website. Nearly every online shopping site these days requires you to create a username and password before purchasing, but consider even the few that don’t. When browsing the store, you find a product you like, so you add that product to your shopping cart. You continue browsing the store and find another product you like. You add it to your shopping cart as well. When you view your shopping cart, you see that both products you added remain in your shopping cart. Somehow, between every request you made, the website knew those requests were coming from the same browser on the same computer and associated that with your shopping cart. Nobody else can see your shopping cart or the items in it — it is exclusively tied to your computer and browser. This scenario is an analogy to a real-life shopping experience. You enter your favorite grocery store, and as you walk in the door, you grab a shopping cart or basket. (You get a session from the server.) You walk through the store and pick up items as you go, placing them in your cart (adding them to the session). When you get to the cash register, you remove the items from the cart and give them to the cashier, who scans them and takesyour money. (You check out using your session.) As you walk out the door, you return your shopping cart or basket. (You close your browser or log out, ending your session.)
In this example, the cart or basket maintains your state as you walk through the store. Without the cart, neither you nor the store could keep up with everything you needed to purchase. If no state were maintained between requests, you would have to “walk in,” grab one item, pay for it, “walk out” (end the request), and repeat the entire process again for each item you wanted to purchase. Sessions are the engine behind maintaining state between requests, and without them the web would be a very different place.
Remembering Users
Another scenario to consider is the user forum website. Almost universally in online forums, users are known by their usernames or “handles.” As a user enters the forums, he logs in, providing a username and password to prove his identity. (The merit of username/password authentication as proof of identity is an argument reserved for Chapter 25.) From that point he can add forum threads, respond to threads, participate in private messages with other users, report threads or responses to moderators, and possibly mark threads as favorites. Notice that the user logged in only a single time during that entire timeline. The system needed a way to remember who he was between each request, and sessions provided that.
Enabling Application Workflow
Often users need some form of workflow to complete a task using an advanced web application. In the case of creating a news article for publication on a news site, for example, the journalist might first go to a screen where she can enter a title, tagline, and body and format the elements appropriately. On the next page she might then select one or more photos associated with the article and indicate how they should be displayed. She might also upload or record some video to be placed in the article. Finally, she would probably be presented with a list of similar articles or a search field to find similar articles so that she could indicate which ones should be placed in a Related Articles box.
After all these steps had been completed, the article would be published. This entire scenario represents the idea of a workflow. The workflow contains many steps in it, each step part of the completion of a single task. To tie all these steps together to complete the workflow, the requests must have state maintained between them. The shopping cart example is actually a subset of the broader idea of workflows.
USING SESSION COOKIES AND URL REWRITING
Now that you understand the importance of sessions, you are probably wondering how they work. There are two different components to this: first, the generic theory behind web sessions and how they are implemented; and second, the specifics behind the session implementation in Java EE web applications. Both are covered in this section.
In the general theory of web sessions, a session is some file, memory segment, object, or container managed by the server or web application that contains various data elements assigned to it. These data elements could be a username, a shopping cart, workflow details, and more. The user’s browser does not hold or maintain any of this data. It is managed solely by the server or web application code. The only missing piece is a link between this container and the user’s browser. For this purpose, sessions are assigned a randomly generated string called a session ID. The first time a session is created (as a result of a request being received), the session ID for that session is conveyed back to the user’s browser as part of the response. Every subsequent request from that user’s browser includes the session ID in some fashion. When the application receives the request with the session ID, it can then link the existing session to that request. This is demonstrated in Figure 5-1.
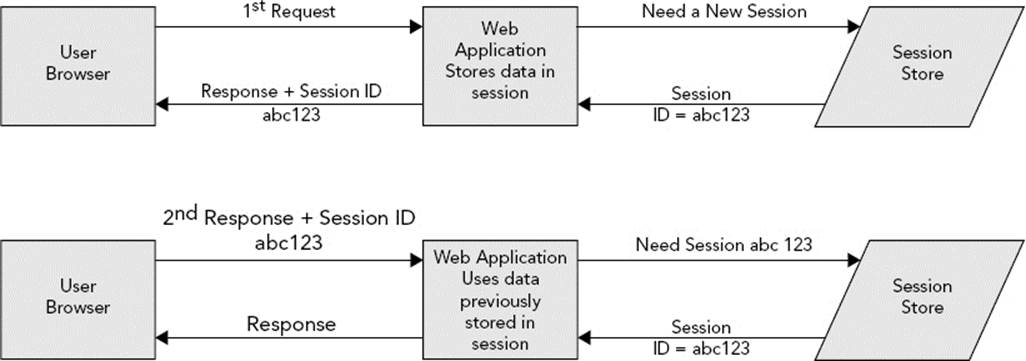
FIGURE 5-1
NOTE You may wonder why the session ID is random instead of a simple sequential ID. The reason for this is compelling: A sequential ID would be predictable, and a predictable ID would make hijacking other users’ sessions trivial.
The remaining problem to be solved is how the session ID is passed from server to browser and back. There are two techniques used to accomplish this: session cookies and URL rewriting.
Understanding the Session Cookie
Fortunately, a solution already exists in HTTP 1.1 that enables servers to send session IDs back to browsers so that the browsers include the session IDs in future requests. This is the technology called HTTP cookies. If you are unfamiliar with cookies, they are essentially a mechanism whereby arbitrary data can be passed from the server to the browser via the Set-Cookie response header, stored locally on the user’s computer, and then transmitted back from the browser to the server via the Cookie request header. Cookies can have various attributes, such as a domain name, a path, an expiration date or maximum age, a secure flag, and an HTTP-only flag.
The Domain attribute instructs the browser for which domain names it should send the cookie back, whereas the Path attribute enables the cookie to further be restricted to a certain URL relative to the domain. Every time a browser makes a request of any type, it finds all cookies that match the domain and path for the site and sends those cookies along with the request. Expires defines an absolute expiration date for the cookie, whereas the mutually exclusive Max-Age attribute defines the number of seconds before the cookie expires. If a cookie’s expiration date is in the past, the browser deletes it immediately. (This is how you delete a cookie — set its expiration date to the past.) If a cookie does not have an Expires or Max-Age attribute, it is deleted when the browser is closed. If the Secureattribute is present (it does not need to have a value) the browser will send the cookie back only over HTTPS. This protects the cookie from being transmitted unencrypted. Finally, the HttpOnly attribute restricts the cookie to direct browser requests. Other technologies, such as JavaScript and Flash, will not have access to the cookie.
Web servers and application servers use cookies to store session IDs on the client side so that they can be transmitted back to the server with each request. With Java EE application servers, the name of this session cookie is JSESSIONID by default. Examine the following headers from a series of requests and responses between a client browser and a Java EE web application deployed at http://www.example.com/support. This is what you would expect to see if tracing the HTTP requests and responses with a network-stiffing tool like Fiddler or Wireshark.
REQUEST 1
GET /support HTTP/1.1
Host: www.example.com
RESPONSE 1
HTTP/1.1 302 Moved Temporarily
Location: https://www.example.com/support/login
Set-Cookie: JSESSIONID=NRxclGg2vG7kI4MdlLn; Domain=.example.com; Path=/; HttpOnly
REQUEST 2
GET /support/login HTTP/1.1
Host: www.example.com
Cookie: JSESSIONID=NRxclGg2vG7kI4MdlLn
RESPONSE 2
HTTP/1.1 200 OK
Content-Type: text/html;charset=UTF-8
Content-Length: 21765
REQUEST 3
POST /support/login HTTP/1.1
Host: www.example.com
Cookie: JSESSIONID=NRxclGg2vG7kI4MdlLn
RESPONSE 3
HTTP/1.1 302 Moved Temporarily
Location: http://www.example.com/support/home
Set-Cookie: remusername=Nick; Expires=Wed, 02-Jun-2021 12:15:47 GMT;
Domain=.example.com; Path=/; HttpOnly
REQUEST 4
GET /support/home HTTP/1.1
Host: www.example.com
Cookie: JSESSIONID=NRxclGg2vG7kI4MdlLn; remusername=Nick
RESPONSE 4
HTTP/1.1 200 OK
Content-Type: text/html;charset=UTF-8
Content-Length: 56823
The Set-Cookie headers in the responses are used to send cookies to the user’s browser for storage. Likewise, the Cookie headers in the requests are used to send cookies back to the web server. In this imaginary scenario, the user navigates to some support site and gets redirected to the login page. While redirected, the user’s browser also gets a session ID cookie from the server. When the user’s browser goes to the login page, it includes the session ID cookie in its request. From then on, each time the browser sends a new request, it includes the JSESSIONID cookie. The server does not send it again because it knows the browser already has it.
After a successful login, the server also sends back a remusername cookie. This is unrelated to the session and in this case represents a technique the site uses to auto-populate the user’s username whenever he goes to the login page. Future requests will always contain this cookie; although, future responses do not reset it. Notice that the JSESSIONID cookie has no expiration date, whereas the remusername cookie does. The remusername cookie will expire in the year 2021 (a long time from now, after which the user will probably have a different computer), whereas the JSESSIONID cookie will expire as soon as the user closes his browser.
NOTE The remusername cookie is used here simply to demonstrate another use for cookies and how multiple cookies are transmitted in the Cookie request header. The actual feature — remembering usernames — is not related to this discussion.
One of the obstacles to using cookies to transmit session IDs is that users can disable cookie support in their browsers, thereby completely eliminating this method of transmitting session IDs. However, over the past decade this has become less and less of a concern, with one major search and e-mail provider and one major social network requiring cookies to be enabled for users of their websites.
Session IDs in the URL
Another popular method for transmitting session IDs is through URLs. The web or application server knows to look for a particular pattern containing the session ID in the URL and, if found, retrieves the session from the URL. Different technologies use different strategies for embedding and locating session IDs in the URL. For example, PHP uses a query parameter named PHPSESSID:
http://www.example.com/support?PHPSESSID=NRxclGg2vG7kI4MdlLn&foo=bar&high=five
Java EE applications use a different approach. The session ID is placed in a matrix parameter in the last path segment (or directory) in the URL. This frees up the query string so that the session ID does not conflict with other parameters in the query string.
http://www.example.com/support;JSESSIONID=NRxclGg2vG7kI4MdlLn?foo=bar&high=five
The specific technique that a given technology uses is immaterial to the end result: Embed the session ID in the URL and you avoid needing to use cookies. You might wonder, however, how the session ID in a request URL gets to the browser in the first place. A request URL is only effective for conveying the session ID from the browser to the server. So where does the session ID come from? The answer is that the session ID must be embedded in every URL that the application sends back in every response, including links on the page, form actions, and 302 redirects. Consider the previous example of the login scenario using cookies. The following headers demonstrate the same set of transactions using URL embedding instead of cookies:
REQUEST 1
GET /support HTTP/1.1
Host: www.example.com
RESPONSE 1
HTTP/1.1 302 Moved Temporarily
Location: https://www.example.com/support/login;JSESSIONID=NRxclGg2vG7kI4MdlLn
REQUEST 2
GET /support/login;JSESSIONID=NRxclGg2vG7kI4MdlLn HTTP/1.1
Host: www.example.com
RESPONSE 2
HTTP/1.1 200 OK
Content-Type: text/html;charset=UTF-8
Content-Length: 21796
...
<form action="http://www.example.com/support/login;JSESSIONID=NRxclGg2vG7kI4MdlLn"
method="post">
...
REQUEST 3
POST /support/login;JSESSIONID=NRxclGg2vG7kI4MdlLn HTTP/1.1
Host: www.example.com
RESPONSE 3
HTTP/1.1 302 Moved Temporarily
Location: http://www.example.com/support/home;JSESSIONID=NRxclGg2vG7kI4MdlLn
REQUEST 4
GET /support/home;JSESSIONID=NRxclGg2vG7kI4MdlLn HTTP/1.1
Host: www.example.com
RESPONSE 4
HTTP/1.1 200 OK
Content-Type: text/html;charset=UTF-8
Content-Length: 56854
...
<a href="http://www.example.com/support/somewhere;JSESSIONID=NRxclGg2vG7kI4MdlLn">
...
In this case, notice that the session ID is being returned to the browser via the Location header, form action, and link tag. As you can see, the browser is never actually “aware” of the session ID like it is with a session cookie. Instead, the server rewrites the Locationheader URL and the URLs in any response content (links, form actions, and other URLs) so that any URLs the browser uses to access the server already have the session ID embedded in them. The important point about this is that the session ID must be embedded in the Location header URL and in every single URL in the markup. This is no trivial task and can often be downright inconvenient. For this purpose, the Java EE Servlet API comes with a few conveniences that make this simple.
For starters, the HttpServletResponse interface defines two methods that rewrite URLs to include embedded session IDs if necessary: encodeURL and encodeRedirectURL. Any URL that will be placed in a link, form action, or other markup can first be passed to theencodeURL method, which returns an appropriately “encoded” version of the URL. Any URL passed to the sendRedirect response method can be passed to the encodeRedirectURL method, which returns an appropriately “encoded” version of that URL. The word “encoded” here means that the JSESSIONID matrix parameter will be embedded in the last path segment of the URL only if all four of the following conditions are met:
· A session is active for the current request. (Either it requested a session by passing in a session ID, or the application code created a new session.)
· The JSESSIONID cookie was not present in the request.
· The URL is not an absolute URL and is a URL within the same web application.
· Session URL rewriting is enabled in the deployment descriptor (more on this in the section “Storing Data in a Session”).
The second condition is the troublesome condition. The only way to detect if a user’s browser allows cookies is to set a cookie and then look for that cookie to be returned on the next request. However, you need a session to associate one request with another; otherwise, how would you know whether the request was simply the first request from a different user or a second request from the same user without a cookie? Therefore, the second condition always assumes that the lack of a JSESSIONID cookie means the user’s browser doesn’t support cookies, with the understanding that this means URLs will always get encoded on the first request to a session-enabled application even if the user’s browser supports cookies. The unfortunate side effect is that sometimes URLs contain theJSESSIONID matrix parameter even if the user’s browser accepted the JSESSIONID cookie.
Of course, the HttpServletRequest methods are just part of the toolset available to help you embed session IDs in URLs. The <c:url> tag, which is discussed more in Chapter 7, also embeds session IDs in URLs.
Session Vulnerabilities
As you can imagine, sessions are not without their vulnerabilities, and I would be remiss if I did not warn you about them. The bad news is that these vulnerabilities can cause serious problems for your users, and if you transact sensitive or personal information (such as credit card numbers or healthcare data) it can mean huge penalties for your business. The good news is that there are easy ways to address these vulnerabilities, which you will learn about as well. Of course, I cannot possibly cover all potential vulnerabilities in your applications as there are thousands of ways to compromise web applications. The developer should always be diligent and well informed on matters of security. In mission-critical, sensitive applications, it would be wise to use a commercial scanner of some type that scans your application for weaknesses.
For more information about web application and session vulnerabilities and how to detect and address them, visit the Open Web Application Security Project (OWASP) https://www.owasp.org/ website.
The Copy and Paste Mistake
Perhaps one of the easiest ways a session can be compromised is for an unsuspecting user to copy and paste the URL from his browser into an e-mail, forum posting, chat room, or other public area. Embedding session IDs in URLs, which you read about earlier in this section, is the source of this problem. Remember the URLs passed back and forth between the client and server? Those URLs, session ID and all, appear in the address bar in the client’s browser. If the user decides to share a page in your application with his friends and copies and pastes the URL from the address bar, the session ID is included in the URL his friends see. If they go to that URL before the session expires, they then assume the identity of the user who shared the URL. The obvious problem with this is that the user’s friends might see personal information accidentally.
The more dangerous scenario is that a nefarious character finds the link and uses it to hijack the user’s session. He can then change the account e-mail address, obtain a password reset link, and finally change the password — giving the attacker complete control over the user’s account and everything in it.
As innocent as the origin of this problem is — a user copying and pasting a URL from his address bar — the only infallible method of addressing this vulnerability is to completely disable embedding session IDs in URLs. Although this may sound like a drastic measure with potentially catastrophic consequences for the usability of your application, remember what was said earlier about how commonplace it has become for major Internet companies to require cookies when using their sites. Cookies have become a fact of life for web users today, and the vulnerabilities inherent in cookies are far less common and dangerous than this one.
Session Fixation
The session fixation attack is similar to the copy-and-paste mistake, except that the “unsuspecting user” in this case is the attacker, and the victims are the users who use a link containing a session ID. An attacker might go to some website known to accept session IDs embedded in the URL. The attacker will obtain a session ID in this manner (either through a URL or by examining the browser’s cookies) and then send a URL containing that session ID to a victim, through a forum or (most often) an e-mail. At this point, when the user clicks the link to go to the website, his session ID is fixed to what was in the URL — a session ID the attacker knows about. If the user then logs in to the website during this session, the attacker will also be logged in because he shares the session ID, giving him access to the user’s account.
There are two ways to address the issue:
· As with the copy-and-paste mistake, you can simply disable the embedding of session IDs in URLs and also disallow your application from accepting session IDs via URLs (something you explore in the section “Storing Data in a Session”).
· Employ session migration after login. When the user logs in, change the session ID, or copy the session details to a new session and invalidate the original session. (Either method achieves the same thing: assigning a different session ID to the newly “logged in” session.) The attacker still has the original session ID, which is no longer valid and not connected to the user’s session.
WARNING There is another type of session fixation attack in which a malicious website writes a session ID cookie using another website’s domain name, effectively setting the session ID for the other website in the victim’s browser. This attack has the same effect as the URL session fixation attack. However, there is no way for web applications to protect against this vulnerability without disabling sessions altogether. This vulnerability is actually a browser vulnerability, not a vulnerability of web applications.
All modern browsers have fixed this vulnerability for cross-domain attacks (site example.net sets a cookie for site example.com). However, site malicious.example.net could still set a session cookie for domain .example.net, which would then be picked up by site vulnerable.example.net. This problem can be avoided altogether by following a simple rule: Don’t share a domain name with untrusted applications.
Cross-Site Scripting and Session Hijacking
You have already read about the copy-and-paste mistake which, when exploited by a malicious party, becomes a session fixation attack. There is another form of session hijacking that utilizes JavaScript to read the contents of a session cookie. An attacker, who exploits a site’s vulnerability to cross-site scripting attacks, injects JavaScript into a page to read the contents of a session ID cookie using the JavaScript DOM property document.cookie. After the attacker retrieves a session ID from an unsuspecting user, he can then assume that session ID by creating a cookie on his own machine or using URL embedding, thereby assuming the identity of the victim.
The most obvious defense against this attack is to secure your site against cross-site scripting, which is a topic outside the scope of this book (see the previously mentioned OWASP website). However, doing this can be tricky and difficult, and attackers are constantly finding new ways to effect cross-site scripting attacks. An alternative defense, which you should always use in conjunction with this, is flagging all your cookies with the HttpOnly attribute. This attribute allows the cookie to be used only when the browser makes an HTTP (or HTTPS) request, whether that request happens via link, manual entry of a URL in the address bar, form submission, or AJAX request. More important, HttpOnly completely disables the ability of JavaScript, Flash, or some other browser scripting or plugin to obtain the contents of the cookie (or even know of its existence). This stops the cross-site scripting session hijacking attack in its tracks. Session ID cookies should always include the HttpOnly attribute.
NOTE Although the HttpOnly attribute prevents JavaScript from accessing the cookie using the document.cookie DOM property, AJAX requests originating from JavaScript code will still include the session ID cookie because the browser, not the JavaScript code, is responsible for forming the AJAX request headers. This means the server will still be able to associate the AJAX requests with the user’s session.
Insecure Cookies
The final vulnerability you should consider is the man-in-the-middle attack (MitM attack), the classic data interception attack whereby an attacker observes a request or response as it travels between the client and server and obtains information from the request or response. This attack gave rise to Secure Sockets Layer and Transport Layer Security (SSL/TLS), the foundation of the HTTPS protocol. Securing your web traffic using HTTPS effectively foils the MitM attack and prevents session ID cookies from being stolen. The problem, however, is that a user might first try to go to your site using HTTP. Even if you redirect them to HTTPS, the damage is already done: Their browser has transmitted the session ID cookie to your server unencrypted, and an observing attacker can steal the session ID.
The Secure cookie flag was created to address this very issue. When your server sends the session ID cookie to the client in the response, it sets the Secure flag. This tells the browser that the cookie should be transmitted only over HTTPS. From then on, the cookie will only be transmitted encrypted, and attackers cannot intercept it. The drawback is that your site must always be behind HTTPS for this to work. Otherwise, as soon as you redirect the user to HTTP, the browser can no longer transmit the cookie and the session will be lost. For this reason, you must weigh the security needs of your application and determine if the data you are protecting is sensitive enough to warrant the performance overhead and hassle of securing every request with HTTPS.
The Strongest Possible Defense
One final option you should understand when dealing with the security of your sessions is the SSL/TLS Session ID. To improve the efficiency of the SSL protocol by eliminating the need to perform an SSL handshake on every request, the SSL protocol defines its own type of session ID. The SSL Session ID is established during the SSL handshake and then used in subsequent requests to tie requests together for determining which keys should be used for encryption and decryption. This very concept duplicates the notion of the HTTP session ID. However, the SSL Session ID is not transmitted or stored using cookies or URLs and is extremely secure. (You can learn more about how the SSL Session ID works by reviewing RFC 2246 “The TLS Protocol.”) It is inordinately difficult to obtain an SSL Session ID for which you are not authorized. Some extremely high-security websites, such as those of financial institutions, reuse the SSL Session ID as the HTTP session ID, thereby eliminating cookies and URL encoding and still maintaining state between requests.
This is an extremely secure method of establishing a session ID across requests and is nearly invulnerable. Plus, when SSL vulnerabilities are found, they are usually dealt with in a matter of weeks and eliminated by browser updates. However, there are understandably some drawbacks to using this technique; otherwise, everyone would use it. In older versions of the Java EE specification, there was no standard way to specify this, so developers had to use container-specific classes to achieve using SSL Session IDs, and this configuration was sometimes hit-or-miss. In the Java EE 6.0 specification, an option was added (which you learn about in the next section) to easily instruct the web container to use SSL session IDs, so configuration is no longer a major concern (though not many sites are using this yet). In addition, as with the Secure cookie flag, it requires that your site always be behind HTTPS. If you are concerned enough about security to enable this feature, however, you probably intend for your entire site to always be behind HTTPS, so this will likely not be an issue for you.
Another problem with reusing the SSL Session ID is that the web container must be responsible for the SSL communications. If you use a web server or load balancer to manage your SSL communications — something common in clustered server environments — the web container will not know what the SSL Session ID is. In such a clustered environment, the user’s request must also always be routed to the same server. Finally, depending on server and browser, the life of the SSL Session ID can be very long or very short, so it’s hard to rely on this as an HTTP session ID replacement.
Now that you have been introduced to sessions, learned about the JSESSIONID cookie and URL rewriting, and explored some of the vulnerabilities inherent in sessions and how to address them, it’s time to start using sessions in your Java EE applications.
STORING DATA IN A SESSION
As you learn about using sessions in Java EE, you will be using the Shopping-Cart example project found on the wrox.com code download site. You will not create an entire shopping site with payment systems and related features. You will simply explore the concept of using sessions to aggregate data collected across multiple pages (in this case, products added to a shopping cart). You can create the project yourself or follow along in the Shopping-Cart project. Your project should start with the deployment descriptor <jsp-config> from Chapter 4 and the following /WEB-INF/jsp/base.jspf file:
<%@ taglib prefix="c" uri="http://java.sun.com/jsp/jstl/core" %>
Also, you should have a simple index.jsp file in your web root for redirecting to your store Servlet:
<c:redirect url="/shop" />
Configuring Sessions in the Deployment Descriptor
In many cases, HTTP sessions are ready to go in Java EE and require no explicit configuration. However, configure them you can, and for security purposes you should. You configure sessions in the deployment descriptor using the <session-config> tag. Within this tag, you can configure the method by which sessions are tracked, the age after which sessions timeout, and the details of the session ID cookie, if you use that. Many of these have default values that you never need to change. The following code demonstrates all the possible deployment descriptor settings for sessions.
<session-config>
<session-timeout>30</session-timeout>
<cookie-config>
<name>JSESSIONID</name>
<domain>example.org</domain>
<path>/shop</path>
<comment><![CDATA[Keeps you logged in. See our privacy policy for
more information.]]></comment>
<http-only>true</http-only>
<secure>false</secure>
<max-age>1800</max-age>
</cookie-config>
<tracking-mode>COOKIE</tracking-mode>
<tracking-mode>URL</tracking-mode>
<tracking-mode>SSL</tracking-mode>
</session-config>
All of the tags within <session-config> and <cookie-config> are optional, but they must appear in the order shown in this example (excluding omitted tags). The <session-timeout> tag specifies how long sessions should remain inactive, in minutes, before being invalidated. If the value is 0 or less, the session never expires. If this tag is omitted, the container default applies. Tomcat’s default container is 30, which can be changed in the Tomcat configuration. If you want consistency, you should explicitly set the timeout using this tag. In this example the timeout is 30 minutes. Each time a user with a certain session ID makes a request to your application, the timer resets on his session’s inactivity. If he goes more than 30 minutes without making a request, his session is considered invalid and he is given a new session. The <tracking-mode> tag, which was added in Servlet 3.0/Java EE 6, indicates which technique the container should use for tracking session IDs. The legal values are:
· URL — The container only embeds session IDs in URLs. It does not use cookies or SSL session IDs. This approach is not very secure.
· COOKIE — The container uses session cookies for tracking session IDs. This technique is very secure.
· SSL — The container uses SSL Session IDs as HTTP session IDs. This method is the most secure approach available but requires all requests to be HTTPS for it to work properly.
You may use <tracking-mode> more than once to tell the container it can use multiple strategies. For example, if you specify both COOKIE and URL, the container prefers cookies but uses URLs when cookies are not available (as described in the previous section). Specifying COOKIE as the only tracking mode tells the container to never embed sessions in URLs and always assume the user has cookies enabled. Likewise, specifying URL as the only tracking mode tells the container to never use cookies. If you enable the SSL tracking mode, you cannot also enable the COOKIE or URL modes. SSL Session IDs must be used on their own; the container cannot fall back to cookies or URLs in the absence of HTTPS.
The <cookie-config> tag applies only when COOKIE is specified as one of the (or the only) tracking modes. Tags within it customize the session cookies that the container returns to the browser:
· The <name> tag enables you to customize the name of the session cookie. The default is JSESSIONID, and you will probably never need to change that.
· The <domain> and <path> tags correspond to the Domain and Path attributes of the cookie. The web container appropriately defaults these for you so that you should usually not need to customize them. The Domain defaults to the domain name used to make the request during which the session was created. The Path defaults to the deployed application context name.
· The <comment> tag adds a Comment attribute to the session ID cookie, providing the opportunity to add arbitrary text. This is often used to explain the purpose of the cookie and point users to the site’s privacy policy. Whether you use this is entirely up to you. If you omit this tag, the Comment attribute is not added to the cookie.
· The <http-only> and <secure> tags correspond to the HttpOnly and Secure cookie attributes, and both default to false. For increased security you should always customize <http-only> to true. <secure> should be changed to true only if you have HTTPS enabled.
· The final tag, <max-age>, specifies the Max-Age cookie attribute that controls when the cookie expires. By default, the cookie has no expiration date, which means it expires when the browser closes. Setting this to -1 has the same effect. Expiring the cookie when the browser closes is almost always what you want. You customize this value in seconds (unlike <session-timeout>, which is in minutes), but doing so could cause the cookie to expire and session tracking to fail while the user is in the middle of actively using your application. It’s best to leave this one alone and not use this tag.
NOTE As of Servlet 3.0/Java EE 6, you can skip the deployment descriptor and configure most of these options programmatically using the ServletContext. Use the setSessionTrackingModes method to specify a Set of one or morejavax.servlet.SessionTrackingMode enum constants. getSessionCookieConfigreturns a javax.servlet.SessionCookieConfig — use this object to configure any of the <cookie-config> settings. You can configure the tracking modes or cookie configuration only within a ServletContextListener’s contextInitialized method or a ServletContainerInitializer’s onStartup method. You learn about listeners in the “Applying Sessions Usefully” section, and ServletContainerInitializers in Chapter 12. Currently you cannot configure the session timeout programmatically — this oversight should be corrected in Java EE 8.
Now that you understand the available options, the session configuration for the Shopping-Cart project is as follows:
<session-config>
<session-timeout>30</session-timeout>
<cookie-config>
<http-only>true</http-only>
</cookie-config>
<tracking-mode>COOKIE</tracking-mode>
</session-config>
This causes sessions to last 30 minutes, instructs the container to only use cookies for session tracking and makes session cookies contain the HttpOnly attribute for security. It accepts all the other default values and does not specify a comment for the cookie. URL session tracking is disabled because it is not secure. For the rest of the book, you will always use this session configuration.
NOTE As noted earlier, the most secure approach would be to use SSL Session IDs. A secure compromise uses cookies but sets the cookie Secure attribute to require HTTPS. This book does not demonstrate either of these techniques because doing so would require generating a self-signed SSL certificate and learning the complexities of configuring SSL in Tomcat. Both of these topics are beyond the scope of this book and can be explored more in the Tomcat documentation.
Storing and Retrieving Data
In your project create a Servlet called com.wrox.StoreServlet and annotate it as a Servlet with the URL pattern /shop. In addition, create a simple map in your Servlet representing a product database. (Or, just use the Shopping-Cart project.)
@WebServlet(
name = "storeServlet",
urlPatterns = "/shop"
)
public class StoreServlet extends HttpServlet
{
private final Map<Integer, String> products = new Hashtable<>();
public StoreServlet()
{
this.products.put(1, "Sandpaper");
this.products.put(2, "Nails");
this.products.put(3, "Glue");
this.products.put(4, "Paint");
this.products.put(5, "Tape");
}
}
You can use this product database to “browse” products and link cart items back to product names.
Using Sessions in Your Servlets
Create a simple implementation of the doGet method supporting three actions: browse, addToCart, and viewCart:
@Override
protected void doGet(HttpServletRequest request, HttpServletResponse response)
throws ServletException, IOException
{
String action = request.getParameter("action");
if(action == null)
action = "browse";
switch(action)
{
case "addToCart":
this.addToCart(request, response);
break;
case "viewCart":
this.viewCart(request, response);
break;
case "browser":
default:
this.browse(request, response);
break;
}
}
The browse and viewCart methods of your Servlet should be quite simple, adding a request attribute and forwarding on to a JSP:
private void viewCart(HttpServletRequest request, HttpServletResponse response)
throws ServletException, IOException
{
request.setAttribute("products", this.products);
request.getRequestDispatcher("/WEB-INF/jsp/view/viewCart.jsp")
.forward(request, response);
}
private void browse(HttpServletRequest request, HttpServletResponse response)
throws ServletException, IOException
{
request.setAttribute("products", this.products);
request.getRequestDispatcher("/WEB-INF/jsp/view/browse.jsp")
.forward(request, response);
}
These methods are similar in that they both add the products database to a request attribute, but they forward to different JSPs. Now take a look at the addToCart method:
private void addToCart(HttpServletRequest request,
HttpServletResponse response)
throws ServletException, IOException
{
int productId;
try
{
productId = Integer.parseInt(request.getParameter("productId"));
}
catch(Exception e)
{
response.sendRedirect("shop");
return;
}
HttpSession session = request.getSession();
if(session.getAttribute("cart") == null)
session.setAttribute("cart", new Hashtable<Integer, Integer>());
@SuppressWarnings("unchecked")
Map<Integer, Integer> cart =
(Map<Integer, Integer>)session.getAttribute("cart");
if(!cart.containsKey(productId))
cart.put(productId, 0);
cart.put(productId, cart.get(productId) + 1);
response.sendRedirect("shop?action=viewCart");
}
This method is definitely more complicated. First, it gets and parses the product ID for the product being added to the cart. After that the code in bold calls some new session-related methods that you haven’t looked at yet. The getSession method onHttpServletRequest comes in two forms: getSession() and getSession(boolean).
A call to getSession() calls getSession(true), which returns the existing session if one exists and creates a new session if a session does not already exist. (It never returns null.) A call to getSession(false), on the other hand, returns the existing session if one exists andnull if no session exists. There are reasons for calling getSession with an argument of false — for example, you may want to test whether a session has already been created — but in most cases you simply call getSession(). The getAttribute method returns an object stored in the session. It has a counterpart, getAttributeNames, which returns an enumeration of the names of all the attributes in the session. The setAttribute method binds an object to the session. In this example, the code looks for the cart attribute, adds it if it does not exist, and then retrieves the simple cart map from the session. It then looks for the product ID in the cart and adds it with a quantity of zero if it does not exist. Finally, it increments the quantity of that product in the cart.
Using Sessions in Your JSPs
The Servlet code can handle the logic in your application, but you need some JSPs to display the product list and shopping cart. Start by creating /WEB-INF/jsp/view/browse.jsp:
<%@ page import="java.util.Map" %>
<!DOCTYPE html>
<html>
<head>
<title>Product List</title>
</head>
<body>
<h2>Product List</h2>
<a href="<c:url value="/shop?action=viewCart" />">View Cart</a><br /><br />
<%
@SuppressWarnings("unchecked")
Map<Integer, String> products =
(Map<Integer, String>)request.getAttribute("products");
for(int id : products.keySet())
{
%><a href="<c:url value="/shop">
<c:param name="action" value="addToCart" />
<c:param name="productId" value="<%= Integer.toString(id) %>"/>
</c:url>"><%= products.get(id) %></a><br /><%
}
%>
</body>
</html>
This JSP has little new in it, and simply lists out all the products. You will explore the <c:url> and <c:param> tags further in Chapter 7. Clicking a product name adds it to the cart. Next create /WEB-INF/jsp/view/viewCart.jsp:
<%@ page import="java.util.Map" %>
<!DOCTYPE html>
<html>
<head>
<title>View Cart</title>
</head>
<body>
<h2>View Cart</h2>
<a href="<c:url value="/shop" />">Product List</a><br /><br />
<%
@SuppressWarnings("unchecked")
Map<Integer, String> products =
(Map<Integer, String>)request.getAttribute("products");
@SuppressWarnings("unchecked")
Map<Integer, Integer> cart =
(Map<Integer, Integer>)session.getAttribute("cart");
if(cart == null || cart.size() == 0)
out.println("Your cart is empty.");
else
{
for(int id : cart.keySet())
{
out.println(products.get(id) + " (qty: " + cart.get(id) +
")<br />");
}
}
%>
</body>
</html>
This JSP uses the implicit session variable you learned about in Chapter 4 to access the shopping cart Map stored in the session. It then lists out all the items in the cart and their quantities. Notice that the session attribute of the page directive is no longer set to false(it defaults to true), which enables you to use the session variable in the JSP.
Compiling and Testing
Now that everything is in place, compile your project, and run Tomcat in your IDE debugger.
1. Navigate in your browser to http://localhost:8080/shopping-cart/ and you see the list of products.
2. Click View Cart to view your cart, which will be empty because you haven’t added anything yet.
3. Click Product List to return to the product list and then click a product name to add it to your cart. You should now see the cart, which has the item in it.
4. Return to the product list and add a different product to the cart. Now you should see both items in your cart. The session is successfully storing data between requests.
5. Add another product and also add some of the same products. More products should appear in your cart, and the quantities should increase for products you’ve added again.
After a while, your cart should look like Figure 5-2.

FIGURE 5-2
To further test that the session is working properly, open your application in a different browser, and click View Cart. The cart in the new browser should be empty, whereas the cart in your original browser should still have items in it. This demonstrates that not only is your cart persisting between requests, but also that it belongs only to your individual session in that browser. No other users can see it.
The final test is to close and re-open the original browser window that had cart items in it. Now the cart should be empty. This is because your session cookie expired when you closed the browser, and when you went back to your application, you got a new session. The old session, however, sticks around for a while until you undeploy the application or shut down Tomcat, or the session times out due to inactivity. There is no (easy) way to get that session back in your browser.
Removing Data
So far the session is useful, but you shouldn’t have to close and re-open your browser to empty your cart. That’s where the removeAttribute method of the session comes in.
1. Add a new case to your doGet method:
2. case "emptyCart":
3. this.emptyCart(request, response);
break;
4. Add the emptyCart method implementation:
5. private void emptyCart(HttpServletRequest request,
6. HttpServletResponse response)
7. throws ServletException, IOException
8. {
9. request.getSession().removeAttribute("cart");
10. response.sendRedirect("shop?action=viewCart");
}
As you can see, this is the simplest method in your Servlet. The code removes the cart attribute from your session and then redirects you to view your empty cart.
NOTE It should be pointed out that you could have instead called getAttribute to retrieve the Map and then called the clear method on the Map. This would also empty the cart and would be slightly more efficient because over time it would lead to fewer garbage collections. However, this example demonstrates the use of the removeAttribute method.
11.You now need a way to navigate to the link to empty the cart. Modify /WEB-INF/jsp/view/viewCart.jsp and add the following link to it:
<a href="<c:url value="/shop?action=emptyCart" />">Empty Cart</a><br /><br />
12.Compile and debug your application and add some products to your cart.
13.After your cart starts to fill up, click Empty Cart. All the products in your cart should go away, leaving you with an empty cart.
You can do some other things with sessions that you won’t experiment with here but that you need to know about. The most obvious thing you might want to do is retrieve the session ID to use for some purpose. Calling the getId method on the HttpSession object easily accomplishes this. Also there are the getCreationTime and getLastAccessedTime methods. Although getCreationTime obviously returns the time (Unix timestamp in milliseconds) that the session object was created, the getLastAccessedTime method can be a bit counterintuitive.
This is not the last time that your code used the session object in some way. Instead, it is the timestamp of the last request that included the session ID for that session in it (URL, cookie, or SSL session) — in other words, the last time the user accessed the session. The isNew method can be handy: It returns true if the session was created during the current request, which means the user’s browser has not yet received the session ID.
getMaxInactiveInterval returns the maximum time (in seconds) that this session can be inactive (no requests containing the session ID) before it expires. Its counterpart is setMaxInactiveInterval, which enables you to change the inactivity window. By default,getMaxInactiveInterval returns the value you set in <session-timeout>. The setMaxInactiveInterval method overrides this configured setting to make it shorter or longer for this specific session.
To understand why you might need to do this, consider an application where certain users (administrators) have a lot of power and can see sensitive information. You might want their inactivity interval to be shorter than other users’. So, when the user first signs in, you call setMaxInactiveInterval to change this value depending on the user’s permissions.
Perhaps one of the most important HttpSession methods to know about is the invalidate method. This is a method that you would call when a user logs out (although that is just one example). invalidate destroys the session and unbinds all the data bound to it. Even if the client’s browser makes another request with the same session ID, the invalidated session is not used. Instead, a new session is created and the response contains the new session ID.
Storing More Complex Data in Sessions
So far you’ve learned how to use the HttpSession object and how to add data to and remove it from the session. However, you worked only with a simple Map with integer keys and values. Is this all that a session can do? The answer is no. Theoretically speaking, a session can store just about anything you want to put in it.
Of course, you have size considerations to think about. If you put too much data in your sessions, you could begin to exhaust the virtual machine’s memory pool. Then there’s clustering to keep in mind. Clustering is discussed in the section “Clustering an Application That Uses Sessions,” but you want to make sure that you can serialize and transmit your session data throughout the cluster (so the session attributes would need to implement Serializable). Other than those two restrictions, there’s really not a lot you can’t put in a session.
To demonstrate this, consider the Session-Activity example project available on the wrox.com download site. It has the same deployment descriptor and /WEB-INF/jsp/base.jspf file and a slightly different index.jsp file:
<c:redirect url="/do/home" />
In the com.wrox package there is a POJO called PageVisit. The class and its fields are shown in the following code. The simple accessor (getter) and mutator (setter) methods for this class are left up to the reader to complete.
import java.io.Serializable;
import java.net.InetAddress;
public class PageVisit implements Serializable
{
private long enteredTimestamp;
private Long leftTimestamp;
private String request;
private InetAddress ipAddress;
// accessor and mutator methods
}
Notice that although enteredTimestamp is a primitive long, leftTimestamp is a wrapper Long. This is so that leftTimestamp can be null. The ActivityServlet in Listing 5-1 isn’t very complex. The standard doGet method calls recordSessionActivity and thenviewSessionActivity. The viewSessionActivity method simply forwards to a JSP. recordSessionActivity is doing all the fun work: It gets the session; ensures the activity Vector exists in the session; updates the leftTimestamp for the last PageVisit in the Vector, if there is one; and then adds information about the current request to the Vector. Vector is used here because, unlike ArrayList, it is a thread-safe List. The URL pattern for the Servlet has a wildcard in it. This URL pattern means that this Servlet answers any request starting with /do/, which can come in handy when you test this out.
LISTING 5-1: ActivityServlet.java
@WebServlet(
name = "storeServlet",
urlPatterns = "/do/*"
)
public class ActivityServlet extends HttpServlet
{
@Override
protected void doGet(HttpServletRequest request, HttpServletResponse response)
throws ServletException, IOException
{
this.recordSessionActivity(request);
this.viewSessionActivity(request, response);
}
private void recordSessionActivity(HttpServletRequest request)
{
HttpSession session = request.getSession();
if(session.getAttribute("activity") == null)
session.setAttribute("activity", new Vector<PageVisit>());
@SuppressWarnings("unchecked")
Vector<PageVisit> visits =
(Vector<PageVisit>)session.getAttribute("activity");
if(!visits.isEmpty())
{
PageVisit last = visits.lastElement();
last.setLeftTimestamp(System.currentTimeMillis());
}
PageVisit now = new PageVisit();
now.setEnteredTimestamp(System.currentTimeMillis());
if(request.getQueryString() == null)
now.setRequest(request.getRequestURL().toString());
else
now.setRequest(request.getRequestURL()+"?"+request.getQueryString());
try
{
now.setIpAddress(InetAddress.getByName(request.getRemoteAddr()));
}
catch (UnknownHostException e)
{
e.printStackTrace();
}
visits.add(now);
}
private void viewSessionActivity(HttpServletRequest request,
HttpServletResponse response)
throws ServletException, IOException
{
request.getRequestDispatcher("/WEB-INF/jsp/view/viewSessionActivity.jsp")
.forward(request, response);
}
}
The final thing to look at in this project is the /WEB-INF/jsp/view/viewSessionActivity.jsp file in Listing 5-2. It’s less complicated than it looks. All it’s doing is displaying all the page visit data accrued in the session in a readable manner. Now to test this, follow these steps:
1. Compile and debug your application and navigate to http://localhost:8080/session-activity/do/home/ in your browser. You should see some information about your session, an indication that the session is new, and information about the request you just made.
2. Start adding paths and query parameters to the end of the URL. Try different URLs and wait different amounts of time between each request. You can even replace home/ with something else — just make sure you leave /do/ in the URL.
After a while, you should start to see something like Figure 5-3 emerge. Your application is tracking request activity and persisting it between requests to display to the user.
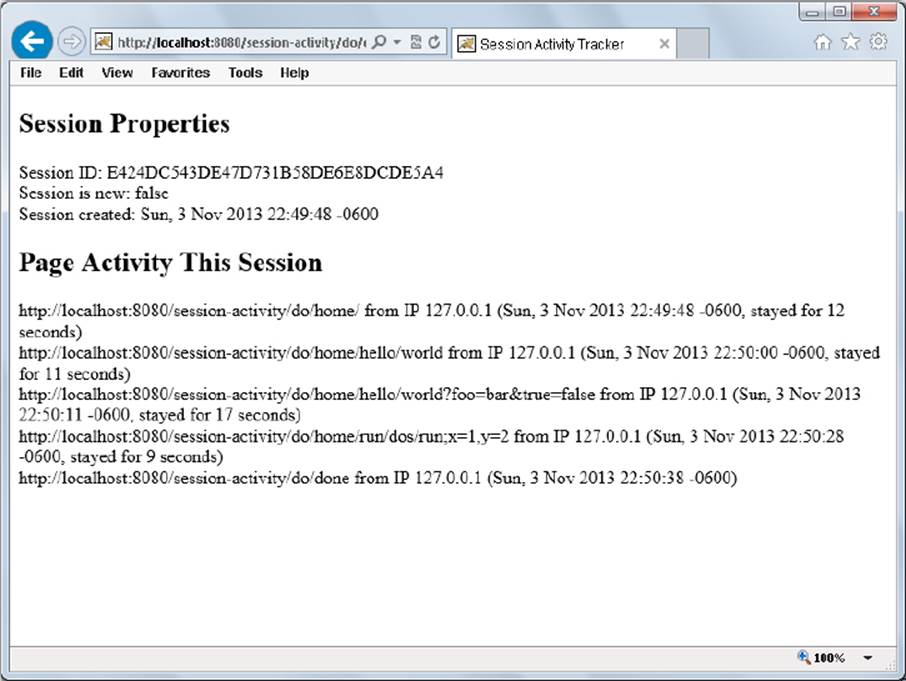
FIGURE 5-3
LISTING 5-2: viewSessionActivity.jsp
<%@ page import="java.util.Vector, com.wrox.PageVisit, java.util.Date" %>
<%@ page import="java.text.SimpleDateFormat" %>
<%!
private static String toString(long timeInterval)
{
if(timeInterval < 1_000)
return "less than one second";
if(timeInterval < 60_000)
return (timeInterval / 1_000) + " seconds";
return "about " + (timeInterval / 60_000) + " minutes";
}
%>
<%
SimpleDateFormat f = new SimpleDateFormat("EEE, d MMM yyyy HH:mm:ss Z");
%>
<!DOCTYPE html>
<html>
<head>
<title>Session Activity Tracker</title>
</head>
<body>
<h2>Session Properties</h2>
Session ID: <%= session.getId() %><br />
Session is new: <%= session.isNew() %><br />
Session created: <%= f.format(new Date(session.getCreationTime()))%><br />
<h2>Page Activity This Session</h2>
<%
@SuppressWarnings("unchecked")
Vector<PageVisit> visits =
(Vector<PageVisit>)session.getAttribute("activity");
for(PageVisit visit : visits)
{
out.print(visit.getRequest());
if(visit.getIpAddress() != null)
out.print(" from IP " + visit.getIpAddress().getHostAddress());
out.print(" (" + f.format(new Date(visit.getEnteredTimestamp())));
if(visit.getLeftTimestamp() != null)
{
out.print(", stayed for " + toString(
visit.getLeftTimestamp() - visit.getEnteredTimestamp()
));
}
out.println(")<br />");
}
%>
</body>
</html>
APPLYING SESSIONS USEFULLY
At this point you should be well acquainted with how sessions work and how to use sessions in Java EE web applications. There are many things you can do with sessions. In addition, some extra tools are available to help you track when sessions are created, destroyed, and updated. You explore those further in this section. For the rest of the chapter, you’ll work with the Customer-Support-v3 project found on the wrox.com code download site and integrate sessions into the Customer Support application.
Adding Login to the Customer Support Application
In the last chapter you disabled sessions in the customer support application by adding session="false" to the page attributes in all the JSPs. You want to use sessions now, and this can prevent you from doing that, so remove the session="false" attribute from all the JSPs in version 3 of the Customer Support application. Remember that this attribute value defaults to true, so removing the attribute altogether enables sessions.
You should also add the <session-config> XML from the Shopping-Cart application to the deployment descriptor so that sessions are configured for better security and session IDs don’t end up in URLs. It should be obvious at this point that the Customer Support application needs some form of user database with logins. In this section, you’ll add a very rudimentary, unsecure login capability to your application. In the last part of the book several chapters cover securing your application with a more comprehensive authentication and authorization system, so you can keep it simple for now.
Setting Up the User Database
Add a LoginServlet class to your application and create a static, in-memory user database in it:
@WebServlet(
name = "loginServlet",
urlPatterns = "/login"
)
public class LoginServlet extends HttpServlet
{
private static final Map<String, String> userDatabase = new Hashtable<>();
static {
userDatabase.put("Nicholas", "password");
userDatabase.put("Sarah", "drowssap");
userDatabase.put("Mike", "wordpass");
userDatabase.put("John", "green");
}
}
As you can see, the user database is a simple map of usernames to passwords without respect to any sort of varying permissions level. Users can either access the system or they can’t, and passwords are not stored in a secure manner. The doGet method is responsible for displaying the login screen, so create that now.
@Override
protected void doGet(HttpServletRequest request, HttpServletResponse response)
throws ServletException, IOException
{
HttpSession session = request.getSession();
if(session.getAttribute("username") != null)
{
response.sendRedirect("tickets");
return;
}
request.setAttribute("loginFailed", false);
request.getRequestDispatcher("/WEB-INF/jsp/view/login.jsp")
.forward(request, response);
}
The first thing the method in the previous example does is check to see if a user is already logged in (a username attribute exists) and redirect them to the ticket screen if they are. If the user is not logged in, it sets a loginFailed request attribute to false and forwards the request to the login JSP. When the login form on the JSP is submitted, it posts to the doPost method:
@Override
protected void doPost(HttpServletRequest request, HttpServletResponse response)
throws ServletException, IOException
{
HttpSession session = request.getSession();
if(session.getAttribute("username") != null)
{
response.sendRedirect("tickets");
return;
}
String username = request.getParameter("username");
String password = request.getParameter("password");
if(username == null || password == null ||
!LoginServlet.userDatabase.containsKey(username) ||
!password.equals(LoginServlet.userDatabase.get(username)))
{
request.setAttribute("loginFailed", true);
request.getRequestDispatcher("/WEB-INF/jsp/view/login.jsp")
.forward(request, response);
}
else
{
session.setAttribute("username", username);
request.changeSessionId();
response.sendRedirect("tickets");
}
}
There’s not a lot new in the doPost method. It again makes sure that the user isn’t already logged in, and then checks the username and password against the “database.” If the login failed it sets the loginFailed request attribute to true and sends the user back to the login JSP. If the credentials match, it sets the username attribute on the session, changes the session ID, and then redirects the user to the ticket screen. The changeSessionId method (code in bold) is a new feature in Servlet 3.1 from Java EE 7 that protects against the session fixation attacks you read about earlier in the chapter by migrating the session (changing the session ID).
Creating the Login Form
Next create /WEB-INF/jsp/view/login.jsp and put a login form in it:
<!DOCTYPE html>
<html>
<head>
<title>Customer Support</title>
</head>
<body>
<h2>Login</h2>
You must log in to access the customer support site.<br /><br />
<%
if(((Boolean)request.getAttribute("loginFailed")))
{
%>
<b>The username or password you entered are not correct. Please try
again.</b><br /><br />
<%
}
%>
<form method="POST" action="<c:url value="/login" />">
Username<br />
<input type="text" name="username" /><br /><br />
Password<br />
<input type="password" name="password" /><br /><br />
<input type="submit" value="Log In" />
</form>
</body>
</html>
This simple page writes out a login form to the screen and, using the loginFailed attribute, notifies users when their login credentials were rejected. Together with the LoginServlet, it completes the simple login feature. However, this doesn’t stop users from accessing the ticket screens. You need to add a check in the TicketServlet to make sure users are logged in before displaying ticket information or letting them post tickets. This is easily accomplished by adding the following code to the top of the doGet and doPost methods in theTicketServlet:
if(request.getSession().getAttribute("username") == null)
{
response.sendRedirect("login");
return;
}
Now that users log in before creating tickets, your code already has access to their names when they create new tickets. This means you don’t need the name field on the ticket form anymore. In the TicketServlet’s createTicket method, change the current code, which sets the ticket’s customer name using the request parameter, so that it now uses the username from the session as shown in the following code. You can also remove the “Your Name” (customerName) input field from /WEB-INF/jsp/view/ticketForm.jsp.
ticket.setCustomerName(
(String)request.getSession().getAttribute("username")
);
Testing the Log In
Now that your application requires logins, follow these steps to test it:
1. Compile the project and debug it using your IDE.
2. Navigate to the application in your browser (http://localhost:8080/support/) and you should immediately be taken to the login page.
3. Try logging in with incorrect usernames and passwords (both of which are case-sensitive) and you should be denied entry.
4. Try a valid username and password, and you should land on the list of tickets.
5. Create a few tickets like you did in previous chapters, and your username should be attached to them.
6. Close your browser, re-open it, and log back in using a different username and password.
7. Create another ticket and you can see that the new ticket has the name of the user you’re currently logged in as, while the old tickets have the other user’s name.
Adding a Logout Link
When testing, you had to close your browser to log out of the Customer Support application. This may not be desirable and is not the hallmark of an enterprise application. Adding a logout link is trivial enough. First, tweak the code at the top of the LoginServlet’sdoGet method to add support for logging the user out:
HttpSession session = request.getSession();
if(request.getParameter("logout") != null)
{
session.invalidate();
response.sendRedirect("login");
return;
}
else if(session.getAttribute("username") != null)
{
response.sendRedirect("tickets");
return;
}
The only other thing you need to do is add a logout link to the top of the listTickets.jsp, ticketForm.jsp, and viewTicket.jsp files in /WEB-INF/jsp/view, just above the <h2> headers:
<a href="<c:url value="/login?logout" />">Logout</a>
Now rebuild and run again, and log in to your application. You should see a logout link on top of every page. Click the logout link and you will return to the login page, indicating that you have successfully been logged out.
Detecting Changes to Sessions Using Listeners
One of the more useful features of sessions in Java EE is the idea of session events. When changes are made to sessions (for example, session attributes are added or removed), the web container can notify your application of these changes. This is achieved through a form of the publish-and-subscribe model, enabling you to decouple the code in your application that needs to be aware of session changes from the code that makes changes to sessions. This is especially useful if some third-party code — such as Spring Framework or Spring Security — makes changes to sessions in your application because it enables you to detect these changes without changing the third-party code. The tools that you use to detect these changes are called listeners.
Several listeners are defined in the Servlet API and most, though not all of them, listen for some form of session activity. You subscribe to an event by implementing the listener interface corresponding to that event and then (in most cases) either adding a <listener>configuration to your deployment descriptor or (as of Servlet 3.0/Java EE 6) annotating the class with @javax.servlet.annotation.WebListener (but not both).
You may implement as few or as many listener interfaces as you need in a single class; although of course, you wouldn’t want to put code that didn’t logically belong together in the same class. When something happens that triggers the publication of an event to which your code is subscribed, the container invokes the method on your class corresponding to that event.
NOTE Starting in Servlet 3.0/Java EE 6, instead of annotating a listener class with @WebListener or declaring it in your deployment descriptor you can programmatically register it using ServletContext’s addListener method. You can only call this method within a ServletContextListener’s contextInitialized method or a ServletContainerInitializer’s onStartup method. Of course, any ServletContextListener you use to do this has to be registered as well (using one of these three approaches). You learn more about ServletContainerInitializers in Chapter 12.
One of the listener interfaces you can implement is the javax.servlet.http.HttpSessionAttributeListener interface. It has three methods that are notified when session attributes are added, updated (replaced) or removed.
A particularly interesting listener is javax.servlet.http.HttpSessionBindingListener. Unlike most other listeners, you do not add deployment descriptor configurations for or annotate HttpSessionBindingListeners. If a class implements this interface, it becomes aware of its status as a session attribute. For example, if class Foo implements HttpSessionBindingListener and you add an instance of Foo to an HttpSession using setAttribute, the container calls that instance’s valueBound method. Likewise, the container call’s the instance’svalueUnbound method when you remove it from the session using removeAttribute.
The two listeners you look at more closely in this section are HttpSessionListener and HttpSessionIdListener in the javax.servlet.http package. Create a SessionListener class in your project that implements both of these interfaces and annotate it with @WebListener (or follow along in the Customer-Support-v3 project):
@WebListener
public class SessionListener implements HttpSessionListener, HttpSessionIdListener
{
...
}
@WebServlet is not the only way to notify the container that your code is subscribing to these events. You could instead register it programmatically or declare the listener in the deployment descriptor as follows (though the example will stick to the annotation because it is the easiest technique).
<listener>
<listener-class>com.wrox.SessionListener</listener-class>
</listener>
The HttpSessionListener interface defines the sessionCreated and sessionDestroyed methods. sessionCreated, intuitively, is called whenever a new session is created. sessionDestroyed is called whenever something causes the session to no longer be valid. This could be an explicit call to the session’s invalidate method in code, or it could be an implicit invalidation due to an inactivity timeout. The following code implements these methods:
@Override
public void sessionCreated(HttpSessionEvent e)
{
System.out.println(this.date() + ": Session " + e.getSession().getId() +
" created.");
}
@Override
public void sessionDestroyed(HttpSessionEvent e)
{
System.out.println(this.date() + ": Session " + e.getSession().getId() +
" destroyed.");
}
As you can see, you use these events to log when a session is created or destroyed. This is a common use case for this particular listener because often administrators want to log this information in some way for record-keeping purposes. HttpSessionIdListener defines only one method, sessionIdChanged. This method, called whenever the session ID is changed using the request’s changeSessionId method, is implemented in the following code:
@Override
public void sessionIdChanged(HttpSessionEvent e, String oldSessionId)
{
System.out.println(this.date() + ": Session ID " + oldSessionId +
" changed to " + e.getSession().getId());
}
All three of these methods use a simple helper method to add a timestamp to the session activity log entries.
private SimpleDateFormat formatter =
new SimpleDateFormat("EEE, d MMM yyyy HH:mm:ss");
...
private String date()
{
return this.formatter.format(new Date());
}
Now compile, debug, and navigate to your application. Immediately a logging message should appear in your debug window indicating that a session was created. Log in to the application, and you should observe another logging message that the session ID changed. This is the session fixation protection that you added to the project a few pages ago. Finally, when you log out of the application, two more log entries appear — one indicating that your session was destroyed and another indicating that a new session was created (because you returned to the login page). You now have a mechanism to log session activity in your application.
NOTE When you first start the debugger but before you open your browser, you may already see a logging message indicating that one or more sessions were destroyed. This is completely normal. Tomcat persists sessions to the filesystem when it is shut down so that the data in them is not lost and then attempts to restore the serialized sessions to memory when Tomcat starts back up. If the persisted sessions expired before Tomcat restored them, Tomcat notifies HttpSessionListeners that the sessions expired just as if Tomcat was never stopped. This is fairly standard behavior among web containers and can be disabled in most cases, but that is outside the scope of this book. Consult your container’s documentation.
Maintaining a List of Active Sessions
In addition to logging session activity, you can use the HttpSessionListener and HttpSessionIdListener to maintain a list of active sessions in the application, something the Servlet API specification does not provide for directly.
To accomplish this, start by creating the SessionRegistry class in Listing 5-3. This class is fairly simple. It maintains a static Map with session IDs as keys and corresponding session objects as values. This may seem inefficient at first, but remember that these session objects already exist in memory for another purpose. The session objects are not being duplicated; this class simply stores another set of references to them, which is a relatively lightweight thing to do compared to the potential memory footprint of the session objects themselves. Because the class contains only static methods, its constructor is private to prevent instantiation.
LISTING 5-3: SessionRegistry.java
public final class SessionRegistry
{
private static final Map<String, HttpSession> SESSIONS = new Hashtable<>();
public static void addSession(HttpSession session)
{
SESSIONS.put(session.getId(), session);
}
public static void updateSessionId(HttpSession session, String oldSessionId)
{
synchronized(SESSIONS)
{
SESSIONS.remove(oldSessionId);
addSession(session);
}
}
public static void removeSession(HttpSession session)
{
SESSIONS.remove(session.getId());
}
public static List<HttpSession> getAllSessions()
{
return new ArrayList<>(SESSIONS.values());
}
public static int getNumberOfSessions()
{
return SESSIONS.size();
}
private SessionRegistry() { }
}
This registry stores references to all the active sessions, but you must add and remove sessions somehow. For that, follow these steps:
1. Expand the SessionListener you created earlier. Add the following code to the sessionCreated method:
SessionRegistry.addSession(e.getSession());
2. Add the following code to the sessionDestroyed method:
SessionRegistry.removeSession(e.getSession());
3. Add the following code to the sessionIdChanged method:
SessionRegistry.updateSessionId(e.getSession(), oldSessionId);
Now sessions will be added to and removed from your registry at the appropriate times, but you still need a way to display these sessions. A simple SessionListServlet handles the request:
@WebServlet(
name = "sessionListServlet",
urlPatterns = "/sessions"
)
public class SessionListServlet extends HttpServlet
{
@Override
protected void doGet(HttpServletRequest request, HttpServletResponse response)
throws ServletException, IOException
{
if(request.getSession().getAttribute("username") == null)
{
response.sendRedirect("login");
return;
}
request.setAttribute("numberOfSessions",
SessionRegistry.getNumberOfSessions());
request.setAttribute("sessionList", SessionRegistry.getAllSessions());
request.getRequestDispatcher("/WEB-INF/jsp/view/sessions.jsp")
.forward(request, response);
}
}
The code for /WEB-INF/jsp/view/sessions.jsp, which takes care of displaying the sessions, is contained in Listing 5-4.
To test this you need two different Internet browsers (not just two windows of the same browser):
1. Rebuild and debug your application, and open the first browser to the support application URL.
2. After logging in, navigate to http://localhost:8080/support/sessions. You should see your current session listed in the list of sessions.
3. Open the second browser, log in to the support application, and navigate to http://localhost:8080/support/sessions in that browser as well. You should see a screen similar to the one in Figure 5-4.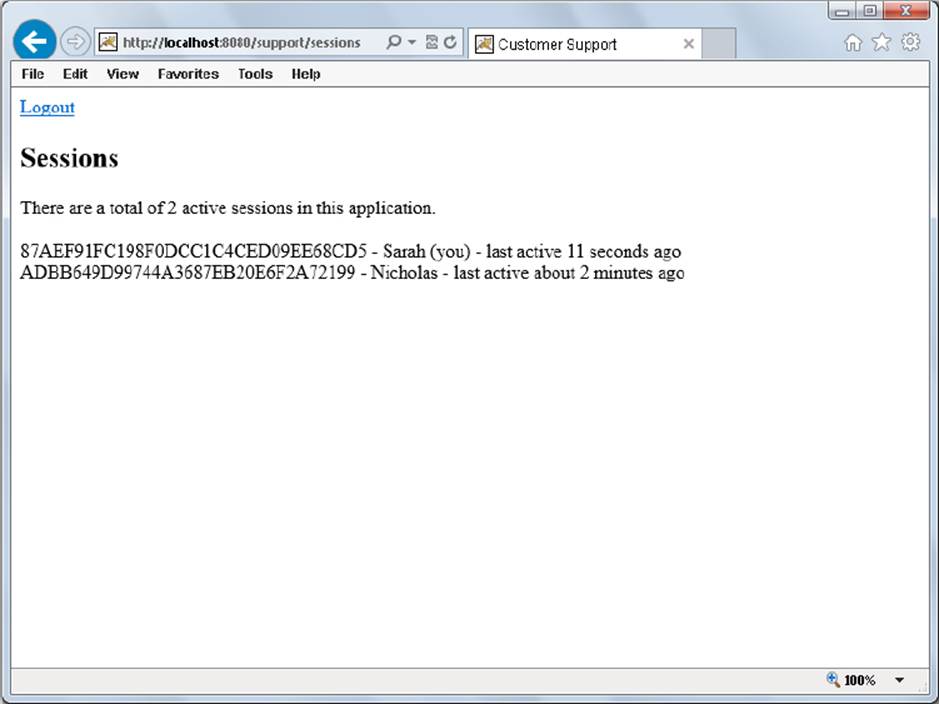
FIGURE 5-4
4. Reload the first browser you opened, and the new session should appear there too. This means you are successfully maintaining a list of sessions.
LISTING 5-4: sessions.jsp
<%@ page import="java.util.List" %>
<%!
private static String toString(long timeInterval)
{
if(timeInterval < 1_000)
return "less than one second";
if(timeInterval < 60_000)
return (timeInterval / 1_000) + " seconds";
return "about " + (timeInterval / 60_000) + " minutes";
}
%>
<%
int numberOfSessions = (Integer)request.getAttribute("numberOfSessions");
@SuppressWarnings("unchecked")
List<HttpSession> sessions =
(List<HttpSession>)request.getAttribute("sessionList");
%>
<!DOCTYPE html>
<html>
<head>
<title>Customer Support</title>
</head>
<body>
<a href="<c:url value="/login?logout" />">Logout</a>
<h2>Sessions</h2>
There are a total of <%= numberOfSessions %> active sessions in this
application.<br /><br />
<%
long timestamp = System.currentTimeMillis();
for(HttpSession aSession : sessions)
{
out.print(aSession.getId() + " - " +
aSession.getAttribute("username"));
if(aSession.getId().equals(session.getId()))
out.print(" (you)");
out.print(" - last active " +
toString(timestamp - aSession.getLastAccessedTime()));
out.println(" ago<br />");
}
%>
</body>
</html>
NOTE The sessions listed in this example are only the ones in the currently running instance of Tomcat. If your application was deployed to multiple Tomcat instances, you would see different sessions listed, depending on which Tomcat instance your request to the application landed on, because the page would still list only sessions on that particular Tomcat instance. The solution to this problem involves properly configuring your application for clustering and setting up session replication in your container. These topics are explored in the next section.
CLUSTERING AN APPLICATION THAT USES SESSIONS
In the time you spend working with enterprise applications, you will undoubtedly come across the need to cluster an application. Clustering provides several advantages, notably adding redundancy and scalability to your application. Properly clustered applications can suffer failures or even endure routine maintenance without end users ever experiencing downtime. In a very well-managed environment, administrators can even roll out upgrades to applications without causing downtime. As you can tell, clustering is an invaluable member of the web application toolset.
Clustering does not come without its downsides, however, and there are challenges that must be overcome. One of the biggest of these challenges is the passing of messages between instances of an application running on separate machines, sometimes even on disparate or disconnected networks or in different regions of the world. For decades engineers have been re-imagining and redesigning cluster messaging systems, constantly searching for that “perfect” messaging framework that is stable, reliable, and fast. Advanced Message Queuing Protocol (AMQP), Java Message Service (JMS), and Microsoft Message Queuing (MSMQ) are three competing technologies that have emerged as a result. Of course, there are other challenges with application clustering than just messaging, and the one you look at in this section is managing sessions in a cluster.
Understanding this section requires you to have some basic knowledge of what load balancing is, how it works, and what some of the common load balancing strategies are. These are topics that would require considerable time to discuss and are outside the scope of this book.
Using Session IDs in a Cluster
The immediate problem you might see with session clustering is that sessions exist as objects in memory and as such only reside on a single instance of a web container. In a purely round-robin or load-smart load balancing scenario, two consecutive requests from the same client may go to different web containers. The first web container instance would assign a session ID to the first request it received, and then when the next request came in to a different instance of the web container, the second instance would not recognize the session ID and would create and assign a new session ID. At this point, sessions would be useless.
One solution to this problem is to employee sticky sessions. The idea of sticky sessions is that the load balancing mechanism is session-aware and always sends a request from the same session to the same server. This can be accomplished in a number of ways and depends largely on the load balancing technology. For example, the load balancer may be made aware of the web container’s session cookie and know that it is a session cookie, therefore using it as a mechanism for determining when requests should go to the same server. Or some load balancers can add their own session cookies to responses and recognize those cookies in subsequent requests. (Yes, a single request can belong to many different sessions, as long as the session cookie names or session ID transmission techniques are all different.)
A potential downside to both of these techniques is that the web container cannot use SSL/HTTPS because that would prevent the load balancer from inspecting or modifying requests or responses. However, many load balancers support handling the encryption and decryption of HTTPS traffic, so you haven’t really made your application less secure; you’ve just moved the encryption mechanism from the server to the load balancer. (Some organizations even prefer this setup, but remember that it prevents you from using SSL Session IDs as your HTTP session IDs.) Finally, some load balancers use a combination of source and destination IP addresses to determine when to send multiple requests to the same server, but this can be troublesome for the same reason that using IP addresses to establish HTTP sessions is a bad idea.
The most common load balancing approach administrators of a Tomcat environment take is to use an Apache HTTPD or Microsoft IIS web server to load balance requests between Apache Tomcat instances. The Apache Tomcat Connectorhttp://tomcat.apache.org/connectors-doc/ provides a mechanism for interfacing these web servers with Tomcat. The connector’s mod_jk component is an Apache HTTPD module that forwards requests to Tomcat and provides sticky sessions capability using Tomcat’s session IDs. Likewise, isapi_redirect is the IIS connector that provides the same capability when using IIS. As load increases even more, you can set up a dumb round-robin load balancer to balance requests between multiple HTTPD or IIS web servers.
This multi-layer approach, demonstrated in Figure 5-5, can achieve extremely high performance and availability while maintaining session affinity. The connector (mod_jk or isapi_redirect) uses a Tomcat concept known as the session ID jvmroute to determine which Tomcat instance to send each request to. Consider the following session ID:
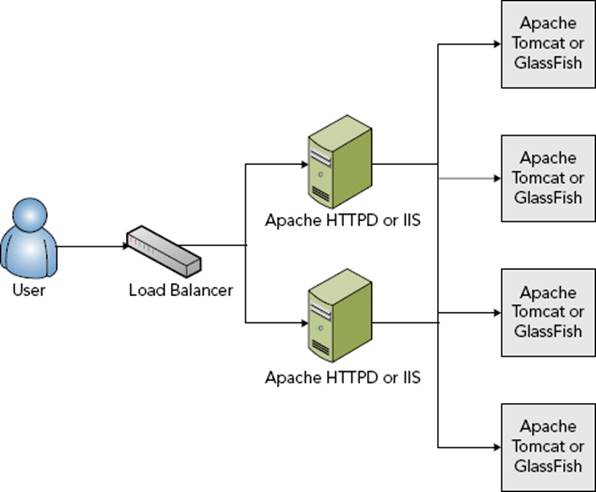
FIGURE 5-5
AA64E92624FFEA976C4148DF5BC6BA03
In a load-balanced environment with multiple Tomcat instances, each Tomcat instance would have a jvmroute configured in the <Connector> element in Tomcat’s conf/server.xml configuration file. That jvmroute is appended to the end of all session IDs. In a cluster with three Tomcat instances having jvmroutes tcin01, tcin02 and tcin03, that same session ID would instead look like this if the session originated on instance tcin02:
AA64E92624FFEA976C4148DF5BC6BA03.tcin02
From then on the web server connector (mod_jk or isapi_redirect) would recognize that this session belonged to Tomcat instance tcin02 and would always send requests in that session to that instance. If your application were secured with HTTPS, the web server would have to be in charge of certificates and encryption/decryption for this to work. The advantage of using mod_jk or isapi_redirect for this is that they have access to the SSL Session ID and re-transmit that ID to Tomcat, allowing SSL session tracking to work properly. This exact sticky-session load balancing approach also works with GlassFish behind Apache HTTPD/mod_jk and IIS/isapi_redirect.
The exact details of configuring mod_jk, isapi_redirect, and Tomcat’s and GlassFish’s jvmroute are outside the scope of this book and vary from one version to the next. Consult the Tomcat and GlassFish documentation for instructions. WebLogic, WebSphere, and other containers offer similar but ultimately different approaches that are covered in detail in their documentation as well.
Understand Session Replication and Failover
The major problem with using sticky sessions is that it may support scalability, but it does not support high availability. If the Tomcat instance that created a particular session goes down, the session is lost and the user must log in again. Even worse, the user could potentially lose unsaved work. For this purpose sessions can be replicated throughout the cluster so that all sessions are available to all web container instances regardless of the instances from which they originated. Enabling session replication in your application is easy to accomplish. You just need to add the <distributable> tag to the deployment descriptor:
<distributable />
That’s all there is to it. There are no attributes, nested tags, or content for this tag. The presence of this in the deployment descriptor tells the web container to replicate sessions across the cluster, if one exists. When a session is created in one instance, it is replicated to the other instances. If a session attribute is changed, that session is re-replicated to the other instances so that they have the latest version of the session.
Of course, it isn’t actually this simple. For instance, this only marks your application as supporting distributable sessions. It does not configure your web container’s session replication mechanism (which is a complex topic not discussed in this book). It also does not automatically mean your application follows best practices. You must be careful which session attributes you set (if they are not Serializable, an IllegalArgumentException is thrown when you call setAttribute) and how you update those session attributes. Consider this code snippet from the Shopping-Cart project:
@SuppressWarnings("unchecked")
Map<Integer, Integer> cart =
(Map<Integer, Integer>)session.getAttribute("cart");
if(!cart.containsKey(productId))
cart.put(productId, 0);
cart.put(productId, cart.get(productId) + 1);
The web container does not (and cannot) know that the Map containing the cart items has changed in this way. Because of this, the change to the session will not be replicated, which means that other container instances cannot know about the new item in the cart. This can be addressed simply:
@SuppressWarnings("unchecked")
Map<Integer, Integer> cart =
(Map<Integer, Integer>)session.getAttribute("cart");
if(!cart.containsKey(productId))
cart.put(productId, 0);
cart.put(productId, cart.get(productId) + 1);
session.setAttribute("cart", cart);
Notice the code in bold that has been added. This may seem silly because you replaced the cart session attribute with the same object that was already assigned to it. However, calling this method tells the container that the session has changed and causes the session to be replicated again. Any time you change an object assigned to a session attribute, you must call setAttribute again to ensure the change is replicated.
There is also a listener associated with the concept of session replication. Any objects added to sessions as attributes can implement the javax.servlet.http.HttpSessionActivationListener interface. When a session is about to be serialized to replicate to other servers, the sessionWillPassivate method is called, giving the object bound to the session an opportunity to perform some action first. When the session is deserialized in another container, the sessionDidActivate method is called to notify the attribute that it has been deserialized.
One final note: Sticky sessions and session replication are not mutually exclusive concepts. Often the two are combined to achieve session failover — sessions are still replicated, but requests in the same session are sent to the same instance until that instance fails, at which point the requests are sent to a different instance that already knows about the session. You can use several techniques to increase the efficiency of your application using sticky session failover, but they are outside the scope of this book. The documentation for your web container should describe the replication features it supports and how to use them.
SUMMARY
In this chapter you have been introduced to the concept of sessions and how sessions are established between the client and server. You learned about some of the many potential security vulnerabilities associated with sessions and how each of them can be addressed, and you also learned about the most secure session ID transmission method of all: using the SSL session ID. You explored employing sessions in Java EE using a shopping cart application and added login support to the Customer Support application. You also discovered how to detect changes to sessions and used that to establish a registry of sessions within your application. Finally, you were introduced to the concepts behind clustering sessions and learned about some of the challenges and approaches to session clustering. In the next three chapters, you explore some technologies that make working with JSPs easier than ever before and help you get rid of Java within JSPs for good.
All materials on the site are licensed Creative Commons Attribution-Sharealike 3.0 Unported CC BY-SA 3.0 & GNU Free Documentation License (GFDL)
If you are the copyright holder of any material contained on our site and intend to remove it, please contact our site administrator for approval.
© 2016-2026 All site design rights belong to S.Y.A.