PROFESSIONAL JAVA FOR WEB APPLICATIONS (2014)
Part I Creating Enterprise Applications
Chapter 9 Improving Your Application Using Filters
IN THIS CHAPTER
· The purpose of filters
· How to create, declare, and map filters
· How to properly order your filters
· Using filters with asynchronous request handling
· Exploring practical uses for filters
· Using filters to simplify authentication
WROX.COM CODE DOWNLOADS FOR THIS CHAPTER
You can find the wrox.com code downloads for this chapter at http://www.wrox.com/go/projavaforwebapps on the Download Code tab. The code for this chapter is divided into the following major examples:
· Filter-Order Project
· Filter-Async Project
· Compression-Filter Project
· Customer-Support-v7 Project
NEW MAVEN DEPENDENCIES FOR THIS CHAPTER
There are no new Maven dependencies for this chapter. Continue to use the Maven dependencies introduced in all previous chapters.
UNDERSTANDING THE PURPOSE OF FILTERS
Filters are application components that can intercept requests to resources, responses from resources, or both, and act on those requests or responses in some manner. Filters can inspect and modify requests and responses, and they can even reject, redirect, or forward requests.
A relatively new addition to the Servlet specification, filters were added in Servlet 2.3, improved in Servlet 2.4, and haven’t really changed much since then. The javax.servlet.Filter interface is very simple and involves the HttpServletRequest and HttpServletResponsethat you are already familiar with. Like Servlets, filters can be declared in the deployment descriptor, programmatically, or with annotations, and they can have init parameters and access the ServletContext. The number of uses for filters is really limited only by your imagination; in this section you explore some of the most common applications.
Logging Filters
Filters can be especially useful for logging activity in your application. You’ll learn about the concepts of and tools involved with logging in Chapter 11, but one scenario applications developers sometimes face is the need to log every request to the application and what the result of each request is (status code, length, and possibly other information). Usually the web container provides facilities for request logging, but if you need proprietary information displayed in your request log, you can use a filter to log requests instead. You can also use filters to add tracking information that will be used for all logging operations for the request. This is called fish tagging, and you’ll learn more about it in Chapter 11.
Authentication Filters
When you need to ensure that only authorized people access your application, this typically involves performing a check on each request to ensure the user is “logged in.” The meaning of that term may vary from application to application, but the tedium of performing this check in every Servlet is universal. Filters can make the job easier by centralizing authentication and authorization checks into one location that intercepts all secured requests.
At the end of this chapter, you add a filter to the ongoing Customer Support project that does just this and removes duplicate code throughout the application. In Part IV, you explore Spring Security and use it to add authentication and authorization to your applications. Filters are the foundation for Spring Security and make up a large part of its functionality.
Compression and Encryption Filters
Though it is not always the case (and is becoming less and less common every day), there are still times in which Internet bandwidth is extremely limited and CPU resources are more abundant. In these cases, it’s often desirable to spend the necessary CPU cycles compressing data before transmitting it over the wire. You can use a filter to accomplish this: When the request comes in, it remains unaltered, but as the response goes back out to the user, the filter compresses it. This, of course, requires that the user can decompress the response. In the section “Investigating Practical Uses for Filters,” you see what’s involved in writing a response compression filter.
Filters can also be useful for handling decryption of requests and encryption of responses. Typically, you rely on HTTPS for this; something the web container or web server can natively handle. However, if the consumers of your resources are not a browser or other web client but instead some other application, they could employ a proprietary encryption system understood only by those two applications. In this case, a filter is a prime candidate for decrypting requests as they come in and encrypting responses as they go out. Understand that this is an unusual scenario, and you really should rely on industry-standard tools such as HTTPS for securing your application’s communications.
Error Handling Filters
Let’s face it: As hard as software developers try to handle errors that arise during the execution of their software, sometimes errors slip through the cracks. When the software is an operating system, the nasty symptom is often a system halt, affectionately referred to in the technology world as “the blue screen of death.” With desktop applications, the user might receive a notice that “the application has quit unexpectedly.”
With web applications, the result is typically an HTTP response code of 500, often accompanied by a plain HTML page with the words “Internal Server Error” and some diagnostic information. For applications run locally (such as on an intranet), this diagnostic information is usually not harmful and it might actually be useful for the developer to figure out what went wrong. But for web applications run remotely, this diagnostic information can potentially reveal sensitive system information that hackers can use to compromise a system.
For these reasons, you should display a more friendly, generic error page to users (often styled like the rest of your web application) and log the error or notify a system administrator as necessary. A filter is the perfect tool for this task. You can wrap request handling in a try-catch block, thus catching and logging any errors. This results in the request being forwarded to a generic error page that does not contain any diagnostic or sensitive information.
CREATING, DECLARING, AND MAPPING FILTERS
Creating a filter is as simple as implementing the Filter interface. Its init method is called when the filter is initialized and provides access to the filter’s configuration, its init parameters, and the ServletContext, just like the init method in a Servlet. Similarly, thedestroy method is called when the web application is shut down. The doFilter method is called when a request comes in that is mapped to the filter. It provides access to the ServletRequest, ServletResponse, and FilterChain objects. Although you can use filters to filter more than just HTTP requests and responses, in reality, for your uses, the request is always an HttpServletRequest and the response is always an HttpServletResponse. In fact, at the moment the Servlet API specification does not support any protocols besides HTTP. Within doFilter you can either reject the request or continue it by calling the doFilter method of the FilterChain object; you can alter the request and the response; and you can wrap the request and response objects.
Understanding the Filter Chain
Although only one Servlet can handle a request, any number of filters may intercept a request. Figure 9-1 demonstrates how the filter chain accepts an incoming request and passes it from filter to filter until all matching filters have been processed, finally passing it on to the Servlet. Calling FilterChain.doFilter() triggers the continuation of the filter chain. If the current filter is the last filter in the chain, calling FilterChain.doFilter() returns control to the Servlet container, which passes the request to the Servlet. If the current filter does not call FilterChain.doFilter(), the chain is interrupted, and the Servlet and any remaining filters never handle the request.

FIGURE 9-1
In this way, the filter chain is very much like a stack (and, indeed, the series of method executions do go on the Java stack). When a request comes in, it goes to the first filter, which is added to the stack. When that filter continues the chain, the next filter is added to the stack. This continues until the request goes to the Servlet, which is the last item added to the stack. As the request completes and the Servlet’s service method returns, the Servlet is removed from the stack and control passes back to the last filter. When itsdoFilter method returns, that filter is removed from the stack and control returns to the previous filter. This continues until control has returned to the first filter. When its doFilter method returns, the stack is empty and request processing completes. Because of this, a filter can take action on a request both before and after the destination Servlet services it.
Mapping to URL Patterns and Servlet Names
Just like Servlets, filters can be mapped to URL patterns. This determines which filter or filters will intercept a request. Any request matching a URL pattern to which a filter is mapped first goes to that filter before going to any matching Servlets. Using URL patterns, you can intercept not only requests to your Servlets, but also to other resources, such as images, CSS files, JavaScript files, and more.
Sometimes, mapping to a particular URL is inconvenient. Possibly you have several URLs — even dozens — that are already mapped to a Servlet, and you want to also map a filter to those URLs. Instead of mapping your filter to a URL or URLs, you can map it to one or more Servlet names. If a request is matched to a Servlet, the container looks for any filters mapped to that Servlet’s name and applies them to the request. Later in this section, you learn about how to map filters to URLs and Servlet names. Whether you map your filters using URL patterns, Servlets names, or both, a filter can intercept multiple URL patterns and Servlet names, and multiple filters can intercept the same URL pattern or Servlet name.
Mapping to Different Request Dispatcher Types
In a Servlet container, you can dispatch requests in any number of ways. There are:
· Normal requests — These originate from the client and include a URL targeted for a particular web application in the container.
· Forwarded requests — These trigger when your code calls the forward method on a RequestDispatcher or uses the <jsp:forward> tag. Though they are related to the original request, they are handled internally as a separate request.
· Included requests — Similarly, using <jsp:include> and calling include on a RequestDispatcher result in separate, internal include requests related to the original requests. (Remember that this is contrary to <%@ include %>.)
· Error resource requests — These are requests to error pages for handling HTTP errors such as 404 Not Found, 500 Internal Server Error, and so on.
· Asynchronous requests — These are requests that are dispatched from the AsyncContext during the handling of any other request.
Prior to Servlet 2.4, filters applied only to resources for typical requests. Servlet 2.4 added the ability to map filters to forwarded requests, include requests, and error resources, greatly expanding their capabilities. In Servlet 3.0 (Java EE 6), the new asynchronous request handling presented a challenge for filter writers: Because the Servlet’s service method returns before the request’s response has been sent, the capability of the filter chain is compromised. To compensate for this, Servlet 3.0 added the new asynchronous dispatcher type for filters intercepting requests dispatched from the AsyncContext. Asynchronous filters should be implemented with caution because they can be invoked multiple times (potentially in different threads) for a single asynchronous request. This is covered in more detail in the next section.
You indicate which dispatcher type or types a filter should apply to when you declare and map a filter, which you learn about in the remainder of this section.
Using the Deployment Descriptor
Before any filters you write can intercept requests, you must declare and map them just like you do your Servlets. As with Servlets, you can accomplish this in multiple ways. The traditional way is in the deployment descriptor using the <filter> and <filter-mapping>elements (analogous to the <servlet> and <servlet-mapping> elements). <filter> elements must contain at least a name and a class but may also include a description, display name, icon, and one or more init parameters.
<filter>
<filter-name>myFilter</filter-name>
<filter-class>com.wrox.MyFilter</filter-class>
</filter>
The previous code snippet demonstrates a simple filter declaration within the deployment descriptor. Unlike Servlets, filters cannot be loaded on the first request. A filter’s init method is always called on application startup: After ServletContextListeners initialize, before Servlets initialize, and in the order the filter appears in the deployment descriptor.
After a filter has been declared, you can map it to any number of URLs or Servlet names. Filter URL mappings can also include wildcards, just like Servlet URL mappings.
<filter-mapping>
<filter-name>myFilter</filter-name>
<url-pattern>/foo</url-pattern>
<url-pattern>/bar/*</url-pattern>
<servlet-name>myServlet</servlet-name>
<dispatcher>REQUEST</dispatcher>
<dispatcher>ASYNC</dispatcher>
</filter-mapping>
In this case, the filter responds to any request to the application-relative URLs /foo and /bar/*, as well as any requests that end up being serviced by the Servlet named myServlet. The two <dispatcher> elements mean that it can respond to normal requests and requests dispatched from the AsyncContext. The valid <dispatcher> types are REQUEST, FORWARD, INCLUDE, ERROR, and ASYNC. A filter mapping may have zero or more <dispatcher> elements. If none are specified, a single, default REQUEST dispatcher is assumed.
Using Annotations
As with Servlets, you can declare and map filters using annotations. The @javax.servlet.annotation.WebFilter annotation contains attributes that substitute for all the options in the deployment descriptor. The following code has the equivalent effect of the previous filter declaration and mapping in the deployment descriptor:
@WebFilter(
filterName = "myFilter",
urlPatterns = { "/foo", "/bar/*" },
servletNames = { "myServlet" },
dispatcherTypes = { DispatcherType.REQUEST, DispatcherType.ASYNC }
)
public class MyFilter implements Filter
The primary disadvantage of using annotations to declare and map filters is the inability to order those filters on the filter chain. Filters have a particular order (which you learn about in the next section) that is very important to their proper interaction. If you want to control the order in which your filters execute without using the deployment descriptor, you need to use programmatic configuration. Hopefully, the future Java EE 8 will include the capability of ordering annotated filters.
Using Programmatic Configuration
You can configure filters programmatically with the ServletContext, just like Servlets, listeners, and other components. Instead of using the deployment descriptor or annotations, you can call methods on the ServletContext to register and map filters. Because this must be done before the ServletContext finishes starting, it is typically accomplished within a ServletContextListener’s contextInitialized method. (You can also add filters within a ServletContainerInitializer’s onStartup method, which you learn more about in Part II.)
@WebListener
public class Configurator implements ServletContextListener
{
@Override
public void contextInitialized(ServletContextEvent event)
{
ServletContext context = event.getServletContext();
FilterRegistration.Dynamic registration =
context.addFilter("myFilter", new MyFilter());
registration.addMappingForUrlPatterns(
EnumSet.of(DispatcherType.REQUEST, DispatcherType.ASYNC),
false, "/foo", "/bar/*"
);
registration.addMappingForServletNames(
EnumSet.of(DispatcherType.REQUEST, DispatcherType.ASYNC),
false, "myServlet"
);
}
}
In this example, the filter is added to the ServletContext using the addFilter method. This returns a javax.servlet.FilterRegistration.Dynamic, which you can use to add filter mappings for URL patterns and Servlet names. The addMappingForUrlPatterns andaddMappingForServletNames methods both accept a Set of javax.servlet.DispatcherTypes as the first argument. As with the deployment descriptor, if the dispatcher types argument is null, the default REQUEST dispatcher is assumed:
registration.addMappingForUrlPatterns(null, false, "/foo", "bar/*");
The second method parameter indicates the filter’s order relative to filters in the deployment descriptor. If false (as in this case), the programmatic filter mapping is ordered before any filter mappings in the deployment descriptor. If true, mappings in the deployment descriptor come first. You’ll learn more about filter order in the next section. The final parameter is a vararg parameter for specifying the URL patterns (for addMappingForUrlPatterns) or Servlet names (for addMappingForServletNames) to map the filter to.
ORDERING YOUR FILTERS PROPERLY
So far throughout this chapter, you have seen several references to the filter order, but you are undoubtedly wondering what exactly that is. Filter order determines where in the filter chain a filter appears, which in turn determines when one filter processes a request in relation to other filters. In some cases it does not matter what order your filters process requests; in other cases, however, it can be critical — it completely depends on how you are using filters. For example, a filter that sets up logging information for a request (or enters the request in a log) should probably come before any other filters because other filters might alter the fate of the request. As discussed earlier, you cannot order filters declared using annotations, making them virtually useless for most enterprise applications. You will use the deployment descriptor or programmatic configuration extensively, but you will probably never use annotations for configuring filters.
URL Pattern Mapping versus Servlet Name Mapping
Defining the filter order is simple: Filters that match a request are added to the filter chain in the order their mappings appear in the deployment descriptor or programmatic configuration. (And remember, if you configure some filters in the deployment descriptor and others programmatically, you can determine whether a programmatic mapping comes before the XML mappings using the second argument to the addMapping* methods.) Filter order is demonstrated in Figure 9-2, where different requests match different filters but always in the same order. However, the order is not quite as simple as that: URL mappings are given preference over Servlet name mappings. If two filters match a request, one by a URL pattern and the other by a Servlet name, the filter that matches by URL pattern always is present on the chain before the filter that matches by Servlet name, as shown in Figure 9-3, even if its mapping appears afterward. To demonstrate this, consider the following mappings:
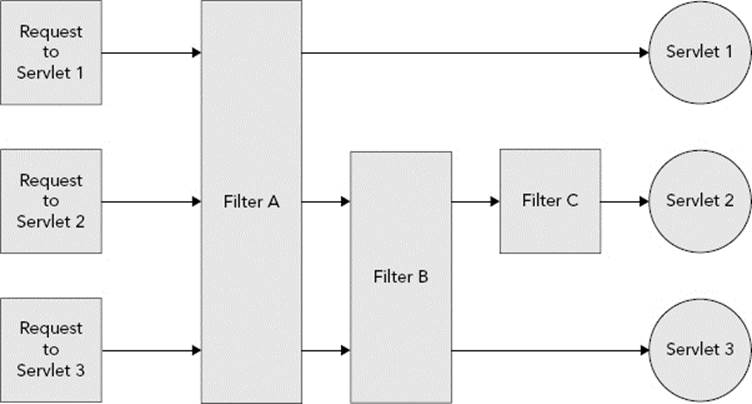
FIGURE 9-2

FIGURE 9-3
<servlet-mapping>
<servlet-name>myServlet</servlet-name>
<url-pattern>/foo*</url-pattern>
</servlet-mapping>
<filter-mapping>
<filter-name>servletFilter</filter-name>
<servlet-name>myServlet</servlet-name>
</filter-mapping>
<filter-mapping>
<filter-name>myFilter</filter-name>
<url-pattern>/foo*</url-pattern>
</filter-mapping>
<filter-mapping>
<filter-name>anotherFilter</filter-name>
<url-pattern>/foo/bar</url-pattern>
</filter-mapping>
If a normal request comes in to the URL /foo/bar, it will match all three filters. The filter chain will consist, in order, of myFilter, anotherFilter, and then servletFilter. myFilter executes before anotherFilter because that’s the order they appear in the deployment descriptor. They both execute before servletFilter because URL mappings always come before Servlet-name mappings. If the request is a forward, include, error dispatch, or asynchronous dispatch, it will not match any of these filters, because the mappings do not specify any <dispatcher>s explicitly.
Exploring Filter Order with a Simple Example
To better understand how filter order works, take a look at the Filter-Order project on the wrox.com code download site. It contains three Servlets and three filters. The following code snippet, ServletOne, is identical to its counterparts ServletTwo and ServletThree, except that all occurrences of “One” have been replaced with “Two” and “Three,” respectively:
@WebServlet(name = "servletOne", urlPatterns = "/servletOne")
public class ServletOne extends HttpServlet
{
@Override
protected void doGet(HttpServletRequest request, HttpServletResponse response)
throws ServletException, IOException {
System.out.println("Entering ServletOne.doGet()");
response.getWriter().write("Servlet One");
System.out.println("Leaving ServletOne.doGet()");
}
}
Similarly, the following FilterA is identical to FilterB and FilterC:
public class FilterA implements Filter
{
@Override
public void doFilter(ServletRequest request, ServletResponse response,
FilterChain chain) throws IOException, ServletException {
System.out.println("Entering FilterA.doFilter()");
chain.doFilter(request, response);
System.out.println("Leaving FilterA.doFilter()");
}
@Override
public void init(FilterConfig config) throws ServletException { }
@Override
public void destroy() { }
}
The filters are mapped to requests in the deployment descriptor as follows so that they match the mappings shown in Figure 9-2.
<filter>
<filter-name>filterA</filter-name>
<filter-class>com.wrox.FilterA</filter-class>
</filter>
<filter-mapping>
<filter-name>filterA</filter-name>
<url-pattern>/*</url-pattern>
</filter-mapping>
<filter>
<filter-name>filterB</filter-name>
<filter-class>com.wrox.FilterB</filter-class>
</filter>
<filter-mapping>
<filter-name>filterB</filter-name>
<url-pattern>/servletTwo</url-pattern>
<url-pattern>/servletThree</url-pattern>
</filter-mapping>
<filter>
<filter-name>filterC</filter-name>
<filter-class>com.wrox.FilterC</filter-class>
</filter>
<filter-mapping>
<filter-name>filterC</filter-name>
<url-pattern>/servletTwo</url-pattern>
</filter-mapping>
To try this out:
1. Compile the application and start Tomcat from your IDE.
2. Go to http://localhost:8080/filters/servletOne in your browser. You can see several messages printed to the standard output from Tomcat in your IDE:
3. Entering FilterA.doFilter().
4. Entering ServletOne.doGet().
5. Leaving ServletOne.doGet().
Leaving FilterA.doFilter().
6. Change the address in your browser to /servletTwo and observe the new output:
7. Entering FilterA.doFilter().
8. Entering FilterB.doFilter().
9. Entering FilterC.doFilter().
10. Entering ServletTwo.doGet().
11. Leaving ServletTwo.doGet().
12. Leaving FilterC.doFilter().
13. Leaving FilterB.doFilter().
Leaving FilterA.doFilter().
Notice how the Filter chain progresses from A to C and then the Servlet. Then after the Servlet completes processing the request, the chain exits in reverse order from C to A.
14.Change the address in your browser to /servletThree. Its output should look like the following code.
15. Entering FilterA.doFilter().
16. Entering FilterB.doFilter().
17. Entering ServletThree.doGet().
18. Leaving ServletThree.doGet().
19. Leaving FilterB.doFilter().
Leaving FilterA.doFilter().
20.Make any changes to the mappings that you can think of to explore how it affects the execution of the filter chain. Try changing one or more of the URL mappings to Servlet name mappings and notice how the filter chain changes again.
Using Filters with Asynchronous Request Handling
As mentioned in the previous section, filters that apply to asynchronous request handling can be tricky to correctly implement and configure. The key problem with asynchronous request handling is that the Servlet’s service method can return before a response is sent to the client. Request handling can then be delegated to another thread or completed based on some event.
For example, the service method (or, by extension, the doGet, doPost, or other method) could start the AsyncContext, register a listener for some type of hypothetical message (such as a chat request received), and then return. Then, when the hypothetical message listener receives a message, it could send the response back to the user. Using this technique, a request thread is not blocked waiting while the request handling is paused. A filter that intercepts such a request would complete before the response is actually sent because when service returns, FilterChain’s doChain method returns.
Filters mapped to the ASYNC dispatcher intercept internal requests made as a result of calling one of AsyncContext’s dispatch methods. To demonstrate this more complex filtering, look at the Filter-Async on the wrox.com code download site. Its AnyRequestFilter wraps the request and response (something you explore more in the next section) and can filter any type of request. If it detects that the Servlet started an AsyncContext, it prints that information and indicates whether the AsyncContext is using the original request and response or the unwrapped request and response.
public class AnyRequestFilter implements Filter
{
private String name;
@Override
public void init(FilterConfig config)
{
this.name = config.getFilterName();
}
@Override
public void doFilter(ServletRequest request, ServletResponse response,
FilterChain chain) throws IOException, ServletException
{
System.out.println("Entering " + this.name + ".doFilter().");
chain.doFilter(
new HttpServletRequestWrapper((HttpServletRequest)request),
new HttpServletResponseWrapper((HttpServletResponse)response)
);
if(request.isAsyncSupported() && request.isAsyncStarted())
{
AsyncContext context = request.getAsyncContext();
System.out.println("Leaving " + this.name + ".doFilter(), async " +
"context holds wrapped request/response = " +
!context.hasOriginalRequestAndResponse());
}
else
System.out.println("Leaving " + this.name + ".doFilter().");
}
@Override
public void destroy() { }
}
This filter is instantiated and mapped three times in web.xml. All three mappings can intercept any URL, but the normalFilter instance intercepts only normal requests; the forwardFilter intercepts only forwarded requests; and the asyncFilter intercepts only requests dispatched from the AsyncContext. Notice the addition of <async-supported>true</async-supported> to each <filter> element. This tells the container that the filter is prepared for asynchronous requests. If a filter without <async-supported> enabled filters a request, attempting to start an AsyncContext in that request will result in an IllegalStateException.
The NonAsyncServlet is very straightforward: It responds to requests to /regular and forwards to the nonAsync.jsp view.
@WebServlet(name = "nonAsyncServlet", urlPatterns = "/regular")
public class NonAsyncServlet extends HttpServlet
{
@Override
protected void doGet(HttpServletRequest request, HttpServletResponse response)
throws ServletException, IOException
{
System.out.println("Entering NonAsyncServlet.doGet().");
request.getRequestDispatcher("/WEB-INF/jsp/view/nonAsync.jsp")
.forward(request, response);
System.out.println("Leaving NonAsyncServlet.doGet().");
}
}
AsyncServlet in Listing 9-1 is much more complex. To make logging very clear, it generates a unique ID for the current request. If the unwrap parameter is not present, it starts the AsyncContext with startAsync(ServletRequest, ServletResponse). This ensures theAsyncContext gets the request and response as passed into doGet. If a filter wrapped the request or response, the wrapper is what the AsyncContext uses. However, if the unwrap is present, the doGet starts the AsyncContext using the no-argument startAsync method. In this case, the AsyncContext gets the original request and response, not the wrapped request and response. Notice the call to AsyncContext’s start(Runnable) method (using Java 8 method references). Using this tells the container to run the Runnable with its internal thread pool. You could also simply start your own thread, but using the container’s thread pool is safer and avoids resource exhaustion.
LISTING 9-1: AsyncServlet.java
@WebServlet(name = "asyncServlet", urlPatterns = "/async", asyncSupported = true)
public class AsyncServlet extends HttpServlet
{
private static volatile int ID = 1;
@Override
protected void doGet(HttpServletRequest request, HttpServletResponse response)
throws ServletException, IOException
{
final int id;
synchronized(AsyncServlet.class)
{
id = ID++;
}
long timeout = request.getParameter("timeout") == null ?
10_000L : Long.parseLong(request.getParameter("timeout"));
System.out.println("Entering AsyncServlet.doGet(). Request ID = " + id +
", isAsyncStarted = " + request.isAsyncStarted());
final AsyncContext context = request.getParameter("unwrap") != null ?
request.startAsync() : request.startAsync(request, response);
context.setTimeout(timeout);
System.out.println("Starting asynchronous thread. Request ID = " + id +
".");
AsyncThread thread = new AsyncThread(id, context);
context.start(thread::doWork);
System.out.println("Leaving AsyncServlet.doGet(). Request ID = " + id +
", isAsyncStarted = " + request.isAsyncStarted());
}
private static class AsyncThread
{
private final int id;
private final AsyncContext context;
public AsyncThread(int id, AsyncContext context) { ... }
public void doWork()
{
System.out.println("Asynchronous thread started. Request ID = " +
this.id + ".");
try {
Thread.sleep(5_000L);
} catch (Exception e) {
e.printStackTrace();
}
HttpServletRequest request =
(HttpServletRequest)this.context.getRequest();
System.out.println("Done sleeping. Request ID = " + this.id +
", URL = " + request.getRequestURL() + ".");
this.context.dispatch("/WEB-INF/jsp/view/async.jsp");
System.out.println("Asynchronous thread completed. Request ID = " +
this.id + ".");
}
}
}
Now experiment with these Servlets and filters:
1. Compile the application and start Tomcat from your IDE; then go to http://localhost:8080/filters/regular in your browser. You should see the following in the output window of the debugger. Notice that normalFilter intercepted the request to the Servlet, and forwardFilter intercepted the forwarded request to the JSP.
2. Entering normalFilter.doFilter().
3. Entering NonAsyncServlet.doGet().
4. Entering forwardFilter.doFilter().
5. In nonAsync.jsp.
6. Leaving forwardFilter.doFilter().
7. Leaving NonAsyncServlet.doGet().
Leaving normalFilter.doFilter().
8. Go to http://localhost:8080/filters/async. The following debugger output appears immediately. Notice that normalFilter intercepts the request but completes before the response is actually sent.
9. Entering normalFilter.doFilter().
10. Entering AsyncServlet.doGet(). Request ID = 1, isAsyncStarted = false
11. Starting asynchronous thread. Request ID = 1.
12. Leaving AsyncServlet.doGet(). Request ID = 1, isAsyncStarted = true
13. Leaving normalFilter.doFilter(), async context holds wrapped request/response=true
Asynchronous thread started. Request ID = 1.
After a 5-second wait, the AsyncThread inner class sends the response to the user, and the following debugger output appears. When the request is dispatched to the JSP using the AsyncContext’s dispatch method, asyncFilter intercepts the internal request to that JSP.
Done sleeping. Request ID = 1, URL = http://localhost:8080/filters/async.
Asynchronous thread completed. Request ID = 1.
Entering asyncFilter.doFilter().
In async.jsp.
Leaving asyncFilter.doFilter().
14.Go to http://localhost:8080/filters/async?unwrap and wait for the response to complete. The following debugger output appears (some of it after 5 seconds). It’s identical except that, in this case, the AsyncContext holds the original request and response instead of the wrapped request and response (the bold output changed).
15. Entering normalFilter.doFilter().
16. Entering AsyncServlet.doGet(). Request ID = 2, isAsyncStarted = false
17. Starting asynchronous thread. Request ID = 2.
18. Leaving AsyncServlet.doGet(). Request ID = 2, isAsyncStarted = true
19. Leaving normalFilter.doFilter(), async context holds wrapped request/response=false
20. Asynchronous thread started. Request ID = 2.
21. Done sleeping. Request ID = 2, URL = http://localhost:8080/filters/async.
22. Asynchronous thread completed. Request ID = 2.
23. Entering asyncFilter.doFilter().
24. In async.jsp.
Leaving asyncFilter.doFilter().
25.Go to http://localhost:8080/filters/async?timeout=3000. The following debugger output appears, and then 5 seconds later the sleep completes, and retrieving the request from the AsyncContext results in an IllegalStateException. This is because theAsyncContext timeout expired and the response was closed before the AsyncThread inner class could complete its work.
26. Entering normalFilter.doFilter().
27. Entering AsyncServlet.doGet(). Request ID = 3, isAsyncStarted = false
28. Starting asynchronous thread. Request ID = 3.
29. Leaving AsyncServlet.doGet(). Request ID = 3, isAsyncStarted = true
30. Leaving normalFilter.doFilter(), async context holds wrapped request/response=true
Asynchronous thread started. Request ID = 3.
It should be clear by now how complex and powerful asynchronous request handling is. The important point is that if you handle the response using the AsyncContext directly, the code executes outside the scope of any filters. However, if you use AsyncContext’sdispatch method to internally forward the request to a URL, a filter mapped for ASYNC requests can intercept the internal forward and apply whatever additional logic is required. You must decide when each approach is appropriate, but in most cases you will have no need for asynchronous request handling. No other parts of this book use asynchronous request handling.
INVESTIGATING PRACTICAL USES FOR FILTERS
The beginning of the chapter discussed many practical uses for filters. The Compression-Filter project on the wrox.com code download site demonstrates two of these uses: a logging filter and a response compression filter. The project contains a simple Servlet mapped to /servlet that responds with “This Servlet response may be compressed.” It also contains a simple /index.jsp file that responds with “This content may be compressed.” This project uses the following ServletContextListener to programmatically configure the filters for the application.
@WebListener
public class Configurator implements ServletContextListener
{
@Override
public void contextInitialized(ServletContextEvent event) {
ServletContext context = event.getServletContext();
FilterRegistration.Dynamic registration =
context.addFilter("requestLogFilter", new RequestLogFilter());
registration.addMappingForUrlPatterns(null, false, "/*");
registration = context.addFilter("compressionFilter",
new CompressionFilter());
registration.setAsyncSupported(true);
registration.addMappingForUrlPatterns(null, false, "/*");
}
@Override
public void contextDestroyed(ServletContextEvent event) { }
}
Adding a Simple Logging Filter
The RequestLogFilter class in Listing 9-2 is the first filter in the filter chain for all requests to the application. It times how long a request takes to process and logs information about every request that comes in to the application — the IP address, timestamp, request method, protocol, response status and length, and time to process the request — similar to the Apache HTTP log format. The logging happens in the finally block so that any exceptions thrown further down the filter chain do not prevent the logging statement from being written.
LISTING 9-2: RequestLogFilter.java
public class RequestLogFilter implements Filter
{
@Override
public void doFilter(ServletRequest request, ServletResponse response,
FilterChain chain) throws IOException, ServletException {
Instant time = Instant.now();
StopWatch timer = new StopWatch();
try {
timer.start();
chain.doFilter(request, response);
} finally {
timer.stop();
HttpServletRequest in = (HttpServletRequest)request;
HttpServletResponse out = (HttpServletResponse)response;
String length = out.getHeader("Content-Length");
if(length == null || length.length() == 0)
length = "-";
System.out.println(in.getRemoteAddr() + " - - [" + time + "]" +
" \"" + in.getMethod() + " " + in.getRequestURI() + " " +
in.getProtocol() + "\" " + out.getStatus() + " " + length +
" " + timer);
}
}
@Override
public void init(FilterConfig filterConfig) throws ServletException { }
@Override
public void destroy() { }
}
NOTE The RequestLogFilter will not work properly with asynchronous request handling. If a Servlet starts an AsyncContext, doFilter will return before the response has been sent, meaning the filter will log incomplete or incorrect information. Making this filter work correctly for asynchronous requests is a significant and complex task that is left as an exercise for the reader to consider.
Compressing Response Content Using a Filter
The CompressionFilter in Listing 9-3 is significantly more complex than the RequestLogFilter. When thinking about compressing the response, you might think that you should execute the filter chain and then perform the compression logic on the way back out. Remember, however, that response data can begin flowing back to the client before the Servlet has completed servicing the request. It can also begin flowing back to the client after the Servlet has completed servicing the request, in the case of asynchronous request handling. Because of this, if you want to alter the response content, you must wrap the response object passed further down the chain. The CompressionFilter does just this.
Take a minute to read over the code and examine what CompressionFilter is doing. First, it checks to see if the client has included an Accept-Encoding request header containing the “gzip” encoding. This is a very important check because if it hasn’t, this means the client may not understand gzip-compressed responses. If it has, it sets the Content-Encoding header to “gzip” and then wraps the response object with an instance of the private inner class ResponseWrapper. This class, in turn, wraps the PrintWriter or ServletOutputStreamthat sends data back to the client with the private inner class GZIPServletOutputStream. This wrapper contains an internal java.util.zip.GZIPOutputStream. Response data is first written to the GZIPOutputStream, and when the request completes, it finishes compression and writes the compressed response to the wrapped ServletOutputStream. The ResponseWrapper also prevents any Servlet code from setting the content length header for the response because the content length cannot be known until after the response is compressed.
LISTING 9-3: CompressionFilter.java
public class CompressionFilter implements Filter
{
@Override
public void doFilter(ServletRequest request, ServletResponse response,
FilterChain chain) throws IOException, ServletException {
if(((HttpServletRequest)request).getHeader("Accept-Encoding")
.contains("gzip")) {
System.out.println("Encoding requested.");
((HttpServletResponse)response).setHeader("Content-Encoding", "gzip");
ResponseWrapper wrapper =
new ResponseWrapper((HttpServletResponse)response);
try {
chain.doFilter(request, wrapper);
} finally {
try {
wrapper.finish();
} catch(Exception e) {
e.printStackTrace();
}
}
} else {
System.out.println("Encoding not requested.");
chain.doFilter(request, response);
}
}
@Override
public void init(FilterConfig filterConfig) throws ServletException { }
@Override
public void destroy() { }
private static class ResponseWrapper extends HttpServletResponseWrapper
{
private GZIPServletOutputStream outputStream;
private PrintWriter writer;
public ResponseWrapper(HttpServletResponse request) {
super(request);
}
@Override
public synchronized ServletOutputStream getOutputStream()
throws IOException {
if(this.writer != null)
throw new IllegalStateException("getWriter() already called.");
if(this.outputStream == null)
this.outputStream =
new GZIPServletOutputStream(super.getOutputStream());
return this.outputStream;
}
@Override
public synchronized PrintWriter getWriter() throws IOException {
if(this.writer == null && this.outputStream != null)
throw new IllegalStateException(
"getOutputStream() already called.");
if(this.writer == null) {
this.outputStream =
new GZIPServletOutputStream(super.getOutputStream());
this.writer = new PrintWriter(new OutputStreamWriter(
this.outputStream, this.getCharacterEncoding()
));
}
return this.writer;
}
@Override
public void flushBuffer() throws IOException {
if(this.writer != null)
this.writer.flush();
else if(this.outputStream != null)
this.outputStream.flush();
super.flushBuffer();
}
@Override
public void setContentLength(int length) { }
@Override
public void setContentLengthLong(long length) { }
@Override
public void setHeader(String name, String value) {
if(!"content-length".equalsIgnoreCase(name))
super.setHeader(name, value);
}
@Override
public void addHeader(String name, String value) {
if(!"content-length".equalsIgnoreCase(name))
super.setHeader(name, value);
}
@Override
public void setIntHeader(String name, int value) {
if(!"content-length".equalsIgnoreCase(name))
super.setIntHeader(name, value);
}
@Override
public void addIntHeader(String name, int value) {
if(!"content-length".equalsIgnoreCase(name))
super.setIntHeader(name, value);
}
public void finish() throws IOException {
if(this.writer != null)
this.writer.close();
else if(this.outputStream != null)
this.outputStream.finish();
}
}
private static class GZIPServletOutputStream extends ServletOutputStream
{
private final ServletOutputStream servletOutputStream;
private final GZIPOutputStream gzipStream;
public GZIPServletOutputStream(ServletOutputStream servletOutputStream)
throws IOException {
this.servletOutputStream = servletOutputStream;
this.gzipStream = new GZIPOutputStream(servletOutputStream);
}
@Override
public boolean isReady() {
return this.servletOutputStream.isReady();
}
@Override
public void setWriteListener(WriteListener writeListener) {
this.servletOutputStream.setWriteListener(writeListener);
}
@Override
public void write(int b) throws IOException {
this.gzipStream.write(b);
}
@Override
public void close() throws IOException {
this.gzipStream.close();
}
@Override
public void flush() throws IOException {
this.gzipStream.flush();
}
public void finish() throws IOException {
this.gzipStream.finish();
}
}
}
The wrapper pattern is a very common pattern that you will likely see applied in many filters. Both the request and response objects can be wrapped; however, wrapping the response is usually more common. Wrapping the response allows you to intercept any method calls on the wrapped response, facilitating the ability to modify the response data. You can also use a very similar filter to that in Listing 9-3 to encrypt response data rather than compress it. The request object could be wrapped to decrypt its contents.
To try out the logging and compression filters:
1. Compile your application and start Tomcat from your IDE.
2. Go to http://localhost:8080/compression/ and http://localhost:8080/compression/servlet in your browser.
3. Using the developer tools built for you browser, start monitoring the headers of requests to and responses from the application. (Microsoft Internet Explorer and Google Chrome have built-in developer tools that can do this, and the Firebug plug-in for Mozilla Firefox has this capability.) You should see a screen like that in Figure 9-4.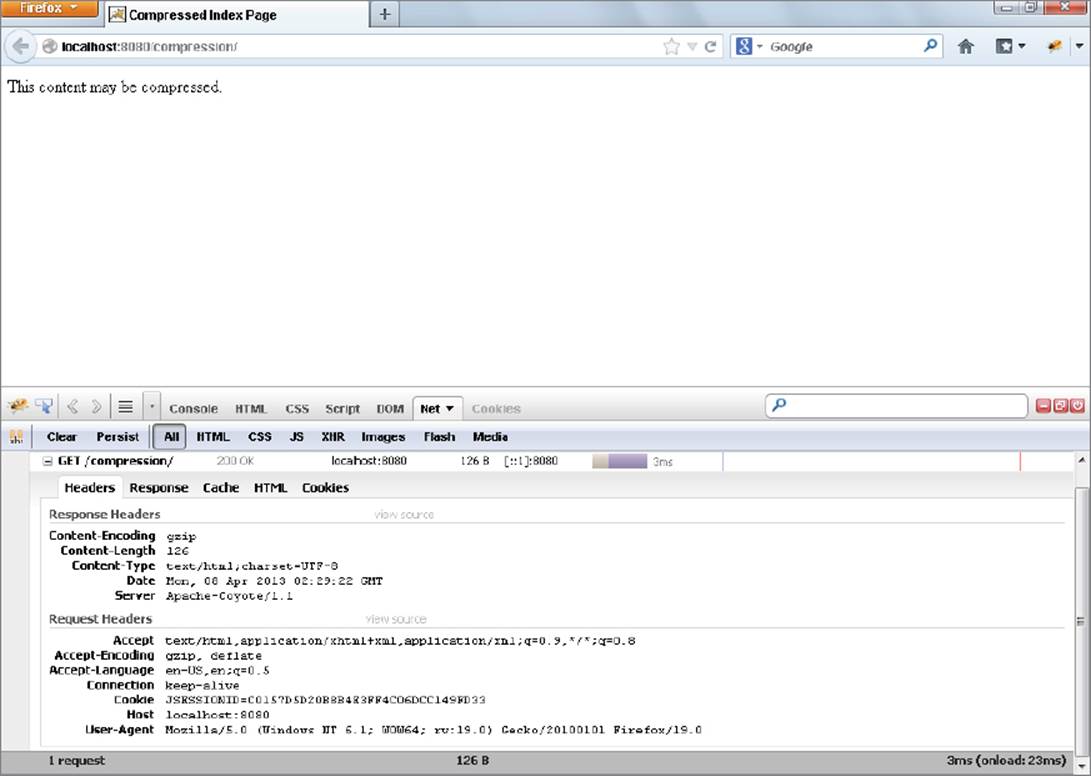
FIGURE 9-4
Notice that the Accept-Encoding request header contains the “gzip” encoding, and the Content-Encoding response header has the value “gzip.” This means that your browser is announcing it can accept gzip-encoded responses, and the compression filter is obliging the request and compressing the response data before sending it to the browser.
SIMPLIFYING AUTHENTICATION WITH A FILTER
One critical use for filters in web applications is for securing applications against unwanted access. The Customer Support application you are making for Multinational Widget Corporation uses a very primitive authentication mechanism for securing its pages. You have probably already noticed that many places in the application contain the same, duplicated code to check for authentication:
if(request.getSession().getAttribute("username") == null)
{
response.sendRedirect("login");
return;
}
At some point you might have thought a better solution is to create a public static method on some class to perform this check and call it everywhere. For sure, this reduces duplicated code, but it still results in performing that method call in multiple places. As the number of servlets in your application increased, so would have the number of calls to that static method.
After what you have learned in this chapter, it should be clear that a filter is a better place to put this code. The Customer-Support-v7 project on the wrox.com code download site demonstrates this by adding the Configurator listener class and the AuthenticationFilterclass. The previous code snippet has been removed from the doGet and doPost methods in TicketServlet and the doGet method in SessionListServlet. The configurator is simple: It declares the AuthenticationFilter and maps it to /tickets and /sessions:
@WebListener
public class Configurator implements ServletContextListener
{
@Override
public void contextInitialized(ServletContextEvent event)
{
ServletContext context = event.getServletContext();
FilterRegistration.Dynamic registration = context.addFilter(
"authenticationFilter", new AuthenticationFilter()
);
registration.setAsyncSupported(true);
registration.addMappingForUrlPatterns(
null, false, "/sessions", "/tickets"
);
}
@Override
public void contextDestroyed(ServletContextEvent event) { }
}
As you add more Servlets or other protected resources (such as JSPs) to your application, you only need to add their URL patterns to the filter registration to ensure that users log in before accessing those resources. Of course, this filter does not protect the login Servlet because you do not want to protect the login screen. You also do not need to protect any of the CSS, JavaScript, or image resources because they do not contain sensitive data. The AuthenticationFilter performs the authentication check on every request of any HTTP method and redirects users to the login screen if they are not logged in:
public class AuthenticationFilter implements Filter
{
@Override
public void doFilter(ServletRequest request, ServletResponse response,
FilterChain chain) throws IOException, ServletException
{
HttpSession session = ((HttpServletRequest)request).getSession(false);
if(session != null && session.getAttribute("username") == null)
((HttpServletResponse)response).sendRedirect("login");
else
chain.doFilter(request, response);
}
@Override
public void init(FilterConfig config) throws ServletException { }
@Override
public void destroy() { }
}
One beautiful thing about this change is that if you alter the authentication algorithm, you only need to change the filter to continue protecting the resources in your application. Previously, you would have had to make changes to every Servlet. Test out these changes by compiling, starting up Tomcat in your IDE, and navigating to http://localhost:8080/support in your browser. Even though the authentication check has been removed from all the Servlets, you are still asked to log in before viewing or creating tickets, or viewing the list of sessions.
SUMMARY
In this chapter you explored the purpose of filters and the many reasons you might use them. You learned about the Filter interface and how to create, declare, and map filters in your applications. You experimented with the all-important filter chain, and learned how the order in which filters are executed can be unimportant in some scenarios and quite critical in others. You were introduced to the concept of asynchronous request handling and used filters to explore that topic further and gain an understanding of how tricky asynchronous request handling can be. Finally, after exploring the three different ways of declaring and mapping filters — in the deployment descriptor, using annotations, and programmatically — you experimented with a logging filter, a response compression filter, and an authentication filter.
In the next chapter you explore the technology of WebSockets, how they dramatically improve interactive web applications, and how to use them in Java and JavaScript. An interesting point is that the code in Tomcat that makes WebSockets possible actually uses a filter to intercept all WebSocket-bound requests in your application and send them to your WebSocket endpoints (which you learn about more in the next chapter). So, without even doing anything, your application already has filters inspecting and, if necessary, modifying requests.
All materials on the site are licensed Creative Commons Attribution-Sharealike 3.0 Unported CC BY-SA 3.0 & GNU Free Documentation License (GFDL)
If you are the copyright holder of any material contained on our site and intend to remove it, please contact our site administrator for approval.
© 2016-2026 All site design rights belong to S.Y.A.