Wrox Press Java Programming 24-Hour Trainer 2nd (2015)
Lesson 2. Eclipse IDE
Your first Java program was written in a plain text editor and compiled from a command window, but this is not a productive way of developing software. Professional programmers use an Integrated Development Environment (IDE), which includes an editor, a compiler, context-sensitive help, a debugger, and a lot more (you become familiar with these features later in this lesson). There are several popular Java IDEs, such as Eclipse, IntelliJ IDEA, and NetBeans.
Eclipse is by far the most widely used IDE, and I use it for compiling and running most of the examples in this book. But switching from one IDE to another is a pretty simple process, and if you see that in some areas one IDE makes you more productive than the other, just use the best one for the job. As a matter of fact, I prefer IntelliJ IDEA IDE, but this doesn’t stop me from enjoying Java development in Eclipse, too.
Introducing Eclipse IDE
Eclipse IDE is an open-source product that was originally created with a substantial code donation by IBM to the Java community, and from that moment Eclipse was a community-driven product. It started as an IDE for developing Java programs, but today it’s a development platform used for building thousands of tools and plug-ins. Some people are using its Rich Client Platform (RCP) API to develop user interfaces (UIs) for applications. With Eclipse you can easily generate and deploy web applications, start and stop servers, use it as a Database admin tool, and a lot more. Some use its plug-ins for developing reports. Visit the Downloads page at www.eclipse.org/downloads to see some of the Eclipse-based products available.
Besides being an IDE, Eclipse supports plug-in development, and each developer can add only those plug-ins that he or she is interested in. For example, there is a plug-in to display UML diagrams, another offers a reporting system, and there are plug-ins for developing applications in C, JavaScript, Apache Flex, and other languages.
Downloading and Installing Eclipse
There are different versions of Eclipse IDE, and this book uses Eclipse IDE for Java EE Developers. Each version of Eclipse IDE has a name. At the time of this writing, the current version is called Luna, and you should download it from http://www.eclipse.org/downloads.
The installation of Eclipse IDE comes down to a simple unzipping of the downloaded file into a disk drive of your choice. Depending on your OS, you find either the file Eclipse.exe or Eclipse.app in the Eclipse folder — just run this program. You immediately see a pop-up window asking you to select a workspace, which is a directory on your hard disk where one or more of your projects is going to be stored.
Eclipse for Java EE IDE starts with showing the Welcome panel; just close it by clicking the little x on the Welcome tab. Figure 2-1 is a snapshot of the workbench of the freshly installed Eclipse IDE.
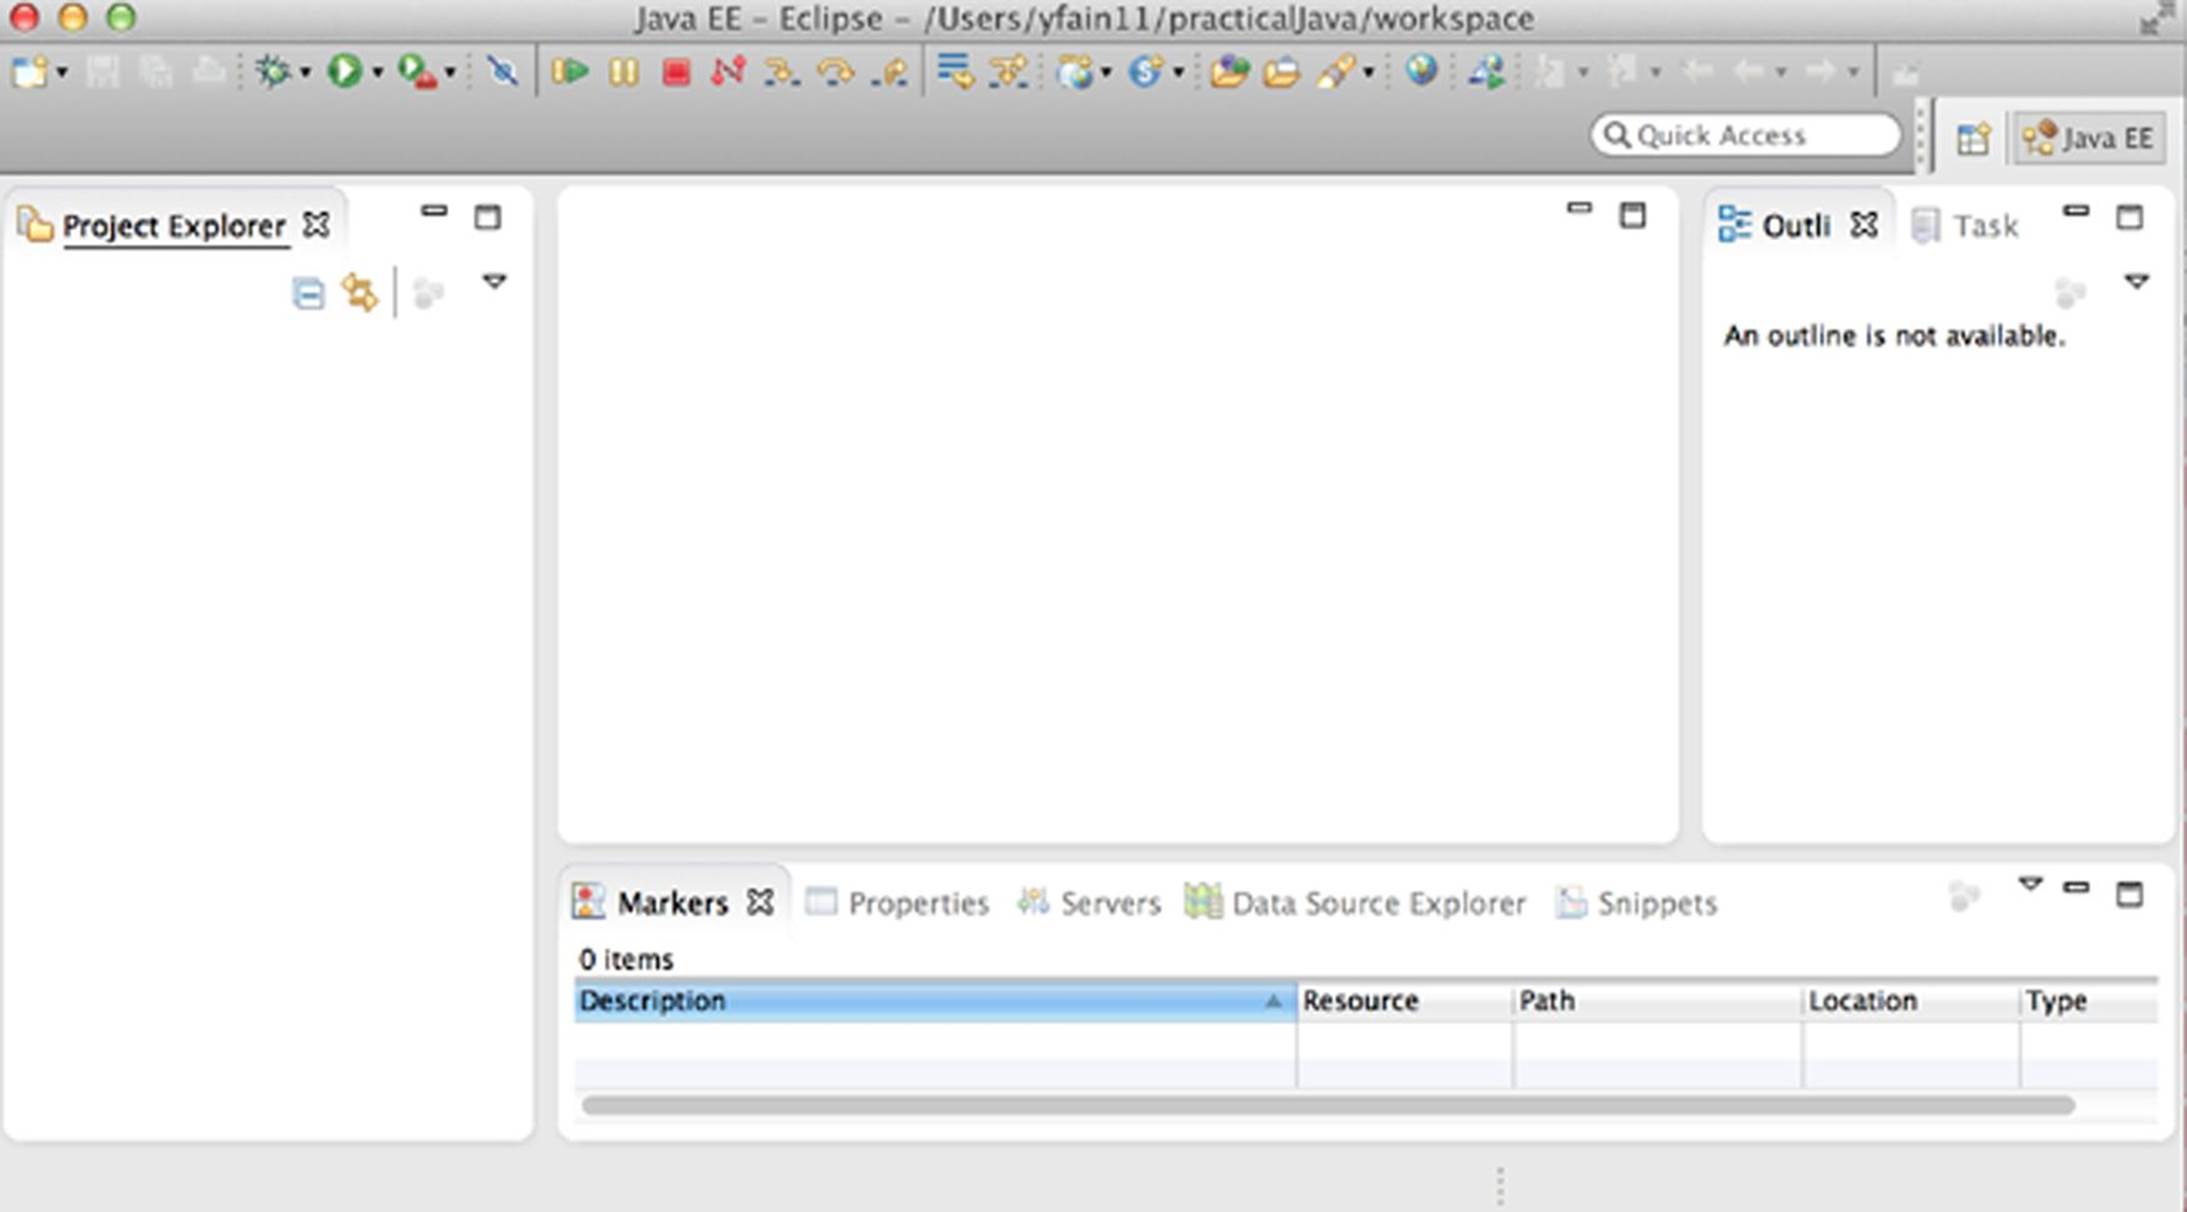
Figure 2-1: The Java EE perspective in Eclipse IDE workbench
In Eclipse you start with creating a project. In the real world, the source code of a decent-sized application can consist of several Eclipse projects.
For code samples of this book, I selected the following workspace directory: practicalJava/workspace.
To be precise, in Figure 2-1 you are looking at Java EE perspective (note the Java EE tab at the top), which is a collection of default views that are opened for Java EE developers. On the left you see a Project Explorer view; creating a Hello project is your next task. The area in the middle is reserved for the code editor view. You start entering Java code in there after creating your first Java class. The Outline view is on the right; you’ll see the names of your classes, methods, and variables (see Chapter 3) there.
There are many other views that you can open and close by yourself by selecting Window → Show View. These include Console, Search, Problems, Servers, and others. If you don’t see some of these menu items, find them in Windows → Show View → Other.
Because you are just starting to learn the language, there is no need to work in the Java EE perspective; you can get by in the Java perspective. Click the little icon with the plus sign on the toolbar by the Java EE tab and select Java perspective. You’ll see a slightly different set of views with the Package Explorer and Hierarchy views on the left, Task List on the right, and the Problems, Javadoc, and Declaration tabs at the bottom, as shown in Figure 2-2.
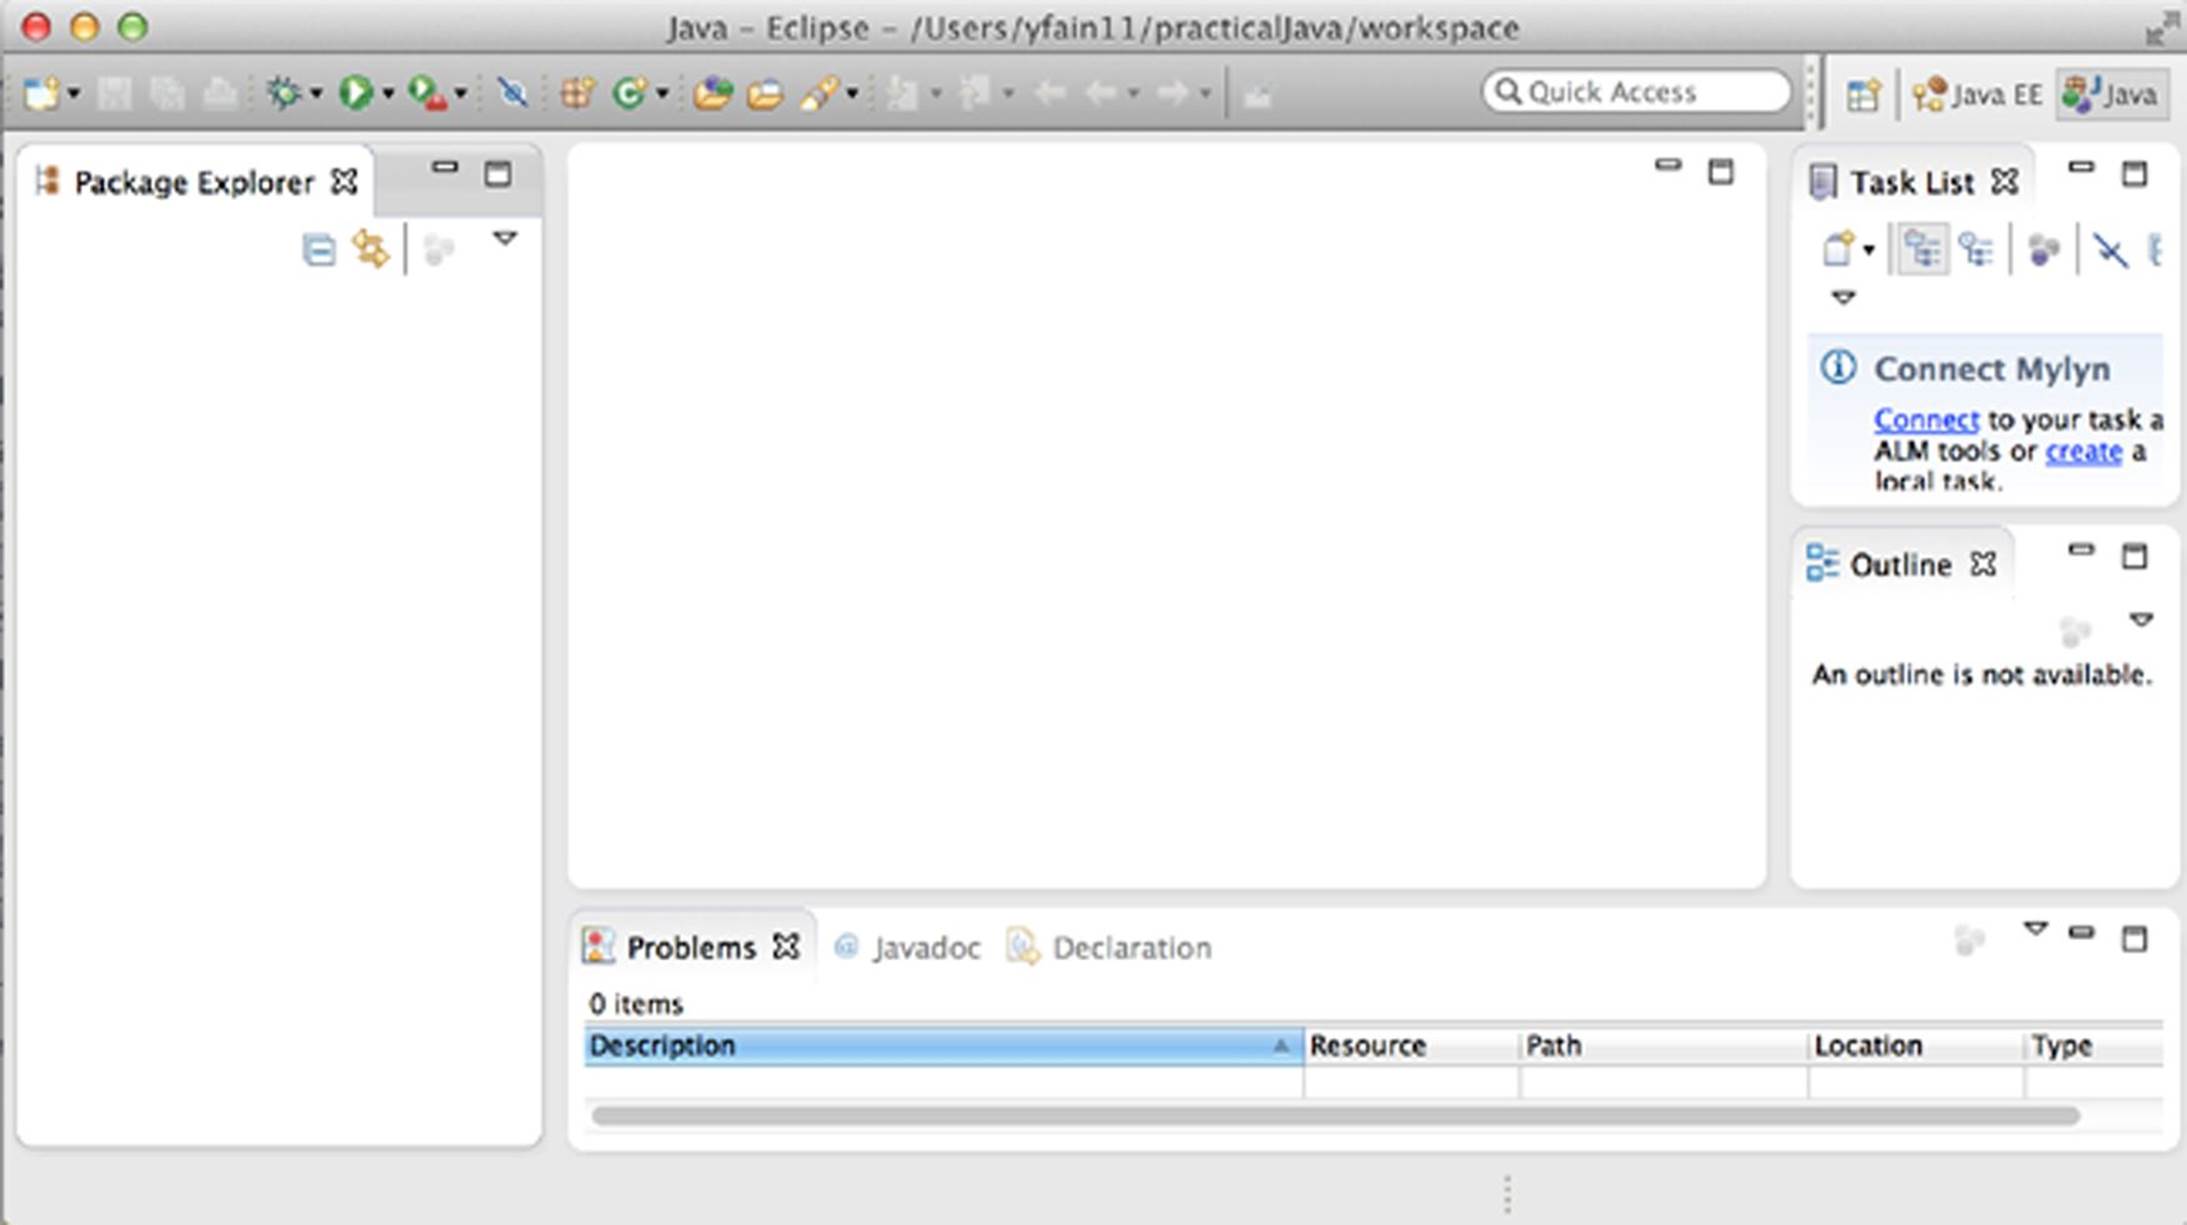
Figure 2-2: The Java perspective in Eclipse IDE workbench
Creating Hello Project in Eclipse
In Chapter 1 you simply created the class HelloWorld, but in Eclipse you have to create the project first. Select File → New → Java Project and enter Hello as the name of the project in the pop-up window, as shown in Figure 2-3.
You can select the version of the JRE you want to work with. In Chapter 1 I’ve installed the JDK and JRE of version 1.8, but you may have more than one version of JRE, and Eclipse can compile the code that will run in another version of JRE. This might be useful if some of your projects have to run with the older versions of JRE. Typically enterprises don’t rush to install the newest version of Java because it requires substantial investments of time and resources to ensure that their production applications are not broken in the new version of JRE. Eclipse allows you to select for your projects any of the installed versions of JRE.

Figure 2-3: Creating a Java project in Eclipse (step 1)
After you click Next, you’re asked to specify the folders where the source code and compiled Java classes of the Hello project should be created (see Figure 2-4). By default, Eclipse creates a Hello folder for this project with a bin subfolder for compiled classes and an src subfolder for the source code. In Chapter 1 both HelloWorld.java and HelloWorld.class were sitting in the same folder, which is OK for a one-class project, but the good practice is to keep .java and .class files in separate folders.
Don’t change the name of the output directory; just click Finish on that window. In Figure 2-5 you see a new project, Hello, in the Package Explorer view of Eclipse. This project has an empty folder named src—you will save the source code of HelloWorld.java there.
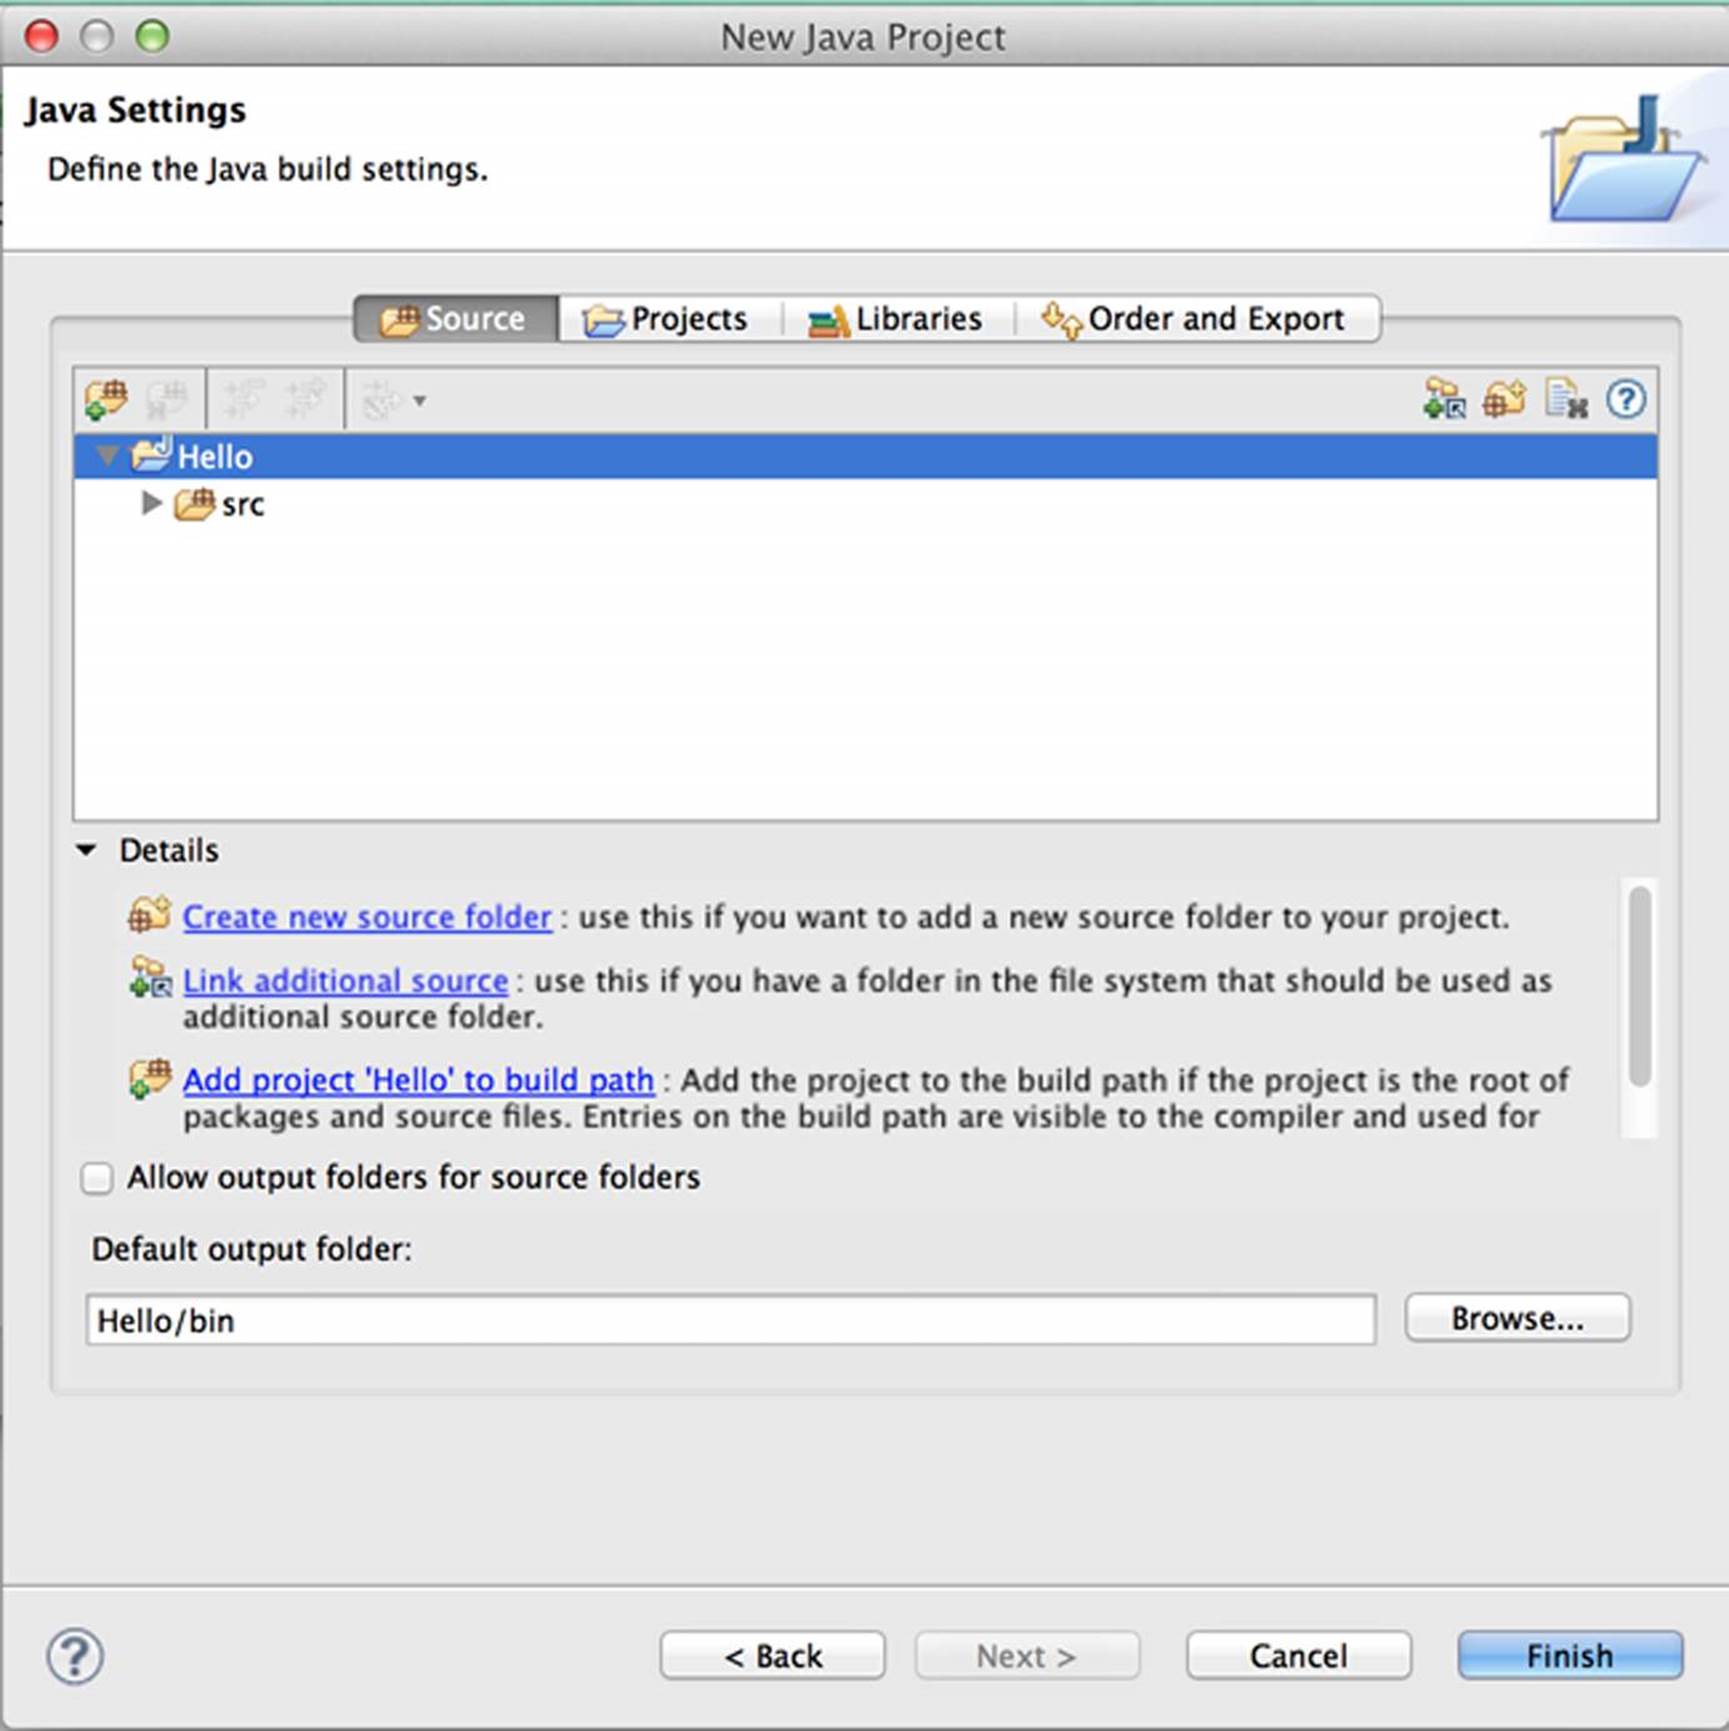
Figure 2-4: Creating a Java project in Eclipse (step 2)
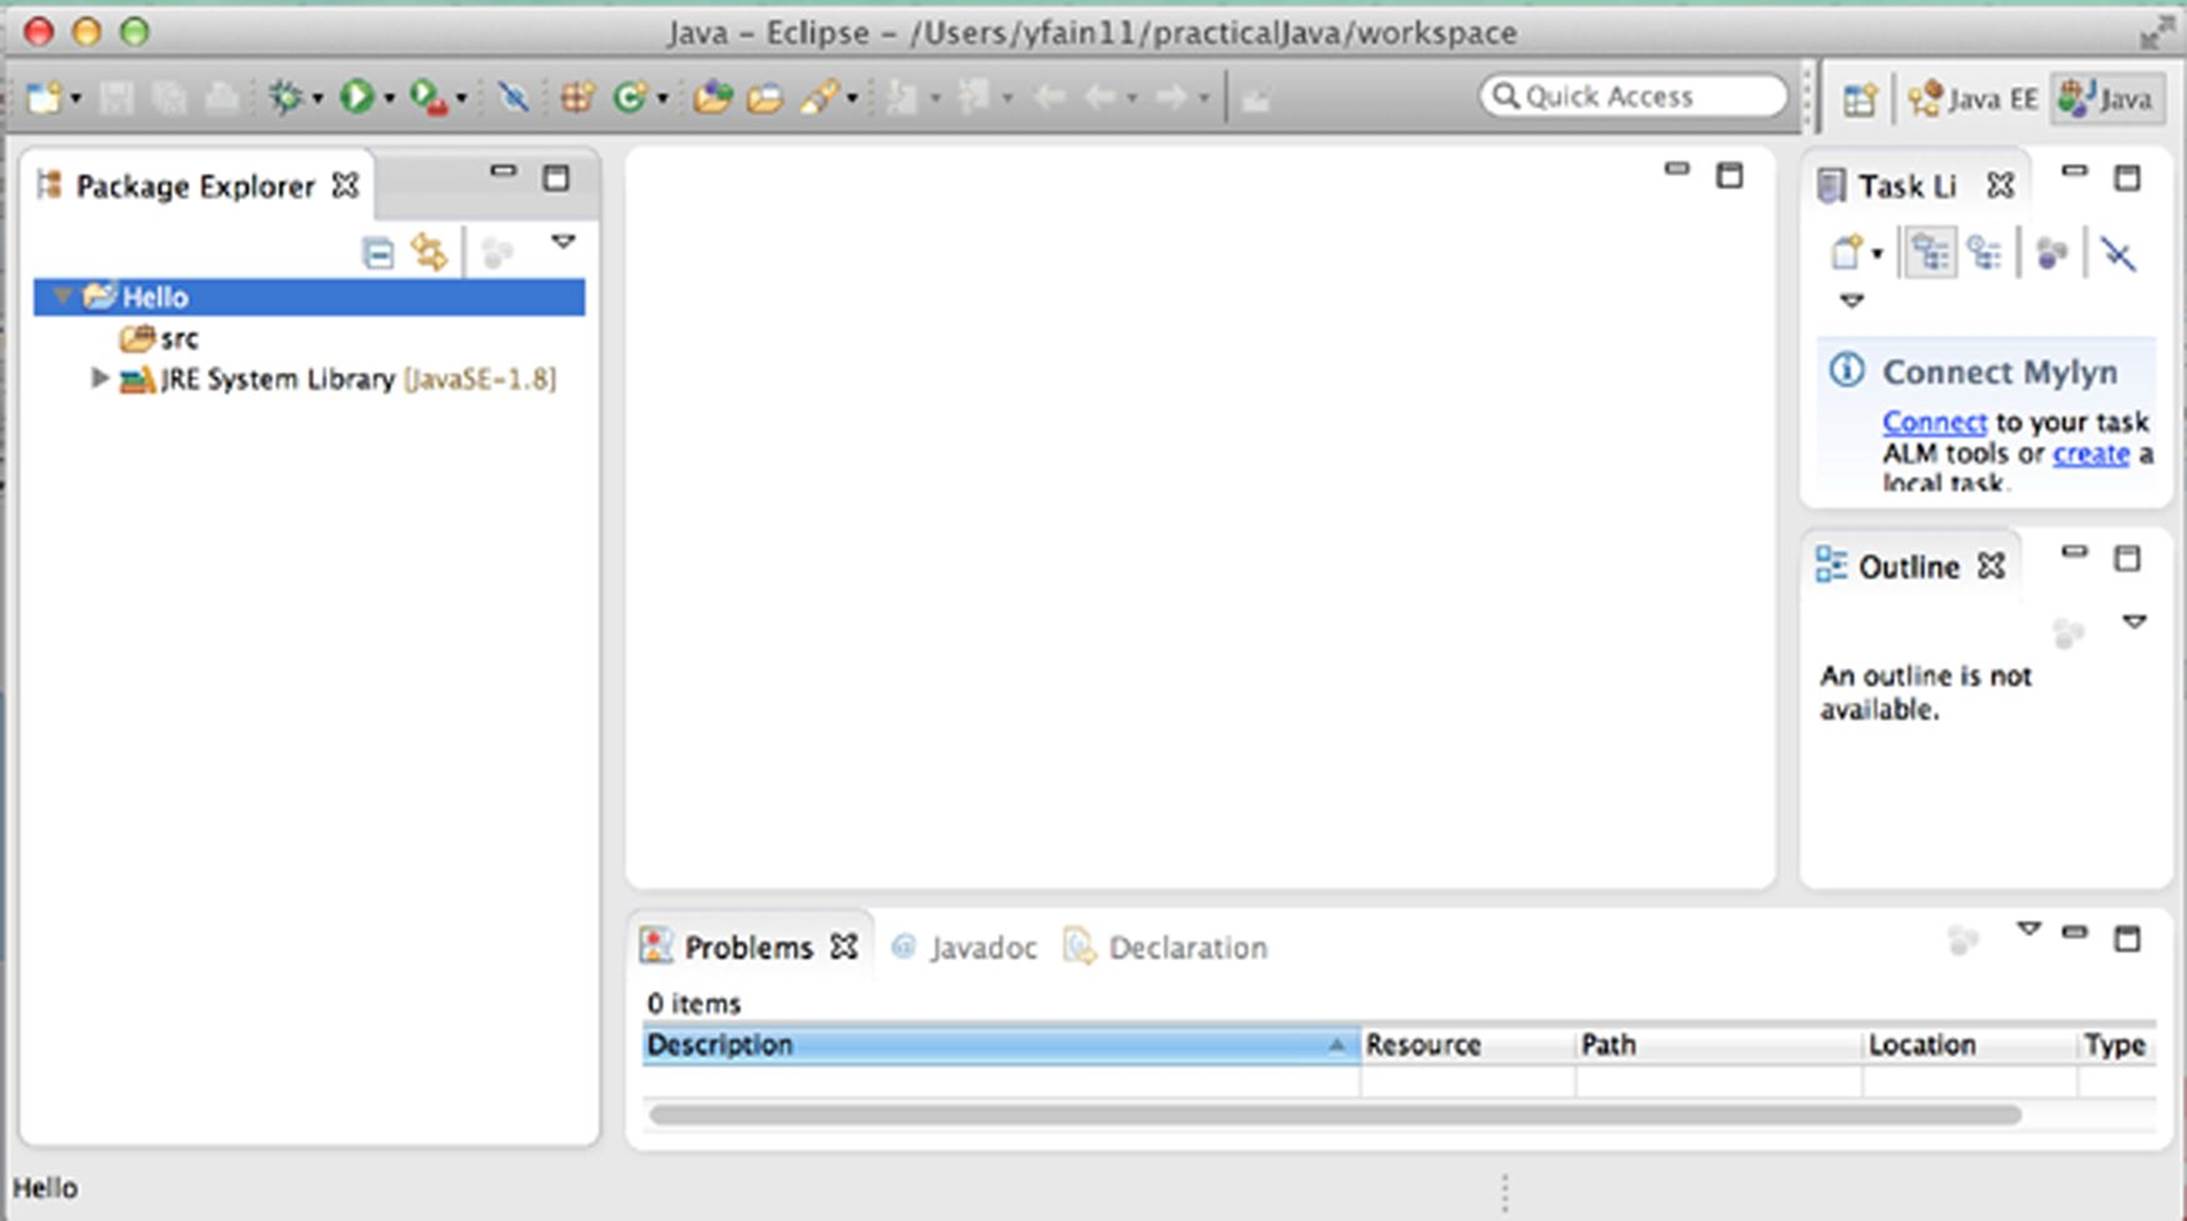
Figure 2-5: The project Hello is created
The JRE folder contains all required Java 1.8 libraries supporting the JVM where HelloWorld will run. These library files have .jar extension in their names. Java SDK comes with a jar utility that allows you to create a file archive that contains one or more compiled classes. Although the JRE folder contains classes created by developers of the JRE itself, most real-world applications consist of groups of files (packages) located in one or more jars.
It doesn’t make much sense to put the only HelloWorld class inside the jar, but as your sample applications grow, you find out how to group and compress files in jars.
Creating the HelloWorld Class in Eclipse
Your Hello project will contain one Java class: HelloWorld from Chapter 1. Select File → New → Class and enter HelloWorld in the Name field in the pop-up window shown in Figure 2-6.
Then enter com.practicaljava.lesson2 in the Package field. The package name is a new addition to the previous version of HelloWorld from Chapter 1.
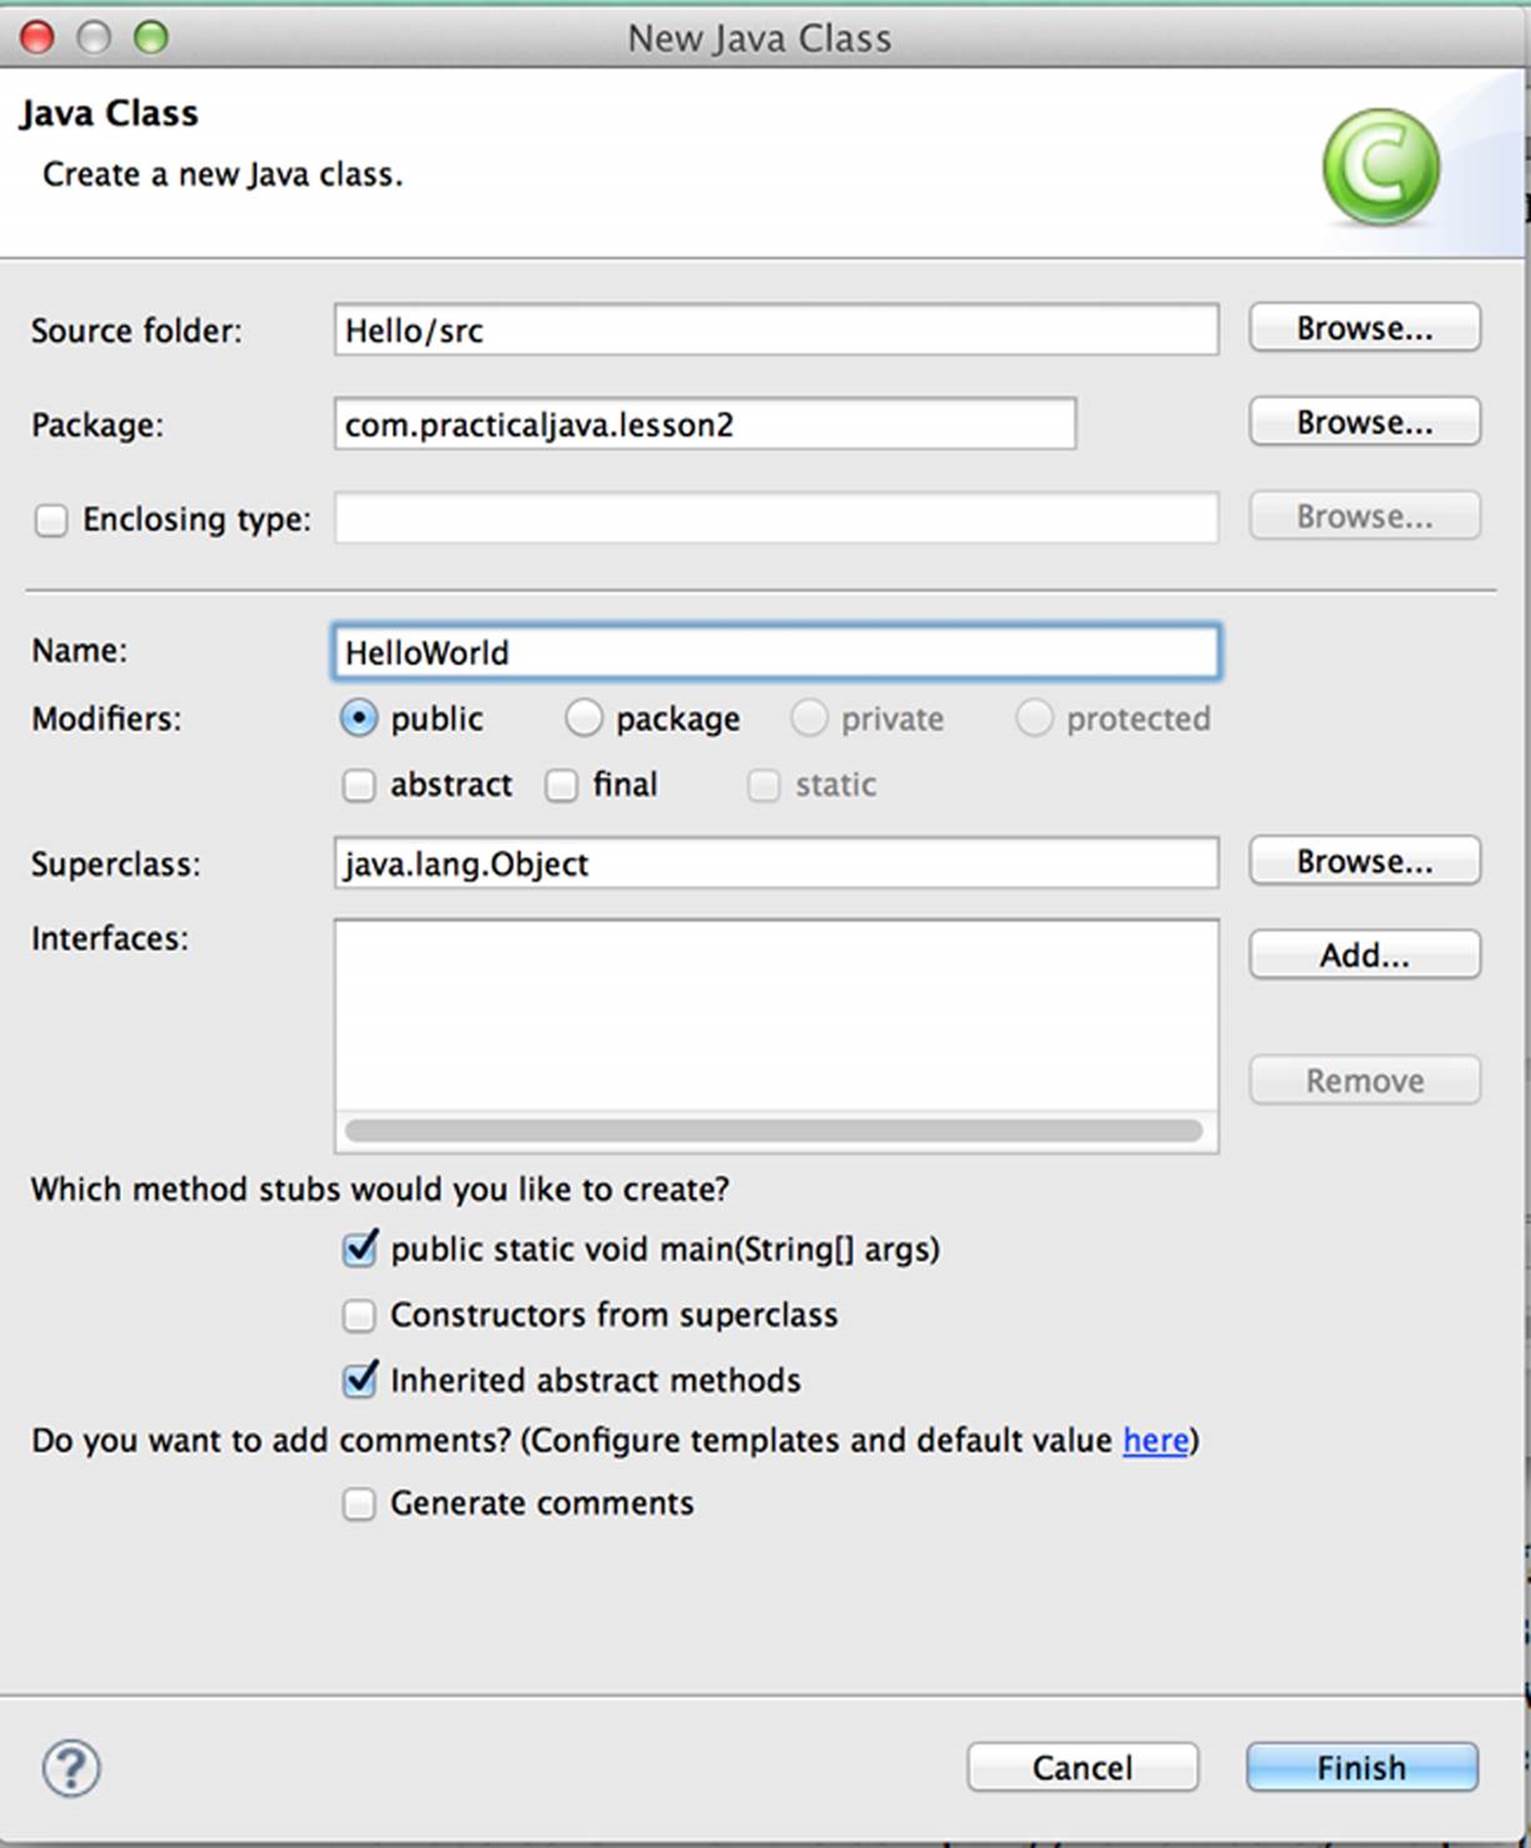
Figure 2-6: Creating a HelloWorld class in Eclipse
Java Packages
Packages in Java are used to better organize multi-file projects and for data protection. It’s not unusual for a project to have several hundreds of Java classes. Keeping them all in one directory is never a good idea. Consequently, the files will be located in various directories and subdirectories (also known as packages).
What are the naming conventions for packages? Java developers use reverse-domain name conventions. Let’s say you work on a project called Sales for a company called Acme, which has an Internet site at acme.com. Every package name will start with the reverse URL of the company, followed by the project name: com.acme.sales.
Accordingly, all Java classes that belong to this package are stored in the following directory structure: com/acme/sales.
If some of the Java classes are specific to domestic sales, whereas others are used in international sales at Acme, you can create two more subdirectories: com/acme/sales/domestic and com/acme/sales/international.
Whereas directory names are separated by a forward slash or backslash, the corresponding Java package names are separated with periods. Java has a special keyword package, and its declaration has to be the first line of the class (program comments don’t count). For example:
package com.acme.sales.domestic;
Let’s assume that you work for a company called Practical Java on the project named Chapter 2; the name of the package will be com.practicaljava.lesson2, which is exactly what I’ve entered in the Package field shown in Figure 2-6.
Besides being used for better organization of Java classes, packages help in controlling data access. You learn about this feature in the section access_levels in programming_with_abstract_classes_and_in.
Completing Code Generation
From Figure 2-6 you may have noticed that I also checked off the box asking Eclipse to generate the main method for me.
Click Finish, and in no time Eclipse generates the initial code for the class HelloWorld, as shown in Figure 2-7.
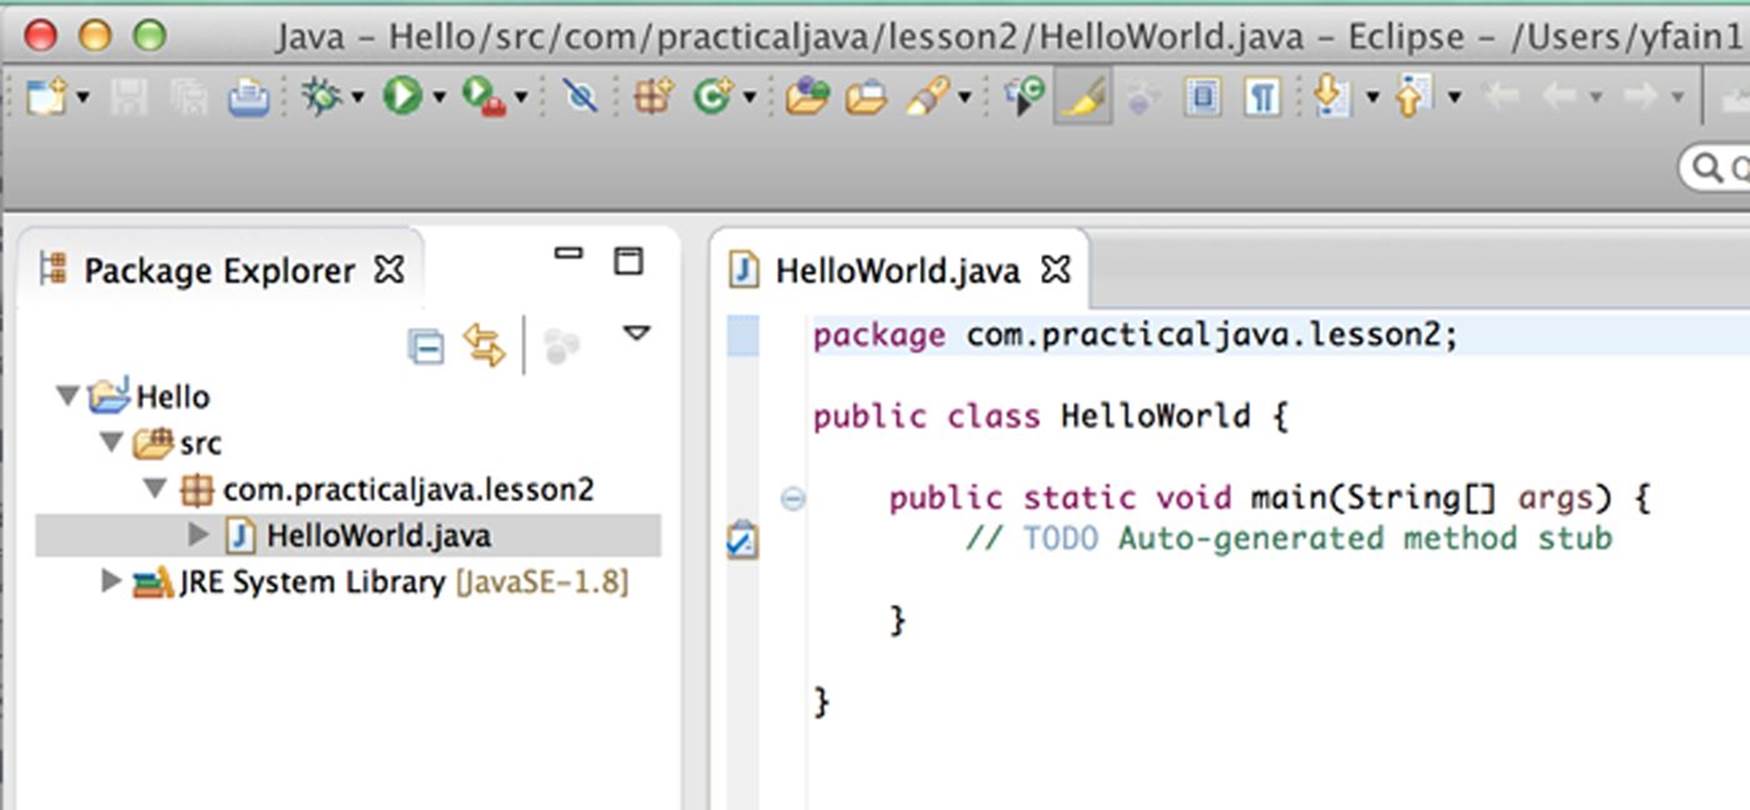
Figure 2-7: The auto-generated code of the HelloWorld class
The generated code is shown in Eclipse’s editor view. It starts with the package statement, and the class declaration with the method name goes next. The line that starts with two slashes is a single-line comment. Programmers use comments to describe code fragments in a free form to explain to author’s intentions to whoever will read the code. Comments are ignored by the compiler.
Place the cursor under the TODO comment, type sysout, and then press Ctrl+Space; Eclipse turns this abbreviation into System.out.println();. From the first seconds of coding Eclipse makes you more productive! Eclipse IDE has lots of useful hot key combinations that will allow you to do less manual typing.
Just add “Hello World!!!!!” between parentheses and save the code by pressing the little diskette image on the toolbar or using the Ctrl+S key combination.
By default, saving the code results in an invocation of the Java compiler. If you didn’t make any syntax errors, Eclipse creates HelloWorld.class in the bin directory of the Hello project. In case of compilation errors, Eclipse puts a little red round bullet in front of problematic lines.
Now you can run the program by pressing the round green Play button on the toolbar. The output of the program is shown in the Console view panel in the lower part of the Eclipse workbench, as in Figure 2-8.
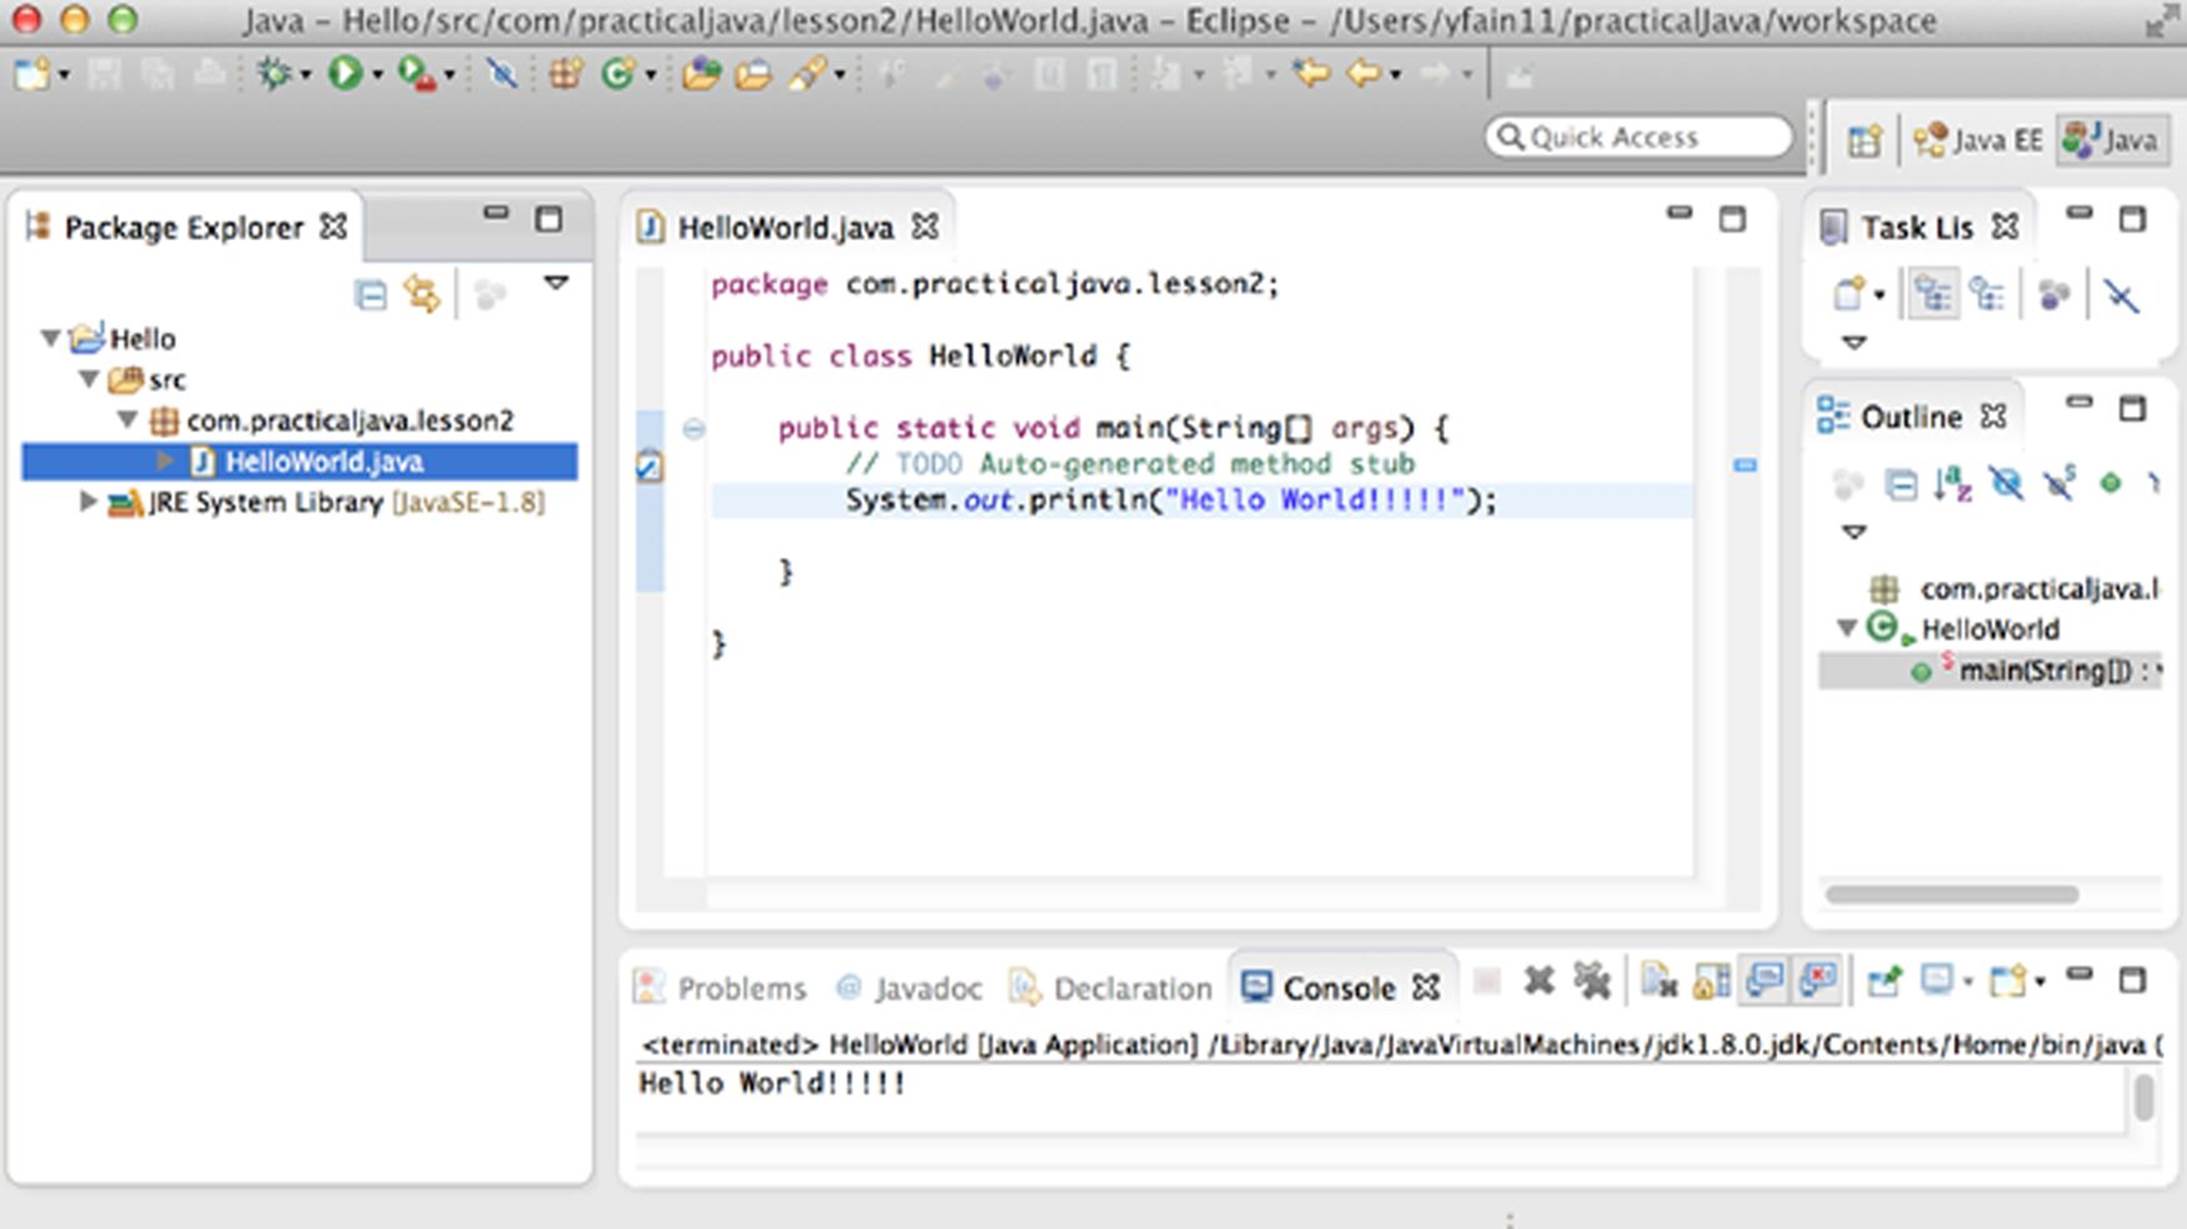
Figure 2-8: The output of the program is shown in the Console view
As you type, Eclipse displays context-sensitive help suggesting a selection of possible values, which minimizes guesswork and typing errors. You can try to bring up the context-sensitive help by pressing Ctrl+Space. In some cases, Eclipse won’t have any suggestions, but sometimes it becomes pretty helpful. For example, place the cursor after the dot behind the System and press Ctrl+Space. You see a list of method names available inside the class System. Selecting out from this list displays the content of online Help for this object.
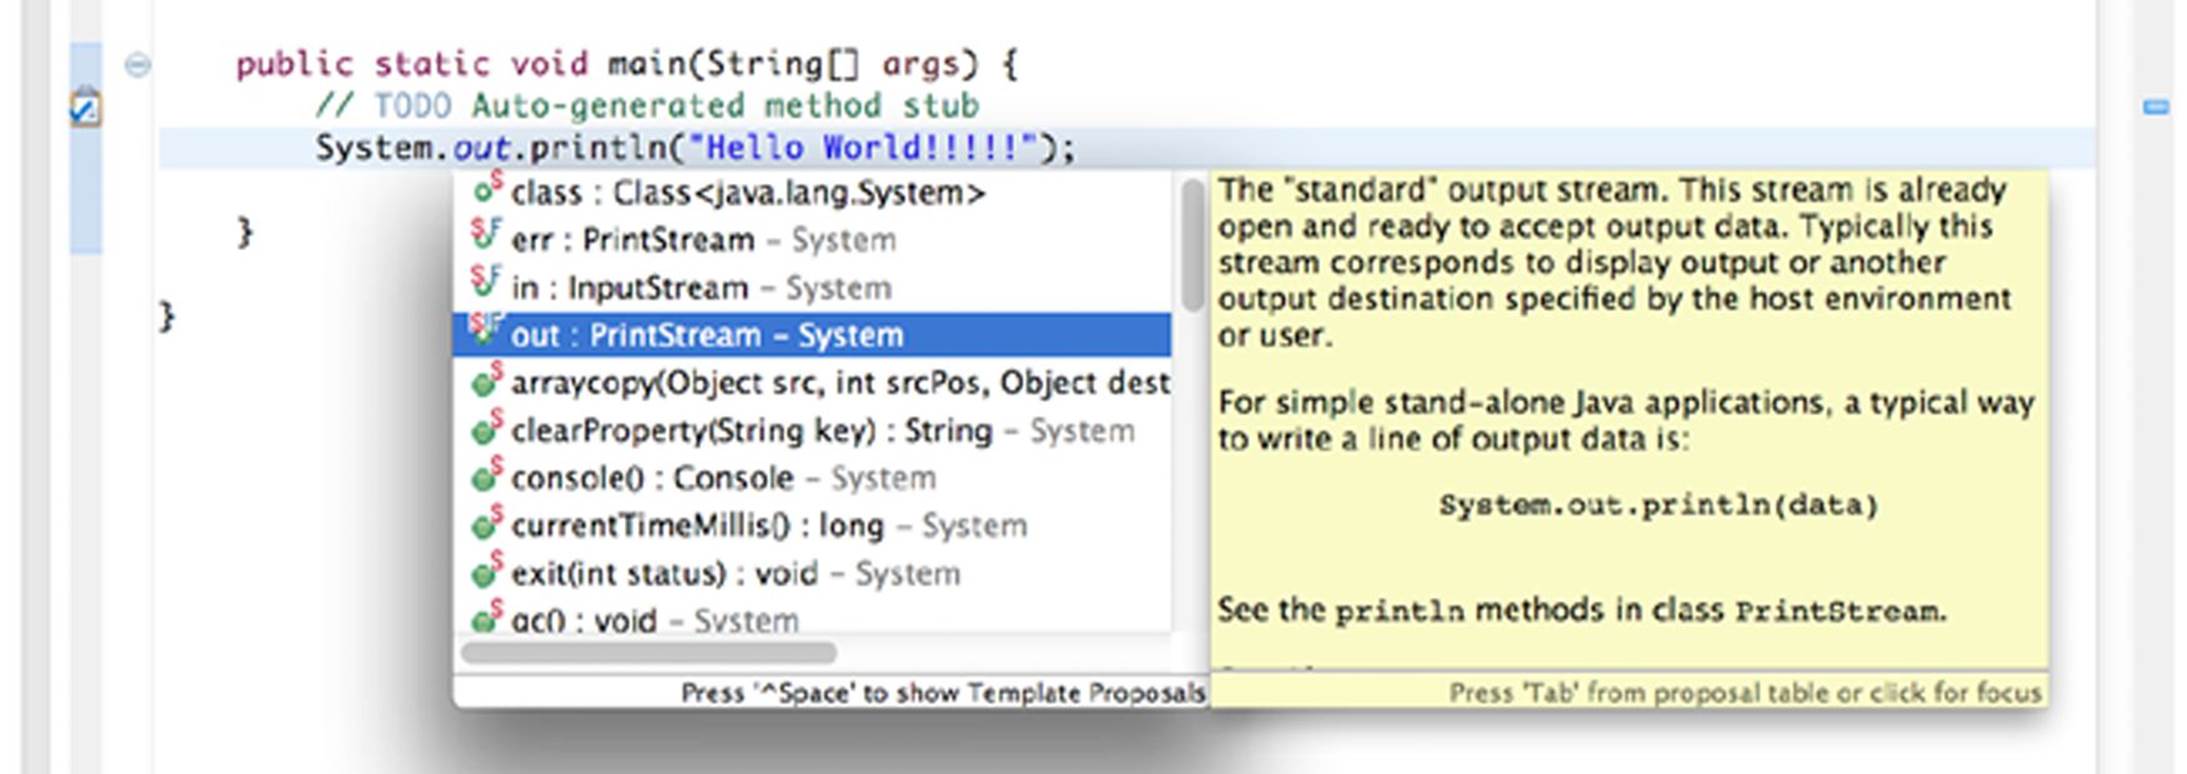
Figure 2-9: Ctrl-Space shows context-sensitive proposals and help
In Chapter 3I explain how to use the debugger of Eclipse IDE. In Chapter 25 I show you how to start Java servers from Eclipse. In Chapter 26 you use Eclipse IDE for creating web projects. The format of this book doesn’t have space for more detailed coverage of all the features of Eclipse. The next section contains additional online resources that can help you in getting more comfortable with Eclipse.
Additional Materials
The Eclipse IDE Documentation web page at http://www.eclipse.org/documentation/ contains comprehensive Eclipse documentation. Select the latest version of Eclipse there and follow the Getting Started section under the Workbench User Guide.
I can also recommend to you the online Eclipse IDE Tutorial by Lars Vogel. It’s available at http://www.vogella.com/tutorials/Eclipse/article.html. Lars Vogel has also published a list of useful Eclipse shortcuts that will increase your productivity. It’s available athttp://www.vogella.com/tutorials/EclipseShortcuts/article.html.
You can also watch Eclipse IDE Tutorial on Youtube produced by luv2code. It’s available at http://bit.ly/1uTYOR2.
Try It
In this lesson your first task is to write, compile, and run HelloWorld in Eclipse IDE.
The second task is to create the new Eclipse project named Sale containing one Java class FriendsAndFamily. This class should also have the method main(). Include inside the method main() several System.out.println() lines that announce that your favorite store runs a 30% off sale on selected products. Output the names of the products that go on sale.
Now your Eclipse project contains two classes with the main() method. Which program will run when you press the green button? Click the class you want to run, and then press the green button. If no class is selected, the class that was run the last time you pressed the green button will run again.
Lesson Requirements
For this lesson, download and install the current version of Eclipse IDE for Java EE Developers from www.eclipse.org/downloads.
Step-by-Step
1. Create the Hello project in Eclipse IDE.
2. Create a new Java class, HelloWorld, with the method main(), as described earlier.
3. Compile the program by clicking Save.
4. Run the program by clicking the green button in the Eclipse toolbar.
Repeat the steps for the second task, but this time your program will have several lines of code invoking println().
TIP Please select the videos for Lesson 2 online at www.wrox.com/go/javaprog24hr2e. You will also be able to download the code and resources for this lesson from the website.
All materials on the site are licensed Creative Commons Attribution-Sharealike 3.0 Unported CC BY-SA 3.0 & GNU Free Documentation License (GFDL)
If you are the copyright holder of any material contained on our site and intend to remove it, please contact our site administrator for approval.
© 2016-2026 All site design rights belong to S.Y.A.